Instrukcja obsługi Fysic F25
Przeczytaj poniżej 📖 instrukcję obsługi w języku polskim dla Fysic F25 (10 stron) w kategorii Przenośny. Ta instrukcja była pomocna dla 15 osób i została oceniona przez 2 użytkowników na średnio 4.5 gwiazdek
Strona 1/10

F25
BASIS INSTELLINGEN / RÉGLAGES DE BASE / GRUNDEINSTELLUNGEN / BASIC SETTINGS
TEKST INVOEREN / ENTRER TEXTE / TEXT EINGEBEN / ENTER TEXT (EX. ‘HANS’)
De telefoon start op.
Dit duurt ongeveer
1 min.
Le téléphone démarre.
Cela prend environ
1 min.
Das Telefon startet.
Dies dauert ca.
1 Minute.
The phone’s starting up.
This takes about 1 min.
Veeg 2x naar
links in het
hoofdscherm.
Balayez 2x vers la
gauche sur l’écran
principal.
Wischen Sie auf
dem Haupt-
bildschirm
2x nach links.
Swipe 2x to the
left in the main
screen.
Een SIM is vaak
beveiligd met een 4
cijferige pincode.
Zie hiervoor de kaart
waar de SIM-kaart is
uitgedrukt.
Une SIM est souvent
protégée par un code
PIN à 4 chires.
Voir la carte où la
carte SIM est
exprimée.
Toets met 0 t/m 9
de pincode in.
Appuyez sur 0 à 9
pour entrer le PIN.
Drücken Sie 0-9, um
den PIN einzugeben.
Enter the PIN code
with 0-9.
1Druk op de
midden-toets.
Appuyer sur la
touche centrale.
Drücken Sie die
Taste in der Mitte.
Press the center
key.
Tik op ‘START’.
Tapez sur
Nederlands, puis
Français, puis
‘START’.
Tippen Sie auf
„Nederlands“,
dann „Deutsch“,
und dann START.
Tap Nederlands,
then English,
then ‘START’.
Tik op
“Instellingen”.
Tapez sur
“Réglages”.
Tippen Sie auf
„Einstellungen“.
Tap
“Settings”.
Tik nu op WiFi.
Tapez sur WiFi.
Tippen Sie auf
WLAN.
Tap WiFi.
Gebruik 0-9 om
het wachtwoord in
te voeren. Zie ‘A’.
Utilisez 0-9 pour
entrer le mot de
passe. Voir “ A “.
Verwenden Sie
0-9, um das
Passwort einzu-
geben, siehe „A“.
Use 0-9 to enter
the WiFi password.
See ‘A’.
Tik op
‘Verbinden’.
Tapez sur
’Connecter’.
Tippen Sie auf
„Verbinden“.
Tap
‘Connect’.
SIM CARD
LOCKED. EMER-
GENCY ONLY
****
123
456
7 8 9
0 ok
SIM CARD
LOCKED. EMER-
GENCY ONLY
Ente r s im pin
123
456
7 8 9
0 ok
Choose your language
Nederlands
START
Flight mode Off
WiFi Off
3G/4G Off
Bluetooth Off
Kies uw eigen
WiFi verbinding.
Choisissez
votre propre
connexion WiFi.
Wählen Sie Ihre
eigene WLAN-
Verbindung aus.
Choose your
own WiFi
connection.
A
4G
H
I
1x G
2x H
3x I
2A
B
C
1x A
2x B
3x C
6M
N
O
1x M
2x N
3x O
7P
Q
R
S
1x P
2x Q
3x R
4x S
Naam
H
Nummer
Nieuwe invoer
Opslaan rugTe
NL
Naam
HA
Nummer
Nieuwe invoer
Opslaan rugTe
NL
Naam
HAN
Nummer
Nieuwe invoer
Opslaan rugTe
NL
Naam
HANS
Nummer
Nieuwe invoer
Opslaan rugTe
NL
Naam
HANS
Nummer
Nieuwe invoer
Opslaan rugTe
NL
1x abc
2x ABC
3x 123
Naam
HANS
Nummer
Nieuwe invoer
Opslaan rugTe
NL
, . ? ! : ;
” ’ - | \ _
/ @ $ % # etc.
Eine SIM-Karte wird
oft mit einem
4-stelligen Pin-Code
geschützt. Sehen Sie
die Karte, auf der
die SIM-Karte
ausgedrückt ist.
A SIM is often
protected with a
4-digit PIN code.
See the card where
the SIM card is
expressed.

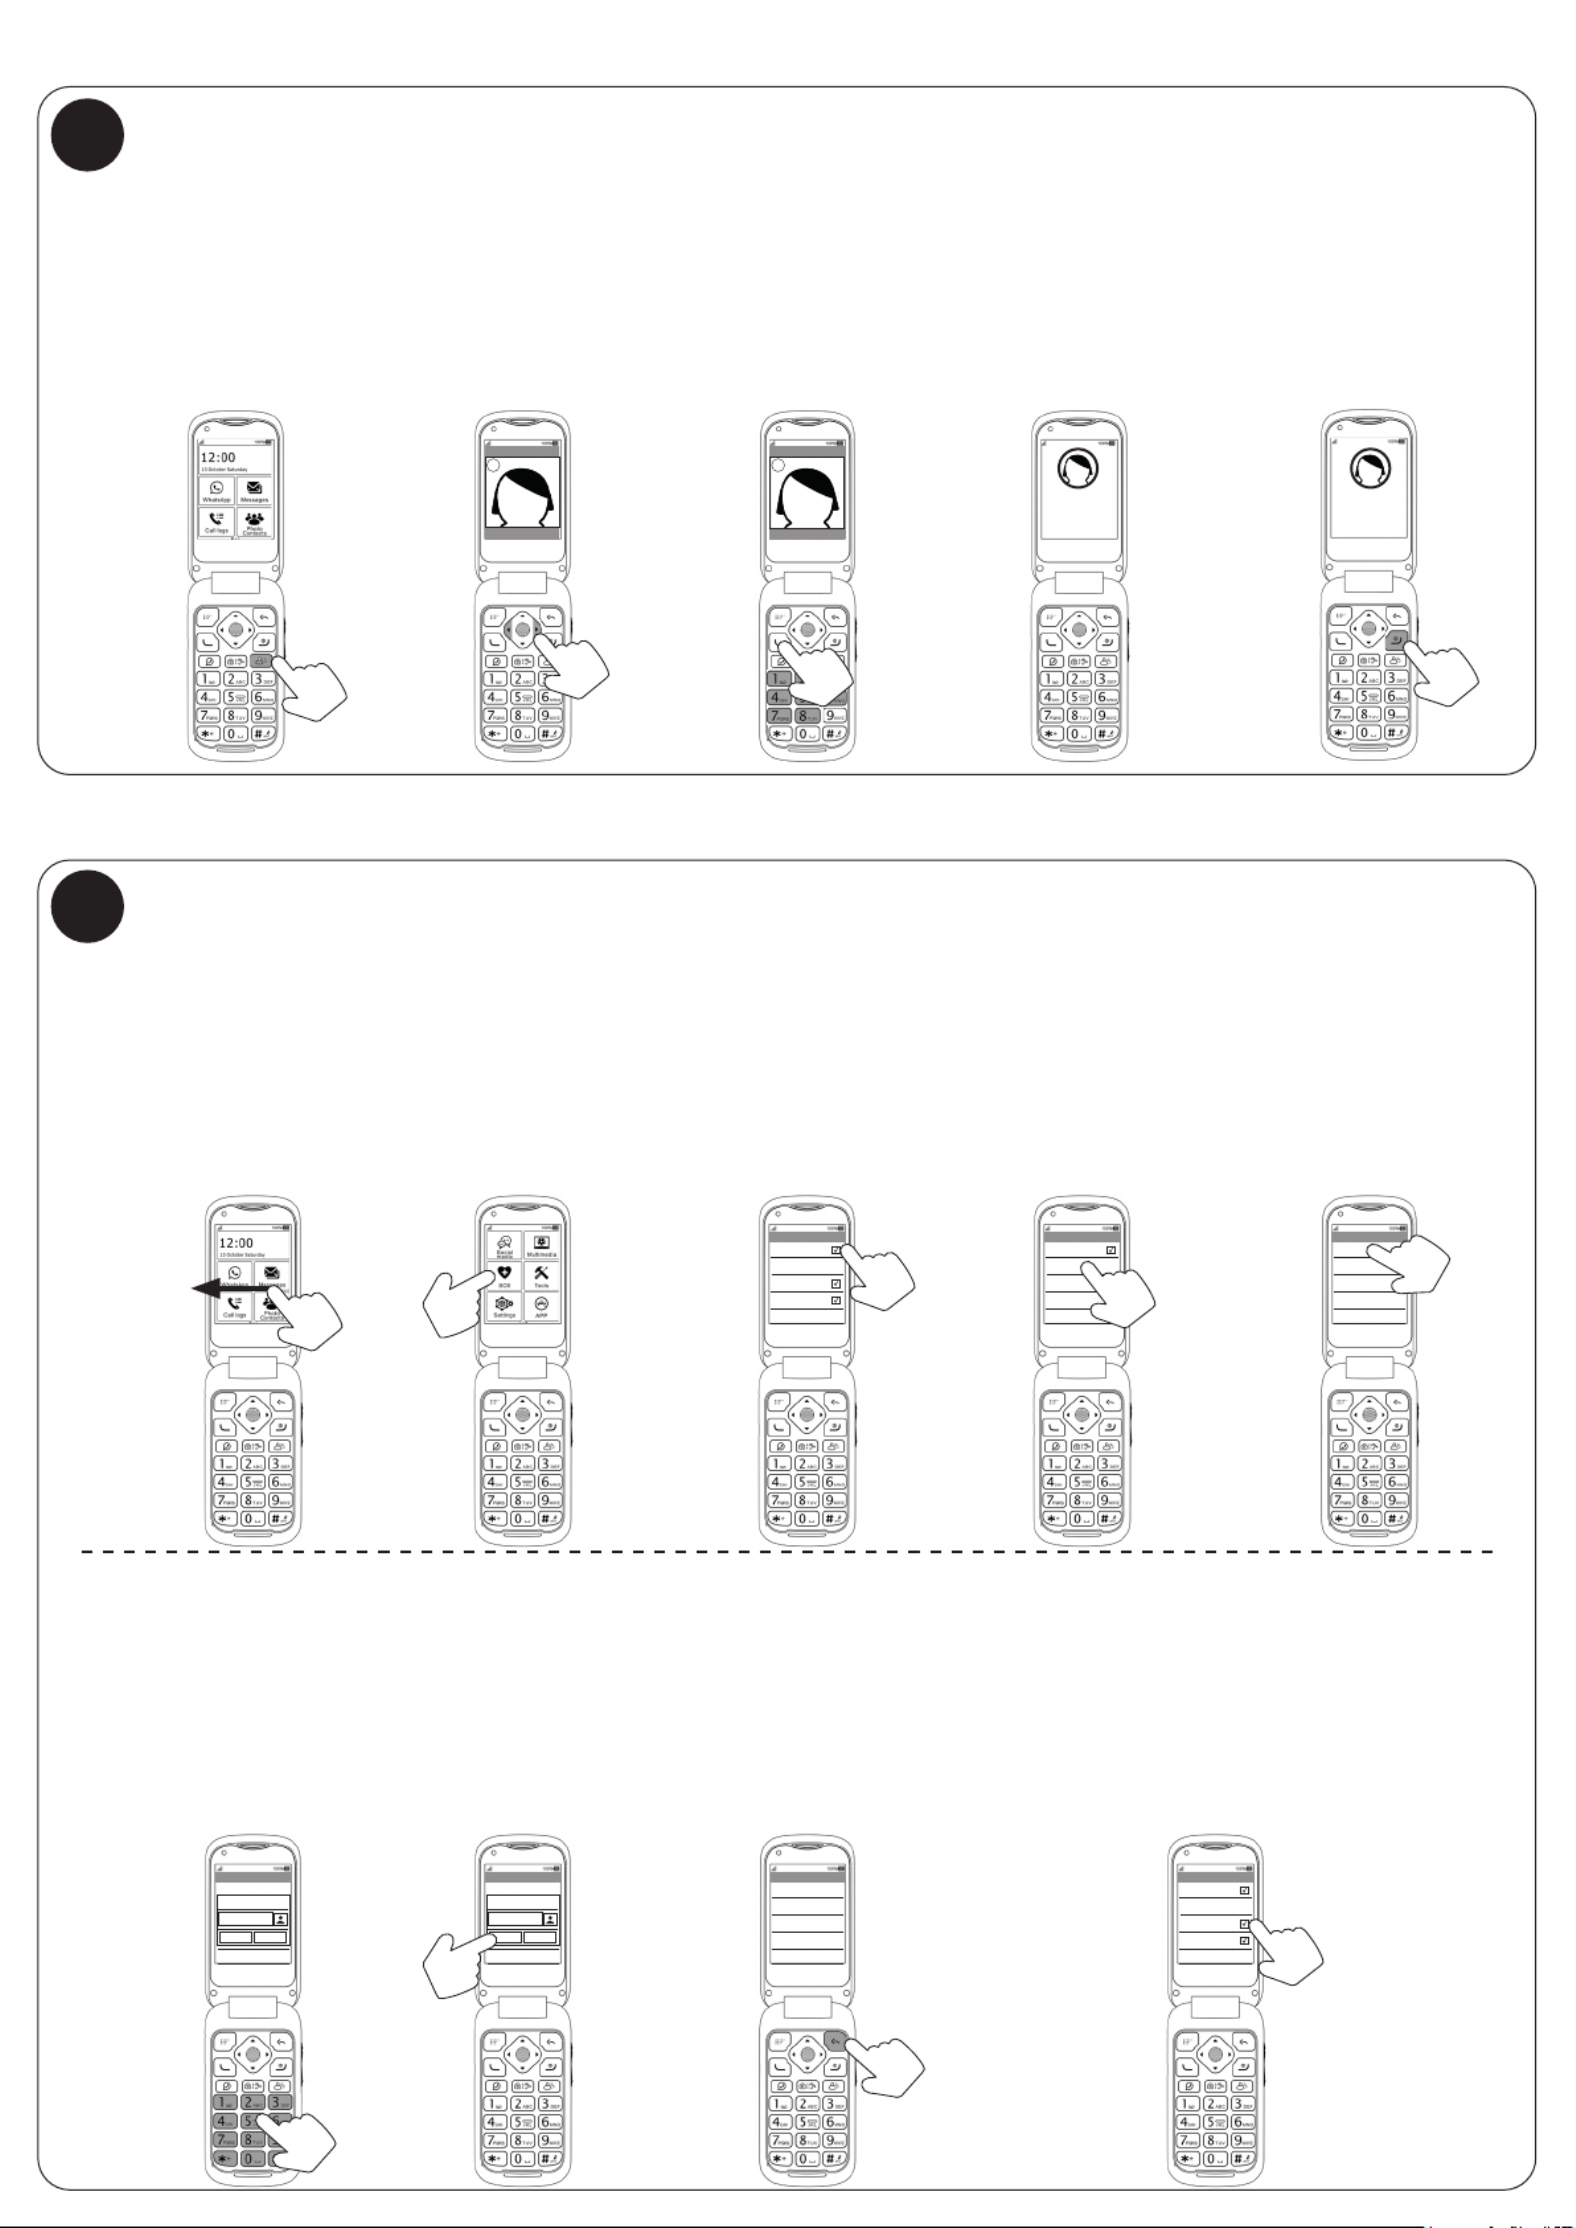
FOTOCONTACTEN TOEVOEGEN / AJOUTER DES CONTACTS PHOTO / FOTOKONTAKTE HINZUFÜGEN
2
Options Back
Tik op foto-
contacten.
Tapez sur
contacts photo.
Tippen Sie auf
Fotokontakte.
Tap photo
contacts.
Kies contact 1-8
met links en rechts.
Sélectionner le
contact 1-8 avec
gauche/droite.
Wählen Sie Kontakt
1-8 mit links und
rechts auswählen.
Select contact 1-8
with left and right.
Druk op de
optie-knop.
Appuyez sur le
bouton d’option.
Drücken Sie auf die
Taste Optionen.
Press the
option button.
Gebruik 0-9 om de
naam in te voeren
Zie ‘A’.
Utilisez 0-9 pour en-
trer le nom. Voir “ A “.
Verwenden Sie 0-9,
um den Namen ein-
zugeben, siehe „A“.
Use 0-9 to enter
the name. See ‘A’.
Druk op de
midden-toets
[Bewerk].
Appuyer sur la
touche centrale
[Éditer].
Drücken Sie auf
die mittlere Taste
[Bearbeiten].
Press the
center key [Edit].
1
Fotocontacts
Back
Options
Edit
Import from phonebook
Druk 2x op de om-
laag-knop [Nummer].
Appuyer sur le
bouton vers
le bas 2x [Numéro].
Drücken Sie 2x auf
die Taste nach unten
[Nummer].
Press the
down-button 2x
[Number].
Gebruik 0-9 om het
nummer in te voeren.
Utilisez 0-9 pour
entrer le numéro.
Verwenden Sie 0-9,
um die Nummer
einzugeben.
Use 0-9 to enter
the number.
Druk op de om-
laag-knop [Foto].
Appuyer sur le
bouton vers le bas
[Photo].
Drücken Sie auf
die Taste nach
unten [Foto].
Press the
down-button
[Photo].
Druk op de
midden-toets
[Foto maken].
Appuyer sur la
touche centrale
[Prendre la photo].
Drücken Sie auf die
mittlere Taste
[Foto aufnehmen].
Press the center key
[Take photo].
Options Back
1
Fotocontacts
Druk op de
midden-toets.
Appuyer sur la
touche centrale.
Drücken Sie
auf die mittlere
Taste.
Press the
center key.
Back
Back
Edit
Name
Record name
Number
Photo
Back
Edit
Name
Harry |
Record name
Number
Photo
Back
Edit
Name
Harry
Record name
Number
Photo
Back
Edit
Name
Harry
Record name
Number
0612345678|
Photo
Edit
0612345678
Photo
Back
Options
Take photo
Choose photo
Gebruik links, rechts,
boven en onder om
een selectie te maken.
Utilisez gauche, droite,
haut et bas pour faire
une sélection.
Verwenden Sie oben,
unten, links und
rechts, um eine
Auswahl zu treen.
Use left, right, top and
bottom to make
a selection.
Druk op de
midden-toets.
Appuyer sur la
touche centrale.
Drücken Sie
auf die mittlere
Taste.
Press the
center key.
Druk op einde-toets.
Appuyer sur la
touche de n.
Drücken Sie auf die
Taste Ende.
Press the end key.
Druk op de
optie-knop.
Appuyez sur le
bouton Option pour
sauvegarder.
Drücken Sie auf die
Taste Optionen, um
zu speichern.
Press the option
button to save.
Back
Edit
0612345678
Photo
Druk op de
midden-toets om
een foto te maken.
Appuyez sur la
touche centrale
pour prendre
une photo.
Drücken Sie auf
die mittlere Taste,
um ein Foto
zu machen.
Press the
center key to
take a photo.
Options Back Options Back Options Back Options Back
1
Fotocontacts
Naam
FOTOCONTACT BELLEN / APPELER DES CONTACT PHOTO/ FOTOKONTAKE ANRUFEN / CALL PHOTO CONTACT
3
4
Druk op links/rechts
om meer te zien.
Appuyez à gauche/
droite pour en
voir plus.
Drücken Sie auf
links/rechts, um mehr
anzuzeigen.
Press left/right
to see more.
Druk op de groene
toets om te bellen
Appuyez sur le
bouton vert pour
composer
Drücken Sie die
grüne Taste, um zu
wählen
Press the green
key to call
Druk op einde-toets
om gesprek
te stoppen.
Appuyer sur touche
de n pour arrêter
l’appel.
Drücken Sie auf die
Ende-Taste, um den
Anruf zu stoppen.
Press the end key
to stop the call.
Druk op de
contact-knop.
Appuyez sur
le bouton de
contact.
Drücken Sie auf
die Taste Kontakt.
Press the
contact button.
Het contact
wordt
nu gebeld.
Le contact
s’appelle
maintenant.
Der Kontakt wird
jetzt angerufen.
The contact is
now called.
Options Back
Photocontacts
1
Options Back
Photocontacts
1
Calling
Naam
Calling
Naam
SOS-TOETS INSTELLEN / RÉGLAGE DU BOUTON SOS / SOS-TASTE EINSTELLEN / SETTING THE SOS BUTTON
Veeg 2x naar links tot
het SOS-icoon
verschijnt.
Glissez 2x vers la gau-
che jusqu’à ce que l’icô-
ne SOS apparaisse.
Wischen Sie 2x
nach links, bis das
SOS-Symbol erscheint.
Swipe 2x to the left
until the SOS icon
appears.
Druk op het
SOS-icoon.
Appuyez sur
l’icône SOS.
Drücken Sie auf
das SOS-Symbol.
Press the
SOS icon.
Vink ‘Status’ aan om
de SOS-functie
te activeren.
Cochez ’Activé’ pour
activer la fonction SOS.
Indem Sie „Aktiv“
antippen, aktivieren
Sie die SOS-Funktion.
Check ‘Enable’ to
activate the SOS
function.
Druk op contacten om
nummers toe te voegen.
Appuyez sur
Contacts pour ajouter
des numéros.
Drücken Sie auf
Kontakte, um Num-
mern hinzufügen.
Press contacts to add
numbers.
Druk op 1 van de
5 lege plaatsen.
Appuyez sur 1
des 5 cases vides.
Wählen Sie eine
der 5 leeren
Stellen aus.
Press 1 of the 5
empty places.
SOS
SOS
SOS
Enable
Enable
Enable 1.Empty
Contacts
Contacts
Contacts 2.Empty
Alert beeps
Alert beeps
Alert beeps 3.Empty
Send message
Send message
Send message 4.Empty
Send to
Send to
Send to 5.Empty
Contacts
1.Empty 1.Empty 1.Harry
2.Empty
3.Empty
4.Empty
5.Empty 5.Empty 5.Empty
Contacts Contacts Contacts
Number Number
0612345678
OK OKCancel Cancel
Gebruik 0-9 om
het nummer in te
voeren.
Utilisez 0-9 pour
entrer le numéro.
Verwenden Sie
0-9, um die Num-
mer einzugeben.
Use 0-9 to enter the
number.
Druk op de
OK toets.
Appuyer sur
la touche OK.
Drücken Sie auf
die Taste OK.
Press the
OK key.
Druk op de
terug-toets.
Appuyer sur
la touche Retour.
Drücken Sie auf die
Taste Zurück.
Press the
back key.
Vink ‘Waarschuwingstonen’ aan om een alarm
te laten horen bij gebruik van de SOS-toets.
Cochez ’Bips d’avertissement’ pour
déclencher une alarme lorsque vous
utilisez le bouton SOS.
Aktivieren Sie das Kästchen „Warnungstö-
ne“, um bei der Verwendung der SOS-Taste
einen Alarm auszulösen.
Check ‘Alert beeps’ to sound an alarm
when using the SOS button.
Specyfikacje produktu
| Marka: | Fysic |
| Kategoria: | Przenośny |
| Model: | F25 |
Potrzebujesz pomocy?
Jeśli potrzebujesz pomocy z Fysic F25, zadaj pytanie poniżej, a inni użytkownicy Ci odpowiedzą
Instrukcje Przenośny Fysic

28 Września 2024
28 Września 2024
28 Września 2024
30 Czerwca 2024
28 Czerwca 2024
28 Czerwca 2024
28 Czerwca 2024
Instrukcje Przenośny
- Przenośny Samsung
- Przenośny AEG
- Przenośny LG
- Przenośny Motorola
- Przenośny Sharp
- Przenośny Huawei
- Przenośny Lenovo
- Przenośny Philips
- Przenośny Acer
- Przenośny Gigaset
- Przenośny Geemarc
- Przenośny Nokia
- Przenośny Festool
- Przenośny Hisense
- Przenośny Panasonic
- Przenośny Medion
- Przenośny Toshiba
- Przenośny Garmin
- Przenośny Profoon
- Przenośny Siemens
- Przenośny Casio
- Przenośny Alcatel
- Przenośny HP
- Przenośny Hyundai
- Przenośny ZTE
- Przenośny MaxCom
- Przenośny Google
- Przenośny TechniSat
- Przenośny Emporia
- Przenośny NEC
- Przenośny Polaroid
- Przenośny Sanyo
- Przenośny Telefunken
- Przenośny Olympia
- Przenośny HTC
- Przenośny RCA
- Przenośny Lexibook
- Przenośny Sencor
- Przenośny Allview
- Przenośny Kazam
- Przenośny Swissvoice
- Przenośny Brondi
- Przenośny Aligator
- Przenośny Amplicomms
- Przenośny Amplicom
- Przenośny Crosscall
- Przenośny Airbus
- Przenośny Qtek
- Przenośny Ecom
- Przenośny Kruidvat
- Przenośny Sony Ericsson
- Przenośny ACN
- Przenośny Sonim
- Przenośny Doro
- Przenośny Sagem
- Przenośny Lava
- Przenośny Blu
- Przenośny Sunstech
- Przenośny NGM
- Przenośny Vodafone
- Przenośny Pantech
- Przenośny Eten
- Przenośny Hagenuk
- Przenośny Peaq
- Przenośny Palm
- Przenośny Phicomm
- Przenośny Neonode
- Przenośny Iget
- Przenośny T-Mobile
- Przenośny ITT
- Przenośny Avus
- Przenośny Beafon
- Przenośny Teleline
- Przenośny BenQ Siemens
- Przenośny Telstra
- Przenośny Hiptop
- Przenośny Ulefone
- Przenośny Swisstone
- Przenośny Benefon
- Przenośny STK
- Przenośny Multi Care Systems
- Przenośny Energizer
- Przenośny Kdi
- Przenośny Mobistel
- Przenośny Itel
- Przenośny KhoCell
- Przenośny Jablotron
- Przenośny Elson
- Przenośny Sydney
- Przenośny O2
- Przenośny AT-T
- Przenośny AT Mobile
- Przenośny Black-Berry
- Przenośny Real Phone
- Przenośny Auro
- Przenośny Simvalley
- Przenośny Binom
- Przenośny Elliptik 8
- Przenośny Orange
- Przenośny Ubiquio
- Przenośny I-mate
- Przenośny Telme
- Przenośny GoldGMT
- Przenośny Matsunichi
- Przenośny Meizu
- Przenośny Gionee
- Przenośny Ericsson
- Przenośny Hi
- Przenośny WayteQ
- Przenośny Utano
- Przenośny Siswoo
- Przenośny Tecmobile
- Przenośny Uniwa
- Przenośny Raytac
- Przenośny Sendo
Najnowsze instrukcje dla Przenośny

15 Stycznia 2025
12 Stycznia 2025
11 Stycznia 2025
11 Stycznia 2025

21 Grudnia 2024

17 Grudnia 2024
5 Października 2024
5 Października 2024
5 Października 2024
5 Października 2024