Instrukcja obsługi TP-Link Festa F65
TP-Link
Punkt dostępu
Festa F65
Przeczytaj poniżej 📖 instrukcję obsługi w języku polskim dla TP-Link Festa F65 (2 stron) w kategorii Punkt dostępu. Ta instrukcja była pomocna dla 17 osób i została oceniona przez 2 użytkowników na średnio 4.5 gwiazdek
Strona 1/2

Quick Installation Guide
Wireless Access Point
Note: Festa F65 is used as an example throughout the Guide. Images may dier from your actual product.
The Festa AP can be mounted to the ceiling, the wall, or in a junction box, using the screws in
the package. Choose the appropriate mounting and installation steps below.
Note: This product requires heat dissipation through the metal bracket during use, please be
careful not to touch the metal bracket in the heat dissipation.
Hardware Installation
2
©2024 TP-Link 7106510972 REV1.0.0
RESET
With the device powered on, press and hold the button for about 5 seconds until the LED flashes quickly. Then
release the button. The device will restore to factory default settings.
Ethernet Port: ETH (PoE)
The port is used to connect to a router/gateway or a switch to transmit data, or to a PSE (Power Sourcing
Equipment), such as a PoE switch, for both data transmission and Power over Ethernet (PoE) through Ethernet
cable.
Power Port
Plug one end of the power adapter to this port and the other end to a standard electrical wall outlet to power the
Festa AP.
Note: Power adapter is not included in the package contents of certain models. For details, refer to the product specications or
datasheet. For power supply specications, refer to the product label.
Rear Panel
Option 2: Wall MountingOption 1: Ceiling Mounting Option 3: Junction Box Mounting
1
Remove the ceiling tile.
Note: Make sure that the ceiling tile is larger than the Festa AP.
Wing NutsWashers Pan-head Screws
Option 1: Ceiling Mounting
5
Connect the Ethernet cable to the Ethernet port.
Please pay attention to the triangle sign. Attach
the Festa AP to the mounting bracket, then rotate
it until it locks into place, as shown on the left.
2
Place the mounting bracket in the center of the
ceiling tile. Mark positions for the screw holes
and a location for the Ethernet cable hole.
Drill holes for the screws and a hole for the
Ethernet cable at the marked positions.
3
Secure the mounting bracket to the ceiling tile
using pan-head screws, washers, and wing nuts,
as shown on the left.
4
Feed the Ethernet cable through the hole and
set the ceiling tile back into place.
Φ 25 mm (63/64 in)
Φ 4 mm (5/32 in)
Self-tapping ScrewsPlastic Wall Anchors
2
Insert the plastic wall anchors into the holes.
Option 2: Wall Mounting
5
Attach the Festa AP to the mounting bracket
by rotating it until it locks into place, as shown
on the left.
3
Secure the mounting bracket to the wall by
driving the self-tapping screws into the
anchors. Make sure that the shoulders of the
mounting bracket are on the outside.
1
If your Ethernet cable feeds through the wall,
position the mounting bracket below the cable
hole. Mark positions for the screw holes and
drill holes at the marked positions.
Φ 7.6 mm (19/64 in)
4
Connect the Ethernet cable to the Ethernet
port on the Festa AP.
Hardware Overview
1
Front Panel
On:
Working normally/Initializing.
Flash: • Flash twice:
Initialization is completed.
• Flash quickly:
The Festa AP is resetting, or the Festa controller is locating the
device*.
• Flash once per second:
The Festa AP is upgrading.
• Flash Slowly:
The Festa AP is in the isolated state.
LED Indicator
Off:
Working abnormally/Power o/LED is turned o.
* When the Locate feature is activated in the Festa controller, the LED will ash quickly for 10 minutes to help you
locate and identify the device. You can disable this feature manually to stop the device from ashing.
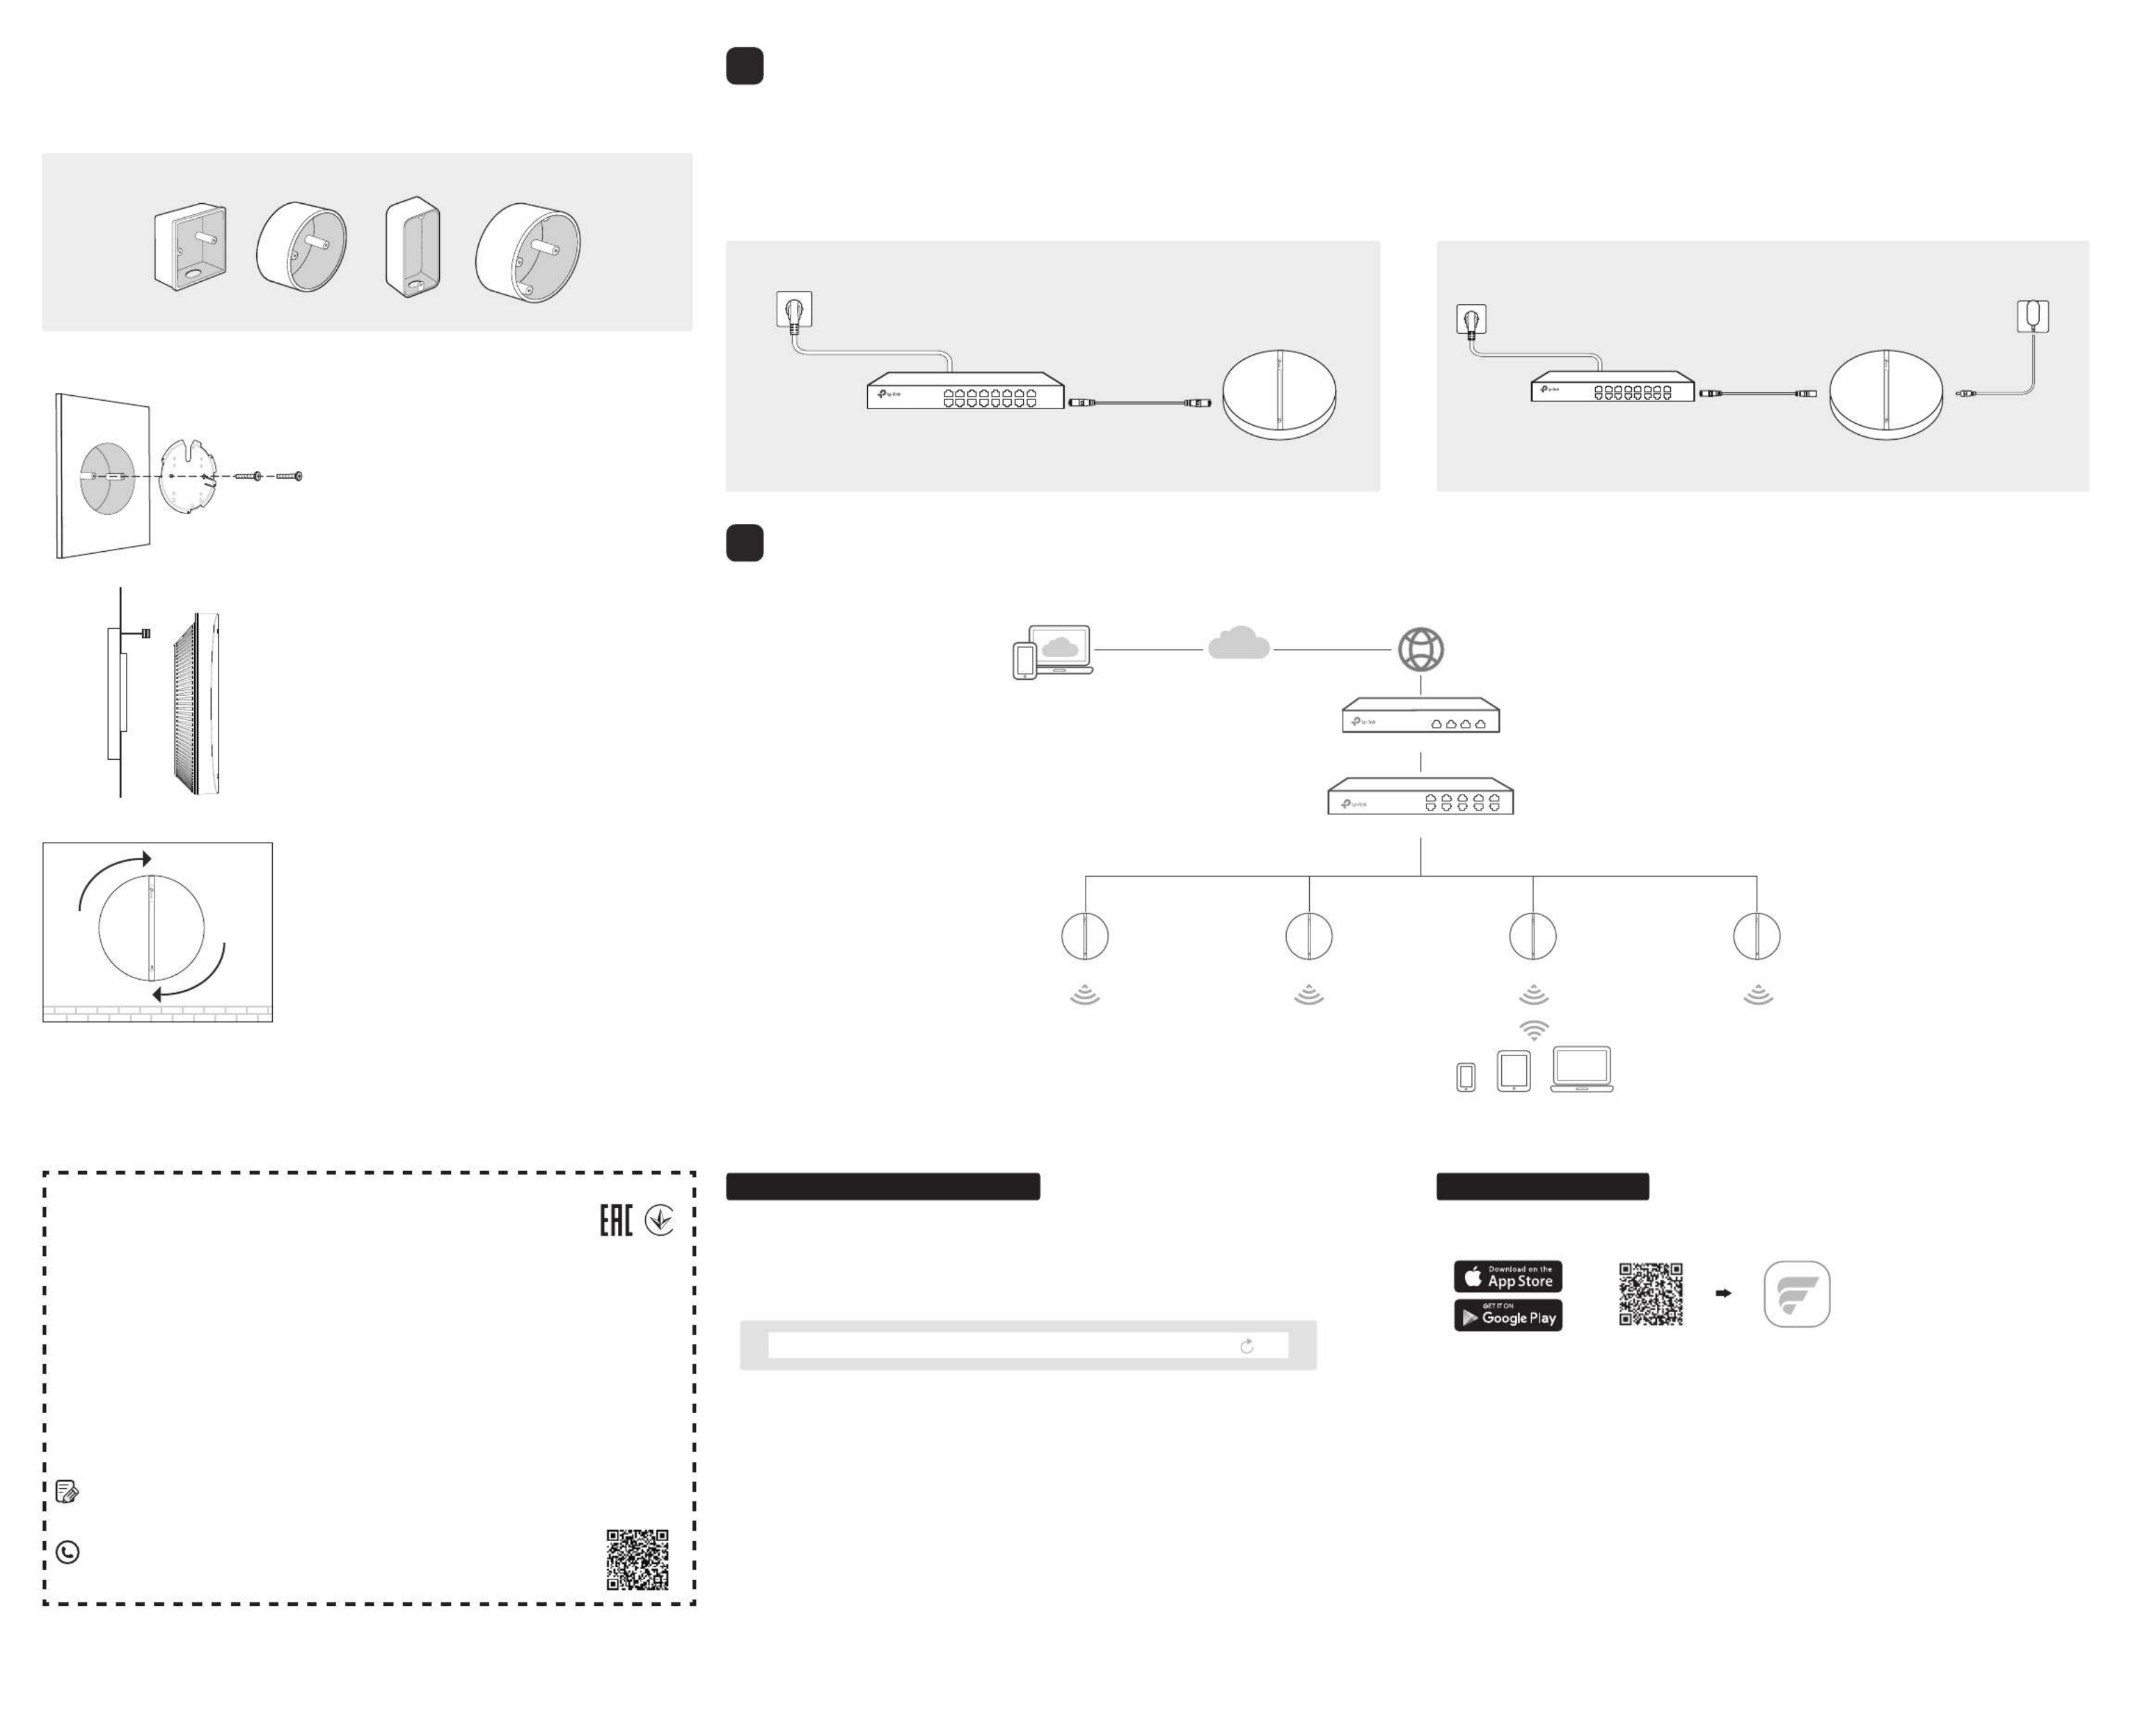
Conguration via Festa Cloud-Based Controller
4
You can easily configure and manage Festa APs via the Festa Cloud-Based Controller.
The Festa AP can be powered via a power adapter or a PSE device (such as a PoE switch) which complies with Power Source Class 2 ( PS2) or Limited Power Source (LPS) of IEC 62368-1.
Power Supply
3
Safety Information
• Keep the device away from water, re, humidity or hot environments.
• Do not attempt to disassemble, repair, or modify the device. If you need service, please contact us.
• Do not use the device where wireless devices are not allowed.
• Do not use damaged charger or USB cable to charge the device.
• Do not use any other chargers than those recommended.
• Adapter shall be installed near the equipment and shall be easily accessible.
For the detailed configurations, refer to the User Guide of the controller. The guide can be
found on the download center of our official website:
https://www.tp-link.com/support/download/?type=smb.
For technical support, the user guide and other information,
please visit https://www.tp-link.com/support/?type=smb, or simply
scan the QR code.
To ask questions, find answers, and communicate with TP-Link users or engineers,
please visit https://community.tp-link.com/business to join TP-Link Community.
TP-Link hereby declares that the device is in compliance with the essential requirements and other relevant provisions of
directives 2014/53/EU, 2009/125/EC, 2011 /65/EU and (EU) 2015/863.
The original EU Declaration of Conformity may be found at https://www.tp-link.com/en/support/ce/
TP-Link hereby declares that the device is in compliance with the essential requirements and other relevant provisions of
the Radio Equipment Regulations 2017.
The original UK Declaration of Conformity may be found at https://www.tp-link.com/support/ukca/
1. Download and install the Festa App from App Store or Google Play.
Scan for Festa App Festa App
or
2. Launch the Festa App and log in with your TP-Link ID.
3. Tap on the upper right corner, then + you will see you have successfully
registered for a Cloud-Based Controller and the controller has been added
to the controller list.
4. Tap , tap Confirm Let’s Get Started and follow the step-by-step instructions
to complete the conguration wizard of the controller.
5. On the controller’s management page, go to Devices + , and click on the
upper right corner, and follow the step-by-step instructions to adopt the
Festa AP.
Now you can configure and manage the Festa AP via the Festa App.
1. Make sure that your management device can access the internet.
2. Launch a web browser and enter https://festa.tplinkcloud.com in the address
bar. Log in with your TP-Link ID.
3. + Add ControllerClick , then you will see you have successfully registered for a
Cloud-Based Controller and the controller has been added to the controller list.
4. Set Up Now Config New Setup Click , click and follow the step-by-step
instructions to complete the conguration wizard of the controller.
5. On the controller’s management page, go to Devices + Add Devices , and click
and follow the step-by-step instructions to adopt the Festa AP.
Now you can configure and manage the Festa AP on the controller.
https://festa.tplinkcloud.com
2
Connect the Ethernet cable to the Ethernet
port on the Festa AP.
3
Attach the Festa AP to the mounting bracket
by rotating it until it locks into place, as shown
on the left.
Option 3: Junction Box Mounting
Prepare the cables and the junction box in advance. Ensure that the mounting holes align
to your junction box.
Route the cables through the square cable
hole on the mounting bracket, and secure the
mounting bracket to the junction box using
screws.
1
*Compatible wall junctions:
Option 2: Via Power Adapter
Plug one end of the power adapter into the power port of the Festa AP and the other end
to a standard electrical wall outlet.
Note: Power adapter is not included in the package contents of certain models. For details, refer to the product specications or
datasheet. For power supply specications, refer to the product label.
Option 1: Via PoE Switch
Connect an Ethernet cable from the PoE switch to the Ethernet port.
Note: For PoE power supply specications, refer to the product label.
PoE Switch Switch
Option1: Via a Web Browser Option 2: Via Festa App
Power Adapter
Switch
Router / Gateway
Festa Cloud
Clients
APAP AP AP
Specyfikacje produktu
| Marka: | TP-Link |
| Kategoria: | Punkt dostępu |
| Model: | Festa F65 |
Potrzebujesz pomocy?
Jeśli potrzebujesz pomocy z TP-Link Festa F65, zadaj pytanie poniżej, a inni użytkownicy Ci odpowiedzą
Instrukcje Punkt dostępu TP-Link

27 Stycznia 2025
30 Grudnia 2025
12 Grudnia 2024
4 Grudnia 2024
9 Października 2024
5 Października 2024
3 Października 2024
3 Października 2024
1 Października 2024
28 Września 2024
Instrukcje Punkt dostępu
- Punkt dostępu Tenda
- Punkt dostępu Huawei
- Punkt dostępu Bosch
- Punkt dostępu StarTech.com
- Punkt dostępu Asus
- Punkt dostępu TRENDnet
- Punkt dostępu D-Link
- Punkt dostępu HP
- Punkt dostępu Honeywell
- Punkt dostępu Mikrotik
- Punkt dostępu Cisco
- Punkt dostępu Moxa
- Punkt dostępu Lindy
- Punkt dostępu Zebra
- Punkt dostępu ZyXEL
- Punkt dostępu V7
- Punkt dostępu Dell
- Punkt dostępu Linksys
- Punkt dostępu Digitus
- Punkt dostępu Vimar
- Punkt dostępu Dahua Technology
- Punkt dostępu Renkforce
- Punkt dostępu Netgear
- Punkt dostępu AVM
- Punkt dostępu Homematic IP
- Punkt dostępu Totolink
- Punkt dostępu Black Box
- Punkt dostępu Lancom
- Punkt dostępu Intellinet
- Punkt dostępu Devolo
- Punkt dostępu Kingston
- Punkt dostępu Speco Technologies
- Punkt dostępu Mercusys
- Punkt dostępu Draytek
- Punkt dostępu Edimax
- Punkt dostępu AirLive
- Punkt dostępu EnGenius
- Punkt dostępu Planet
- Punkt dostępu LevelOne
- Punkt dostępu Ubiquiti Networks
- Punkt dostępu Juniper
- Punkt dostępu Cudy
- Punkt dostępu Netis
- Punkt dostępu Allnet
- Punkt dostępu Media-Tech
- Punkt dostępu EQ-3
- Punkt dostępu Grandstream
- Punkt dostępu Allied Telesis
- Punkt dostępu Eminent
- Punkt dostępu Sitecom
- Punkt dostępu Fortinet
- Punkt dostępu Techly
- Punkt dostępu Steren
- Punkt dostępu Buffalo
- Punkt dostępu Macally
- Punkt dostępu Aruba
- Punkt dostępu Interlogix
- Punkt dostępu EQ3
- Punkt dostępu Hawking Technologies
- Punkt dostępu INCA
- Punkt dostępu Moog
- Punkt dostępu LigoWave
- Punkt dostępu Advantech
- Punkt dostępu Hercules
- Punkt dostępu SMC
- Punkt dostępu CradlePoint
- Punkt dostępu Silex
- Punkt dostępu Aerohive
- Punkt dostępu Bountiful
- Punkt dostępu WatchGuard
- Punkt dostępu NUVO
- Punkt dostępu IP-COM
- Punkt dostępu Syscom
- Punkt dostępu Meru
- Punkt dostępu Amped Wireless
- Punkt dostępu Cambium Networks
- Punkt dostępu 3Com
- Punkt dostępu Ruckus Wireless
- Punkt dostępu Bintec-elmeg
- Punkt dostępu Mach Power
- Punkt dostępu Brocade
- Punkt dostępu Insteon
- Punkt dostępu Comtrend
- Punkt dostępu Premiertek
- Punkt dostępu Extreme Networks
- Punkt dostępu Atlantis Land
- Punkt dostępu Mojo
- Punkt dostępu FlyingVoice
- Punkt dostępu Luxul
- Punkt dostępu Peplink
Najnowsze instrukcje dla Punkt dostępu
9 Kwietnia 2025
9 Kwietnia 2025
5 Kwietnia 2025

2 Kwietnia 2025
20 Marca 2025
28 Lutego 2025
26 Stycznia 2025

15 Stycznia 2025
14 Stycznia 2025
14 Stycznia 2025