Instrukcja obsługi Ruark Audio R5
Ruark Audio
radio
R5
Przeczytaj poniżej 📖 instrukcję obsługi w języku polskim dla Ruark Audio R5 (256 stron) w kategorii radio. Ta instrukcja była pomocna dla 13 osób i została oceniona przez 2 użytkowników na średnio 4.5 gwiazdek
Strona 1/256

R5 High Fidelity Music System
User guide
EN-2
Thank you for choosing our R5 High Fidelity Music System.
Please take the time to read this user guide as it will help you get
the best from your R5.
With due care, we’re condent your R5 will give you many years
of listening pleasure and if you should need any help or advice,
please do not hesitate to contact us. As a British, family-run
company, we pride ourselves on our customer service and will
always do our utmost to help.
Once again, thank you for choosing Ruark Audio.
Alan O’Rourke
Founder and managing director

EN-3
EN
Contents
What’s in the box 4
Controls 5
Overview 6
Getting started 8
Common functions 10
System settings 13
FM radio 15
DAB radio 16
Internet radio 17
CD player 19
Bluetooth 20
Music player 22
DLNA media streaming 24
Music streaming services 25
Line in and optical 26
Phono 26
Input level adjustment 26
Multi-room 27
App control 28
Alarms, snooze and sleep 28
Specications 29
Safety and regulatory information 30
Troubleshooting 31
Guarantee 32
General care 32
Copyright and trademarks 32
EN-4
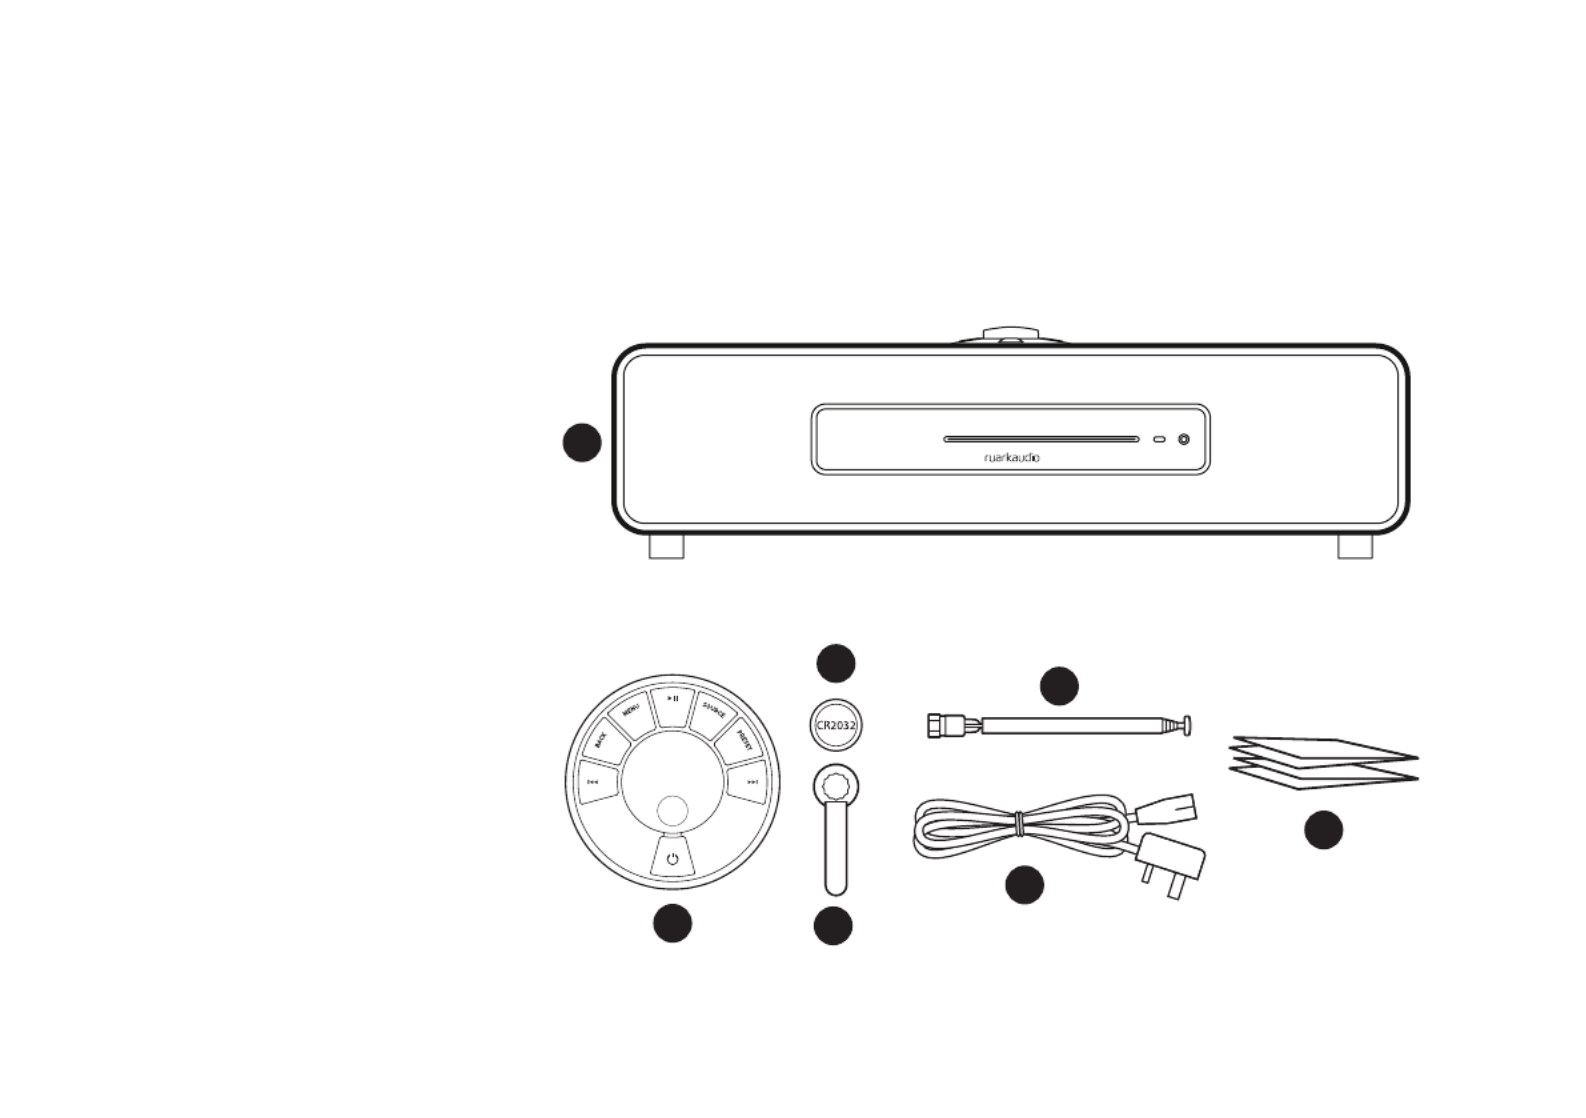
Ensure that all parts listed below are
in the box.
If any part is missing, do not use
the R5 and contact us directly if
purchased in the UK, or your Ruark
Audio dealer if purchased outside
the UK.
1. R5
2. Remote control
3. Remote battery (CR2032)*
4. Antenna spanner
5. Telescopic antenna
6. Mains power cord
7. User guide & other documents
If possible, please retain the carton
and all packaging materials.
What’s in the box
1
3
4
5
6
7
2
M
E
N
U
B
A
C
K
P
R
E
S
E
T
S
O
U
R
C
E
*The battery may already be tted to
the remote.

EN-5
EN
Controls
The controls on the R5 and on the remote are exactly the same.
11. – STANDBY
12. CONTROL KNOB / SELECT
Rotate to adjust volume from a Now Playing screen
Rotate to browse menus, tracks or station lists*
Press to SELECT
13. – press to skip to next station or track, press and hold
to fast forward
14. – press to skip to previous station or track, press and
hold to rewind
15. – press to recall a saved station or playlist, press PRESET
and hold for two seconds to save a station or playlist
16. – press to change audio sourceSOURCE
17. – press to play/pause a track or mute audio inputs and
radio
18. – press to view the menuMENU
19. – press to return to the previous menu or list screenBACK
20. INDICATOR LIGHT
On the R5 it indicates your music system is on and ashes
when Bluetooth is ready to pair or when using the remote.
On the remote it ashes when pressing a key or using the
control knob and when the battery is low, the light will
change from blue to amber.
M
E
N
U
B
A
C
K
P
R
E
S
E
T
S
O
U
R
C
E
11
1314
15
16
12
18
19
17
20
*You can also press or to browse menus,
tracks, sources or station lists
How long you press a key is important
Press = tap or press and immediately release
Press and hold = press and release after two seconds

EN-6
21. Neodymium full-range drivers
22. Headphone out
23. CD eject button
24. CD loading slot
Overview
2526 21
27 222324
25. Controls
26. OLED Display
27. Subwoofer

EN-7
EN
2829
30
32
31
33
37
35
3836 34
28. Mains power switch
29. Mains power fuse
30. Mains power cord inlet
31. Phono input
32. Line in
33. Line out
34. DAB-FM antenna
35. Ethernet
36. Optical input
37. USB
38. Grounding terminal
EN-8
Getting started
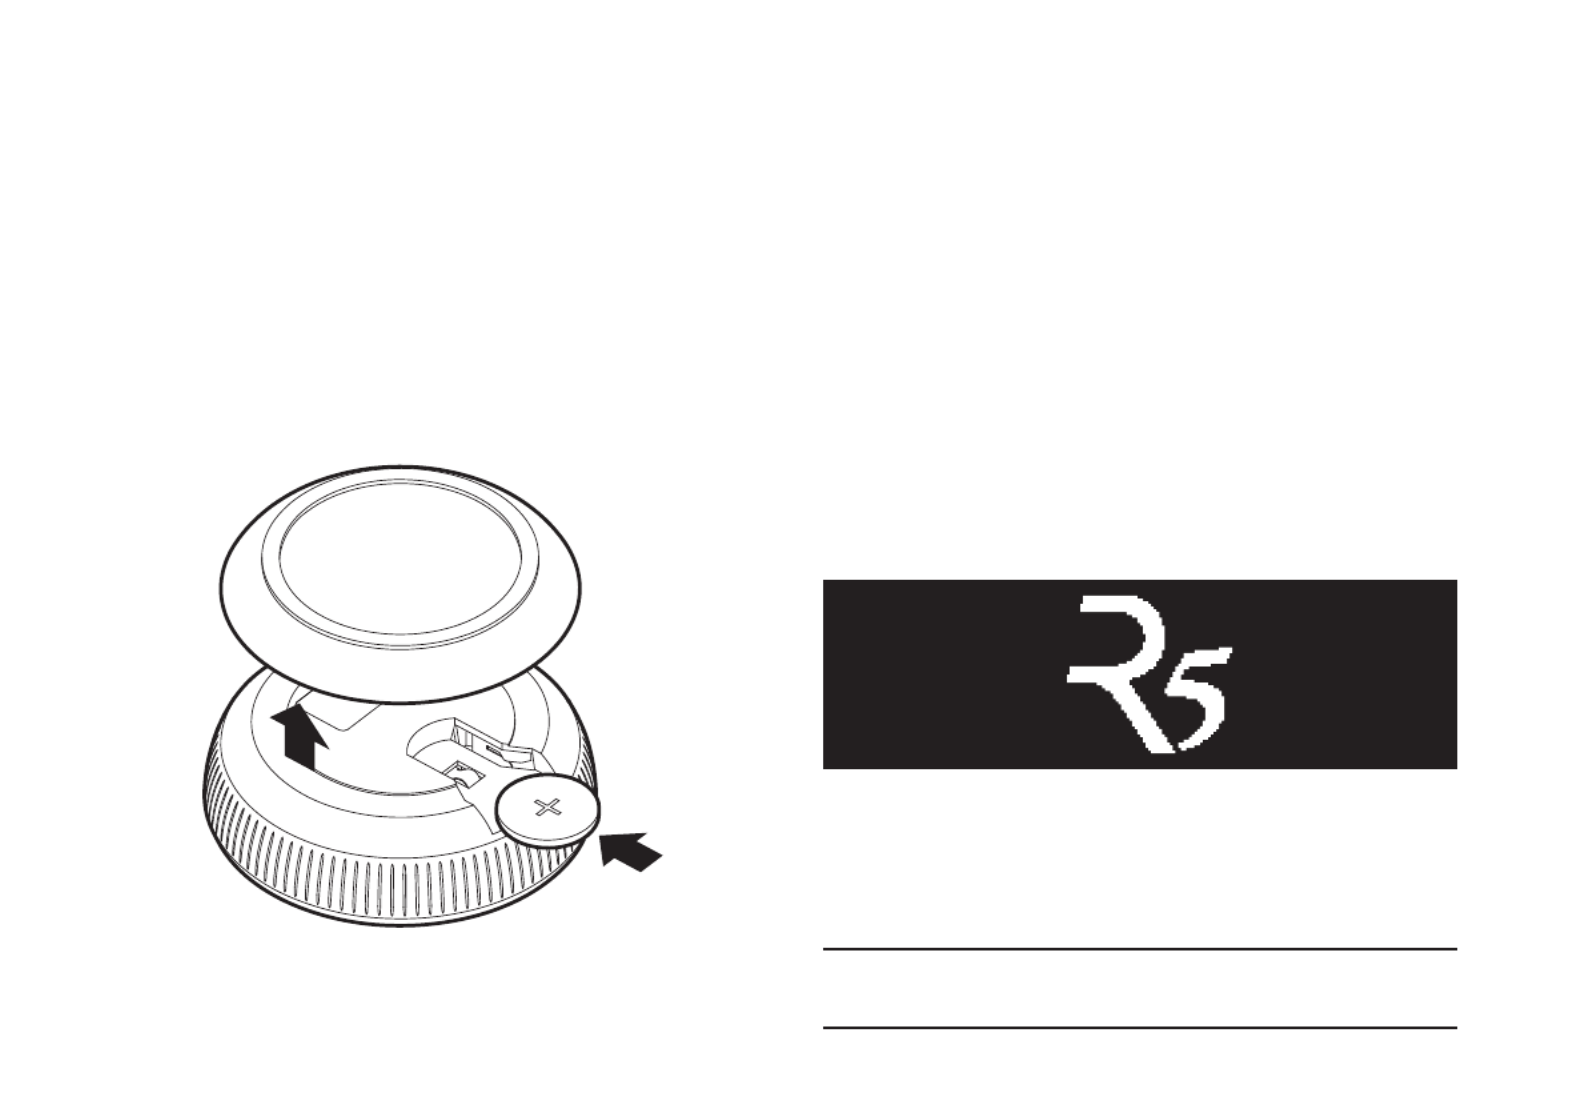
1 Activate remote
Gently pull off the magnetic steel base and with the remote
face down, slide the battery (type CR2032) into the slot,
ensuring the at side marked with + faces up. Replace the
steel base. Depending on model, you may also need to
remove the screw securing the plastic battery cover and then
sliding the cover out.
2 Connect the aerial
Fit the telescopic aerial to the DAB/FM antenna socket on
the back of your R5 and gently tighten it using the supplied
spanner.
3 Connect to AC mains
Plug the mains power cord into the mains power socket on the
back of your music system and then plug it into an AC mains
outlet.
4 Switch on
Switch the mains power switch on the back of your music
system to the ON position. Your R5 is now in standby.
To turn your R5 on, press STANDBY on the controls on the
cabinet and the R5 logo will appear on the screen.
Please note that the remote may not work until it is paired with
the main system (see step 6).
EN-9
EN
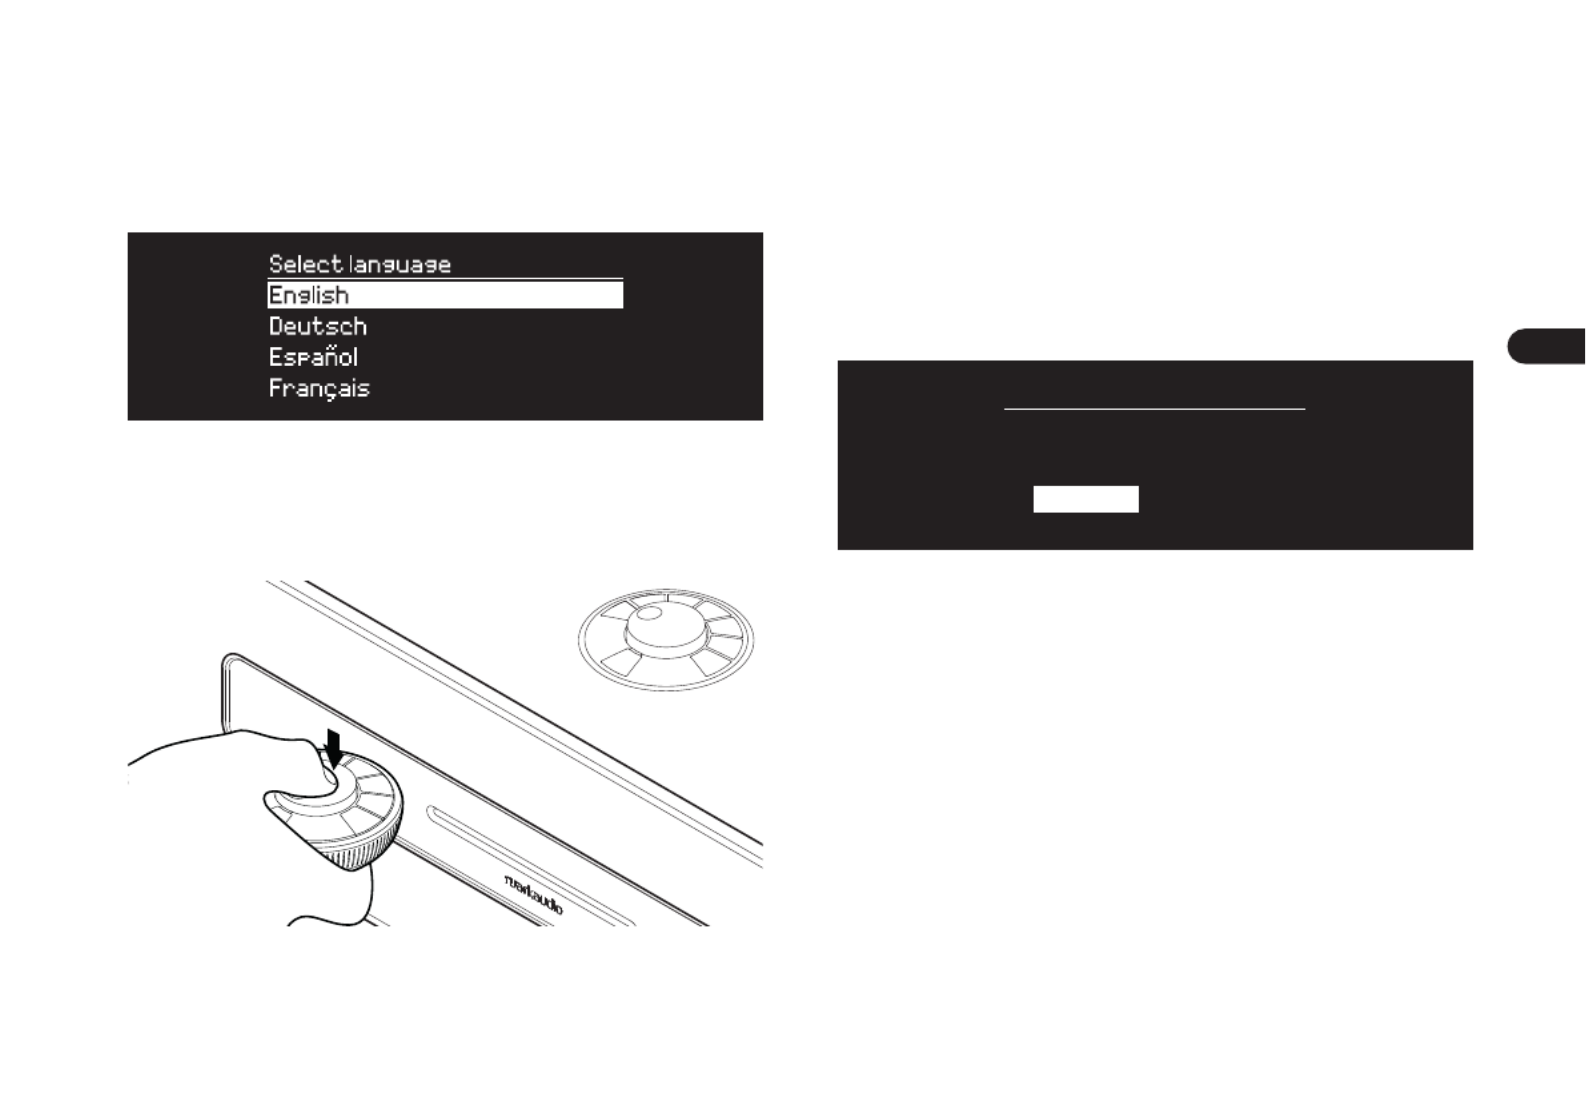
5 Select language
Rotate the until your preferred choice is CONTROL KNOB
highlighted, then press SELECT.
6 Pair your remote
When you are prompted to pair your remote control, hold it
very close to the display and then press and hold SELECT
on the remote until is displayed.Remote paired
Press to continue.SELECT
You won’t normally need to pair it again but if you if do, simply
hold it very close to the screen and press and hold any key
until you see the conrmation message. You can do this in any
mode.
7 Setup wizard
When you turn on your R5 for the rst time, setup wizard will
help you congure the clock and connect to your network.
Setup wizard
Start now?
YES NO
To start the setup wizard, rotate the to CONTROL KNOB
highlight and then press the knob to . If you YES SELECT
choose , your R5 will start without conguring time/date NO
and network settings.
8 Select a source
When your setup is complete, your R5 will display a menu with
a list of the available sources. Use the to CONTROL KNOB
choose a source and press .SELECT
9 Enjoy your music!

EN-10
Common functions
Switch on and to standby
Press STANDBY to turn your music system on. Press again to
switch to standby.
Now Playing screens
Unless you’re adjusting a setting, the screen will look similar
to the example below with the clock above and station/track/
album/artist information below.
The on-screen icons below are shown when their respective
functions are active.
Alarm Sleep timer
Shufe Repeat
Menu screens
The menus enable you to set the various options such as
adjusting the bass and treble. To change a setting, press
MENU to display the list of available options, rotate the
CONTROL KNOB to highlight the one you wish to change,
then press the knob to conrm your selection.
System
Audio
Network
Date and time
Brightness
Language
Browsing menus, track and station lists
To change settings – press MENU
To scroll through options – rotate CONTROL KNOB
To select option – press CONTROL KNOB
To exit menu – press or wait for a few secondsMENU
To return to the previous menu/list – press BACK
How long you press a key is important
Press = tap or press and immediately release
Press and hold = press and release after two seconds

EN-12
Save radio station preset
Press and hold until is shown then PRESET ‘Save preset’
rotate the to choose the preset number and CONTROL KNOB
press the knob to save the current station. Presets are either
marked with the station name, frequency or as ‘[ ’.Not set]
Save preset
1. [Not set]
2. Planet Rock
3. [Not set]
4. BBC Radio 4
5. [Not set]
If you save a station over an existing preset, the new station
will replace it.
Recall radio station preset
Press , rotate the to scroll through PRESET CONTROL KNOB
the preset station list, then press the knob to select a station.
Recall preset
1. [Not set]
2. Planet Rock
3. [Not set]
4. BBC Radio 4
5. [Not set]
Connect a Bluetooth device
When you change the source to Bluetooth, your R5 will
attempt to automatically connect to the last connected device.
If you have not yet paired your device or the previous device
is not available, your R5 will enter into pairing mode. See
‘Bluetooth’ section for more details.
Headphones
Connect your headphones to the 3.5mm stereo jack socket on
the front of your R5.
Headphone volume is adjusted independently from speaker
volume, so when headphones are plugged in the volume is
shown as Volume (HP).
USB charging
The USB socket on your R5 is rated at 5W (5V 1.0A) and will
power most smart devices and USB powered accessories.
Please note that: means press MENU > System > Audio
MENU System Audio, select and nally select

EN-13
EN
System settings
Bass, treble and sub
MENU > System > Audio > Bass, Treble or Sub level
Adjust the bass and treble levels using the CONTROL KNOB
then press it to save the setting.
Loudness
Loudness automatically boosts the treble and bass
frequencies at lower volumes.
MENU > System > Audio > Loudness
3D sound
3D widens the stereo sound stage and creates a more
immersive and involving sound.
MENU > System > Audio > 3D
Date and time
MENU > System > Date and time
The time and date are automatically synchronised with
national time signals broadcast over DAB, network and FM
(FM time synchronisation may not always be available).
You can also set the time manually by turning auto update off
and change the time and date format.
Display brightness
MENU > System > Brightness
Independently adjust the brightness of the display when your
R5 is on and in standby.
When the brightness is set to 0 the display will automatically
switch off after a few seconds. The display will then briey
illuminate whenever any key is pressed.
You can also adjust the standby brightness when your R5 is in
standby by pressing or .
Language
MENU > System > Language
Change the menu language.
Software update
MENU > System > Software update
Your R5 is set to automatically check for software updates.
If one is available, you will be asked whether you want to
download and install it.
CAUTION: Disconnecting the power during a software update
could permanently damage your R5.
Factory reset
MENU > System > Factory reset
Resets all settings and clears presets.
Currently saved settings are marked with an asterisk ( )
EN-14
Setup wizard
MENU > System > Setup wizard
Runs the setup wizard to guide you through setting up the
clock and network.
Inactive standby
Your R5 is set to automatically switch itself to standby if there
is no audio for more than 20 minutes. To change this select
MENU > System > Inactive standby.
Network wizard
For a guided process to help you connect to a wired or Wi-Fi
network, select MENU > System > Network > Network
wizard.
Network profiles
Your R5 will automatically attempt to connect to any network it
has previously connected to.
To see the list of saved networks, select MENU > System >
Network > Network profile. To delete an unwanted network,
highlight it, press the and select CONTROL KNOB YES.
Keep network connected
MENU > System > Network > Keep connected
Choose whether your R5 always remains connected to your
network, even in standby (default). We recommend you
set it to as it will ensure your R5 is always keep connected
accessible using Spotify or DLNA music streaming. We also
recommend this if you have set your clock to update from
Network.
System information
Shows details of your R5 including the software version,
unique radio ID code and friendly name.
Advanced network settings
There are other advanced network settings for experienced
users for manual conguration or diagnosing and xing
network problems.
Friendly name
The friendly name is how your R5 shows up on networks,
Spotify and Bluetooth. You can change this to something more
descriptive like “Ozzie’s R5” or “Living room R5”.
You can view your R5’s status and change its friendly name by
viewing its web page in a browser. In Windows, your R5 will
typically show up as a Media Device, double clicking on the
icon will open the conguration page in your browser.
For more information visit www.ruarkaudio.com/support.
EN-16
DAB radio
When listening to DAB/DAB+, your R5 displays the station
name and other DLS* programme information when available.
The rst time you use your R5, or if the station list is empty,
it will automatically perform a full scan to identify available
stations.
*Dynamic Label Segment
Change station
Press or to tune to the next/previous station.
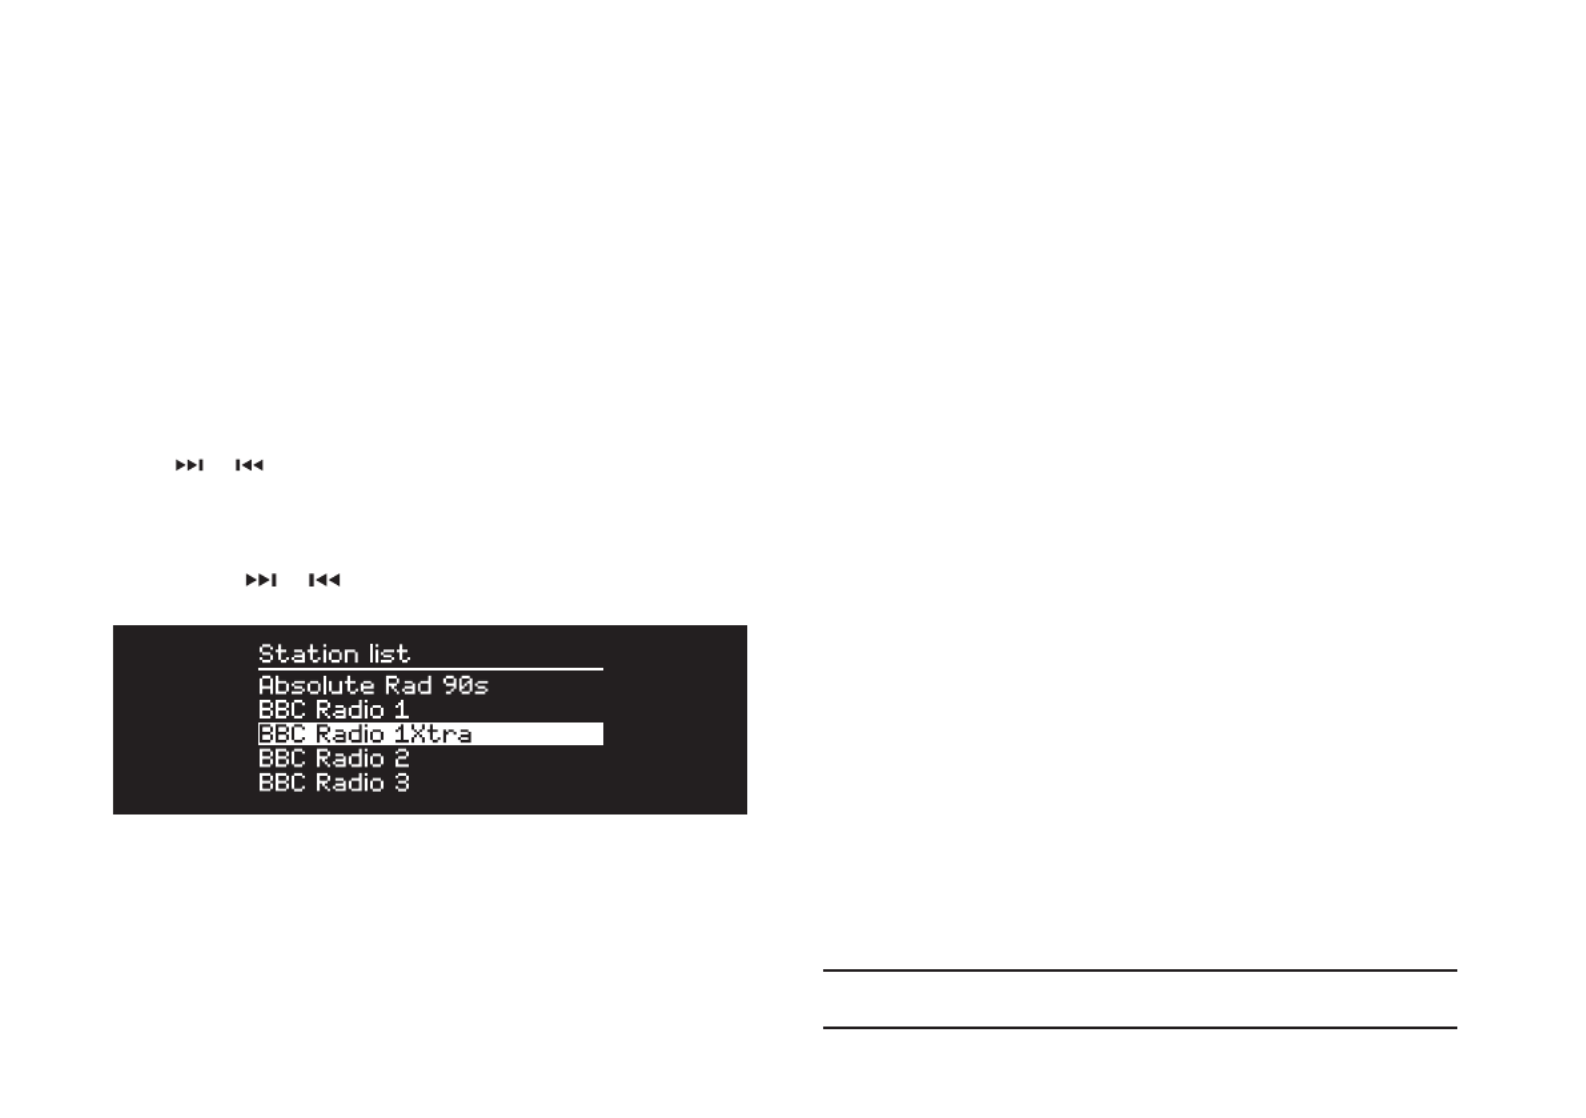
Station list
To view a list of available DAB stations select MENU > Station
list or press or . Highlight the station you wish to listen
to and press .SELECT
Programme information
Choose from radio text, programme type, signal strength,
signal format and date by selecting .MENU > Info
Save preset
You can store 10 DAB stations in your preset list. See
‘Common functions’ section.
Recall preset
See ‘Common functions’ section.
Secondary services
Some DAB radio stations have one or more secondary
stations associated with them. If a secondary station is
available ‘>>’ is shown after the current station name in the
station list.
Secondary stations are indicated with ‘<<’ before the station
name.
Station order
The DAB station list can be ordered by , Alphanumeric
Ensemble Valid Alphanumeric or . puts the stations in
alphabetical order, groups stations from the same Ensemble
broadcaster together, Valid shows available stations rst and
places invalid stations (marked with ‘?’) last.
To change station order, select and Menu > Station order
select (default), or Alphanumeric Ensemble Valid.
Invalid stations have ‘?’ in front of the station name

EN-18
Now playing information
The station name is shown along with additional information
like artist and track name. To change what is displayed select
MENU > Info and choose from radio text, genre, signal quality,
track name, location, and date.
Search for a station
Search for a station by selecting MENU > Station list >
Stations > Search stations and then entering the name of the
station you’re looking for.
Podcasts
Many stations will have associated podcasts which you can
browse and search for just like internet radio stations.
Mute
Press to mute and press again to resume listening.
Save a preset
You can store 10 Internet radio stations in your preset list. See
‘Common functions’ section.
Recall a preset
See ‘Common functions’ section.

EN-21
EN
Operating range
This is typically up to 10 metres (30 feet) from your R5,
although obstructions such as walls will reduce this.
Connect device
To disconnect the current device and connect a new one,
select .MENU > Connect device
Pairing additional devices
You can pair up to 7 devices, although you will only be able to
play audio from one device at a time.
Clearing the paired devices list
If you are having trouble connecting your Bluetooth device, we
recommend you clear all pairing information. To do this, select
MENU > Clear devices.
You will also need to delete from the paired devices Ruark R5
list on your Bluetooth device before pairing it to your R5 again.
For more information visit www.ruarkaudio.com/support.
You cannot use the Bluetooth function on
your R5 to connect to Bluetooth headphones

EN-22
Rights-protected WMA and AAC tracks cannot be played on
your R5.
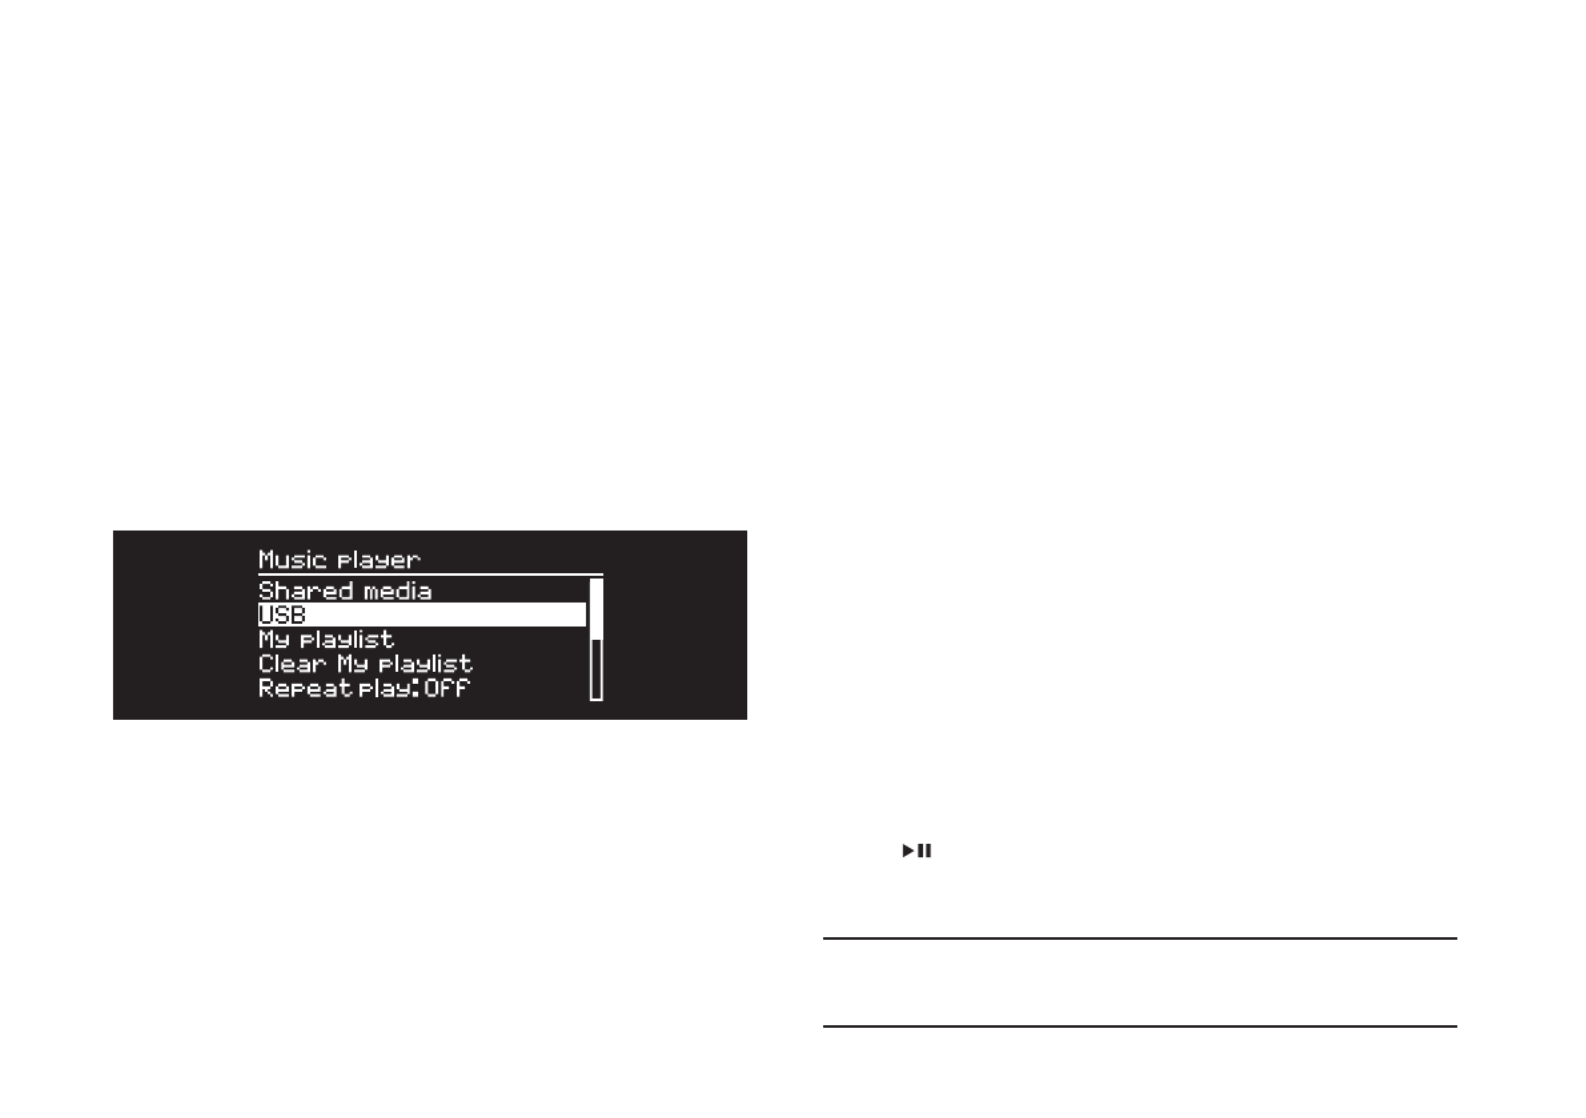
Music player
Music player enables you to play audio les stored on a
computer on your network, a USB memory stick or portable
hard drive.
USB music player
To play audio from a USB mass-storage device (must be
FAT32 format) such as a USB Flash stick or USB hard drive,
connect it to the USB socket on the back of your R5.
When you rst connect a USB mass-storage device, your
R5 will automatically ask if you want to view the track list.
Otherwise, to view the track list select .Menu > USB
Network music player
Your R5 is fully DLNA compatible and will play music stored
in shared media libraries on other devices on your network. A
shared library might be on a laptop, smartphone or tablet, but
it could also be on a dedicated music server such as a NAS
drive (Network Attached Storage).
Most computers running Windows are already congured as
media servers as are most NAS drives and some routers will
also work as media servers. There are many apps available
for Mac, iOS, Linux, Android, Windows phone, Blackberry,
Symbian, etc. that will turn your MP3 player, smartphone or
tablet into a music server.
To play music shared by devices on your network select Menu
> Shared media. After your R5 has scanned your network for
shared media you will see a list of music servers consisting
of the computer name and shared media name, for example
<Ruark-Laptop: Ozzie Music>.
The menus after this are generated by the media server,
although in most cases you will nd options to browse by
genre, folder, artist, album etc.
If your R5 is not connected to a network it will attempt to
connect.
For more information visit www.ruarkaudio.com/support
Browse and play music
Rotate the to scroll though the track lists, CONTROL KNOB
then press the knob to open the highlighted folder/album or
play the track.
To go back to the previous screen press .BACK
Pause track
Press and then press again to play.

EN-23
EN
Skip track
Press to skip to the next track in the folder or album, press
to skip to the start of the current track, press again to skip
to the previous track.
Fast-forward or rewind
Press and hold or to fast-forward or rewind.
Shuffle
To play tracks in random order, select and MENU > Shuffle
press the to toggle shufe play on and off.CONTROL KNOB
NOTE: It may not be possible to use this function if the folder
contains a large number of tracks.
Repeat
To repeat a single track or all the tracks in the current folder,
select and press the to MENU > Repeat CONTROL KNOB
choose one, all or off.
My playlist
You can create your own playlist and queue of up to 500
tracks. These can be a mixture of tracks from any available
media servers and an attached USB device. To manage your
playlist, select .Menu > My playlist
To add a track or folder to your playlist, highlight it then press
and hold the for two seconds.CONTROL KNOB
To remove a track from your playlist, highlight the track in My
playlist and then press and hold the for two CONTROL KNOB
seconds.
Please note that your playlist will stored as long as your R5
remains on or in standby but will be cleared if you turn it off.
Now Playing information
Typically, the track name is shown with additional information
below. To change what is displayed select and MENU > Info
choose from album and artist information, show the progress
bar or data format.
Prune servers
Your R5 will automatically store the name of media servers
it has connected to and that are not currently available are
shown with a question mark before their name eg ‘?Home-
Laptop’. You can remove them from the list by selecting
MENU > Prune servers > YES.
EN-24
DLNA media streaming requires that your R5 is connected
to your network so we recommend that you set it to keep
network connected. See system settings section.
DLNA media streaming
You can also stream audio to your R5 from a Digital Living
Network Alliance (DLNA) compatible media server. This is
where you browse for music on the server itself and play it
through your R5. There are many apps available for Mac,
iOS, Linux, Android, Windows phone, etc that will turn your
smartphone, tablet or laptop into a DLNA media server.
Windows Media Player even has a ‘Play to’ function built in
that allows you to stream music stored on your computer
directly to your R5.
With DLNA media streaming, your R5 functions as a Digital
Media Renderer (DMR) so you browse for music on your
smartphone or laptop and then stream it to your R5 over your
network.
Your R5 will automatically change to DMR mode when you
select your R5* as your chosen player – DMR is not a mode
that can be selected using the key.SOURCE
Similarly, all the Now playing information will be controlled by
the server so there are no settings you can change.
For more details refer to the documentation for your device or
app or visit www.ruarkaudio.com/support.

EN-26
Line in and optical
You can listen to audio from an external analogue audio source
by connecting it to Line in or a digital source by connecting it
to Optical.
Phono
Your R5 includes a high-delity phono stage pre-amplier for
use with a moving magnet (MM) turntable cartridge.
It is not designed for a moving coil type cartridge.
To connect a turntable to your R5, we recommend high quality
phono leads.
Input level adjustment
For best audio performance, we recommend you balance the
volume level of an external device (eg portable music player or
turntable) so its volume is about the same as inbuilt sources
like CD or USB.
If the volume is lower, increase the input level.
If the volume is higher or distorts, decrease the input level.
You can adjust the input level by selecting MENU > Input level
and choose your desired level.
If your external audio source has a volume control you may
also need to adjust that.
Line in input levels
- 3dB (devices with high output level)
+ 0dB (devices with standard 2.1Vrms line level output)
+ 6dB (default)
+ 12dB (eg smartphones with high headphone output level)
+ 18dB (eg smartphones with standard headphone output level)
+ 24dB (eg smartphones with low headphone output level)
Phono input levels
These are designed to work with the most common moving
magnet (MM) cartridges, please check the specication of your
cartridge and select the most appropriate setting.
- 3dB (6-8mV)
+ 0dB (4-6mV)
+ 3dB (3-4mV)
+ 6dB (2-3mV)
For best audio performance, we recommend you balance the
volume level of external devices by adjusting input levels

EN-29
EN
Specifications
Amplifiers and drivers
2 × 75mm full-range neodymium drivers
130mm long-throw subwoofer
90W Class AB power amplier
Integrated MM phono preamplier
Enhanced digital 3D audio processor
Tuner
DAB, DAB+ and FM Tuner with RDS
75 Ohm F-type DAB/FM aerial input
CD player
CD, CD-ROM, CD-R/RW disks
MP3, WMA, AAC 320kbps
Digital audio
Audiophile 32-bit 112dB audio stereo DAC
Internet radio, Spotify Connect, Amazon Music, Deezer, TIDAL,
UPnP™ DLNA
802.11b/g/n Wi-Fi supports WEP, WPA & WPA2 security
MP3 48kHz 320kbps, AAC 96kHz 320kbps,
FLAC 24-bit 48kHz, WAV 16-bit 48kHz / 24 bit 44.1kHz,
WMA 44.1kHz 320kbps
Bluetooth V4.0, SBC, AAC, A2DP, aptX, aptX HD
Inputs and outputs
MM phono input (RCA) 2-8mV
Digital optical (TOSLINK) 24-bit 192kHz
Line input (RCA) 2.3Vrms
Line line out (RCA) 2.0Vrms
Ethernet (RJ45)
USB 2.0 5W (5V 1A)
3.5mm headphone jack, 25mW into 16-32 Ohm
Power
Mains input 100-120/200-240V AC 50 – 60Hz
Fuse 250V T3.15A
Nominal consumption 13W
Standby consumption 2.0W
Physical
H142 × W520 × D300mm
(H5.6 x W 20.5 x D 11.8in)
Weight 9.5kg (20.9lbs)
Specication and design subject to modication without notice.

EN-30
● Read this user guide and follow all instructions, it will help you set
up and operate your product properly.
● Heed all warnings and keep this user guide for future reference.
● Do not attempt to use a damaged device as this could result in a
dangerous electric shock.
● Do not open the unit or remove any panels to expose the
electronics. No user serviceable parts inside.
● Refer all servicing to qualied service personnel. Servicing is
required when the device has been damaged in any way, such as
power-supply cord or plug is damaged, liquid has been spilled or
objects have fallen into the device, the device has been exposed to
rain or moisture, does not operate normally, or has been dropped.
● This device is intended to be operated ONLY from the AC voltages
listed on the back panel or included power supply. Operation from
voltages other than those indicated may cause irreversible damage
to the device and void the product warranty.
● Ensure that the mains plug or mains connector into the unit is readily
accessible in case disconnection from the mains is required.
● The mains adapter, mains plug or mains connector must be
removed from the socket to completely disconnect the system from
mains power.
● Do not place any naked ame sources, such as lighted candles,
on or near the device. Do not install near any heat sources such as
radiators, stoves, or other devices (including ampliers) that produce
heat.
● Avoid exposure to extreme heat or cold.
● Only use attachments/accessories specied for this device. Make
no modications to the system or accessories. Unauthorised
alterations may compromise safety, regulatory compliance, and
system performance.
● Only use the supplied aerial or an approved replacement.
● To reduce the risk of re or electrical shock, do not expose the
device to rain or moisture. Do not expose this device to dripping
or splashing, and do not place objects lled with liquids, such as
vases, on or near the device. As with any electronic products, use
care not to spill liquids into any part of the system. Liquids can
cause a failure and/or a re hazard.
● Unplug this device during lightning storms or when unused for long
periods of time to prevent damage to this device.
● To prevent risk of re or electric shock, avoid overloading wall
outlets, extension cords, or integral convenience receptacles.
● Long-term exposure to loud music may cause hearing damage. It is
best to avoid extreme volume when using headphones, especially
for extended periods.
● Do not install this device in a conned space. Always leave a space
of at least 10cm around the device for ventilation and ensure that
curtains or other objects never cover ventilation openings on the
device.
Safety and regulatory information

EN-31
EN
LITHIUM COIN CELL SAFETY NOTICE. The remote control
contains a lithium coin cell battery which if ingested, may
cause chemical burns. Keep new and used batteries out of
reach of small children. If you think batteries may have been ingested,
seek immediate medical attention. Do not handle leaking or damaged
batteries. Danger of explosion if battery is incorrectly replaced.
Replace only with the same or equivalent type.
This device is labelled in accordance with European Directive
2012/19/EU concerning waste electrical and electronic
equipment. This symbol indicates that the product or
associated batteries should not be disposed of as general
household waste. As with any electrical equipment, please
dispose of it according to local regulations.
CE COMPLIANCE INFORMATION
This product conforms to all EU Directive requirements as applicable
by law. Hereby, Ruark Audio, declares that this device complies
with the essential requirements and other relevant provisions of the
European Radio Equipment Directive 2014/53/EU.
You can download the full CE Declaration of Conformity at
www.ruarkaudio.com/doc/R5doc.pdf
UK CONFORMITY ASSESSMENT INFORMATION
This product conforms to all UK Conformity Assessment regulations
as applicable by law. You can download the full UKCA Declaration of
Conformity at www.ruarkaudio.com/doc/R5UKCA.pdf
Troubleshooting
For help with your product, please refer to the FAQ (Frequently
Asked Questions) page in the support area of our website.
For more information visit www.ruarkaudio.com/support

DA-2
Tak fordi du har valgt vores R5 HiFi Musiksystem.
Tag dig god tid til at læse denne brugervejledning, da den vil
hjælpe dig med at få det bedste ud af din R5.
Hvis du passer på den, er vi overbevist om, at R5 vil give dig
mange års lytteglæde, og hvis du får brug for hjælp eller råd, må
du endelig kontakte os. Som et britisk familieforetagende er vi
stolte af vores kundeservice, og vi vil altid gøre vores allerbedste
for at hjælpe.
Endnu engang mange tak, fordi du valgte Ruark Audio.
Alan O’Rourke
Grundlægger og administrerende direktør

DA-3
DA
Indholdsfortegnelse
Hvad er der i æsken? 4
Betjening 5
Oversigt 6
Godt begyndt... 8
Fællesfunktioner 10
Systemindstillinger 13
FM-radio 15
DAB-radio 16
Internetradio 17
CD-afspiller 19
Bluetooth 20
Musikafspiller 22
DLNA mediestreaming 24
Musik streaming tjenester 25
Line in og optisk 26
Phono 26
Indgangsniveau-justering 26
Multi-room 27
App kontrol 28
Alarmer, snooze og sleep 28
Specikationer 29
Sikkerheds- og lovgivningsmæssige oplysninger 30
Fejlsøgning 31
Garantiinformation 32
Generel pleje 32
Copyright og varemærker 32

DA-8
Godt begyndt...
1 Montér fjernbatteri
Træk forsigtigt den magnetiske stålbase af og med forsiden
nedad og føres batteriet (type CR2032) ind i rillen, idet det
sikres, at den ade side med +-mærket vender opad. Sæt
stålbunden på igen.
2 Tilslut antennen
Tilslut antennen til stikket bag på R5 og tilspænd forsigtigt
møtrikken med skruenøglen.
3 Tilslut til vekselstrømsforsyningen
Sæt el-ledningens stik i el-bøsningen bag på dit musiksystem
og sæt den anden ende i en stikkontakt.
4 Tænd
Sæt strømkontakten bag på dit musiksystem i ON-
indstillingen. R5 er nu i standby.
Tryk, for at tænde din R5 på STANDBY på kabinetbetjeningen
og R5-logoet vises på skærmen.
Bemærk, at fjernbetjeningen muligvis ikke virker, før den er
sammenkoblet til hovedsystemet (se trin 6).

DA-9
DA
5 Vælg sprog
Drej til dit foretrukne valg er fremhævet, KONTROLKNAPPEN
tryk derefter på VÆLG.
6 Sammenkobl fjernbetjeningen
Når du bliver bedt om at sammenkoble fjernbetjeningen, skal
du holde den meget tæt på displayet og trykke og hold på
VÆLG.
Når fjernbetjeningen er sammenkoblet, vil du se en
bekræftelse på skærmen, og fjernbetjeningen er så klar til
brug, tryk VÆLG for at fortsætte.
Du skal normalt ikke sammenkoble den igen, men hvis
du skal, skal du blot holde den meget tæt på skærmen
og trykke og holde enhver tast nede, indtil du får
bekræftelsesmeddelelsen. Du kan gøre dette i enhver
tilstand.
7 Kongurationsguide
Når du tænder din R5 første gang, vil installationsguiden
hjælpe dig med at kongurere uret og oprette forbindelse til dit
netværk.
Setup wizard
Start now?
YES NO
Start kongurationsguiden ved at dreje KONTROLKNAPPEN
indtil fremhæves og tryk derefter på knappen JA VÆLG. Hvis
du vælger , starter din R5 uden at kongurere tid/dato og NEJ
netværksindstillinger.
8 Vælg en kilde
Når kongurationen er afsluttet, vil R5 vise en menu med en
liste over tilgængelige kilder. Brug til at KONTROLKNAPPEN
vælge kilde, og tryk på VÆLG.
9 Nyd din musik!

DA-10
Fællesfunktioner
Tænd og gå i standby.
Tryk på STANDBY for at tænde for musiksystemet. Tryk igen
for at skifte til standby.
Skærmbilleder, der viser, hvad der spiller
Medmindre du er ved at justere en indstilling, vil skærmen
ligne nedenstående eksempel med uret for oven og station/
spor/album/kunstner-information for neden.
Ikonerne på skærmen for neden vises, når deres respektive
funktioner er aktive.
Alarm Sleep timer
Shufe Gentag
Menu-skærme
Menuerne gør det muligt at indstille de forskellige muligheder,
som f.eks. at justere bas og diskant. For at ændre en indstilling
tryk på for at vise listen over tilgængelige muligheder, MENU
drej for at fremhæve den, du vil ændre KONTROLKNAPPEN
og tryk derefter på knappen for at bekræfte dit valg.
System
Audio
Network
Date and time
Brightness
Language
Gennemse menuer, spor- og
stationslister
For at skifte indstillinger – tryk på MENU
For at rulle igennem valg – drej KONTROLKNAPPEN
For at vælge valg – tryk på KONTROLKNAPPEN
For at forlade menu – tryk på eller vent nogle få MENU
sekunder
For at gå tilbage til forrige menu/liste – tryk på TILBAGE
Det er vigtigt, hvor længe du trykker på en tast.
Tryk = slå let eller tryk og slip straks
Tryk og hold = tryk og slip efter to sekunder

DA-11
DA
Indstil lydstyrken
Drej fra enhver Spiller-Nu skærm. KONTROLKNAPPEN
Højttaler- og hovedtelefonlydstyrker justeres separat, så når
hovedtelefoner er sat i, vil lydstyrken blive vist som Volume
(HP).
BEMÆRK: hvis der drejes på når en KONTROLKNAPPEN,
menu eller spor/stationsliste bliver vist, vil der blive rullet
igennem menuen eller listen og lydstyrken vil ikke blive
ændret.
Skift lydkilde
Tryk på for at se den aktuelle lydkilde, drej SOURCE
KONTROLKNAPPEN for at rulle igennem listen over kilder og
tryk derefter på knappen for at vælge en, der vises. (Du kan
også trykke på gentagne gange for at køre igennem SOURCE
listen over kilder i stedet for at dreje på knappen.)
Internet radio
Multi-room
Denne enhed er fuldt kompatibel med Ruark Audio multi-room
og giver dig mulighed for at streame musik problemfrit fra et
rum til et andet. Se ‘Multi-room’ for yderligere oplysninger.
Pausér nummeret, eller slå lyden fra
Tryk på , og tryk så igen for at genoptage lytning.
Afspil næste/forrige spor
Tryk på for at gå til næste spor i mappen eller albummet,
tryk på for at gå til begyndelsen af det aktuelle spor, og
tryk igen for at gå til forrige spor.
Hurtig fremspoling eller tilbagespoling af
spor
Tryk og hold eller (fungerer måske ikke med Bluetooth).
Skift FM-radiostation
Tryk på eller for at vælge næste eller forrige station. Se
‘FM’ for yderligere oplysninger.
Skift DAB-radiostation
Tryk på eller for at tune ind på den næste eller forrige
station.
Du kan også se multiline-stationslisten ved at vælge MENU >
Station list.
Se ’DAB’ for yderligere oplysninger.
Skift station- eller sporinformation
Skift den station-/sporinformation, der vises, ved at vælge en
af mulighederne fra . MENU > Info
For at gå tilbage til forrige menuniveau eller stationsliste,
tryk på TILBAGE

DA-12
Gem radiostationforindstilling
Tryk og hold nede indtil vises PRESET ‘Gem preset’
og drej derefter på for at vælge KONTROLKNAPPEN
forindstillingsnummeret og tryk derefter på knappen for at
gemme den aktuelle station. Forindstillinger er enten markeret
med stationsnavn, frekvens eller som ‘[ ’.Not set]
Save preset
1. [Not set]
2. Planet Rock
3. [Not set]
4. BBC Radio 4
5. [Not set]
Hvis du gemmer en station over en eksisterende forindstilling,
vil den nye station erstatte den gamle.
Find radiostationforindstilling
Tryk på , drej for at rulle PRESET KONTROLKNAPPEN
igennem listen over forindstillede stationer og tryk derefter på
knappen for at vælge en station.
Recall preset
1. [Not set]
2. Planet Rock
3. [Not set]
4. BBC Radio 4
5. [Not set]
Tilkobl et Bluetooth-udstyr
Når du ændrer kilden til Bluetooth, forsøger din R5 automatisk
at oprette forbindelse til den sidst tilsluttede enhed. Hvis du
endnu ikke har parret dit udstyr, eller det tidligere udstyr ikke
er tilgængeligt, vil R5 gå i parringstilstand. Se ‘Bluetooth’ for
yderligere oplysninger.
Hovedtelefoner
Tilslut dine hovedtelefoner til det 3,5mm stereo-jackstik foran
på R5.
Hovedtelefonlydstyrken justeres separat fra
højttalerlydstyrken, så når hovedtelefoner er sat i, vil lydstyrken
blive vist som Volume (HP).
USB-opladning
USB-stikket på R5 er 5W (5V - 1,0A) og vil strømforsyne de
este smarte enheder og USB-drevent tilbehør.
Bemærk: betyder tryk MENU > Systemindstillinger > Audio
på , vælg og vælg til slut MENU Systemindstillinger Audio

DA-13
DA
Systemindstillinger
Bas, diskant og sub
MENU > System > Audio > Bas, Diskant og Sub niveau
Justér bas- og diskant-niveauer med og KONTROLKNAPPEN
tryk derefter på den for at gemme indstillingen.
Lydstyrke
Lydstyrke booster automatisk diskant- og basfrekvenserne
ved lavere lydstyrker.
MENU > System > Audio > Loudness
3D-lyd
3D udvider stereolydfasen og skaber en mere fordybende og
involverende lyd.
MENU > System > Audio > 3D
Dato og tidspunkt
MENU > System > Date and time
Tidspunkt og dato synkroniseres automatisk med nationale
tidssignaler, der udsendes over DAB, netværk og FM (FM-
tidssynkronisering er muligvis ikke altid tilgængelig).
Du kan også indstille tidspunktet manuelt ved at slukke for
automatisk opdatering og ændre tids- og datoformatet.
Display-lysstyrke
MENU > System > Brightness
Justér displayets lysstyrke uafhængigt, når der er tændt for din
R5 og i standby.
Når lysstyrken er indstillet til 0, slukker displayet automatisk
efter nogle få sekunder. Displayet lyser derefter kortvarigt, når
der trykkes på en tast.
Du kan også justere standby lysstyrken, når din R5 er i
standby ved at trykke på eller .
Sprog
MENU > System > Language
Skift menusprog.
Softwareopdatering
MENU > System > Software update
R5 er indstillet til automatisk at tjekke for
softwareopdateringer. Hvis en er tilgængelig, vil du blive
spurgt, om du ønsker at downloade og installere den.
ADVARSEL: Hvis strømmen afbrydes under en
softwareopdatering, kan det beskadigede din R5 permanent.
Fabriksnulstilling
MENU > System > Factory reset
Nulstiller alle indstillinger og rydder forindstillinger.
Aktuelt gemte indstillinger er markeret med en stjerne ( )

DA-18
Oplysninger om, hvad der afspilles
Stationsnavnet vises sammen med anden information som
f.eks. kunstner og spornavn. Du kan ændre, hvad der vises,
ved at vælge og vælge mellem radiotekst, genre, MENU > Info
signalkvalitet, spornavn, beliggenhed og dato.
Søg efter en station
Søg efter en station ved at vælge MENU > Station list >
Stations > Search stations og derefter indtaste navnet på
stationen, som du søger efter.
Podcasts
Mange stationer vil have tilknyttede podcasts, som du kan
gennemse og søge efter lige som internetradiostationer.
Slå lyd fra/til
Tryk på for at slå lyd fra og tryk igen for at genoptage
lytning.
Gem en forindstilling
Du kan gemme 10 Internetradiostationer i listen over
forindstillede stationer. Se afsnittet 'Fællesfunktioner'.
Find en forindstilling
Se afsnittet 'Fællesfunktioner'.

DA-20
Bluetooth
Din R5 understøtter aptX til streaming af cd-kvalitet og
aptX HD til 24-bit hi-streaming streaming. Den forbinder
automatisk til din Bluetooth-enhed ved hjælp af den højeste
kvalitetstilslutning, der understøttes af din enhed.
Parring af Bluetooth-udstyr
Når du har ændret kilden til Bluetooth, skal du vente indtil
Awaiting connection... vises og indikator-lyset på toppen
blinker.
Brug Bluetooth-opsætningen på dit smart-udstyr for at parre
og tilkoble det til din R5. Det vil blive vist i listen over parret
udstyr som . Når du er tilsluttet, vises Ruark R5* BT Connected
+ dit enhedsnavn (f.eks. Ozzie’s telefon).
Det kan tage nogen få sekunder, før R5 vises i listen på dit
udstyr og i nogle tilfælde kan det være nødvendigt at indtaste
“0000” som parringadgangskode.
Hvis du ikke tilkobler indenfor nogle få minutter, vil R5 holde
op med at prøve at tilkoble og vise For at No connection.
tilkoble vælg MENU > Connect device.
Tilkobling af Bluetooth-udstyr
Lige så snart du skifter til Bluetooth, vil din R5 vise
Connecting, idet den forsøger at tilkoble til det sidste udstyr,
den blev parret med.
Hvis dette udstyr ikke er tilgængeligt, vil den vise Awaiting
connection... For at tilkoble til din R5 skal du sørge for, at
Bluetooth-funktionen på udstyret er tændt og vælge Ruark R5*
fra listen over parret udstyr på dit Bluetooth-udstyr.
Kaldenavn
*Din R5 vil blive vist som Ruark R5 på Bluetooth-udstyr, men
du kan ændre det til noget mere beskrivende, som f.eks.
“Ozzies R5” eller “Stue R5”. Se ‘Systemindstillinger’
Lydafspilning
Når udstyret er tilkoblet, vil lyd fra Bluetooth-udstyret afspille
igennem R5. Find yderligere information om lydafspilning fra
Bluetooth-udstyret i udstyrets vejledning.
BEMÆRK: det kan blive nødvendigt at vælge Ruark R5 eller
Bluetooth som lydudgang på udstyret.
Pausér spor
Tryk på , og tryk så igen for at afspille.
Afspil næste/forrige spor
Tryk på for at gå til næste spor i mappen eller albummet,
tryk på for at gå til begyndelsen af det aktuelle spor, og
tryk igen for at gå til forrige spor.
Indstil lydstyrken
Vi anbefaler, at du justerer lydstyrken på dit Bluetooth-udstyr,
så afspilningsvolumenet er omtrent det samme som på andre
kilder. Du kan derefter bruge lydstyrken på din R5 til at justere
den samlede afspilningsvolumen.
Oplysninger om, hvad der afspilles
Kunstner-, album- og spornavn vises, hvis Bluetooth-udstyret
og app'en understøtter Bluetooth-metadata. Du kan også vise
navnet på det tilsluttede udstyr. Vælg det, der skal vises, fra
MENU > Info.
DA-22
Musikafspiller
Musikafspiller giver dig mulighed for at afspille lydler,
der er gemt på en computer på dit netværk, en USB-
hukommelsesstick eller bærbar harddisk.
USB-musikafspiller
For at afspille lyd fra en USB-masselagringsenhed (Skal være
FAT32-format), som f.eks. en USB-Flashstick eller USB-
harddisk, skal den tilsluttes til USB-stikket bag på R5.
Når du først tilslutter en USB-masselagringsenhed, vil din R5
automatisk spørge, om du ønsker at se sporlisten. Hvis du vil
se sporlisten på et andet tidspunkt, vælg .Menu > USB
Netværksmusikafspiller
R5 er fuldt is fuldt DLNA-kompatibel og vil afspille musik, der
er lagret på delte mediebiblioteker eller andet udstyr på dit
netværk. Et delt bibliotek kan være en laptop, smartphone eller
tablet, men det kan også være på en dedikeret musikserver,
som f.eks. et NAS-drev (Network Attached Storage).
De este computere, der bruger Windows, er allerede
kongureret som medieservere og det samme gælder de
este NAS-drivere - nogle routere vil ligeledes fungere som
medieservere. Der er mange apps for Mac, iOS, Linux,
Android, Windows-telefon, Blackberry, Symbian osv., der
vil gøre din MP3-afspiller, smartphone eller tablet til en
musikserver.
For at afspille musik, der er delt af udstyr på dit netværk, vælg
Menu > Shared media. Når R5 har scannet netværket for
delte medier, vil du se en liste over musikservere, der består af
computernavn og delt medienavn som f.eks. <Ruark-Laptop:
Ozzie Music>.
Menuerne efter dette genereres af medieserveren, selvom du
i de este tilfælde vil nde muligheder for at gennemse efter
genre, mappe, kunstner, album osv.
Hvis R5 ikke er tilkoblet et netværk, vil den forsøge at tilkoble.
For yderligere information besøg
www.ruarkaudio.com/support.
Gennemse og afspil musik
Drej for at rulle igennem sporlisterne KONTROLKNAPPEN
og tryk derefter på knappen for at åbne den/det fremhævede
mappe/album eller afspille sporet.
Gå tilbage til forrige skærmbillede ved at trykke på .BACK
Pausér spor
Tryk på , og tryk så igen for at afspille.
Rettighedsbeskyttede WMA- og AAC-spor kan ikke afspilles
på din R5.
DA-24
DLNA mediestreaming
Du kan også streame lyd til din R5 fra en Digital Living
Network Alliance- (DLNA) kompatibel medieserver. Det er,
når du leder efter musik på selve serveren og afspiller den
igennem din R5. Der er mange apps for Mac, iOS, Linux,
Android, Windows-telefon osv., der vil gøre din smartphone,
tablet eller laptop til en DLNA-medieserver. Windows Media
Player har endda en indbygget ‘Play to’-funktion, der gør det
muligt for dig at streame musik, der er gemt på din computer,
direkte til din R5.
Med DLNA-mediestreaming fungerer din R5 som en Digital
Media Renderer (DMR), så du kan lede efter musik på din
smartphone eller laptop og derefter streame det til din R5 over
dit netværk.
R5 vil automatisk skifte til DMR-tilstand, når du vælger din R5*
som afspiller – DMR er ikke en tilstand, der kan vælges med
SOURCE-tasten.
På samme måde vil Spiller nu-information blive styret af
serveren, så der er ikke nogen indstillinger, du kan ændre.
For yderligere information se dokumentationen for dit udstyr
eller app eller besøg www.ruarkaudio.com/support.
DLNA-mediestreaming kræver, at din R5 er tilsluttet til
dit netværk, så vi anbefaler, at du indstiller det til ‘hold
netværksforbindelsen tilkoblet. Se afsnittet Systemindstillinger.

DA-29
DA
Specikationer
Forstærkere og drivere
2 x 75mm neodym hi--drivere
130mm subwoofer
90W klasse AB effektforstærker
Integreret MM phono forforstærker
Forbedret digital 3D-lydprocessor
Tuner
DAB, DAB+ og FM Tuner med RDS
75 Ohm F-type DAB/FM antennestik
CD-afspiller
CD, CD-ROM, CD-R/RW-diske
MP3, WMA, AAC op til 320kbps
Digital audio
Audiophile 32-bit 112dB audio stereo DAC
Internet radio, Spotify Connect, Amazon Music, Deezer, TIDAL,
UPnP™ DLNA
Wi-Fi 802.11b/g/n understøttet WEP-, WPA- og WPA2-sikkerhed
MP3 48kHz 320kbps, AAC 96kHz 320kbps,
FLAC 24-bit 48kHz, WAV 16-bit 48kHz / 24 bit 44.1kHz,
WMA 44.1kHz 320kbps
Bluetooth V4.0, SBC, AAC, A2DP, aptX, aptX HD
Indgange og udgange
MM phono indgang (RCA) 2-8mV
Digital optisk (TOSLINK) 24-bit 192kHz
Line indgang (RCA) 2.3Vrms
Line udgang (RCA) 2.0Vrms
Ethernet (RJ45)
USB 2.0 5W (5V 1A)
3,5mm stereostik, hovedtelefonudgang, 25mW 16-32 Ohm
Strøm
Forsyningsnetindgang 100-120/200-240V AC 50 – 60Hz
Sikring 250V T3,15A
Nominelt forbrug 13W
Standbyforbrug 2,0W
Fysisk
H142 × W520 × D 300mm
Vægt 9,5kg
Specikation og design kan ændres uden forudgående varsel.
Specyfikacje produktu
| Marka: | Ruark Audio |
| Kategoria: | radio |
| Model: | R5 |
Potrzebujesz pomocy?
Jeśli potrzebujesz pomocy z Ruark Audio R5, zadaj pytanie poniżej, a inni użytkownicy Ci odpowiedzą
Instrukcje radio Ruark Audio

29 Września 2024
29 Września 2024
28 Września 2024
28 Września 2024
28 Września 2024
28 Września 2024
28 Września 2024
28 Września 2024
28 Września 2024
28 Września 2024
Instrukcje radio
- radio Sony
- radio Yamaha
- radio AEG
- radio Sven
- radio Motorola
- radio Stabo
- radio Logitech
- radio Sharp
- radio Pioneer
- radio Milwaukee
- radio Philips
- radio SilverCrest
- radio Technics
- radio Bosch
- radio JBL
- radio Onkyo
- radio Easy Home
- radio Scott
- radio Festool
- radio Kärcher
- radio Bose
- radio Panasonic
- radio Muse
- radio SW-Stahl
- radio Nedis
- radio Stanley
- radio Be Cool
- radio Medion
- radio Tangent
- radio Boss
- radio Black & Decker
- radio OK
- radio Lenco
- radio Adler
- radio Marquant
- radio Toshiba
- radio Majestic
- radio Quigg
- radio Jensen
- radio August
- radio ILive
- radio Garmin
- radio Blaupunkt
- radio Terris
- radio Salora
- radio Teac
- radio DeWalt
- radio Dual
- radio Einhell
- radio Grundig
- radio Soundmaster
- radio Hyundai
- radio DAP-Audio
- radio Manhattan
- radio ECG
- radio Matsui
- radio Makita
- radio Denon
- radio Block
- radio Ozito
- radio Audac
- radio Cambridge
- radio Kenwood
- radio Icy Box
- radio Polk
- radio RYOBI
- radio Alpine
- radio Zebra
- radio Cobra
- radio JVC
- radio BLUEPALM
- radio Memphis Audio
- radio Furrion
- radio Moulinex
- radio DEDRA
- radio Oricom
- radio Hilti
- radio Dartel
- radio Lowrance
- radio TechniSat
- radio Auna
- radio Vimar
- radio Schneider
- radio Krüger&Matz
- radio OneConcept
- radio Emos
- radio Renkforce
- radio Pure
- radio BaseTech
- radio Uniden
- radio Clarion
- radio Thomson
- radio La Crosse Technology
- radio Velleman
- radio Ferguson
- radio Fusion
- radio Intertechno
- radio DreamGEAR
- radio Manta
- radio Pyle
- radio NGS
- radio CRUX
- radio Midland
- radio Sennheiser
- radio Camry
- radio Lenoxx
- radio Imperial
- radio Monitor Audio
- radio Audio Pro
- radio Nevir
- radio TriStar
- radio Bogen
- radio ION
- radio Delta
- radio Harman Kardon
- radio Audio-Technica
- radio Maginon
- radio SPC
- radio GoGen
- radio Sonoro
- radio Parrot
- radio Aiwa
- radio JL Audio
- radio AKAI
- radio Sanyo
- radio ICOM
- radio Acoustic Energy
- radio Majority
- radio Teufel
- radio Clatronic
- radio Tronic
- radio Telefunken
- radio Oregon Scientific
- radio Viper
- radio Kicker
- radio Aluratek
- radio Omnitronic
- radio Olympia
- radio Hama
- radio Duronic
- radio Sagemcom
- radio Bush
- radio Schwaiger
- radio Sangean
- radio Navman
- radio Hager
- radio Victrola
- radio Elta
- radio Mac Audio
- radio Infinity
- radio Denver
- radio Albrecht
- radio Hitachi
- radio Hertz
- radio Emerson
- radio Craftsman
- radio Busch-Jaeger
- radio RCA
- radio Klein Tools
- radio Futaba
- radio Trevi
- radio Technaxx
- radio Xhdata
- radio Sirius
- radio Lexibook
- radio GPX
- radio Topcom
- radio PowerPlus
- radio Sencor
- radio Noxon
- radio Vonroc
- radio Tesco
- radio HiKOKI
- radio EasyMaxx
- radio Power Dynamics
- radio Tecsun
- radio Alecto
- radio Kathrein
- radio Binatone
- radio Rockford Fosgate
- radio JUNG
- radio Timex
- radio Monacor
- radio Daewoo
- radio Audizio
- radio Laser
- radio Kunft
- radio Roberts
- radio H-Tronic
- radio Porter-Cable
- radio Metabo
- radio Weather X
- radio MAAS
- radio Terratec
- radio Axxess
- radio Cotech
- radio Vitek
- radio Geneva
- radio Clas Ohlson
- radio Reflexion
- radio Sogo
- radio REVO
- radio Crosley
- radio Proline
- radio Schaub Lorenz
- radio Artsound
- radio Data-Tronix
- radio AMX
- radio Swan
- radio Argon
- radio Brennenstuhl
- radio Tevion
- radio GPO
- radio Caliber
- radio Exibel
- radio Logik
- radio Telestar
- radio Sagem
- radio Brigmton
- radio Sunstech
- radio GlobalTronics
- radio Nordmende
- radio AudioAffairs
- radio Steren
- radio Audiosonic
- radio Coby
- radio Envivo
- radio Bigben Interactive
- radio Technoline
- radio Audiovox
- radio Yaesu
- radio MB Quart
- radio Switel
- radio Bigben
- radio Sunwind
- radio Alba
- radio Naxa
- radio Lexon
- radio Ricatech
- radio Konig
- radio Boston Acoustics
- radio Mpman
- radio Sweex
- radio Ices
- radio Nikkei
- radio PerfectPro
- radio Peaq
- radio Freecom
- radio Roadstar
- radio Gira
- radio Dnt
- radio Balance
- radio MT Logic
- radio Difrnce
- radio HQ
- radio Noveen
- radio Irradio
- radio Karcher Audio
- radio PAC
- radio IHome
- radio AIC
- radio Ruarkaudio
- radio Tivoli Audio
- radio Go Green
- radio Wolfgang
- radio Linn
- radio Numan
- radio Iluv
- radio TELEX
- radio Aconatic
- radio Multiplex
- radio Clint
- radio Soundstream
- radio Xoro
- radio Zolid
- radio Berker
- radio Woxter
- radio View Quest
- radio Harley Davidson
- radio Hitec
- radio Orava
- radio Brionvega
- radio Wet Sounds
- radio Eissound
- radio Dcybel
- radio JGC
- radio Scansonic
- radio TFA Dostmann
- radio Audisse
- radio Tivoli
- radio ETON
- radio Kruger Matz
- radio Equity
- radio EKO
- radio Pinell
- radio Videologic
- radio Mtx Audio
- radio Aquatic AV
- radio Roswell
- radio Intek
- radio Digitalbox
- radio Whistler
- radio Xact
- radio Magnavox
- radio Digitech
- radio GME
- radio NUVO
- radio Narex
- radio Tiny Audio
- radio R-MUSIC
- radio E-bench
- radio Konig Electronic
- radio Peha
- radio SiriusXM
- radio Sanwa
- radio Sailor
- radio SSV Works
- radio Microlab
- radio QFX
- radio Voxx
- radio SACK It
- radio BasicXL
- radio Roth
- radio Ices Electronics
- radio AmpliVox
- radio Elbe
- radio GBS Elettronica
- radio Sang
- radio Gewiss
- radio Lutron
- radio Retekess
- radio Wintal
- radio Acoustic Solutions
- radio Atlantis Land
- radio Ranger
- radio Mebby
- radio Blonder Tongue
- radio Yamazen
- radio MOOOV
- radio RoadKing
Najnowsze instrukcje dla radio
2 Kwietnia 2025
2 Kwietnia 2025
1 Kwietnia 2025

1 Kwietnia 2025
1 Kwietnia 2025
29 Marca 2025
26 Marca 2025

24 Marca 2025
14 Marca 2025
11 Marca 2025