Instrukcja obsługi SEADA GM9
Przeczytaj poniżej 📖 instrukcję obsługi w języku polskim dla SEADA GM9 (2 stron) w kategorii edytor. Ta instrukcja była pomocna dla 13 osób i została oceniona przez 2 użytkowników na średnio 4.5 gwiazdek
Strona 1/2
GM9 Quick Start Manual
SD- -0 1 MA 32 V0
Note
1. Do not fix the device to any surface which is a heat source avoid over heating to
2. Do not cover the surface or ventilation grills of the device avoid over heating to
1. Verify the package contents
Please verify the package contents against the list below
1. GM9 Controller 1
2. Power Adapter 1
3. Ethernet Cable 1
4. GM9 Quick Start Manual 1
5. RS232 RJ45 to Serial Port Cable 1
6. Download Guide Card 1
If any of the items in the packing list are missing, please contact your reseller.
2. Set up the GM9
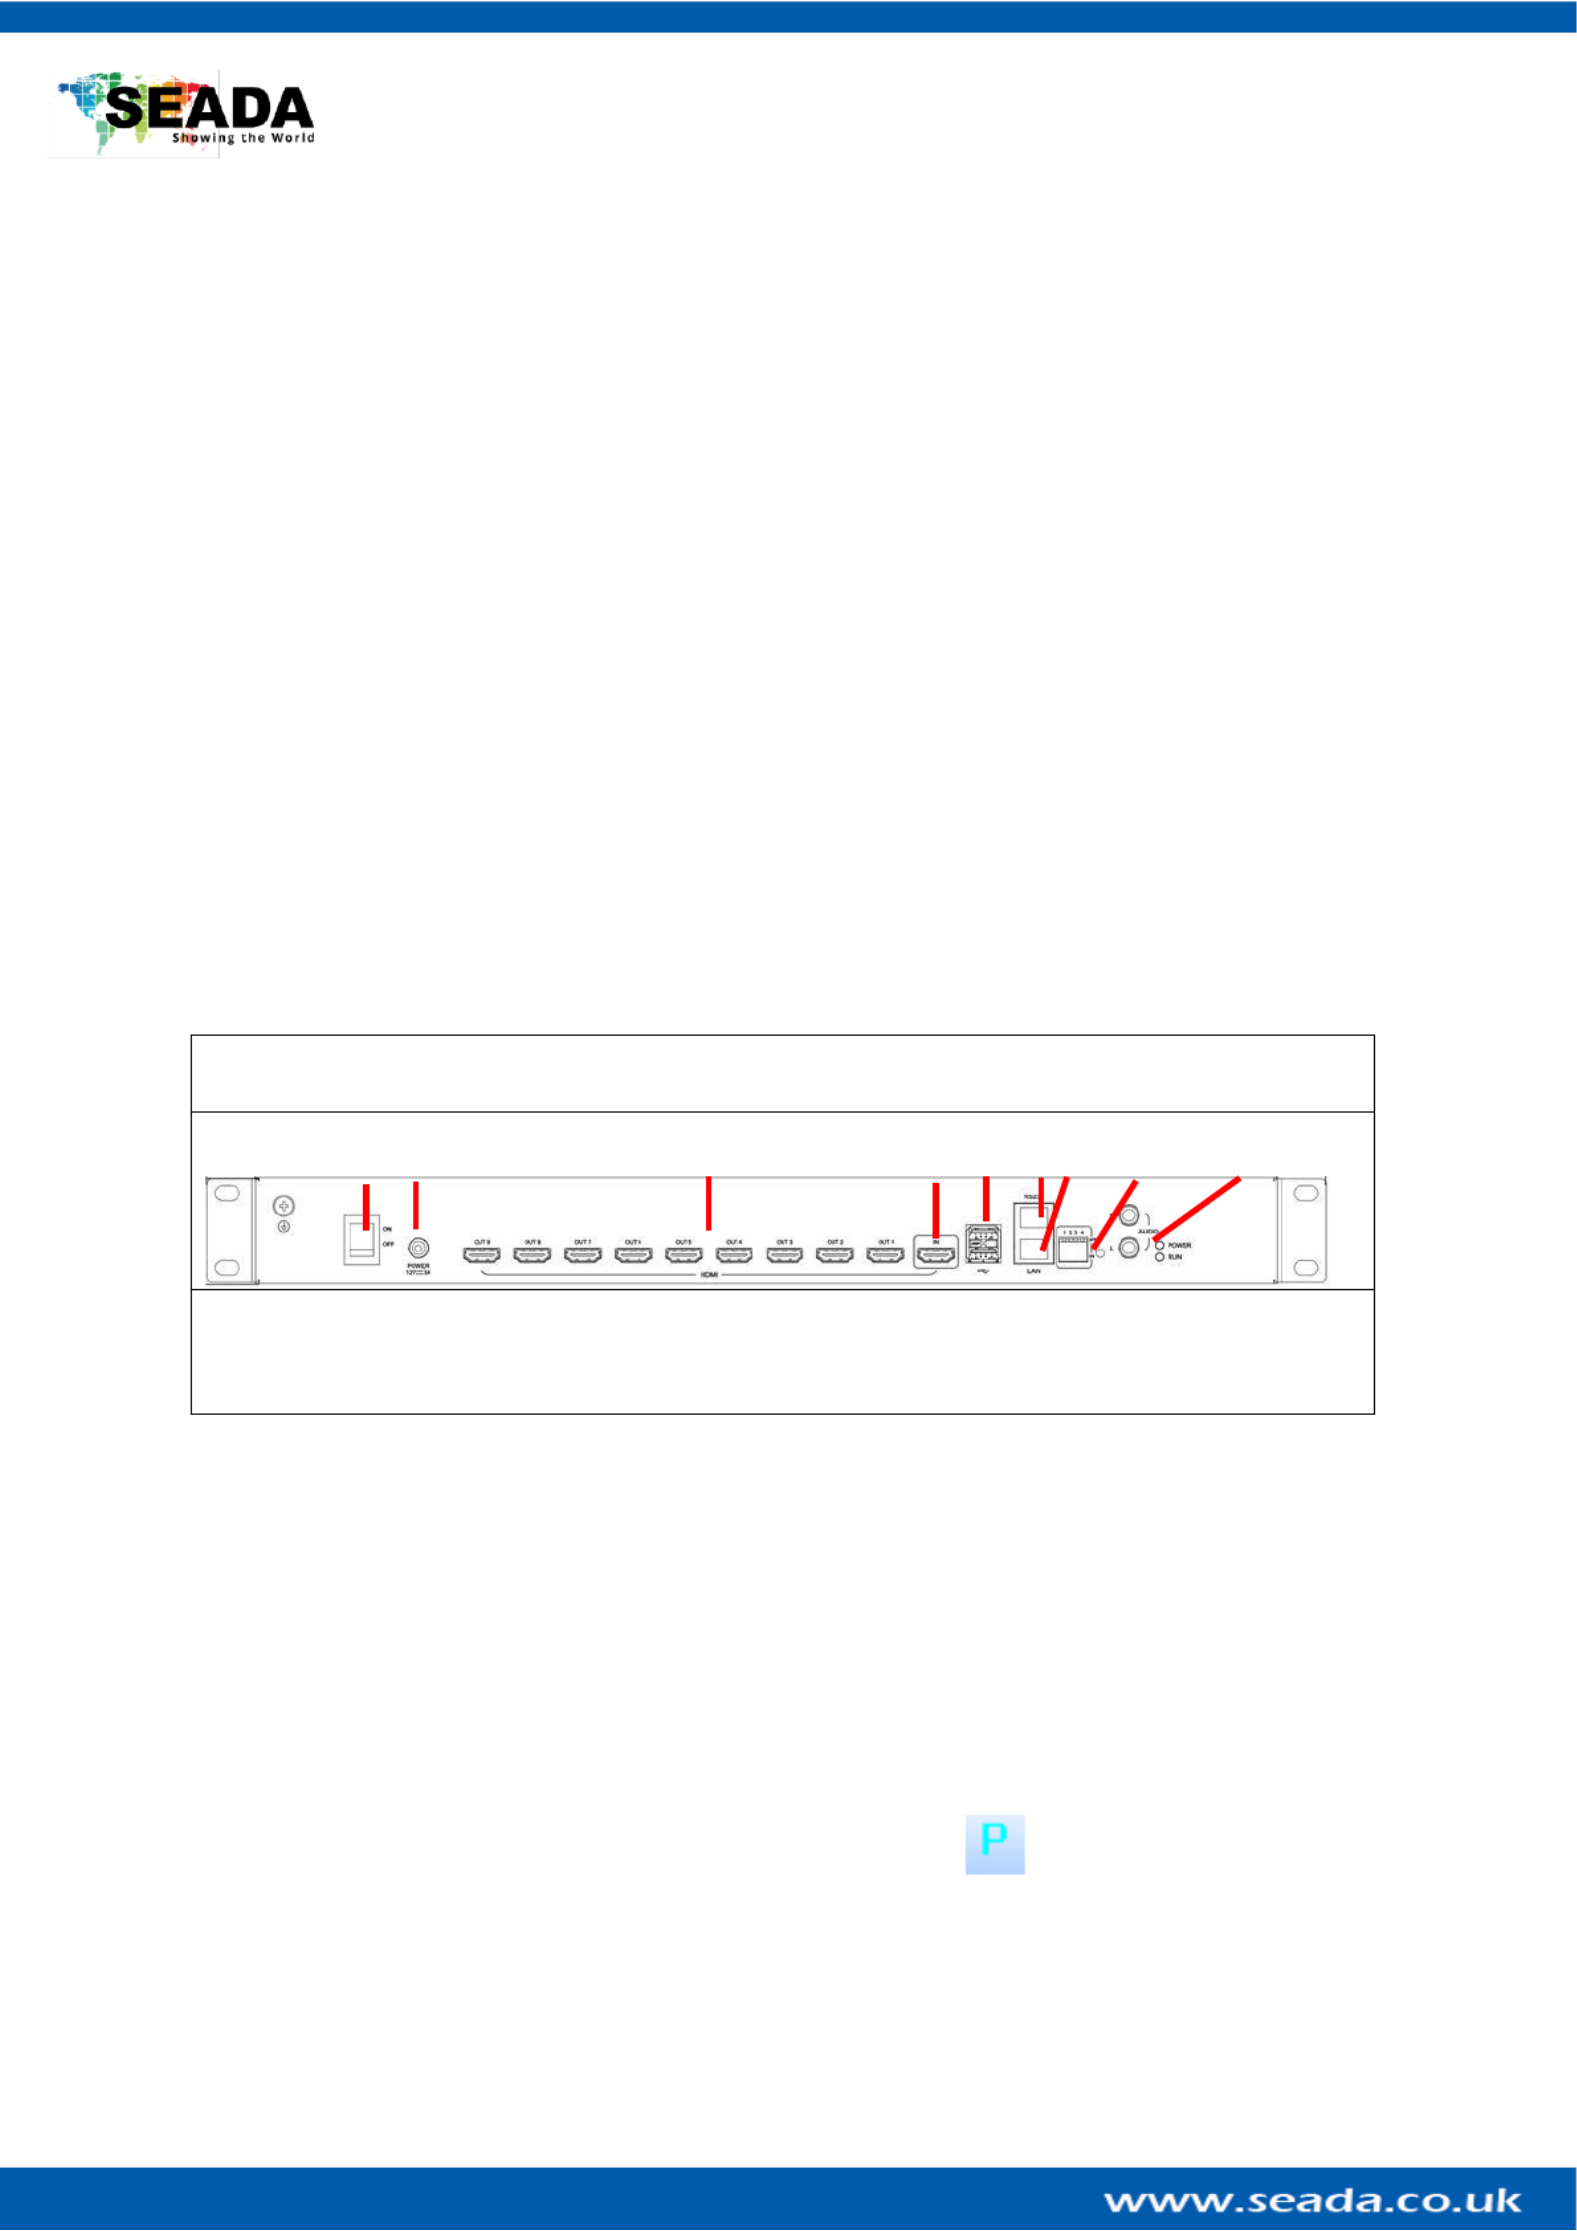
Power up the GM9 controller and connect the input and outputs to correct devices.
GM9
❶ ❷ ❸ ❹ ❺ ❻❼ ❽ ❾
1 4 – Power Switch – – HDMI Input 7 Ethernet RJ45 Port
2 – – Power Connector 5 USB 3.0 Ports 8 - Dipswitches
3 9 – – HDMI Outputs 6 RS232 RJ45 Port – RCA Audio Output
Figure 1
3. Connect through IP in ‘Device’
The default IP address for GM9 controller is Users need to change the IP address of 192.168.1.236.
control PC to the same IP group of G M9.
• Change the ‘Obtain an IP address automatically’ to ‘Use the following IP address’ to set up a static
IP address of TCP/IPv4 in Ethernet Properties
➢ IP address: any address between and except the address 192.168.1.2 192.168.1.253
which has been taken by the GM9
➢ Subnet mask: Default Gateway: 255.255.255.0, 192.168.1.254
• Once the control PC IP address having been set up, connect PC to the LAN RJ45 port of the GM9
controllers via a network cable and then press the button (or Connection -> Player
Connection Settings) and wait for the scan to complete Select the device and press .
connect

GM9 Quick Start Manual
SD- -0 1 MA 32 V0
4. Configuration
To configure the GM9, either press the System Setup button or navigate to Configuration - > System
Settings.
• Select the correct size screen from the Output
Selection dropdown menu at the top of the
screen. If you can’t find the monitor make and
model, you can click on and create a new one with your dimensions. Edit
• Add the number of screens you want to the video wall by
double clicking on the screens in the Add Outputs section.
Keep in mind that the GM9 can support up to 2 video
walls. After you are done press Add Outputs to Wall
• Once you add the screens make sure you rearrange them
to the specifications of your video wall from the
Row and section below and click Column
Rearrange.
• You can adjust the angle of the screens by selecti the degrees you want to rotate your screens and ng at
pressing for clockwise and for anti-clockwise. If you +–
want to fine tune and adjust in smaller increments. Press
“ ” and “ ” for increments of 1 degree< >
5. Displaying a signal
There are 2 ways to display a signal on the GM9 through the built- media player –in
or through the input.
• To play something through the built-in media player, navigate to the Video
Source Settings (Video -> Video Source Settings) or
• Upload a video by selecting “Send video file” to send one file or “Send video
folder” to
• send a whole folder. After you have uploaded your video just press the
button “Play video on screen”
• If you want to display the local input instead of the built-in media player,
then all you need to do is connect your source to the input port of the GM9
and use one of the many frames from the software. If you would not like to
have a frame and simply display the input, you can select the “invisible
frame ourth frame from top to bottom). To display a frame simply drag ”(f
and drop from the frame selection to the video wall. To delete a frame select
it and press “delete” on your keyboard or you can use the buttons on the toolbar
This quick start guide provides basic instructions for setting up SEADA GM9 Creative Video Wall controllers. For
additional information about how to use the controllers, please refer to the GM9 User Guide (SD- -0 )MA 31 , which
is available on .seada.co.uk. www
Specyfikacje produktu
| Marka: | SEADA |
| Kategoria: | edytor |
| Model: | GM9 |
Potrzebujesz pomocy?
Jeśli potrzebujesz pomocy z SEADA GM9, zadaj pytanie poniżej, a inni użytkownicy Ci odpowiedzą
Instrukcje edytor SEADA

3 Października 2024
3 Października 2024
3 Października 2024
3 Października 2024
3 Października 2024
3 Października 2024
3 Października 2024
3 Października 2024
3 Października 2024
3 Października 2024
Instrukcje edytor
- edytor Yamaha
- edytor Lenovo
- edytor Hikvision
- edytor Fujitsu
- edytor Roland
- edytor Bose
- edytor Asus
- edytor Allen & Heath
- edytor Black & Decker
- edytor HP
- edytor Heritage Audio
- edytor Shure
- edytor Phoenix Gold
- edytor Alpine
- edytor Datapath
- edytor Digitus
- edytor LD Systems
- edytor DataVideo
- edytor Pyle
- edytor Zoom
- edytor Bogen
- edytor Alto
- edytor ART
- edytor TC Helicon
- edytor Vivolink
- edytor Eventide
- edytor DBX
- edytor Lindell Audio
- edytor Smart-AVI
- edytor Ashly
- edytor Atlas Sound
- edytor Gefen
- edytor Radial Engineering
- edytor Arturia
- edytor Lectrosonics
- edytor Blackmagic Design
- edytor TOA
- edytor Neutrik
- edytor Tascam
- edytor SPL
- edytor Alfatron
- edytor BSS Audio
- edytor Chandler
- edytor KanexPro
- edytor Kopul
- edytor BZBGear
- edytor RGBlink
- edytor CEDAR
- edytor Rupert Neve Designs
- edytor AMX
- edytor Dangerous Music
- edytor Summit Audio
- edytor Matrox
- edytor Intel
- edytor Fredenstein
- edytor QSC
- edytor Golden Age Project
- edytor DAS Audio
- edytor Noise Engineering
- edytor Sonifex
- edytor Solid State Logic
- edytor Black Lion Audio
- edytor Mathew Lane
- edytor Warm Audio
- edytor Drawmer
- edytor SIIG
- edytor Manley
- edytor MuxLab
- edytor Helix
- edytor Christie
- edytor Rane
- edytor AMD
- edytor Lexicon
- edytor Empirical Labs
- edytor AudioThing
- edytor Avenview
- edytor Audibax
- edytor FabFilter
- edytor Metric Halo
- edytor Henry Engineering
- edytor MyMix
- edytor Decimator
- edytor GeoBox
- edytor AuviTran
Najnowsze instrukcje dla edytor
3 Kwietnia 2025
19 Marca 2025
26 Lutego 2025
20 Lutego 2025
20 Lutego 2025
20 Lutego 2025
20 Lutego 2025
20 Lutego 2025
20 Lutego 2025
20 Lutego 2025