Instrukcja obsługi Readynet WRT300N-RN
Przeczytaj poniżej 📖 instrukcję obsługi w języku polskim dla Readynet WRT300N-RN (2 stron) w kategorii router. Ta instrukcja była pomocna dla 15 osób i została oceniona przez 2 użytkowników na średnio 4.5 gwiazdek
Strona 1/2
Quick Installation Guide
WRT300N-rn
Wireless Router
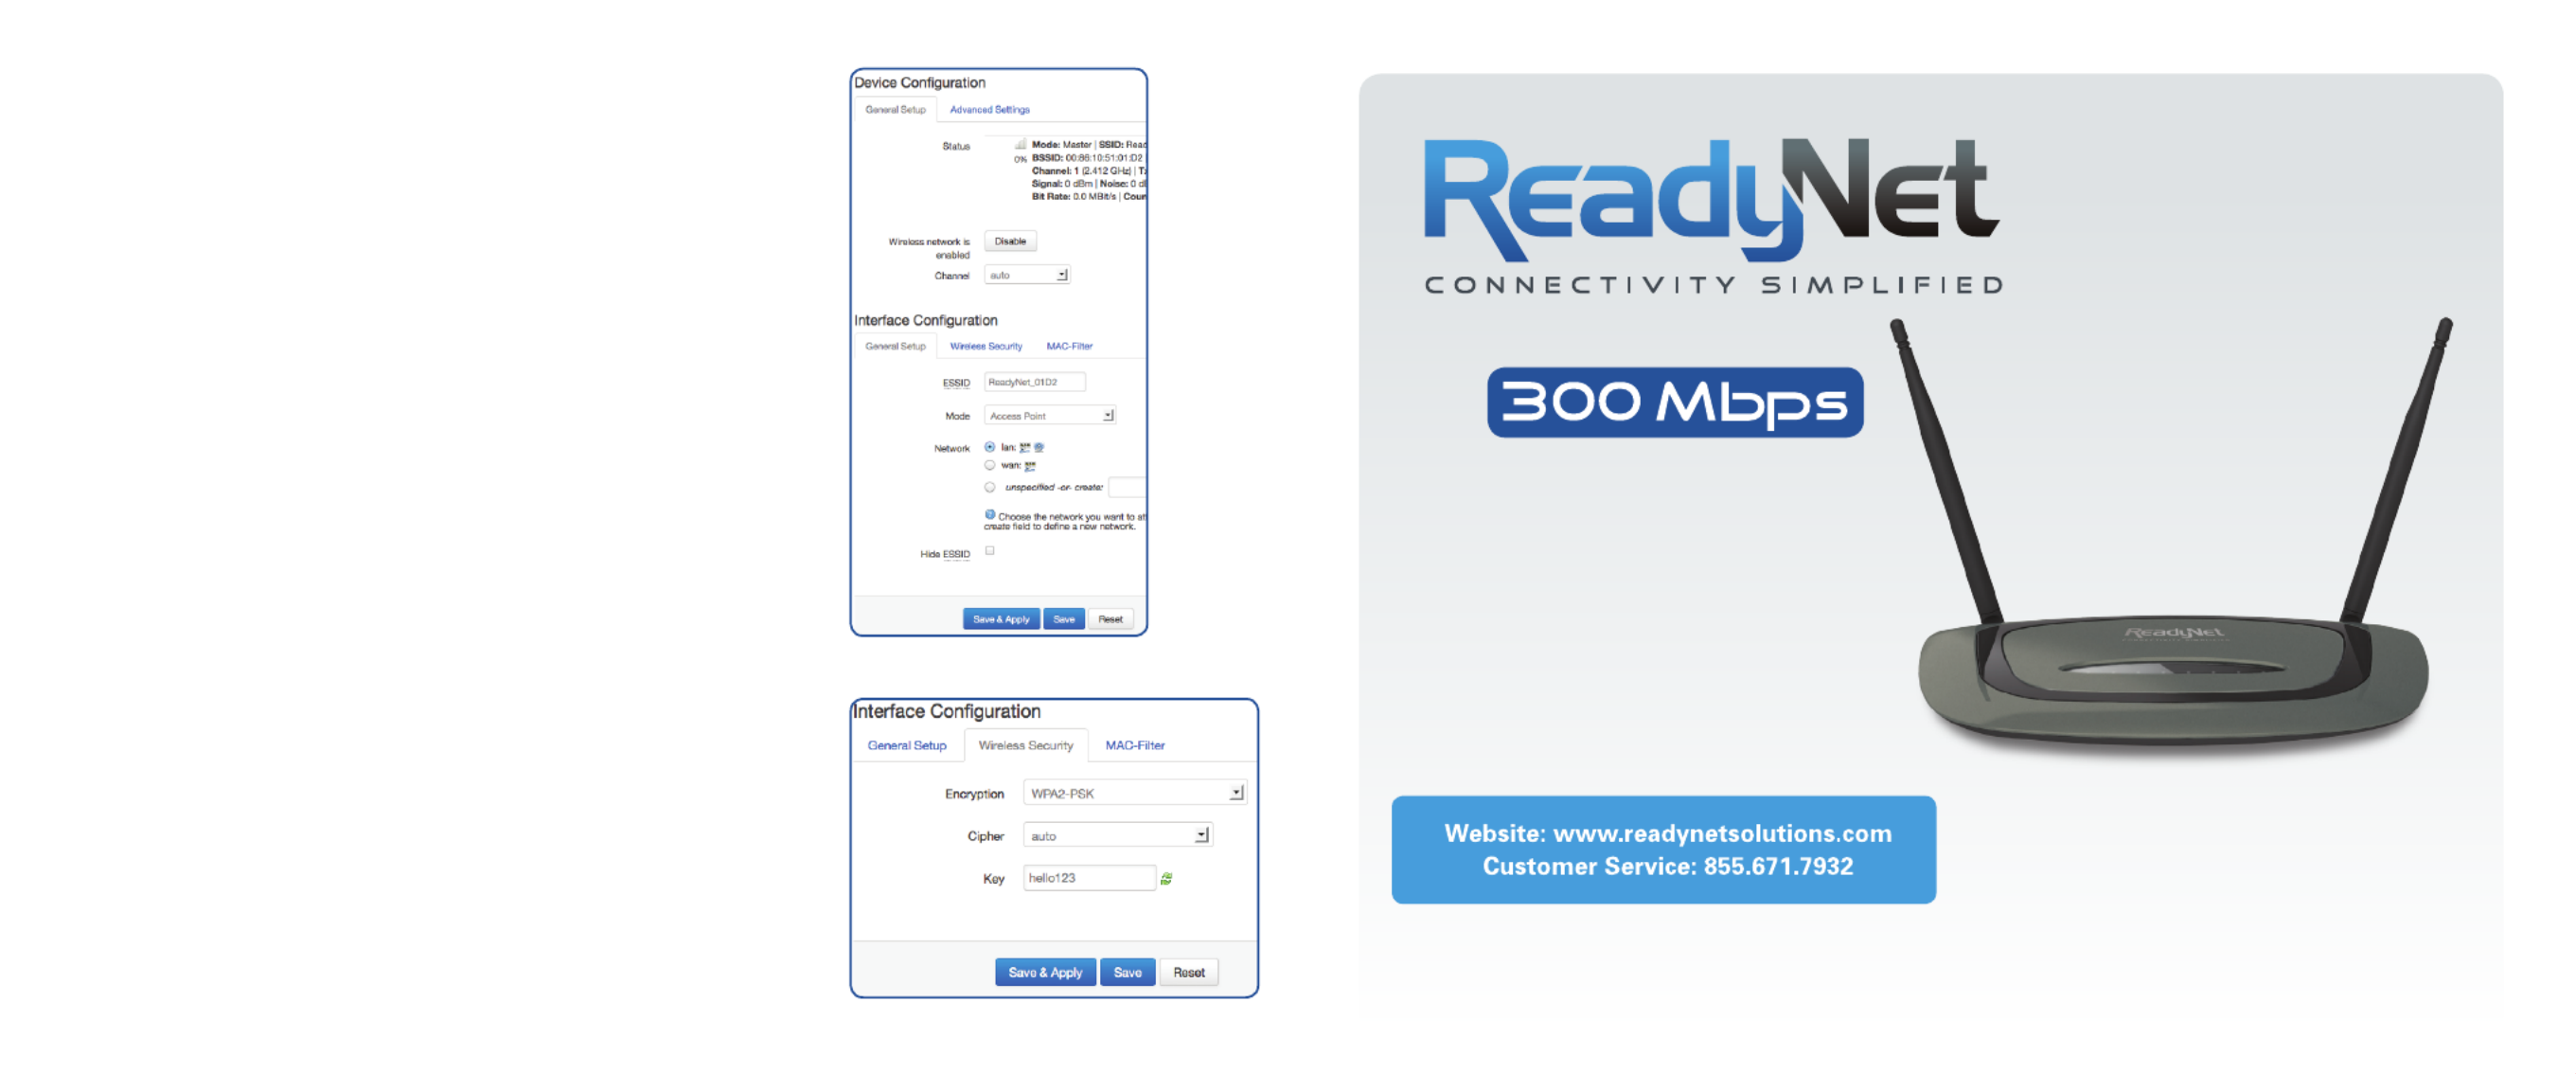
Step 2: Basic Wireless Settings
The pre-configured settings on this page
will be appropriate for most settings. You might want to change the
Network Name (ESID) and Frequency (Channel) fields. Click ‘Network’
and then ‘Wifi’. In the ‘Wireless Overview’ section click the ‘Edit’
button. To change the wireless channel from ‘auto’, change the
‘Channel’ field in the ‘Device Configuration’ field. To edit the
Wireless broadcast ID, change the ESSID field in the
‘Interface Configuration’ section.
Step 3: Wireless Security Setup
This final step allows you to prevent unauthorized use of your wireless
network by configuring an encryption method and a pass-phrase that
only you know. If, for example, you want to use WPA2-PSK as the
Security mode, automatic cipher, and hello123 as the pass-phrase,
your setting would be like figure 4.
Now click the ‘Save & Apply’ button.
D. Setting Up Your Wireless Devices
Your wireless devices (desktop, laptop, iPad, smart-phone, etc.) must be
configured to work with your wireless router. Each of these devices must
have an internal or external wireless adapter and applicable drivers.
User guides for each of these devices should have instructions for
wireless set up. You will need the SSID and password you assigned
to this wireless router during router set up. For each wireless device,
access the setup menu, choose the appropriate SSID from the list of
wireless networks, enter your password, and test the wireless connection.
Figure 3
Figure 4

B. Log Into Your WRT300N-RN Router
1. The network settings of your computer
operating system must be set to automatically
obtain an IP address and to automatically
obtain a DNS Server Address.
2. Type in the Address field “http://192.168.11.1”
of your web browser and press the “Enter” key.
A User Name and Password dialog box will
appear. The default User Name is “root” and
the default password is “pz938q”. Enter the
user name and password then click the
“Login” button.
Note: The default wireless IP address for the wireless router is and the default is 192.168.11.1 Subnet Mask
255.255.255.0
C. Configure Your
WRT300N-RN Router
1. WAN Connection Protocol
The default WAN connection
Protocol is ‘DHCP Client’. Continue
with this step only if you need to
use a WAN connection protocol
other than ‘DHCP Client’. To change
the WAN connection protocol click
the ‘Network’ link and then the
‘Interfaces’ link. Click the ‘Edit’ button
next to the WAN network. Change
the ‘Protocol’ field to suit your needs
and then click ‘Switch Protocol’. Finally
you might need to enter protocol
specific settings given to you by your
ISP. Click ‘Save & Apply’
A. Connect the WRT300N-RN Router to Your Computer
1. To set up your router for the
first time, please connect the
router to your desktop or laptop
computer as shown in the
following diagram. Your
broadband Internet access will
generally be from a cable modem,
ADSL modem, or similar device.
2. After the hardware connections have
been completed, check the status of the LED
Indicators using the following table:
Note: If the LED indicator is not displaying a “Normal Status” as described in the table above, please check the
associated hardware and connections.
Safety Notice
• Thedeviceshouldbeplacedonaathorizontalsurface,orsecuredsafelytoawall.
• Operateequipmentawayfromheatsources.
• Providegoodairventilation.
• Keepawayfromwateranddampareas.
• Disconnectpowerfromthedeviceduringseverethunderstorms.
• UseonlytheincludedACpoweradapter.
• Keeprouteratleast20cmawayfrompeopletoreduceexposuretoradiofrequencyemissions.
LED Indicator Description Normal Status
PWR Power Status Indicator Steady Light
RUN Operating System Status Indicator Steady Light
NET Booted Status Indicator Steady Light or Flashing
Wireless Status Indicator Steady Light or Flashing
WAN Broadband Network Status Indicator Steady Light or Flashing
LAN 1-4 LAN Indicator Steady Light or Flashing
Broadband
Internet
Acess
WAN
POWER
LAN
Desktop PC
Figure 1
Figure 2
Specyfikacje produktu
| Marka: | Readynet |
| Kategoria: | router |
| Model: | WRT300N-RN |
Potrzebujesz pomocy?
Jeśli potrzebujesz pomocy z Readynet WRT300N-RN, zadaj pytanie poniżej, a inni użytkownicy Ci odpowiedzą
Instrukcje router Readynet

25 Września 2024
25 Września 2024
25 Września 2024
Instrukcje router
- router Samsung
- router Tenda
- router AEG
- router Motorola
- router Xiaomi
- router Huawei
- router TCL
- router TP-Link
- router Milwaukee
- router Gigabyte
- router Acer
- router Bosch
- router Hikvision
- router Roland
- router Nokia
- router Toolcraft
- router Festool
- router EZVIZ
- router Conceptronic
- router StarTech.com
- router Asus
- router Medion
- router Black & Decker
- router TRENDnet
- router MSI
- router D-Link
- router ATen
- router Siemens
- router Thrustmaster
- router DeWalt
- router Einhell
- router Alcatel
- router Sigma
- router HP
- router Teltonika
- router Silverline
- router Manhattan
- router Strong
- router Makita
- router Mikrotik
- router Cisco
- router Moxa
- router Synology
- router Gembird
- router ZTE
- router Lindy
- router Zebra
- router ZyXEL
- router Trust
- router LogiLink
- router Dell
- router IFM
- router Linksys
- router Google
- router Digitus
- router Vimar
- router Dahua Technology
- router Schneider
- router Kyocera
- router Sabrent
- router AVMATRIX
- router Renkforce
- router Netgear
- router Thomson
- router AVM
- router BT
- router Totolink
- router Black Box
- router Güde
- router Apple
- router Lancom
- router Zoom
- router Iogear
- router Intellinet
- router Devolo
- router Vtech
- router Mercusys
- router I-TEC
- router Draytek
- router Edimax
- router Razer
- router AirLive
- router EnGenius
- router Planet
- router NEC
- router Blustream
- router LevelOne
- router Digi
- router Milesight
- router Rocstor
- router Hama
- router Ubiquiti Networks
- router Western Digital
- router ModeCom
- router Smart-AVI
- router Barco
- router Sagemcom
- router Juniper
- router Cudy
- router QNAP
- router Arris
- router Netis
- router Anker
- router Allnet
- router Marshall Electronics
- router Hitachi
- router M-life
- router AJA
- router Media-Tech
- router BenQ
- router Atlona
- router FSR
- router Gefen
- router Vivanco
- router Topcom
- router PowerPlus
- router HiKOKI
- router Blackmagic Design
- router Kathrein
- router JUNG
- router Foscam
- router Alfa
- router Porter-Cable
- router Metabo
- router Starlink
- router Keewifi
- router Digital Forecast
- router Keenetic
- router SPL
- router Cotech
- router Skil
- router Alfatron
- router Digitalinx
- router Clas Ohlson
- router KPN
- router Belkin
- router Kramer
- router KanexPro
- router Kopul
- router BZBGear
- router RGBlink
- router Key Digital
- router UPC
- router Lumantek
- router Allied Telesis
- router Actiontec
- router Proximus
- router Eminent
- router Sitecom
- router Sagem
- router Nilox
- router Sonos
- router Patton
- router Techly
- router Envivo
- router Buffalo
- router Nest
- router Vodafone
- router ICIDU
- router Milan
- router Konig
- router AT&T
- router Sweex
- router Aruba
- router Phicomm
- router Kasda
- router Technicolor
- router Verizon
- router Billion
- router T-Mobile
- router RAVPower
- router Hawking Technologies
- router Nexxt
- router WyreStorm
- router Beafon
- router Kraun
- router LTS
- router Zolid
- router Telstra
- router Holzmann
- router SIIG
- router Eero
- router Advantech
- router Mercku
- router Hercules
- router Xantech
- router Intelix
- router MuxLab
- router Pentagram
- router Ocean Matrix
- router Comprehensive
- router Arcadyan
- router Digiconnect
- router Ubee
- router SMC
- router Tele 2
- router Kogan
- router Peak
- router CradlePoint
- router Davolink
- router Sixnet
- router AVPro Edge
- router Evolution
- router 7inova
- router Predator
- router A-NeuVideo
- router United Telecom
- router F-Secure
- router Rosewill
- router Digicom
- router On Networks
- router Wisetiger
- router Leoxsys
- router OneAccess
- router Accelerated
- router Nexaira
- router Hamlet
- router Approx
- router T-com
- router Amped Wireless
- router Cambium Networks
- router 3Com
- router Avenview
- router Ruckus Wireless
- router Dovado
- router Mach Power
- router EXSYS
- router NetComm
- router Comtrend
- router Premiertek
- router Bea-fon
- router GL.iNet
- router Shinybow
- router Edgewater
- router Atlantis Land
- router Lantronix
- router PulseAudio
- router Luxul
- router DVDO
- router StarIink
- router Silentwind
- router Keezel
- router VigilLink
Najnowsze instrukcje dla router
9 Kwietnia 2025
9 Kwietnia 2025

8 Kwietnia 2025

3 Kwietnia 2025

2 Kwietnia 2025
1 Kwietnia 2025
30 Marca 2025
30 Marca 2025
30 Marca 2025
30 Marca 2025