Instrukcja obsługi AMX NXA-WAPZD1100
Przeczytaj poniżej 📖 instrukcję obsługi w języku polskim dla AMX NXA-WAPZD1100 (2 stron) w kategorii Kontroler. Ta instrukcja była pomocna dla 8 osób i została oceniona przez 2 użytkowników na średnio 4.5 gwiazdek
Strona 1/2
Installation Guide
NXA-WAPZD1100 ZoneDirector Smart WLAN Controller
Overview
The NXA-WAPZD1100 (FG2255-75) is a centrally managed wireless LAN (WLAN)
controller for homes and business using multiple NXA-WAP1000 Wireless Access
Points, that delivers exceptional performance by integrating the Ruckus Smart/OS
application engine. It delivers advanced features such as smart wireless meshing,
hotspot authentication, elegant guest networking and dynamic Wi-Fi security.
Redundant and secure, the AMX ZoneDirector provides WLAN-wide network,
security, RF and location management within a single, easy-to-use and affordable
WLAN system.
Common Applications
Ideal for homes and businesses that require a robust and secure WLAN that can be
easily deployed, centrally managed and automatically tuned. The NXA-WAP1000 is
perfect for environments where high bandwidth applications such as video streaming
are accessed simultaneously from several wireless devices such as iPads, laptops,
and gaming consoles.
Features
•Configure and Install in Minutes - Automatically discovers and configures AMX
NXA-WAP1000 Wireless Access Points making them instantly manageable.
•Smart Wireless Mesh Networking - Simplifies deployment and reduces
installation cost by eliminating the need to run Ethernet cable to every AMX
NXA-WAP1000.
•Automatically Adapts to Wi-Fi Signal Changes in Real-time - The SmartMesh
Networking is self-organizing, self-optimizing, and self-healing to provide
maximum performance and reliability.
•Complete Centralized WLAN Control - Dynamically controls the RF channel
assignment and transmit power level for each NXA-WAP1000 Wireless Access
Point.
•Integrated Wi-Fi Client Performance Tools - Ruckus SpeedFlex™ allows
administrators to locally or remotely determine client Wi-Fi performance over the
wireless LAN to improve troubleshooting.
•Secure Admission Control Across the WLAN - The NXA-WAP1000 centralizes
authentication and authorization decisions for all access points.
•Automatic User Security - Supports Ruckus's patent-pending Dynamic
Pre-Shared Key (PSK) capability eliminating the requirement to configure and
update individual PC client devices with unique encryption keys.
Power Adapter Compatibility
The NXA-WAPZD1100 is shipped with an appropriate power adapter for the country in
which it is to be used:
• FG2255-75: Includes US Power Adapter for use in US, Canada, Colombia,
Ecuador, Mexico
Product Specifications
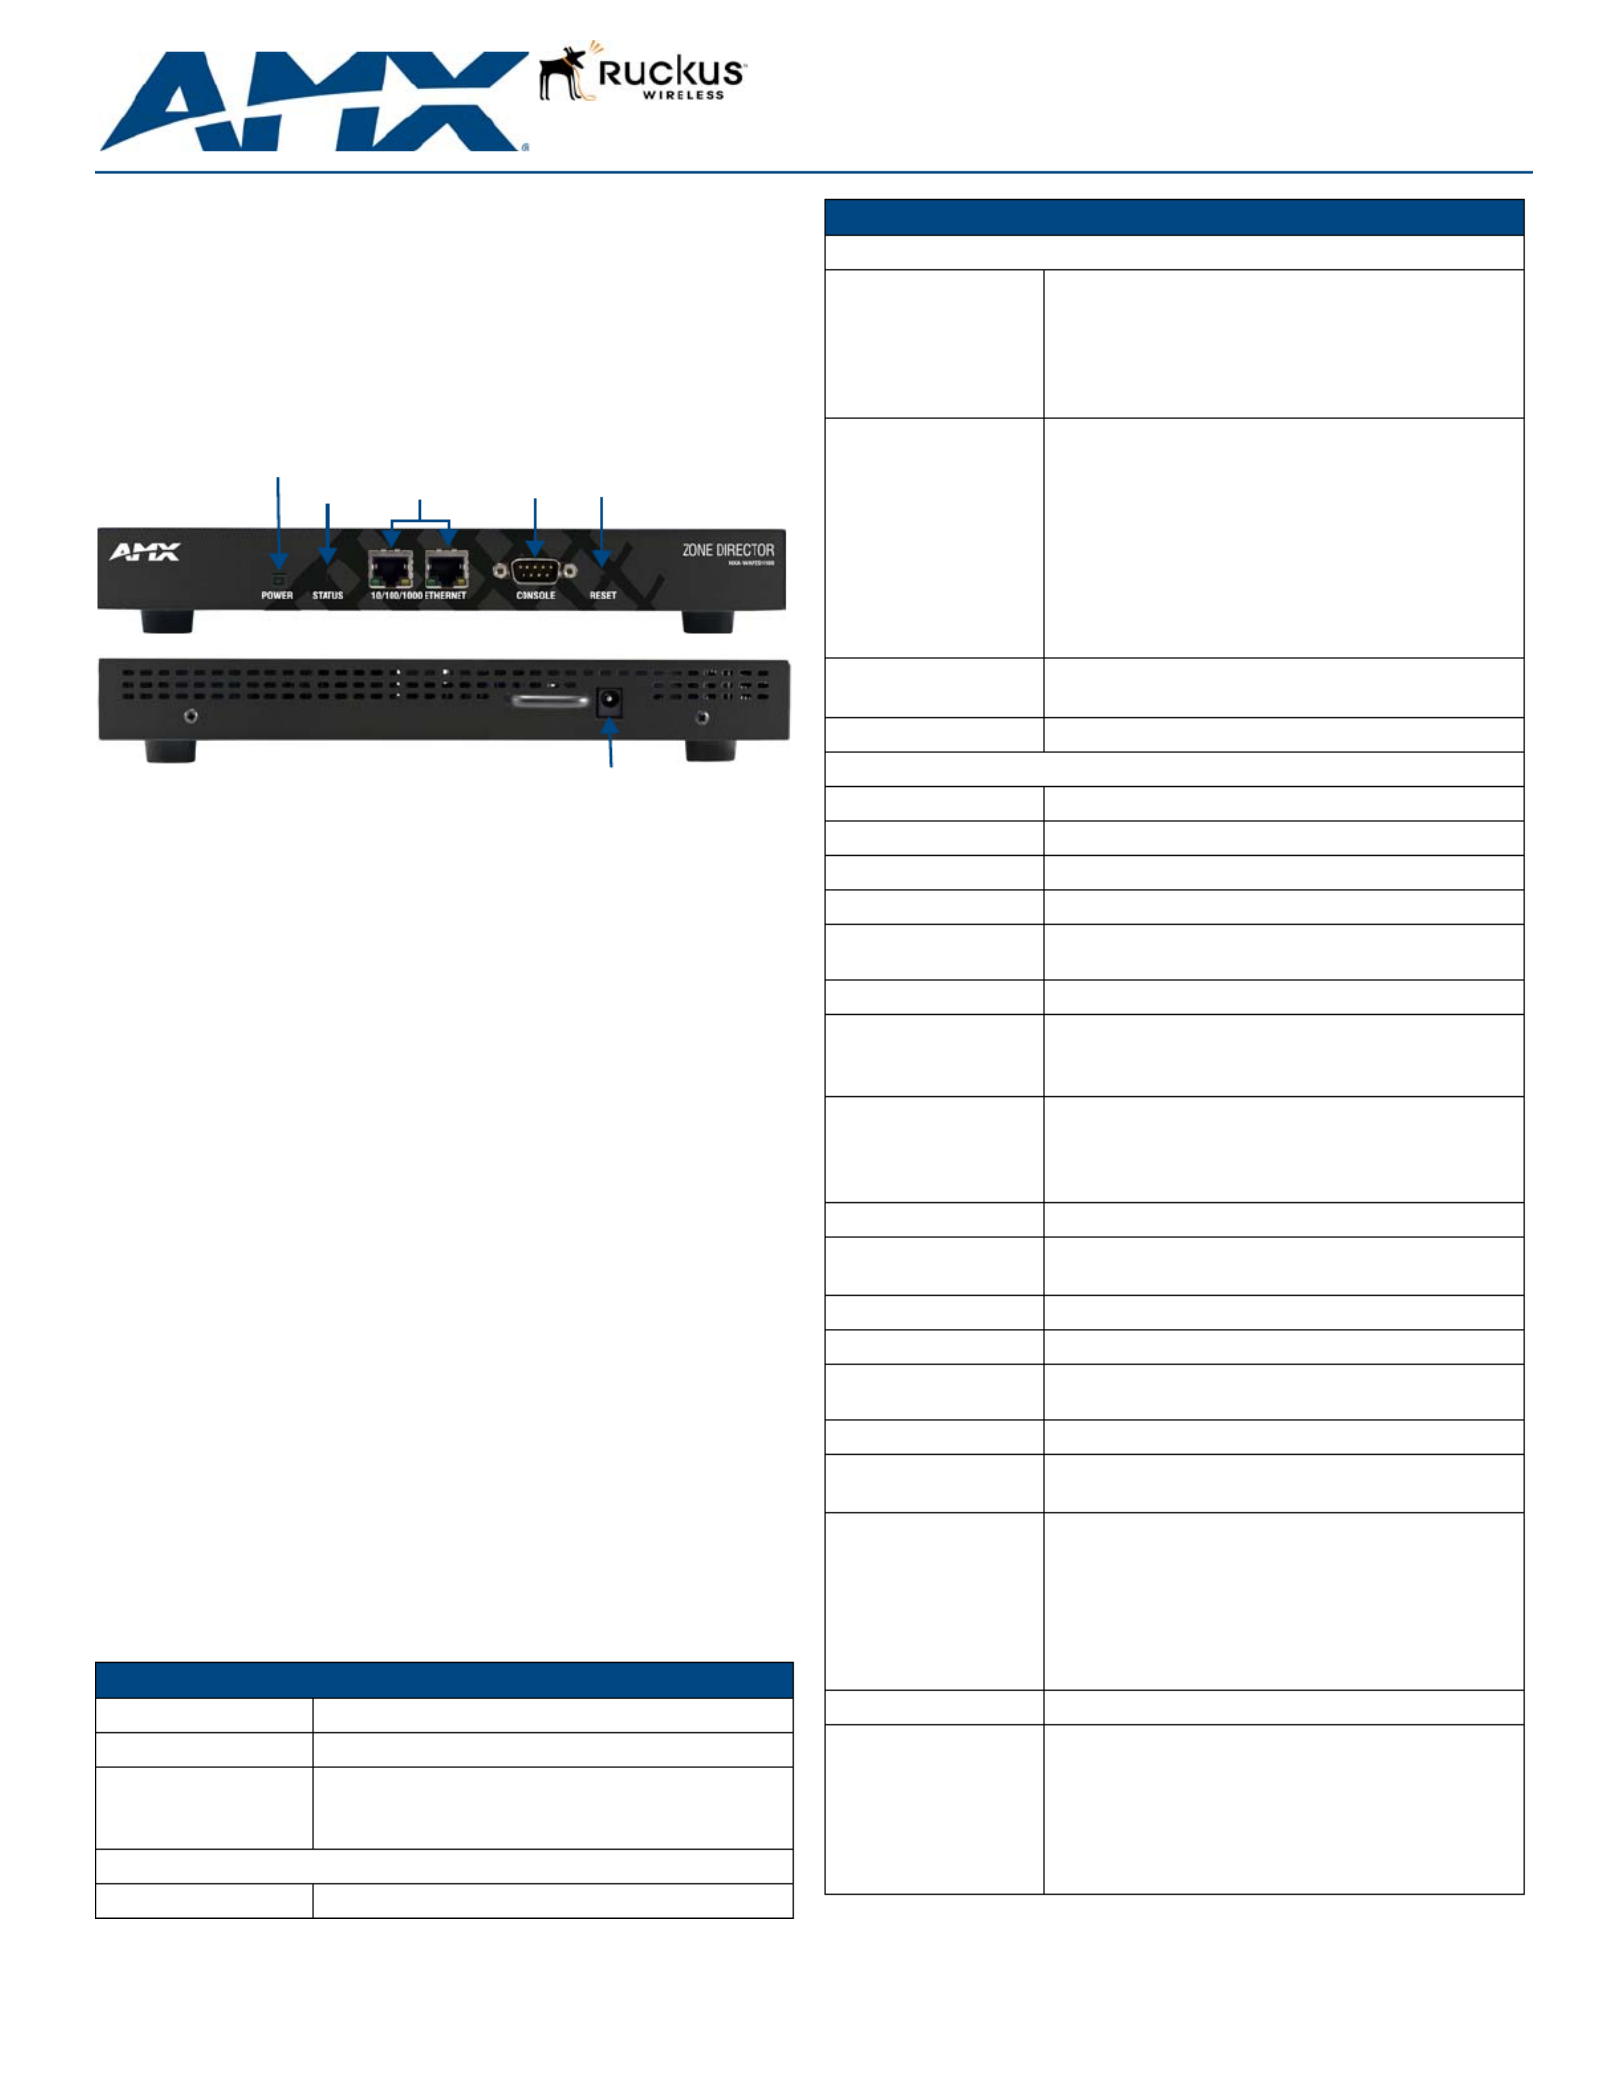
FIG. 1 NXA-WAPZD1100 front and rear view
NXA-WAPZD1100 (FG2255-75) Specifications
Dimensions (HWD): 1 1/2” x 6 5/16” x 9 13/16” (39 mm x 159 mm x 250 mm)
Weight: 2.2 lbs (1 Kg)
Power: • External power adapter
• Input: 110 - 240V AC
• Output: 12V DC, 1A
Front Panel Components:
Power LED: Green LED: the device is receiving power.
(front)
(rear)
Power
Status 10/100/1000
Ethernet Output Console ResetLED
LED Port Button
12VDC
Input
NXA-WAPZD1100 (FG2255-75) Specifications (Cont.)
Front Panel Components (Cont.):
Status LED: •Steady green LED: Device is configured.
•Blinking green LED: Device in factory default settings.
•Steady amber LED: Device is shut down but still
connected to a power source.
•Flashing amber LED: Device is starting up or shutting
down.
10/100/1000
Ethernet: Two 10/100/1000Mbps RJ-45 ports for Ethernet
connectivity.
•Solid green or amber left LED: The port is connected to
a device.
•Blinking green or amber left LED: The port is
transmitting or receiving data traffic.
•Green right LED: The port is connected to a 1000Mbps
device.
•Amber right LED: The port is connected to a 100Mbps
or 10Mbps device.
Console port: DB-9 port for accessing the NXA-WAPZD1100 command
line interface.
Reset Button: Hold the reset button for 8 seconds to reset the device.
Rear Panel Components:
Input: One 12VDCpower jack
Configuration: Web user interface
Statistics: LAN, wireless and associated stations (available via UI)
VLAN Support: 802.1Q (per BSSID)
AP Discovery &
Control: Layer-2 or Layer-3
WLANs (BSSIDs): Up to 32
Access Lists (ACLs): • Layer-2 (MAC address based ACL)
• Layer-3 (IP address based ACL)
• L2 client isolation
Wireless Intrusion
Detection (WIDS): • Rogue AP detection
• DoS attack prevention
• Password guessing protection
• Rate limiting
Wireless Security: WEP, WPA-TKIP, WPA2-AES, 802.11i
Authentication: • 802.1X, local database
• External AAA servers: ActiveDirectory/RADIUS/LDAP
Local Authentication: 1000 user entries
Countries: US, Canada, Colombia, Ecuador, Mexico
Number of Managed
APs: Up to 6
Concurrent Stations: Up to 1250
Operating
Environment:
• 32°F - 122°F (0°C - 50°C)
• Operating humidity - 15% – 95% (non-condensing)
Certifications: • FCC
• IC
• CE
• C-Tick
• VCCI
• EN 60950-1
• RoHS
Included Accessories: • External power adapter
Other AMX Equipment: • NXA-ENET8-2POE Gigabit Ethernet Switch
( )FG2178-63
• NXA-WAP1000 Smart Wireless Access Point, US
Operation (FG2255-51)
• NXA-WAP1000 Smart Wireless Access Point,
Operation Outside US (FG2255-53)
• NXA-WAPZD License Upgrades (FG2255-62/63/64)
For full warranty information, refer to the AMX Instruction Manual(s) associated with your Product(s).
11/12
©2012 AMX. All rights reserved. AMX and the AMX logo are registered trademarks of AMX.
AMX reserves the right to alter specifications without notice at any time.
3000 RESEARCH DRIVE, RICHARDSON, TX 75082 • 800.222.0193 • fax 469.624.7153 • technical support 800.932.6993 • www.amx.com
93-2255-75 REV: B
Configuring the NXA-WAPZD1100
NOTE: Windows 7 users may need to turn on Network Discovery before attempting
these steps.
To configure the NXA-WAPZD1100 and its companion NXA-WAP1000 devices:
1. Connect the NXA-WAPZD1100 to a convenient power source and press the
power button.
2. After the Power LED is lit, the Status LED is a blinking red light.
3. When the NXA-WAPZD1100 is powered up, the Status LED is a blinking green
light, indicating that the system is in the “factory default” state. After you
complete the Setup Wizard, the Status LED will be a steady green light.
Once the NXA-WAPZD1100 is on and connected to your network, use your
administration PC to “discover” it, verifying its connection. This automatically starts the
Setup Wizard.
1. Open the My Network Places window from your PC desktop.
2. Click the Show icons for networked UPnP (Universal Plug and Play) devices link
in the Network Tasks pane.
3. If the Show UPnP Device Icons confirmation dialog box appears, click Yes to
proceed. Windows sets up the feature, then activates it.
4. After Windows checks the network, a new “NXA-WAPZD1100” icon appears in
the My Network Places window. To proceed with setup, double-click that icon.
5. The NXA-WAPZD1100 ZoneDirector Wireless Setup wizard appears, ready for
wireless network configuration.
Working With the Wizard
1. Before using the Wireless Setup wizard, obtain and enter the following
information to complete the configuration:
•Language: Pick the language you prefer to use in the WebUI application from
the drop-down list. (This is separate from OS/System or browser language
settings.)
•General: Create a unique Name for the NXA-WAPZD1100. Use only letters and
numbers for the name. Choose the country code.
•Management IP: If you select DHCP, you must connect your NXA-WAPZD1100
to the local network via one of the Ethernet ports. The wizard will display the IP
address it acquires from the local network. Write this down, as you will need it
later. If you selected Manual, then enter the required network settings in the
(now) active text fields.
NOTE: The NXA-WAPZD1100’s default IP address is 192.168.0.2, with a network
mask of 255.255.255.0. The NXA-WAPZD1100 is shipped with its default IP address
settings as “DHCP”, but if it is installed outside of a DHCP network, the device will
revert to the default IP address.
•Wireless LANs: Enter the network name (ESSID). If you choose WPA-PSK for
security, enter a secure Passphrase for your WLAN. (Make a note of the
passphrase, as some users may need it when connecting their clients.)
•Guest WLAN (optional): click the check box to create a Guest WLAN in
addition to the corporate WLAN, then enter the name of the Guest WLAN.
•Administrator: Set up both the “admin” account, and the first network user
account (representing you as the administrator).
NOTE: The user name and password can be any combination of letters and numbers,
plus underscores or hyphens.
2. Review the wizard Confirmation entries. If you need to make a correction, click
Back until the appropriate setup screen appears, then make the changes.
3. When the wizard Finish screen appears, note the instructions, including the IP
address now assigned to the NXA-WAPZD1100.These will enable you to log
into the newly-configured XA-WAPZD1100.
NOTE: Complete information on other configuration, management and
trouble-shooting options is available through the NXA-WAPZD1100 Operation
Reference Guide, available at www.amx.com.
Connecting NXA-WAP1000s to Your Local Area Ethernet
Network
To connect the NXA-WAP1000s to the local Ethernet network:
1. Distribute the NXA-WAP1000s around your worksite, making sure they are 100
to 200 feet apart to ensure the best coverage.
2. Record each WAP’s Ethernet MAC address (printed on the bottom of every
WAP), and note each devices’ exact worksite location.
3. Connect each NXA-WAP1000 to an Ethernet port. When the NXA-WAP1000s
have powered up, they will automatically discover the NXA-WAPZD1100.
Accessing the NXA-WAPZD1100’s Command Line Interface
Aside from using the NXD-WAPZD1100’s Browser-Based Configuration Pages, you
can also perform many management and configuration tasks using the
NXD-WAPZD1100’s Command Line Interface (CLI) by connecting directly to the
Console port.
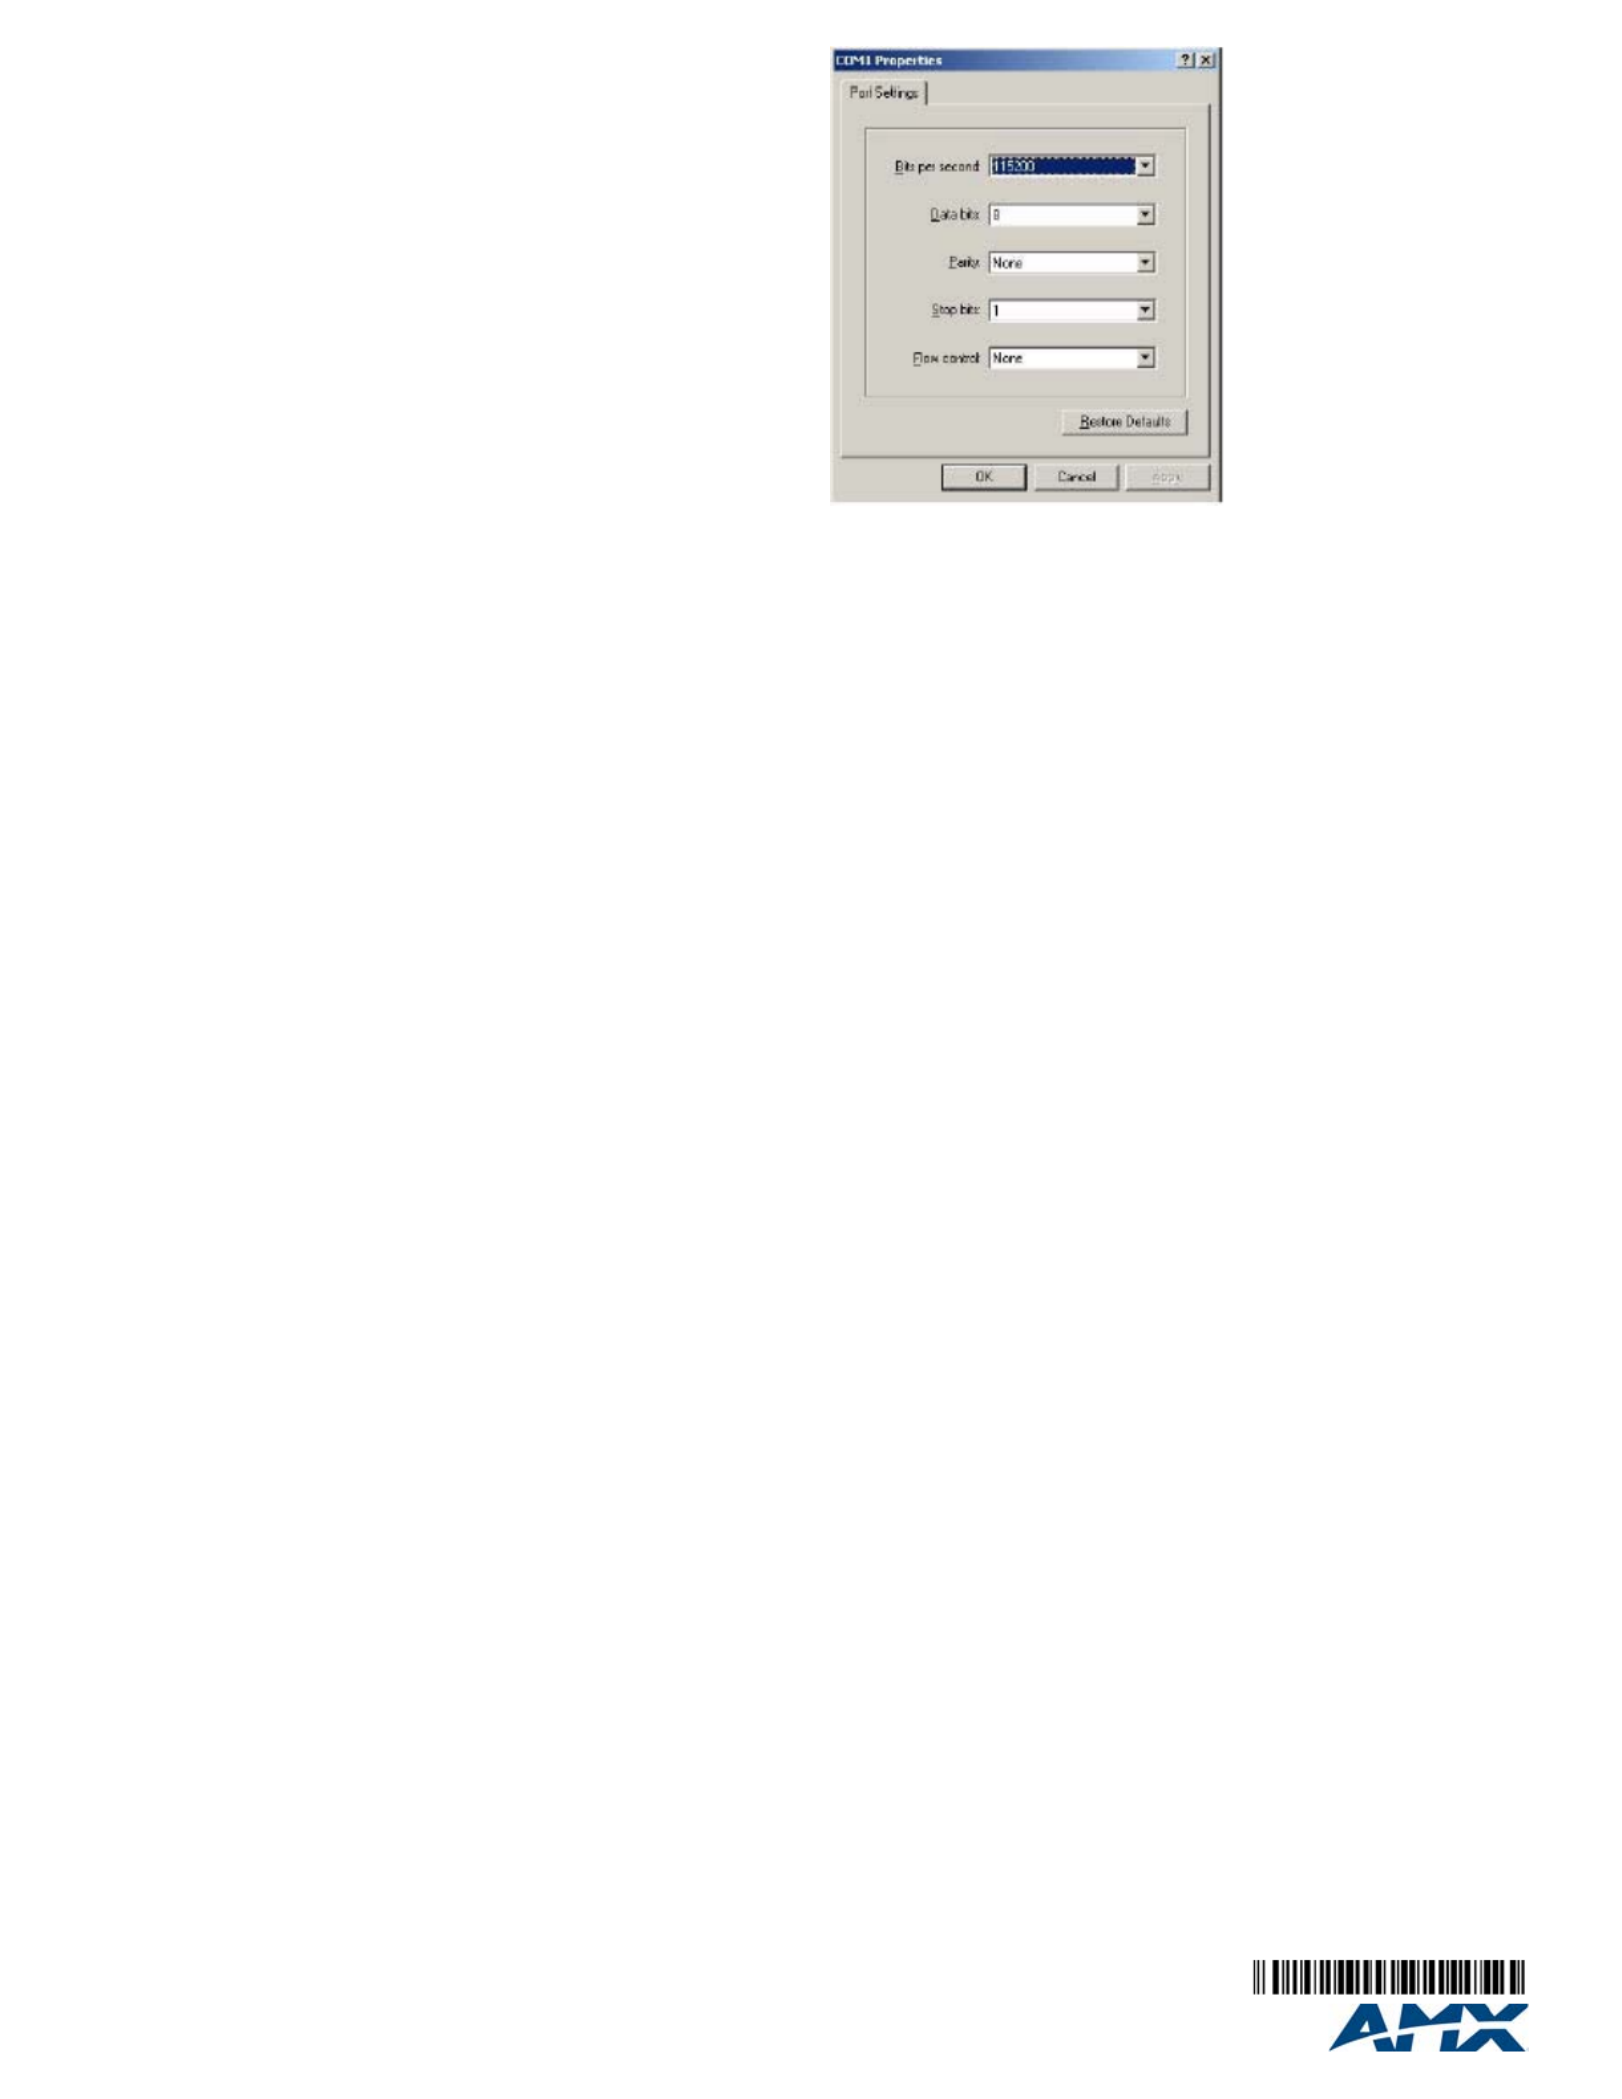
To access the NXD-WAPZD1100 CLI:
1. Connect an admin PC to the NXD-WAPZD1100 Console port (FIG. 1), using a
DB-9 serial cable.
2. Launch a terminal program, such as Hyperterminal, PuTTy, etc. (FIG. 2)
3. Enter the following connection settings:
•Bits per second: 115200
•Data bits: 8
•Parity: None
•Stop bits: 1
•Flow control: None
4. Click OK or Open to connect (depending on your terminal client).
5. At the Please Login prompt, enter the admin login name (default: admin) and
password (default: admin).
You are now logged into the NXA-WAPZD1100 with limited privileges. As a user with
limited privileges, you can view a history of previously executed commands and ping a
device. If you want to run more commands, you can switch to privileged mode by
entering enable at the root prompt.
To view a list of commands that are available at the root level, enter help or ?.
FIG. 2 Configuring a terminal client
Specyfikacje produktu
| Marka: | AMX |
| Kategoria: | Kontroler |
| Model: | NXA-WAPZD1100 |
Potrzebujesz pomocy?
Jeśli potrzebujesz pomocy z AMX NXA-WAPZD1100, zadaj pytanie poniżej, a inni użytkownicy Ci odpowiedzą
Instrukcje Kontroler AMX

26 Lutego 2025
28 Września 2024
28 Września 2024
28 Września 2024
Instrukcje Kontroler
- Kontroler Sony
- Kontroler Yamaha
- Kontroler Samsung
- Kontroler Sven
- Kontroler Logitech
- Kontroler Spektrum
- Kontroler BeamZ
- Kontroler Huawei
- Kontroler Supermicro
- Kontroler Pioneer
- Kontroler Philips
- Kontroler Plantronics
- Kontroler Bosch
- Kontroler JBL
- Kontroler Hikvision
- Kontroler HyperX
- Kontroler Bose
- Kontroler StarTech.com
- Kontroler Canon
- Kontroler Behringer
- Kontroler Asus
- Kontroler Nedis
- Kontroler Allen & Heath
- Kontroler IK Multimedia
- Kontroler American DJ
- Kontroler Tangent
- Kontroler Boss
- Kontroler MSI
- Kontroler Niceboy
- Kontroler Garmin
- Kontroler ATen
- Kontroler Speed-Link
- Kontroler Thrustmaster
- Kontroler Genesis
- Kontroler Honeywell
- Kontroler Manhattan
- Kontroler Chauvet
- Kontroler Heritage Audio
- Kontroler Tripp Lite
- Kontroler Denon
- Kontroler Carel
- Kontroler Audac
- Kontroler Cisco
- Kontroler SBS
- Kontroler Broan
- Kontroler Kenwood
- Kontroler Scosche
- Kontroler DJI
- Kontroler Synology
- Kontroler Natec
- Kontroler Gembird
- Kontroler Lindy
- Kontroler Zebra
- Kontroler Deltaco
- Kontroler Trust
- Kontroler Dell
- Kontroler Axor
- Kontroler IFM
- Kontroler Datapath
- Kontroler Steelseries
- Kontroler Schneider
- Kontroler Eurolite
- Kontroler Hori
- Kontroler Marshall
- Kontroler Perel
- Kontroler Somfy
- Kontroler Thomson
- Kontroler Velleman
- Kontroler Fusion
- Kontroler Korg
- Kontroler Homematic IP
- Kontroler DataVideo
- Kontroler One For All
- Kontroler Danfoss
- Kontroler DreamGEAR
- Kontroler Manta
- Kontroler Pyle
- Kontroler CTA Digital
- Kontroler Zoom
- Kontroler Datalogic
- Kontroler Numark
- Kontroler Monster
- Kontroler Showtec
- Kontroler EtiamPro
- Kontroler NACON
- Kontroler Gossen Metrawatt
- Kontroler Bogen
- Kontroler Schaudt
- Kontroler Mitsubishi
- Kontroler Razer
- Kontroler IVT
- Kontroler ION
- Kontroler ART
- Kontroler Rolls
- Kontroler Parrot
- Kontroler AKAI
- Kontroler Axis
- Kontroler DBX
- Kontroler Kicker
- Kontroler Amazon
- Kontroler Hama
- Kontroler Mackie
- Kontroler Microsoft
- Kontroler Smart-AVI
- Kontroler Cameo
- Kontroler Jumbo
- Kontroler Reely
- Kontroler Juniper
- Kontroler Clarity
- Kontroler COLBOR
- Kontroler Apricorn
- Kontroler Esperanza
- Kontroler GVM
- Kontroler Vakoss
- Kontroler Infinity
- Kontroler Marshall Electronics
- Kontroler Tracer
- Kontroler Silverstone
- Kontroler Magnus
- Kontroler RCA
- Kontroler Genius
- Kontroler Media-Tech
- Kontroler Atlas Sound
- Kontroler Atlona
- Kontroler Thermaltake
- Kontroler Amer
- Kontroler Hunter
- Kontroler Nintendo
- Kontroler Gefen
- Kontroler Vivanco
- Kontroler Radial Engineering
- Kontroler Polsen
- Kontroler Ikan
- Kontroler JUNG
- Kontroler Lumens
- Kontroler TOA
- Kontroler Monacor
- Kontroler HQ Power
- Kontroler Hotone
- Kontroler Tascam
- Kontroler Novation
- Kontroler Adj
- Kontroler SPL
- Kontroler Alfatron
- Kontroler Areca
- Kontroler Belkin
- Kontroler Kramer
- Kontroler Rosco
- Kontroler Inovonics
- Kontroler Sonance
- Kontroler Dangerous Music
- Kontroler American Audio
- Kontroler Targus
- Kontroler Da-Lite
- Kontroler Ednet
- Kontroler Bigben Interactive
- Kontroler Valcom
- Kontroler Astro
- Kontroler Bigben
- Kontroler Naxa
- Kontroler Carat
- Kontroler Intel
- Kontroler Sherwood
- Kontroler Konig
- Kontroler Sweex
- Kontroler Vizio
- Kontroler Metronic
- Kontroler Aruba
- Kontroler T'nB
- Kontroler ESI
- Kontroler Rain Bird
- Kontroler Irritrol
- Kontroler Vaddio
- Kontroler Apart
- Kontroler Saitek
- Kontroler Turtle Beach
- Kontroler Russound
- Kontroler Xtreme
- Kontroler Krom
- Kontroler Monoprice
- Kontroler Fostex
- Kontroler ASTRO Gaming
- Kontroler OSD Audio
- Kontroler 8BitDo
- Kontroler AirTurn
- Kontroler Adaptec
- Kontroler Big Ben
- Kontroler SIIG
- Kontroler Contour Design
- Kontroler Xantech
- Kontroler Kohler
- Kontroler Ganz
- Kontroler Movistar
- Kontroler MuxLab
- Kontroler AViPAS
- Kontroler Konix
- Kontroler Auray
- Kontroler Logic3
- Kontroler GOgroove
- Kontroler Morningstar
- Kontroler HID Identity
- Kontroler LYYT
- Kontroler Venom
- Kontroler PDP
- Kontroler Gioteck
- Kontroler MOZA
- Kontroler Robitronic
- Kontroler Steca
- Kontroler Icon
- Kontroler Premier Mounts
- Kontroler Aquatic AV
- Kontroler Tru Components
- Kontroler Elite Screens
- Kontroler KONFTEL
- Kontroler PowerA
- Kontroler LSI
- Kontroler Phoenix Contact
- Kontroler Softube
- Kontroler SmartAVI
- Kontroler RiotPWR
- Kontroler Highpoint
- Kontroler Leviton
- Kontroler PCE Instruments
- Kontroler SecurityMan
- Kontroler Ltech
- Kontroler Canyon
- Kontroler IPEGA
- Kontroler Dadson
- Kontroler Niles
- Kontroler Rachio
- Kontroler Ledxon
- Kontroler Blizzard Lighting
- Kontroler Trenton Systems
- Kontroler Steelplay
- Kontroler Heath Zenith
- Kontroler Gamesir
- Kontroler Re.corder
- Kontroler Snakebyte
- Kontroler Nyko
- Kontroler EXSYS
- Kontroler ALC
- Kontroler Kanex
- Kontroler Audibax
- Kontroler Mitzu
- Kontroler CoolerMaster
- Kontroler Dragonshock
- Kontroler Atlantis Land
- Kontroler Universal Remote Control
- Kontroler LumenRadio
- Kontroler Victrix
- Kontroler MOGA
- Kontroler HuddleCamHD
- Kontroler Balam Rush
- Kontroler JLCooper
- Kontroler Visual Productions
Najnowsze instrukcje dla Kontroler
2 Kwietnia 2025
30 Marca 2025
30 Marca 2025
30 Marca 2025
30 Marca 2025
30 Marca 2025
28 Marca 2025
27 Marca 2025
26 Marca 2025
2 Marca 2025