Instrukcja obsługi ZyXEL FSG1100HN
Przeczytaj poniżej 📖 instrukcję obsługi w języku polskim dla ZyXEL FSG1100HN (183 stron) w kategorii router. Ta instrukcja była pomocna dla 16 osób i została oceniona przez 2 użytkowników na średnio 4.5 gwiazdek
Strona 1/183

FSG1100HN
Wireless Active Fiber Router
Firmware Version: 1.0
Edition1, 3/2010
www.zyxel.com
IP Address
User Name http://192.168.1.1
admin
Password
1234


About This User’s Guide
FSG1100HN User’s Guide
3
About This User's Guide
Intended Audience
This manual is intended for people who want to configure the FSG1100HN using
the Web Configurator. You should have at least a basic knowledge of TCP/IP
networking concepts and topology.
Tips for Reading User’s Guides On-Screen
When reading a ZyXEL User’s Guide On-Screen, keep the following in mind:
• If you don’t already have the latest version of Adobe Reader, you can download it
from http://www.adobe.com.
• Use the PDF’s bookmarks to quickly navigate to the areas that interest you.
Adobe Reader’s bookmarks pane opens by default in all ZyXEL User’s Guide
PDFs.
• If you know the page number or know vaguely which page-range you want to
view, you can enter a number in the toolbar in Reader, then press [ENTER] to
jump directly to that page.
• Type [CTRL]+[F] to open the Adobe Reader search utility and enter a word or
phrase. This can help you quickly pinpoint the information you require. You can
also enter text directly into the toolbar in Reader.
• To quickly move around within a page, press the [SPACE] bar. This turns your
cursor into a “hand” with which you can grab the page and move it around freely
on your screen.
• Embedded hyperlinks are actually cross-references to related text. Click them to
jump to the corresponding section of the User’s Guide PDF.
Related Documentation
• Quick Start Guide
The Quick Start Guide is designed to help you get your FSG1100HN up and
running right away. It contains information on setting up your network and
configuring for Internet access.
• Supporting Disc
The embedded Web Help contains descriptions of individual screens and
supplementary information.
• Support Disc
Refer to the included CD for support documents.

About This User’s Guide
FSG1100HN User’s Guide
4
Documentation Feedback
Send your comments, questions or suggestions to: techwriters@zyxel.com.tw.
Thank you!
The Technical Writing Team, ZyXEL Communications Corp., 6 Innovation Road II,
Science-Based Industrial Park, Hsinchu, 30099, Taiwan.
Need More Help?
More help is available at www.zyxel.com.
• Download Library
Search for the latest product updates and documentation from this link. Read the
Tech Doc Overview to find out how to efficiently use the User Guide, Quick Start
Guide and Command Line Interface Reference Guide in order to better understand
how to use your product.
• Knowledge Base
If you have a specific question about your product, the answer may be here. This is
a collection of answers to previously asked questions about ZyXEL products.
• Forum
This contains discussions on ZyXEL products. Learn from others who use ZyXEL
products and share your experiences as well.’

Document Conventions
FSG1100HN User’s Guide
6
Document Conventions
Warnings and Notes
These are how warnings and notes are shown in this User’s Guide.
Warnings tell you about things that could harm you or your device.
Note: Notes tell you other important information (for example, other things you may
need to configure or helpful tips) or recommendations.
Syntax Conventions
• The FSG1100HN may be referred to as the “FSG1100HN”, the “device”, the
“product” or the “system” in this User’s Guide.
• Product labels, screen names, field labels and field choices are all in bold font.
• A key stroke is denoted by square brackets and uppercase text, for example,
[ENTER] means the “enter” or “return” key on your keyboard.
• “Enter” means for you to type one or more characters and then press the
[ENTER] key. “Select” or “choose” means for you to use one of the predefined
choices.
• A right angle bracket ( > ) within a screen name denotes a mouse click. For
example, Maintenance > Log > Log Setting means you first click Maintenance
in the navigation panel, then the Log sub menu and finally the Log Setting tab to
get to that screen.
• Units of measurement may denote the “metric” value or the “scientific” value. For
example, “k” for kilo may denote “1000” or “1024”, “M” for mega may denote
“1000000” or “1048576” and so on.
• “e.g.,” is a shorthand for “for instance”, and “i.e.,” means “that is” or “in other
words”.

Document Conventions
FSG1100HN User’s Guide
7
Icons Used in Figures
Figures in this User’s Guide may use the following generic icons. The ZyXEL icon
is not an exact representation of your device.

Safety Warnings
FSG1100HN User’s Guide
8
Safety Warnings
• Do NOT use this product near water, for example, in a wet basement or near a
swimming pool.
• Do NOT expose your device to dampness, dust or corrosive liquids.
• Do NOT store things on the device.
• Do NOT install, use, or service this device during a thunderstorm. There is a
remote risk of electric shock from lightning.
• Connect ONLY suitable accessories to the device.
• Do NOT open the device or unit. Opening or removing covers can expose you to
dangerous high voltage points or other risks. ONLY qualified service personnel
should service or disassemble this device. Please contact your vendor for further
information.
• Make sure to connect the cables to the correct ports.
• Place connecting cables carefully so that no one will step on them or stumble over
them.
• Always disconnect all cables from this device before servicing or disassembling.
• Use ONLY an appropriate power adaptor or cord for your device.
• Connect the power adaptor or cord to the right supply voltage (for example, 110V
AC in North America or 230V AC in Europe).
• Do NOT allow anything to rest on the power adaptor or cord and do NOT place
the product where anyone can walk on the power adaptor or cord.
• Do NOT use the device if the power adaptor or cord is damaged as it might cause
electrocution.
• If the power adaptor or cord is damaged, remove it from the power outlet.
• Do NOT attempt to repair the power adaptor or cord. Contact your local vendor to
order a new one.
• Do not use the device outside, and make sure all the connections are indoors.
There is a remote risk of electric shock from lightning.
• Do NOT obstruct the device ventilation slots, as insufficient airflow may harm your
device.
• Antenna Warning! This device meets ETSI certification requirements when using
the included antenna(s). Only use the included antenna(s).
• If you wall mount your device, make sure that no electrical lines, gas or water
pipes will be damaged.
• Optical Warning! "PRODUCT COMPLIES WITH 21 CFR 1040.10 AND 1040.11"
"PRODUIT CONFORME SELON 21CFR 1040.10 ET 1040.11”
CLASS 1 LASER PRODUCT
APPAREIL À LASER DE CLASSE 1
Your product is marked with this symbol, which is known as the WEEE mark.
WEEE stands for Waste Electronics and Electrical Equipment. It means that
used electrical and electronic products should not be mixed with general
waste. Used electrical and electronic equipment should be treated
separately.

SAFETY WARNINGS
FSG1100HN User’s Guide
9

Table of Contents
FSG1100HN User’s Guide
10
Table of Contents
FSG1100HN ............................................................................................................... 1
About This User's Guide ........................................................................................................................................ 3
Safety Warnings ........................................................................................................................................................ 8
Table of Contents ................................................................................................................................................... 10
Introduction ............................................................................................................ 13
1 Getting to Know Your FSG1100HN ...................................................................................................... 15
1.1 Overview ...................................................................................................................................................... 15
1.2 Applications ............................................................................................................................................... 15
1.3 Ways to Manage the FSG1100HN ................................................................................................... 16
1.4 Good Habits for Managing the FSG1100HN ............................................................................... 16
1.5 LEDs............................................................................................................................................................... 16
2 The WPS Button ............................................................................................................................................. 19
2.1 Overview ...................................................................................................................................................... 19
3 Introducing the Web Configurator ....................................................................................................... 21
3.1 Overview ...................................................................................................................................................... 21
3.2 Accessing the Web Configurator ...................................................................................................... 21
3.3 Resetting the FSG1100HN ................................................................................................................... 22
3.3.1 Procedure to Use the Reset Button.............................................................................................. 22
3.4 Navigating the Web Configurator .................................................................................................. 23
3.4.1 WLAN Information: Multiple AP Table ...................................................................................... 24
3.4.2 Summary: Active Session Table .................................................................................................... 25
3.5 Setting the Device Mode ....................................................................................................................... 26
Network .................................................................................................................. 28
4 Wireless LAN ................................................................................................................................................... 30
4.1 Overview ...................................................................................................................................................... 30
4.2 What You Can Do .................................................................................................................................... 31
4.3 What You Should Know ........................................................................................................................ 31
4.4 Wireless Basic Settings Screen .......................................................................................................... 32
4.4.1 Multiple AP Table .............................................................................................................................. 33
4.4.2 Active Wireless Client Table .......................................................................................................... 34
4.5 Wireless Advanced Settings Screen ................................................................................................ 35
4.6 Wireless Security Screen ...................................................................................................................... 37
4.6.1 WEP ........................................................................................................................................................ 37
4.6.2 WPA ........................................................................................................................................................ 39
4.6.3 WPA2 ..................................................................................................................................................... 41
4.6.4 WPA-Mixed .......................................................................................................................................... 42
4.7 Wireless Access Control Screen ........................................................................................................ 44
4.8 Wi-Fi Protected Setup Screen ............................................................................................................ 44
5 WAN ..................................................................................................................................................................... 48
5.1 Overview ...................................................................................................................................................... 48
5.2 What You Can Do .................................................................................................................................... 48
5.3 WAN for DHCP Client Screen ............................................................................................................. 49
5.4 WAN for Static IP Screen ..................................................................................................................... 51
5.5 WAN for PPPoE Screen ......................................................................................................................... 53
6 LAN ....................................................................................................................................................................... 56
6.1 Overview ...................................................................................................................................................... 56
6.2 What You Can Do .................................................................................................................................... 56
6.3 What You Need To Know ..................................................................................................................... 57
6.3.1 IP Pool Setup ....................................................................................................................................... 57
6.3.2 LAN TCP/IP.......................................................................................................................................... 57
6.4 LAN General Screen ............................................................................................................................... 58

Table of Contents
FSG1100HN User’s Guide
11
6.4.1 Active DHCP Client Table ................................................................................................................ 59
6.4.2 Static DHCP .......................................................................................................................................... 60
6.5 VLAN Screen .............................................................................................................................................. 61
7 NAT ....................................................................................................................................................................... 63
7.1 Overview ...................................................................................................................................................... 63
7.2 What You Can Do .................................................................................................................................... 63
7.3 NAT General Screen ............................................................................................................................... 64
7.4 NAT DMZ Screen ...................................................................................................................................... 66
7.5 NAT Port Forwarding Screen ............................................................................................................ 67
Security ................................................................................................................... 69
8 Firewall ............................................................................................................................................................... 71
8.1 What You Can Do .................................................................................................................................... 72
8.2 What You Need To Know ..................................................................................................................... 72
8.2.1 About the FSG1100HN Firewall.................................................................................................... 72
8.3 Firewall Filter Screen ............................................................................................................................ 73
8.4 Firewall Filter Add Screen .................................................................................................................. 74
8.5 Firewall Denial of Service Screen .................................................................................................... 75
8.6 Firewall Content Filter Screen .......................................................................................................... 77
Management .......................................................................................................... 80
9 Media Bandwidth Management ............................................................................................................. 82
9.1 Media Bandwidth Management Screen ....................................................................................... 82
10 TR-069 ................................................................................................................................................................ 85
10.1 TR-069 General Screen ......................................................................................................................... 85
11 Auto Provision ................................................................................................................................................ 88
11.1 Auto Provision Screen ........................................................................................................................... 88
Maintenance and Troubleshooting ......................................................................... 91
12 System Settings .............................................................................................................................................. 93
12.1 System Settings General Screen........................................................................................................ 93
12.2 System Settings Dynamic DNS Screen ........................................................................................... 94
12.3 System Settings Time Screen ............................................................................................................. 95
13 Log......................................................................................................................................................................... 98
13.1 Log Screen .................................................................................................................................................. 98
14 Tools................................................................................................................................................................... 100
14.1 Tools Firmware Screen...................................................................................................................... 100
14.2 Tools Configuration Screen ............................................................................................................. 100
14.3 Tools Restart Screen ........................................................................................................................... 101
Appendices ........................................................................................................... 104
A Pop-up Windows, JavaScripts and Java Permissions ............................................................... 106
B IP Addresses and Subnetting ................................................................................................................ 114
C Setting up Your Computer’s IP Address .......................................................................................... 124
D Wireless LANs .............................................................................................................................................. 142
E Services ............................................................................................................................................................ 154
F Legal Information........................................................................................................................................ 158


Chapter 2 The WPS Button
FSG1100HN User’s Guide
15
1
Getting to Know Your FSG1100HN
1.1 Overview
This chapter introduces the main features and applications of the FSG1100HN.
The FSG1100HN extends the range of your existing wired network without
additional wiring, providing easy network access to mobile users. You can set up a
wireless network with other IEEE 802.11b/g/n compatible devices.
A range of services such as a firewall and content filtering are also available for
secure Internet computing.
1.2 Applications
You can create the following networks using the FSG1100HN:
• Wired. You can connect network devices via the Ethernet ports of the
FSG1100HN so that they can communicate with each other and access the
Internet.
• Wireless. Wireless clients can connect to the FSG1100HN to access network
resources.
• WAN. Connect to a broadband modem/router for Internet access.
FSG1100HN Network

Chapter 2 The WPS Button
FSG1100HN User’s Guide
16
1.3 Ways to Manage the FSG1100HN
Use any of the following methods to manage the FSG1100HN.
• WPS (Wi-Fi Protected Setup). You can use the WPS button or the WPS section of
the Web Configurator to set up a wireless network with your ZyXEL Device.
• Web Configurator. This is recommended for everyday management of the
FSG1100HN using a (supported) web browser.
1.4 Good Habits for Managing the FSG1100HN
Do the following things regularly to make the FSG1100HN more secure and to
manage the FSG1100HN more effectively.
• Change the password. Use a password that’s not easy to guess and that
consists of different types of characters, such as numbers and letters.
• Write down the password and put it in a safe place.
• Back up the configuration (and make sure you know how to restore it).
Restoring an earlier working configuration may be useful if the device becomes
unstable or even crashes. If you forget your password, you will have to reset
the FSG1100HN to its factory default settings. If you backed up an earlier
configuration file, you would not have to totally re-configure the FSG1100HN. You
could simply restore your last configuration.
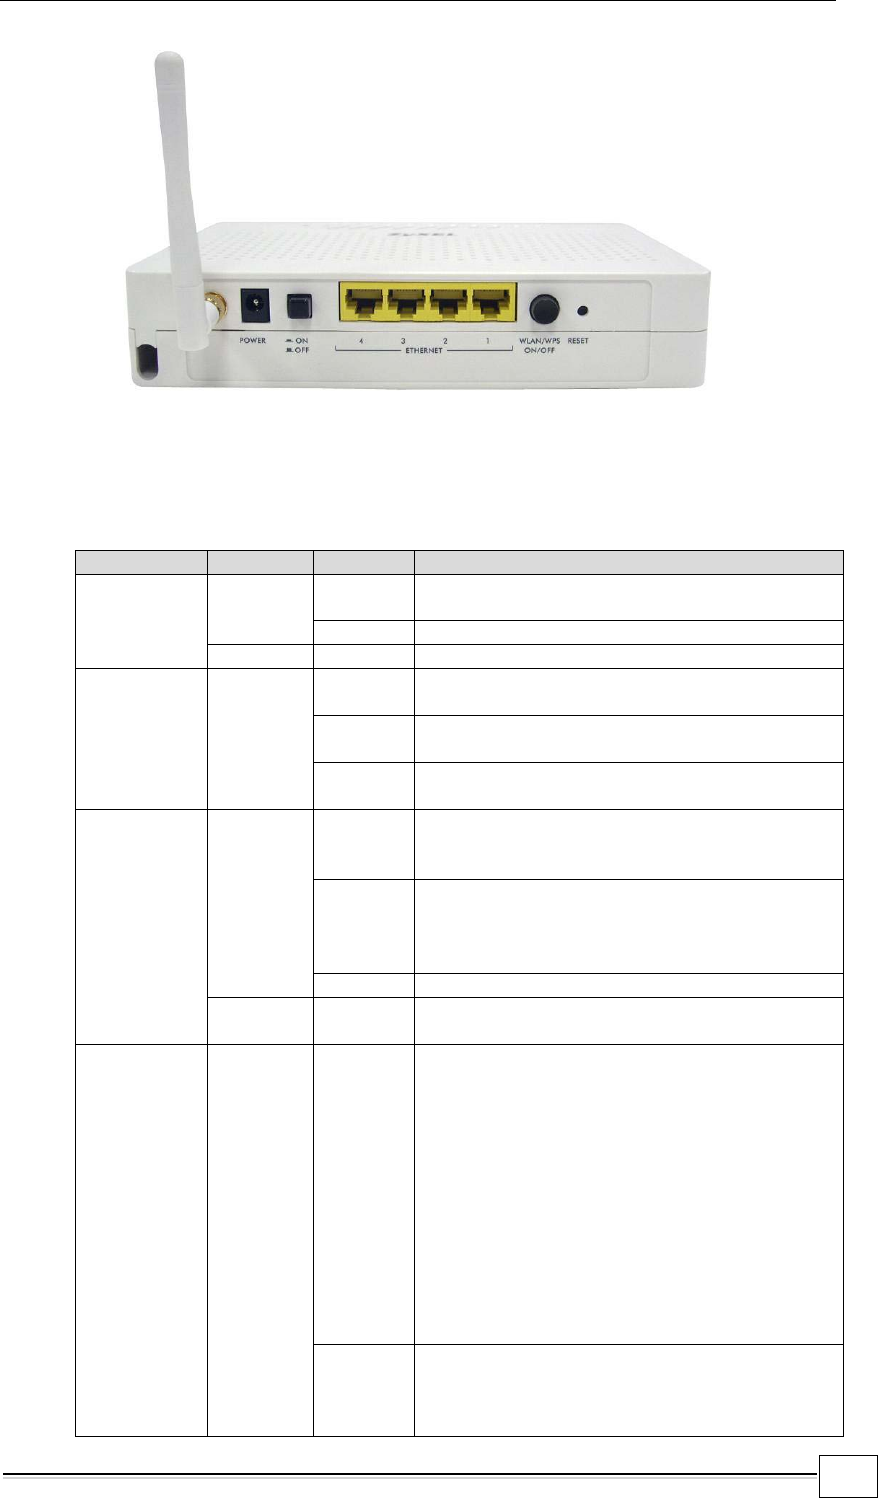
1.5 LED and Rear Panel
Chapter 2 The WPS Button
FSG1100HN User’s Guide
17
The following table describes the LEDs and the WPS button.
Front Panel LEDs and WPS Button
LED
COLOR
STATUS
DESCRIPTION
Power
Green
On
The FSG1100HN is receiving power and
functioning properly
Off
The FSG1100HN is not receiving power.
Red
On
A system error has occurred.
WAN
Green
On
The FSG1100HN has a successful
10/100Mbps WAN connection.
Blinking
The FSG1100HN is sending/receiving data
through the WAN.
Off
The WAN connection is not ready, or has
failed.
WLAN/WPS
Green
On
The FSG1100HN is ready, but is not
sending/receiving data through the wireless
LAN.
Blinking
The FSG1100HN is sending/receiving data
through the wireless LAN.
The FSG1100HN is negotiating a WPS
connection with a wireless client.
Off
The FSG1100HN is not ready or has failed.
Orange
Blinking
The FSG1100HN’s WPS connection is being
configured.
Internet
Green
On
The FSG1100HN’s IP is connected (the
device has a WAN IP address from IPCP or
DHCP and fiber is linked or a static IP
address is configured, PPP negotiation has
successfully completed – if used – and fiber is
linked) and no traffic is detected. If the IP or
PPPoE session is dropped due to an idle
timeout, the light will remain green if a fiber
connection is still present. If the session is
dropped for any other reason, the light is
turned off. The light will turn red when it
attempts to reconnect and DHCP or PPPoE
fails.
Blinking
The FSG1100HN’s IP is connected and IP
traffic is passing through the device (either
direction), flashing at 4 Hz with a 50% duty
cycle.

Chapter 2 The WPS Button
FSG1100HN User’s Guide
18
Off
The FSG1100HN’s power is off, it is in
bridged mode, or a connection not present.
Red
On
The FSG1100HN’s attempt to achieve an IP
connection failed (no DHCP response, no
PPPoE response, PPPoE authentication
failed, no IP address from IPCP, etc.).
LAN 1-4
Green
On
The FSG1100HN has a successful
10/100Mbps Ethernet connection.
Blinking
The FSG1100HN is sending/receiving data
through the LAN, flashing at 4 HZ with a 50%
duty cycle.
Off
The LAN is not connected or the FSG1100HN
is powered off.
WPS
Button
Press this button for 1 second to set up a wireless connection via
WiFi
Protected Setup with another WPS-enabled client. You must press
the
WPS button on the client side, holding the button for at least 5
seconds, for a successful connection.

Chapter 4 Wireless LAN
FSG1100HN User’s Guide
21
3
Introducing the Web Configurator
3.1 Overview
This chapter describes how to access the FSG1100HN Web Configurator and
provides an overview of its screens.
The Web Configurator is an HTML-based management interface that allows easy
setup and management of the FSG1100HN via Internet browser. Use Internet
Explorer 6.0 and later or Netscape Navigator 7.0 and later versions or Safari 2.0
or later versions. The recommended screen resolution is 1024 by 768 pixels.
In order to use the Web Configurator you need to allow:
• Web browser pop-up windows from your device. Web pop-up blocking is
enabled by default in Windows XP SP (Service Pack) 2.
• JavaScripts (enabled by default).
• Java permissions (enabled by default).
Refer to the Troubleshooting chapter to see how to make sure these functions are
allowed in Internet Explorer.
3.2 Accessing the Web Configurator
1. Make sure your FSG1100HN hardware is properly connected and prepare your
computer or computer network to connect to the FSG1100HN (refer to the Quick
Start Guide).
2. Launch your web browser.
3. Type "http://192.168.1.254" as the website address.
Your computer must be in the same subnet in order to access this website
address.
Chapter 4 Wireless LAN
FSG1100HN User’s Guide
22
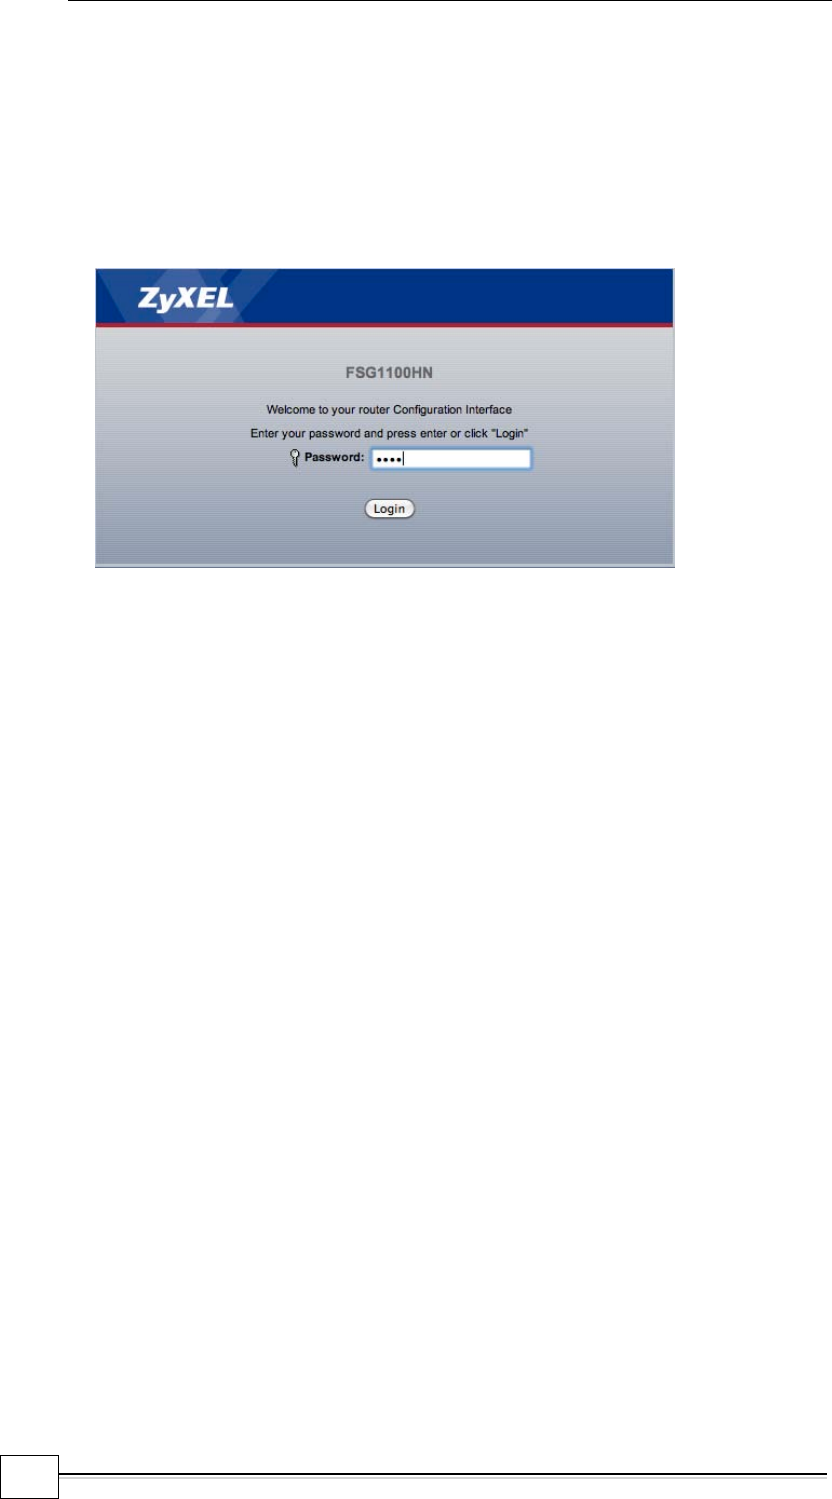
4. Type "1234" (default) as the password and click Login. In some versions, the
default password appears automatically - if this is the case, click Login.
5. You should see a screen asking you to change your password (highly
recommended) as shown next. Type a new password (and retype it to confirm)
and click Apply or click Ignore.
Password Screen
Note: The management session automatically times out when the time period set
in the Administrator Inactivity Timer field expires (default five minutes).
Simply log back into the FSG1100HN if this happens.
3.3 Resetting the FSG1100HN
If you forget your password or IP address, or you cannot access the Web
Configurator, you will need to use the RESET button at the back of the
FSG1100HN to reload the factory-default configuration file. This means that you will
lose all configurations that you had previously saved, the password will be reset to
“1234” and the IP address will be reset to “192.168.1.254”.
3.3.1 Procedure to Use the Reset Button
1 Make sure the power LED is on.
2 Press the RESET button for longer than 1 second to restart/reboot the
FSG1100HN.
3 Press the RESET button for longer than five seconds to set the FSG1100HN
back to its factory-default configurations.

Chapter 4 Wireless LAN
FSG1100HN User’s Guide
23
3.4 Navigating the Web Configurator
The following summarizes how to navigate the Web Configurator from the Status
screen.
Status Screen
Click this icon at anytime to exit the Web Configurator.
Web Configurator Status Screen
LABEL
DESCRIPTION
Device Information
System Name
This is the System Name you enter in the Maintenance >
System Settings > General screen. It is for identification
purposes.
Firmware Version
This is the firmware version.
System Up Time
This is the total time the FSG1100HN has been on.
Current Date/Time
This is the FSG1100HN’s present date and time.
Device Mode
This is the current FSG1100HN mode. The device can
function as a Router, Bridge, or Mixed. See the Device
Mode window (System Information > Device Mode) to
change this setting.
WAN Information
IP Address
This is the WAN port’s IP address.
IP Subnet Mask
This is the WAN port’s subnet mask.
Connection Type
This displays the connection type status.
DNS
This displays the IP address of the DNS.

Chapter 4 Wireless LAN
FSG1100HN User’s Guide
24
LAN Information
IP Address
This is the LAN port’s IP address.
IP Subnet Mask
This is the LAN port’s subnet mask.
DHCP
This is the LAN port’s DHCP role, Enable or Disable.
System Status
Interface
These are the devices three types of interfaces.
Status
This is the current status of each interface type.
CPU Usage
This displays what percentage of the FSG1100HN’s
processing ability is currently used. When this percentage
is close to 100%, the FSG1100H is running at full load,
and the throughput is not going to improve anymore. If
you want some applications to have more throughput, you
should turn off other applications.
Memory Usage
This displays what percentage of the heap memory the
FSG1100HN is using.
WLAN Information
SSID
This is a descriptive name used to identify the
FSG1100HN on the wireless LAN.
Mode
This is the level of wireless security the FSG1100HN is
currently using.
Band
This is the manually selected operating frequency
currently being used on the wireless LAN.
Channel Number
This is the manually selected channel number currently
being used on the wireless LAN.
Encryption
This is the type of encryption security currently being used
on the wireless LAN.
WPS
This displays Enabled when the WPS has been set up.
This displays Disabled if the WPS has not been set up.
Multiple AP
Click the Detail hyperlink to display the Multiple AP Table.
Summary
Active Session
Click the Detail hyperlink to display the Active Session
Table.
Refresh
Click Refresh to begin configuring this screen afresh.
3.4.1 WLAN Information: Multiple AP Table
Click the Multiple AP Table Detail
hyperlink in the Status screen. Read-only
information includes SSID, Band, Encryption, BSSID, and Associated Clients.

Chapter 4 Wireless LAN
FSG1100HN User’s Guide
25
The following table describes the multiple AP labels in this screen
Status > Multiple AP
LABEL
DESCRIPTION
SSID
This displays the Service Set Identity (SSID) associated with
the AP.
Band
This displays the operating frequency for the AP. The options
are: 2.4 GHz (B+G+N) for networks using a mix of 802.11b,
802.11g, and 802.11n wireless clients, 2.4 GHz (G+N) for
networks using a mix of 802.11g and 802.11n wireless clients,
2.4 GHz (B+G)
for networks using a mix of 802.11b and
802.11g wireless clients, 2.4 GHz (N)
for networks using
802.11n wireless clients only, 2.4 GHz (G) for networks using
802.11g wireless clients only, or 2.4 GHz (B) for networks using
802.11b wireless clients only.
Encryption
This displays whether encryption is enabled or disabled.
Broadcast SSID
This displays the broadcast SSID.
Associated
Clients
This displays the number of associated clients.
Refresh
Click Refresh to display the information on this screen afresh.
Close
Click Close to close this pop-up window.
3.4.2 Summary: Active Session Table
The Active Session Table displays all current active sessions.
Click System Information > Active Session to open the Active Session Table
screen.
System Information > Active Session
The following table describes the active session labels in this screen.


Chapter 4 Wireless LAN
FSG1100HN User’s Guide
31
4.2 What You Can Do
• Use the Basic screen (32) to configure the basic wireless settings, including to
enable the Wireless LAN, select the band, display the currently configured multiple
APs, enter the SSID, select the channel width, set the control sideband, select a
channel number, enable broadcast SSID, set the data rate, and display active
clients.
• Use the Advanced screen (35) to configure the fragment threshold, RTS threshold,
preamble type, IAPP, B/G protection, frame aggregation, short GI, block intra-BSS
traffic, and RF output power.
• Use the Security screen (37) to select and configure the wireless security mode on
your wireless network.
• Use the Access Control screen (44) to enable access control on your wireless
network.
• Use the Wi-Fi Protected Setup screen (44) to configure WPS on your wireless
network.
4.3 What You Should Know
Every wireless network must follow these basic guidelines.
• Every wireless client in the same wireless network must use the same SSID.
The SSID is the name of the wireless network. It stands for Service Set
IDentity.
• If two wireless networks overlap, they should use different channels.
Like radio stations or television channels, each wireless network uses a specific
channel, or frequency, to send and receive information.
• Every wireless client in the same wireless network must use security compatible
with the AP.
Security stops unauthorized devices from using the wireless network. It can also
protect the information that is sent in the wireless network.

Chapter 4 Wireless LAN
FSG1100HN User’s Guide
32
4.4 Wireless Basic Settings Screen
The Wireless Basic Settings window allows users to configure the Wireless LAN
Interface.
Click Wireless > Basic Settings to open the Wireless Basic Settings screen.
Wireless > Basic Settings
The following table describes the basic wireless labels in this screen.
Wireless > Basic Settings
LABEL
DESCRIPTION
Wireless Basic Settings
Wireless
LAN
Interface
Enable or disable the wireless LAN interface on the FSG1100HN.
Band
Choose the proper operating frequency for the wireless network. The
options are: 2.4 GHz (B+G+N) for networks using a mix of 802.11b,
802.11g, and 802.11n wireless clients, 2.4 GHz (G+N) for networks
using a mix of 802.11g and 802.11n wireless clients, 2.4 GHz (B+G)
for networks using a mix of 802.11b and 802.11g wireless clients, 2.4
GHz (N) for networks using 802.11n wireless clients only, 2.4 GHz (G)
for networks using 802.11g wireless clients only, or 2.4 GHz (B) for
networks using 802.11b wireless clients only.
Mode
Choose the desired mode. The option is AP. Click the Multiple AP
button to open the Multiple AP table, as shown on the next page. Up
to four APs can be enabled and configured on this table.
SSID
Enter a descriptive name for the Service Set Identity (SSID)
associated with the wireless station. All wireless stations associating
with the access point built-in to the FSG1100HN must have the same
SSID.
Channel
Width
Select the channel width. Select 20MHz if no 802.11n wireless clients
are being used. A standard 20 MHz channel offers transfer speeds up
to 150Mbps whereas a 40 MHz channel uses two standard channels
and offers speeds up to 300Mbps. As not all wireless devices support
40 MHz channels, most users select Auto 20/40MHz to allow the

Chapter 4 Wireless LAN
FSG1100HN User’s Guide
33
FSG1100HN to adjust the channel bandwidth automatically.
Channel
Number
Select the channel number for the wireless network between 1 and 11
or select Auto to automatically scan for an active channel on the
network.
Broadcast
SSID
Enable or disable the broadcasting of the FSG1100HN’s SSID. If this
is disabled, the SSID in the outgoing beacon frame will be hidden.
This prevents a station from obtaining the SSID through scanning
using a site survey tool.
Data Rate
Select the data transmission rate. For best performance, it is strongly
suggested to choose the default, Auto.
Associated
Clients
Click the Show Active Clients button to open the Active Wireless
Client Table, as shown below. This displays all current associated
wireless clients.
Apply
Click Apply to save your changes back to the FSG1100HN.
Refresh
Click Refresh to begin configuring this screen afresh.
4.4.1 Multiple AP Table
The FSG1100HN allows up to four APs to be enabled and configured on the
Multiple AP window.
Click Wireless > Basic Settings > Multiple AP to open the Multiple AP screen.
Wireless > Basic Settings > Multiple AP
The following table describes the multiple AP labels in this screen.
Wireless > Basic Settings > Multiple AP
LABEL
DESCRIPTION
Multiple AP
Index
The index number of the multiple AP table entry.
Enable
Tick to enable the multiple AP table entry.
Band
Select the proper operating frequency for the wireless network.
The options are: 2.4 GHz (B+G+N) for networks using a mix of
802.11b, 802.11g, and 802.11n wireless clients, 2.4 GHz (G+N)
for networks using a mix of 802.11g and 802.11
n wireless
clients, 2.4 GHz (B+G) for networks using a mix of 802.11b and
802.11g wireless clients, 2.4 GHz (N)
for networks using
802.11n wireless clients only, 2.4 GHz (G) for networks using
802.11g wireless clients only, or 2.4 GHz (B) for networks using
802.11b wireless clients only.
SSID
Enter a Service Set Identity (SSID) associated with the wireless
station. All wireless stations associating with the access point
Chapter 4 Wireless LAN
FSG1100HN User’s Guide
34
built-in to the FSG1100HN must have the same SSID.
Data Rate
Select the data transmission rate. For best performance, it is
strongly suggested to choose the default, Auto.
Broadcast SSID
Enable or disable the broadcasting of the FSG1100HN’s SSID. If
this is disabled, the SSID in the outgoing beacon frame will be
hidden. This prevents a station from obtaining the SSID through
scanning using a site survey tool.
Block Intra-BSS
Traffic
Enable this feature to prevent clients on each WLAN from being
able to ping each other.
Active Client List
Click the Show button to display the Active Wireless Client
Table window for AP1, AP2, AP3, or AP4.
Apply
Click Apply to save your changes back to the FSG1100HN.
Refresh
Click Refresh to begin configuring this screen afresh.
Close
Click Close to close this pop-up window.
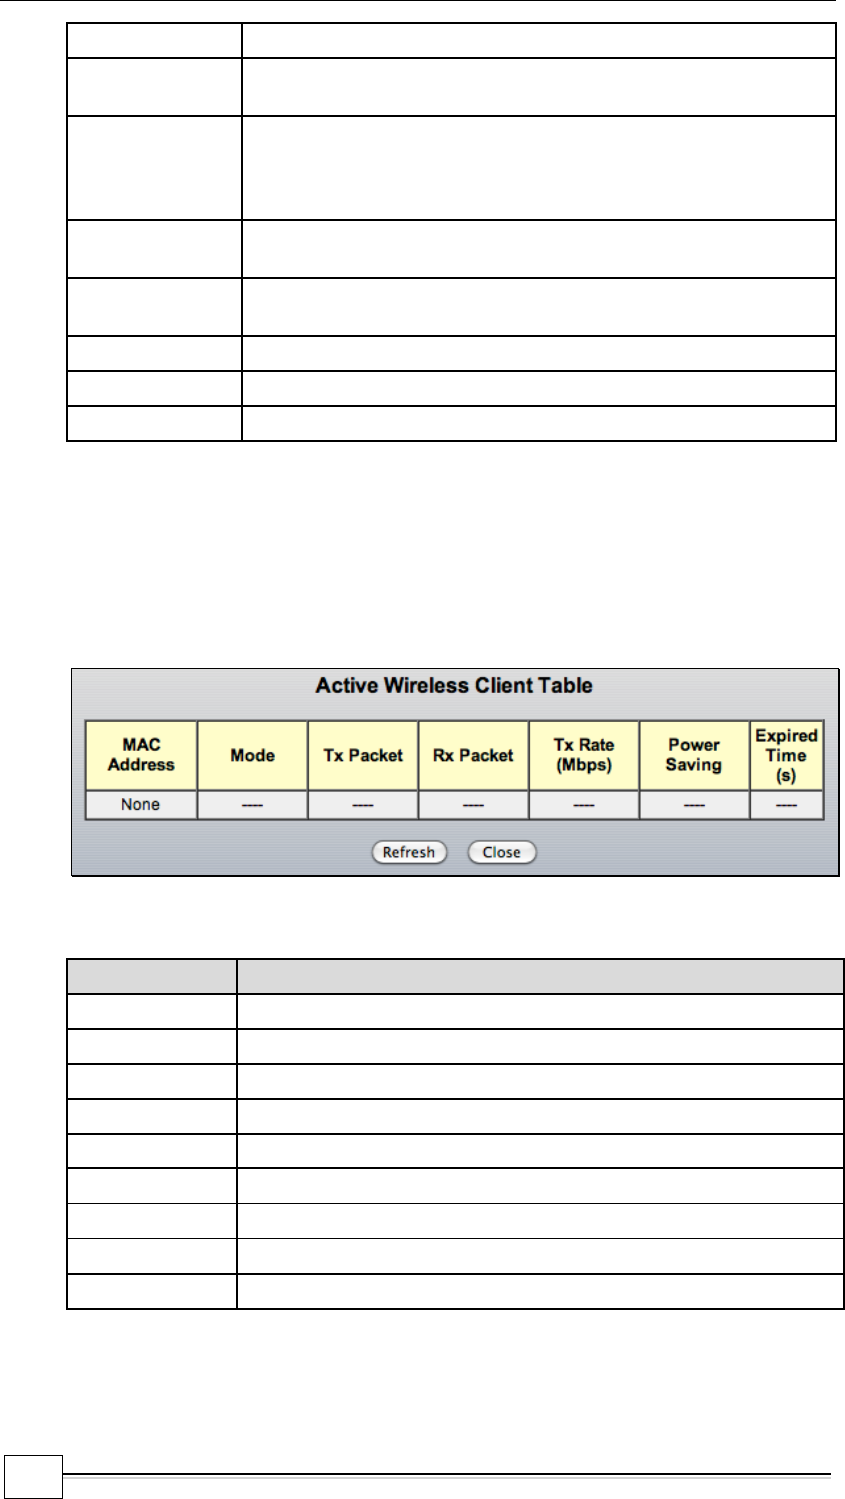
4.4.2 Active Wireless Client Table
The Active Wireless Client Table displays all current associated wireless clients.
Click Wireless > Basic Settings > Show Active Clients to open the Active Wireless
Client Table screen.
Wireless > Basic Settings > Show Active Clients
The following table describes the active wireless client labels in this screen
Wireless > Basic Settings > Show Active Clients
LABEL
DESCRIPTION
MAC Address
The MAC address of the wireless client.
Mode
The current mode of the wireless client.
Tx Packet
The number of packets transmitted by this wireless client.
Rx Packets
The number of packets received by this wireless client.
Tx Rate (Mbps)
The packet transmitted rate in Mbps.
Power Saving
The current power saving setting on this wireless client.
Expired Time(s)
The time before this wireless client times out.
Refresh
Click Refresh to begin configuring this screen afresh.
Close
Click Close to close this pop-up window.

Chapter 4 Wireless LAN
FSG1100HN User’s Guide
35
4.5 Wireless Advanced Settings Screen
The Wireless Advanced Settings window allows users to configure the Wireless LAN
Interface.
Click Wireless > Advanced Settings to open the Wireless Advanced Settings
screen.
Wireless > Advanced Settings
The following table describes the advanced wireless labels in this screen
Wireless > Advanced Settings
LABEL
DESCRIPTION
Wireless Advanced Settings
Fragment
Threshold
This is the threshold, specified in bytes, for the fragmentation
boundary for directed messages. It is the maximum data fragment
size that can be sent. Packets exceeding the 2346-byte setting will
be fragmented before transmission. Enter an even number between
256 and 2346. 2346 is the default.
RTS
Threshold
Data with its frame size larger than this value will perform the
Request To Send (RTS)/CTS (Clear To Send) handshake.
Enter a value between 0 and 2347. 0 means always send RTS.
Preamble
Type
Choose either Long Preamble or Short Preamble. A preamble
affects the timing in the wireless network. There are two preamble
types: long and short. If a wireless device uses a different preamble
type than the FSG1100HN, then it cannot communicate with the
FSG1100HN.
IAPP
Enable or disable Inter-Access Point Protocol (IAPP). This protocol
is designed for the enforcement of unique association throughout
the Extended Service Set and for the secure exchange of a wireless
station’s security context between a current AP and a new AP
during the handoff period.
B/G
Protection
Enable or disable B/G Protection. This feature limits cross-talk in a
mixed 802.11b and 802.11g environment.
Frame
Aggregation
Enable or disable Frame Aggregation. This feature increases
throughput by sending two or more data frames in a single
transmission.

Chapter 4 Wireless LAN
FSG1100HN User’s Guide
36
Short GI
Enable or disable Short Guard Interval (GI). Enabling this feature
reduces the guard interval time thereby increasing data capacity.
The drawback is that it can be less reliable and may create higher
data loss.
Block Intra-
BSS Traffic
Enable or disable Intra-BSS Traffic. A Basic Service Set (BSS)
exists when all communications between wireless clients or
between a wireless client and a wired network client go through one
access point. Intra-BSS traffic is traffic between wireless clients in
the BSS. When Intra-BSS is enabled, wireless client A and B can
access the wired network and communicate with each other. When
Intra-BSS is disabled, wireless client A and B can still access the
wired network but cannot communicate with each other.
RF Output
Power
Select the transmit power of the antennas. The default is 100%.
Apply
Click Apply to save your changes back to the FSG1100HN.
Refresh
Click Refresh to begin configuring this screen afresh.
Chapter 4 Wireless LAN
FSG1100HN User’s Guide
37
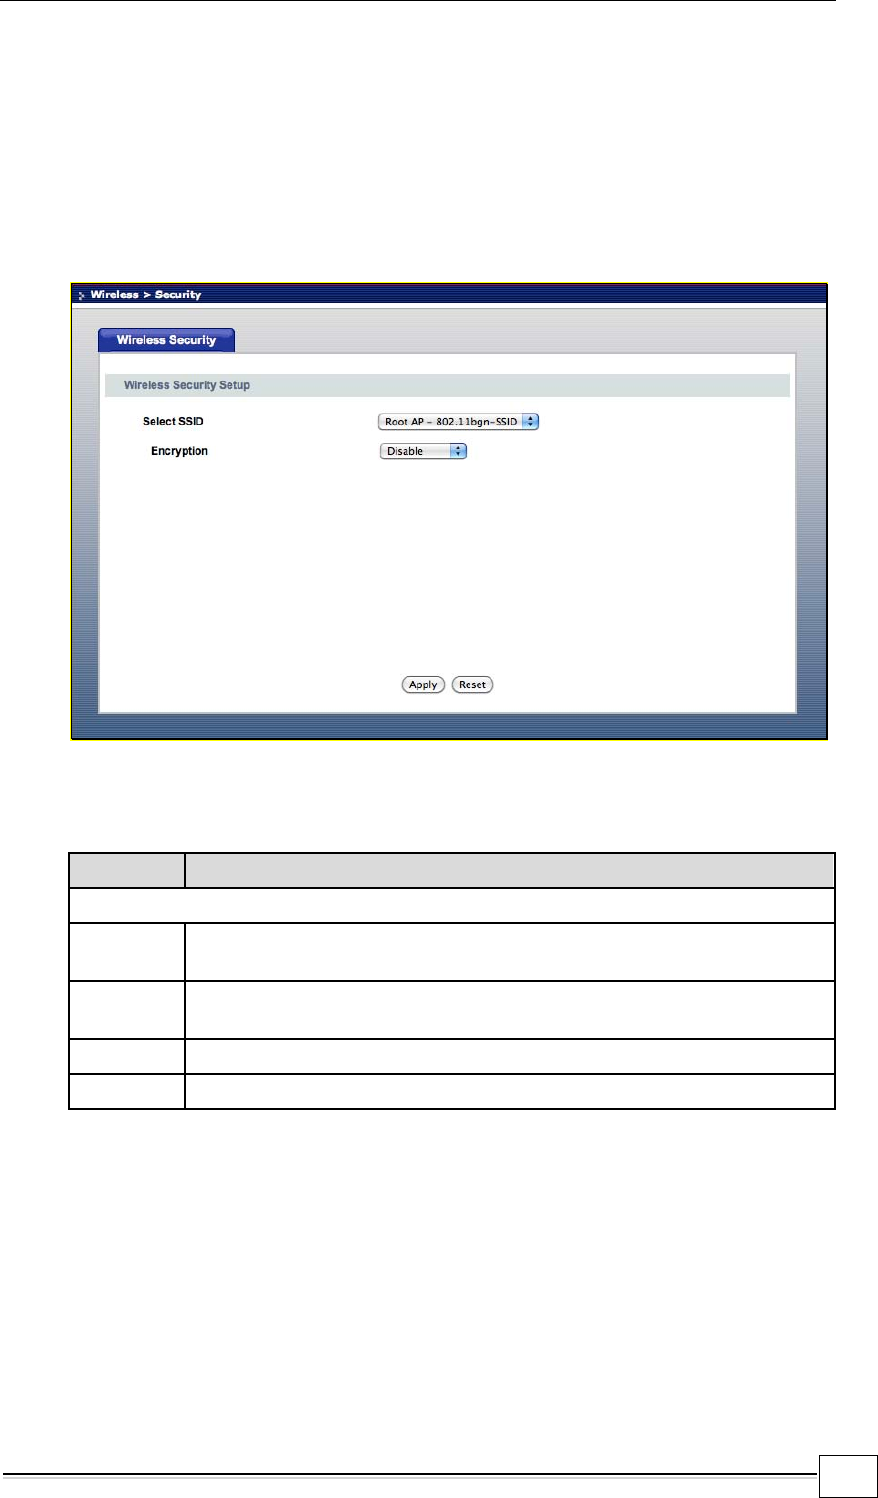
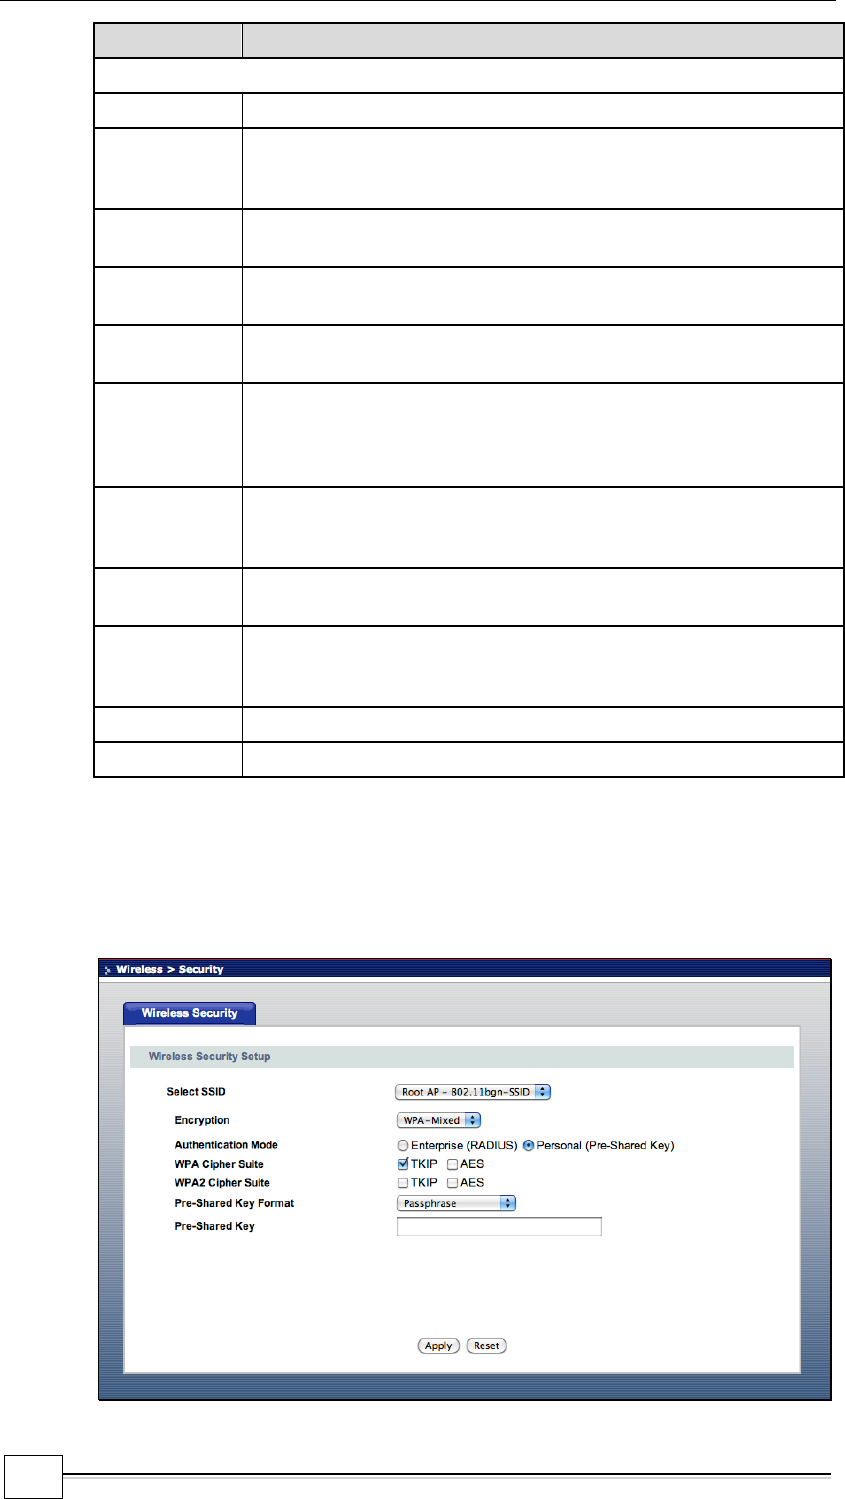
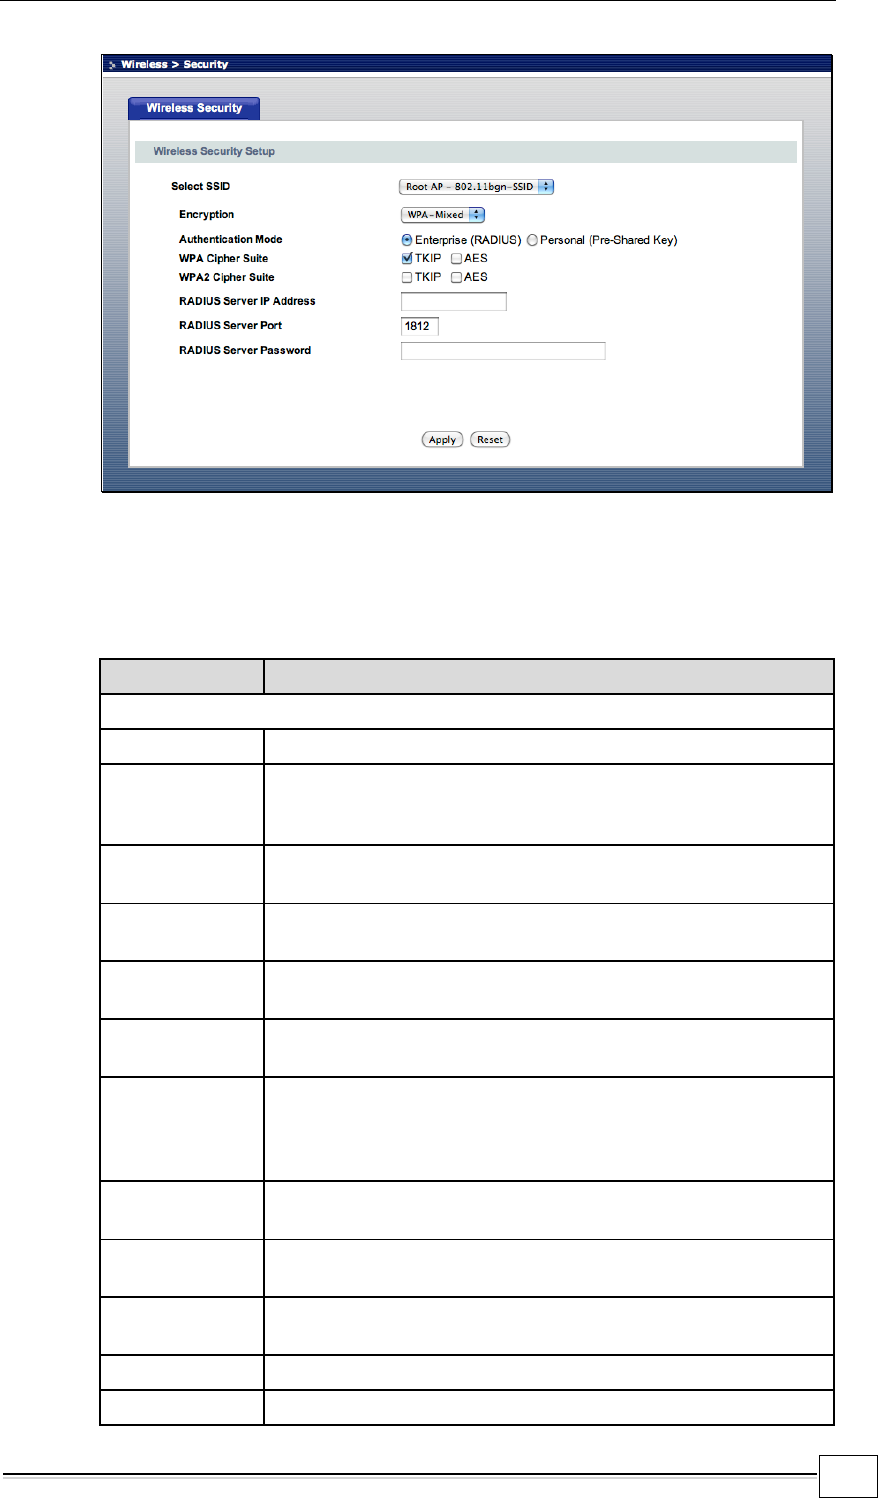
4.6 Wireless Security Screen
The Wireless Security Setup window allows users to configure WEP, WPA, WPA2,
and WPA-Mixed encryption.
Click Wireless > Security to open the Wireless Security screen.
Wireless > Security
The following table describes the wireless security labels in this screen
Wireless > Security
LABEL
DESCRIPTION
Wireless Security Setup
Select
SSID
Select the desired Service Set Identity (SSID).
Encryption
Choose from the following encryption options: WEP. WPA, WPA2,
WPA-Mixed, and Disable. The default is Disable.
Apply
Click Apply to save your changes back to the FSG1100HN.
Reset
Click Reset the settings on this screen.
4.6.1 WEP
Wired Equivalent Privacy (WEP) is an encryption security option based on IEEE
802.11 that uses the RC4 encryption algorithm. WEP encryption scrambles the
data transmitted between the wireless stations and the access points to keep
network communications private. It encrypts unicast and multicast communications
in a network. Both the wireless stations and the access points must use the same
WEP key. The FSG1100HN allows configuration of up to four 64-bit or 128-bit WEP
keys but only one key can be enabled at any one time.
Click Wireless > Security > WEP to open the Wireless Security WEP screen.

Chapter 4 Wireless LAN
FSG1100HN User’s Guide
39
4.6.2 WPA
Wi-Fi Protected Access (WPA) is an encryption security option designed to improve
upon the features of WEP. It employs Temporal Key Integrity Protocol (TKIP) to
scramble the keys using a hash algorithm and, by adding an integrity-checking
feature, ensures that the keys have not been tampered with. WPA-PSK/WPA2-PSK
uses a passphrase or key to authenticate wireless connections. The key is an
alphanumeric password between 8 and 63 characters long. The password can also
be symbols (!?*&_) and spaces. In addition, WPA/WPA2 includes Extensible
Authentication Protocol (EAP) to ensure only authorized network users can access
the network.
Click Wireless > Security > WPA to open the Wireless Security WPA screens.
Wireless > Security > WPA
Wireless Security Setup window for WPA (Personal (Pre-Shared Key))
Wireless Security Setup window for WPA (Enterprise (RADIUS))
The following table describes the wireless security for WPA labels in these screens.
Wireless > Security > WPA

Chapter 4 Wireless LAN
FSG1100HN User’s Guide
40
LABEL
DESCRIPTION
Wireless Security Setup
Select SSID
Select the desired Service Set Identity (SSID).
Encryption
Choose the encryption security type, WPA. The other
encryption security options are: WEP, WPA2, WPA-Mixed,
and Disable. The default is Disable.
Authentication
Mode
Select Enterprise (RADIUS) or Personal (Pre-Shared Key)
authentication. Personal (Pre-Shared Key) is the default.
WPA Cipher
Suite
Tick the Cipher Suite type, TKIP or AES.
Pre-Shared
Key Format
Select the PSK format, Passphrase or HEX – 64 characters.
Pre-Shared
Key
Enter a simple common password for the PSK. The pre-
shared key is from 8 to 63 case-sensitive ASCII characters
(including spaces and symbols) or less than 64 case-sensitive
HEX characters ("0-9", "A-F").
RADIUS
Server IP
Address
Enter the IP address of the RADIUS server.
RADIUS
Server Port
Enter the port number being used with the RADIUS server.
1812 is the default port.
RADIUS
Server
Password
Enter the security key for the RADIUS server.
Apply
Click Apply to save your changes back to the FSG1100HN.
Reset
Click Reset to reset the settings on this screen.
Chapter 4 Wireless LAN
FSG1100HN User’s Guide
42
LABEL
DESCRIPTION
Wireless Security Setup
Select SSID
Select the desired Service Set Identity (SSID).
Encryption
Choose encryption security type WPA2. The other encryption
security options are: WEP, WPA, WPA-Mixed, and Disable. The
default is Disable.
Authentication
Mode
Select Enterprise (RADIUS) or Personal (Pre-Shared Key)
authentication. Personal (Pre-Shared Key) is the default.
WPA2 Cipher
Suite
Tick the Cipher Suite type, TKIP or AES.
Pre-Shared
Key Format
Select the PSK format, Passphrase or HEX – 64 characters.
Pre-Shared
Key
Enter a simple common password for the PSK. The pre-shared
key is from 8 to 63 case-sensitive ASCII characters (including
spaces and symbols) or less than 64 case-sensitive HEX
characters ("0-9", "A-F").
RADIUS
Server IP
Address
Enter the IP address of the RADIUS server.
RADIUS
Server Port
Enter the port number being used with the RADIUS server. 1812
is the default port.
RADIUS
Server
Password
Enter the security key for the RADIUS server.
Apply
Click Apply to save your changes back to the FSG1100HN.
Reset
Click Reset to reset the settings on this screen.
4.6.4 WPA-Mixed
Click Wireless > Security > WPA-Mixed to open the Wireless Security WPA-
Mixed screens.
Wireless > Security > WPA-Mixed
Wireless Security Setup window for WPA-Mixed (Personal (Pre-Shared Key))
Chapter 4 Wireless LAN
FSG1100HN User’s Guide
43
Wireless Security Setup window for WPA-Mixed (Personal (Enterprise (RADIUS))
The following table describes the wireless security for WPA-Mixed labels in these
screens.
Wireless > Security > WPA-Mixed
LABEL
DESCRIPTION
Wireless Security Setup
Select SSID
Select the desired Service Set Identity (SSID).
Encryption
Choose the encryption security type, WPA-Mixed. The other
encryption security options are: WEP, WPA, WPA2, and
Disable. The default is Disable.
Authentication
Mode
Select Enterprise (RADIUS) or Personal (Pre-Shared Key)
authentication. Personal (Pre-Shared Key) is the default.
WPA Cipher
Suite
Tick the Cipher Suite type, TKIP or AES.
WPA2 Cipher
Suite
Tick the Cipher Suite type, TKIP or AES.
Pre-Shared
Key Format
Select the PSK format, Passphrase or HEX – 64 characters.
Pre-Shared
Key
Enter a simple common password for the PSK. The pre-
shared key is from 8 to 63 case-sensitive ASCII characters
(including spaces and symbols) or less than 64 case-sensitive
HEX characters ("0-9", "A-F").
RADIUS Server
IP Address
Enter the IP address of the RADIUS server.
RADIUS Server
Port
Enter the port number being used with the RADIUS server.
1812 is the default port.
RADIUS Server
Password
Enter the security key for the RADIUS server.
Apply
Click Apply to save your changes back to the FSG1100HN.
Reset
Click Reset to reset the settings on this screen.
Chapter 4 Wireless LAN
FSG1100HN User’s Guide
44
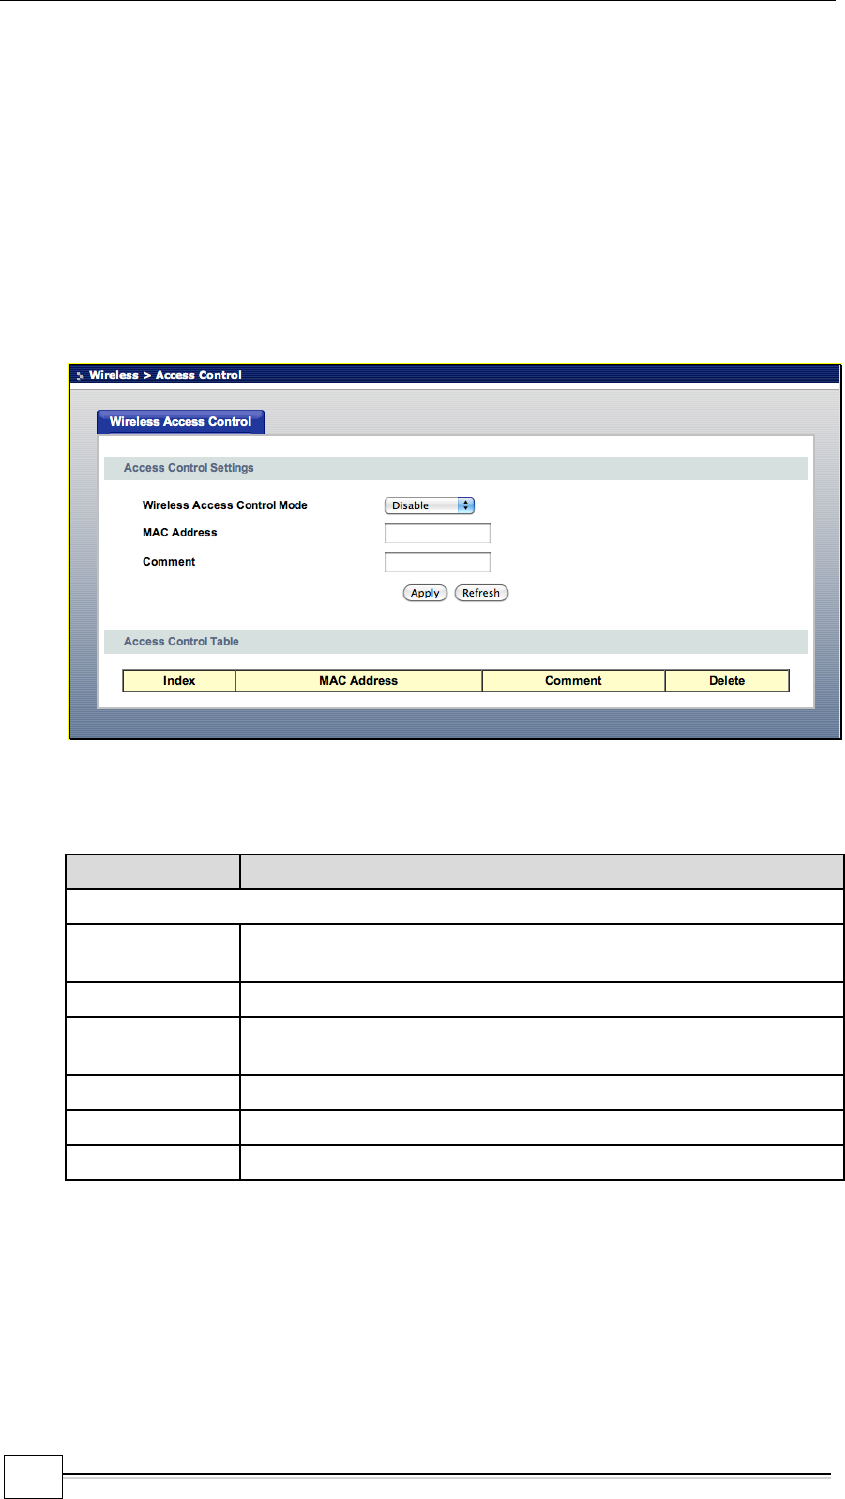
4.7 Wireless Access Control Screen
The Wireless Access Control window allows users to configure wireless access
control by creating a white list and a black list. This allows administrators to block
users or only allow approved users to make a connection.
Click Wireless > Access Control to open the Wireless Access Control screen.
Wireless > Access Control
The following table describes the wireless access control labels in this screen.
Wireless > Access Control
LABEL
DESCRIPTION
Access Control Settings
Wireless Access
Control Mode
Select Allow Listed, Deny Listed, or Disable.
MAC Address
Enter a MAC address.
Comment
Enter a user-specified comment to help identify this access
control rule.
Apply
Click Apply to save your changes back to the FSG1100HN.
Refresh
Click Refresh to begin configuring this screen afresh.
Delete
Click button to delete the table entry.
4.8 Wi-Fi Protected Setup Screen
The Wi-Fi Protected Setup window allows users to quickly set up a wireless network
with strong security, without having to configure security settings manually. WiFi
Protected Setup (WPS) is an industry standard specification, defined by the WiFi
Alliance. Depending on the devices on the network, users can either press a button
(on the device itself, or in its configuration utility) or enter a PIN (Personal Identification
Number) in the devices. Then, they connect and set up a secure network by
themselves.

Chapter 4 Wireless LAN
FSG1100HN User’s Guide
45
Click Wireless > WPS to open the Wi-Fi Protected Setup screen.
Wireless > WPS
The following table describes the WPS labels in this screen.
Wireless > WPS
LABEL
DESCRIPTION
WPS Settings
Active
Enable or Disable the WPS feature. Click Apply to commit
the setting. Click Refresh to display current settings of the
window.
WPS Summary
WPS Configured
This indicates when the FSG1100HN has connected to a
wireless network using WPS or when the Active setting is
Enable and wireless or wireless security settings have been
changed. The current wireless and wireless security settings
also appear in the window. This displays No if WPS is disabled
and there are no wireless or wireless security changes on the
FSG1100HN or if the user clicks the Reset to Unconfigured
button to remove the configured wireless and wireless security
settings.
WPS SSID
Displays the Service Set Identity name.
WPS Security
Mode
Indicates the current WPS security mode.
WPS Encryp Type
Indicates the current WPS encryption type.
WPS Default Key
Index
Indicates the current WPS default key.
AP PIN
Indicates the access point personal identification number.
WPS Action
PIN
Enter the personal identification number and then click the
Configure via PIN button. This is commonly known as the PIN
method of setting up WPS.

Chapter 4 Wireless LAN
FSG1100HN User’s Guide
46
PBC
Push Button Configuration (PBC) allows users to click the
Configure via PBC button to set up WPS. Once the button is
clicked on this window, users have 2 minutes to press a similar
virtual or actual button on the new wireless client device.
Chapter 5 WAN
FSG1100HN User’s Guide
49
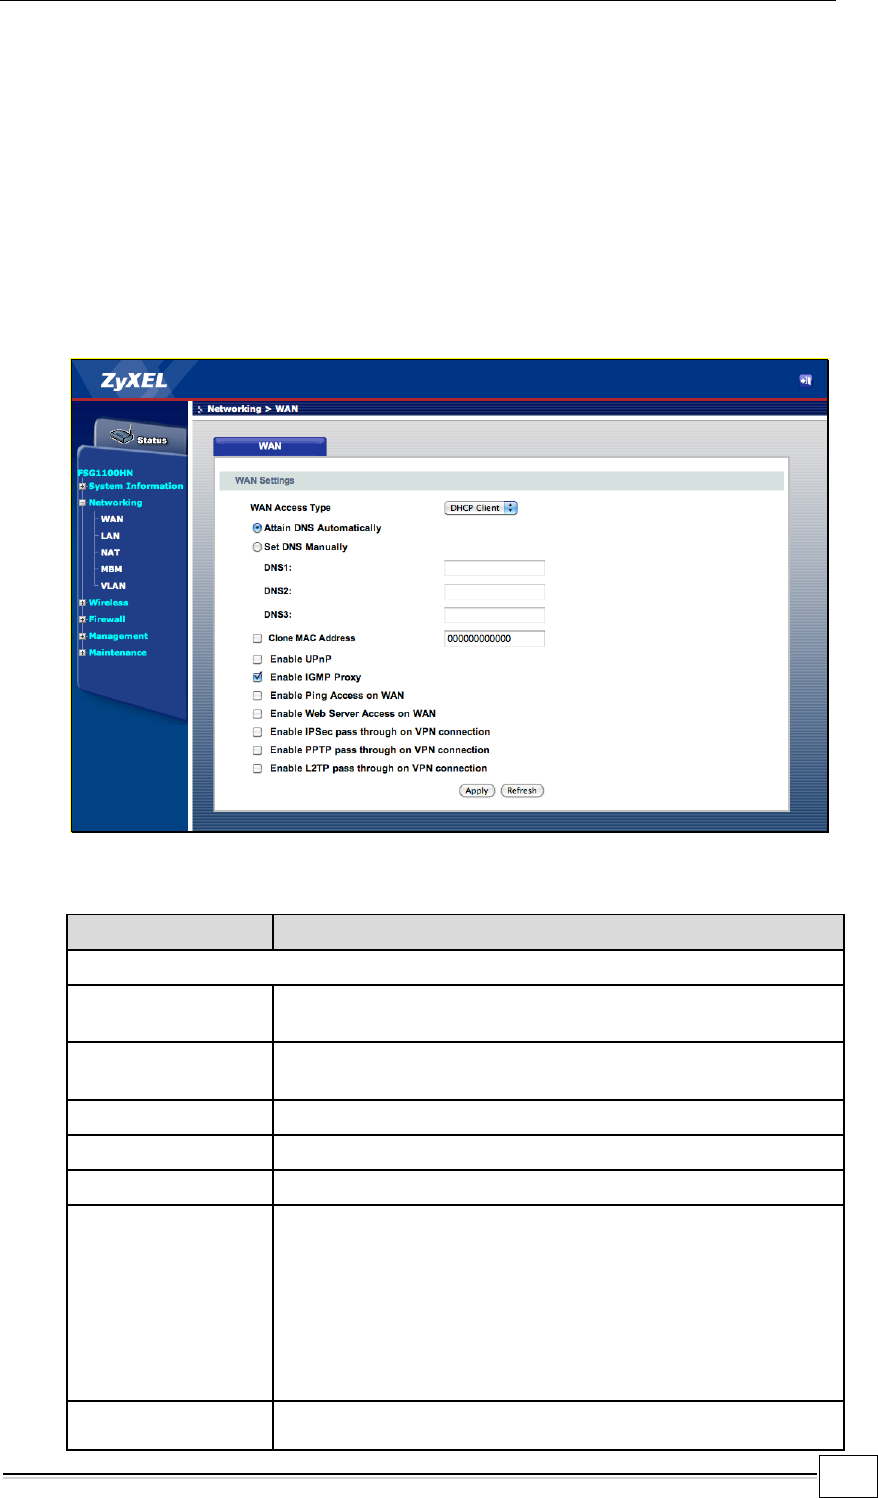
5.3 WAN for DHCP Client Screen
Dynamic Host Configuration Protocol (DHCP), based on RFC 2131 and RFC 2132,
allows individual clients to obtain TCP/IP configuration at start-up from a server. Users
can configure the FSG1100HN’s LAN as a DHCP server or disable it. When
configured as a server, the FSG1100HN provides the TCP/IP configuration for the
clients. If DHCP service is disabled, another DHCP server must be available on that
network, or the computer will need to be manually configured.
Click Networking > WAN > DHCP Client to open the WAN screen for DHCP Client
(the default WAN screen).
Networking > WAN > DHCP Client
The following table describes the WAN DHCP client labels in this screen.
Networking > WAN > DHCP Client
LABEL
DESCRIPTION
WAN Settings
WAN Access Type
Choose DHCP Client. The other options are Static IP or
PPPoE.
Attain DNS
Automatically
Click to attain DNS automatically. Otherwise, enter DNS
manually using the field below.
Set DNS Manually
Enter the DNS server IP address(es) assigned by the ISP.
DNS1-DNS3
Enter the DNS server IP address(es) assigned by the ISP.
Clone MAC Address
Enable MAC address cloning.
Enable UPnP
Enable the Universal Plug and Play (UPnP) feature. Universal
Plug and Play (UPnP) is a distributed, open networking
standard that uses TCP/IP for simple peer-to-peer network
connectivity between devices. A
UPnP device can
dynamically join a network, obtain an IP address, convey its
capabilities and learn about other devices on the network. In
turn, a device can
leave a network smoothly and
automatically when it is no longer in use.
Enable IGMP Proxy
Enable the IGMP proxy feature. IGMP proxy enables the
device to issue IGMP host messages on behalf of hosts that

Chapter 5 WAN
FSG1100HN User’s Guide
50
the device discovered through standard IGMP interfaces.
Enable Ping Access
on WAN
Enable the Ping access on WAN feature. This allows Ping to
use the WAN to send ICMP echo request packets to the
target host and listen for ICMP echo response replies.
Enable Web Server
Access on WAN
Enable the Web server access on WAN feature. This allows
Web server access via the WAN.
Enable IPSec Pass
Through on VPN
Connection
Enable the IPSec Pass Through on VPN connection feature.
This encapsulates a complete IP datagram, forming a virtual
tunnel between IPSec-capable devices.
Enable PPTP Pass
Through on VPN
Connection
Enable the PPTP Pass Through on VPN connection feature.
Point-to-Point Tunneling Protocol (PPTP) enables secure
transfer of data through a Virtual Private Network (VPN).
Enable L2TP Pass
Through on VPN
Connection
Enable the L2TP Pass Through on VPN connection feature.
Layer 2 Tunneling Protocol (L2TP) is used to support data
transfer through a Virtual Private Network (VPN). It relies on
an encryption protocol that it passes within the tunnel to
provide privacy.
Apply
Click Apply to save your changes back to the FSG1100HN.
Refresh
Click Refresh to begin configuring this screen afresh.

Chapter 5 WAN
FSG1100HN User’s Guide
51
5.4 WAN for Static IP Screen
Select Static IP if the WAN port IP information is provided by the ISP. Users will need
to enter the IP address, subnet mask, gateway address, and DNS(es) provided by the
ISP.
Click Networking > WAN > Static IP to open the WAN screen for Static IP.
Networking > WAN > Static IP
The following table describes the WAN static IP labels in this screen.
Networking > WAN > Static IP
LABEL
DESCRIPTION
WAN Settings
WAN Access
Type
Choose Static IP. The other options are DHCP Client or PPPoE.
IP Address
The WAN IP address is an IP address for the FSG1100HN, which
makes it accessible from an outside network. It is used to
communicate with other devices on other networks.
If this static WAN IP address has been assigned by the ISP, it
should also assign the subnet mask and DNS server IP
address(es). A default gateway IP address may also be provided.
Subnet Mask
Enter the subnet mask.
Default
Gateway
Enter the default gateway IP address.
DNS1-DNS3
Enter the DNS server IP address(es) assigned by the ISP.
Clone MAC
Address
Enable MAC address cloning.
Enable UPnP
Enable the Universal Plug and Play (UPnP) feature. Universal Plug
and Play (UPnP) is a distributed, open networking standard that

Chapter 5 WAN
FSG1100HN User’s Guide
53
5.5 WAN for PPPoE Screen
Point-to-Point Protocol over Ethernet (PPPoE) emulates a dial-up connection. It allows
an ISP to use their existing network configuration with newer broadband technologies
such as ADSL. The PPPoE driver on the FSG1100HN is transparent to the computers
on the LAN, which see only Ethernet and are not aware of PPPoE thus saving users
the need to manage PPPoE clients on individual computers.
Click Networking > WAN > PPPoE to open the WAN screen for PPPoE.
The following table describes the WAN PPPoE labels in this screen.
Networking > WAN > PPPoE
LABEL
DESCRIPTION
WAN Settings
WAN Access Type
Choose PPPoE. The other options are DHCP Client or Static
IP.
User Name
Enter the user name provided by the ISP.
Password
Enter the password associated with the user name above.
Connection Type
Select Continuous, Connect on Demand, or Manual. If
Manual is selected, users will need to manually click Connect
and Disconnect to use the Internet. If Connect on Demand is
selected, users need to enter an Idle Time value in the next
field.
Idle Time
Enter an age-out value, in minutes, between 1 and 1000.
Specyfikacje produktu
| Marka: | ZyXEL |
| Kategoria: | router |
| Model: | FSG1100HN |
Potrzebujesz pomocy?
Jeśli potrzebujesz pomocy z ZyXEL FSG1100HN, zadaj pytanie poniżej, a inni użytkownicy Ci odpowiedzą
Instrukcje router ZyXEL

1 Kwietnia 2025
10 Października 2024
23 Września 2024
23 Września 2024
18 Września 2024
18 Września 2024
17 Września 2024
10 Września 2024
10 Września 2024
10 Września 2024
Instrukcje router
- router Samsung
- router Tenda
- router AEG
- router Motorola
- router Xiaomi
- router Huawei
- router TCL
- router TP-Link
- router Milwaukee
- router Gigabyte
- router Acer
- router Bosch
- router Hikvision
- router Roland
- router Nokia
- router Toolcraft
- router Festool
- router EZVIZ
- router Conceptronic
- router StarTech.com
- router Asus
- router Medion
- router Black & Decker
- router TRENDnet
- router MSI
- router D-Link
- router ATen
- router Siemens
- router Thrustmaster
- router DeWalt
- router Einhell
- router Alcatel
- router Sigma
- router HP
- router Teltonika
- router Silverline
- router Manhattan
- router Strong
- router Makita
- router Mikrotik
- router Cisco
- router Moxa
- router Synology
- router Gembird
- router ZTE
- router Lindy
- router Zebra
- router Trust
- router LogiLink
- router Dell
- router IFM
- router Linksys
- router Google
- router Digitus
- router Vimar
- router Dahua Technology
- router Schneider
- router Kyocera
- router Sabrent
- router AVMATRIX
- router Renkforce
- router Netgear
- router Thomson
- router AVM
- router BT
- router Totolink
- router Black Box
- router Güde
- router Apple
- router Lancom
- router Zoom
- router Iogear
- router Intellinet
- router Devolo
- router Vtech
- router Mercusys
- router I-TEC
- router Draytek
- router Edimax
- router Razer
- router AirLive
- router EnGenius
- router Planet
- router NEC
- router Blustream
- router LevelOne
- router Digi
- router Milesight
- router Rocstor
- router Hama
- router Ubiquiti Networks
- router Western Digital
- router ModeCom
- router Smart-AVI
- router Barco
- router Sagemcom
- router Juniper
- router Cudy
- router QNAP
- router Arris
- router Netis
- router Anker
- router Allnet
- router Marshall Electronics
- router Hitachi
- router M-life
- router AJA
- router Media-Tech
- router BenQ
- router Atlona
- router FSR
- router Gefen
- router Vivanco
- router Topcom
- router PowerPlus
- router HiKOKI
- router Blackmagic Design
- router Kathrein
- router JUNG
- router Foscam
- router Alfa
- router Porter-Cable
- router Metabo
- router Starlink
- router Keewifi
- router Digital Forecast
- router Keenetic
- router SPL
- router Cotech
- router Skil
- router Alfatron
- router Digitalinx
- router Clas Ohlson
- router KPN
- router Belkin
- router Kramer
- router KanexPro
- router Kopul
- router BZBGear
- router RGBlink
- router Key Digital
- router UPC
- router Lumantek
- router Allied Telesis
- router Actiontec
- router Proximus
- router Eminent
- router Sitecom
- router Sagem
- router Nilox
- router Sonos
- router Patton
- router Techly
- router Envivo
- router Buffalo
- router Nest
- router Vodafone
- router ICIDU
- router Milan
- router Konig
- router AT&T
- router Sweex
- router Aruba
- router Phicomm
- router Kasda
- router Technicolor
- router Verizon
- router Billion
- router T-Mobile
- router RAVPower
- router Hawking Technologies
- router Nexxt
- router WyreStorm
- router Beafon
- router Kraun
- router LTS
- router Zolid
- router Telstra
- router Holzmann
- router SIIG
- router Eero
- router Advantech
- router Mercku
- router Hercules
- router Xantech
- router Intelix
- router MuxLab
- router Pentagram
- router Ocean Matrix
- router Comprehensive
- router Arcadyan
- router Digiconnect
- router Ubee
- router SMC
- router Tele 2
- router Kogan
- router Peak
- router CradlePoint
- router Davolink
- router Sixnet
- router AVPro Edge
- router Evolution
- router 7inova
- router Predator
- router A-NeuVideo
- router United Telecom
- router F-Secure
- router Rosewill
- router Digicom
- router On Networks
- router Wisetiger
- router Leoxsys
- router Readynet
- router OneAccess
- router Accelerated
- router Nexaira
- router Hamlet
- router Approx
- router T-com
- router Amped Wireless
- router Cambium Networks
- router 3Com
- router Avenview
- router Ruckus Wireless
- router Dovado
- router Mach Power
- router EXSYS
- router NetComm
- router Comtrend
- router Premiertek
- router Bea-fon
- router GL.iNet
- router Shinybow
- router Edgewater
- router Atlantis Land
- router Lantronix
- router PulseAudio
- router Luxul
- router DVDO
- router StarIink
- router Silentwind
- router Keezel
- router VigilLink
Najnowsze instrukcje dla router
9 Kwietnia 2025
9 Kwietnia 2025

8 Kwietnia 2025

3 Kwietnia 2025

2 Kwietnia 2025
30 Marca 2025
30 Marca 2025
30 Marca 2025
30 Marca 2025
29 Marca 2025