Instrukcja obsługi Sonic Alert SBW100 Sonic Boom
Sonic Alert
Bezpieczeństwo
SBW100 Sonic Boom
Przeczytaj poniżej 📖 instrukcję obsługi w języku polskim dla Sonic Alert SBW100 Sonic Boom (6 stron) w kategorii Bezpieczeństwo. Ta instrukcja była pomocna dla 7 osób i została oceniona przez 2 użytkowników na średnio 4.5 gwiazdek
Strona 1/6
English
Model SBW100
Sonic Boom
OPERATION INSTRUCTIONS
IMPORTANT - Please read these instructions carefully before use and retain for future reference.
- Use only the supplied or recommended Sonic Alert adaptor to connect the unit.
WARNING: To prevent fire or shock hazard do not expose this appliance to rain or moisture.
- The ventilation should not be impeded by covering the ventilation openings with items
such as, newspaper, table cloth, curtains, etc.;
- No naked flame sources, such as lighted candles should be placed on the apparatus.
- It shall not be exposed to dripping or splashing and that no objects filled with liquids,
such as vases, shall be placed on the apparatus.
- Do not place the product in closed bookcases or racks without proper ventilation.
- Where the mains/ power plug is used as the disconnect device, the disconnect device
shall remain readily operable.
GENERAL DATA:
UL listed Power Adaptor: AC100-240V~, 50/60Hz
Adaptor Output: DC5V , 2.2 A
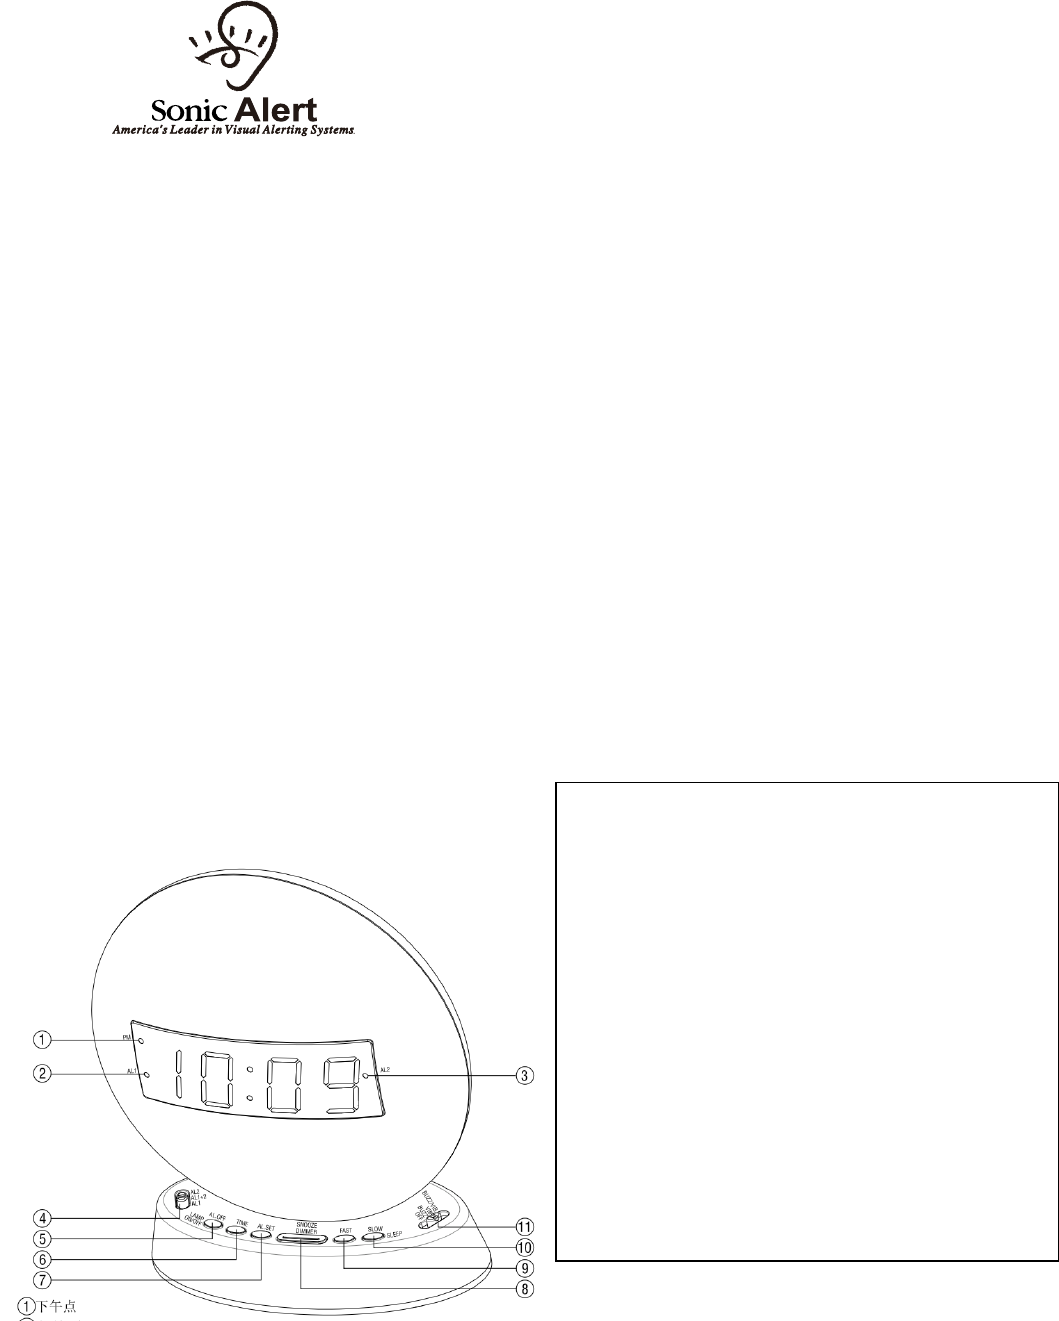
Features
1) PM Indicator
2) Alarm 1 Indicator
3) Alarm 2 Indicator
4) Alarm Mode Switch (AL1, AL2, AL1+AL2)
5) Alarm Off / LAMP on/off
6) Time Set
7) Alarm Set
8) Snooze / Dimmer
9) Fast
10) Slow / Sleep
11) Alarm Function Switch

Test Mode:
1) Press and hold the Snooze (8) and Time (6) buttons for 3 seconds to enter the Test Mode. The
display will show "7ES7" to indicate it is in TEST Mode.
2) If within 1 minute no button is pressed, then it will exit the Test Mode and return back to the
Time Mode.
3) While in Test Mode, sliding the Alarm Function Switch (11) will demonstrate the different
functions of the clock; Buzz, VIB or Buzz & Vib.
4) After finish with the Test Mode, press any button (except the Snooze & Time buttons, which has
no effect) it will exit the Test Mode immediately.
Setting the Correct Time -
1) Press and hold the TIME Button (6) and at the same time press the FAST Button (9)
or the SLOW button (10) to advance clock display until you have desired time.
2) The lighted dot (1) located in upper left corner of the clock display indicates the time is
PM. For AM time, this dot will not light up.
Setting the Alarm Time -
Setting Alarm 1
1) Slide the ALARM MODE SWITCH (4) to AL1 position, the alarm indicator AL1 (2) will
light up.
2) Press and hold the ALARM SET (7) button and at the same time press the FAST
Button (9) or the SLOW button (10) to advance clock display until the desired
alarm setting is reached.
3) Make sure alarm time is correctly set for AM or PM.
Setting Alarm 2
4) Once alarm AL1 has been set, slide ALARM MODE SWITCH (4) to AL2 position, the
alarm indicator AL2 (3) will light up.
5) Press and hold the ALARM SET (7) button and at the same time press the FAST
Button (9) or the SLOW button (10) to advance clock display until you reach desired
alarm setting.
12) Alarm Sound Selector
13) Vibrator Output
14) Tone Wheel
15) USB for Charging
16) AUX Input
17) DC Input
18) Volume Wheel
19) Record / Play
Selecting 12 or 24 hours format -
Press and hold the Fast Button (9) for 6 seconds to enter the hour selection mode,
release the Fast Button (9) when the display shows "12 H" or "24 H".
Press the FAST button (9) to toggle between 12 or 24 hours format. If no selection is
made within 4 seconds, then the last displayed hour format will be chosen and the display
will return to the normal Time mode.
Alarm -
Enable Alarms:
1) To enable Alarm 1, slide the ALARM MODE SWITCH (4) to AL1 position. the alarm
indicator AL1 (2) will light up.
2) To enable Alarm 2, slide the ALARM MODE SWITCH (4) to AL2 position, the alarm
indicator AL2 (3) will light up.
3) To enable both alarms, slide the ALARM MODE SWITCH (12) to AL1+AL2 position,
the alarm indicators AL1 (2) and AL2 (3) will light up.
Shutting Off the Alarm -
Alarm can be shut off temporary for the day or permanently shut off.
1) When alarm goes off, press the ALARM OFF (5) button to turn off for the day. The alarm will
repeat at the same time the next day, if alarm setting has not been changed.
2) To shut the alarm off permanently, slide the Alarm Function Switch (11) down to the
OFF position.
NOTE: The Alarm Off function of Alarm 1 and Alarm 2 is independent of each other.
To Select Wake up mode -
To select the wake up mode, slide the Alarm Function Switch (11) to your desired position: -
a) BUZZ for sound (Alarm Sound is user selectable)
b) VIB for bed shaker
c) VIB/ BUZZ for both sound and bed shaker
NOTE: once the wake up mode is chosen, this will apply to both alarms.
To Select Alarm Sound
To select the alarm sound, slide the Alarm Sound Selector (12) to your desired setting.
The user can select between, two built-in sounds, the standard buzzer sounds, as well as
their own recordings.
Recordings
To make your recording, press and hold the Record (19) button 1 sec, then make your own
recording. (10 sec)
To playback your recording, press the Play (19) button.
Alarm Patterns -
When the alarm is activated, alarm pattern of the buzzer / flashing display will be out of
sync with the vibrator. This means that when the buzzer / flashing display is ON, the vibrator will
be OFF and while the buzzer/ flashing display is OFF, the vibrator will be ON.
ALARM 1 - When Alarm 1 is active, the buzzer will beep 3 times, then the vibrator will be on.
This pattern is repeated until the alarm is stopped.
ALARM 2 - When Alarm 2 is active, the buzzer will beep 4 times, then the vibrator will be on.
Specyfikacje produktu
| Marka: | Sonic Alert |
| Kategoria: | Bezpieczeństwo |
| Model: | SBW100 Sonic Boom |
Potrzebujesz pomocy?
Jeśli potrzebujesz pomocy z Sonic Alert SBW100 Sonic Boom, zadaj pytanie poniżej, a inni użytkownicy Ci odpowiedzą
Instrukcje Bezpieczeństwo Sonic Alert

24 Września 2024
23 Września 2024
23 Września 2024
23 Września 2024
19 Września 2024
18 Września 2024
18 Września 2024
12 Września 2024
10 Września 2024
10 Września 2024
Instrukcje Bezpieczeństwo
- Bezpieczeństwo Bosch
- Bezpieczeństwo Hikvision
- Bezpieczeństwo Easy Home
- Bezpieczeństwo Geemarc
- Bezpieczeństwo EZVIZ
- Bezpieczeństwo Panasonic
- Bezpieczeństwo Theben
- Bezpieczeństwo Nedis
- Bezpieczeństwo Medion
- Bezpieczeństwo TRENDnet
- Bezpieczeństwo Marquant
- Bezpieczeństwo Blaupunkt
- Bezpieczeństwo Siemens
- Bezpieczeństwo Grundig
- Bezpieczeństwo BTicino
- Bezpieczeństwo Honeywell
- Bezpieczeństwo Steinel
- Bezpieczeństwo Trust
- Bezpieczeństwo V-TAC
- Bezpieczeństwo Eufy
- Bezpieczeństwo BaseTech
- Bezpieczeństwo AXA
- Bezpieczeństwo Perel
- Bezpieczeństwo Somfy
- Bezpieczeństwo Netgear
- Bezpieczeństwo Velleman
- Bezpieczeństwo Bavaria
- Bezpieczeństwo Devolo
- Bezpieczeństwo Juwel
- Bezpieczeństwo Waeco
- Bezpieczeństwo Eden
- Bezpieczeństwo Edimax
- Bezpieczeństwo Grothe
- Bezpieczeństwo First Alert
- Bezpieczeństwo Maginon
- Bezpieczeństwo Prestigio
- Bezpieczeństwo LevelOne
- Bezpieczeństwo Axis
- Bezpieczeństwo Unitron
- Bezpieczeństwo Heidemann
- Bezpieczeństwo Abus
- Bezpieczeństwo Elro
- Bezpieczeństwo Marmitek
- Bezpieczeństwo Goobay
- Bezpieczeństwo Netatmo
- Bezpieczeństwo Optex
- Bezpieczeństwo Yale
- Bezpieczeństwo Technaxx
- Bezpieczeństwo Y-cam
- Bezpieczeństwo Grandstream
- Bezpieczeństwo Powerfix
- Bezpieczeństwo EasyMaxx
- Bezpieczeństwo Alecto
- Bezpieczeństwo JUNG
- Bezpieczeństwo Foscam
- Bezpieczeństwo Monacor
- Bezpieczeństwo Alphatronics
- Bezpieczeństwo Smartwares
- Bezpieczeństwo Lamax
- Bezpieczeństwo Sygonix
- Bezpieczeństwo Müller
- Bezpieczeństwo Kopp
- Bezpieczeństwo Fenton
- Bezpieczeństwo Profile
- Bezpieczeństwo Fysic
- Bezpieczeństwo Ajax
- Bezpieczeństwo AngelEye
- Bezpieczeństwo Aritech
- Bezpieczeństwo AceSee
- Bezpieczeństwo Airbolt
- Bezpieczeństwo Brennenstuhl
- Bezpieczeństwo Alhua - Dahua
- Bezpieczeństwo Tevion
- Bezpieczeństwo Eminent
- Bezpieczeństwo Doro
- Bezpieczeństwo Jacob Jensen
- Bezpieczeństwo Trebs
- Bezpieczeństwo Ednet
- Bezpieczeństwo ME
- Bezpieczeństwo Goliath
- Bezpieczeństwo Audiovox
- Bezpieczeństwo Nest
- Bezpieczeństwo Switel
- Bezpieczeństwo Topcraft
- Bezpieczeństwo Secure Pro
- Bezpieczeństwo Nemef
- Bezpieczeństwo Dahua
- Bezpieczeństwo BRK
- Bezpieczeństwo Hagenuk
- Bezpieczeństwo Logicom
- Bezpieczeństwo Jupiter Pro
- Bezpieczeństwo Xavax
- Bezpieczeństwo Elkron
- Bezpieczeństwo Orbis
- Bezpieczeństwo Niko
- Bezpieczeństwo Gira
- Bezpieczeństwo Interlogix
- Bezpieczeństwo Dnt
- Bezpieczeństwo Fito
- Bezpieczeństwo Urmet
- Bezpieczeństwo Iget
- Bezpieczeństwo Ranex
- Bezpieczeństwo Wanscam
- Bezpieczeństwo Satel
- Bezpieczeństwo Dymond
- Bezpieczeństwo Notifier
- Bezpieczeństwo Friedland
- Bezpieczeństwo HomeWizard
- Bezpieczeństwo Plustek
- Bezpieczeństwo Golmar
- Bezpieczeństwo Batavia
- Bezpieczeństwo Storage Options
- Bezpieczeństwo Provision ISR
- Bezpieczeństwo NetworX
- Bezpieczeństwo Bitron Video
- Bezpieczeństwo Zmodo
- Bezpieczeństwo Velbus
- Bezpieczeństwo Elro-Flamingo
- Bezpieczeństwo Electronics Line
- Bezpieczeństwo One2track
- Bezpieczeństwo HUMANTECHNIK
- Bezpieczeństwo PIR Alarm
- Bezpieczeństwo Directed Electronics
- Bezpieczeństwo Oplink
- Bezpieczeństwo BML
- Bezpieczeństwo Unitec
- Bezpieczeństwo Jablotron
- Bezpieczeństwo Home8
- Bezpieczeństwo AVTech - Velleman
- Bezpieczeństwo Galaxy
- Bezpieczeństwo I-onik
- Bezpieczeństwo Smartalarm
- Bezpieczeństwo GE Security
- Bezpieczeństwo Microtech
- Bezpieczeństwo Nor-tec
- Bezpieczeństwo Entrya
- Bezpieczeństwo Tegui
- Bezpieczeństwo Stobo
- Bezpieczeństwo Kompernass
- Bezpieczeństwo Iiquu
- Bezpieczeństwo Storex
- Bezpieczeństwo Powermax
- Bezpieczeństwo Woonveilig
- Bezpieczeństwo Mikros
- Bezpieczeństwo Bolyguard
- Bezpieczeństwo Indexa
- Bezpieczeństwo Skytronic
- Bezpieczeństwo FlinQ
- Bezpieczeństwo Paradox
- Bezpieczeństwo Flamingo FA15RF
- Bezpieczeństwo SecuFirst
- Bezpieczeństwo BRK DICON
- Bezpieczeństwo FBII
- Bezpieczeństwo Dericam
- Bezpieczeństwo Myfox
- Bezpieczeństwo Kocom
- Bezpieczeństwo RISCO Group
- Bezpieczeństwo SmartHome
- Bezpieczeństwo Bellman
- Bezpieczeństwo Protector
- Bezpieczeństwo I-Tel
- Bezpieczeństwo Home Protector
- Bezpieczeństwo Ksenia
- Bezpieczeństwo Mr Safe
- Bezpieczeństwo Epine
- Bezpieczeństwo Inner Range
- Bezpieczeństwo Dedicated Micros
- Bezpieczeństwo Visonic
- Bezpieczeństwo PROmax
- Bezpieczeństwo Selvag
- Bezpieczeństwo Voxx
- Bezpieczeństwo Fracarro
- Bezpieczeństwo Guardall
- Bezpieczeństwo Xena
- Bezpieczeństwo Smanos
- Bezpieczeństwo One Concept
- Bezpieczeństwo QuattSecure
- Bezpieczeństwo NetBotz
- Bezpieczeństwo Securitas
Najnowsze instrukcje dla Bezpieczeństwo
19 Lutego 2025
15 Stycznia 2025
15 Stycznia 2025
15 Stycznia 2025
11 Stycznia 2025
11 Stycznia 2025
5 Października 2024
2 Października 2024
28 Września 2024
28 Września 2024