Instrukcja obsługi Samsung Galaxy Feel
Przeczytaj poniżej 📖 instrukcję obsługi w języku polskim dla Samsung Galaxy Feel (157 stron) w kategorii telefon. Ta instrukcja była pomocna dla 7 osób i została oceniona przez 2 użytkowników na średnio 4.5 gwiazdek
Strona 1/157

’17.5
SC-04J
INSTRUCTION MANUAL
Introduction
Thank you for purchasing "SC-04J" mobile terminal.
Before and during use of your terminal, be sure to thoroughly read this
instruction manual to ensure you are able to correctly use your terminal.
Manual
■ "クイックスタートガイド (Quick start guide)" (included with the terminal) (In
Japanese only)
This guide provides information of parts names and functions.
■ Instruction Manual (guide app of the terminal) (In Japanese only)
This manual provides detailed information and operations of the functions.
• From the Home screen, → Tap "Instruction Manual".
For some functions, tap the written contents, and you can see the content
or start the function directly from the description.
• For the first time, download and install the app according to the onscreen
instructions.
• For installing "Instruction Manual" app if you uninstalled it, from the Home
screen, tap "Play Store" and search "SC-04J 取扱説明書 (SC-04J the
Instruction manual)" in "Play Store" and download "Instruction Manual" app.
■ INSTRUCTION MANUAL (PDF le)
This manual provides detailed information and operations of the functions.
• Download from NTT DOCOMO website:
https://www.nttdocomo.co.jp/english/support/trouble/manual/download/
index.html
* You can download the latest information. URL and the contents are subject
to change without prior notice.
Operation descriptions
In this manual, the operation steps such as the menu operations are simply
described as follows.
• "Tap" is an operation of touching lightly the display of the terminal with nger
(P.28).
(Example) For tapping (Apps icon) on the Home screen to display the app
menu and then tapping (Settings icon), the operation is described as follows.
1From the Home screen, → "Settings"
• In this manual, the operation steps and screen images are described in
default status. The operation steps or screen image on the terminal may
vary by the service you use or app you installed.
• In this manual, explanations and screen images for terminal color "Moon
White", "docomo LIVE UX" as Home app and "Original" as Kisekae are
provided. Home app can be switched by the operation from the Home
screen, tap "ホーム切替 (Change home)".
• An operation guidance screen may appear on the Home screen, Apps
screen, etc. If "Do not show again" etc. option is displayed on the screen,
select the option to hide the screen from then on.
• The images and illustration used in this manual are examples. They may
dier from the actual displays.
• In this manual, function or setting that is available in multiple operations
are explained mostly with the easily understandable operation steps.
• In this manual, "SC-04J" mobile terminal is usually referred to as "terminal".
Please be forewarned.
• Reproduction of the content of this manual in part or in whole is prohibited.
• The content of this manual is subject to change without notice.

1
Contents/Precautions
Accessories
SC-04J (with warranty) ご利用にあたっての注意事項 (Notes on
Usage) (In Japanese only)
クイックスタートガイド (Quick start
guide) (In Japanese only)
External TV antenna cable SC04
* The terminal supports only 1Seg.
SIM ejector tool (sample)
To check and purchase optional accessories compatible with the terminal
(sold separately), refer to NTT DOCOMO website.
https://www.mydocomo.com/onlineshop/options/index.html

2
Contents/Precautions
Contents
Contents/
Precautions
Before
usingthe
terminal
docomo
LIVEUX
Calling
Accessories ······································································································ 1
About usage of the terminal ········································································· 4
Precautions (Always follow these directions) ········································ 5
Handling precautions ··················································································· 14
Waterproofness/Dustproofness ······························································ 18
Part names and functions ·········································································· 21
docomo nano UIM card ·············································································· 22
microSD card··································································································· 24
Charging ··········································································································26
Turning power ON/OFF ··············································································· 27
Basic Operation ···························································································· 28
Character entry ····························································································· 32
Initial settings ································································································ 35
Display and icons ························································································· 35
Home screen ·································································································· 38
Apps screen ····································································································39
Using Quick search box ·············································································· 43
Recently-used apps ······················································································ 44
Using Split screen view ··············································································· 44
Switching home apps ··················································································· 45
Enabling Emergency mode ········································································ 45
Home screen ·································································································· 46
Managing Home screen ·············································································· 46
Viewing apps screen ···················································································· 48
Managing apps ······························································································· 48
Installing recommended apps ··································································· 49
Displaying all apps ························································································ 49
Backing up and restoring the Home screen ········································ 50
Using My Magazine ······················································································· 50
Home screen information ···········································································51
Making a call ·································································································· 52
Receiving a call ······························································································ 53
Operation during a call ················································································· 54
Recent calls ····································································································· 56
Answering message ···················································································· 57
Making an international call (WORLD CALL) ······································· 57
Call settings ···································································································· 58
Phonebook ······································································································ 62
Mail/Web
browser
Apps
Settings
File
management
DOCOMO mail ································································································· 65
SMS ···················································································································· 65
Email ··················································································································· 67
Gmail ··················································································································69
Early Warning "Area Mail" ··········································································· 70
Web browser ··································································································· 71
dmenu ··············································································································· 74
dmarket ············································································································ 74
Play Store ········································································································ 75
Galaxy Apps ····································································································· 75
Osaifu-Keitai ··································································································· 76
ToruCa ··············································································································· 78
1Seg ··················································································································· 79
Camera ············································································································· 84
Gallery ··············································································································· 88
Media Player ···································································································· 89
GPS/Navigation ···························································································· 90
Clock ·················································································································91
Calendar ············································································································ 92
Galaxy Notes ··································································································· 93
Voice Recorder ······························································································ 94
Calculator ········································································································ 94
docomo Data Copy························································································ 95
YouTube ············································································································ 96
Dictionary ········································································································· 97
S Health ········································································································97
S Voice ·············································································································· 97
Setting menu ··································································································98
Connections ····································································································98
Sounds and vibration ················································································· 104
Notications ································································································· 106
Display ············································································································ 107
Wallpapers and themes ············································································ 108
Device maintenance ·················································································· 108
Apps ················································································································ 109
Lock screen and security ········································································ 110
Cloud and accounts ··················································································· 115
docomo service/cloud··············································································· 116
Google ············································································································ 117
Accessibility ································································································· 117
General management ················································································ 119
Software update ························································································· 121
About phone ································································································· 121
Storage folder structure ·········································································· 122
File operation ······························································································ 122

3
Contents/Precautions
Data
communication
Externaldevice
connection
Overseas
use
Appendix/
Index
Bluetooth ······································································································ 124
NFC communication ·················································································· 125
Connecting to a PC ·················································································· 126
Connecting to printer ··············································································· 127
Overview of international roaming (WORLDWING) ························· 128
Available overseas services ··································································· 128
Before using the terminal overseas····················································· 129
Making/Receiving a call in the country you stay ···························· 130
International roaming settings ······························································ 131
After returning to Japan··········································································· 132
Troubleshooting ·························································································· 133
Anshin Enkaku Support ············································································ 139
Warranty and After-Sales Service ························································ 139
Updating software ···················································································· 141
Main specications ···················································································· 142
Specic Absorption Rate (SAR) of Mobile Phones ························ 144
Export Administration Regulations ······················································ 147
Intellectual Property Right ······································································ 147
SIM unlock ···································································································· 149
Index ················································································································ 150

4
Contents/Precautions
Aboutusageoftheterminal
• The terminal supports LTE, W-CDMA, GSM/GPRS, and wireless LAN.
• Since the terminal uses wireless signal, it may not be able to use in
a location with no signal reception such as a tunnel, underground, a
building, an outdoor location with weak or poor signal reception, or a
location outside of the LTE and FOMA service areas. Even when you are
high up in a tall building or condominium and nothing blocks your view
outside, your terminal may not be able to receive or transmit signals.
Also, communication may be interrupted even when the signal meter
on your terminal indicates there are strong radio waves and you are not
moving (traveling).
• Because your terminal uses radio waves to communicate, it is possible
that a third party may attempt to tap your calls. However, LTE, W-CDMA,
GSM/GPRS system automatically applies a condential communication
function to all calls, so even if a third party could somehow tap a call,
they only hear noise.
• The terminal encodes voice communication as digital data. When you
are operating your terminal while moving to a location subject to weaker
radio wave conditions, the transmitted digital data may not be correctly
decoded and as a result the decoded voice may dier somewhat from
the actual voice.
• The terminal has FOMA Plus-Area and FOMA HIGH-SPEED Area support.
• Keep the information that you registered in the terminal separately by
noting down periodically or saving to microSD card, PC etc. DOCOMO
assumes no responsibility for any loss of your data caused by
malfunction, repair, change to a new model or any other reasons.
• Although the display is manufactured with extremely advanced
technology, some dots may not be lit or be always lit. Note that, this
shows characteristics of liquid crystal displays and not defects in the
terminals.
• If the terminal internal storage or the microSD card does not have
enough memory, running applications may not work normally. In such
case, delete saved data.
• For commercially available option devices, DOCOMO is not liable to any
failures or the malfunctions.
• As with PCs, some applications that you install or websites that you
access may give the terminal instability of the operation, or may send
your location information or personal information registered to the terminal
to outside via the Internet and the information may be used improperly.
Therefore, verify the supplier and operating conditions of the applications
and websites before using them.
• Only the docomo nano UIM card is available for the terminal. If you
have the UIM card docomo mini UIM card or the FOMA card, bring it to
docomo Shop to replace.
• The terminal does not support accessing i-mode site (programs) and i-α
ppli, etc.
• The terminal automatically performs communication for some functions,
for example, to synchronize data, check the latest software, maintain
connection with the server, etc. Additionally, when you download
applications or watch video etc, a large amount of packet communication
charges are executed. Therefore, it is highly recommended to use packet
pack or packet at-rate service.
• Depending on the applications or service you use, packet communication
charge may be applied even in Wi-Fi communication.
• The terminal does not support public mode (drive mode).
• In the terminal, sounds (video sound, music, shutter sound, etc.) other
than ringtone and each notication are not muted even when Silent
mode (Vibrate, Mute) is set.
• Follow the instruction below to view your phone number.
From the Home screen, tap → "Settings" → "About phone"
• You can update software of the terminal to the latest one (P.141).
• In the terminal, functions may be added or operation steps may be
changed due to upgrading Operating System (OS). For latest information
of additional function or operation steps, refer to NTT DOCOMO website.
• When OS is upgraded, some applications used for former OS may not
work or unintended failure may occur.
• Applications or services are subject to change without prior notice.
• For using services and applications provided by the third party including
the applications provided by Google Inc., conrm the terms and
conditions specied by Google or the providers. DOCOMO assumes
no responsibility for any malfunctions resulting from the services and
applications.
• When the terms of use screen appears, follow the on-screen instructions.
• In case of loss of the terminal, set the screen lock to ensure the security
of the terminal.
(P.111)
5
Contents/Precautions
• If you lose your terminal, change password of online service accounts
from PC so that Google Services such as Gmail, Google Play, and
service such as SNS, etc. should not be used by others.
• The terminal does not support service providers other than sp-mode,
mopera U or Business mopera Internet.
• When using tethering, subscribing to a packet pack or packet at-rate
service is highly recommended.
• For details on usage fee, refer to the NTT DOCOMO website.
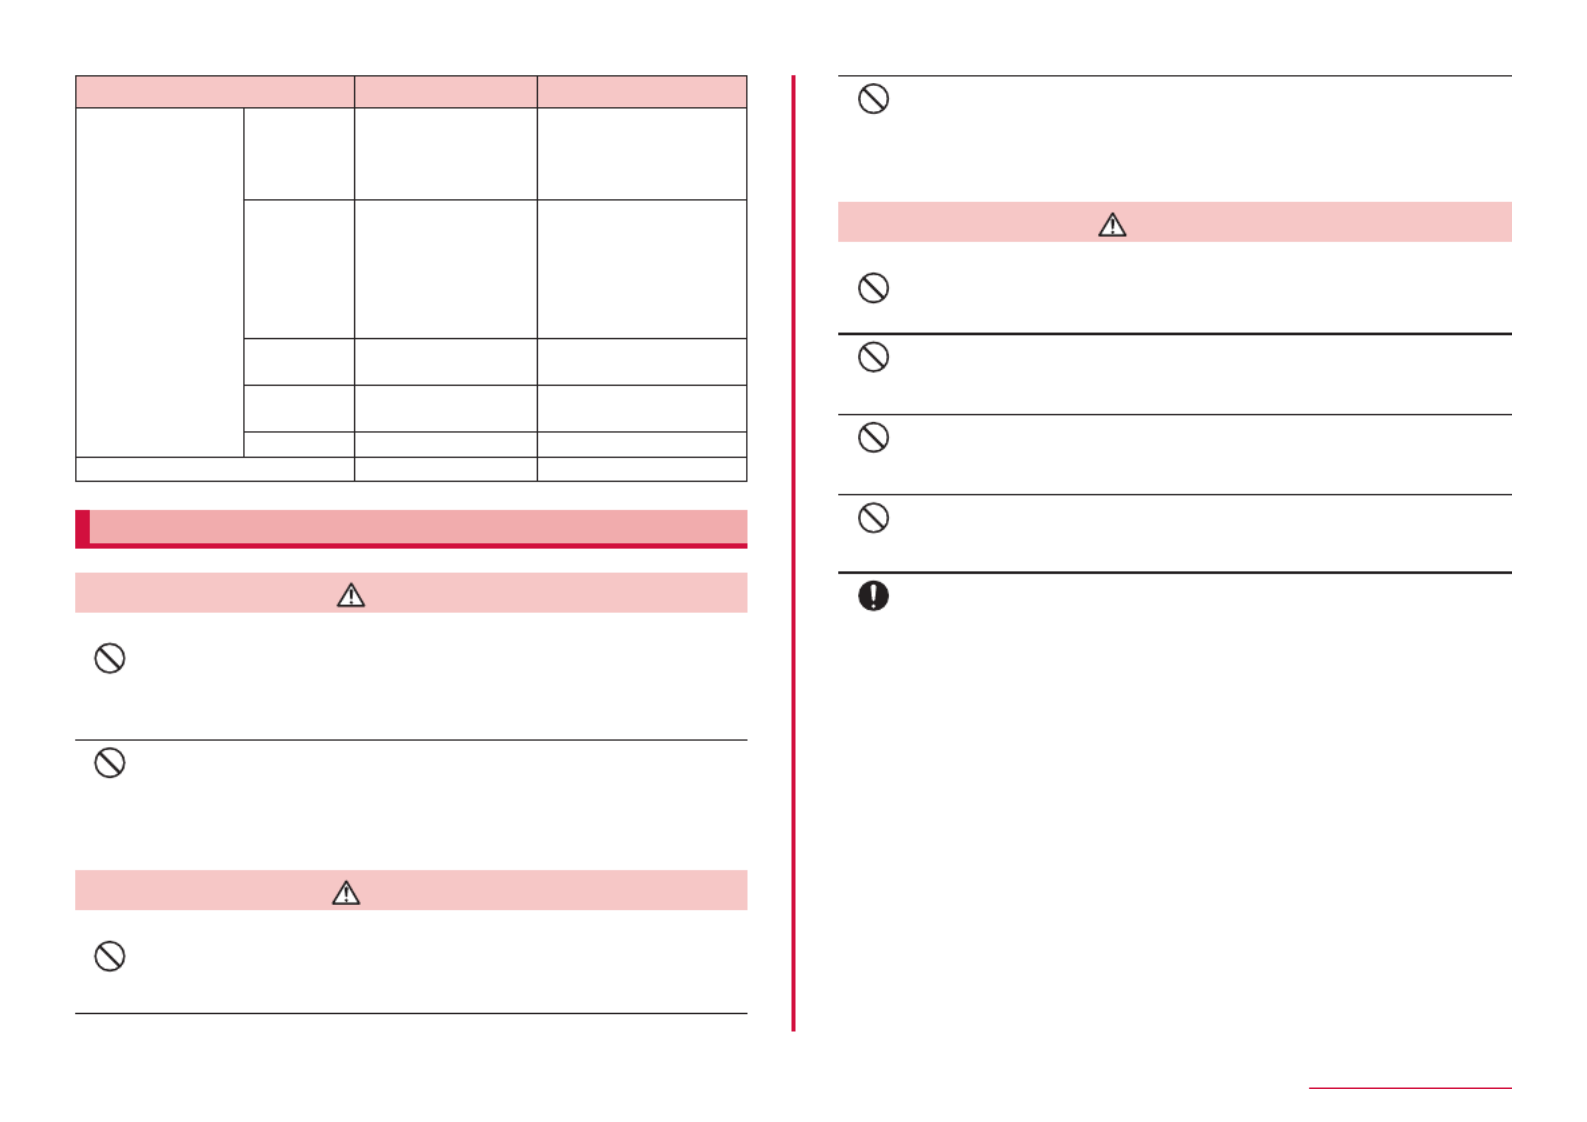
Precautions(Alwaysfollowthesedirections)
■ Before using your terminal, or when necessary, read the
precautions
below to ensure safe use and handling.
■ These precautions are intended to protect you and others around
you. Read and follow them carefully to avoid injury, damage to the
terminal or damage to property.
■ The signs below dierentiate between the levels of danger that can
occur if the terminal is not used within the specied guidelines.
DANGER
This sign denotes that "death or serious injury ( *1) may
result from improper use".
WARNING
This sign denotes that "death or serious injury ( *1) may
result from improper use".
CAUTION
This sign denotes that "minor injury ( *2) or damage to
property (*3 ) may result from improper use".
*1 Serious injury: This refers to loss of sight, injury, burns (high- and
low-temperature), electric shock, broken bones, injuries with residual
aftereffects from poisoning, etc., and injuries requiring hospital
admission for treatment or long term hospital attendance as an
outpatient.
*2 Minor injury: This refers to injuries, burns (high- and low-temperature),
el ectr ic sh ock , etc. that d o not re qui re hospital admission f or
treatment or long-term hospital attendance as an outpatient.
*3 Physical damage: This refers to extended damage to buildings,
furniture, livestock, pets, etc.
■ The symbols below show specic directions.
Don’t
This symbol denotes that the action is prohibited.
No
disassembly
This symbol denotes that disassembling the phone or its
components is not allowed.
No
liquids
This symbol denotes that using the phone or its components
in a bathroom or other highly humid area is not allowed.
No wet
hands
Indicates that handling with wet hands is not allowed.
Do
This symbol denotes that an instruction must be obeyed at all
times.
Unplug
This symbol denotes that the equipment should be unplugged.
■ Precautions contain the description below.
1. Handling the terminal, adapter, docomo nano UIM card and External
TV antenna cable (common) …………………………………………………P.6
2. Handling the terminal ……………………………………………………………P.8
3. Handling adapter ……………………………………………………………… P.10
4. Handling docomo nano UIM card ………………………………………… P.11
5. Handling mobile phones near electronic medical equipment …… P.12
6. Material list ……………………………………………………………………… P.12
7. Handling samples (SIM ejector tool) …………………………………… P.13

6
Contents/Precautions
1.Handlingtheterminal,adapter,docomonanoUIM
cardandExternalTVantennacable(common)
DANGER
Don’t
Do not use, store or leave the terminal in hot places (e.g.
by the re, near a heater, under a kotatsu or futon, in direct
sunlight, in a car in the hot sun).
May cause re, burns, injuries, or electric shock.
Don’t
Do not put the terminal into or near a heating cooking device
such as a microwave oven or IH cooker, or high-pressure
container such as a pressure cooker.
May cause re, burns, injuries, or electric shock.
Don’t
Do not put sand, dirt, or mud on the terminal or put it on them
directly. Do not touch the terminal with hands to which sand
or others adhere.
May cause re, burns, injuries, or electric shock.
For the waterproof and dustproof functions, refer to the following.
→ P.18 "Waterproofness/Dustproofness"
Don’t
Do not charge when the terminal is wet with water (drinking
water, perspiration, seawater, urine of pet animals, etc.).
May cause re, burns, injuries, or electric shock.
For the waterproof function, refer to the following.
→ P.18 "Waterproofness/Dustproofness"
Don’t
Do not subject the terminal to strong pressure or break
the terminal. Especially when bringing the terminal putting
in a pocket of clothes, do not let the terminal hit against
surroundings or being put between the objects.
May cause re, burns, injuries, electric shock due to internal
battery to ignite, burst, heat or leak.
* The following are examples that you should be careful of:
• Sitting or squatting with the terminal put in a pocket of
trousers or skirt
• Putting the terminal in a pocket of outer wear and catching
them in a door or a door of car
• Stepping on the terminal on a soft object such as a sofa, bed,
or bedding, or on a oor
No
disassembly
Do not disassemble or remodel the equipment.
May cause re, burns, injuries or electric shocks, etc.
No
liquids
Do not let the product get wet with water (drinking water,
perspiration, seawater, urine of pet animals, etc).
May cause re, burns, injuries or electric shocks, etc.
For the waterproof function, refer to the following.
→ P.18 "Waterproofness/Dustproofness"
No
liquids
Do not put water (drinking water, perspiration, seawater,
urine of pet animals, etc.) into the charging terminal or
external connection terminal.
May cause re, burns, injuries, or electric shock.
For the waterproof function, refer to the following.
→ P.18 "Waterproofness/Dustproofness"
Do
Use the optional products specied by NTT DOCOMO for your
terminal.
Not doing so may cause re, burns, injuries, or electric shock.
WARNING
Don’t
Do not drop, trample, or throw the terminal or give a strong
force or vibration to it.
May cause re, burns, injuries, or electric shock.
Don’t
Do not allow conductive materials (metal pieces, pencil lead, etc.)
to come in contact with the charging terminal or external
connection terminal and do not alow dust to get inside.
May cause re, burns, injuries, electric shock.
Don’t
Do not cover or wrap the product with bedding, etc. while
using or charging the product.
May cause re or burns.
Do
If charging is not complete after the specied charging time
has passed, stop charging.
Not doing so may cause re, burns, or injuries due to overcharge.

7
Contents/Precautions
Do
Make sure to turn o the terminal or stop charging before
you get close to places like a gas station where a ammable
gas or dust can be generated.
Not doing so may cause the gas to ignite or re.
When using Osaifu-Keitai in a place such as a gas station, turn
o the terminal before using it. (When NFC/Osaifu-Keitai lock is
activated, deactivate it before turning o the terminal.)
Do
If the equipment gives o a strange smell, noise, smoke, or
overheats or becomes discolored or deformed during use,
charge, or storage, perform the following operations.
• Remove the power plug from outlet or cigarette lighter socket.
• Turn the terminal o.
Failure to do the above operations may cause re, burns, injuries,
or electric shock.
CAUTION
Don’t
Do not use the damaged terminal.
May cause re, burns, or injuries.
Don’t
Do not leave the equipment on unstable or sloping surfaces.
Be careful especially while the vibrator is set.
The terminal may fall and cause injuries.
Don’t
Do not store the equipment in extremely humid, dusty or hot
areas.
May cause re, burns, or electric shock.
For the waterproof and dustproof functions, refer to the following.
→ P.18 "Waterproofness/Dustproofness"
Don’t
When children use the terminal, do not let them use incorrectly
without instruction by an adult for proper use.
May cause injuries.
Don’t
Do not store the product within the reach of small children.
May cause small children to accidentally swallow the equipment or
cause injuries and electric shock.
Do
Be careful when using the terminal continuously for a long
time or charging as it gets hot. Also, avoid touching the
terminal for a long time by falling asleep unintentionally.
If you use applications, make calls, perform data communications,
watch 1Seg or videos, etc. while charging the battery for a long
time, the temperatures of the product and the adapter may rise.
Directly touching a hot part for a long time, you may have redness,
itching or rash on your skin, or it may result in low-temperature
burns depending on your constitution and/or health condition.

8
Contents/Precautions
2.Handlingtheterminal
DANGER
Don’t
Do not throw the terminal into re or apply heat.
May cause re, burns, injuries, electric shock due to internal
battery to ignite, burst, heat or leak.
Don’t
Do not put excessive force such as sticking a nail into the
terminal, hitting it with a hammer, or stepping on it.
May cause re, burns, injuries, electric shock due to internal
battery to ignite, burst, heat or leak.
Do
If the substance inside the terminal gets into your eyes or
mouth, rinse with clean water and receive medical care from
a doctor immediately.
The substance inside the terminal may cause loss of sight or poor
health.
WARNING
Don’t
Do not lighten or ash the lighting part of the light close to
person's eye. Keep enough distance especially from small
children.
May cause vision disturbance. Also, you may get dazzled or
surprised causing an accident.
Don’t
Do not lighten or ash the light to drivers of cars, etc.
May disturb driving and cause an accident, etc.
Don’t
Do not watch the display that blinks repeatedly for a long
time.
May cause spasm, loss of consciousness, etc.
Don’t
Do not put foreign objects such as liquid like drinking water,
sweat, seawater or urine of the pet into docomo nano UIM
card/microSD card slot.
Please do not mistake the insertion location and direction of
the docomo nano UIM card or microSD memory card.
May cause re, burns, injuries or electric shocks, etc.
Don’t
Do not expose the camera lens to direct sunlight for an
extended period.
May cause re, burns, injuries, etc. by the light-collecting
mechanism of the lens.
Do
When on board an airplane, turn the power of the terminal o
or put it in Airplane mode.
Follow the instructions of each airline, because there are dierent
restrictions for using the terminal on an airplane.
Not doing so may cause electronic equipment of airplanes to fail or
malfunction.
If you do a prohibited act such as using the terminal in an airplane,
you will be punished according to law.
Do
When using the terminal in a medical facility, be sure to observe
the regulations of the facility.
Turn the terminal o where its use is prohibited.
Not doing so may cause electronic equipment or electronic medical
equipment to fail or malfunction.
Do
When using the handsfree call, ringtone is ringing loud, or in
the standby mode, be sure to keep this terminal o of the
ears.
Also, when playing games, video, or music with an earphone
microphone connected to the terminal, adjust the volume to
the proper level.
When using the handsfree call, loud noise sounds from the
terminal.
Even in the standby mode, ringtone and vibrator may work suddenly.
Using continuously for a long time with too loud volume may cause
a hearing loss, etc.
And, if you cannot hear the sound around you clearly, it may cause
an accident.
Do
If you have weak heart, be careful when setting the vibrate
alert (vibration) or alert volume setting.
Not doing so may cause harmful eect on heart.
Do
When you use electronic medical equipment, check with the
equipment manufacturer to determine how the device is
aected by radio waves before using.
Not doing so may cause harmful eect on electronic medical
equipment etc.
9
Contents/Precautions
Do
Turn the terminal o near high-precision electronic control
equipment or electronic equipment using low-power signals.
Not doing so may cause the equipment to fail or malfunction.
* Examples of electronic equipment to avoid
Hearing aids, implanted pacemakers or debrillators,
other electronic medical equipment, and other automatic
control equipment. Users wearing implanted pacemakers or
debrillators, or other electronic medical equipment should
check with the manufacturer or sales outlet about the eect of
radio frequencies on the equipment.
Do
When the display or camera lens is accidentally broken,
be careful of broken glass or exposed internal parts of the
terminal.
If you mistakenly touch broken or exposed parts, you may have
burns, injuries, or electric shock.
Do
If the internal battery leaks or gives o a strange smell,
immediately remove the terminal from the vicinity of open
ames.
The vapors from leaking battery uid may ignite, re or explode.
Do
Prevent your pet, etc, from biting the terminal.
Not doing so may cause battery pack to ignite, burst, heat, or leak,
and may cause re, burns, or injuries.
CAUTION
Don’t
Do not swing the terminal around by holding strap, etc.
May cause an accident such as injury to yourself or others, or
damage to surrounding objects by hitting.
Don’t
When using the motion sensor, stay alert to your surroundings,
hold the terminal rmly, and do not swing it excessively.
May cause accident such as injuries.
Don’t
If the display breaks and the uid etc. leaks out from inside,
do not let the uid contact with the skin on your face or
hands or clothes.
May cause eye or skin problems.
If the uid etc. enters your eyes or mouth, or contacts skin or
clothes, immediately ush the contacted area with clean water.
If the uid etc. enters your eyes or mouth, immediately see a
doctor after ushing.
Don’t
Do not discard the old terminal together with other garbage.
May cause ignition resulting in re, burns, or injuries. Also, may
cause environmental destruction. Bring them to a sales outlet
such as docomo Shop. If your local municipality has a battery
recycling program, dispose of them as provided for.
Don’t
If uid etc. leaks out from the battery pack, do not let the
uid contact with the skin on your face or hands.
May cause eye or skin problems.
If the uid etc. enters your eyes or mouth, or contacts skin or
clothes, immediately ush the contacted area with clean water.
If the uid etc. enters your eyes or mouth, immediately see a
doctor after ushing.
Do
When you remove docomo nano UIM card, be careful of the
nib of SIM ejector tool or paper clip not to hurt your body
parts such as ngers.
Not doing so may cause injuries when you touch the nib of SIM
ejector tool or paper clip.
Do
To use the terminal in car, check with automobile manufacturer
or dealer to determine how vehicle devices are aected by
radio waves before using.
In rare cases, using the phone in some vehicle models can cause
the vehicle's electronic equipment to malfunction. In that case,
stop using the terminal immediately.
Do
If you develop skin problems, stop using the terminal
immediately, and see a doctor. Mobile phones can give some
users skin problems such as itching, allergic reactions or
rashes.
For materials of parts, refer to the following.
→ P.12 "Material list"

10
Contents/Precautions
Do
Be sure to check that there are no metal fragments (such as
cutter blades or staples) adhered to the magnetic parts used
in the speaker and ear piece of the terminal.
Not doing so may cause injuries, etc. due to adhered objects.
Do
When watching the display screen, keep a certain distance
from the display in a fully bright place.
Not doing so may reduce visual acuity.
3.Handlingadapter
WARNING
Don’t
Do not use the adapter cord if it gets damaged.
May cause re, burns, or electric shock.
Don’t
Do not use the adapter in a bathroom or other highly humid
area.
May cause re, burns, or electric shock.
Don’t
Always use the DC adapter with a negative-ground vehicle.
Do not plug it into a positive-ground vehicle.
May cause re, burns, or electric shock.
Don’t
When it starts to thunder, do not touch adapter.
May cause electric shock.
Don’t
Do not short the charging terminal while it is connected to
an outlet or accessory socket. Do not touch the charging
terminal with a part of your body such as your hand or nger.
May cause re, burns, or electric shock.
Don’t
Do not place heavy objects on the adapter cord, or do not
pull the cord with excessive force.
May cause re, burns, or electric shock.
Don’t
When you insert and remove the AC adapter from power
outlet, do not contact a metal strap or other metal objects
with the jack.
May cause re, burns, or electric shock.
Don’t
Do not use a transformer for overseas travel (travel converter)
as the AC adapter.
May cause ignition, heating, or electric shock.
Don’t
Do not apply force on the connected parts when the adapter
is connected to the terminal.
May cause re, burns, injuries or electric shocks, etc.
11
Contents/Precautions
No wet
hands
Do not touch the adapter cord, charging terminal, or power
plug with wet hands.
May cause re, burns, or electric shock.
Do
Only use with the specied power source and voltage. When
charging the terminal overseas, use AC adapter for global
use.
If incorrect voltage is used, this may cause re, burns or electric
shock.
AC adapter: AC100V (Connect to the AC outlet for internal
household use)
AC adapter for global use: Between 100V and 240V AC (Connect
to the AC outlet for internal household use)
DC adapter: DC12V・24V (specic for negative ground vehicle)
Do
When replacing the DC adapter's fuse, replace it only with a
specied fuse.
Replacing with a dierent type of fuse might cause re, burns,
electric shock, etc. For the specied fuse, see the provided
instruction manual.
Do
Wipe o any dust that accumulates on the power plug.
Not doing so may cause re, burns, or electric shock.
Do
When you connect the adapter to an outlet or accessory
socket, rmly connect it to the outlet.
Not doing so may cause re, burns, electric shock.
Do
When you disconnect the power plug from an outlet or
accessory socket, do not pull the adapter cord with
excessive force. Instead, hold the adapter to disconnect.
Not doing so may cause re, burns, electric shock.
Do
When connecting/disconnecting the adapter to/from the
terminal, do not use force and connect/disconnect straight
without bending.
May cause re, burns, injuries, or electric shock.
Do
Immediately stop using the terminal if the external connection
terminal is deformed. Do not use it by restoring the deformation.
May cause re, burns, injuries, or electric shock due to short circuit
of the charging terminal.
Unplug
Always remove the power plug of the adapter from an outlet
or accessory socket when not using the adapter.
If the power plug is left plugged in, this may cause re, burns,
injuries, electric shocks, etc.
Unplug
Immediately remove the power plug from the outlet or
accessory socket if water or other uids (drinking water,
perspiration, seawater, urine of pet animals, etc.) get into the
adapter.
Not doing so may cause re, burns, or electric shock.
Unplug
Always remove the power plug from an outlet or accessory
socket when cleaning the equipment.
Not doing so may cause re, burns, or electric shock.
CAUTION
Don’t
Do not touch the adapters for a long time while they are
connected to an outlet or accessory socket.
May cause burns.
4.HandlingdocomonanoUIMcard
CAUTION
Do
Be careful of the cut surface when handling a docomo nano
UIM card as it may damage a part of your body such as
ngers, etc.
Not doing so may cause injuries.

12
Contents/Precautions
5.
Handlingmobilephonesnearelectronicmedical
equipment
WARNING
Do
Wearers of medical equipment such as implanted pacemakers
or debrillators must carry and use the terminal at least 15
cm away from the implanted device.
The terminals signals may aect the performance of electronic
medical equipment.
Do
When electronic medical equipment other than implanted
pacemakers or debrillators are in use outside of medical
facilities (such as in home care settings), check with the
device manufacturer to determine how the device is aected
by electrical signals.
The terminal's signals may aect the performance of electronic
medical equipment.
Do
Make sure that the terminal will not emit any signals (turn o
power, put it in Airplane mode, etc.) if within 15 cm of those
around you, such as where crowded and you cannot move
freely.
There may be wearers of medical equipment such as implanted
pacemakers or debrillators around you. The terminal's signals may
aect the performance of electronic medical equipment.
Do
When using the terminal in a medical facility, be sure to
observe
the regulations of the facility.
Not doing so may aect the performance of electronic medical
equipment.
6.Materiallist
Part Material Surface treatment
Display (touch screen)
Hardened glass Laminating + AF coat-
ing
Exterior case (side) Aluminum Anodic oxidation treat-
ment
docomo nano UIM card/microSD
card tray
PC -
docomo nano UIM card/microSD
card tray (side)
Aluminum Anodic oxidation treat-
ment
docomo nano UIM card/microSD
card tray (waterproof packing)
Silicone -
Rear panel Hardened glass Laminating + AF coat-
ing
Home key/ngerprint sensor
(center area)
Silicon wafer Coating
Home key/ngerprint sensor
(surrounding area)
Aluminum Anodic oxidation treat-
ment
Power key/screen lock key, vol-
ume UP key/shutter key, volume
DOWN key/shutter key
Aluminum Anodic oxidation treat-
ment
Earpiece Aluminum Anodic oxidation treat-
ment
Out-camera (lens panel) Hardened glass Print
Out-camera lens (surrounding
area)
Aluminum Anodic oxidation treat-
ment
Flash/light (surrounding area) Aluminum Anodic oxidation treat-
ment
Flash/Light
Transparent PC -
External connection jack
(surrounding area), headphone
connection jack (surrounding
area)
PBT resin GF45 -
13
Contents/Precautions
Part Material Surface treatment
External TV anten-
na cable SC04
Earphone
microphone
jack (metal
part)
Brass Nickel plating and Gold
plating
Earphone
microphone
jack outer
cover, Con-
nection plug
outer cover
LDPE, TPE -
Cable JIS-FR331W803F
BLACK
-
Plug (metal
part)
Brass Nickel plating and Gold
plating
Plug (resin) LDPE, TPE -
SIM ejector tool SUS304 Barrel polishing
7.Handlingsamples(SIMejectortool)
DANGER
Don’t
Do not use, store or leave the terminal in hot places (e.g.
by the re, near a heater, under a kotatsu or futon, in direct
sunlight, in a car in the hot sun).
May cause re, burns, injuries, or electric shock.
Don’t
Do not put the terminal into or near a heating cooking device
such as a microwave oven or IH cooker, or high-pressure
container such as a pressure cooker.
May cause re, burns, injuries, or electric shock.
WARNING
Don’t
Do not drop, trample, or throw the terminal or give a strong
force or vibration to it.
May cause re, burns, injuries, or electric shock.
Don’t
The end of the SIM ejector tool is sharp. Do not point it at
yourself or other people.
Doing so might hit yourself or other people resulting in injury or
loss of sight.
CAUTION
Don’t
Do not leave the equipment on unstable or sloping surfaces.
The terminal may fall and cause injuries.
Don’t
Do not store the equipment in extremely humid, dusty or hot
areas.
May cause re, burns, or electric shock.
Don’t
When children use the terminal, do not let them use
incorrectly without instruction by an adult for proper use.
May cause injuries.
Don’t
Do not store the product within the reach of small children.
May cause small children to accidentally swallow the equipment or
cause injuries and electric shock.
Do
If you develop skin problems , stop using the phone
immediately,
and see a doctor. Mobile phones can give some users skin
problems such as itching, allergic reactions or rashes.
For materials of parts, refer to the following.
→ P.12 "Material list"

14
Contents/Precautions
Handlingprecautions
General
■ SC-04J is waterproof/dustproof; however, do not allow water
(drinking water, perspiration, seawater, urine of pet animals, etc.)
or dust to enter this terminal or come in contact with accessories
or optional devices.
Adapter, docomo nano UIM card and external TV antenna cable are not
waterproof/dustproof. Do not use them in places with high humidity
such as a bath or where rain may get it wet. If you carry the terminal
close to your body, moisture from sweat may corrode the internal parts
causing a malfunction. Note that if a trouble is diagnosed as exposure
to water or other liquid, repairs of the terminal may not be covered by the
Warranty. For repairs, contact "Repairs" on the last page of this manual (In
Japanese only) or DOCOMO specied repair oce.
■ Clean the terminal with a dry soft cloth (such as a cloth for eyeglasses).
• Rubbing it roughly with a dry cloth may scratch the display.
• Drops of water or dirt left on the display may cause stains.
• If the terminal is wiped with alcohol, paint thinner, benzine or detergent,
the printing may disappear or color may fade.
■ Clean the jacks or the ngerprint sensor occasionally and use the
terminal in a clean state.
If the jack etc. is dirt, you may not use the terminal normally.
When cleaning, be careful not to damage the terminals.
■ Do not place the terminal near an air-conditioner outlet.
The rapid change in temperature may cause condensation, causing
internal corrosion and malfunction.
■ Do not apply excessive force to the terminal.
Putting the terminal into a tightly packed bag or sitting on the terminal
in your pocket might damage the display or internal circuit board
resulting in a malfunction.
Also, keeping an external device connected to the external connection
terminal might damage the connector resulting in a malfunction.
■ Use the optional products specied by NTT DOCOMO for your
terminal.
If you use optional products other than specied, it may cause
malfunction or damage.
■ Read the instruction manuals supplied with individual optional devices.
■ Do not drop or give a strong impact to the terminal.
May cause malfunction or damage.
Theterminal
■ Do not press display surface forcibly, or not operate with a sharp
pointed objects.
Doing so may cause a malfunction or damage of display.
■ Do not use the terminal in extremely hot or cold places.
Use the terminal within a temperature range of 0℃ to 35℃ and a
humidity range of 0% to 95%.
■ The terminal may aect land-line phones, TVs or radios in use
nearby, so use it as far as possible from these appliances.
■ Keep the information that you registered in the terminal separately
by backing up to microSD card, PC, cloud, etc. or noting down.
If the data is deleted, DOCOMO assumes no responsibility for the loss
of any data.
■ Do not plug external devices into the external connection jack at
a slant, or do not pull it forcibly while it is plugged.
May cause malfunction or damage.
■ It is normal for the terminal to become warm during use or
charging.
Continue to use it.
■ Do not leave the camera lens under direct sunlight.
May cause discoloring or burn-in of elements.
■ Usually, close the docomo nano UIM card/microSD card tray tightly
during use.
Not doing so may cause malfunction due to entering foreign objects
such as liquid like water (drinking water, perspiration, seawater, urine of
pet animals, etc.) or dust to the terminal.
■ Do not give strong force to the ngerprint sensor or scratch the
surface of it.
May cause damage to the ngerprint sensor or cause the terminal to be
unavailable to perform the authentication.
■ While microSD card is being used, do not take the card out or do
not turn o the terminal.
May cause data loss or malfunction.
■ Do not bring magnetic cards or magnetic objects, etc. close to the
terminal.
Magnetic data in cash cards, credit cards, telephone cards, oppy disks,
etc. may be erased.
Bringing strong magnetism close to the terminal may cause malfunction.
■ Do not decorate the terminal sensor with lm or sticker.
May cause the functions that use the proximity/light sensor to malfunction.
For the position of the proximity/light sensor, refer to the following.
→ P.21 "Part names and functions"
15
Contents/Precautions
■ Since the Internal battery is a consumable accessory, it is not
under warranty.
The internal battery may swell as battery life gets closer depending on
operating conditions.
Battery life varies depending on usage conditions, etc., but it is time to
change battery pack when the usage time has become extremely short
or the internal battery has swollen even though the battery pack has
been fully charged. To replace the internal battery, contact "Repairs"
provided on the last page of this manual or a repair center specied by
DOCOMO.
■ Charge the battery in an area within the proper ambient temperature
range (5-35℃ ).
■ The operation time provided by the internal battery varies by the
operating environment and internal battery deterioration.
■ To store the terminal, avoid the following conditions so as not to
degrade the performance or the battery life of the internal battery.
• Storing under the state of the full charge (right after charging ends)
• The battery has run out (the terminal cannot be turned on)
An appropriate battery level for storing is about 40%.
■ The terminal has the following type of battery pack.
Display Battery type
Li-ion 00 Li-ion battery
Instructionsforusingtheadapter
■ Charge the battery in an area within the proper ambient
temperature range (5-35℃ ).
■ Do not charge the battery in the areas below.
• In areas of excessive humidity, dust or vibrations
• Near land-line phones or TV/radio
■ It is normal for the adapter to become hot while charging.
Continue to use it.
■ When using the DC adapter for charging, keep the vehicle engine
running.
The vehicle's battery could become at.
■ When using an outlet with a mechanism preventing unplugging,
follow the handling instructions for that outlet.
■ Do not give strong shock. Do not deform the charging terminal.
May cause malfunction.
docomonanoUIMcard
■ Do not put excessive force on the docomo nano UIM card when
inserting into or removing from the terminal.
■ Note that DOCOMO assumes no responsibility for malfunctions
occurring as the result of inserting and using a docomo nano UIM
card with other IC card reader/writer.
■ Clean the IC part occasionally and use it in a clean state.
If the IC is dirty, it may not be used properly.
■ Clean docomo nano UIM with a soft, dry cloth (such as a cloth for
eyeglasses).
■ Be sure to back up the data you saved in the docomo nano UIM
card on a microSD card, PC or cloud service, or keep a separate
note.
If the data is deleted, DOCOMO assumes no responsibility for the loss
of any data.
■ Take an expended docomo nano UIM card to a sales outlet such
as a docomo Shop for proper disposal in order to protect the
environment.
■ Take care not to scratch, touch accidentally or short IC.
May cause data loss or malfunction.
■ Do not drop a docomo nano UIM card or subject it to impact.
May cause malfunction.
■ Do not bend a docomo nano UIM card or place a heavy object on
it.
May cause malfunction.
■ Do not install docomo nano UIM card into the terminal with a label
or sticker put on.
May cause malfunction.
16
Contents/Precautions
Bluetoothfunction
■ The terminal is equipped with the security features, that are
compliant with Bluetooth standards for communication via
Bluetooth. However, depending on the settings, there may not be
enough security. Be aware of security risks when using Bluetooth.
■ DOCOMO assumes no responsibility for any information which
may be leaked during communication via Bluetooth.
■ Frequency bands
The frequency band used by the terminal's Bluetooth function/Wi-Fi
function is storage section is as follows.
2.4 FH1 / DS4 / OF4 / XX8
2.4 : This radio equipment uses the 2400 MHz band.
FH/DS/OF/XX
: Modulation scheme is FH-SS, DS-SS, OFDM or other
scheme.
1 : The estimated interference distance is 10 m or less.
4 : The estimated interference distance is 40 m or less.
8 : The estimated interference distance is 80m or less.
: The full band between 2400 MHz and 2483.5 MHz
is used and the band of the mobile identication
device is unavoidable.
Available channels vary by the country.
For use in an aircraft, contact the airline company beforehand.
■ Cautions on using Bluetooth devices
In the bandwidth used by the terminal, in addition to home electric
appliances such as a microwave oven and industrial/scientic/medical
devices, in-plant radio stations used to identify mobile objects used in
production lines of a factory that require a license, specied low power
radio stations, or amateur radio stations that do not require a license
(hereafter "other radio stations") can be in operation.
1. Before using the terminal, conrm that "another station" is not being
operated nearby.
2. In the event of the terminal causing harmful radio wave interference
with "another station", promptly change the operating frequency or
stop radio wave emission by turning o the power, etc.
3. If you have further questions, contact docomo Information Center
provided on the last page of this manual.
WirelessLAN(WLAN)precautions
■ Wireless LAN (WLAN) exchanges information using radio waves,
and allows you to freely establish LAN connection if you are within
an area where radio wave reaches. At the same time, there is a
risk that a malicious third party may obtain unauthorized access if
security settings have not been congured. You are recommended
to congure security settings before using wireless LAN at your
decision and responsibility. It is recommended to make necessary
security settings on your judgment and responsibility.
■ Wireless LAN
Do not use wireless LAN in a place that is magnetized by electric
products, AV, OA equipment, etc. or where electromagnetic wave is
generated.
• Subjecting the terminal to magnetic or electrical noise might increase
noise and prevent it from performing communications. (the terminal
is particularly susceptible to noise when it is used near a microwave
oven.)
• Using the terminal near a TV, radio or similar appliance might cause
reception interference and disrupt TV images.
• The searching might not be successful if there are multiple wireless
LAN access points near to the terminal or the same channel is being
used.
• For using WLAN overseas, point of use etc. may be restricted
depending on country. In that case, conrm conditions such as
available frequency or regulations of the country to use it.
■ 2.4 GHz device cautions
In the frequency band used by WLAN devices, in addition to home
electric appliances such as a microwave oven and industrial/scientic/
medical devices, in-plant radio stations for identication of mobile
objects used in production lines of a factory (a license is required),
specied low power radio stations (a license is not required), or amateur
radio stations (a license is required) can be in operation.
1. Before using the device, confirm that premises radio stations for
identifying mobile units, specified low power radio stations and
amateur radio stations are not being operated nearby.
2. If the device causes harmful radio interference to premises radio
sta tions fo r i dentifying m obi le unit s, im mediately ch ang e the
frequency band or stop use, and contact "docomo Information Center"
described on the last page of this manual for crosstalk avoidance,
etc. (e.g. partition setup).
3. If the device causes radio interference to specified low power radio
stations or amateur radio stations, contact "docomo Information
Center" described on the last page of this manual.

17
Contents/Precautions
■ 5GHz device cautions
The terminal can use 3 frequency bands of 5.2GHz band (W52), 5.3GHz
band (W53), 5.6 GHz band (W56).
• 5.2GHz band (W52/36, 40, 44, 48 ch)
• 5.3GHz band (W53/52, 56, 60, 64 ch)
• 5.6GHz band (W56/100, 104, 108, 112, 116, 120, 124, 128, 132,
136, 140 ch)
Using wireless LAN built-into the terminal in 5.2/5.3 GHz outside is
prohibited by the Radio Law.
PrecautionsonFeliCaandNFCreader/writer
■ The FeliCa and NFC reader/writer, P2P function for the terminal
handle delicate signals that require no radio station license.
■ The 13.56 MHz frequency band is used. When someone uses
the FeliCa and NFC reader/writer or P2P function in your
surroundings, keep the terminal away suciently from them.
Also, make sure that there is no radio station using the same
frequency band nearby.
■ For use in an aircraft, contact the airline company beforehand.
Use is limited in some countries. Conrm regulations etc. for the
country/area before using.
Samples(SIMejectortool)precautions
■ Do not insert the SIM ejector tool into any hole other than the
docomo nano UIM card/microSD card tray eject hole.
May cause malfunction or damage.
■ Do not apply excessive force to the SIM ejection tool when using
it.
May cause malfunction or damage.
■ When disposing of it, follow the rules regarding disposal in your
area.
■ Do not use the SIM ejector tool with other mobile phones.
May cause malfunction or damage to the terminal.
Note
■ Do not use a remodeled terminal. Using a remodeled terminal
violates the Radio Law/Telecommunications Business Act.
The terminal is compliant with rules on the technical standard
conformance of specied wireless equipment based on the Radio Law/
Telecommunications Business Act. As proof of this, the "Technical
Compliance Mark " is depicted in the electronic faceplate. The
electronic faceplate can be conrmed by operating this terminal as
follows.
From the Home screen, → "Settings" → "About phone" → "Regulatory
information"
If you remove the screws and alter the inside of the terminal, the
technical regulations compliance certication becomes invalid. Do not
use the terminal with the certication invalid, as it is a violation of the
Radio Law and Telecommunications Business Act.
■ Be careful when you use the terminal while driving a car etc.
There is a penalty for holding or using the terminal while driving.
However, absolutely necessary cases such as rescue of a sick person
or maintaining public safety are exempted.
■ The FeliCa and NFC reader/writer function of the terminal
conforms to Japanese radio standards.
If you use the function overseas, conrm regulations of the
country/region beforehand.
■ Do not alter the basic software illegally.
Repairs may be refused as a modication of software.
18
Contents/Precautions
Waterproofness/Dustproofness
SC-04J provides waterproofness of IPX5 *1, IPX8*2 and dustproofness of
IP6X*3 with rmly attaching the docomo nano UIM card/microSD card slot.
*1 IPX5 means that a phone keeps functioning after applying a jet ow
of 12.5 L/min. from every direction from a distance of approximately 3
m for at least 3 minutes using water nozzle in 6.3 mm inner diameter.
*2 For SC-04J, IPX8 means that a phone keeps functioning after SC-04J
is slowly submerged to depth of 1.5 m in static tap water at room
temperature, left there for 30 minutes and then taken out. (Camera
function cannot be used under water.)
*3 IP6X, a degree of protection, indicates that the terminal can maintain
its functionality to prevent dust particles from entering into the
terminal even when it has been shaken for 8 hours in an apparatus
containing dust particles 75 μm or less in diameter.
WhatyoucandowithwaterproofnessofSC-04J
■ You can talk without an umbrella in the rain (for rainfall of 20 mm
or less per hour).
■ The terminal can be washed with tap water at room temperature.
• Do not apply water ow stronger than allowed (P.18).
• Do not use brush, sponge, soap, detergent, etc.
• If mud or dirt has adhered to your terminal, shake it several times in
tap water put in a washbowl or other container to rinse it o and then
ush it with running water.
• Drain water in the specied steps (P.19) after washing.
• Do not wash rubbing strongly.
Toensurewaterproofness/dustproofness
■ To avoid water/dust ingress, be sure to observe the following
points.
• The terminal can be washed with tap water at room temperature.
• Do not poke the headphone connection jack, mouthpiece/microphone,
receiver, speaker, external connection terminal with a sharp object.
• Do not let the terminal fall. It may scratch the terminal, causing its
waterproof/dustproof performance to degrade.
• Make sure that the docomo nano UIM card/microSD card tray is
tightly closed. Even a ne obstacle (one hair, one grain of sand, tiny
ber, etc.) which is put between contact surfaces may allow water or
dust to enter.
To keep the terminal waterproofness/dustproofness, replacement
of parts is required every 2 years regardless of whether the terminal
appears normal or abnormal. DOCOMO takes the terminal to replace the
parts as a chargeable service. Bring the terminal to a sales outlet such
as a DOCOMO-specied repair oce.
19
Contents/Precautions
Importantprecautions
Do not perform actions shown in the illustrations below.
〈Example〉
Attaching Soap/
Detergent/
Bath powder
Soaking in
ocean water
Using in
hot spring
Attaching
sand/mud
Observe the following precautions to use the terminal properly.
• Accessories and optional devices are not waterproof/dustproof.
• Do not apply water ow stronger than allowed (P.18). SC-04J is
waterproof
in IPX5 waterproof, water may enter inside from a damaged section and
cause troubles such as electric shocks or corrosion of the battery.
• If the terminal gets wet with salt water, sea water, refreshing beverage,
etc. or mud or soil adhered, wash it immediately. If they dry out, it is hard
to remove the dirt and it may cause damage or malfunction.
• Do not put the terminal in hot water, use it in a sauna or apply hot airow
(from a hair dryer etc.) to it.
• Do not move the terminal in water or slam the terminal against the
surface of water.
• The terminal does not oat on water.
• Do not leave water drop on the terminal. In a cold region, it may cause
the water to freeze, resulting in a malfunction.
• Do not leave water on the headphone connection jack, microphone,
receiver or speaker. Such water may interfere with talking.
• If liquid such as water is splashed on the terminal while the docomo nano
UIM card/microSD card tray is open, the liquid may enter the terminal
interior and may cause electric shock, malfunction, etc. Do not continue
using the terminal and immediately switch o the terminal and contact
DOCOMO-specied repair oce.
• When a water droplet is attached to the terminal or when your hands are
wet, please do not attach/remove the docomo nano UIM card/microSD
card tray.
DOCOMO does not guarantee actual operations under all states.
Malfunctions deemed to be caused by inappropriate operation by the
customer are not covered by the warranty.
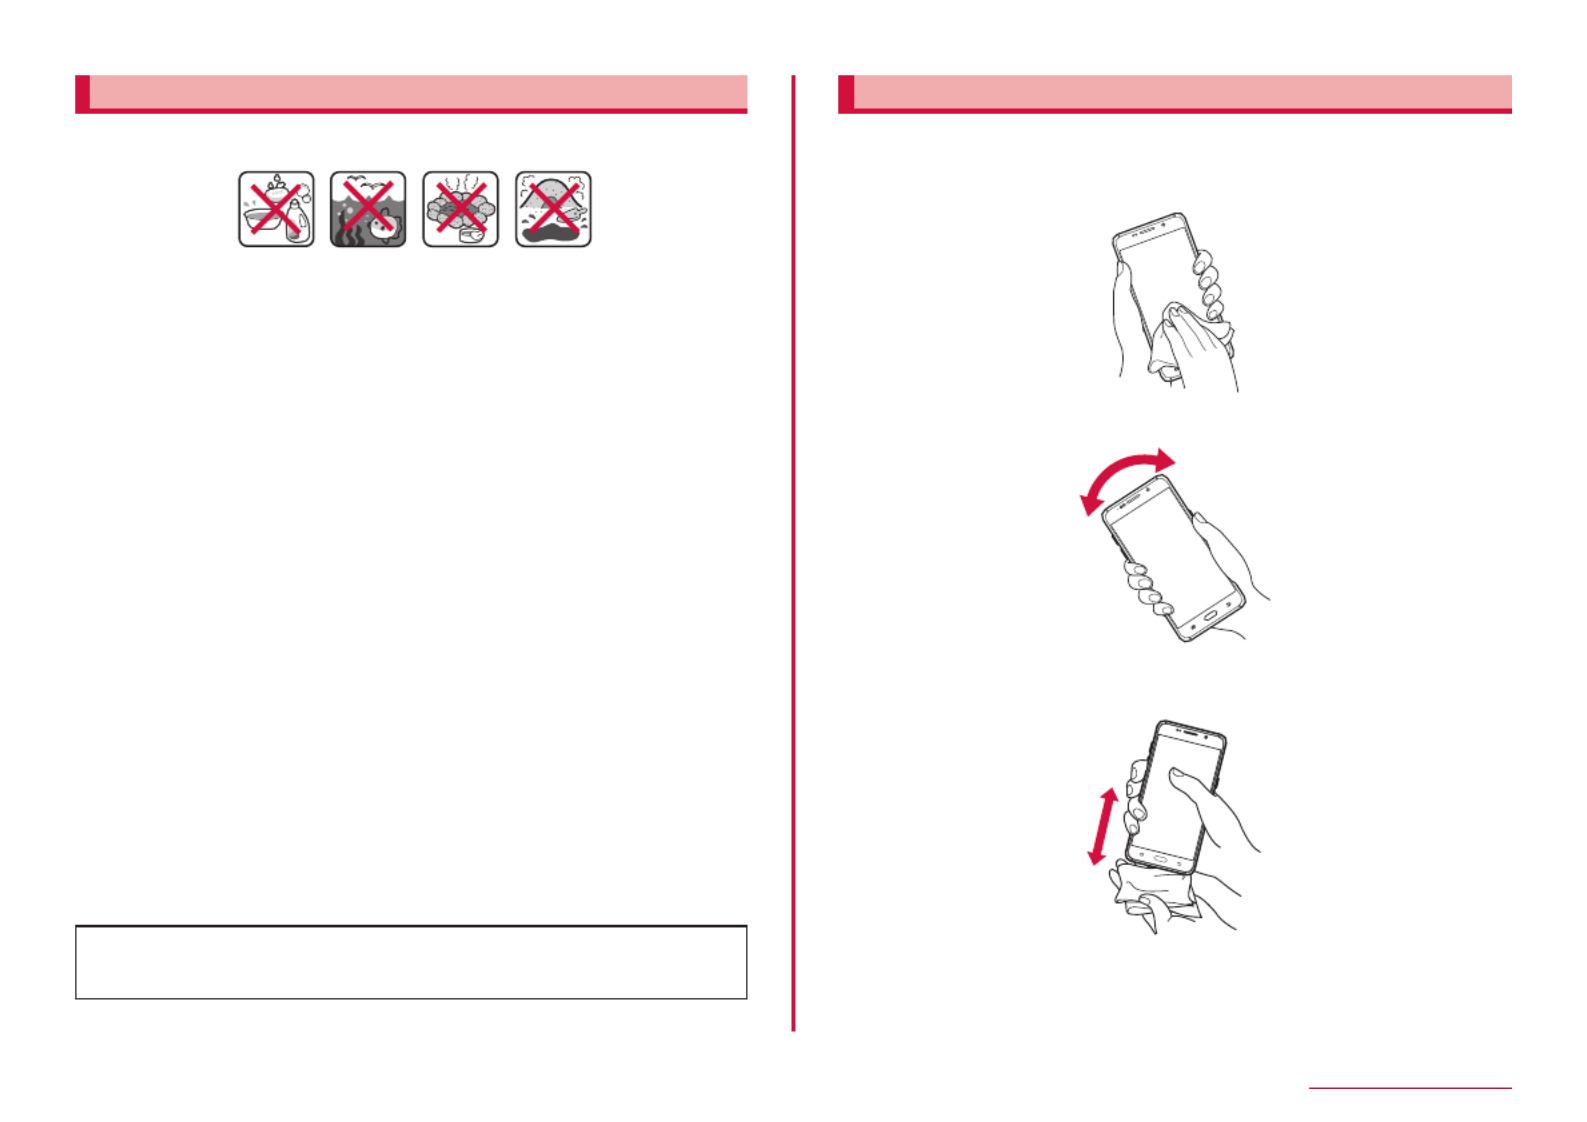
Drainingwater
When the terminal is wet, water may ow out after wiping it o; drain the
water in the following steps.
a Hold the terminal rmly and wipe o moisture on the terminal surface
and back side with dry, clean cloth etc.
b Shake the terminal approximately 20 times, rmly holding it, until
there is no more water splattering.
c Swing the terminal about 10 times against a dry, clean cloth etc.
to wipe o water remaining in the headphone connection jack,
mouthpiece/microphone, receiver, speaker, keypad etc.
d Wipe o water drained from the terminal with dry, clean cloth etc., and
dry naturally.
• Water, if any, remaining in the terminal may ooze up after wiping o.
• Do not wipe o water remaining in gaps directly with a cotton swab etc.

20
Contents/Precautions
Charging
Check the following during and after charging.
• Never try to charge the battery when the terminal is wet.
• When charging the battery after the terminal gets wet, adequately drain the
terminal, wipe o the remaining water with a dry, clean cloth or something
similar and then connect it to the external connection jack on the terminal.
• Do not use the AC adapter in a bathroom, shower room, kitchen, lavatory
or other highly humid area. May cause re or electric shock.
• Do not touch the AC adapter with wet hands. May cause electric shock.
21
Before using the terminal
Beforeusingtheterminal
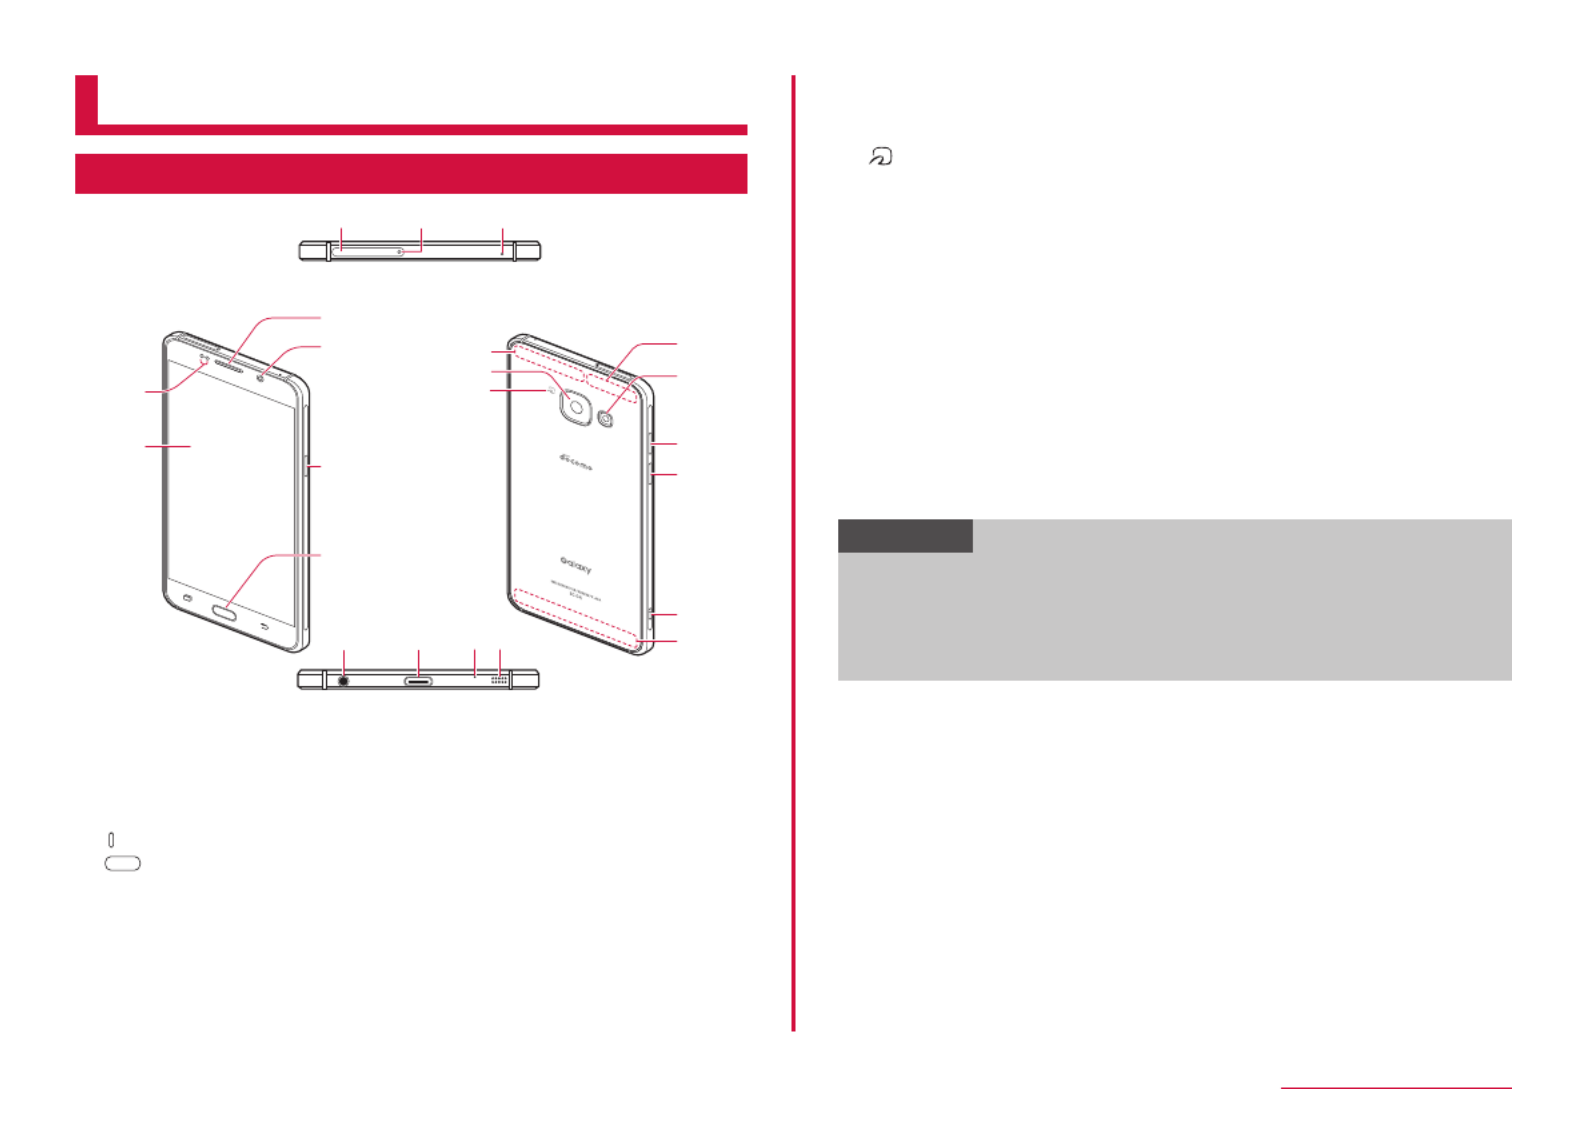
Partnamesandfunctions
g h i
jk ml
a
b
c
d
e
f
r
q
s
t
u
v
p
o
n
Top
Bottom
a Proximity/Light sensor*1
b Display (touch screen) (P.28)
c Earpiece
d In-camera (P.84)
e Power/Screen lock key
f Home key/Fingerprint sensor (P.113)
g docomo nano UIM card/micro SD card tray
h docomo nano UIM card/micro SD card tray eject hole
i Mouthpiece/Microphone (upper)*2
j Headphone connection jack
k External connection jack
l Mouthpiece/Microphone (lower) *3
m Speaker
n GPS antenna*4
o Out-camera (P.84)
p mark (P.77)
q Wi-Fi/Bluetooth antenna*4
r Flash/Light
s Volume UP Key/Shutter key
t Volume DOWN Key/Shutter key
u Strap hole
v LTE/FOMA antenna*4
*1 Do not cover the sensor with your hand or put a sticker on the sensor.
The sensor may not work properly.
*2 Mouthpiece/Microphone (upper) operates for calling, handsfree calling
or video recording, etc.
*3 Mouthpiece/Microphone (lower) operates for calling, handsfree calling
or recording by voice recorder, video recording or speech recognition
using S voice or Memo, etc.
*4 Antenna is built into the terminal. Covering around the antenna with
your hand may aect the quality of communications.
Information
• Transparent protective sheets are attached around the home key,
lens of the out-camera, and on the lateral side of the terminal. Put
them o if required.
• The back cover cannot be removed. Trying to remove it with
excessive force may cause damage or malfunction.

22
Before using the terminal
docomonanoUIMcard
docomo nano UIM card is an IC card storing user information such
as phone numbers.
• Only the docomo nano UIM card is available for the terminal. If you have a
mini UIM, UIM or FOMA card, bring it to docomo Shop to replace.
• If docomo nano UIM card is not inserted, you cannot use functions such
as calling, sending/receiving SMS, packet communication.
• In Japan, calls to emergency telephone numbers (110, 119, 118)
cannot be made if docomo nano UIM card is not installed.
• For details on handling docomo nano UIM card, refer to the docomo nano
UIM card manual.
• The included SIM ejector tool (sample) is required to attach/remove the
docomo nano UIM card or NTT DOCOMO website.
SecuritycodesofdocomonanoUIMcard
The docomo nano UIM card has security code, named PIN code (P.112).
Installing/RemovingadocomonanoUIMcard
AttachingdocomonanoUIMcard
1Insert the tip of the SIM ejector tool into the docomo nano
UIM card/microSD card tray eject hole horizontally
The docomo nano UIM card/microSD card tray will slightly eject.
• Not inserting the tool in a straight line might result in damage or a
fault.
2
Pull out the docomo nano UIM card/microSD card tray in a
straight line
3Place the IC surface of the docomo nano UIM card down on
the docomo nano UIM card/microSD card tray
• Fit the docomo nano UIM card securely into the tray or it may come
o when you try to insert it into the slot.
Notch
IC
4Insert the docomo nano UIM card/microSD card tray into
the terminal
• Take care to insert the docomo nano UIM card/microSD memory
tray in the correct direction. If the direction you insert the docomo
nano UIM card/microSD card tray is incorrect, it may be damaged.

23
Before using the terminal
RemovingdocomonanoUIMcard
1Insert the tip of the SIM ejector tool into the docomo nano
UIM card/microSD card tray eject hole horizontally (P.22)
The docomo nano UIM card/microSD card tray will slightly eject.
• Not inserting the tool in a straight line might result in damage or a
fault.
2Pull out the docomo nano UIM card/microSD card tray in a
straight line
3Remove the docomo nano UIM card/microSD card from the
docomo nano UIM card/microSD card tray
4
Insert the docomo nano UIM card/microSD card tray into
the terminal (P.22)
Information
• When handling docomo nano UIM card, take care not to touch or
scratch the IC.
• Attaching or removing forcibly may damage the docomo nano UIM card.
• Be careful not to lose the removed docomo nano UIM card.
• If you lost the SIM ejector tool, you can use a paper clip instead.
Example of a paper clip

24
Before using the terminal
microSDcard
You can attach microSD card (including microSDHC card and microSDXC
card) to the terminal and use it.
• The terminal supports microSD cards of up to 2 GB, microSDHC cards of
up to 32 GB and microSDXC cards of up to 256 GB (as of May, 2017).
However, actual operations are not guaranteed for all microSD cards
sold commercially.
For compatible microSD cards, contact each manufacturer of microSD
card.
• The terminal supports up to Class 10 speed microSD cards, the UHS
speed class is Class 1.
• microSDXC card can be used only with SDXC compatible devices. Do
not insert microSDXC card into a device incompatible with SDXC. Doing
so may damage data saved in the microSDXC card.
• To use microSDXC card with the data damaged again, formatting the
microSDXC card with SDXC compatible device is needed (All data is
erased).
• To copy data to/from SDXC incompatible device, use memory card
compatible with the standard of device for copying to/from such as
microSDHC card or microSD card.
AttachingmicroSDcard
1Insert the tip of the SIM ejector tool into the docomo nano
UIM card/microSD card tray eject hole horizontally
The docomo nano UIM card/microSD card tray will slightly eject.
• Not inserting the tool in a straight line might result in damage or a
fault.
2
Pull out the docomo nano UIM card/microSD card tray in a
straight line
3Place the IC (metallic) surface of the microSD card down on
the docomo nano UIM card/microSD card tray
4Insert the docomo nano UIM card/microSD card tray into
the terminal
• Take care to insert the docomo nano UIM card/microSD memory
tray in the correct direction. If the direction you insert the docomo
nano UIM card/microSD card tray is incorrect, it may be damaged.

25
Before using the terminal
RemovingmicroSDcard
To remove the microSD card, perform "UNMOUNT" (P.109) in advance.
1Insert the tip of the SIM ejector tool into the docomo nano
UIM card/microSD card tray eject hole horizontally (P.24)
The docomo nano UIM card/microSD card tray will slightly eject.
• Not inserting the tool in a straight line might result in damage or a
fault.
2Pull out the docomo nano UIM card/microSD card tray in a
straight line
3Remove the microSD card from the docomo nano UIM card/
microSD card tray
4
Insert the docomo nano UIM card/microSD card tray into
the terminal
Information
• If you lost the SIM ejector tool, you can use a paper clip instead.
Example of a paper clip
FormattingmicroSDcard
Note that formatting microSD card erases all data in the microSD card.
1From the Home screen, → "Settings" → "Device
maintenance"
2"Storage" → → "Storage settings"
3"SD card" → "Format" → "FORMAT" → "DONE"

26
Before using the terminal
Charging
■ Internal battery life
• The internal battery is a consumable part. Each time it is charged,
time available with each charging reduces.
• Watching 1Seg, etc. while charging the battery for a long time may
shorten the battery life.
• When the usage time becomes about half of a new battery, life of
the internal battery is assumed to be over. We recommend that you
replace the internal battery ahead of time.
■ Charging
• For details of AC adapter 05 (sold separately), DC adapter 04 (sold
separately), see respective manuals.
• AC Adapter 05 is applicable to AC 100-240V.
• The AC adapter has a plug dedicated to AC 100V (for domestic use).
When using the AC adapter in the range of AC 100V and 240V
overseas, a conversion plug adapter applicable to the country you are
staying in is required. Do not charge the battery using a transformer for
overseas travel.
• When the terminal is turned ON, you can operate the terminal even
while charging. However, in that case, charging takes longer time
because of reducing charging volume.
• When inserting/removing the connector, make sure not to put
excessive
force.
■ Do not charge for a long while (several days) with the power
turned on.
• If the terminal is left for a long time with the power turned on while
charging, the internal battery starts feeding the terminal when the
charging is complete. For that reason, the actual battery time may
shorten and battery alert may appear shortly. In such case, charge
again in a proper way. When charging again, remove the terminal from
the AC adapter or DC adapter and set again.
■ Estimate internal battery operating time
• The operating time of the internal battery varies depending on the
operating environment and the degradation level of the internal
battery etc. For estimate of operating time, see "Main specications"
(P.142).
■ Estimate internal battery charging time
• For estimate of charging time, see "Main specications" (P.142)
ChargingwithACadapter
Charging using AC Adapter 05 (optional) is explained here.
microUSB plug
Notification LED
AC adapter
1Insert the microUSB plug of AC adapter with facing B
engraved up horizontally into the external connection jack of
the terminal
2Turn up and insert the power plug of AC adapter to the
outlet
3When charging is completed, pull out the power plug of AC
adapter from the outlet
4Pull out the microUSB plug of AC adapter from the terminal
horizontally
ChargingwithDCadapter
DC adapter 04 (sold separately) is an adapter that provides power to
charge from a vehicle's cigarette lighter socket (12/24V).
For details, refer to the user manual of the DC adapter 04.
ChargingwithUSBcableAtoB
You can charge the terminal with a PC by connecting it to a PC using a
USB cable A to B 01 (sold separately).
• For connection to a PC, see P.126.
• When you perform USB connection with a PC, popup screen may appear
on the PC. If you just want to charge the terminal without synchronizing
to the PC, select "キャンセル (Cancel)".
• Depending on the terminal condition, it may take time for charging, or
may not be charged.

27
Before using the terminal
Whenthebatteryisalmostexhausted
Notification tone sounds, a message prompting to charge appears and
the display dims. When the battery is exhausted, the power of the terminal
automatically turns off. Depending on the function or app, a message
indicating low battery may appear when you try to activate them and they
may not be activated.
TurningpowerON/OFF
TurningpowerON
1Press
[Power/Screen lock key] for 2 seconds or longer
• The starting screen appears, and then the lock screen appears.
• When you turn the power on for the rst time, make the initial settings
following to the onscreen instructions (P.35).
2
■ Checking the radio wave condition
An icon indicating radio wave reception level appears on the status bar
(P.36).
When appears, you are out of LTE/FOMA service area or in a place
where the radio wave cannot reach.
TurningpowerOFF
1Press
[Power/Screen lock key] for 1 second or longer
2"Power o" → "Power o"
• The terminal vibrates and power turns o.
• Press and hold for 1 second or longer to power o, restart and
enable/disable emergency mode (P.45).
Setting/Cancelingscreenlock
You can set the screen lock to prevent the erroneous operation of the
touch screen or keys.
• When the display is turned o with "Screen timeout" (P.107) set, the
screen lock activates automatically after about 5 seconds. You can
change time period before the screen lock activates automatically
(P.107).
Settingscreenlock
1Press [Power/Screen lock key]
• The display turns o and the screen lock is set.

28
Before using the terminal
Cancelingscreenlock
1During the screen lock, press [Power/Screen lock key]
/ [Home key]
• Lock screen appears.
2
Lockscreen
a
b
c e
Lock screen (example)
d
"ひつじのしつじくん®
(Butler Sheep)"
©TT DOCOMO
a Clock widget
b Lock canceling button*
c Camera activating button
d Machi-chara (e.g. ひつじのしつじくん (Butler Sheep))
• Notify you of information such as mail reception or incoming call.
e しゃべってコンシェル (Shabette concier) button*
• You can activate しゃべってコンシェル (Shabette concier).
* Appears only when the Home screen is set to "docomo LIVE UX".
Information
• When notication information for missed calls or others arrives during
the screen lock, the notication information may be displayed on the
lock screen.
• You can change the unlock method of the screen lock (P.111).
BasicOperation
You can operate the terminal variously with touch screen and
motions.
• Do not contact the touch screen with electric materials or metallic
materials. The terminal might not operate well due to static electricity.
• The touch screen might not operate when you use the terminal while
charging. In that case, remove the terminal from the charger.
• Do not cover the antenna section with your hand when operating the
terminal while holding it.
Usingtouchscreen
■ Notes on using the touch screen
• Touch screen is designed for being touched lightly with ngers. Do
not push it forcibly with a nger or press it with sharp objects (a nail,
ballpoint pen, pin etc.).
• The touch screen may not work in the following cases. Note that such
operations may cause malfunction.
- Operation with gloved hands
- Operation with tip of ngernail
- Operation with a foreign object on the display
- Operation with protective sheet or seal on the display
- Operation when the touch screen is wet
- Operation with nger wet by sweat or water
- Operation under water
You can operate the touch screen (display) of the terminal by directly
touching with your nger. In this manual, main operations are described as
follows.
■ Tap/Double-tap
Touch a displayed item or icon lightly with your
nger to select/perform (Tap).
Tap twice quickly on a displayed image or web
page to zoom in/out the contents (Double-tap).
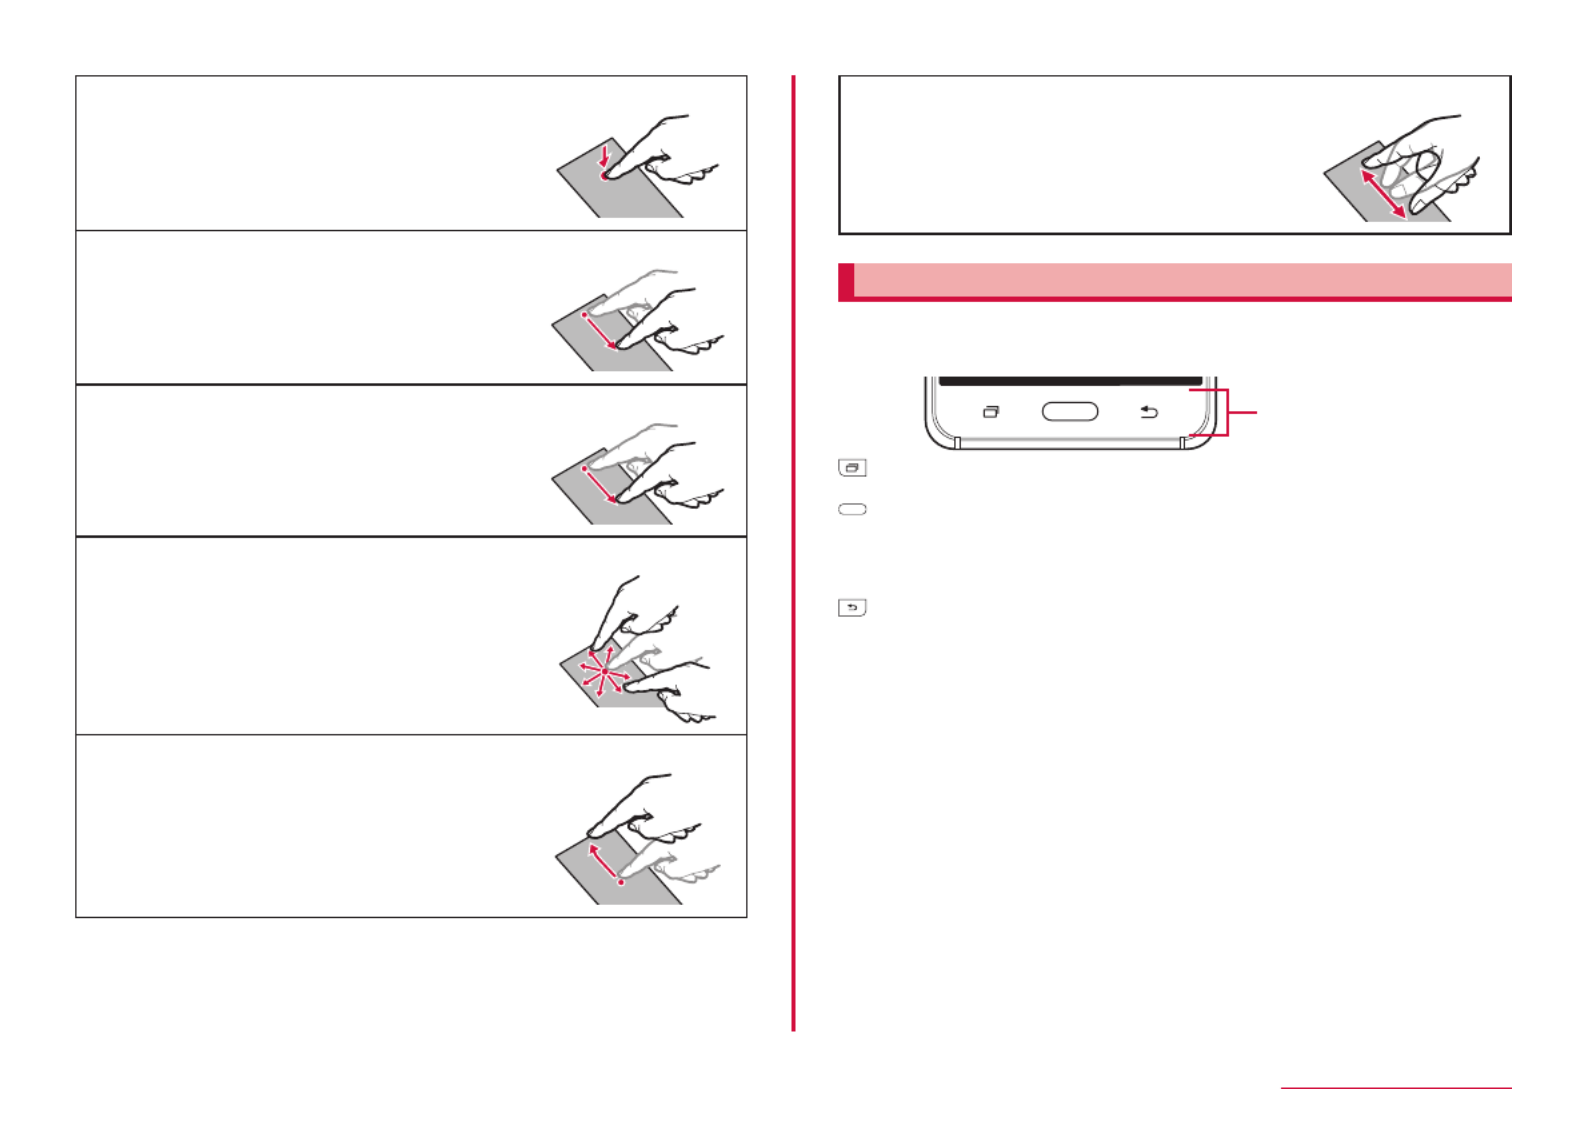
29
Before using the terminal
■ Touch and hold
Touch and hold a displayed content or item for 1
second or longer to display menu etc.
■ Drag
With touching with your nger, move a displayed
item or icon.
■ Swipe
Lightly move your nger across the surface of
the screen.
■ Scroll
With touching a displayed content with your
nger, move it up/down/right/left or switch the
views.
■ Flick
With touching the displayed content with your
nger, quickly move it up/down/right/left and
release it to scroll the content.
■ Pinch out/Pinch in
With touching a displayed image or web page
with your two ngers, widen (pinch out) or
narrow (pinch in) the distance to zoom in/out
the content.
Usingnavigationarea
You can operate the screen by using the keys in the navigation area at the
bottom of the terminal.
The name and operation of each key is as follows.
Navigation area
: History key
Display recently used apps
: Home key
Return to the Home screen
• Press it 1 second or more to activate Google app.
• Press it to turn o Always On Display while Always on Display is
displayed. → P.31
: Back key
Back to the previous screen
• Close the dialog box, options menu and notication panel. You can
end some apps.
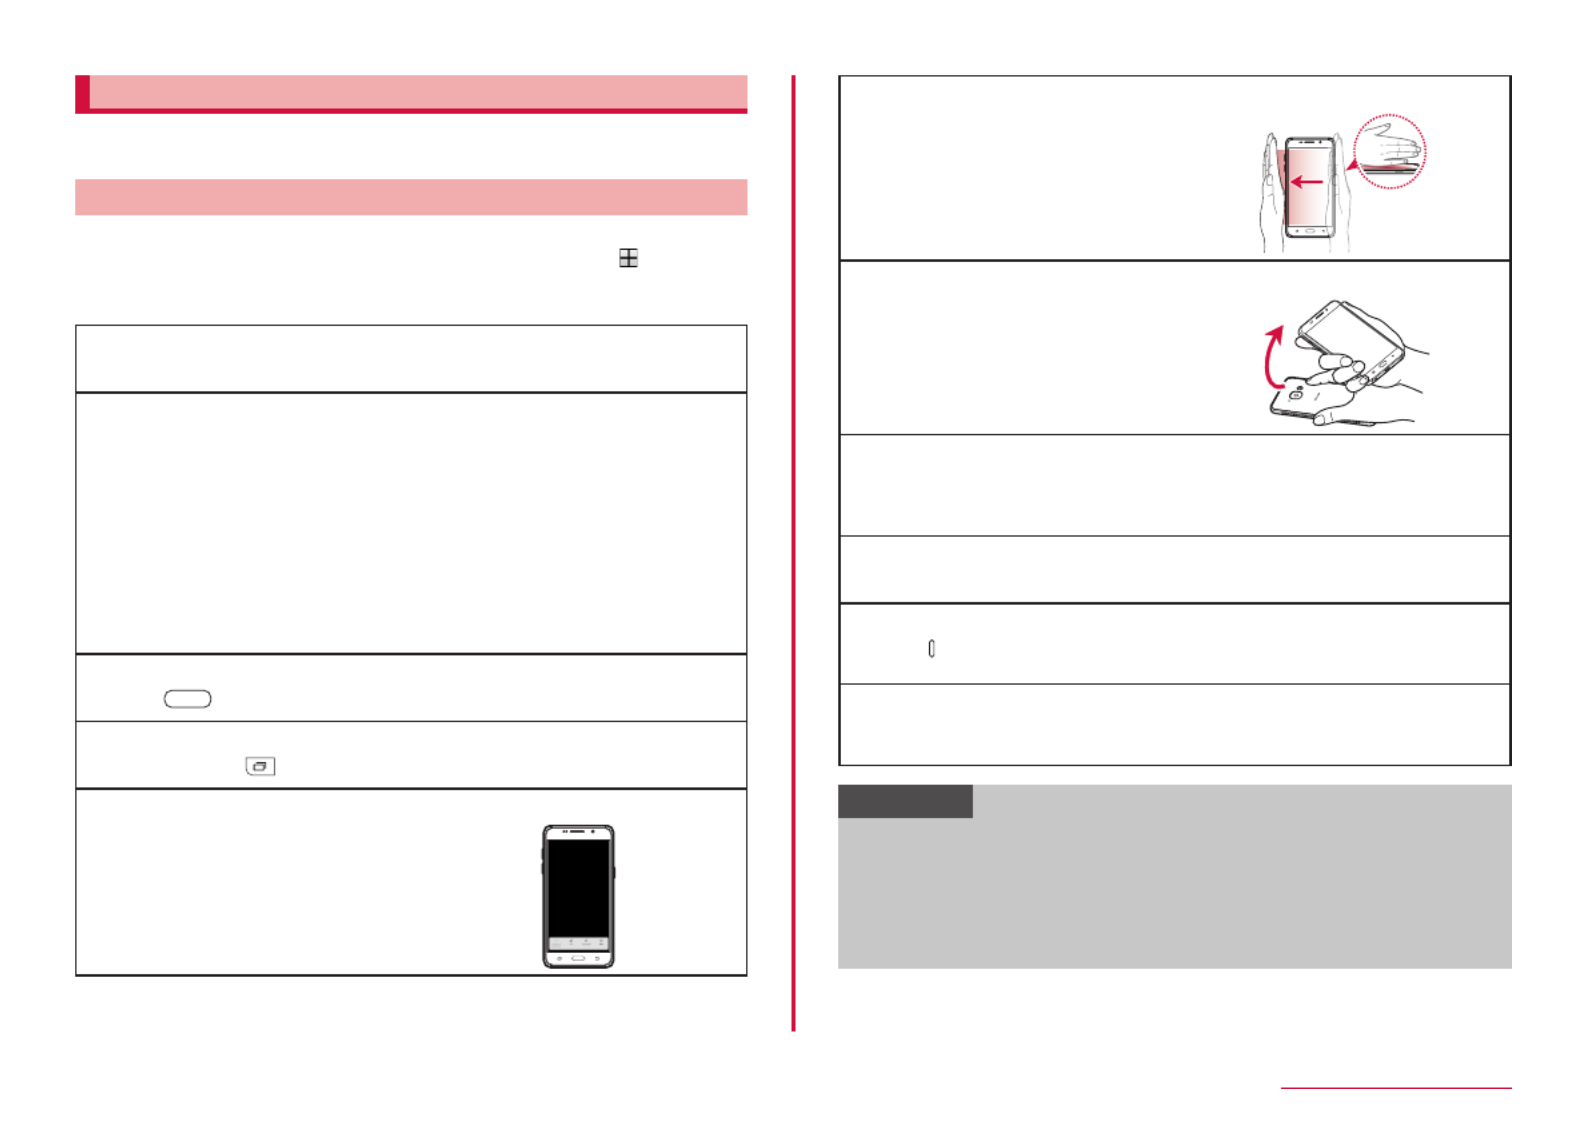
30
Before using the terminal
UsingAdvancedfeatures
Use simple operation to use a variety of functions.
* This feature may not be available for some other apps.
Mainadvancedfeatures
Moving the terminal performs the following operations.
• Before using the advanced features, from the Home screen, →"Settings"
→ "Advanced features" → Tap Advanced features to turn ON the advanced
functions you want to use.
■ Smart stay
You can keep the screen ON while you are looking at it.
■ Game
You can manage all games automatically by setting "Game Launcher
"to ON.
Setting "Game Tools" to ON will let you access the "No alerts during
game", "Lock Recents and Back keys", "Minimize game", "Screenshot"
and "Record" functions using the oating buttons on the game screen.
• If an installed game is not shown in Game Launcher, you can add it
by tapping "Add apps", select the game you wish to add, and then
tap "ADD". If a game is not recognized as a game on this terminal,
you can tap "REQUEST REGISTRATION" on the "Unable to add game"
screen to send a feedback requesting the game to be added in the
future.
■ Quick launch Camera
Press [Home key] twice quickly to launch camera.
■ Multi window
Press and hold [History key] to switch the split screen view.
■ Smart capture
After a screen capture, the
"Scroll capture", "Draw", "Crop" and
"Share" options will appear. These
options allow you to capture a
non-displayed area of the screen,
draw lines on a captured screen
or share/trim a screen capture.
■ Palm swipe to capture
Swipe the screen from right to left
or vice versa with the side of your
hand to capture the displayed
screen.
■ Smart alert
If you pick up the terminal when
there are missed calls or new
SMS and the screen turns o, the
terminal vibrates to notify.
■ Swipe to call/send messages
You can make a call by swiping a contact or phone number right or
send a message by swiping a message left on "Dial", "Contacts" or
"Messages" app.
■ Dual messenger
Use the same app with each individual account.
■ Send SOS message
Press [Power/Screen lock key] 3 consecutive times to send an SOS
message to emergency contacts.
■ Direct share
Directly share contents with the specied other party from the share
panel.
Information
• If excessive movement (shakiness, impact, etc.) is given to the
terminal, Motion may not function correctly because of sensor
characteristic.
• If you wear dark color glove or perform gesture operation out of
the sensor recognition range, Gesture may not function correctly
because of sensor characteristic.

31
Before using the terminal
SettingAlwaysOnDisplay
When the screen is OFF, you can display the clock, the calendar and
pictures.
• Always On Display can't work when the battery remain level is less than
5%.
9 月 1 日(水)
午前 10:00
90%
Always On Display (example)
1From the Home screen, → "Settings" → "Lock screen and
security"
2"Always On Display" →
3Select contents to view the screen
Information
• To turn o the Always On Display, press [Home key] or [Power/
Screen lock key].
Switchingtheorientationofthedisplay
automatically
Motion sensor which detects the terminal orientation (vertical/horizontal)
and tilt can switch the screen view automatically.
1Open notication panel (P.37)
2
Information
• For the Home screen or some functions, orientation of the display
may not automatically be switched.
Switchingsettings
Tap the toggle switches, or drag them, and tap checkboxes, to toggle the
ON/OFF and enable/disable settings.
• is ON, and is OFF.
• shows available, and shows unavailable.
Savingdisplaycontentasimage
Save screen content as image (screen capture).
1Display a screen you want to save as an image
2Press [Home key] and [Power/Screen lock key] at
the same time for 1 second or longer
Information
• Screen capture may not be available for some apps.
• Captured images are saved in the png format, and you can check
them in "Gallery"/"Photos" app.
• Enable "Palm swipe to capture" (P.30) in advanced features so
that screen capture is available by swiping the screen of the terminal
from right to left or vice versa with the side of your hand.
• When "Smart capture" (P.30) on Advanced features is ON, after
capture a screen, the "Scroll capture", "Draw", "Crop" and "Share"
options will appear. Tap "Scroll capture" to keep capturing the area
that is able to display by scrolling as one image. Captured images
using "Scroll capture" are saved in the jpg format.
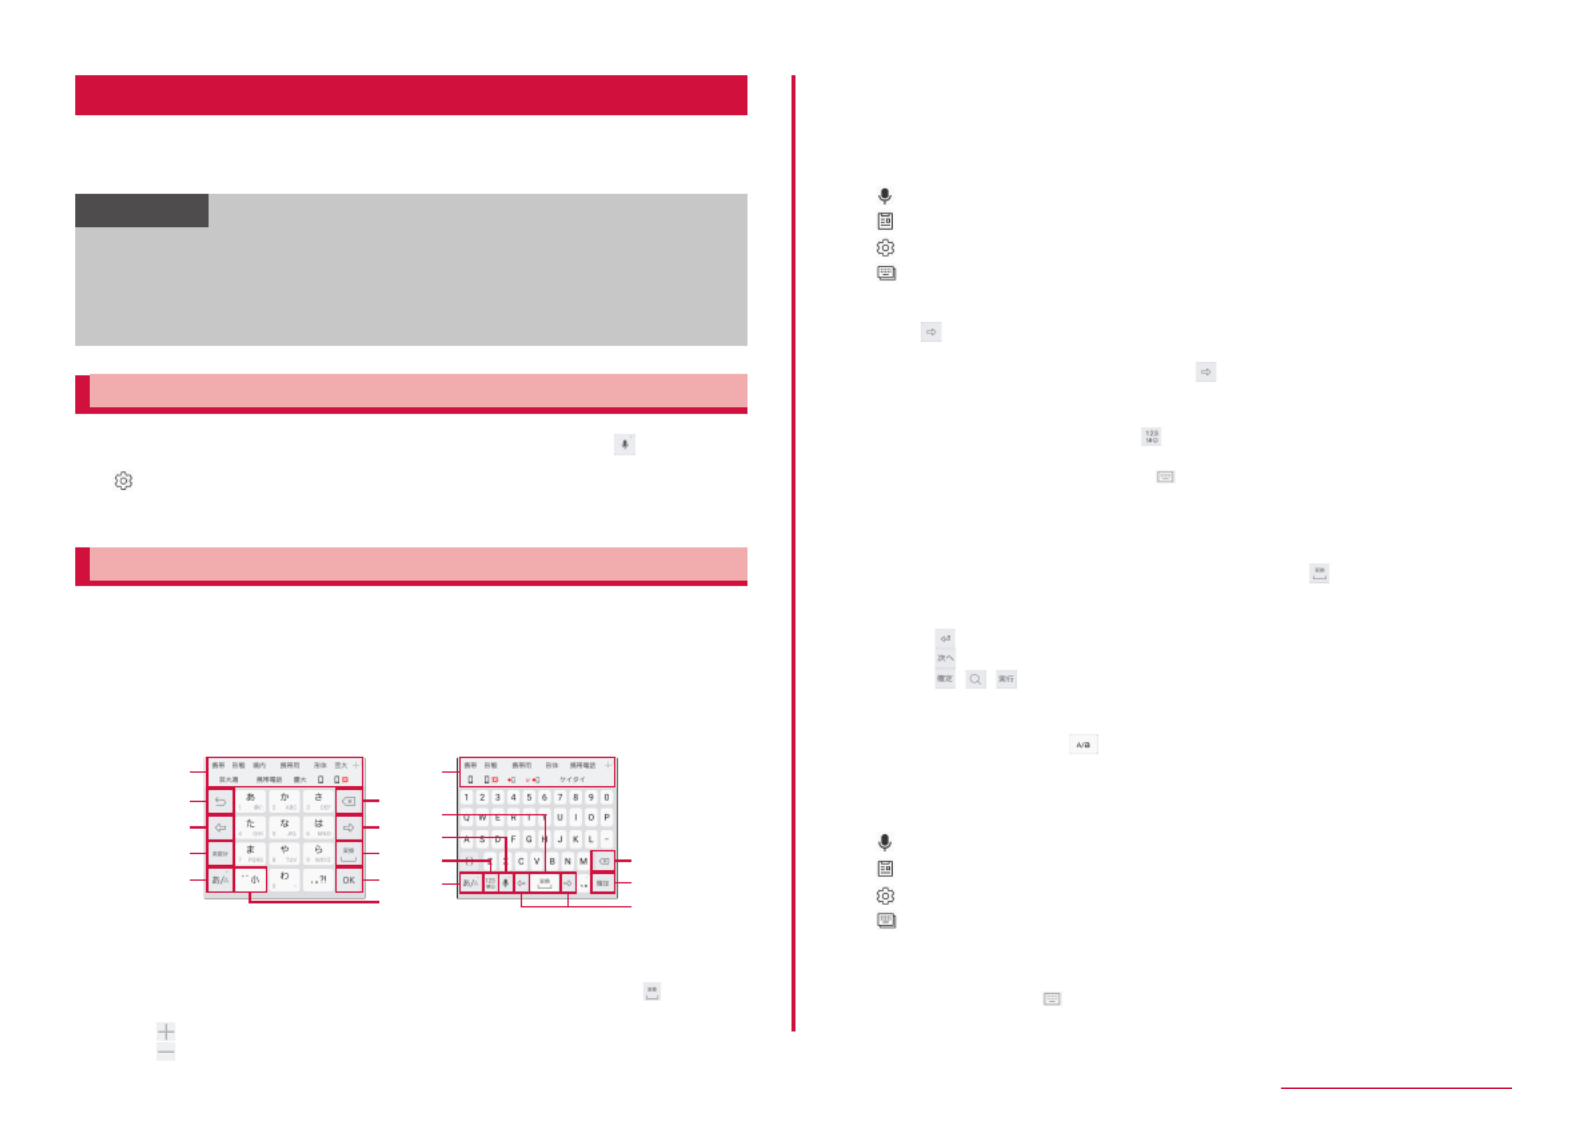
32
Before using the terminal
Characterentry
To enter characters, tap the character entry field to display the keyboard
(Galaxy Japanese keyboard) for character entry, and then tap a key of the
keyboard.
Information
• Use Google voice typing or Moji-Henshu to enter characters by voice
sound.
• Depending on usage condition, the display or operation of each
keyboard may dier or the dedicated keyboard for the app or function
you use may appear.
Switchingkeyboardtypes(inputmethod)
1While the keyboard is displayed, touch and hold
2 → 3X4 Keyboard ⇔ QWERTY Keyboard
3Tap a input method you want to use
EnteringwithGalaxyJapanesekeyboard
In Ga la x y J ap an ese k e yb oar d, y ou ca n use t wo t ype s of k eyb oa rds:
"3x4 Keyboard" and "QWERTY Keyboard".
• 3x4 Keyboard: it is a keyboard similar to a general mobile phone keyboard
(for multi-tap method). Tap a key assigned character you want to enter
several times until the target character is entered.
• QWERTY Keyboard: it is a keyboard similar to the one of PC. Enter
Japanese
in Roman character.
a
a
b
c
d
e
f
c
g
h
i
g
j
k
e
f
h
c
QWERTY Keyboard3x4 Keyboard
a Display predictive options/usual conversion options. Tap an option to enter
text.
• When "Japanese Word Prediction"/"Word Prediction" is set to OFF, if is tapped
while the predictive options is displayed, usual conversion options appear.
• Tap to widen the display area of predictive options/usual conversion options.
Tap to return the previous display.
b Switch an unconrmed character to the one in reverse order of when you tap
the key (Does not switch when using ick input).
• When no character is entered, perform displayed key operations.
Touch and hold to display the following icon menu. Displayed key diers depending
on selected icon menu.
:Switch to voice input
:Display clipboard and paste text etc.
:Display Galaxy Japanese keyboard setting menu
:Switch between oating keyboard/keyboard for one-handed operation
c Moves cursor left or right.
• Tap to enter a character assigned to the same key in a row on 3x4 Keyboard.
• When "Japanese Wildcard Prediction"/"Wildcard Prediction" is set to ON, wildcard
prediction can be used (P.33) by tapping .
d Alphanumeric/katakana conversion options appear. Tap again to display
predictive options/usual conversion options.
• When a character is not entered, is displayed. Tap it to switch to Number/
Symbol input mode. Touch and hold the key to display Emoji/Emoticon/symbol list.
Tap the tab to switch the list. Tap to return to the keypad display.
e Switch Hiragana/kanji/Alphabet input mode.
f Delete characters or symbols to the left of the cursor.
g Display usual conversion options.
• If suggestions are not displayed, tap to enter a space. is displayed only when
entering Hiragana/kanji.
h Conrm entered characters.
• When is displayed, tap to insert a linefeed.
• When appears, tap to move the cursor to the next entry eld.
• When , , appears, tap to search.
i Put a voiced sound mark or the Japanese voiceless bilabial sound mark.
Switch upper/lower case etc.
• In alphabet input mode, is displayed.
j Perform displayed key operations.
• Touch and hold to display the following icon menu. Displayed key diers depending
on selected icon menu.
:Switch to voice input
:Display clipboard and paste text etc.
:Display Galaxy Japanese keyboard setting menu
:Switch between oating keyboard/keyboard for one-handed operation
k Switch to Symbol input mode.
• Touch and hold the key to display Emoji/Emoticon/symbol list. Tap the tab to
switch the list. Tap to return to the keypad display.

33
Before using the terminal
Information
• For Moji-Henshu, connection by Mobile network is required. It may not
be available via Wi-Fi connection.
Switchingkeyboardtypes
1While the keyboard is displayed,
2"3x4 Keyboard ⇔ QWERTY Keyboard"
3"3x4 Keyboard"/"QWERTY Keyboard" → "OK"
Information
• When "Custom Settings" is selected in Step 3, set screen orientation
and keyboard type for each input mode.
SwitchingHalf-width/Full-width
1While the keyboard is displayed, touch and hold
2"Half-width"/"Full-width"
UsingWildcardPrediction
Wildcard Prediction is a function to narrow down conversion options by
entering numbers of the reading of word etc.
• It is available when "Japanese Word Prediction" and "Japanese Wildcard
Prediction" are set to ON.
• For entering alphabet/Korean characters, it is available when "Word
Prediction" and "Wildcard Prediction" are set to ON.
Example: Entering " 東京都"
1When the keyboard is displayed, enter"と" "う"
2Tap 4 times
• "とう○○○○ " is displayed and "東京都 " is displayed in the predictive
conversion options.
• Tap / to change the numbers of reading.
3" 東京都"
Selecting/Copying/Cutting/Pastingtext
1While the keyboard is displayed, touch and hold entered
character string
• / , etc. appear. Drag / , etc. to move the cursor.
2Select icon to use
Item Description
SELECT
ALL
Select all entered characters.
CUT Cut out selected character string.
COPY Copy the selected character string.
PASTE Paste copied/cut character string.
Information
• In horizontal view display, the display may be dierent.
• For some apps, the function may not be available or there may be
unavailable functions. And display of icon may be dierent or icons
not shown in Step 2 may be displayed.
• Touch and hold an entry eld in which any characters are not entered to
display a menu so that you can use "SELECT ALL", "PASTE", "CLIPBOARD"
(For some apps, it may be unavailable).

34
Before using the terminal
Settingcharacterentry/conversionfunction
SettingGalaxyJapanesekeyboard
You can set entry operations when entering characters using Galaxy
Japanese keyboard, register to the user dictionary, etc.
1 From the Home screen, → "Settings" → "General management"
→ "Language and input" → "Virtual keyboard" → "Galaxy Japanese
keyboard"
2Tap an item to set
Item Description
Input Language Select the system languages from a combination
of Japanese, English, or Korean.
3X4
Keyboard⇔QWERTY
Keyboard
Switch keyboard types.
Flick Input Select Flick Type, set Flick Sensitivity, Toggle
Input.
Display/Key
operation
Set the displays for Key size, Lines of Candidate
Area, and the key operations for the Sound on
Key Press, Key Preview.
Prediction/
Conversion
Set whether to save a word to the dictionary and
to display conversion options.
Voice Input Select a voice input from "docomo Voice Input",
"Google Voice Input", or "None".
Dictionary Register/edit words etc. to user dictionary.
External Application Set whether to use Mushroom plug-in.
Backup and restore Send/receive/restore the backup data between
the other devices and the terminal using NFC
feature.
Reset Clear learning dictionary and reset all settings.
iWnn IME for Galaxy Check version of Galaxy Japanese keyboard.
CheckinginformationofMoji-Henshu
1From the Home screen, → "Settings" → "General
management" → "Language and input" → "Virtual keyboard"
→ "Moji-Henshu"
2
“アプリ情報 (App information)”
• Check advanced information of Moji-Henshu.
SettingGooglevoicetyping
Set the language, etc. for Google voice search.
1From the Home screen, → "Settings" → "General
management" → "Language and input" → "Virtual keyboard"
→ "Google voice typing"
2Tap an item to set

35
Before using the terminal
Initialsettings
When you turn the terminal ON for the rst time after purchasing,
follow the onscreen instructions to make settings for language,
Google/Galaxy account, etc. and initial setting for docomo service.
Operation steps may vary depending on connection to network,
omitting the setting, etc.
1"START"
• To change the language, tap "日本語 (Japanese)" → "English".
• To change accessibility, tap "Accessibility" → Make Accessibility
settings.
• From here on, follow the onscreen instructions to congure the
following, tap "NEXT".
• Wi-Fi
• Terms and conditions
• Add your account
• Google services
• Name
• Protect your phone
2When the initial settings screen for docomo services
appears, mark "Agree to all" → "NEXT"
• From here on, follow the onscreen instructions to congure the
following, tap "NEXT".
• d ACCOUNT
• docomo cloud
• Install all apps
3Set Galaxy account
4Set Change home
5Set other useful functions
6"Finish"
• The Home screen wizard appears. Tap "Next" → "Next" → "Do not
show again"/"OK" to displays the Home screen.
Information
• Some functions can be changed after you have set them up.
• Before setting up online services, check that the terminal can transmit
data (LTE/3G/GSM)
or that the terminal is connected to a Wi-Fi
network.
• While you can use the terminal without setting up a Google account,
Google services, such as Gmail and Google Play, cannot be used.
Displayandicons
In the status bar at the top of the display, icons which indicate the
terminal status or notication information are displayed. Notication
icons appear on the left side of status bar, and status icons appear
on the right side of status bar.
Status bar
Notification icon
Status icon
Mainnoticationicons
• Some notication icons may be displayed with icons overlapped for indicating
multiple notications.
Notication icon
Dialing/receiving/calling → P.52
Missed call exists → P.56
New Gmail exists → P.69
New Email exists → P.67
New SMS exists → P.66
Trouble in delivery of SMS → P.65
New Area Mail exists → P.70
Data downloading/download completed
Data uploading/upload completed
Messages in Voice Mail service exist → P.58
Answering message On → P.57
Recorded message in the answering message exists →
P.57
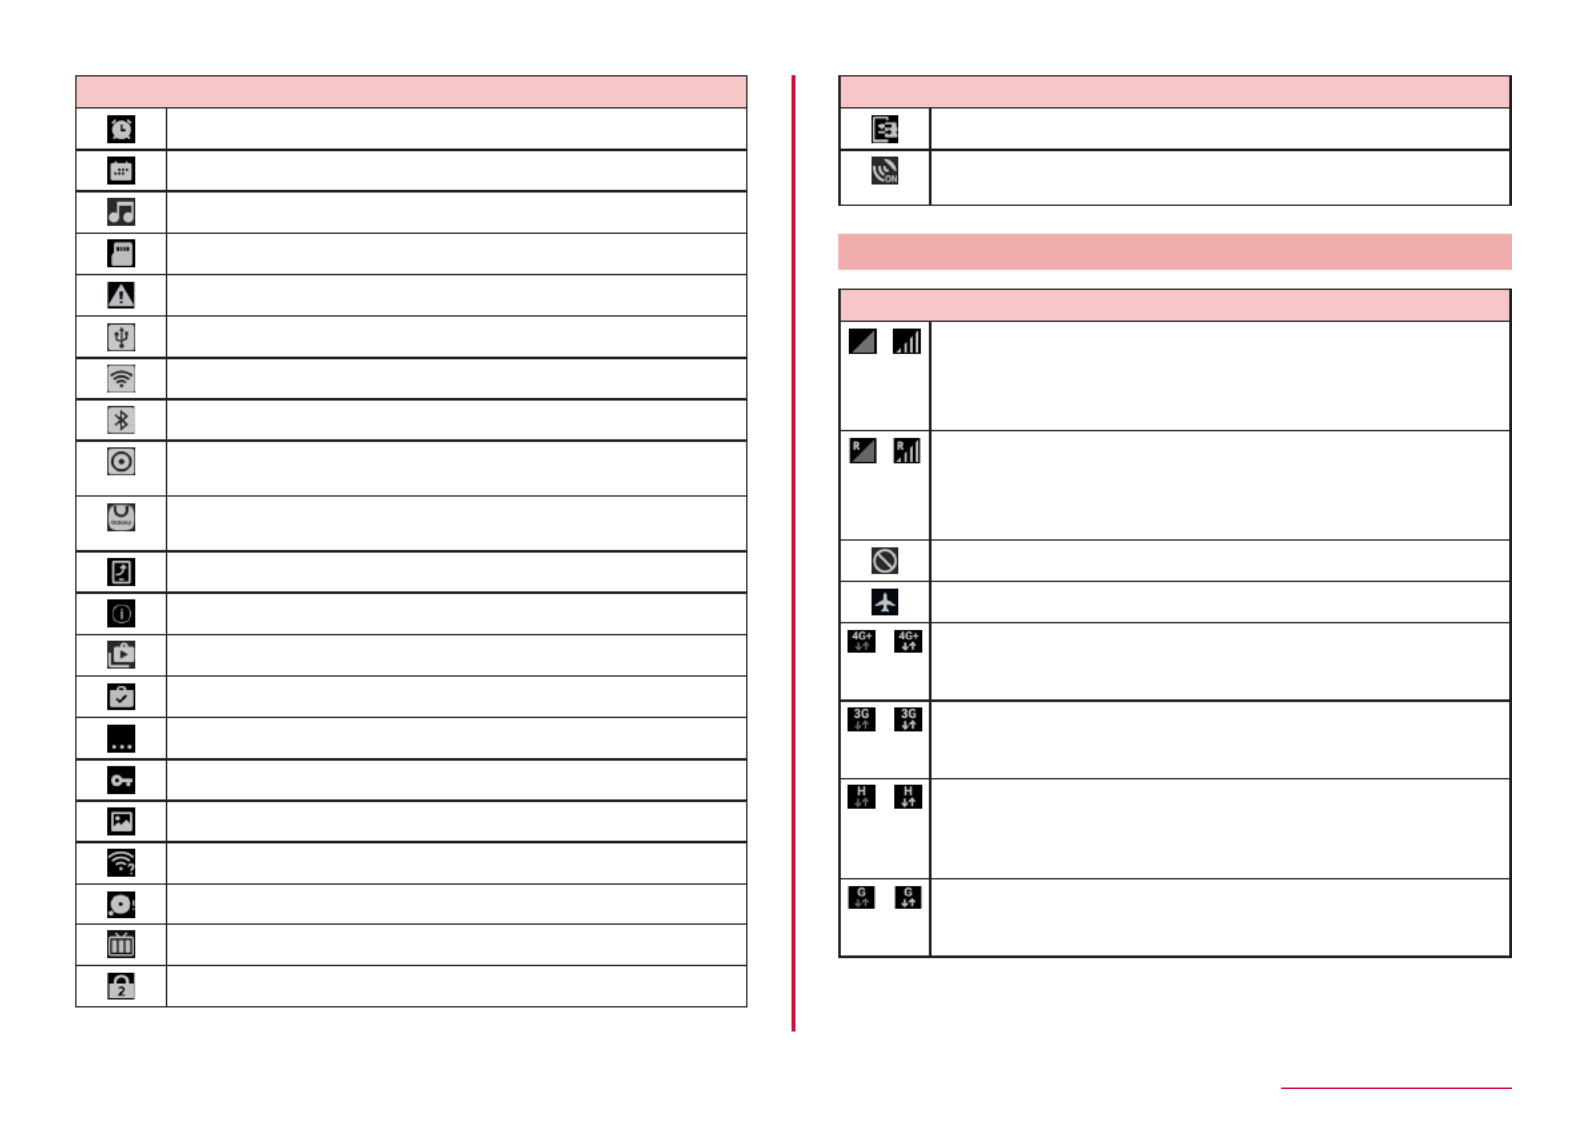
36
Before using the terminal
Notication icon
Alarm exists → P.91
Alarm of Schedule, etc. exists → P.92
Playing/pausing music → P.89
Using microSD card → P.24
Error message exists
USB tethering enabled → P.103
Wi-Fi tethering ON → P.102
Bluetooth tethering enabled → P.102
Two or more tethering functions simultaneously enabled →
P.102
Installation of Galaxy Apps applications is complete/updates
for installed app exists → P.75
Setting/checking software update → P.141
Updatable app exists in dmarket → P.74
Updatable apps exist in Google Play → P.75
Google Play apps are installed → P.75
Hidden notication information exists
VPN connected → P.104
Image saved by screen capture exists → P.31
Available Wi-Fi open network exists → P.99
Available memory space of the terminal drops
Watching/recording 1Seg → P.79
Omakase lock is set
Notication icon
Notication of docomo Data Copy → P.95
Location information function of docomo apps is enabled →
P.116
Mainstatusicons
Status icon
⇔
(Weak
⇔
Strong)
Radio wave condition
⇔
(Weak
⇔
Strong)
Radio wave condition (roaming)
Out of service area
Airplane mode is set → P.101
/ 4G (LTE) network available/communication in use *
(dark gray arrow in standby, light gray arrow while receiving/
sending)
/ 3G network available/communication in use
(dark gray arrow in standby, light gray arrow while receiving/
sending)
/ FOMA high-speed/HSDPA network available/communication in
use
(dark gray arrow in standby, light gray arrow while receiving/
sending)
/ GPRS network available/communication in use
(dark gray arrow in standby, light gray arrow while receiving/
sending)
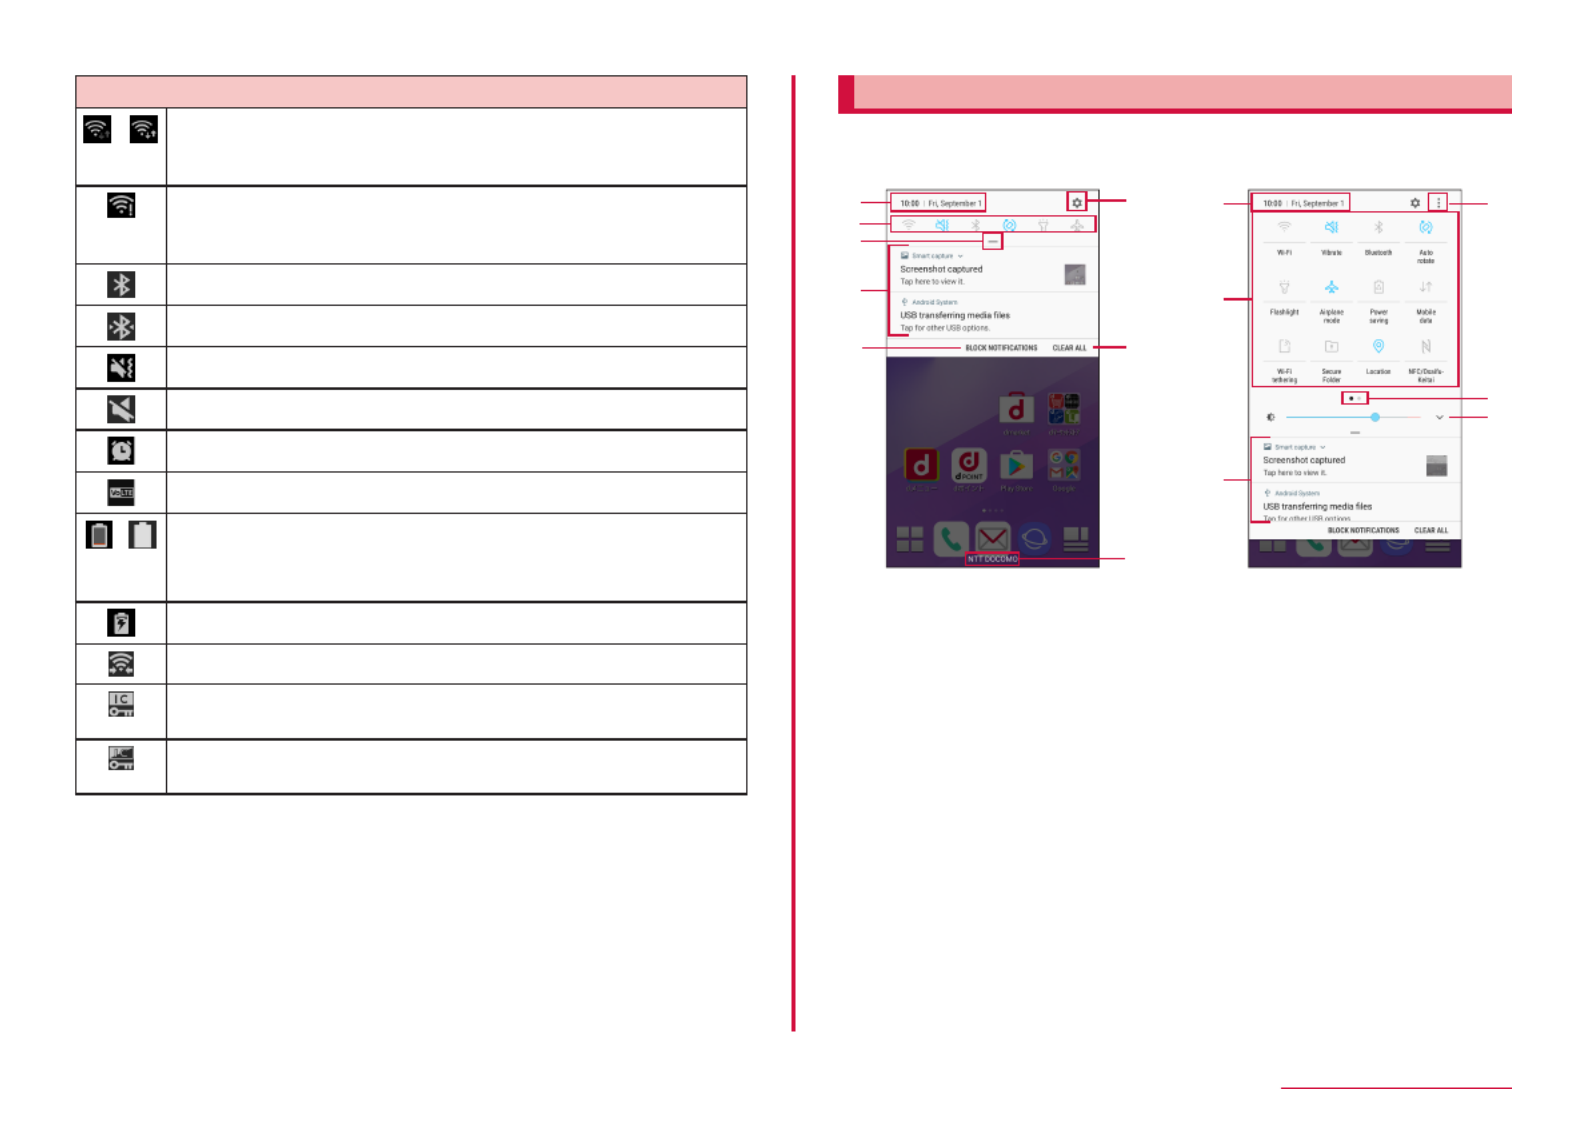
37
Before using the terminal
Status icon
/ Wi-Fi network available/communication in use
(dark gray arrow in standby, light gray arrow while receiving/
sending) → P.99
Connect to a Wi-Fi network that requires user authentication,
and the user authentication is in an unestablished state
The Internet cannot be connected to → P.99
Bluetooth function enabled → P.124
Connected to Bluetooth device → P.124
In Silent mode (Vibrate) → P.105
In Silent mode (Mute) → P.105
Alarm set → P.91
VoLTE network usable
⇔
(Low ⇔
High)
Battery level
Charging battery → P.26
Wi-Fi Direct connected → P.100
NFC/Osaifu-Keitai lock is set on the terminal and docomo nano
UIM card → P.77
NFC/Osaifu-Keitai lock is set on the terminal or docomo nano
UIM card → P.77
* "4G+" appears on the screen when the terminal is connected to LTE.
Noticationpanel
Scroll/ick the status bar downward to display the Notication panel. You
can check the notification information or tap the icons to set functions.
Scroll and ick upward to close the Notication panel.
a
b
c
d
d
e
f
g
h
a
b
i
k
j
Contents on Notification panel Contents on Notification panel
(when expanded)
a Display current date and time.
b Switch ON/OFF for each function (quick settings button). Scroll down the bar
(c) on the center of the notication panel to display hidden icons. Touch and
hold to display setting screen for each function.
• Wi-Fi: → P.98
• Sound: → P.104
• Bluetooth: → P.124
• Auto rotate: → P.31
• Flashlight: Switch ON/OFF for ashlight.
• Airplane mode: → P.101
• Power saving: → P.108
• Mobile data: Switch ON/OFF for data communication. If OFF is set, data
communication by the mobile network is not available.
• Wi-Fi tethering: → P.102
• Secure Folder: → P.42
• Location: → P.90
• NFC/Osaifu-Keitai: → P.125
• Always On Display: → P.31
• Do not disturb: → P.105
• Sync: → P.115

38
Before using the terminal
c Scroll down to display a list of quick setting buttons.
d Information in progress or notications * is displayed. Check information or tap
to activate an app.
e Select apps to receive the notication.
f Tap to display the setting menu (P.98).
g Tap to delete notication information and notication icon on the status bar.
• Some notication information may not be deleted.
h Display the connecting network operator name.
i Tap to change the order of quick setting buttons.
j Indicate the page number of the list of the quick setting buttons and which
screen you are in.
k Adjust the display brightness (P.107).
* Some notications will not be displayed on the notications panel
on the Lock screen (when the terminal is locked by "Pattern", "PIN",
"Password", or "Fingerprints") and you will not be notied about them.
Information
• Quick setting buttons are displayed in blue when the functions are
enabled.
Homescreen
"docomo LIVE UX" and "TouchWiz home" can be set as the screen
[Home screen] displayed by pressing [Home key].
• For information on "docomo LIVE UX", see P.46.
• For Switching home apps, refer to P.45.
TouchWizhome
b
d
e
c
a
f
a
"ひつじのしつじくん®(Butler Sheep)"
©TT DOCOMO
Contents on Home screen (example)
a Widgets (e.g. weather information, Google Search)
• Activate or operate widget (app located on the home screen).
b Machi-chara (e.g. ひつじのしつじくん (Butler Sheep))
• Notify you of information such as mail reception or incoming call.
c Apps
• Activate app, etc.
d The current position of the Home screen
e Apps and folders can be allocated in the dock
• These icons are displayed on any Home screen.
• Shortcuts and folders can also be located.
f Folder
• Contain several shortcuts into a folder.

39
Before using the terminal
Information
• From the Home screen, ick the screen right to activate "BRIEFING".
Addingshortcutsorwidgets
1 From the Home screen, touch and hold a wallpaper in which
shortcuts or widgets are not displayed
2 "Widgets"
3 Touch and hold an item you want to add to the Home screen
→ Drag to the position you want to move to and release it
Creatingafolder
1 From the Home screen, touch and hold a shortcut → Drag it
to another shortcut
2 Enter folder name → "Done"
Changingwallpaper
1 From the Home screen, touch and hold a wallpaper in which
shortcuts or widgets are not displayed
2 "Wallpapers and themes"
3 Select a wallpaper → Select a screen to change → "Set as
wallpaper"
• To select an image other than wallpaper, tap → Select an image
→ Tap "Set as wallpaper".
Information
• To delete a shortcut, widget, folder, etc., touch and hold a shortcut,
widget or folder → "Remove".
• For widgets connecting to network, packet communication charge
may be applied.
Appsscreen
Apps screen when the Home screen is set to "TouchWiz home" is
described.
1 From the Home screen, swipe up or down
• Apps screen appears.
a
b
c
d
e
"ひつじのしつじくん®(Butler Sheep)"
©TT DOCOMO
Contents on Apps screen (example)
a Apps
b Show which app screen you are in.
• When an apps screen has multiple pages, you can toggle the apps screen
by scrolling/icking left and right.
c Search
• Search Apps.
• Tap to search by voice sound.
d Menu
• You can edit the Apps screen menu and change the order.
e Machi-chara (e.g. ひつじのしつじくん(Butler Sheep))
• Notify you of information such as mail reception or incoming call.

40
Before using the terminal
Applist
Some apps require subscriptions (charged) to use.
• You can check the functions and operation steps from Help for some
apps.
Icon Apps Description
docomo mail Send/receive mails using DOCOMO mail address
(@docomo.ne.jp). If a d ACCOUNT is used, use
the same mail address on several devices such
as tablets and computer browsers to send and
receive, and read mail. → P.65
Phone Use phone or make settings of phone. →
P.52
docomo
phonebook
A phonebook app is provided by DOCOMO. It
enables you to manage phonebook data of
docomo's account in the cloud. → P.62
Schedule An app for creating/managing events and the
data is shared with Memo app. It supports
i-concier.
Memo An app for creating/managing memos and the
data is shared with Schedule app. It supports
i-concier.
Hanashite
Hon'yaku
Interactive translation app which converts
words and sentences from a language to
another. You can enjoy conversation with people
who speak dierent languages.
My Magazine My Magazine is a search service for displaying
articles for categories you selected. → P.50
しゃべってコンシェ
ル (Shabette
concier)
Just by speaking to it, this app can simply read
your intentions, check the weather and train
transfer information, make outgoing phone calls,
and set alarms. You can also enjoy chatting
with various characters.
Icon Apps Description
iコ ン シ ェル
(i-concier)
i-concier is a service for supporting your life like
a butler or concierge.
This app delivers useful information for daily life
such as nimbus alarm, train service information
or outing spot depending on your schedule, area
where you live, or your current location.
おすすめアプリ
(Recommended
App)
Display recommended apps.
Galaxy Apps Download apps or update installed apps. →
P.75
Galaxy
Members
Obtain necessary answers related to Galaxy
products and make use of events, user
community, diagnosis and customer service.
S Health Improve health-care using body scale and a
heart ratemeter. → P.97
S Voice
Operate each terminal function by voice input. →
P.97
Gmail You can send/receive emails using Gmail. →
P.69
Chrome Web browser app by Google.
Drive Save images or videos to Google Drive or share
them.
Play Movies&
TV
Purchase videos from Google Play.
Duo Make a video call by Google Duo.
Photos View pictures and movies.
You can also sync with Google Photos to
backup images and share them with others.
Play Music Discover, listen to, and share music on your
device.
Upload your own music collections to the cloud
and listen to them later.
Word Microsoft Word app for Android.
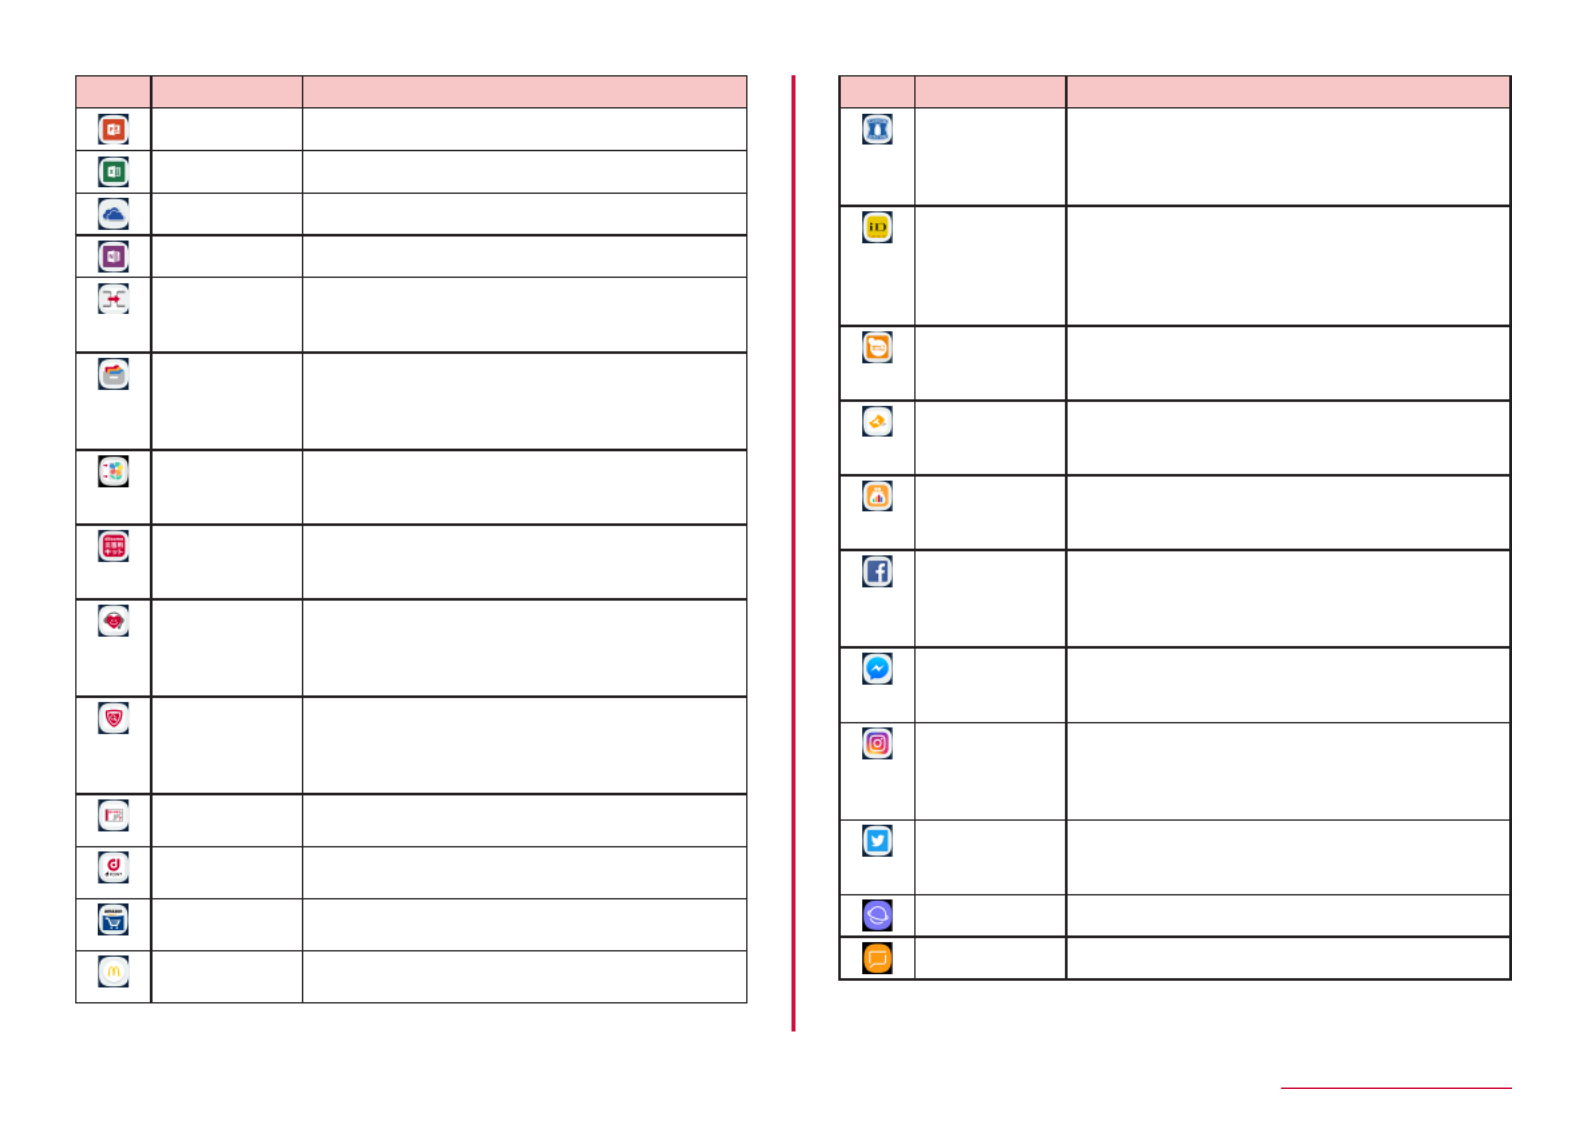
41
Before using the terminal
Icon Apps Description
PowerPoint Microsoft PowerPoint app for Android.
Excel Microsoft Excel app for Android.
OneDrive Microsoft OneDrive app. Use for online storage.
OneNote Microsoft OneNote app for Android.
Data Copy An app to transfer data for model upgrades or
backup/restore data to "microSD card" or "データ
保管BOX (Data saving BOX)". → P.95
データ保管BOX
(Data saving
BOX)
An app to use データ保管BOX (Data saving
BOX). Data saving BOX is a service which
allows you to upload les to easily manage
them in the cloud.
フォトコレク
ション (Photo
Collection)
A service with which you can back up photos or
videos to cloud up to 5 GB for free and access
them from smartphone, tablet, PC, etc.
Disaster kit An app for using Disaster Message Board,
Disaster Voice Messaging Service and Early
Warning "Area Mail". → P.70
遠隔サポー
ト (Remote
support)
An app to use "Anshin Enkaku Support". Anshin
Enkaku Support is a service in which Call
Center sta helps your operation checking your
terminal's screens remotely. → P.139
Anshin Scan Ensure your smartphone by checking virus, apps
which require your personal data, by alerting
when you attempt to access a nonsecure
website, etc.
Instruction
Manual
The instruction manual for the terminal. You can
activate desired functions from instructions.
dポイント (d
point)
d point is an app with which you can "Conrm",
"Save" and "Spend".
Amazon
Shopping
Shopping at Amazon store.
McDonald's
This is McDonald's ocial app. An app for
collecting coupons or latest information.
Icon Apps Description
LAWSON This is Lawson's ocial app. You can display
digital membership using your mobile phone
as a member's card, search shops, and nd
valuable exchange coupons.
iD アプリ (iD
app)
An app to use electronic money "iD" provided by
DOCOMO. You can enjoy shopping simply and
conveniently only by holding Osaifu-Keitai set
with "iD" over the IC card reader in stores. →
P.77
Osaifu-Keitai It allows you to pay money only by holding the
terminal over an IC card reader in stores, etc. →
P.76
トルカ (ToruCa) An app to collect coupon tickets, useful
information, etc. from your favorite stores. →
P.78
マネレコ
(Manereco)
A household account book app for checking the
balance of the bank account and credit card
statement, etc. all at once.
Facebook Facebook is a social networking service that
makes it easy for you to connect and share with
your friends, family, colleagues and classmates
online, and nd out what is happening in the
world.
Messenger You can use it to send messages and make a
voice/video call to your contacts in your mobile
phone and Facebook friends.
Instagram An app that you can use to edit images and
videos shot on the terminal, and easily share
with your family, friends, and people around the
world.
Twitter Ocial Twitter client app. Publish short
message on the site to communicate with
others.
Internet Web browser app. → P.71
Message Send/receive SMS. → P.65

42
Before using the terminal
Icon Apps Description
Email
Set
Email
account to send/receive emails.
→
P.67
Galaxy Notes Create note using software keyboard or
handwritten input. → P.93
Calendar Manage schedule. → P.92
Clock Use Alarm, World Clock, etc. → P.91
Calculator Perform various calculations with calculator. →
P.94
My Files View/manage data such as still images, videos,
music, etc. → P.122
Media Player Play music or video. → P.89
MobileTV Watch 1Seg, etc. → P.79
Dictionary Use dictionaries to search for words and
phrases. → P.97
Voice Recorder
Record voice sound.
→ P.94
Play Store Download apps from Google Play. → P.75
Google Search various information by the quick search
box.
Maps Check current location or search a destination
with Google Maps. → P.91
YouTube Play/post videos. → P.96
Dial Make/receive calls using the terminal's "Dial"
app provided by Galaxy.
Contacts Manage contacts using the terminal's
"Contacts" app provided by Galaxy.
Camera Shoot still images/videos. → P.84
Gallery View/organize still images/videos. → P.88
Settings Make the terminal settings. → P.98
Icon Apps Description
dメニュー
(dmenu)
App shortcut to access "dmenu". In dmenu, you
can quickly access DOCOMO recommended
sites and useful apps. → P.74
dmarket Various services including selling digital
contents such as music, videos, books,
shopping sites, travel reservation sites, etc. are
provided. → P.74
Secure Folder Protect private les and apps securely.
Information
• These apps are preinstalled ones when you purchased the terminal.
Some preinstalled apps can be uninstalled. Even if you uninstall such
apps, downloading again may be available at "Play Store" (P.75)
etc.
• When an app has notication information, number (number of
notications) may be displayed on the icon.
AddingshortcutstotheHomescreen
1 From the Apps screen, touch and hold an app to add to the
Home screen
2 Drag to the position you want to add to and release it
Information
• Alternatively, from the Apps screen, touch and hold an app to add to
the Home screen → Tap "Add shortcut to Home" to add.
Sortingapps
1 Touch and hold an app you want to move
2 Drag to the position you want to move to and release it

43
Before using the terminal
Uninstalling/Disablingapps
1 Tap an app you want to uninstall/disable
2 "Uninstall"/"Disable"
3 "OK"/"DISABLE"
Information
• To enable disabled apps, from the Home screen → "Settings" →
"Apps" → "All apps" → "Disabled" → Tap apps you want to enable →
"ENABLE".
UsingQuicksearchbox
You can search information including entered word in the terminal or
on the Internet.
1 From the Home screen, tap Google Search widget
• The quick search box appears.
• When you enter characters in the quick search box, information and
search suggestions in the terminal including the entered characters
appear below the quick search box.
• If "Google Now" information screen appears, follow the onscreen
instructions.
a b
Quick search box
a An entered character appears.
b Tap it to delete all entered characters.
Tap before entering character, you can enter words you want to search by
voice sound (only for web search).
Information
• Alternatively, press [Home key] for 1 second or longer, or from
the Home screen, tap "Google" → "Google" to activate Quick search.

44
Before using the terminal
Recently-usedapps
1 • Tap a thumbnail of app to activate the app.
• Tap "CLOSE ALL" to remove the list.
• Scroll/ick thumbnail left or right to delete it from the list.
• Tap to activate split screen view (P.44).
• If the "Pin windows" is set to ON, of the app thumbnails which were
displayed just before appears.
Pinningappstothescreens
Pins apps to the screens so that other apps cannot be used.
• The "Pin windows" (P.111) needs to be set to ON in advance.
1 Activate the app to pin
2
3 of a thumbnail of app
4 "START"
Information
• To release app pinning, simultaneously press and for 1
second or longer.
UsingSplitscreenview
You can display two windows on the screen to use different apps at the
same time.
• App to display need to be activated in advance.
* In some apps, this feature may not be available.
Split screen view (example)
1 Tap
• Display a thumbnail of app.
2 Tap of the thumbnail of app
• The screen is divided into two parts in the center and an app is
displayed on the upper side of the window.
3 Tap a thumbnail of app on the lower side of the window
• Display the app on the lower side of the window.
Information
• Tap to switch upper and lower (left and right for landscape view)
windows.
• Tap to end split screen view

45
Before using the terminal
Switchinghomeapps
Change the Home screen displayed by pressing [Home key].
1 From the Home screen,
→
"Settings" → "Apps" → →
Default apps → "Home screen"
2 "docomo LIVE UX"/"TouchWiz home"
3 "OK"
EnablingEmergencymode
Enabling Emergency mode changes the following settings to reduce
battery consumption.
• Limit number of available apps.
• Turn Mobile data o when the screen turns OFF.
• Turn o connection functions such as Wi-Fi, Bluetooth function.
• Turn OFF Silent mode (Mute, Vibrate).
1 Press [Power/Screen lock key]
for 1 second or longer
2 "Emergency mode Turned o" → Conrm the note and mark
the checkbox → "AGREE" → "TURN ON"
Information
• To disable Emergency mode, → "Turn o Emergency mode" or
Touch and hold [Power/Screen lock key] for 1 second or longer to
display a menu screen, then tap "Emergency mode".
• To enable Wi-Fi, Bluetooth function in Emergency mode, →
"Settings" → "Wi-Fi"/"Bluetooth" → Tap .
• To turn Silent mode (Vibrate, Mute) ON during Emergency mode,
touch and hold the Volume DOWN key until Silent mode is set.
• Enabling Emergency mode restricts part of functions. In addition,
available functions for apps may be limited.
• Using 1Seg and a browser consumes much power even in Emergency
mode.
• Disabling Emergency mode may hide some widgets on the Home
screen and may need to rearrange them.
• The emergency call number (119) is registered in your main
contacts.
• To delete an app on the Home screen, → "Remove" → Tap the app
you want to delete → "DONE".
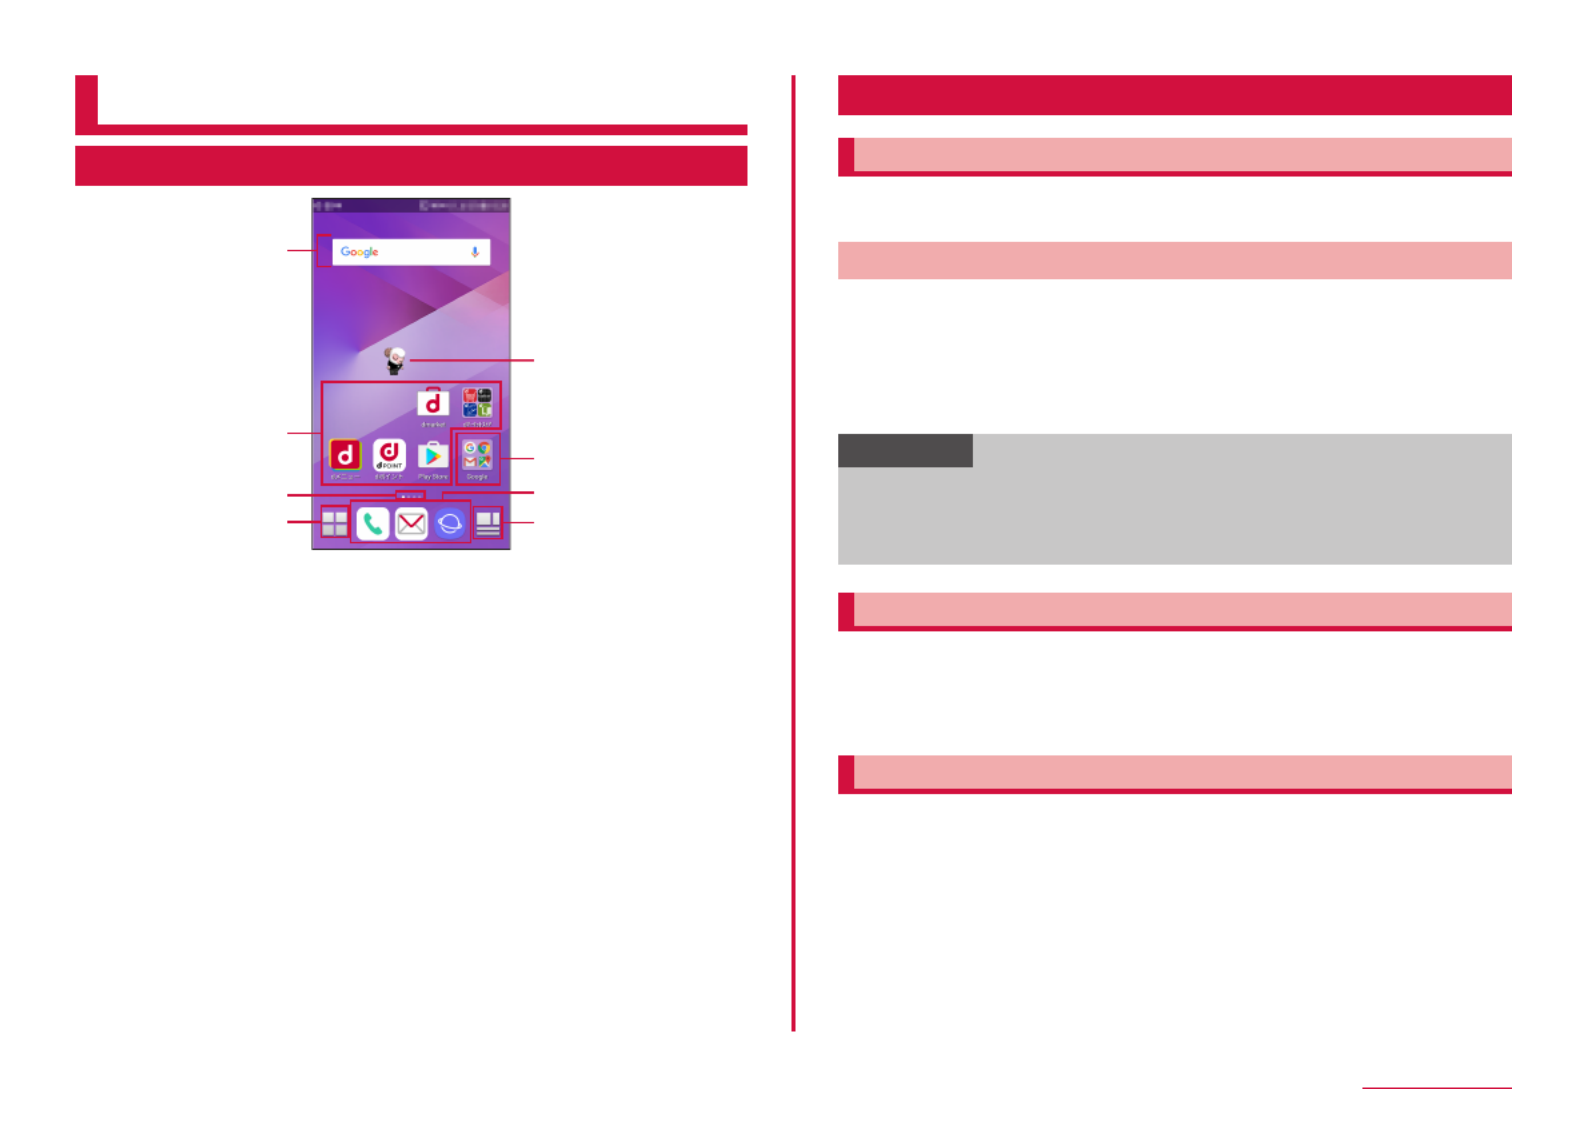
46
docomo LIVE UX
docomoLIVEUX
Homescreen
a
b
e
d
cg
h
f
Contents on Home screen (example)
"ひつじのしつじくん
®(Butler Sheep)"
©TT DOCOMO
a Widget (e.g. Google Search)
• Activate or operate widget.
b Apps
• Activate apps.
c Current location
• Indicates the Home screen page count and current location.
• You can toggle the screens by scrolling/icking left and right.
d Apps button
• Apps screen appears. → P.48
• These icons are displayed on any Home screen.
e Machi-chara (e.g. ひつじのしつじくん(Butler Sheep))
• Notify you of information such as mail reception or incoming call.
f Folder
• Contain several apps into a folder.
g Dock
• These icons are displayed on any Home screen.
• Shortcuts and folders can also be located.
h My Magazine button
• Displays My Magazine. → P.50
• These icons are displayed on any Home screen.
ManagingHomescreen
AddableitemsonHomescreen
Move apps and add shortcuts for widgets, folders, etc. on the Home
screen.
Movingoraddingapps,etc.
1 From the Home screen, touch and hold a wallpaper in which
apps or widgets, etc. are not displayed
2 "Show apps"/"Show widgets"/"Create folder"
• To move or add apps and widgets, touch and hold an icon → Drag to
the Home screen shown on the bottom of the screen and release it.
Information
• For widgets connecting to network, packet communication charge
may be applied.
• To change folder name, tap the folder → Tap the folder name → Enter
folder name → Tap "Done".
Movingapps,etc.
1 From the Home screen, touch and hold an app or widget,
etc. you want to move
2 Drag to the position you want to move to and release it
MovingappsfromHomescreentoAppsscreen
1 From the Home screen, touch and hold an app to return to
Apps screen
2 Drag to "Back to apps list" and release it

47
docomo LIVE UX
Deletingwidgets,etc.fromHomescreen
1 From the Home screen, touch and hold a widget or shortcut,
etc. you want to delete
2 Drag to "Remove from Home" and release it
Uninstallingappsorwidgets
1 From the Home screen, touch and hold an app or widget you
want to uninstall
2 Drag to "Uninstall" and release → "OK"
• Uninstallation completion message appears.
Information
• For some apps which cannot be uninstalled, in Step 2, drag the
app to "Disable app", then release your nger → Tap "Disable app"
→ "DISABLE" to disable it (P.109).
ChangingKisekae
Set wallpaper or Apps screen at one time.
1 From the Home screen, touch and hold a wallpaper in which
apps or widgets, etc. are not displayed → "Change Kisekae"
2 Select an item → "Set"
Changingwallpaper
You can change Home screen wallpaper as you like.
1 From the Home screen, touch and hold a wallpaper in
which apps or widgets, etc. are not displayed → "Change
wallpaper"
2 Select a wallpaper
• Tap "Select another wallpaper" to select from "Photos", "Gallery",
"Live wallpapers" and "Wallpapers".
3 Follow the onscreen instruction to set the wallpaper
Addinghomescreens
1 From the Home screen, touch and hold a wallpaper in which
apps or widgets, etc. are not displayed → "Home screens" or
pinch in on the Home screen list
2 "Add Home screen"
• Add up to 7 pages.
Sortinghomescreens
1 From the Home screen, touch and hold a wallpaper in which
apps or widgets, etc. are not displayed → "Home screens" or
pinch in on the Home screen list
2 Touch and hold a thumbnail of Home screen
3 Drag to the position you want to move to and release it
Deletinghomescreen
1 From the Home screen, touch and hold a wallpaper in which
apps or widgets, etc. are not displayed → "Home screens" or
pinch in on the Home screen list
2 Tap of thumbnail of home screen you want to remove
DisplayingMachi-chara
Set a character moving on the Home screen freely and speak "you want to
search", "you want to do", etc. to the terminal. The apps read the meaning
of the words to display most appropriate answer.
1 From the Home screen, touch and hold a wallpaper in which
apps or widgets, etc. are not displayed → "Machi-Chara
setting"
2 "キャラ設定 (Chara setting)" tab " 表示する (Display)"→ in "キャラ表
示 (Chara display)"
Information
• Alternatively, touch and hold displayed character to open the setting
screen.
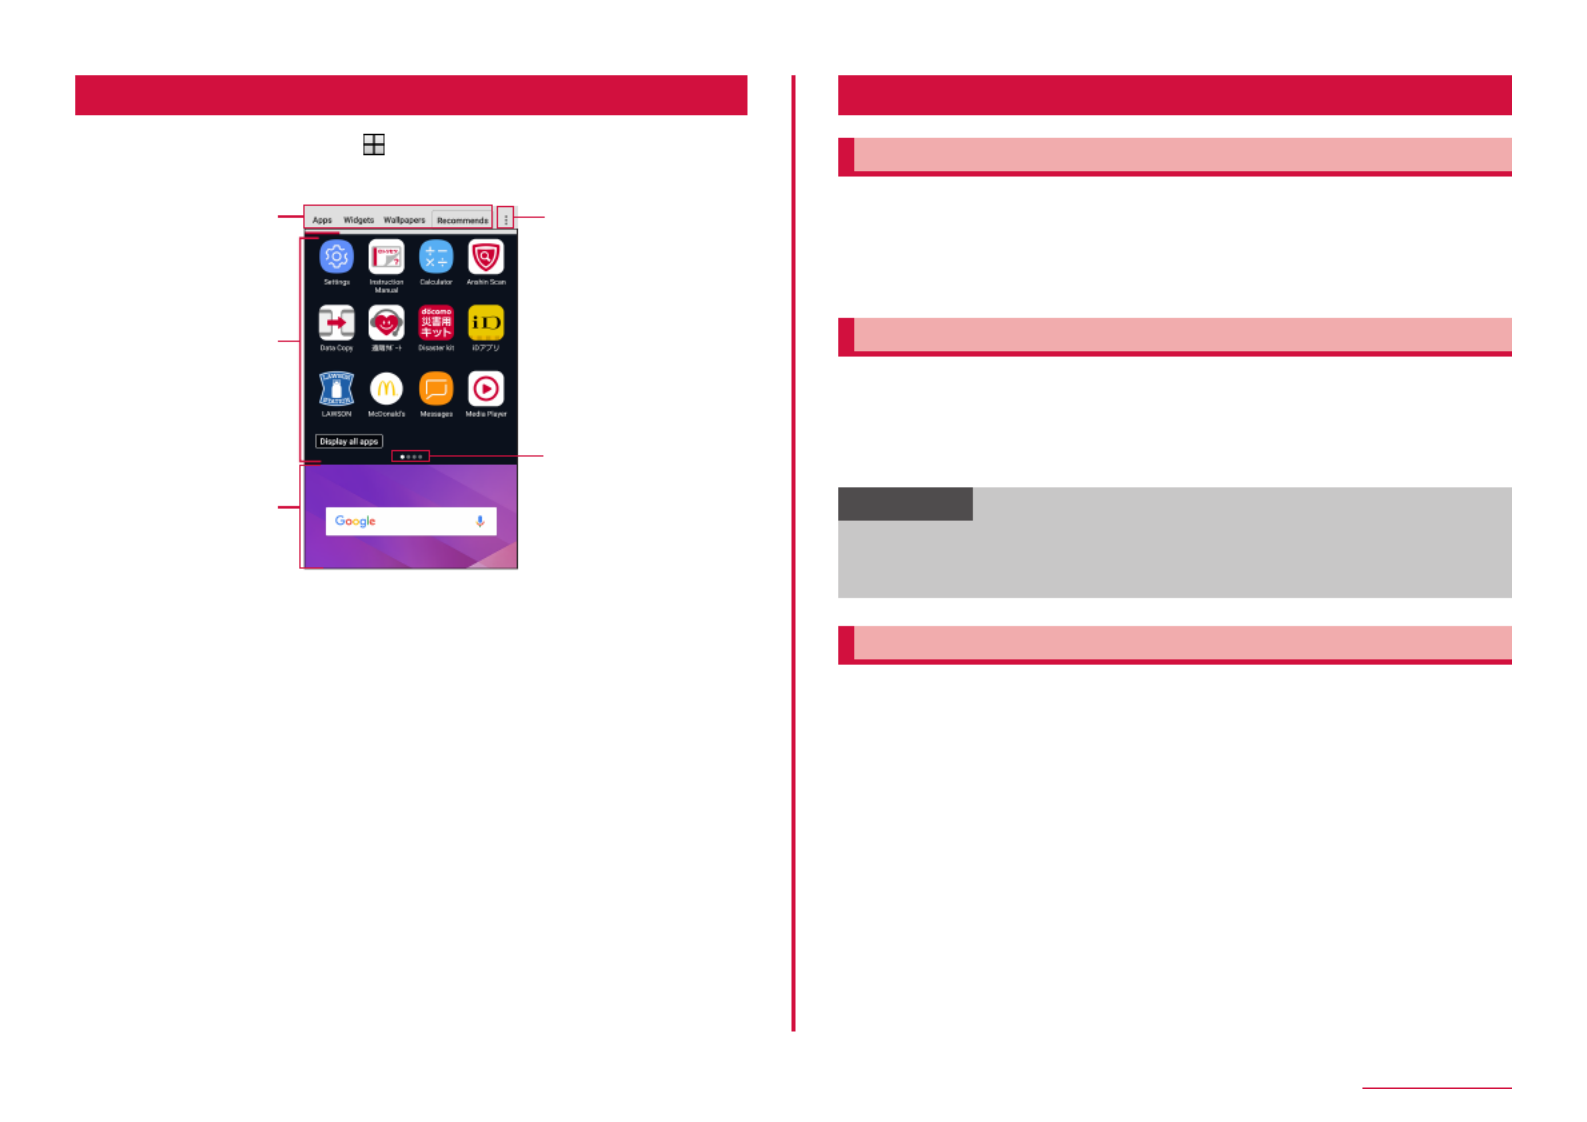
48
docomo LIVE UX
Viewingappsscreen
1 From the Home screen,
• Apps screen appears.
• You can scroll/ick the Home screen down to display Apps screen.
Contents on Apps screen (example)
a
b
c
d
e
a "Apps" tab/"Widgets" tab/"Wallpapers" tab/"Recommends" button
• Display the app/widget/wallpapers screen.
• Tapping "Recommends" button to install apps recommended by DOCOMO
(P.49).
b Apps
• The shown apps are not on Home screen. Select an icon to activate.
• You can toggle the screens by scrolling/icking left and right.
c Home screen
• You can toggle the screens by scrolling/icking left and right.
• Scroll/ick up to display the Home screen.
d Menu
• Display menu such as Search, Settings, Help, etc.
e Current location
• Indicate the apps screen page count and current location.
Managingapps
MovingappstoHomescreen
1 From the Apps screen, touch and hold an app you want to
move to the Home screen
2 Drag to the Home screen shown on the bottom of the
screen and release it on the position you want to move to
Uninstallingappsorwidgets
1 From the Apps/Widgets screen, touch and hold an app/widget
you want to uninstall
2 Drag to "Uninstall" and release → "OK"
• Uninstallation completion message appears.
Information
• For some apps which cannot be uninstalled, in Step 2, drag the app to
"Disable app", then release your nger → Tap "DISABLE" → "DISABLE"
to disable it (P.109).
Movingapps
1 Touch and hold an app you want to move
2 Drag to the position you want to move to and release it
49
docomo LIVE UX
Installingrecommendedapps
You can install apps recommended by DOCOMO.
• A guidance page appears for the rst activation. Tap " おすすめアプリ
を見る (See recommended apps)" to display app list and notication of
recommended apps sets ON.
• From the Home screen, tap → "Recommends" → → of
notication settings to set ON/OFF.
Displayingallapps
This feature searches the location of apps in the terminal.
1 From the Apps screen, → "Display all apps"
Display a list of all apps. Tap an app to activate it. Tap to transfer
to the screen that app is on. It will also be focused and displayed.

50
docomo LIVE UX
BackingupandrestoringtheHomescreen
You can restore the Home screen layout such as apps and widgets
using docomo LIVE UX data backed up in docomo cloud. At this time,
the docomo service page will be added to the end of your Home
screen.
Backinguphomescreen
1 From the Apps screen, → "Layout backup & Restore"
• To backup/restore the settings of your home screen, you need to
get a d ACCOUNT (P.116).
2 → "BACKUP"
RestoringHomescreen
1 From the Apps screen, → "Layout backup & Restore"
2 "Restore the latest backup data" → "RESTORE"
• If there are multiple instances of backup data, tap "Restore from
backup data list" and select the backup data.
UsingMyMagazine
My Magazine is a retrieval service to show articles from genre
you selected. It learns your preference by helping to set retrieval
word according to your reading history and prole information.
You can also congure My Magazine so that it can be customized
using notications, location information, docomo service contract
information, etc.
1 From the Home screen,
• When using for the rst time, follow the onscreen instructions to set
the journals to be displayed in My Magazine.
• The list screen divided by genres appears. Flick the article list by
categories left or right to switch categories.
• Tap “See more info” to display the article list other than displayed
ones.
Information
• Alternatively, ick on the Home screen to display the article list of My
Magazine.
• From the Home screen, → → Tap "My Magazine settings" to make
setting so that you can use My Magazine customization such as using
the location information, docomo service subscription information, etc.
Settingcategories
Add, delete or sort categories to be displayed on the article list
1 From the Home screen, → → "Display category setting"
2 Mark/unmark categories
• Marked categories are displayed.
• To change the categories order, tap and drag up or down to
change the position and tap "OK".
51
docomo LIVE UX
MyMagazineusesetting
1 From the Home screen, → → "My Magazine settings" →
"My Magazine use setting"
2 "Use"/"Not use" → "OK"
• You can set whether to display the My Magazine icon on the Home
screen by marking/unmarking the "Display icon" checkbox.
Information
• Alternatively, from the Apps screen, tap → "My Magazine use
setting" to set whether to use My Magazine.
Homescreeninformation
Version
You can check the provider of docomo LIVE UX and version information
etc. of home app.
1 From the Apps screen, → "About"
• If there is docomo LIVE UX update, "Update now" button appears on
the app information screen. Then tap it to update docomo LIVE UX.
Helptext
You can view the descriptions or instructions, etc. about docomo LIVE UX.
1 From the Apps screen, → "Help"

52
Calling
Calling
Makingacall
1 From the Home screen, → "Dial"
2 Enter a phone number of the other party
• Enter a city code even when the other party is in the same city.
Dial screen
a
b
c
d
e
f
g
a Phonebook
Start "docomo phonebook" app.
b Dial: Dial screen appears.
Recent calls: Recent calls screen appears (P.56).
Favorites: Contact list added to Favorites appears (P.63).
c Phone number entry eld
Entered phone number is displayed.
d Call key
Call to the entered phone number.
e Menu
Display menu.
f Delete key
Delete a number at the far right or a number to the left of the cursor. To delete
all entered numbers, touch and hold the key.
g Key for registering to phonebook
Register entered phone numbers to phonebook.
3
• To make a video call, tap → "Video call".
4 When the call ends,
Information
• To show/hide the caller ID per call, enter prex "186" (notify) /
"184"(not notify) before the phone number. You can set to show/hide
in "Caller ID notication" (P.58) in advance.
• Use "Add 2-sec pause" or "Add wait" to dial phone number and
additional code in a row when sending an additional code during a
call is required for bank balance inquiries, ticket reservation services,
etc.
- On the dial screen, enter the phone number → → "Add 2-sec
pause", enter the desired phone number, and tap → , the
call is
connected and the touch-tone signals (numbers) are automatically
sent after about 2 seconds.
- On the dial screen, enter the phone number → → "Add wait" →
enter the desired phone number, and tap , the call is
connected and the touch-tone signals (numbers) are sent when
you have tapped "YES".
• You can make calls and video calls in high quality with VoLTE.
To use VoLTE, you and the other party both need to meet the
following conditions.
- The device supports VoLTE.
- Both parties are in a VoLTE service area
- "Network mode" of "Mobile networks" (P.129) is set to "4G/3G/
GSM (auto connect)" and "Call mode" * is set to ON when available
* F rom t he H om e s cr een , → "Set tin gs " → "Co nnect ions" →
"Mobile networks" → "Call mode"
• You can see each other's images while talking by video call. You can
also switch to voice call.
- When making video calls, there is a call charge and packet
communication charge. In addition, there is also a packet
communication charge for incoming video calls.
- Since it is a best eort communication (the optimum
communication
speed changes depending on the network trac), the image quality
diers depending on the network environment.
- When you could not switch to video call from voice call, a
notication will appear on the display indicating that the switching
to video call failed, and voice call will continue.
- Since imaging for video call varies by terminal model, your terminal
and the other party's terminal may show dierent image in scope.
• Alternatively, from the Home screen, → Tap "Dial" to activate "Dial"
app provided by Galaxy and then tap to make a call. However,
available functions etc. dier from those of "Phone" app provided by
DOCOMO.

53
Calling
Emergencycall
Emergency call Phone number
Police call 110
Fire and emergency rescue 119
Marine emergency 118
Information
• The terminal supports "Emergency report location notication". If you
use the terminal to place a call to emergency numbers such as 110,
119, or 118, the information of a location where you are calling from
(location information) is automatically notied to the Emergency call
acceptance organization such as the Police Station. The Emergency
call acceptance organization may not be able to gure out your exact
location depending on the location where you place a call or radio
wave condition. If the location information is informed, the agency's
name is displayed on the Home screen. If you dial by adding "184" in
front of your number to hide your caller ID, your location information
and phone number are not notied. However, if the agency you called
considers your location information and phone number necessary for
important purposes such as life saving, the agency can retrieve your
accurate location information regardless of your mobile settings.
Note that the areas/time for which the "Emergency call location
information" is ready to be used vary depending on the preparatory
state of each Emergency call acceptance organization.
• When you call the Police (110), Fire/Ambulance (119), or Maritime
rescue (118) from the terminal, clearly indicate that you are calling
from a mobile phone, then give your present location and mobile
phone number. To make sure that you are not cut o during the call,
do not move during the call and do not turn OFF the phone after the
call, but keep it ON for about 10 minutes.
• Depending on the area you are calling from, you are not connected to
the local police or re department.
• In Japan, when docomo nano UIM card is not inserted to the terminal,
the emergency numbers of 110, 119 or 118 are not available on
the
PIN code entry screen or during PIN code lock/PUK lock.
• If you make an emergency call 110, 119, 118 with call blocking
setting enabled, call blocking setting will be disabled.
• Emergency call may not be available via some networks.
• You can not make emergency calls by video calls.
Receivingacall
1 A call is received
• A reception screen appears.
• When receiving a call with VoLTE, "HD" is displayed at the top of the
screen.
Incoming call screen
(voice call)
Incoming call screen
(video call)
2 Drag to outside of the circle./
• A call starts.
To decline a call
Drag to outside of the circle
To decline a call and inform the caller of the reason of the decline by
SMS
Drag "SEND MESSAGE" at the bottom of the screen upward and tap a
decline message.
• You can change the reason of decline. (P.59).
To answer with "Recorded message"
Drag "SEND MESSAGE" at the bottom of the screen upward and tap
"Answering message".
• You can use this function only by voice call.
When you do not want to show your image to the caller
Tap "Show me" and drag to the outside of the circle that is shown.
To answer a video call by a voice call
Drag to outside of the circle

54
Calling
• A voice call starts.
3 When the call ends,
Information
• To stop ringtone sounding or vibration, press
[Power/Screen lock
key] or volume UP key/volume DOWN key.
• If you set "Suguden settings" ( → P.60) to ON, you can answer an
incoming call simply by placing the terminal on your ear.
Receivingincomingcallwhileappisactivated
If an incoming call is received when an app is activated, the call is displayed
in a pop-up dialog box.
Incoming call screen
• You can start/decline the call by tapping "ANSWER"/"DECLINE".
• You can decline a call and convey the reason for declining the call to the
caller with SMS by tapping "SEND MESSAGE".
• Tapping the pop-up displays the call in full screen view.
Operationduringacall
1 A call is received
• A reception screen appears.
2 Drag / to outside of the circle
• A call screen appears and calling starts.
Voice calling screen
d
b
c
a
Video calling screen
a
e
f
d
g
h
k
c
j
i
a High-quality sound indication
Appears when using a call with high quality sound of VoLTE.
b Menu icons
Tap to perform one of the following operations.
• Add call: Make a second call
• Video call: Switch to video call.
• Bluetooth: Connect with Bluetooth device to call hands-free.
• Speaker: Emit the other party's voice from the speaker to call hands-free.
• Keypad/Hide: Show/hide the keypad. Tap keypad to send touch-tone signal.
• Mute: Mute your voice not to be heard by the other party.
c
End the call.
d Menu
Display the menu for calling screen (P.55).
e Your own image
• Tap → "Switch video displays" to exchange your own image and the other
party's image.

55
Calling
f The other party's image
Depending on the other party's setting, a substitute image may be displayed.
• When the other party's image cannot be received, appears.
g Camera
Switch for whether to send your own image.
h Switch
Switch the cameras for the image to send to the other party from the inside or
outside.
i Voice call
Switch to voice call.
j Mute
Mute your voice not to be heard by the other party.
k Speaker
Set the other party's voice from the speaker to call hands-free.
Information
• If the caller changes to a video call during a voice call, a pop-up is
displayed conrming whether you want to switch to a video call. Tap
"Accept" to switch to the video call screen.
• If you change to an app from "Phone" during a video call, video will no
longer be transmitted to the caller.
Menuoncallingscreen
Tap / on the calling screen to display the following items.
Item Description
Hold/Resume
call
*1*2
Hold/resume a call.
Record/Stop
recording *2
Record/stop recording your current call.
Turn on extra
volume/Turn o
extra volume *3
Switch whether or not to enable extra volume.
View contact/Add
to Contacts *2
View contact or add contact.
Send message *2 Send SMS.
Capture image *4 Capture the screen of the other party during video
call.
Keypad *4 Show keypad.
Switch to headset/
Switch to phone *4
Set whether or not to use a Bluetooth device when
calling.
Switch to voice
call *4
Switch to voice call.
Switch video
displays *4
Set whether or not to exchange your own image
and the other party's image.
*1 Available only when you subscribe to "Call waiting".
*2 Shown only during voice call.
*3 Shown only during voice call. May not show depending on the network
which is connected to.
*4 Shown only during video call.
Information
• To adjust the volume of the other party's voice (call volume), press
the volume UP key/volume DOWN key during a call.
• The voice call screen turns o automatically when the screen is
covered by making the terminal close to your face (except when a
headset or the like is attached or the speaker is ON) or about 30
seconds are passed with no operation. To display the call screen,
keep the terminal away from your face or press [Power/Screen lock
key] / [Home key].

56
Calling
Recentcalls
On the Recent calls screen, you can check logs of dialed calls,
received calls.
• Up to 500 items can be displayed.
1 From the Home screen, → "Recent calls"
• Recent calls screen is displayed.
Recent calls screen
a
b
c
d
e
f
g
a Phonebook
Start "docomo phonebook" app.
b Dial: Dial screen appears (P.52).
Recent calls: Recent calls appear.
Favorites: Contact list added to Favorites appears (P.63).
c Switch logs
Switch display between Incoming log and Outgoing log. Tap "All" to display
all incoming/outgoing call logs.
d Name, Phone number, Call date and time
• Tap to open the recent calls screen. Tap an item on the Outgoing screen to make
a call, send an SMS, etc.
• Touch and hold an item to edit number, delete from call log, register number to
decline or search location before calling.
e Menu
Display menu.
f Outgoing, incoming, missed calls
• The dierence between voice and video calls are not shown.
g Voice call key
Make a voice call to the number for the call log.
Information
• When there is a missed call, appears on the status bar. Scroll/ick
the status bar downward and follow the onscreen instructions.
• From the Home screen, → Tap "Dial" to activate "Dial" app provided
by Galaxy, and then tap "Recents" to check incoming/outgoing call
log. However, available functions etc. dier from those of "Phone" app
provided by DOCOMO.

57
Calling
Answeringmessage
Set answering message which plays answering message and records
caller's message when you cannot answer an incoming call.
• Answering message is not available for video call.
1From the Home screen, → → "Call settings"
2"Answering message settings" → "Auto answer
with message" → "Always"/"Turn on when set to
vibrate"/"Manual"
• Tap "Language" to set language for answering message.
• Tap "Play answering message after" to set answer time from 0 to
120 seconds.
Information
• When there is a recorded message, appears on the status bar
.
Scroll/ick the status bar downward and tap "New recorded message"
to check the recorded message. From the Home screen, →
→ "Call
settings" → "Answering message settings" → "Recorded messages"
to open recorded messages.
• Up to 13 hours can be recorded for one message. Number of savable
messages depends on available memory space in the device memory.
Makinganinternationalcall(WORLDCALL)
WORLD CALL is an international telephone service that you can use
inside Japan with DOCOMO terminal.
For using overseas, see P.128 and after.
• Depending on the network operator, the caller ID may not be shown/
displayed properly. In this case, calls cannot be made from the logs.
1From the Home screen, → "Dial" → "0", "1", "0" → Country
code → Area code (city code) → Enter a phone number of
the other party
• Please omit the prex "0" in the area code (city code). However, "0"
maybe required to dial to some countries or areas such as Italy.
2
3When the call ends,
Information
• When "0" is touched and held to enter prex "+" before "Country code-
Area code (City code)-phone number", international dial assist screen
appears when making a call. When you tap "Call by WORLD CALL", "+"
is changed to an international access code "009130010", and you
can make an international call.

58
Calling
Callsettings
You can set functions for calling from the Home screen, → →
"Call settings".
Item Description
Hide contacts without numbers When displaying the contacts by "Dial"
numbers provided by Galaxy, display
only contacts with registered phone
numbers. The other contacts is not
displayed.
Network
services
Voice mail service *
The service takes voice message of
the other party for you if you cannot
answer an incoming call.
Call forwarding
service *
The service forwards a call if you
cannot answer an incoming call.
Call waiting * The service which allows you to put
the current call on hold and answer a
second call or make a call to another
party.
Caller ID notication
Notify your phone number on the
screen display of the other party when
making a call.
Nuisance call
blocking service
Save caller's number and set call
decline.
Caller ID display
request service
Activate/deactivate Caller ID display
request.
Call notications Activate/deactivate missed call
notication.
English guidance Set English guidance.
Remote operation Activate/deactivate remote operation.
Public mode (turn
o)
While the terminal is OFF or in Airplane
mode, a guidance message indicating
that the receiver is in a place where
power should be turned o is heard on
the caller's terminal and then the call
ends.
Roaming → P.131
Item Description
Call
blocking
Blocking mode Set Blocking mode.
Block list Manage the phone numbers which are
going to have their incoming calls and
messages blocked.
Quick decline
messages
→ P.59
Answering
and ending
calls
Press Home key to
answer calls
Set whether to answer call by
pressing [Home key].
Automatic
answering
Set whether or not to answer a call
automatically after two seconds when
a headset or a Bluetooth device is
connected to the terminal.
Press Power key to
end calls
Set whether to end call by pressing
[Power/Screen lock key].
• If "Press Power key to end calls" is
set to ON and the terminal turns
into sleep mode during a call, cancel
the sleep mode by pressing
[Home key] and end call by pressing
[Power/Screen lock key].
Answering
message
settings
*
Auto answer with
message
→ P.57
Play answering
message after
→ P.57
Language → P.57
Recorded
messages
→ P.57
Show caller information Set whether to display the latest
contact information for each caller.
Show calls in pop-up Display ongoing calls in a pop-up
instead of full screen while using other
apps.

59
Calling
Item Description
Call alerts Vibrate when
answered
Set whether to vibrate the terminal
when the other party answers your
call.
Vibrate when call
ends
Set whether to vibrate terminal when
the call ends.
Call connect tone Set whether to sound call connect
tone.
Call end tone Set whether to sound call end tone.
Notify during calls Set whether to sound notication
sound when there is an alarm or SMS
reception.
Ringtones
and keypad
tones
Ringtones Set incoming call ringtone.
Vibration pattern Set vibration pattern.
Vibrate while
ringing
Set whether to vibrate while ringing
Dialing keypad
tone
Play tone when the dialing keypad is
tapped.
Record
calls
Recording
notications
Receive notications after calls are
recorded.
Auto record calls Record calls to or from selected
numbers automatically.
Auto area code Register the area code to add to the
front of the phone number when calling
by "Dial" app.
Suguden settings → P.60
About Phone Display version information of phone
app and open source licenses
* Not supported to video calls.
RegisteringreasonofdeclineforSMStobesent
whendecliningcall
The terminal can decline an incoming call and inform the caller of the
reason of decline by SMS. Up to 6 decline messages can be registered.
• By default, 3 decline messages are registered.
1From the Home screen, → → "Call settings" → "Call
blocking" → "Quick decline messages"
2Enter a phone number to decline →
To edit registered decline message
Tap a decline message to edit → Edit the decline message → Tap
"Save".
To delete a decline message
Tap of messages to delete.

60
Calling
Blockingcallreceptionsfromspeciedphonenumber
You can register the phone number you want to block the calls and
messages
from and select number categories.
1From the Home screen, → → "Call settings" → "Call
blocking" → "Block list"
2Enter a phone number to decline →
• Tap to enter a phone number by selecting Recent calls or contacts.
• "Blocked number categories" → Mark the number category you want
to block, and you can collectively do blocking.
Information
• To decline saved phone number, select "For numbers in Block list" in
"Blocking mode" (P.58)
SettingSuguden
Set "Suguden" to answer just via motion and voice keywords.
1From the Home screen, → → "Call settings" → "Suguden
settings"
Item Description
Answer Set whether to answer by placing the terminal
to your ear.
Disconnect Motion Set whether to disconnect the call by putting
the terminal horizontally with the screen facing
down or by shaking the terminal twice during a
call.
Voice
command
Set whether to disconnect the call by releasing
the terminal from your ear after voice command
during a call.
Call Set whether to call the registered number or
the number in Recent calls by shaking the
terminal once on the Home screen then placing
the terminal to your ear.
Mute, Reject Set whether to mute or decline the call by
putting the terminal horizontally with the screen
facing down or by shaking the terminal twice
during a call. Select from "Mute", "Disconnect",
or "Reject and send SMS".
Call ranking You can check call ranking according to the
number of outgoing calls.
Hide the name when
receiving
Set whether to hide the caller's name until
handling the terminal when receiving a call.
Sending of use
information
Set whether to send the use information.
Disable Suguden during
roaming
Set whether to disable the Suguden function
overseas.

61
Calling
Information
• Suguden will not operate in the following cases.
- When using the speaker
- When using the earphone/headset
- When connected with a Bluetooth device with calling function
- When a call is made/a call is received during a call
- When you are lying down
- When you are doing intense exercises such as going up and down
stairs, running, etc.
- When covering up the display with a book-type smartphone case,
etc.
• If you place the terminal in a bag or pocket with the screen ON while
there is an incoming call, in rare cases, Suguden may recognize the
action as a motion and answer or end the call.
• Shaking the terminal strongly is recognized as an operating motion
and may cause the call to be disconnected.
• When a call is disconnected, the fast motion of putting the terminal
with its screen facing down may cause the operation to fail (cannot
disconnect). In this case, perform the action slowly to operate
(disconnect) the terminal.
• The proximity sensor does not respond well to black objects.
(When answering a call) If hair is blocking the earpiece as you bring
the phone to your ear, the proximity sensor may have trouble working
and cause the call not to be picked up. In this case, place the earpiece
directly against your ear.
(When disconnecting/rejecting a call) Turning the terminal over on a
black desk, etc. may cause the operation to fail (cannot disconnect/
reject). In this case, instead of placing the terminal directly on the
surface, raise the terminal 1cm from the desk, etc. as you ip it over
to operate (disconnect/reject).
• If a motion is detected after enabling the call ending function of
Suguden, the call will be ended in the following cases.
- While the other party is holding
- When the answering message is active (playing the answering
message/recording a message)
• When the voice command is set to ON during a call, you may not be
able to use apps for which other microphones are needed or apps that
use voice during a call (example: call recording app). To use these apps
during a call, set “Disconnect” (Voice command) to OFF.
• When the answering message or voice memo (playing the answering
message/recording a message or voice memo) is active, you cannot
disconnect the call with the voice command. When you answer the
call while the message or voice memo is being recorded, you can
disconnect the call with the voice command.
• When you call with “Hanashite Hon' yaku”, you cannot disconnect the
call with the voice command.
• Suguden voice command functions use speech recognition technology
and language processing technology. However, DOCOMO is not liable
to the accuracy of these techniques.
• If you speak in a too low voice during a call or you call in noisy situation,
your voice may not be recognized depending on your way of speech.
• “Call” is only available on the Home screen or lock screen.
• Suguden does not support video calls. Video calls are only supported
by the “Hide the name when receiving” function.
The “Hide the name when receiving” function displays the caller's
name when receiving a call and the answering message is active.
• Suguden function is automatically disabled overseas. When using the
Suguden function overseas, set “Disable Suguden during roaming” to
OFF.

62
Calling
Phonebook
Registeringtophonebook
Manage various contact information such as name, phone number or mail
address using "docomo phonebook" app provided by DOCOMO.
• For using the cloud service on phonebook, docomo phonebook app is
required.
• When you activate "docomo phonebook" for the rst time (including after
resetting the app), "Use of Cloud" screen appears and set to use Cloud.
1From the Home screen, " ドコモクラウド (docomo Cloud)" →
"docomo phonebook"
• By default, contacts list screen appears.
2"Register"
Edit contacts screen
a
b
c
a Account
Tap "Setting" to select an account.
b Image eld
Tap "Setting" to register an image.
c Label key
Select a content label (item).
3
Enter the required items
• When group (P.63) is set to a contact, tap "Set" in "Group" to
group the contact.
4"Save"
• If the contact is not displayed, on the contacts list screen, tap →
"Settings" → "Accounts to display" to change the display settings.
Information
• Alternatively, from the Home screen, → Tap "Contacts" provided by
Galaxy to activate "Contacts" app to register or manage contacts.
However, available function etc. of the app diers from "Phone" app
provided by DOCOMO.
• To save the contact to the terminal, from the Home screen, →
"Contacts" → → "Phone"

63
Calling
Checking/Editingacontact
1From the Home screen, "ドコモクラウド (docomo cloud)" →
"docomo phonebook" → "Contacts"
Contact list screen
a
b
c
d
e
f
g
h
i
j
k
a Contacts
• Display the contact list screen.
b Name registered in the phonebook
c Photo set in the phonebook
d Register
• Add contacts (P.62).
e Log in to/out from the cloud
f Menu
• Display menu.
g My prole
• Prole screen appears. You can check the phone number, edit/manage your own
prole information (P.64).
h Group
• Displays the group list screen. You can add and edit groups (P.63).
i Index character display area
• Tap "Index" to display index characters by which you can search a name in the order
of the Japanese syllabary, alphabet, etc.
j Index
• Display the index character display area.
k Search
• Search contacts.
2Tap the contact you want to check
• Prole screen appears.
• Tap "Edit" to edit a contact.
Makingacallfromphonebook
1On the Contacts list screen, tap the recipient you want to call
• Prole screen appears.
2• Tap the phone number to create SMS or make video call.
• To create a mail, tap a mail address and select an app.
AddingacontacttoFavorites
1On the Contacts list screen, tap the contact you want to
add to Favorites → Tap (white) to change to (yellow)
• Added contact is displayed in the "Favorites" group.
Adding/Editingagroup
1On the Contacts list screen, "Group"
2"Add group"
To edit saved group
Tap a group you want to edit → "Edit" → Edit and then tap "OK".
To delete group
→ "Delete group" → Mark groups you want to delete → "OK" → Tap
"OK".
To change display order of groups
"Sort" → Tap a group → Drag the group to desired place → Tap "OK".
3Select account → Enter a group name → Select an icon and
color
4"OK"
64
Calling
Information
• You can set icon or color when creating group or change order in the
group list only for the groups saved in docomo's account.
Addingcontacttoagroup
1On the Contacts list screen, "Group"
2Tap a group → "Add member" → Mark contacts to add →
"OK" → "OK"
• To delete contact from a group, tap a group that includes a contact
you want to delete → "Delete member" → Mark contacts to delete →
"OK" → Tap "OK".
Information
• Only contacts saved in the save location where the same account is
can be added to the group.
RegisteringMyprole
1On the Contacts list screen, "My prole"
• Prole screen appears.
2"Edit"
3Enter the required items → "Save"
Importing/Exportingcontacts
You can import contacts between microSD card or docomo nano UIM card
and the terminal, or send them as contact data (vCard).
1On the Contacts list screen, → "SD card/SIM card/
common"
2Select an item
• Follow the onscreen instructions.
65
Mail/Web browser
Mail/Webbrowser
DOCOMOmail
Send/receive mails using DOCOMO mail address (@docomo.ne.jp).
Sent/received mails are saved in docomo mail server. You can
transfer mail data easily when the terminal is lost or you change
the model. Additionally, with d ACCOUNT, you can send, receive and
read mail on multiple devices such as a tablet and PC browser using
the same mail address.
For details of docomo mail, refer to NTT DOCOMO website.
https://www.nttdocomo.co.jp/service/docomo_mail/
1From the Home screen,
• From here on, follow the on-screen instructions.
SMS
You can send and receive text messages with a mobile phone number
as the destination.
* For details on a number of characters that you can send/receive etc,
refer to "Short Message Service (SMS)" on the NTT DOCOMO website.
CreatingandsendingSMS
1From the Home screen, → "Messages"
• A thread (sender/recipient of SMS) list appears.
2• SELECT RECIPIENTS screen appears.
3Select a recipient → "COMPOSE
• When sending to an unregistered recipient, tap "COMPOSE" and
enter the recipient's cell phone number.
• To send to multiple recipients, enter comma (,) after a cell phone
number or tap .
• Tap to enter recipients selecting from Contacts.
4Enter text in "Enter message" eld
• To insert saved phrase, tap " " → "Quick responses" → Tap a
message to insert.
5"SEND"
To send an SMS on a specied date and time
→ "Schedule message" → Set date you want to send it →"DONE" →
Tap .
To save composing SMS as a draft
When a recipient and text are entered and the keypad is displayed, tap
twice (When word prediction candidates are displayed, tap in 3
times).

66
Mail/Web browser
Information
• SMS can be also sent to or received from the parties using overseas
network operators. For countries and overseas network operators
available, refer to NTT DOCOMO website.
• To send to users of overseas network operators, enter "+", "Country
code" and then "the recipient mobile phone number". Enter the phone
number without a leading "0", if any. You can also enter "010",
"Country code" and "the recipient mobile phone number" to send
messages.
• If "#" or " " is included in the address, SMS cannot be sent.
• SMS is not sent if the terminal is not ON at the scheduled date for
sending SMS.
• Sending-scheduled SMS is sent at the date and time set on the
terminal. Depending on network condition or radio wave condition,
sending date may be dierent from the set scheduled one.
CheckingreceivedSMS
1From the Home screen, → "Messages"
• A thread (sender/recipient of SMS) list appears.
• Tap "Search" to search messages.
2Tap a thread you want to read
• An SMS list appears.
• Received messages are displayed on the left side, and sent
messages and scheduled messages are displayed on the right.
• Tap to make a call to the received phone number.
Information
• If "Notications" (P.66) is set to ON, when an SMS is received,
appears on the status bar.
Menuonthreadlistscreen
Tap on the thread list screen to display the following items.
Item Description
Edit Edit a thread.
Mark all as read Mark all threads as read.
Locked messages Display locked SMS.
Item Description
Settings Notications Notication
sound
Set notication sound for
sounding when an SMS is
received.
Vibrate
when
sound
plays
Set whether to vibrate when a
message is received.
Pop-up
display
Set whether to notify with pop-
ups when a message is received.
Preview
message
Set whether to display previews
of new messages on the lock
screen and in pop-ups.
Backgrounds Set a background.
Quick responses Add/edit phrase.
Block
messages
Block
numbers
Manage the phone numbers from
which calls and messages will be
blocked.
Block
phrases
Manage the phrases that will
cause incoming messages to be
blocked.
Blocked
messages
Display blocked messages.
Font size Set font size.
More
settings
Text
messages
Set delivery reports, manage SIM
card messages, message center
and expiration date.
Delete old
messages
Delete the oldest message when
the maximum number of text
messages (1,000) has been
exceeded.
Show web
previews
Set whether to display previews
of websites linked to in chats.
About Messages Display the version information of
Messages and Message service
apps and Open source licenses.
67
Mail/Web browser
Item Description
Contact us Contact Galaxy Members.
MenuonSMSlistscreen
In SMS list screen, tap to display the items. Follow the onscreen instructions.
Menuonmessagescreen
Touch and hold a sent/received SMS or scheduled SMS to display the
items. Follow the onscreen instructions.
Information
• Alternatively, you can tap for an scheduled message → "Send now"
→ "SEND NOW" to send the scheduled message immediately.
• Up to 20 messages can be copied to the docomo nano UIM card.
Email
You can set a POP3- or IMAP-compatible Email account provided by a
general service provider to send/receive email.
SettingEmailaccount
When you enter mail address and password, Email account settings are
downloaded and set automatically.
• If settings cannot be made automatically or you make settings manually,
you need to enter settings for sending and receiving. Prepare the required
information of Email account settings in advance.
• The steps vary depending on the email accounts which are set.
1From the Home screen, → "Email"
2Enter mail address and password → "SIGN IN"
• An account type selection screen appears, follow the onscreen
instruction to make settings.
Creatingandsendinganemail
1From the Home screen, → "Email"
2• The email creation screen appears.
3In "To" eld, enter a mail address to send
• To add Cc/Bcc, tap to enter an address in the Cc eld or Bcc eld.
• Tap to select to enter contacts from Contacts.
4Enter a subject in the "Subject" eld
5Enter a text in the message eld
6"SEND"
Information
• If you send/receive emails to/from a PC or other device, some pictograms,
HTML mails, etc. may not be displayed correctly depending on the usage
environment.
68
Mail/Web browser
Checkingreceivedemails
1From the Home screen, → "Email"
2Slide Email list downward
3Tap an email you want to read
• A message screen appears.
Information
• If → → "Notications" is set to ON, when an email is received,
etc. appears on the status bar.
• Tap email address of sender on the message screen and select "View
contact" to register to the phonebook or send email.
• When data is attached, appears on the Email list. When you tap
the le name of attached data, the attached data appears.
MenuonEmaillistscreen
Tap on the Email list screen to display the items. Follow the onscreen
instructions.
Menuonmessagescreen
Tap on the message screen to display the items. Follow the onscreen
instructions.
ChangingEmailsettings
Accountsettings
1From the Home screen, → "Email"
2 → → Tap an account you want to set
3Tap an item to set
Item Description
Sync account Set whether to synchronize with Email server.
Account name Change account name.
Your name Change user name.
Always Cc/Bcc
myself
Add your mail address to Cc/Bcc.
Signature Set whether to add signature to a mail message. Also
edit signature.
Show images Set whether to display images.
Auto download
attachments*1
Set whether to download attached les automatically
when connecting via Wi-Fi.
Sync schedule Set Email synchronizing timing.
Period to sync
Email*1
Set period for synchronizing Email.
Number of
emails to load*2
Set number of emails to display.
Limit retrieval
size
Set email size for receiving.
Limit retrieval
size while
roaming
Set email size for receiving while roaming.
Server settings Change settings of sending/receiving server.
*1 Does not appear for POP3 account.
*2 Does not appear for IMAP account.

69
Mail/Web browser
Information
• When multiple Email accounts are set, tap on the Email list screen
→ Tap "All accounts" to check a list of received mails in all the
registered accounts.
• To delete an Email account, on the Email list screen, → → Tap
email accounts you want to delete → "REMOVE" → Tap "REMOVE".
• For Microsoft Exchange ActiveSync account, the setting items dier.
Generalsettings
1From the Home screen, → "Email"
2 →
3Tap an item to set
Gmail
You can send/receive emails using Gmail.
• To use Gmail, you need to set an email address (P.115). When a
setting screen of email address appears, perform the settings according
to the onscreen instructions and then operate it.
• For details of Gmail, on the Gmail screen, → "Help & feedback".
OpeningGmail
1From the Home screen, "Google" → "Gmail"
• If the screen describing new Gmail functions appears, follow the
instructions on the screen.
2Tap an email you want to read
• Content of the selected email appears.
CreatingandsendingGmail
1From the Home screen, "Google" → "Gmail"
2• The Email creation screen appears.
3In "To" eld, enter an address
• To send an email to multiple recipients, separate with a comma (,).
• To add Cc/Bcc, tap .
4Enter a subject in the "Subject" eld
5Enter a text message in "Compose email" eld
6
70
Mail/Web browser
Switchingaccounts
If you have more than one Email account, you can switch Email accounts.
1From the Home screen, "Google" → "Gmail"
2
3Tap an account name → Tap an account to switch
• Inbox of the selected account appears.
EarlyWarning"AreaMail"
Area Mail is a service that you can receive Earthquake Early Warning
and Tsunami Warning provided by the Meteorological Agency, and
Disaster/Evacuation information provided by the nation or local public
body without being aected by the line congestion.
• Area Mail is a free service and subscription is not required.
• Up to 50 items can be saved.
• Area Mail cannot be received during a voice call (except for voice calls
with VoLTE), when the power o, in Airplane mode, while international
roaming, while PIN lock screen is displayed, etc. Also if the terminal is low
on memory, receiving Area Mail may fail.
• You cannot receive the unreceived Area Mail (Earthquake Early Warning).
Area Mail (tsunami warning, emergency warning related to weather etc.,
disaster/evacuation information) can be resent. In the case you could not
receive it, you can receive it again.
WhenreceivingEarlyWarning"AreaMail"
When Area Mail is received, the Area Mail buzzer or ringtone sounds, a
notication icon appears on the status bar, and receiving screen opens.
• The Area Mail buzzer or ringtone sounds in maximum volume by default.
The setting cannot be changed. → P.71
• The Area Mail buzzer or ringtone sounds even in Silent mode (Vibrate,
Mute) by default. Setting not to sound in Silent mode is available. →
P.71
ViewingreceivedAreaMail
1From the Home screen, → "Disaster kit"
2"Early Warning "Area Mail"" → Tap an Area Mail you want to
check
To delete Area Mails
"Early Warning "Area Mail"" → Mark an Area Mail you want to delete →
Tap "Delete" → "OK".
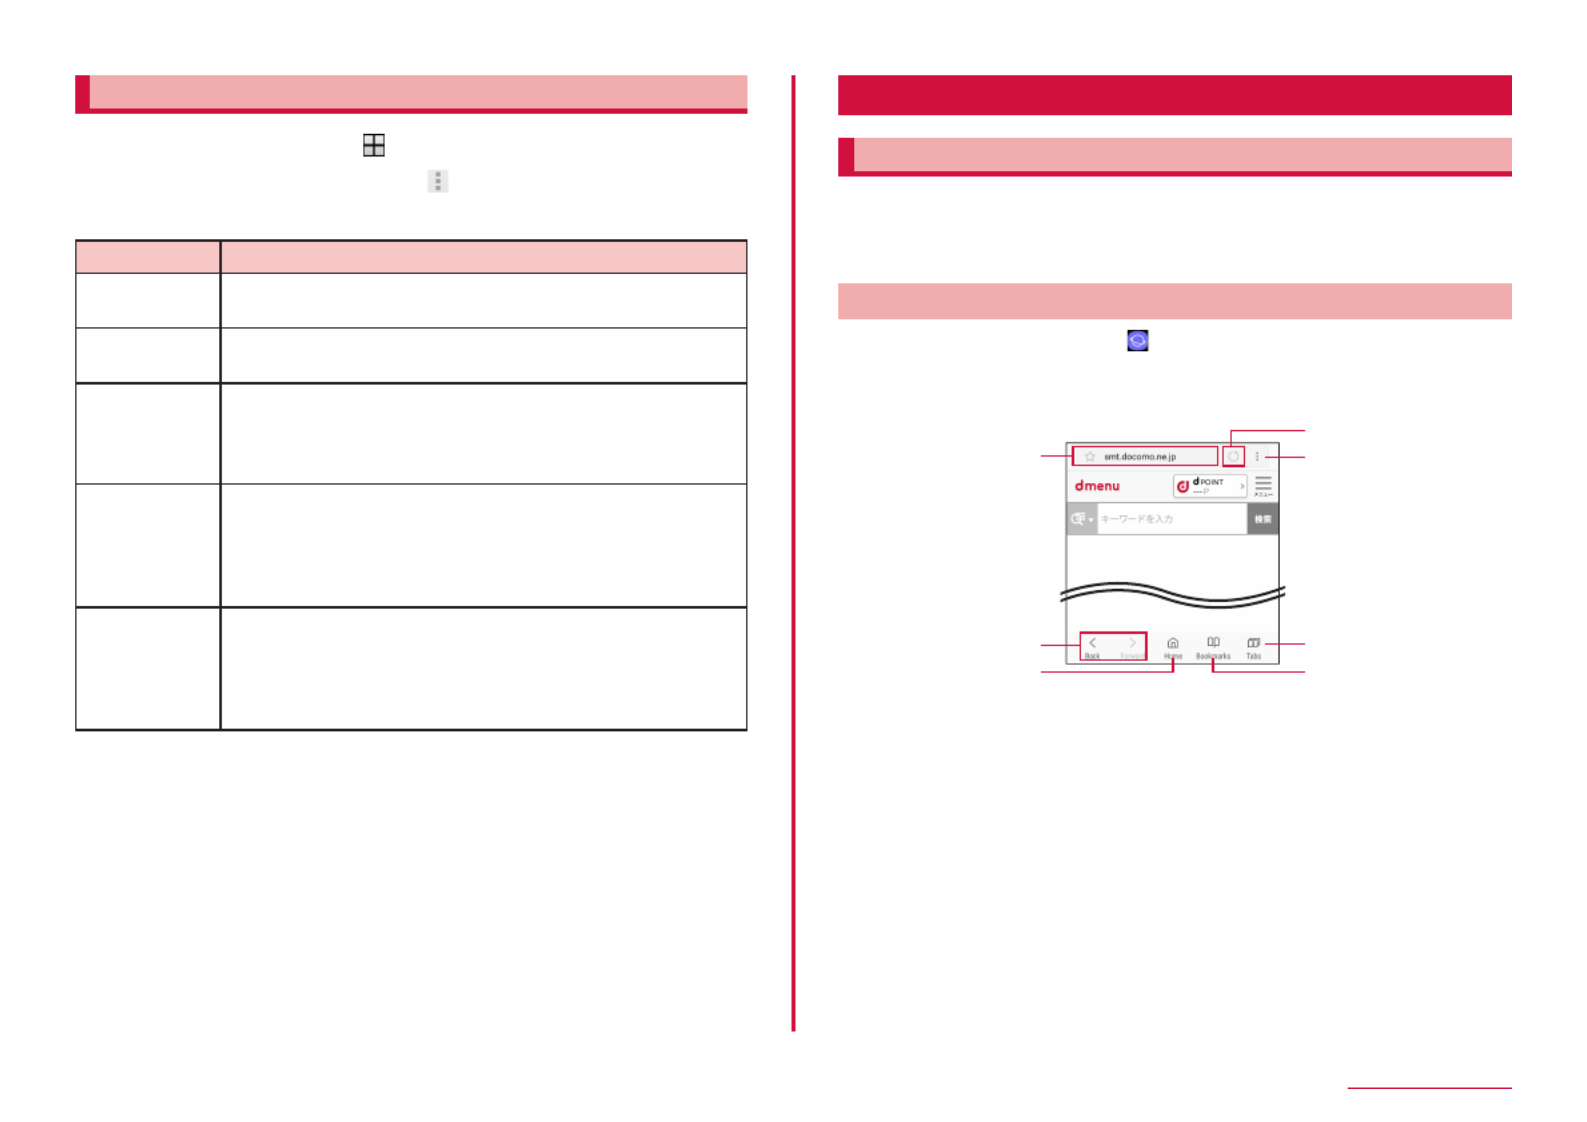
71
Mail/Web browser
SettingEarlyWarning"AreaMail"
1From the Home screen, → "Disaster kit"
2"Early Warning "Area Mail"" → → "Settings"
3Tap an item to set
Item Description
Receive
setting
Set whether to receive Area Mail.
Beep tone
Set ring time and volume of buzzer or ringtone. Set whether
to sound buzzer or ringtone in Silent mode (Vibrate, Mute).
Check screen
image and
beep tone
Check the ringtone and the screen for reception of
earthquake early warning, tsunami warning, or disaster/
evacuation information (including emergency warning
related to weather etc.).
やさしい日本語
表示 (Display
easy-to-
understand
Japanese)
Set whether Earthquake Early Warning, Tsunami Warning
are to be displayed in easy-to-comprehend Japanese.
翻訳・アプ
リ連携設定
(Translation/
App link
setting)
Translate the received content or use the link with the
other apps.
Webbrowser
Usingwebbrowser
Using web browser, you can view web pages as PCs.
On the terminal, web browser can be used via a packet transmission or Wi-
Fi connection.
• Some web pages may not be displayed or may not appear properly.
Activatingwebbrowser
1From the Home screen,
• Web browser activates and web page set as home page (by default,
dmenu (http://smt.docomo.ne.jp/?home) (In Japanese only))
appears.
Web browser screen
a
b
c
d
e
f
g
a Address bar
Enter a URL of web page or a keyword you want to search.
Tap address bar to display quick access.
b Back/Forward
c Home
Return to web page set as homepage.
d Refresh
e Menu
Display browser menu.
f Tab
Switch between tabs, close and open tabs.
g Bookmarks
Display a list of bookmarks, etc.
72
Mail/Web browser
Information
• When the address bar or icon is not displayed, ick/swipe the screen
to display it.
Exitingwebbrowser
1 → Flick thumbnail of browser left or right
• Even when you return to the Home screen by pressing
[Home key] or press on the browser screen, the browser is not
terminated.
Information
• The following operations are available (Some operations are not
available depending on the web page display).
- Zooming in/out: Pinch out/in at the point you want to zoom in/out.
- Scrolling: Scroll/ick the screen.
- Back to the previous screen: Tap .
- Using magnier: Touch and hold the screen.
- Copying text/Sharing text/Searching text: Touch and hold the text
which is not posted to the links on the screen → Drag / in all
directions, select the range of text → Tap the functions you want
to use.
Openingnewtab
1From the Home screen,
2"Tabs"
• Tab manager appears.
3"NEW TAB"
• Web page set as a Homepage (P.73) appears.
4Enter search keyword in the search box at the top of screen
• To close tabs,
"Tabs" → Tap in the window you want to close.
Openingnewsecrettab
View with the browser without history of browser or search remained.
All of bookmarks and web pages saved in secret mode is not displayed
when the secret mode is disabled.
1From the Home screen,
2"Tabs"
• Tab manager appears.
3"TURN ON SECRET MODE"
4"DON’T USE PASSWORD" → "OK"
• If you use password, tap "SET PASSWORD" and follow the onscreen
instructions.
• If you register password later, tap → "Secret mode security" → Tap
"Use password" on the tab manager screen and follow the onscreen
instructions.
Information
• If you turn OFF secret mode, restart browser app or tap "TURN OFF
SECRET MODE" on the tab manager screen.
• For windows viewing in secret mode, frame of the address bar
appears in gray.
• Web pages viewed in secret tabs will not appear in the browser or
search
history. Cookies will not be stored in the terminal during secret mode.
However, downloaded les or bookmarked web pages viewing in secret
tab will be stored.
Operatinglinksinwebpages
You can display links in new tabs, and download images, etc.
1From the Home screen,
2Touch and hold a link
3Tap an item you want to use
Information
• Depending on the web pages, some link operation menu may not be
displayed or the displayed items may dier.

73
Mail/Web browser
Managinghistoryandbookmarks
Viewingwebpagesfromthehistory
1From the Home screen,
2"Bookmarks" → "HISTORY" tab
• A history list appears.
• History is displayed in reverse chronological order of view date.
3Tap a web page you want to view
Information
• To delete all histories, on the history list, tap → "Clear history".
AddingwebpagetoBookmarks
1From the Home screen,
2Display a web page to bookmark → → "Add to Bookmarks"
3Conrm/change title and web address of bookmark and
storage location → "SAVE"
• You can also tap "All", and change the save location.
ViewingwebpagefromBookmarks
1From the Home screen,
2"Bookmarks"
• A bookmark list appears.
3Tap a web page you want to view
Information
• When is tapped on the bookmark list, the following items appear.
- "Edit": Select multiple bookmarks, and you can delete and move
them, or change their display sequence, etc.
- "Create folder": Create a folder.
Bookmarks/History/Savedpages
Touch and hold bookmarks/history/saved pages to display the selection
screen. Follow the on-screen instructions.
Settingwebbrowser
1From the Home screen,
2 → "Settings"
3Tap an item to set
Item Description
Homepage Set a homepage.
Default search
engine
Set a search engine.
Auto ll forms Set the text to be lled in automatically in the
text eld.
Manual zoom Set whether to be able to zoom in or out
regardless of the web page settings.
Privacy Set whether data regarding privacy is to be used,
and delete data.
Sync with Galaxy
Cloud
Sign in to your Galaxy account to sync
bookmarks, Saved pages, etc.
Advanced Set detailed functions.
About internet Display the version of browser

74
Apps
Apps
dmenu
In dmenu, you can easily access sites recommended by DOCOMO or
convenient apps.
1From the Home screen, "dメニュー (dmenu)"
• Browser activates and "dmenu" appears.
Information
• To use dmenu, Internet connection by packet communication
(LTE/3G/GSM) or Wi-Fi is required.
• For connecting dmenu and downloading apps introduced by dmenu,
a packet communication charge is applied separately. Some
downloaded apps automatically perform packet communications.
• Apps introduced by dmenu may include charged ones.
dmarket
Various services including selling digital contents such as music,
videos, books, shopping sites, travel reservation sites, etc. are
provided.
1From the Home screen, "dmarket"
Information
• For details on dmarket, refer to the following website.
https://d.dmkt-sp.jp/common/about/index.html

75
Apps
PlayStore
• To use Google Play, you need to set a Google account (P.115).
Installinganapp
1From the Home screen, "Play Store"
2Search for an app you want to download, then tap it →
Check details
3For free apps, "INSTALL", for charged ones, tap the price →
Follow the onscreen instructions
• When installing is complete, appears on the status bar.
• Be very cautious about apps that have access to many functions
or a signicant amount of data. Once you download an app, you are
responsible for the results of using the app on the terminal.
Information
• Once you accept the installation of an app, you will be held responsible
for its use. Be very cautious about apps that have access to many
functions or a signicant amount of data.
• Be sure to check the security of apps, and then install them at your
own risk. The terminal may be infected with a virus and the data may
be damaged.
• NTT DOCOMO is not liable for any malfunctions or disadvantage
brought to you or any third party due to app which you installed and
provided by a third party including Google Inc.
• For the app which you installed from Play Store and provided by the
third party including Google Inc., contact each provider.
• Some apps automatically perform packet communications. Packet
communication keeps active unless you disconnect it or the time-out
occurs.
• If you are not satised with the purchased app, you can ask for
refund within the specied time frame. Note that refund is accepted
only once for each app.
• For details on Google Play, on the Play Store screen, → Tap "Help
& feedback".
• For instructions on uninstalling apps, see "Uninstalling apps or widgets"
(P.47).
GalaxyApps
You can easily download a lot of recommended apps using Galaxy
Apps.
ConnectingtoGalaxyApps
1From the Home screen, → "Galaxy Apps"
2Search an app you want to use and download it
Information
• Galaxy Apps may not be available depending on the country or region.
For details, refer to the support page in the Galaxy Apps website
from PC.
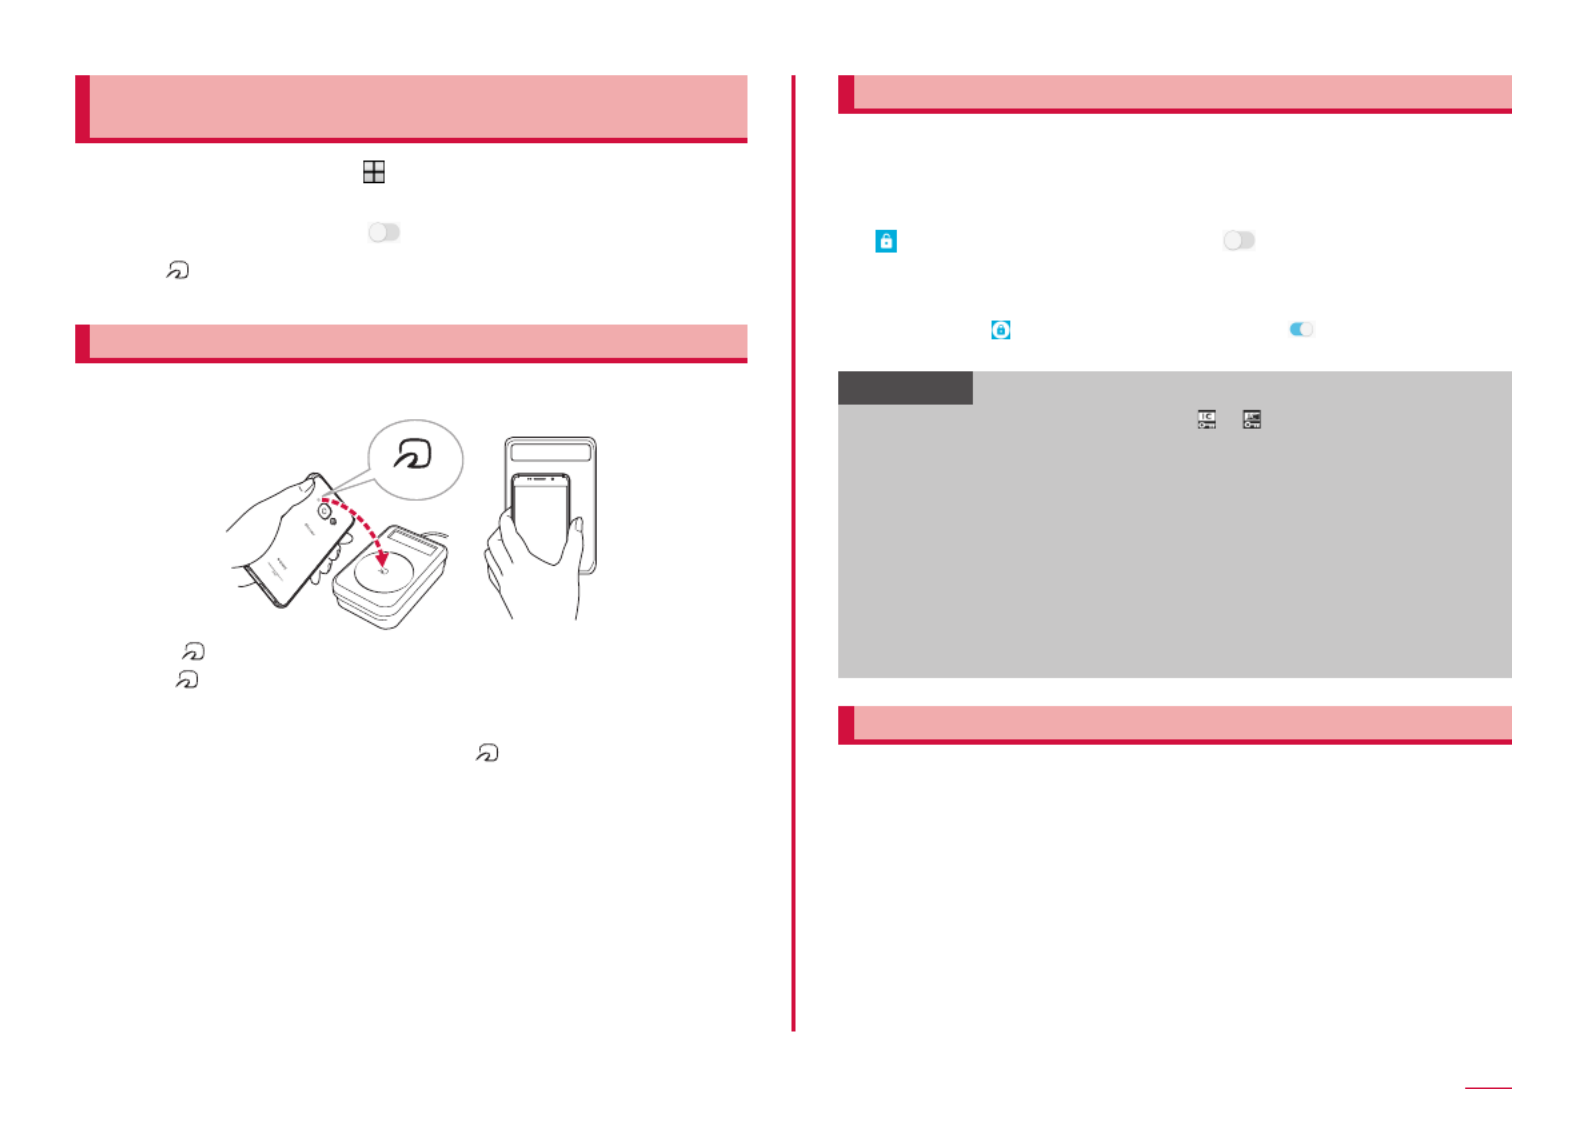
77
Apps
Using"かざしてリンク対応サービス(Kazashite-Link
compatibleservice)"
1 From the Home screen, → "Settings" → "Connections" →
"NFC/Osaifu-Keitai settings"
2 "Reader/Writer, P2P" →
3 Hold mark over an NFC module equipped device, smart
poster, etc.
Notesonholdingoverthedevice
Please note the following when holding the terminal over an IC card reader
or NFC module equipped device.
mark
• Bring the mark close to the device slowly, not strike strongly.
• Hold the mark over the device at the center horizontally. If scanning
fails even with it held in front of the center of the scanner, slightly lift up
the terminal, or move it backwards/forwards or to the left/right.
• When there is a metal object between the mark and the device,
reading may fail. Note that putting the terminal into a case or cover may
aect communication performance, take it out from case or cover.
LockingOsaifu-Keitaifunction
Use "NFC/Osaifu-Keitai Lock" to restrict Osaifu-Keitai function or the
services. NFC/Osaifu-Keitai lock is dierent from the screen lock and SIM
card lock.
1 From the Home screen, "Osaifu-Keitai"
2 → "NFC/Osaifu-Keitai Lock" → → Enter the password
→ "OK"
• Setting password is required for the rst activation. Follow the
onscreen instructions to set password.
• To unlock, → "NFC/Osaifu-Keitai Lock" → → Enter the
password → Tap "OK"
Information
• When using "NFC/Osaifu-Keitai Lock", or appears on the status bar.
• Be careful about remaining battery level because "NFC/Osaifu-Keitai
Lock settings" cannot be canceled if the battery runs out while using
"NFC/Osaifu-Keitai Lock". If the battery runs out, charge the battery and
then cancel "NFC/Osaifu-Keitai Lock".
• To use Osaifu-Keitai menu while using "NFC/Osaifu-Keitai Lock", unlock
"NFC/Osaifu-Keitai Lock".
• A password for NFC/Osaifu-Keitai cannot be deleted even if the
terminal is reset.
• When unlocking "NFC / Osaifu-Keitai lock", insert the same docomo
nano UIM card as the one inserted when "NFC / Osaifu-Keitai lock"
was set, then unlock.
iDアプリ(iDapp)
iD is electric money provided by docomo. You can enjoy shopping simply
and conveniently only by holding Osaifu-Keitai set with "iD" over the IC card
reader in stores. Since up to two types of card information can be set, you
can use them separately according to the benets, etc.
• To use iD with Osaifu-Keitai, setting iD app is required.
• The charges required for iD service (including the annual charge) vary by
card issuer.
• Setting up the iD app or checking its information overseas will incur
packet communication charges that are dierent from those in Japan.
• For details on iD, refer to iD website (http://id-credit.com/) (In Japanese
only).

78
Apps
Tap&Pay
Enable or disable the setting of the service available by holding the
terminal over the IC card reader, such as Osaifu-Keitai service.
• For the details of Tap & Pay, refer to Help.
1 From the Home screen, → "Settings" → "Connections" →
"NFC/Osaifu-Keitai settings"
2 "Tap and pay"
• To show Help, from Tap & Pay screen, → Tap "Help".
ToruCa
The ToruCa app allows you to save coupons oered by your favorite
shops and other useful information to your terminal. It can be obtained
from mail, downloading from websites, Bluetooth function or IC tags,
etc. Update the obtained ToruCa to the latest information simply.
• For details of ToruCa, refer to NTT DOCOMO website.
Information
• For obtaining, displaying or updating ToruCa, a packet communication
charge may be applied.
• To obtain ToruCa by Bluetooth function, set Bluetooth of ToruCa app
to ON.
• When obtaining ToruCa from an IC tag, you must turn ON "Reader/
Writer, P2P" on the terminal. → P.125
• Depending on the settings of contents provider, the following
functions may not be available.
Updating, sharing ToruCa, displaying on the map, obtaining from the
IC card reader
• You may not be able to obtain ToruCa with an IC card reader if you do
not make initial setting for Osaifu-Keitai.
• The "ToruCa" app performs communication which is necessary for
obtaining ToruCa in the background regardless of the setting of
"Power saving mode" (P.108) or "Data saver" (P.101), and the
packet communication charge may be incurred.
• ToruCa may not be obtained by using Bluetooth function, an IC tag
or a reader until the screen lock is canceled after the terminal is
started.
• The backlight may be turned ON when ToruCa is received via
Bluetooth function with the screen backlight turned OFF.
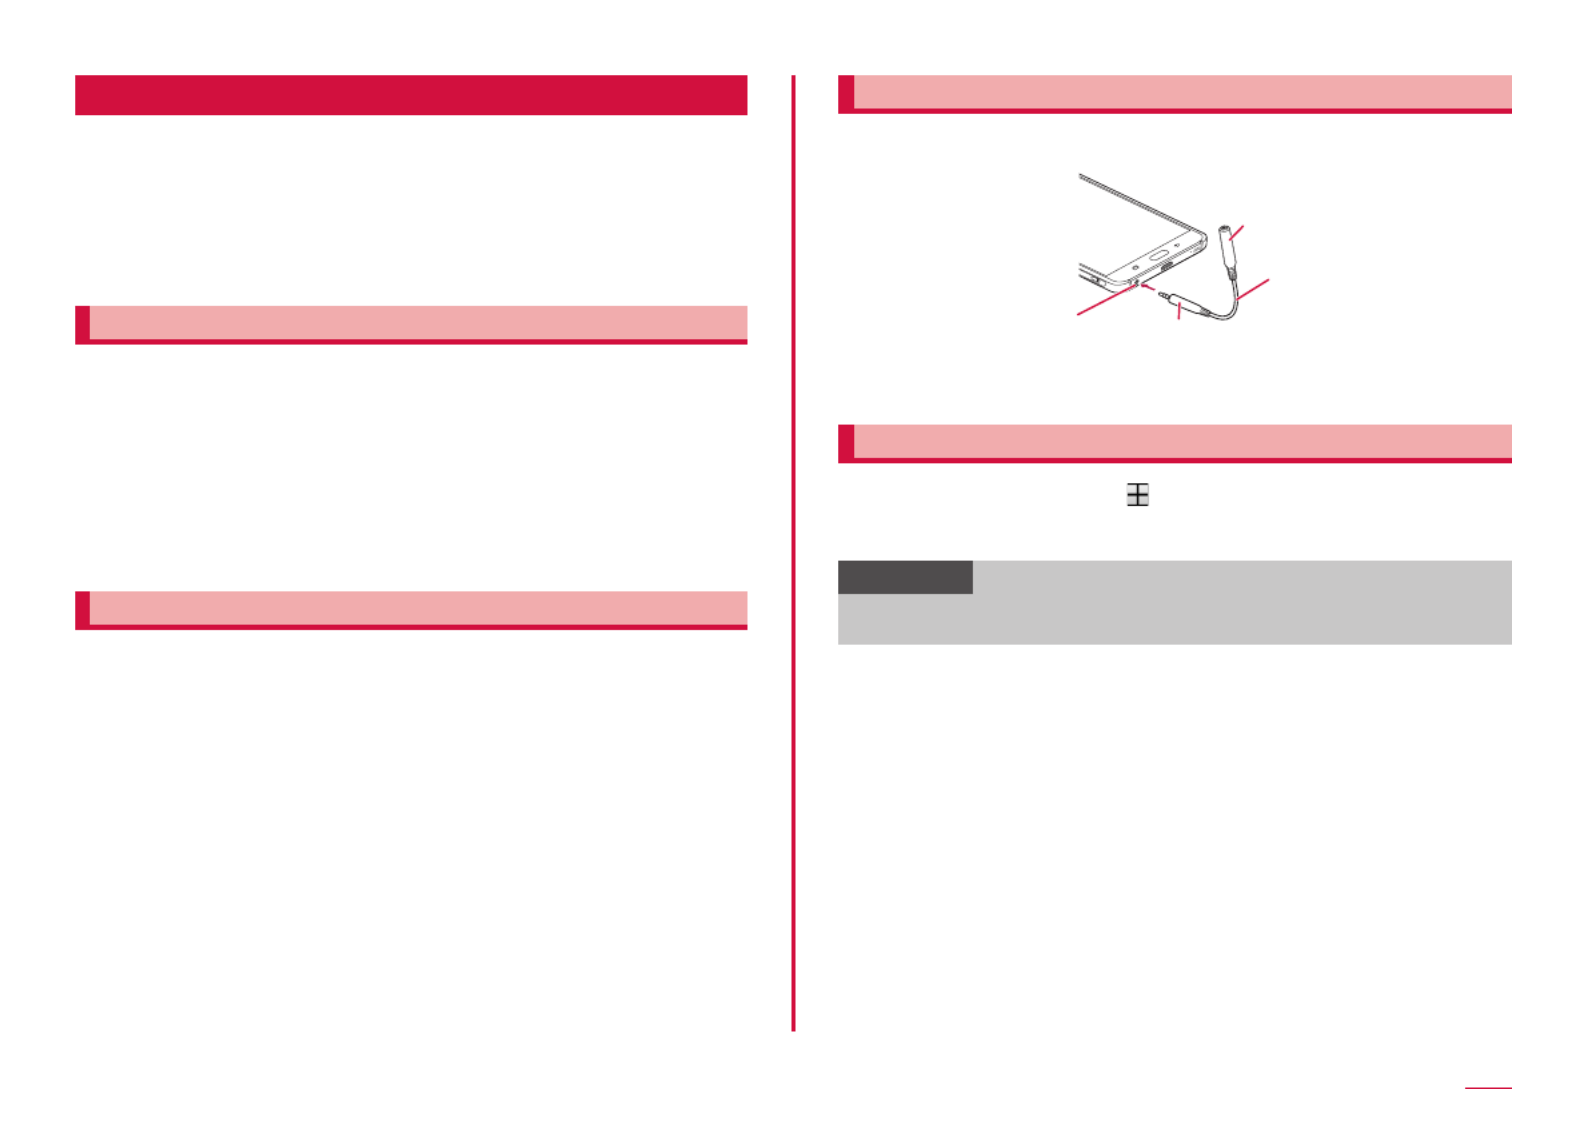
79
Apps
1Seg
1Seg is a digital terrestrial TV broadcasting service for mobile
devices that allows you to receive data programs along with video
and audio. Also, interactive service using communication function of
mobile devices and receiving detailed information are available.
For details on 1Seg service, refer to the website below.
The Association for Promotion of Advanced Broadcasting Services
http://www.apab.or.jp/en/
Notesonusing1Seg
1Seg is a service provided by TV broadcast companies (broadcast
stations). Receiving video and audio is free. For more information about
NHK reception fees, contact NHK.
The data broadcast area displays two types of information: "Data
broadcasting"
and "data broadcasting web site".
"Data broadcasting" information is carried in a broadcast wave, together
with image and sound. "Data broadcasting web site" information is used to
access sites provided by the TV broadcaster (broadcast station).
Packet communication charges are incurred when accessing a site such
as a "data broadcasting web site" or others.
Some sites require information charges to be used.
Airwaves
1Seg is a broadcast service and a dierent type of radio waves (airwaves)
from that of LTE service or FOMA service is received. For this reason, the
signal cannot be received at places where the broadcast does not reach or
while broadcasting is out of service, regardless of whether the terminal is
outside or inside the LTE/FOMA service area.
Even in areas where the terrestrial digital TV broadcasting service is
available,
you may have poor or no reception in the following places:
• Place far away from a tower that transmits airwaves
• Places where the signal is disrupted due to the landscaper or structures
such as mountain areas or behind buildings
• Places where the signal is weak or does not reach, such as tunnels,
basements, or places inside buildings
Changing the direction of included External TV antenna cable SC04 or
moving to other location may improve signal reception.
ExternalTVantennacableSC04
To watch 1Seg, connect the supplied External TV antenna cable SC04 to
the terminal.
External TV
antenna cable SC04
Headphone connection jack
Earphone microphone jack
Connection plug
1 Connect the connection plug of External TV antenna cable
SC04 to the headphone connection jack of the terminal
Watching1Seg
1 From the Home screen, → "MobileTV"
• When the rst activation or if the channel area is not registered,
follow the onscreen instructions to set channel area (P.83).
Information
• According to the airwave status, the images and sounds may be
interrupted.

80
Apps
Watchingscreen
Viewing screen (vertical screen)
a
b
c
j
f
h
g
d
e
i
k
l
m
a Channel
b Image
• Channel can be switched by icking to the left or right.
• Touch to show/hide menu etc.
• Display details of the program by touching and holding the image.
c Subtitle
d Remote control
e Channel list
• Display the channel list.
f Broadcast data
g Radio wave condition
h Menu
i Screen lock
j TV operation panel
• Channel can be switched with / .
k Record
• Record a TV program.
l Pop-up screen
• Pop-up display.
m Operation panel for data broadcasting
• Adjust the cursor with / , tap "OK" to select an item. The broadcast
data of the link displays.
• Tap to return to the previous linked program.
■ Key operations on viewing screen
• Adjust the volume with the volume UP key/volume DOWN key.
Operationscreen
1 On the viewing screen,
2 Tap a tab at the top of the screen
CHTab
Operation screen (CH tab)
a
b
c
j
f
h
g
d
e
i
k
l
m
a Channel
b Image
• Channel can be switched by icking to the left or right.
• Touch to show/hide menu etc.
• Display details of the program by touching and holding the image.
c Subtitle
d Remote control
e Broadcast data
f Channel list
• Tapping a channel switches to the channel.
• Channel can be removed from the Channel list by touching and holding the
channel → Tap "Delete" → "OK".
g Radio wave condition
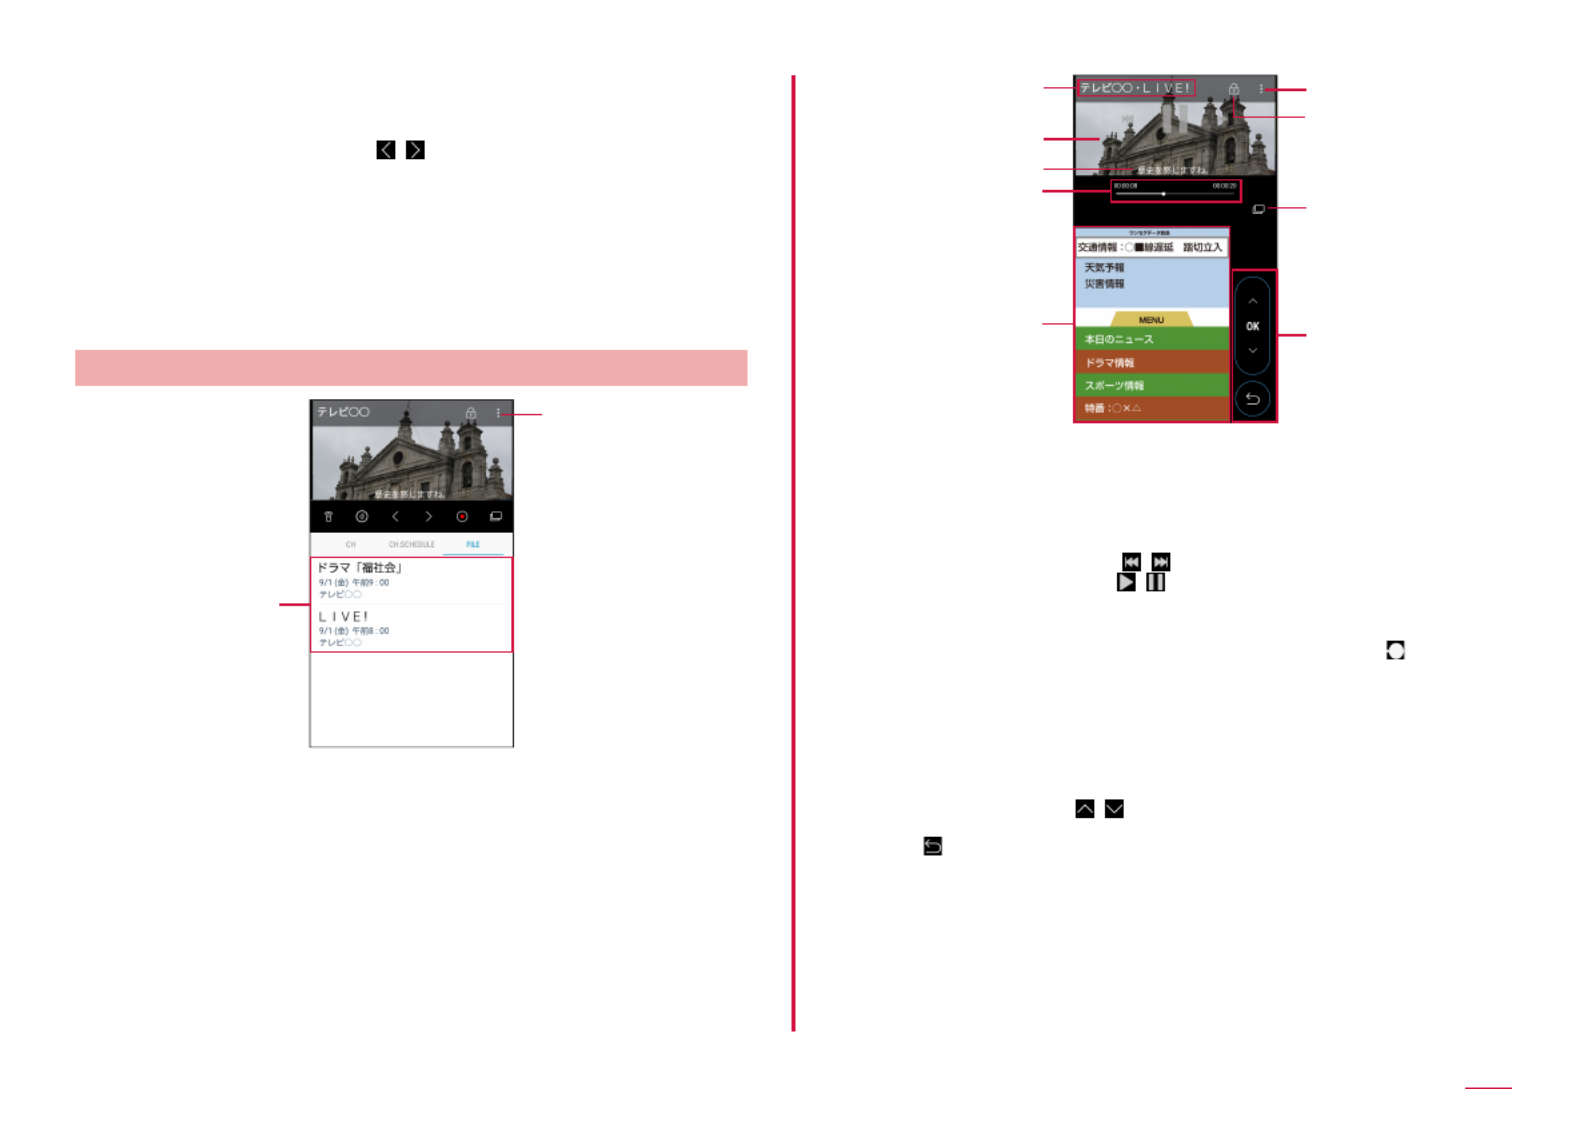
81
Apps
h Menu
i Screen lock
j TV operation panel
• Channel can be switched with / .
k Record
• Record a TV program.
l Pop-up screen
• Pop-up display.
m Program list
• The watching program list appears by tapping it.
■ Key operations on CH tab
• Adjust the volume with the volume UP key/volume DOWN key.
TVlestab
Operation screen (TV FILE tab)
a
b
a TV le list
• Tap to playback TV les, and to display captured images.
• Touch and hold a TV le → Tap "Delete" → "OK" to delete the TV le.
b Menu
TV le playback screen
a
b
c
e
f
d
g
h
i
a Channel/Program name
b Image
• Flick left or right to switch TV les.
• Play operation panel is displayed on the image.
• TV le can be changed with / .
• Play/pause the TV le with / .
c Subtitle
d Play time, slider
• Change any time point of a TV le to be viewed by dragging .
e Broadcast data
f Menu
g Screen lock
h Pop-up screen
• Pop-up display.
i Operation panel for data broadcasting
• Adjust the cursor with / , tap "OK" to select an item. The broadcast
data of the link displays.
• Tap to return to the previous linked program.
■ Key operations on the playing TV le screen
• Adjust the volume with the volume UP key/volume DOWN key.

82
Apps
Reservations
1 On the viewing screen, → "Reservations"
Operation screen (Reservation tab)
a
b
c
a Schedule list
: Recording schedule (including the completed schedule)
: Watching schedule (including the completed schedule)
b Menu
c "RESERVED"/"SUCCEEDED"/"FAILED" tab
• Succeeded schedules are displayed in the "SUCCEEDED" tab and failed
schedules is displayed in the "FAILED" tab.
• Change the schedule by tapping the unexecuted schedule.
• Conrm the result or delete from the list by tapping the executed schedule.
TVLink
1 On the viewing screen, → "Settings" → "TV Link"
TV Link screen
a
b
a TV link
• Connect to registered site (P.82).
b Delete
RegisteringTVlink
1 Operate broadcast data and select an item to register to TV
link
• The registration method of TV links varies depending on each program.
Information
• TV links may not be registered depending on each link.
DisplayingTVlinks
1 Select a TV link on the TV link screen → "OK"
• Connect to the registered website.

83
Apps
DeletingTVlinks
1 On the TV link screen, "DELETE"
2 Select a TV link to delete
3 "DELETE" → "OK"
Recording1Seg
1 On the viewing screen,
• While recording, appears.
• To stop recording, tap .
Information
• According to the airwave status, the images and sounds may be
interrupted.
• While recording, channel cannot be changed.
• If you activate any other apps while recording, the program may not
be recorded correctly.
Playingrecordedprograms
1 On the viewing screen, → "FILE" tab
2 Tap a program to play
Schedulingtorecordorwatch1Seg
Schedulingmanually
1 On the viewing screen, → "Reservations"
2 → "Schedule manually"
3 Enter each items on New program reservation screen
4 "Finish"
Information
• On the viewing screen, → "CH. SCHEDULE"
Deletingreservations
1 On the viewing screen, → "Reservations"
2 Touch and hold the reservation to delete
3 "Delete" → "OK"
Settingchannels
1 On the viewing screen, → "Settings" → "Change area"
2 Tap a unmarked area → "OK"
3 Select regions → select province → select local area
• Channels are searched and the selected area is registered to the
channel list.
Switchingareainformation
1 On the viewing screen, → "Settings" → "Change area"
2 Select an area you want to set
Deletingareainformation
1 On the viewing screen, → "Settings" → "Change area"
2 Touch and hold an area to delete
3 "OK"

84
Apps
SettingMobileTV
1 On the watching screen, → "Settings"
2 Tap an item to set
Item Description
Caption Set caption.
Audio signal Set the main audio and sub audio.
Save to Set a saving location.
Free memory Display the free memory of the terminal and external
SD card and available recording time.
TV O timer Set time before stopping Mobile TV automatically.
Change area → P.83
TV link → P.82
Broadcast data Congure settings pertaining to data transmissions,
and check information.
About MobileTV Display the version of TV app.
RESET TO
DEFAULT
Reset to default settings.
Camera
Copyrights and portrait rights
Avoid reproducing, altering, or editing taken or recorded pictures or
sounds using the terminal without the copyright holders authorization,
because, except for personal use etc., they are prohibited by the
Copyright law. Avoid using or altering pictures of others without their
consent, because they may infringe on portrait rights. Note that
taking photos or recordings at some demonstrations, performances or
exhibitions may be prohibited even when only for personal use.
If you cause the public any trouble using the terminal, you may be
punished under law or regulations (for example, nuisance prevention
ordinance).
Please be considerate of the privacy of individuals around you when
taking and sending photos using camera-equipped mobile phones.
BeforeusingCamera
• Though the camera is manufactured using extremely accurate technology,
some dots and lines may always be displayed to be lighter or darker than
you expect. Images shot under very low light intensity contain increased
noise such as white lines or random dots, but it is not a malfunction.
• Note that a stripe pattern may appear on the screen when Camera is
activated, but it is not a malfunction.
• Still images or videos shot by Camera may dier from actual subjects in
color and brightness.
• When attempting to take a photo of a strong light source such as the
sun or a lamp, images may become dark or degraded.
• If the lens is contaminated with ngerprints or skin oil, you cannot
shoot clear still images/videos. Use a soft cloth to remove any such
contaminants on the lens before taking photos.
• When shooting, hold the terminal rmly with your hand not to move.
Moving the terminal when shooting may cause shot images blur.
• Do not cover the lens with your nger or hair when shooting.
• Using Camera consumes much power of battery. Note that if you shoot
with low battery, the screen may become dark or a shot image may be
blurred.
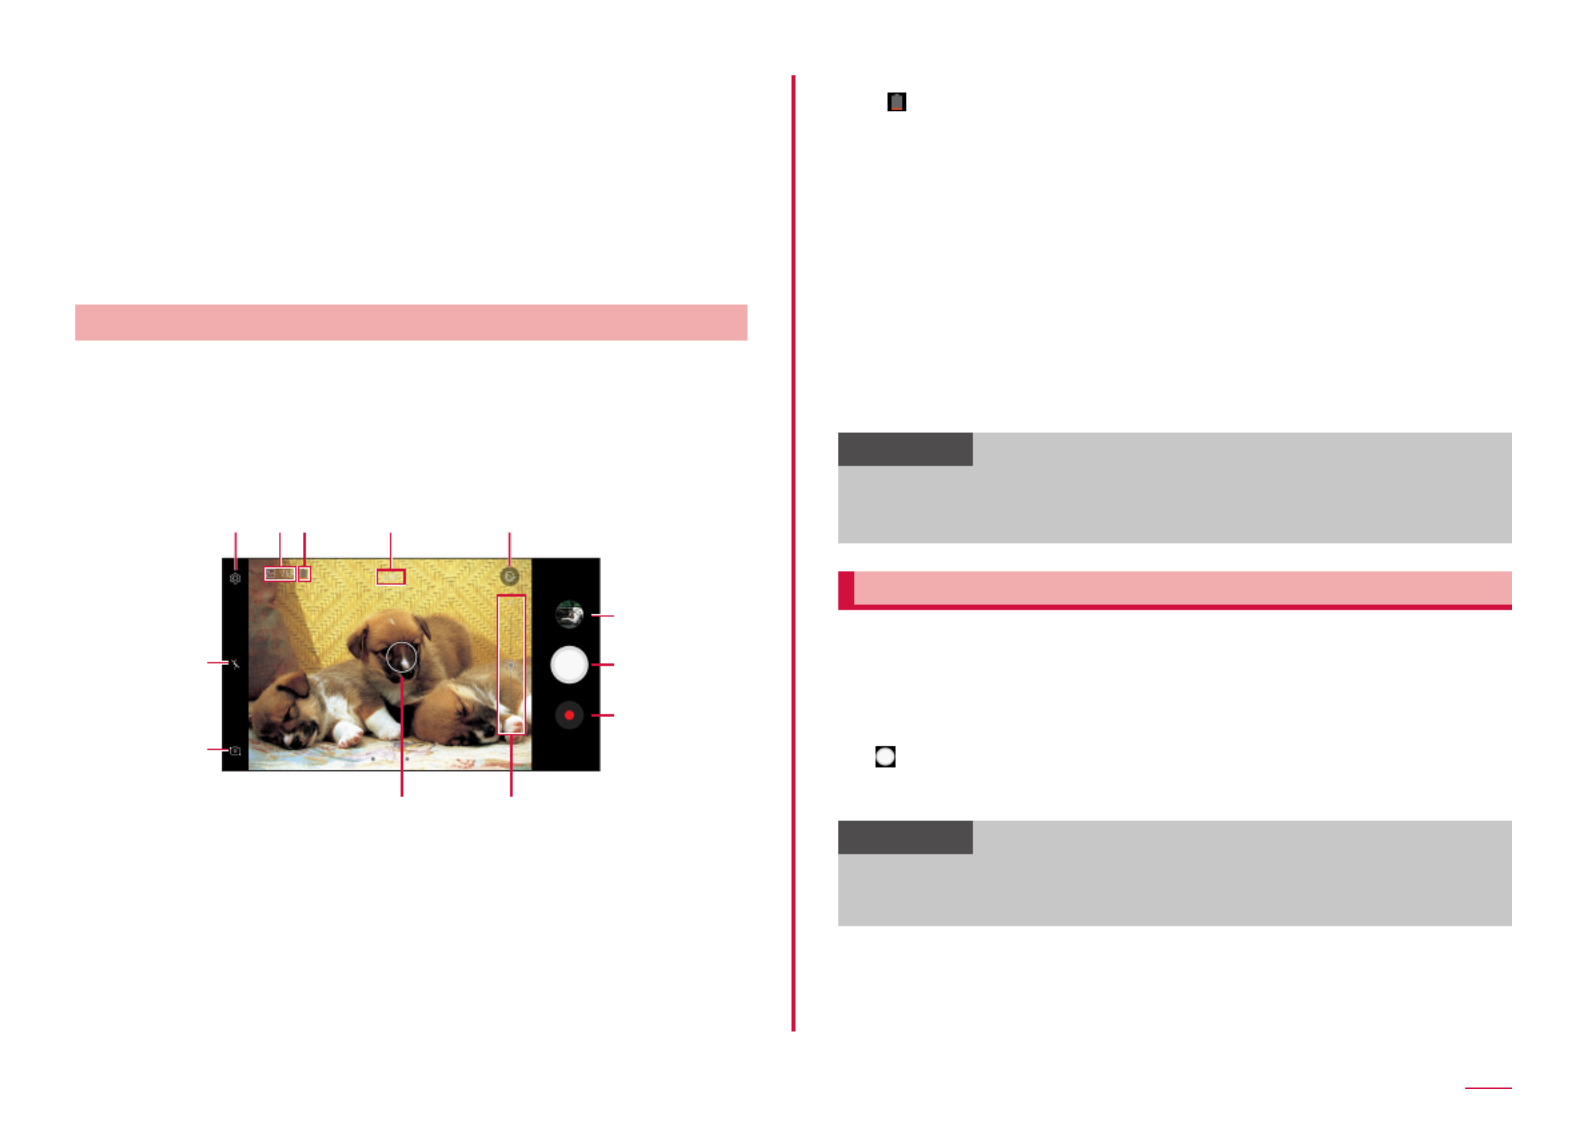
85
Apps
• If you use Camera for a long time such as continuous shooting of still
images and longtime shooting of videos, the terminal may become hot
and Camera may be terminated automatically, but it is not a malfunction.
Please use after a while.
• Do not remove microSD card forcibly immediately after capturing. It may not
save correctly or may cause data corruption. Before removing the microSD
card, perform "UNMOUNT" (P.109) and remove the back cover.
• Even in Silent mode (Mute, Vibrate), shutter sound for still image shooting
and start/stop sound of shooting video sounds.
Shootingscreen
1 From the Home screen, "Camera"
• For the rst time activation, a conrmation screen for saving location
appears when a microSD card is installed. Conrm the contents and
tap "Cancel"/"OK".
• If a screen related to a location tag appears, conrm the content
and follow the instructions on the screen.
• Apps to be displayed vary depending on the settings.
Still image/video shooting screen
a
f
g
k l
b c d e
h
i
j
a Settings
• Tap to display settings menu. → P.86
b Saving destination (microSD card), savable number of images
• Appears when a saving location is set to microSD card and the shootable
number is 300 or less.
• Savable number of images is estimate value. Number may not change even
after shooting.
c Remaining battery level
• appears when battery level is less than 15%.
d Current shooting mode
• Currently set mode appears.
e Skin tone
f Flash settings
• Switch ash to OFF/AUTO/ON.
g Switch between In-camera and Out-camera
• Alternatively, ick up or down on the shooting screen to switch between In-
camera and Out-camera.
h Thumbnail
• Tap to activate Gallery.
i Shutter (still image shooting)
j Shutter (video shooting)
k Focus
l Brightness adjustment
Information
• If you ick left on the shooting screen, the camera lter appears.
• If no operation is performed for approximately 2 minutes with Camera
activated, Camera ends.
Shootingstillimages
1 From the Home screen, "Camera"
• Still image/video shooting screen appears.
2 Point Camera at an object
• You can adjust zooming by pinching in/out on the display.
3 • Shutter sound sounds and then an image is shot.
• The shot still images are automatically saved.
Information
• If "Take pictures" in the "Volume key function" option is selected in
the setting menu, you can also press the volume key to shoot still
images (P.87).
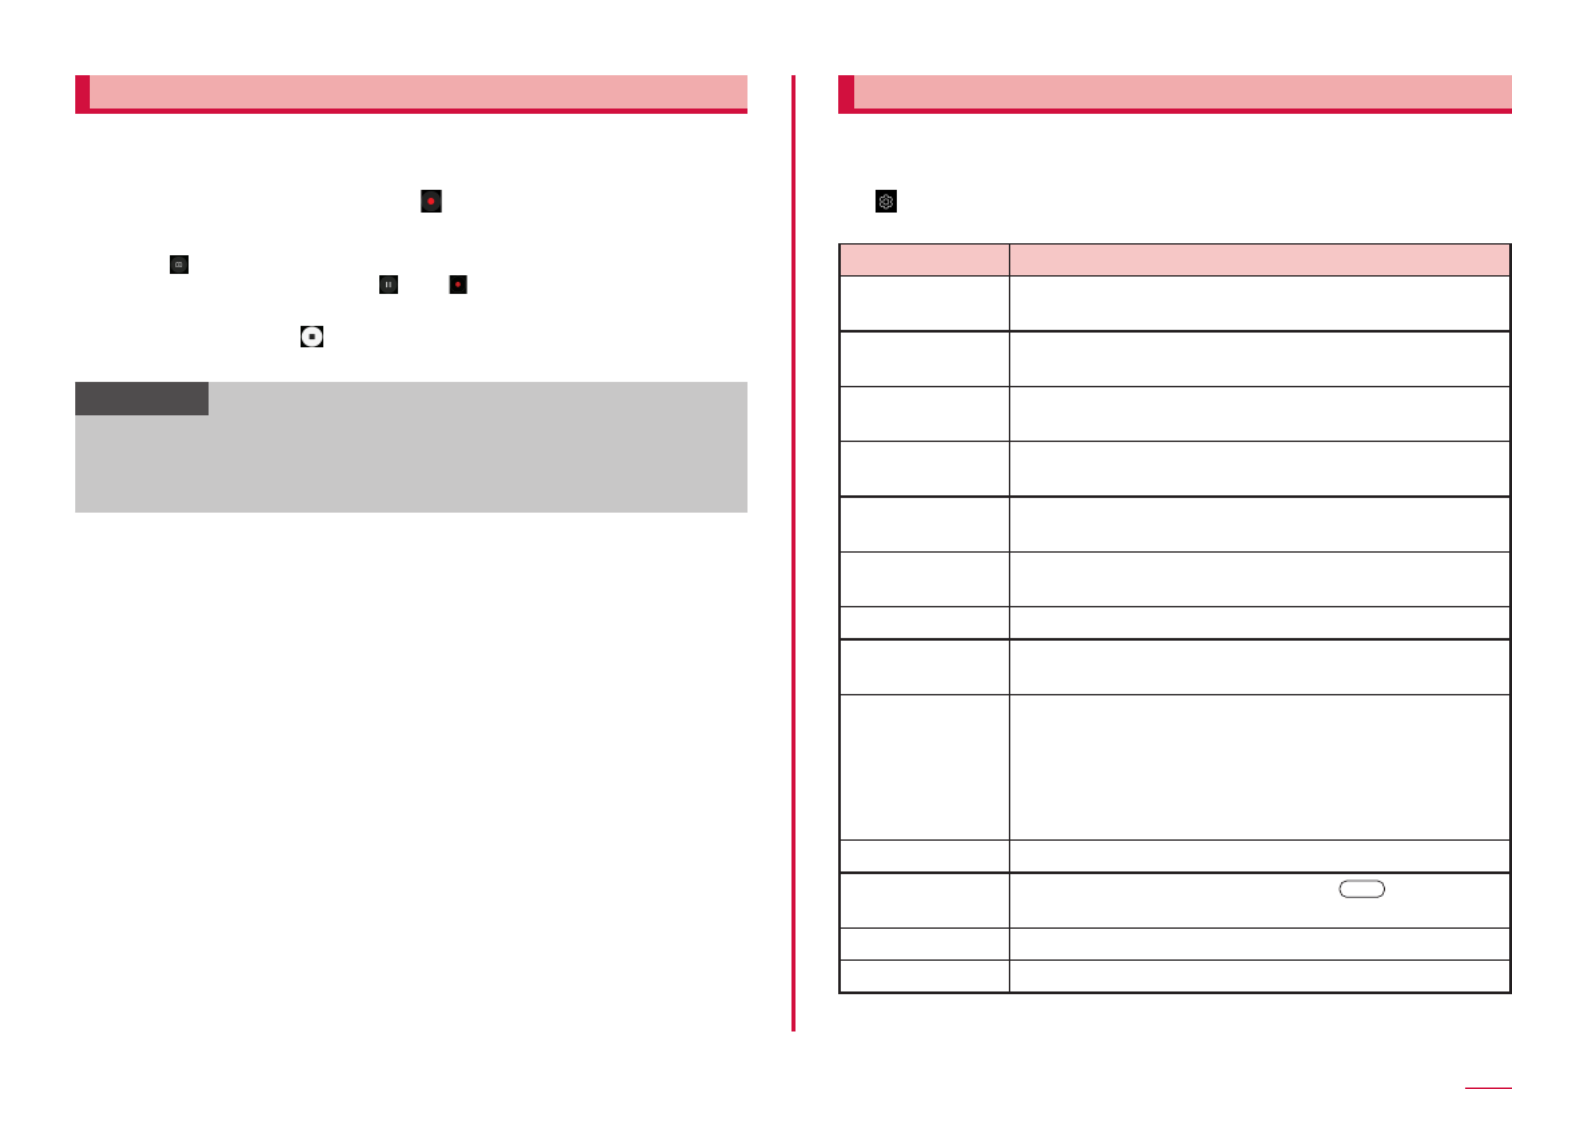
86
Apps
Shootingvideos
1 From the Home screen, "Camera"
• Still image/video shooting screen appears.
2 Point Camera at an object →
• Start sound sounds and shooting video starts.
• You can adjust zooming by pinching in/out on the display.
• Tap to shoot still images while shooting video.
• To pause the shooting, tap . Tap during pause to resume
shooting.
3 To stop shooting,
• Stop sound sounds and video is saved automatically.
Information
• Before shooting video, check if the memory space is enough.
• If "Record video" in the "Volume key function" option is selected in the
setting menu, you can also press the volume UP key/volume DOWN
key to shoot/stop videos (P.87).
SettingCamera
1 From the Home screen, "Camera"
• Still image/video shooting screen appears.
2 • There are items that cannot be set from Shooting mode.
Item Description
Picture size
(rear)
Set the size of the still images which the Out-camera
is going to shoot.
Video size (rear) Set the size of the videos which the Out-camera is
going to shoot.
Picture size
(front)
Set the size of the still images which the In-camera is
going to shoot.
Video size (front) Set the size of the videos which the In-camera is
going to shoot.
Save pictures as
previewed
Laterally invert and save shot images/videos.
Ways to take
pictures
Set "Tap to take pictures" and "Gesture control".
Timer Set self-timer.
Grid lines Display grid for shooting range on the shooting
screen.
Location tags Set whether to add location information.
• To receive GPS signal correctly, do not use in a
poor reception area. → P.90
• When uploading shot still images, added location
information may be tracked by third parties. To
avoid leaking location information, set to OFF.
Review pictures Displays the result as soon as you shoot a photo.
Quick launch Launch Camera by quickly pressing [Home key]
twice.
Storage location *Select a saving location of shot still image/video.
Voice control Set the voice control function to ON/OFF.
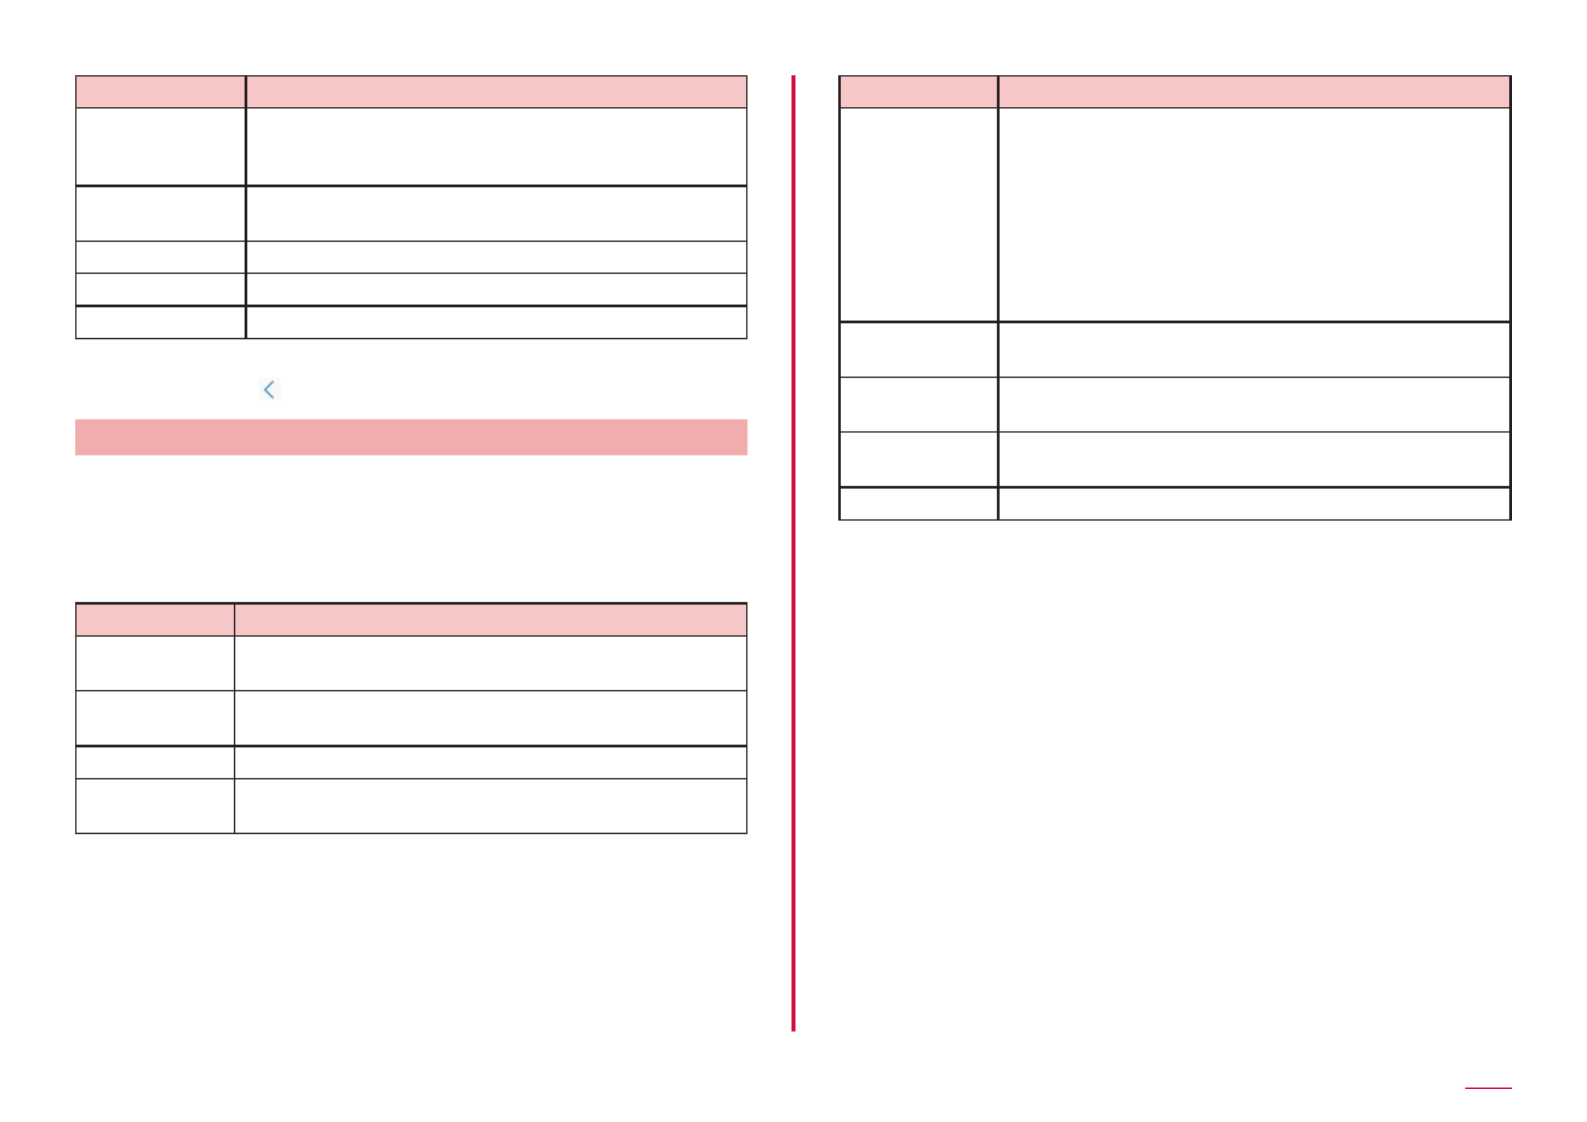
87
Apps
Item Description
Floating Camera
button
Set whether to add an extra Camera button that you
can move anywhere on the screen to Auto and Sele
modes.
Volume key
function
Select the operation to perform when pressing the
volume UP key/volume DOWN key.
Detect QR codes Set whether to detect QR codes.
Reset settings Reset camera settings.
Contact us Contact Galaxy Members.
* Appears only when microSD card is attached.
3 After setting,
Switchingshootingmode
1 From the Home screen, "Camera"
2 Flick right on the shooting screen
• The displayed items will be dierent depending on the camera (Out-
camera/In-camera) being used.
• Tap "DOWNLOAD" to download other shooting modes.
Item Description
Auto Adjust lithographic exposure automatically to optimize
color tone and brightness.
Pro Manually adjust metering, ISO speed, exposure value,
and white balance.
Sele Take seles easily.
Wide sele If you move the terminal side-to-side when taking a
sele, you can take a sele of a large number of people.
Item Description
Panorama
Move the terminal horizontally or vertically to shoot
panorama photo.
• Slowly move the camera in a direction not to get the
white frame out of the white guideline when shooting.
• Shooting objects in front of a plain colored wall or in
empty space may fail.
• No audio is recorded when a panorama photo is shot.
• The vertical/horizontal size of the displayed
panorama may be narrower than still images.
Continuous
shot
Shoot still images continuously.
HDR (Rich
tone)
Composite photos shot at various exposure values to
enhance soft and rich colors.
Night Shoot brightly fresh photos without using the ash
even in dark places.
Food Highlight the fresh color of food to shoot photos.
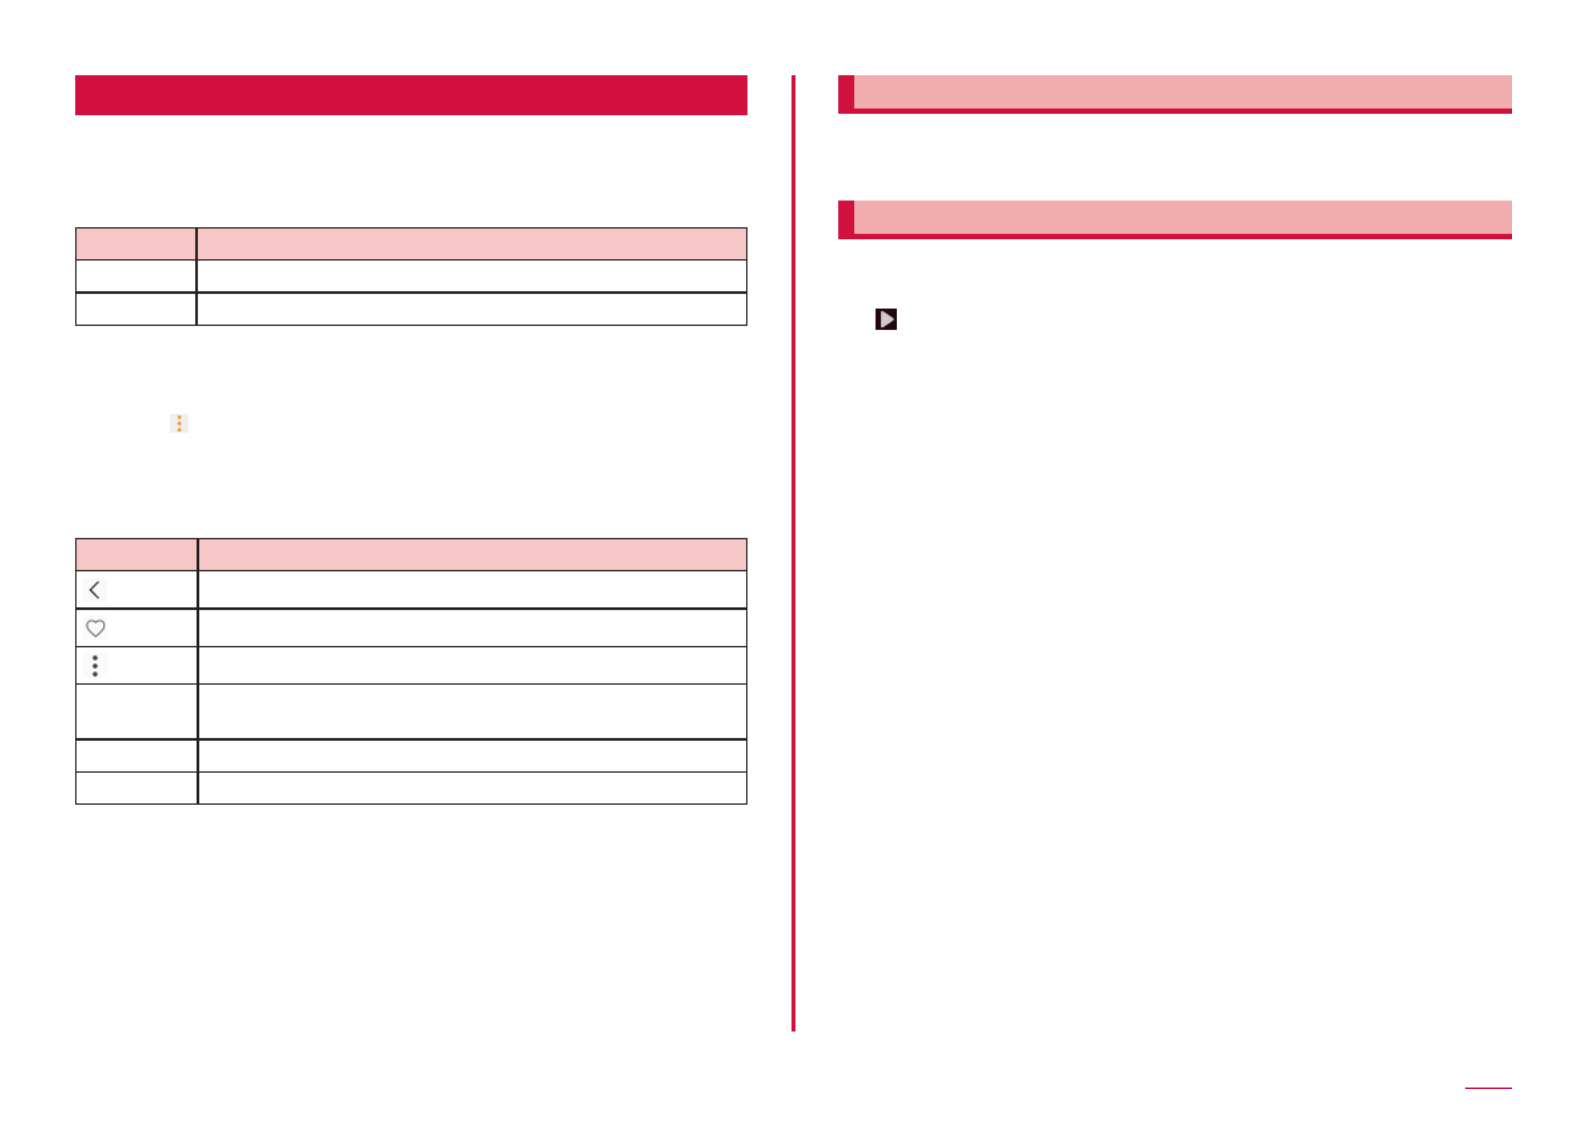
88
Apps
Gallery
You can view or organize still images/videos saved to the terminal
or microSD card.
Supported le formats are as follows. However, some images or
videos in the following le formats may not be displayable/playable.
Type File format
Still image JPEG, PNG, GIF, BMP, WBMP, WEBP, AGIF
Video MP4, M4V, 3GP, 3G2, WMV, ASF, AVI, FLV, MKV, WEBM
1 From the Home screen, "Gallery"
• A data list screen arranged by shooting date appears.
• You can change display by tapping "PICTURES"/"ALBUMS"/"STORIES".
• Tap to launch camera and display the function menu of each data
list screen.
2 Tap data
• When no icons are displayed, tap the screen to display. Displayed
icons vary by displayed data.
Item Description
Return to the data list screen.
Add the item to "Favorites".
Display a function menu for each selected data type.
Share Share data using online services, send data via Bluetooth
or attaching to mail, or use data on other apps.
Edit Edit still image and video data.
Delete Delete data.
Viewingstillimage
1 On the data list screen, tap a still image to display
• The still image appears.
• To switch still images, scroll the screen to the left or right.
Playingvideo
1 On the data list screen, tap a video to play
• To switch videos, scroll the screen to the left or right.
2 • Playing starts.
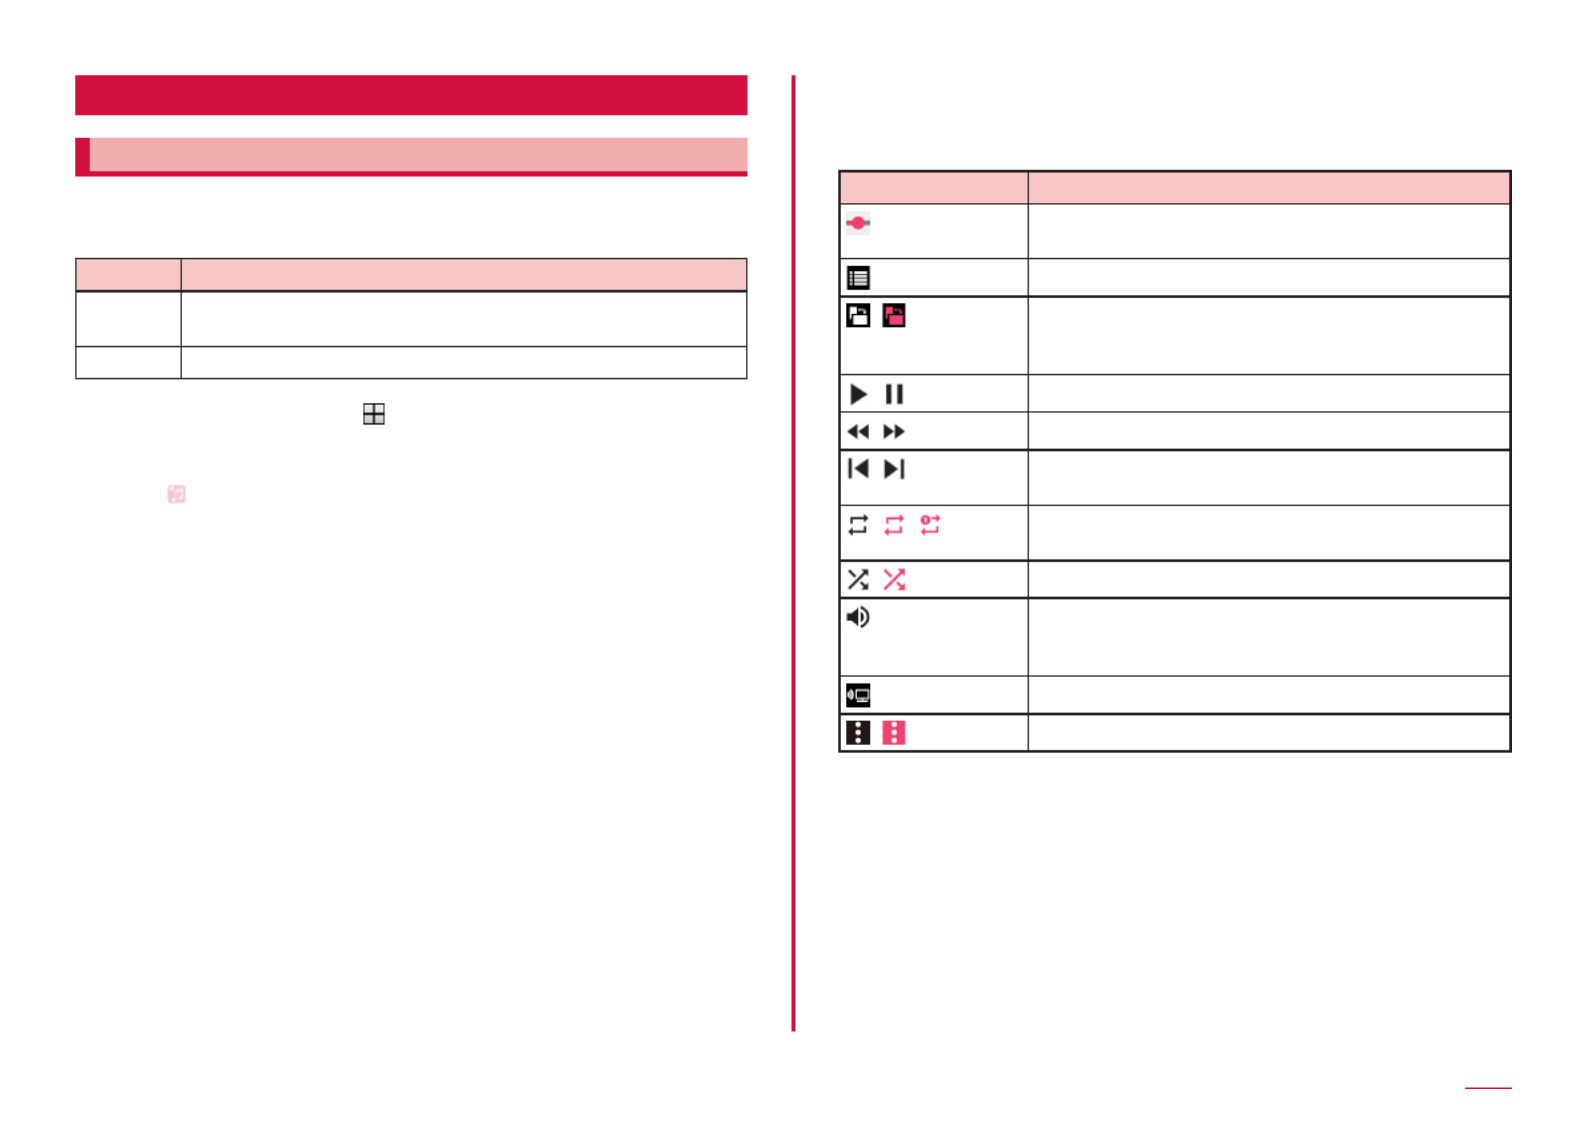
89
Apps
MediaPlayer
UsingMediaPlayer
You can play music or videos saved on the terminal or microSD card.
Available le formats for playing are as follows. However, even if in the
following le formats, some songs and videos may not be playable.
Type File format
Music MP3, M4A, 3GA, AAC, OGG, OGA, WAV, WMA, AMR, AWB,
FLAC, MID, MIDI, XMF, MXMF, IMY, RTTTL, RTX, OTA
Video MP4, M4V, 3GP, 3G2, WMV, ASF, AVI, FLV, MKV, WEBM
1 From the Home screen, → "Media Player"
2 Select a tab at the top of the screen
• Result corresponding to tapped tab appears.
• Tap to check TOP, New arrivals and Ranking of "dミュージック" (dmusic).
3
Tap a music or a video to play
• Playing music or video starts.
• Displayed items will be dierent depending on the screen (playing
music screen/playing video screen).
Item Description
Indicate the current playback position. Drag left and
right to change the playback position.
Display data list.
/
Set whether to automatically switch portrait or
landscape view according to orientation of the
terminal.
/Play/pause.
/Tap to fast rewind/fast forward.
/Tap to go back to the beginning of data or the
previous data/skip to the next data.
/ / Set repeat mode (Repeat is o/Repeat all songs/
Repeat current song).
/Set shue function (Shue is o/on).
Display the volume level. Drag left or right to adjust
the volume.
• Tap the playing screen to display it.
Play a video being connected to wireless device.
/Display menu.

90
Apps
GPS/Navigation
Enablinglocationinformation
If you use an app that uses location information, you need to enable GPS
function in advance.
1 From the Home screen → "Settings" → "Connections" →
"Location"
2 → "AGREE"
3 "Locating method" → Select a detection method
Item Description
High accuracy
Uses GPS, Wi-Fi and mobile networks to identify
current location. Although current location can be
detected more accurately, the terminal consumes
much power of battery.
Battery saving Uses Wi-Fi and mobile networks to identify current
location.
Phone only Uses GPS to identify current location.
UsingtheGPSfunction
• DOCOMO is not liable for any damage caused by abnormality of the
system.
• Note that DOCOMO shall have no liabilities for any purely economic loss
including those due to missing a chance to check the measurement
(communication) results because of external factors (including the
running out of the battery), such as a failure, malfunction, or any other
problems of the terminal or the power failure.
• You cannot use the terminal as a navigation system for aircraft, vehicles,
persons, etc. For this reason, note that DOCOMO is not liable for losses
incurred by navigation performed by using location information.
• You cannot use the terminal as a high-accuracy measurement GPS.
Note that DOCOMO shall have no liabilities whatsoever even if you suer
damage or loss due to a deviation of the location information.
• GPS is a service operated by the USA Department of Defense, so the
GPS radio wave condition may be controlled (accuracy degraded, radio
wave suspended, etc.) for reasons of US national security. And, wave
conditions dier by satellite locations; therefore, positioning operations
in the same location under the same environmental conditions may not
yield the same result.
• Wireless communications products (mobile phone or data detector, etc.)
may intercept satellite signal and signal reception may not be stable.
• The displayed map based on the acquired location information (latitude
and longitude information) may be inaccurate because of the legal
system in each country and area.
■ Where radio waves are dicult to receive
Note that radio waves may not be received or it may be dicult to
receive radio waves in the following conditions, since GPS uses radio
waves from a satellite.
• Inside or immediately under a building
• Inside a basement or tunnel, and below the ground or water
• Inside a bag or box
• In buildings-clustered or residential area
• Inside or under a thick covering of trees
• Near a high-voltage cable
• In a car, inside a train compartment
• Bad weather such as heavy rain or snow
• When there are obstructions (people or objects) near the terminal

91
Apps
UsingGoogleMaps
By using Google Maps, you can search for the current location or other
locations, or obtain guide information to destination.
• To use Google Maps, enable data connection (4G/3G/GSM) or connect
to Wi-Fi.
• Google Maps does not cover the whole world or region.
OpeningGoogleMaps
1 From the Home screen, "Google" → "Maps"
• When the message screen appears, follow the onscreen instructions.
2 Enter area name etc. in the search box
SearchingdirectionbyGoogleMaps
Use the "Directions" function of Google Maps to search the route by car,
by train or on foot.
1 From the Home screen, "Google" → "Maps"
2 → Tap the transportation ( / / ) icon
3 Enter a place name, etc. in the search box above
4 Enter a place name, etc. in the search box below
5 Tap a route
Searchingspotsinthearea
You can search stores and facilities around the current location using
Google Maps.
1 From the Home screen, "Google" → "Maps"
2 Tap the search box → After that, follow the onscreen
instructions
Clock
You can use Alarm, World Clock, Stopwatch or Timer.
1 From the Home screen, → "Clock"
2 Tap a tab at the top of the screen
• Tapping switches screen of each function.
UsingALARM
1 On the "ALARM" screen, → Set each item → "SAVE"
• Tap the number of hour/minute to display 3x4 keyboard.
2 To stop alarm, drag out of the displayed circle
• If "Alarm" screen appears, tap "DISMISS".
• When snooze is set, tap "SNOOZE" and alarm sounds again every
ve minutes.
Information
• Snooze is a function which stops the alarm and sets it to ring again
at a short time later.
• To delete registered alarm, on the "Alarm" screen, tap → "Delete"
→ Select an alarm and tap "DELETE".
• To set registered alarm to OFF, tap to .
UsingWORLDCLOCK
You can check a list of the date and time of the registered cities.
1 On the "WORLD CLOCK" screen, → Tap a displayed city
on the map → "ADD"
• To register city based on the current location, → Tap a city.
Information
• If you enter the city name or country name in the search box that you
want to search on the "ADD CITY" screen, you can search via city/
country name.
• To delete registered city, on the "WORLD CLOCK" screen, touch and
hold the city to delete → Tap "DELETE".

92
Apps
UsingStopwatch
1 On the "Stopwatch" screen, "START"
• Measurement starts.
2 To stop the measurement, "STOP"
• To measure the lap time, tap "RESET".
UsingTimer
1 Set Hours, Minutes, Seconds on the "TIMER" screen
2 "START"
• The timer starts.
3 To stop time-up notication sound, drag out of the
displayed circle
• If "Timer" screen appears, tap "DISMISS".
Calendar
Display Calendar to register event and task. Set up a Google
account to synchronize with Google calendar.
1 From the Home screen, → "Calendar"
2
Event registration screen
3 Set items → "SAVE"

94
Apps
VoiceRecorder
Recordingvoicesound
1 From the Home screen, → "Voice Recorder"
2 • Recording starts.
3 • Recording stops. Enter a le name and tap "SAVE" to save the
recorded content.
Playingvoicesound
1 From the Home screen, → "Voice Recorder"
2 "LIST"
• A recorded data list screen appears.
3 Tap data you want to play
• Playing starts.
MenuofVoiceRecorder
When you tap on the recorded data list screen/playback screen, the
items will be displayed. Follow the on-screen instructions.
Calculator
You can perform four arithmetic operations (+, - , × , ÷ ), percent
calculus, functional calculus, etc.
1 From the Home screen, → "Calculator"
• When the Auto rotate is ON, turning the terminal sideways switches
to the alpha calculator. Alternatively, when the Auto rotate is OFF,
tap to switch to the alpha calculator.

95
Apps
docomoDataCopy
With "docomo Data Copy", you can copy the data saved in the
terminal to another terminal, or back up/restore the data.
Use this app for transferring data when you change the model, or
backing up your important data at regular intervals.
Datatransfer
You can copy your data such as phonebook, images, etc. to another
terminal with one-to-one direct communication, not using the Internet.
Activate "Data Copy" of both the source terminal and the destination
terminal, and line them up before use.
1 From the Home screen, → "Data Copy" → "Data transfer"
• Follow the on-screen instructions.
• Installing this app is required for both the source terminal and the
destination terminal. Available to download from NTT DOCOMO
website, if it is not installed yet.
• Communication methods vary depending on the use of devices or
OS version.
• For details about compatibility or information, see NTT DOCOMO
website.
Backingupto/restoringfrommicroSDcard
You can transfer or back up the data such as phonebook entries or images
using a microSD card.
• Do not remove the microSD card from the terminal or turn o the terminal
during backup or restoration. Data may be damaged.
• Some items may be changed or deleted when the other terminal's data
such as phonebook entries (phone number etc.) dier from the terminal.
Available characters in phonebooks may vary depending on each terminal,
some may be deleted.
• Phonebook data available to back up is phonebook saved in docomo's
account and the terminal.
• When backing up phonebook entries to microSD card, data without a
name registered cannot be copied.
• When available memory space of microSD card is not enough, backup
may not be executed. In such case, delete unnecessary les from the
microSD card to save the memory space.
• When the remaining battery gets low, backup or restoration may not be
executed. In such case, charge the battery of the terminal and then back
up or restore.
• With this app, image data only stored on the terminal can be backed up.
Data stored in microSD card cannot be backed up.
Backingupdata
Back up data such as phonebook entries, media les, etc. a microSD card.
1 From the Home screen, → "Data Copy" → "Backup &
Restore"
2 "Backup" → Mark data to back up → "Start backup" →
"BACKUP"
• Selected data is saved to a microSD card.
3 "Back to top"
Restoring
Restore the data such as phonebook entries or media les backed up to
the microSD card to the terminal.
1 From the Home screen, → "Data Copy" → "Backup &
Restore"
2 "Restore" → "Select" of data type to be restored → Mark data
to restore → "Select"
3 Select restoration method → "Start restore" → "RESTORE"
• Selecting restore method is not required depending on the data
type.
• Selected data is restored to the terminal.
4 "Back to top"
CopyingphonebookentriessavedinGoogleaccountorthe
terminaltodocomoaccount
You can copy the contacts data in your Google account or terminal to the
docomo account.
1 From the Home screen, → "Data Copy" → "Backup &
Restore"
2 "Phonebook account copy" → "Select" on the phonebook
entry to be copied → "OVERWRITE"/"ADD"
• The copied contacts are saved to your docomo account.
3 "OK"
96
Apps
Backingupto/restoringfromDataStorageBOX
You can backup/restore call logs, music, etc. using データ保管BOX (Data
Storage BOX).
1 From the Home screen, → "Data Copy" → → "Backup /
Restore to Cloud"
2 "Backup" or "Restore"
• Follow the on-screen instructions.
• If you do not sign in to docomo cloud, the conrmation screen appears.
Information
• The periodical backup may not be executed at the specied time
while the screen lock is set or power saving mode is enabled. In the
case, the backup will be executed when the activation is possible
next time.
• Note that a packet communication charge may be high, if you set
Periodical backup of Data Storage Box.
YouTube
YouTube is a free online video streaming service. You can view or
post video.
Playingvideo
1 From the Home screen, "Google" → "YouTube"
2 Tap a video you want to play
• Video is played.

97
Apps
Dictionary
Use dictionaries to search for words and phrases.
You can use this terminal to download dictionary data.
1 From the Home screen, → "Dictionary"
• Since the dictionary data downloading/installation screen appears
when the app is initially started up, tick the dictionaries which are to
be downloaded, and tap "Download". A Wi-Fi environment is required
for downloading dictionary data.
SHealth
Support your health management by recording the amount of calories
you spend and you take, and exercises, etc. using items such as
"TRACKERS" such as pedometers, "GOALS" and "PROGRAMS" of
warming-up exercise or running, etc.
• To backup data to the server, you need a Galaxy Account setting. If the
setting screen of Galaxy Account appears, follow the on-screen instructions
and make settings before using.
1 From the Home screen, → "S Health"
• S Health screen appears.
2 Tap an item
Information
• For details on S Health, on the S Health screen, tap → "Contact us".
SVoice
Operate each terminal function such as sending SMS, creating
memo by voice input.
BeforeusingSVoice
To enhance the voice recognition, take care of the following points.
• Speak clearly against the terminal.
• Use in quiet place.
• Avoid using slang, dialect, etc.
UsingSVoice
1 From the Home screen, → "S Voice"
• S Voice screen appears.
• If VOICE RECOGNITION LEGAL INFO appears, conrm the content,
follow the onscreen instructions.
2 Follow the onscreen instructions to set wake-up command
Information
• For instructions on how to input S Voice, tap on the S Voice
screen.

98
Settings
Settings
Settingmenu
You can set various items such as screen brightness, screen view,
ringtone, communication, etc.
1 From the Home screen, → "Settings"
2 Select a menu item and make settings
Item Description
Connections → P.98
Sound and vibration → P.104
Notications → P.106
Display → P.107
Wallpapers and themes → P.108
Advanced features → P.30
Device maintenance → P.108
Apps → P.109
Lock screen and security → P.110
Cloud and accounts → P.115
docomo service/cloud → P.116
Google → P.117
Accessibility → P.117
General management → P.119
Software update → P.121
About phone → P.121
Information
• Suggested setting may be displayed above the "Connections"
depending on the condition of usage of the terminal.
• Tap and enter keyword that you want to search in the search box to
search in the settings and check the setting contents.
Connections
1 From the Home screen, → "Settings" → "Connections"
2 Select a menu item and make settings
Item Description
Wi-Fi → P.98
Bluetooth → P.124
Data usage → P.101
Airplane mode → P.101
NFC/Osaifu-Keitai settings → P.101
Tethering → P.102
Mobile networks → P.103
Location → P.90
More connection settings → P.104
Wi-Fi
You can use Wi-Fi function of the terminal to connect to wireless access
point of your home or company network. Also, you can connect to Public
wireless LAN service access point to use mails and Internet.
■ Reception interference caused by Bluetooth
The terminal's wireless LAN device and Bluetooth devices use the
same frequency band (2.4GHz). If you use the terminal near a Bluetooth
device, reception interference may occur or the communications speed
may lower. Also, you may hear noise or have a connection problem. In
these cases, do the following:
1. Keep the wireless LAN device over approximately 20 m away from a
Bluetooth device.
2. Within approximately 20 m, turn o the Bluetooth device.

99
Settings
Information
• Even when Wi-Fi is ON, packet communication is available. However,
while you connect Wi-Fi network, Wi-Fi comes rst. If Wi-Fi network
is disconnected, network is automatically switched to 4G/3G/GSM.
Be noticed that packet communication charge is applied if you keep
using 4G/3G/GPRS network after toggling.
• Connect to a Wi-Fi network that requires user authentication, and
if the user authentication is unestablished when is displayed,
communications may be carried out not by Wi-Fi, but rather via a
mobile network.
To perform Wi-Fi communications via these kinds of access points,
set the "Smart network switch" to OFF when making connections
with access points.
• If the docomo service is being used via Wi-Fi, "d アカウント" (d
ACCOUNT) needs to be set. From the Home screen, → "Settings"
→ "docomo service/cloud" → "d ACCOUNT setting"
■ Enabling Wi-Fi and connecting to network
1 From the Home screen, → "Settings" → "Connections" →
"Wi-Fi"
2 • Scanning available Wi-Fi networks starts automatically and a list is
displayed.
3 Tap a Wi-Fi network you want to connect → "CONNECT"
• To connect to a Wi-Fi network protected by security, enter a password
(security key) and tap "Connect".
• Wi-Fi network compatible with WPS can be connected using WPS (Wi-
Fi Protected Setup). On the Wi-Fi network list screen, "ADVANCED"
→ "WPS push button"/"WPS PIN entry" → Operate on access point
device.
• If "Auto reconnect" is marked, the network is automatically connected
when Wi-Fi is enabled.
Information
• The Wi-Fi network password (security key) is automatically saved
when connection is established so that you do not need to enter it
next time.
■ Deleting connection of Wi-Fi network
1 From the Home screen, → "Settings" → "Connections" →
"Wi-Fi"
2 Tap a connected Wi-Fi network → "FORGET"
■ Setting Wi-Fi access point
• For information necessary for connection, refer to user manual of wireless
LAN access point you use. For connecting to company LAN or using Public
wireless LAN service, ask a network administrator or service provider about
the required information for connecting.
• When the wireless LAN access point is set for connecting only to the MAC
address registered device,
register the MAC address of the terminal to
the wireless LAN access point.
To check MAC address, from the Home
screen, → "Settings" → "Connections" → "Wi-Fi" → "ADVANCED".
1 From the Home screen, → "Settings" → "Connections" →
"Wi-Fi"
2 "Add network"
3 Enter the network name → Set the security
• The possible certicate method is "WEP", "WPA/WPA2/FT PSK",
"802.1x EAP".
4 Enter a password → "CONNECT"
• If you set Security to "None", entering password is not needed.
■ Setting smart network switch
Set whether to check availability of the connected Wi-Fi network and change
to the mobile network if it is unavailable.
1 From the Home screen, → "Settings" → "Connections" →
"Wi-Fi"
2 "ADVANCED"
3 "Smart network switch" →
Information
• When Wi-Fi connection is disconnected with the access point
(such as memory card with embedded wireless LAN which does not
connect to Internet) while "Smart network switch" is ON, set "Smart
network switch" to OFF.

100
Settings
■ Connecting to Wi-Fi access point compatible with Hotspot 2.0
automatically
Set whether to automatically connect to Wi-Fi access point compatible
with Hotspot 2.0 within the area without setting the Wi-Fi access point.
1 From the Home screen, → "Settings" → "Connections" →
"Wi-Fi"
2 "ADVANCED"
3 "Hotspot 2.0" →
■ Managing network
Saved networks appear.
1 From the Home screen, → "Settings" → "Connections" →
"Wi-Fi"
2 "ADVANCED"
3 "Manage networks"
■ Setting sleep policy of Wi-Fi
You can make settings so that you can disable Wi-Fi when the display of the
terminal turns o or always keep Wi-Fi on when charging.
1 From the Home screen, → "Settings" → "Connections" →
"Wi-Fi"
2 "ADVANCED"
3 "Keep Wi-Fi on during sleep" → Select sleep policy
■ Installing a network certicate
Install a network certicate.
1 From the Home screen, → "Settings" → "Connections" →
"Wi-Fi"
2 "ADVANCED"
3 "Install network certicates"
■ Using static IP address
You can set the terminal to connect to Wi-Fi network using the static IP
address.
1 From the Home screen, → "Settings" → "Connections" →
"Wi-Fi"
2 Tap Wi-Fi network to connect → Mark "Show advanced
options"
3 Tap "IP settings" eld → "Static"
4 Set required items
• For using static IP address, enter the following items.
- IP address
- Gateway
- Network prex length
- DNS 1/DNS 2
• When setting proxy is required, select "Manual"/"Auto-cong" and
follow the onscreen instructions.
5 "CONNECT"
■ Using Wi-Fi Direct
You can exchange data by connecting Wi-Fi Direct compatible devices.
1 From the Home screen, → "Settings" → "Connections" →
"Wi-Fi"
2 "Wi-Fi Direct"
3 Tap a detected device name
• When the connection is accepted on the searched device, the
terminal will be connected via Wi-Fi Direct and appears on the
status bar.
■ Disconnecting Wi-Fi Direct
1 From the Home screen, → "Settings" → "Connections" →
"Wi-Fi"
2 "Wi-Fi Direct"
3 Tap a device name to disconnect

101
Settings
Datausage
Enable/disable mobile data communication or set upper limit of data
communication. Also set a period of time for measuring amount of
communications.
1 From the Home screen, → "Settings" → "Connections" →
"Data usage"
• Data usage screen appears and estimated value of mobile data
usage for a period and for each app.
• Set "Mobile data" to ON to enable Internet access via mobile networks.
• Tap "Mobile data usage" → to set the limit and warning of mobile
data communication usage. To set the limit, set "Data limit" to ON.
Limiting background data communication
From the data usage screen, tap "Data saver" → to restrict mobile
data communication automatically made by apps.
Tap "Allow app while Data saver on" to restrict usage of mobile data
of Individual apps.
Displaying status of Wi-Fi use
Tap "Wi-FI data usage" to display the estimated amount of Wi-Fi data
usage for a period and for each app.
Restricting use of Wi-Fi network for using Wi-Fi tethering
Tap "Restrict networks" to prevent background apps from using
specied Wi-Fi network.
Information
• Displayed data usage volume is an estimate. It may be dierent
from the actual one. You can check your data usage volume at My
docomo.
• Note that mobile data communication will suspend when data usage
volume reaches to the set limit volume. To resume the mobile data
communication, on the pop-up screen of "Mobile data turned o", tap
"TURN ON MOBILE DATA", or change the setting value of the data
usage limit.
Airplanemode
Disable all wireless connections.
1 From the Home screen, → "Settings" → "Connections" →
"Airplane mode"
2
Information
• Alternatively, tap "Airplane mode" on the notication panel to switch
the setting.
• If you enable "Airplane mode", Wi-Fi, Bluetooth, and functions of the
NFC such as reader/writer, P2P, etc. are turned OFF. However, you
can turn them ON again during Airplane mode.
NFC/Osaifu-KeitaiSetting
Lock Osaifu-Keitai function, or make settings so that you permit/deny
sending/receiving of a content/le etc. via Reader/Writer, P2P function.
1 From the Home screen, → "Settings" → "Connections" →
"NFC/Osaifu-Keitai settings"
2 Tap an item to set
Item Description
NFC/Osaifu-
Keitai Lock
Lock NFC/Osaifu-Keitai function.
Reader/Writer,
P2P
Set whether to permit exchange of data when
putting the terminal close to the other device with
NFC module built-in or Reader/Writer, P2P function
installed. → P.125
Android Beam
Set whether to permit to send/receive web page links
or contents of contacts to/from other device with P2P
function installed.
• Enable "Reader/Writer, P2P" before using.
NFC Type
Settings
Set communication mode from "FeliCa / Type A / Type
B (Default)", "FeliCa / Type A" or "FeliCa / Type B".

102
Settings
Item Description
Tap and pay Enable or disable the setting of the service available
by holding the terminal over the IC card reader, such
as Osaifu-Keitai service. → P.78
Usingtethering
Tethering is generally a function which uses a mobile device such as smart
phone, etc. as modem to connect wireless LAN devices, USB compatible
devices and Bluetooth compatible devices to Internet.
• Up to 10 devices can be connected using Wi-Fi tethering at one time, 1
device can be connected using USB tethering, and up to 3 devices can
be connected using Bluetooth tethering. When you use Wi-Fi tethering,
USB tethering and Bluetooth tethering at one time, 14 devices in total
can be connected.
■ Setting Wi-Fi tethering
You can use your terminal as an Internet access point and connect at
most 10 wireless LAN devices to Internet.
1 From the Home screen, → "Settings" → "Connections" →
"Tethering" → "Wi-Fi tethering"
2 • After the precautions are displayed, conrm them and tap "OK".
■ Setting access point for Wi-Fi tethering
1 From the Home screen, → "Settings" → "Connections" →
"Tethering" → "Wi-Fi tethering"
2 • After the precautions are displayed, conrm them and tap "OK".
3
→ "Congure Wi-Fi tethering"
4 Tap "Network name" eld → Input the network name
• "AndroidAP" is set in advance.
5 Tap "Security" eld
• Select a proper setting from "Open" and "WPA2 PSK".
6 Tap "Password" eld → Enter password
• Password is not required if you set "Open" in "Security".
7
"SAVE"
Information
• "WPA2 PSK" is set by default.
• While connected via Wi-Fi tethering, on the Wi-Fi tethering screen,
→ "Congure Wi-Fi tethering" → Mark "Hide my device" → Tap "SAVE"
to disconnect the connected wireless LAN device temporarily, but it
connects again automatically.
• If "Hide my device" is marked, the terminal cannot be scanned. When
you connect from the other device, conrm the information displayed
in "HOW TO CONNECT FROM OTHER DEVICES" on the Wi-Fi tethering
screen, and then set the Wi-Fi access point manually.
• When connected via Wi-Fi tethering, on the Wi-Fi tethering screen,
tap → "WPS push button" to connect by pressing WPS button
on connected device. Also, on the Wi-Fi tethering screen, tap →
"Timeout settings" to turn o Wi-Fi tethering automatically when
there is no connected device for specied time.
■ Setting Bluetooth Tethering
You can connect up to 3 Bluetooth devices to the Internet at one time,
using the terminal as an Internet access point.
1 From the Home screen, → "Settings" →
"Connections" →
"Tethering" → "Bluetooth tethering" →
Information
• To use Bluetooth tethering, this terminal needs to be detectable.
For details, refer to "Enabling Bluetooth function and making your
terminal detectable"
(P.124)
.
103
Settings
■ Setting USB tethering
You can connect to the Internet by connecting the terminal to a PC via a
USB cable A to B 01 (sold separately).
1 Insert microUSB (B) plug of the USB cable A to B into the
external connection jack of the terminal
• For connecting method, see "Connecting with USB cable A to B"
(P.126).
2 Insert USB plug of the USB cable A to B plug into a PC USB
port
3 From the Home screen, → "Settings" → "Connections" →
"Tethering"
4 "USB tethering"
Information
• During USB tethering, you can't look inside this terminal and microSD
card from connected PC.
• Operating environments for USB tethering are as follows. DOCOMO
is not liable for the operation after upgrading/adding/changing OS.
- Windows 7
- Windows 8.1
- Windows 10
Settingaccesspoint
Access point for connecting the Internet (sp-mode) is already registered.
You can add or change it if necessary.
For details on sp-mode, refer to NTT DOCOMO website.
https://www.nttdocomo.co.jp/service/spmode/
When using mopera U or Business mopera Internet, add access point manually.
For details on mopera U, refer to mopera U website.
https://www.mopera.net/
■ Checking the access point in use
1 From the Home screen, → "Settings" → "Connections" →
"Mobile networks" → "Access Point Names"
■ Setting an access point additionally
1 From the Home screen, → "Settings" → "Connections" →
"Mobile networks" → "Access Point Names" → "ADD"
2 "Name" → Enter a name of network prole to create → "OK"
3 "APN" → Enter the access point name → "OK"
4 Enter the other items required by the network operator
• Do not change "MCC" and "MNC" other than 440 and 10,
respectively. If they are changed, they are not displayed on the
screen.
5 → "Save"
Information
• When you changed settings of MCC or MNC and access points
are not displayed, initialize the access point or set an access point
manually.
■ Initializing an access point
By initializing an access point, the default state is restored.
1 From the Home screen, → "Settings" → "Connections" →
"Mobile networks" → "Access Point Names"
2 → "Reset to default" → "RESET"

104
Settings
ConnectingtoVPN(VirtualPrivateNetwork)
VPN (Virtual Private Network) is a technology to connect to the information
in a protected local network from another network. Generally, VPNs are
provided to companies, schools and other facilities. A user can access to
the information in the local network from outside of the premises.
• To set up a VPN access from the terminal, you need to retrieve the
information related to security from your network administrator.
■ Adding a VPN
1 From the Home screen, → "Settings" → "Connections" →
"More connection settings" → "VPN"
2 "ADD VPN"
• If an attention screen appears, tap "OK" and set the screen unlock
method following the onscreen instructions.
To edit VPN
Tap of VPN to edit → Set each item → Tap "SAVE"
To delete VPN
Tap of VPN to delete → Tap "DELETE"
3 Follow the instruction of the network administrator to set
required items of VPN settings
4 "SAVE"
■ Connecting to a VPN
1 From the Home screen, → "Settings" → "Connections" →
"More connection settings" → "VPN"
2 Tap a VPN you want to connect to
3 Enter necessary authentication information → "CONNECT"
• appears on the status bar.
■ Disconnecting VPN
1 Open the Notication panel → Tap the VPN connecting
notication
2 "DISCONNECT"
Soundsandvibration
1 From the Home screen, → "Settings" → "Sounds and
vibration"
2 Select a menu item and make settings
Item Description
Sound mode → P.105
Vibrate while ringing Set whether to vibrate while ringing.
Default Volume key control Set "Ringtone"/"Media" for the default
volume key control.
Volume → P.105
Vibration intensity Set the intensity of vibration for
"Incoming call"/Notications"/"Vibration
feedback".
Ringtone → P.105
Vibration pattern → P.105
Notication sounds → P.105
Do not disturb → P.105
Touch sounds → P.106
Screen lock sounds → P.106
GPS notications → P.106
Charging sound → P.106
Vibration feedback → P.106
Dialing keypad tones → P.106
Keyboard sound → P.106
Keyboard vibration → P.106
Sound quality and eects Customize the sound settings and
eects.

105
Settings
SettingSilentmode
If Silent mode is set to "Vibrate"/"Mute", incoming call ringtones and
notication sounds no longer ring.
1 From the Home screen, → "Settings" → "Sounds and
vibration" → "Sound mode"
2 "Vibrate"/"Mute"
Information
• If you change "Ringtone" (P.105) of "Volume" when Silent mode
(Vibrate, Mute) is set to "Vibrate"/"Mute", Silent mode (Vibrate, Mute)
is canceled.
• When Silent mode (Vibrate, Mute) is set to "Mute", tap "Temporary
mute" to set how long to keep your phone muted before returning to
"Sound"/"Vibrate" mode.
Adjustingvolumes
1 From the Home screen, → "Settings" → "Sounds and
vibration" → "Volume"
• A volume bar appears.
Item Description
Ringtone Adjust ringtone for incoming call.
Media Adjust playback sound of Music Player etc.
Notications Adjust notication sound for incoming notication
(P.37).
System Adjust sound for touch operation, ON/OFF sound for
screen lock/unlock, GPS enabling.
2 Drag of each sound volume left or right
■ Adjusting volumes with the volume UP key/volume DOWN key
1 Press volume UP key/volume DOWN key
Notifyingincomingcall/noticationbysound/
vibration
Set melody, etc. of ringtone/notication sound for incoming call or
notication or whether to vibrate the terminal.
■ Setting ringtone
1 From the Home screen, → "Settings" → "Sounds and
vibration" → "Notication sounds"
2 Tap a notication sound you want to set
• When "Mute" is set, phone ringtone does not sound.
• Tap "Add from phone" to search ringtones and add.
■ Setting notication sound
1 From the Home screen, → "Settings" → "Sounds and
vibration" → "Notication sounds"
2 "Default notication sound" → Tap notication sound you
want to set
• When "Mute" is set, notication sound does not sound.
■ Setting vibration pattern
1 From the Home screen, → "Settings" → "Sounds and
vibration" → "Vibration pattern"
2 Tap a pattern you want to set
Information
• If "Vibrate while ringing" is set to ON when Silent mode (Vibrate,
Mute) is not set, ringtone sounds and the terminal vibrates for
incoming calls. If "Vibrate while ringing" is set to OFF, only ringtone
sounds.
• Notication sound and vibration pattern of Messages, Calender and
Email can be set individually.
Mutingnoticationsounds
Make settings so that you mute all calls and alarms and do not display
notications, apart from any exceptions you have selected.
1 From the Home screen, → "Settings" → "Sounds and
vibration" → "Do not disturb"

106
Settings
2
"Turn on now"
Information
• If "Turn on now" is turned ON, SMS pop-up notication is set to OFF.
• To set the time for muting notication sounds, turn "Turn on as scheduled"
ON, and set "Days", "Start time" and "End time".
• To allow exceptions, "Allow exceptions" → Tap items you want to make
exception.
Settingsystemsoundsandvibration
Set whether to play sounds for operation and vibrate the terminal.
1 From the Home screen, → "Settings" → "Sounds and
vibration" → "Touch sounds"/"Screen lock sounds"/"GPS
notications"/"Charging sound"/"Vibration feedback"
Settingkey-tapsoundsandvibration
Set whether to play sounds when tapping keys and vibrate the terminal.
1 From the Home screen, → "Settings → "Sounds and vibration"
→ "Dialing keypad tones"/"Keyboard sound"/"Keyboard
vibration"
Notications
Set apps you want to receive notications from
1 From the Home screen, → "Settings" → "Notications"
2 of app that you want to receive notication from
• Tap "ADVANCED" to make advanced notication settings.
Settingnotications
1 From the Home screen, → "Settings" → "Notications"
2 Select app or function to set
3 "Allow notications"/"Show silently"/"Set as priority"
Settingadvancednotications
1 From the Home screen, → "Settings" → "Notications"
2 "ADVANCED" → Select app or function to set
3 Set required items

108
Settings
Wallpapersandthemes
Set wallpapers and themes.
1 From the Home screen, → "Settings" → "Wallpapers and
themes"
2 "Wallpapers"/"Themes"/"Icons"
3 Select a wallpaper or theme to set
4 Set according to the onscreen instructions
Devicemaintenance
Set the terminal performance evaluation, battery, storage, memory and
terminal security.
1 From the Home screen, → "Settings" → "Device
maintenance"
• The terminal performance evaluation is displayed. To optimize more,
tap "OPTIMIZE NOW".
Item Description
Battery → P.108
Storage → P.108
Memory → P.109
Device security → P.109
Battery
Displays the battery usage data, the power saving mode setting and
optimized
app information.
1 From the Home screen, → "Settings" → "Device
maintenance" → "Battery"
Item Description
Remaining
battery level
Display the percentage of battery power remaining.
Item Description
Estimated
remaining
charging time
Display the estimated time until the battery is fully
charged when charging. However, the estimated time
until the battery is fully charged may not be displayed
if being charged in a low or high temperature
environment.
Estimated battery
life
Display the estimated time of the battery life to use
when not charging.
BATTERY USAGE
Display the battery usage. You can also check which
apps are consuming power and optimize battery usage
of each app.
• To change the settings of battery usage optimization,
tap → "Optimize battery usage" → "Apps not
optimized" → "All apps" to select apps to change the
settings.
Power saving
mode
Set Power saving mode.
App power
monitor
Display apps that are consuming battery power in
the background. Optimize the power usage of apps
and save battery power by setting apps to sleep.
• To set apps to sleep, mark apps to put to sleep →
tap "OPTIMIZED".
Unmonitored
apps
Select apps that you do not set to sleep to extend
the battery life.
Storage
You can check memory space of the terminal or microSD card, or format
microSD card.
1 From the Home screen, → "Settings" → "Device
maintenance" → "Storage"
• The available space of storage is displayed. To expand the available
space, tap "CLEAN NOW".
• Tap "SD card" to check the available space of SD card.
■ Setting storage
1 From the Home screen, → "Settings" → "Device
maintenance" → "Storage" → → "Storage settings"
109
Settings
Item Description
Device memory Display the data space of the terminal.
Tap "Used space" to display the data space saved
as apps and images, etc. by category. Tap an item to
check data.
SD card * Display the data space of microSD card.
• Tap "UNMOUNT" to unmount microSD card. After
unmounting, "SD card" → "MOUNT" to mount
microSD card.
• Tap "Format" to format microSD card.
* Appears only when microSD card is attached.
Information
• When USB storage is attached to the terminal, corresponding items
appear.
Memory
Check the memory status.
1 From the Home screen, → "Settings" → "Device
maintenance" → "Memory"
• The available space of memory is displayed. To expand the available
space, tap "CLEAN NOW".
Information
• When several apps are running, battery consumption may increase
and usage time may shorten. Therefore, ending unused apps is
recommended.
Devicesecurity
Perform the device security.
1 From the Home screen, → "Settings" → "Device
maintenance" → "Device security" → "SCAN PHONE"
• The device security status is displayed.
Apps
Set apps.
1 From the Home screen, → "Settings" → "Apps"
2 Tap an app
• Set each app according to the onscreen instructions.
Information
• From the apps setting screen, tap → "Default apps" to set usual
home screen, browser apps, message apps, etc.
• From the apps setting screen, tap to display system apps or
select apps that are displayed as oating apps such as buttons,
pop-up, etc, even when other apps are activated.
Disablingapps
Disabled app stops its operation and it is not displayed on the app screen.
• The app is not uninstalled.
• It is available for some apps or services that cannot be uninstalled.
1 From the Home screen, → "Settings" → "Apps"
2 Tap an app to disable → "DISABLE" → "DISABLE"
Information
• If you disable an app, other apps linking with the disabled app
may not operate correctly. Enable the app again to operate linked
apps correctly. To enable apps from the Home screen again, →
"Settings" → "Apps" → "All apps" → "Disabled" → tap an app to enable
→ "ENABLE".
110
Settings
Settingtheapp'spermission
When you access a app or function on the terminal for the rst time,
a conrmation screen will appear requesting you to permit the access
privileges.
When you grant access privileges to permit to an app or function, you can
use applicable function or information.
Example: When viewing the TV for the rst time
1 From the Home screen, → "MobileTV"
2 Tap "DENY"/"ALLOW"
Information
• If you do not select "ALLOW", you may be unable to activate the app/
function or the function may be restricted.
• To change the permission setting, from the Home screen, →
"Settings" → "Apps" → Tap the app whose permission setting you
want to change →"Permissions" → tap / of the permission you
want to change.
Lockscreenandsecurity
• Displayed items vary by setting of the screen lock.
1 From the Home screen, → "Settings" → "Lock screen and
security"
2 Select a menu item and make settings
Item Description
Screen lock type → P.111
Fingerprint Scanner → P.113
Smart Lock When accepted locations or devices
are detected, unlock the mobile
terminal automatically.
• Setting the security unlock method
with authentication is required in
advance.
Secure lock settings Set the secure lock functions such as
"Lock automatically", "Lock instantly
with power key", etc.
Always On Display → P.31
Information and FaceWidgets Select the contents to display on the
lock screen and Always on Display.
Notications Set the notication options on the lock
screen and Always on Display.
App shortcuts → P.111
Galaxy Pass Perform the authentication safely
and easily by using biometric
authentication.
Find My Mobile → P.111
Unknown sources Permit the installation of apps other
than ones provided by Google Play.
Secure Folder → P.42
Secure startup Protect the terminal by using a screen
lock when the terminal turns on.
Encrypt SD card Encrypt data saved in a microSD card
not to be used on the other terminal
or a PC. After encrypting SD card, the
item name is changed into "Decrypt SD
card"
• When the microSD card is encrypted
and perform "Factory data reset", you
can't use the data in the microSD
card. Please decrypt before doing
"Factory data reset". To decrypt, tap
"Decrypt SD card".
113
Settings
SettingPINcode
You can make settings so that you require the PIN code entry for using
the terminal when the power is turned on.
1 From the Home screen, → Settings" → "Lock screen and
security" → "Other security settings" → "Set up SIM card
lock" → "Lock SIM card" → Enter PIN cord → "OK"
• "Lock SIM card" is set to ON.
ChangingPINcode
When "Lock SIM card" (P.113) is set, you can change the PIN code.
1 From the Home screen, → Settings" → "Lock screen and
security" → "Other security settings" → "Set up SIM card
lock"
2 "Change SIM card PIN" → Enter the current PIN code and a
new PIN code according to the onscreen instructions.
Fingerprintauthentication
Fingerprint authentication is an authentication sliding your nger over the
ngerprint sensor.
■ Precautions for using ngerprint authentication
• This function is designed to authenticate using the characteristics
information of ngerprint image. For this reason, user with ngerprint
that does not provide enough characteristics information may not be
able to use the ngerprint authentication.
• Scanning several times with the same nger is needed to register your
ngerprint. Do not use dierent ngers to register.
• Authentication performance (the probability of successful ngerprint
authentication for correctly holding down your nger) depends on usage
conditions. Fingerprint registration may be dicult or the authentication
performance may decrease depending on conditions such as the hand is
dry. Taking measures according to the condition of your nger including
washing hands, wiping hands, using a dierent nger for ngerprint
authentication, etc. may improve the authentication performance.
• When registering or authenticating your ngerprint, align the rst joint of
one of your ngers to the center of the sensor, and hold down your nger.
To prevent authentication failure due to dierence in nger positions at
registration and authentication, keep your nger parallel to the terminal as
you place it.
• If you bend your nger or touch the ngerprint sensor with ngertip,
recognition may not be performed normally.
• If you hold down your nger too lightly or take it away too quickly, your
ngerprint may not be recognized correctly. Try as much as possible to
place your nger so that the center of the whorl of the ngerprint comes
to the center of the ngerprint sensor.
• Do not touch the ngerprint sensor before the lock screen appears by
pressing [Power/Screen lock key]/ [Home key]. The ngerprint
sensor may fail to work.
• If ngerprint registration or authentication is started with the nger put
on the ngerprint sensor, activation may fail. Put the nger o from the
ngerprint sensor and retry the operation.
• Fingerprint authentication technology does not guarantee complete
identity authentication or verication. The likelihood of the ngerprint
sensor confusing two dierent ngerprints is very low. However, in
rare cases where separate ngerprints are very similar, the sensor
may recognize them as identical. Note that DOCOMO assumes
no responsibility for any damage caused by use of this terminal or
unavailability of this terminal.
■ Usage precautions for ngerprint sensor
• The ngerprint sensor malfunction may occur if dirt adheres to the
surface of the ngerprint sensor or your nger. Wipe any dirt with a soft
cloth before use. Also wrinkled nger with water may cause malfunction.
• Do not strike the terminal or give a hard shock. May cause failure or
damage. Do not scratch the surface of the ngerprint sensor or pick with
a pointed objected, such as a nib.
• Rubbing hard with a ngernail or hard object such as metal piece of
strap may scratch the surface of the ngerprint sensor.
• Dirt with mud etc. or scratch on the surface of the ngerprint sensor
may cause failure or damage.
• Remove the protective lm attached at the time of purchase and use the
ngerprint sensor. If you use the ngerprint sensor with the protective
lm attached, it may not work normally.
• Do not attach a sticker or paint with ink etc. on the ngerprint sensor.
• Dirt of dust, sebum, etc. may make ngerprint scanning dicult or reduce
the authentication performance. Clean occasionally the ngerprint
sensor surface.
• When ngerprint registration or authentication fails often, clean the
surface of the ngerprint sensor. The phenomenon may be improved.

114
Settings
• To clean the ngerprint sensor, wipe its surface with a dry, soft and
static-free cloth. Long-term use may cause the ngerprint sensor to get
dusty, but do not try to remove the dust with a pointed object even in
such a case.
• Static electricity may cause malfunction. Before placing the nger on
the ngerprint sensor, eliminate static electricity by touching a metal
object with the hand, etc. Take particular care in dry seasons such as
winter.
Settingngerprintauthentication
Register ngerprints or set function to use. You can register up to three
ngerprints.
• For unlocking method of screen lock, see "Setting unlock method for the
screen lock" (P.111).
■ Registering ngerprints
1 From the Home screen, → "Settings" → "Lock screen and
security" → "Fingerprint Scanner"
2 Set the screen unlock method
3 After this step, follow the onscreen instructions to register
ngerprint
■ Setting use for Galaxy Pass/Galaxy account authentication
1 From the Home screen, → "Settings" → "Lock screen and
security" → "Fingerprint Scanner"
• Cancel the security to protect ngerprint.
2 "Galaxy Pass"/"Galaxy account"
3 After this step, follow the onscreen instructions to register
ngerprint
■ Unregister ngerprint
1 From the Home screen, → "Settings" → "Lock screen and
security" → "Fingerprint Scanner"
• Cancel the security to protect ngerprint.
2 Touch and hold the ngerprint to unregister → "REMOVE" →
"REMOVE"
Authenticatingngerprint
1 When the ngerprint authentication screen appears, place
your nger over the ngerprint sensor
• If the authentication failed, remove the nger from the ngerprint
sensor and try the authentication again.
Information
• When you do not use the ngerprint to unlock the screen of the
terminal, set "Fingerprint unlock" to OFF on the ngerprint scanner
screen.
• When the security is not registered correctly, tap to cancel the
screen lock using the method of unlock when you registered the
ngerprint.
• If ngerprint authentication failed 5 times consecutively, a message
indicating to retry in 30 seconds appears.

115
Settings
Cloudandaccounts
1 From the Home screen, → "Settings" → "Cloud and
accounts"
2 Select a menu item and make settings
Item Description
Galaxy Cloud → P.115
Accounts → P.115
Backup and restore → P.116
Smart Switch Transfer contents such as images,
contacts, messages, etc. from the old
terminal.
GalaxyCloud
Make settings about synchronizing, backing up and restoring data such as
contacts, calender, browser, gallery, etc. To use Galaxy Cloud, signing in to
your Galaxy account is required.
Accounts
1 From the Home screen, → "Settings" → "Cloud and
accounts" → "Accounts"
Item Description
docomo docomo's account is registered in advance.
Add account → P.115
Information
• Set Google account with "Add account" to use Gmail, Google and
Google service.
Settingaccount
1 From the Home screen, → "Settings" → "Cloud and
accounts" → "Accounts" → "Add account"
2 Tap an account you want to add
3 Set according to the onscreen instructions
• For the online services requiring log in such as Facebook, enter mail
address, password, etc. and tap "LOG IN", etc.
Information
• To edit a registered account, delete the account and register again.
• To change items to synchronize, from the Home screen, → "Settings"
→ "Cloud and accounts" → "Accounts" → Tap an account type → Tap
an
account to change → Set only items to synchronize to ON.
• To synchronize manually, from the Home screen, → "Settings" →
"Cloud and accounts" → "Accounts" → Tap an account type → Tap an
account to synchronize → → "Sync now".
Galaxyaccount
If the Galaxy account is set, you can use the device remote tracking
service to remotely control the terminal, and synchronize the data between
the terminal and the Galaxy account.
• To set Galaxy account, from the Home screen, → "Settings" → "Cloud
and accounts" → "Accounts" → "Add account" → Tap "Galaxy account" to
follow the onscreen instructions.
• For details on the device remote tracking service, refer to the following
website.
http://findmymobile.samsung.com/(In Japanese only)
Information
• Make sure to note down the password you set when registering a
Galaxy account and not to forget it. If you forget your Galaxy account
password, tap "Forgot your ID or password?", and follow the onscreen
instructions.
117
Settings
Google
Information and settings for Google account and services can be
checked/changed/deleted.
• For details on Google settings, from Google screen, → tap "Help &
feedback" to refer to Help.
1 From the Home screen, → "Settings" → "Google"
The Google setting screen is displayed.
2 Set required items
Accessibility
1 From the Home screen, → "Settings" → "Accessibility"
2 Select a menu item and make settings
Item Description
Vision Voice Assistant Enable user accessibility such as
service with which sound or vibration
responds to your operations and text-
reading service.
Voice Assistant help Perform practice and tutorial of touch
operation.
• Set "Voice Assistant" to ON to use
it.
Dark screen Always turn the screen OFF to
protect privacy.
• Set "Voice Assistant" to ON to set
it.
• Press [Power/Screen lock key]
twice to enable/disable this
function.
Rapid key input Release the nger to make
settings so that you enter selected
characters.
• Set "Voice Assistant" to ON to set
it.
Speak passwords Set whether to read out the entered
password by using Voice Assistant.
• Set "Voice Assistant" to ON to set
it.
Accessibility
shortcut
Set whether to use user accessibility
with a simple operation.
• Press
[Power/Screen lock key]
for 1 second or more until you
hear sound or feel vibration. And
then keep pressing and holding
the screen with two ngers until
you hear voice sound to use the
accessibility function.

118
Settings
Item Description
Vision Voice Label Write voice recording to NFC tag to
provide you with information related
to surrounding objects.
Screen zoom and
font
Set the screen zoom, font size and
font style.
High contrast fonts Adjust the color and outline of fonts.
High contrast
keyboard
Adjust the size of the keyboard and
change its colors.
Show button shapes Display buttons with shaded
backgrounds.
Magnier window Magnify content on the screen.
Magnication
gestures
Set how to magnify screen.
Large mouse/
touchpad pointer
Enlarge the size of mouse and
touchpad pointer.
Grayscale Grayscale the screen color.
Negative colors Invert screen color.
Color adjustment Test color sense to adjust the screen
display in most suitable colors.
Hearing Flash notication Set whether to notify information by
ashing the light.
Mute all sounds Turn OFF all sounds including phone
calls.
Galaxy subtitles (CC) Set and check how to display
subtitles.
Goolge subtitles
(CC)
Left/right sound
balance
Set the balance between left and
right sounds to listen to music by
Media Player with earphones.
Mono audio Switch audio to mono to listen to with
mono ear.
Item Description
Dexterity
and
interaction
Universal switch Control your terminal with your
customized switches.
Assistant menu Enable the function to improve phone
accessibility for users with reduced
dexterity.
Press and hold delay Set the time that the touch panel
detects the touch-and-hold operation.
Click after pointer
stops
Automatically click after the pointer
stops.
Interaction control Set interactable or non-interactable
areas for touching operations.
• To enable this function and set the
operation, touch and hold the volume
DOWN key and [Home key]
at the same time, and follow the
onscreen instructions.
• When using "Split screen view"
(P.44), you cannot enable this
function.
• If this function is enabled, "Auto
rotate" (P.31) turns OFF
automatically.
Text-to-speech Set sound synthesizing engine for
text reading or text reading speed.
Direction lock
Unlock the screen by swiping in
a series of directions. To disable
the setting, from the direction lock
screen, tap "ON" and follow the on-
screen instructions.
Direct access
Set/cancel the accessibility function
by quickly pressing
[Home key]
three times.
Notication reminder
Set whether to notify with vibration
or sound when there are unread
message notications such as SMS,
emails, etc. and the notication
interval.

119
Settings
Item Description
Answering and ending calls Add operation methods to answer
incoming calls, and make settings so
that you can end call by pressing
[Power/Screen lock key].
• If "Press Power key to end calls" is
set to ON and the terminal turns
into sleep mode during a call,
cancel the sleep mode by pressing
[Home key] and end call by
pressing [Power/Screen lock key].
Single tap mode Set whether to operate answering/
declining a call, stopping/snoozing
an alarm, etc by taping instead of
dragging.
Manage accessibility
Import/export: Save (export) the
accessibility settings as a le, and
import a saved le and update the
accessibility settings.
Share via: Share the accessibility
settings via online service, and send
them via Bluetooth function, mail,
etc.
Osusume hint
This is a function that introduces
how to use the terminal according to
the operation or condition of usage.
Information
• If "Voice Assistant" is permitted to use, note that personal information
such as credit card numbers, etc and operations in the user interface
are recorded. Note that DOCOMO is not responsible for data or
information leak.
• If "Voice Assistant" is permitted to use, the touch guide function is
enabled. Touch guide is a function for reading up or displaying an
explanation for an item of your nger position. When the touch guide
function is ON, tap once to select item and then double-tap it for
item selection and scroll with 2 ngers for operation.
• "Voice Assistant" may not work correctly when the Home screen is
set to "docomo LIVE UX".
Generalmanagement
1 From the Home screen, → "Settings" → "General
management"
2 Select a menu item and make settings
Item Description
Language and input → P.119
Date and time → P.120
Contact us This is available for Galaxy members.
Report diagnostic information Set whether to report the diagnostic
information.
Marketing information Set whether to receive the marketing
information
Reset → P.120
Languageandinput
1 From the Home screen, → "Settings" → "General
management" → "Language and input"
Item Description
Language
Set language to use.
Default keyboard
Set the keyboard for the standard use.
Virtual keyboard Make settings about Galaxy Japanese keyboard/
Google voice typing/Moji-Henshu.
Physical
keyboard
Make settings for an external keyboard.
Text-to-speech Set sound synthesizing engine for text reading or
text reading speed.
Pointer speed Set a pointer speed when using mouse/trackpad.

120
Settings
Dateandtime
1 From the Home screen, → "Settings" → "General
management" → "Date and time"
Item Description
Automatic date
and time
Adjust date and time automatically according to online
settings. By default, they are set to be corrected
automatically.
Set date *Set date.
• To set the date manually, turn "Automatic date and
time" OFF and make settings.
Set time *Set the time.
• To set the time manually, turn "Automatic date and
time" OFF and make settings.
Select time zone Set time zone.
• To set the time zone manually, turn "Automatic time
zone" OFF and make settings.
Use 24-hour
format
Switch clock to 24-hour format.
* Date and time information may be adjusted automatically.
Reset
1 From the Home screen, → "Settings" → "General
management" → "Reset"
Item Description
Reset settings
Reset the terminal to the default state except for your
personal data, downloaded apps settings, security,
language and account settings.
Reset network
settings
Reset network settings such as Wi-Fi, mobile data,
Bluetooth, etc.
Factory data reset Reset the terminal to the factory default state.
Item Description
Auto restart
Set whether to have the terminal restart automatically
at the time you set.
The terminal is optimized after it restarts. Any unsaved
data will be lost.

122
File management
Filemanagement
Storagefolderstructure
Phone(Internalstorage)
Main folders in the internal storage (/storage/emulated/0) by default are
as follows.
• Depending on operations on the terminal, displayed folders may dier.
Item Description
Alarms Save music data etc. for alarm sound.
Android Save setting data or temporary les for the system or
apps.
DCIM Save still image/video data shot by the camera and
image data of displayed screen (screen capture) (when
the saving location is set to the terminal).
Download Save data downloaded by the browser.
Movies Save video data.
Music Save music data.
Notications Save music data etc. to set as notication sound.
Pictures Save image data etc.
Playlists Save Playlists data.
Podcasts Save podcast data.
Ringtones Save music data etc. to set as ringtone.
Samsung Save data obtained from Galaxy related site.
microSDcard(externalstorage)
You can attach microSD card to the terminal and use it.
• For details on microSD cards that can be used for this terminal, refer to
"microSD card" (P.24)
.
• For how to attach/remove microSD card, refer to "Attaching microSD
card" (P.24) and "Removing microSD card" (P.25).
Fileoperation
Folderandleoperation
Use "My Files" to display or manage various data such as still images,
videos, music or document saved on the terminal or microSD card.
• Depending on the folders, there are some operations which cannot be
performed such as changing and deleting names, etc.
1 From the Home screen, → "My Files"
2 Tap category/storage → Tap a folder as required
• When you touch and hold a folder/file to mark, the items appear.
Follow the onscreen instructions.
3 Tap a le you want to use
• Display/play the le.
Creatingshortcuts
1 From the Home screen, → "My Files"
2 Tap category/storage
3 Touch and hold folder/le you want to create a shortcut for
→ → "Add shortcut" → "In My Files"/"On Home screen"
DeletingshortcutsonthemainscreeninMyFiles
1 From the Home screen, → "My Files"
2 → "Manage shortcuts" → Select shortcut you want to
delete → "REMOVE"
Creatingafolder
1 From the Home screen, → "My Files"
2 Tap storage → Tap folder as required
3 → "Create folder" → Enter a folder name → "CREATE"

124
Data communication
Datacommunication
Bluetooth
You can transfer data between the terminal and Bluetooth device
wireless.
• For Bluetooth compatible version or prole, see "Main specications"
(P.142).
• For setting or operations, refer to the user manual of Bluetooth device to
connect.
• The terminal does not connect wireless with all types of Bluetooth
devices.
■ Notes on using Bluetooth function
1. Connect the terminal to the other Bluetooth device within
approximately 10 m of vistaed distance. Depending on the
environment (wall, furniture, etc.) or structure of building, available
distance for connecting becomes short.
2. Keep more than approximately 2 m away from the other device
(electronic products, AV equipment, OA equipment etc.) and connect
it. Always keep more than approximately 3 m away from a microwave
oven because it strongly aects the connection when it is operated.
If it is near, the connection may not be established properly when the
other device power on. Or the connection may cause noises on TV or
radio or the image may be distorted.
3. Under strong ambient signals, connection may not be established.
4.
Radio waves emitted by a Bluetooth device may affect electronic
medical equipment. Turn o the terminal and other Bluetooth devices
in a train, aircraft or hospital, near an automatic door or fire alarm,
and at a place where flammable gases are generated such as a gas
station.
■ Reception interference caused by wireless LAN devices
The terminal's Bluetooth function and wireless LAN devices use the
same frequency band (2.4GHz). If you use the terminal near a wireless
LAN device, reception interference may occur or the communications
speed may lo wer. Also , y ou may hear noise or hav e a connecti on
problem. In these cases, do the following:
1. Keep the Bluetooth device over approximately 20 m away from a
wireless LAN device.
2. Within approximately 20 m, turn o either the Bluetooth device or the
wireless LAN device.
■ Bluetooth pass code
Pass code is an authentication code to enter when accessing Bluetooth
devices for the rst time to recognize and permit the connection each
other. Entering the same pass code (up to 16 half-width alphanumeric
characters) on each sending/receiving device is required. Entering may
be required depending on the Bluetooth device.
• On the terminal, pass code may be displayed as "PIN", "passkey".
EnablingBluetoothfunctionandmakingyour
terminaldetectable
1From the Home screen, → "Settings" → "Connections" →
"Bluetooth"
2
Information
• When you do not use Bluetooth function, turn it OFF to save the
battery.
• The setting of the Bluetooth ON/OFF is not changed even when the
power is turned o .
Pairing/ConnectingwithBluetoothdevice
To transfer data between your terminal and other Bluetooth device, perform
paring with the device and register it to the terminal beforehand. And then
perform connection.
•
Depending on Bluetooth device, only pairing may be performed or pairing and
connection may be performed successively
.
• When pairing, entering the passcode (PIN) may be required depending on
the Bluetooth device.
1From the Home screen, → "Settings" → "Connections" →
"Bluetooth"
2• Detected Bluetooth devices are displayed by list.
• If no Bluetooth devices are displayed, tap "Scan" to re-search.
3Tap a device you want to connect
4 Conrm a pass code → "OK"

125
Data communication
Whentheotherdevicerequestsforpairing
When pairing request for Bluetooth communication screen appears, tap
"OK" as required.
Cancelingconnection
On the Bluetooth device list, tap a connected device.
Cancelingpairing
1 From the Home screen, → "Settings" → "Connections" →
"Bluetooth"
2 of a device you want to cancel → "Unpair"
Sending/ReceivingdataviaBluetooth
• Set the Bluetooth function to ON beforehand to be detectable.
SendingdataviaBluetooth
You can send contacts (contact data in vcf format) or les such as still
images or videos, etc. to a device (PC etc.) compatible with Bluetooth.
• For sending, perform the operation from the menu such as "Share" or
"Send" of each app.
ReceivingdataviaBluetooth
1 If "File transfer" screen appears, tap "ACCEPT"
• appears on the status bar and data reception starts.
• Reception condition can be checked by the Notication panel.
• After completion of the reception, display Notification panel and tap
"File received" to display the list of received data. Tap data you want
to view/play, you can check received data.
NFCcommunication
NFC is an abbreviation of Near Field Communication that is an international
standard proximity wireless communication method specified by ISO
(International Organization for Standardization). By using reader/writer
function (R/W) or device communication function (P2P), put the terminal
close to NFC tag to receive data, send/receive data to/from other device
equipped with NFC module.
• For holding over the other device, see P.77.
EnablingNFCReader/Writer,P2Pfunction
To send/receive data between the terminal and an NFC equipped
mobile phone etc., turn Reader/Writer, P2P ON.
• When "Android Beam" is set to ON, you can send/receive contents such
as web pages or contacts to/from a device with P2P function installed.
1 From the Home screen, → "Settings" → "Connections" →
"NFC/Osaifu-Keitai settings" → "Reader/Writer, P2P"
2 • To use Android Beam, tap "Android Beam" on "NFC/Osaifu-Keitai
settings" screen → .
Sending/Receivingdata
1 Display a content to send on the terminal/recipient device
2 Put marks of the terminal and the recipient device closer
3 Tap a screen on the terminal/perform sending operation on
the recipient device
• The content is sent/received.
• If the app selection screen appears, select an app to use.
Information
• If you perform sending operations from the terminal and the other
device at the same time, sending may fail.
• While the screen is locked, NFC tag information cannot be sent/
received.
• When NFC/Osaifu-Keitai Lock is set, Android Beam cannot be used.
• For some apps, Android Beam is unavailable.
• Actual communications are not guaranteed for all devices equipped
with Reader/Writer, P2P.
Specyfikacje produktu
| Marka: | Samsung |
| Kategoria: | telefon |
| Model: | Galaxy Feel |
Potrzebujesz pomocy?
Jeśli potrzebujesz pomocy z Samsung Galaxy Feel, zadaj pytanie poniżej, a inni użytkownicy Ci odpowiedzą
Instrukcje telefon Samsung

4 Października 2024
5 Września 2024
24 Sierpnia 2024
22 Sierpnia 2024
20 Sierpnia 2024
20 Sierpnia 2024
17 Sierpnia 2024
16 Sierpnia 2024
14 Sierpnia 2024
13 Sierpnia 2024
Instrukcje telefon
- telefon Sony
- telefon Yamaha
- telefon Gamdias
- telefon AEG
- telefon LG
- telefon Motorola
- telefon Logitech
- telefon Xiaomi
- telefon MyPhone
- telefon Huawei
- telefon TCL
- telefon Pioneer
- telefon Lenovo
- telefon Philips
- telefon Plantronics
- telefon SilverCrest
- telefon Acer
- telefon Realme
- telefon Xblitz
- telefon Gigaset
- telefon JBL
- telefon Roland
- telefon Geemarc
- telefon Nokia
- telefon Infiniton
- telefon Panasonic
- telefon Crestron
- telefon Asus
- telefon Medion
- telefon TRENDnet
- telefon Audioline
- telefon Marquant
- telefon Toshiba
- telefon D-Link
- telefon Alcatel-Lucent
- telefon Yealink
- telefon GE
- telefon Blaupunkt
- telefon Profoon
- telefon Siemens
- telefon Evolveo
- telefon Grundig
- telefon Alcatel
- telefon Honor
- telefon Mikrotik
- telefon Viking
- telefon Cisco
- telefon Scosche
- telefon ZTE
- telefon Lindy
- telefon MaxCom
- telefon Bang & Olufsen
- telefon Flex
- telefon ZyXEL
- telefon Trust
- telefon Linksys
- telefon Oricom
- telefon Oppo
- telefon Dartel
- telefon Vimar
- telefon Kyocera
- telefon Krüger&Matz
- telefon Renkforce
- telefon Marshall
- telefon Uniden
- telefon Netgear
- telefon Thomson
- telefon AVM
- telefon BT
- telefon Pyle
- telefon CTA Digital
- telefon Apple
- telefon Sennheiser
- telefon Jabra
- telefon Vtech
- telefon Emporia
- telefon Draytek
- telefon TriStar
- telefon Bogen
- telefon Avaya
- telefon AirLive
- telefon Audio-Technica
- telefon EnGenius
- telefon SPC
- telefon Planet
- telefon NEC
- telefon Parrot
- telefon Prestigio
- telefon LevelOne
- telefon Telefunken
- telefon Oregon Scientific
- telefon OnePlus
- telefon Olympia
- telefon Hama
- telefon Mackie
- telefon Microsoft
- telefon Marmitek
- telefon Ubiquiti Networks
- telefon MXL
- telefon Sagemcom
- telefon Loewe
- telefon Clarity
- telefon HTC
- telefon Akuvox
- telefon CAT
- telefon Denver
- telefon Anker
- telefon Hitachi
- telefon Cortelco
- telefon AVerMedia
- telefon RCA
- telefon Trevi
- telefon Lexibook
- telefon Overmax
- telefon Topcom
- telefon Grandstream
- telefon Sencor
- telefon Tador
- telefon Binatone
- telefon Allview
- telefon Oukitel
- telefon XD Enjoy
- telefon Snom
- telefon Crosley
- telefon Tecdesk
- telefon KPN
- telefon Swissvoice
- telefon Fenton
- telefon Lewitt
- telefon Fysic
- telefon Wiko
- telefon Aastra
- telefon Amplicomms
- telefon AGFEO
- telefon Airis
- telefon Amplicom
- telefon Archos
- telefon Crosscall
- telefon Ascom
- telefon Proximus
- telefon BeeWi
- telefon GPO
- telefon Sitecom
- telefon Logik
- telefon Fortinet
- telefon Doro
- telefon Sagem
- telefon Sunstech
- telefon Sylvania
- telefon Patton
- telefon Jacob Jensen
- telefon Nordmende
- telefon Blackberry
- telefon Steren
- telefon Envivo
- telefon Belgacom
- telefon Auerswald
- telefon ArtDio
- telefon Teledex
- telefon Valcom
- telefon Switel
- telefon Chacon
- telefon RugGear
- telefon Innovaphone
- telefon AT&T
- telefon Sweex
- telefon Hagenuk
- telefon Essentiel B
- telefon Logicom
- telefon Peaq
- telefon MT Logic
- telefon Mitel
- telefon Ranex
- telefon T-Mobile
- telefon Fanvil
- telefon Spectralink
- telefon Gigaset Pro
- telefon Vogtec
- telefon VXi
- telefon Tiptel
- telefon Unify
- telefon Yeastar
- telefon Edenwood
- telefon Telstra
- telefon JPL
- telefon Premier
- telefon OpenVox
- telefon CSL
- telefon Liam&Daan
- telefon HUMANTECHNIK
- telefon Polycom
- telefon Dnake
- telefon Primare
- telefon Neat
- telefon Syco
- telefon Edge-Core
- telefon ClearOne
- telefon SMC
- telefon Pixel
- telefon Legrand
- telefon Digium
- telefon Davolink
- telefon KONFTEL
- telefon Mitsai
- telefon POCO
- telefon Clear Sounds
- telefon ALLO
- telefon On-Q
- telefon Canyon
- telefon Tecno
- telefon Olitech
- telefon Dopod
- telefon Hamlet
- telefon Sedna
- telefon Cubot
- telefon AudioCodes
- telefon 3Com
- telefon British Telecom
- telefon CyberData Systems
- telefon Bintec-elmeg
- telefon Wantec
- telefon Algo
- telefon Future Call
- telefon 4family
- telefon Ooma
- telefon FlyingVoice
- telefon HMD
- telefon EMeet
- telefon Cyber Acoustics
Najnowsze instrukcje dla telefon

3 Kwietnia 2025

30 Marca 2025
29 Marca 2025
18 Marca 2025
5 Marca 2025
5 Marca 2025
5 Marca 2025
5 Marca 2025
1 Marca 2025
1 Marca 2025