Instrukcja obsługi Ozito EPP-751
Ozito
nożyce do żywopłotu
EPP-751
Przeczytaj poniżej 📖 instrukcję obsługi w języku polskim dla Ozito EPP-751 (8 stron) w kategorii nożyce do żywopłotu. Ta instrukcja była pomocna dla 7 osób i została oceniona przez 2 użytkowników na średnio 4.5 gwiazdek
Strona 1/8

3/8” LP
33
3/8” LP33
TELESCOPIC
POLE PRUNER
750W 200MM
INSTRUCTION MANUAL
SPECIFICATIONS
Input Power: 750W
No Load Speed: 5,800/min
Chain Speed: 11m/s
Bar Length: 200mm
Telescopic Range: 1.80-2.56m
Max. Cutting Width: 180mm
Oil Tank: 100ml
Noise Rating: 100dB
Weight: 3.10kg
EPP-751
STANDARD EQUIPMENT
3 YEAR REPLACEMENT WARRANTY*
Your product is guaranteed for a period of 36 months from the original date of purchase. If
a product is defective it will be replaced in accordance with the terms of this warranty. Warranty
excludes consumable parts, for example: bearings, guide bar & chain.
*This product is intended for DIY use only and replacement warranty covers domestic use.
WARNING
The following actions will result in the warranty being void.
• If the tool has been operated on a supply voltage other than that specified on the machine.
• If the tool shows signs of damage or defects caused by or resulting from abuse, accidents
or alterations.
• Failure to perform maintenance as set out within the instruction manual.
• If the tool is disassembled or tampered with in any way.
• Professional, industrial or high frequency use.
WARRANTY
Ozito Industries Pty. Ltd. 25 Fox Drive, Dandenong South, Victoria, Australia 3175.
ozito.com.au
Telescopic Pole Pruner
Chain & Bar
0922
IN ORDER TO MAKE A CLAIM UNDER THIS WARRANTY
YOU MUST RETURN THE PRODUCT TO YOUR NEAREST
BUNNINGS WAREHOUSE WITH YOUR BUNNINGS
REGISTER RECEIPT. PRIOR TO RETURNING YOUR
PRODUCT FOR WARRANTY PLEASE TELEPHONE OUR
CUSTOMER SERVICE HELPLINE:
Australia: 1800 069 486
New Zealand: 0508 069 486
The benefits provided under this warranty are in addition to other rights and remedies which
are available to you at law.
Our goods come with guarantees that cannot be excluded at law. You are entitled to a
replacement or refund for a major failure and for compensation for any other reasonably
foreseeable loss or damage. You are also entitled to have the goods repaired or replaced if the
goods fail to be of acceptable quality and the failure does not amount to a major failure.
Generally you will be responsible for all costs associated with a claim under this warranty,
however, where you have suffered any additional direct loss as a result of a defective product
you may be able to claim such expenses by contacting our customer service helpline above.
TO ENSURE A SPEEDY RESPONSE PLEASE HAVE
THE MODEL NUMBER AND DATE OF PURCHASE
AVAILABLE. A CUSTOMER SERVICE REPRESENTATIVE
WILL TAKE YOUR CALL AND ANSWER ANY QUESTIONS
YOU MAY HAVE RELATING TO THE WARRANTY POLICY
OR PROCEDURE.
Shoulder Strap
Guide Bar Cover

3/8” LP
33
3/8” LP
33
Cutter
Sprocket
3/8” LP
33
Fitting the guide bar and chain
1. Loosen the chain cover lock and remove the chain sprocket
cover.
1. Chain
2. Guide bar
3. Chain sprocket cover
4. Motor housing
5. Telescopic tube collar
6. Main tube
7. Shoulder strap retainer
8. Soft grip handle
9. Rear handle
10. Oil tank cap
11. Chain tension dial
12. Chain cover lock
13. Safety switch
14. Extension cord retainer
15. Trigger switch
16. Guide bar cover
17. Shoulder strap
TELESCOPIC POLE PRUNER
ACCESSORIES
KNOW YOUR PRODUCT
1. CHAIN & BAR ASSEMBLY
SETUP & PREPARATION
1
2
3
4
8
9
5
10 11 12
6
7
WARNING! ENSURE THE MACHINE IS TURNED OFF AND
DISCONNECTED FROM THE POWER SUPPLY BEFORE
PERFORMING ANY OF THE FOLLOWING OPERATIONS.
ONLINE MANUAL
Scan this QR Code with your mobile
device to take you to the online manual.
13
14 15
WARNING! THE CHAIN HAS SHARP EDGES, FOR YOUR
OWN SAFETY, PLEASE USE WORK GLOVES. NEVER
TOUCH THE CHAIN OR SERVICE THE UNIT WITH THE
POWER SUPPLY CONNECTED.
2. Place the chain in the groove of the guide bar as shown.
Refer to the image printed on the guide bar that indicates the
direction that the chain should face.
WARNING! IF THE CHAIN IS INSTALLED BACKWARDS
(CHAIN CUTTERS FACING IN THE OPPOSITE DIRECTION
OF ROTATION) THE POLE PRUNER WILL VIBRATE
EXCESSIVELY AND NOT CUT.
3. Place the guide bar and chain onto the mount, ensuring that the
chain sits around the chain sprocket.
4. Re-mount the chain sprocket cover and softly-tighten the chain
cover lock.
NOTE: Only tighten the chain cover lock securely once the chain
tension has been adjusted (see: Tensioning the chain).
7
16
17
3/8” LP
33
3/8” L P
33
3/8” LP
33
3/8” LP
33
MIN
3/8” LP
33
MIN
3/8” LP
33
MIN
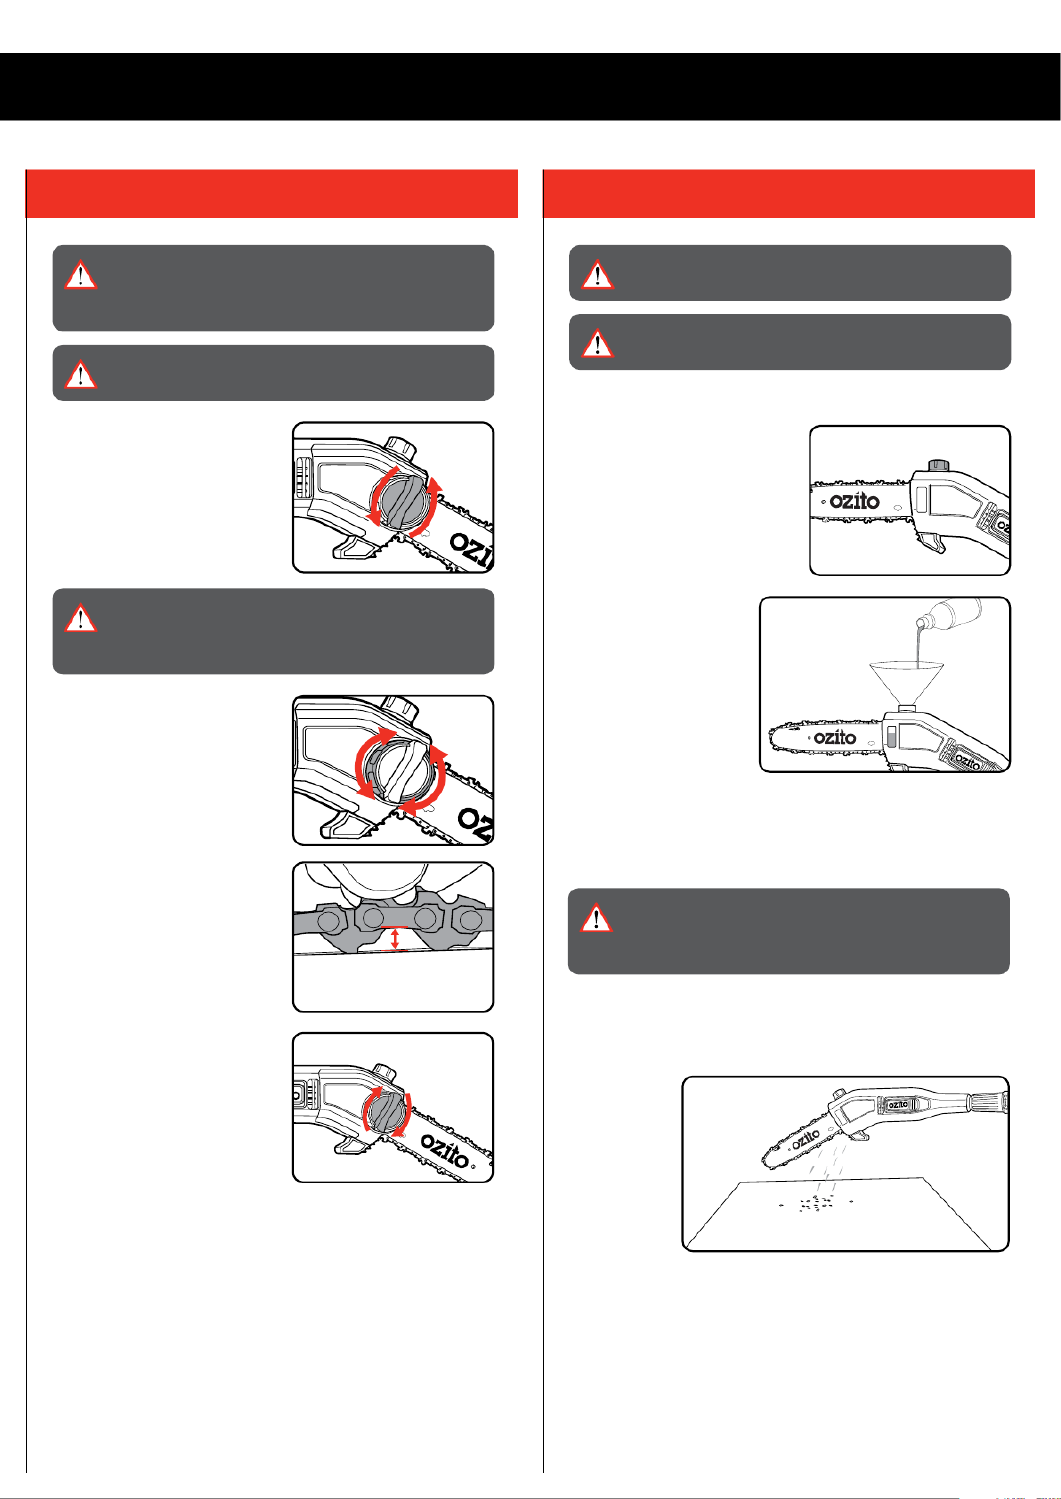
2. TENSIONING THE CHAIN 3. LUBRICATION OF THE CHAIN & GUIDE BAR
WARNING! THE CHAIN HAS SHARP EDGES, FOR YOUR
OWN SAFETY, PLEASE USE WORK GLOVES. NEVER
TOUCH THE CHAIN OR SERVICE THE UNIT WITH THE
POWER SUPPLY CONNECTED.
1. Loosen the chain cover lock. Do
not remove the chain sprocket
cover.
WARNING! IF YOU TRY TO ROTATE THE CHAIN
TENSION DIAL WHILST THE CHAIN COVER LOCK IS
TIGHT, IT WILL RESULT IN THE CHAIN NOT LOOSENING
AND POSSIBLE DAMAGE TO THE MECHANISM.
2. Adjust the chain tension with
the chain tension dial. Turning
the dial CLOCKWISE increases
the chain tension, turning
it COUNTER-CLOCKWISE
decreases the chain tension.
3. For the correct chain tension,
firmly pull up on the chain at
the middle of the top of the
exposed guide bar. When the
chain is pulled up to its highest
point, the bottom tip of the links
should only just stay in the
track [middle of the guide bar]. 3mm gap is the
ideal tension
4. After the chain has been
accurately tensioned, lock
securely the guide bar in place
with the chain cover lock.
5. Check the tension again after
a few minutes of cutting and
several times in the first hour
because the chain will lengthen
as it breaks in. Adjust as you go. A loose chain causes rapid
wear to both the chain and the guide bar and could derail
causing a major safety hazard.
NOTE: Proper tension of the chain is extremely important and
must be checked before starting, as well as during any cutting
operation. Taking the time to make adjustments to the chain will
result in improved cutting performance and prolonged chain life.
WARNING! NEVER START WORK UNLESS THE CHAIN
AND GUIDE BAR ARE LUBRICATED.
1. Place the telescopic pole pruner on a level surface.
2. Clean the area around the oil
tank cap and then open it.
3. Fill the oil tank with
CHAIN AND BAR OIL (not
supplied).
Do not overfill in doing
so, make sure that no
dirt gets into the oil tank.
This will ensure that the
oil nozzle does not clog.
4. Always fill the oil tank
when the oil level is
below the minimum mark on the oil level window. The capacity
of the oil tank is 100ml. Do not overfill.
5. Close the oil tank cap and clean any spillage.
WARNING! THE USE OF THE POLE PRUNER WITHOUT
CHAIN & BAR OIL OR WITH OIL BELOW THE MINIMUM
OIL LEVEL MARK WILL RESULT IN DAMAGE TO THE
CHAIN.
6. To check the lubricating system, switch on the pole pruner and
hold it with the guide bar and chain above some light coloured
paper such as newspaper. A steadily increasing stain caused by
oil spray shows the lubricating system is working.
NOTE: Chain & bar oil may leak if the pole pruner is left for long
periods. This is normal. If left unused for an extended time, drain
the oil from the pole pruner. Refill before use.
WARNING! ONLY USE OIL THAT IS EXPRESSLY
LABELLED “CHAIN & BAR OIL”
WARNING! BEFORE BEGINNING WORK, INSPECT THE
CHAIN. NEVER USE AN OBVIOUSLY DAMAGED CHAIN.
Specyfikacje produktu
| Marka: | Ozito |
| Kategoria: | nożyce do żywopłotu |
| Model: | EPP-751 |
Potrzebujesz pomocy?
Jeśli potrzebujesz pomocy z Ozito EPP-751, zadaj pytanie poniżej, a inni użytkownicy Ci odpowiedzą
Instrukcje nożyce do żywopłotu Ozito

10 Października 2024
4 Października 2024
2 Października 2024
26 Września 2024
26 Września 2024
16 Września 2024
14 Września 2024
13 Września 2024
12 Września 2024
11 Września 2024
Instrukcje nożyce do żywopłotu
- nożyce do żywopłotu Worx
- nożyce do żywopłotu Honda
- nożyce do żywopłotu Milwaukee
- nożyce do żywopłotu Stihl
- nożyce do żywopłotu Bosch
- nożyce do żywopłotu Parkside
- nożyce do żywopłotu Cramer
- nożyce do żywopłotu Stiga
- nożyce do żywopłotu Kärcher
- nożyce do żywopłotu MacAllister
- nożyce do żywopłotu Stanley
- nożyce do żywopłotu Black & Decker
- nożyce do żywopłotu Scheppach
- nożyce do żywopłotu Grizzly
- nożyce do żywopłotu Gardena
- nożyce do żywopłotu DeWalt
- nożyce do żywopłotu Einhell
- nożyce do żywopłotu Remington
- nożyce do żywopłotu Hyundai
- nożyce do żywopłotu Husqvarna
- nożyce do żywopłotu Makita
- nożyce do żywopłotu Fuxtec
- nożyce do żywopłotu RYOBI
- nożyce do żywopłotu NAC
- nożyce do żywopłotu Wolf Garten
- nożyce do żywopłotu Eurogarden
- nożyce do żywopłotu Handy
- nożyce do żywopłotu DEDRA
- nożyce do żywopłotu Garden Feelings
- nożyce do żywopłotu Baumr-AG
- nożyce do żywopłotu Sovereign
- nożyce do żywopłotu CMI
- nożyce do żywopłotu Sterwins
- nożyce do żywopłotu Trotec
- nożyce do żywopłotu Meec Tools
- nożyce do żywopłotu AL-KO
- nożyce do żywopłotu Güde
- nożyce do żywopłotu Texas
- nożyce do żywopłotu ATIKA
- nożyce do żywopłotu Bavaria
- nożyce do żywopłotu Zipper
- nożyce do żywopłotu Flymo
- nożyce do żywopłotu Florabest
- nożyce do żywopłotu Hanseatic
- nożyce do żywopłotu Solo
- nożyce do żywopłotu Ferrex
- nożyce do żywopłotu Brandson
- nożyce do żywopłotu Ergotools Pattfield
- nożyce do żywopłotu Ferm
- nożyce do żywopłotu Hitachi
- nożyce do żywopłotu Craftsman
- nożyce do żywopłotu Fieldmann
- nożyce do żywopłotu Homelite
- nożyce do żywopłotu Shindaiwa
- nożyce do żywopłotu Gardenline
- nożyce do żywopłotu PowerPlus
- nożyce do żywopłotu Vonroc
- nożyce do żywopłotu Spear & Jackson
- nożyce do żywopłotu HiKOKI
- nożyce do żywopłotu McCulloch
- nożyce do żywopłotu Proviel
- nożyce do żywopłotu Metabo
- nożyce do żywopłotu Bestgreen
- nożyce do żywopłotu Hoberg
- nożyce do żywopłotu EGO
- nożyce do żywopłotu Cotech
- nożyce do żywopłotu Skil
- nożyce do żywopłotu Cocraft
- nożyce do żywopłotu Greenworks
- nożyce do żywopłotu Yellow Garden Line
- nożyce do żywopłotu Challenge
- nożyce do żywopłotu Alpina
- nożyce do żywopłotu Powerworks
- nożyce do żywopłotu Tel Sell
- nożyce do żywopłotu Sun Joe
- nożyce do żywopłotu Tanaka
- nożyce do żywopłotu Troy-Bilt
- nożyce do żywopłotu Topcraft
- nożyce do żywopłotu Martha Stewart
- nożyce do żywopłotu Gamma
- nożyce do żywopłotu Kress
- nożyce do żywopłotu Dolmar
- nożyce do żywopłotu McGregor
- nożyce do żywopłotu Qualcast
- nożyce do żywopłotu Varo
- nożyce do żywopłotu Pattfield
- nożyce do żywopłotu Kibani
- nożyce do żywopłotu Echo
- nożyce do żywopłotu Maruyama
- nożyce do żywopłotu Grouw
- nożyce do żywopłotu Batavia
- nożyce do żywopłotu Gtech
- nożyce do żywopłotu Levita
- nożyce do żywopłotu Efco
- nożyce do żywopłotu Black Decker
- nożyce do żywopłotu Gartenmeister
- nożyce do żywopłotu Lux Tools
- nożyce do żywopłotu Verto
- nożyce do żywopłotu Anova
- nożyce do żywopłotu Hurricane
- nożyce do żywopłotu Budget
- nożyce do żywopłotu Challenge Xtreme
- nożyce do żywopłotu Deltafox
- nożyce do żywopłotu Palmera
- nożyce do żywopłotu Yardforce
- nożyce do żywopłotu Powerpeak
- nożyce do żywopłotu Toledo
- nożyce do żywopłotu Kaaz
- nożyce do żywopłotu Garden Groom
- nożyce do żywopłotu Mr Gardener
- nożyce do żywopłotu Kingcraft
- nożyce do żywopłotu Mac Allister
- nożyce do żywopłotu Jonsered
- nożyce do żywopłotu Robust
- nożyce do żywopłotu LawnMaster
- nożyce do żywopłotu G-Technology
- nożyce do żywopłotu Maxbear
- nożyce do żywopłotu Turbo-Silent
Najnowsze instrukcje dla nożyce do żywopłotu
5 Kwietnia 2025
5 Kwietnia 2025
3 Kwietnia 2025
3 Kwietnia 2025
3 Kwietnia 2025

31 Marca 2025
30 Marca 2025
30 Marca 2025
30 Marca 2025

30 Marca 2025