Instrukcja obsługi One For All Evolve 2
One For All
Zdalne sterowanie
Evolve 2
Przeczytaj poniżej 📖 instrukcję obsługi w języku polskim dla One For All Evolve 2 (2 stron) w kategorii Zdalne sterowanie. Ta instrukcja była pomocna dla 7 osób i została oceniona przez 2 użytkowników na średnio 4.5 gwiazdek
Strona 1/2

B SET UP BY CODE
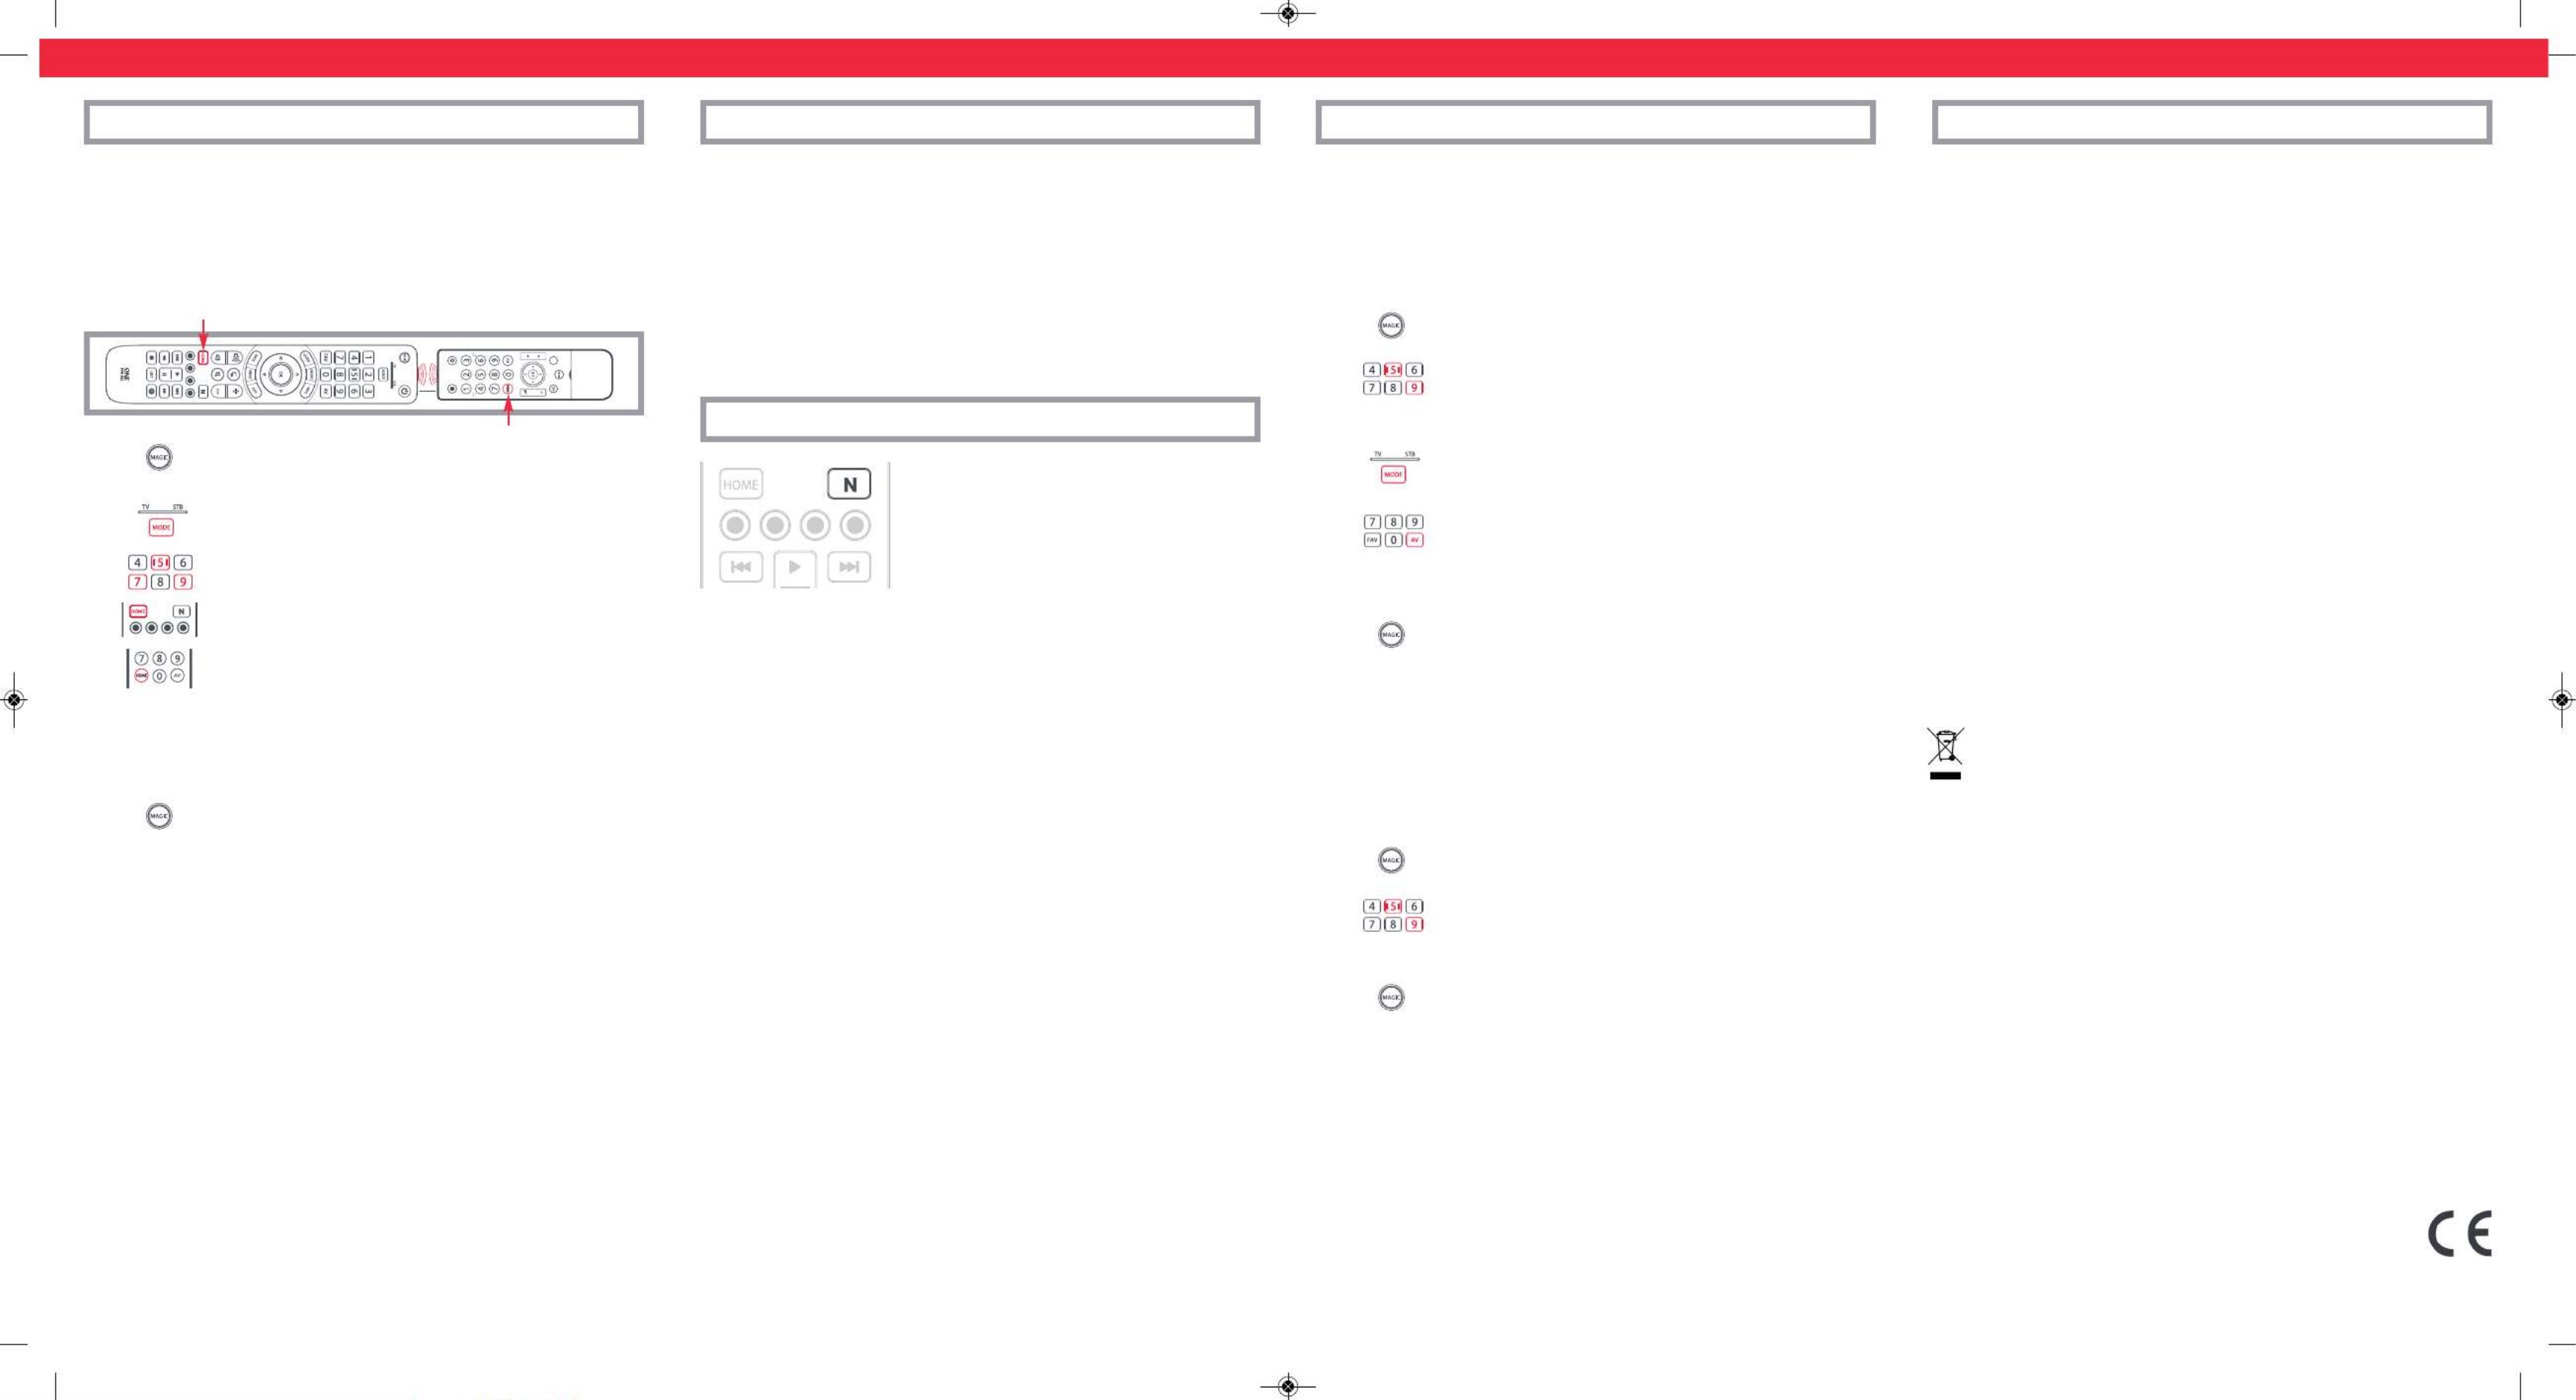
HOW TO SET UP YOUR REMOTE
If your brand is not listed in section A, you can set up your device by trying codes individually.
To do this:
1. Turn your device on (not on standby).
2. Locate the brand of your device in the code list (pages 126-137). Codes
are listed by Device Type and Brand.
3. Hold down MAGIC until the LED under the device blinks twice. The LED
under the current device will stay lit.
4. Press the MODE key repeatedly until the LED for the device you want to
set up is lit.
5. Enter the rst 4 digit code listed for your brand (e.g. 4542 for a Aiwa TV).
6. The LED will blink twice and go out.
7. Now aim the remote towards your device and press the POWER key.
8. If the device turns o, your remote is ready to use. If not, repeat steps 3-7 with the next code
in the list.
• Some codes are quite similar. If you nd that one or more keys do not operate as you expect,
try again from step 3 with the next code in the list.
ESPAÑOL
URC7125
SIMPLE SET UP GUIDE
ENGLISH
Open the battery door.
Insert 2 AAA batteries.
ENGLISH
KEY TABLE
HOW TO SET UP YOUR REMOTE
A – SIMPLESET
SimpleSet is a quick and easy way of setting up the remote to control the most popular brands of
each device type with only a few key presses, typically in under a minute per device. The rst step
is to select which device you are going to set up. The following is a list of Device Modes on the
remote control, and the Device types that can be set up on that mode:
Device Mode Type of device
TV TV, HDTV, LED, LCD, Plasma, Projector
STB Set Top Box, Satellite Receiver, Cable Converter,
Freeview, DVB-T, IPTV, Media, Streamer
For each Device type, there is a list of the top brands, each with a number assigned to it,
for example 6 for a Samsung TV. Locate your device and brand in the list that follows:
TV
1Bush
2Grundig
3LG
4Panasonic
5Philips
6Samsung
7Sharp
8Sony
9TCL / Thomson
0Toshiba
STB: Sat, Cable, DVB-T
1BSkyB / Sky Ireland / Orange
2Canal+ / CanalSat / Telefonica /
Movistar / KPN
3TechniSat
4DStv / Multichoice / Foxtel / Sky New
Zealand
5freebox / Vu+ / Deutsche Telekom /
T-Home
6Humax / Tricolor TV
7Vodafone / Kabel Deutschland
8Sky Italia / SFR / Neuf TV
9Sky Deutschland / Österreich
0UPC / Cablecom / Ziggo / Virgin Media /
Telenet
MAGIC: Used to set up
your remote
+/-: Channel Up and Down
MENU: Show the menu of
the current device
EXIT: Exit from the Menu of
the current device
AV: Select the input on
the current device
INFO: Displays info of
current playback
POWER:
Power on/o
PP: Previous Program, Last
Channel
NETTV: NETTV, Netix
Red, Green, Yellow, Blue –
Fastext/Quick access keys
PLAYBACK: Playback keys
for the current device
MODE: Scroll through
the devices your remote is
set up to control
WATCH TV: Combines TV and
STB into one mode
for TV viewing
FAV: Favourite Channels
GUIDE: TV Guide, EPG
SMART: Access internet
and Smart features
of your TV or internet-
connected device
BACK: Back one step in
the Menu of the current device
VOL: Volume Up, Down and
Mute
HOME: Displays the Home
Menu
LIST: Displays a list of
recorded programmes
A – SIMPLESET
HOW TO SET UP YOUR REMOTE
To set up your device
1. Turn on your device (not on standby) and point the OFA remote towards it.
2. Hold down MAGIC until the LED under the device blinks twice. The LED
under the current device will stay lit.
3. Press the MODE key repeatedly until the LED for the device you want to
set up is lit.
4. Hold down the digit for your brand and device as listed above (e.g. 6 for
Samsung TV).
5. The remote will send Power every 3 seconds until your device switches o.
6. As soon as your device switches o, release the digit.
7. The LED will blink twice and go out. The remote should now operate your device.
• If you nd one or more keys do not work as you expect, start again at step 1 – the remote will
start with the next code in the memory.
Evolve_2_QSG_UK_URC7125_711733_RDN1010519.qxp_Opmaak 1 01-05-19 17:11 Pagina 1
LEARNING
Your One For All remote control can learn any function from any other working remote control.
This can be useful if you are missing one or more functions from your original remote control and
would like to add them to the ONE FOR ALL. You can learn onto any key except MAGIC or MODE.
You can also learn a complete device if you can’t nd a code.
To learn, rstly make sure you have all your original remote controls to hand, and that they have
working batteries in. To learn functions, the original remote should be approximately 3cm from
the OFA remote, pointing towards it as shown below:
1. Hold down MAGIC until the LED under the device blinks twice.
The LED under the current device will stay lit.
2. Press the MODE key repeatedly until the LED for the device you want to
learn functions on is lit.
3. Press 975 – the LED will blink twice.
4. Press and release the key you want to learn a function onto (for example
the HOME key) – The red LED will blink continuously.
5. Press and release the key on the original remote.
6. The LED will blink twice to indicate the key has been learned correctly.
7. Repeat steps 4 and 5 for each key you want to learn – remember you can learn from multiple
remotes, but only one function per key.
8. When you learned all the functions you require, press and hold the
MAGIC key until the LED blinks twice and turns o.
HINTS
• If the LEDs shows one long blink at step 6, the function was not learned correctly, please try
again from step 4.
• If you nd one or more keys don’t work properly after set up, you can re-enter the learning
mode at any time by repeating the procedure from step 1.
TO DELETE A LEARNED FUNCTION, THE PROCEDURE IS:
1. Hold down MAGIC until the LED under the device blinks twice.
The LED under the current device will stay lit.
2. Using the MODE key, make sure the LED for the device you want to delete functions
from is lit.
3. Press 976 – the LED will blink twice
4. Press the key to delete twice – the LED will blink twice.
Repeat the above procedure for each key you want to delete.
ACTIVITIES
The Watch TV feature combines TV and STB into a single mode. In this mode the Volume and AV
keys will control the TV, and the rest of the keys will control the STB.
As the AV key is intended to select the input on your TV and most TVs use a menu to select from a
list of inputs, when the AV key is pressed in Watch TV Mode, the Menu Up, Down, Left, Right and
OK keys temporarily control the TV. If the OK key is pressed, or no key is pressed for ten seconds,
these keys will revert to controlling the STB.
If you hold down the Power key for 2 seconds in Watch TV Mode, the remote will send the Power
function for TV and STB.
MACROS
PROGRAM A MACRO
You can program any key on your OFA remote (except MAGIC or MODE) to send multiple
commands on a single press –a Macro. This can be useful for controlling multiple devices to put
them in a certain state – for instance you could put your TV on HDMI 1 and press Power on the
Set Top Box to start watching TV.
To program a macro, the procedure is as follows:
1. Hold down MAGIC until the LED under the device blinks twice.
The LED under the current device will stay lit.
2. Press 995 – the LED will blink twice.
3. Next select the key you want to program the Macro on.
4. Now use the MODE key to select the device you want the rst function
of the Macro to come from, for example TV.
5. Next, press the key you want to include in the Macro, for example the
AV key.
6. Repeat steps 4 (if necessary) and 5 to add more keys to the Macro. You can include up to 15
key presses .
7. To store the Macro, hold down the MAGIC key until the LED blinks twice.
• If the LED shows a long blink when you press a key in steps 4 or 5, you have entered too
many keys, please try again.
DELETING A MACRO
If you want to remove a macro from a key, please perform the following:
1. Hold down MAGIC until the LED under the device blinks twice. The LED
under the current device will stay lit.
2. Press 995 – the LED will blink twice.
3. Press the key the macro is programmed on.
4. Now hold down the MAGIC key until the LED blinks twice – the Macro is
deleted.
VOLUME LOCK
If you always use one device to control volume, for example your TV, you can set up the One For
All to always control that device, regardless of which device your remote is controlling. To do this:
1. Hold down MAGIC until the LED under the device blinks twice. The LED under the current
device will stay lit.
2. Press 993 – the LED will blink twice.
3. Use the MODE key to select the Device you want to lock the Volume to.
4. Press MAGIC once – the LED will blink twice and volume is now locked.
To unlock the volume and set every device back to controlling its own volume, the procedure is:
1. Hold down MAGIC until the LED under the TV key blinks twice. The LED under the current
mode key will stay lit.
2. Press 993 – the LED will blink twice.
3. Press VOLUME UP – the LED will blink twice and Volume is now unlocked.
Universal Electronics BV
Europe & International
Colosseum 2, 7521 PT Enschede
The Netherlands
URC7125
711733
RDN-1010519
2 - 5 CM
THE NETTV FEATURE
The Evolve features a “NETTV” key for viewing digital TV,
streamed over the internet. If your original remote control
already had a key for this - for example many newer TVs have
a Netix key - then this key will perform exactly the same as
the key on your original remote. However if you did not have
a key like this, but still had the ability to watch a streaming
service, you can use this key as a shortcut by programming a
macro on it. Most AV devices which are connected to the internet, such as Smart TVs or streaming
Set Top Boxes have one or more applications they can run to access TV viewing via the internet.
Examples of these would be Netix, YouTube, Amazon Prime, BBC iPlayer or similar.
To program the macro, you rst need to know the device you use to access the service, and then
the sequence of keys you need to press to always bring up the service you prefer, For example,
some Panasonic TVs will start Netix by pressing the Apps key, then Menu Down Twice, and
nally the OK key. Or on an Apple TV, the sequence is Menu, Menu Down and OK.
Once you have determined the sequence for your device, follow these steps:
1. Sit in front of your device with It switched on (not on standby)
2. Hold down the NETTV key until the LED blinks twice and stays lit
3. Use the MODE key to select the device you want to use for the NETTV macro (e.g. TV)
4. Now perform the sequence of keys exactly as would normally. The remote will operate your
device and the macro is recorded in real time - so if it normally takes a few seconds for your
device to react don’t worry.
5. One you have nished the sequence - and the Streaming Service has started on your device -
hold down the NETTV key until the LED blinks twice and goes out. The macro is now stored.
Tips
• Make sure the Evolve Is operating the device in question before programming
If you nd the Macro doesn’t work as expected, you can just repeat the same sequence
to reprogram
• When programming, wait for your device to respond rst, the remote will remember
the timing
• The NETTV macro is tied to one device, remember to make sure you are watching
the correct device.
English - PRODUCT DISPOSAL
This product bears the selective sorting symbol for waste electrical and electronic equipment
(WEEE). This means that this product must be handled pursuant to European directive
2012/19 / EU in order to be recycled or dismantled to minimize its impact on the
environment.
User has the choice to give this product to a competent recycling organization or to the retailer
when user buys a new electrical or electronic equipment.
BATTERY DISPOSAL
(EUROPEAN DIRECTIVE 2006/66/EC)
Please do not dispose your batteries with your normal household waste but inform yourself about
the local separate collection for empty batteries to dispose them correctly. This will help preventing
potential negative eects on the environment and/or human health.
UNIVERSAL ELECTRONICS INC/ONE FOR ALL warrants to the original purchaser that this product
will be free from defects in materials and workmanship under normal and correct use for a period
of one (1) year from the date of original purchase. This product will be replaced free of charge if it
has been proven to be defective within the one (1) year warranty period. This warranty does not
cover cartons, carrying cases, batteries, broken or marred cabinets or any other item used in con-
nection with the product. Any further obligation than listed above is excluded. Please notice that
we need your purchase receipt so that we may establish your eligibility for service. If you have
bought this product for purposes which are not related to your trade, business or profession, please
remember that you may have legal rights under your national legislation governing the sale of con-
sumer goods. This guarantee does not aect those rights.
www.oneforall.com
Evolve_2_QSG_UK_URC7125_711733_RDN1010519.qxp_Opmaak 1 01-05-19 17:11 Pagina 5
Specyfikacje produktu
| Marka: | One For All |
| Kategoria: | Zdalne sterowanie |
| Model: | Evolve 2 |
Potrzebujesz pomocy?
Jeśli potrzebujesz pomocy z One For All Evolve 2, zadaj pytanie poniżej, a inni użytkownicy Ci odpowiedzą
Instrukcje Zdalne sterowanie One For All

14 Stycznia 2025
14 Grudnia 2024
28 Września 2024
22 Września 2024
21 Września 2024
20 Września 2024
19 Września 2024
17 Września 2024
16 Września 2024
12 Września 2024
Instrukcje Zdalne sterowanie
- Zdalne sterowanie Sony
- Zdalne sterowanie Yamaha
- Zdalne sterowanie Ikea
- Zdalne sterowanie Samsung
- Zdalne sterowanie PeakTech
- Zdalne sterowanie AEG
- Zdalne sterowanie LG
- Zdalne sterowanie Motorola
- Zdalne sterowanie Logitech
- Zdalne sterowanie Spektrum
- Zdalne sterowanie BeamZ
- Zdalne sterowanie Pioneer
- Zdalne sterowanie Milwaukee
- Zdalne sterowanie Philips
- Zdalne sterowanie SilverCrest
- Zdalne sterowanie Technics
- Zdalne sterowanie Parkside
- Zdalne sterowanie Hikvision
- Zdalne sterowanie Onkyo
- Zdalne sterowanie Edision
- Zdalne sterowanie Miele
- Zdalne sterowanie Geemarc
- Zdalne sterowanie Bose
- Zdalne sterowanie EZVIZ
- Zdalne sterowanie Conceptronic
- Zdalne sterowanie Panasonic
- Zdalne sterowanie Canon
- Zdalne sterowanie Crestron
- Zdalne sterowanie Nedis
- Zdalne sterowanie Nexa
- Zdalne sterowanie American DJ
- Zdalne sterowanie Medion
- Zdalne sterowanie Toshiba
- Zdalne sterowanie Majestic
- Zdalne sterowanie Jensen
- Zdalne sterowanie Ardes
- Zdalne sterowanie Garmin
- Zdalne sterowanie Iiyama
- Zdalne sterowanie Metra
- Zdalne sterowanie Dual
- Zdalne sterowanie Grundig
- Zdalne sterowanie Hegel
- Zdalne sterowanie Honeywell
- Zdalne sterowanie Chauvet
- Zdalne sterowanie Strong
- Zdalne sterowanie Tripp Lite
- Zdalne sterowanie Steinel
- Zdalne sterowanie Nikon
- Zdalne sterowanie HeiTech
- Zdalne sterowanie Cisco
- Zdalne sterowanie Smart
- Zdalne sterowanie ORNO
- Zdalne sterowanie Kenwood
- Zdalne sterowanie Scosche
- Zdalne sterowanie DJI
- Zdalne sterowanie Alpine
- Zdalne sterowanie Natec
- Zdalne sterowanie Uni-T
- Zdalne sterowanie Chamberlain
- Zdalne sterowanie Bang & Olufsen
- Zdalne sterowanie DSC
- Zdalne sterowanie JVC
- Zdalne sterowanie Trust
- Zdalne sterowanie LogiLink
- Zdalne sterowanie Memphis Audio
- Zdalne sterowanie Grohe
- Zdalne sterowanie Funai
- Zdalne sterowanie TechniSat
- Zdalne sterowanie Vimar
- Zdalne sterowanie Autel
- Zdalne sterowanie Ansmann
- Zdalne sterowanie Clarion
- Zdalne sterowanie Wacom
- Zdalne sterowanie Thomson
- Zdalne sterowanie Tado
- Zdalne sterowanie Pro-Ject
- Zdalne sterowanie Absima
- Zdalne sterowanie Velleman
- Zdalne sterowanie Fusion
- Zdalne sterowanie Homematic IP
- Zdalne sterowanie Neumann
- Zdalne sterowanie DataVideo
- Zdalne sterowanie Danfoss
- Zdalne sterowanie Intertechno
- Zdalne sterowanie Delta Dore
- Zdalne sterowanie Apple
- Zdalne sterowanie Devolo
- Zdalne sterowanie Marantz
- Zdalne sterowanie Waeco
- Zdalne sterowanie Revox
- Zdalne sterowanie Schaudt
- Zdalne sterowanie Mitsubishi
- Zdalne sterowanie Naim
- Zdalne sterowanie Chief
- Zdalne sterowanie BENNING
- Zdalne sterowanie NAD
- Zdalne sterowanie Continental Edison
- Zdalne sterowanie Delta
- Zdalne sterowanie Harman Kardon
- Zdalne sterowanie Audio-Technica
- Zdalne sterowanie NEC
- Zdalne sterowanie Parrot
- Zdalne sterowanie Antec
- Zdalne sterowanie JL Audio
- Zdalne sterowanie Axis
- Zdalne sterowanie Vision
- Zdalne sterowanie Telefunken
- Zdalne sterowanie Unitron
- Zdalne sterowanie Control4
- Zdalne sterowanie Vogel's
- Zdalne sterowanie Viper
- Zdalne sterowanie Kicker
- Zdalne sterowanie Amazon
- Zdalne sterowanie Abus
- Zdalne sterowanie Olympia
- Zdalne sterowanie Hama
- Zdalne sterowanie Marmitek
- Zdalne sterowanie Omega
- Zdalne sterowanie Optex
- Zdalne sterowanie Reely
- Zdalne sterowanie Schwaiger
- Zdalne sterowanie Watson
- Zdalne sterowanie Loewe
- Zdalne sterowanie Amewi
- Zdalne sterowanie SVS
- Zdalne sterowanie TomTom
- Zdalne sterowanie Arcam
- Zdalne sterowanie Vakoss
- Zdalne sterowanie Yale
- Zdalne sterowanie Technika
- Zdalne sterowanie Silverstone
- Zdalne sterowanie Busch-Jaeger
- Zdalne sterowanie Magnus
- Zdalne sterowanie RCA
- Zdalne sterowanie Genius
- Zdalne sterowanie Futaba
- Zdalne sterowanie Technaxx
- Zdalne sterowanie Hunter
- Zdalne sterowanie Fibaro
- Zdalne sterowanie Gefen
- Zdalne sterowanie Vivanco
- Zdalne sterowanie EQ-3
- Zdalne sterowanie Gaggenau
- Zdalne sterowanie PowerBass
- Zdalne sterowanie Kathrein
- Zdalne sterowanie Rockford Fosgate
- Zdalne sterowanie JUNG
- Zdalne sterowanie TOA
- Zdalne sterowanie Monacor
- Zdalne sterowanie Aputure
- Zdalne sterowanie Tascam
- Zdalne sterowanie H-Tronic
- Zdalne sterowanie AudioControl
- Zdalne sterowanie EVE
- Zdalne sterowanie Smartwares
- Zdalne sterowanie Adj
- Zdalne sterowanie Cotech
- Zdalne sterowanie Match
- Zdalne sterowanie Clas Ohlson
- Zdalne sterowanie Savio
- Zdalne sterowanie RADEMACHER
- Zdalne sterowanie KPN
- Zdalne sterowanie Ruwido
- Zdalne sterowanie Profoto
- Zdalne sterowanie AMX
- Zdalne sterowanie Reflecta
- Zdalne sterowanie Ziggo
- Zdalne sterowanie Intermatic
- Zdalne sterowanie Brennenstuhl
- Zdalne sterowanie Tevion
- Zdalne sterowanie Eminent
- Zdalne sterowanie Targus
- Zdalne sterowanie Sitecom
- Zdalne sterowanie Meliconi
- Zdalne sterowanie Exibel
- Zdalne sterowanie Energy Sistem
- Zdalne sterowanie Doro
- Zdalne sterowanie Hähnel
- Zdalne sterowanie KlikaanKlikuit
- Zdalne sterowanie Ei Electronics
- Zdalne sterowanie Sonos
- Zdalne sterowanie Kensington
- Zdalne sterowanie Steren
- Zdalne sterowanie Bigben Interactive
- Zdalne sterowanie ESYLUX
- Zdalne sterowanie Malmbergs
- Zdalne sterowanie AV:link
- Zdalne sterowanie Vello
- Zdalne sterowanie Audiovox
- Zdalne sterowanie MB Quart
- Zdalne sterowanie FireAngel
- Zdalne sterowanie Asustor
- Zdalne sterowanie Nemef
- Zdalne sterowanie Hema
- Zdalne sterowanie Konig
- Zdalne sterowanie Valueline
- Zdalne sterowanie Sweex
- Zdalne sterowanie Vizio
- Zdalne sterowanie Conrad
- Zdalne sterowanie Xit
- Zdalne sterowanie Metronic
- Zdalne sterowanie T'nB
- Zdalne sterowanie Hannspree
- Zdalne sterowanie Xavax
- Zdalne sterowanie Fantini Cosmi
- Zdalne sterowanie Provision
- Zdalne sterowanie Niko
- Zdalne sterowanie Humax
- Zdalne sterowanie Vaddio
- Zdalne sterowanie Zephir
- Zdalne sterowanie Lifetec
- Zdalne sterowanie Apart
- Zdalne sterowanie Electia
- Zdalne sterowanie Projecta
- Zdalne sterowanie Genaray
- Zdalne sterowanie Jolly
- Zdalne sterowanie HQ
- Zdalne sterowanie Msonic
- Zdalne sterowanie Nanlite
- Zdalne sterowanie Verizon
- Zdalne sterowanie Tihao
- Zdalne sterowanie Zapman
- Zdalne sterowanie OEM
- Zdalne sterowanie Emtec
- Zdalne sterowanie Ranex
- Zdalne sterowanie Jasco
- Zdalne sterowanie CME
- Zdalne sterowanie Russound
- Zdalne sterowanie Engel Axil
- Zdalne sterowanie Bazooka
- Zdalne sterowanie Wentronic
- Zdalne sterowanie Walkera
- Zdalne sterowanie EQ3
- Zdalne sterowanie REV
- Zdalne sterowanie Neewer
- Zdalne sterowanie Neets
- Zdalne sterowanie ETiger
- Zdalne sterowanie VDO Dayton
- Zdalne sterowanie Aeon Labs
- Zdalne sterowanie Packard Bell
- Zdalne sterowanie Provision ISR
- Zdalne sterowanie CSL
- Zdalne sterowanie Entone
- Zdalne sterowanie Fortin
- Zdalne sterowanie Samlex
- Zdalne sterowanie Zalman
- Zdalne sterowanie Simplify
- Zdalne sterowanie Interphone
- Zdalne sterowanie SIIG
- Zdalne sterowanie Wet Sounds
- Zdalne sterowanie Televés
- Zdalne sterowanie Swiss Sense
- Zdalne sterowanie Extron
- Zdalne sterowanie ProMaster
- Zdalne sterowanie Ebode
- Zdalne sterowanie RadioShack
- Zdalne sterowanie Exxter
- Zdalne sterowanie Skymaster
- Zdalne sterowanie Hartig Helling
- Zdalne sterowanie Multibox
- Zdalne sterowanie Online
- Zdalne sterowanie Libec
- Zdalne sterowanie Furman
- Zdalne sterowanie AT-T
- Zdalne sterowanie Logic3
- Zdalne sterowanie Medion MD6461
- Zdalne sterowanie TCM
- Zdalne sterowanie Pixel
- Zdalne sterowanie Morel
- Zdalne sterowanie Antelope Audio
- Zdalne sterowanie PDP
- Zdalne sterowanie Ecler
- Zdalne sterowanie Q-Sonic
- Zdalne sterowanie Elite Screens
- Zdalne sterowanie Roswell
- Zdalne sterowanie SpeakerCraft
- Zdalne sterowanie Sunwave
- Zdalne sterowanie Tevion (Medion)
- Zdalne sterowanie Syrp
- Zdalne sterowanie Bravo
- Zdalne sterowanie Maximex
- Zdalne sterowanie Pentatech
- Zdalne sterowanie Glashart Media
- Zdalne sterowanie Bang Olufsen
- Zdalne sterowanie TV Vlaanderen
- Zdalne sterowanie Innr
- Zdalne sterowanie Universal Electronics
- Zdalne sterowanie TELE System
- Zdalne sterowanie Voxx
- Zdalne sterowanie Beoplay
- Zdalne sterowanie Prolectrix
- Zdalne sterowanie Remotec
- Zdalne sterowanie Audiofrog
- Zdalne sterowanie Nanoleaf
- Zdalne sterowanie Tiq
- Zdalne sterowanie Elbe
- Zdalne sterowanie GBS Elettronica
- Zdalne sterowanie Gewiss
- Zdalne sterowanie Insteon
- Zdalne sterowanie Mosconi
- Zdalne sterowanie Lutron
- Zdalne sterowanie CGV
- Zdalne sterowanie Universal Remote Control
- Zdalne sterowanie Aplic
- Zdalne sterowanie Ridem
- Zdalne sterowanie SMK-Link
- Zdalne sterowanie URC
- Zdalne sterowanie Canal Digitaal
- Zdalne sterowanie AXIL
Najnowsze instrukcje dla Zdalne sterowanie
28 Marca 2025
28 Marca 2025
28 Marca 2025
27 Marca 2025
26 Marca 2025
22 Marca 2025

13 Marca 2025
11 Marca 2025

10 Marca 2025
10 Marca 2025