Instrukcja obsługi Needit ParkOne X
Needit
Nie skategoryzowane
ParkOne X
Przeczytaj poniżej 📖 instrukcję obsługi w języku polskim dla Needit ParkOne X (2 stron) w kategorii Nie skategoryzowane. Ta instrukcja była pomocna dla 4 osób i została oceniona przez 2 użytkowników na średnio 4.5 gwiazdek
Strona 1/2

1 3 5
2 4 6
Developed by Needit Denmark
Designed by John Sebastian
Brugervejledning
Tillykke med din nye ParkOne X
www.parkonex.dk
Inden montering
Vend P-skiven med bagsiden opad. Sæt en eller ere negle ind i sprækken øverst på den
runde bagklap og træk låget af.
A: Akver baeriet
Fjern forsiggt plaststrimlen og pres baeriet på plads igen, hvis det løsner sig. Skulle
baeriet falde ud, indsæes det igen med + opad (samme side som den med tekst).
Er baeriet korrekt placeret, blinker i displayet. (Der kan gå lidt d, før tallet i ”mer”
displayet blinker).
B: Indsl det digitale ur
(Uret i ParkOne X indsller selv både sommer- og vinterd, men funkonen kan om
nødvendigt deakveres manuelt, se C:)
1. Når blinker, skal du trykke gentagne gange på knap ❷, indl me tallet “mer”
er korrekt indsllet.
2. Tryk én gang på knap ❶, og blinker. Indsl minuer med knap ❷.“minuer”
3. Indsl år, måned og dato som ovenfor (i nævnte rækkefølge).
4. Når du har indsllet ovenstående oplysninger, må ingen tal i displayet blinke.
Bemærk dog at de to prikker (:) imellem klokkeslæet blinker hele den. Hvis ét af
tallene blinker, tryk da gentagne gange på knap ❶ indl ingen af tallene blinker.
Hvis du opdager, at du har indsllet forkert, kan du ald begynde forfra på ParkOne X
indsllingerne ved at holde knap ❶ inde, l tallet ”mer” blinker.
Det anbefales at kontrollere urets indsllinger jævnligt, især ved ski mellem sommer-
og vinterd.
C: Akvering/deakvering af sommerd/vinterd.
Det digitale ur er som standard indsllet l selv at skie mellem sommer- og vinterd.
Men hvis du bender dig i et land, hvor der ikke skies, kan du deakvere funkonen
ved at følge nedenstående trin:
Akver indsllingslstand ved at trykke på både knap ❶ og ❷, indl “mer” og
“minuer” “oN:Su” viser .
Slip langsomt knap ❶.
Hold knap ❷ inde l displayet viser ”oF:Su”.
Displayet vender automask lbage l funkonslstand.
Din ParkOne X er nu klar l montering indvendigt på bilens forrude.
Montering af ParkOne X
Find det bedste sted indvendigt på forrudens nederste højre hjørne (lovkrav), hvor alle
re klæbepuder berører ruden. Sørg for at du har adgang l alle knapperne på bagsiden
af uret, og at du kan komme l at skie baeriet.
1. Gør ruden ren indvendigt med en fugg klud, hvor P-skiven skal monteres. Tør
ruden og brug dereer den medfølgende renseserviet l at rense området
grundigt. (Kun den medfølgende serviet må bruges – ikke andre rensemidler.)
2. Sørg for at ruden er mindst +15°C, da klæbepuderne ikke fungerer lfredssllende
ved lavere temperaturer. Varm eventuelt ruden op med bilens blæser eller (med
forsigghed) en hårtørrer.
Når baeriet udskies, nulslles uret automask. Du kan ald slle alle dsindsl-
linger som dligere beskrevet. Vær opmærksom på, at LCD-displayet i din ParkOne X
slukker kort d eer, at baeriet er ernet, så du bør undgå at forlade bilen, så længe
der ikke er baeri i uret.
Udskining af baeri
1. Køb et nyt knapbaeri nr. CR 2477 – 3 Volt.
2. Træk baglåget af.
3. Skub baeriet op
4. Isæt nyt baeri.
5. Montér baglåget igen.
HUSK AT STILLE URET IGEN.
Service og garan
På www.needit.dk kan du nde svar på mange spørgsmål vedrørende din nye ParkOne X.
Du har også mulighed for at slle spørgsmål på kundeservice@needit.dk. Needit Den-
mark ApS yder garan i henhold l købeloven. Hvis der i garanperioden skulle opstå
fejl eller mangler, kan ParkOne X aeveres hos den forhandler, hvor P-skiven er købt.
Den vil så blive repareret eller erstaet med en ny. Ved reklamaon bedes en kopi af
din kviering medbragt som garanbevis.
Godkendelser og cerkater
ParkOne X er godkendt af Trakstyrelsen med henvisning l Bekendtgørelse nr. 327 af
29/07/2022 om parkeringsskiver og bærer styrelsens godkendelsesnummer FS52 på
forsiden.
Vedligeholdelse
Udsæt ikke for ekstreme temperaturer (under -20°C eller over +75°C), da ParkOne X
det kan ødelægge elektronikken og/eller påvirke reakonsden.
Hvis ParkOne X bliver udsat for stærk fugt eller vand, skal den straks aørres med en ren
klud. Brug kun en klud l at rengøre skiven. Der må ikke anvendes rengøringsmidler.
CE-mærkning
Med CE-mærket erklærer Needit Denmark ApS, at vores produkt opfylder de gene-
relle sikkerhedskrav i relevante CE-mærkningsdirekver. Med CE-mærket garanterer
producenten, at produktet er fremsllet i overensstemmelse med fælleseuropæiske
krav l sikkerhed, sundhed og miljø. Needit Denmark ApS erklærer hermed, at denne
parkeringsskive er i overensstemmelse med (CE) EN 61000-6-3 (Electromagnec Com-
pability – Part 6-3: Generic Standards – Emission standard for residenal, commercial
and light-industrial environments) and (CE) EN 61000-6-1 (Electromagnec Compabi-
lity – Part 6-1: Generic Standards – Immunity for residenal, commercial and light-in-
dustrial environments).
WEEE
Elektriske og elektroniske komponenter (EEE) og materialer kan være farlige og ska-
delige for helbred og miljø og skal bortskaes korrekt. ParkOne X må ikke bortskaes
sammen med almindeligt husholdningsaald men skal indsamles særskilt. Baeriet
kan aeveres hos forhandlere af baerier, og selve kan aeveres på den ParkOne X
lokale genbrugsstaon eller der, hvor P-skiven er købt.
Specikaoner og regheder
Størrelse i cm: 10 x 10 x 1,6
Baerispecikaon: Knapbaeri nr. CR 2477 - 3 Volt
Baeriets leved: Op l 5 år
Urets nøjagghed (gns.): ± 2 min./2 år
Reakonsd – parkeringslstand: Ca. 20 sek.
Reakonsd – ud af parkeringslstand: Ca. 20 sek.
ParkOne X er patentanmeldt.
Alle regheder l produktet ParkOne X lhører:
Needit ApS • Hammerholmen 18 • 2650 Hvidovre
Tlf. +45 70 221 535 • kundeservice@needit.dk
www.parkonex.dk
Der tages forbehold for, at indholdet af denne brugervejledning kan ændres.
VIGTIGT
Det er førerens ansvar at sørge for, at uret er indsllet korrekt. P-afgier aoldes ikke
af Needit Denmark ApS, ligesom monteringsfejl ikke er Needits ansvar.
3. Fjern beskyelsesfolien fra de re klæbepuder og pres P-skiven hårdt ind mod
ruden i ca. 30 sekunder. Undgå at presse på bagsidens midte. Kontroller dereer
udefra at alle re puder klæber ordentligt l ruden.
4. Du har nu monteret din og er klar l at køre.ParkOne X
NB!
ParkOne X må ikke ligge løst i bilen men skal være fastmonteret på ruden for at
fungere korrekt.
Sådan fungerer ParkOne X
Når du parkerer bilen, sller ParkOne X sig automask frem l nærmeste kvarter eer
ankomsdspunktet (f.eks. ved ankomst 10:07 sller sig på 10:15). ParkOne X
Manuel indslling
Som loven kræver det, kan din ParkOne X også slles manuelt. BEK. nr. 327 af
9/04/2003 (§3 stk. 3): “Såfremt der under et køretøjs parkering indtræder en periode uden
dsbegrænsning, skal viseren senest ved periodens udløb indslles på det dspunkt,
hvorfra der på ny gælder en dsbegrænsning.” Hvis du har behov for at slle din
ParkOne X manuelt, skal du blot trykke på knap ❷ , og uret tæller frem i intervaller
på 15 minuer. Hold knappen inde og slip, når det ønskede dspunkt vises. Bemærk at
denne funkon kun er lgængelig, når er i parkeringslstand.ParkOne X
Baeri
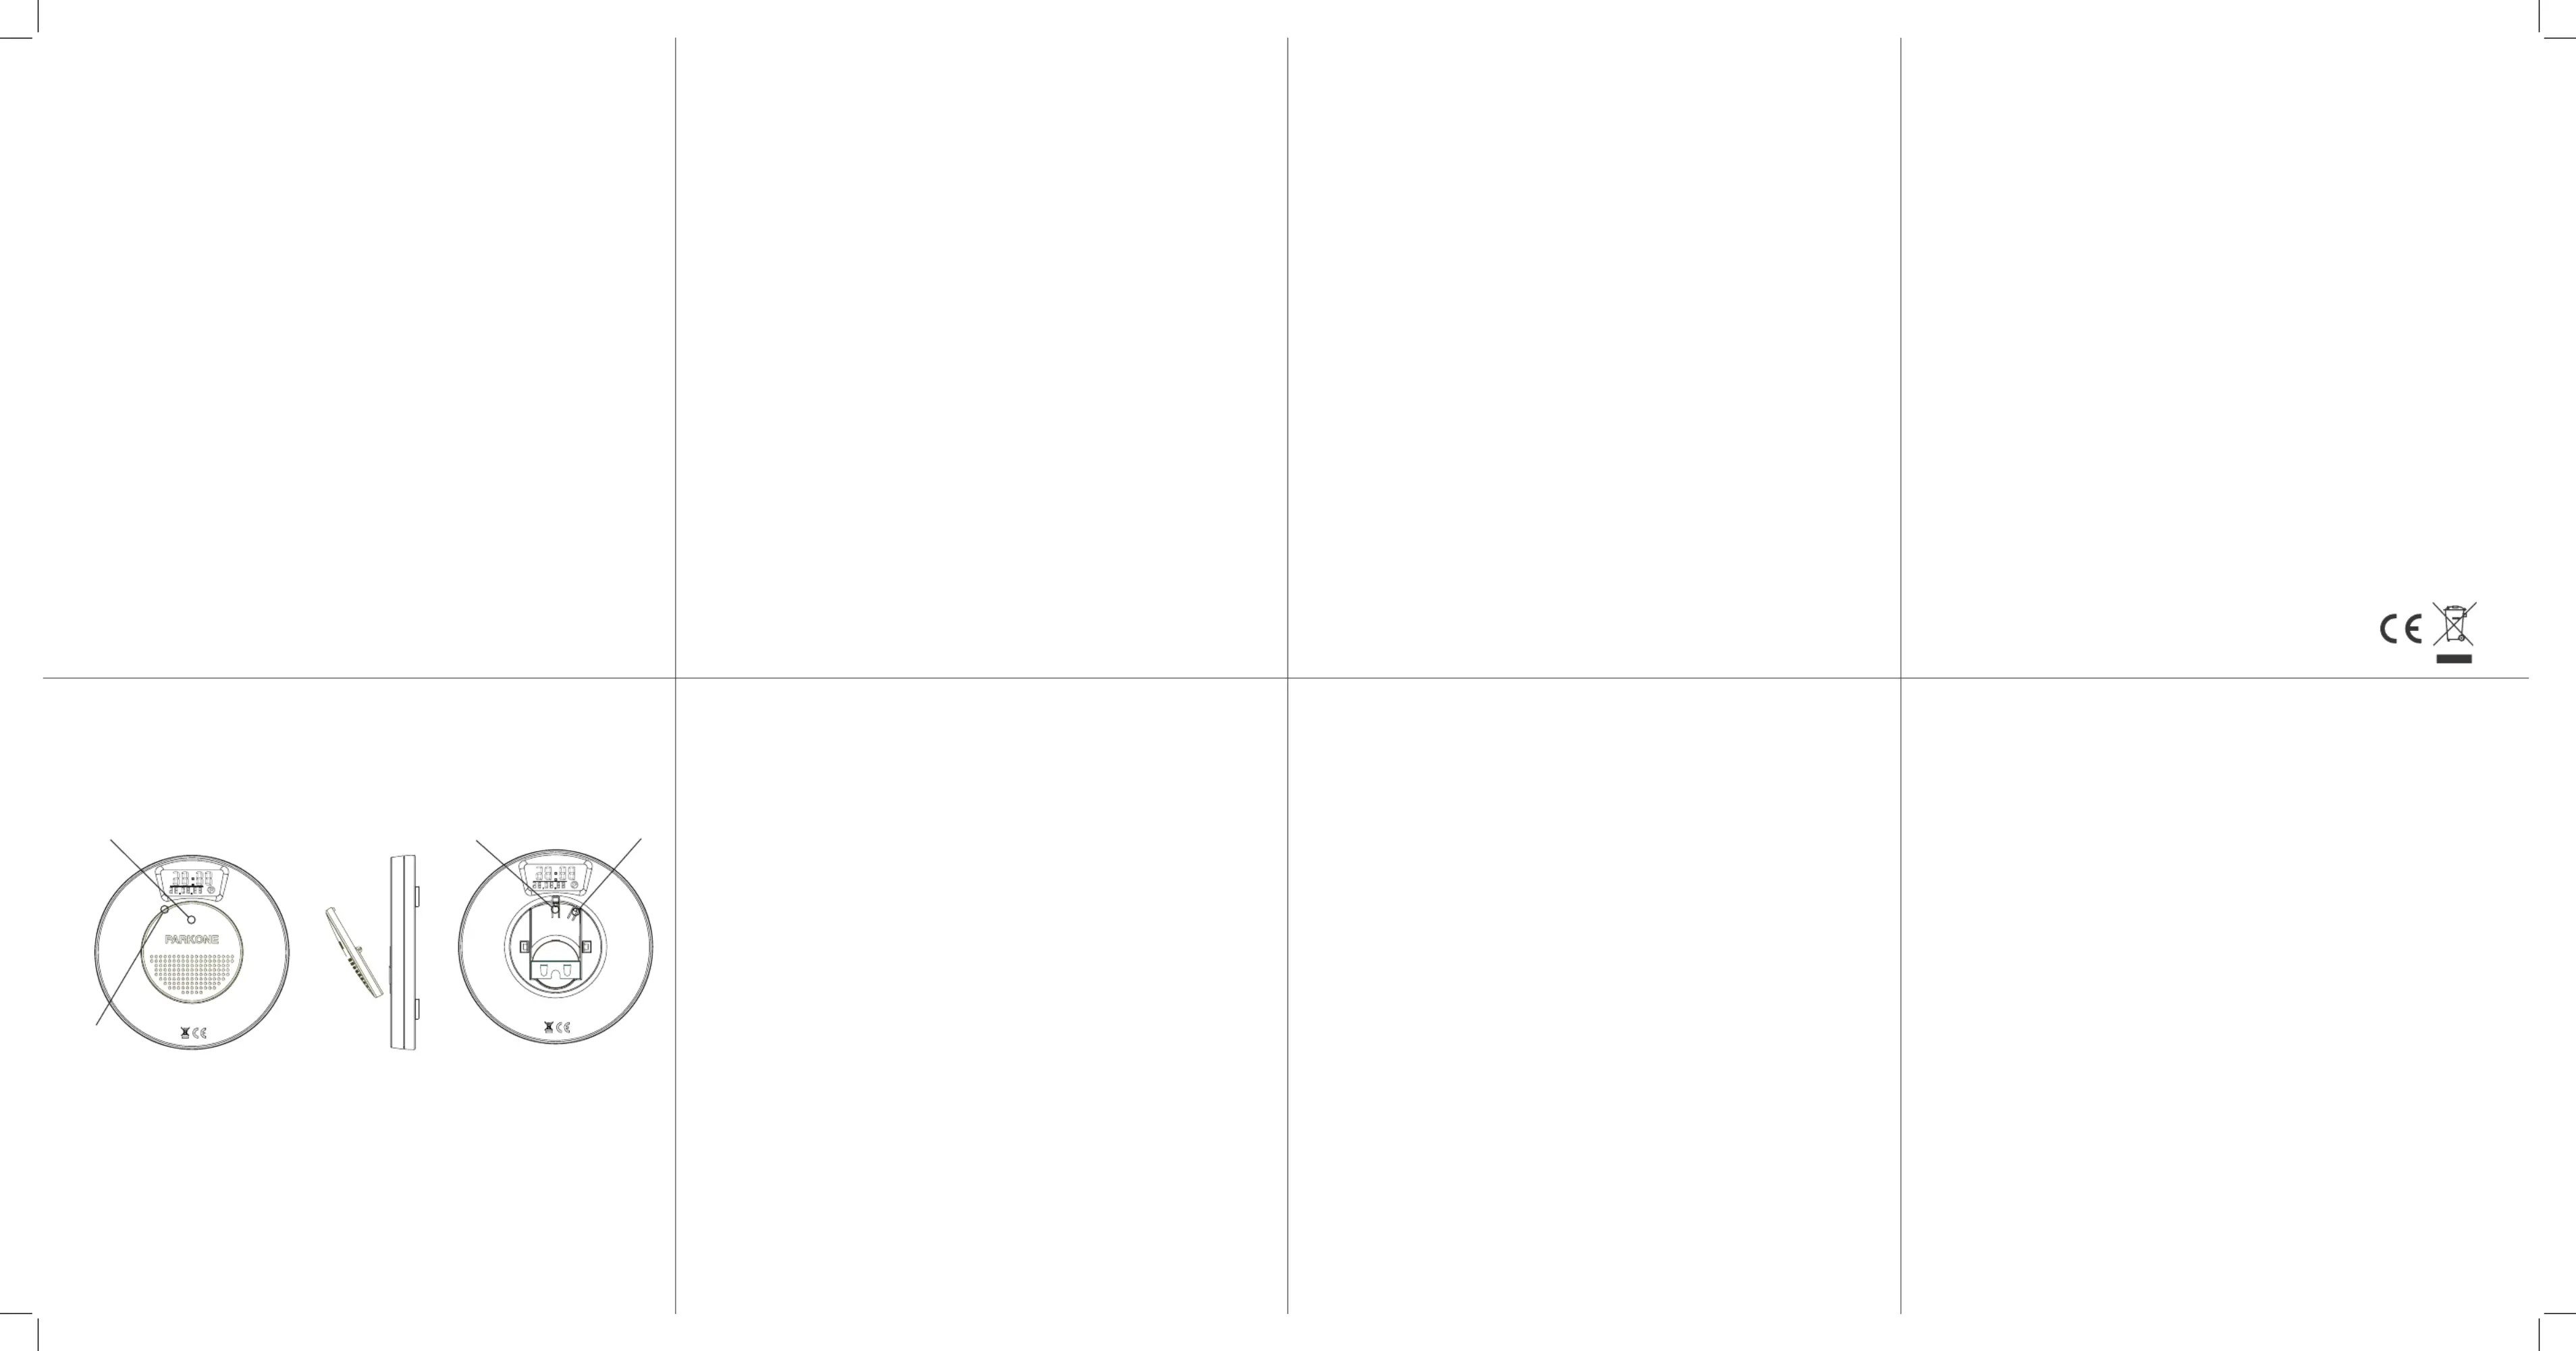
Ved lavt baeri akveres højtaleren , der vil afgive en alarm (5 x bip som gentages ❸
3 gange) for at gøre opmærksom på, at baeriet skal udskies inden for en uge.
Alarmen afgives, når parkeringslstand akveres og forlades.
DA, EN v. 001
❸
❶
❷❷
PARKONE X

1 3 5
2 4 6
Developed by Needit Denmark
Designed by John Sebastian
Instructions for use
Congratulations on your new ParkOne X
www.parkonex.dk
Before installaon
Turn the parking disc around with its backside upwards. Insert one or more ngernails
into the slot at the top of the round compartment lid and pull it o.
A: Acvate the baery
Remove the plasc strip carefully and press the baery back into place if it comes
loose. If the baery falls out, insert it again with the + upwards (same side as the one
wrien in the baery compartment). If the baery is placed correctly, the ”hours”
ashes on the display. (It may take some me for the number on the display to ash).
B: Set the digital clock
(The clock in adjusts to both summer and winter me automacally, but the ParkOne X
funcon may be deacvated manually if necessary, see C:)
1. When is ashing, press buon ❷ repeatedly unl the hour is adjusted ”hours”
correctly.
2. Press buon ❶ once and ”minutes” ashes on the display. Adjust the minutes
with buon ❷.
3. Set year, month, and date as above (in that order).
4. When you have adjusted the above informaon, no numbers in the display should
ash.
Note, however, that the two dots (:) between the me ash connuously. If one of the
numbers is ashing, press buon ❶ repeatedly unl none of the numbers are ashing.
If you nd that you have adjusted ParkOne X incorrectly, you can always start over by
pressing and holding buon ❶ unl the ”hours” digit ashes.
We recommend that you check the clock sengs regularly, especially when switching
between summer and winter me.
C: Acvang/deacvang daylight saving me
The digital clock is by default set to switch between summer and winter me.
However, if you are in a country where there is no switching, you may disable the
feature by following the steps below:
1. Acvate the preference mode by pressing both buon ❶ and ❷ unl ”hours”
and ”minutes” ”oN:Su” show .
2. Slowly release buon ❶.
3. Press and hold buon ❷ unl the display shows ”oF:Su”.
4. The display automacally returns to operang mode.
Your ParkOne X is now ready for installaon on the inside of your car’s windscreen.
Installaon of ParkOne X
Find the best place on the inside of the lower right corner of the windscreen (legal
requirement) where all four adhesive pads touch the glass. Make sure you have access
to all the buons on the back of the clock and that the baery compartment is
accessible.
1. Clean the inside of the window where the parking disc is to be installed with a
damp cloth. Wipe the window with a dry cloth or paper towel, and use the
included cleaning cloth to clean the area thoroughly. (Only the included wipe may
be used - no other cleaning agents).
2. Make sure the window is at least +15°C, as the adhesive pads do not work
pro perly at lower temperatures. If necessary, warm up the window with the car’s
blower motor or with a hair dryer (if you’re careful).
When the baery is replaced, the clock automacally resets. You may always adjust all
me sengs as previously described. Be aware that the LCD display in your ParkOne X
will turn o shortly aer the baery is removed, so you should avoid leaving the car while
there’s no baery in the clock.
Replacing the baery
1. Buy a new buon cell baery: no. CR 2477 - 3 Volt.
2. Pull o the round compartment lid on the backside.
3. Remove the baery.
4. Insert new baery.
5. Put the compartment lid back on.
REMEMBER TO SET THE CLOCK AGAIN.
Service and warranty
On www.needit.dk, you can nd answers to many quesons about your new
ParkOne X. If you have any quesons, please email us at kundeservice@needit.dk.
Needit Denmark ApS oers 2 years of warranty in accordance with the Danish Purchase
Act. In the event of any defects or deciencies during the warranty period, ParkOne X
may be returned to the retailer. Here, it will be repaired or replaced with a new one. In
case of a complaint, please bring a copy of your receipt as proof of warranty.
Approvals and cercates
ParkOne X is approved by the Danish Civil Aviaon and Railway Authority with
reference to Statutory Order No. 327 of 29/07/2022 on parking discs and bears the
Agency’s approval number FS52 on the front.
Maintenance
Do not expose ParkOne X to extreme temperatures (below -20°C or above +75°C), as
this may damage the electronics and/or aect response me.
If is exposed to strong moisture or water, it must be wiped immediately ParkOne X
with a clean cloth. Use only a cloth to clean the disc. Do not use cleaning agents.
CE labelling
With the CE marking, NeedIt Denmark ApS declares that our product meets the gene-
ral safety requirements of any relevant CE marking direcves and regulaons. With the
CE marking, the manufacturer guarantees that the product has been manufactured
in accordance with the European Union requirements for safety, health, and environ-
ment. Needit Denmark ApS hereby declares that this parking disc is in compliance
with (CE) EN 61000-6-3 (Electromagnec Compability – Part 6-3: Generic Standards
– Emission standard for residenal, commercial and light-industrial environments)
and (CE) EN 61000-6-1 (Electromagnec Compability – Part 6-1: Generic Standards –
Immunity for residenal, commercial and light-industrial environments).
WEEE
Electrical and electronic equipment (EEE) and materials may be hazardous and harmful
to human health and the environment and must be disposed of properly. ParkOne X
must not be disposed of with normal household waste but must be collected separately.
The baery may be returned to the baery retailers, and the ParkOne X itself may be
returned to the local recycling centre or to the parking disc retailer.
Specicaons and rights
Size in cm: 10 x 10 x 1.6
Baery specicaons: Buon cell baery: no. CR 2477 - 3 Volt
Baery life: Up to 5 years
Clock accuracy (avg.): ± 2 min./2 years
Response me - parking mode: Approx. 20 sec.
Response me - non-parking mode: Approx. 20 sec.
ParkOne X is patent pending.
All rights to the product ParkOne X belong to:
Needit ApS • Hammerholmen 18 • 2650 Hvidovre
Telephone +45 70 221 535 • kundeservice@needit.dk
www.parkonex.dk
The contents of this user manual are subject to change without noce.
Important
It is the driver’s responsibility to ensure that the clock is adjusted correctly. Parking
ckets are not refunded by Needit Denmark ApS, nor are they responsible or liable for
any installaon errors.
3. Remove the protecve lm from the four adhesive pads and press the parking
disc rmly against the window for about 30 seconds. Avoid pressing in the middle
of the backside. Aer this, you must check whether all four adhesive pads are
scking properly to the window from the outside of the car.
4. You have now installed your ParkOne X and are ready to drive.
Note:
ParkOne X must not be le unaached in the car but must be xed to the window to
work properly.
How ParkOne X works
When you park your car, automacally sets the clock forward to the next ParkOne X
quarter aer the arrival me (e.g., if you arrive at 10:07, will set the clock ParkOne X
forward to 10:15).
Manual seng
Your can also be set manually as required by law. Statutory Order no. 327 ParkOne X
of 9/04/2003 (§3 paragraph 3): ”If a period without a me limit occurs during the
parking of a vehicle, the pointer shall be set, latest at the end of the me period,
at the me from which a me limit applies again.” If you need to set your ParkOne X
manually, simply press buon ❷ and the clock will count up in 15-minute increments.
Press, hold and release the buon when the desired me is displayed. Note that this
funcon is only available when ParkOne X is in parking mode.
Baery
When the baery is low, the speaker ❸ is acvated and the alarm sounds (5 x beep
tone repeated 3 mes) to indicate that the baery needs to be replaced within a
week. The alarm sounds when the parking mode is acvated and exited.
❸
❶
❷❷
PARKONE X
Specyfikacje produktu
Marka: | Needit |
Kategoria: | Nie skategoryzowane |
Model: | ParkOne X |
Potrzebujesz pomocy?
Jeśli potrzebujesz pomocy z Needit ParkOne X, zadaj pytanie poniżej, a inni użytkownicy Ci odpowiedzą
Instrukcje Nie skategoryzowane Needit

27 Lutego 2025

27 Lutego 2025

27 Lutego 2025

27 Lutego 2025

27 Lutego 2025

27 Lutego 2025
Instrukcje Nie skategoryzowane
- Nie skategoryzowane Ikea
- Nie skategoryzowane Samsung
- Nie skategoryzowane AEG
- Nie skategoryzowane Beko
- Nie skategoryzowane LG
- Nie skategoryzowane Worx
- Nie skategoryzowane Smeg
- Nie skategoryzowane Gaggia
- Nie skategoryzowane Honda
- Nie skategoryzowane Philips
- Nie skategoryzowane SilverCrest
- Nie skategoryzowane Bosch
- Nie skategoryzowane Parkside
- Nie skategoryzowane Whirlpool
- Nie skategoryzowane Roland
- Nie skategoryzowane Miele
- Nie skategoryzowane Easy Home
- Nie skategoryzowane Nokia
- Nie skategoryzowane Hisense
- Nie skategoryzowane StarTech.com
- Nie skategoryzowane Theben
- Nie skategoryzowane Crestron
- Nie skategoryzowane Asus
- Nie skategoryzowane Black & Decker
- Nie skategoryzowane Hazet
- Nie skategoryzowane Conair
- Nie skategoryzowane RIKON
- Nie skategoryzowane Blaupunkt
- Nie skategoryzowane IOptron
- Nie skategoryzowane Iiyama
- Nie skategoryzowane Lincoln Electric
- Nie skategoryzowane Metra
- Nie skategoryzowane Manhattan
- Nie skategoryzowane Microchip
- Nie skategoryzowane Heritage Audio
- Nie skategoryzowane Tripp Lite
- Nie skategoryzowane Shure
- Nie skategoryzowane Shimano
- Nie skategoryzowane TFA
- Nie skategoryzowane Icy Box
- Nie skategoryzowane RYOBI
- Nie skategoryzowane Alpine
- Nie skategoryzowane Gembird
- Nie skategoryzowane LogiLink
- Nie skategoryzowane Polaris
- Nie skategoryzowane IFM
- Nie skategoryzowane Moulinex
- Nie skategoryzowane Biltema
- Nie skategoryzowane Digitus
- Nie skategoryzowane Vimar
- Nie skategoryzowane V-TAC
- Nie skategoryzowane Emos
- Nie skategoryzowane AVMATRIX
- Nie skategoryzowane Corbero
- Nie skategoryzowane Morphy Richards
- Nie skategoryzowane Crivit
- Nie skategoryzowane Everdure
- Nie skategoryzowane La Crosse Technology
- Nie skategoryzowane Neumann
- Nie skategoryzowane Victron Energy
- Nie skategoryzowane Pyle
- Nie skategoryzowane Texas
- Nie skategoryzowane Panduit
- Nie skategoryzowane CRUX
- Nie skategoryzowane KitchenAid
- Nie skategoryzowane EchoMaster
- Nie skategoryzowane Esoteric
- Nie skategoryzowane Chord
- Nie skategoryzowane Speco Technologies
- Nie skategoryzowane ARRI
- Nie skategoryzowane Fluke
- Nie skategoryzowane Bogen
- Nie skategoryzowane Pulsar
- Nie skategoryzowane Exquisit
- Nie skategoryzowane Chief
- Nie skategoryzowane Arçelik
- Nie skategoryzowane AirLive
- Nie skategoryzowane Audio-Technica
- Nie skategoryzowane Planet
- Nie skategoryzowane Rocktrail
- Nie skategoryzowane JL Audio
- Nie skategoryzowane Konica Minolta
- Nie skategoryzowane Inventum
- Nie skategoryzowane Ariete
- Nie skategoryzowane LiftMaster
- Nie skategoryzowane Taga Harmony
- Nie skategoryzowane Argoclima
- Nie skategoryzowane Livarno Lux
- Nie skategoryzowane Marmitek
- Nie skategoryzowane Smart-AVI
- Nie skategoryzowane Cameo
- Nie skategoryzowane Schwaiger
- Nie skategoryzowane Mean Well
- Nie skategoryzowane Gravity
- Nie skategoryzowane Kenmore
- Nie skategoryzowane Deaf Bonce
- Nie skategoryzowane Sangean
- Nie skategoryzowane Playtive
- Nie skategoryzowane ZKTeco
- Nie skategoryzowane True
- Nie skategoryzowane Nebula
- Nie skategoryzowane Hitachi
- Nie skategoryzowane CyberPower
- Nie skategoryzowane Black Diamond
- Nie skategoryzowane Fieldmann
- Nie skategoryzowane Soundskins
- Nie skategoryzowane Vivanco
- Nie skategoryzowane Leifheit
- Nie skategoryzowane Lectrosonics
- Nie skategoryzowane Hobart
- Nie skategoryzowane Kanto
- Nie skategoryzowane Lumens
- Nie skategoryzowane HQ Power
- Nie skategoryzowane BioChef
- Nie skategoryzowane Vicoustic
- Nie skategoryzowane Elgato
- Nie skategoryzowane SureFire
- Nie skategoryzowane Snom
- Nie skategoryzowane Savio
- Nie skategoryzowane RADEMACHER
- Nie skategoryzowane Crosley
- Nie skategoryzowane HK Audio
- Nie skategoryzowane Ideal
- Nie skategoryzowane Proscan
- Nie skategoryzowane Lava
- Nie skategoryzowane Simplified MFG
- Nie skategoryzowane Musway
- Nie skategoryzowane Hansa
- Nie skategoryzowane Livarno
- Nie skategoryzowane Melinera
- Nie skategoryzowane GeoVision
- Nie skategoryzowane Brabantia
- Nie skategoryzowane Godrej
- Nie skategoryzowane Vizio
- Nie skategoryzowane DoorBird
- Nie skategoryzowane Nevadent
- Nie skategoryzowane Genelec
- Nie skategoryzowane Vorago
- Nie skategoryzowane Expobar
- Nie skategoryzowane PAC
- Nie skategoryzowane ColorKey
- Nie skategoryzowane Fischer
- Nie skategoryzowane Keter
- Nie skategoryzowane Berker
- Nie skategoryzowane Atdec
- Nie skategoryzowane Wise
- Nie skategoryzowane MuxLab
- Nie skategoryzowane Extron
- Nie skategoryzowane Pigtronix
- Nie skategoryzowane Morningstar
- Nie skategoryzowane Brinno
- Nie skategoryzowane Legrand
- Nie skategoryzowane NovaStar
- Nie skategoryzowane Parasound
- Nie skategoryzowane DB Technologies
- Nie skategoryzowane Berkel
- Nie skategoryzowane Phoenix Contact
- Nie skategoryzowane Morphor
- Nie skategoryzowane Fluance
- Nie skategoryzowane Buchla & TipTop Audio
- Nie skategoryzowane On-Q
- Nie skategoryzowane SetonixSynth
- Nie skategoryzowane Planet Audio
- Nie skategoryzowane Hedbox
- Nie skategoryzowane IPEGA
- Nie skategoryzowane Oras
- Nie skategoryzowane Royal Catering
- Nie skategoryzowane Qu-Bit
- Nie skategoryzowane IMG Stageline
- Nie skategoryzowane PUR
- Nie skategoryzowane Rexing
- Nie skategoryzowane IDIS
- Nie skategoryzowane I-PRO
- Nie skategoryzowane Senseca
- Nie skategoryzowane Ruggard
- Nie skategoryzowane DQ
- Nie skategoryzowane XTRARM
- Nie skategoryzowane Ingenuity
- Nie skategoryzowane Phase Technology
- Nie skategoryzowane CkeyiN
- Nie skategoryzowane Casr
- Nie skategoryzowane Hypnos
- Nie skategoryzowane BlaknBlu
- Nie skategoryzowane Louroe Electronics
- Nie skategoryzowane Orbitrek
- Nie skategoryzowane Zaahn
- Nie skategoryzowane Kaorka
- Nie skategoryzowane MOOOV
- Nie skategoryzowane Crem
- Nie skategoryzowane Zeapon
- Nie skategoryzowane CLIMAQUA
- Nie skategoryzowane Tece
- Nie skategoryzowane Sportime
- Nie skategoryzowane Quasar Science
- Nie skategoryzowane Beltronics
Najnowsze instrukcje dla Nie skategoryzowane

15 Marca 2025

14 Marca 2025

14 Marca 2025

14 Marca 2025

14 Marca 2025

14 Marca 2025

14 Marca 2025

14 Marca 2025

14 Marca 2025

14 Marca 2025