Instrukcja obsługi NEC UM330Wi
NEC
projektor wideo
UM330Wi
Przeczytaj poniżej 📖 instrukcję obsługi w języku polskim dla NEC UM330Wi (148 stron) w kategorii projektor wideo. Ta instrukcja była pomocna dla 4 osób i została oceniona przez 2 użytkowników na średnio 4.5 gwiazdek
Strona 1/148

Portable Projector
UM330X/UM280X/
UM 330W/UM 280W
User’s Manual
The UM280X and UM280W are not distributed in North America.
Model No.
NP-UM330X, NP-UM280X, NP-UM330W, NP-UM280W

Ver. 1/09/12
• Apple,Mac,MacOS,MacBook,andiMacaretrademarksofAppleInc.registeredintheU.S.andothercountries.
• Microsoft,Windows,WindowsVista, Internet Explorer, .NETFrameworkandPowerPoint are either aregistered
trademarkortrademarkofMicrosoftCorporationintheUnitedStatesand/orothercountries.
• IntelandIntelCorearetrademarksofIntelCorporationintheU.S.and/orothercountries.
• PowerPCisaregisteredtrademarkoftheInternationalBusinessMachinesCorporation.
• MicroSaverisaregisteredtrademarkofKensingtonComputerProductsGroup,adivisionofACCOBrands.
• VirtualRemoteToolusesWinI2C/DDClibrary,©NicomsoftLtd.
• HDMI,theHDMILogoandHigh-DenitionMultimediaInterfacearetrademarksorregisteredtrademarksofHDMI
LicensingLLC.
• TrademarkPJLinkisatrademarkappliedfortrademarkrightsinJapan,theUnitedStatesofAmericaandother
countries and areas.
• Wi-Fi®,Wi-Fi Alliance®,and Wi-FiProtected Access (WPA,WPA2)® are registered trademarksof theWi-Fi Alli-
ance.
• Blu-rayisatrademarkofBlu-rayDiscAssociation
• CRESTRONandROOMVIEWareregisteredtrademarksofCrestronElectronics,Inc.intheUnitedStatesandother
countries.
• Otherproductandcompanynamesmentionedinthisuser’smanualmaybethetrademarksorregisteredtrademarks
oftheirrespectiveholders.
• GPL/LGPLSoftwareLicenses
TheproductincludessoftwarelicensedunderGNUGeneralPublicLicense(GPL),GNULesserGeneralPublic
License(LGPL),andothers.
Formoreinformationoneachsoftware,see“readme.pdf”insidethe“aboutGPL&LGPL”folderonthesuppliedCD-
ROM.
NOTES
(1)Thecontentsofthisuser’smanualmaynotbereprintedinpartorwholewithoutpermission.
(2)Thecontentsofthisuser’smanualaresubjecttochangewithoutnotice.
(3)Greatcarehasbeentakeninthepreparationofthisuser’smanual;however,shouldyounoticeanyquestionable
points,errorsoromissions,pleasecontactus.
(4)Notwithstandingarticle(3),NECwillnotberesponsibleforanyclaimsonlossofprotorothermattersdeemed
toresultfromusingtheProjector.

i
Important Information
Safety Cautions
Precautions
PleasereadthismanualcarefullybeforeusingyourNECprojectorandkeepthemanualhandyforfuturereference.
CAUTION
Toturnoffmainpower,besuretoremovetheplugfrompoweroutlet.
Thepoweroutletsocketshouldbeinstalledasneartotheequipmentaspossible,andshouldbeeasily
accessible.
CAUTION
TOPREVENTSHOCK,DONOTOPENTHECABINET.
THEREAREHIGH-VOLTAGECOMPONENTSINSIDE.
REFERSERVICINGTOQUALIFIEDSERVICEPERSONNEL.
Thissymbolwarnstheuserthatuninsulatedvoltagewithintheunitmaybesufcienttocauseelectrical
shock.Therefore,itisdangeroustomakeanykindofcontactwithanypartinsideoftheunit.
Thissymbolalertstheuserthatimportantinformationconcerningtheoperationandmaintenanceofthis
unithasbeenprovided.
Theinformationshouldbereadcarefullytoavoidproblems.
WARNING:TOPREVENTFIREORSHOCK,DONOTEXPOSETHISUNITTORAINORMOISTURE.
DONOTUSETHISUNIT’SPLUGWITHANEXTENSIONCORDORINANOUTLETUNLESSALLTHEPRONGS
CANBEFULLYINSERTED.
DOC Compliance Notice (for Canada only)
This Class B digital apparatus meets all requirements of the Canadian Interference-Causing Equipment Regula-
tions.
Machine Noise Information Regulation - 3. GPSGV,
Thehighestsoundpressurelevelislessthan70dB(A)inaccordancewithENISO7779.
CAUTION
Avoiddisplayingstationaryimagesforaprolongedperiodoftime.
DoingsocanresultintheseimagesbeingtemporarilysustainedonthesurfaceoftheLCDpanel.
Ifthisshouldhappen,continuetouseyourprojector.Thestaticbackgroundfrompreviousimageswill
disappear.
Disposing of your used product
EU-widelegislationasimplementedineachMemberStaterequiresthatusedelectricalandelectronicprod-
uctscarryingthemark(left)mustbedisposedofseparatelyfromnormalhouseholdwaste.Thisincludes
projectorsandtheirelectricalaccessoriesorlamps.Whenyoudisposeofsuchproducts,pleasefollowthe
guidanceofyourlocalauthorityand/orasktheshopwhereyoupurchasedtheproduct.
Aftercollectingtheusedproducts,theyarereusedandrecycledinaproperway.Thiseffortwillhelpus
reducethewastesaswellasthenegativeimpactsuchasmercurycontainedinalamptothehumanhealth
andtheenvironmentattheminimumlevel.
ThemarkontheelectricalandelectronicproductsonlyappliestothecurrentEuropeanUnionMember
States.

ii
Important Information
WARNING TO CALIFORNIA RESIDENTS:
Handlingthecablessuppliedwiththisproductwillexposeyoutolead,achemicalknowntotheStateofCalifornia
tocausebirthdefectsorotherreproductiveharm.WASHHANDSAFTERHANDLING.
RF Interference (for USA only)
WARNING
TheFederalCommunicationsCommissiondoesnotallowanymodicationsorchangestotheunitEXCEPTthose
speciedbyNECDisplaySolutionsofAmerica,Inc.inthismanual.Failuretocomplywiththisgovernmentregu-
lationcouldvoidyourrighttooperatethisequipment.Thisequipmenthasbeentestedandfoundtocomplywith
thelimitsforaClassBdigitaldevice,pursuanttoPart15oftheFCCRules.Theselimitsaredesignedtoprovide
reasonableprotectionagainstharmfulinterferenceinaresidentialinstallation.Thisequipmentgenerates,uses,and
canradiateradiofrequencyenergyand,ifnotinstalledandusedinaccordancewiththeinstructions,maycause
harmfulinterferencetoradiocommunications.However,thereisnoguaranteethatinterferencewillnotoccurina
particularinstallation.
Ifthisequipmentdoescauseharmfulinterferencetoradioortelevisionreception,whichcanbedeterminedby
turningtheequipmentoffandon,theuserisencouragedtotrytocorrecttheinterferencebyoneormoreofthe
followingmeasures:
• Reorientorrelocatethereceivingantenna.
• Increasetheseparationbetweentheequipmentandreceiver.
• Connecttheequipmentintoanoutletonacircuitdifferentfromthattowhichthereceiverisconnected.
• Consultthedealeroranexperiencedradio/TVtechnicianforhelp.
ForUKonly:InUK,aBSapprovedpowercordwithmouldedplughasaBlack(veAmps)fuseinstalledforusewith
thisequipment.Ifapowercordisnotsuppliedwiththisequipmentpleasecontactyoursupplier.
Important Safeguards
Thesesafetyinstructionsaretoensurethelonglifeofyourprojectorandtopreventreandshock.Pleasereadthem
carefullyandheedallwarnings.
Installation
• Donotplacetheprojectorinthefollowingconditions:
- on an unstable cart, stand, or table.
- nearwater,baths,ordamprooms.
- indirectsunlight,nearheaters,orheatradiatingappliances.
- inadusty,smokyorsteamyenvironment.
- onasheetofpaperorcloth,rugsorcarpets.
• Ifyouwishtohavetheprojectorinstalledontheceiling:
- Donotattempttoinstalltheprojectoryourself.
- Theprojectormustbeinstalledbyqualiedtechniciansinordertoensureproperoperationandreducetherisk
ofbodilyinjury.
- Inaddition,theceilingmustbestrongenoughtosupporttheprojectorandtheinstallationmustbeinaccordance
withanylocalbuildingcodes.
- Pleaseconsultyourdealerformoreinformation.

iii
Important Information
WARNING
• Donotplaceanyobjects,whichareeasilyaffectedbyheat,infrontoftheprojectionwindow.Doingsocould
leadtotheobjectmeltingfromtheheatthatisemittedfromthelightoutput.
Place the projector in a horizontal position
Thetiltangleoftheprojectorshouldnotexceed10degrees,norshouldtheprojectorbeinstalledinanywayother
thanthedesktopandceilingmount,otherwiselamplifecoulddecreasedramatically.
+10˚
−10˚
Fire and Shock Precautions
• Ensurethatthereissufcientventilationandthatventsareunobstructedtopreventthebuild-upofheatinsideyour
projector.Allowatleast4inches(10cm)ofspacebetweenyourprojectorandawall.
• Donottrytotouchtheexhaustventasitcanbecomeheatedwhiletheprojectoristurnedonandimmediatelyafter
theprojectoristurnedoff.Partsoftheprojectormaybecometemporarilyheatediftheprojectoristurnedoffwith
thePOWERbuttonoriftheACpowersupplyisdisconnectedduringnormalprojectoroperation.
Usecautionwhenpickinguptheprojector.
• Preventforeignobjectssuchaspaperclipsandbitsofpaperfromfallingintoyourprojector.Donotattempttoretrieve
anyobjectsthatmightfallintoyourprojector.Donotinsertanymetalobjectssuchasawireorscrewdriverintoyour
projector.Ifsomethingshouldfallintoyourprojector,disconnectitimmediatelyandhavetheobjectremovedbya
qualiedservicepersonnel.
• Donotplaceanyobjectsontopoftheprojector.
• Donottouchthepowerplugduringathunderstorm.Doingsocancauseelectricalshockorre.
• Theprojectorisdesignedtooperateonapowersupplyof100-240VAC50/60Hz.Ensurethatyourpowersupply
tsthisrequirementbeforeattemptingtouseyourprojector.
• Donotlookintotheprojectionwindowwhiletheprojectorison.Seriousdamagetoyoureyescouldresult.
• Keepanyitemssuchasmagnifyingglassoutofthelightpathoftheprojector.Thelightbeingprojectedfromthe
projection windowisextensive,thereforeanykindofabnormal objectsthatcanredirectlightcomingoutofthe
projectionwindow,cancauseunpredictableoutcomesuchasreorinjurytotheeyes.
• Donotplaceanyobjects,whichareeasilyaffectedbyheat,infrontofaprojectorexhaustvent.
Doingsocouldleadtotheobjectmeltingorgettingyourhandsburnedfromtheheatthatisemittedfromtheex-
haust.
• Donotsplashwaterovertheprojector.Doingsocancauseelectricalshockorre.Iftheprojectorgetswet,turnoff
theprojector,unplugthepowercordandhavetheprojectorservicedbyaqualiedservicepersonnel.
• Handlethepowercordcarefully.Adamagedorfrayedpowercordcancauseelectricshockorre.
- Donotuseanypowercordotherthantheonesuppliedwiththeprojector.

iv
Important Information
- Donotbendortugthepowercordexcessively.
- Donotplacethepowercordundertheprojector,oranyheavyobject.
- Donotcoverthepowercordwithothersoftmaterialssuchasrugs.
- Donotheatthepowercord.
- Donothandlethepowerplugwithwethands.
• Turnofftheprojector,unplugthepowercordandhavetheprojectorservicedbyaqualiedservicepersonnelunder
thefollowingconditions:
- Whenthepowercordorplugisdamagedorfrayed.
- Ifliquidhasbeenspilledintotheprojector,orifithasbeenexposedtorainorwater.
- Iftheprojectordoesnotoperatenormallywhenyoufollowtheinstructionsdescribedinthisuser’smanual.
- Iftheprojectorhasbeendroppedorthecabinethasbeendamaged.
- Iftheprojectorexhibitsadistinctchangeinperformance,indicatinganeedforservice.
• Disconnectthepowercordandanyothercablesbeforecarryingtheprojector.
• Turnofftheprojectorandunplugthepowercordbeforecleaningthecabinetorreplacingthelamp.
• Turnofftheprojectorandunplugthepowercordiftheprojectorisnottobeusedforanextendedperiodoftime.
• WhenusingaLANcable(onlymodelswiththeRJ-45LANport):
Forsafety,donotconnecttotheconnectorforperipheraldevicewiringthatmighthaveexcessivevoltage.
CAUTION
• Besuretotightenthescrewsafterattachingthecablecover.Failuretodosomaycausethecablecovertocome
offandfall,resultingininjuryordamagetothecablecover.
• Donotputbundledcablesinthecablecover.Doingsomaydamagethepowercord,resultinginare.
• Donotholdthecablecoverwhilemovingtheprojectorordonotapplyexcessiveforcetothecablecover.Doing
somaydamagethecablecover,resultingininjury.
• Donotusethefeetforpurposesotherthanoriginallyintended.Misusessuchasgrippingthetilt-footorhanging
onthewallcancausedamagetotheprojector.
• Donotsendtheprojectorinthesoftcasebyparceldeliveryserviceorcargoshipment.Theprojectorinsidethe
softcasecouldbedamaged.
• Select[HIGH]inFanmode ifyoucontinuetousetheprojectorforconsecutivedays.(Fromthemenu,select
[SETUP] [OPTIONS(1)] [FANMODE] [HIGH].)→ → →
• DonotturnofftheACpowerfor60secondsafterthelampisturnedonandwhilethePOWERindicatorisblink-
ingblue.Doingsocouldcauseprematurelampfailure.
Remote Control Precautions
• Handletheremotecontrolcarefully.
• Iftheremotecontrolgetswet,wipeitdryimmediately.
• Avoidexcessiveheatandhumidity.
• Donotshort,heat,ortakeapartbatteries.
• Donotthrowbatteriesintore.
• Ifyouwillnotbeusingtheremotecontrolforalongtime,removethebatteries.
• Ensurethatyouhavethebatteries’polarity(+/−)alignedcorrectly.
• Donotusenewandoldbatteriestogether,orusedifferenttypesofbatteriestogether.
• Disposeofusedbatteriesaccordingtoyourlocalregulations.

v
Important Information
Note for US Residents
Thelampinthisproductcontainsmercury.PleasedisposeaccordingtoLocal,StateorFederalLaws.
Lamp Replacement
• Usethespeciedlampforsafetyandperformance.
• Toreplacethelamp,followallinstructionsprovidedonpage120.
• Besuretoreplacethelampandlterwhenthemessage[THE LAMP HAS REACHED THE END OF ITS USABLE
LIFE. PLEASE REPLACE THE LAMP AND FILTER.]appears.Ifyoucontinuetousethelampafterthelamphas
reachedtheendofitsusablelife,thelampbulbmayshatter,andpiecesofglassmaybescatteredinthelampcase.
Donottouchthemasthepiecesofglassmaycauseinjury.
Ifthishappens,contactyourdealerforlampreplacement.
A Lamp Characteristic
Theprojectorhasahigh-pressuremercurylampasalightsource.
Alamphasacharacteristicthatitsbrightnessgraduallydecreaseswithage.Alsorepeatedlyturningthelampon
andoffwillincreasethepossibilityofitslowerbrightness.
Theactuallamplifemayvarydependingupontheindividuallamp,theenvironmentalconditionsandusage.
CAUTION:
• DONOTTOUCHTHELAMPimmediatelyafterithasbeenused.Itwillbeextremelyhot.Turntheprojectoroff
andthendisconnectthepowercord.Allowatleastonehourforthelamptocoolbeforehandling.
• Whenremovingthelampfromaceiling-mountedprojector,makesurethatnooneisundertheprojector.Glass
fragmentscouldfallifthelamphasbeenburnedout.
About High Altitude mode
• Set[FANMODE]to[HIGHALTITUDE]whenusingtheprojectorataltitudesapproximately5500feet/1700meters
orhigher.
Usingtheprojectorataltitudesapproximately5500feet/1700metersorhigherwithoutsettingto[HIGHALTITUDE]
cancausetheprojectortooverheatandtheprotectorcouldshutdown.Ifthishappens,waitacoupleminutesand
turnontheprojector.
• Usingtheprojectorataltitudeslessthanapproximately5500feet/1700metersandsettingto[HIGHALTITUDE]
cancausethelamptoovercool,causingtheimagetoicker.Switch[FANMODE]to[AUTO].
• Usingtheprojectorataltitudesapproximately5500feet/1700metersorhighercanshortenthelifeofopticalcom-
ponentssuchasthelamp.
About Copyright of original projected pictures:
Pleasenotethatusingthisprojectorforthepurposeofcommercialgainortheattractionofpublicattentioninavenue
suchasacoffeeshoporhotelandemployingcompressionorexpansionofthescreenimagewiththefollowingfunc-
tionsmayraiseconcernabouttheinfringementofcopyrightswhichareprotectedbycopyrightlaw.
[ASPECTRATIO],[KEYSTONE],Magnifyingfeatureandothersimilarfeatures.
Turkish RoHS information relevant for Turkish market
EEE Yonetmeliğine Uygundur.
Thisdeviceisnotintendedforuseinthedirecteldofviewatvisualdisplayworkplaces.Toavoidincommodingreec-
tionsatvisualdisplayworkplacesthisdevicemustnotbeplacedinthedirecteldofview.

vi
Table of Contents
Important Information ............................................................................................i
1. Introduction .......................................................................................................... 1
1What’sintheBox? ......................................................................................................... 1
IntroductiontotheProjector .......................................................................................... 2
Featuresyou’llenjoy: ............................................................................................... 2
Aboutthisuser’smanual .......................................................................................... 3
PartNamesoftheProjector .......................................................................................... 4
TopandScreenSideofProjector ............................................................................ 4
TerminalPanelSideofProjector .............................................................................. 4
RemovingandAttachingtheCableCover ............................................................... 5
TopFeatures ............................................................................................................ 7
TerminalPanelFeatures .......................................................................................... 8
PartNamesoftheRemoteControl ............................................................................... 9
BatteryInstallation ................................................................................................. 10
RemoteControlPrecautions .................................................................................. 10
OperatingRangeforWirelessRemoteControl ...................................................... 10
OperatingEnvironmentforSoftwareIncludedonCD-ROM ........................................ 11
OperatingEnvironment .......................................................................................... 12
2. Projecting an Image (Basic Operation) .............................................. 14
1FlowofProjectinganImage ........................................................................................ 14
ConnectingYourComputer/ConnectingthePowerCord ............................................. 15
TurningontheProjector 6 .............................................................................................. 1
NoteonStartupscreen(MenuLanguageSelectscreen) ...................................... 17
SelectingaSource ...................................................................................................... 18
Selectingthecomputerorvideosource................................................................. 18
AdjustingthePictureSizeandPosition ....................................................................... 19
Adjustinghorizontal/verticalposition ...................................................................... 20
Adjustingthefocus(Focusring) ............................................................................ 20
Adjustingthetilt(Tiltfoot) ...................................................................................... 21
Finelyadjustingtheverticaltilt ............................................................................... 21
Adjustingthesize[DigitalZoom] ............................................................................ 22
CorrectingKeystoneDistortionManually .................................................................... 23
Adjustingwithbuttonsonthecabinet .................................................................... 23
Adjustingwiththeremotecontrol ........................................................................... 24
OptimizingComputerSignalAutomatically 5 ................................................................. 2
AdjustingtheImageUsingAutoAdjust .................................................................. 25
TurningUporDownVolume ........................................................................................ 25
TurningofftheProjector 6 .............................................................................................. 2
WhenMovingtheProjector ......................................................................................... 27
3. Convenient Features ..................................................................................... 28
1TurningofftheImageandSound ................................................................................ 28
FreezingaPicture ....................................................................................................... 28
EnlargingaPicture ...................................................................................................... 28
ChangingEcoMode/CheckingEnergy-SavingEffect ................................................ 29

vii
Table of Contents
UsingEcoMode[ECOMODE] .............................................................................. 29
CheckingEnergy-SavingEffect[CARBONMETER] ............................................. 30
PreventingtheUnauthorizedUseoftheProjector[SECURITY] ................................. 31
UsingtheComputerCable(VGA)toOperatetheProjector(VirtualRemoteTool) ..... 34
OperatingYourComputer’sMouseFunctionsfromtheProjector’sRemoteControl
viatheUSBCable(RemoteMouseFunction) ....................................................... 04
ProjectingYourComputer’sScreenImagefromtheProjectorviatheUSBCable
(USBDisplay) 4 ........................................................................................................ 1
ControllingtheProjectorbyUsinganHTTPBrowser 4 ................................................. 3
ControllingtheProjectoroveraLAN(PCControlUtilityPro4/Pro5) ......................... 05
ProjectingYourComputer’sScreenImagefromtheProjectoroveraLAN(Image
ExpressUtilityLite) ................................................................................................ 54
StartingImageExpressUtilityLitefromaUSBMemoryorSDCard .................... 57
ProjectinganImagefromanAngle(GeometricCorrectionToolinImageExpress
UtilityLite) .............................................................................................................. 95
WhatyoucandowithGCT .................................................................................... 95
ProjectinganImagefromanAngle(GCT) ............................................................. 95
ConnectingYourMicrophone ....................................................................................... 16
4. Using the Viewer ............................................................................................. 26
❶WhatyoucandowiththeViewer ................................................................................. 26
❷ProjectingimagesstoredinaUSBmemorydevice .................................................... 64
ConvertingPowerPointlestoSlides(ViewerPPTConverter3.0) ............................. 07
5. Using On-Screen Menu ................................................................................ 37
1UsingtheMenus .......................................................................................................... 37
MenuElements ............................................................................................................ 74
ListofMenuItems ....................................................................................................... 75
MenuDescriptions&Functions[SOURCE] ................................................................ 87
COMPUTER .......................................................................................................... 87
HDMI1and2 .......................................................................................................... 87
VIDEO .................................................................................................................... 87
S-VIDEO ................................................................................................................ 87
VIEWER ................................................................................................................. 87
NETWORK ............................................................................................................. 87
USBDISPLAY ........................................................................................................ 87
MenuDescriptions&Functions[ADJUST] .................................................................. 97
[PICTURE] ............................................................................................................. 97
[IMAGEOPTIONS] ................................................................................................ 82
MenuDescriptions&Functions[SETUP] .................................................................... 86
[GENERAL] ............................................................................................................ 86
[MENU] .................................................................................................................. 88
[INSTALLATION] .................................................................................................... 90
[OPTIONS(1)] ........................................................................................................ 92
[OPTIONS(2)] ........................................................................................................ 94
SettinguptheProjectorforaWiredLANConnection[WIREDLAN] ..................... 96
SettinguptheProjectorforaWirelessLANConnection(withtheoptionalUSB
WirelessLANUnitequipped)[WIRLESSLAN] ...................................................... 97

1
Projector
Cable cover (24F48981)
(attached to the projector at the time of
shipment page )→ 5
1. Introduction
1 What’s in the Box?
Makesureyourboxcontainseverythinglisted.Ifanypiecesaremissing,contactyourdealer.
Pleasesavetheoriginalboxandpackingmaterialsifyoueverneedtoshipyourprojector.
Power cord
(US: 7N080240)
(EU: 7N080027)
Computer cable (VGA)
(7N520073/7N520052)
NEC Projector CD-ROM
User’s manual (PDF) and the utility
software
(7N951861)
For North America only
Limited warranty
For customers in Europe:
You will nd our current valid
Guarantee Policy on our Web
Site:
www.nec-display-solutions.com
• ImportantInfomation(ForNorth
America: 7N8N3231) (For Other
countries than North America:
7N8N3231 and 7N8N3241)
• QuickSetupGuide(7N8N3251)/
(7N8N3261)
Remote control
(7N900924)
Batteries (AAA × 2)
Unless otherwise described in the user’s manual, the drawings for the projector cabinet show examples of the
UM330X.

2
1. Introduction
Introduction to the Projector
Thissectionintroducesyoutoyournewprojectoranddescribesthefeaturesandcontrols.
Features you’ll enjoy:
• Ultrashortthrowdistances
Ultrashortfocallenses provideforalargerimage usingashorterthrowdistancewhencomparedtoa typical
projectorlens.
UM330X/UM280X:Max116.6"(UM330W/UM280W:Max110"),throwdistance:51cm/20inches
(Thethrowdistancereferstothedistancebetweenthescreenandthescreensideoftheprojector)
• Quickstart(3seconds* 1),QuickPowerOff,DirectPowerOff
3 seconds* 1afterturningonthepower,theprojectorisreadytodisplayPCorvideoimages.
Theprojectorcanbeputawayimmediatelyaftertheprojectorispowereddown.Nocooldownperiodisrequired
aftertheprojectoristurnedofffromtheremotecontrolorcabinetcontrolpanel.
Theprojectorhasafeaturecalled“DirectPowerOff”.Thisfeatureallowstheprojectortobeturnedoff(evenwhen
projectinganimage)byusingtheMainPowerSwitchordisconnectingtheACpowersupply.
ToturnofftheACpowersupplywhentheprojectorispoweredon,useapowerstripequippedwithaswitchand
abreaker.
*1 Thequickstarttimeisonlywhen[STANDBYMODE]issetto[NORMAL]intheon-screenmessage.
• 0.2W(100-130VAC)/0.4W(200-240VAC)instandbyconditionwithenergysavingtechnology
Selecting[POWER-SAVING]for[STANDBYMODE]fromthemenucanputtheprojectorinpower-savingmode
thatconsumesonly0.2W(100-130VAC)/0.4W(200-240VAC).
• CarbonMeter
Thisfeaturewillshowenergy-savingeffectintermsofCO 2emissionreduction(kg)whentheprojector’s[ECO
MODE]issetto[AUTOECO],[NORMAL],or[ECO].
TheamountofCO 2emissionreductionwillbedisplayedintheconrmationmessageatthetimeofpower-offand
intheINFOoftheon-screenmenu.
• Lamplifeupto8000hours* 2
UsinginEcoMode(ECO)allowsyoutoprolongtheprojector’slamplifeupto8000hours(upto4000hoursin
ECOMODEOFF).
*2 UM330X/UM330W:6000hours(upto3000hoursinECOMODEOFF)
• TwoHDMIinputssupportsdigitalsignals
ThetwoHDMIinputsprovideHDCPcompatibledigitalsignals.TheHDMIinputalsosupportsaudiosignal.
• 16Wbuilt-inspeakerforanintegratedaudiosolution
Powerful16wattmonauralspeakerprovidesvolumeneedforlargerooms.
• MICInputprovided
AMICinputjackforacommerciallyavailabledynamicmicrophoneisusefulforyourpresentationinaconference
room or lecture in a classroom.
• Theoptionalinteractivewhiteboardkitandtheprojectorcanbeusedtoconvertyourwhiteboardintoa
virtualtouchscreen.
Aninteractivewhiteboardkit(NP02Wi)isavailableasanoption.
• ThesuppliedremotecontrolallowsyoutoassignaCONTROLIDtotheprojector
Multipleprojectorscanbeoperatedseparatelyandindependentlywiththesamesingleremotecontrolbyassigning
anIDnumbertoeachprojector.

3
1. Introduction
• USBDisplay
UsingacommerciallyavailableUSBcable(compatiblewithUSB2.0specications)toconnectthecomputerwith
theprojectorallowsyoutosendyourcomputerscreenimagetotheprojectorwithouttheneedofatraditional
computercable(VGA).
• IntegratedRJ-45connectorforwirednetworkingcapabilityalongwithwirelessnetworkingcapabilities
AnRJ-45connectorisstandard.AnoptionalUSBWirelessLANUnitisrequiredforwirelessLANconnection.
• Softwareprograms(UserSupportware)containedinthesuppliedCD-ROM
ThesuppliedNECProjectorincludesfourprograms:VirtualRemoteTool,ImageExpressUtilityLite(forWindows/
MacOS),PCControlUtilityPro4(forWindows)/5(forMacOS),andViewerPPTConverter3.0.
ImageExpressUtilityLite(forWindows)canbestartedfromacommerciallyavailableUSBmemoryorSDcard
withouttheneedofinstallingonyourcomputer.
• AUTOPOWERONandAUTOPOWEROFFfeatures
TheDIRECTPOWERON,AUTOPOWERON(COMP.),AUTOPOWEROFF,andOFFTIMERfeatureseliminate
theneedtoalwaysusethePOWERbuttonontheremotecontrolorprojectorcabinet.
• Preventingunauthorizeduseoftheprojector
Enhancedsmartsecuritysettingsforkeywordprotection,cabinetcontrolpanellock,securityslot,andsecurity
chainopeningtohelppreventunauthorizedaccess,adjustmentsandtheftdeterrence.
• HighresolutionuptoWUXGA* 3
Highresolutiondisplay-uptoWUXGAcompatible,XGA(UM330X/UM280X)/WXGA(UM330W/UM280W)native
resolution.
*3 WhenWXGAMODEissettoON.
• CRESTRONROOMVIEWcompatibility
TheprojectorsupportsCRESTRONROOMVIEW,allowingmultipledevicesconnectedinthenetworktobeman-
agedandcontrolledfromacomputerorcontroller.
About this user’s manual
Thefastestwaytogetstartedistotakeyourtimeanddoeverythingrightthersttime.Takeafewminutesnowto
reviewtheuser’smanual.Thismaysaveyoutimelateron.Atthebeginningofeachsectionofthemanualyou’llnd
anoverview.Ifthesectiondoesn’tapply,youcanskipit.

4
1. Introduction
Part Names of the Projector
Top and Screen Side of Projector
Controls
( page )→ 7
FilterCover/IntakeVent/Filter
( page , )→ 116 123
Spacer (Left/Right)
To ne-adjust the height of the rear
foot, remove the spacer and rotate
the rear foot to the desired height.
( page )→ 21
Projection Window
Focus Ring
( page )→ 20
Tilt Foot
( page )→ 21
Built-in Security Slot ( )*
Lamp Cover
( page )→ 121
Security chain opening
Attach an anti-theft device.
The security chain opening accepts
security wires or chains up to 0.18
inch/4.6 mm in diameter.
* ThissecurityslotsupportstheMicroSaver ®SecuritySystem.
MonauralSpeaker(16W)
Terminal Panel ( page )→ 8
ACInput
Connect the supplied power cord’s
three-pin plug here, and plug the
other end into an active wall outlet.
( page )→ 15
Remote Sensor
( page )→ 10
Screw Hole for Cable Cover (Left/
Right)
( page )→ 5
Terminal Panel Side of Projector
IntakeVent/Filter
( page , )→ 116 123
Exhaust Vent

5
1. Introduction
Removing and Attaching the Cable Cover
Afternishingconnections,attachthesuppliedcablecovertoproperlyhidethecables.
CAUTION:
• Besuretotightenthescrewsafterattachingthecablecover.Failuretodosomaycausethecablecovertocome
offandfall,resultingininjuryordamagetothecablecover.
• Donotputbundledcablesinthecablecover.Doingsomaydamagethepowercord,resultinginare.
• Donotholdthecablecoverwhilemovingtheprojectorordonotapplyexcessiveforcetothecablecover.Doingso
maydamagethecablecover,resultingininjury.
Removingthecablecover
Toolneeded:
• Phillipsscrewdriver(plus-head)about9cm/4inchesinlength
9 cm/4 inches
1. Loosen the cable cover screws until the Phillips screw-
driver goes into a freewheeling condition
2. Remove the cable cover.
1Push up the cable cover slightly and rotate it to release.
Pull the cable cover while pushing and holding the arrow
part
Ifyoundittohardtoreleasethecablecover,tryholdingit
slightly up.
1
2

7
1. Introduction
Top Features
1, 2
7
4 8
9
11
5
6
10
3
1. (POWER)Button( page )→1 26, 6
2. POWER Indicator ( page )→112125, 6, 6, 6
3. STATUSIndicator( page )→126
4. LAMPIndicator( page )→120 12, 6
5. ECOButton( page )→29
6. SOURCEButton( page )→18
7. AUTOADJ.Button( page )→25
8. MENUButton( page )→73
9. /VolumeButtons /KeystoneButtons
( page )→23 2, 5
10.ENTERButton( page )→73
11.EXITButton( page )→73
9
1. Introduction
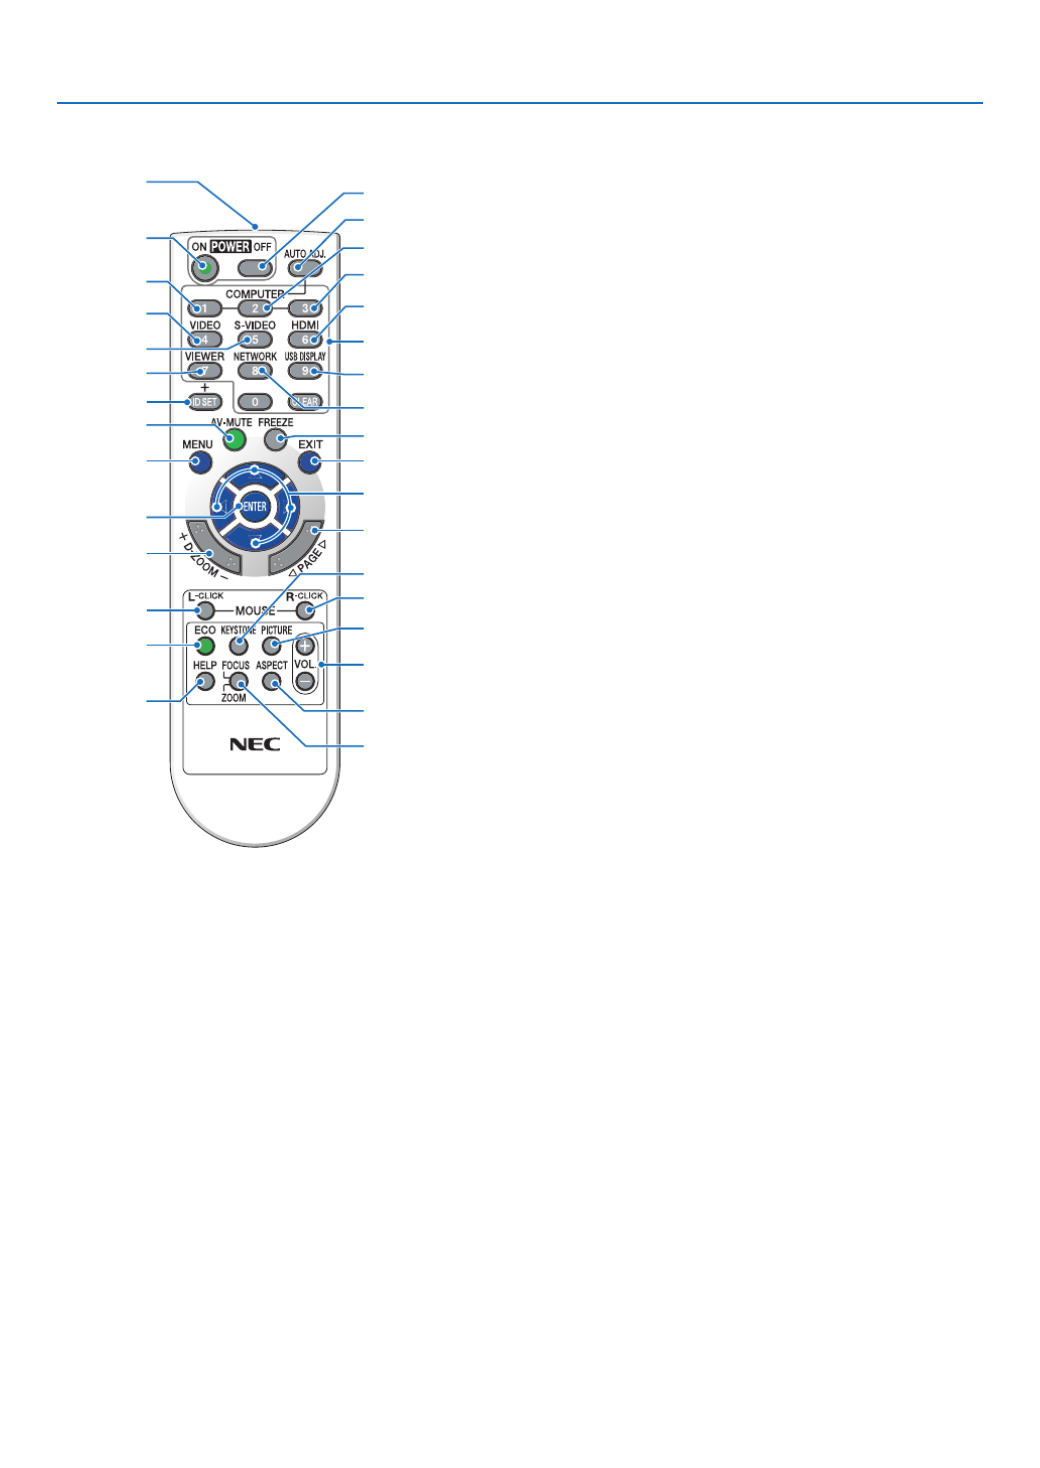
Part Names of the Remote Control
3
7
5
6
1
2
10
15
16
14
17
9
4
8
13
29
30
31
19
20
25
27
28
24
18
23
22
21
26
32
12
11
1. Infrared Transmitter
(→page )10
2. POWERONButton
(→page )16
3. POWEROFFButton
(→page )26
4,5,6.COMPUTER1/2/3Button
(→page )18
(COMPUTER2/3buttonisnotavailable.)
7. AUTOADJ.Button
(→page )25
8. VIDEOButton
(→page )18
9. S-VIDEOButton
(→page )18
10.HDMIButton( page )→18
11.VIEWERButton( page )→18 2, 6
12.NETWORKButton( page )→18
13.USBDISPLAYButton( page )→18
14.IDSETButton
(→page )91
15.NumericKeypadButton/CLEARButton
(→page )91
16.FREEZEButton
(→page )28
17.AV-MUTEButton
(→page )28
18.MENUButton
(→page )73
19.EXITButton( page )→73
20.Button( page )→73
21.ENTERButton( page )→73
22.D-ZOOM(+)(–)Button
(→page )28
23.MOUSEL-CLICKButton*
(→page )40
24.MOUSER-CLICKButton*
(→page )40
25.PAGE / Button
(→page )40
26.ECOButton( page )→29
27.KEYSTONEButton
(→page )24
28.PICTUREButton
(→page )79 81,
29.VOL.(+)(–)Button
(→page )25
30.ASPECTButton
(→page )84
31.FOCUS/ZOOMButton
TheZOOMbuttonwilldisplaytheDIGITALZOOMbar.
( page )TheFOCUSbuttondoesnotwork→22 8, 6
onthisseriesofprojectors.
32.HELPButton
(→page )99
* TheMOUSEL-CLICKandMOUSER-CLICKbuttonsworkonlywhenaUSBcableisconnectedwithyourcom-
puter.

10
1. Introduction
Remote Control Precautions
• Handletheremotecontrolcarefully.
• Iftheremotecontrolgetswet,wipeitdryimmediately.
• Avoidexcessiveheatandhumidity.
• Donotshort,heat,ortakeapartbatteries.
• Donotthrowbatteriesintore.
• Ifyouwillnotbeusingtheremotecontrolforalongtime,removethebatteries.
• Ensurethatyouhavethebatteries’polarity(+/−)alignedcorrectly.
• Donotusenewandoldbatteriestogether,orusedifferenttypesofbatteriestogether.
• Disposeofusedbatteriesaccordingtoyourlocalregulations.
Operating Range for Wireless Remote Control
30°
30°
30°
30°
60°
22 feet/7 m
19.7 feet/6 m
Remote sensor on projector cabinet
Remote sensor on projector cabinet
Remote control
Remote control
• Theinfraredsignaloperatesbyline-of-sightuptoadistanceofabout22feet/7mandwithina60-degreeangleof
theremotesensorontheprojectorcabinet.
• Theprojectorwillnotrespondifthereareobjectsbetweentheremotecontrolandthesensor,orifstronglightfalls
onthesensor.Weakbatterieswillalsopreventtheremotecontrolfromproperlyoperatingtheprojector.
1Pressrmlyandslidethebattery
coveroff.
2Installnewbatteries(AAA).Ensure
thatyouhavethebatteries’polarity
(+/−)alignedcorrectly.
Battery Installation
3
Slip the cover back over the bat-
teriesuntilitsnapsintoplace.Do
notmixdifferenttypesofbatteries
ornewandoldbatteries.
OPEN
OPEN

12
1. Introduction
Operating Environment
ThefollowingistheoperatingenvironmentforImageExpressUtilityLite.Fortheoperatingenvironmentofothersoft-
wareprogram,refertothehelpfunctionofeachsoftwareprogram.
[Windows]
SupportedOS Windows7HomeBasic
Windows7HomePremium
Windows7Professional
Windows7Ultimate
Windows7Enterprise
WindowsVistaHomeBasic
WindowsVistaHomePremium
WindowsVistaBusiness
WindowsVistaUltimate
WindowsVistaEnterprise
WindowsXPHomeEdition(32-bitversion)ServicePack3orlater
WindowsXPProfessional(32-bitversion)ServicePack3orlater
• Windowspower-savingfunctionisnotsupported.
Processor • Windows7/WindowsVista
PentiumM1.2GHzequivalentorhigherrequired
Dualcore1.5GHzorhigherrecommended
• WindowsXP
PentiumM1.0GHzequivalentorhigherrequired
Dualcore1.0GHzorhigherrecommended
Memory • Windows7/WindowsVista
512MBormorerequired
1GBormorerecommended
• WindowsXP
256MBormorerequired
512MBormorerecommended
* More memory may be required to run additional applications simultane-
ously.
Graphicprocessor • Windows7/WindowsVista
The “Graphics” score 3.0 or more of “Windows Experience Index” recom-
mended.
Networkenvironment TCP/IP-compatiblewiredLANorwirelessLAN
(*UseawirelessLANunitcomplyingwiththeWi-Fistandard.)
Resolution • Windows7/WindowsVista
SVGA(800×600)orhigherrequired
XGA(1024×768)recommended
• WindowsXP
VGA(640×480)orhigherrequired
XGA(1024×768)recommended
1024 dots × 768 lines - 1280 dots × 800 lines recommended (UM330W/
UM280W)
ScreenColors HighColor(15bits,16bits)
TrueColor(24bits,32bits)(recommended)
• 256orfewercolorsarenotsupported.
17
2. Projecting an Image (Basic Operation)
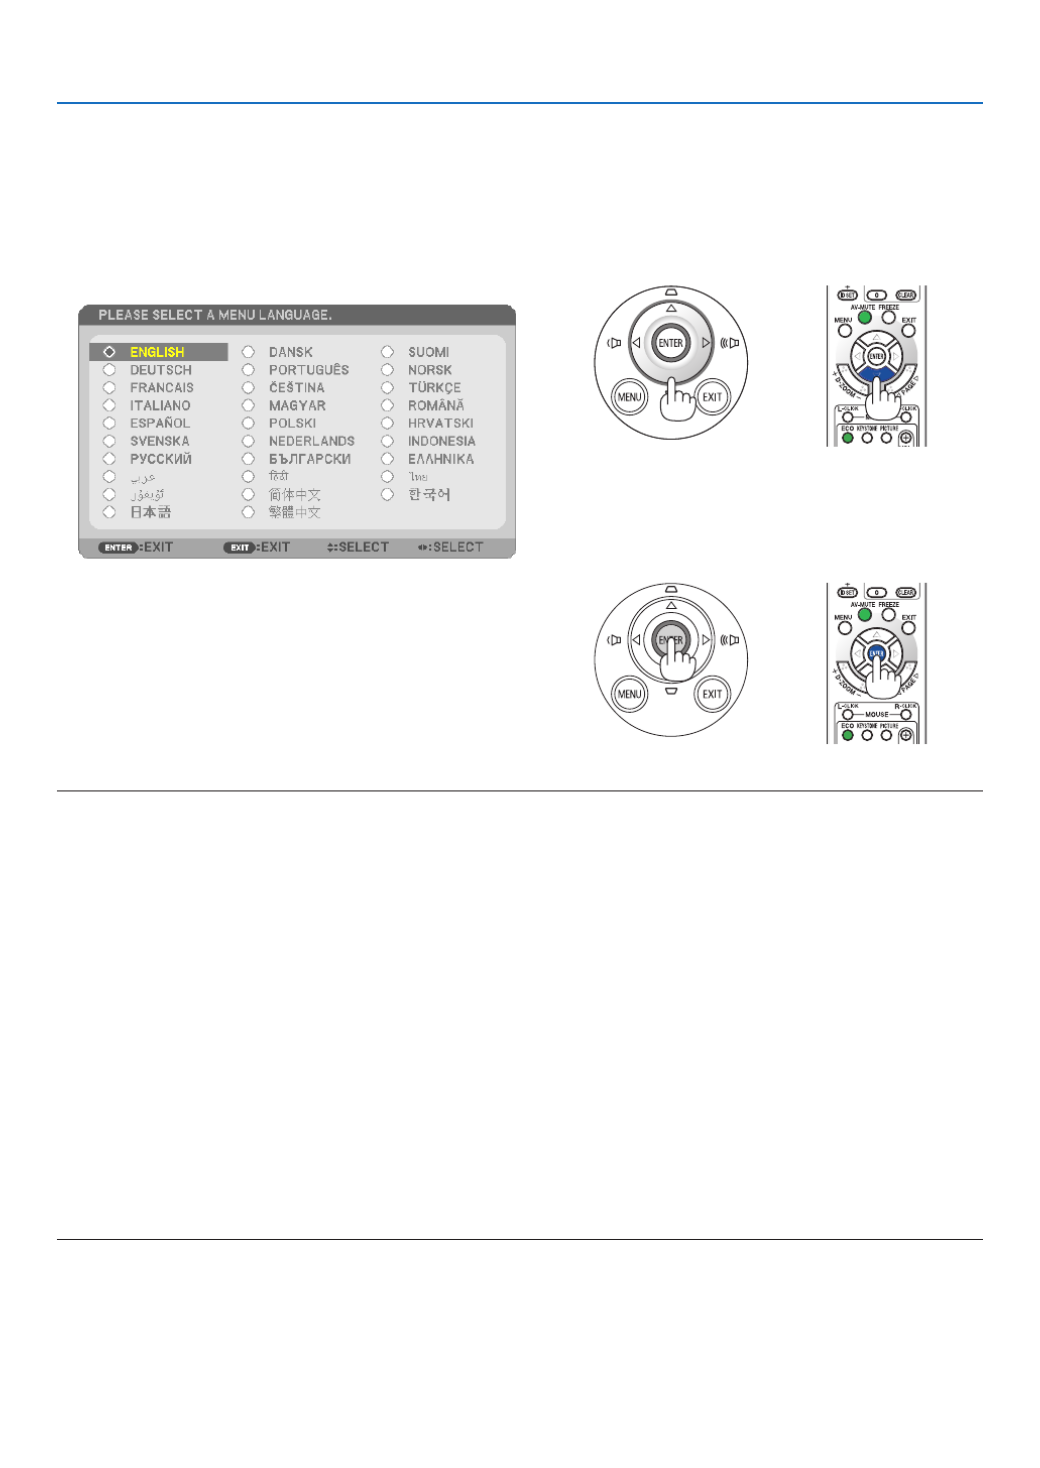
Note on Startup screen (Menu Language Select screen)
Whenyourstturnontheprojector,youwillgettheStartupmenu.Thismenugivesyoutheopportunitytoselectone
ofthe29menulanguages.
Toselectamenulanguage,followthesesteps:
1. Use the or button to select one of the 29 , ,
languages from the menu.
2. Press the ENTER button to execute the selection.
After this has been done, you can proceed to the menu
operation.
Ifyouwant,youcanselectthemenulanguagelater.
( [LANGUAGE]onpage )→75 and 88
NOTE:
• Whenturningoffthepowersupplyandthenbackonbyusingapowerstriporbreaker.
Allowaminimumof1secondbetweenturningoffthemainpowersupplyandturningitbackonagain.
Failingtodosocouldresultinnopowertotheprojector.(Therewillbenostand-byLED)
Shouldthishappen,unplugthepowercordandplugitinagain.Turnonthemainpower.
• Ifoneofthefollowingthingshappens,theprojectorwillnotturnon.
- Iftheinternaltemperatureoftheprojectoristoohigh,theprojectordetectsabnormalhightemperature.Inthisconditionthe
projectorwillnotturnontoprotecttheinternalsystem.Ifthishappens,waitfortheprojector’sinternalcomponentstocool
down.
- Whenthelampreachesitsendofusablelife,theprojectorwillnotturnon.Ifthishappens,replacethelamp.
- IftheSTATUSindicatorlightsorangewiththepowerbuttonpressed,itmeansthatthe[CONTROLPANELLOCK]isturnedon.
Cancelthelockbyturningitoff.( page→90)
- Ifthelampfailstolight,andiftheSTATUSindicatorashesonandoffinacycleofsixtimes,waitafullminuteandthenturn
onthepower.
• WhilethePOWERindicatorisblinkingblueinshortcycles,thepowercannotbeturnedoffbyusingthepowerbutton.
• Immediatelyafterturningontheprojector,screenickermayoccur.Thisisnormal.Wait3to5minutesuntilthelamplightingis
stabilized.
• Whentheprojectoristurnedon,itmaytakesometimebeforethelamplightbecomesbright.
• Ifyouturnontheprojectorimmediatelyafterthelampisturnedofforwhenthetemperatureishigh,thefansrunwithoutdisplay-
inganimageforsometimeandthentheprojectorwilldisplaytheimage.
Specyfikacje produktu
| Marka: | NEC |
| Kategoria: | projektor wideo |
| Model: | UM330Wi |
| Kolor produktu: | Biały |
| Typ produktu: | Projektor ultrakrótkiego rzutu |
| Źródło zasilania: | Prąd przemienny |
| Wbudowany wyświetlacz: | Nie |
| Częstotliwość wejściowa AC: | 50 - 60 Hz |
| Napięcie wejściowe AC: | 100 - 240 V |
| Wysokość produktu: | 112 mm |
| Szerokość produktu: | 378 mm |
| Głębokość produktu: | 428 mm |
| Waga produktu: | 5700 g |
| W zestawie pilot zdalnego sterowania: | Tak |
| Podręcznik użytkownika: | Tak |
| Certyfikat środowiskowy (zrównoważonego rozwoju): | RoHS |
| Poziom hałasu: | 28 dB |
| Wbudowane głośniki: | Tak |
| Moc wyjściowa (RMS): | 16 W |
| Certyfikaty: | CE; TÜV GS; Gost-R |
| Wyjścia słuchawkowe: | 1 |
| Obsługiwany typ USB: | USB Type-A, USB Type-B |
| Ilość portów Ethernet LAN (RJ-45): | 1 |
| Umieszczenie: | Komputer stacjonarny |
| Zakres temperatur (eksploatacja): | 5 - 40 °C |
| Zakres wilgotności względnej: | 20 - 80 % |
| Współczynnik kontrastu (typowy): | 3000:1 |
| Natywne proporcje obrazu: | 16:10 |
| Możliwość przybliżenia: | Tak |
| Skrócona instrukcja obsługi: | Tak |
| Przewody: | AC, VGA |
| Pobór mocy w trybie czuwania: | 0.4 W |
| Wejscie Audio (L,P): | 1 |
| Liczba portów USB 2.0: | 3 |
| Przewodowa sieć LAN: | Tak |
| Zintegrowany czytnik kart: | Nie |
| Kompatybilność 3D: | Nie |
| Pobór mocy: | 263 W |
| Zakres temperatur (przechowywanie): | -20 - 60 °C |
| Dopuszczalna wilgotność względna: | 20 - 80 % |
| Ilość portów HDMI: | 2 |
| Port RS-232: | 1 |
| Liczba portów VGA (D-Sub): | 2 |
| Wyście mocy ac: | Tak |
| Zużycie energii w trybie energooszczędnym: | 233 W |
| Ilość wbudowanych glosników: | 1 |
| Długość ogniskowa: | - mm |
| Zasięg skanowania w poziomie: | 15 - 100 kHz |
| Zasięg skanowania (długość): | 50 - 120 Hz |
| Obsługiwane tryby wideo: | 1080i, 480i, 480p, 576i, 576p, 720p |
| Port DVI: | Nie |
| Obsługiwane proporcje obrazu: | 16:10 |
| Uchwyty mocowania dołączone: | Tak |
| Pełny HD: | Nie |
| System formatu sygnału analogowego: | NTSC, NTSC 3.58, NTSC 4.43, PAL, PAL 60, PAL M, PAL N, SECAM |
| Ostrość: | Ręczny |
| Interfejs SCSI: | RS-232 |
| Jasność projektora: | 3300 ANSI lumenów |
| Technologia projekcji: | 3LCD |
| Naturalna rozdzielczość projektora: | WXGA (1280x800) |
| Odległość projekcji: | 0.11 - 0.51 m |
| Kompatybilność rozmiaru ekranu: | 60 - 100 " |
| Rodzaj źródła światła: | Lampa |
| Moc lampy: | 195 W |
| Żywotność źródła światła: | 3500 h |
| Żywotność źródła światła (tryb ekonomiczny): | 3000 h |
| Współczynnik zbliżenia: | 1.4:1 |
| Wejście S-Video: | 1 |
| Poziom hałasu (tryp ekonomiczn): | 28 dB |
| Rozmiar matrycy: | 0.59 " |
| Moc lampy (tryp ekonomiczn): | 160 W |
| Jasność projektora (tryb ekonomiczny): | 1980 ANSI lumenów |
| Typ matrycy: | 3-panel (p-Si TFT active) |
| Natężenie światła białego: | 3300 ANSI lumenów |
| Natężenie światła barwnego: | 3300 ANSI lumenów |
Potrzebujesz pomocy?
Jeśli potrzebujesz pomocy z NEC UM330Wi, zadaj pytanie poniżej, a inni użytkownicy Ci odpowiedzą
Instrukcje projektor wideo NEC

4 Września 2024
28 Maja 2024
28 Maja 2024
27 Maja 2024
27 Maja 2024
23 Maja 2024
23 Maja 2024
22 Maja 2024
22 Maja 2024
21 Maja 2024
Instrukcje projektor wideo
- projektor wideo Sony
- projektor wideo Sharp
- projektor wideo Lenovo
- projektor wideo Philips
- projektor wideo Acer
- projektor wideo Epson
- projektor wideo Hisense
- projektor wideo Panasonic
- projektor wideo Promethean
- projektor wideo Canon
- projektor wideo Viewsonic
- projektor wideo Asus
- projektor wideo D-Link
- projektor wideo Blaupunkt
- projektor wideo Salora
- projektor wideo Casio
- projektor wideo HP
- projektor wideo Prixton
- projektor wideo Kodak
- projektor wideo Dell
- projektor wideo Eurolite
- projektor wideo Ricoh
- projektor wideo Pyle
- projektor wideo Kindermann
- projektor wideo OKI
- projektor wideo Mitsubishi
- projektor wideo RCF
- projektor wideo XGIMI
- projektor wideo Sanyo
- projektor wideo Optoma
- projektor wideo Barco
- projektor wideo 3M
- projektor wideo Nebula
- projektor wideo Anker
- projektor wideo Hitachi
- projektor wideo BenQ
- projektor wideo Adj
- projektor wideo Miroir
- projektor wideo Stairville
- projektor wideo Planar
- projektor wideo Speaka
- projektor wideo InFocus
- projektor wideo Vivitek
- projektor wideo Vankyo
- projektor wideo EKO
- projektor wideo Christie
Najnowsze instrukcje dla projektor wideo

25 Września 2024
25 Września 2024

19 Września 2024
16 Września 2024
16 Września 2024
16 Września 2024
16 Września 2024

16 Września 2024
14 Września 2024
14 Września 2024