Instrukcja obsługi JVC LT-55VU3005
Przeczytaj poniżej 📖 instrukcję obsługi w języku polskim dla JVC LT-55VU3005 (96 stron) w kategorii Telewizja. Ta instrukcja była pomocna dla 11 osób i została oceniona przez 2 użytkowników na średnio 4.5 gwiazdek
Strona 1/96

English
Quck Start Gude
Insert the batteres nto the Remote Control
1
Insert two or equvalent type batteres nsde.AAA/R3
Observe the correct polarty (+/-) when nsertng batteres
and replace the battery cover.
3
Connect the TV to the mans socket
2Connect the antenna to your TV
REAR SIDE OF THE TV
Satellte
Aeral
or
Cable
* dffer dependng on theThe back connection options may model
After connectng the power cord to the mans socket, the
standby LED lghts up.
2b. Press the control button on the TV.
To swtch on the TV from standby mode ether;
2a. Press the mddle of the sde functon swtch on the TV
n.
--------- or ---------
* The appearance of the remote control buttons and the poston of
the control buttons on the TV may dffer dependng on the model
1. Standby Press the button, a numerc button or
Programme +/- button on the remote control.
To swtch the TV on (dependng on the model)
4
or
ANT SAT
ANT TV
12a
2b
English
Auto Setup procedure
6
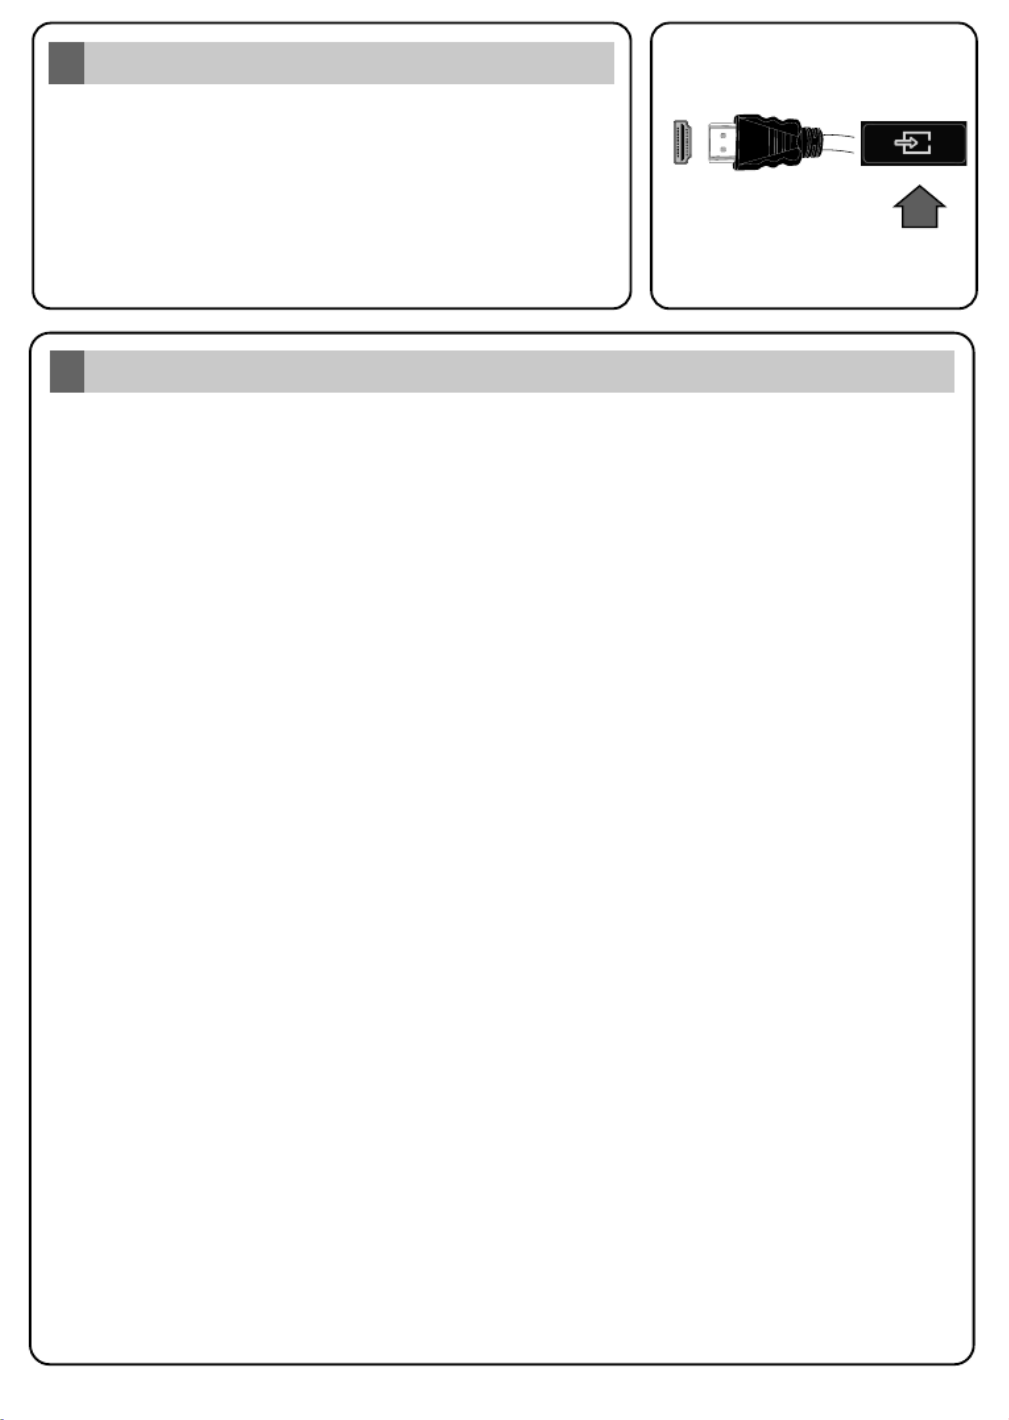
PLEASE ENSURE BOTH UNITS ARE SWITCHED OFF
BEFORE CONNECTING. Use a HDMI to HDMI cable to
connect the two unts together. To select the HDMI nput,
press the Source button on the remote control. Each tme t s
pressed the on-screen menu confrms your selecton.
* The appearance of the Source button may dffer dependng on the
model of the remote control
HDMI nput
5
SOURCE
SOURCE
SOURCE
SOURCE
SOURCE
To HDMI connecton
on the devce
Hghlght and Next press button on the remote control to continue and the OK Network/Internet
Settings menu will be displayed.
Analogue ○
D.Aerial ○
On the next screens et your preferences.
Select for home use. You can activate option at this point if necessary, Home Mode Store Mode
however, this option is only intended for store use.
On the next screen set your country preference. Then press OK to continue.
Broadcast Search;
Depending on the model of your TV and the country selection Privacy Settings menu may appear
at this point. Using this menu you can set your privacy privileges. Highlight a feature and use Left
and Right directional buttons to enable or disable. If the option is disabled Internet Connection
Network/Internet Settings screen will be skipped and not displayed.
Refer to secton to confgure a wred or a wreless connecton. Connect your TV to the nternet
After the settngs are completed hghlght Next and press OK button to contnue.
Select favourite network type Satellte
Satellite ●
After the initial settings are completed TV will start to search for available broadcasts of the selected
broadcast types.
When turned on for the first time, the language selection screen is displayed. Select the desired
language and press OK.
(*) LCN is the Logical Channel Number system that organizes available broadcasts in accordance
with a recognizable channel number sequence (if available).
While the search continues a message may appear, asking whether you want to sort channels
according to the LCN(*). Select Yes and press OK to confirm.
After the channel scan has been completed the menu may appear. Select the Choose Region
appropriate settings for your location using the directional buttons then press OK.
When finished, highlight Next and press OK to start channel scan.
Note: Do not turn off the TV while initializing first time installation. Note that, some options may not be available
depending on the country selection.
Scan Encrypted Channels On
D.Cable ○
After all the available stations are stored, menu will be displayed. You can edit the Channels
channel list according to your preferences using the tab options or press the button to Edit Menu
quit and watch TV.

English
Connect your TV to the Internet
7
Connectvty feature allows you to connect your TV to the home network wred or wrelessly. You
can use ths networkng system to connect to nternet or to access photo, vdeo and audo fles that
are stored on a Meda server connected to the network and play/dsplay them on the TV.
However, f your TV does not have Wreless USB dongle or doesn’t support nternal WLAN
feature, you should use wred connecton type. Add your TV to your home network by connectng t
to the modem/router va an LAN cable (not suppled) as llustrated.
T may LAN Yo use your TV with your wireless network, you need a W USB dongle. ou should
connect t to one of the USB inputs o the TV.n If your TV supports nternal WLAN feature you won't
need a wreless LAN adaptor.
Press the button to open the man TV menu. Select by usng the drectonal Menu Settngs
buttons, hghlght Network and press OK. Whle Network Type s hghlghted, press Left or Rght
buttons to select connecton type. Wred connecton wll be establshed automatcally. If wreless
connecton s selected, hghlght Scan Wreless Networks and press . The TV wll search for OK
the avalable wreless networks and lst them when fnshed. Select one and press the OK button to
connect. If the wreless network s password-protected you should enter the correct password to
access the network.
Wred ConnectonWreless Connecton
LAN (ethernet) cable
or
USB input s on the rear left /
side of the TV
LAN nput on the rear sde
of the TV
Broadband
ISP
connecton
Broadband
ISP
connecton
TV wth nternal WLAN
Wreless USB
dongle
By usng the drectonal buttons select a desred category. Every category ncludes dfferent
topcs. Select a topc and press to read nstructons. To close the E-Manual screen press OK
the or button.Ext Menu
Ths manual s not meant to be comprehensve and should not be taken as such. You can fnd
detaled nstructons for your TV's features n the E-Manual. To access the E-Manual, enter
Settngs Manuals OK Menu menu, select and press . For quck access press button and then
Info button.
Note: The content of the E-Manual may vary accordng to the model.
E-Manual
8
Specyfikacje produktu
| Marka: | JVC |
| Kategoria: | Telewizja |
| Model: | LT-55VU3005 |
Potrzebujesz pomocy?
Jeśli potrzebujesz pomocy z JVC LT-55VU3005, zadaj pytanie poniżej, a inni użytkownicy Ci odpowiedzą
Instrukcje Telewizja JVC

11 Stycznia 2025
3 Października 2024
2 Października 2024
30 Września 2024
24 Września 2024
24 Września 2024
24 Września 2024
23 Września 2024
22 Września 2024
22 Września 2024
Instrukcje Telewizja
- Telewizja Sony
- Telewizja Yamaha
- Telewizja Samsung
- Telewizja Electrolux
- Telewizja AEG
- Telewizja Beko
- Telewizja LG
- Telewizja Küppersbusch
- Telewizja Xiaomi
- Telewizja Sharp
- Telewizja TCL
- Telewizja Pioneer
- Telewizja Lenovo
- Telewizja Philips
- Telewizja SilverCrest
- Telewizja Acer
- Telewizja Nokia
- Telewizja Hisense
- Telewizja Infiniton
- Telewizja Panasonic
- Telewizja Muse
- Telewizja Viewsonic
- Telewizja Nedis
- Telewizja AG Neovo
- Telewizja Medion
- Telewizja OK
- Telewizja Lenco
- Telewizja Polar
- Telewizja Marquant
- Telewizja Toshiba
- Telewizja Tesla
- Telewizja Westinghouse
- Telewizja Majestic
- Telewizja Jensen
- Telewizja ILive
- Telewizja Blaupunkt
- Telewizja Brandt
- Telewizja Vivax
- Telewizja Terris
- Telewizja Salora
- Telewizja Siemens
- Telewizja Teac
- Telewizja Casio
- Telewizja Iiyama
- Telewizja Citizen
- Telewizja Dual
- Telewizja Grundig
- Telewizja Haier
- Telewizja Soundmaster
- Telewizja Hyundai
- Telewizja Manhattan
- Telewizja Strong
- Telewizja ECG
- Telewizja Oyster
- Telewizja Icy Box
- Telewizja Bang & Olufsen
- Telewizja V7
- Telewizja Dell
- Telewizja Furrion
- Telewizja Funai
- Telewizja Oppo
- Telewizja TechniSat
- Telewizja Schneider
- Telewizja Krüger&Matz
- Telewizja Philco
- Telewizja CHiQ
- Telewizja Qilive
- Telewizja Uniden
- Telewizja Thomson
- Telewizja Ferguson
- Telewizja Wharfedale
- Telewizja Manta
- Telewizja Pyle
- Telewizja Cecotec
- Telewizja Marantz
- Telewizja AOC
- Telewizja Monster
- Telewizja Peerless-AV
- Telewizja Caratec
- Telewizja Nevir
- Telewizja Mitsubishi
- Telewizja Arçelik
- Telewizja Continental Edison
- Telewizja GoGen
- Telewizja Intenso
- Telewizja NEC
- Telewizja Polaroid
- Telewizja Aiwa
- Telewizja AKAI
- Telewizja Sanyo
- Telewizja Clatronic
- Telewizja Telefunken
- Telewizja Optoma
- Telewizja SVAN
- Telewizja Innoliving
- Telewizja Abus
- Telewizja Jay-Tech
- Telewizja Bush
- Telewizja Loewe
- Telewizja Kemo
- Telewizja VOX
- Telewizja Insignia
- Telewizja AYA
- Telewizja Element
- Telewizja Orima
- Telewizja Denver
- Telewizja Kernau
- Telewizja Aspes
- Telewizja Albrecht
- Telewizja Orion
- Telewizja Hitachi
- Telewizja Technika
- Telewizja Seiki
- Telewizja SereneLife
- Telewizja RCA
- Telewizja MBM
- Telewizja BenQ
- Telewizja Trevi
- Telewizja Lexibook
- Telewizja GPX
- Telewizja Sencor
- Telewizja Odys
- Telewizja Nabo
- Telewizja Nextbase
- Telewizja Zenith
- Telewizja Daewoo
- Telewizja Allview
- Telewizja Metz
- Telewizja Kunft
- Telewizja Grunkel
- Telewizja Alphatronics
- Telewizja XD Enjoy
- Telewizja RevolutionHD
- Telewizja FFalcon
- Telewizja Dyon
- Telewizja Reflexion
- Telewizja Megasat
- Telewizja Sogo
- Telewizja Proline
- Telewizja Finlux
- Telewizja Alden
- Telewizja Aldi
- Telewizja Airis
- Telewizja Aristona
- Telewizja Apex
- Telewizja Ziggo
- Telewizja Techwood
- Telewizja Walker
- Telewizja Saba
- Telewizja Antarion
- Telewizja Tevion
- Telewizja Proscan
- Telewizja Vestel
- Telewizja Tucson
- Telewizja Energy Sistem
- Telewizja Sagem
- Telewizja Sunstech
- Telewizja Sylvania
- Telewizja Sunny
- Telewizja Luxor
- Telewizja Nordmende
- Telewizja AudioAffairs
- Telewizja Magnum
- Telewizja Audiosonic
- Telewizja Kubo
- Telewizja Coby
- Telewizja Seg
- Telewizja Vivo
- Telewizja Daitsu
- Telewizja Changhong
- Telewizja Alba
- Telewizja Naxa
- Telewizja Star-Light
- Telewizja Fantec
- Telewizja Mpman
- Telewizja Sweex
- Telewizja Vizio
- Telewizja Cello
- Telewizja Mx Onda
- Telewizja Nikkei
- Telewizja Peaq
- Telewizja Hannspree
- Telewizja DGM
- Telewizja Yasin
- Telewizja Roadstar
- Telewizja Humax
- Telewizja MT Logic
- Telewizja Superior
- Telewizja Difrnce
- Telewizja ITT
- Telewizja Avtex
- Telewizja Inovia
- Telewizja Lin
- Telewizja Aconatic
- Telewizja NPG
- Telewizja Bluesky
- Telewizja Videocon
- Telewizja Xoro
- Telewizja Durabase
- Telewizja HKC
- Telewizja Edenwood
- Telewizja Woxter
- Telewizja Premier
- Telewizja Onn
- Telewizja Teleco
- Telewizja Packard Bell
- Telewizja Opera
- Telewizja LTC
- Telewizja JTC
- Telewizja Zalman
- Telewizja Horizon
- Telewizja United
- Telewizja SYLVOX
- Telewizja Doffler
- Telewizja FOX Electronics
- Telewizja Viewpia
- Telewizja JGC
- Telewizja Online
- Telewizja DirecTV
- Telewizja Tele 2
- Telewizja Graetz
- Telewizja Kogan
- Telewizja Telesystem
- Telewizja EKO
- Telewizja E-motion
- Telewizja Mitsai
- Telewizja Selfsat
- Telewizja High One
- Telewizja Tve
- Telewizja ISymphony
- Telewizja Pantel
- Telewizja Magnavox
- Telewizja ATYME
- Telewizja HCI
- Telewizja Inno-Hit
- Telewizja Engel
- Telewizja Bang Olufsen
- Telewizja TechLine
- Telewizja Elements
- Telewizja Digihome
- Telewizja Englaon
- Telewizja Time
- Telewizja Reflex
- Telewizja Astar
- Telewizja Visco
- Telewizja Tivax
- Telewizja H&B
- Telewizja Norcent
- Telewizja TELE System
- Telewizja TIM
- Telewizja Belson
- Telewizja Vision Plus
- Telewizja Sbr
- Telewizja Bauhn
- Telewizja Voxx
- Telewizja Rm 2000
- Telewizja Hoher
- Telewizja Felson
- Telewizja Mach Power
- Telewizja Elbe
- Telewizja Axing
- Telewizja CGV
- Telewizja Smart Tech
- Telewizja Séura
- Telewizja Mitzu
- Telewizja JTC24
- Telewizja Coocaa
- Telewizja Kivi
- Telewizja Smart Brand
- Telewizja Mystery
- Telewizja Linsar
Najnowsze instrukcje dla Telewizja

3 Kwietnia 2025
3 Kwietnia 2025
3 Kwietnia 2025

3 Kwietnia 2025
3 Kwietnia 2025

3 Kwietnia 2025
3 Kwietnia 2025

3 Kwietnia 2025
3 Kwietnia 2025

3 Kwietnia 2025