Instrukcja obsługi Hotpoint HVMB14S4WWW
Hotpoint
Magnetostrykcja
HVMB14S4WWW
Przeczytaj poniżej 📖 instrukcję obsługi w języku polskim dla Hotpoint HVMB14S4WWW (32 stron) w kategorii Magnetostrykcja. Ta instrukcja była pomocna dla 20 osób i została oceniona przez 2 użytkowników na średnio 4.5 gwiazdek
Strona 1/32

49-7000264 Rev. 0 02-24
Write the model and serial
numbers here:
Model # _________________
Serial # _________________
You can find them on a label inside
the oven.
OWNER’S MANUAL
MICROWAVE OVEN
HVMB14S4
GE is a trademark of the General Electric Company. Manufactured under trademark license.
SAFETY INFORMATION ...........3
USING YOUR OVEN
Parts and Features . . . . . . . . . . . . . . . . . . . . .6
Control Panel . . . . . . . . . . . . . . . . . . . . . . . . .8
Power Levels . . . . . . . . . . . . . . . . . . . . . . . . . 10
Time Features . . . . . . . . . . . . . . . . . . . . . . . . 10
Sensor Features . . . . . . . . . . . . . . . . . . . . . . 10
Microwave Terms . . . . . . . . . . . . . . . . . . . . . 12
CARE AND CLEANING
Care and Cleaning . . . . . . . . . . . . . . . . . . . . 12
TROUBLESHOOTING . . . . . . . . . . . . . 14
CONSUMER SUPPORT
Limited Warranty . . . . . . . . . . . . . . . . . . . . . 15
Consumer Support . . . . . . . . . . . . . . . . . . . . 16

249-7000264 Rev. 0
THANK YOU FOR MAKING GE APPLIANCES A PART OF YOUR HOME.
Whether you grew up with GE Appliances, or this is your first, we’re happy to have you in the family.
We take pride in the craftsmanship, innovation and design that goes into every GE Appliances product, and we think you
will too. Among other things, registration of your appliance ensures that we can deliver important product information and
warranty details when you need them.
Register your GE appliance now online. Helpful websites and phone numbers are available in the Consumer Support
section of this Owner’s Manual. You may also mail in the pre-printed registration card included in the packing material.

49-70000264 Rev. 0 3
SAFETY INFORMATION
IMPORTANT SAFETY INSTRUCTIONS
READ ALL INSTRUCTIONS BEFORE USING THE APPLIANCE
WARNING To reduce the risk of burns, electric shock, re, injury to persons, or exposure to
excessive microwave energy:
When using electrical appliances, basic safety precautions should be followed, including the following:
Ŷ Read all instructions before using this appliance.
Ŷ Read and follow the specific PRECAUTIONS TO
AVOID POSSIBLE EXPOSURE TO EXCESSIVE
MICROWAVE ENERGY section.
Ŷ Use this appliance only for its intended use as
described in this manual. Do not use corrosive
chemicals or vapors in this appliance. This microwave
oven is specifically designed to heat, dry or cook
food, and is not intended for laboratory or industrial
use.
Ŷ This appliance should be serviced only by qualified
service personnel. Contact nearest authorized service
facility for examination, repair, or adjustment.
INSTALLATION
Ŷ Install or locate this appliance only in accordance with
the provided installation instructions.
Ŷ This appliance must be grounded. Connect only to
a properly grounded outlet. See the GROUNDING
INSTRUCTIONS section.
Ŷ Do not operate this appliance if it has a damaged
power cord or plug, if it is not working properly, or if it
has been damaged or dropped.
Ŷ Keep power cord away from heated surfaces.
Ŷ Do not let cord hang over edge of table or counter.
Ŷ Do not immerse power cord or plug in water.
Ŷ Do not cover or block any opening on the appliance.
Ŷ Do not store this appliance outdoors. Do not use this
product near water - for example, in a wet basement,
near a swimming pool, or in a similar location.
Ŷ Do not mount over a sink.
TO REDUCE THE RISK OF FIRE IN THE CAVITY:
— Do not overcook food. Carefully attend appliance
when paper, plastic or other combustible materials
are placed inside the oven while cooking.
— Remove wire twist-ties and metal handles from
paper or plastic containers before placing them in
the oven.
— If materials inside the oven ignite, keep the oven
door closed, turn the oven off and disconnect the
power cord, or shut off power at the fuse or circuit
breaker panel.
— Do not store any materials in the oven when not in
use. Do not leave paper products, cooking utensils,
or food in the cavity when not in use. All racks
should be removed from oven when not in use.
— Do not operate the microwave feature without food
in the oven.
TO REDUCE THE RISK OF BURNS
Ŷ Be careful when opening containers of hot food. Use
pot holders and direct steam away from face and
hands.
Ŷ Vent, pierce, or slit containers, pouches or plastic
bags to prevent build-up of pressure.
Ŷ%HFDUHIXOZKHQWRXFKLQJWKHWXUQWDEOHGRRUUDFNVRU
walls of the oven which may become hot during use.
Do not touch heating elements.
Ŷ(QHUJL]HGFRRNWRSVXUIDFHDQGLQWHULRUFDYLW\OLJKWLQJ
will cause burns. Use caution when cleaning and
allow lamps to cool prior to replacement.
Ŷ HOT CONTENTS CAN CAUSE SEVERE BURNS.
DO NOT ALLOW CHILDREN TO USE THE
MICROWAVE. Use caution when removing hot items.
READ AND SAVE THESE INSTRUCTIONS

49-70000264 Rev. 0 5
READ AND SAVE THESE INSTRUCTIONS
IMPORTANT SAFETY INSTRUCTIONS
READ ALL INSTRUCTIONS BEFORE USING THE APPLIANCE
SAFETY INFORMATION
GROUNDING INSTRUCTIONS
WARNING Improper use of the grounding plug can result in a risk of electric shock.
This appliance must be
grounded. In the event of
an electrical short circuit,
grounding reduces the
risk of electric shock by
providing an escape wire
for the electric current.
This appliance is equipped with a power cord having a
grounding wire with a grounding plug. The plug must
be plugged into an outlet that is properly installed and
grounded.
Consult a qualified electrician or service technician if
the GROUNDING INSTRUCTIONS are not completely
understood, or if doubt exists as to whether the
appliance is properly grounded.
If the outlet is a standard 2-prong wall outlet, it is
your personal responsibility and obligation to have it
replaced with a properly grounded 3-prong wall outlet.
Do not under any circumstances cut or remove the third
(ground) prong from the power cord.
A short power-supply cord is provided to reduce risks
resulting from becoming entangled or tripping over a
longer cord.
Do not use an extension cord. If the power cord is too
short, have a qualified electrician or service technician
install an outlet near the appliance.
For best operation, plug this appliance into its own
electrical outlet to prevent flickering of lights, blowing of
fuse or tripping of circuit breaker.
PRECAUTIONS TO AVOID POSSIBLE EXPOSURE
TO EXCESSIVE MICROWAVE ENERGY
(a) Do Not Attempt to operate this oven with the
door open since open-door operation can result
in harmful exposure to microwave energy. It is
important not to defeat or tamper with the safety
interlocks.
(b) Do Not Place any object between the oven front
face and the door or allow soil or cleaner residue to
accumulate on sealing surfaces.
(c) Do Not Operate the oven if it is damaged.
It is particularly important that the oven door close
properly and that there is no damage to the:
(1) door (bent),
(2) hinges and latches (broken or loosened),
(3) door seals and sealing surfaces.
(d) The Oven Should Not be adjusted or repaired by
anyone except properly qualified service personnel.
NOTICE: PACEMAKERS
Most pacemakers are shielded from interference from electronic products, including microwaves. However,
patients with pacemakers may wish to consult their physicians if they have concerns.
Ensure proper ground
exists before use.
VENT FAN
WARNING The fan will operate automatically under certain conditions. Take care to prevent the starting
and spreading of accidental cooking fires while the vent fan is in use.
Ŷ&OHDQWKHXQGHUVLGHRIWKHPLFURZDYHRIWHQ'RQRW
allow grease to build up on the microwave or the fan
lters.
Ŷ,QWKHHYHQWRIDJUHDVHILUHRQWKHVXUIDFHXQLWV
below the microwave oven, smother a flaming pan
on the surface unit by covering the pan completely
with a lid, a cookie sheet or a flat tray.
Ŷ8VHFDUHZKHQFOHDQLQJWKHYHQWIDQILOWHUV
Corrosive cleaning agents, such as lye-based oven
cleaners, may damage the filters.
Ŷ:KHQSUHSDULQJIODPLQJIRRGVXQGHUWKHPLFURZDYH
turn the fan on.
Ŷ1HYHUOHDYHVXUIDFHXQLWVEHQHDWK\RXUPLFURZDYH
oven unattended. Boilovers cause smoking and
greasy spillovers that may ignite and spread if
the microwave vent fan is operating. To minimize
automatic fan operation, use adequate sized
cookware and use high heat on surface units only
when necessary.

649-7000264 Rev. 0
Parts and Features
Throughout this manual, features and appearance may vary from your model.
USING YOUR OVEN
A. Door
B. Window
C. Interlock System
D.&RQWURO3DQHO
E. Turntable Ring Assembly
F. Turntable Coupler
G. Glass Turntable
H. Top Grille
I.3RZHU&RUG
J. Surface Lights
K. Grease Filters
A
B
C
D
E F G
H
I
A
K
J
K
Front View
Bottom View

49-70000264 Rev. 0 7
USING YOUR OVEN
Parts and Features
Specications
Model Number HVMB14S4
Rated Voltage 120V~60Hz
5DWHG,QSXW3RZHU0LFURZDYH 1500 Watt
5DWHG2XWSXW3RZHU0LFURZDYH 1000 Watt
Oven Capacity 1.4 cu.ft
Turntable Diameter 13-1/2” (34.5 cm)
External Dimensions (W x D x H) 23-7/8 “ x 16-3/16 “ x 17” (60.6 cm x 41.1 cm x 43.2 cm)
Net Weight 57.3 lbs (26 kg)
LED Lighting Service Replacement only
Turntable
• The turntable ring assembly and the glass turntable
must be used during cooking.
• If you are using large or oblong-shaped cookware
that would touch the walls of the microwave when the
turntable spins, you can turn o the turntable.
• 3UHVVTURNTABLE. “OFF” and the icon will
appear in the display.
• Assemble the turntable as shown
A
B
C
D
A: Hub (underside)
B: Glass Turntable
C : Turntable Ring Assembly
D : Turntable Coupler
NOTE:
• Do not place the glass turntable upside down.
• The glass tray should never be restricted.
3ODFHDOOIRRGDQGFRQWDLQHUVRIIRRGRQWKHJODVVWUD\
for cooking.
• If glass turntable or turntable ring assembly cracks or
breaks, contact the Customer Satisfaction Center at
1-877-337-3639 or the parts department at
encompassparts.com.
849-7000264 Rev. 0
Clock
Your model features a 12-hour clock.
SET TIME OF DAY
1. 3UHVVCLOCK to enter the Clock Setting mode. "12:00
35(66&/2&.(17(57,0(ZLOODSSHDULQWKH
display.
2. 3UHVVWKHQXPEHUSDGVWRHQWHUWKHFRUUHFWWLPHRI
day. For example, if the time is 10:12, press number
pads "1, 0, 1, 2" to enter the time.
3.3UHVVSTART to conrm the time.
KITCHEN TIMER
The microwave features a convenient timer for your
cooking needs.
1.3UHVVKITCHEN TIMER. “ENTER TIME” will appear in
the display.
2. 3UHVVWKHQXPEHUSDGVWRLQSXWWKHGHVLUHGFRRNLQJ
time.
NOTE: The maximum cooking time is 99 minutes and 99
seconds.
3.3UHVVSTART to begin counting down the time.
NOTE: When the set time has expired, "END" will appear
in the display and three long alert tones will sound.
4.3UHVVSTOP to exit the Kitchen Timer Function.
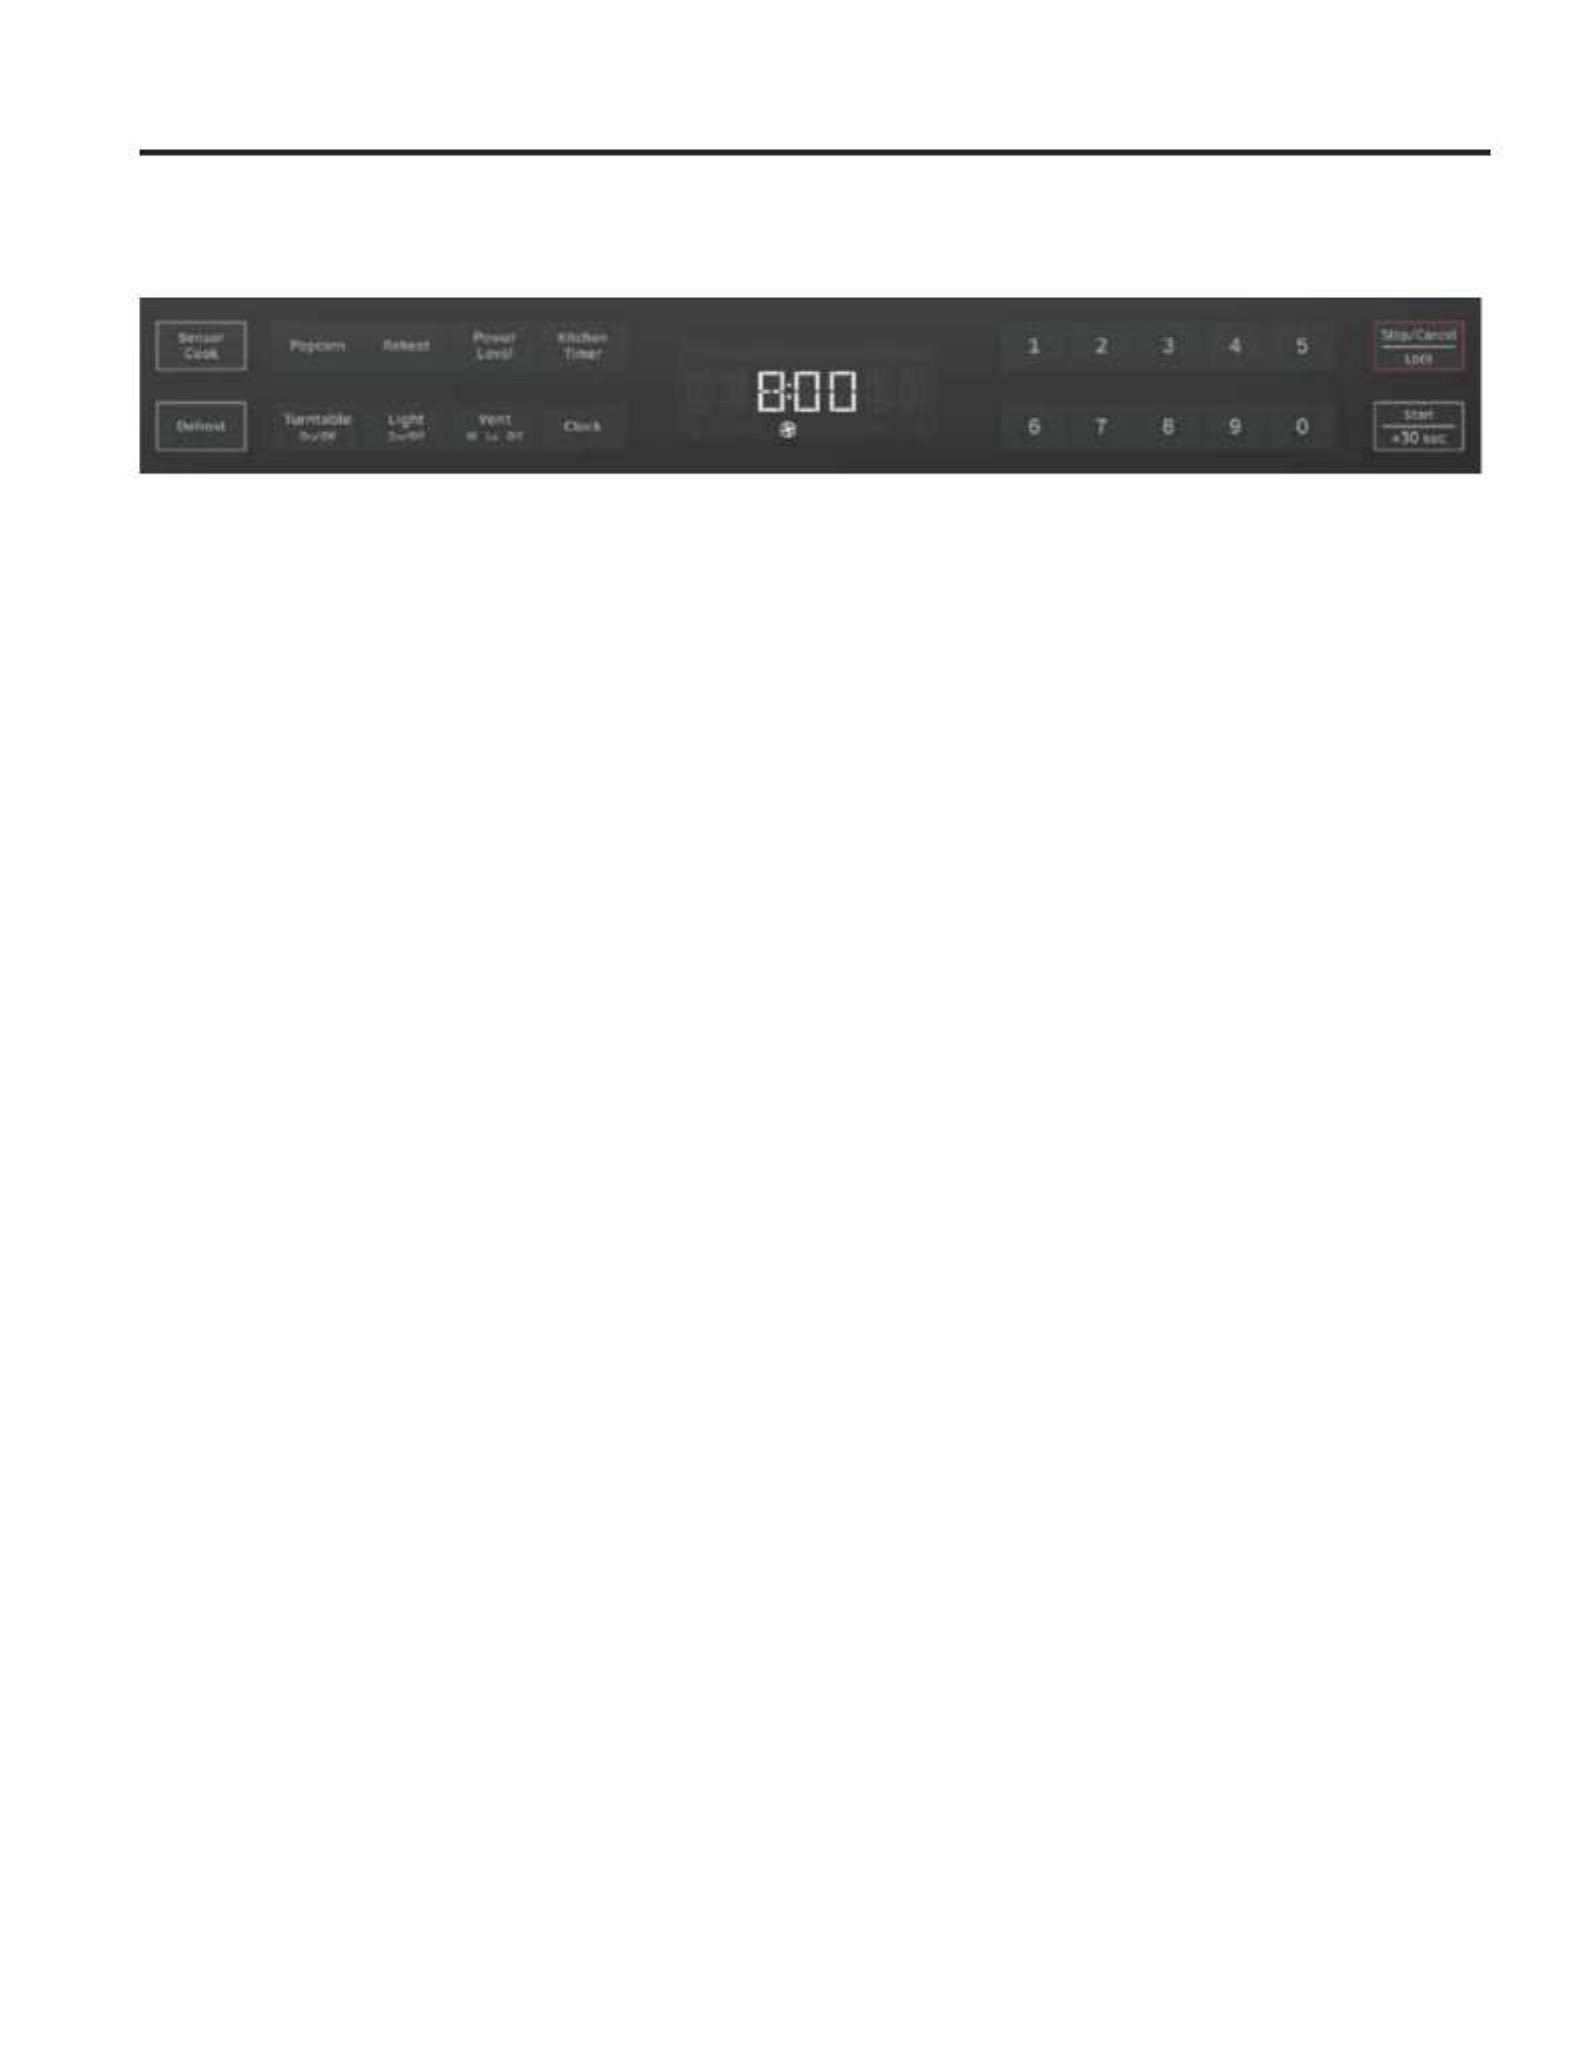
Control Panel
USING YOUR OVEN
A
I
B
J
C
K
D
L
E F G H
NM
A. Sensor Cook
B.3RSFRUQ
C. Reheat
D.3RZHU/HYHO
E. Kitchen Timer
F. Display
G.1XPEHU3DGV
H. Stop / Cancel / Lock
I. Defrost
J. Turntable On/O
K. Light On/O
L. Vent Hi-Lo-Off
M. Clock
N. Start / +30 Sec

49-70000264 Rev. 0 9
VENT FAN
The vent fan feature allows you to exhaust heat and
steam from the cooking surface below.
3UHVVVENT HI-LO-OFF to Turn On/O the fan and to
regulate the fan speed.
NOTE:
• The fan speed cannot be adjusted if the control panel is
locked.
• When the control is pressed the first time, “High”
appears in the display.
+LJK6SHHG3UHVVRQFH
/RZ6SHHG3UHVVWZLFH
2))3UHVVWKUHHWLPHV
SURFACE LIGHTING
The surface light feature illuminates the cooking surface
below the microwave oven.
3UHVVLIGHT to toggle among High, Low and OFF.
CHILD LOCKOUT
The Child Lock feature allows you to lock the microwave
control panel for easy cleaning or to avoid unintentionally
changing the settings or turning on the microwave oven.
To Lock/Unlock the control panel:
3UHVVSTOP/CANCEL for 3 seconds. Two beeps
will sound to indicate the lock has been activated/
deactivated and "LOCKED" or "UNLOCK" will appear
in the display.
STATUS RECALL
The Status Recall feature allows you to check the Time
DQG3RZHUVHWWLQJVGXULQJPLFURZDYHFRRNLQJ
3UHVVPOWER LEVEL to display the set power level
3UHVVCLOCK to display the time.
Control Panel
USING YOUR OVEN

12 49-7000264 Rev. 0
Care and Cleaning
Optional Kits
Microwave Terms
CLEANING
IMPORTANT:
• Disconnect power before cleaning.
• Before cleaning, make sure all controls are off and the
microwave oven is cool. Always follow label instructions on
cleaning products.
• To avoid damage to the microwave oven caused by arcing
due to soil buildup, keep the oven cavity, top grille and the
area where the door touches the oven frame clean.
1. Using a warm water and mild soap solution and a soft
cloth or sponge, clean the oven cavity, frame and oven
exterior.
2. Rinse with clean warm water and dry with a soft cloth.
NOTE: Do not use scouring powder or rough scouring
pads on the microwave. The glass turntable may be washed
and dried in the dishwasher. For stainless steel models, a
stainless steel cleaner may be used on the exterior.
Recirculating Charcoal Filter Kit
WB02X28929 – Charcoal Filter
Filter kits are used when the microwave oven cannot be
vented to the outside.
Reheat Programs
3URJUDP Item Quantity
1 Beverage 1 to 3 cups
2'LQQHU3ODWH 1 plate
33L]]D 1 to 4 slices
4 Soup/Sauce 1 to 3 cup
5 Casserole/Lasagna 10.5 oz.
POPCORN
The popcorn control is programmed to pop microwave
popcorn based on the size of the bag.
1.3UHVVPOPCORN to toggle between the bag sizes.
3UHVVWLPH7RSRSDRXQFHEDJRISRSFRUQ
3UHVVWLPHV7RSRSDRXQFHEDJRISRSFRUQ
2.3UHVVSTART to confirm selection and begin cooking.
The popping time will appear on the display.
Term Definition
Arcing Arcing is the microwave term for sparks in the oven. Arcing is caused by:
• metal or foil touching the side of the oven.
• foil that is not molded to food (upturned edges act like antennas).
• metal such as twist ties, poultry pins, gold-rimmed dishes.
• recycled paper towels containing small metal pieces.
• plates or dishes with a metallic trim or glaze with a metallic sheen.
Covering Covers hold in moisture, allow for more even heating and reduce cooking time. Venting plastic wrap or covering with wax
paper allows excess steam to escape.
Shielding In a regular oven, you shield chicken breasts or baked foods to prevent over-browning. When microwaving, you use small
strips of foil to shield thin parts, such as the tips of wings and legs on poultry, which would cook before larger parts.
Standing Time When you cook with regular ovens, foods such as roasts or cakes are allowed to stand to finish cooking or to set. Standing
time is especially important in microwave cooking. A microwaved cake is not placed on a cooling rack. NOTE:
Venting After covering a dish with plastic wrap, you vent the plastic wrap by turning back one corner so excess steam can escape.
Microwave Oven Use
USING YOUR OVEN/CARE AND CLEANING

49-70000264 Rev. 0 13
GREASE FILTER(S)
Grease filters are located on the underside of microwave
oven. The grease filters should be removed and cleaned
often; generally at least once every month.
1. Remove the grease filter. Grasp the metal ring, slide
the filter toward the back, and then gently pull the filter
downward. Repeat for the second filter.
Surface
Lights
Door
Metal Loop
Grease
Filters
A A
B
B
C
C
D
D
2. Soak the grease filters in hot water with a mild
detergent added. Rinse well and shake to dry.
NOTE: Do not use ammonia or wash in a dishwasher.
The aluminum on the filter will corrode and darken.
3. Reinstall the grease filter by inserting the back edge of
the filter into the opening and gently pushing it up into
place. Repeat for the second filter.
CHARCOAL FILTER
IMPORTANT: A charcoal must be installed in the
microwave oven when it is used in a non-vented
(recirculating) installation. Your microwave oven comes
from the factory with the charcoal installed.
The charcoal cannot be cleaned, so it must be replaced
at least every 6 months or more often depending on use.
To order a replacement charcoal for your model, contact
the Customer Satisfaction Center. See “Back Cover” for
contact information.
1. Unplug or disconnect power.
2.8VLQJD3KLOOLSVVFUHZGULYHUUHPRYHVFUHZVIURPWKH
top grille.
3. Open the microwave door so you can grasp the top
grille, and then pull the grille straight out to remove.
A
4. Remove the used charcoal from the back of the grille,
and then discard the filter.
5. Align the holes in the new charcoal filter with the five
posts on the back of the grille, and gently press down
to attach.
A Charcoal Filter
a
6. Align the top edge of the grille so that when the grille
is pushed into place the screw holes align with holes
in the microwave cabinet. Gentilly push grille until it
snaps into place and screw holes are aligned.
NOTE: Make sure that the wire harness, located near the
door hinge, is not pinched when you are replacing the top
grille.
7. Replace the two screws removed earlier, and tighten
the screws completely.
LIGHTS
IMPORTANT: Your microwave oven features LED interior
lighting as well as LED surface lighting. These lights
are designed to last for the life of your microwave oven.
However, if the lights stop illuminating, please contact a
technician for replacement or the Customer Satisfaction
Center for service. See the back cover for contact
information.
Care and Cleaning
CARE AND CLEANING

14 49-7000264 Rev. 0
Problem Possible Causes What to do
Oven will not start Microwave oven power cord is not plugged
into an electrical outlet.
3OXJLQWRDJURXQGHGSURQJRXWOHW
Door is open. Close the door and try again.
Wrong operation is set. Check instruction.
"KEYPAD SHORTED--- SERVICE
MAY BE NEEDED" appears on
display
A key has been activated for more than 60
VHFRQGV3UHVVStop/Cancel to clear the
display. This can happen if liquid is on the
control panel.
Dry the control panel thoroughly after
cleaning.
"FOOD" appears on display along
with beeping
Key press has been detected and the door
has not been opened within 5 minutes of
the last key press.
Open and close the door and reattempt
new cycle.
"LOCKED" appears on display The control has been locked. 3UHVVDQGKROGStop/Cancel for 3
seconds. Two beeps will sound and then
"UNLOCKED" will appear on display.
FEDERAL COMMUNICATIONS COMMISSION
(U.S.A.) RADIO FREQUENCY INTERFERENCE
STATEMENT
This equipment generates and uses ISM frequency
energy and if not installed and used properly, that is in
strict accordance with the manufacturer's instructions,
may cause interference to radio and television
reception. It has been type tested and found to comply
with limits for an ISM Equipment pursuant to part 18 of
FCC Rules, which are designed to provide reasonable
protection against such interference in residential
installation. However, there is no guarantee that
interference will not occur in a particular installation.
If this equipment does cause interference to radio
or television reception, which can be determined
by tuning the equipment off and on, the user is
encouraged to try to correct the interference by one or
more of the following:
• Reorient the receiving antenna of radio or television.
• Relocate the Microwave oven with respect to the
receiver.
• Move the microwave oven away from the receiver.
3OXJWKHPLFURZDYHRYHQLQWRDGLIIHUHQWRXWOHWVR
that the microwave oven and receiver are on different
branch circuits.
The manufacturer is not responsible for any radio of TV
interference caused by unauthorized modification to
this microwave oven. It is the responsibility of the user
to correct such interference.
Troubleshooting Tips...Before you call for service
TROUBLESHOOTING

49-70000264 Rev. 0 15
GEAppliances.com
All warranty service is provided by our Factory Service Centers, or an authorized service technician. To schedule
service online, visit us at GEAppliances.com/service or call 800.GE.CARES (800.432.2737) during normal business
hours.
What GE Appliances will not cover:
Ŷ6HUYLFHWULSVWR\RXUKRPHWRWHDFK\RXKRZWRXVHWKH
product.
Ŷ,PSURSHULQVWDOODWLRQGHOLYHU\RUPDLQWHQDQFH,I\RX
have an installation problem, contact your dealer or
installer. You are responsible for providing adequate
electrical, exhausting, and other connecting facilities.
Ŷ)DLOXUHRIWKHSURGXFWRUGDPDJHWRWKHSURGXFWLILWLV
abused, misused (for example, cavity arcing from wire
rack or metal/foil), or used for other than the intended
purpose or used commercially.
Ŷ5HSODFHPHQWRIKRXVHIXVHVRUUHVHWWLQJRIFLUFXLW
breakers.
Ŷ'DPDJHWRWKHSURGXFWFDXVHGE\DFFLGHQWILUHIORRGV
or acts of God.
Ŷ,QFLGHQWDORUFRQVHTXHQWLDOGDPDJHFDXVHGE\SRVVLEOH
defects with this appliance.
Ŷ'DPDJHFDXVHGDIWHUGHOLYHU\
Ŷ3URGXFWQRWDFFHVVLEOHWRSURYLGHUHTXLUHGVHUYLFH
Ŷ6HUYLFHWRUHSDLURUUHSODFHOLJKWEXOEVH[FHSWIRU/('
lamps.
Ŷ'DPDJHWRWKHILQLVKVXFKDVVXUIDFHUXVWWDUQLVKRU
small blemishes not reported within 48 hrs of delivery.
6WDSOH\RXUUHFHLSWKHUH3URRIRIWKHRULJLQDOSXUFKDVH
date is needed to obtain service under the warranty.
LIMITED WARRANTY
Microwave Oven Limited Warranty
EXCLUSION OF IMPLIED WARRANTIES
Your sole and exclusive remedy is product repair as provided in this Limited Warranty. Any implied warranties,
including the implied warranties of merchantability or fitness for a particular purpose, are limited to one year or
the shortest period allowed by law.
This limited warranty is extended to the original purchaser and any succeeding owner for products purchased for
home use within the USA. If the product is located in an area where service by a GE Appliances Authorized Servicer
is not available, you may be responsible for a trip charge or you may be required to bring the product to an Authorized
GE Appliances Service location for service. In Alaska, the limited warranty excludes the cost of shipping or service
calls to your home.
Some states do not allow the exclusion or limitation of incidental or consequential damages. This limited warranty
gives you specific legal rights, and you may also have other rights which vary from state to state. To know what your
legal rights are, consult your local or state consumer affairs office or your state’s Attorney General.
Warrantor: GE Appliances, a Haier company
Louisville KY,40225
For the period of GE Appliances will replace
One year
From the date
of the original
purchase
Any part of the oven which fails due to a defect in materials or workmanship. During this
limited one-year warranty, GE Appliances will also provide, free of charge, all labor and
related service costs to replace the defective part when the unit is serviced.

16 49-7000264 Rev. 0
Printed in China
Consumer Support
CONSUMER SUPPORT
GE Appliances Website
Have a question or need assistance with your appliance? Try the GE Appliances Website 24 hours a day, any day
of the year! You can also shop for more great GE Appliances products and take advantage of all our on-line support
services designed for your convenience. GEAppliances.com
Register Your Appliance
Register your new appliance on-line at your convenience! Timely product registration will allow for enhanced
communication and prompt service under the terms of your warranty, should the need arise. You may also mail in
the pre-printed registration card included in the packing material. GEAppliances.com/register
Schedule Service
Expert GE Appliances repair service is only one step away from your door. Get on-line and schedule your service at
your convenience any day of the year.
GEAppliances.com/service or call 800.GE.CARES (800.432.2737) during normal business hours.
Contact Us
If you are not satisfied with the service you receive from GE Appliances, contact us on our Website with all the
details including your phone number, or write to: General Manager,
*HQHUDO0DQDJHU&XVWRPHU5HODWLRQV_*($SSOLDQFHV$SSOLDQFH3DUN_/RXLVYLOOH.<
GEAppliances.com/contact
Parts and Accessories
Individuals qualified to service their own appliances can have parts or accessories sent directly to their homes
(VISA, MasterCard and Discover cards are accepted). Order on-line today 24 hours every day.
GEAppliances.com/parts or call 800.432.2737 during normal business hours.
Instructions contained in this manual cover procedures to be performed by any user. Other servicing
generally should be referred to qualied service personnel. Caution must be exercised, since improper
servicing may cause unsafe operation.

49-7000264 Rev. 0 02-24
HVMB14S4
MANUAL DEL
PROPIETARIO
Escriba los números de modelo y
de serie aquí:
Nº de Modelo _______________
Nº de Serie _________________
Los encontrará en una etiqueta
dentro del horno.
GE Appliances es una marca de General Electric Company. Fabricado bajo licencia de la marca.
HORNO MICROONDAS
INFORMACIÓN DE
SEGURIDAD . . . . . . . . . . . . . . . . . . . . . . 19
USO DEL HORNO
Piezas y Características . . . . . . . . . . . . . . . .22
Panel de Control . . . . . . . . . . . . . . . . . . . . . .23
Nivel de Potencia . . . . . . . . . . . . . . . . . . . . .25
Funciones con Temporizador . . . . . . . . . . .25
Funciones del Sensor . . . . . . . . . . . . . . . . . .25
Términos del Microondas . . . . . . . . . . . . . .27
CUIDADO Y LIMPIEZA
Cuidado y Limpieza . . . . . . . . . . . . . . . . . . .27
SOLUCIÓN DE PROBLEMAS . . 29
SOPORTE AL CONSUMIDOR
Garantía Limitada . . . . . . . . . . . . . . . . . . . . 30
Soporte al Consumidor . . . . . . . . . . . . . . . . 31

18 49-7000248 Rev. 0
GRACIAS POR HACER QUE GE APPLIANCES SEA PARTE DE SU HOGAR.
Ya sea que haya crecido usando GE Appliances, o que ésta es su primera vez, nos complace
tenerlo en la familia.
Sentimos orgullo por el nivel de arte, innovación y diseño de cada uno de los electrodomésticos de GE Appliances, y
creemos que usted también. Entre otras cosas, el registro de su electrodoméstico asegura que podamos entregarle
información importante del producto y detalles de la garantía cuando los necesite.
Registre su electrodoméstico GE ahora a través de Internet. Sitios Web y números telefónicos útiles están disponibles
en la sección de Soporte para el Consumidor de este Manual del Propietario. También puede enviar una carta en la
tarjeta de inscripción preimpresa que se incluye con
el material embalado.
Specyfikacje produktu
| Marka: | Hotpoint |
| Kategoria: | Magnetostrykcja |
| Model: | HVMB14S4WWW |
Potrzebujesz pomocy?
Jeśli potrzebujesz pomocy z Hotpoint HVMB14S4WWW, zadaj pytanie poniżej, a inni użytkownicy Ci odpowiedzą
Instrukcje Magnetostrykcja Hotpoint

1 Kwietnia 2025
27 Lutego 2025
27 Lutego 2025
27 Lutego 2025
27 Lutego 2025
27 Lutego 2025
27 Lutego 2025
8 Października 2024
5 Października 2024
2 Października 2024
Instrukcje Magnetostrykcja
- Magnetostrykcja Bauknecht
- Magnetostrykcja Ikea
- Magnetostrykcja Samsung
- Magnetostrykcja Bertazzoni
- Magnetostrykcja Electrolux
- Magnetostrykcja DeLonghi
- Magnetostrykcja AEG
- Magnetostrykcja Balay
- Magnetostrykcja Beko
- Magnetostrykcja Teka
- Magnetostrykcja LG
- Magnetostrykcja Küppersbusch
- Magnetostrykcja Smeg
- Magnetostrykcja Gram
- Magnetostrykcja Caso
- Magnetostrykcja Amica
- Magnetostrykcja Gorenje
- Magnetostrykcja Etna
- Magnetostrykcja LERAN
- Magnetostrykcja Sharp
- Magnetostrykcja Cookology
- Magnetostrykcja Russell Hobbs
- Magnetostrykcja Sage
- Magnetostrykcja SilverCrest
- Magnetostrykcja Dometic
- Magnetostrykcja Bosch
- Magnetostrykcja Candy
- Magnetostrykcja Whirlpool
- Magnetostrykcja Miele
- Magnetostrykcja Midea
- Magnetostrykcja Lamona
- Magnetostrykcja Severin
- Magnetostrykcja Hisense
- Magnetostrykcja Infiniton
- Magnetostrykcja Conceptronic
- Magnetostrykcja Panasonic
- Magnetostrykcja Medion
- Magnetostrykcja Baumatic
- Magnetostrykcja Black & Decker
- Magnetostrykcja OK
- Magnetostrykcja Adler
- Magnetostrykcja Hoover
- Magnetostrykcja Toshiba
- Magnetostrykcja Westinghouse
- Magnetostrykcja Rinnai
- Magnetostrykcja Hendi
- Magnetostrykcja Quigg
- Magnetostrykcja Maytag
- Magnetostrykcja Domo
- Magnetostrykcja GE
- Magnetostrykcja Taurus
- Magnetostrykcja Orbegozo
- Magnetostrykcja Blaupunkt
- Magnetostrykcja Brandt
- Magnetostrykcja Vivax
- Magnetostrykcja Salora
- Magnetostrykcja Siemens
- Magnetostrykcja Ambiano
- Magnetostrykcja Danby
- Magnetostrykcja Grundig
- Magnetostrykcja Haier
- Magnetostrykcja Cylinda
- Magnetostrykcja Jocel
- Magnetostrykcja Hyundai
- Magnetostrykcja Silverline
- Magnetostrykcja Blomberg
- Magnetostrykcja Brother
- Magnetostrykcja Husqvarna
- Magnetostrykcja Concept
- Magnetostrykcja Fisher & Paykel
- Magnetostrykcja ECG
- Magnetostrykcja Indesit
- Magnetostrykcja Ilve
- Magnetostrykcja Viking
- Magnetostrykcja Nodor
- Magnetostrykcja CATA
- Magnetostrykcja Kenwood
- Magnetostrykcja V-Zug
- Magnetostrykcja Trisa
- Magnetostrykcja Ariston Thermo
- Magnetostrykcja Zelmer
- Magnetostrykcja Mestic
- Magnetostrykcja PKM
- Magnetostrykcja Cuisinart
- Magnetostrykcja Wilfa
- Magnetostrykcja Thor
- Magnetostrykcja Amana
- Magnetostrykcja Dacor
- Magnetostrykcja Hotpoint Ariston
- Magnetostrykcja Furrion
- Magnetostrykcja Bomann
- Magnetostrykcja Moulinex
- Magnetostrykcja Ursus Trotter
- Magnetostrykcja PowerXL
- Magnetostrykcja Emerio
- Magnetostrykcja H.Koenig
- Magnetostrykcja Meireles
- Magnetostrykcja Melissa
- Magnetostrykcja Schneider
- Magnetostrykcja Beper
- Magnetostrykcja Alaska
- Magnetostrykcja Stirling
- Magnetostrykcja MPM
- Magnetostrykcja CDA
- Magnetostrykcja Philco
- Magnetostrykcja Neff
- Magnetostrykcja Corbero
- Magnetostrykcja Morphy Richards
- Magnetostrykcja Zanussi
- Magnetostrykcja Fagor
- Magnetostrykcja Redmond
- Magnetostrykcja Koenic
- Magnetostrykcja Thomson
- Magnetostrykcja ProfiCook
- Magnetostrykcja Klarstein
- Magnetostrykcja BEEM
- Magnetostrykcja Manta
- Magnetostrykcja Wolkenstein
- Magnetostrykcja Cecotec
- Magnetostrykcja Artusi
- Magnetostrykcja KitchenAid
- Magnetostrykcja AFK
- Magnetostrykcja Steba
- Magnetostrykcja Scarlett
- Magnetostrykcja Sôlt
- Magnetostrykcja Nevir
- Magnetostrykcja TriStar
- Magnetostrykcja Exquisit
- Magnetostrykcja Bartscher
- Magnetostrykcja First Austria
- Magnetostrykcja Hestan
- Magnetostrykcja Privileg
- Magnetostrykcja Arçelik
- Magnetostrykcja Hanseatic
- Magnetostrykcja Continental Edison
- Magnetostrykcja Bifinett
- Magnetostrykcja Linarie
- Magnetostrykcja Atag
- Magnetostrykcja Rosieres
- Magnetostrykcja Franke
- Magnetostrykcja NEC
- Magnetostrykcja G3 Ferrari
- Magnetostrykcja AKAI
- Magnetostrykcja Sanyo
- Magnetostrykcja Novy
- Magnetostrykcja Clatronic
- Magnetostrykcja Rommer
- Magnetostrykcja Inventum
- Magnetostrykcja SVAN
- Magnetostrykcja Ariete
- Magnetostrykcja IFB
- Magnetostrykcja Innoliving
- Magnetostrykcja Waring Commercial
- Magnetostrykcja Mora
- Magnetostrykcja Caple
- Magnetostrykcja AEG-Electrolux
- Magnetostrykcja Omega
- Magnetostrykcja Comfee
- Magnetostrykcja Classique
- Magnetostrykcja Wisberg
- Magnetostrykcja Siméo
- Magnetostrykcja Kenmore
- Magnetostrykcja Kaiser
- Magnetostrykcja Breville
- Magnetostrykcja VOX
- Magnetostrykcja Insignia
- Magnetostrykcja Pelgrim
- Magnetostrykcja Veripart
- Magnetostrykcja Frilec
- Magnetostrykcja Benavent
- Magnetostrykcja Element
- Magnetostrykcja Tower
- Magnetostrykcja Elta
- Magnetostrykcja Orima
- Magnetostrykcja Rex
- Magnetostrykcja Denver
- Magnetostrykcja Kernau
- Magnetostrykcja Aspes
- Magnetostrykcja DCS
- Magnetostrykcja Hitachi
- Magnetostrykcja Zerowatt
- Magnetostrykcja Respekta
- Magnetostrykcja Technika
- Magnetostrykcja Emerson
- Magnetostrykcja Seiki
- Magnetostrykcja JennAir
- Magnetostrykcja Frigidaire
- Magnetostrykcja Galanz
- Magnetostrykcja Barazza
- Magnetostrykcja RCA
- Magnetostrykcja Summit
- Magnetostrykcja Foster
- Magnetostrykcja Fulgor Milano
- Magnetostrykcja Kelvinator
- Magnetostrykcja Gaggenau
- Magnetostrykcja Sencor
- Magnetostrykcja Tesco
- Magnetostrykcja Nabo
- Magnetostrykcja Avanti
- Magnetostrykcja Asko
- Magnetostrykcja Kalorik
- Magnetostrykcja Esatto
- Magnetostrykcja Signature
- Magnetostrykcja Daewoo
- Magnetostrykcja Porter & Charles
- Magnetostrykcja Kunft
- Magnetostrykcja Grunkel
- Magnetostrykcja Becken
- Magnetostrykcja Scandomestic
- Magnetostrykcja Ignis
- Magnetostrykcja Guzzanti
- Magnetostrykcja Belling
- Magnetostrykcja De Dietrich
- Magnetostrykcja ZLine
- Magnetostrykcja Magic Chef
- Magnetostrykcja Sauber
- Magnetostrykcja Sogo
- Magnetostrykcja Constructa
- Magnetostrykcja Proline
- Magnetostrykcja Euromaid
- Magnetostrykcja Schaub Lorenz
- Magnetostrykcja Flama
- Magnetostrykcja Scancool
- Magnetostrykcja OBH Nordica
- Magnetostrykcja Optimum
- Magnetostrykcja Swan
- Magnetostrykcja Zanker
- Magnetostrykcja ACP
- Magnetostrykcja Alpina
- Magnetostrykcja Airlux
- Magnetostrykcja Aftron
- Magnetostrykcja Korona
- Magnetostrykcja Saturn
- Magnetostrykcja Nordland
- Magnetostrykcja Progress
- Magnetostrykcja Tomado
- Magnetostrykcja Bellini
- Magnetostrykcja Oster
- Magnetostrykcja Sinbo
- Magnetostrykcja Prima
- Magnetostrykcja Junker
- Magnetostrykcja Mabe
- Magnetostrykcja Monogram
- Magnetostrykcja Logik
- Magnetostrykcja Valberg
- Magnetostrykcja Scholtes
- Magnetostrykcja Profilo
- Magnetostrykcja Mellerware
- Magnetostrykcja Heinner
- Magnetostrykcja Termozeta
- Magnetostrykcja Maxxmee
- Magnetostrykcja Juno
- Magnetostrykcja Defy
- Magnetostrykcja Blokker
- Magnetostrykcja Nordmende
- Magnetostrykcja Friac
- Magnetostrykcja Boretti
- Magnetostrykcja Hansa
- Magnetostrykcja Elba
- Magnetostrykcja Royal Sovereign
- Magnetostrykcja WLA
- Magnetostrykcja SEB
- Magnetostrykcja Malmbergs
- Magnetostrykcja Champion
- Magnetostrykcja Everglades
- Magnetostrykcja Buffalo
- Magnetostrykcja Jenn-Air
- Magnetostrykcja Tatung
- Magnetostrykcja Limit
- Magnetostrykcja Edesa
- Magnetostrykcja Farberware
- Magnetostrykcja Milectric
- Magnetostrykcja New World
- Magnetostrykcja WhiteLine
- Magnetostrykcja Glem Gas
- Magnetostrykcja Johnson
- Magnetostrykcja Viva
- Magnetostrykcja M-System
- Magnetostrykcja Primo
- Magnetostrykcja Creda
- Magnetostrykcja Saro
- Magnetostrykcja Godrej
- Magnetostrykcja Ices
- Magnetostrykcja Cello
- Magnetostrykcja Goldstar
- Magnetostrykcja Igenix
- Magnetostrykcja Essentiel B
- Magnetostrykcja Team
- Magnetostrykcja Stoves
- Magnetostrykcja CaterChef
- Magnetostrykcja Lifetec
- Magnetostrykcja Wolf
- Magnetostrykcja Carrefour Home
- Magnetostrykcja Equator
- Magnetostrykcja Superior
- Magnetostrykcja Electrolux-Rex
- Magnetostrykcja Koenig
- Magnetostrykcja Fakir
- Magnetostrykcja Elis And Elsa
- Magnetostrykcja Mepamsa
- Magnetostrykcja Upo
- Magnetostrykcja Belion
- Magnetostrykcja Waves
- Magnetostrykcja Coline
- Magnetostrykcja Home Electric
- Magnetostrykcja Café
- Magnetostrykcja Lynx
- Magnetostrykcja Crofton
- Magnetostrykcja Bluesky
- Magnetostrykcja Tecnolux
- Magnetostrykcja Tisira
- Magnetostrykcja Micromaxx
- Magnetostrykcja La Germania
- Magnetostrykcja Technolux
- Magnetostrykcja Holland Electro
- Magnetostrykcja Prima Donna
- Magnetostrykcja Oranier
- Magnetostrykcja Apelson
- Magnetostrykcja CombiSteel
- Magnetostrykcja Domoclip
- Magnetostrykcja Mbo
- Magnetostrykcja Rival
- Magnetostrykcja Thomas
- Magnetostrykcja Steelmatic
- Magnetostrykcja StarQ
- Magnetostrykcja Mei
- Magnetostrykcja Kucht
- Magnetostrykcja Kogan
- Magnetostrykcja Solwave
- Magnetostrykcja PowerTec Kitchen
- Magnetostrykcja Menumaster (Amana)
- Magnetostrykcja Lidl
- Magnetostrykcja Microstar
- Magnetostrykcja WestBend
- Magnetostrykcja XO
- Magnetostrykcja Adelberg
- Magnetostrykcja Winia
- Magnetostrykcja BMC256SS
- Magnetostrykcja Simfer
- Magnetostrykcja Merrychef
- Magnetostrykcja Powertec
- Magnetostrykcja Viking Range
- Magnetostrykcja Girmi
- Magnetostrykcja Commercial Chef
- Magnetostrykcja Cosmo
- Magnetostrykcja Kitchenware
- Magnetostrykcja FAURE
- Magnetostrykcja Novamatic
- Magnetostrykcja VENINI
- Magnetostrykcja Deco
- Magnetostrykcja EST
- Magnetostrykcja Salco
- Magnetostrykcja Adora
- Magnetostrykcja Ices Electronics
- Magnetostrykcja Artrom
- Magnetostrykcja Haden
- Magnetostrykcja Arthur Martin-Electrolux
- Magnetostrykcja Elektra Bregenz
- Magnetostrykcja Menumaster
- Magnetostrykcja Smart Brand
- Magnetostrykcja Imarflex
- Magnetostrykcja Yamazen
- Magnetostrykcja Universal Blue
- Magnetostrykcja Pitsos
- Magnetostrykcja Toastmaster
- Magnetostrykcja Sheffield
- Magnetostrykcja Goodmans
- Magnetostrykcja Moris
Najnowsze instrukcje dla Magnetostrykcja

9 Kwietnia 2025

9 Kwietnia 2025
8 Kwietnia 2025

8 Kwietnia 2025
8 Kwietnia 2025

8 Kwietnia 2025
7 Kwietnia 2025
7 Kwietnia 2025
7 Kwietnia 2025
7 Kwietnia 2025