Instrukcja obsługi GreatCall Jitterbug 5
Przeczytaj poniżej 📖 instrukcję obsługi w języku polskim dla GreatCall Jitterbug 5 (242 stron) w kategorii smartfon. Ta instrukcja była pomocna dla 17 osób i została oceniona przez 2 użytkowników na średnio 4.5 gwiazdek
Strona 1/242

User Guide

Welcome to the GreatCall® Family.
Thank you for choosing the Jitterbug5. At GreatCall, we’ve made it easy for
you to stay connected to friends and family with the simplicity of the Jitterbug5.
Additionally, our 24-hour service professionals and health and safety services
are designed to keep you protected, connected and in control of your life. This
helpful guide contains all the information you need to start using your new cell
phone. And if you have any questions or need assistance, you can count on us to
be here for you day and night.
Best Regards,
Your friends at GreatCall
For additional information about GreatCall, visit www.greatcall.com.

Table of Contents
Table of Contents I
Table of Contents
Section 1: Getting Started ....................................................................... 1
Key Items In The Jitterbug Box ............................................................................2
The Front Of Your Jitterbug .................................................................................3
The Back Of Your Jitterbug ..................................................................................5
The Inside Of Your Jitterbug ...............................................................................7
Activating Your Jitterbug ..................................................................................... 9
Charging The Battery ........................................................................................ 13
• Using The Wall Charger: ............................................................................13
Battery Level Indicator .....................................................................................15
Turning Your Jitterbug On And Off .....................................................................17
• Turning Your Jitterbug On: .........................................................................17
• To Turn Your Jitterbug Off: .........................................................................18
How To Read The Inside Display .......................................................................19
• Using The Main Screen .............................................................................21
• Making Your First Call................................................................................26
The 5Star Button ..............................................................................................27
MyCalendar .....................................................................................................29

Table of Contents
II Table of Contents
• Online ......................................................................................................30
• By Phone .................................................................................................. 32
Operator Assistance ......................................................................................... 33
• To Call An Operator: .................................................................................. 34
Emergency 9-1-1 Service ..................................................................................35
• To Make An Emergency Call.......................................................................35
Installing And Removing The Battery ................................................................36
• To Remove The Battery ..............................................................................36
• To Install The Battery ................................................................................37
Getting More Information ................................................................................. 38
GreatCall Customer Service .............................................................................39
Section 2: Placing And Receiving Calls .................................................. 40
Placing A Call ................................................................................................... 41
• Using An Operator To Make A Call: ............................................................42
• Using Your Phone Book To Make A Call ......................................................43
Speakerphone .................................................................................................45
Answering A Call ..............................................................................................47
• Answering A Call When Your Jitterbug Is Closed ......................................... 48

Table of Contents
Table of Contents III
• Receiving A Call When Your Jitterbug Is Open ............................................49
Ending A Call ...................................................................................................49
Ignoring A Call .................................................................................................49
• To Ignore A Call When Your Jitterbug Is Closed ........................................... 49
• To Ignore A Call When Your Jitterbug Is Open .............................................50
Adjusting The Ringer Volume ............................................................................51
Adjusting The Earpiece Speaker Volume ........................................................... 53
Call Waiting .....................................................................................................53
Using Call History To See Recent Calls ..............................................................56
• To Review Call History: .............................................................................. 56
Returning Missed Calls And Redialing ..............................................................58
Using Voice Dial ..............................................................................................59
Setting Up Voice Mail ....................................................................................... 61
Changing Your Voice Mail Greeting ...................................................................62
When To Check Your Voice Mail Messages ........................................................63
Listening To Voice Mail Messages .....................................................................64
Listening To Saved Voice Mail Messages ..........................................................65
International Dialing ........................................................................................67

Table of Contents
IV Table of Contents
Section 3: GreatCall Health and Safety Services .................................... 68
GreatCall GoPlans ............................................................................................69
5Star Service ...................................................................................................70
Urgent Care ......................................................................................................71
Medication Reminders .....................................................................................71
Brain Games .................................................................................................... 72
Your new Jitterbug gives you access to fun innovative games, clinically-proven
to sharpen your mind. Make A Pair and Quick Match come pre-loaded on your
phone. This section will explain how to use them. ............................................ 72
– About Make A Pair ....................................................................................72
– About Quick Match ...................................................................................72
– Accessing Your Games ..............................................................................73
Section 4: Managing Your Phone Book .................................................. 79
About Phone Book ........................................................................................... 80
Use The Operator To Add, Change And Delete Numbers .................................... 81
Use mygreatcall.com To Add, Change And Delete Numbers...............................82
Adding A Contact Directly On Your Jitterbug ......................................................84
Modifying A Contact Directly On Your Jitterbug ..................................................86

Table of Contents
Table of Contents V
Deleting A Contact Directly On Your Jitterbug ....................................................88
Section 5: Using The Camera ................................................................. 90
Taking A Photo With Your Jitterbug ...................................................................91
Viewing A Photo On Your Jitterbug ....................................................................92
Sending A Photo From Your Jitterbug ................................................................93
Deleting A Photo From Your Jitterbug ................................................................95
Receiving A Photo On Your Jitterbug .................................................................97
Section 6: Using Text Messaging ........................................................... 98
Receive A New Text Message ............................................................................99
Read A New Text Message ..............................................................................100
Reply To A Text Message ................................................................................. 101
Saving And Deleting A Text Message ..............................................................103
• Saving A Text Message:...........................................................................103
• Deleting A Text Message: ........................................................................105
– Deleting A New Text Immediately After Reading: ...................................... 105
– Deleting An Old Text From Your Saved Messages .....................................108
Sending A New Text Message .........................................................................109
Modes For Creating Your Own Text Message ..................................................114

Table of Contents
VI Table of Contents
– 123 Mode...............................................................................................114
– ABC Mode ..............................................................................................115
– Abc-S Mode ............................................................................................115
– Abc-W Mode ...........................................................................................116
– abc Mode ...............................................................................................116
Section 7: Using Bluetooth® ................................................................117
About Bluetooth ............................................................................................118
Using Your Jitterbug With Your Bluetooth Headset ..........................................119
Turning The Bluetooth Feature On Your Jitterbug On And Off ...........................119
Setting Your Bluetooth Headset To Pairing Mode ............................................123
Setting Your Jitterbug To Pairing Mode ...........................................................124
Answering A Call When Paired With Your Bluetooth Headset ........................... 128
Ending A Call When Paired With Your Bluetooth Headset ................................128
• To End A Call When Your Jitterbug Is Open ............................................... 128
• To End A Call When Your Jitterbug Is Closed .............................................128
Section 8: Managing Settings .............................................................129
Using Your Settings ........................................................................................130
Selecting The Color Of The Inside Display .......................................................131

Table of Contents
Table of Contents VII
Changing Ring Tones ......................................................................................133
Turning The Start-Up GreatCall Jingle On And Off ............................................135
• Turning The Jingle Off .............................................................................. 135
• Turning The Jingle On ..............................................................................136

Section 1
Getting Started 1
Section 1: Getting Started
This section explains how to start using your Jitterbug® phone.
Topics
• Key Items In The Jitterbug Box
• The Front Of Your Jitterbug
• The Back Of Your Jitterbug
• The Inside Of Your Jitterbug
• Activating Your Jitterbug
• Charging The Battery
• Battery Level Indicator
• Turning Your Jitterbug
On And Off
For additional support, visit us online at www.greatcall.com/support.
• How To Read The Inside Display
• Using The Main Screen
• Making Your First Call
• The 5Star Button
• MyCalendar
• Operator Assistance
• Installing and Removing The Battery
• Getting More Information
• GreatCall Customer Service

Section 1
2 Getting Started
Key Items In The Jitterbug Box
The Jitterbug box you received includes everything you need to get started:
1. Jitterbug cell phone and rechargeable battery - the battery has been pre-installed for
your convenience
2. Wall Charger – to charge your phone
3. User Guides – to get important information about activating and using your Jitterbug
1 2 3
888-
555-
5555
CALL?
GET
BACK
For you & a friend.
$25
With GreatCall Link,
families stay connected,
even when they’re apart.
TM
Section 1
Getting Started 3
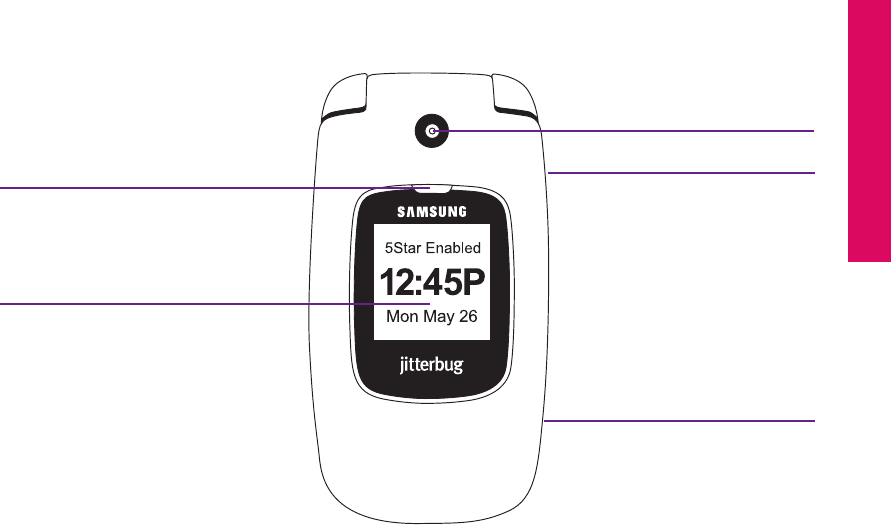
The Front Of Your Jitterbug
Indicator Light Headset Jack (side)
Camera
Power Connector (side)
Outside Display

Section 1
4 Getting Started
Indicator Light – the area just above the outside display will light up for incoming
calls or when the phone is fully charged. The following list outlines the Indicator
Light and what each one means:
• The Indicator Light is on when the battery is completely charged
• The Indicator Light ashes continually to indicate the following:
- A missed call - A missed Text Message - A new Voice Mail Message
Camera – allows you to take a picture with your Jitterbug
Headset Jack – connect to a headset to listen to calls
Outside Display – view the current time, the current date and notications about
charging status, incoming calls, or messages
Power Connector – allows you to charge your Jitterbug with the provided Wall
Charger, as well as connect several accessories to your Jitterbug

Section 1
Getting Started 7
888-
555-
5555
CALL?
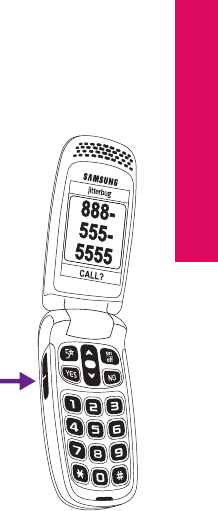
The Inside Of Your Jitterbug Earpiece Speaker
Inside Display
On/Off Button
Microphone
“YES” Button
Volume Button
“NO” Button
Up/Down Button
5Star Button

Section 1
8 Getting Started
Earpiece Speaker – lets you hear the caller loud and clear
Inside Display – shows all the information you need to operate your Jitterbug
Up/Down Button – for navigating between screens on the Inside Display
5Star Button – allows you to get help in an unsafe or uncertain situation (see page 28
for more information)
YES Button – allows you to answer “Yes” to questions or commands on the Inside
Display.
On/Off Button – turns your Jitterbug on and off
NO Button – allows you to answer “No” to questions or commands on the Inside
Display
Microphone – picks up your voice loud and clear

Section 1
Getting Started 9
Activating Your Jitterbug
Please do not turn on your phone until instructed to do so. If you turn it on
prior to setting up your account, the device may fail to activate. If the device
fails to activate, power off and start with step .
IMPORTANT!
To ensure that your Jitterbug phone is activated successfully, it is important that
you follow these simple steps when activating.
• If you purchased your Jitterbug phone directly from GreatCall by phone or on
greatcall.com, please skip to step . Otherwise proceed to step .

Section 1
Getting Started 11
2Go Online Or Call To Set Up Your Account.
If you do not have a GreatCall account, visit us online at
www.greatcall.com/activate. There you can enter your Jitterbug Serial
Number and follow the instructions to set up your account. If you do not
have Internet access, please call
1-866-482-1424.
- OR -
If you are an existing GreatCall customer and would like to replace,
upgrade, or add a Jitterbug phone to your account, or need to activate
more than one device, call us at 1-866-482-1424.

Section 1
12 Getting Started
3Turn On Your Jitterbug To Activate.
You can now open your Jitterbug and press the
on
off
button and the activation process
will automatically begin.
This process may take a few minutes and you may notice the phone reboot several
times. Once complete you will see a screen “Phone was set up successfully!”
Congratulations! Your Jiiterbug is now activated.

Section 1
Getting Started 13
Charging The Battery
Your Jitterbug can be charged with the included Wall Charger or with the optional
Car Charger that can be purchased by visiting
www.greatcall.com/jitterbug/accessories.
Using The Wall Charger:
1. Plug the large end of the Wall Charger into a standard
wall outlet (110/220 VAC).
2. Plug the smaller end of the Wall Charger into the Power
Connector on the side of your Jitterbug. You’ll see a
“Charging” message appear on the Outside Display.
3. When the battery is fully charged, you’ll see a “Charging
Completed” message on the Outside Display.

Section 1
14 Getting Started
The Jitterbug Rechargeable Battery must be fully charged before using the phone
for the rst time. We recommend an initial charge of up to 12 hours. Failure to do so
may damage your battery. If you use your Jitterbug without charging the battery, and
it is critically low, it will turn itself off.
IMPORTANT!

Section 1
Getting Started 15
Battery Level Indicator
Your Jitterbug will remind you to charge the battery. Reminders appear on the
Inside Display and Outside Display with the following messages:
• Battery Low – a low battery alert and a message will tell you that your battery
is beginning to get low.
• Battery Critical – a low battery alert and a message will appear when the
battery has approximately 20% of battery life remaining.
Jitterbug batteries have been designed specically for the Jitterbug phone.
Using other batteries could damage your Jitterbug and may void your
warranty.
IMPORTANT!

Section 1
16 Getting Started
You can easily check the remaining charge on the Jitterbug battery by
navigating to the Phone Info menu and pressing the button to view.
Please reference page 23 for more information on Phone Info.
The Jitterbug features a standby time of up to 25 days. Talk time is
approximately 5 hours. Common factors that affect battery performance
include text messaging, taking or sending pictures, usage of 5Star Service
and making calls. Always make sure to charge your phone when not in use.
NOTE:

Section 1
Getting Started 17
Turning Your Jitterbug On And Off
If you have not activated your Jitterbug, please refer to page 10 before turning
your Jitterbug on for the rst time.
IMPORTANT!
Turning Your Jitterbug On:
1. Open your Jitterbug.
2. Press the on
off button in the upper right corner of the keypad until your Jitterbug
turns on and the GreatCall logo appears on the Inside Display.
3. When you hear a dial tone, your Jitterbug has service and is ready to use.
If a connection is not possible, a “No Service” message will appear on the
Outside Display and a dial tone will not be heard.

Section 1
18 Getting Started
To Turn Your Jitterbug Off:
1. Press and hold the on
off button in the upper right corner of the keypad until the
GreatCall logo appears on the Inside Display.
2. Your Jitterbug will then turn off.
We recommend keeping your Jitterbug on at all times and charging it over
night so you can always stay connected.
NOTE:

Section 1
Getting Started 19
How To Read The Inside Display
Throughout this guide, the screen on the inside of your Jitterbug is referred to as
the Inside Display. The following diagram explains the areas of the Inside Display
and how to use them, using the Phone Book as an example.
Feature Area
Detail Area Additional
Information Exists
Action Line

Section 1
20 Getting Started
Feature Area – the top of the Inside Display is the Feature Area. It identies the
feature you are using. For example, when you are in the Phone Book, you will see
“PHONE BOOK” in the Feature Area.
Detail Area – the middle of the Inside Display provides the details of each
feature. For example, information such as detailed entries from your Phone Book,
will appear in this area.
Action Line – the bottom of the Inside Display is the Action Line where
questions or commands are displayed. You can respond by pressing
the or buttons.
Additional Information Exists – the small arrows at the top and bottom of the
Inside Display indicate when information is available before or after the current
screen. Use the “Up/Down” button to scroll through entries.
If you are ever not sure what to do, simply press or buttons to answer
the question in the Action Line at the bottom of the Inside Display.
NOTE:

Section 1
Getting Started 21
Using The Main Screen
When you open your Jitterbug while it is powered on, you will see the Main
Screen as shown in the diagram at the bottom of the page.
The Main Screen will display your Jitterbug phone number at the top of the
screen as shown in the following screen as, “My # 800-733-6632.”
NOTE:
The Main Screen is where you access the features on your
Jitterbug. Your Jitterbug is designed with the following six
features installed in your phone:
1. Phone Book – store up to 200 of the names and
numbers that you call most often. Operators can
even set-up the Phone Book for you. Please reference
page 85 for more information.

Section 1
22 Getting Started
2. Call History – an easy way to review your last ten incoming, outgoing and
missed calls, listed with the most recent rst. Please reference page 59 for
more information.
3. Phone Info – gives you the following important points of information about your
Jitterbug.
• My phone number
• Battery life
• Signal strength
• Approximate minutes used per month
4. Settings – the following items can be changed from within the Settings
feature. Please reference Section 5, page 139 for more information.
• Colors: Change the color of the Inside Display
• Jingle ON: Turn the GreatCall start-up Jingle on or off
• Ring Tones: Change the ring tone on your Jitterbug
• Bluetooth: Turn the Bluetooth feature on or off

Section 1
Getting Started 23
5. Camera– this is where you will take photos that will be automatically stored in
My Photos. See page 97 for more information.
6. My Photos – an easy way to view, delete or send photos. See page 97 for more
information.
Approximate minutes used per month shows your estimated minute usage
each month. This time resets at the beginning of your monthly billing cycle.
Your Main Screen may contain additional features depending on your plan.
NOTE:

Section 1
24 Getting Started
You can easily access all of your features
within the Main Screen using three
simple buttons located at the top of
the keypad.
1. When the feature you want to select is highlighted in gray in the middle of
the Inside Display, press the button to select that feature.
2. Use the “Up/Down” button to scroll through the features of the
Main Screen.
3. The button enables you to answer “No” to questions in the Action Line
and return to a previous screen. If you make a mistake while dialing a
number or typing a Text Message, you can always press the button to
back up and delete what you entered.
on
off
1 2 3

Section 1
Getting Started 25
For your ease-of-use, you can change the start-up screen of your Jitterbug.
For example, you may nd it easier to have your Jitterbug start directly in your
Phone Book each time you turn your Jitterbug on. You have two options to
choose from as your start-up screen:
1. Main Screen – your new Jitterbug comes with this turned on.
2. Phone Book – please see page 85 to learn more about your Phone Book.
To change your start-up screen, please give us a call anytime, 24 hours a day,
seven days a week by dialing “0” on your Jitterbug to reach an Operator.
NOTE:

Section 1
26 Getting Started
Making Your First Call
1. You can make a call directly from your Main Screen at any
time by using your keypad. Simply enter the ten digit phone
number and press the button to dial.
2. You will see “Calling...” on the Inside Display followed
by “Connected” conrming you are connected – as
displayed on the following screen.
3. When your call is nished, press the button or close
your Jitterbug to end the call.
4. You can also make a call directly from your Phone Book. Starting from the Main
Screen, use the “Up/Down” button to scroll until“Phone Book” appears and
press the button. When you nd the desired name and number, press the
button again to make the call.
To learn more about placing and receiving calls, please reference page 43.

Section 1
Getting Started 27
The 5Star Button
Customers with a GreatCall GoPlanTM have access to the 5Star Service. Simply
press the red 5Star button to be connected to a 5Star Agent in an unsafe or
uncertain situation. The 5Star Agent will assess the situation, conrm your
location using GPS and connect you to emergency services if you need it. See
page 75for more information on GoPlans, 5Star Service and GreatCall’s suite of
health and wellness services.
on
off

Section 1
28 Getting Started
If you do not have a GreatCall GoPlan, you will be asked if you would like to
be connected directly to 9-1-1 services when the 5Star button is pressed.
Press “YES” if you would like to call 9-1-1 or “NO” if you would like to hang
up.
IMPORTANT!

Section 1
Getting Started 29
MyCalendar
MyCalendar makes it easy for you to enter your appointments and events online at
mygreatcall.com. Or, simply press the button on your Jitterbug Plus to reach one
of our friendly GreatCall Operators, who can manage and update your calendar for
you. MyCalendar will ensure you never have to worry about missing important dates
or appointments, so you can spend more time focusing on the things that matter
most to you.
There are two easy ways to add a new event to your calendar: online or by phone.
In order to manage your MyCalendar online, you will need to have a
mygreatcall.com account. Simply visit mygreatcall.com to register for an
account if you have not done so already. Have your GreatCall phone number,
home address and email address handy.
NOTE:

Section 1
30 Getting Started
Online
1. Log in to your personal account at mygreatcall.com. After logging in to
mygreatcall.com, click on “My Apps” tab. Under services, click “View/Edit”
under “MyCalendar”.
2. Click on the “Add Calendar Event” button at the top right of your calendar,
or click on the day you would like to add an event. You will see a small box
appear on your screen
3. Click on the “Subject” box to enter a brief description of the event. There is
a limit of 24 characters.
4. The “Date” box shows the date that you selected to schedule the event. To
change the date, click on the box and a small calendar will appear on your
screen. Click on the day that you would like to schedule the event and the
date will be updated.
5. To change the start time, move the “Hour” and “Minute” sliders under the
calendar to the desired event start time and click the “Done” button to
save the selected date and start time.

Section 1
Getting Started 31
6. The “Duration” box shows the length of the event. Click to select All Day
Event, 30 Minutes, 1 Hour, 2 Hours, or 4 Hours.
7. If you are scheduling a recurring event, such as a weekly appointment,
the “Repeats” box allows you to select the frequency of the event. You
can select between Daily, Weekly, Monthly or Yearly events. This will
automatically add recurring future events into your calendar. If you are
scheduling a one-time event, select “One-time event.”
8. The “Remind Me” box allows you to set a reminder for the scheduled
event. Your Jitterbug Plus will remind you with an alert sound. To change
the alert time, click the box and select how long before the event you
would like to be notied.
9. Click on the description box to enter any additional details about the
event.
10. Click the “Add” to save your calendar event.

Section 1
32 Getting Started
By Phone
Call a friendly GreatCall Operator, available 24 hours a day, seven days a week. If you
would prefer to use our helpful Operator Assistance to update your calendar, we’ve
made it easy to do so. Simply press the button on your Jitterbug Plus to reach an
Operator who can manage your events and reminders for you.

Section 1
Getting Started 33
Operator Assistance
Live Operators are available 24 hours a day, seven days a week, and can help you:
1. Update and manage your Phone Book.
2. Look up a residential, business or government phone number.
3. Connect you to any number in the U.S. or Canada.
4. Place calls to anyone in your Phone Book.
5. Add events and appointments to your calendar (if MyCalendar is enabled).

Section 1
Getting Started 35
Emergency 9-1-1 Service
To Make An Emergency Call
1. Open your Jitterbug and make sure it’s on.
2. Dial 9–1–1 using the keypad.
3. Press the button when you see “CALL?” at the
bottom of the Inside Display.

Section 1
36 Getting Started
Installing And Removing The Battery
The battery has been pre-installed into your Jitterbug phone for your
convenience.
To Remove The Battery
1. If the phone is on, turn it off by opening your Jitterbug and holding down the
on
off
button until the GreatCall logo appears. The phone will then turn off.
2. With the back of the Jitterbug facing up, hold the phone with both hands so
that the GreatCall and Samsung logos are upside-
down.
3. Place both of your thumbs over the Samsung logo,
while squeezing the phone between your ngers and
thumbs, push the Battery Cover away from you.
4. To remove the battery, simply slide a ngernail in the
groove at the top of the battery, and gently pull the
battery out.

Section 1
Getting Started 37
To Install The Battery
1. Hold the battery with the Samsung logo facing up, slide the battery into the
back of your Jitterbug so the gold contacts on the side of the battery connect
with the gold pins inside the phone.
2. Push the battery into place.
3. Place the cover over the back of the phone so the hinges align with the slots
near the top of the phone.
4. While holding the phone with both hands
place your thumbs on the Samsung logo.
Make sure the logo is facing right-side-up.
Push the Battery Cover up while squeezing
the phone. The Battery Cover will click into
place.

Section 1
38 Getting Started
Getting More Information
GreatCall customers have access to two unique websites that are easy to
navigate and explore – www.greatcall.com and www.mygreatcall.com.
The main GreatCall website – greatcall.com – is the place to learn more about
the company, read about new services available, shop for Jitterbug accessories
or get answers to frequently asked questions.
As a GreatCall customer, you have exclusive access to www.mygreatcall.com
where you can update your Phone Book, view your remaining monthly minutes,
review and pay your monthly bill, add exclusive apps and services, and update
your prole. For more information on mygreatcall.com please reference page 88.

Section 1
Getting Started 39
GreatCall Customer Service
Use any of these ways to contact us:
• Send us an email at customerservice@greatcall.com
• Call us toll-free at 1-800-733-6632
• Write to us at:
GreatCall Customer Service
P.O. Box 4428
Carlsbad, CA 92018

Section 2
40 Placing And Receiving Calls
Section 2: Placing And Receiving Calls
This section explains how to use the calling and answering features on your Jitterbug.
Topics
• Placing A Call
• Using Your Phone Book To
Make A Call
• Speakerphone
• Answering A Call
• Ending A Call
• Ignoring A Call
• Adjusting The Ringer Volume
• Adjusting The Earpiece
Speaker Volume
• Call Waiting
For additional support, visit us online at www.greatcall.com/support.
• Using Call History
To See Recent Calls
• Using Voice Dial
• Setting Up Voice Mail
• Changing Your Voice Mail Greeting
• When To Check Your Voice Mail
Messages
• Listening To Voice Mail Messages
• Listening To Saved Voice Mail
Messages
• International Dialing

Section 2
Placing And Receiving Calls 41
• Using Call History
To See Recent Calls
• Using Voice Dial
• Setting Up Voice Mail
• Changing Your Voice Mail Greeting
• When To Check Your Voice Mail
Messages
• Listening To Voice Mail Messages
• Listening To Saved Voice Mail
Messages
• International Dialing
Placing A Call
You can dial a phone number directly from almost every screen on your Jitterbug.
1. When you open your Jitterbug, you will hear a dial tone to indicate that service is
available. If service is not available, there will be no dial tone and you will see “No
Service” on the Inside Display.
2. Dial the full ten-digit number using your keypad. You may be required to dial
the number “1” rst before placing a call in some areas.
3. Press the button to place the call.
If you accidentally press a wrong button, press the button to back up and
delete the last number.

Section 2
42 Placing And Receiving Calls
There are three screens where you cannot dial a phone number: (1) when
typing a Text Message, (2) when entering a new name and number into your
Phone Book using your keypad and (3) when using Voice Dial.
NOTE:
Using An Operator To Make A Call:
A live Operator can connect you to anyone in your Phone Book or to any number
in the U.S. or Canada.
1. Press the button on your keypad.
2. Press the button when you see “CALL?” at the bottom of the Inside
Display.
3. “Calling Operator” will appear on the Inside Display followed by the words
“Connected...”

Section 2
Placing And Receiving Calls 43
4. Tell the Operator the name of the person in your Phone Book you want to call
or tell them the ten digit number you want to call.
5. When the call is nished, press the button or simply close your Jitterbug to end
the call.
Using Your Phone Book To Make A Call
To place a call to a number in your Phone Book:
1. Starting from the Main Screen, use the “Up/Down” button
and scroll until “Phone Book” appears highlighted in gray in the
middle of the Inside Display.
2. Press the button to view your “Phone Book.”
3. Your Phone Book will always start with the rst name and number you’ve
entered in the Phone Book, as indicated by the number “1” in the top right
corner of the Inside Display. You can manage the order of the names and

Section 2
44 Placing And Receiving Calls
numbers of your Phone Book at mygreatcall.com. Please reference page 88 to
learn more about mygreatcall.com.
4. You can scroll through the names and numbers in your
Phone Book by pressing the “Up/Down” button.
5. When you nd the desired name and number, press the
button to place the call.
6. You will see “Calling...” on the Inside Display followed by
“Connected” to conrm you are connected, as shown.
7. When you’re nished with the call, press the button or
close your Jitterbug to end the call.
While in the Phone Book, you can dial any phone number you need by using
the keypad. Simply dial the number you wish to call and press the button
to connect.
NOTE:

Section 2
Placing And Receiving Calls 45
Speakerphone
The Speakerphone provides you the convenience to make a call without holding
the phone to your ear. The Speakerphone can be activated at any time while you
are actively on a call. During your call, you will see an indicator at the top of the
Inside Display indicating the current status of the Speakerphone. “SPEAKER OFF”
indicates that the Speakerphone is off, and “SPEAKER ON” indicates that the
Speakerphone is on.
To turn your Speakerphone on, press the up arrow on the
“Up/Down” button on your keypad until “SPEAKER ON” is
displayed on the Inside Display.
With the Speakerphone you do not need to hold the phone
to your ear. Depending on your surroundings, you can enjoy
a conversation using your Speakerphone up to two feet from
your Jitterbug.

Section 2
46 Placing And Receiving Calls
To turn your Speakerphone off, press the up arrow on the “Up/Down” button
on your keypad until “SPEAKER OFF” is displayed on the Inside Display
If you choose to turn the Speakerphone off during a call, your conversation will not
end. The audio will be transferred to the Earpiece Speaker that you hold to your
ear.
If you close your Jitterbug during a conversation while using the
Speakerphone, the call will end and the Speakerphone will be turned off.
NOTE:
Section 2
Placing And Receiving Calls 47
Answering A Call
Your Jitterbug rings or vibrates (depending on how you set the ringer volume
level) to indicate an incoming call. Additionally, there are other indications of
incoming calls:
• The Light Indicator on the outside of your Jitterbug ashes.
• The name or phone number of the person calling will
appear on the Outside Display.
• If the caller’s number is stored in your Phone Book then
the name and number will appear on the Inside Display, as
shown.
• If the caller cannot be identied, you may see the phone
number or you may see “Unavailable” or “Restricted.”

Section 2
48 Placing And Receiving Calls
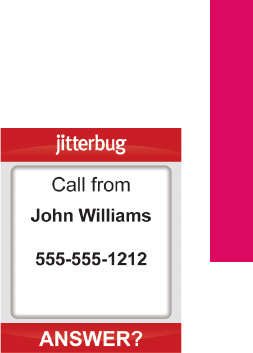
Answering A Call When Your Jitterbug Is Closed
1. If the caller’s name and number are stored in your Phone Book or the caller ID
is recognized, either the name or the phone number appears on the Outside
Display, as shown.
2. Open your Jitterbug when you hear it ring. The ring tone
will stop when the phone is opened.
3. A “Connected” message will appear on the Inside Display
and the caller’s voice can be heard through the earpiece
speaker. Call from
888-555-5555

Section 2
Placing And Receiving Calls 49
Receiving A Call When Your Jitterbug Is Open
1. When the “ANSWER?” question appears on the Inside Display, press the
button to connect.
2. A “Connected” message will appear on the Inside Display and the caller’s
voice will be heard through the earpiece speaker.
Ending A Call
To end any active call, press the button or close your Jitterbug.
Ignoring A Call
To Ignore A Call When Your Jitterbug Is Closed
When the phone is ringing you can press the volume button to mute the ringer.
If Voice Mail is active, the caller will be directed to your Voice Mail. If Voice Mail
is not active, callers will get a message that you are not available.

Section 2
50 Placing And Receiving Calls
To Ignore A Call When Your Jitterbug Is Open
You can send a caller directly to your Voice Mail by pressing the button
when you see “ANSWER?” at the bottom of the Inside Display. This will give an
unavailable message if you do not have Voice Mail.
To ignore an incoming call while you are already on a call, press the button.
Your Jitterbug will continue to ring until:
• You answer the call
• The calling party hangs up
• You mute the ringer
• The call is sent to Voice Mail
NOTE:
Section 2
Placing And Receiving Calls 51
Adjusting The Ringer Volume
1. Open your Jitterbug to conrm it’s on and not actively on a call.
2. Press the Volume Button on the left-hand side of the phone. Press
the top of the Volume Button to increase the volume and the
bottom of the Volume Button to decrease the volume.
The available options are:
• Max
• High
• Medium
• Low
• Vibrate
Volume Button

Section 2
52 Placing And Receiving Calls
The selected volume level will appear on the Inside Display. The Ringer
Volume cannot be adjusted while actively on a call.
The ringer can be silenced by pressing the volume button down until
“Vibrate” appears on the Inside Display. With “Vibrate” selected your
Jitterbug will only vibrate to alert you of incoming calls. This can come in
handy at a movie, a library or any other location where a ringer may be a
distraction.
NOTE:

Section 2
Placing And Receiving Calls 53
Adjusting The Earpiece Speaker Volume
When you’re on a call, press the volume button up or down until the sound
reaches a comfortable level.
Your Jitterbug has three volume options for your earpiece speaker that you can
adjust while on a call as shown below:
• High
• Medium
• Low
Call Waiting
Call Waiting is a feature that allows you to accept a second call if you are already
on a call with another person. The phone does not come with this helpful feature
enabled, but if you would like to turn it on, simply call us at 1-800-733-6632. A
Call Waiting signal alerts you that there is a second caller waiting. The following
steps outline how to use Call Waiting on your Jitterbug:

Section 2
54 Placing And Receiving Calls
1. When a second person calls your Jitterbug while you are already on a call with
someone else, you will hear an audible beep and a message will appear on the
Inside Display to notify you of a second incoming call.
2. To answer the second incoming call, press the button. You will switch to
the second caller and the rst caller will be put on hold and will remain on the
other line.
3. To switch between the two callers, press the button. The Inside Display will
indicate the name and number of the person you are connected with.
4. To end a call at anytime, simply press the button.
To ignore an incoming call while you are already on a call with someone else,
simply press the button. The second caller will go directly to your Voice Mail (if
enabled).
NOTE:

Section 2
56 Placing And Receiving Calls
Using Call History To See Recent Calls
Your Jitterbug keeps a list of your ten most recent outgoing, incoming and missed calls.
To Review Call History:
1. Starting from the Main Screen, use the “Up/Down” button and scroll until “Call
History” appears highlighted in gray in the middle of the Inside Display.
2. Press the button to select “Call History.”
3. The rst number you will see in your Call History will be your most recent
phone call.
4. Using the “Up/Down” button, scroll down to view your Call History in
sequence according to the time of occurrence.
If a call matches a number from your Phone Book, the name and number of
that person will appear on the Inside Display.
NOTE:

Section 2
Placing And Receiving Calls 57
5. As you scroll through your Call History you will see the following information
on the Inside Display:
• Feature Area – you will see “CALL HISTORY” indicating
that you are in your Call History.
• Detail Area – you will see the following messages:
• “Missed” if you missed an incoming call
• “Incoming” if you received and answered a call
• “Outgoing” if you placed a call
In the middle of the Inside Display you will see the time,
date and phone number for each call.
• Action Line – you will see “CALL?”
CALL?
CALL HISTORY
03:27 PM - 01/12/14
Missed
888-555-5555

Section 2
60 Placing And Receiving Calls
5. If Voice Dial is unsure it will say “Repeat the name” followed by a beep.
6. Voice Dial will dial the number of the person whose name you selected.
7. Press the button or close your Jitterbug to end the call.
8. “Call Ended” will appear, letting you know the call has concluded.
If Voice Dial is unable to nd the name, press the button to retry, or the
button to exit to the Main Screen.
To ensure a successful Voice Dial experience, remember these important tips:
• Wait for the system beep before speaking
• Speak clearly and in your normal voice
• Say the name exactly as it appears in your Phone Book
• Make sure each Phone Book entry is unique in its description
NOTE:

Section 2
Placing And Receiving Calls 61
Setting Up Voice Mail
This section only applies if you have purchased Voice Mail with your
GreatCall service. To purchase Voice Mail service for your Jitterbug,
please call us at 1-800-733-6632.
Follow these steps to set up Voice Mail:
1. Starting from the Main Screen, use the “Up/Down” button and scroll until
“Voice Mail” appears highlighted in gray in the middle of the Inside Display.
2. Press the button to dial the GreatCall Voice Mail system.
3. Your Jitterbug will know it is your rst time setting up Voice Mail. You will be
guided through your Voice Mail set-up the rst time you connect. Follow the
instructions, pressing the and buttons as prompted.

Section 2
64 Placing And Receiving Calls
Listening To Voice Mail Messages
• If you have a new Voice Mail message, your Jitterbug will notify you by
displaying “You have a new voice message” on the Inside Display and
“LISTEN?” in the Action Line.
• Press the button to listen to your message.
• Simply listen to the prompts and follow along to save or delete your
messages.
Once a message is deleted, there is no way to retrieve it.
IMPORTANT!

Section 2
Placing And Receiving Calls 65
Listening To Saved Voice Mail Messages
1. Starting from the Main Screen, use the “Up/Down” button and scroll until
“Voice Mail” appears highlighted in gray in the middle of the Inside Display.
2. Press the button to select “Voice Mail” and listen to the prompts to play
your saved messages.
3. To exit your Voice Mail, simply close your Jitterbug at any time.
To quickly manage multiple messages, press the button at any time while
listening to a message. You will then be given the option to save or delete
your message. Pressing the button will save that message and advance to
your next Voice Mail message.
NOTE:

Section 2
66 Placing And Receiving Calls
5. Press the button to return the call.
6. Press the button or close your Jitterbug to end the call.
7. “Call Ended” will appear, letting you know the call has concluded.

Section 3
68 GreatCall Health and Safety Services
Section 3: GreatCall Health and Safety Services
This section describes additional services that make your Jitterbug more than
just an easy-to-use cell phone. With access to a network of health and safety
experts, your Jitterbug becomes a mobile medical alert device.
Topics
• GreatCall GoPlans
• 5Star Service
• Urgent Care
• Medication Reminders
For additional support, visit us online at www.greatcall.com/support.
• Brain Games
• The Wellness Call
• The Check-in Call
• Daily Health Tips

Section 3
GreatCall Health and Safety Services 69
GreatCall GoPlans
The Jitterbug5 is more than an easy-to-use cell phone, it’s also a network of
people who are health and safety experts. Combined with affordable talk minutes,
GreatCall GoPlans make it easier than ever to stay connected, safe and healthy.
With a GreatCall GoPlan you have access to convenient health and safety services
such as:
•5Star – Get help from NAED (National Academies of Emergency Dispatch)
Certied Response Agents in any uncertain or unsafe situation.
•Urgent Care – Access registered nurses and board-certied doctors for advice,
diagnoses and/or prescriptions 24/7.
•Medication Reminders – Stay on schedule with your medications and rells.
•Brain Games - Improve cognitive functions while having fun.
•The Wellness Call – Receive motivational calls from Brian Alman, PhD.
•The Check-in Call – Friendly automated calls will check in with you daily.
•Daily Health Tips – Get free tips for maintaining a healthy lifestyle.
If you’re interested in a GreatCall GoPlan please call us at 1-800-292-5174 or visit
us online at greatcall.com to learn more.
Specyfikacje produktu
| Marka: | GreatCall |
| Kategoria: | smartfon |
| Model: | Jitterbug 5 |
Potrzebujesz pomocy?
Jeśli potrzebujesz pomocy z GreatCall Jitterbug 5, zadaj pytanie poniżej, a inni użytkownicy Ci odpowiedzą
Instrukcje smartfon GreatCall

27 Września 2024
13 Września 2024
4 Lipca 2024
3 Lipca 2024
3 Lipca 2024
Instrukcje smartfon
- smartfon Sony
- smartfon Samsung
- smartfon AEG
- smartfon LG
- smartfon Motorola
- smartfon Xiaomi
- smartfon MyPhone
- smartfon Sharp
- smartfon Huawei
- smartfon TCL
- smartfon Lenovo
- smartfon TP-Link
- smartfon Philips
- smartfon SilverCrest
- smartfon Gigabyte
- smartfon Acer
- smartfon Realme
- smartfon Gigaset
- smartfon Geemarc
- smartfon Nokia
- smartfon Hisense
- smartfon Infiniton
- smartfon Panasonic
- smartfon Mio
- smartfon Asus
- smartfon Nedis
- smartfon Medion
- smartfon OK
- smartfon Audioline
- smartfon Toshiba
- smartfon Tesla
- smartfon Alcatel-Lucent
- smartfon Majestic
- smartfon Bluebird
- smartfon Garmin
- smartfon Blaupunkt
- smartfon Profoon
- smartfon Vivax
- smartfon Evolveo
- smartfon Alcatel
- smartfon Haier
- smartfon HP
- smartfon Hyundai
- smartfon Honeywell
- smartfon Honor
- smartfon Kodak
- smartfon ZTE
- smartfon MaxCom
- smartfon Dell
- smartfon Google
- smartfon Intex
- smartfon Oppo
- smartfon Kyocera
- smartfon Krüger&Matz
- smartfon Qilive
- smartfon Thomson
- smartfon Manta
- smartfon Apple
- smartfon NGS
- smartfon CRUX
- smartfon Emporia
- smartfon Nevir
- smartfon Mitsubishi
- smartfon Razer
- smartfon GoClever
- smartfon SPC
- smartfon Intermec
- smartfon NEC
- smartfon Polaroid
- smartfon Prestigio
- smartfon Aiwa
- smartfon Sanyo
- smartfon Telefunken
- smartfon OnePlus
- smartfon Amazon
- smartfon Olympia
- smartfon Microsoft
- smartfon Bush
- smartfon HTC
- smartfon CAT
- smartfon Denver
- smartfon Saiet
- smartfon Albrecht
- smartfon RCA
- smartfon Media-Tech
- smartfon BenQ
- smartfon Trevi
- smartfon Lexibook
- smartfon Overmax
- smartfon Micromax
- smartfon Sencor
- smartfon NUU Mobile
- smartfon Alecto
- smartfon Binatone
- smartfon Hammer
- smartfon Allview
- smartfon Oukitel
- smartfon Best Buy
- smartfon Cyrus
- smartfon Kazam
- smartfon Tecdesk
- smartfon KPN
- smartfon Swissvoice
- smartfon I.safe Mobile
- smartfon TrekStor
- smartfon Brondi
- smartfon Fysic
- smartfon Wiko
- smartfon Yarvik
- smartfon Aligator
- smartfon Amplicomms
- smartfon AQISTON
- smartfon Amplicom
- smartfon Archos
- smartfon Androidtech
- smartfon Crosscall
- smartfon Ecom
- smartfon Sony Ericsson
- smartfon Vestel
- smartfon Sonim
- smartfon Energy Sistem
- smartfon Doro
- smartfon Sagem
- smartfon Lava
- smartfon Blu
- smartfon Easypix
- smartfon Konrow
- smartfon Brigmton
- smartfon Sunstech
- smartfon Aspera
- smartfon Sunny
- smartfon Nordmende
- smartfon Blackberry
- smartfon Vivo
- smartfon Wolder
- smartfon NGM
- smartfon Vodafone
- smartfon Switel
- smartfon InFocus
- smartfon XD
- smartfon Pantech
- smartfon Alba
- smartfon RugGear
- smartfon Umidigi
- smartfon AT&T
- smartfon Mpman
- smartfon Bury
- smartfon Logicom
- smartfon Karbonn
- smartfon Palm
- smartfon Hannspree
- smartfon Phicomm
- smartfon Plum
- smartfon Lumigon
- smartfon Infinix
- smartfon Keneksi
- smartfon Klipad
- smartfon Iget
- smartfon T-Mobile
- smartfon JCB
- smartfon Casper
- smartfon Unnecto
- smartfon Wileyfox
- smartfon ITT
- smartfon Yota
- smartfon Avus
- smartfon Spice
- smartfon Wolfgang
- smartfon BQ
- smartfon ORA
- smartfon Danew
- smartfon Echo
- smartfon Primux
- smartfon Tiptel
- smartfon UTStarcom
- smartfon Zipy
- smartfon Mediacom
- smartfon Beafon
- smartfon BGH
- smartfon Billow
- smartfon Telstra
- smartfon Ulefone
- smartfon CSL
- smartfon ToughGear
- smartfon Benefon
- smartfon Komu
- smartfon Doogee
- smartfon Energizer
- smartfon Tremay
- smartfon Kurio
- smartfon Piranha
- smartfon Coolpad
- smartfon Syco
- smartfon TAG Heuer
- smartfon Mobistel
- smartfon Itel
- smartfon Garmin-Asus
- smartfon Handheld
- smartfon Fero
- smartfon AT Telecom
- smartfon Xtreamer
- smartfon Verykool
- smartfon O2
- smartfon General Mobile
- smartfon Mustang
- smartfon Kogan
- smartfon Pharos
- smartfon Storex
- smartfon Fairphone
- smartfon Freeman
- smartfon HomTom
- smartfon Leotec
- smartfon Auro
- smartfon Maxx
- smartfon ITTM
- smartfon Posh Mobile
- smartfon THL
- smartfon NGM-Mobile
- smartfon POCO
- smartfon Nothing
- smartfon Lark
- smartfon Senifone
- smartfon Tecno
- smartfon Telme
- smartfon UMi
- smartfon Olitech
- smartfon Mobiola
- smartfon Meizu
- smartfon Neffos
- smartfon Gionee
- smartfon TIM
- smartfon Cubot
- smartfon Leagoo
- smartfon NTech
- smartfon Nubia
- smartfon LeEco
- smartfon GSmart
- smartfon Bea-fon
- smartfon Opticon
- smartfon EStar
- smartfon Facom
- smartfon Jitterbug
- smartfon Custom
- smartfon Aplic
- smartfon HMD
- smartfon Opis
- smartfon Volla
- smartfon Nothing Tech
- smartfon Maxwest
- smartfon Kalley
Najnowsze instrukcje dla smartfon
2 Kwietnia 2025

30 Marca 2025
10 Marca 2025
7 Marca 2025
5 Marca 2025
5 Marca 2025
3 Marca 2025

2 Marca 2025

26 Lutego 2025
26 Lutego 2025