Instrukcja obsługi Gigabyte G-Power II
Gigabyte
Sprzęt komputerowy
G-Power II
Przeczytaj poniżej 📖 instrukcję obsługi w języku polskim dla Gigabyte G-Power II (1 stron) w kategorii Sprzęt komputerowy. Ta instrukcja była pomocna dla 7 osób i została oceniona przez 2 użytkowników na średnio 4.5 gwiazdek
Strona 1/1
1. Universal design, supports LGA775 & AMD K8 / AM2 platform.
2. Curve design combines CPU and MOSFEAT cooling together.
3. 9CM silent fan with PWM function, highest fan speed can reach 2300RPM.
4. Highly heat conducting heat pipe, provides extreme cooling performance.
5. Pure copper base with aluminum fin, extra large heat dissipation area allows heat been carried away faster.
6. Hassle-free installation.
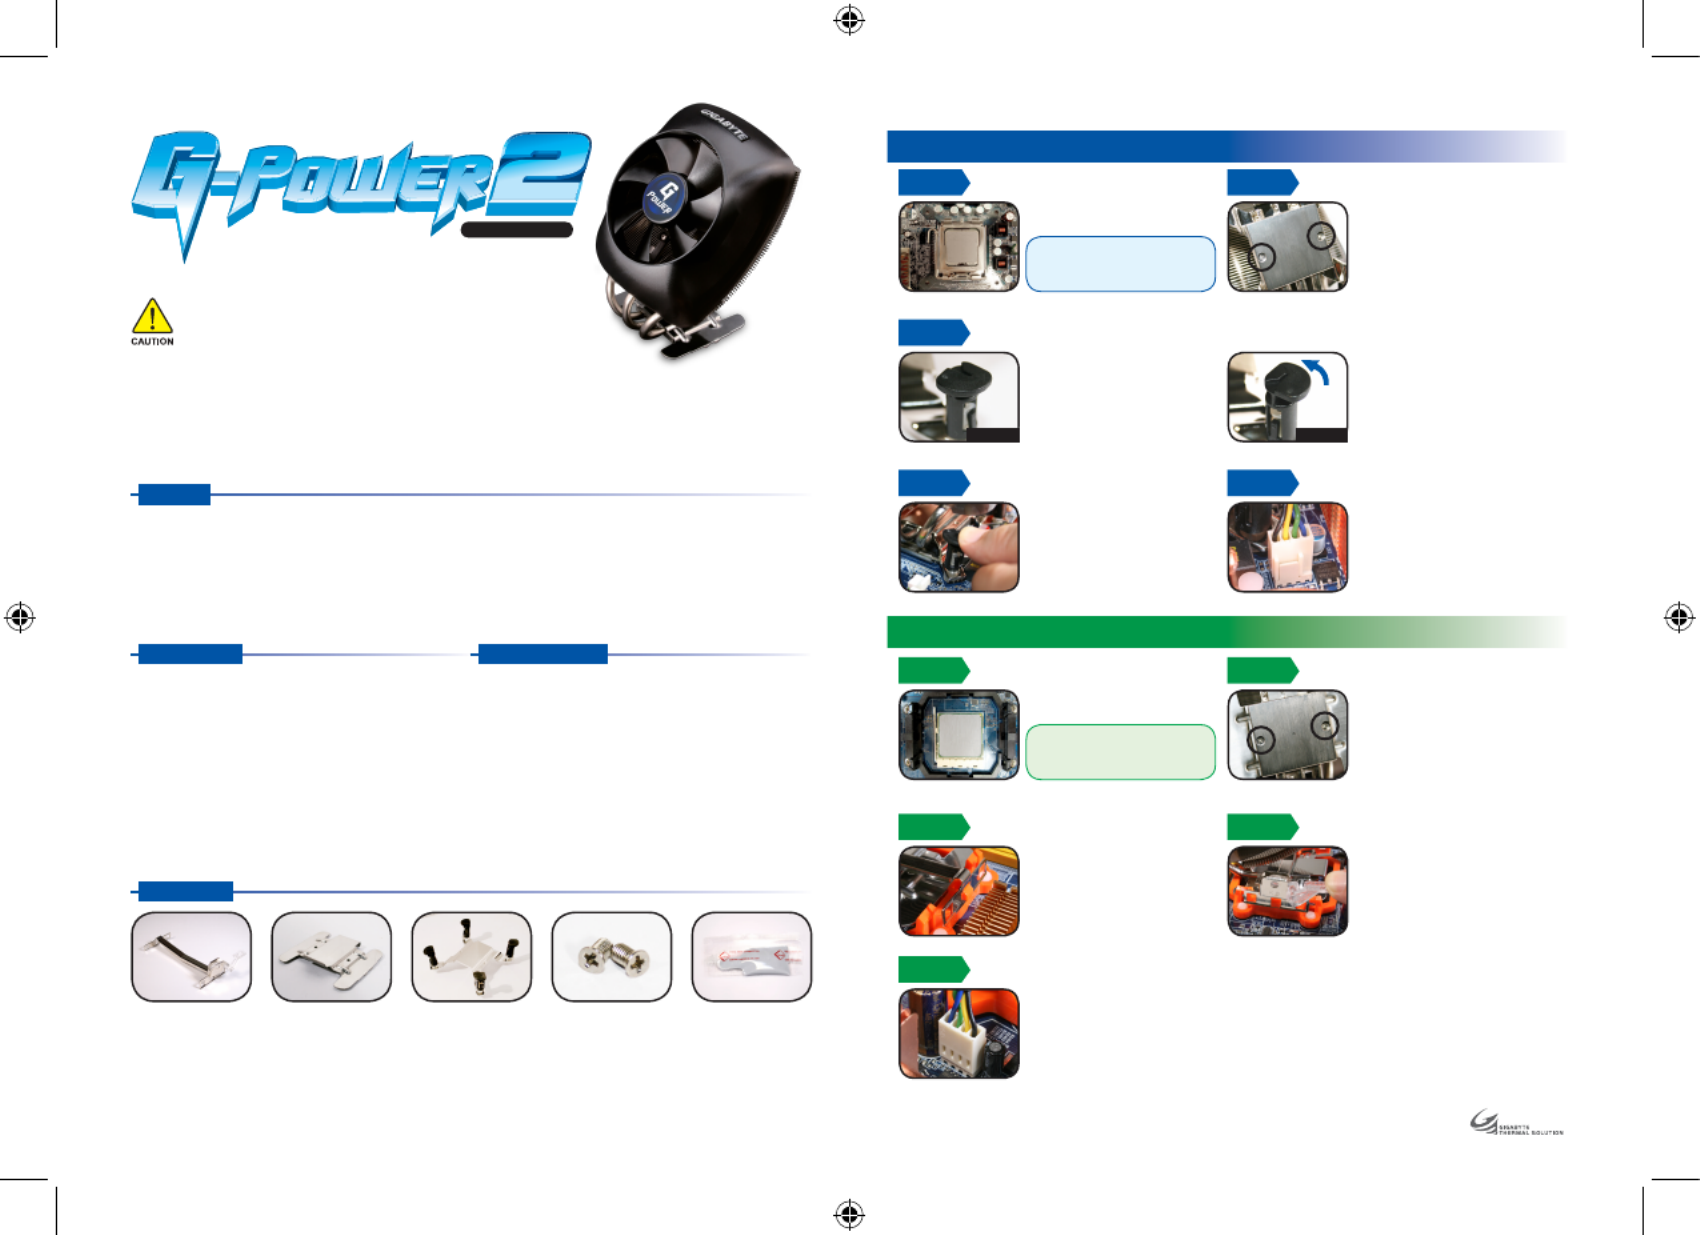
STEP 3
STEP 4 STEP 5
Before installation, please make
sure the pin is on the right
direction. (as Figure A)
Plug the 4-pin connector of the
cooler into the motherboard’s CPU
fan socket.
Align the pin of the cooler with
the hole of the CPU on the
motherboard and push down
the pin diagonally.
Please make sure the four pins
are firmly secured.
To remove the cooler, turn the four
pins to the removing direction and
pull them up.(as Figure B)
The followings are not covered by the warranty :
1. Use the product incorrectly or in a manner other than the designed purpose.
2. Nonobservance of the proper operation. ( e.g. over-clocking )
3. Malfunction due to interference from other devices.
4. Unauthorized modification of the product.
5. Malfunction due to unfit specifications on Motherboard.
6. Malfunction arising from casualties ( earthquake, thunder, fire, and flood ).
The cooler fan speed levels provided are for reference use only.
Please refer to the motherboard BIOS to verify actual fan speed levels.
Dimension : 102 x 122 x 139 mm
Fan Dimension : 90 x 90 x 25 mm
Heat Pipe : 3
Base Material: Copper
Fin Material : Aluminum
Rated Voltage : 12 V
Rated Current : 0.2 Amp
Fan Speed : 2,300 rpm
Noise Level : 25dBA
Bearing Type : EBR
Fan Life Expectancy : 30,000 hr
AMD K8 / AM2 Clip AM2/K8 Bracket LGA775 Bracket screws x 2
Apply some thermal grease on
the CPU properly.
STEP 2
Place the 775 bracket between the
copper base and the cooler unit.
Align the holes of the bracket with
the holes of the copper base. Secure
the 775 bracket with supplied
bracket screws. Make sure the screws
are evenly and firmly fastened.
Thermal grease
Installation Guide
G H-P SU 22 - P C
STEP 1
STEP 3
Lock the tab on one side of AMD
K8 / AM2 clip in the salient point
of the CPU cooler.
Lock the tab on the other side of
AMD K8 / AM2 clip in the salient
point of the CPU cooler bracket;
push down and secure the bar on
the clip firmly.
STEP 4
STEP 5
Plug the 4-pin connector of the
cooler into the motherboard’s
CPU fan socket.
STEP 2
Apply some thermal grease on
the CPU properly.
Caution :
Before installation, please turn off the
power, unplug the power cord, and
be sure to remove the sticker from the
bottom of the cooler unit.
Place the AM2/K8 Bracket between
the copper base and the cooler unit.
Align the holes of the bracket with
the holes of the copper base. Secure
the AM2/K8 Bracket with supplied
bracket screws. Make sure the screws
are evenly and firmly fastened.
Features
7. The product’s warranty label has been removed or damaged.
8. The devices inside, including power supply, hard disk, CD-ROM drive,
motherboard, cooler, etc, are not detached from the chassis prior to the
transportation of the computer product, resulting in damage to the cooler
or computer-related devices.
9. Any damage caused by nonobservance of the installation instruction contained
in this manual.
Specification
Intel® CoreTM 2 Extreme Processor Series
Intel® CoreTM 2 Quad Processor Series
Intel® CoreTM 2 Duo Processor Series
Intel® Pentium® Extreme Edition Series
Intel® Pentium® D Processor Series
Intel® Pentium® 4 Processor Series (LGA775)
AMD AM2
AMD AthlonTM FX Series
AMD AthlonTM 64x2 Series
AMD AthlonTM 64 Series
AMD Sempron Series
Compatible CPU
Accessories
STEP 1
LGA 775 Platform Installation
AMD K8 / AM2 Platform Installation
Caution :
Before installation, please turn off the
power, unplug the power cord, and
be sure to remove the sticker from the
bottom of the cooler unit.
Figure A Figure B
Specyfikacje produktu
| Marka: | Gigabyte |
| Kategoria: | Sprzęt komputerowy |
| Model: | G-Power II |
| Kolor produktu: | Srebrny |
| Liczba źródeł światła: | 1 szt. |
| Materiał obudowy: | Aluminium |
| Wbudowany wyłącznik: | Tak |
| Głębokość produktu: | 117 mm |
| Waga produktu: | 27.5 g |
| Ilość na paczkę: | 1 szt. |
| Rodzaj baterii: | AAA |
| Typ lamp: | LED |
| Ilość lamp: | 1 lamp(y) |
| Kolor światła: | Biały |
| Rodzaj opakowania: | Blister |
| Liczba baterii: | 1 |
| Baterie w zestawie: | Tak |
| Liczba poziomów zasilania: | 1 |
| Czas pracy na zasilaniu akumulatorowym: | 15 h |
| Przenośny: | Tak |
| Żywotność baterii: | 15 h |
| Typ latarki: | Latarka w długopisie |
| Moc świetlna (max): | 3 lm |
| Kolor LED: | Biały |
| Żarówki w zestawie: | Tak |
| Odległość wiązki światła (max): | 11 m |
| Średnica głowicy: | 14 mm |
| Długość: | 11.7 cm |
Potrzebujesz pomocy?
Jeśli potrzebujesz pomocy z Gigabyte G-Power II, zadaj pytanie poniżej, a inni użytkownicy Ci odpowiedzą
Instrukcje Sprzęt komputerowy Gigabyte

3 Kwietnia 2025
3 Kwietnia 2025
7 Sierpnia 2024
7 Sierpnia 2024
Instrukcje Sprzęt komputerowy
- Sprzęt komputerowy StarTech.com
- Sprzęt komputerowy Asus
- Sprzęt komputerowy MSI
- Sprzęt komputerowy Evolveo
- Sprzęt komputerowy APC
- Sprzęt komputerowy Tripp Lite
- Sprzęt komputerowy Akasa
- Sprzęt komputerowy Cooler Master
- Sprzęt komputerowy Corsair
- Sprzęt komputerowy Daikin
- Sprzęt komputerowy NZXT
- Sprzęt komputerowy Cougar
- Sprzęt komputerowy TriStar
- Sprzęt komputerowy Phanteks
- Sprzęt komputerowy Antec
- Sprzęt komputerowy DeepCool
- Sprzęt komputerowy Silverstone
- Sprzęt komputerowy Thermaltake
- Sprzęt komputerowy Be Quiet!
- Sprzęt komputerowy Noctua
- Sprzęt komputerowy In Win
- Sprzęt komputerowy ALSEYE
- Sprzęt komputerowy Savio
- Sprzęt komputerowy Arctic Cooling
- Sprzęt komputerowy Lian Li
- Sprzęt komputerowy Intel
- Sprzęt komputerowy ENDORFY
- Sprzęt komputerowy Alpenföhn
- Sprzęt komputerowy Dynatron
- Sprzęt komputerowy Zalman
- Sprzęt komputerowy AeroCool
- Sprzęt komputerowy Krux
- Sprzęt komputerowy SilentiumPC
- Sprzęt komputerowy Mars Gaming
- Sprzęt komputerowy Thermalright
- Sprzęt komputerowy Alphacool
- Sprzęt komputerowy AZZA
- Sprzęt komputerowy Middle Atlantic
- Sprzęt komputerowy CoolerMaster
- Sprzęt komputerowy Iceberg Thermal
- Sprzęt komputerowy Raijintek
- Sprzęt komputerowy Bitspower
- Sprzęt komputerowy EK Water Blocks
- Sprzęt komputerowy Middle Atlantic Products
- Sprzęt komputerowy Cryorig
- Sprzęt komputerowy AC Infinity
- Sprzęt komputerowy Scythe
Najnowsze instrukcje dla Sprzęt komputerowy

9 Kwietnia 2025
9 Kwietnia 2025

9 Kwietnia 2025

8 Kwietnia 2025
8 Kwietnia 2025
8 Kwietnia 2025
8 Kwietnia 2025
8 Kwietnia 2025
8 Kwietnia 2025
8 Kwietnia 2025