Instrukcja obsługi Fujifilm FinePix Z91
Fujifilm
Aparaty cyfrowe
FinePix Z91
Przeczytaj poniżej 📖 instrukcję obsługi w języku polskim dla Fujifilm FinePix Z91 (126 stron) w kategorii Aparaty cyfrowe. Ta instrukcja była pomocna dla 15 osób i została oceniona przez 2 użytkowników na średnio 4.5 gwiazdek
Strona 1/126

FINEPIX Z85/Z90 Series
DIGITAL CAMERA
Owner’s Manual
Thank you for your purchase
of this product. This manual
describes how to use your
FUJIFILM digital camera and the
supplied software. Be sure that
you have read and understood
its contents and the warnings in
“For Your Safety” ( ii) before us-P
ing the camera.
For information on related products, visit our website at
http://www.fujifilm.com/products/digital_cameras/index.html
EN
Before You Begin
First Steps
Basic Photography and Playback
More on Photography
More on Playback
Movies
Connections
Menus
Technical Notes
Troubleshooting
Appendix
BL01256-201

ii
F
F
F
For
or
or
or Y
Y
Y
Your Safety
our Safety
our Safety
our Safety For Your Safety
• Read Instructions: All the safety and operat-
ing instructions should be read before the
appliance is operated.
• Retain Instructions: The safety and operating
instructions should be retained for future
reference.
• Heed Warnings: All warnings on the ap-
pliance and in the operating instructions
should be adhered to.
• Follow Instructions: All operating and use
instructions should be followed.
Installation
Installation
Installation
InstallationInstallation
Power Sources: This video product should be
operated only from the type of power source
indicated on the marking label. If you are
not sure of the type of power supply to your
home, consult your appliance dealer or local
power company. For video products intend-
ed to operate from battery power, or other
sources, refer to the operating instructions.
Grounding or Polarization: This video product
is equipped with a polarized alternating-
current line plug (a plug having one blade
wider than the other). This plug will fi t into
the power outlet only one way. This is a safety
feature. If you are unable to insert the plug
fully into the outlet, try reversing the plug. If
the plug should still fail to fi t, contact your
electrician to replace your obsolete outlet.
Do not defeat the safety purpose of the po-
larized plug.
Alternate Warnings: This video product is
equipped with a three-wire grounding-type
plug, a plug having a third (grounding) pin.
This plug will only fi t into a grounding-type
power outlet. This is a safety feature. If you
are unable to insert the plug into the outlet,
contact your electrician to replace your obso-
lete outlet. Do not defeat the safety purpose
of the grounding type plug.
Overloading: Do not overload wall outlets and
extension cords as this can result in a risk of
fi re or electric shock.
Ventilation: Slots and openings in the cabinet
are provided for ventilation, to ensure reliable
operation of the video product and to pro-
tect it from overheating, and these openings
must not be blocked or covered. The open-
ings should never be blocked by placing the
video product on a bed, sofa, rug, or other
similar surface.
This video product should not be placed in a
built-in installation such as a bookcase or rack
unless proper ventilation is provided or the
manufacturer’s instructions have been ad-
hered to. This video product should never be
placed near or over a radiator or heat register.
Attachments: Do not use attachments not
recommended by the video product manu-
facturer as they may cause hazards.
Water and Moisture: Do not use this video
product near water—for example, near a
bath tub, wash bowl, kitchen sink, or laundry
tub, in a wet basement, or near a swimming
pool, and the like.
Power-Cord Protection: Power-supply cords
should be routed so that they are not likely
to be walked on or pinched by items placed
upon or against them, paying particular
attention to cords at plugs, convenience re-
ceptacles, and the point where they exit from
the appliance.
Accessories: Do not place this video product
on an unstable cart, stand, tripod, bracket, or
table. The video product may fall, causing
serious injury to a child or adult, and serious
damage to the appliance. Use only with a
cart, stand, tripod, bracket, or table recom-
mended by the manufacturer, or sold with
the video product. Any mounting of the ap-
pliance should follow the manufacturer’s in-
structions, and should use a mounting acces-
sory recommended by the manufacturer.
An appliance and cart
combination should
be moved with care.
Quick stops, exces-
sive force, and uneven
surfaces may cause
the appliance and cart
combination to overturn.
IMPORTANT SAFETY INSTRUCTIONS
iii
For Your Safety
Antennas
Antennas
Antennas
AntennasAntennas
Outdoor Antenna Grounding: If an outside
antenna or cable system is connected to the
video product, be sure the antenna or cable
system is grounded so as to provide some
protection against voltage surges and built-
up static charges. Section 810 of the National
Electrical Code, ANSI/NFPA No. 70, provides
information with respect to proper ground-
ing of the mast and supporting structure,
grounding of the lead-in wire to an antenna
discharge unit, size of grounding conductors,
location of antenna discharge unit, connec-
tion to grounding electrodes, and require-
ments for the grounding electrode.
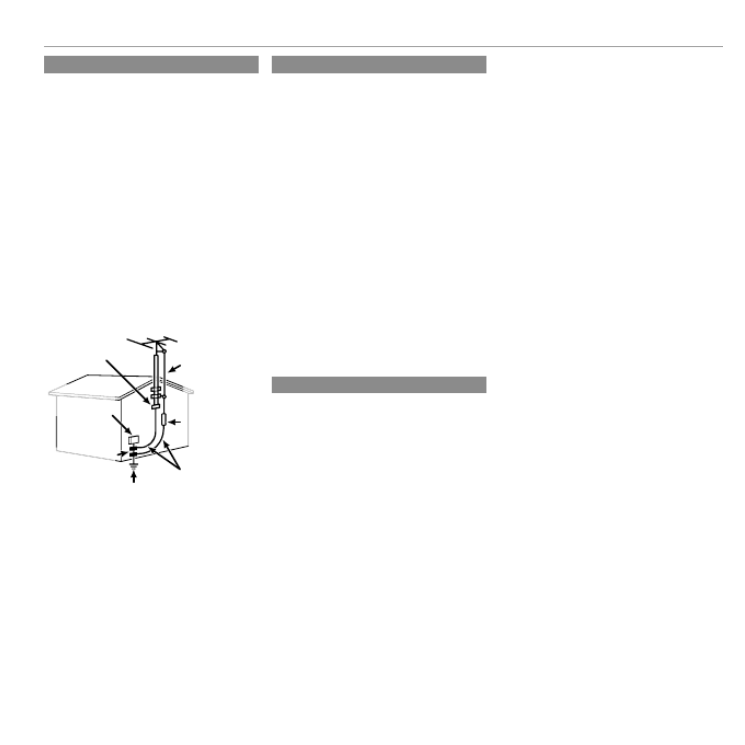
EXAMPLE OF ANTENNA GROUNDING AS PER
NATIONAL ELECTRICAL CODE
Antenna Lead
in Wire
Ground Clamp
Grounding
Conductors
(NEC SECTION
810-21)
Power Service Grounding
Electrode System (NEC ART
250. PART H)
Antenna
Discharge Unit
(NEC SECTION
810-20)
Electric Service
Equipment
Ground Clamps
Power Lines: An outside antenna system
should not be located in the vicinity of over-
head power lines or other electric light or
power circuits, or where it can fall into such
power lines or circuits. When installing an
outside antenna system, extreme care should
be taken to keep from touching such power
lines or circuits as contact with them might
be fatal.
Use
Use
Use
UseUse
Cleaning: Unplug this video product from the
wall outlet before cleaning. Do not use liq-
uid cleaners or aerosol cleaners. Use a damp
cloth for cleaning.
Object and Liquid Entry: Never push objects
of any kind into this video product through
openings as they may touch dangerous volt-
age points or short out parts that could result
in a fi re or electric shock. Never spill liquid of
any kind on the video product.
Lightning: For added protection for this video
product receiver during a lightning storm, or
when it is left unattended and unused for
long periods of time, unplug it from the wall
outlet and disconnect the antenna or cable
system. This will prevent damage to the
video product due to lightning and power-
line surges.
Service
Service
Service
ServiceService
Servicing: Do not attempt to service this video
product yourself as opening or removing cov-
ers may expose you to dangerous voltage or
other hazards. Refer all servicing to qualifi ed
service personnel.
Damage Requiring Service: Unplug this video
product from the wall outlet and refer servic-
ing to qualifi ed service personnel under the
following conditions:
• When the power-supply cord or plug is
damaged.
• If liquid has been spilled, or objects have
fallen into the video product.
• If the video product has been exposed to
rain or water.
• If the video product has been dropped or
the cabinet has been damaged.
If the video product does not operate nor-
mally follow the operating instructions. Ad-
just only those controls that are covered by
the operating instructions as an improper
adjustment of other controls may result in
damage and will often require extensive work
by a qualifi ed technician to restore the video
product to its normal operation.
When the video product exhibits a distinct
change in performance—this indicates a
need for service.
Replacement Parts: When replacement parts
are required, be sure the service technician
has used replacement parts specifi ed by the
manufacturer or have the same characteris-
tics as the original part. Unauthorized sub-
stitutions may result in fi re, electric shock or
other hazards.
Safety Check: Upon completion of any service
or repairs to this video product, ask the ser-
vice technician to perform safety checks to
determine that the video product is in proper
operating condition.

iv
For Your Safety
Be sure to read these notes before use
Safety Notes
• Make sure that you use your camera correctly. Read these safety
notes and your carefully before use.Owner’s Manual
• After reading these safety notes, store them in a safe place.
About the Icons
The icons shown below are used in this document to indicate the
severity of the injury or damage that can result if the information
indicated by the icon is ignored and the product is used incorrectly
as a result.
WARNING
This icon indicates that death or serious injury can result if the
information is ignored.
CAUTION
This icon indicates that personal injury or material damage can
result if the information is ignored.
The icons shown below are used to indicate the nature of the instruc-
tions which are to be observed.
Triangular icons tell you that this information requires atten-
tion (“Important ”).
Circular icons with a diagonal bar tell you that the action indi-
cated is prohibited (“Prohibited”).
Filled circles with an exclamation mark indicate an action that
must be performed (“Required”).
WARNING
WARNING
WARNING
WARNINGWARNING
Unplug from
power socket
If a problem arises, turn the camera off , remove the battery, and
disconnect and unplug the AC power adapter. Continued use of
the camera when it is emitting smoke, is emitting any unusual
odor, or is in any other abnormal state can cause a fi re or elec-
tric shock. Contact your FUJIFILM dealer.
Avoid exposure
to water
Do not allow water or foreign objects to enter the camera. If water
or foreign objects get inside the camera, turn the camera off ,
remove the battery, and disconnect and unplug the AC power
adapter. Continued use of the camera can cause a fi re or elec-
tric shock. Contact your FUJIFILM dealer.
WARNING
WARNING
WARNING
WARNINGWARNING
Do not use in
the bathroom or
shower
Do not use the camera in the bathroom or shower. This can cause
a fi re or electric shock.
Do not
disassemble
Never attempt to change or take apart the camera (never open
the case). Failure to observe this precaution can cause fi re or
electric shock.
Do not touch
internal parts
Should the case break open as the result of a fall or other accident,
do not touch the exposed parts. Failure to observe this precau-
tion could result in electric shock or in injury from touching the
damaged parts. Remove the battery immediately, taking care
to avoid injury or electric shock, and take the product to the
point of purchase for consultation.
Do not change, heat or unduly twist or pull the connection cord and
do not place heavy objects on the connection cord. These actions
could damage the cord and cause a fi re or electric shock. If the
cord is damaged, contact your FUJIFILM dealer.
Do not place the camera on an unstable surface. This can cause the
camera to fall or tip over and cause injury.
Never attempt to take pictures while in motion. Do not use the
camera while you are walking or driving a vehicle. This can re-
sult in you falling down or being involved in a traffi c accident.
Do not touch any metal parts of the camera during a thunderstorm.
This can cause an electric shock due to induced current from
the lightning discharge.
Do not use the battery except as specifi ed. Load the battery as
shown by the indicator.
Do not heat, change or take apart the battery. Do not drop or sub-
ject the battery to impacts. Do not store the battery with metallic
products. Any of these actions can cause the battery to burst or
leak and cause fi re or injury as a result.
Use only the battery or AC power adapters specifi ed for use with this
camera. Do not use voltages other than the power supply voltage
shown. The use of other power sources can cause a fi re.
If the battery leaks and fl uid gets in contact with your eyes, skin or
clothing, fl ush the aff ected area with clean water and seek medical
attention or call an emergency number right away.

v
For Your Safety
WARNING
WARNING
WARNING
WARNINGWARNING
Do not use the charger to charge batteries other than those speci-
fi ed here. The supplied battery charger is for use only with the
type of battery supplied with the camera. Using the charger to
charge conventional batteries or other types of rechargeable
batteries can cause the battery to leak fl uid, overheat or burst.
When carrying the battery, install it in a digital camera or keep it in
the hard case. When storing the battery, keep it in the hard case.
When discarding, cover the battery terminals with insulation tape.
Contact with other metallic objects or batteries could cause
the battery to ignite or burst.
Keep memory cards out of the reach of small children. Because
memory cards are small, they can be swallowed by children.
Be sure to store memory cards out of the reach of small chil-
dren. If a child swallows a memory card, seek medical atten-
tion or call an emergency number.
CAUTION
CAUTION
CAUTION
CAUTIONCAUTION
Do not use this camera in locations aff ected by oil fumes, steam, hu-
midity or dust. This can cause a fi re or electric shock.
Do not leave this camera in places subject to extremely high temper-
atures. Do not leave the camera in locations such as a sealed
vehicle or in direct sunlight. This can cause a fi re.
Keep out of the reach of small children. This product could cause
injury in the hands of a child.
Do not place heavy objects on the camera. This can cause the
heavy object to tip over or fall and cause injury.
Do not move the camera while the AC power adapter is still connect-
ed. Do not pull on the connection cord to disconnect the AC power
adapter. This can damage the power cord or cables and cause
a fi re or electric shock.
Do not use the AC power adapter when the plug is damaged or the
plug socket connection is loose. This could cause a fi re or electric
shock.
Do not cover or wrap the camera or the AC power adapter in a cloth
or blanket. This can cause heat to build up and distort the cas-
ing or cause a fi re.
When you are cleaning the camera or you do not plan to use the
camera for an extended period, remove the battery and disconnect
and unplug the AC power adapter. Failure to do so can cause a
fi re or electric shock.
Unplug from
power socket
When charging ends, unplug the charger from the power socket.
Leaving the charger plugged into the power socket can cause
a fi re.
Using a fl ash too close to a person’s eyes may temporarily aff ect the
eyesight. Take particular care when photographing infants and
young children.
When a memory card is removed, the card could come out of the slot
too quickly. Use your fi nger to hold it and gently release the card.
Injury could result to those struck by the ejected card.
Request regular internal testing and cleaning for your camera.
Build-up of dust in your camera can cause a fi re or electric
shock. Contact your FUJIFILM dealer to request internal clean-
ing every two years. Please note that this service is not free
of charge.

vi
For Your Safety
The Battery and Power Supply
Note: Check the type of battery used in
your camera and read the appropriate
sections.
The following describes the proper use of
batteries and how to prolong their life. Incor-
rect use can shorten battery life or cause leak-
age, overheating, fi re, or explosion.
Li-ion Batteries
Li-ion Batteries
Li-ion Batteries
Li-ion BatteriesLi-ion Batteries
Read this section if your camera uses a
rechargeable Li-ion battery.
The battery is not charged at shipment.
Charge the battery before use. Keep the bat-
tery in its case when not in use.
■ Notes on the Battery
The battery gradually loses its charge when
not in use. Charge the battery one or two
days before use.
Battery life can be extended by turning the
camera off when not in use.
Battery capacity decreases at low tempera-
tures; a depleted battery may not function at
when cold. Keep a fully charged spare bat-
tery in a warm place and exchange as nec-
essary, or keep the battery in your pocket or
other warm place and insert it in the camera
only when shooting. Do not place the bat-
tery in direct contact with hand warmers or
other heating devices.
■ Charging the Battery
Charge the battery in the supplied battery
charger. Charging times will increase at am-
bient temperatures below +10 °C (+50 °F) or
above +35 °C (+95 °F). Do not attempt to
charge the battery at temperatures above
40 °C (+104 °F); at temperatures below 0 °C
(+32 °F), the battery will not charge.
Do not attempt to recharge a fully charged
battery. The battery does not however need
to be fully discharged before charging.
The battery may be warm to the touch imme-
diately after charging or use. This is normal.
■ Battery Life
At normal temperatures, the battery can be
recharged about 300 times. A noticeable de-
crease in the length of time the battery will
hold a charge indicates that it has reached
the end of its service life and should be re-
placed.
■ Storage
Performance may be impaired if the battery is
left unused for extended periods when fully
charged. Run the battery fl at before storing it.
If the camera will not be used for an extended
period, remove the battery and store it in a
dry place with an ambient temperature of
from +15 °C to +25 °C (+59 °F to +77 °F). Do
not store in locations exposed to extremes of
temperature.
■ Cautions: Handling the Battery
• Do not transport or store with metal objects
such as necklaces or hairpins.
• Do not expose to fl ame or heat.
• Do not disassemble or modify.
• Use with designated chargers only.
• Do not drop or subject to strong physical
shocks.
• Do not expose to water.
• Keep the terminals clean.
• The battery and camera body may become
warm to the touch after extended use. This
is normal.
AA Alkaline/Rechargeable Ni-MH Batteries
AA Alkaline/Rechargeable Ni-MH Batteries
AA Alkaline/Rechargeable Ni-MH Batteries
AA Alkaline/Rechargeable Ni-MH BatteriesAA Alkaline/Rechargeable Ni-MH Batteries
Read this section if your camera uses AA
alkaline or rechargeable AA Ni-MH bat-
teries. Information on compatible battery
types may be found elsewhere in the camera
manual.
■ Cautions: Handling the Batteries
• Do not expose to water, fl ame, or heat, or
store in warm or humid conditions.
• Do not transport or store with metal objects
such as necklaces or hairpins.
• Do not disassemble or modify the batteries
or battery casing.
• Do not subject to strong physical shocks.
• Do not use batteries that are leaking, de-
formed, or discolored.
• Keep out of reach of infants and small chil-
dren.
• Insert in the correct orientation.

vii
For Your Safety
• Do not mix old and new batteries, batteries
with diff erent charge levels, or batteries of
diff erent types.
• If the camera will not be used for an extend-
ed period, remove the batteries. Note that
the camera clock will be reset.
• The batteries may be warm to the touch
immediately after use. Turn the camera
off and allow the batteries to cool before
handling.
• Battery capacity tends to decrease at low
temperatures. Keep spare batteries in a
pocket or other warm place and exchange
as necessary. Cold batteries may recover
some of their charge when warmed.
• Fingerprints and other stains on the battery
terminals can impair battery performance.
Thoroughly clean the terminals with a
soft, dry cloth before inserting them in the
camera.
If the batteries leak, clean the battery
compartment thoroughly before in-
serting new batteries.
If fl uid from the battery comes into
contact with skin or clothing, fl ush
the aff ected area with water. If fl uid
enters your eyes, immediately fl ush the
aff ected area with water and seek
medical attention. Do not rub your eyes.
Failure to observe this precaution could
result in permanent visual impairment.
■ Ni-MH Batteries
The capacity of Ni-MH batteries may be
temporarily reduced when new, after long
periods of disuse, or if they are repeatedly
recharged before being fully discharged. This
is normal and does not indicate a malfunc-
tion. Capacity can be increased by repeatedly
discharging the batteries using the discharge
option in the camera setup menu and re-
charging them using a battery charger.
QCAUTION: Do not use the discharge option
with alkaline batteries.
The camera draws a small amount of current
even when off . Ni-MH batteries that have
been left in the camera for an extended pe-
riod may be drawn down to the point that
they no longer hold a charge. Battery perfor-
mance may also drop if the batteries are run
down in a device such as a fl ashlight. Use the
discharge option in the camera setup menu
to discharge Ni-MH batteries. Batteries that
no longer hold a charge even after repeat-
edly being discharged and recharged have
reached the end of their service life and must
be replaced.
Ni-MH batteries can be recharged in a bat-
tery charger (sold separately). Batteries may
become warm to the touch after charging.
Refer to the instructions provided with the
charger for more information. Use the char-
ger with compatible batteries only.
Ni-MH batteries gradually lose their charge
when not in use.
■ Disposal
Dispose of used batteries in accord with local
regulations.
AC Po
AC Po
AC Po
AC Power Adapters (A
wer Adapters (A
wer Adapters (A
wer Adapters (Available Separately)
vailable Separately)
vailable Separately)
vailable Separately)AC Power Adapters (Available Separately)
This section applies to all camera models.
Use only FUJIFILM AC power adapters desig-
nated for use with this camera. Other adapt-
ers could damage the camera.
• The AC power adapter is for indoor use only.
• Be sure the DC plug is securely connected
to the camera.
• Turn the camera off before disconnecting
the adapter. Disconnect the adapter by the
plug, not the cable.
• Do not use with other devices.
• Do not disassemble.
• Do not expose to high heat and humidity.
• Do not subject to strong physical shocks.
• The adapter may hum or become hot to the
touch during use. This is normal.
• If the adapter causes radio interference,
reorient or relocate the receiving antenna.

viii
For Your Safety
Using the Camera
Do not aim the camera at extremely bright
light sources, such as the sun in a cloudless
sky. Failure to observe this precaution could
damage the camera image sensor.
T
T
T
Take T
ake T
ake T
ake Test Shots
est Shots
est Shots
est ShotsTake Test Shots
Before taking photographs on important
occasions (such as at weddings or before
taking the camera on a trip), take a test shot
and view the result in the LCD monitor to en-
sure that the camera is functioning normally.
FUJIFILM Corporation can not accept liability
for damages or lost profi ts incurred as a result
of product malfunction.
Notes on Copyright
Notes on Copyright
Notes on Copyright
Notes on CopyrightNotes on Copyright
Unless intended solely for personal use, imag-
es recorded using your digital camera system
cannot be used in ways that infringe copy-
right laws without the consent of the owner.
Note that some restrictions apply to the
photographing of stage performances, enter-
tainments, and exhibits, even when intended
purely for personal use. Users are also asked
to note that the transfer of memory cards
containing images or data protected under
copyright laws is only permissible within the
restrictions imposed by those copyright laws.
Handling
Handling
Handling
HandlingHandling
To ensure that images are recorded correctly,
do not subject the camera to impact or physi-
cal shocks while images are being recorded.
Liquid Crystal
Liquid Crystal
Liquid Crystal
Liquid CrystalLiquid Crystal
In the event that the LCD monitor is dam-
aged, care should be taken to avoid contact
with liquid crystal. Take the urgent action
indicated should any of the following situa-
tions arise:
• If liquid crystal comes in contact with your
skin, clean the area with a cloth and then
wash thoroughly with soap and running
water.
• If liquid crystal enters your eyes, fl ush the af-
fected eye with clean water for at least 15
minutes and then seek medical assistance.
• If liquid crystal is swallowed, rinse your
mouth thoroughly with water. Drink large
quantities of water and induce vomiting,
then seek medical assistance.
Although the display is manufactured using
extremely high-precision technology, it may
contain pixels that are always lit or that do not
light. This is not a malfunction, and images re-
corded with the product are unaff ected.
Tr
Tr
Tr
Trademark Information
ademark Information
ademark Information
ademark InformationTrademark Information
xD-Picture Card and E are trademarks of
FUJIFILM Corporation. The typefaces included
herein are solely developed by DynaComware
Taiwan Inc. Macintosh, QuickTime, and Mac
OS are trademarks of Apple Inc. in the U.S.A.
and other countries. Windows 7, Windows
Vista, and the Windows logo are trademarks
of the Microsoft group of companies. Adobe
and Adobe Reader are either trademarks
or registered trademarks of Adobe Systems
Incorporated in the U.S.A. and/or other
countries. The SDHC and SDXC logos are
trademarks of SD-3C, LLC. The HDMI logo is a
trademark. YouTube is a trademark of Google
Inc. All other trade names mentioned in
this manual are the trademarks or registered
trademarks of their respective owners.
Electrical Interference
Electrical Interference
Electrical Interference
Electrical InterferenceElectrical Interference
This camera may interfere with hospital or
aviation equipment. Consult with hospital
or airline staff before using the camera in a
hospital or on an aircraft.
Color T
Color T
Color T
Color Television Systems
elevision Systems
elevision Systems
elevision SystemsColor Television Systems
NTSC (National Television System Committee)
is a color television telecasting specifi cation
adopted mainly in the U.S.A., Canada, and
Japan. PAL (Phases Alternation by Line) is
a color television system adopted mainly in
European countries and China.
Exif Print (Exif Version 2.3)
Exif Print (Exif Version 2.3)
Exif Print (Exif Version 2.3)
Exif Print (Exif Version 2.3)Exif Print (Exif Version 2.3)
Exif Print is a newly revised digital camera fi le
format in which information stored with pho-
tographs is used for optimal color reproduc-
tion during printing.
IMPORTANT NOTICE:
Read Before Using the Software
Direct or indirect export, in whole or in part,
of licensed software without the permission
of the applicable governing bodies is pro-
hibited.

ix
About
About
About
About This Manual
This Manual
This Manual
This ManualAbout This Manual
Before using the camera, read this manual and the warnings in “For Your Safe-
ty” (P ii). For information on specifi c topics, consult the sources below.
T
T
T
Table of Contents
able of Contents
able of Contents
able of ContentsTable of Contents .............................
.............................
.............................
............................. .............................P
P
P
PP xi
xi
xi
xi xi T
T
T
Troubleshooting
roubleshooting
roubleshooting
roubleshootingTroubleshooting ............................
............................
............................
............................ ............................ P
P
P
PP 90
90
90
90 90
The “Table of Contents” gives an
overview of the entire manual. The
principal camera operations are list-
ed here.
Having a specifi c problem with the
camera? Find the answer here.
W
W
W
Warning Messages and Displays
arning Messages and Displays
arning Messages and Displays
arning Messages and DisplaysWarning Messages and Displays
.....
.....
.....
..... ..... P
P
P
PP 96
96
96
96 96
Find out what’s behind that fl ashing
icon or error message in the display.
Memory Cards
Memory Cards
Memory Cards
Memory Cards Memory Cards
Pictures can be stored in the camera’s internal memory or on optional SD, SDHC, and
SDXC memory cards ( 14), referred to in this manual as “memory cards.”P

x
■
■
■
■■
Switching Shooting and Playback Modes
Switching Shooting and Playback Modes
Switching Shooting and Playback Modes
Switching Shooting and Playback Modes Switching Shooting and Playback Modes
Press the button when shooting a
switches to the playback mode.
Press the button when playback switches to B
the shooting mode.
Fr
Fr
Fr
Frequently-U
equently-U
equently-U
equently-Used Buttons
sed Buttons
sed Buttons
sed ButtonsFrequently-Used Buttons
■
■
■
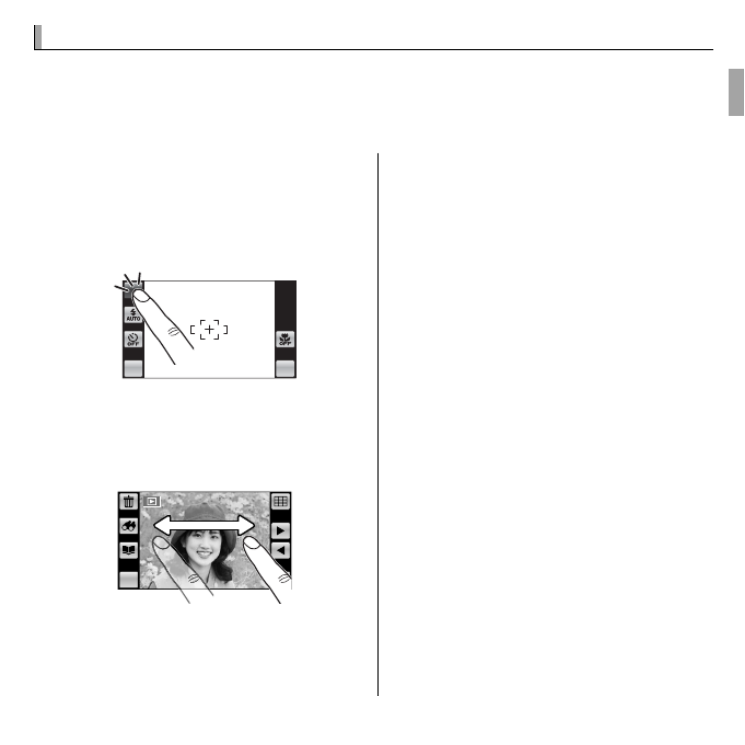
■■T
T
T
Taking Pictures During Playback
aking Pictures During Playback
aking Pictures During Playback
aking Pictures During PlaybackTaking Pictures During Playback
y To return instantly to shoot-
ing mode, press the shutter
button halfway.
View
Shoot
■
■
■
■■
Recording Movies
Recording Movies
Recording Movies
Recording Movies Recording Movies
y Press the F button to
shoot a movie. To end
recording, press the F
button again.

xi
T
T
T
Table of Con
able of Con
able of Con
able of Contents
tents
tents
tents Table of Contents
For Your Safety ..................................................................ii
IMPORTANT SAFETY INSTRUCTIONS ..................................ii
Safety Notes ....................................................................iv
About This Manual ...........................................................ix
Frequently-Used Buttons .................................................x
Before Y
Before Y
Before Y
Before You Begin
ou Begin
ou Begin
ou BeginBefore You Begin
Symbols and Conventions .................................................1
Supplied Accessories .........................................................1
Parts of the Camera ..........................................................2
Camera Displays (Touch Panel) .........................................3
Shooting ........................................................................3
Playback .........................................................................4
The Touch Panel Display....................................................5
Ta p.................................................................................5
Scroll ..............................................................................5
Rotating the Camera ........................................................6
Shooting ........................................................................6
Playback .........................................................................7
Touch Panel Icons .............................................................8
Shooting ........................................................................8
Playback .........................................................................9
First Steps
First Steps
First Steps
First StepsFirst Steps
Charging the Battery ......................................................10
Inserting the Battery and a Memory Card .....................11
Compatible Memory Cards .............................................14
Turning the Camera on and Off ......................................16
Shooting Mode ..............................................................16
Playback Mode ...............................................................16
Basic Setup ......................................................................18
Basic Photography and Pla
Basic Photography and Pla
Basic Photography and Pla
Basic Photography and Playback
yback
yback
ybackBasic Photography and Playback
Taking Pictures in Q (Scene Recognition) Mode ......20
Viewing Pictures .............................................................24
More on Photography
More on Photography
More on Photography
More on PhotographyMore on Photography
Shooting Mode ................................................................25
B AUTO .......................................................................26
J TOUCH & SHOOT ......................................................26
x TOUCH & TRACK ........................................................26
SP SCENE POSITION.......................................................27
r MOTION PANORAMA ...............................................28
D C/ NATURAL LIGHT / NATURAL & N ...................30
P PROGRAM AE ..............................................................31
Focus Lock ........................................................................32
d Exposure Compensation ..........................................34
N Using the Flash (Intelligent Flash) ............................35
h Using the Self-Timer .................................................37
F Macro Mode (Close-ups) ...........................................38
b Intelligent Face Detection .......................................39

xii
Table of Contents
More on Playback
More on Playback
More on Playback
More on PlaybackMore on Playback
Playback Options .............................................................40
Playback Zoom ...............................................................41
G Multi-Frame Playback .............................................42
e Deleting Pictures ........................................................44
H Image Search............................................................45
K PhotoBook Assist......................................................47
Creating a PhotoBook.....................................................47
Viewing Photobooks ......................................................48
Editing and Deleting Photobooks ...................................48
j Edit ............................................................................49
f COLLAGE .................................................................50
C IMAGE ROTATE .........................................................51
G CROP .......................................................................51
O RESIZE .....................................................................52
B RED EYE REMOVAL ...................................................52
L MOVIE TRIMMING ....................................................53
P MOVIE JOIN .............................................................54
Viewing Panoramas ........................................................55
Movies
Movies
Movies
MoviesMovies
Recording Movies ............................................................56
Movie Frame Size ...........................................................57
Viewing Movies ...............................................................58
Connections
Connections
Connections
ConnectionsConnections
Printing Pictures via USB ................................................59
Viewing Pictures on a Computer ....................................61
Windows: Installing MyFinePix Studio ...........................61
Macintosh: Installing FinePixViewer...............................63
Connecting the Camera ..................................................65
Menus
Menus
Menus
MenusMenus
Using the Menus: Shooting Mode ..................................68
Using the Shooting Menu...............................................68
Shooting Menu Options .................................................69
d EXP. COMPENSATION ...............................................69
N ISO........................................................................69
O IMAGE SIZE ............................................................70
T IMAGE QUALITY .....................................................71
P FINEPIX COLOR .......................................................71
D WHITE BALANCE ....................................................72
R CONTINUOUS .........................................................72
b FACE DETECTION ....................................................73
V MOVIE QUALITY .....................................................73
c BEST FRAMING ......................................................73
o SILENT MODE .........................................................73
M SET-UP ..................................................................73

1
Before Y
Before Y
Before Y
Before You Begin
ou Begin
ou Begin
ou Begin Before You Begin
Symbols and C
Symbols and C
Symbols and C
Symbols and Conv
onv
onv
onventions
entions
entions
entionsSymbols and Conventions
The following symbols are used in this manual:
Q : This information should be read before use to ensure correct operation.
: Additional information that may be helpful when using the camera.R
P : Other pages in this manual on which related information may be found.
Menus and other text in the LCD monitor are shown in bold. In the illustra-
tions in this manual, displays may be simpli ed for explanatory purposes.
Supplied Ac
Supplied Ac
Supplied Ac
Supplied Accessories
cessories
cessories
cessoriesSupplied Accessories
The following items are included with the camera:
NP-45A rechargeable
battery
BC-45B battery charger USB cable CD-ROM (contains
this manual)
• Strap
• User Guide
A
A
A
Attaching the Strap
ttaching the Strap
ttaching the Strap
ttaching the Strap Attaching the Strap
Attach the strap as shown.

2Before You Begin
Parts of the Camera
Parts of the Camera
Parts of the Camera
Parts of the CameraParts of the Camera
For more information, refer to the page listed to the right of each item.
1 Zoom control ...........................................................21, 41
2 Shutter button .............................................................. 22
3 (movie recording) button ....................................x, 56 F
4 Flash ............................................................................. 35
5 Microphone .................................................................. 56
6 Lens ............................................................................ 104
7 Speaker ......................................................................... 58
8 On/off switch and lens cover ......................................... 16
9 Self-timer lamp ............................................................ 37
10 LCD monitor ................................................................ 106
Touch panel display .................................................3, 5, 6
11 (playback) button .............................................24a
12 (shooting) button .............................................1B
13 Strap eyelet ...........................................................
14 Battery-chamber cover ..........................................
15 Tripod mount
16 Connector for USB cable ......................................
17 Battery chamber ....................................................
18 Memory card slot ..................................................
19 Battery latch .........................................................

3Before You Begin
Parts of the Camera
Camera Displays (
Camera Displays (
Camera Displays (
Camera Displays (T
T
T
Touch Panel)
ouch Panel)
ouch Panel)
ouch Panel) Camera Displays (Touch Panel)
The following types of indicator may be displayed during shooting and play-
back. Indicators vary with camera settings.
■ Shooting
10
10
10
10:
:
:
:00
00
00
00
AM
AM
AM
AM
10: 00
AM
127
127
127
127
127
N
N
N
N
NMENU DISP
12
12
12
12 /
/
/
/31
31
31
31 /
/
/
/2050
2050
2050
2050
12 / 31 / 2050
3
+1
P
1600
1 Battery level ......................................................
2 Intelligent Face Detection indicator ...................
3 Silent mode indicator ........................................
4 White balance .....................................................
5 Continuous shooting mode .................................
6 Focus warning ...................................................
7 Blur warning ......................................................
8 Focus frame .......................................................
9 FINPIX COLOR ................................................
10 Internal memory indicator
*
11 Image size/quality ..............................................
12 Movie quality .....................................................
13 Number of available frames ...............................
14 Sensitivity ...........................................................
15 Date and time .....................................................
16 Exposure compensation ......................................
* a: indicates that no memory card is inserted and that pictures will be stored in the camera’s internal
5Before You Begin
The
The
The
The T
T
T
Touch P
ouch P
ouch P
ouch Panel Display
anel Display
anel Display
anel Display The Touch Panel Display
The touch panel display can be operated by tapping the display or gliding a
nger over the panel. The panel responds to pressure; use a rm touch, but
do use excessive force.NOT
■ Tap
Lightly tap the display to adjust set-
tings or select pictures or menu op-
tions.
MENU DISP
P
■ Scroll
Glide lightly over the display to scroll
through pictures during playback.
MENU DISP
Q Note that some monitor covers may
aff ect the visibility of the image in
the monitor or make the monitor less
responsive. To avoid damaging the
monitor and touch panel display, ob-
serve the following precautions:
• Use only your ngers to operate the
panel. Do not use excessive force.
• Do not sit on the camera (by, for ex-
ample, leaving it in a back pocket
when sitting down), place it under
heavy objects, or attempt to force it
into a small space (such as a suitcase
that is already full).
• Do not attach objects to the camera
strap that might place pressure on
the monitor.
6Before You Begin
The Touch Panel Display
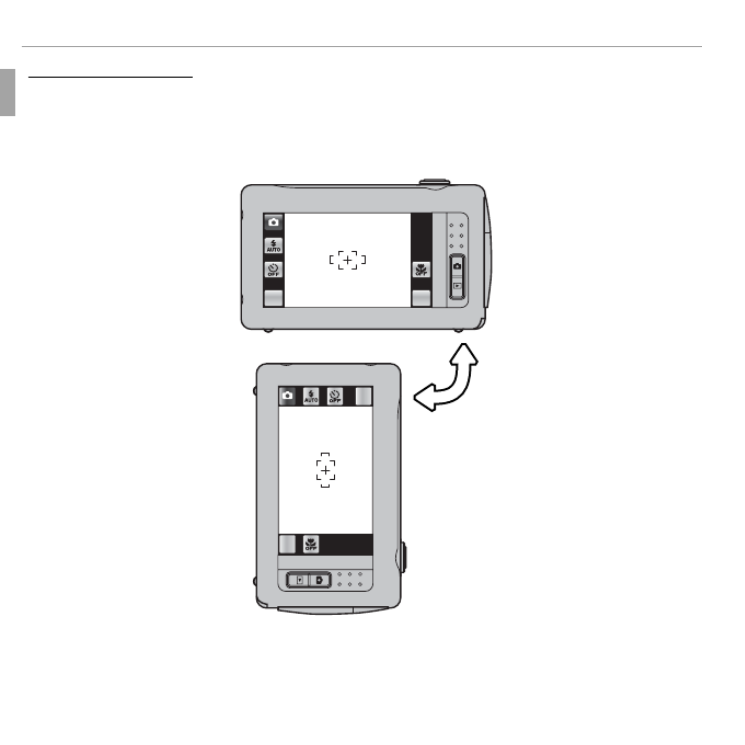
Rotating the Camera
Rotating the Camera
Rotating the Camera
Rotating the Camera Rotating the Camera
With some exceptions, the display in the monitor rotates 90 ° when the cam-
era is in “tall” orientation.
■ Shooting
MENU DI SP
MENU
DISP

7Before You Begin
The Touch Panel Display
■Playback
MENUMENU DISP
MENU
DISP

8Before You Begin
The Touch Panel Display
T
T
T
Touch P
ouch P
ouch P
ouch Panel Icons
anel Icons
anel Icons
anel IconsTouch Panel Icons
■Shooting
Tap the icons in the shooting display to perform the operations listed below.
The icons displayed vary with the options currently selected.
MENU DISP
P
Macro mode: Shoot in mac-
ro mode (P 38).
Display: Turn indicators on
or off (P 4).
Shooting mode: Choose a
shooting mode (P 25).
Shooting menu: View the
shooting menu (P 68).
Flash mode: Choose a fl ash
mode (P 35).
Self-timer: Use the self-
timer (P 37).

9Before You Begin
The Touch Panel Display
■Playback
Tap the icons in the playback display to perform the operations listed below.
The icons displayed vary with the type of picture and the current playback
mode.
MENU DISP
Previous: View the previ-
ous picture (P 24).
Next: View the next pic-
ture (P 24).
Multi-frame: View multiple
pictures (P 42).
Display: Turn indicators on
or off (P 4).
Delete: Delete the current
picture (P 44).
Playback menu: View the
playback menu (P 74).
Image search: Find pictures
(P 45).
Photobook assist: Create
photobooks (P 47).

10
First Steps
First Steps
First Steps
First Steps First Steps
Charging the Battery
Charging the Battery
Charging the Battery
Charging the Battery Charging the Battery
The battery is not charged at shipment. Charge the battery before use.
1 Place the battery in the supplied battery charger.
Insert the battery in the orientation
indicated by the CBD labels.
The camera uses an NP-45A recharge-
able battery.
Battery charger
CBD
label
CBD label
Arrow
Battery
2 Plug the charger in.
Plug the charger into a power outlet. The charging indicator will light.
T
T
T
The Charging Indicator
he Charging Indicator
he Charging Indicator
he Charging Indicator The Charging Indicator
The charging indicator shows battery charge status as follows:
Charging indicator
Charging indicator
Charging indicator
Charging indicatorCharging indicator Battery status
Battery status
Battery status
Battery statusBattery status Action
Action
Action
ActionAction
Off
Off
Off
Off
Off Battery not inser
Battery not inser
Battery not inser
Battery not inserted.
ted.
ted.
ted.Battery not inserted. Inser
Inser
Inser
Insert the battery.
t the battery.
t the battery.
t the battery.Insert the battery.
On (green)
On (green)
On (green)
On (green)On (green) Battery fully charged.
Battery fully charged.
Battery fully charged.
Battery fully charged.Battery fully charged. Remove the battery.
Remove the battery.
Remove the battery.
Remove the battery.Remove the battery.
On (yellow)
On (yellow)
On (yellow)
On (yellow)On (yellow) Battery charging.
Battery charging.
Battery charging.
Battery charging.Battery charging. —
—
—
——
Blinks (yellow)
Blinks (yellow)
Blinks (yellow)
Blinks (yellow)Blinks (yellow) Battery fault.
Battery fault.
Battery fault.
Battery fault.Battery fault. Unplug the charger and remov
Unplug the charger and remov
Unplug the charger and remov
Unplug the charger and remove the battery.
e the battery.
e the battery.
e the battery.Unplug the charger and remove the battery.
3 Charge the battery.
Remove the battery when charging is complete.
QUnplug the charger when it is not in use.

11First Steps
Inserting the Batter
Inserting the Batter
Inserting the Batter
Inserting the Battery and a Memory Card
y and a Memory Card
y and a Memory Card
y and a Memory Card Inserting the Battery and a Memory Card
Although the camera can store pictures in internal memory, optional SD,
SDHC and SDXC memory cards (sold separately) can be used to store addi-
tional pictures. After charging the battery, insert the battery and memory
card as described below.
1
Open the battery-chamber cover.
RBe sure the camera is off before opening the
battery-chamber cover.
QDo not open the battery-chamber cover
when the camera is on. Failure to observe this
precaution could result in damage to image
fi les or memory cards.
QDo not use excessive force when handling the battery-chamber cover.
2 Insert the battery.
Align the orange stripe on the battery with
the orange battery latch and slide the bat-
tery into the camera, keeping the battery
latch pressed to one side.
QInsert the battery in the correct orientation.
Do NOT use force or attempt to insert the bat-
tery upside down or backwards. The battery
will slide in easily in the correct orientation.
Battery latch
Orange stripe

12 First Steps
Inserting the Battery and a Memory Card
3 Insert the memory card.
Holding the memory card in the orienta-
tion shown at right, slide it in until it clicks
into place at the back of the slot.
Q Be sure card is in the correct orientation; do
not insert at an angle or use force. If the
memory card is not correctly inserted or no
memory card is inserted, will appear in a
the LCD monitor and internal memory will
be used for recording and playback.
Q SD/SDHC/SDXC memory cards can be locked, making
it impossible to format the card or to record or delete
images. Before inserting an SD/SDHC/SDXC memory
card, slide the write-protect switch to the unlocked
position.
Write-protect switch
4 Close the battery-chamber cover.
Click

13First Steps
Inserting the Battery and a Memory Card
Remo
Remo
Remo
Removing the Battery and Memory Card
ving the Battery and Memory Card
ving the Battery and Memory Card
ving the Battery and Memory Card Removing the Battery and Memory Card
Before removing the battery or memory card, turn the camera off and open the
battery-chamber cover.
To remove the battery, press the battery latch to the
side, and slide the battery out of the camera as shown.
Battery latch
To remove the memory card, press it in and release it
slowly. The card can then be removed by hand. When
a memory card is removed, the card could come out
of the slot too quickly. Use your nger to hold it and
gently release the card.

14 First Steps
Inserting the Battery and a Memory Card
■ Compatible Memory Cards
FUJIFILM and SanDisk SD, SDHC and SDXC memory cards have been ap-
proved for use in the camera. A complete list of approved memory cards
is available at http://www.fujifilm.com/support/digital_cameras/compatibility/.
Operation is not guaranteed with other cards. The camera can not be used
with or ulti ediaxD-Picture Cards M M Card (MMC) devices.
Q
Q
Q
QQMemory Cards
Memory Cards
Memory Cards
Memory CardsMemory Cards
• Do not turn the camera off or remove the memory card while the memory card is being fo
or data are being recorded to or deleted from the card. Failure to observe this precautio
could damage the card.
• Format SD/SDHC/SDXC memory cards before rst use, and be sure to reformat all
memory cards after using them in a computer or other device. For more information
on formatting memory cards, see “ K FORMAT” (P 83).
• Memory cards are small and can be swallowed; keep out of reach of children. If a
child swallows a memory card, seek medical assistance immediately.
• miniSD or microSD adapters that are larger or smaller than the standard dimensions
of an SD/SDHC/SDXC card may not eject normally; if the card does not eject, take
the camera to an authorized service representative. Do not forcibly remove the card.
• Do not affi x labels to memory cards. Peeling labels can cause camera malfunction.
• Movie recording may be interrupted with some types of SD/SDHC/SDXC memory
card. Use a G card or better when shooting HD movies.

15First Steps
Inserting the Battery and a Memory Card
• The data in internal memory may be erased or corrupted when the camera is re-
paired. Please note that the repairer will be able to view pictures in internal memory.
• Formatting a memory card or internal memory in the camera creates a folder in
which pictures are stored. Do not rename or delete this folder or use a computer or
other device to edit, delete, or rename image les. Always use the camera to delete
pictures from memory cards and internal memory; before editing or renaming les,
copy them to a computer and edit or rename the copies, not the originals.
Q
Q
Q
QQBatteries
Batteries
Batteries
BatteriesBatteries
• Remove dirt from the battery terminals with a clean, dry cloth. Failure to observe this
precaution could prevent the battery from charging.
• Do not affi x stickers or other objects to the battery. Failure to observe this precaution
could make it impossible to remove the battery from the camera.
• Do not short the battery terminals. The battery could overheat.
• Read the cautions in “The Battery and Power Supply” (P vi).
• Use only battery chargers designated for use with the battery. Failure to observe this
precaution could result in product malfunction.
• Do not remove the labels from the battery or attempt to split or peel the outer casing.
• The battery gradually loses its charge when not in use. Charge the battery one or
two days before use.

16 First Steps
T
T
T
Turning the Camera on and Off
urning the Camera on and Off
urning the Camera on and Off
urning the Camera on and Off
Turning the Camera on and Off
Shooting Mode
Shooting Mode
Shooting Mode
Shooting ModeShooting Mode
To turn the camera on, open the
lens cover fully. The camera turns off
when the lens cover is closed.
Camera on Camera off
Playback Mode
Playback Mode
Playback Mode
Playback ModePlayback Mode
If the lens cover is closed, the camera
can be turned on in playback mode
by pressing the a button for about
a second.
To turn the camera off , press and
hold the button.a
R
R
R
RR
Switching to Shooting Mode
Switching to Shooting Mode
Switching to Shooting Mode
Switching to Shooting Mode Switching to Shooting Mode
To exit to shooting mode, press the shut-
ter button halfway or the button.B

17First Steps
Turning the Camera on and Off
Q Fingerprints and other marks on the lens can aff ect pictures. Keep the lens clean.
Q Turning the camera off does not completely end the supply of power to the cam-
era.
R
R
R
RRAuto Po
Auto Po
Auto Po
Auto Power Off
wer Off
wer Off
wer Off
Auto Power Off
The camera will turn off automatically if no operations are performed for the length of
time selected for M AUTO POWER OFF (P 84).

19First Steps
Basic Setup
4
Tap a shooting mode.
5
Tap OK to enter shooting mode when setup is com-
plete.
MENU DISP
R
R
R
RRThe Camera Clock
The Camera Clock
The Camera Clock
The Camera ClockThe Camera Clock
If the battery is removed for an extended period, the camera clock will be reset and the
language-selection dialog will be displayed when the camera is turned on.

20
Basic Photography and Playback
Basic Photography and Playback
Basic Photography and Playback
Basic Photography and Playback Basic Photography and Playback
T
T
T
Taking Pictures in
aking Pictures in
aking Pictures in
aking Pictures in Taking Pictures in Q
Q
Q
QQ (Scene Recognition) Mode
(Scene Recognition) Mode
(Scene Recognition) Mode
(Scene Recognition) Mode (Scene Recognition) Mode
This section describes how to take pictures in
Q
Q
Q
Q
Q ( scene recognition
scene recognition
scene recognition
scene recognitionscene recognition) mode.
The camera automatically analyzes the composition and adjusts settings ap-
propriately.
1
Turn the camera on.
Fully open the lens cover. Q shooting indicators will be displayed.
MENU DISP
T
T
T
The
he
he
he The
g
g
g
gg Icon
Icon
Icon
Icon Icon
This icon indicates that the camera continuously searches for faces to select the
appropriate scene, increasing the drain on the battery.
T
T
T
The Scene Icon
he Scene Icon
he Scene Icon
he Scene Icon The Scene Icon
The camera selects the scene according to shooting conditions and the type of
subject: b PORTRAIT LANDSCAPE (portraits), c (landscapes), d NIGHT (poorly-li
scapes), e MACRO (close ups), f NIGHT PORTRAIT (poorly-lit portraits), g BACKLI
(backlit portraits), a AUTO (all other scenes)

21Basic Photography and Playback
Taking Pictures in Q (Scene Recognition) Mode
2
Frame the picture.
Use the zoom control to frame the picture in the display.
MENU DISP
Zoom indicator
MENU DISP
Zoom out Zoom in
H
H
H
Holding the Camera
olding the Camera
olding the Camera
olding the Camera Holding the Camera
Hold the camera steady with both hands and brace
your elbows against your sides. Shaking or unsteady
hands can blur your shots.
To prevent pictures that are out of focus or too dark
(underexposed), keep your ngers and other objects
away from the lens and ash.

22 Basic Photography and Playback
Taking Pictures in Q (Scene Recognition) Mode
3
Focus.
Press the shutter button halfway to focus.
R The lens may make a noise when the camera focuses; this
is normal.
If the camera is able to focus, it will beep twice.
If the camera is unable to focus, the focus frame will turn
red, s will be displayed. Change the composition or
use focus lock (P 32).
Double
beep

23Basic Photography and Playback
Taking Pictures in Q (Scene Recognition) Mode
4
Shoot.
Smoothly press the shutter button the rest of the way
down to take the picture.
R If the subject is poorly lit, the ash may re when the pic-
ture is taken. For information on using the ash when
lighting is poor, see “ Using the Flash (Intelligent Flash)” N
(P 35).
Click
T
T
T
The Shutter Button
he Shutter Button
he Shutter Button
he Shutter Button The Shutter Button
The shutter button has two positions. Pressing the shutter button halfway sets
focus and exposure; to shoot, press the shutter button the rest of the way down.

24 Basic Photography and Playback
V
V
V
Viewing Pictures
iewing Pictures
iewing Pictures
iewing Pictures Viewing Pictures
Pictures can be viewed in the LCD monitor. When taking important photo-
graphs, take a test shot and check the results.
1
Press the a button.
The most recent picture will be displayed.
2
View additional pictures.
Scroll left or right or tap 8 9 or .
MENU DISP
MENU DISP
Press the shutter button or the button to exit to shooting mode.B

25
More on Photography
More on Photography
More on Photography
More on Photography More on Photography
Shooting Mode
Shooting Mode
Shooting Mode
Shooting Mode Shooting Mode
Choose a shooting mode according to the scene or type
of subject. Tap the shooting mode icon in the monitor
and tap the icon for the desired mode.
Mode
Mode
Mode
ModeMode See
See
See
SeeSee Mode
Mode
Mode
ModeMode See
See
See
SeeSee
SCENE RECOGNITION
SCENE RECOGNITION
SCENE RECOGNITION
SCENE RECOGNITION
SCENE RECOGNITION 20 MOTION P
MOTION P
MOTION P
MOTION PANORAMA
ANORAMA
ANORAMA
ANORAMA
MOTION PANORAMA 28
AUTO
AUTO
AUTO
AUTO
AUTO 26
/
/
/
/ / NA
NA
NA
NATURAL LIGHT/
TURAL LIGHT/
TURAL LIGHT/
TURAL LIGHT/NATURAL LIGHT/
NA
NA
NA
NATURAL &
TURAL &
TURAL &
TURAL & NATURAL &
N
N
N
NN30
TOUCH & SHOOT
TOUCH & SHOOT
TOUCH & SHOOT
TOUCH & SHOOT
TOUCH & SHOOT 26
TOUCH & TRA
TOUCH & TRA
TOUCH & TRA
TOUCH & TRACK
CK
CK
CK
TOUCH & TRACK 26 PROGRAM AE
PROGRAM AE
PROGRAM AE
PROGRAM AE
PROGRAM AE 31
SP
SP
SP
SPSP SCENE POSITION
SCENE POSITION
SCENE POSITION
SCENE POSITION
SCENE POSITION 27
MENU DISP
A description of the selected mode will be displayed; tap the description to
continue, or wait for it to clear from the display automatically.

27More on Photography
Shooting Mode
SP
SP
SP
SP SP SCENE POSITION
SCENE POSITION
SCENE POSITION
SCENE POSITION SCENE POSITION
The camera off ers a choice of “scenes,” each adapted to
particular shooting conditions or a speci c type of sub-
ject. Choose from the following options:
P
SHOOTING MODE
BACK
HOME
Program AEScene Position
Touch&Shoot
Motion
Panorama
Natural Light
Natural&Flash
AUTO
Scene Recognition
Touch&Track
Scene
Scene
Scene
SceneScene Description
Description
Description
DescriptionDescription
L
L
L
LL
PORTRAIT
PORTRAIT
PORTRAIT
PORTRAIT PORTRAIT Choose for portraits.
Z
Z
Z
ZZ PORTRAIT ENHANCER
PORTRAIT ENHANCER
PORTRAIT ENHANCER
PORTRAIT ENHANCER PORTRAIT ENHANCER
Choose for a smooth skin eff ect when shooting portraits.
M
M
M
MM LANDSCAPE
LANDSCAPE
LANDSCAPE
LANDSCAPE LANDSCAPE Choose for daylight shots of buildings and landscapes.
N
N
N
NN
SPORT
SPORT
SPORT
SPORT SPORT Choose when photographing moving subjects.
O
O
O
OO NIGHT
NIGHT
NIGHT
NIGHT NIGHT Choose this mode for poorly lit twilight or night scenes.
H
H
H
HH
NIGHT (TRIPOD)
NIGHT (TRIPOD)
NIGHT (TRIPOD)
NIGHT (TRIPOD) NIGHT (TRIPOD)Choose this mode for slow shutter speeds when shooting at night.
Q
Q
Q
QQ
SUNSET
SUNSET
SUNSET
SUNSET SUNSET Choose this mode to record the vivid colors in sunrises and sunsets.
R
R
R
RR
SNOW
SNOW
SNOW
SNOW SNOW Choose for crisp, clear shots that capture the brightness of scenes domi-
nated by shining white snow.
S
S
S
SS BEA
BEA
BEA
BEACH
CH
CH
CH BEACH Choose for crisp, clear shots that capture the brightness of sunlit beach-
es.
U
U
U
UU P
P
P
PARTY
ARTY
ARTY
ARTY PARTY Capture indoor background lighting under low-light conditions.
V
V
V
VV
FL
FL
FL
FLOWER
OWER
OWER
OWER FLOWER Choose for vivid close-ups of owers.
W
W
W
WW
TEXT
TEXT
TEXT
TEXT TEXT Take clear pictures of text or drawings in print.
28 More on Photography
Shooting Mode
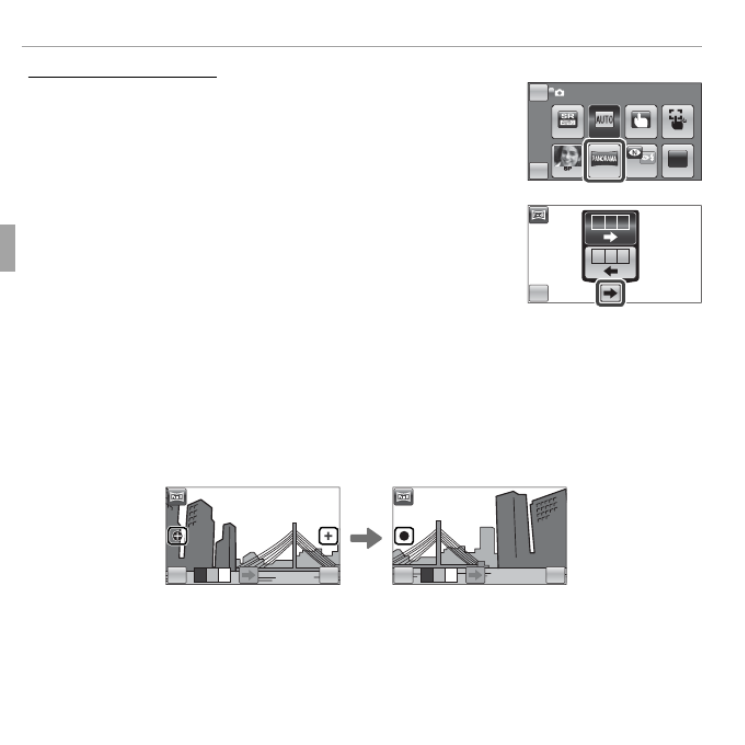
r
r
r
r r MOTION PANORAMA
MOTION PANORAMA
MOTION PANORAMA
MOTION PANORAMA MOTION PANORAMA
Follow an on-screen guide to take photos that will auto-
matically be joined to form a panorama.
P
SHOOTING MODE
BACK
HOME
Program AEScene Position
Touch&Shoot
Motion
Panorama
Natural Light
Natural&Flash
AUTO
Scene Recognition
Touch&Track
1
Tap y and select the pan direction.
BACK
2 31
213
2
Take a photograph. Exposure and white balance for the panorama are set
with the rst shot.
3
Frame the next shot to overlap with the previous picture by superimpos-
ing y on + so that they form a solid circle (z). The camera will release the
shutter automatically.
BACK OK
2 31
BACK OK
2 31
Display after 1st shot Shutter released

36 More on Photography
N Using the Flash (Intelligent Flash)
R If the ash will re, will be displayed when the shutter button is pressed halfway. p
At slow shutter speeds, k will appear in the display to warn that pictures may be
blurred; use of a tripod is recommended.
R The ash may re several times with each shot. Do not move the camera until
shooting is complete.
R The ash may cause vignetting.
Red-E
Red-E
Red-E
Red-Eye Remo
ye Remo
ye Remo
ye Removal
val
val
val Red-Eye Removal
When Intelligent Face Detection and red-eye removal (P 39) are on, red-eye removal
is available in auto ( ; RED EYE REDUCTION), ash on ; FORCED FLASH), andK (L
slow sync (M; RED EYE & SLOW) modes. Red-eye removal minimizes “red-eye”
caused when light from the ash is re ected from the subject’s retinas.

37More on Photography
h
h
h
h h Using the Self-
Using the Self-
Using the Self-
Using the Self-T
T
T
Timer
imer
imer
imer Using the Self-Timer
To use the self-timer, tap the self-timer icon and choose from the following
options:
MENU DISP DISPMENU
Option
Option
Option
OptionOption Description
Description
Description
DescriptionDescription
a (COUPLE TIME)
The camera starts the timer when it detects two portrait subjects close together.
Tap g or h to choose how close the subjects must be together before the timer
starts (the more hearts, the closer the subjects must be together).
R To stop the timer before the picture is taken, press the shutter button halfway.
g (GROUP TIMER)
The camera will start the timer when it detects the selected number of portrait
subjects. Tap or to choose the number of subjects.g h
R To stop the timer before the picture is taken, press the shutter button halfway.
S (10 SEC)
The shutter is released ten seconds after the shutter button is pressed. Use for
self-portraits. The self-timer lamp on the front of the camera blinks while the
timer counts down.
R (2 SEC)
The shutter is released two seconds after the shutter button is pressed. Use to
reduce blur caused by the camera moving when the shutter button is pressed.
The self-timer lamp will blink as the timer counts down.
T (OFF) Self-timer off .

39More on Photography
b
b
b
b b Intelligent F
Intelligent F
Intelligent F
Intelligent Face Detection
ace Detection
ace Detection
ace Detection Intelligent Face Detection
Intelligent Face Detection sets focus and exposure for human faces anywhere
in the frame, preventing the camera from focusing on the background in
group portraits. Choose for shots that emphasize portrait subjects.
To use Intelligent Face Detection, tap to display MENU
the shooting menu and select on for b FACE DETEC-
TION (P 73). Faces can be detected with the camera in
vertical or horizontal orientation; if a face is detected,
it will be indicated by a green border. If there is more
than one face in the frame, the camera will select the
face closest to the center; other faces are indicated by
white borders.
Q In some modes, the camera may set exposure for the frame
as a whole rather than the portrait subject.
Q If the subject moves as the shutter button is pressed, their face may not be in the
area indicated by the green border when the picture is taken.
MENU DISP
MENU DISP
Green border
Specyfikacje produktu
| Marka: | Fujifilm |
| Kategoria: | Aparaty cyfrowe |
| Model: | FinePix Z91 |
| Kolor produktu: | Black,Stainless steel |
| Typ produktu: | Przelewowy ekspres do kawy |
| Pojemność zbiornika na wodę: | 1.25 l |
| Moc: | 1800 W |
| Przyrządza kawę: | Tak |
| Typ kontroli: | Przyciski |
| Wbudowany wyświetlacz: | Nie |
| Łatwy do czyszczenia: | Tak |
| Wbudowany młynek: | Nie |
| System gorącej wody: | Tak |
| Typ wkładu kawy: | Kawa mielona |
| Pojemność w kubkach: | 10 kub. |
| Położenie urządzenia: | Blat |
| Typ ekspresu do kawy: | Pełna automatyka |
| Zbiornik na kawę: | Dzbanek |
| Automatyczne wyłączanie zasilania: | Tak |
| Wysokość produktu: | 425 mm |
| Szerokość produktu: | 250 mm |
| Głębokość produktu: | 195 mm |
| Waga produktu: | 2990 g |
| Podręcznik użytkownika: | Tak |
| Szerokość opakowania: | 305 mm |
| Wysokość opakowania: | 465 mm |
| Głębokość opakowania: | 230 mm |
| Ilość na paczkę: | 1 szt. |
| Waga wraz z opakowaniem: | 4010 g |
| Wysokość skrzyni wzorcowej (zewnętrznej): | 590 mm |
| Długość skrzyni głównej (zewnętrznej): | 250 mm |
| Waga brutto obudowy głównej (zewnętrznej): | 8890 g |
| Szerokość skrzyni zbiorczej (zewnętrznej): | 625 mm |
| Regulacja mocy kawy: | Nie |
| Schowek na przewód sieciowy: | Tak |
| Kod produktu celnego (TARIC): | 8516710000 |
| Waga paczki: | 4010 kg |
| W opakowaniu zbiorczym GTIN (EAN / UPC): | 4016324102951 |
| Produkty na jeden kontener intermodalny (20ft): | 724 szt. |
| Produkty na jeden kontener intermodalny (40ft): | 1494 szt. |
| Produkty w jednym kontenerze intermodalnym (40ft, HC): | 1782 szt. |
| Produktów na palecie: | 28 szt. |
| Szerokość brutto palety: | 1200 mm |
| Długość brutto palety: | 800 mm |
| Szerokość kartonu dostawczego: | 625 mm |
| Długość kartonu do wysyłki: | 250 mm |
| Wysokość kartonu dostawczego: | 590 mm |
| Produkty na skrzynię wysyłkową (wewnętrzną): | 2 szt. |
| Wysokość brutto palety: | 1650 mm |
| Produkty na warstwę palety: | 12 szt. |
| Skrzynie zbiorcze (zewnętrzne) na warstwę palety: | 6 szt. |
| Produkty w skrzyni głównej (zewnętrznej): | 2 szt. |
| Podświetlony włącznik/wyłącznik: | Tak |
| Rodzaj zakrętki: | Zdejmowana pokrywa |
| Warstwy na paletę: | 2 szt. |
| Wbudowane światło: | Tak |
| Skrzynie zbiorcze (zewnętrzne) na paletę: | 14 szt. |
| Łatwy w użyciu: | Tak |
| Płytka grzejna: | Tak |
| Filtr do kawy: | Tak |
| Łyżka w zestawie: | Tak |
| Zbiornik na wodę: | Plastik |
| Zdejmowany uchwyt filtra: | Tak |
| Liczba grzałek wody: | 1 |
| Poziomy temperatury gorącej wody: | 100 |
Potrzebujesz pomocy?
Jeśli potrzebujesz pomocy z Fujifilm FinePix Z91, zadaj pytanie poniżej, a inni użytkownicy Ci odpowiedzą
Instrukcje Aparaty cyfrowe Fujifilm

9 Sierpnia 2024
9 Sierpnia 2024
9 Sierpnia 2024
9 Sierpnia 2024
8 Sierpnia 2024
8 Sierpnia 2024
8 Sierpnia 2024
8 Sierpnia 2024
7 Sierpnia 2024
7 Sierpnia 2024
Instrukcje Aparaty cyfrowe
- Aparaty cyfrowe Sony
- Aparaty cyfrowe Samsung
- Aparaty cyfrowe Leica
- Aparaty cyfrowe Panasonic
- Aparaty cyfrowe Canon
- Aparaty cyfrowe Medion
- Aparaty cyfrowe Lenco
- Aparaty cyfrowe GE
- Aparaty cyfrowe Casio
- Aparaty cyfrowe Nikon
- Aparaty cyfrowe Ricoh
- Aparaty cyfrowe Rollei
- Aparaty cyfrowe Olympus
- Aparaty cyfrowe Polaroid
- Aparaty cyfrowe Sanyo
- Aparaty cyfrowe Pentax
- Aparaty cyfrowe Hitachi
- Aparaty cyfrowe BenQ
- Aparaty cyfrowe Trevi
- Aparaty cyfrowe Lexibook
- Aparaty cyfrowe Vivitar
- Aparaty cyfrowe Ingo
- Aparaty cyfrowe SeaLife
Najnowsze instrukcje dla Aparaty cyfrowe

13 Stycznia 2025

11 Października 2024
11 Października 2024

10 Października 2024
10 Października 2024
8 Października 2024
6 Października 2024
9 Sierpnia 2024

9 Sierpnia 2024
9 Sierpnia 2024