Instrukcja obsługi EverFocus EZN3260
EverFocus
Kamera monitorująca
EZN3260
Przeczytaj poniżej 📖 instrukcję obsługi w języku polskim dla EverFocus EZN3260 (87 stron) w kategorii Kamera monitorująca. Ta instrukcja była pomocna dla 3 osób i została oceniona przez 2 użytkowników na średnio 4.5 gwiazdek
Strona 1/87

EZ N Series
Outdoor IR Bullet IP Camera
User’s Manual
Copyright © EverFocus Electronics Corp,
Release , 13 Date: March 20

Copyright 2013 . EverFocus Electronics Corp
All rights reserved. No part of the contents of this manual may be reproduced or transmitted in any form or by
any means without written permission of the EverFocus Electronics Corporation.
EverFocus
12F, No.79, Sec. 1, Shin-Tai Wu Road,
Hsi- Chih, Taipei, Taiwan
TEL: +886 2 2698 2334
FAX: +886 2 2698 2380
www.everfocus.com.tw
March, 2013

i
About this document
All the safety and operating instructions should be read and followed before the unit is operated. This
manual should be retained for future reference. The information in this manual was current when
published. The manufacturer reserves the right to revise and improve its products. All specifications are
therefore subject to change without notice.
Regulatory Notices
FCC Notice "Declaration of Conformity Information"
This equipment has been tested and found to comply with the limits for a Class
A digital device, pursuant to part 15 of the FCC Rules. These limits are designed to provide reasonable
protection against harmful interference in a residential installation. This equipment generates, uses and
can radiate radio frequency energy and, if not installed and used in accordance with the instructions,
may cause harmful interference to radio communications. However, there is no guarantee that
interference will not occur in a particular installation. If this equipment does cause harmful interference
to radio or television reception, which can be determined by turning the equipment off and on, the user
is encouraged to try to correct the interference by one or more of the following measures:
- Reorient or relocate the receiving antenna.
- Increase the separation between the equipment and receiver.
- Connect the equipment into an outlet on a circuit different from that to which the receiver is
connected.
- Consult the dealer or an experienced radio/TV technician for help.
Warning: Changes or modifications made to this equipment, not expressly approved by EverFocus or
parties authorized by EverFocus could void the user's authority to operate the equipment.
This device complies with part 15 of the FCC Rules. Operation is subject to the following two conditions:
(1) This device may not cause harmful interference, and
(2) This device must accept any interference received, including interference that may cause undesired
operation.
EverFocus Electronics Corp.
12F, No. 79, Sec. 1, Shin Tai Wu Rd., Hsi- -Chi,
Taipei Hsien, Taiwan, R.O.C.
EZN Series cameras comply with CE and FCC.

ii
Precautions
1. Do not install the camera near electric or magnetic fields.
Install the camera away from TV/radio transmitters, magnets, electric motors, transformers and
audio speakers since the electromagnetic fields generated from these devices may distort the video
image or otherwise interfere with camera operation.
2. Never disassemble the camera beyond the recommendations in this manual nor introduce
materials other than those recommended herein.
Improper disassembly or introduction of corrosive materials may result in equipment failure or other
damage.
3. Try to avoid facing the camera toward the sun.
In some circumstances, direct sunlight may cause permanent damage to the sensor and/or internal
circuits, as well as creating unbalanced illumination beyond the capability of the camera to
compensate.
4. Keep the power cord away from water and other liquids and never touch the power cord with wet
hands.
Touching a wet power cord with your hands or touching the power cord with wet hands may result
in electric shock.
5. Never install the camera in areas exposed to oil, gas or solvents.
Oil, gas or solvents may result in equipment failure, electric shock or, in extreme cases, fire.
6. Cleaning
For cameras with interchangeable lenses, do not touch the surface of the sensor directly with the
hands. Use lens tissue or a cotton tipped applicator and ethanol to clean the sensor and the camera
lens. Use a damp soft cloth to remove any dirt from the camera body. Please do not use complex
solvents, corrosive or abrasive agents for cleaning of any part of the camera.
7. Do not operate the camera beyond the specified temperature, humidity or power source ratings.
Use the camera at temperatures within - 540°C ~ 5 °C / -40°F ~ 131°F or (12 VDC) - 5 -420°C ~ 5 °C / °F ~
131°F (PoE); this device is not rated as submersible. The input power source is 12 VDC / PoE. Be sure
to connect the proper + / - polarity and voltage, as incorrect polarity or too high a voltage will likely
cause the camera to fail, and such damage is not covered by the warranty. The use of properly fused
or Class 2 power limited type supplies is highly recommended.
8. Mounting
Use care in selecting a solid mounting surface which will support the weight of the camera plus any
wind, snow, ice or other loading, and securely attach the camera to the mounting surface using
screws and anchors which will properly support the camera. If necessary (e.g. when mounting to
drop ceilings) use a safety wire to provide additional support for the camera.

EZN Series
1
1. I ntroduction
The EZ N series is an outdoor bullet camera delivering image quality of up to 3-megapixel. The camera
supports both H.264 and MJPEG compression formats. The IP66-rat and vandal proof housing make it ed
suitable for outdoor use. The IR LEDs are also implemented for infrared illumination in night vision
applications.
The EZN series features the Wide Dynamic Range (WDR) function, which can provide clear images even
under back light circumstances where intensity of illumination can vary excessively. A built -in micro SDHC
card slot and Power over Ethernet (IEEE802.3af) features are also provided. You can power the camera
over the network or by connecting the camera to a 12 DC power supply. Since the E V ZN series conforms to
ONVIF / PSIA for compatibility with other network video devices, it interoperates with a wide variety of
hardware and software systems. You can also use EverFocus Mobile Applications to remotely view the live ’
views of the cameras through your handheld devices; or use EverFocus CMS to remotely ’ manage multiple
IP devices connected on the LAN or WAN.
The E Series ModelsZN
Model Name Megapixel WDR
EZ N3160 1.3 MP Yes
EZ N3260 2 MP Yes
EZ N3340 3 MP No
System Requirement
Before installing, please check that your computer meets this system requirement.
• Operating System: Microsoft Windows XP / Vista (32- bit) / 7 (32- bit)
• Microsoft Internet Explorer 7 or above
Note: For using the Internet Explorer, some settings are required. Please refer to 5.2 Settings for
Microsoft Internet Explorer.
EZ N Series
3
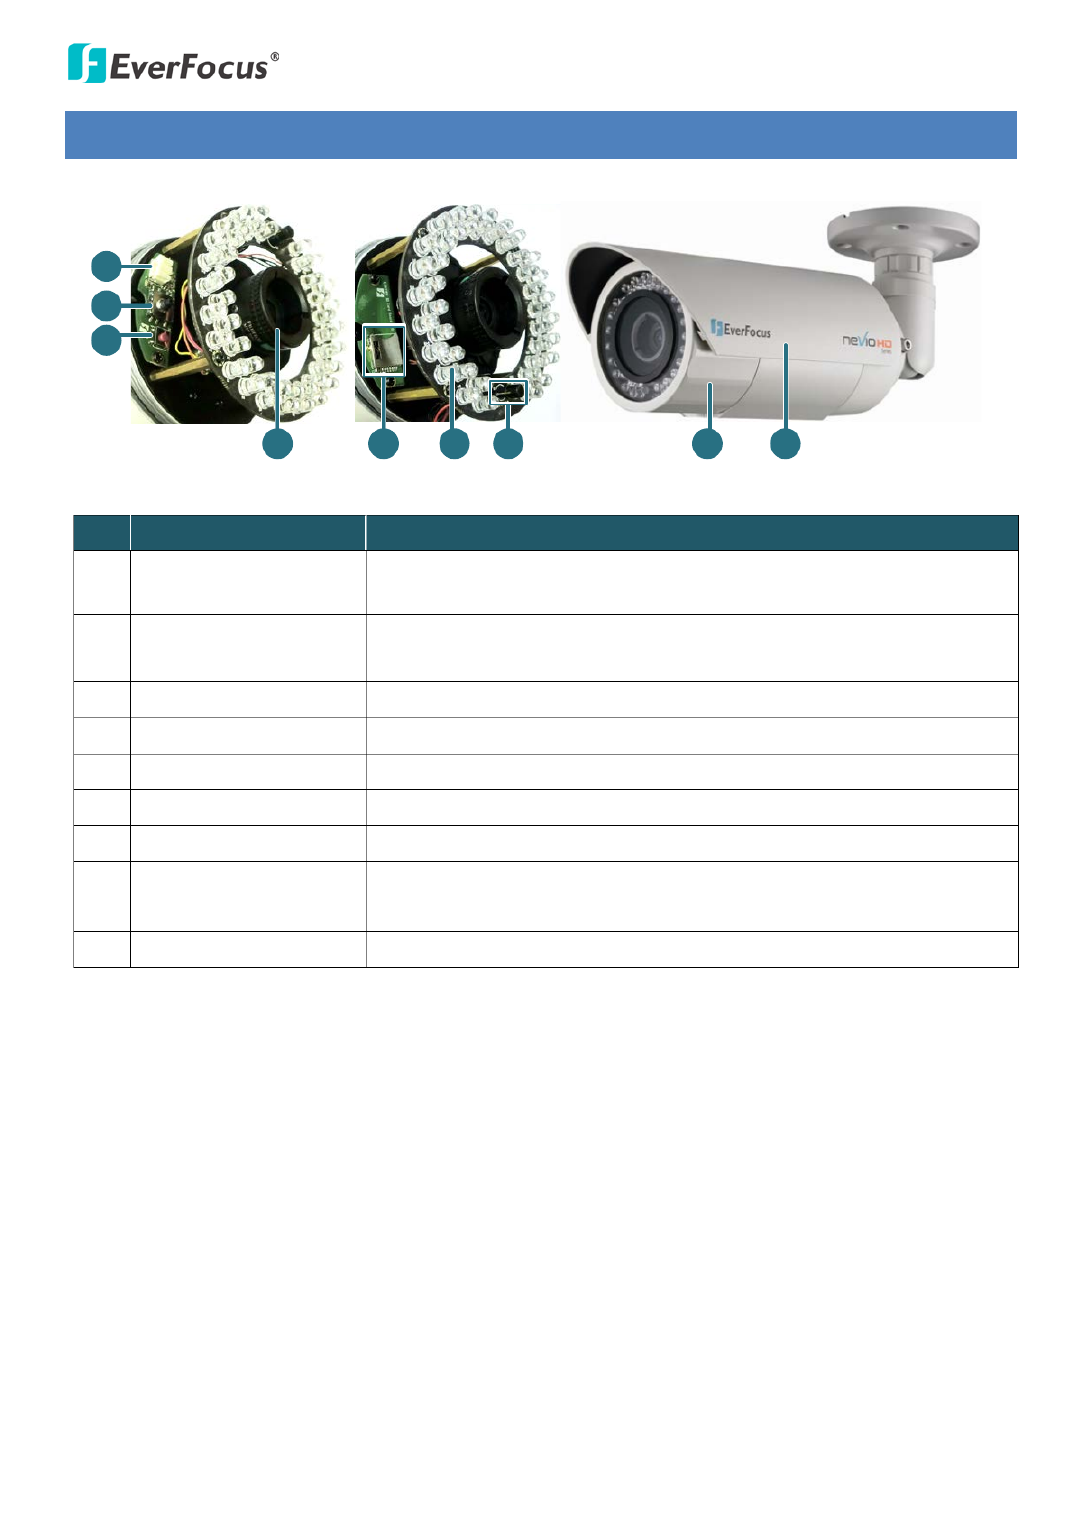
3. Overview
1
2
3
4 5 6 7 8 9
No. Name Description
1 Test Output Connects to a handheld test monitor for adjusting camera focus and
zoom.
2 Focus / Zoom Control Press this control to the left or right to adjust camera focus. To zoom in
/ out the camera view, press this control up or down.
3 Reset Button Resets all configurations to the factory default settings.
4 Lens Varifocal lens.
5 Micro SD / SDHC Slot For inserting a micro SD / SDHC card.
6 IR LEDs 44 IR LEDs for infrared illumination in night vision applications.
7 Light Sensor Detects lights.
8 Camera Cover Remove the cover for adjusting camera focus and / inserting a zoom
micro SD card or connecting to a handheld test monitor.
9 Sunshield Protect the camera from the direct rays of the sun.

EZ N Series
4
4. Installation
4.1 Pack ing List
Please check that there is no missing item in the package before installing.
• EZN Series Camera x 1 4-• Pin Terminal Block x 1
• Quick Mounting Ring x 1 • Software CD x 1
• RJ- 45 Connector 1 x • Quick Installation Guide x 1
• Mounting Kit x 1 - C • Test Out able x 1
- Long Screw x 4 (for attaching the Quick Mounting Ring to the mounting surface)
- Short Screw x 4 (for connecting the camera base to the quick Mount Ring)
- Screw Anchor x 4 (in conjunction with Long Screw)
- Hexagon Key x 1 (for adjusting the camera position)
- Hexagon Wrench x 1 (for removing the sunshield)
- Torx Wrench x 1 (for removing the lock tab)
- Mounting Template x 1
Note:
1. Equipment configurations and supplied accessories vary by country. Please consult your local
EverFocus office or agents for more information. Please also keep the shipping carton for possible
future use.
2.
Contact the shipper if any items appear to have been damaged in the shipping process.
4.2 Cabl es
The Cables provide connections for Network, power, audio input / output and alarm input / output. The
wires are illustrated and defined below. Note that microphones with external power supplies are
required.
Alarm Input / Output
Audio Input (Pink)
Audio Output (Green)
12 VDC Input
LAN / PoE Cable
Pin Assignment for Alarm Input / Output
4 3 2 1
Pin 1: Alarm GND
Pin 2: Alarm In
Pin3: Alarm Out-
Pin4: Alarm Out+

EZ N Series
5
4.3 Basic Installation
This section will introduce the basic installation on mounting / wiring the camera, inserting a micro SD
card and adjusting camera focus / zoom.
4.3.1 Mounting and Wirin g
Follow the steps below for mounting and wiring the camera.
1. Before screwing the camera to the wall, drill four holes on the wall according to the hole-positions
on the supplied Quick-Mounting Ring. If you wish to run the wires into the wall, drill another hole
in the middle of the circular area within the Quick-Mounting Ring.
2. Push the four supplied anchors into the four holes on the wall.
3. Place the Quick-Mounting Ring against the anchoring surface so that the holes line up. Screw the
Quick-Mounting Ring to the wall using the supplied Long Screws.
Quick-Mounting Ring
Long Screws
4. Screw the camera body to the Quick-Mounting Ring using the supplied four Short Screws.
a. If you want to wire the cables from the side of the camera base:
Camera Base Quick-Mounting Ring
Cables
EZ N Series
7
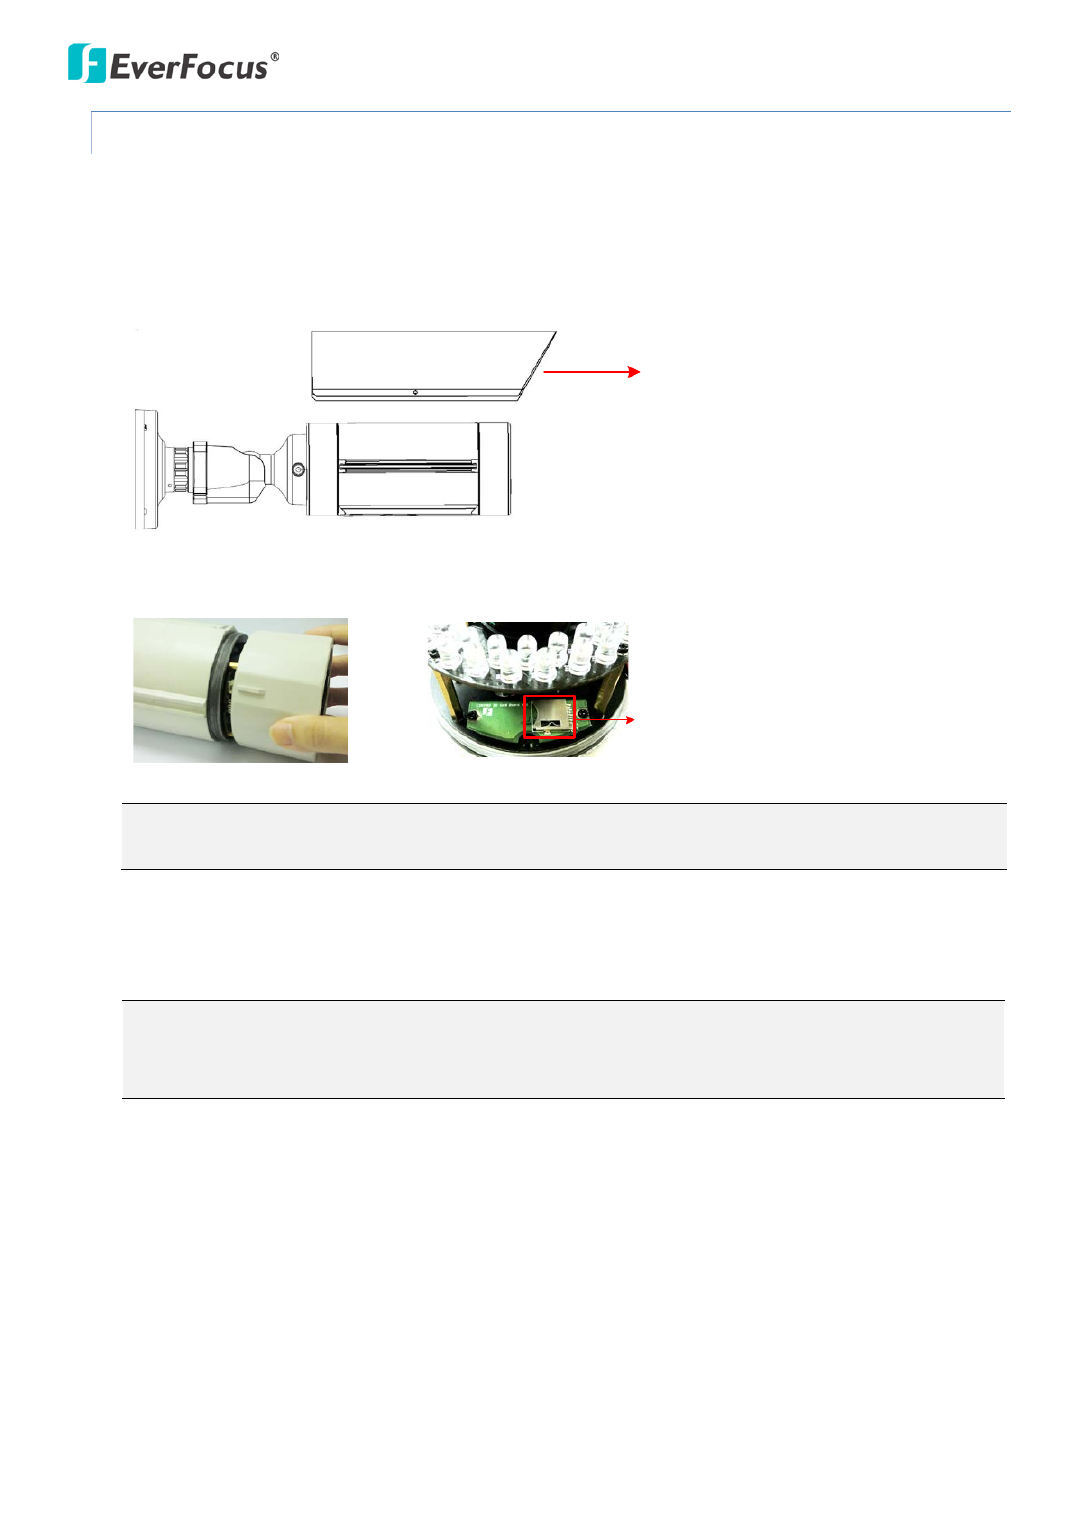
4.3.2 Inserting a Micr o SD Card
You can optionally insert a micro SD card into the card slot on the camera module for recording videos.
1. Remove the Sunshield from the camera. Loosen the screw on the Sunshield using the provided
hexagon wrench. Slide the Sunshield out from the rail on the camera body.
Screw
Sunshield
Camera Body
2. Rotate and then remove the camera cover, and insert a micro SD card into the card slot.
Micro SD Card Slot
Note: After opening the camera cover for inserting the micro SD card, you have to close the cover
immediately in case of reducing the absorption capacity of the desiccant bag inside the camera.
3. Firmly close the camera cover for waterproofing and then slide the Sunshield back to the camera
body.
Note: When properly installed, the rear-side of the Sunshield should be even with the rear-side of
the camera body. Extending the Sunshield in order to shade the lens will compromise the image
quality.

EZ N Series
10
5. To change the IP settings, double values in the and type the numbers or select - click the column
an option. Click Set IP Address to save the settings.
Note: Most networks support DHCP protocol, but if you are unsure of your network
protocol, please consult your IP administrator for network configuration details.
6. To access the camera, highlight the camera and click Connect to Selected IP. The Internet
Explorer window pops up.
7. Type the user ID and password to log in. The Live View window of the camera appears.
Note: You might be required to download ActiveX, which is required to view the camera
feed. If asked, click " For more details on setting up the Microsoft Internet Explorer, Yes".
please refer to 5.2 Settings for Microsoft Internet Explorer.
Specyfikacje produktu
| Marka: | EverFocus |
| Kategoria: | Kamera monitorująca |
| Model: | EZN3260 |
Potrzebujesz pomocy?
Jeśli potrzebujesz pomocy z EverFocus EZN3260, zadaj pytanie poniżej, a inni użytkownicy Ci odpowiedzą
Instrukcje Kamera monitorująca EverFocus

23 Września 2024
22 Września 2024
22 Września 2024
22 Września 2024
22 Września 2024
22 Września 2024
22 Września 2024
22 Września 2024
22 Września 2024
22 Września 2024
Instrukcje Kamera monitorująca
- Kamera monitorująca Sony
- Kamera monitorująca Samsung
- Kamera monitorująca Tenda
- Kamera monitorująca Motorola
- Kamera monitorująca Stabo
- Kamera monitorująca Logitech
- Kamera monitorująca Xiaomi
- Kamera monitorująca Braun
- Kamera monitorująca Pioneer
- Kamera monitorująca TP-Link
- Kamera monitorująca Philips
- Kamera monitorująca Bosch
- Kamera monitorująca Gigaset
- Kamera monitorująca Hikvision
- Kamera monitorująca EZVIZ
- Kamera monitorująca Conceptronic
- Kamera monitorująca Panasonic
- Kamera monitorująca Canon
- Kamera monitorująca Crestron
- Kamera monitorująca Withings
- Kamera monitorująca Asus
- Kamera monitorująca Nedis
- Kamera monitorująca AG Neovo
- Kamera monitorująca Reolink
- Kamera monitorująca Boss
- Kamera monitorująca TRENDnet
- Kamera monitorująca Marquant
- Kamera monitorująca Toshiba
- Kamera monitorująca D-Link
- Kamera monitorująca August
- Kamera monitorująca Niceboy
- Kamera monitorująca Ring
- Kamera monitorująca Garmin
- Kamera monitorująca Imou
- Kamera monitorująca Blaupunkt
- Kamera monitorująca Grundig
- Kamera monitorująca APC
- Kamera monitorująca Honeywell
- Kamera monitorująca BLOW
- Kamera monitorująca Manhattan
- Kamera monitorująca Strong
- Kamera monitorująca Swann
- Kamera monitorująca Kwikset
- Kamera monitorująca Kodak
- Kamera monitorująca Cisco
- Kamera monitorująca ORNO
- Kamera monitorująca Broan
- Kamera monitorująca Moxa
- Kamera monitorująca Synology
- Kamera monitorująca Gembird
- Kamera monitorująca ZTE
- Kamera monitorująca Turing
- Kamera monitorująca Lindy
- Kamera monitorująca Minox
- Kamera monitorująca Zebra
- Kamera monitorująca DSC
- Kamera monitorująca JVC
- Kamera monitorująca ZyXEL
- Kamera monitorująca Trust
- Kamera monitorująca LogiLink
- Kamera monitorująca Furrion
- Kamera monitorująca Linksys
- Kamera monitorująca Google
- Kamera monitorująca Digitus
- Kamera monitorująca Vimar
- Kamera monitorująca V-TAC
- Kamera monitorująca Dahua Technology
- Kamera monitorująca Schneider
- Kamera monitorująca Eufy
- Kamera monitorująca Ricoh
- Kamera monitorująca Emos
- Kamera monitorująca AVMATRIX
- Kamera monitorująca Renkforce
- Kamera monitorująca Rollei
- Kamera monitorująca Marshall
- Kamera monitorująca Perel
- Kamera monitorująca Somfy
- Kamera monitorująca Uniden
- Kamera monitorująca Netgear
- Kamera monitorująca Thomson
- Kamera monitorująca DiO
- Kamera monitorująca Velleman
- Kamera monitorująca Ferguson
- Kamera monitorująca DataVideo
- Kamera monitorująca Delta Dore
- Kamera monitorująca Pyle
- Kamera monitorująca Intellinet
- Kamera monitorująca CRUX
- Kamera monitorująca Setti+
- Kamera monitorująca Waeco
- Kamera monitorująca Vivotek
- Kamera monitorująca Vtech
- Kamera monitorująca Speco Technologies
- Kamera monitorująca EtiamPro
- Kamera monitorująca Edimax
- Kamera monitorująca Petcube
- Kamera monitorująca ION
- Kamera monitorująca First Alert
- Kamera monitorująca AirLive
- Kamera monitorująca Maginon
- Kamera monitorująca EnGenius
- Kamera monitorująca SPC
- Kamera monitorująca Planet
- Kamera monitorująca Brilliant
- Kamera monitorująca Genie
- Kamera monitorująca LevelOne
- Kamera monitorująca Axis
- Kamera monitorująca Sanyo
- Kamera monitorująca Lorex
- Kamera monitorująca Control4
- Kamera monitorująca Milesight
- Kamera monitorująca Aluratek
- Kamera monitorująca Abus
- Kamera monitorująca Elro
- Kamera monitorująca Olympia
- Kamera monitorująca Hama
- Kamera monitorująca Marmitek
- Kamera monitorująca Ubiquiti Networks
- Kamera monitorująca Western Digital
- Kamera monitorująca Netatmo
- Kamera monitorująca Schwaiger
- Kamera monitorująca Promise Technology
- Kamera monitorująca GVI Security
- Kamera monitorująca AVer
- Kamera monitorująca ZKTeco
- Kamera monitorująca Netis
- Kamera monitorująca Extech
- Kamera monitorująca Denver
- Kamera monitorująca Anker
- Kamera monitorująca Allnet
- Kamera monitorująca Marshall Electronics
- Kamera monitorująca Orion
- Kamera monitorująca Yale
- Kamera monitorująca SereneLife
- Kamera monitorująca Ernitec
- Kamera monitorująca AVerMedia
- Kamera monitorująca MEE Audio
- Kamera monitorująca Genius
- Kamera monitorująca Trevi
- Kamera monitorująca Technaxx
- Kamera monitorująca Atlona
- Kamera monitorująca Hanwha
- Kamera monitorująca Overmax
- Kamera monitorująca Quantum
- Kamera monitorująca Y-cam
- Kamera monitorująca Grandstream
- Kamera monitorująca Raymarine
- Kamera monitorująca Powerfix
- Kamera monitorująca Avanti
- Kamera monitorująca Ikan
- Kamera monitorująca Alecto
- Kamera monitorująca Avidsen
- Kamera monitorująca JUNG
- Kamera monitorująca Burg Wächter
- Kamera monitorująca Foscam
- Kamera monitorująca Lumens
- Kamera monitorująca Monacor
- Kamera monitorująca Dörr
- Kamera monitorująca M-e
- Kamera monitorująca EVE
- Kamera monitorująca Smartwares
- Kamera monitorująca Adj
- Kamera monitorująca Qian
- Kamera monitorująca Arenti
- Kamera monitorująca Elmo
- Kamera monitorująca Vitek
- Kamera monitorująca Alfatron
- Kamera monitorująca UniView
- Kamera monitorująca Clas Ohlson
- Kamera monitorująca Laserliner
- Kamera monitorująca Megasat
- Kamera monitorująca REVO
- Kamera monitorująca BZBGear
- Kamera monitorująca BirdDog
- Kamera monitorująca KJB Security Products
- Kamera monitorująca HiLook
- Kamera monitorująca Profile
- Kamera monitorująca Aldi
- Kamera monitorująca Aritech
- Kamera monitorująca Acti
- Kamera monitorująca ACME
- Kamera monitorująca Flamingo
- Kamera monitorująca Caliber
- Kamera monitorująca Eminent
- Kamera monitorująca Sitecom
- Kamera monitorująca Exibel
- Kamera monitorująca Fortinet
- Kamera monitorująca KlikaanKlikuit
- Kamera monitorująca Trebs
- Kamera monitorująca Ednet
- Kamera monitorująca Steren
- Kamera monitorująca Flir
- Kamera monitorująca Buffalo
- Kamera monitorująca Arlo
- Kamera monitorująca Nest
- Kamera monitorująca Siedle
- Kamera monitorująca Hive
- Kamera monitorująca Switel
- Kamera monitorująca Chacon
- Kamera monitorująca InFocus
- Kamera monitorująca Hombli
- Kamera monitorująca Naxa
- Kamera monitorująca Konig
- Kamera monitorująca Valueline
- Kamera monitorująca BRK
- Kamera monitorująca QSC
- Kamera monitorująca Xavax
- Kamera monitorująca Vaddio
- Kamera monitorująca Gira
- Kamera monitorująca Interlogix
- Kamera monitorująca Boyo
- Kamera monitorująca IC Intracom
- Kamera monitorująca Iget
- Kamera monitorująca Adesso
- Kamera monitorująca Satel
- Kamera monitorująca POSline
- Kamera monitorująca Notifier
- Kamera monitorująca Hawking Technologies
- Kamera monitorująca Friedland
- Kamera monitorująca Nexxt
- Kamera monitorująca Monoprice
- Kamera monitorująca Watec
- Kamera monitorująca Beafon
- Kamera monitorująca Chuango
- Kamera monitorująca ETiger
- Kamera monitorująca Videcon
- Kamera monitorująca INSTAR
- Kamera monitorująca Provision ISR
- Kamera monitorująca Aqara
- Kamera monitorująca Advantech
- Kamera monitorująca Digital Watchdog
- Kamera monitorująca Ganz
- Kamera monitorująca AViPAS
- Kamera monitorująca ClearOne
- Kamera monitorująca Ebode
- Kamera monitorująca Oplink
- Kamera monitorująca Sonic Alert
- Kamera monitorująca Linear PRO Access
- Kamera monitorująca Summer Infant
- Kamera monitorująca SMC
- Kamera monitorująca Topica
- Kamera monitorująca Kogan
- Kamera monitorująca Iiquu
- Kamera monitorująca Verint
- Kamera monitorująca Brinno
- Kamera monitorująca Rostra
- Kamera monitorująca Caddx
- Kamera monitorująca Spyclops
- Kamera monitorująca EKO
- Kamera monitorująca Kguard
- Kamera monitorująca Woonveilig
- Kamera monitorująca Mobi
- Kamera monitorująca Surveon
- Kamera monitorująca Hollyland
- Kamera monitorująca Epcom
- Kamera monitorująca Indexa
- Kamera monitorująca Lutec
- Kamera monitorująca Whistler
- Kamera monitorująca ClearView
- Kamera monitorująca VideoComm
- Kamera monitorująca IMILAB
- Kamera monitorująca 3xLOGIC
- Kamera monitorująca Pelco
- Kamera monitorująca Leviton
- Kamera monitorująca Inkovideo
- Kamera monitorująca Pentatech
- Kamera monitorująca Weldex
- Kamera monitorująca SecurityMan
- Kamera monitorująca Canyon
- Kamera monitorująca CNB Technology
- Kamera monitorująca Tapo
- Kamera monitorująca Aigis
- Kamera monitorująca Exacq
- Kamera monitorująca Brickcom
- Kamera monitorująca Laxihub
- Kamera monitorująca Securetech
- Kamera monitorująca EFB Elektronik
- Kamera monitorująca NetMedia
- Kamera monitorująca Videotec
- Kamera monitorująca Illustra
- Kamera monitorująca Nivian
- Kamera monitorująca E-bench
- Kamera monitorująca Syscom
- Kamera monitorująca Tecno
- Kamera monitorująca Night Owl
- Kamera monitorująca Guardzilla
- Kamera monitorująca Astak
- Kamera monitorująca Blink
- Kamera monitorująca Milestone Systems
- Kamera monitorująca Zavio
- Kamera monitorująca Campark
- Kamera monitorująca IPX
- Kamera monitorująca Dedicated Micros
- Kamera monitorująca Hamlet
- Kamera monitorująca Annke
- Kamera monitorująca AVTech
- Kamera monitorująca Qoltec
- Kamera monitorująca Approx
- Kamera monitorująca Digimerge
- Kamera monitorująca Wisenet
- Kamera monitorująca Infortrend
- Kamera monitorująca Epiphan
- Kamera monitorująca Mach Power
- Kamera monitorująca Compro
- Kamera monitorująca Aida
- Kamera monitorująca Ikegami
- Kamera monitorująca Accsoon
- Kamera monitorująca Vimtag
- Kamera monitorująca Gewiss
- Kamera monitorująca Alula
- Kamera monitorująca Insteon
- Kamera monitorująca Costar
- Kamera monitorująca ALC
- Kamera monitorująca Security Labs
- Kamera monitorująca Comtrend
- Kamera monitorująca Seneca
- Kamera monitorująca Avigilon
- Kamera monitorująca American Dynamics
- Kamera monitorująca Vosker
- Kamera monitorująca Sentry360
- Kamera monitorująca Bea-fon
- Kamera monitorująca Owltron
- Kamera monitorująca Enabot
- Kamera monitorująca Luis Energy
- Kamera monitorująca Sir Gawain
- Kamera monitorująca VisorTech
- Kamera monitorująca Atlantis Land
- Kamera monitorująca B & S Technology
- Kamera monitorująca I3International
- Kamera monitorująca IDIS
- Kamera monitorująca Ecobee
- Kamera monitorująca Conbrov
- Kamera monitorująca HuddleCamHD
- Kamera monitorująca Mobotix
- Kamera monitorująca IOIO
- Kamera monitorująca BIRDFY
- Kamera monitorująca I-PRO
- Kamera monitorująca DVDO
- Kamera monitorująca TCP
- Kamera monitorująca Bolin Technology
- Kamera monitorująca Nextech
Najnowsze instrukcje dla Kamera monitorująca
28 Stycznia 2025
25 Stycznia 2025
17 Stycznia 2025
17 Stycznia 2025
15 Stycznia 2025

13 Stycznia 2025

13 Stycznia 2025
13 Stycznia 2025

12 Stycznia 2025
12 Stycznia 2025