Instrukcja obsługi Epson PERFECTION V350 PHOTO
Przeczytaj poniżej 📖 instrukcję obsługi w języku polskim dla Epson PERFECTION V350 PHOTO (4 stron) w kategorii skaner. Ta instrukcja była pomocna dla 12 osób i została oceniona przez 2 użytkowników na średnio 4.5 gwiazdek
Strona 1/4
Start Here • Point de départ • Guía de instalación
Epson Perfection® V350 Photo
Read these instructions before using your product • Lisez ces instructions avant d’utiliser votre produit • Lea esta guía antes de utilizar el producto
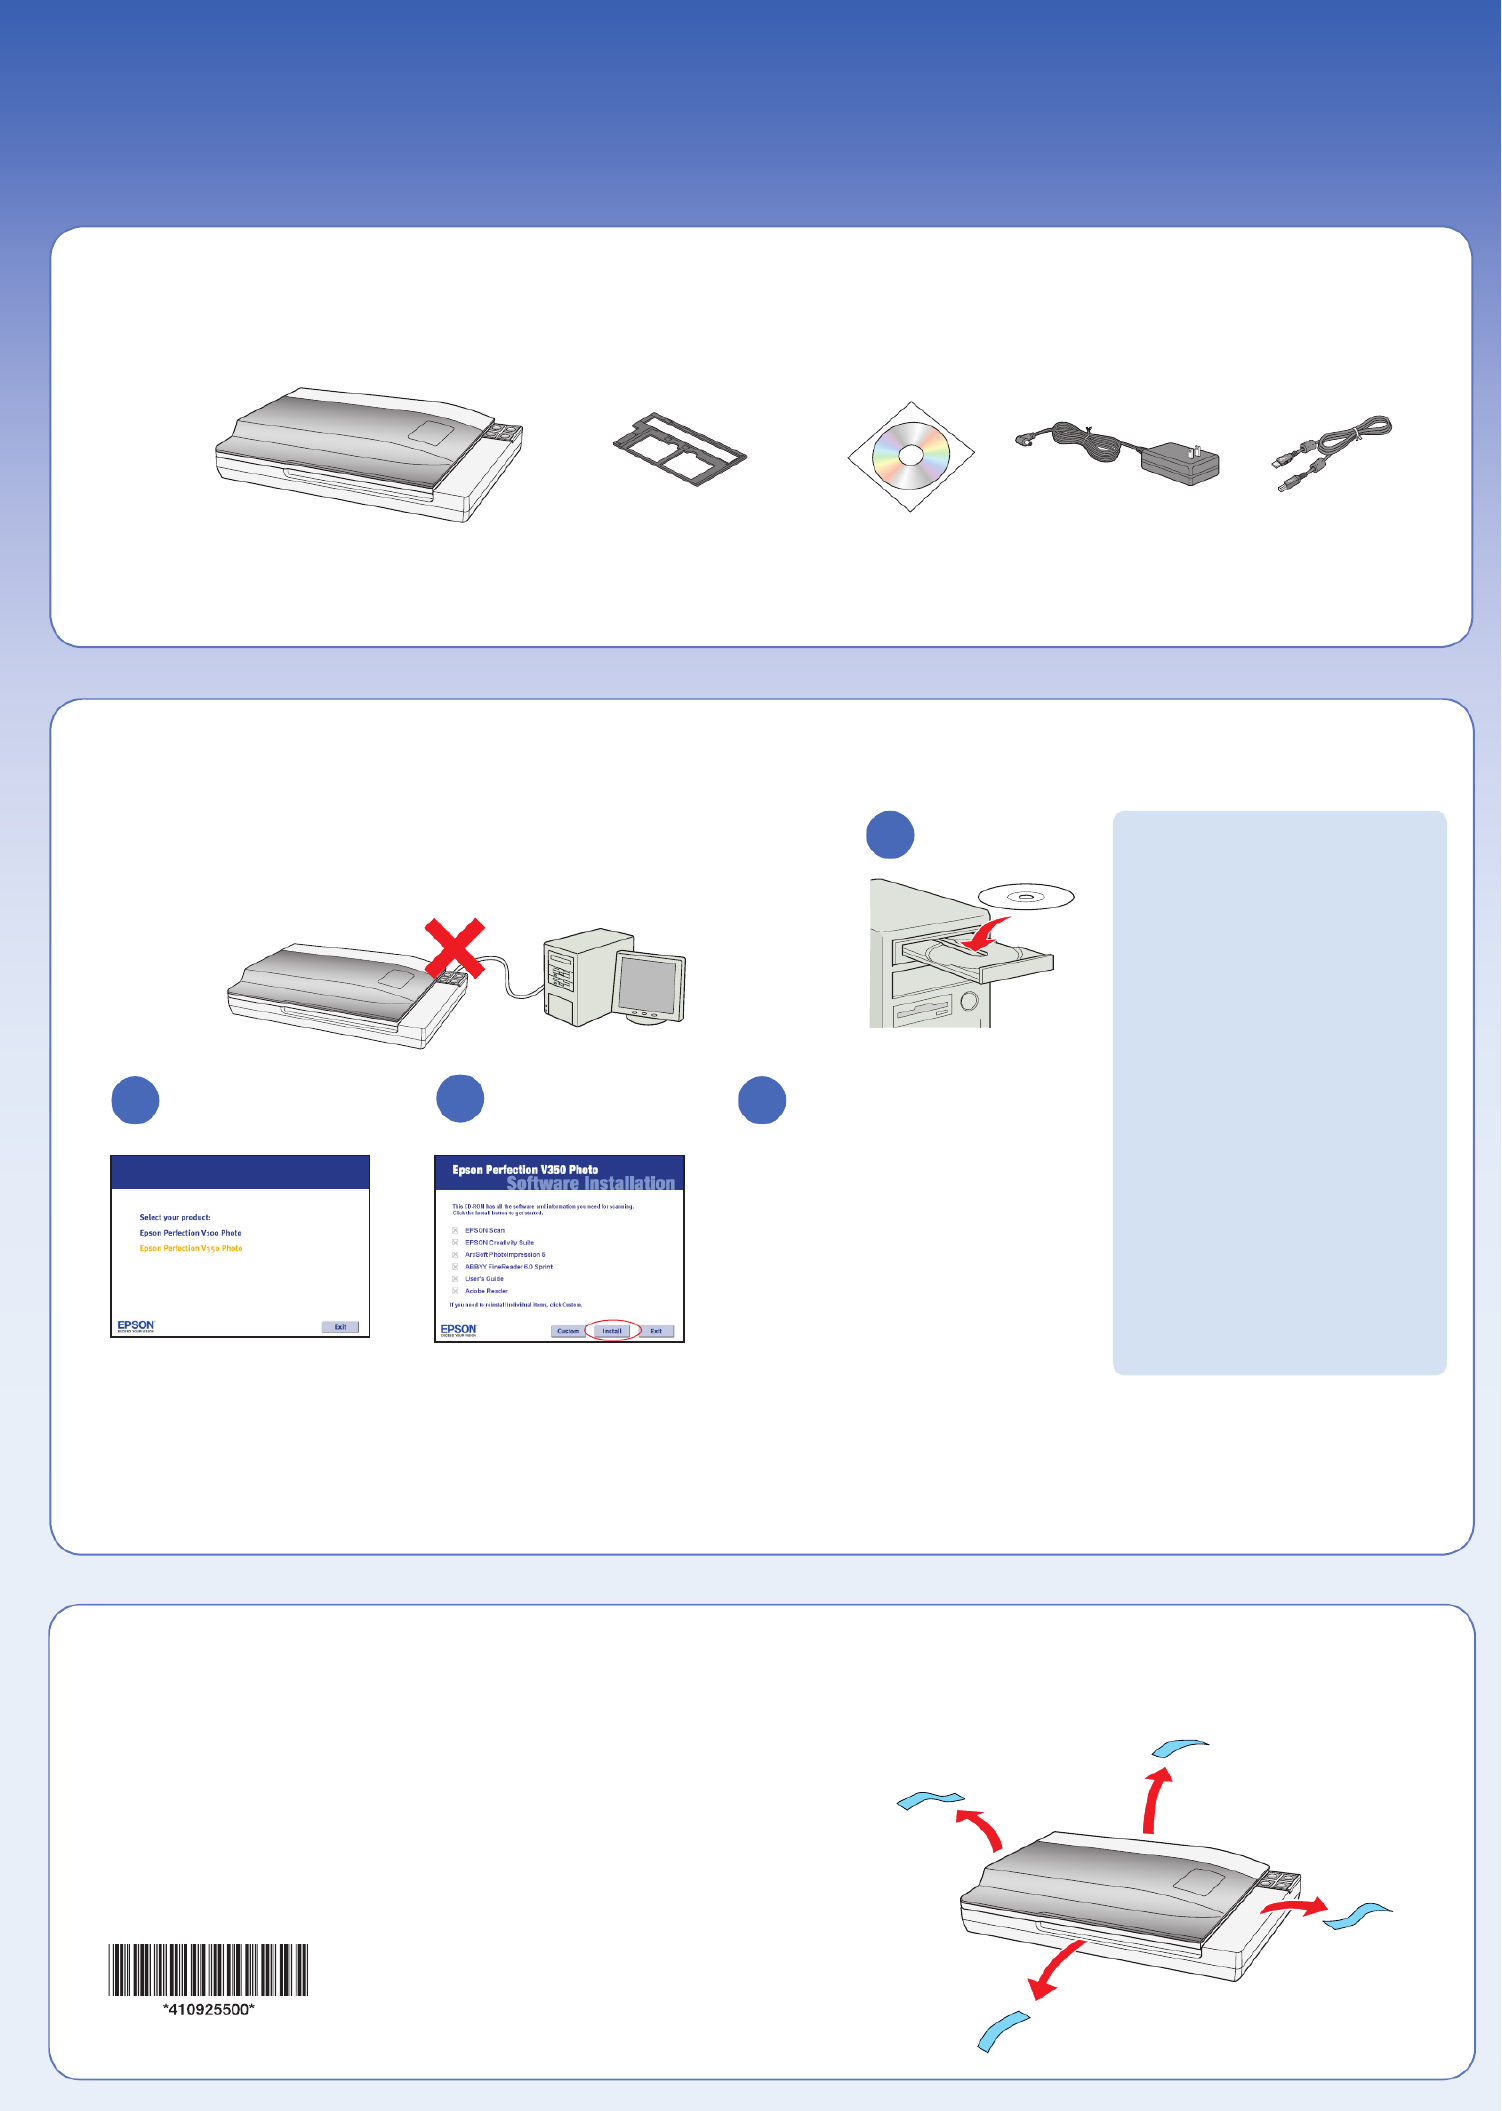
Unpack • Déballez le scanner • Desembale el producto
Install software • Installez les logiciels • Instale el software
Do not connect the USB cable yet.
Ne branchez pas le câble USB tout de suite.
No conecte el cable USB todavía.
3
Remove protective tape • Retirez le ruban protecteur •
Retire la cinta adhesiva de protección
Film holder
Support de film
Soporte para película fotográfica
Printed in XXXXXX XX.XX-XX XXX
Imprimé au XXXXXX
Impreso en XXXXXX
Windows Vista™:
If you see the AutoPlay window,
click Run Epsetup.exe. When
you see the User Account Control
screen, click Next.
À l’écran AutoPlay, cliquez
Exécuter Epsetup.exe. Cliquez
Continuer à l’écran Contrôle de
compte d’utilisateur.
Si aparece la pantalla AutoPlay,
haga clic en Ejecutar Epsetup.exe.
Cuando vea la pantalla Control de
cuentas de usuario, haga clic en
Continuar.
Macintosh® OS X:
Double-click the CD-ROM icon on
the desktop.
Double-cliquez sur l’icône du
CD-ROM sur le bureau.
Haga doble clic en el icono de
CD-ROM situado en el escritorio
1
2 4
Follow the on-screen instructions
and select the default options.
Remove the CD when you’re finished
installing software.
Suivez les instructions à l’écran et
sélectionnez les options par défaut.
Retirez le CD quand vous avez fini
l’installation du logiciel.
Siga las instrucciones en
pantalla y seleccione las
opciones predeterminadas. Retire
el CD cuando termine de instalar
el software.
3
Select Epson Perfection
V350 Photo.
Sélectionnez Epson Perfection
V350 Photo.
Seleccione Epson Perfection
V350 Photo.
1
2

Plug the AC adapter into an electrical outlet to turn the scanner on.
Branchez l’adaptateur CA dans une prise de courant pour mettre le
scanner sous tension.
Para encender el escáner, enchufe el adaptador de CA en una toma
de corriente.
Connect and plug in • Connectez et branchez le scanner •
Conecte y enchufe el escáner
12
Scan a photo • Numérisez une photo • Escanee una foto
4
6
EPSON Scan opens and scans your
photo in Full Auto Mode. Wait for
your scan to finish or click Pause to
change settings.
Epson Scan ouvre et numérise
votre photo en Mode Automatique.
Attendez que la numérisation se
termine ou cliquez sur Pause pour
changer les paramètres.
El programa Epson Scan se
abre y escanea su foto en Modo
Automático. Espere hasta que
termine de escanear o haga clic en
Pausa para cambiar los ajustes.
2 3
View your photo in Pictures (Windows Vista
and Mac OS® X) or My Pictures (other versions
of Windows).
Regardez votre photo dans le dossier Images
(Windows Vista ou Mac OS® X) ou Mes images
(autres versions de Windows).
Visualice su foto en la carpeta Imágenes
(Windows Vista o Mac OS® X) o Mis imágenes
(otras versiones de Windows).
Click .Scan
Cliquez sur Numériser.
Haga clic en Escanear.
1
5
Press the Start button.
Appuyez sur le bouton .Démarrer
Pulse el botón .
4
5

7
Scan slides • Numérisez des diapositives •
Escanee diapositivas
31 2
5
Follow steps 3 through 6 in section
5, “Scan a photo.”
Suivez les étapes 3 à 6 dans la
section 5, « Numérisez une photo ».
Sigas los pasos 3 a 6 de la sección
5, “Escanee una foto”.
4
6
Scan negatives • Numérisez des négatifs • Escanee negativos
1
46
Follow steps 3 through 6 in
section 5, “Scan a photo.”
Suivez les étapes 3 à 6 dans
la section 5, « Numérisez une
photo ».
Sigas los pasos 3 a 6 de la
sección 5, “Escanee una
foto”.
Do More • Autres Options • Más op
Slide in negatives with
the shiny side facing
down. The scanner
automatically feeds the
negatives into position.
Faites glisser les
négatifs avec le côté
brillant face vers le bas.
Le scanner alimente
automatiquement les
négatifs en position.
Coloque los negativos
con el lado brillante
hacia abajo. El escáner
automáticamente
avanza los negativos a
la posición adecuada.
3
5
2
7
Specyfikacje produktu
| Marka: | Epson |
| Kategoria: | skaner |
| Model: | PERFECTION V350 PHOTO |
Potrzebujesz pomocy?
Jeśli potrzebujesz pomocy z Epson PERFECTION V350 PHOTO, zadaj pytanie poniżej, a inni użytkownicy Ci odpowiedzą
Instrukcje skaner Epson

11 Października 2024
4 Października 2024
26 Września 2024
26 Września 2024
26 Września 2024
26 Września 2024
24 Września 2024
24 Września 2024
24 Września 2024
22 Września 2024
Instrukcje skaner
- skaner Braun
- skaner Voltcraft
- skaner SilverCrest
- skaner Fujitsu
- skaner Panasonic
- skaner Canon
- skaner Nedis
- skaner Medion
- skaner Lenco
- skaner HP
- skaner Brother
- skaner Honeywell
- skaner Nikon
- skaner Kodak
- skaner Xerox
- skaner Zebra
- skaner Cobra
- skaner Trust
- skaner AgfaPhoto
- skaner Eurolite
- skaner Ricoh
- skaner Renkforce
- skaner Rollei
- skaner Uniden
- skaner Dymo
- skaner Panduit
- skaner Visioneer
- skaner ION
- skaner Maginon
- skaner Antec
- skaner Konica Minolta
- skaner Jay-Tech
- skaner Creality
- skaner Albrecht
- skaner AVerMedia
- skaner Genius
- skaner Technaxx
- skaner Martin
- skaner Blackmagic Design
- skaner Newland
- skaner Elmo
- skaner Avision
- skaner Lexmark
- skaner Agfa
- skaner Reflecta
- skaner Tevion
- skaner Targus
- skaner Sagem
- skaner Easypix
- skaner Kensington
- skaner GlobalTronics
- skaner Steren
- skaner Konig
- skaner Minolta
- skaner Veho
- skaner Dnt
- skaner Hella
- skaner Ipevo
- skaner Rittz
- skaner Jobo
- skaner Plustek
- skaner Zolid
- skaner Traveler
- skaner Mustek
- skaner Neat
- skaner RadioShack
- skaner ICarsoft
- skaner Kenko
- skaner Kogan
- skaner Yupiteru
- skaner Vupoint Solutions
- skaner DTRONIC
- skaner Ross-Tech
- skaner DENSO
- skaner Perfect Choice
- skaner IRIS
- skaner Soundsation
- skaner CDVI
- skaner Scan Dimension
- skaner Dyka
- skaner Matter And Form
- skaner Pacific Image
- skaner Doxie
- skaner CZUR
- skaner Cartrend
- skaner 3DMAKERPRO
- skaner Ambir
- skaner Microtek
Najnowsze instrukcje dla skaner

29 Marca 2025

22 Lutego 2025

19 Lutego 2025
28 Stycznia 2025
16 Stycznia 2025
12 Stycznia 2025
11 Stycznia 2025
11 Stycznia 2025
29 Grudnia 2024
22 Grudnia 2024