Instrukcja obsługi Epson DS-C480W
Przeczytaj poniżej 📖 instrukcję obsługi w języku polskim dla Epson DS-C480W (4 stron) w kategorii skaner. Ta instrukcja była pomocna dla 15 osób i została oceniona przez 2 użytkowników na średnio 4.5 gwiazdek
Strona 1/4

Press the power button.
Appuyez sur le bouton d’alimentation.
Select your language, date, and time settings.
Sélectionnez les paramètres de langue, de date et
d’heure.
1
1
2
DS-C480W
IMPORTANT: Before using this product, make sure you read
these instructions and the safety instructions in the online
User’s Guide.
IMPORTANT : Avant d’utiliser ce produit, assurez-vous de lire
ces instructions et les instructions de sécurité dans le Guide de
l’utilisateur en ligne.
Start Here
Point de départ
Turn on the scanner •
Allumez le scanner
Note: Do not connect the USB cable until instructed to
doso.
Remarque : Ne branchez pas le câble USB avant d’y être
invité.
Remove the packing
materials Retirez tout le •
matériel d’emballage
Note: An internet connection is required to obtain the
product software.
Remarque : Une connexion Internet est requise pour
obtenir le logiciel du produit.
Visit Epson’s support site listed below to download
the Drivers and Utilities Combo Package.
Visitez le site de soutien d’Epson indiqué ci-dessous
pour télécharger l’Ensemble des pilotes et logiciels.
http://epson.com/support/dsc480w (U.S./É.-U.)
http://epson.ca/support/dsc480w (Canada)
Double-click the le you downloaded to install the
software. Follow the on-screen instructions to set up
the connection.
Double-cliquez sur le chier que vous avez
téléchargé pour installer le logiciel. Suivez les
instructions à l’écran pour congurer la connexion.
1
3Install software •
Installez le logiciel
Vériez l’icône achée sur l’écran ACL et eectuez
l’une des actions suivantes :
• Si l’icône est achée, passez à l’étape 2.
• Si l’icône est achée, déplacez le sélecteur
de position à l’arrière du scanner vers la droite et
faites basculer le scanner vers l’avant.
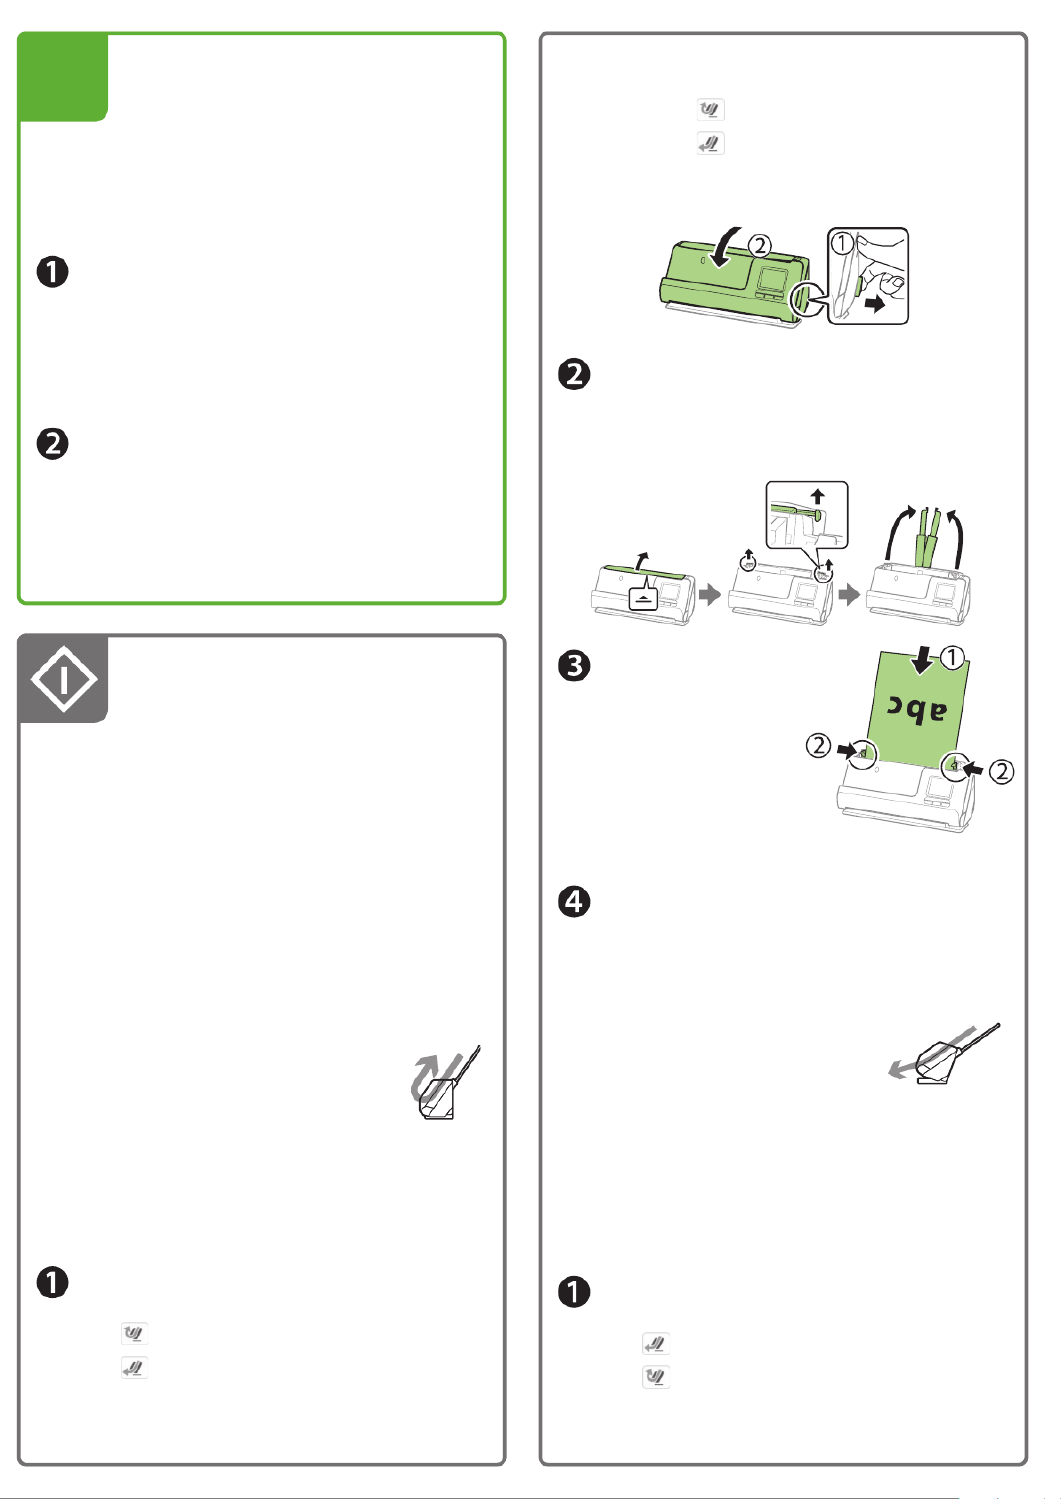
Open the input tray and raise the input tray
extension.
Ouvrez le bac d’entrée et levez la rallonge du bac
d’entrée.
Load the original faceup
and top edge rst, then
slide the edge guides
against the original.
Chargez l’original face
vers le haut et bord
supérieur en premier,
puis faites glisser les
guide-papier contre l’original.
Select Computer on the LCD screen, select a job,
then press the icon to initiate the scan.Start
Sélectionnez Ordinateur sur l’écran ACL,
sélectionnez un travail, puis appuyez sur l’icône
Démarrer pour lancer la numérisation.
Straight path position •
Position de chemin droit
Use the straight path position to scan large, folded originals,
such as tabloid or A3, long paper, booklets, I.D. cards,
passports, and envelopes.
Utilisez la position de chemin droit pour numériser les
originaux pliés et larges, comme le papier de format
tabloïde ou A3, le papier long, les livrets, les cartes
d’identité, les passeports et les enveloppes.
Check the icon on the LCD screen and do one of the
following:
• If is displayed, continue to step 2.
• If is displayed, pull the position selector on
the back of the scanner to the right, and tilt the
scanner backward.
Note: For detailed information on loading and scanning
originals, see the online User’s Guide.
Remarque : Pour obtenir des informations détaillées sur
lechargement et la numérisation des originaux, consultez
le en ligne.Guide de l’utilisateur
Note: To scan using the Start icon, you must connect
the scanner to a computer with Document Capture Pro
(Windows®) or Document Capture (Mac) installed.
Remarque : Pour numériser en utilisant l’icône Démarrer,
vous devez connecter le scanner à un ordinateur avec le
logiciel Document Capture Pro (Windows®) ou Document
Capture (Mac) installé.
Vertical path position •
Position de chemin vertical
Use the vertical path position to scan Letter- or A4-size
originals, receipts, and business cards.
Utilisez la position de chemin vertical pour numériser les
originaux de format Lettre ou A4, les reçus et les cartes
professionnelles.
Check the icon on the LCD screen and do one of the
following:
• If is displayed, continue to step 2.
• If is displayed, pull the position selector on
the back of the scanner to the right, and tilt the
scanner forward.
Scan a document •
Numérisez un document

To scan from an iOS or Android™ device, ®
download and install the free Epson Smart
Panel app from the App Store or Google Play™.®
Note: For information on setting up presets and
Epson Connect™, see the online User’s Guide.
Pour numériser depuis un appareil iOS ou ®
AndroidMC, téléchargez et installez l’application
gratuite Epson Smart Panel depuis l’App Store ®
ou Google PlayMC.
Remarque : Pour obtenir plus d’informations
concernant la conguration des présélections
et d’Epson ConnectMC, consultez le Guide de
l’utilisateur en ligne.
You can also scan from your computer with Document
Capture Pro (Windows) or Document Capture (Mac).
Windows 11/Windows 10: Click or , then search for
Document Capture Pro and select it.
Windows 8.x: Navigate to the screen and select Apps
Document Capture Pro.
Windows 7: Click > All Programs Epson Software > >
Document Capture Pro.
Mac: Applications Epson Software Document Select > >
Capture.
For more information about scanning from a computer
and creating custom scan jobs with Document Capture Pro
(Windows) or Document Capture (Mac), click the or Help ?
button in the scanner software or see online User’s Guide.
Vous pouvez aussi numériser depuis votre ordinateur avec
Document Capture Pro (Windows) ou Document Capture
(Mac).
Windows 11/Windows 10 : Cliquez sur ou , puis
eectuez une recherche de Document Capture Pro et
sélectionnez-le.
Windows 8.x : Naviguez vers l’écran et Applications
sélectionnez Document Capture Pro.
Windows 7 : Cliquez sur > Tous les programmes >
Epson Software Document Capture Pro > .
Mac : Applications Epson Software Sélectionnez > >
Document Capture.
Pour obtenir plus d’informations concernant la
numérisation depuis un ordinateur et la création de travaux
de numérisation personnalisés avec Document Capture
Pro (Windows) ou Document Capture (Mac), cliquez sur
le bouton ou dans le logiciel de numérisation ou Aide ?
consultez le en ligne.Guide de l’utilisateur
Scan from a mobile
device Numérisez depuis •
un appareil mobile
Scan from a computer •
Numérisez depuis un
ordinateur
Vériez l’icône achée sur l’écran ACL et eectuez
l’une des actions suivantes :
• Si l’icône est achée, passez à l’étape 2.
• Si l’icône est achée, déplacez le sélecteur
de position à l’arrière du scanner vers la droite et
faites basculer le scanner vers l’arrière.
Open the input tray and raise the input tray
extension.
Ouvrez le bac d’entrée et levez la rallonge du bac
d’entrée.
Load the original faceup and top edge rst, then
slide the edge guides against the original.
Chargez l’original face vers le haut et bord supérieur
en premier, puis faites glisser les guide-papier contre
l’original.
Select Computer on the LCD screen, select a job,
then press the icon to initiate the scan.Start
Sélectionnez Ordinateur sur l’écran ACL,
sélectionnez un travail, puis appuyez sur l’icône
Démarrer pour lancer la numérisation.
Specyfikacje produktu
| Marka: | Epson |
| Kategoria: | skaner |
| Model: | DS-C480W |
Potrzebujesz pomocy?
Jeśli potrzebujesz pomocy z Epson DS-C480W, zadaj pytanie poniżej, a inni użytkownicy Ci odpowiedzą
Instrukcje skaner Epson

11 Października 2024
4 Października 2024
26 Września 2024
26 Września 2024
26 Września 2024
26 Września 2024
24 Września 2024
24 Września 2024
24 Września 2024
22 Września 2024
Instrukcje skaner
- skaner Braun
- skaner Voltcraft
- skaner SilverCrest
- skaner Fujitsu
- skaner Panasonic
- skaner Canon
- skaner Nedis
- skaner Medion
- skaner Lenco
- skaner HP
- skaner Brother
- skaner Honeywell
- skaner Nikon
- skaner Kodak
- skaner Xerox
- skaner Zebra
- skaner Cobra
- skaner Trust
- skaner AgfaPhoto
- skaner Eurolite
- skaner Ricoh
- skaner Renkforce
- skaner Rollei
- skaner Uniden
- skaner Dymo
- skaner Panduit
- skaner Visioneer
- skaner ION
- skaner Maginon
- skaner Antec
- skaner Konica Minolta
- skaner Jay-Tech
- skaner Creality
- skaner Albrecht
- skaner AVerMedia
- skaner Genius
- skaner Technaxx
- skaner Martin
- skaner Blackmagic Design
- skaner Newland
- skaner Elmo
- skaner Avision
- skaner Lexmark
- skaner Agfa
- skaner Reflecta
- skaner Tevion
- skaner Targus
- skaner Sagem
- skaner Easypix
- skaner Kensington
- skaner GlobalTronics
- skaner Steren
- skaner Konig
- skaner Minolta
- skaner Veho
- skaner Dnt
- skaner Hella
- skaner Ipevo
- skaner Rittz
- skaner Jobo
- skaner Plustek
- skaner Zolid
- skaner Traveler
- skaner Mustek
- skaner Neat
- skaner RadioShack
- skaner ICarsoft
- skaner Kenko
- skaner Kogan
- skaner Yupiteru
- skaner Vupoint Solutions
- skaner DTRONIC
- skaner Ross-Tech
- skaner DENSO
- skaner Perfect Choice
- skaner IRIS
- skaner Soundsation
- skaner CDVI
- skaner Scan Dimension
- skaner Dyka
- skaner Matter And Form
- skaner Pacific Image
- skaner Doxie
- skaner CZUR
- skaner Cartrend
- skaner 3DMAKERPRO
- skaner Ambir
- skaner Microtek
Najnowsze instrukcje dla skaner

29 Marca 2025

22 Lutego 2025

19 Lutego 2025
28 Stycznia 2025
16 Stycznia 2025
12 Stycznia 2025
11 Stycznia 2025
11 Stycznia 2025
29 Grudnia 2024
22 Grudnia 2024