Instrukcja obsługi Crestron IDOC-PAD-LCA-DSWC-B-S
Crestron
podstawa/stacja dokująca
IDOC-PAD-LCA-DSWC-B-S
Przeczytaj poniżej 📖 instrukcję obsługi w języku polskim dla Crestron IDOC-PAD-LCA-DSWC-B-S (2 stron) w kategorii podstawa/stacja dokująca. Ta instrukcja była pomocna dla 17 osób i została oceniona przez 2 użytkowników na średnio 4.5 gwiazdek
Strona 1/2
DO GUIDE
DO Check the Box
QUANTITY PRODUCT COLOR PART NUMBER
1 Bit, Torx, T8 2025915
4 Screw, 6-32 x 3/4", Undercut Head, Phillips 2033247
4 Screw, M3 x 16 mm, Flat Head, Phillips 2013788
4 Screw, 4-40 x 3/4", Pan Head, Phillips 2007184
2 Screw, M3.5 x 25 mm, Flat Head, Phillips 2023756
Items for IDOC-PAD-LCA-DSWC-B-S and IDOC-PAD-LCA2-DSWC-B-S
1 Cover, Front Black 4519812
1 Plate, Mounting Black 2040499
2 Screw, 2-56 x 5/16", Pan Head, Torx Black 2040263
4 Screw, 6-32 x 1/4", Pan Head, Phillips Black 2007215
Items for IDOC-PAD-LCA-DSWC-W-S and IDOC-PAD-LCA2-DSWC-W-S
1 Cover, Front White 4519811
1 Plate, Mounting White 2039781
2 Screw, 2-56 x 5/16", Pan Head, Torx 2040264
4 Screw, 6-32 x 1/4", Pan Head, Phillips 2007213
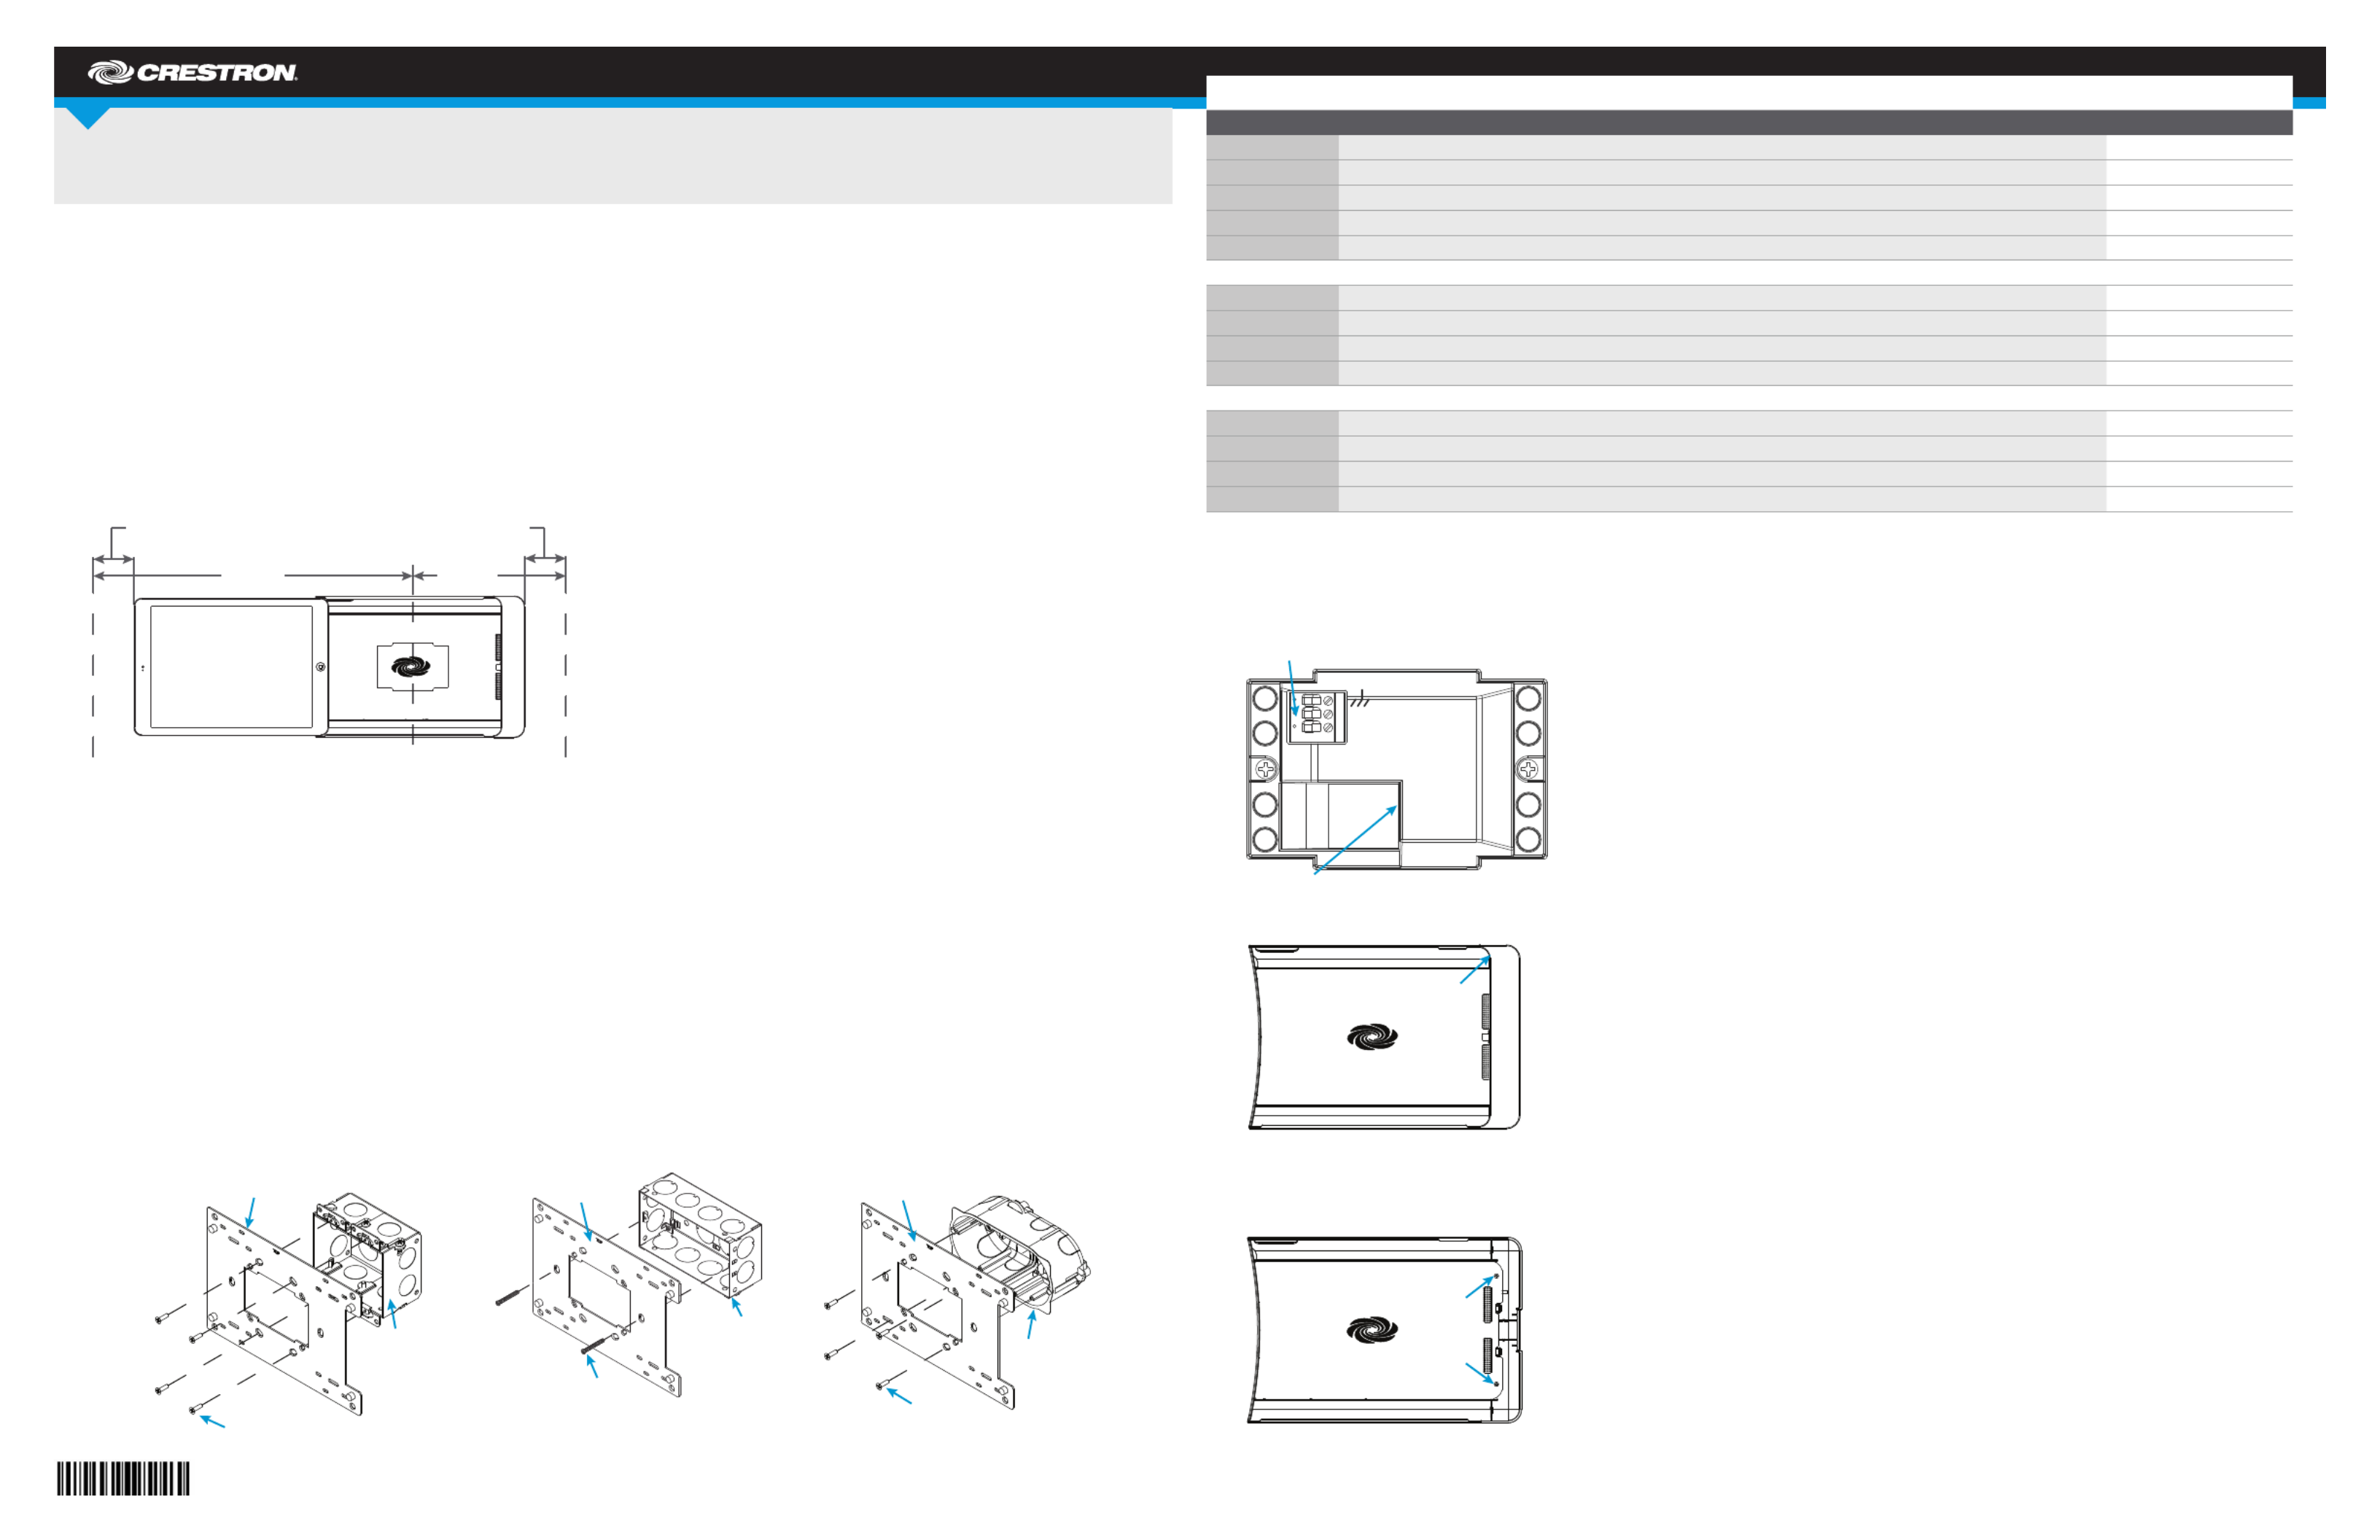
2. Connect the 24 Vdc or PoE line and earth ground to the rear of the iPanel.
NOTE: Ensure the unit is properly grounded by connecting the chassis ground terminal to an earth ground (building steel). If PoE is used, an earth
ground connection must still be made to the terminal block connector.
NOTE: The iPanel can be connected to 24 Vdc and and PoE simultaneously.
3. Lift and remove the plastic cover from the iPanel.
4. Use the Phillips screwdriver to remove the screws and washers that hold the metal plate in place, and remove the metal plate.
NOTE: If necessary, remove the cable holder.
IDOC-PAD-LCA(2)-DSWC
iPanel® Wall Dock for iPad Air® Devices
DO Install the Device
The Crestron® IDOC-PAD-LCA-DSWC and IDOC-PAD-LCA2-DSWC iPanel ® Wall Docks feature similar operation. For simplicity within this guide, the
term “iPanel” is used except where noted. Similarly, the word “iPad” is used to denote iPad Air and iPad Air
2. The iPad® is sold separately.
For the iPad Air, use the IDOC-PAD-LCA-DSWC. For the iPad Air 2, use the IDOC-PAD-LCA2-DSWC.
The Crestron iPanel installs into a standard 2-gang U.S., U.K., or European electrical box. It can also be attached directly to drywall and other surfaces
over the front of a 2-3/8" H x 3-3/8" W (60 mm H x 86 mm W) cutout. When installed, it protrudes just 1" (26 mm) from the mounting surface and secures
to its included mounting plate with included screws.
Choose a Location
To allow installation and removal of the iPad, the iPanel requires a minimum amount of clearance on both sides. When choosing an installation location,
make sure the center of the mounting location has a minimum of 7-7/16" (189 mm) clearance on the closed side of the iPanel and 15-1/2" (394 mm)
clearance on the open side of the iPanel, as shown below.
NOTE: Although the iPanel can be mounted with the opening oriented to the right, note that the iPad Air volume buttons face downward in this
conguration. This may not be optimal for the end user.
Required Tools
The following are required to install the iPanel.
• #2 Phillips screwdriver
• Torx bit (included) and driver (not included)
Install the Device into an Electrical Box
NOTE: A 24 Vdc or PoE cable should already be in the electrical box. The iPanel can use only one source for power.
1. Use the included screws to attach the mounting plate to the electrical box.
• For U.S.-style installations, use the included 06-32 x 3/4" screws.
• For U.K.-style installations, use the included 3.5 x 25 mm screws.
• For European-style installations, use the included 3 x 16 mm screws.
24 Vdc
PoE
24
G
Lift here.
Remove
screws and
washers.
Minimum Wall Distance Minimum Wall Distance
2 in
(51 mm)
2 in
(51 mm)
15-1/2 in
(394 mm)
7-7/16 in
(189 mm)
Center Box Cutout
U.S. Electrical Box
Mounting Plate
Screws (4) 6-32 X 3/4"
Screws (2) 3.5 X 25 mm
U.K. Electrical Box
Mounting Plate
European
Electrical Box
Mounting Plate
Screws (4) 3 X 16 mm

DO GUIDE DOC. 7766D (2043444) 05.16
Specications subject to change without notice.
5. Using the included 1/4" screws, attach the iPanel to the mounting plate.
6. Replace the metal plate and secure it to the iPanel using the screws and washers removed in
step 4.
NOTE: When replacing the metal plate, slide the metal plate between the cable holder’s top
prong and the bottom prongs, as shown in the following diagram.
7. Snap the plastic cover that was removed in step 3 into place.
8. (Optional) Install the antitheft lock.
a. Place the iPad in the iPanel as described in “Insert the iPad” below.
b. Slide the antitheft lock over the end of the iPad, and secure it to the iPanel using the
included Torx screws and bit, as shown in the following diagram. Do not overtighten the
Torx screws.
DO Use the Device
Insert the iPad
1. Hold the iPad horizontally (with the iPad dock connector facing into the dock), and position it so
that it rests behind the iPanel’s top and bottom retaining lips.
2. Slide the iPad into the iPanel until the cable holder pops out, as shown in the following diagram.
3. Hold the iPad in place and press the cable holder so that it is ush with the iPanel. The iPad is
now connected to the iPanel.
Remove the iPad
To remove the iPad, hold the left side of the iPad and slide it out of the iPanel.
As of the date of manufacture, the product has been tested and found to comply with specications for CE marking.
Federal Communications Commission (FCC) Compliance Statement
This device complies with part 15 of the FCC Rules. Operation is subject to the following conditions:
(1) This device may not cause harmful interference and (2) this device must accept any interference received, including interference that may cause undesired operation.
Caution: Changes or modications not expressly approved by the manufacturer responsible for compliance could void the user’s authority to operate the equipment.
Note: This equipment has been tested and found to comply with the limits for a Class B digital device, pursuant to part 15 of the FCC Rules. These limits are designed to provide reasonable protection
against harmful interference in a residential installation. This equipment generates, uses and can radiate radio frequency energy and, if not installed and used in accordance with the instructions, may
cause harmful interference to radio communications. However, there is no guarantee that interference will not occur in a particular installation.
If this equipment does cause harmful interference to radio or television reception, which can be determined by turning the equipment off and on, the user is encouraged to try to correct the interference
by one or more of the following measures:
• Reorient or relocate the receiving antenna.
• Increase the separation between the equipment and receiver.
• Connect the equipment into an outlet on a circuit different from that to which the receiver is connected.
• Consult the dealer or an experienced radio/T V technician for help.
Industry Canada (IC) Compliance Statement
CAN ICES-3(B)/NMB-3(B)
The specic patents that cover Crestron product s are listed a . The product warranty can be f ound at ht t p://www.crestron.com/legal/pat ent s www.crest ron.com/warrant y.
Cert ain Crestron products contain open source software. For specic information, please visit . www.crestron.com/opensource
Crestron, the Crestron logo, and iPanel are eit her t rademarks or registered trademarks of Crestron Electronics, Inc., in the Unit ed St ates and/or other countries. iPad, iPad Air, and Light ning are eit her t rademarks or registered trademarks of Apple, Inc. in the United Stat es and/or other countries.
Ot her t rademarks, registered trademarks, and trade names may be used in this document to refer to either the entities claiming the marks and names or their product s. Crest ron disclaims any propriet ary interest in the marks and names of ot hers. Crestron is not responsible for errors in typography
or photography.
This document was written by the Technical Publications department at Crestron.
©2016 Crestron Electronics, Inc.
DO Learn More
Visit the website for additional information and the latest rmware updates. To learn
more about this product, use a QR reader application on your mobile device to scan
the QR images.
Crestron Electronics
15 Volvo Drive, Rockleigh, NJ 07647
888.CRESTRON | www.crestron.com
Cable Holder
IDOC-PAD-LCA-DSWC
IDOC-PAD-LCA2-DSWC
Bottom
Prong
Metal
Plate
Bottom
Prong
Top
Prong
Lightning®
Connector
Screws (4) 6-32 x 1/4"
iPanel Mounting Plate
Specyfikacje produktu
| Marka: | Crestron |
| Kategoria: | podstawa/stacja dokująca |
| Model: | IDOC-PAD-LCA-DSWC-B-S |
| Kolor produktu: | Czarny |
| Wysokość produktu: | 175 mm |
| Szerokość produktu: | 258 mm |
| Głębokość produktu: | 61 mm |
| Waga produktu: | 417 g |
| Bluetooth: | Nie |
| Ilość: | 1 |
| Maksymalne zużycie mocy: | 17 W |
| Ilość portów Ethernet LAN (RJ-45): | 1 |
| HDMI: | Nie |
| Kompatybilność: | iPad Air, iPad 7 |
| Materiały: | Plastik |
| Kompatybilność marki: | Apple |
| Wyjście prądu stałego (w amperach): | 0.71 A |
| Wyjście audio: | Nie |
| Wyjście prądu stałego (w woltach): | +24V |
| Podstawowy typ urządzenia: | Tablet |
Potrzebujesz pomocy?
Jeśli potrzebujesz pomocy z Crestron IDOC-PAD-LCA-DSWC-B-S, zadaj pytanie poniżej, a inni użytkownicy Ci odpowiedzą
Instrukcje podstawa/stacja dokująca Crestron

3 Czerwca 2024
3 Czerwca 2024
3 Czerwca 2024
3 Czerwca 2024
3 Czerwca 2024
3 Czerwca 2024
Instrukcje podstawa/stacja dokująca
- podstawa/stacja dokująca Logitech
- podstawa/stacja dokująca Lenovo
- podstawa/stacja dokująca JBL
- podstawa/stacja dokująca Onkyo
- podstawa/stacja dokująca LC-Power
- podstawa/stacja dokująca Nokia
- podstawa/stacja dokująca Scott
- podstawa/stacja dokująca Bose
- podstawa/stacja dokująca Conceptronic
- podstawa/stacja dokująca StarTech.com
- podstawa/stacja dokująca Lenco
- podstawa/stacja dokująca ILive
- podstawa/stacja dokująca Blaupunkt
- podstawa/stacja dokująca Salora
- podstawa/stacja dokująca Speed-Link
- podstawa/stacja dokująca HP
- podstawa/stacja dokująca Soundmaster
- podstawa/stacja dokująca Manhattan
- podstawa/stacja dokująca Tripp Lite
- podstawa/stacja dokująca Denon
- podstawa/stacja dokująca Kenwood
- podstawa/stacja dokująca Scosche
- podstawa/stacja dokująca Icy Box
- podstawa/stacja dokująca Gembird
- podstawa/stacja dokująca Deltaco
- podstawa/stacja dokująca Trust
- podstawa/stacja dokująca Dell
- podstawa/stacja dokująca Vimar
- podstawa/stacja dokująca Renkforce
- podstawa/stacja dokująca Thomson
- podstawa/stacja dokująca Fresh 'n Rebel
- podstawa/stacja dokująca Black Box
- podstawa/stacja dokująca Pyle
- podstawa/stacja dokująca NGS
- podstawa/stacja dokująca Imperial
- podstawa/stacja dokująca I-TEC
- podstawa/stacja dokująca ION
- podstawa/stacja dokująca Harman Kardon
- podstawa/stacja dokująca SPC
- podstawa/stacja dokująca Sonoro
- podstawa/stacja dokująca AKAI
- podstawa/stacja dokująca Hama
- podstawa/stacja dokująca Marmitek
- podstawa/stacja dokująca Axagon
- podstawa/stacja dokująca Sharkoon
- podstawa/stacja dokująca Denver
- podstawa/stacja dokująca Silverstone
- podstawa/stacja dokująca Klip Xtreme
- podstawa/stacja dokująca GPX
- podstawa/stacja dokująca Havis
- podstawa/stacja dokująca Karma
- podstawa/stacja dokująca Geneva
- podstawa/stacja dokująca Mophie
- podstawa/stacja dokująca Chieftec
- podstawa/stacja dokująca Enermax
- podstawa/stacja dokująca Arctic Cooling
- podstawa/stacja dokująca Sogo
- podstawa/stacja dokująca Swissvoice
- podstawa/stacja dokująca Fenton
- podstawa/stacja dokująca Xcellon
- podstawa/stacja dokująca TrekStor
- podstawa/stacja dokująca Twelve South
- podstawa/stacja dokująca Cabasse
- podstawa/stacja dokująca ACME
- podstawa/stacja dokująca Sitecom
- podstawa/stacja dokująca Energy Sistem
- podstawa/stacja dokująca Vorago
- podstawa/stacja dokująca IHome
- podstawa/stacja dokująca Satechi
- podstawa/stacja dokująca Orava
- podstawa/stacja dokująca Gamber-Johnson
- podstawa/stacja dokująca Leotec
- podstawa/stacja dokująca Defender
Najnowsze instrukcje dla podstawa/stacja dokująca
28 Września 2024
28 Września 2024
24 Września 2024
24 Września 2024
24 Września 2024
20 Września 2024
20 Września 2024
20 Września 2024
20 Września 2024
20 Września 2024