Instrukcja obsługi Bushnell BackTrack Mini GPS
Bushnell
urządzenie GPS
BackTrack Mini GPS
Przeczytaj poniżej 📖 instrukcję obsługi w języku polskim dla Bushnell BackTrack Mini GPS (65 stron) w kategorii urządzenie GPS. Ta instrukcja była pomocna dla 12 osób i została oceniona przez 2 użytkowników na średnio 4.5 gwiazdek
Strona 1/65

RECO R D YO U R T R ACK FI N D YOU R WAY B ACK
B
C
Model#: GPSBTM
SIMPLE NAVIGATION

2
TABLE OF CONTENTS PAGE #
Control and Display Guide..............................................................................................................2
Basic Set Up & Settings....................................................................................................................3
Waypoints............................................................................................................................3
Trips: Starting, Recording & Using Waypoints............................................................................4
Compass Calibration.........................................................................................................................4
Alternate Calibration.........................................................................................................................4
Connecting to the Bushnell Connect App...................................................................................5
Navigating the Bushnell Connect Home Screen........................................................................5
Bushnell Connect Library: Trips & Waypoints..............................................................................6
Send & Share Trips & Waypoints with the Bushnell Connect App...........................................7
My Prole............................................................................................................................................7
Warranty.....................................................................................................................................8
Warnings & Notices...........................................................................................................................9
Control & Display Guide
1. Power Button
2. Select & Menu Button
3. Toggle Up Button/Backlight
4. Toggle Down Button
5. Internal Data available
6. Date
7. Local Time
8. Temperature
9. Battery Level Indicator
10. Satellite Strength
11. USB Port
BACK VIEW
11
13
24
9
6
7
8
10
5
BUSHNELL CONNECT APP
Scan the QR code to Download the Bushnell Connect App
to your Android/iPhone to:
– Save trips and waypoints
– Share favorite trips and waypoints
– See trips and waypoints on detailed maps

3
BASIC SETUP & SETTINGS
• Fully charge the BackTrack Mini before use. Plug the provided charging cable and charge the unit from any USB port.
• Go outdoors. Press and hold POWER (1) until the display comes on. Wait for the GPS satellite to connect (10)
(Fig. 1). The percentage indicates the strength of the satellite signal. After the first power-up in a new area, it may take
a few minutes to find the satellite signal. *It is recommended to turn off the unit when going indoors. The unit will
continue searching for a satellite and consume the battery faster than normal.
• Press and hold the SELECT (2) button for 3 seconds to access the menu. (Fig. 2)
• Select SETTINGS to adjust the Time, Units, Backlight, Reset, FW Upgrade, and About. Press SELECT (1) to choose
which option you wish to make changes.
Time: 1) Format: 12 HOUR or 24 HOUR
2) Daylight Saving: OFF or ON
3) Time Zone: Press the Toggle Up/Down buttons to choose your time zone preference and time
display format. Press Select to confirm.
Unit: 1) Unit: English (Ft., MPH) or Metric (M., KPH)
2) Temperature: °F or °C
3) Coordinates: DMS (Degrees, Minutes, Seconds), DMM (Degrees, Decimal Minutes), or DD (Degrees)
Timer: 1) Frequency - Off, Daily, Weekday, Weekend
2) Time - Set timer by selecting Hour, Minutes and AM/PM
* Note: timer does not vibrate or audio sound.
Backlight: 1) Period - 15 sec., 30 sec., 60 sec., 90 sec.
2) Brightness - Low, Medium, High
* Note: the longer the backlight stays on, the more battery the backlight will consume.
Reset: Do Factory Reset? Yes or No
FW Upgrade: See full instructions on Page 7.
About: Firmware version, FCC ID, and IC ID
WAYPOINTS - Waypoints are locations you record and store or upload to the device. Waypoints can
mark where you are, where you are going, or where you have been.
• While in the Settings menu, select WAYPOINTS. Before creating a new Waypoint, check that the GPS signal is fixed
and not flashing. If the satellite icon is flashing, the GPS signal is not active.
• The BackTrack Mini will not save a new Waypoint if there is insufficient internal memory. The user will need to release
enough memory space to create a Waypoint. (Fig. 3) We suggest synchronizing with the Bushnell Connect app and
saving the trips and waypoints, then removing trips and waypoints off of the BackTrack Mini.
• On the Create screen, select one of 18 Location icons (Fig. 4. While standing at the location you want to mark, press
the Toggle Down button (4) to highlight and select MARK (Fig. 5) to save the position in the BackTrack Mini’s memory.
• Waypoint name: Waypoint - Date - Time “WP092121-1429” Waypoint September 21, 2021 - 12:29pm
• To return to the location you marked, press the Power button (1) to return to the home screen. Press the Select key (2)
to see your current location’s Elevation, Pressure, Sunrise, Sunset, Moonrise, and Moonset from the home screen. (Fig. 6)
• From the Elevation screen, press the Toggle Up or Down buttons to see the Hunt/Fish Times. (Fig. 7)
• Press Select (2) to view the Compass screen (Fig. 8), displaying the Latitude and Longitude of your current location,
and a Digital Compass Display (Fig. 9) including your heading (direction of travel) in degrees.
• Once the Waypoint is created, go back to Waypoints in the Settings menu and choose
View All (Fig. 10). Waypoint order is by the time waypoint is created (i.e., its default filename).
The latest Waypoint is on top, and the oldest is on the bottom. Choose a Waypoint to edit the
usage of that specific Waypoint. (Fig. 11)
- Show: Waypoint is visible and available to be added to a Trip.
- Hide: Waypoint is saved but not visible and cannot be added.
- Delete: Permanently delete the Waypoint from the unit.
Fig. 1
Fig. 10
2:22P WAYPOINT
CREATE
VIEW ALL
2:22P MENU
SETTINGS
WAYPOINTS
TRIPS
CONNECTION
COMP CALIBR
ALT CALIBR
Fig. 2
Fig. 3
Fig. 4 Icons
Waypoint Saving Shortcut:
Standing at the location you want to mark, press the Select ( ) and Toggle Down ( ) at the same time. 2 4
Press Select (2) to conrm the save.
Fig. 5
Fig. 6 Fig. 7 Fig. 8 Fig. 9
(1)
* When the device is
close to the Waypoint,
within 10 meters, the
system will show a
gure (Fig.12) to let
the user know they
have arrived at the
Waypoint.
Fig. 11
Fig. 12
(1)
Home Flag Hills Car
Trail
head Fence Fish Tree
Stand
Back
Pack Camp Bird
Crossing
Tracks River
Meadow
Tree
Forest Deer

4
TRIPS - STARTING, RECORDING & USING WAYPOINTS
• While in the Settings menu, select TRIP. Before creating a new Trip, check the GPS signal is fixed and not flashing. If the
satellite icon is flashing, the GPS signal is not active. (10)
• The BackTrack Mini will not save a new Trip if there is not enough internal memory. The user will need to release
enough memory space to create a Trip. (Fig. 3) We suggest synchronizing with the Bushnell Connect app and saving
the trips and waypoints.
• On the Create screen, select START TRIP (Fig. 14) to create a Trip from one Waypoint to another you have linked and are
in the range of your current location. If “NO WAYPOINT” is shown, there are no saved Waypoints available. You will see
point coordinates, elevation, and temperature on this screen. The Trip with linked Waypoints will appear.
• Pressing the Toggle Down (4) button will show the Digital Compass Display for each linked Waypoint.
• When you have completed your Trip, go to the Settings Menu/Trips and choose STOP TRIP. To access the Trip to restart,
go back to TRIPS and choose VIEW ALL.
• Maximum log time for a single trip is 50 hours. If memory for a single trip is full (over 50 hrs) during trip recording, the
system will log to the last point. Then, the system will pop up a message (Fig. 3) to stop and save a trip. Battery life can
last up to 35 hours under normal GPS operation. Note: The user may need to charge the unit a few times during a long
trip. *During a long journey of 50 hours, the user should create multiple trips. For example, 2 - 25 hour trips or 3 - 16
hour trips.
COMPASS CALIBRATION (COMP CALIBR)
• It is recommended to calibrate the compass before each use, especially after a long drive or plane flight.
• To ensure directional accuracy, hold the BackTrack Mini out in front of you, with the display facing up in the palm of
your hand and move it in a “Figure 8” pattern a few times to re-calibrate the compass.
• We recommend holding the BackTrack Mini in a horizontal position (not tilted) during use when using on a trip.
• When the calibration is successful, a “Calibration Complete” note will appear.
* Note magnets affect the compass and keep away from the device when calibrating or using the compass
ALTERNATE CALIBRATION (ALT CALIBR)
• If you wish to enter your current altitude manually, you may enter it through the Alternate Calibration option in the
menu. Press Select (2) to scroll through each field and use the Toggle Up or Down buttons (3 & 4) to set the altitude.
When finished, a pop-up noting “Altitude Saved!” will appear.
Fig. 14
Fig. 15
True North Current GPS
Coordinates
1st Waypoint
Scan the QR code to download the Bushnell
Connect App to your Android or iPhone.
BUSHNELL CONNECT APP
The screen will go off
after ve minutes of
inactivity. Press any
button to turn screen on.
Screen Inactivity

5
CONNECTING AND USING THE BUSHNELL® CONNECT APP
1. Download the Bushnell Connect app. Please create an account and set up a password if you have not already. Accept
the terms and conditions. If you opt-in to receive marketing and company information, you will receive discounts and
the latest information on Bushnell products.
2. Put the BackTrack Mini in Bluetooth mode. Press and hold the SELECT button on the unit’s left to access the menu.
Choose CONNECTION > TO PHONE to connect the BackTrack Mini to a smartphone or portable Bluetooth device.
Choose CONNECTION > TO PC to connect the BackTrack Mini to a computer.
• Phone: Open the menu on your smartphone that shows all available Bluetooth devices and chooses BackTrack
Mini when available.
• Computer: To connect to your computer, plug in the USB cable provided for charging into your computer or
laptop. This action will allow your computer to read the BackTrack Mini as an external drive. In addition, you will be
able to save Waypoints and Trips to your computer to open memory space on your BackTrack Mini.
* Most Bluetooth devices provide an auto connection to the smartphone app. However, to maximize battery life and ensure
you have plenty of hours to use the GPS, the BackTrack Mini does not auto-connect. Instead, the connection must be set up
by going into the BackTrack Mini settings, the connection menu, and the phone.
3. Go into the Bushnell Connect app and connect the device by selecting the plus sign button below the picture of the
device. After the BackTrack Mini is connected, it will need to be given a name in your list of devices in Bushnell
Connect. Do this on the Device Detail screen.
4. Additional BackTracks or other Bushnell devices can be added or deleted. Connect or disconnect
your device from Bluetooth from this screen. To go to the main page for the BackTrack Mini, press
on the picture of the device.
Navigating the Bushnell Connect Home Screen
• If the BackTrack Mini has not been used, the Home Screen will not have Trip Data. Trip Data
shown is from previous trips that have been synced from the BackTrack Mini with a GPS
connection.
• The Temperature, Elevation, and Pressure data are shown for the current position. These sensors
do not require a GPS signal, and the data acquired is within the BackTrack Mini’s software.
• To sync the data in the BackTrack Mini to the app, be sure the Bluetooth connection is active
between the BackTrack Mini and the app. Press UPDATE/SYNC DEVICE DATA. The trips,
waypoints, and details of the last recorded trip with be available to review in the app.
• To remove all trip and waypoint data from previous trips from the BackTrack Mini, choose this
screen. As long as the device’s data has been synced with the app, the data will remain stored in
the app’s Library.
• The BackTrack Mini is now synced with the Bushnell Connect app. Trip
data can be stored on the device or, if memory space is needed,
remove it to free up space for your next adventure. Once data is
removed from the device, the data will be stored on the app. If you
delete data from the app, it will be permanently deleted.
2:22P CONNECTION
TO PHONE
TO PC
7
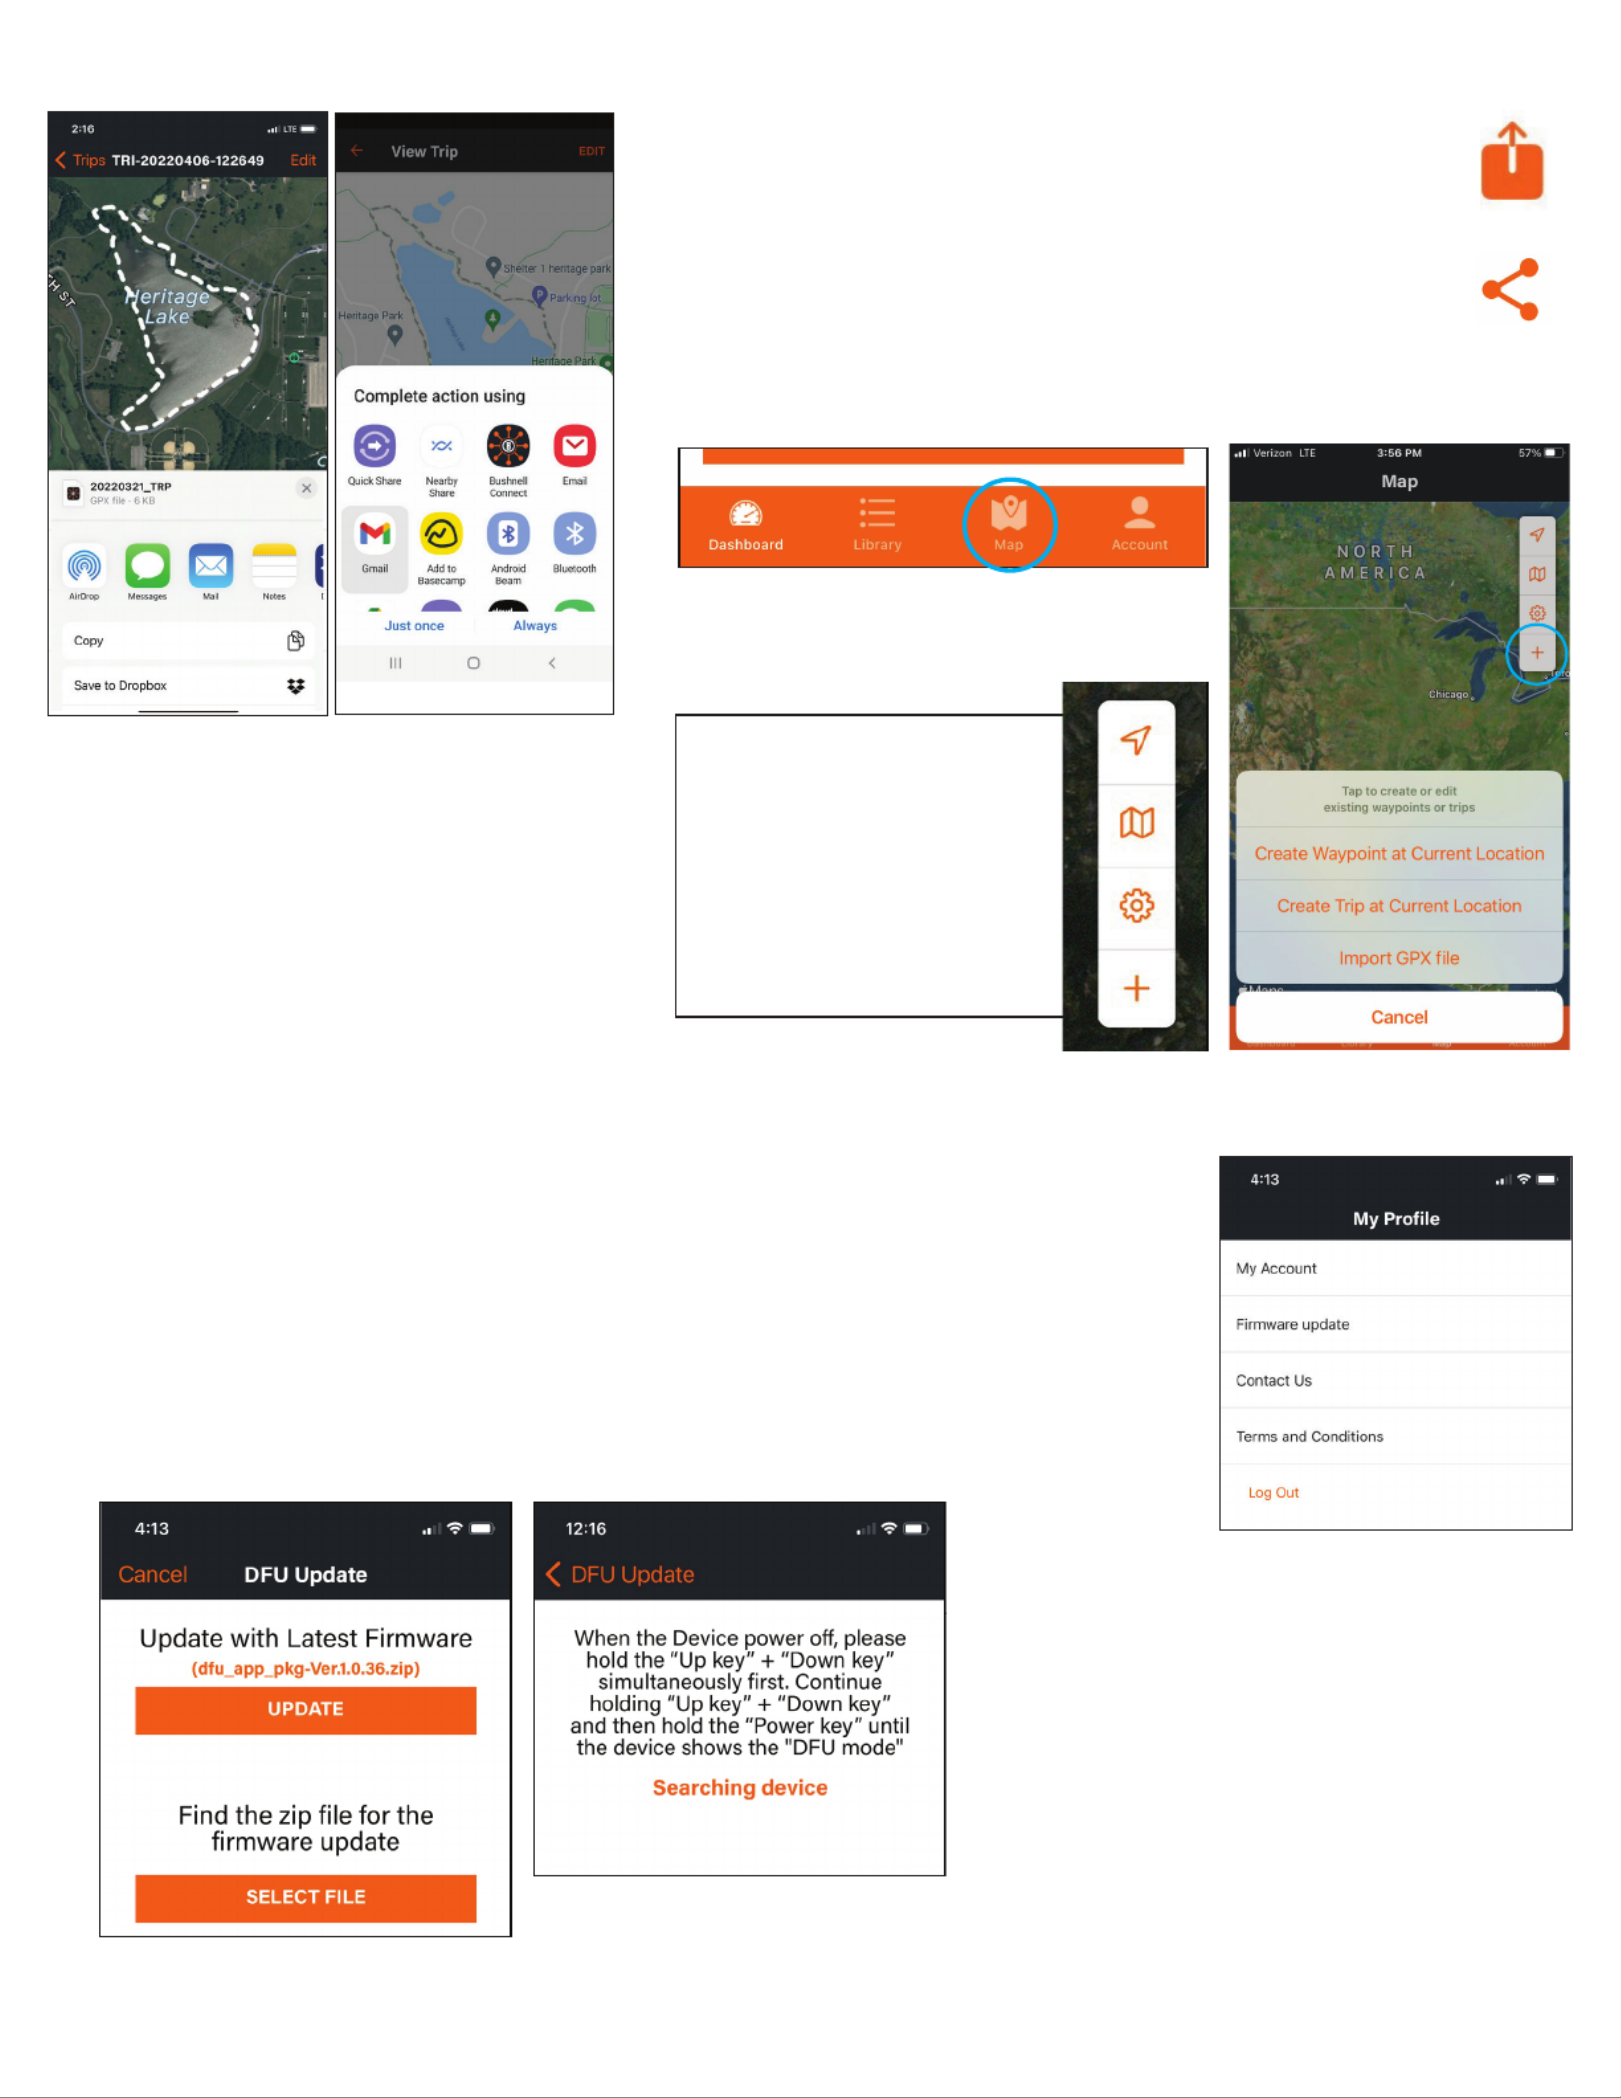
Send and Share Trips & Waypoints within Bushnell Connect App.
While in the library, select the trip you want to share. To the right of the trip
name, you will see a share button; select that button. Now you can share via
email or text message.
When receiving the trip via email or text by phone, download the GPX file to
your file folder like the download folder. Import the file by going to the map
menu, selecting the plus button, then selecting the import GPX file. Explore
where you saved the GPX file sent and save it to your trip library.
My Profile
My Account: Access your account settings by pressing My Account on the Profile screen. Users can opt-in to
receive promotions, product updates or delete their account.
Firmware Update: To update firmware, please follow the steps below.
1. Turn off BackTrack Mini.
2. Place BackTrack Mini in DFU mode: While pressing the Up and Down buttons simultaneously, push
and hold down the Power button until the device turns into DFU mode, approximately three seconds.
3. Select Update.
4. The app will scan for the device and connect and update the Firmware.
MAP ICONS:
Arrow: current location
Map: changes from satellite to street
map
Settings: map settings coordinates,
miles/km
Plus: initiates the creation of trip,
waypoint, or import GPX file
iOS Share Screen Android Share Screen
iOS Share
Button
Android Share
Button

9
Warnings and Notices
GPS System & Location Accuracy Notice:
The Global Positioning System (GPS) is operated by the government of the United States, which is solely responsible for its accuracy and maintenance. The
system is subject to changes which could affect the accuracy and performance of all GPS equipment. The inherent nature of the GPS system itself limits the
accuracy of the distance indicated on the unit’s display to within about ±3~5 meters (or yards) of the actual marked location.
Warning:
This device is intended as a supplemental handheld navigation aide only. The user assumes all responsibility associated with the use of this product. It must not
be used for any purpose requiring precise measurement of location, direction, distance, velocity or topography. This device should not be used for any aircraft
navigation applications.
Operating Temperature:
This device’s operating temperature range is -10 deg to 45 deg Celsius. The device may malfunction if it is not within the temperature range.
Vehicular Use Notice:
Bushnell is committed to the safe and responsible enjoyment of the outdoors.
Do not use this product while driving. An accident can result in property damage, injury or death if the operator fails to practice prudent driving practices. It is the
sole responsibility of the driver of any vehicle to operate the motor vehicle in a safe manner. Information from the GPS unit can distract the operator of a motor
vehicle. It is unsafe to operate the controls of the GPS unit while operating a motor vehicle. If used in a motor vehicle, it must not be used by the operator of the
motor vehicle. If it is used in a motor vehicle it must be mounted in a manner such that it does not distract the operator, does not interfere with the operator’s
eld of view, and does not block or interfere with the air bags or other safety mechanisms of the motor vehicle. Windshields and car windows with integrated
metallic materials, such as defrosters, or car window tinting lms, can degrade GPS reception inside a car.
Liability Notice:
In no event shall Bushnell be liable for any incidental, special, indirect or consequential damages, whether resulting from the use, misuse, or inability to use this
product or from defects in the product.
Some states do not allow the exclusion of incidental or consequential damages, so the above limitations may not apply to you.
Disposal of Electric and Electronic Equipment
(Applicable in the EU and other European countries with separate collection systems)
This equipment contains electric and/or electronic parts and must therefore not be disposed of as normal household waste.
Instead, it should be disposed at the respective collection points for recycling provided by the communities. For you, this is
free of charge.
If the equipment contains exchangeable (rechargeable) batteries, these too must be removed before and, if necessary, in turn
be disposed of according to the relevant regulations (see also the respective comments in this unit’s instructions).
Further information about the subject is available at your community administration, your local waste collection company, or
in the store where you purchased this equipment.
FCC ID: 2ASQI-GPSBTM
IC ID : 24886-GPSBTM
Industry Canada Statement :
This device complies with ISED’s license-exempt RSSs. Operation is subject to the following two conditions: (1) This device may not cause harmful interference,
and (2) this device must accept any interference received, including interference that may cause undesired operation.
Le présent appareil est conforme aux CNR d’ ISED applicables aux appareils radio exempts de licence. L’exploitation est autorisée aux deux conditions suivantes:
(1) le dispositif ne doit pas produire de brouillage préjudiciable, et (2) ce dispositif doit accepter tout brouillage reçu, y compris un brouillage susceptible de
provoquer un fonctionnement indésirable.
Radiation Exposure Statement / Déclaration d’exposition aux radiations :
This device complies with the Industry Canada portable RF exposure limit set forth for an uncontrolled environment and is safe for the intended operation as
described in this manual. Further RF exposure reduction can be achieved if the product can be kept as far as possible from the user’s body or if the device is
set to a lower output power if such function is available.
Le produit est conforme aux limites d’exposition pour les appareils portables RF pour les Etats-Unis et le Canada établies pour un environnement non contrôlé.
Le produit est sûr pour un fonctionnement tel que décrit dans ce manuel. La réduction aux expositions RF peut être augmentée si l’appareil peut être conservé
aussi loin que possible du corps de l’utilisateur ou que le dispositif est réglé sur la puissance de sortie la plus faible si une telle fonction est disponible.
FCC Statement
This device complies with part 15 of the FCC Rules. Operation is subject to the following two conditions: (1) This device may not cause harmful interference, and
(2) this device must accept any interference received, including interference that may cause undesired operation.
This equipment has been tested and found to comply with the limits for a Class B digital device, pursuant to Part 15 of the FCC Rules. These limits are designed to
provide reasonable protection against harmful interference in a residential installation. This equipment generates, uses and can radiate radio frequency energy
and, if not installed and used in accordance with the instructions, may cause harmful interference to radio communications. However, there is no guarantee that
interference will not occur in a particular installation. If this equipment does cause harmful interference to radio or television reception, which can be determined
by turning the equipment off and on, the user is encouraged to try to correct the interference by one or more of the following measures:
• Reorient or relocate the receiving antenna.
• Increase the separation between the equipment and receiver.
• Connect the equipment into an outlet on a circuit different from that to which the receiver is connected.
• Consult the dealer or an experienced radio/TV technician for help.
Shielded interface cable must be used with the equipment in order to comply with the limits for a digital device pursuant to Subpart B of Part 15 of FCC Rules.
Specications and designs are subject to change without any notice or obligation on the part of the manufacturer.

11
CONFIGURATION ET RÉGLAGES DE BASE
• Chargez entièrement le BackTrack Mini avant utilisation. Branchez le câble de charge fourni et chargez l’unité depuis n’importe quel port USB.
• Allez à l’extérieur. Maintenez enfoncée la touche POWER (marche/arrêt) (1) jusqu’à ce que l’écran s’allume. Attendez que la connexion du
satellite GPS (10) (Fig. 1). Le pourcentage indique la force du signal satellite. La recherche du signal satellite peut prendre quelques minutes
après la première mise sous tension dans une nouvelle zone. *Il est recommandé d’éteindre l’appareil en intérieur. L’appareil continuerait à
rechercher un signal satellite et épuiserait la batterie plus rapidement qu’à l’ordinaire. Appuyez sur le bouton SELECT (sélection) (2) et
maintenez-le enfoncé pendant 3 secondes pour accéder au menu. (Fig. 2)
• Sélectionnez SETTINGS (Paramètres) pour régler l’heure, les unités, le rétroéclairage, la réinitialisation, la mise à niveau du micrologiciel et la
section « À propos de ». Appuyez sur SELECT (sélection) (1) pour choisir l’option que vous souhaitez modier.
Heure: 1) Format : 12 HEURES ou 24 HEURES
2) Heure d’été : ACTIVÉE ou DÉSACTIVÉE
3) Fuseau horaire : Appuyez sur les boutons Toggle Up/Down (bascule haut/bas) pour choisir le fuseau horaire et format
d’afchage de l’heure souhaités. Appuyez sur Select (Sélection) pour conrmer.
Unités: 1) Unités : Anglo-saxonnes (ft, mph) ou métriques (m, kph)
2) Température : °F ou °C
3) Coordonnées : DMS (degrés, minutes, secondes), DMM (degrés, minutes décimales) ou DD (degrés)
Minuteur: 1) Fréquence - Désactivé, quotidien, jour de la semaine, week-end
2) Heure - Congurez le minuteur en sélectionnant l’heure, les minutes et matin/après-midi
* Remarque : le minuteur ne vibre pas et n’émet pas de son.
Rétroéclairage: 1) Période - 15 s, 30 s, 60 s, 90 s
2) Luminosité - basse, moyenne, élevée
* Remarque : plus le rétroéclairage est utilisé, plus il consomme de batterie.
Réinitialiser : Effectuer une réinitialisation d’usine ? Oui ou non
Mise à niveau du micrologiciel : Voir les instructions complètes à la page 7.
À propos : Version du micrologiciel, FCC ID et IC ID
POINTS DE CHEMINEMENT
- les points de cheminement sont des lieux que vous enregistrez et stockez ou importez
dans l’appareil. Les points de cheminement marquent le lieu où vous vous trouvez, où vous allez ou d’où vous venez.
• Depuis le menu Settings (Paramètres), sélectionnez WAYPOINTS (points de cheminement). Avant de créer un nouveau point de cheminement,
vérifiez que le signal de GPS est fixe et ne clignote pas. Si l’icône satellite clignote, le signal GPS n’est pas actif.
•
Le BackTrack Mini n’enregistrera pas de nouveau point de cheminement si la mémoire interne est insufsante. L’utilisateur doit libérer assez
d’espace mémoire pour créer un point de cheminement. (Fog. 3) Nous suggérons d’effectuer une synchronisation avec l’application Bushnell
Connect et d’enregistrer les itinéraires et points de cheminement, puis de supprimer les itinéraires et points de cheminement sur le BackTrack Mini.
• Sur l’écran Create (créer), sélectionnez l’une des 18 icônes de lieu (Fig. 4). Lorsque vous vous trouvez sur le lieu que vous souhaitez marquer,
appuyez sur le bouton Toggle Down (bascule bas) (4) pour le mettre en surbrillance et sélectionnez MARK (marquer) (Fig. 5) pour enregistrer la
position dans la mémoire du BackTrack Mini.
• Nom du point de cheminement : Point de cheminement - Date - Heure Point de cheminement « WP092121-1429 » 21 septembre 2021 - 0h29
• Pour revenir au lieu que vous avez marqué, appuyez sur le bouton Power (marche/arrêt) (1) et vous reviendrez à l’écran d’accueil. Depuis
l’écran d’accueil, appuyez sur la touche Select (sélection) (2) pour voir l’altitude, la pression, le lever, le coucher du soleil, le lever et le coucher
de la lune de votre position actuelle. (Fig. 6)
• Depuis l’écran Elevation (altitude), appuyez sur les boutons Toggle Up/Down (Bascule haut/bas) pour voir les heures de chasse/pêche. (Fig. 7)
• Appuyez sur Select (sélection) (2) pour consulter l’écran Boussole (Fig. 8), afchant la latitude et la longitude de votre position actuelle, et une
boussole numérique (Fig. 9), indiquant votre cap (sens de déplacement) en degrés.
• Une fois le point de cheminement créé, revenez aux points de cheminement dans le menu Settings (Paramètres) et
choisissez View All (voir tout) (Fig. 10). L’ordre des points de cheminement se base sur leur heure de création
(correspondant à leur nom de chier). Le point de cheminement le plus récent se trouve tout en haut, le plus ancien
tout en bas. Choisissez un point de cheminement pour modier l’utilisation de ce point de cheminement spécique.
(Fig. 11)
- Afcher : Le point de cheminement est visible et disponible à être ajouté à un itinéraire.
- Masquer : Le point de cheminement est enregistré mais n’est pas visible et ne peut pas être ajouté.
- Supprimer : Suppression dénitive du point de cheminement de l’appareil.
Fig. 1
Fig. 10
2:22P WAYPOINT
CREATE
VIEW ALL
2:22P MENU
SETTINGS
WAYPOINTS
TRIPS
CONNECTION
COMP CALIBR
ALT CALIBR
Fig. 2
Fig. 3
Fig. 4 Icons
Raccourci d’enregistrement du point de cheminement :
Lorsque vous vous trouvez sur le lieu que vous souhaitez marquer, appuyez sur les boutons Select (sélection) (2) et
Toggle Down (bascule bas) (4) en même temps. Appuyez sur Select (sélection) (2) pour conrmer l’enregistrement.
Fig. 5
Fig. 6 Fig. 7 Fig. 8 Fig. 9
(1)
*Lorsque l’appareil
est proche du point
de cheminement, à
moins de 10 mètres,
le système afche une
gure (Fig.12) indiquant
à l’utilisateur qu’il est
arrivé au point de
cheminement.
Fig. 11
Fig. 12
(1)
Home Flag Hills Car
Trail
head Fence Fish Tree
Stand
Back
Pack Camp Bird
Crossing
Tracks River
Meadow
Tree
Forest Deer

12
ITINÉRAIRES - DÉMARRAGE, ENREGISTREMENT ET UTILISATION DES POINTS DE CHEMINEMENT
• Depuis le menu Settings (Paramètres), sélectionnez TRIP (itinéraire). Avant de créer un nouvel itinéraire, vériez que le signal GPS est
xe et ne clignote pas. Si l’icône satellite clignote, le signal GPS n’est pas actif. (10)
• Le BackTrack Mini n’enregistrera pas de nouvel itinéraire si la mémoire interne est insufsante. L’utilisateur doit libérer assez
d’espace mémoire pour créer un itinéraire. (Fig. 3) Nous suggérons d’effectuer une synchronisation avec l’application Bushnell
Connect et d’enregistrer les itinéraires et points de cheminement.
• Depuis l’écran Create (créer), sélectionnez START TRIP (démarrer l’itinéraire) (Fig. 14) pour créer un itinéraire depuis un point de
cheminement à un autre que vous avez associé et qui se trouve à portée de votre position. Si la mention « NO WAYPOINT » (aucun
point de cheminement) s’afche, aucun point de cheminement enregistré n’est disponible. Cet écran afche les coordonnées,
l’altitude, et la température du point. L’itinéraire comprenant les points de cheminement associés s’afche alors.
• Appuyez sur le bouton Toggle Down (bascule bas) (4) pour afcher l’écran Boussole numérique pour chaque point de cheminement
associé.
• Lorsque vous avez terminé votre itinéraire, accédez à Settings Menu/Trips (Menu paramètres/Itinéraires) et choisissez STOP TRIP
(interrompre l’itinéraire). Pour accéder à l’itinéraire à recommencer, revenez à TRIPS (itinéraires) et choisissez VIEW ALL (voir tout).
• La durée d’enregistrement maximale pour un seul itinéraire est de 50 heures. Si la mémoire pour un itinéraire simple est pleine
(plus de 50 heures) pendant l’enregistrement d’un itinéraire, le système enregistre jusqu’au dernier point. Ensuite, le système afche
un message (Fig. 3) invitant à interrompre et enregistrer un itinéraire. La batterie a une autonomie pouvant aller jusqu’à 35 heures
lors d’un fonctionnement GPS normal. Remarque : L’utilisateur peut devoir charger l’appareil plusieurs fois pendant un itinéraire de
longue durée. *Si l’itinéraire est long (plus de 50 heures), l’utilisateur doit créer plusieurs itinéraires. Par exemple, 2 itinéraires de
25 heures ou 3 itinéraires de 16 heures.
CALIBRAGE DE LA BOUSSOLE (COMP CALIBR)
•
Il est recommandé de calibrer la boussole avant chaque utilisation, en particulier après une longue période de conduite ou un long vol.
• Pour garantir une précision directionnelle, tenez le BackTrack Mini devant vous, écran vers le haut, dans la paume de votre main et
déplacez-le en effectuant des mouvements en forme de « 8 » plusieurs fois an de recalibrer la boussole.
• Nous recommandons de tenir le BackTrack Mini en position horizontale (non inclinée) pendant l’utilisation au cours d’un itinéraire.
• Une fois le calibrage effectué, le message « Calibration Complete » (calibrage effectué) apparaît.
*Veuillez noter que les aimants ont un impact sur la boussole ; nous vous recommandons de les tenir à l’écart de l’appareil lors du
calibrage ou de l’utilisation de la boussole
CALIBRAGE ALTERNATIF (ALT CALIBR)
• Si vous souhaitez saisir votre altitude en cours manuellement, vous pouvez la saisir via l’option Alternate
Calibration (calibrage alternatif) dans le menu. Appuyez sur Select (sélection) (2) pour faire déler chaque champ
et utilisez les boutons Toggle Up/Down (bascule haut/bas) (3 & 4) pour dénir l’altitude. Une fois cette opération
effectuée, une fenêtre contextuelle « Altitude Saved » (altitude enregistrée) apparaît.
Fig. 14
Fig. 15
Nord géographique Coordonnées GPS
en cours
1er point de
cheminement
Scannez le QR code pour télécharger l’application
Bushnell Connect sur votre téléphone Android/iPhone.
L’écran s’éteint après
cinq minutes d’inactivité.
Appuyez sur n’importe quel
bouton pour le réactiver.
Inactivité de l’écran
APPLICATION BUSHNELL CONNECT

13
CONNEXION ET UTILISATION DE L’APPLICATION BUSHNELL® CONNECT
1. Téléchargez l’application Bushnell Connect. Créez un compte et dénissez un mot de passe si vous ne l’avez pas
déjà fait. Acceptez les conditions d’utilisation. Si vous acceptez de recevoir des informations commerciales et sur
l’entreprise, vous recevrez les offres et l’actualité la plus récente des produits Bushnell.
2. Placez le BackTrack Mini en mode Bluetooth. Appuyez et maintenez le bouton SELECT (sélection) à gauche
de l’appareil pour accéder au menu. Choisissez CONNECTION > TO PHONE (connexion > vers le téléphone)
pour connecter le BackTrack Mini à un smartphone ou appareil portatif Bluetooth. Choisissez CONNECTION >
TO PC (connexion > vers le PC) pour connecter le BackTrack Mini à un ordinateur.
• Téléphone : Ouvrez sur votre smartphone le menu afchant tous les appareils Bluetooth disponibles et
choisissez BackTrack Mini lorsqu’il est disponible.
• Ordinateur : Pour vous connecter à votre ordinateur, branchez le câble USB fourni pour la charge à votre
ordinateur ou ordinateur portable. Cette action permettra à votre ordinateur de lire le BackTrack Mini comme
un lecteur externe. En outre, les points de cheminement et itinéraires pourront être sauvegardés sur votre
ordinateur, ce qui libérera de l’espace mémoire sur votre BackTrack Mini.
*La plupart des appareils Bluetooth offrent une connexion automatique à l’application smartphone. Cependant,
an de maximiser l’autonomie de la batterie et vous assurer de disposer de nombreuses heures d’utilisation
du GPS, le BackTrack Mini ne s’y connecte pas automatiquement. La connexion doit donc s’effectuer depuis les
Paramètres du BackTrack Mini, puis « menu connexion » et enn « téléphone ».
3. Ouvrez l’application Bushnell Connect et connectez l’appareil en choisissant le bouton « plus » sous l’image de
l’appareil. Une fois le BackTrack Mini connecté, un nom doit lui être attribué depuis votre liste d’appareil sur
Bushnell Connect. Effectuez cette opération depuis l’écran Device Detail (détails de l’appareil).
4. Il est possible d’ajouter ou de supprimer d’autres BackTracks ou appareils Bushnell. Activez ou
désactivez le Bluetooth de votre appareil depuis cet écran. Pour accéder à la page principale
du BackTrack Mini, appuyez sur l’image de l’appareil.
Navigation sur l’écran d’accueil de l’application Bushnell Connect
• Lors de la première utilisation du BackTrack, l’écran d’accueil n’afche aucune donnée
d’itinéraire. Les données d’itinéraire afchés proviennent d’itinéraires précédents ayant été
synchronisés depuis le BackTrack Mini via une connexion GPS.
• Les données de température, altitude, et pression sont afchées pour la position actuelle. Ces
capteurs ne nécessitent d’aucun signal GPS et les données acquises sont intégrées au logiciel
du BackTrack Mini.
• Pour synchroniser les données du BackTrack Mini dans l’application, assurez-vous qu’une
connexion Bluetooth est active entre le BackTrack Mini et l’application. Appuyez sur UPDATE/
SYNC DEVICE DATA (mettre à jour/synchroniser les données de l’appareil). Les itinéraires,
points de cheminement et détails du dernier itinéraire enregistré sont alors consultables dans
l’application.
• Pour supprimer sur le BackTrack Mini toutes les données d’itinéraire et points de cheminement
de précédents itinéraires, sélectionnez cet écran. Si les données de l’appareil ont été
synchronisées avec l’application, celles-ci resteront stockées dans la bibliothèque de
l’application.
• Le BackTrack Mini est à présent synchronisé avec l’application
Bushnell Connect. Les données d’itinéraires peuvent être stockées
sur l’appareil ou, si vous avez besoin de plus de mémoire, supprimées
pour libérer de l’espace pour votre prochaine aventure. Une fois les
données supprimées de l’appareil, elles sont stockées dans
l’application. La suppression des données dans l’application entraîne
leur perte dénitive.
2:22P CONNECTION
TO PHONE
TO PC

15
Envoyez et partagez des itinéraires et points de cheminement via l’application Bushnell Connect
Depuis la bibliothèque, sélectionnez l’itinéraire que vous souhaitez
partager. À droite du nom de l’itinéraire se trouve un bouton de partage.
Sélectionnez-le. Vous pouvez à présent effectuer un partage par e-mail
ou SMS.
Si vous recevez un itinéraire par e-mail ou texto, téléchargez le chier
GPX dans un dossier de chiers comme par exemple le dossier de
téléchargement. Importez le chier en accédant au menu de la carte,
en sélectionnant le bouton « plus », puis en choisissant le chier GPX
importé. Naviguez jusqu’à l’emplacement de sauvegarde du chier GPX
reçu et enregistrez-le dans votre bibliothèque de voyage.
Mon prol
Mon compte : Accédez à vos paramètres de compte en appuyant sur le bouton My Account
(mon compte) depuis l’écran Prole (prol). Les utilisateurs peuvent désactiver la réception d’offres
promotionnelles et de mises à jour de produit ou supprimer leur compte.
Mise à jour micrologicielle : Pour mettre à jour le micrologiciel, veuillez suivre les étapes ci-dessous.
1. Mettez le BackTrack Mini hors tension.
2. Placez le BackTrack Mini en mode DFU : Tout en appuyant simultanément sur les boutons Up et
Down (haut et bas), appuyez et maintenez le bouton Power (marche/arrêt) jusqu’à ce que l’appareil
passe en mode DFU, après environ trois secondes.
3. Sélectionnez Update (mise à jour).
4. L’application recherchera et se connectera à l’appareil, puis mettra à jour le micrologiciel.
ICÔNES DE CARTE :
Flèche : position actuelle
Carte : différences entre la carte satellite
et plan de rues
Paramètres : dénition des coordonnées
de carte, miles/km
Plus : initialisation de la création d’un
itinéraire, d’un point de cheminement ou
importation d’un chier GPX
iOS Share Screen Android Share Screen
Bouton de
partage iOS
Bouton de
partage Android

16
La garantie Ironclad est une garantie limitée d’un an qui couvre ce produit. Nous garantissons que
ce produit est exempt de défauts de matériaux et de fabrication et répondra à toutes les normes de
performance représentées pendant la première année suivant l’achat de ce produit. Si ce produit ne
fonctionne pas correctement en raison d’un défaut couvert, nous le réparerons ou le remplacerons,
à notre discrétion, et vous le renverrons sans frais. Cette garantie est entièrement transférable et
nécessite un reçu, une carte de garantie ou l’enregistrement du produit. Cette garantie ne couvre pas
les éléments suivants : composants électroniques ; piles; Dégâts cosmétiques; les dommages causés
par un mauvais entretien du produit; perte; vol; les dommages résultant d’une réparation, d’une
modication ou d’un démontage non autorisé; dommages intentionnels, mauvaise utilisation ou abus;
et l’usure normale. Cette garantie sera annulée si le tampon dateur ou d’autres codes de sérialisation
ont été retirés du produit.
Pour consulter la garantie complète et trouver des détails sur la façon de demander un service dans
le cadre de la garantie, rendez-vous sur notre site Web à l’adresse www.bushnell.com/warranty.
Alternativement, vous pouvez demander une copie de la garantie en nous appelant au 1-800-423-3537
ou en nous écrivant à l’une des adresses suivantes :
AUX U.S.A. Envoyer à: AU CANADA Envoyer à:
Bushnell Holdings, Inc. Bushnell Holdings, Inc.
A l’attn de.: Réparations A l’att. du Sce: Réparations
9200 Cody 140 Great Gulf Drive, Unit B
Overland Park, Kansas 66214 Vaughan, Ontario L4K 5W1
Pour les produits achetés hors des États-unis ou du Canada veuillez s’il vous plait contacter
votre revendeur local pour les informations applicables de la garantie.
Produits pour extérieur Bushnell ©2022
Specyfikacje produktu
| Marka: | Bushnell |
| Kategoria: | urządzenie GPS |
| Model: | BackTrack Mini GPS |
Potrzebujesz pomocy?
Jeśli potrzebujesz pomocy z Bushnell BackTrack Mini GPS, zadaj pytanie poniżej, a inni użytkownicy Ci odpowiedzą
Instrukcje urządzenie GPS Bushnell

25 Września 2024
25 Września 2024
25 Września 2024
29 Sierpnia 2024
15 Sierpnia 2024
15 Sierpnia 2024
14 Sierpnia 2024
6 Sierpnia 2024
26 Maja 2024
Instrukcje urządzenie GPS
- urządzenie GPS Samsung
- urządzenie GPS LG
- urządzenie GPS Pioneer
- urządzenie GPS Acer
- urządzenie GPS Mio
- urządzenie GPS Nedis
- urządzenie GPS Polar
- urządzenie GPS Garmin
- urządzenie GPS Dual
- urządzenie GPS Teltonika
- urządzenie GPS BLOW
- urządzenie GPS Kenwood
- urządzenie GPS Alpine
- urządzenie GPS IFM
- urządzenie GPS Lowrance
- urządzenie GPS Renkforce
- urządzenie GPS Uniden
- urządzenie GPS Coyote
- urządzenie GPS First Alert
- urządzenie GPS Lezyne
- urządzenie GPS Navman
- urządzenie GPS TomTom
- urządzenie GPS Hitachi
- urządzenie GPS Magellan
- urządzenie GPS Humminbird
- urządzenie GPS Fysic
- urządzenie GPS Orbit
- urządzenie GPS Celestron
- urządzenie GPS Ventus
- urządzenie GPS Audiovox
- urządzenie GPS QStarz
- urządzenie GPS Teasi
- urządzenie GPS Chipolo
- urządzenie GPS Tile
- urządzenie GPS Spotter
- urządzenie GPS Falk
- urządzenie GPS Kogan
- urządzenie GPS Tractive
- urządzenie GPS Navilock
- urządzenie GPS Tragant
- urządzenie GPS Nedsoft
- urządzenie GPS Canyon
- urządzenie GPS Trackilive
- urządzenie GPS Avidyne
- urządzenie GPS Hamlet
- urządzenie GPS Moki
- urządzenie GPS Lantronix
- urządzenie GPS LifeWatcher
- urządzenie GPS PAJ GPS
- urządzenie GPS GlobalSat
- urządzenie GPS Cobblestone
Najnowsze instrukcje dla urządzenie GPS

27 Marca 2025

21 Lutego 2025
12 Lutego 2025
12 Lutego 2025
12 Lutego 2025
30 Stycznia 2025
11 Stycznia 2025
10 Stycznia 2025
28 Grudnia 2024
8 Października 2024