Instrukcja obsługi ZKTeco ZPAD
Przeczytaj poniżej 📖 instrukcję obsługi w języku polskim dla ZKTeco ZPAD (88 stron) w kategorii System kontroli dostępu. Ta instrukcja była pomocna dla 10 osób i została oceniona przez 2 użytkowników na średnio 4.5 gwiazdek
Strona 1/88

USER MANUAL
ZKTime.Net 3.0-Android
Version: 1.0
Date: April, 2015

About This Manual
This document introduces the installation and uninstallation of the ZKTime.Net 3.0 -
Android, and describes the user interface and menu operations of this software.
This version is especially designed for Android series devices, including XPad, ZPad, Epad,
and US2000.

Important Claim
Firstly, thank you for purchasing this product, before use, please read this manual carefully
to avoid the unnecessary damage! The company reminds you that the proper user will
improve the use effect and authentication speed.
Without the consent by our company, any unit or individual is not allowed to excerpt
and copy the content of this manual partially or thoroughly and spread the content
in any formats.
The product being described in the manual perhaps includes the software whose
copyrights are shared by the licensors including our company. Except for the permission
from the relevant holder, any person cannot copy, distribute, revise, modify, extract,
decompile, disassemble, decrypt, reverse the engineering, lease, transfer, sub-license the
software, or perform other acts of copyright infringement, but the limitations applied to
the law is excluded.
Due to the constant renewal of products,the company cannot undertake
the actual product in consistence with the information in the document.
If there is any dispute caused by the difference between the actual
technical parameters and the information in this document, please be
aware of any change without notice.

ZKTime.Net 3.0 I
Contents
1 Overview .............................................................................................................................................................................................................................1
1.1 ZKTime.Net 3.0 - Android Function Guide 1 .........................................................................................................
1.2 Procedure for Using of ZKTime.Net 3.0 1 ................................................................................................................
2 Glossary ................................................................................................................................................................................................................................3
3 Before Use ...........................................................................................................................................................................................................................6
3.1 Installation and Registration 6 .......................................................................................................................................
3.1.1 Installation 6 ............................................................................................................................................................
3.1.2 Registeration 10 .....................................................................................................................................................
3.2 Uninstallation 11 .....................................................................................................................................................................
3.3 Login 12 ........................................................................................................................................................................................
3.4 User Interface and Main Menu 14 ...............................................................................................................................
4 System Management ............................................................................................................................................................................................. 18
4.1 Configuration 18 .....................................................................................................................................................................
4.2 Sender Settings.................................................................................................................................................................20
4.3 Role Management 21 ..........................................................................................................................................................
4.4 User Management 23 ..........................................................................................................................................................
4.5 Operation Logs .................................................................................................................................................................23
4.6 Database Management 24 ...............................................................................................................................................
4.6.1 Database Initialization 25 .................................................................................................................................
4.6.2 Database Backup 25 ..........................................................................................................................................
4.6.3 Database Restoration 26 ..................................................................................................................................
5. Human Resource Management ...................................................................................................................................................................27

II ZKTime.Net 3.0 - Android
5.1 Company Setting 27 ............................................................................................................................................................
5.2 Employee Management 28 .............................................................................................................................................
5.2.1 Employee Adding 29 ..........................................................................................................................................
5.2.2 Fingerprint Management 31 .........................................................................................................................
5.2.3 Employee Maintenance 32 .............................................................................................................................
5.3 Pay Code 33 ...............................................................................................................................................................................
6. Attendance Management ................................................................................................................................................................................. 34
6.1 Attendance Rule 34 ..............................................................................................................................................................
6.1.1 OT & Weekend Setting 34 ................................................................................................................................
6.1.2 Holiday Setting 36 ................................................................................................................................................
6.1.3 Advanced Setting 38 ..........................................................................................................................................
6.2 Timetable Setting ............................................................................................................................................................39
6.2.1 Timetable Adding ..........................................................................................................................................40
6.2.2 Timetable Edition/Deletion .....................................................................................................................44
6.3 Shift Management 45 ..........................................................................................................................................................
6.3.1 Shift Adding 45 .......................................................................................................................................................
6.3.2 Shift Maintenance 46 ..........................................................................................................................................
6.3.3 Shifts Assigning Management 47 ...............................................................................................................
6.4 Employee Schedule 48 .......................................................................................................................................................
6.4.1 Query and Check Employee Schedule 49 .............................................................................................
6.4.2 Temporary Schedule ....................................................................................................................................49
6.4.3 OFF Setting 51 ........................................................................................................................................................
6.5 Assigning Exception 52 .....................................................................................................................................................
7. Terminal Maintenance ..........................................................................................................................................................................................56

ZKTime.Net 3.0 III
7.1 Device Management 56 ....................................................................................................................................................
7.1.1 Device Adding 56 .................................................................................................................................................
7.1.2 Device Edition/Deleteion 57 ..........................................................................................................................
7.2 Zone Setting 58 .......................................................................................................................................................................
7.2.1 Adding Zone 59 .....................................................................................................................................................
7.2.2 Zone Maintenance 59 ........................................................................................................................................
7.3 SMS Management 61 ..........................................................................................................................................................
8. 65 Report Management .............................................................................................................................................................................................
8.1 Attendance Records 65 ......................................................................................................................................................
8.2 Attendance Calculation 66 ...............................................................................................................................................
8.3 Viewing Reports ...............................................................................................................................................................69
Appendices 78 .........................................................................................................................................................................................................................
Appendix 1 Common Operations 78 ................................................................................................................................
1. Selecting Date 78 ........................................................................................................................................................
2. Setting Time .............................................................................................................................................................79
Appendix 2 End User License Agreement 80 ...............................................................................................................

ZKTime.Net 3.0 - Android 1
1 Overview
1.1 ZKTime.Net 3.0 - Android Function Guide
The system is a Windows-based PC application design, to offer simple yet effective employee time and
attendance management.
ZKTime.Net 3.0 - Android System Features:
• Supports ZKProto middleware WAN device management and Data Sync
• The new UI and flatting style bring new operation experience to user
• The program will automatically send abnormal attendance report to the user-defined mail address for
administrator to check
• Supports device zoning function; automatically sync the data among devices in the save zone; simplifies
the device management operation
• Supports auto search and adds device from ZKProto middleware
• Supports more than 20 reports, meeting different needs
• Supports Employee Card, Terminal Card and Report Card overview
• Supports License Control and Networking Update
• Supports multi-languages and Local Development, meeting attendance requirement around the world
1.2 Procedure for Using of ZKTime.Net 3.0
The following procedure takes the super user as an example to introduce the use of the software. The
operation procedure varies with users of different operation authorities.
Step 1: Register and Login. Add User and assign Role as required. (Such as Company Manger, Registrar
and Attendance Manager, etc.)
Step 2: Set Company Structure. Set and assign Company and Department Info as the actual situation.
Step 3: Enter employees; enroll fingerprints, passwords or cards, and maintain daily personnel information.
Step 4: Set Pay Code, and define the type of salary payment.
Step 5: Set Zone, for device partition setting.

4 ZKTime.Net 3.0 - Android
Schedule: sets employee shifts in a certain time period to facilitate attendance monitor. This is a major
reference for calculating attendance.
Temporary Schedule: an adjustment to the fixed shifts in work schedule on specific dates when the work
hours of one or more employees change temporarily. This schedule is also applicable to irregular posts.
(Allow) Late Arrival/Early Out: is defined as the start time for counting a punch-in /punch-out as Late Arrival/
Early Out after it exceeds the allowable time limit in the specified work time.
Work Time: is defined as the work time (in the unit of Minute) of an employee from check-in to check-out. The
value entered here might be unequal to the time interval between the employee’s actual check-in and check-
out time, which depends on the company regulations.
(Default) Timetable: defines a timetable that is set in default by the system.
(Default) Shift: is defined as a shift that is set in default by the system, which is a cycle of the default timetable
in one week. You can use the default shift for the employees who have no fixed work schedules but are
required to record their attendance. Default shift is applicable to bosses, sales staff, service staff, and made-to-
order production personnel.
Check-In Start/End: is defined as a valid time range for check-in. Records out of this range are invalid.
Check-Out Start/End: is defined as a valid time range for check-out. Records out of this range are invalid. The
check-out start time and the check-in end time must not overlap.
Break: is used to deduct the lunchtime and rest time which are inaccurately counted as work time because
employees have their punch-in /punch-out only twice a day. For example, the period 08:00~17:30 contains
the time for lunch and rest, which can be deducted. You need to set a break period from 12:00 to 13:30.
This period is not used directly for calculating the time points but only for calculating the attendance time.
For example, if an employee works only in the morning, his/her work hours are 4 hours. When the period
12:00~17:30 (5.5 hours) is considered as the employee’s absence time, it is obviously greater than the actual
absence time (13:30~17:30, 4 hours). Therefore, you need to set the break start and end time between punch-
in and punch-out. This setting is not necessary in other cases.
Round Value Check-In/Check-Out: is defined as the smallest unit for rounding the time of check-in/
check-out. For example, if Round Value In/out is set to 10, the smallest unit of time that can be included in
attendance records is 10 minutes.
Round Down Check-In/Check-Out: When values are greater than the set Round Down value, they will be
rounded up; when values are smaller than or equal to the Round Down value, they will be rounded down.
Shift: sets the schedule properties, including the dates and shifts of the schedule, and whether there are
cycling schedule dates, and then assigns the preset schedule to a department or individual employee.
Hire Date: is defined as the date when an employee is hired. When adding an employee, you can either use
the default hiring date which is the current system date, or you can change the date. This information is very
important. So, remember to enter the correct date.

ZKTime.Net 3.0 5
Status: is defined as the status of the device. If you click Enable, the device functions and you can perform
the following operations on the device: user uploading/downloading, work code uploading, and record
downloading. If you click Disable, the device does not function.

6 ZKTime.Net 3.0 - Android
3 Before Use
3.1 Installation and Registration
3.1.1 Installation
• Note:
(1) The demonstration figure below may be different from your actual installation, the actual software
installation shall prevail.
(2) You must install .Net Framework 4.0 first. Otherwise, you cannot install this program. (Tips: The installation
CD includes the .Net Framework 4.0 setup file. You can install it as required.)
(3) You must install ZKProto Server first. Otherwise, you cannot connect ZKTime.net 3.0 to android devices.
For more details, please refer to the ZKProto Server Installation Guide.
(4) If you have installed this program before, please uninstall it first, and restart your computer.
(5) It is better to turn off all other applications before installation, to avoid any conflict in installing
procedure.
(6) During the installation, the computer firewall software may prevent the service from this program. Please
select “Allow all”, or temporarily stop the firewall software before installation.
1. Put the installation CD into the CD driver,
installation program will run automatically.
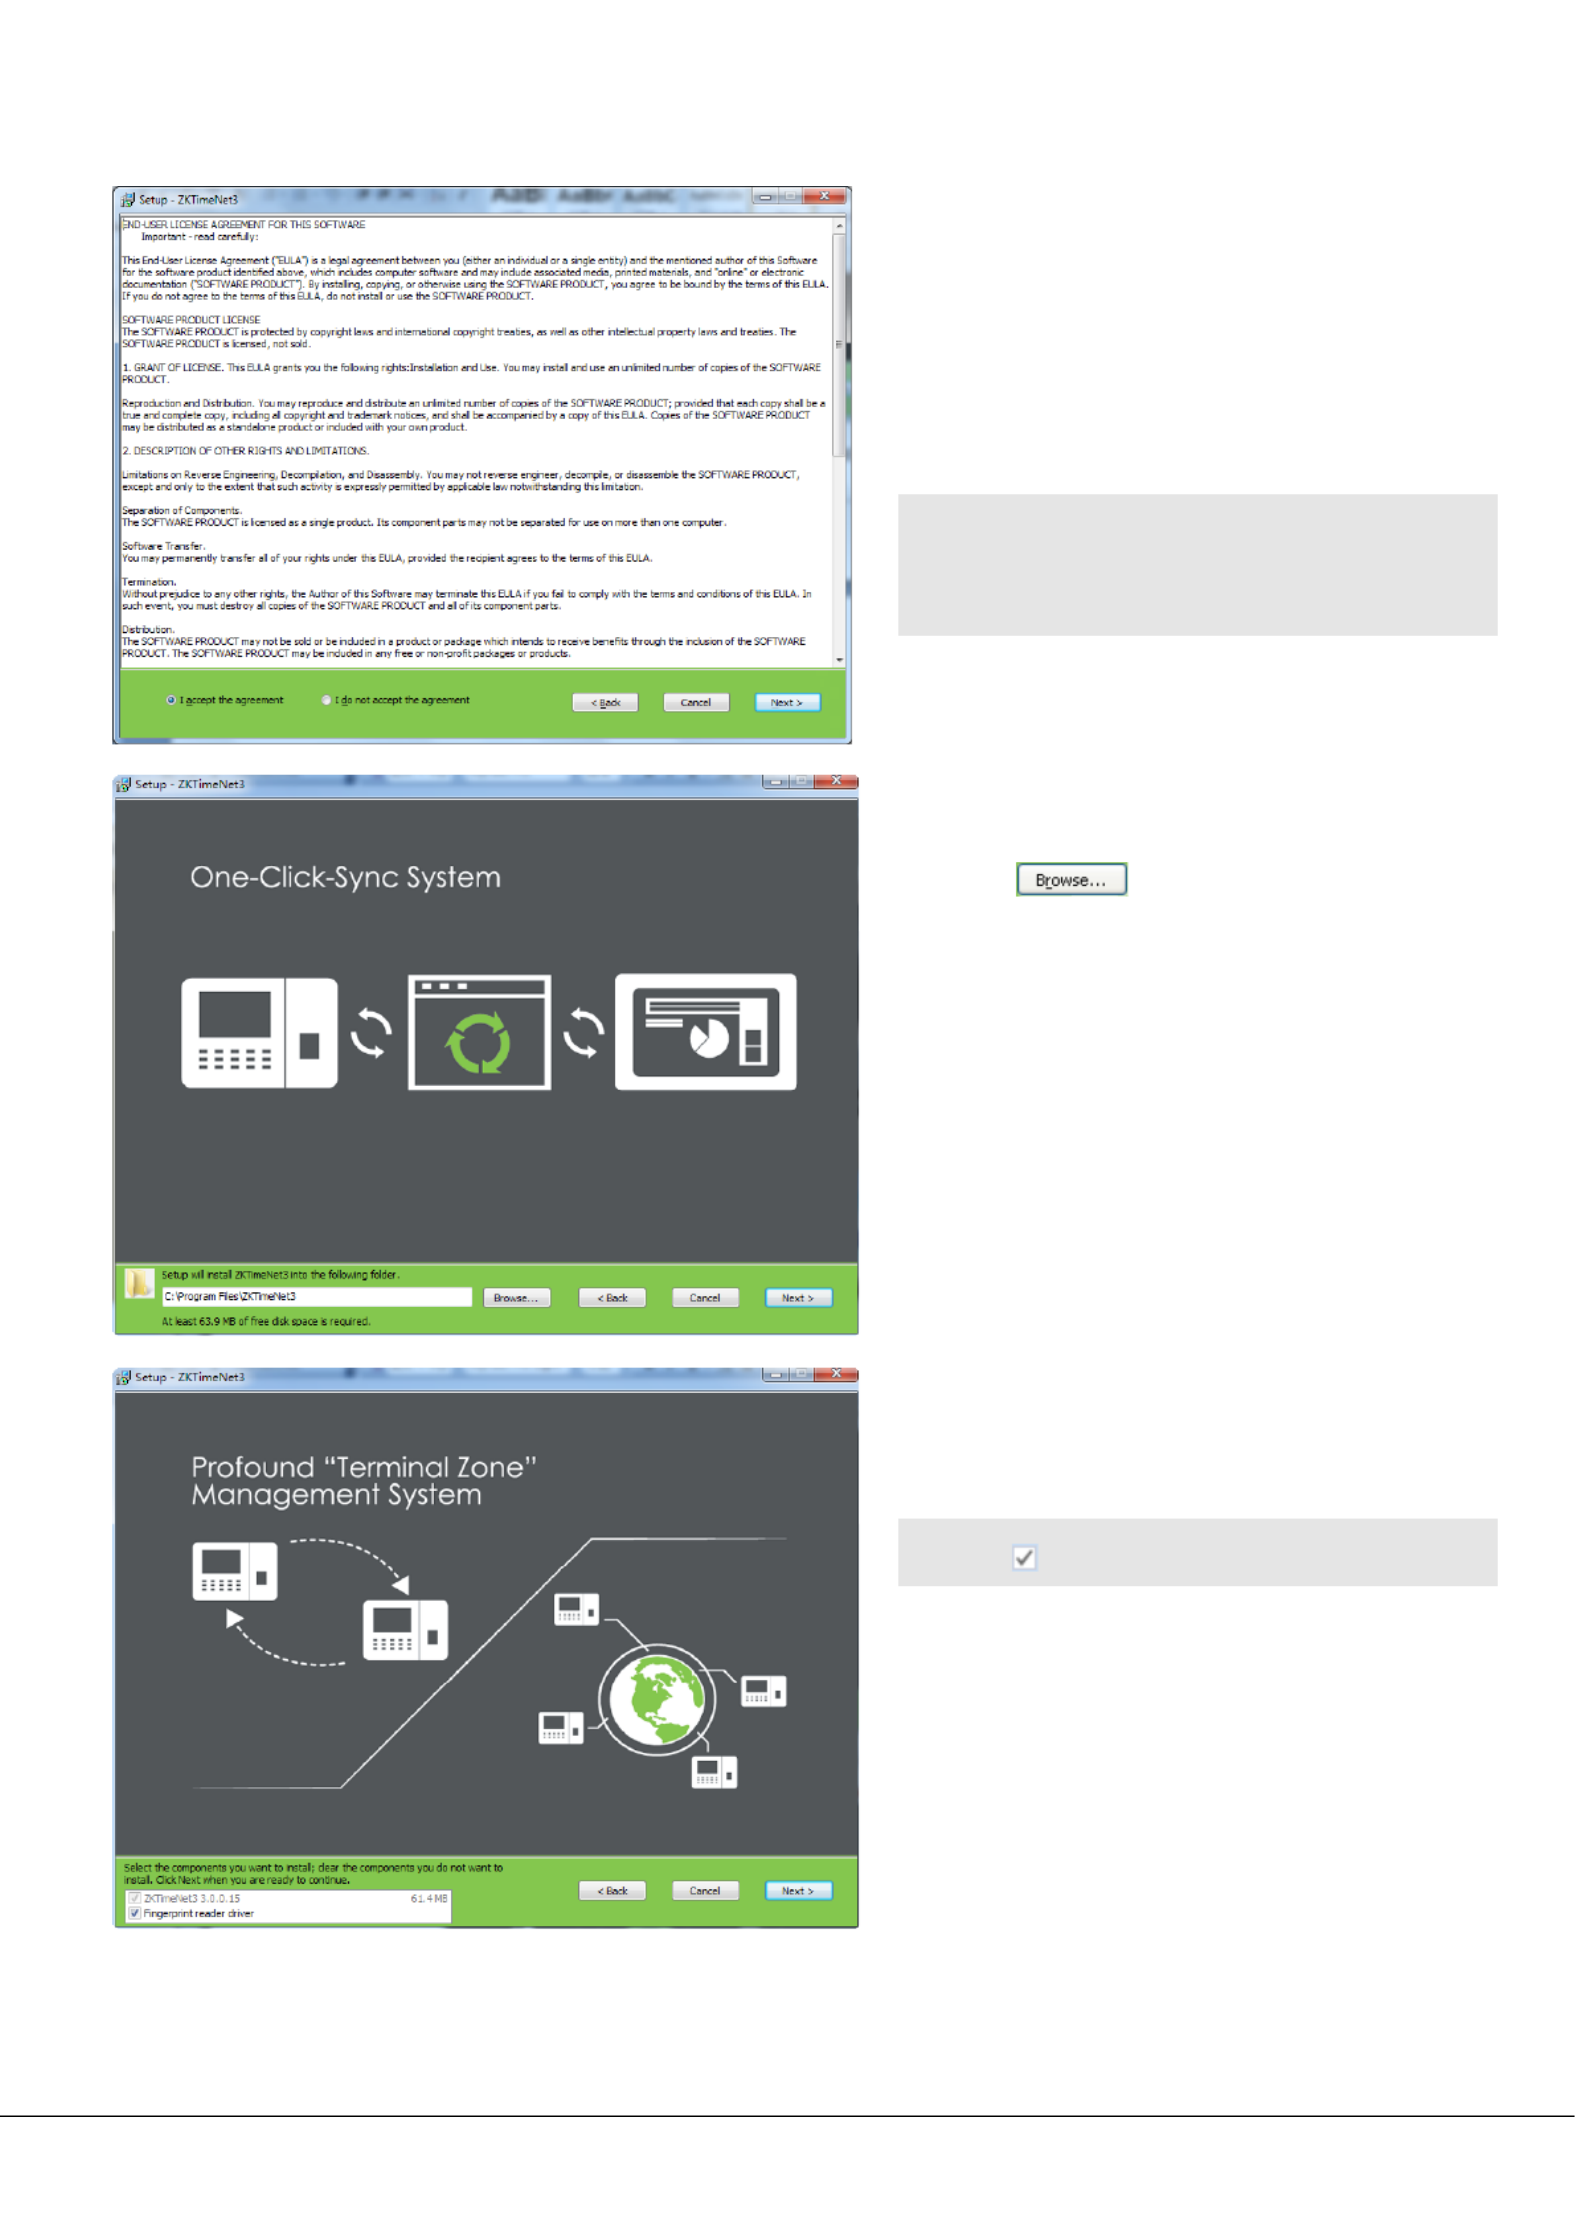
2. [Next] Click button on the Installation Guide
window to enter the END-USER LICENSE
AGREEMENT FOR THIS SOFTWARE window.
ZKTime.Net 3.0 - Android 7
3. Read the agreement carefully; select
I accept the agreement, and then
click button to enter to the [Next]
Installation Path Setting window.
• Tips: [Cancel] Click button to cancel the
installation operation.
4. Click button, and select
the installation path in the pop-up
window. Click button to enter [Next]
the window.Select Components
5. Choose the component as required, and
then click button to continue. [Next]
• Tips: means selected.

8 ZKTime.Net 3.0 - Android
6. Click button, and select the path
for creating the program’s shortcut. Click
[Next] Installation button to enter the
Confirmation window.
7. [Install] Click button to continue with the
installation; or click button, if you [Back]
want to review the change of any setting.
• Note: If you have selected the Fingerprint
reader driver at , the following step 5
window will pop-up.

ZKTime.Net 3.0 - Android 9
(1) [Next] Click button to enter the
Installation Confirm window.
(2) [Install] Click button to continue
with the installation of Fingerprint
reader driver.
(3) [Finish] Click button to close
the setup window.

10 ZKTime.Net 3.0 - Android
3.1.2 Registeration
8. After finishing the installation,
the completing wizard window
will pop-up.
• Note: After successfully installing
the program, this icon will
display. Double- click this icon to run
ZKTime.Net 3.0 - Android program.
9. [Finish] Software Click button, the
Register window will pop up.
In order to use the system appropriately,
please install the authorized software.
1. Send the unique product code
to the software provider to get
the Registration Code.

ZKTime.Net 3.0 - Android 11
3.2 Uninstallation
• Method 1
If you no longer use this software and wish to delete it, remove it as follows: Click > [Start] [All Programs] >
[ZKTime.Net 3.0] [Uninstall ZKTime.Net 3.0]> .
• Method 2
1. Exit the ZKTime.Net 3.0 - Android program.
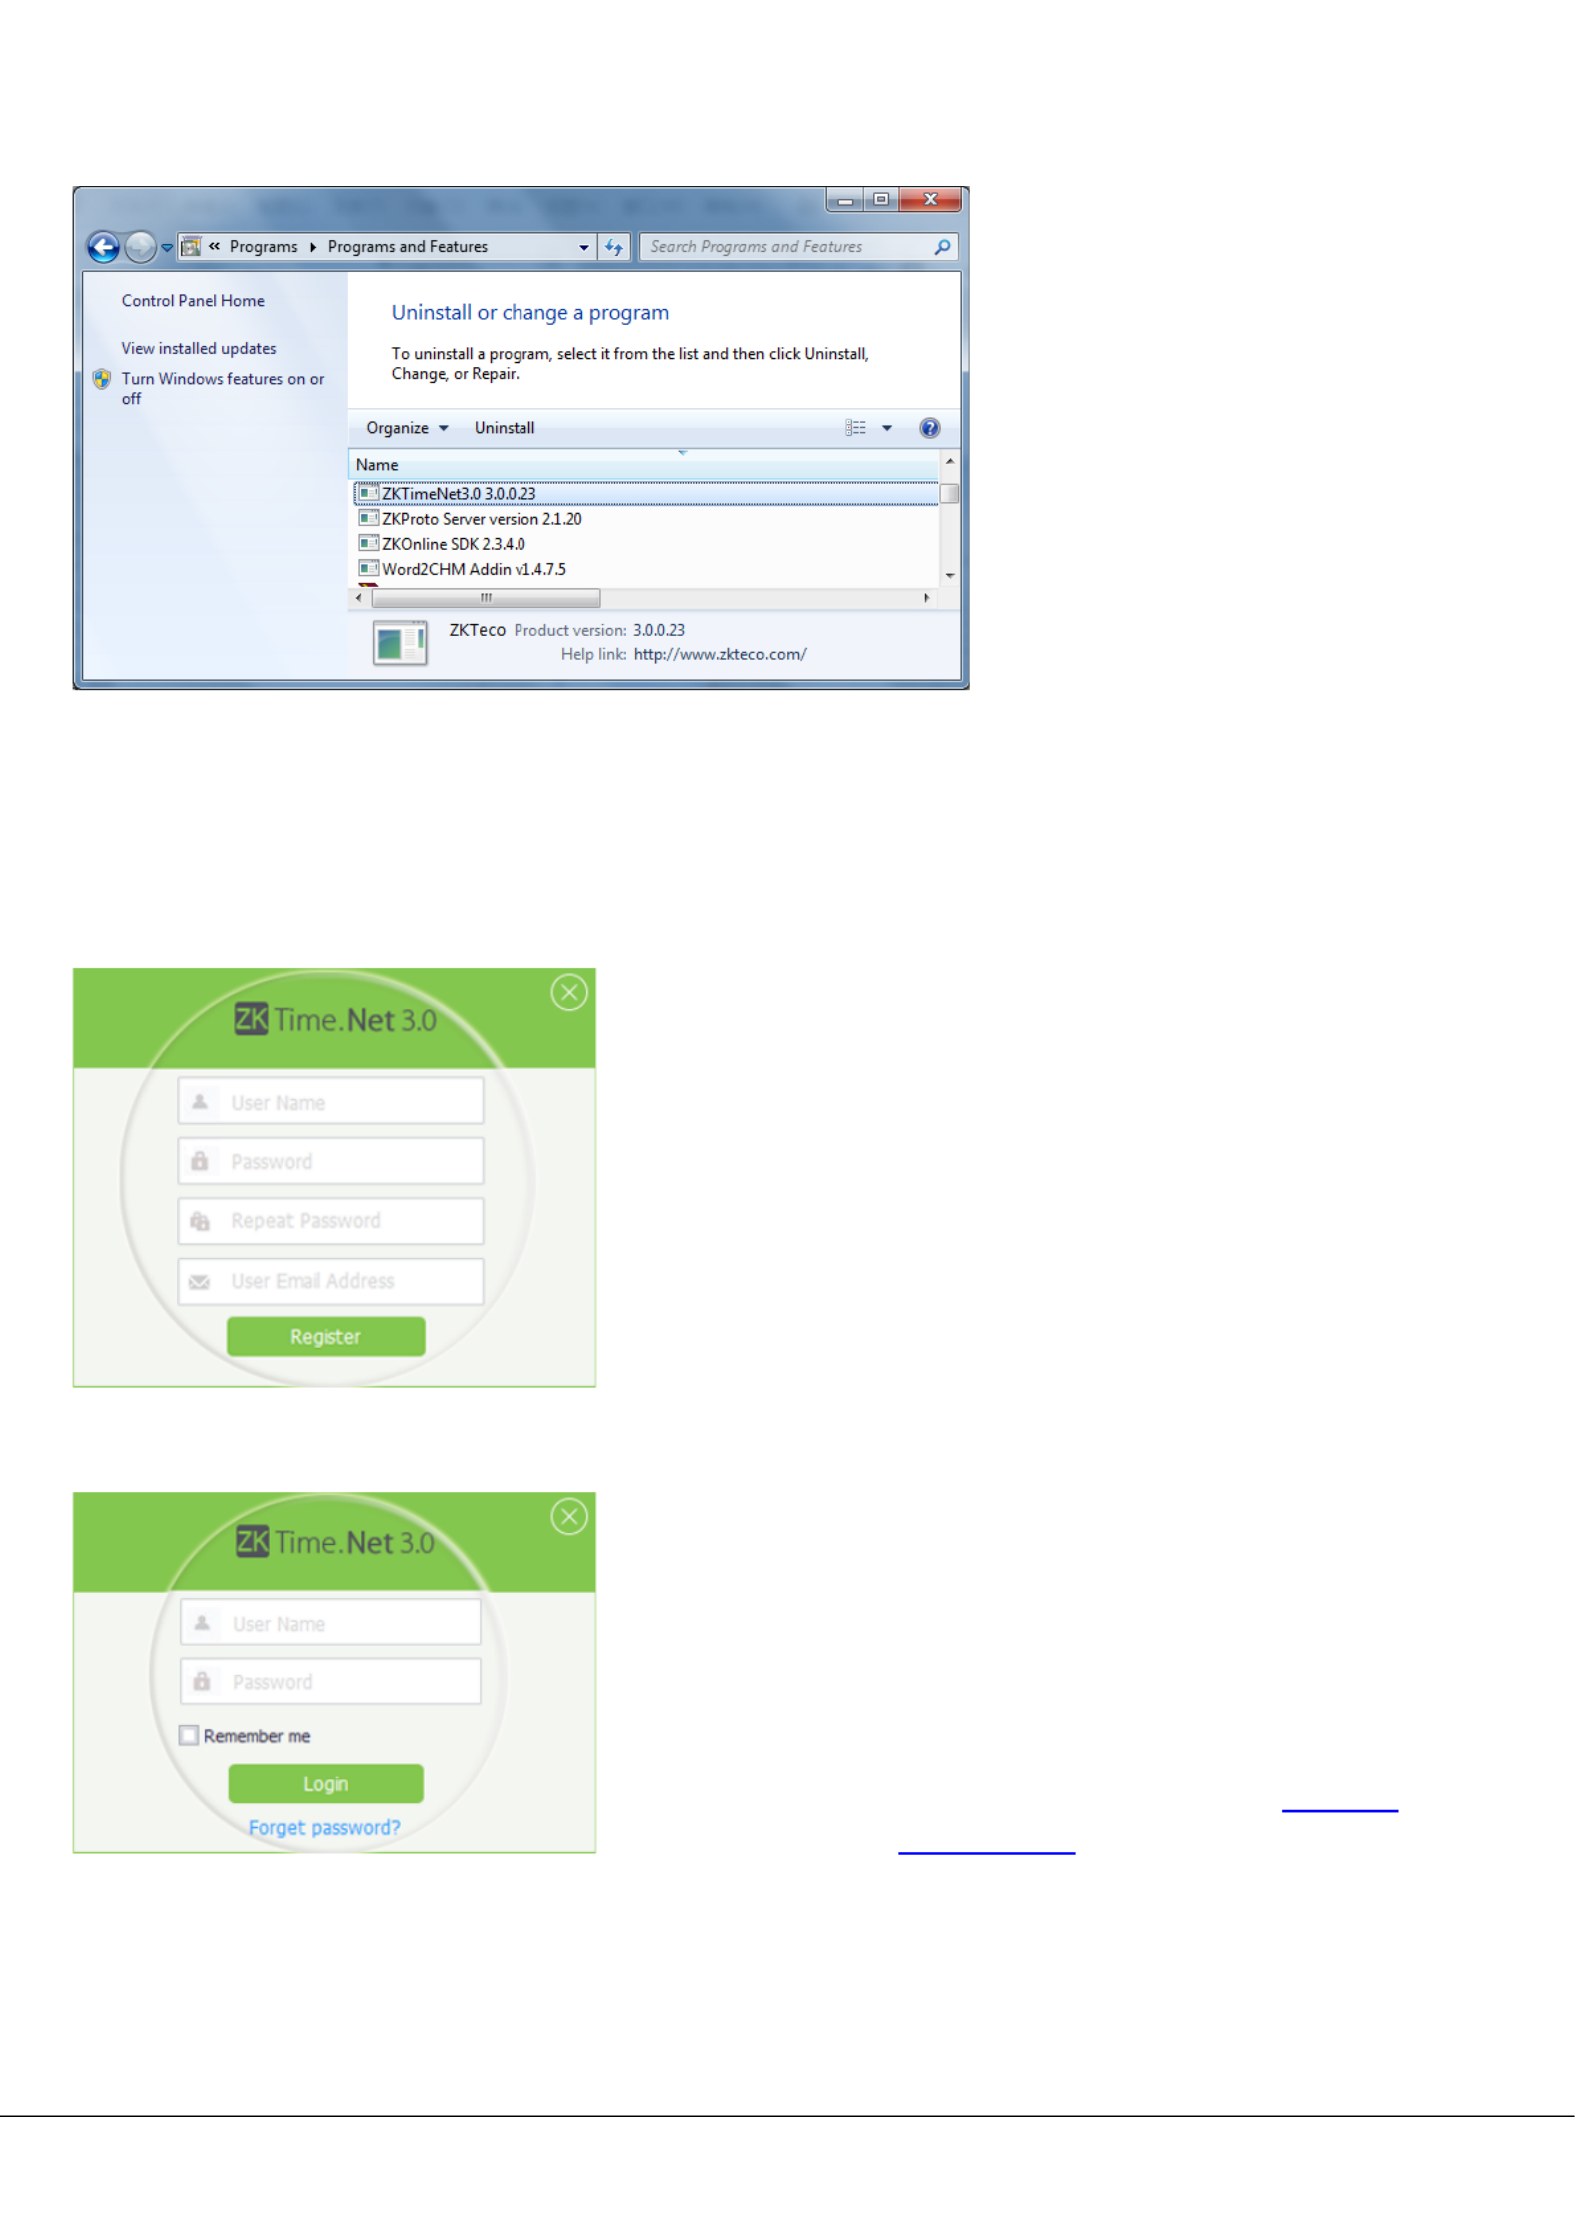
2. [Start] [Control Panel] [Uninstall a Program] [ZKTime.Net 3.0] Choose > > > right-click , and click
[Uninstall] button.
2. Enter the Registration Code in
the box.License
3. [Register] Click button to register.
4. Click [OK] button to close the
Information prompt box.
12 ZKTime.Net 3.0 - Android
3.3 Login
Double-click the desktop shortcut, or choose > [Start] [Programs] [ZKTime.Net 3.0] > to access the
Login window.
3. [Yes] Click to remove the
ZKTime.Net 3.0 - Android
program.
1. If you log in the system for the first time (this
means the system has no users), the system
displays the administrator registeration
interface. Enter the User Name, Password,
Repeat Password and User Email Address as
required, and then click button to [Register]
register user.
2. If you have previously logged in the system,
enter the correct registered User Name
and Password. For more information about
setting the User Name, Password, and user
privilege (Role), please refer to “4.4 User
Management”. Click [Login] button to log in
the system, or click button to exit. [Quit]

ZKTime.Net 3.0 - Android 13
3. You can log in different
system interfaces based
on different user privileges
(Role). The administrator
will enter the Employee
Card interface in default
setting.
• Note: Click icon to view in
Grid, and display the Employee
Management interface.
14 ZKTime.Net 3.0 - Android
3.4 User Interface and Main Menu
Main Menu Bar:
Provides main functional menus of the system. The clear classification management six
and powerful functional structures help you to manage the staff attendance of your
company smoothly.
The Secondary Menu Bar:
Simplifies functions and helps you to perform operations more effectively.
Operation Area: Allows you to view and use various functions.
Shortcut Icons:
Allows you to perform operations conveniently, including quick access to navigation,
system registration and checking of the system’s version.
Information Bar:
Displays the Employee Card, Device Card, Report Card and current Login User.
• Main Menu and Function Instruction
The system menu bar lists all the operation options. User can click different menus to select different

ZKTime.Net 3.0 - Android 15
operations on the bar. If user clicks one menu, the sub-menu will display.
System Management: allows you to manage the system’s configuration, including Configuration Sender ,
Settings Role and User Management Database Management Operation Logs, , , and check the .
HRM (Human Resource Management): for setting , inputting Company Structure Employees, and setting
Pay Code for salary payment.
Attendance Setting: sets attendance , and , as well as Rule Timetable Shift Schedule (contains Temporary
Schedule) and (namely Vacation and Sick Leave setting). Exception
Device Maintenance: manage the attendance checking device, and the employee information and
attendance records on the device. It includes , , and , , Area setting Data Sync management of Device SMS
Work Code U Diskand .
Reports Management: allows you to process and manage reports by two categories: employee info and
attendance record. You can calculate the attendance records by specifying the scope of employees and time,
and output reports. You can import or export the attendance data as required by using a U Disk.
• Instruction of Shortcut Icons
1. Home
If you encounter any problem
when performing operations in
the system, you can click icon
to return to the system navigation,
which will help you to complete
attendance management quickly.

16 ZKTime.Net 3.0 - Android
2. License
For the specic operation method, please refer to “3.1.2 Registeration”.
3. About
• Instruction of Information Bar
1. Device Card
You can click to check the system’s version.[About]
Click icon, the system will
enter the Device Card interface
automatically. An overview of added
devices’ information and current
connection status will be shown.
A prompt box will pop up at the bottom right corner
of the screen, displaying the connecting procedure
and status for all devices.

ZKTime.Net 3.0 - Android 17
2. Employee Card
3. Reports Card
Click icon, the system will
enter the Employee Card
interface automatically.
Click icon, the system
will enter the Report Card
interface automatically.
• Tips: For the method of
checking report, please refer to
“8.3 View Reports”.

18 ZKTime.Net 3.0 - Android
4 System Management
The System Management function includes conguring ZKProto information, system and Sender Settings,
adding system User (such as Company Manager, Registrant, Attendance Statisticians, etc.), assigning role as
required, checking Operation Logs and managing database.
4.1 Conguration
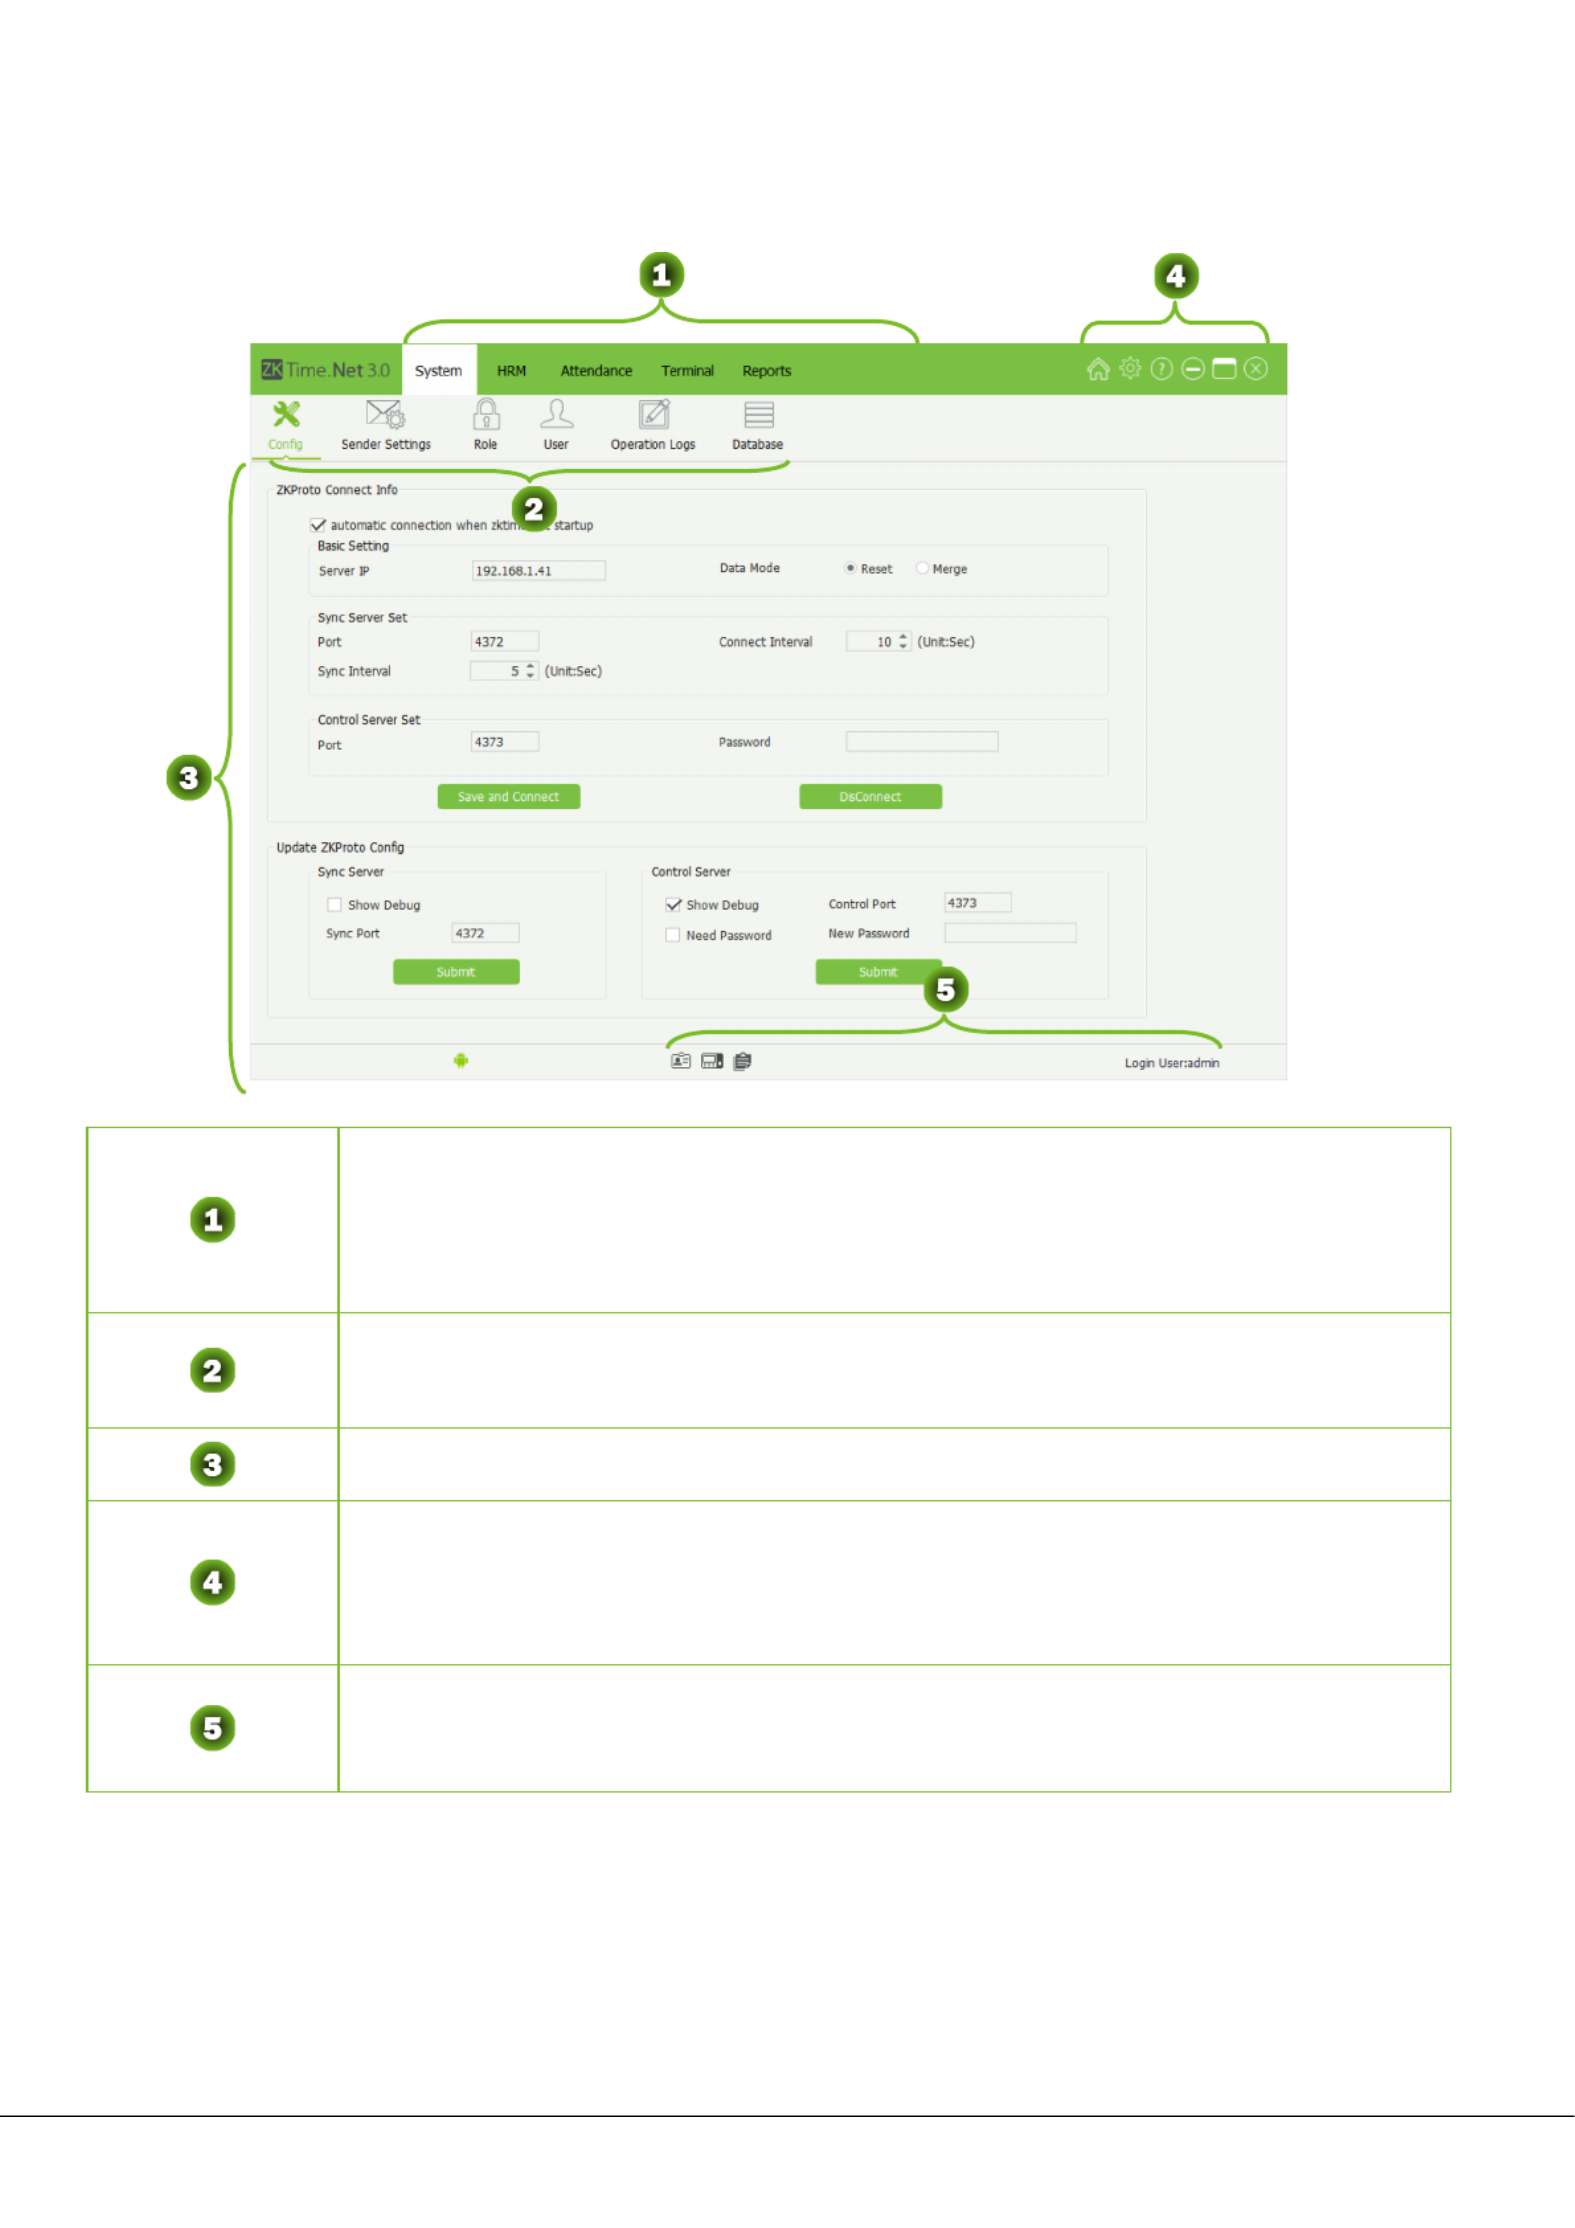
1. ZKProto Connection Information
Automatic Connection when ZKTime.net Starts up: The system would be connected automatically with
middleware if you select this option.
• Basic Setting
Server IP: The IP address of middleware server.
Data Policy: Includes “Reset” and “Merge”. It will be activated as long as the system is connected with the
middleware for the rst time and it will not be able to work unless manually activated.
»Reset: Means the data including Employee, Message, Terminal, Zone and other information in
middleware will replace those in the software.
»Merge: Means the data in the software and middleware are merged complementarily in transmission.
The employees’ information will not be merged.
Click [System] > [Cong] to enter the
(System) Conguration interface.
• Note: Please be cautious to
set the Data Policy when the
system is connected with the
middleware for the rst time, or
it will lead to data loss.

ZKTime.Net 3.0 - Android 19
• Sync Server Setting
Port: the port of middleware Sync Server, it has a default value of 4372.
Sync Interval: the interval of data synchronizingthe software and middleware. It is suggested to be 5.
Connect Interval: the system will try to be reconnected with the middleware after this interval.
• Control Server Setting
Port: the port of middleware Control Server, it has a default value of 4373.
Password: the password for connecting with middleware. There is no password in default setting.
Click [Save and Connect] when nished setting. The status will be displayed at the lower left corner.
indicates successful connection, and indicates failed connection.
2. Update ZKProto Conguration
• Sync Server
Set whether to show the debug of middleware or not. You can also change the sync port.
• Control Server
Set whether to show the debug of middleware or not. You can also change the control port and set the
password for connecting to the server.
3. [Save] After setting, click button to save.
20 ZKTime.Net 3.0 - Android
4.2 Sender Settings
After setting the sender, the system will automatically send data to the user-dened email address, according
to the selected data type.
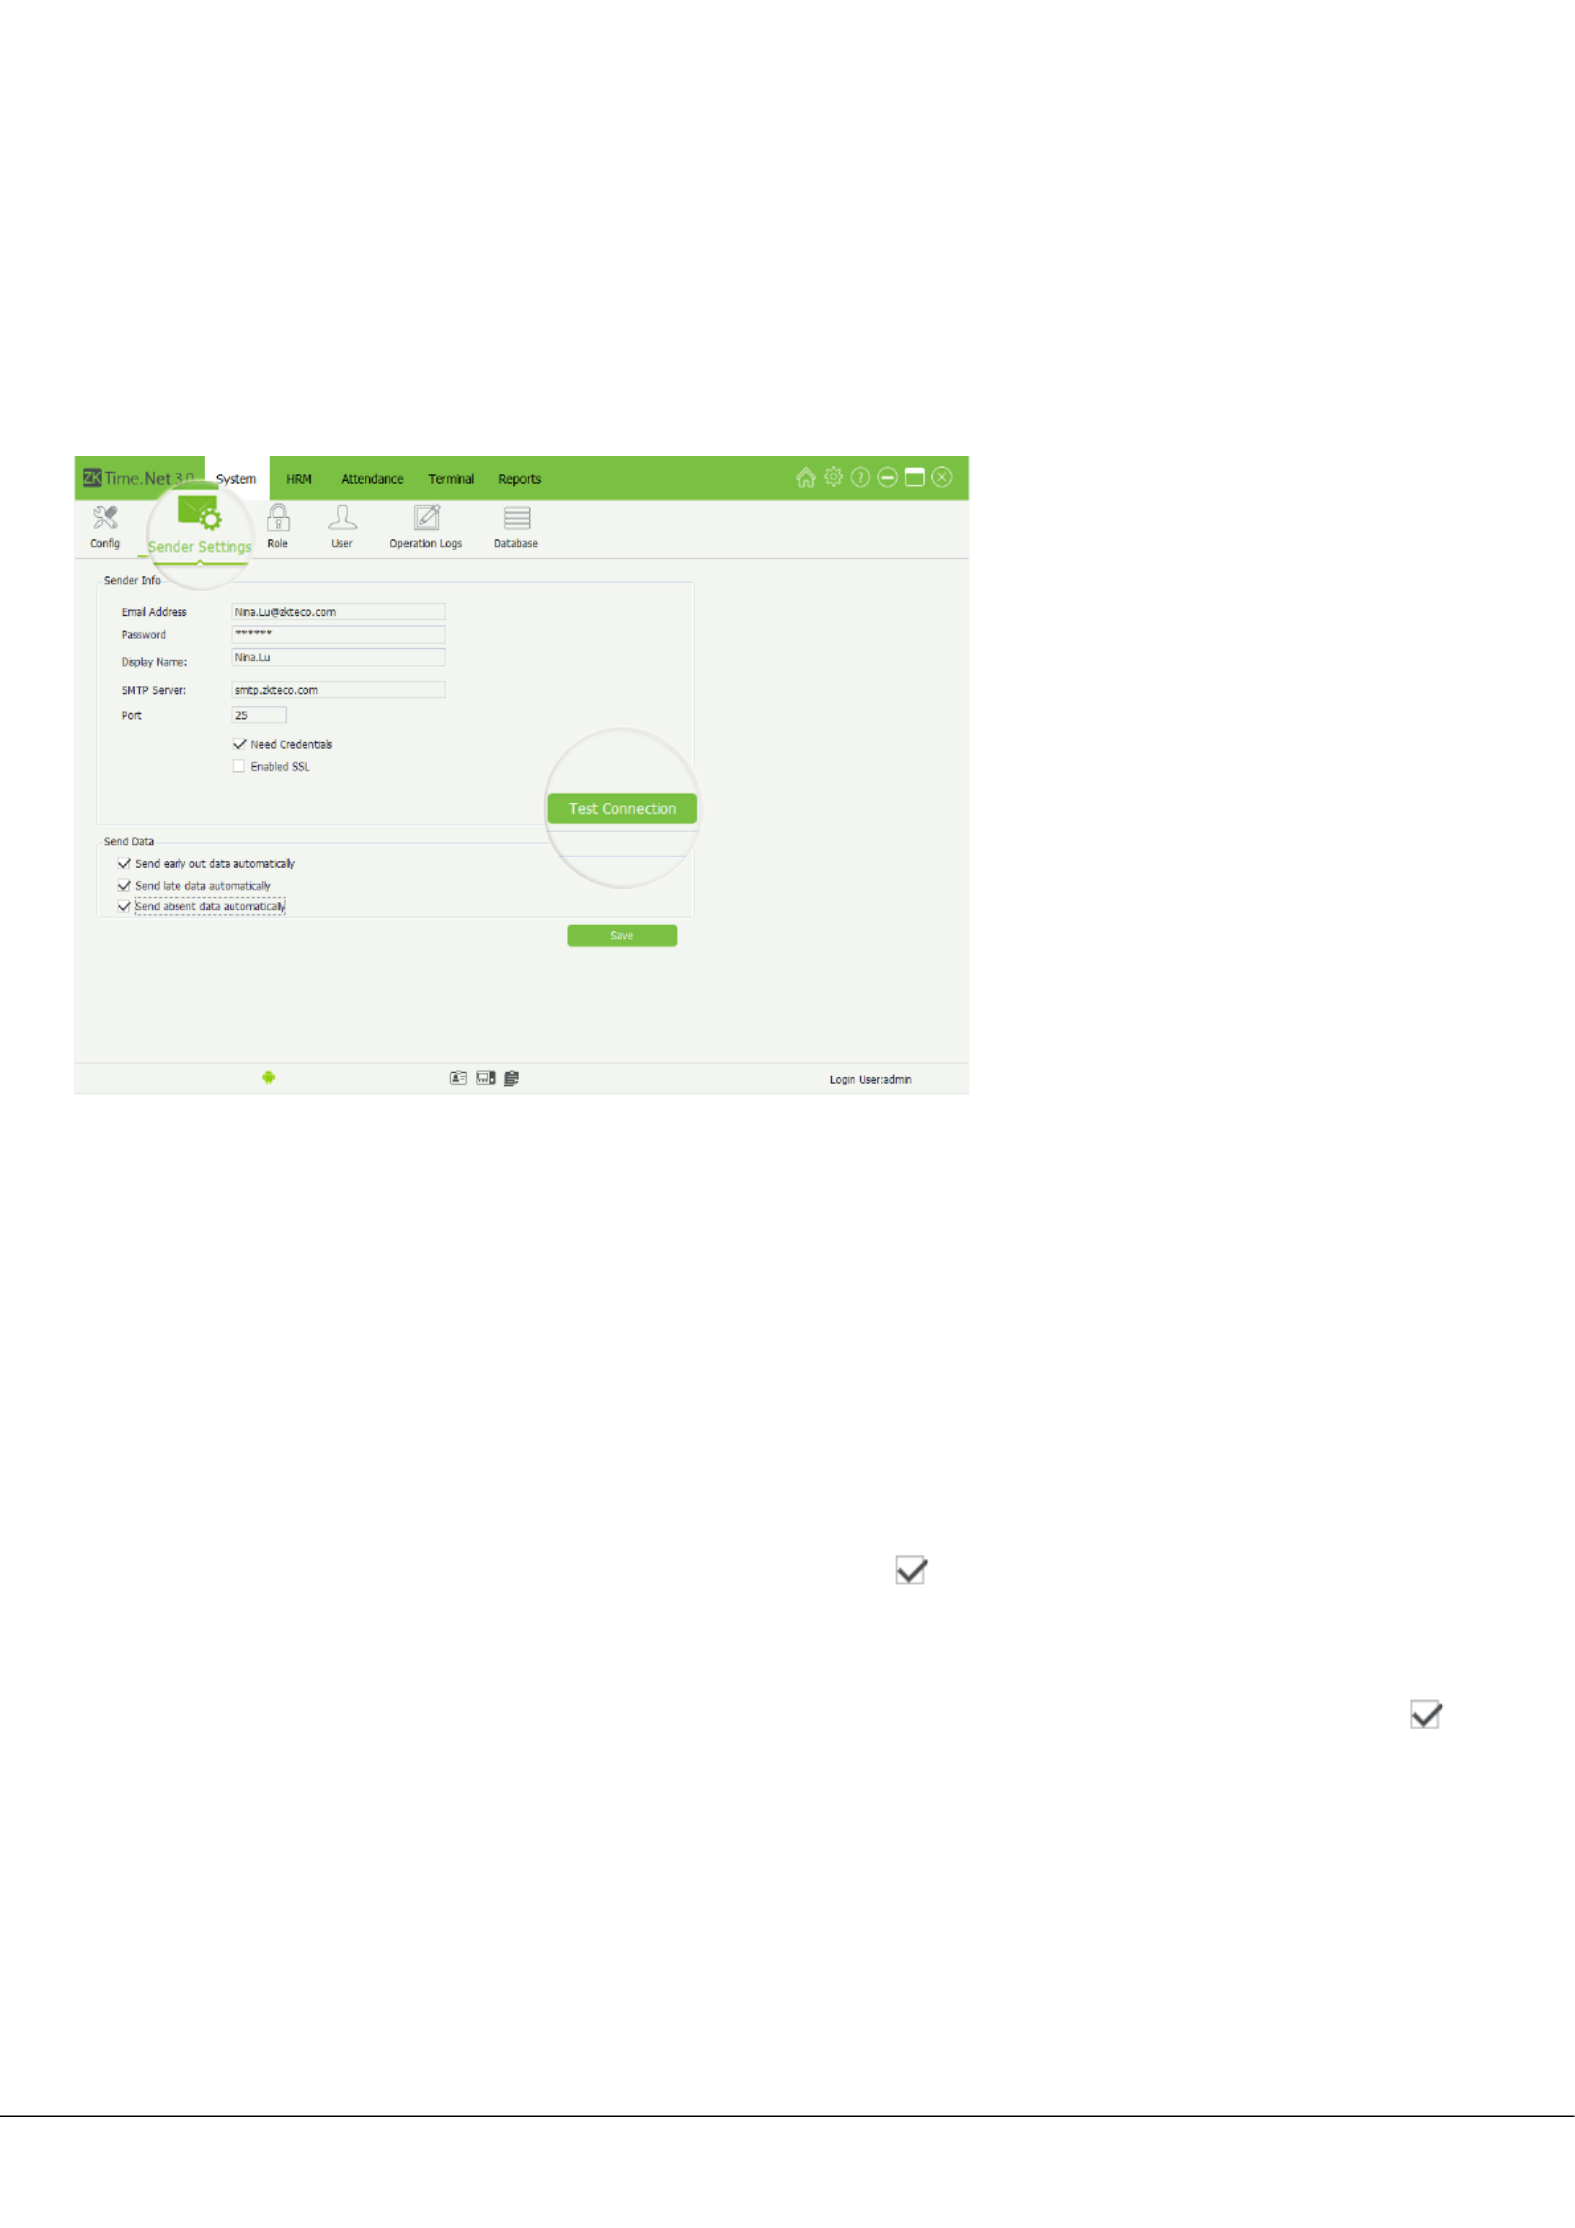
1. [System] [Sender Settings] Sender SettingsClick > to enter the interface.
• Sender Info
Email Address: Enter the email address for receiving data.
Password: Enter the correct password of this email address, and click [Test Connection] button to check
whether it is connected to the email server successfully.
Display Name, SMTP Server: Generated automatically by entering email address.
Port: The default value is 25. Modify it as required.
• Need Credentials, Enable SSL: Enable them as required; tick ( ) means to enable the function.
• Send Data
Send early out data automatically, Send late data automatically, Send absent data automatically: Tick ( )
and select the optiona as required, multiple selection is enabled.
2. [Save] After setting, click button to save.

ZKTime.Net 3.0 - Android 21
4.3 Role Management
During the daily use procedure, the administrator needs to assign different kinds of privilege users. To avoid
the set-up repetition for each user, you can assign different kinds of roles. After that, assign the decent role
directly to the user while adding user. There are six privilege modules, which are System, HRM, Attendance,
Terminal, Access Control, and Reports.
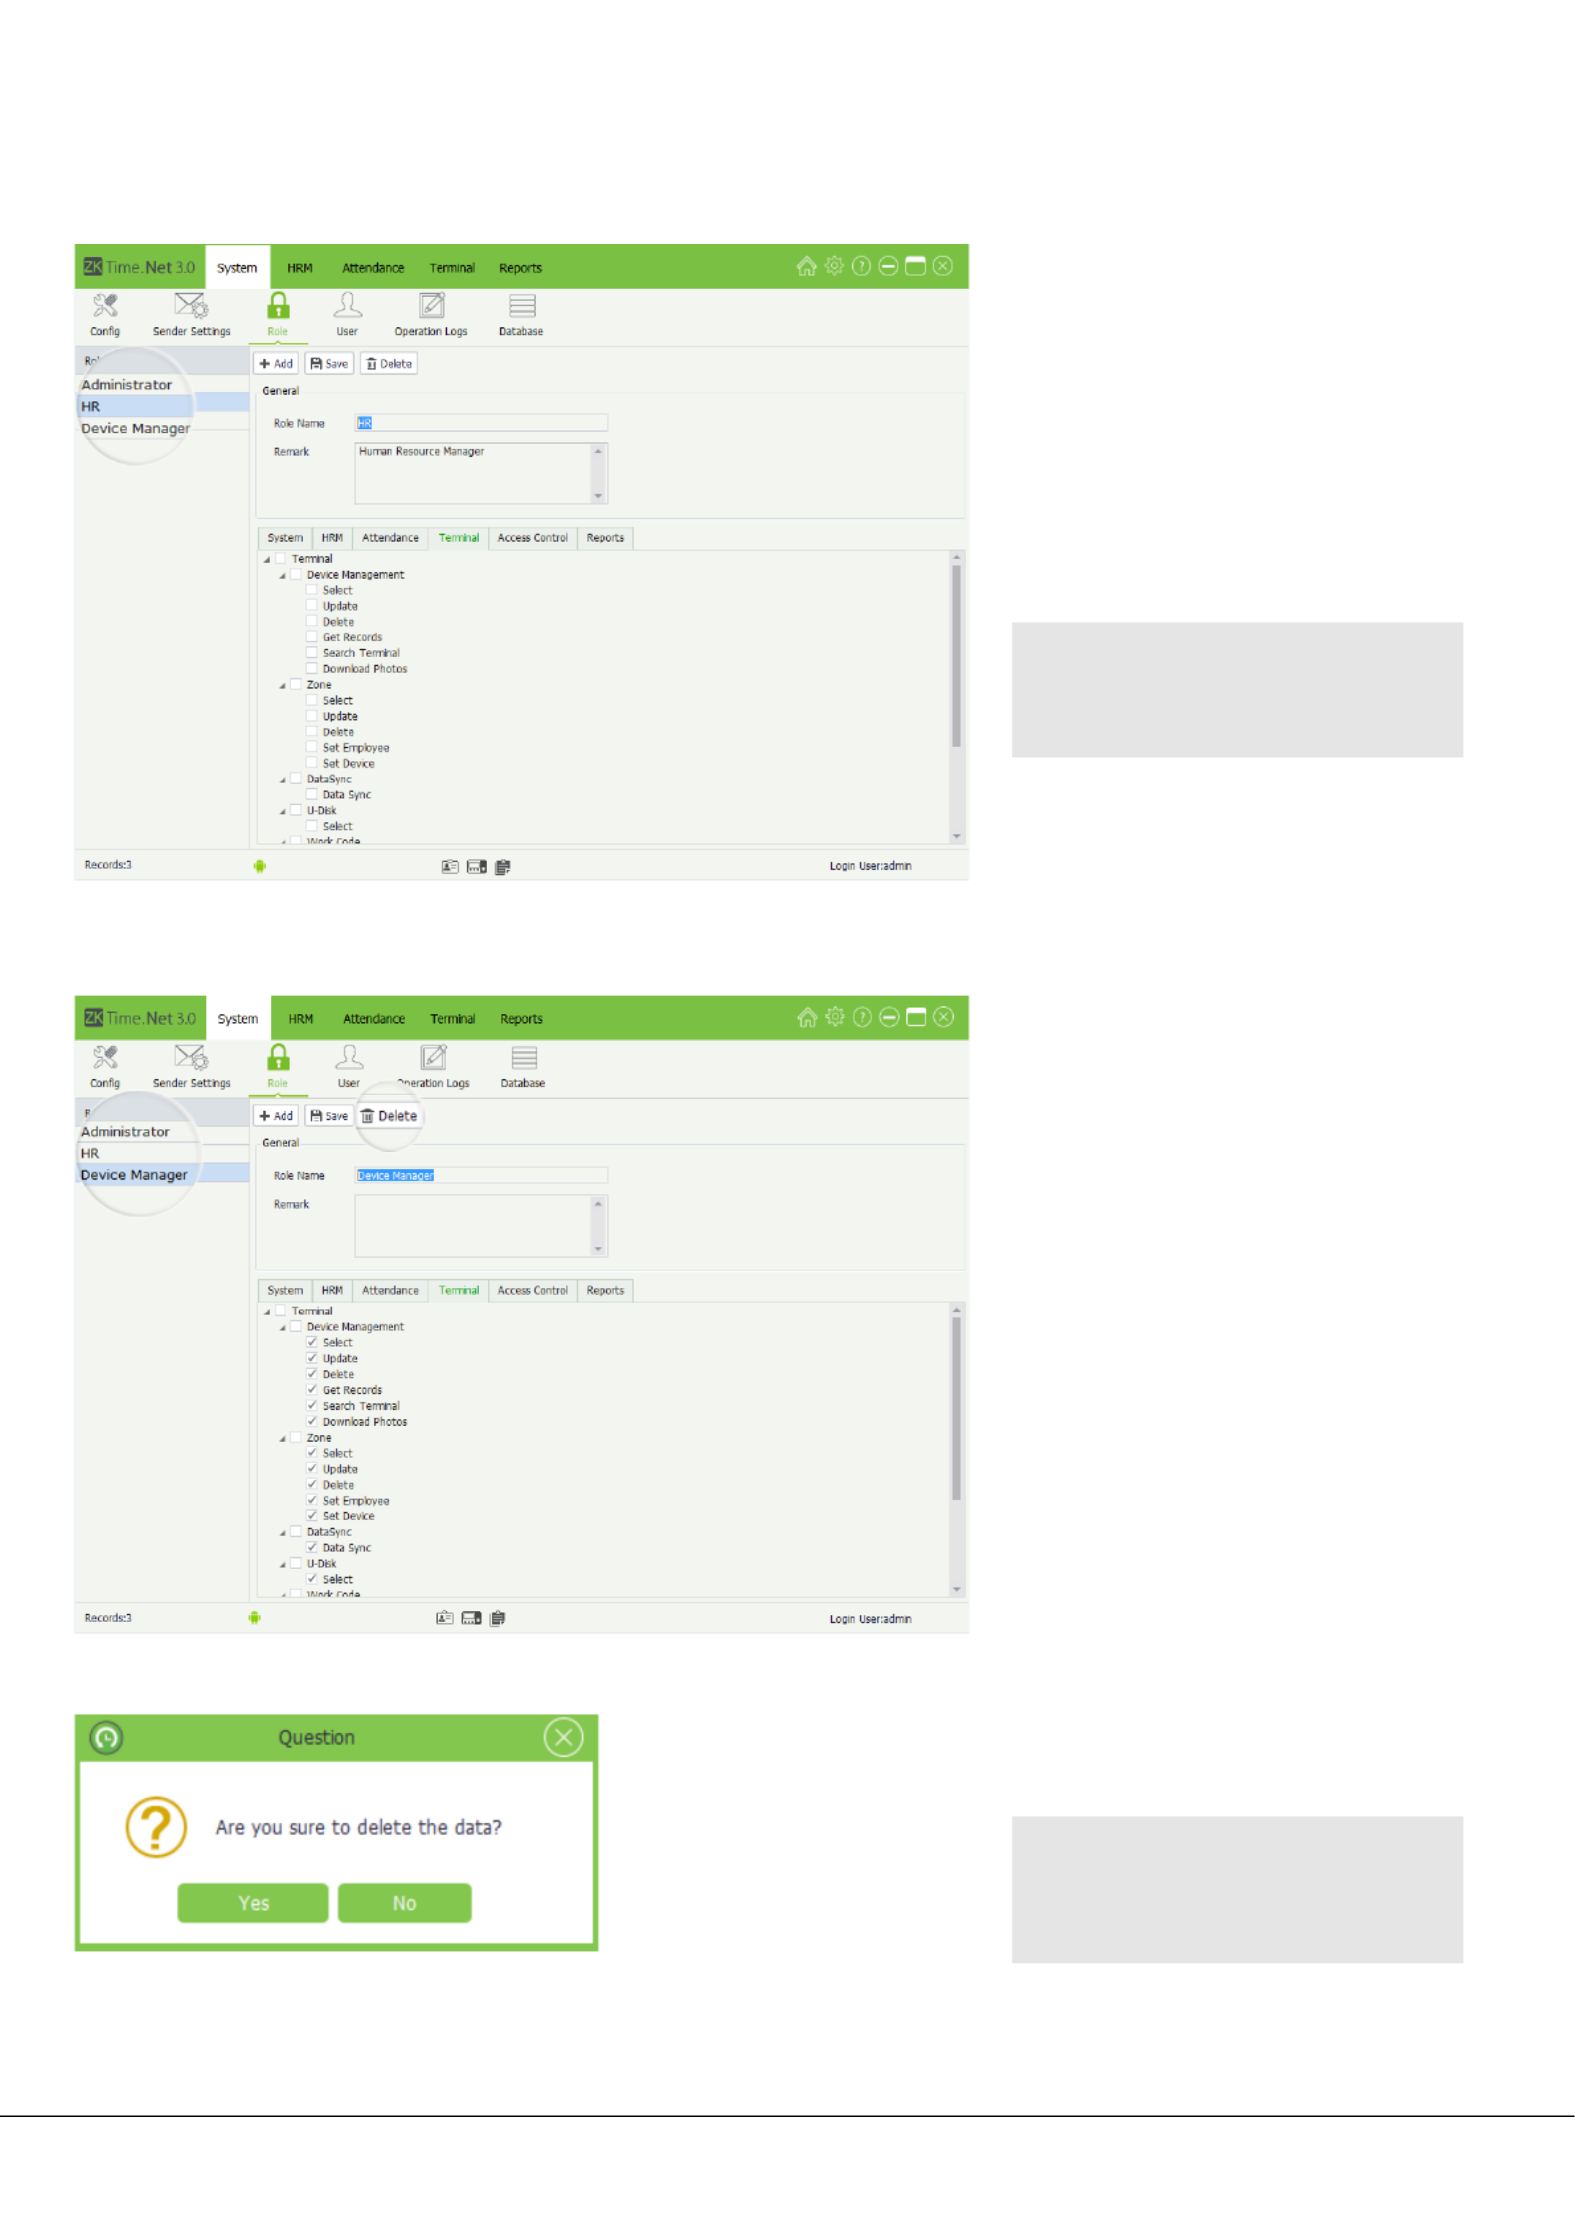
Click > to enter the interface. You can add, delete, edit and query [System] [Role] Role management
roles as required.
• Add Role
• Note: The system has one role
(Administrator) in default setting.
This role has all privileges.
1. [Add] Click button to enter the
Add Role interface.
2. Set the general information
and assign the privilege for
role as required.
• General
Role Name, Remark: Enter the role
name and remark information.
• Assigning Privilege
Tick ( ) and select privileges in the
Privilege Type Tab; or directly tick (
) and select the highest privilege to
select all sub-privileges.
For example, if you tick ( ) and
select the highest privilege HRM,
then the sub-privileges of HRM, such
as Company, Employee, Pay Code,
etc. will be selected automatically as
shown in the ngure.
3. [Save] After setting, click button
to save changes.
22 ZKTime.Net 3.0 - Android
• Editing Role
• Delete Role
1. Click and select the role
which you want to edit on
the list on the Role Role
Management interface.
2. Modify the role information as
required.
• Tips: The specic
operation method is the
same as Adding Role.
3. [Save] After setting, click button
to save the role information.
1. Click and select the role
which you want to delete
on the list.Role
2. [Delete] Click button, and
a question box will pop
up.
3. [Yes] Click button to
delete the selected role.
• Note: The default role
(Administrator) of the system
cannot be deleted.

ZKTime.Net 3.0 - Android 23
4.4 User Management
Add user and assign role (privilege) for system. Click >[System] [User] to enter to the User Management
interface. You can add, delete, edit and query users as required.
• Add User
4.5 Operation Logs
The program will record all uses’ operations logs automatically.
Then you can check as required.
1. [Add] Click button to enter to
the interface.Add User
User Name, Password, Email
Address: Enter the user name,
(login) password and email address
for new user.
Role: By ticking ( ) role on
the list to assign privilege Role
for user; single selection only.
Remark: Enter the remarking
information as required.
2. [Save] After setting, click button
to save user info.
• Editing/Deleting User
• Tips: The operation methods
of editing/ deleting user are
the same as that in editing/
deleting role. For the specic
operation method, please refer
to “4.3 Role Management”.
Click > [System] [Operation Logs]
to enter the Operation Logs
management interface.

24 ZKTime.Net 3.0 - Android
• Export Operation Logs
Click button to export operation logs. [Export]
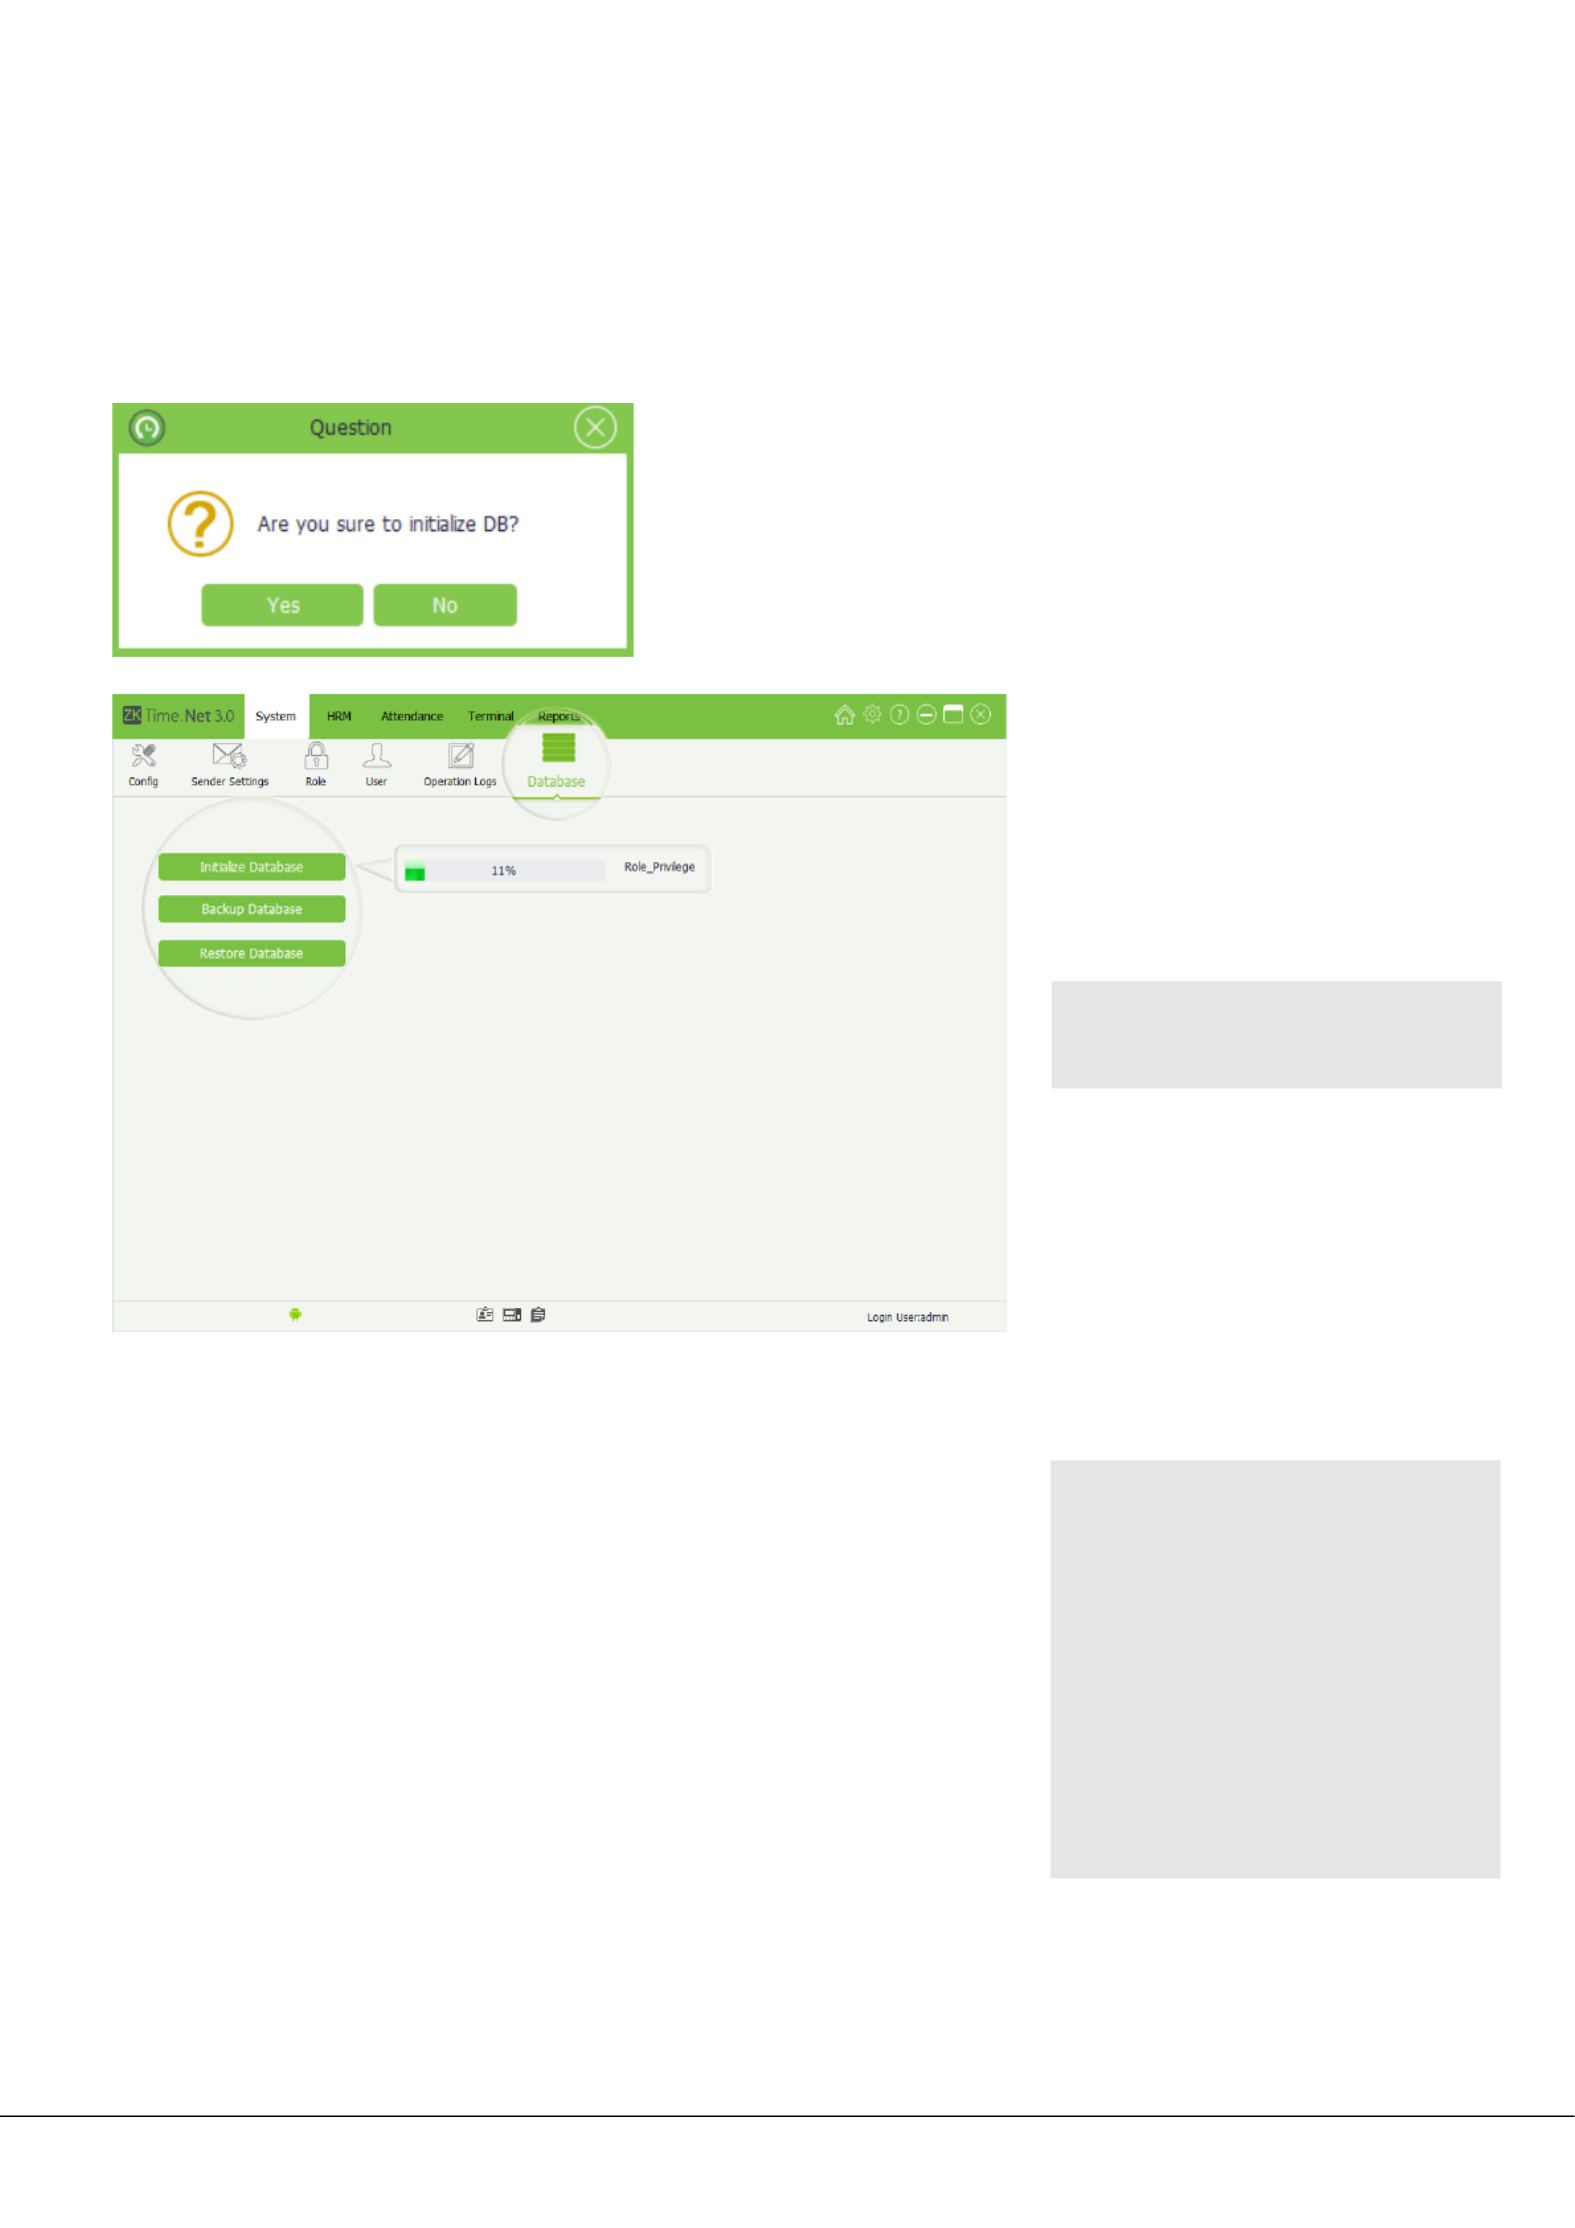
4.6 Database Management
Click > [System] [Database] Database Management to enter the interface:
• Filtering and Checking Operation Logs
Select query option to lter and display the
operation logs as required.
• Deleting Operation Logs
1. [Delete]Click the icon beside button, the
date selecting box will pop up.
2. Select date.
• ( For the method of selecting date, Tips:
please refer to “1. Selecting Date” in
A chapter.)ppendix 1 Common Operations
3. [Delete] Click button to delete all operation
logs before the selected date.
• Note: It is irreversible once you have
removed the Operation Logs, please
operate it carefully.
You can operation Initialize
Database, Backup Database and
Restore Database in Database
Management interface.
ZKTime.Net 3.0 - Android 25
4.6.1 Database Initialization
This function can restore system to the original installment status, please operate it carefully.
The specic operation is shown as below:
4.6.2 Database Backup
1. [Initialize Database] Click
button, the prompt Question
box will pop up.
2. [Yes] Click button to start
initializing database operation.
• Note: [No]Click button to
cancel operation.
• Notes:
(1) Do not set the database
backup path and the
system installation path
on the same drive.
(2) Do not set the backup
path under the root
directory of a drive.
In order to ensure the data security and to restore
database, we suggest you to back up the database in a
regularly
The specic operation is showed as below:
1. [Backup Database] Save AsClick button, the window will
pop up. Choose backup path and enter the backup le
name in the File name bar.
2. [Save] Click button to start backing up database; the
operation is shown as below:

26 ZKTime.Net 3.0 - Android
4.6.3 Database Restoration
The specic operation is shown as below:
• Note: We suggest you to back
up the database after building
human resource record, adding
terminal information and
accessing control setting.
Click button [Restore Database]
on the Database Management
interface, the window will Open
pop up. Choose the backup le
which you want to restore, and click
[Open] button to start restoring
database.

ZKTime.Net 3.0 - Android 27
5. Human Resource Management
Before using the attendance function, you should do the human resource management. The rst part is
Company Setting, namely, setting the company structure. The second part is employee management, namely,
entering employee and assigning department for the system and managing employee as required. The third
party is Pay Code setting.
5.1 Company Setting
Click > [HRM] [Company] to enter to the Company Setting interface. • Setting Company Information
The system supports you to modify
the company’s basic info and the
name for the default department.
Click button to save settings.[Save]
• Tips: Double-click the
department name to enter
the modify interface, and then
modify the name as required.
• Note: The parameter with *
means that it cannot be empty.
Country: Click button, and
then select country on the
drop-down list.
Logo: Click icon, double-
click the LOGO le in the pop-
up window, and then add
LOGO for company.
• Note: The size of the LOGO
le must be in the scope of
270*145. Moreover, you can
click icon to delete the
added LOGO.
Show In Report: Tick ( ) and
select this option, and then the
company’s LOGO will be displayed
in the reports. Otherwise, it will be
hidden.

28 ZKTime.Net 3.0 - Android
• Adding Department
1. Click icon, the Department Edit window will pop up as shown as below.
Parent: Click button in Parent parameter, and then select parent department for the new department.
Department Name: Enter the department name.
2. [Save] After setting, click button to save the department information.
• Editing Department
The operation method of editing department is the same as that in editing role. For the specic operation
method, please refer to “4.3 Role Management”.
• Deleting Department
Click the department which you want to delete on the Company Structure list, and then click icon:
• If there are no employees in this department, directly delete this department.
• If there are employees in this department, the prompt box will pop up.Question
Click [Yes] button to remove these employees from the default department.
Click button to cancel the deleting operation.[No]
5.2 Employee Management
Before use, you should add employee into the system, or import employee information from other programs.
• Note: The default company and
department are undeletable, but you can
modify them as required.

ZKTime.Net 3.0 - Android 29
5.2.1 Employee Adding
Add employee info, and enroll fingerprint and issue card as required.
The specific operation is shown as below:
• Basic Information
Status: Tick ( ) and select , meaning that this employee is in-service, otherwise, meaning that the Enable
emplayee has resigned.
Emp ID: Enter employee ID. The setting range is 1~999999999 and unrepeatable.
Click > [HRM] [Employee]
to enter the Employee
Management interface.
You can add, delete, edit and
query employees as required
on this interface.
1. [Add] Click button
to enter the Add
Employee interface.
• Note: The parameter
with * means that it
cannot be empty.

30 ZKTime.Net 3.0 - Android
Department: Click button, and select the subordinate department on the drop-down department list.
Hire Date: Display the current date in default setting. Click button, and select hire date in the drop-down
date box as required.
Salary Mode: Hours Click button, and select the salary mode on the drop-down list; you can select or
Salary as required.
Terminal Zone: Click button, and select the (attendance) zone on the drop-down area list. For the Terminal
Zone setting, please refer to “7.2 Zone Setting”.
Photo: Supports two kinds of method to add photo information of employee:
• Method 1: Click icon, double-click and select file in the pop-up window, and then add photo of
employee.
• Method 2: If the computer is connected with video camera, you can click icon, and add photo of
employee by using camera photograph.
Password/Password 2: Enter password as required. When the employee has password verification privilege,
then he/ she can punch-in / punch-out via password on the device.
Card/Card 2: Enter the card No. to issue card for employee.
FP Count, Face Count: Display the count of enrolled fingerprints and faces.
• Others Setting
Click to enter the othersOthers
setting interface.
Set employee information as
required.
2. [Save]After setting, click
button to save employee
information.
• Tips: The size of the
employee photo must be in
the scope of 200*200. You
can click icon to delete the
added employee photo.

ZKTime.Net 3.0 - Android 31
5.2.2 Fingerprint Management
The program supports Terminal or FP Sensor to enroll fingerprint for employee.
• Viewing FP
1. Click and select employee on
the list, and click Employee
Enroll FP to enter the Enroll
Fingerprint interface.
2. You can view the enrolled
fingeprint of this employee on
this page.
• Note: The fingerprint can
not be edited or deleted in
ZKTime.Net 3.0.

32 ZKTime.Net 3.0 - Android
5.2.3 Employee Maintenance
• Editing Employee
1. Click and select employee on the Employee list.
2. Modify the employee information as required, and click button to save settings.[Save]
• Deleting Employee
1. Click and select employee on the Employee list.
2. [Delete] QuestionClick button, the prompt box will pop up.
3. [Yes] Click button to delete the selected employee, or click button to cancel operation.[No]
• Batch Update
1. Tick ( ) and select multi
employee on the Employee list.
Click button, the [Batch Update]
Batch Update window will then
pop up.
2. Batch update the employees’
Department Hire Date Salary , ,
Mode Terminal Zone, and as
required, and click [Save] button
to save settings.
ZKTime.Net 3.0 - Android 33
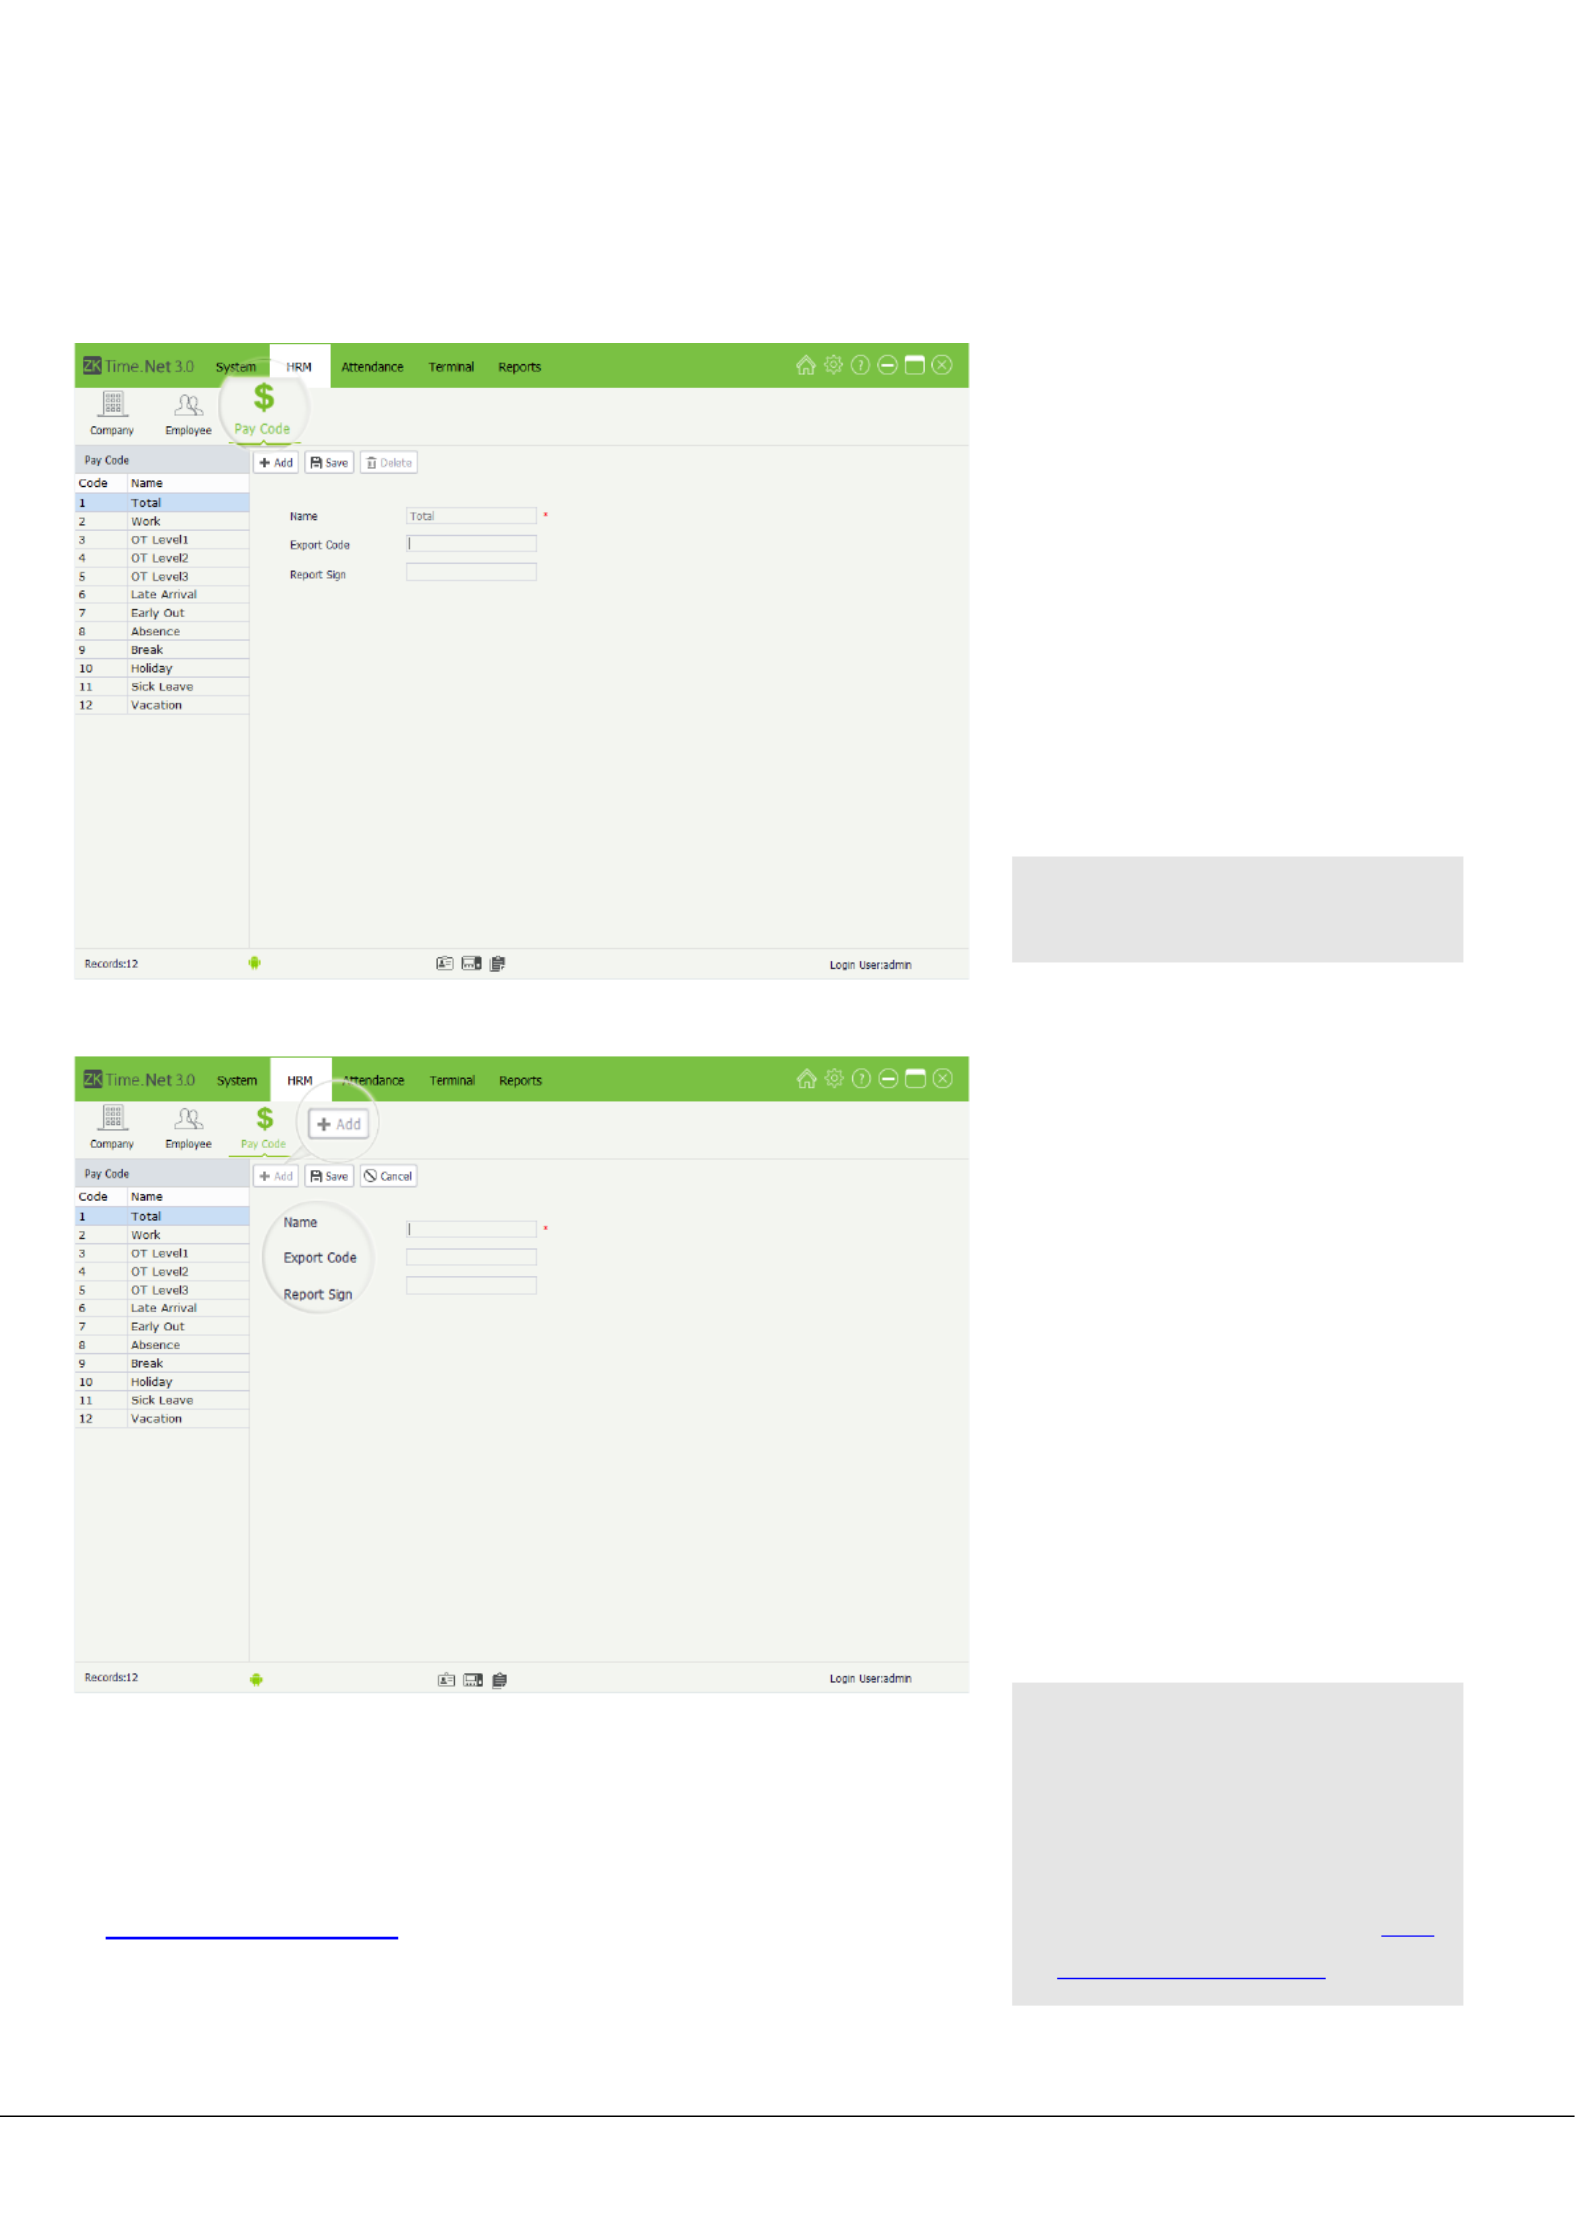
5.3 Pay Code
It is defined as the type of salary payment which is used for payroll calculation.
• Add Pay Code
Click >[HRM] [Pay Code] to enter
the Pay Code setting interface.
1. [Add] Click button to enter the
Add Pay Code interface.
• Note: The parameter with *
means that it cannot be empty.
Name: Enter the pay code name.
Export Code, Report Sign: Enter
the export code and the report
sign for this pay code.
2. [Save] After setting, click button
to save information.
• Note: The Pay Code whose
Export Code is greater than or
equal to11 will be used for Pay
Code setting on the Assigning
Exception menu interface.
For details, please refer to “6.5
Assigning Exception ”.
• Edit/Delete Pay Code
The operation method of editing/deleting pay code is the same asthat
in editing/deleting role. For the specific operation method, please refer
to “4.3 Role Management”.
34 ZKTime.Net 3.0 - Android
6. Attendance Management
To help enterprises perform an information-based attendance management, this software offers effective
functions in automatically collecting, calculating and querying employee attendance data. This improves the
management of human resources and facilitates the check-in of employees. This software enables managing
department to collect statistics and check employee attendance, as well as to query and appraise the
attendance of all departments, thus allowing enterprises to acquire accurate employee attendance data.
The data exchange between the attendance device and the program has to be performed in advance to
execute synchronous management of the attendance device, and collect the employee attendance records
saved In the attendance device. For the attendance device setting, please refer to “7.1 Device Management”.
The Attendance menu mainly possesses the following functions: Attendance Rule setting, Timetable and Shift
which are used for common attendance, Schedule (includes Temporary Schedule) and Assigning Exception
etc.
6.1 Attendance Rule
The attendance system varies across companies, so you need to manually set attendance rules to ensure the
accuracy of the nal attendance calculation. The attendance rule setting is a major way to demonstrate a
company’s attendance system.
Click [Attendance] [Rule]> to enter the setting interface. Set it as required, and click Attendance Rule [Save]
button to save settings.
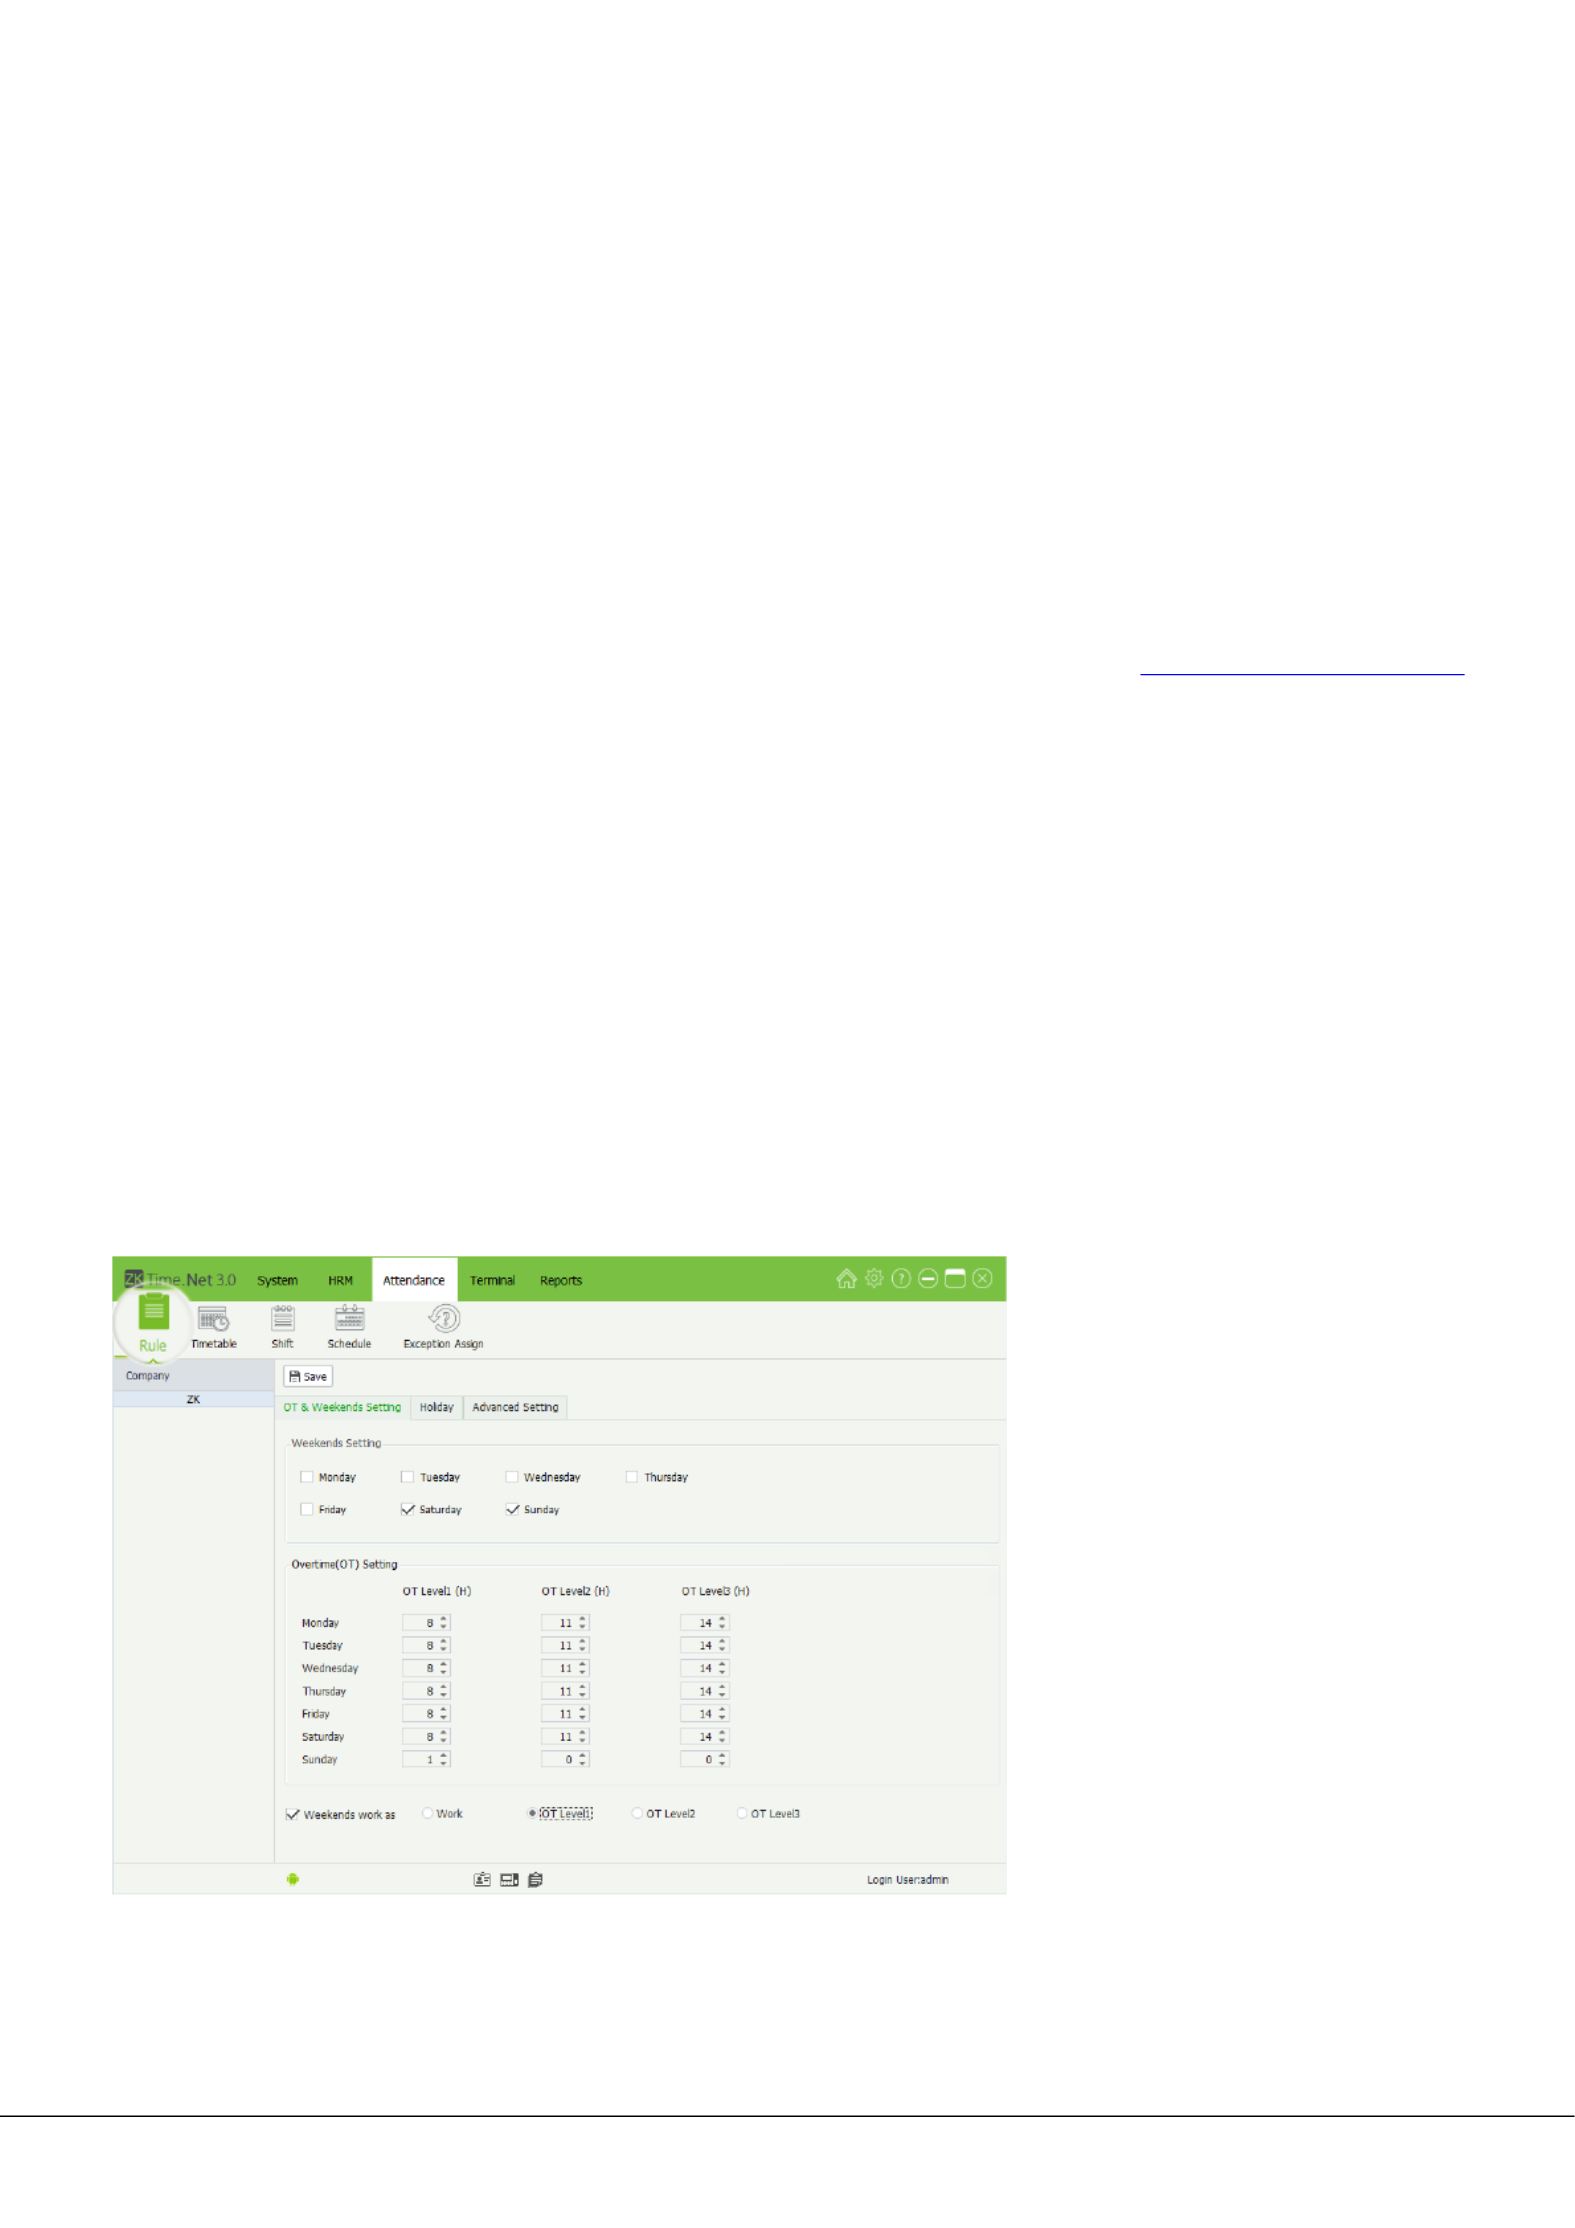
6.1.1 OT & Weekend Setting

ZKTime.Net 3.0 - Android 35
• Weekend Setting
Select weekends based on the company's actual situation. (Multiple selection is enabled)
• Overtime (OT) Setting
Set OT Levels 1, 2, and 3 to different lengths of work time.
Method of Overtime Level Calculation: (Calculated in subparagraph)
Assume that the values of T1 to T3 are specied as below. T represents the end point of work time.
• If an employee’s are greater than but less than actual daily working hours Time 1 Time 2, then the
overtime at OT Level 1 Actual daily working hours Time 1 is the minus .
• If an employee’s are greater than but less than actual daily working hours Time 2 Time 3, then the
overtime at OT Level 1 Time 2 Time 1 is the minus ; the overtime at OT Level 2 actual daily working is the
hours Time 2 minus .
• If an employee’s are greater than , then the overtime at actual daily working hours Time 3 OT Level 1 is
the minus Time 2 Time 1 OT Level 2 Time 3 Time 2; the overtime at is minus ; the overtime of OT Level 3
is the minus .actual daily working hours Time 3
The following example is used to explain how overtime is calculated by using the values specified in the
preceding figure.
• If an employee works 9 hours a day, he/she has 1-hour overtime (9 minus 8) at OT Level 1.
Click OT & Weekend Setting on the
Attendance Rule setting interface,
to enter the OT & Weekend Setting
interface.
Time 1
Time 2
Time 3

36 ZKTime.Net 3.0 - Android
• If the employee works 12 hours a day, he/she has a total of 4-hour overtime, 3-hour overtime (11 minus 8)
at OT Level 1 and 1-hour overtime (12-11) at OT Level 2.
• If the employee works 15 hours a day, he/she has a total of 7-hour overtime, 3-hour overtime (11 minus 8)
at OT Level 1, 3-hour overtime (14-11) at OT Level 2, and 1-hour overtime (15-14) at OT Level 3.
Weekends work as: Species how the work time on weekends is calculated. The work time on weekends can
be included into the normal work time or one of the three types of overtime.
6.1.2 Holiday Setting
The required attendance time on holidays might differ from that on usual days. For ease of operation, the
system provides Holiday setting which allows you to set the attendance time and rules for holidays. After a
holiday is specied, the system will set attendance rules for the holiday, and collect statistics and display the
attendance records on the holiday.
Click on the Holiday Attendance
Rule setting interface to enter the
Holiday setting interface.
Click [Add] button, and the Holiday
Edit interface will pop up.

ZKTime.Net 3.0 - Android 37
• Adding Holiday
Name: Enter the holiday name.
Count Work Time: You can select , Work OT Level 1 OT Level 2 OT Level 3 , or based on actual situation.
Circulation Rules Setting: You can select Fixed Date Cycle by Year Cycle by Date, or as required.
-->When select Fixed Date or Cycle by Year
Fixed Date: When select Fixed Date, then this holiday will only be applied to the selected date.
Cycle by Year: When the holiday has a fixed date, such as the New Year’s Day on January 1th, you can set the
holiday as Cycle by Year. After setting, the system will set this date as holiday automatically.
Start From: Click button, and then select the holiday starting date in the drop-down date box.
Days: Supports manual input or clicking / to increase or decrease to set continuous days for holiday.
-->When select ad Cycle by Date
Cycle by Date: The holiday has no fixed date, such as the Thanksgiving Day on every 4th Thursday of
November, you can set the holiday as Cycle by Date.
1. [Add] Click button to enter the
Add Holiday interface.

38 ZKTime.Net 3.0 - Android
Start From: Click button of the Month, Week and Day one by one, and then select the specific month, week
and day on the drop-down list.
Days: Supports manual input or clicking / to increase or decrease values to set continuous days for holiday.
2. [Save] After setting, click button to save settings.
• Editing/Deleting Holiday
The operation methods of editing/deleting holidays are the same as editing/deleting the role. For the specific
operation method, please refer to “4.3 Role Management”.
6.1.3 Advanced Setting
Time interval between two records: Sets the interval length for saving effective attendance record. The
default length is minutes. You can set this parameter as required. For example, if an employee punches 5
in at 08:30 a.m, his/her another punch-out record in the following 5 minutes (08:30~08:35) will be invalid
and will not be stored in the attendance device. Similarly, the attendance device will save only the valid
punch=in / punch-out records according to this rule.
If no check-in, counted as Late Arrival / Absent: Tick ( ) and select this option, click button and select
Late Arrival Absent or on the drop-down list as required. Then employee with no check-in will be counted as
Late Arrival Absent or .
If no check-out, count as Early Out / Absent: Tick ( ) and select this option, click button and select
Early Out Absent or on the drop-down list as required. Then employee with no check-in will be counted
as or .Early Out Absent
Click Advanced Setting
on the Attendance Rule
setting interface to enter the
Advanced Setting interface.

ZKTime.Net 3.0 - Android 39
If Late exceeds _ minutes, counted as absent: 0 The default value is minute, you can modify it as
required. After ticking ( ) and selecting this option, if the is a.m, all punch-in after Check-In Time 9 9
a.m, will be counted as absent.
If Early leave exceeds _ minutes, counted as absent: The default value is minute, you can modify it as 0
required. After ticking ( ) and selecting this option, if the is p.m, all punch-out before Check-Out Time 18 18
p.m, will be counted as absent.
Active automatic schedule for no-shift employee: After ticking ( ) and selecting this option, the system will
schedule employees with no shifts for the default shift automatically.
Active attendance status: If tick ( ) and select this option, the system will identify the attendance
status of the attendance records downloaded from the device according to the preset attendance status
in the device. If you do not select this option, the system will identify the attendance status according to
the odd and even numbers of the attendance records, where an odd number represents “check-in’ and
an even number represents “check-out”. Specifically, the first attendance record is “check-in”, the second is
“check-out”, the third is “check-in”, the fourth is “Check-out”, and the like etc.
Active Round Setting (Attendance > Timetable > Round Setting): By ticking ( ) and selecting this option,
to activate the Round Setting function, otherwise, it is disabled.
6.2 Timetable Setting
You can set all timetables that may be used during the attendance procedure, and then set each option as
required. Such as Check-In /Out Time, Late Arrival/Early Out time, Break and Rounding setting, etc.
Before shift setting, you must set all the timetables that might be used. Only if employees are assigned to
shifts, can you collect and calculate employee attendance time based on the attendance parameters.
Click [Attendance] >
[Timetable] to enter the
Timetable setting interface.
The system has a default timetable
named. It can be modified as
required but undeletable.

40 ZKTime.Net 3.0 - Android
6.2.1 Timetable Adding
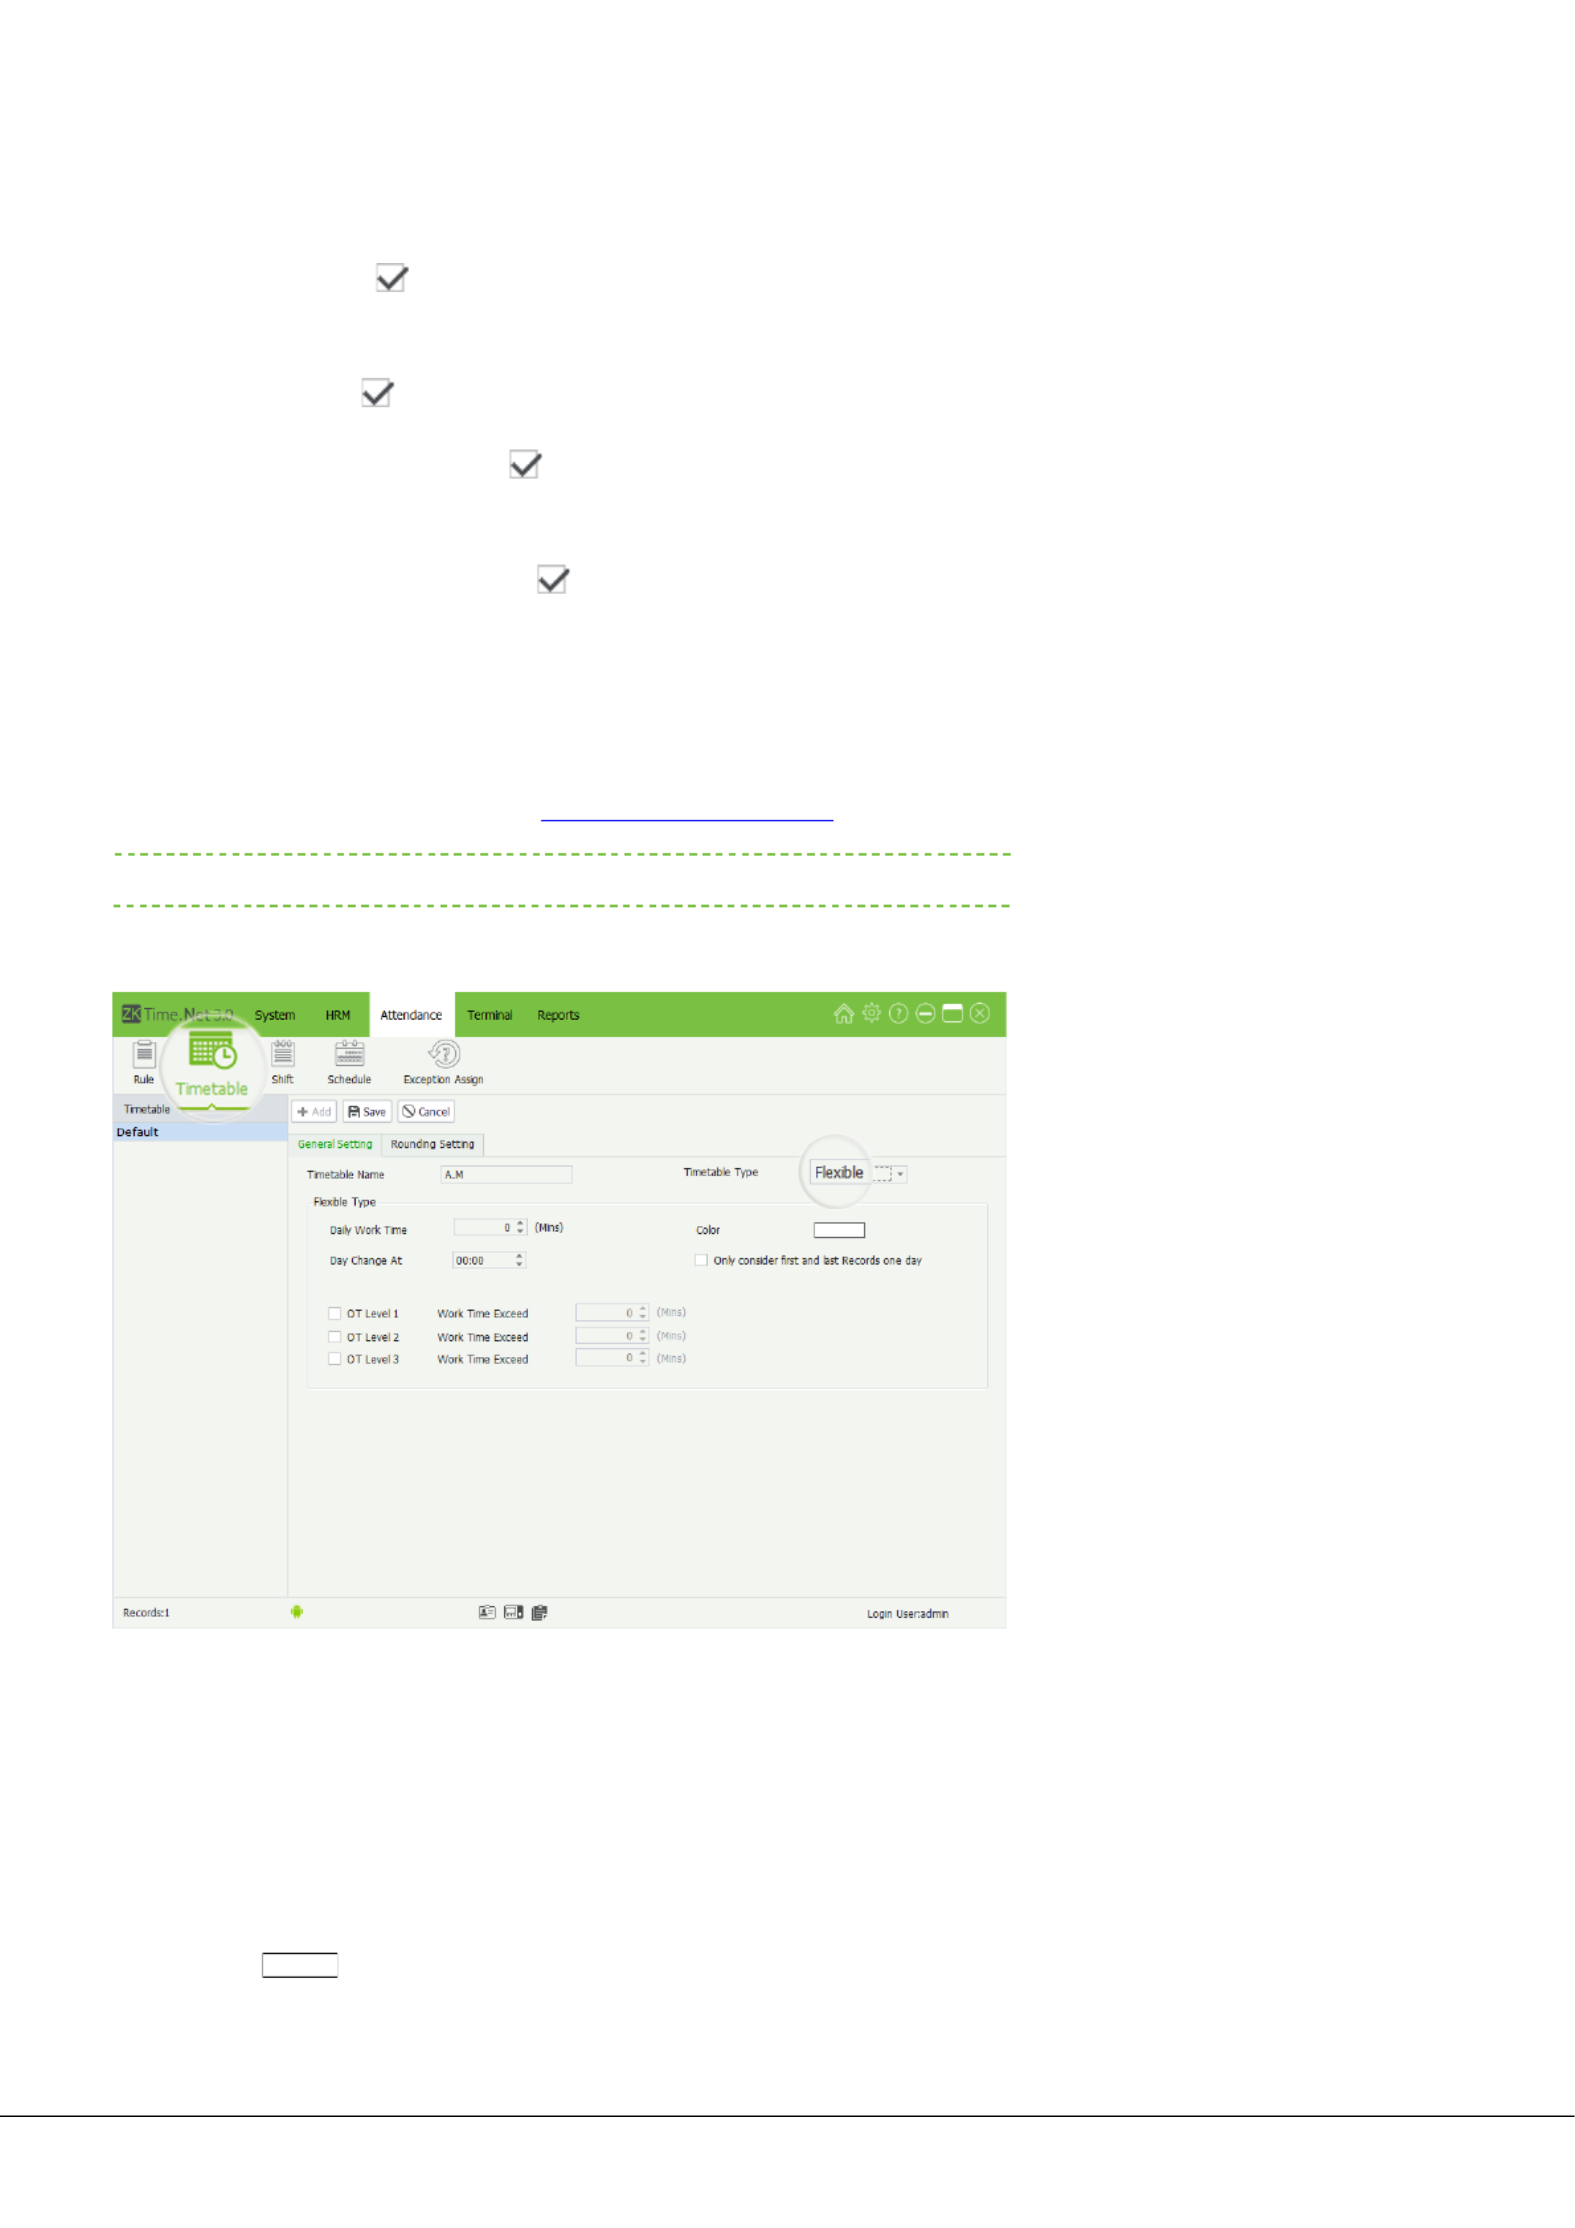
1. [Add] Click button to enter the Adding Timetable interface.
• General Setting
Timetable Name: Enter the timetable name.
Timetable Type: Click button and select timetable type (Regular or Flexible) on the drop-down list
-->When the Timetable Type is selected as Regular
The General Setting interface is shown as below:
• Regular Type
Check-In/Out Time: Set the Check-In and Check-Out Time.
Color: Click icon, and select the display color for this timetable in the pop-up color box.
Active additional setting: If you want to manually modify the following parameters, tick ( ) and select this
option, and modify them as required. Otherwise, use the default setting by unselecting this option.
Check-In Start at: The default Check-In Start time is two hours before Time. For example, if the Check-In
Check-In time is 08:00, the system will set 06:00 as the Check-In Start Time automatically. The Check-In Start
Time must be earlier than or equal to Time. All punches before Time will be counted as Check-In Check-In Start
invalid records.
Check-In End at: The default Time is two hours after time. For example, when the Check-In End Check-In
Check-In Time is 08:00, the system will set 10:00 as the Check-In End Time automatically.
42 ZKTime.Net 3.0 - Android
Break (Mins): Generate automatically after setting Start Time and End Time.
Auto Deduct: If tick ( ) and select this option, without punching, the system will deduct the break time from
the work time automatically.
Must Check: If tick ( ) and select this option, you must check before and end break.
Early return_ Mins forward to: means to active this function. Set the time as required. When comes back
early before this time, then forward to Work OT Level 1 OT Level 2 OT Level 3, , , or .
Break Exceed _ Mins forward to: means to active this function. Set the time as required. When comes back
exceeding this time, then forward to , , or .Late Arrival Early Out Absence
» Editing / Deleting Break
The operation methods of editing/deleting break are the same as editing/deleting role. For the specific
operation method, please refer to “4.3 Role Management”.
-->When the Timetable Type is selected as Flexible
The Flexible Setting interface is shown as below:
• Flexible Type
(Not to limit the Check-In and Check-Out Time, but the time between Check-In and Check-Out needs to be
greater than or equal to the Daily Work Time.)
Daily Work Time: Enter the daily work time, namely, the minimum time that employees have to work
every day.
Color: Click icon, and select the display color for this timetable in the pop-up color box.

ZKTime.Net 3.0 - Android 43
Day Change at: Set the day change time, namely, the end time of counting work time within a day. For
example, when the Day Change Time is 23 o’clock, the work time after 23 o’clock will be counted into the
work time of the next day.
Only consider first and last Records one day: After ticking ( ) and selecting this option, the system will only
record the first and last effective punch records; other records will be considered invalid. The terminal will only
store the effective records.
OT Level 1/2/3 Work Time Exceed: Set and select as required. The specific operation is the same as “6.1.1 OT &
Weekend Setting”.
• Rounding Setting
Click to enter the interface:Rounding Setting Rounding Setting
Rounding Type: There are two types of rounding, namely, Regular and Custom.
-->When the Rounding Type is selected as Regular
» Regular
Check-In/Check-Out Round Value: The minimum round-off unit of punch-in/ punch-out time. If the Round
Value = 10, then takes 10 minutes as the minimum unit when counting the punch-in/ punch-out time.
Check-In/Check-Out Round Down: The rules of rounding down. When punch-in/ punch-out time is
greater than or equal to the cutoff value, it gets rounded up; otherwise, it gets rounded down and not
counted on the attendance time.
Assume that Check-In/Check-Out Round Value = 10 minutes; Check-In/Check-Out Cutoff Value = 5
minutes.

44 ZKTime.Net 3.0 - Android
For example, if an employee checks in at 08:02 and checks out at 17:55, his/her check-in time will be counted
as 08:00 and check-out time as 18:00 after rounding off. In other words, the period of 2 minutes after the
requested check-in time will not be recorded as Late Arrival, and the period of 5 minutes before the requested
check-out time will not be recorded as Early Out.
-->When the Rounding Type is selected as Custom
The user can manually add rounding type as required.
Click button to add rounding type, and then set the Round Time,
Start Time and End Time as required.
The user-defined round rule must meet the following condition: Start
Time ≤ Round Time ≤ End Time. Any attendance time in the range of
Start Time to End Time will be recorded as the Round Time.
For example: when the Round Time is set to 07:05, the Start Time
is set to 07:00, and the End Time is set to 07:10, then the punch-in/
punch-out between 07:00 and 07:10 will be recorded as 07:05.
6.2.2 Timetable Edition/Deletion
The operation methods of editing/deleting timetable are the same as
that in editing/ deleting role. For the specific operation method, please
refer to “4.3 Role Management”.
• Tips: Click icon to delete
the rounding type.
• Note: The Round Time
cannot be set as Check-
In or Check-Out Time.
The round rule’s Start
and End Time must meet
one of the following
conditions
(1) The rounding type’s Start
and End time are earlier
than the Check-In Time.
(2) The rounding type’s Start
and End time are later
than the Check-In Time
and earlier than the
Check-Out Time.
(3) The rounding type’s Start
and End time are later
than the Check-Out Time.
2. After setting, click [Save]
button to save information.
• Tips: The default timetable
cannot be deleted.

ZKTime.Net 3.0 - Android 45
6.3 Shift Management
The Shift is a preset work schedule consisting of one or more preset timetables according to certain sequence
and cycle. To monitor employee’s time and attendance, you must set shifts first.
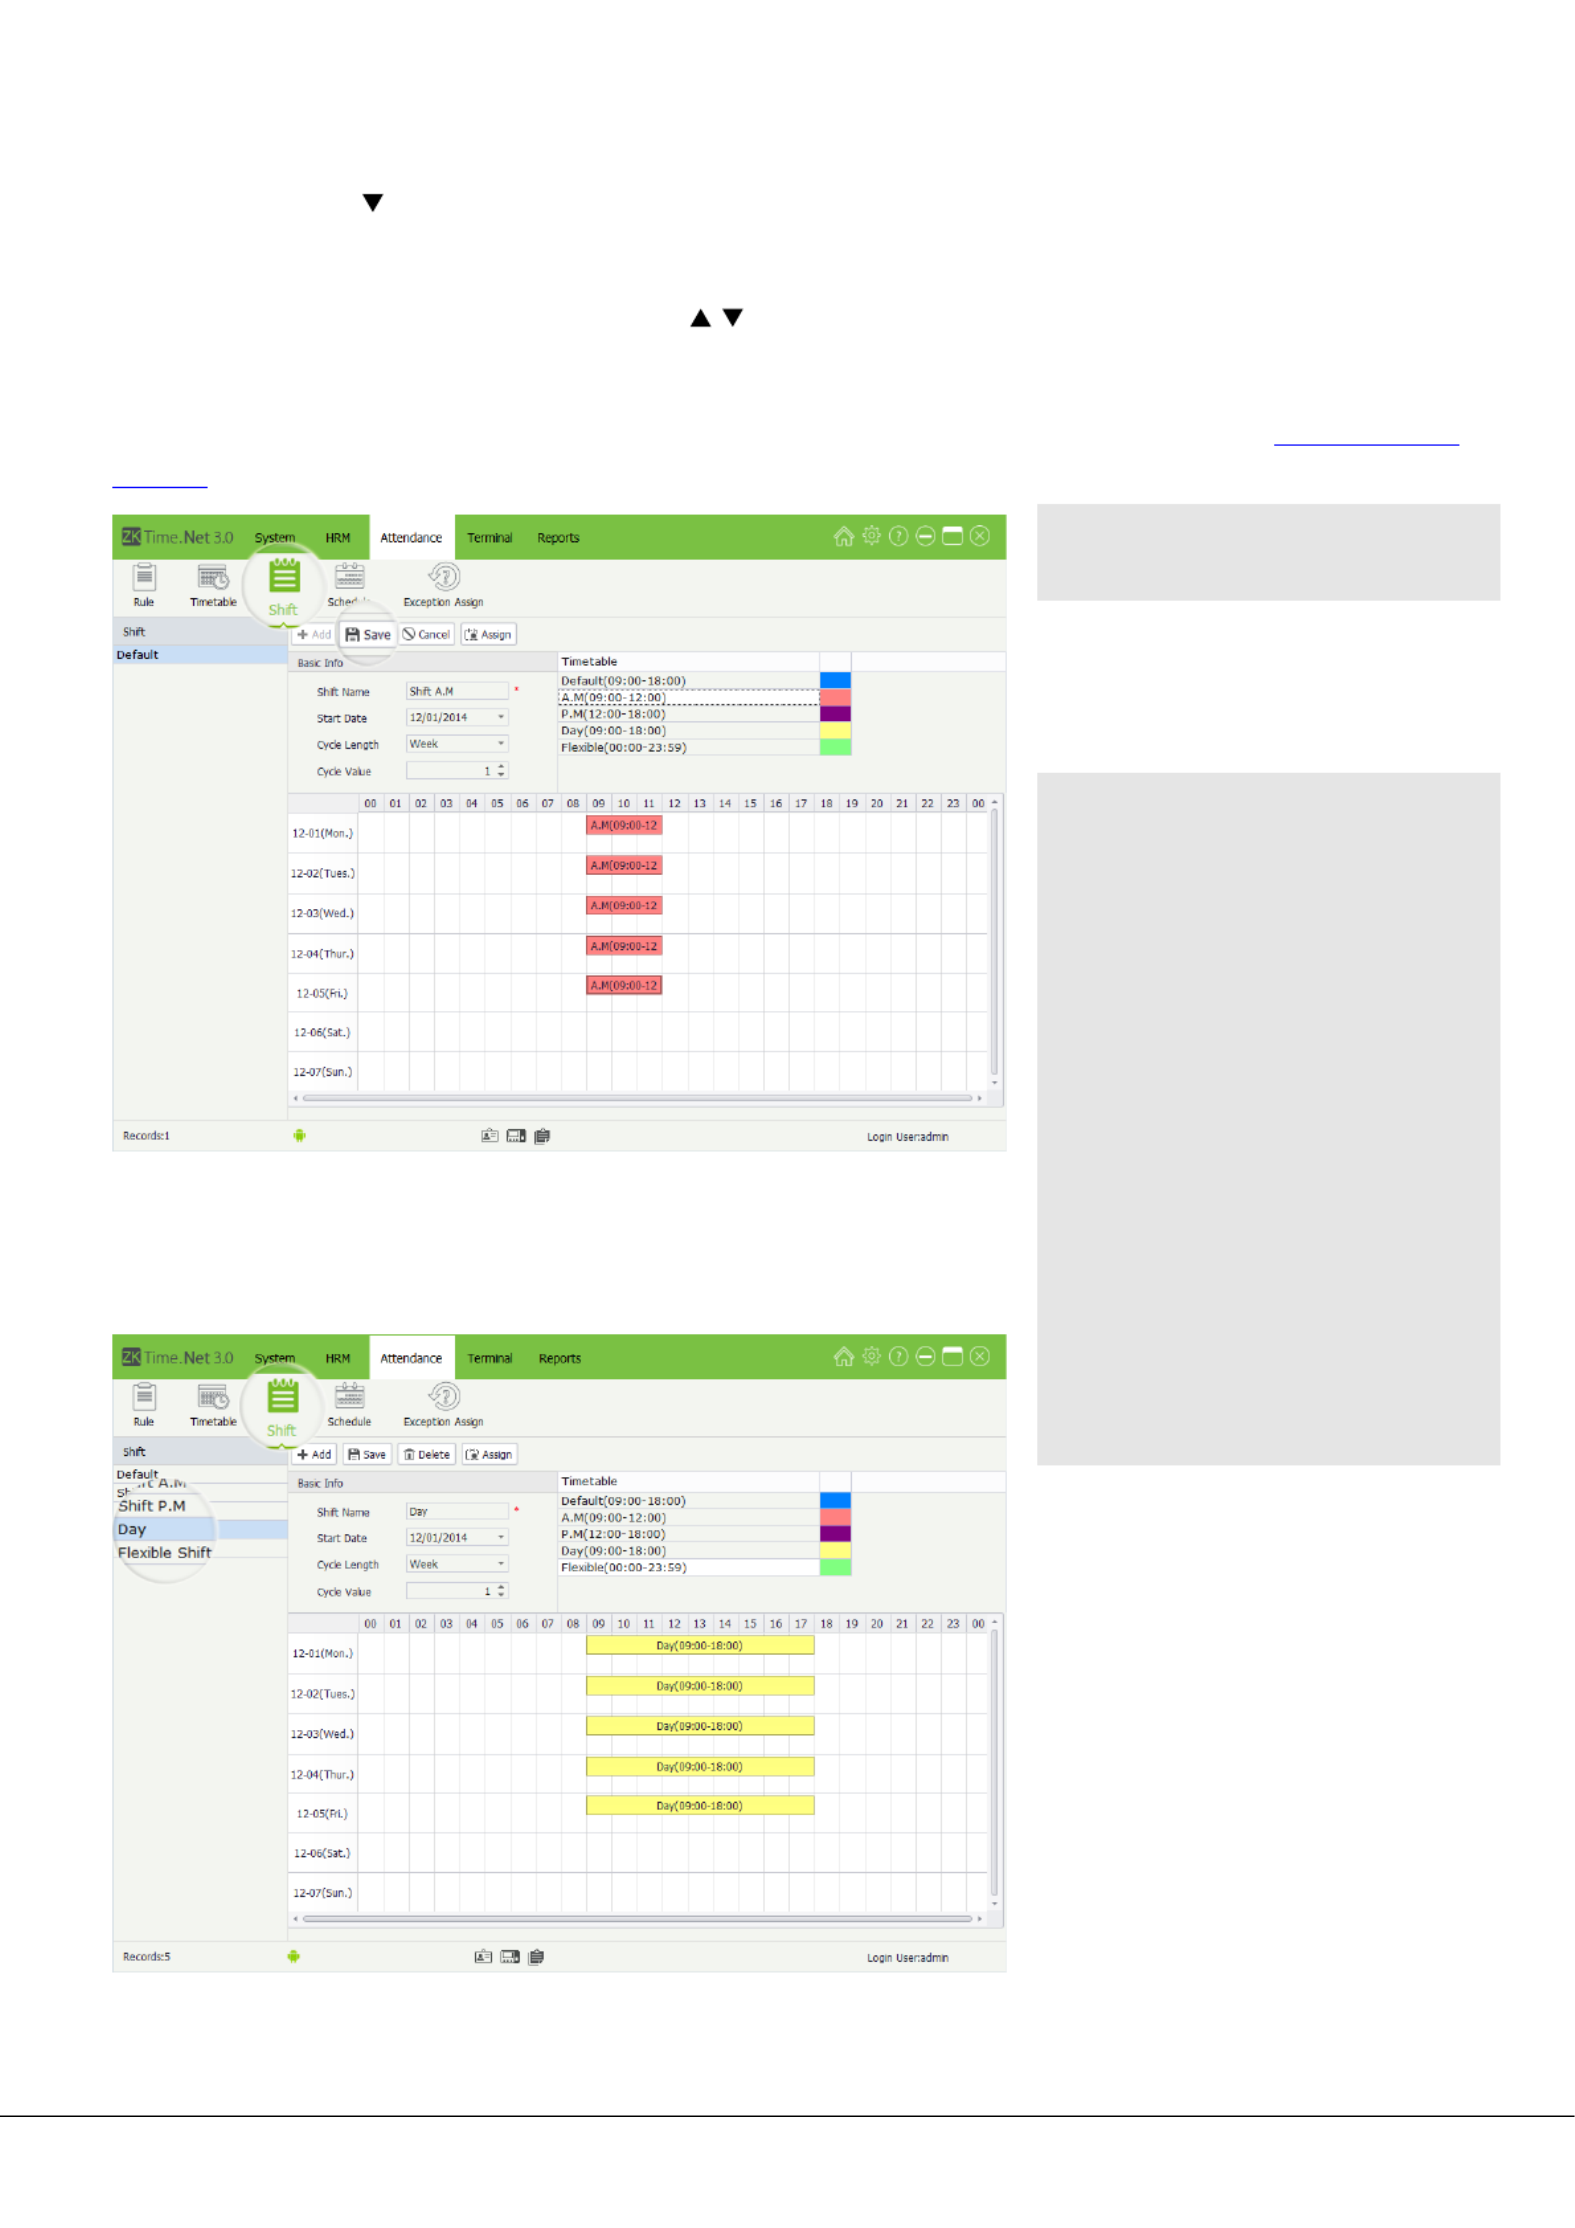
6.3.1 Shift Adding
Set the parameters as required, the specific operation is shown as below:
Shift Name: can be any characters; cannot be identical to any exiting shift name.
Start Date: Click button and select start date on the drop-down list.
Click [Attendance] [Shift]> to
enter the Shift Management
interface. All shifts will be displayed
on the Shift list.
• Click and select shift on the
Shift list, the detailed timetable
of the shift will be shown as the
chart on the right.
The system has a shift named
Default in default setting. It can
be modified as required but not
deleted.
1. [Add] Click button to enter the
Add Shift interface.
• Note: The parameter with *,
means that it cannot be empty.
46 ZKTime.Net 3.0 - Android
Cycle Length: Click button and select cycle length on the drop-down list. There are two options, Day and
Week.
Cycle Value: Manually input the value or click / button to increase or decrease the cycle value.
Timetable: Select timetable for this shift. Click and select timetable on the Timetable list, and drag it onto the
corresponding date (as shown as the figure below). For the timetable setting, please refer to “6.2 Timetable
Setting”.
6.3.2 Shift Maintenance
• Editing Shift
• Tips: The Shift Cycle Period =
Cycle Length * Cycle Value.
2. [Save] After setting, click button
to save. The added shift info will
be displayed in the Shift list.
• Note: A shift is a cycling of a
user-selected timetable in the
user-defined cycle. The dates
that are without any specified
timetable are deemed as
holidays. When arranging a
schedule for employees, the
user only needs to select the
start and end time of the shift
without specifying the working
days or vacations. After selecting
a shift, the system will determine
on which day the employees
need to work or taking time off
according to the predefined
cycle of the shift.
1. Click and select shift in the
Shift list to enter to the Edit
Shift interface.
2. Modify the parameters as
required, and click [Save] button
to save the shift info.

ZKTime.Net 3.0 - Android 47
• Deleting Shift
6.3.3 Shifts Assigning Management
Assigning shift for employee, namely, employee scheduling.
• Note: If you want to change
the timetable used by date,
you should click the select
the timetable on the date,
and then click [Delete] key
(on the keyboard) to delete
the old timetable. Finally click
and select timetable in the
Timetable list, and drag it onto
the corresponding date.
1. Click and select shift in
the Shift list, and then
click button, the [Delete]
Question box will pop up.
2. [Yes] Click button to delete
the selected shift, or click [No]
button to cancel operation.
• Note: After deleting the shift
info, the system will clear the
schedules that are being used
in this shift automatically.
1. Click and select shift on
the Shift list.
2. [Assign]Click button, the
Assigning Shift window will
pop up.

48 ZKTime.Net 3.0 - Android
Start/End Date: Select the start and end date for assigning shifts.
Employee: Tick ( ) and select employee. (Multiple choice)
6.4 Employee Schedule
After ticking ( ) and selecting Active automatic schedule for no-shift employee option in the Attendance
Rule setting interface, the system will use the default shift to schedule for no-shift employee automatically.
If an employee is not assigned with any work schedule, the system cannot collect statistics on the
employee’s attendance. If an employee is not assigned with any shift, the system cannot determine
whether the employee’s attendance record is Check-In or Check-Out and also cannot collect the
employee attendance data.
• Tips: For the method of selecting
date, please refer to “1. Select Date”
in Appendix 1 Common Operations
chapter.
• Note:
(1) If tick ( ) and select department, directly
select all employees in this department.
(2) The system supports search employee
vby or . Type in your query, Emp ID Name
and click button to search and select
the corresponding employee info.
3. [Save]After setting, click button to save.
Right now, the system will schedule for
the selected employee.
Click [Attendance] >
[Schedule] to enter to the
Employee Schedule interface.
You can query and check employee
schedule records, and assign
temporary schedule of employee
as required.
ZKTime.Net 3.0 - Android 49
6.4.1 Query and Check Employee Schedule
Tick ( ) and select employee in the Company Structure list to check the employee’s schedule.
To facilitate administrators to locate a employee quickly from a large number of employees, the system
supports querying via or to search and check employee’s schedule records. Emp ID Name
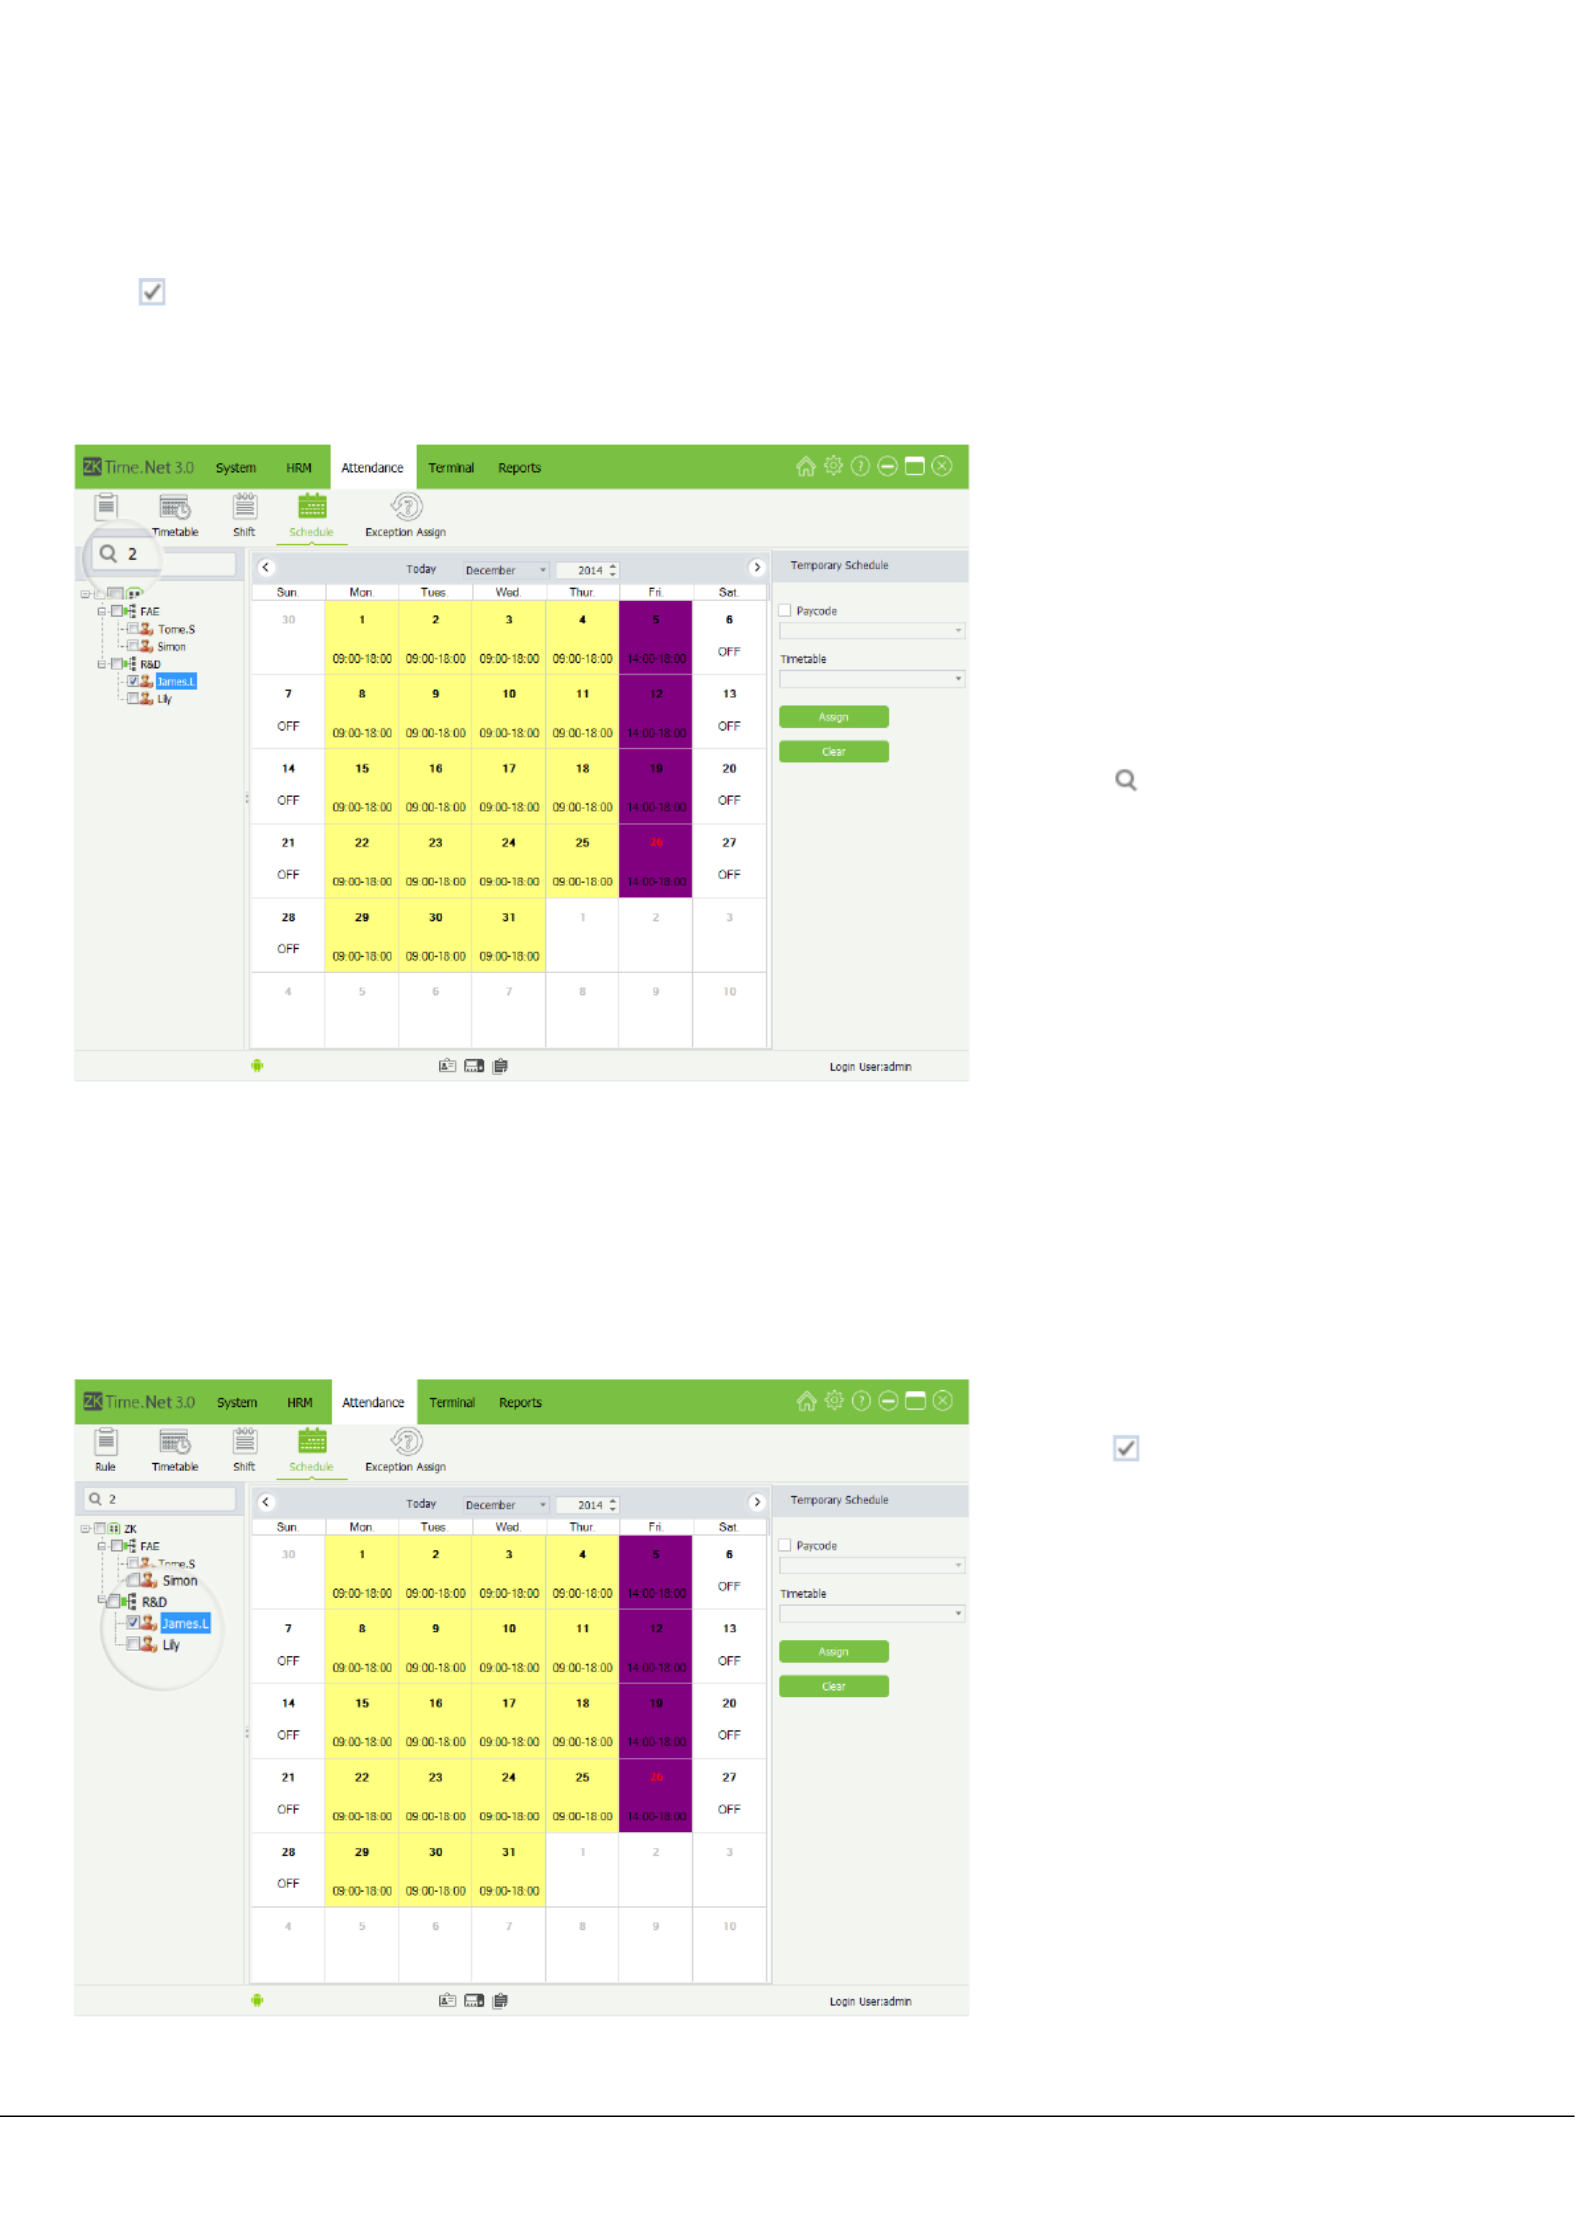
6.4.2 Temporary Schedule
• Adding Temporary Schedule
(If one (or several) employee needs to change his/her work hours
temporarily, his/her shift can be arranged temporarily.)
The specific operation method is
shown as below:
1. Enter or in the Emp ID Name
search bar.
2. Click button to search and
display the corresponding
employee’s schedule record.
1. Tick ( ) and select employee on
the list.Company Structure

50 ZKTime.Net 3.0 - Android
2. Select the year and month of the
date when the employee needs
a temporary schedule and then
click and select date. (Click and
hold the key to select more.) Ctrl
• Note: [Today]Click button, it
will turn to the current month,
the red one is the current date.
3. Pay CodeTick ( ) and select
option, click button, and select
the pay code for the temporary
schedule in the drop-down list.
4. Click button under the
Timetable option, and select
the timetable for the temporary
schedule in the drop-down list.
5. [Assign] After setting, click
button to add temporary
schedule for the selected
employee.
• Note: After a temporary
schedule is added on the
day with a fixed schedule,
the system will be subject
to the temporary schedule
for collecting employee
attendance data.
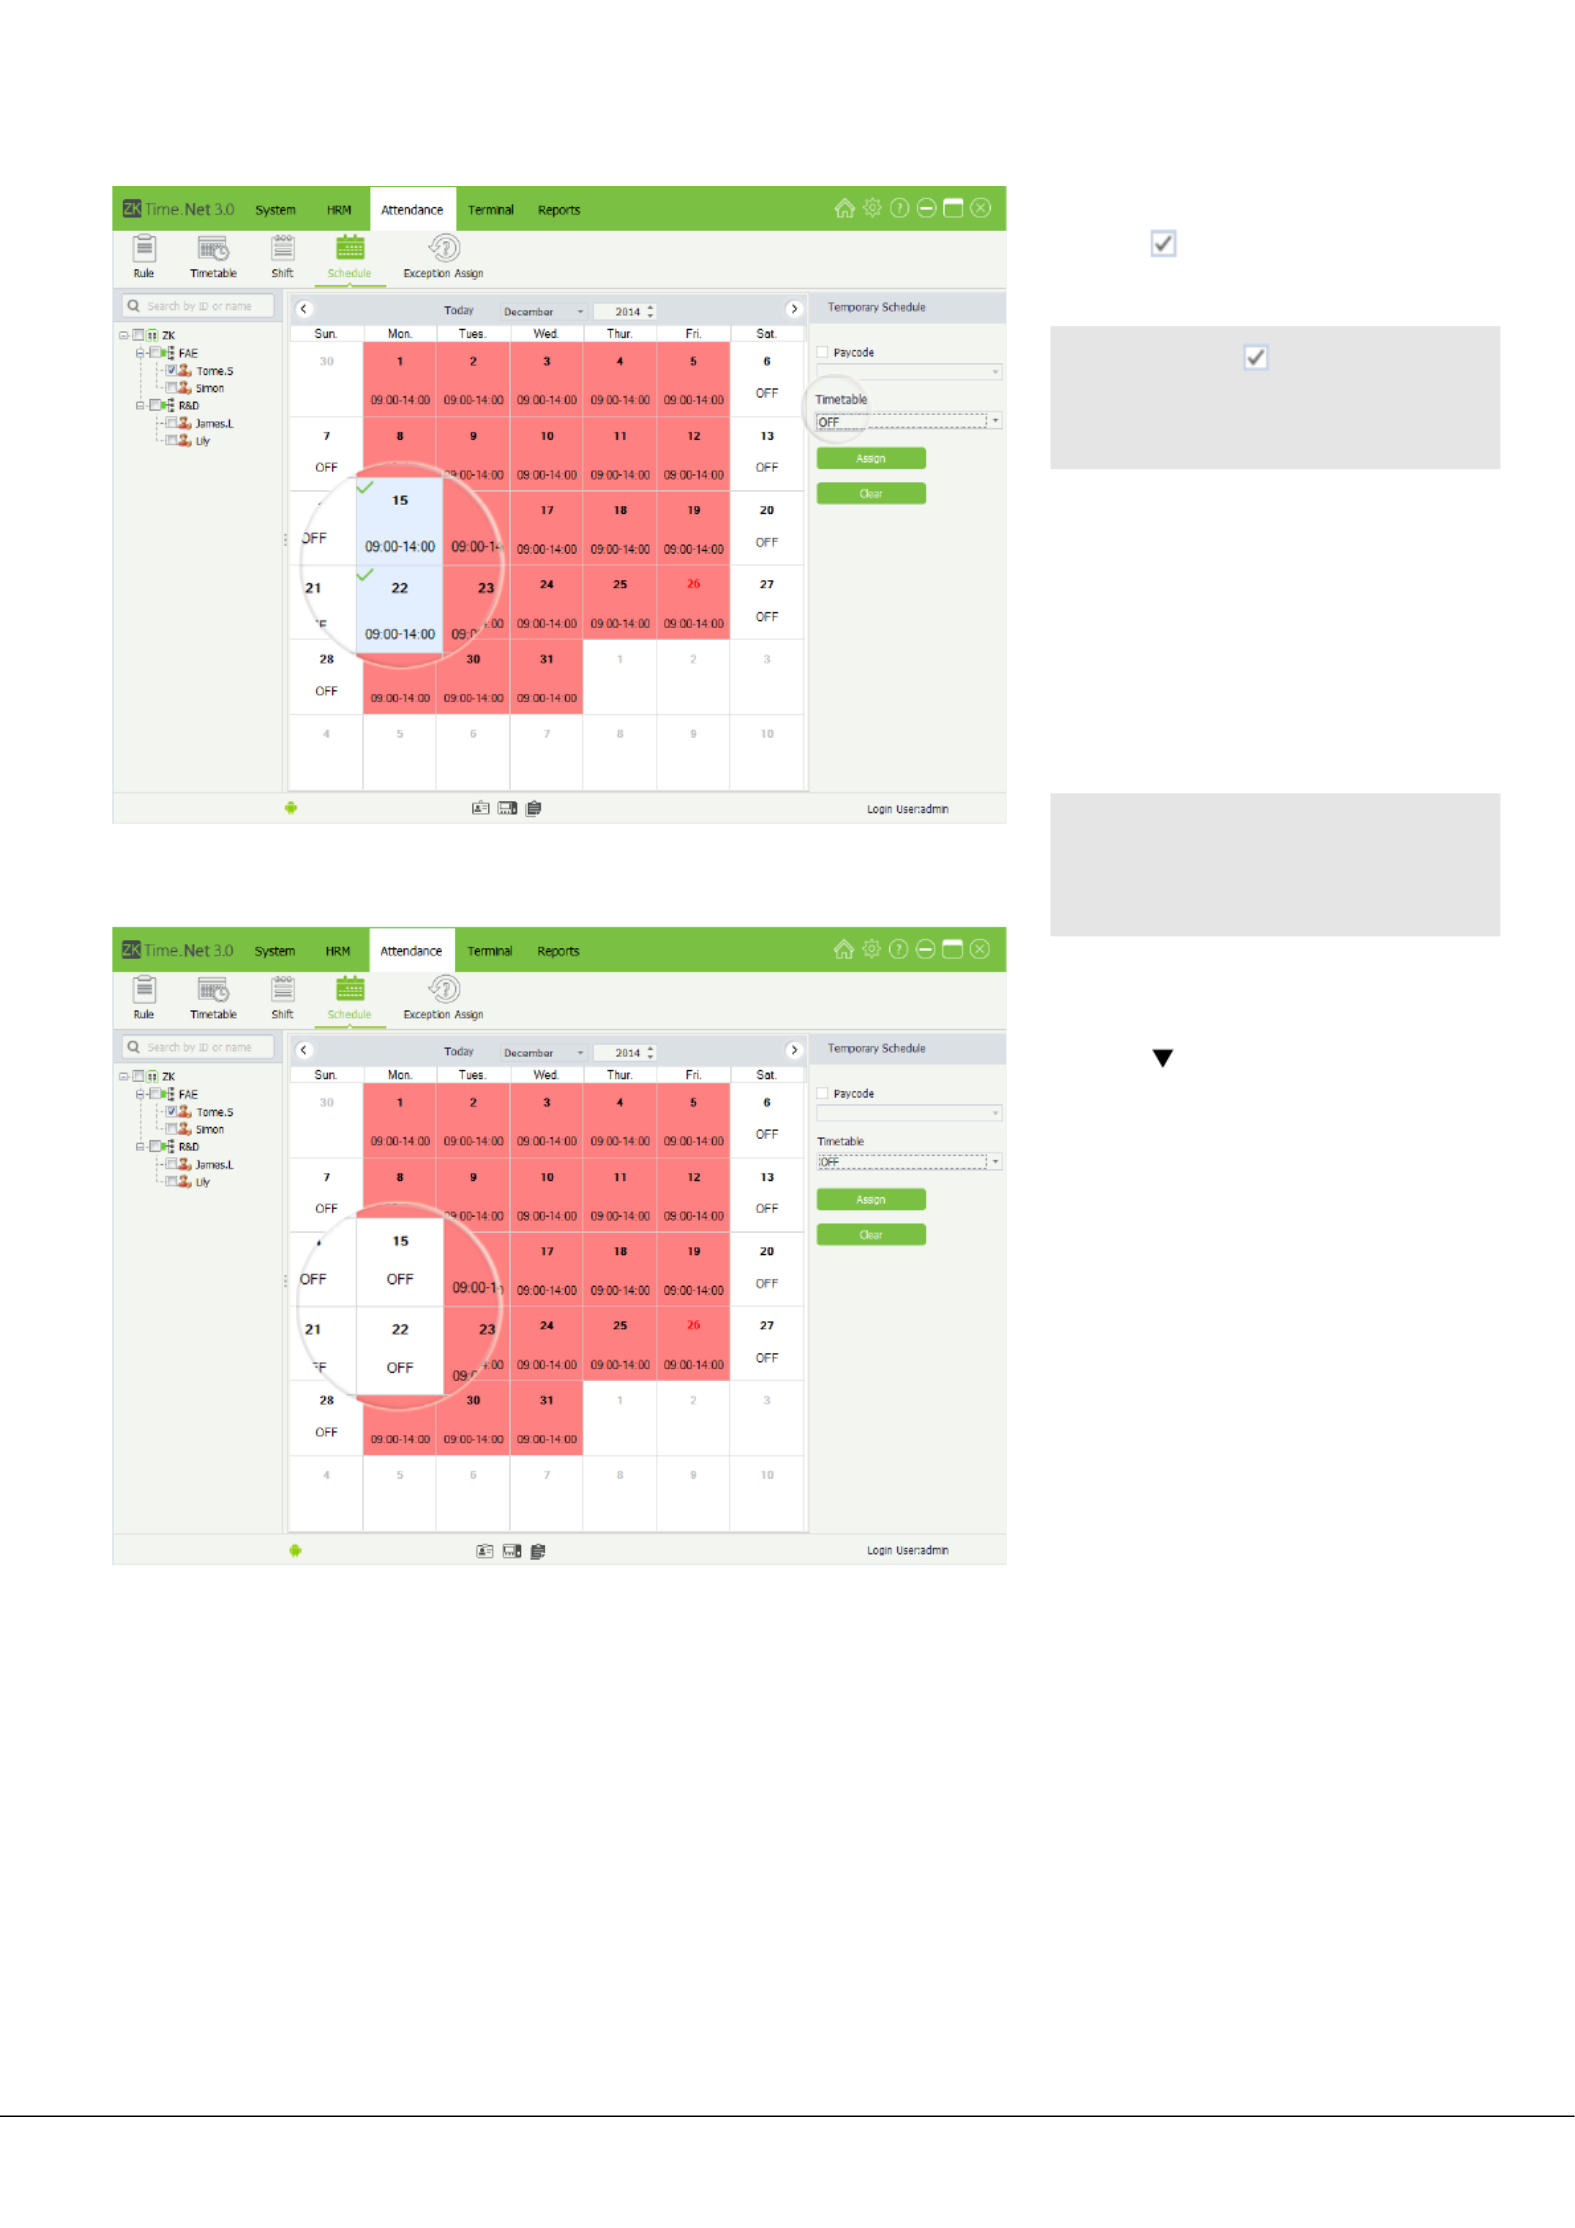
52 ZKTime.Net 3.0 - Android
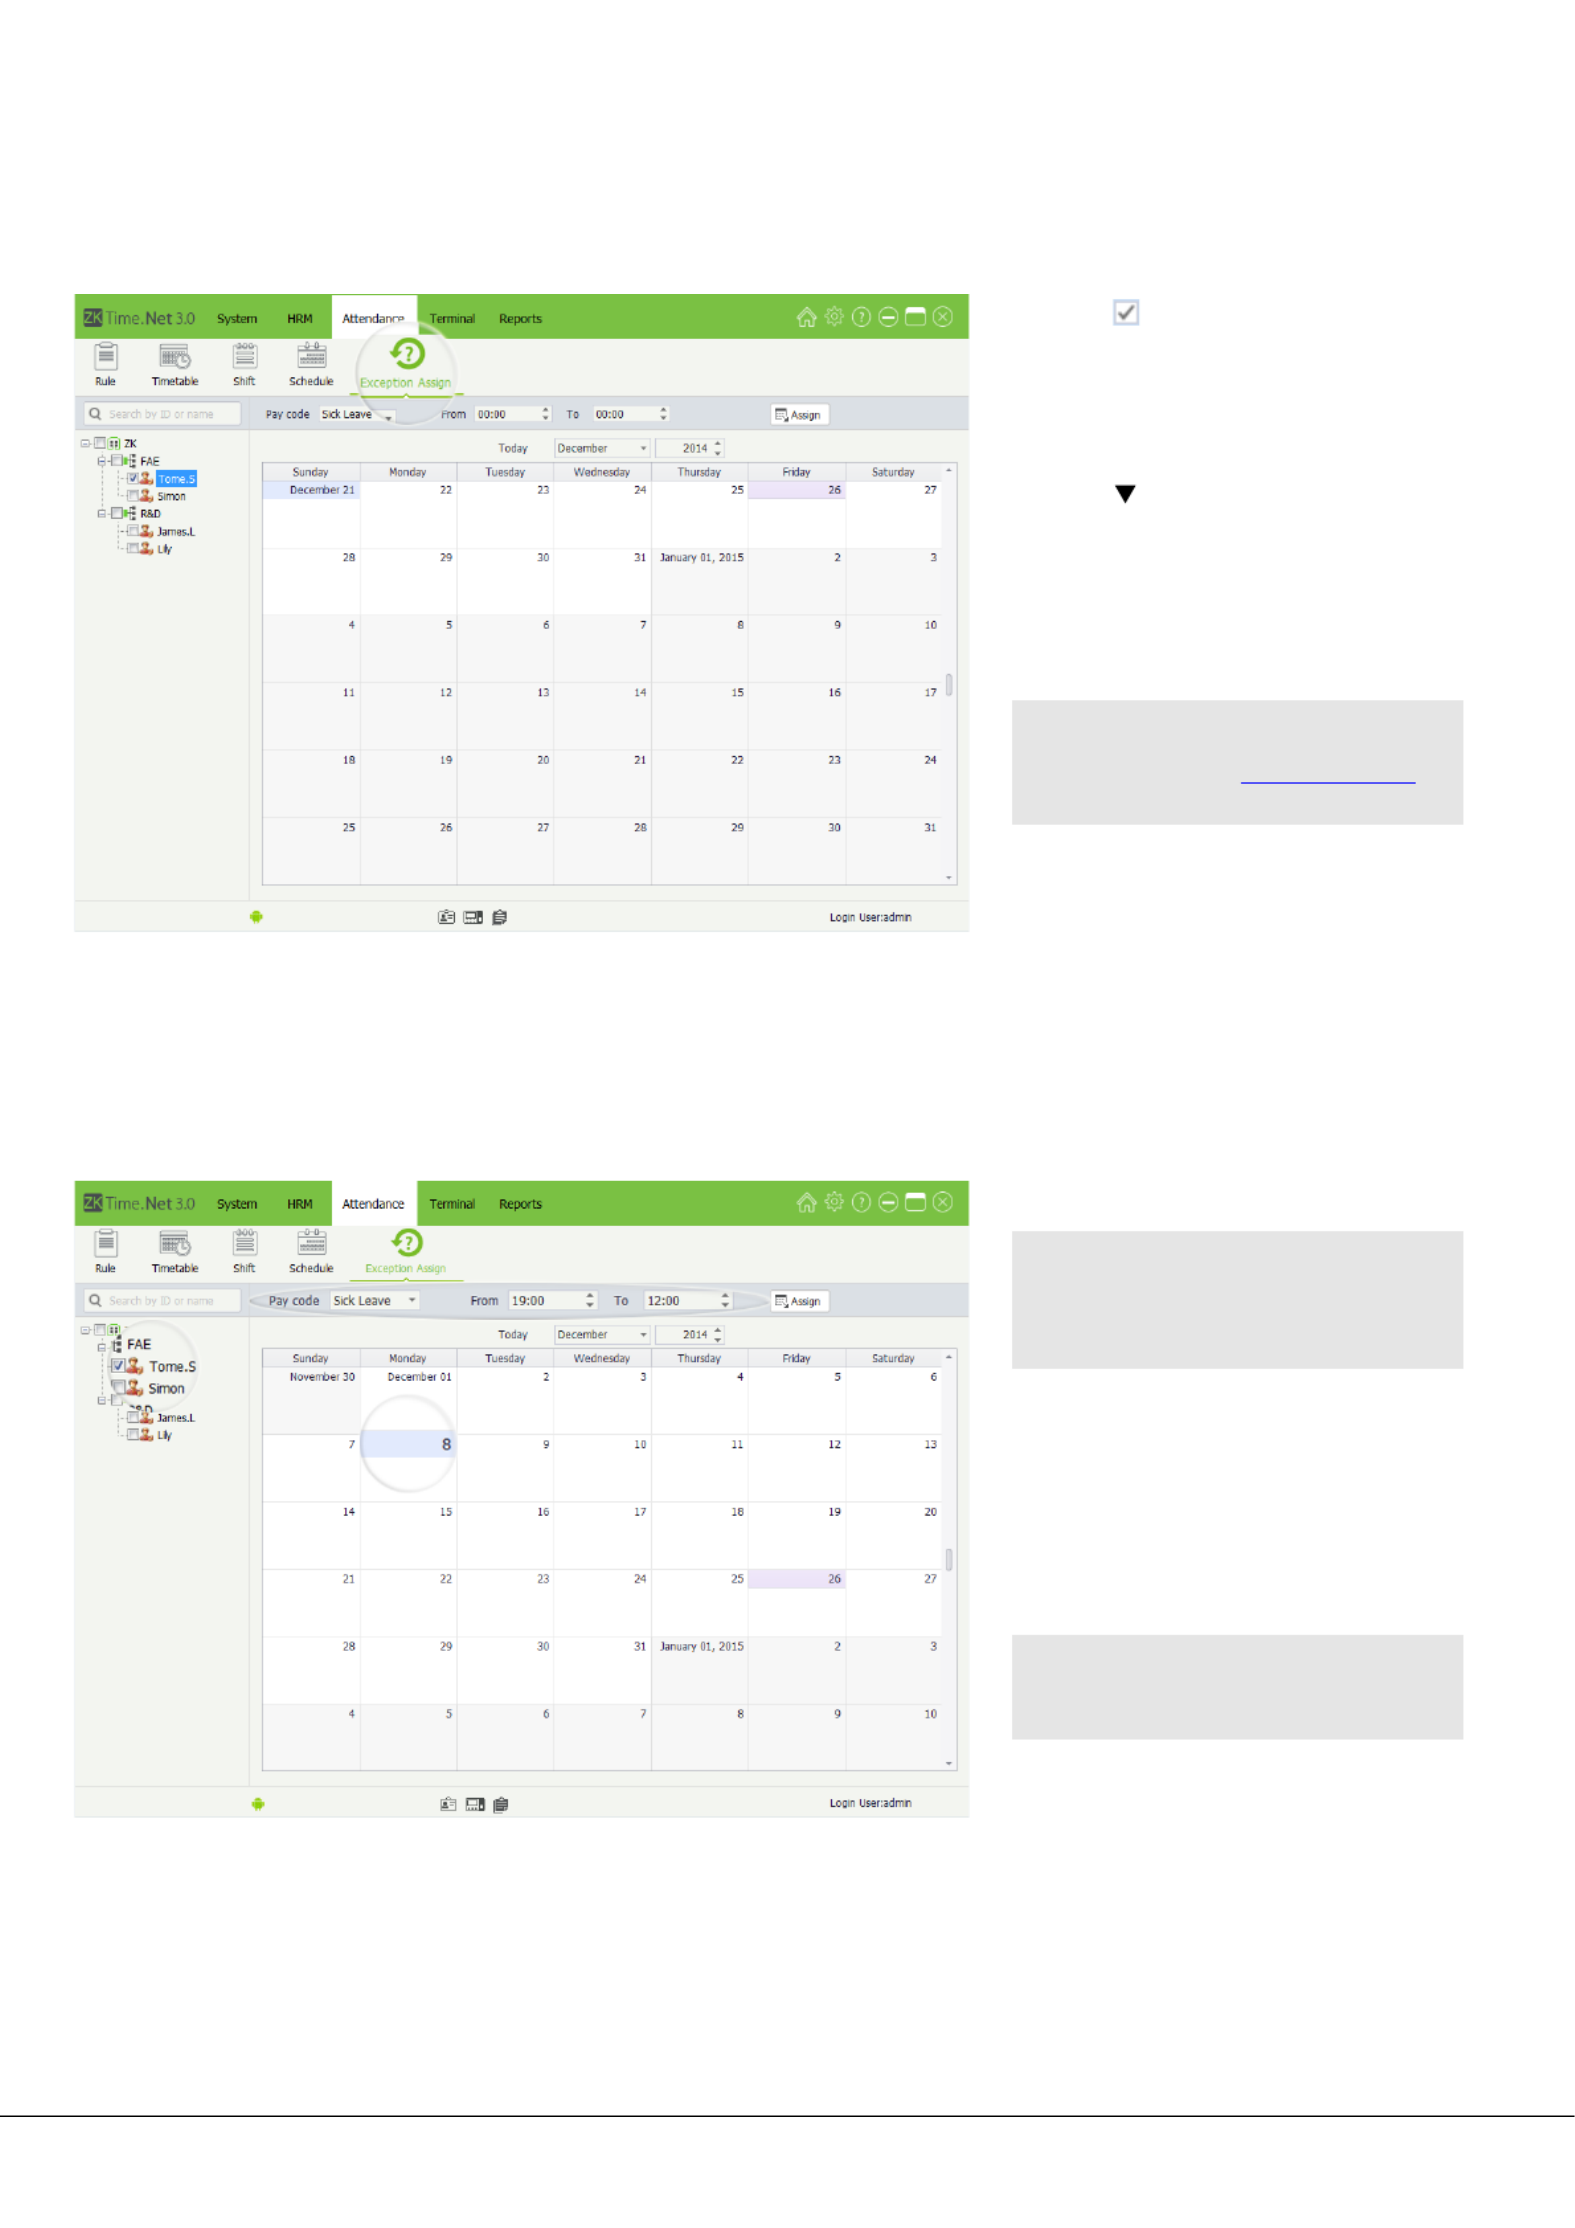
6.5 Assigning Exception
It is possible for the employee to apply for leave when he/she encounters serious problems. Due to different
reason, applying for leave can be an automatic statistic in the system.
1. Tick ( ) and select employee in
the list.Company Structure
• T If tick ( ) and select ips:
department, directly select all
employees in this department.
2. Select the year and month of the
date when the employee needs
to clear schedule, and click and
select date. Press key to Ctrl
select more.
• Note: [Today] Click button, it
will turn to the current month,
the red one is the current date.
3. Click button under the
Timetable option, and select
OFF in the drop-down list.
4. [Assign] Click button to clear
employee schedule for the
selected date, and set the date
as . OFF
ZKTime.Net 3.0 - Android 53
Click [Attendance] [Exception Assign] Exception Assign > to enter to the interface.
• Add Exception
1. Tick ( ) and select employee in
the Company Structure list.
2. Pay codeClick button behind
option, and select pay code in
the drop-down list.
• Note: For the Pay Code’s setting,
please refer to “5.3 Pay Code”.
3. Select the year and month of
the date when the employee
needs to assign exception, and
click and select date.
• Note: [Today] Click button, it
will turn to the current month,
the red one is the current date.
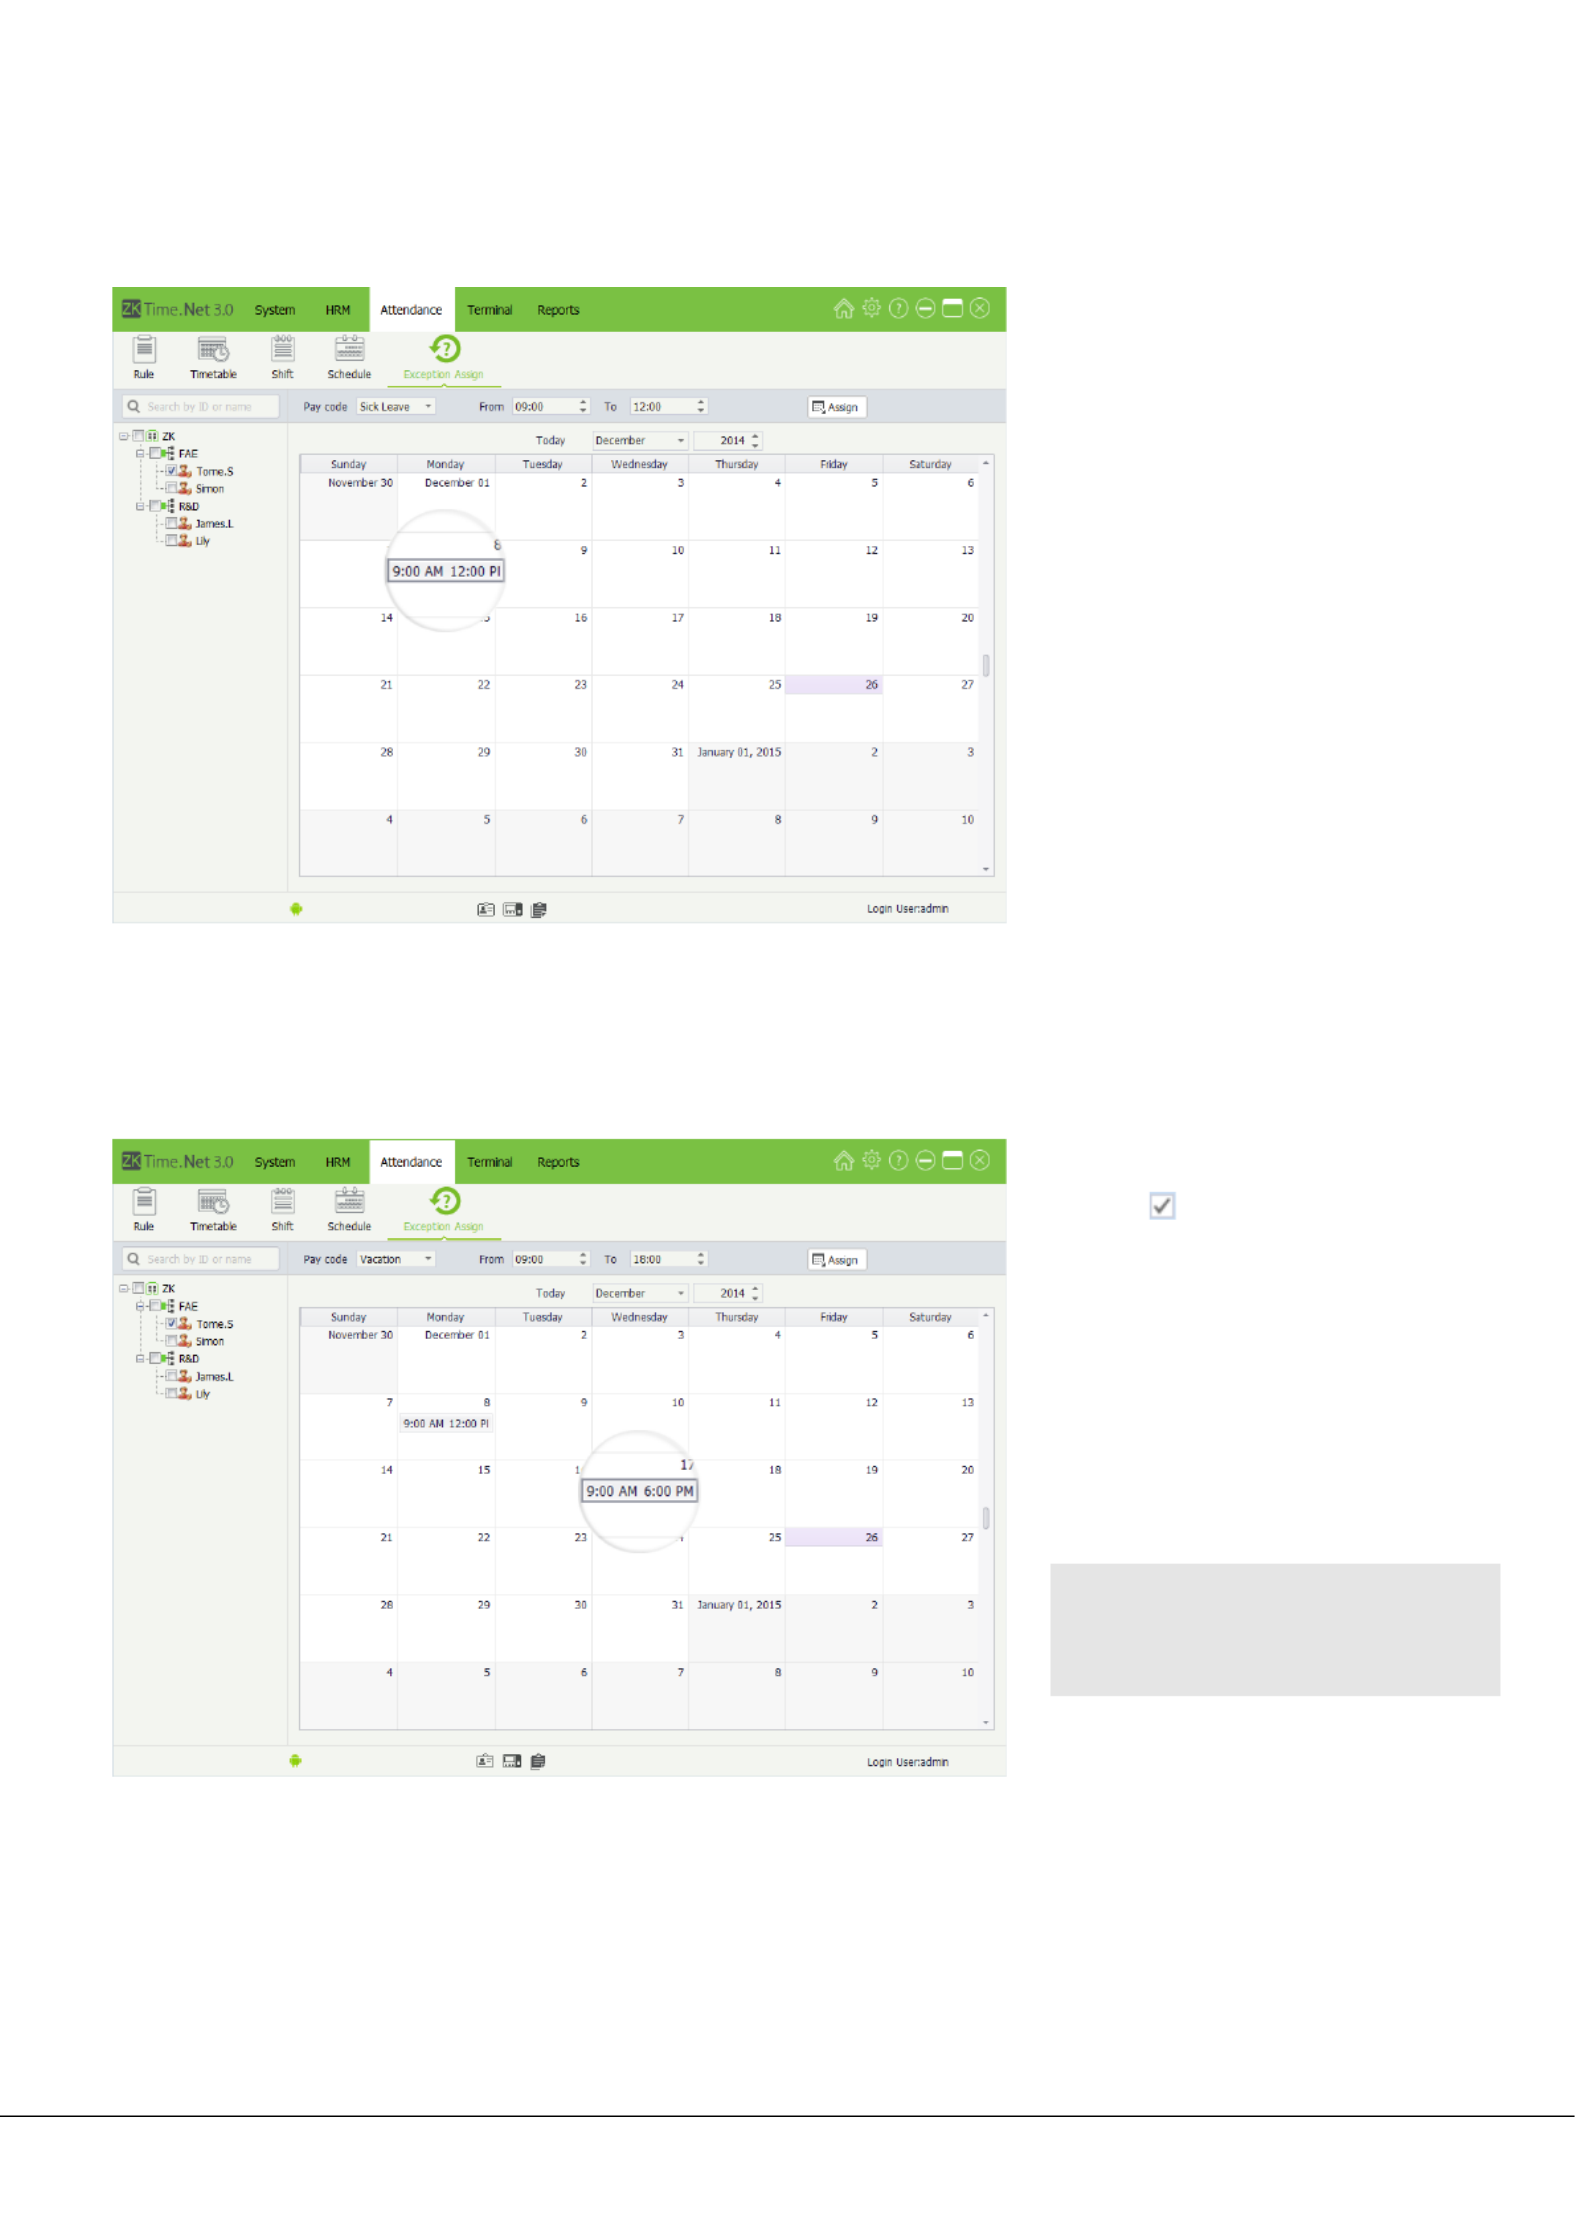
4. Set the exception’s start
and end time.
• Tips: From indicates start, while
To indicates end.
54 ZKTime.Net 3.0 - Android
• Delete Exception
5. [Assign] Click button to add
exception for the selected
employee. After assigning the
exception successfully, the
interface is shown as left figure.
1. Tick ( ) and select employee in
the list.Company Structure
2. Select the year and month of
the date when the employee
needs to delete exception, and
click and select date.
• Note: [Today]Click button, it
will turn to the current month,
the red one is the current date.
Specyfikacje produktu
| Marka: | ZKTeco |
| Kategoria: | System kontroli dostępu |
| Model: | ZPAD |
Potrzebujesz pomocy?
Jeśli potrzebujesz pomocy z ZKTeco ZPAD, zadaj pytanie poniżej, a inni użytkownicy Ci odpowiedzą
Instrukcje System kontroli dostępu ZKTeco

4 Października 2024
4 Października 2024
17 Września 2024
17 Września 2024
16 Września 2024
16 Września 2024
15 Września 2024
15 Września 2024
15 Września 2024
15 Września 2024
Instrukcje System kontroli dostępu
- System kontroli dostępu Bosch
- System kontroli dostępu Hikvision
- System kontroli dostępu APC
- System kontroli dostępu Honeywell
- System kontroli dostępu Viking
- System kontroli dostępu DSC
- System kontroli dostępu Vimar
- System kontroli dostępu Dahua Technology
- System kontroli dostępu Velleman
- System kontroli dostępu Delta Dore
- System kontroli dostępu Panduit
- System kontroli dostępu Speco Technologies
- System kontroli dostępu Chief
- System kontroli dostępu Assa Abloy
- System kontroli dostępu Axis
- System kontroli dostępu LiftMaster
- System kontroli dostępu Abus
- System kontroli dostępu Marmitek
- System kontroli dostępu Optex
- System kontroli dostępu Yale
- System kontroli dostępu EQ-3
- System kontroli dostępu Burg Wächter
- System kontroli dostępu Acti
- System kontroli dostępu Eminent
- System kontroli dostępu Techly
- System kontroli dostępu Steren
- System kontroli dostępu GeoVision
- System kontroli dostępu Safescan
- System kontroli dostępu Iget
- System kontroli dostępu EverFocus
- System kontroli dostępu Satel
- System kontroli dostępu EQ3
- System kontroli dostępu ETiger
- System kontroli dostępu Provision ISR
- System kontroli dostępu Suprema
- System kontroli dostępu HID Identity
- System kontroli dostępu Indexa
- System kontroli dostępu ONE Smart Control
- System kontroli dostępu Approx
- System kontroli dostępu Gewiss
- System kontroli dostępu SOREX
- System kontroli dostępu Atlantis Land
Najnowsze instrukcje dla System kontroli dostępu

1 Kwietnia 2025
1 Kwietnia 2025
1 Kwietnia 2025
1 Kwietnia 2025
1 Kwietnia 2025
1 Kwietnia 2025
1 Kwietnia 2025
29 Marca 2025
29 Marca 2025
28 Marca 2025