Instrukcja obsługi Vtech VM2251
Vtech
Elektroniczna niania
VM2251
Przeczytaj poniżej 📖 instrukcję obsługi w języku polskim dla Vtech VM2251 (4 stron) w kategorii Elektroniczna niania. Ta instrukcja była pomocna dla 22 osób i została oceniona przez 2 użytkowników na średnio 4.5 gwiazdek
Strona 1/4
Quick start guide
VM2251
VM2251-2
Video Monitor
Go to www.vtechphones.com
to register your product for
enhanced warranty support and
the latest VTech product news.
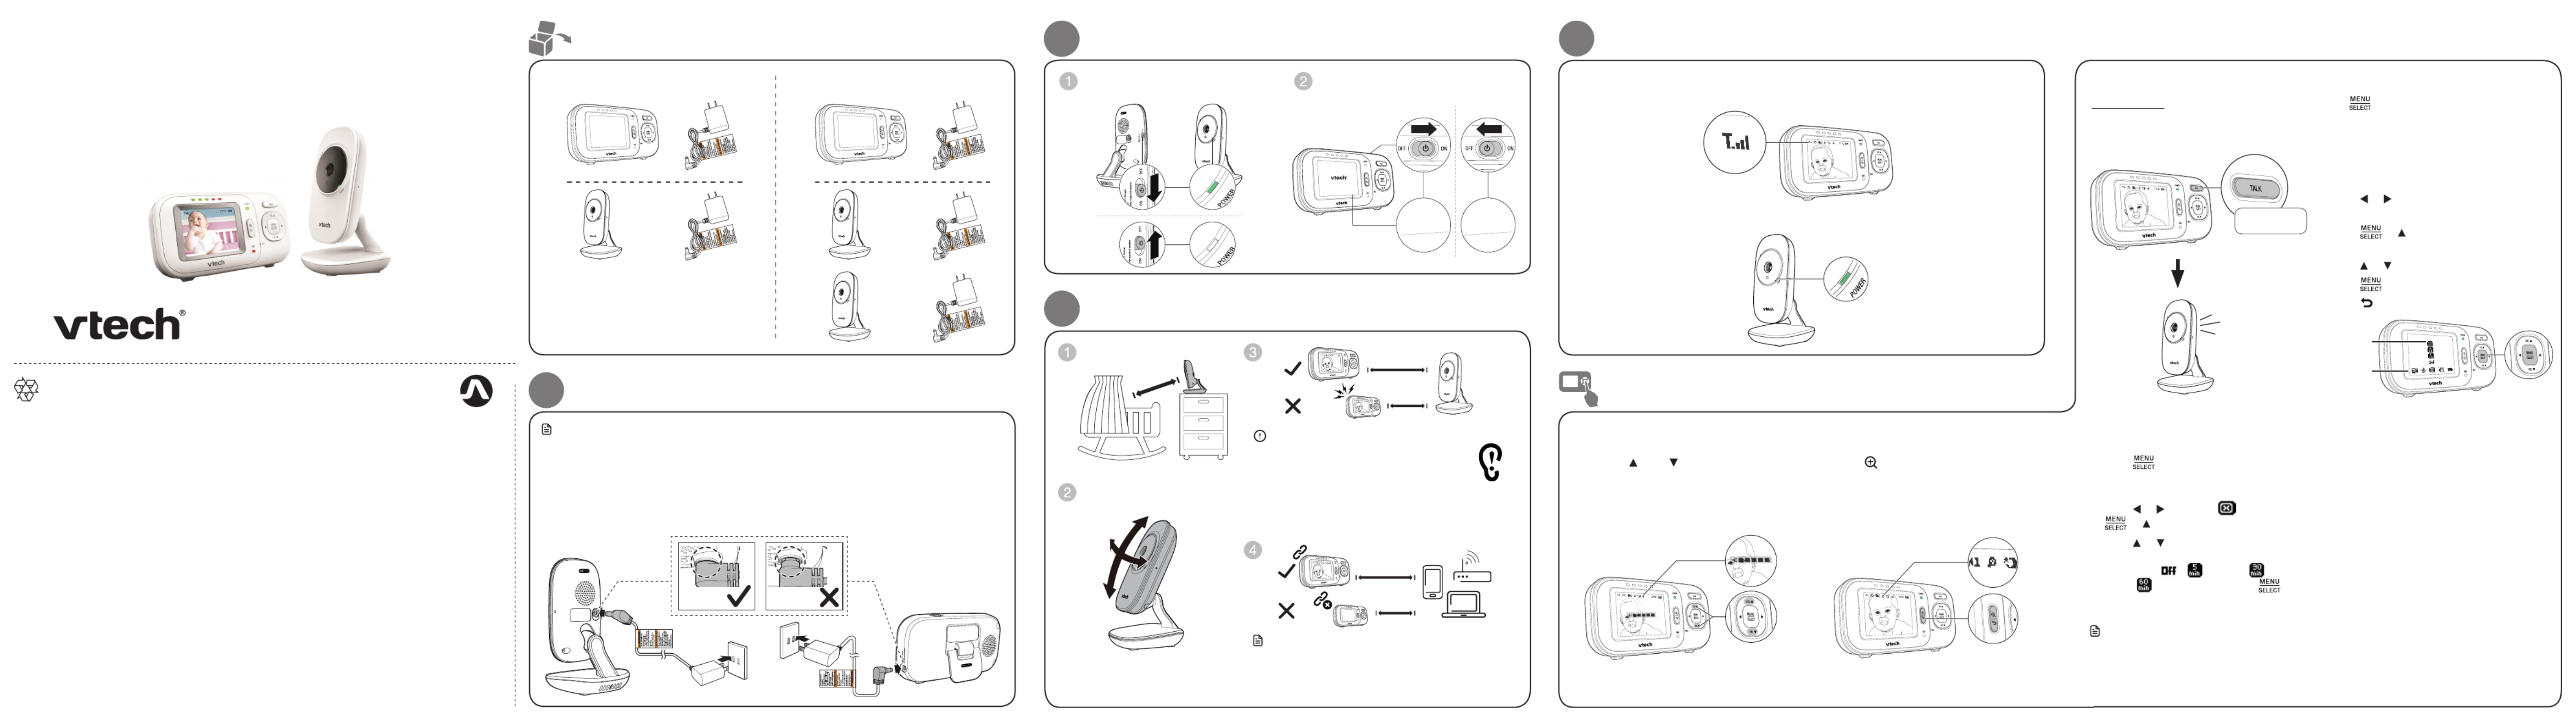
What’s in the box
VM2251 VM2251-2
1
Connect the baby monitor
NOTESNOTE
• The rechargeable battery is pre-installed in your parent unit.
• Use only the power adapters supplied with this product.
• Make sure the baby monitor is not connected to the switch controlled electric outlet.
• Connect the power adapters in a vertical or floor mount position only. The adapters’ prongs are
not designed to hold the weight of baby monitor, so do not connect them to any ceiling, under-
the-table, or cabinet outlets. Otherwise, the adapters may not properly connect to the outlets.
• Make sure the parent unit, the baby unit and the power adapter cords are out of reach of children.
2 Power on the baby monitor
Slide the ON/OFF switch to power
on your baby unit.
Slide the ON/OFF switch to power
on your parent unit.
4 Status check
Once you power on both your baby unit and parent unit, your parent unit displays image
from the baby unit, and the connection status displays on the LCD screen.
The LED light of baby unit turns on.POWER
Adjust speaker volume
Press to adjust your parent VOL / VOL
unit speaker volume. It determines the
volume of sound transmitted from your
baby units.
Zoom
Press to zoom in or out.
Talk to your baby unit
Press and hold TALK and speak to your
parent unit. Your voice is transmitted to
the baby unit.
Use the menu
Press to enter the menu, choose a menu
item, or save a setting. You can use the parent
unit for advanced settings or operations, such
as to adjust the baby unit sound sensitivity or
the temperature range for alerts.
While in the menu:
• Press or to scroll among the menu
options.
• Press or to enter the desired
submenu.
• Press or to select an item.
• Press to confirm your selection.
• Press to exit the menu or submenu.
Main menu
Submenu
Set screen off timer
1. Press to enter the main menu
when
the parent unit is idle.
2. Press or to choose , then press
or to open the submenu.
3. Press or to choose the desired
time period to automatically turn
off screen ( / - 5 min./ - 30
min. / - 60min.), then press to
confirm your selection.
Note
• Press any keys on the parent unit to turn on
the screen again.
Basic operation - Parent unit
Press and hold
6U]KXOTMUT
3OYKKTLUTIZOUT
6U]KXOTMULL
3OYKKTLUTIZOUT
6U]KXOTMUT
3OYKKT LUTIZOUT
Specifications are subject to change without notice.
© 2018 VTech Communications, Inc. All rights reserved.
11/18. VM2251-2_QSG_V6.
Document order number: 96-011937-060-100
Caution
• The default volume of your parent unit is level
3, and the maximum volume is level 5. If you
experience high-pitched screeching noise from
your baby monitor while positioning:
- Make sure your baby unit and parent unit are more
than 1 meter (3 feet) apart, OR
- Turn down the volume of your parent unit.
3
Positioning the baby monitor
>
< 3ft (1m)
3ft (1m)
Note
• To avoid interference from other electronic devices,
place your baby monitor at least 3 feet (1 meter) away
from devices such as wireless routers, microwaves, cell
phones and computers.
≥
<
3ft (1m)
3ft (1m)
﹏﹏﹏
﹏﹏﹏
﹏﹏﹏﹏
﹏﹏﹏﹏
﹏﹏﹏﹏
﹏﹏﹏﹏﹏
﹏﹏﹏﹏﹏
﹏﹏﹏
﹏﹏﹏
﹏﹏﹏﹏
﹏﹏﹏﹏
﹏﹏﹏﹏
﹏﹏﹏﹏﹏
﹏﹏﹏﹏﹏
> 3ft (1m)


Press or to choose . Press to open the submenu. After that, and then or
press or to select to enter PATROL mode to alternately view the image from one
baby unit to the next one in every 10 seconds.
For VM2251-2 only
If you are viewing baby unit , the LED light of baby unit turns on. POWER
As baby unit is not being viewed, its LED light flashes.POWER
NN
Note
• If you power on only one baby unit, your parent unit may display LED light flashes. and the POWER
Press or . Press to open the submenu. Press or to select and then to choose or
the baby unit you have powered on.
Status check - Two baby units
Change different views - Patrol
10s
Switch among
the baby units
Press or to choose . Press to open the submenu. After that, press and then
or elect a camera number to enter mode. to s SINGLE-CAM
Change different views - Single-cam
Use a pencil to mark two holes in parallel.
Make sure they are the same distance apart
as the wall mount holes on the baby unit.
Note
• Check for reception strength and camera
angle before drilling the holes.
Note
• The types of screws and anchors you need
depend on the composition of the wall.
Items to purchase
You will need to purchase the
following items separately to mount
your baby unit:
2 screws
2 anchors
Mount the baby unit for dry wall (optional)
Adjust the camera angle.
Drill two holes in the wall.
If you drill the holes into a stud, go to
step 3.
-OR-
If you drill the holes into an object other
than a stud, insert the wall anchors into
the holes. Tap gently on the ends with a
hammer until the wall anchors are flush
with the wall.
Insert the screws into the holes and
tighten the screws until only 1/4 inch
of the screws are exposed.
Align the wall mount holes on the
baby unit with the screws on the wall.
Slide the baby unit down until it locks
into place.
Night vision
The baby unit has infrared LEDs that
allow you to see your baby clearly at
night or in a dark room. When the baby
unit being viewed detects low light
levels, the infrared LEDs are switched
on automatically. The images from the
baby unit are in black and white, and
appears on the screen.
Notes
• It is normal if you see a short white glare
on your parent unit screen as the baby unit
is adapting to the dark environment.
• When the infrared LEDs are on, the images
are in black and white. This is normal.
Tip
• Depending on the surroundings and other
interfering factors, like lightings, objects,
colors and backgrounds, the display
resolution may vary. Adjust the baby unit’s
angle or place the baby unit at a higher
level to prevent glare and blurry display.
POWER LED light
TALK
Zoom / Back MENU/SELECT
Arrow keys and
VOL VOL /
Microphone
Battery indicator
Visual sound
indicators
LCD display
Stand
Power jack
Speaker
ON/OFF switch
Overview - Parent unit
Light sensor
Camera
Microphone
POWER LED light
Wall mount holes
Infrared LEDs
Overview - Baby unit
ON/OFF switch
Speaker
Power jack
Sound sensitivity and sound activation
Sound sensitivity
With sound sensitivity setting, you can choose to hear sounds
from the baby unit all the time, or to hear sounds that exceed
a certain level. The default level allows you to hear all Highest
sounds (including background noises).
63ē
Sound activation
When sound activation is on, the parent unit screen stays off
to save power when the baby unit detects no sound.
Once the baby unit detects sounds that are louder than the
chosen sound sensitivity level, the parent unit screen turns
on automatically. It will then turn off again after 50 seconds
of no sound detection.
If you set the sound
sensitivity to a lower level
(e.g. Medium), you will only
hear sounds that exceed the
selected level. The baby unit
may not detect soft sounds,
and the parent unit speaker
may remain quiet.
For details, please see Adjust
the sound sensitivity of
the baby unit in the User’s
manual.
Specyfikacje produktu
| Marka: | Vtech |
| Kategoria: | Elektroniczna niania |
| Model: | VM2251 |
Potrzebujesz pomocy?
Jeśli potrzebujesz pomocy z Vtech VM2251, zadaj pytanie poniżej, a inni użytkownicy Ci odpowiedzą
Instrukcje Elektroniczna niania Vtech

25 Stycznia 2025
25 Stycznia 2025
25 Stycznia 2025
25 Stycznia 2025
25 Stycznia 2025
25 Stycznia 2025
25 Stycznia 2025
25 Stycznia 2025
25 Stycznia 2025
25 Stycznia 2025
Instrukcje Elektroniczna niania
- Elektroniczna niania Ikea
- Elektroniczna niania Motorola
- Elektroniczna niania Beurer
- Elektroniczna niania Stabo
- Elektroniczna niania Sanitas
- Elektroniczna niania Tefal
- Elektroniczna niania Philips
- Elektroniczna niania SilverCrest
- Elektroniczna niania Xblitz
- Elektroniczna niania Lionelo
- Elektroniczna niania Geemarc
- Elektroniczna niania EZVIZ
- Elektroniczna niania Withings
- Elektroniczna niania Nedis
- Elektroniczna niania TRENDnet
- Elektroniczna niania Audioline
- Elektroniczna niania D-Link
- Elektroniczna niania Niceboy
- Elektroniczna niania Alcatel
- Elektroniczna niania Hyundai
- Elektroniczna niania Concept
- Elektroniczna niania Manhattan
- Elektroniczna niania Angelcare
- Elektroniczna niania Kodak
- Elektroniczna niania Chicco
- Elektroniczna niania Medisana
- Elektroniczna niania Cobra
- Elektroniczna niania Oricom
- Elektroniczna niania TrueLife
- Elektroniczna niania Eufy
- Elektroniczna niania Emos
- Elektroniczna niania BaseTech
- Elektroniczna niania Graco
- Elektroniczna niania Uniden
- Elektroniczna niania Ansmann
- Elektroniczna niania Chipolino
- Elektroniczna niania BT
- Elektroniczna niania Safety 1st
- Elektroniczna niania TriStar
- Elektroniczna niania GoClever
- Elektroniczna niania Babymoov
- Elektroniczna niania Oregon Scientific
- Elektroniczna niania Lorex
- Elektroniczna niania Ariete
- Elektroniczna niania Elro
- Elektroniczna niania Olympia
- Elektroniczna niania Hama
- Elektroniczna niania Duronic
- Elektroniczna niania Terraillon
- Elektroniczna niania Jane
- Elektroniczna niania Denver
- Elektroniczna niania Albrecht
- Elektroniczna niania SereneLife
- Elektroniczna niania Technaxx
- Elektroniczna niania Lanaform
- Elektroniczna niania Overmax
- Elektroniczna niania Topcom
- Elektroniczna niania Alecto
- Elektroniczna niania Binatone
- Elektroniczna niania Foscam
- Elektroniczna niania M-e
- Elektroniczna niania Reer
- Elektroniczna niania NUK
- Elektroniczna niania Tomy
- Elektroniczna niania Brondi
- Elektroniczna niania Amplicomms
- Elektroniczna niania Cresta
- Elektroniczna niania Trebs
- Elektroniczna niania ME
- Elektroniczna niania Summer
- Elektroniczna niania Tigex
- Elektroniczna niania Fisher Price
- Elektroniczna niania Lindam
- Elektroniczna niania BabyOno
- Elektroniczna niania Switel
- Elektroniczna niania Duux
- Elektroniczna niania Nova
- Elektroniczna niania Esscom
- Elektroniczna niania Grixx
- Elektroniczna niania Luvion
- Elektroniczna niania Konig
- Elektroniczna niania Babyfon
- Elektroniczna niania HQ
- Elektroniczna niania Lupilu
- Elektroniczna niania Tommee Tippee
- Elektroniczna niania Neonate
- Elektroniczna niania Beaba
- Elektroniczna niania Bebetel
- Elektroniczna niania Hartig And Helling
- Elektroniczna niania Babysense
- Elektroniczna niania Jablotron
- Elektroniczna niania Modern-Electronics
- Elektroniczna niania Hartig Helling
- Elektroniczna niania Levana
- Elektroniczna niania Summer Infant
- Elektroniczna niania IBaby
- Elektroniczna niania Kogan
- Elektroniczna niania Fischer Price
- Elektroniczna niania Mobi
- Elektroniczna niania Pabobo
- Elektroniczna niania MicroTalk
- Elektroniczna niania Oretti
- Elektroniczna niania Neno
- Elektroniczna niania LeamsiQ
- Elektroniczna niania Philips-Avent
- Elektroniczna niania Heimvision
- Elektroniczna niania BabySafe
- Elektroniczna niania Chillax Baby
- Elektroniczna niania Hubble Connected
- Elektroniczna niania Peekyboo
Najnowsze instrukcje dla Elektroniczna niania

28 Stycznia 2025
27 Stycznia 2025
26 Stycznia 2025

19 Stycznia 2025

19 Stycznia 2025

18 Stycznia 2025
18 Stycznia 2025
18 Stycznia 2025
18 Stycznia 2025
18 Stycznia 2025