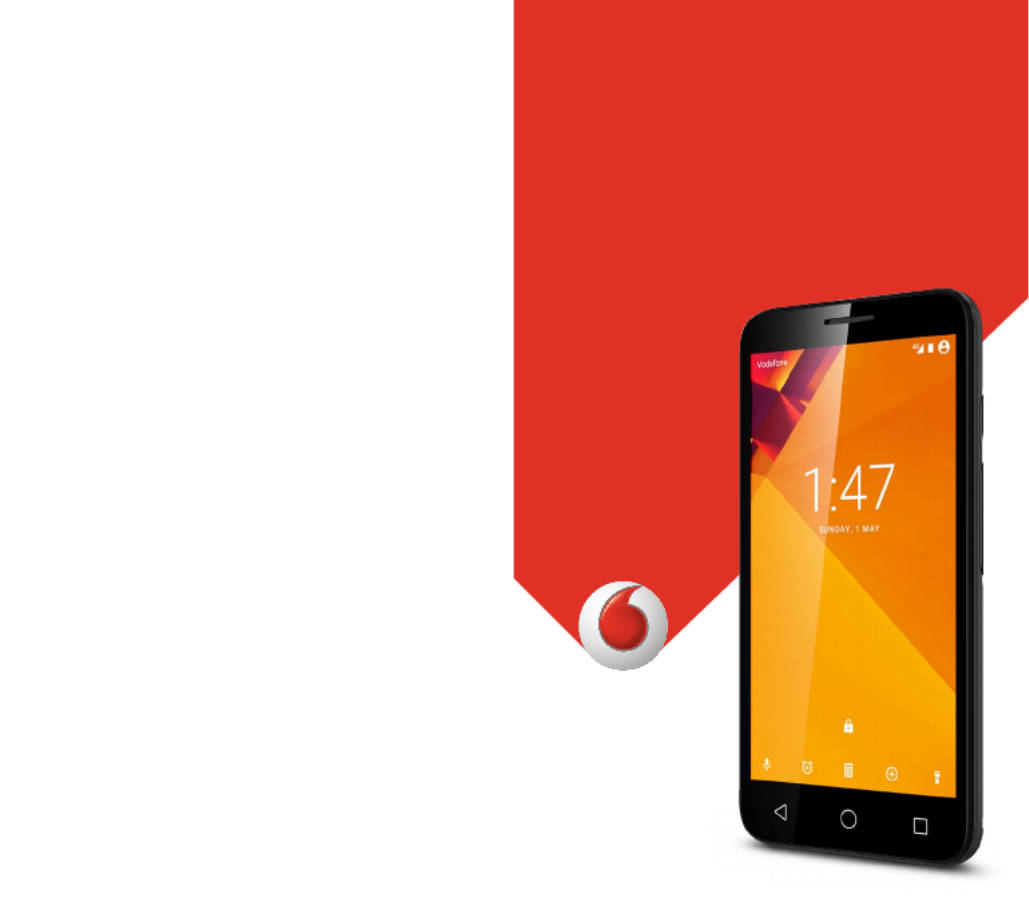
Instrukcja obsługi Vodafone Smart turbo 7
Przeczytaj poniżej 📖 instrukcję obsługi w języku polskim dla Vodafone Smart turbo 7 (110 stron) w kategorii smartfon. Ta instrukcja była pomocna dla 6 osób i została oceniona przez 2 użytkowników na średnio 4.5 gwiazdek
Strona 1/110
English - CJA28UAVDAAA
© Vodafone Group 2016. Vodafone and the
Vodafone logos are trade marks of Vodafone Group.
Any product or company names mentioned herein
may be the trade marks of their respective owners.
VFD 500 / VFD 501
User manual
Smart turbo 7


1 2
Table of Contents
1 Your phone ................................................................ 4
1.1 Keys and connectors ..................................................... 4
1.2 Getting started ................................................................. 7
1.3 Home screen ...................................................................10
2 Text input .................................................................20
2.1 Using the onscreen keyboard ..................................20
2.2 Text editing ......................................................................21
3 Phone call, Call log & People ............................22
3.1 Phone call ........................................................................22
3.2 Recents .............................................................................. 29
3.3 Contacts ............................................................................29
4 Messaging & Email ...............................................36
4.1 Message+ ..........................................................................36
4.2 Gmail/Email ....................................................................42
5 Calendar , Alarm clock & Calculator ..............45
5.1 Calendar ............................................................................45
5.2 Clock ...................................................................................47
5.3 Calculator .........................................................................48
6 Getting connected ................................................50
6.1 Connecting to the Internet .......................................50
6.2 Chrome ..............................................................................53
6.3 Connecting to Bluetooth devices...........................53
6.4 Connecting to a computer via USB .......................54
6.5 To safely remove the microSD card from your
phone 55 .................................................................................
6.6
Sharing your phone’s mobile data connection
...56
6.7 Connecting to virtual private networks ...............57
7 Google Play Store .................................................58
8 Multimedia applications ....................................59
8.1 Camera...............................................................................59
8.2 Photos ................................................................................ 62
8.3 Play music ........................................................................64
8.4 Video Player .....................................................................66
9 Google Maps .............................................................. 67
9.1 Get My Location .............................................................67
9.2 Search for a location ....................................................68
9.3 Save a location ...............................................................68
9.4 Open Street View for a location ..............................69
9.5 Get driving, public transportation or walking
directions 69 ..........................................................................
10 Others .......................................................................70
10.1 File Manager ....................................................................70
10.2 Sound Recorder .............................................................70
10.3 Radio ................................................................................... 71
11 Settings ....................................................................73
11.1 Wireless & networks .....................................................73

3 4
11.2 Device .................................................................................75
11.3 Personal.............................................................................78
11.4 System ...............................................................................84
12 Update your phone’s software .........................91
13 Product safety information ...............................92
14 Telephone warranty .......................................... 104
15 Accessories .......................................................... 106
16 Specifications ...................................................... 107
1 Your phone
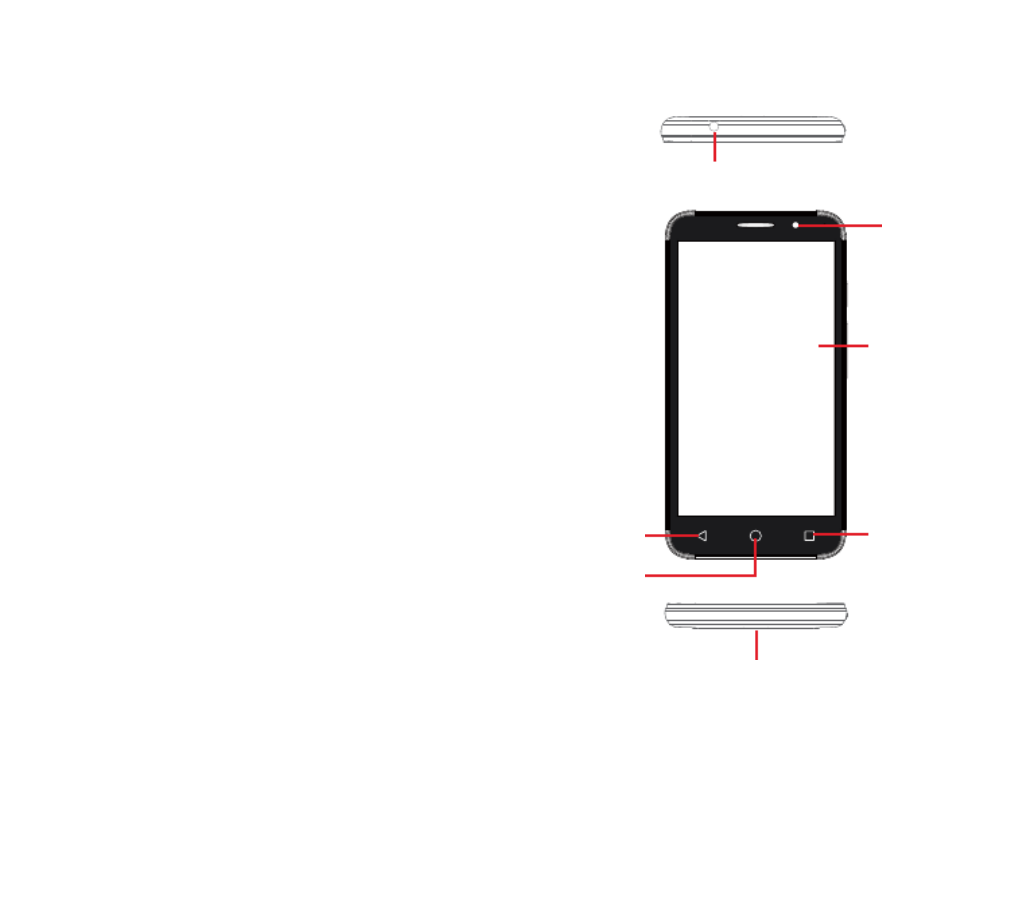
1.1 Keys and connectors
Micro-USB connector
Back key
Home key
Recents key
Touch screen
Front camera
Headset connector

5 6
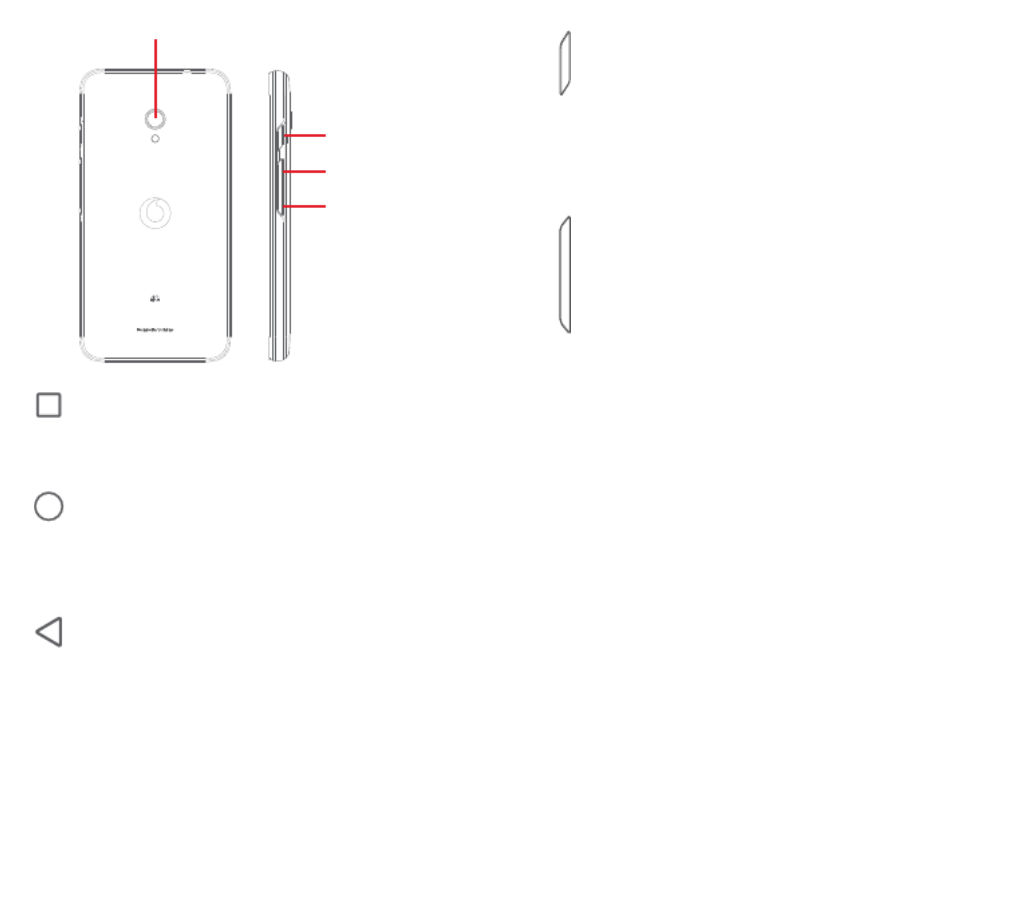
Volume up
Volume down
Power key
Camera
Recents key
• Touch: this shows your recently-used apps. Touch
an app to open it, or swipe it left or right to remove
it from the list.
Home key
• While on any app or screen, touch the Home key to
return to the main Home screen.
• Long press this key to access Google Now & Voice
Search.
Back key
• Touch to go back to the previous screen, or to close
a dialogue box, options menu, the Notification panel,
etc.
Power key
• Press: activate the lock screen/wake up the screen.
• Long press: show the pop-up menu to select from
Shut down Flight mode, , Restart .
Press and hold: power on.
• Long press the Power key and the Volume down key
to capture a screenshot.
Volume keys
• During a call, they adjust the earpiece or headset
volume.
• In Music/Video/Streaming mode, they adjust the
media volume.
• In general mode, they adjust the ringtone volume.
• Mute the ringtone of an incoming call.


7 8
1.2 Getting started
1.2.1 Setup
Removing or installing the back cover
Inserting or removing the SIM card
You must insert your SIM card to make phone calls.
Power off your phone and remove battery before inserting or
removing the SIM card.
Place the SIM card with the chip facing downwards and slide it
into its housing. Make sure that it is correctly inserted. To remove
the SIM card, press and slide it out.
Your phone only supports micro-SIM card. Do not attempt
to insert other SIM types like mini or nano cards, as you
may damage your phone.
Installing or removing the battery
Power off your phone before removing the battery.
• Insert the battery and click it into place, then close the cover.
• Unclip the cover, then remove the battery.
Inserting or removing the microSD card
Power off your phone and remove battery before inserting or
removing the microSD card.
Place the microSD card with the chip facing downwards and
slide it into its housing. Make sure that it is correctly inserted. To
remove the microSD card, press and slide it out.
Charging the battery
To charge the battery, connect the charger to your phone and
mains socket. You can also charge your phone via a USB cable.
To reduce your phone’s power consumption, switch off
Wi-Fi, GPS, Bluetooth or apps running in the background
when not needed. In Settings you can also lower the
brightness of the screen, and shorten the length of time
before the screen goes to sleep.


9 10
1.2.2 Power on your phone
Hold down the key until the phone powers on. It will take Power
a few seconds before the screen lights up. Unlock your phone
(Swipe, PIN, password or pattern) if necessary and confirm. The
Home screen will display.
If you do not know your PIN code or if you have forgotten it,
contact your network operator. Do not leave your PIN code with
your phone. Store this information in a safe place when not in use.
Set up your phone for the first time
The first time you power on the phone you will be asked to set the
following options: language, Google account, date & time, etc.
1. Select the phone’s language, then touch .
2. Select Wi-Fi network, then touch NEXT.
3. Input your , then touch Name NEXT.
4. Protect your phone, set screen lock now or touch to SKIP
move to next setup.
5. Select Google services, once finished, touch NEXT.
6. Select a Home screen NEXT., then touch
7. Select Help tips, then touch NEXT.
Together with the other options (Date & time, App permissions,
and etc) all configured, the setup of your device is completed.
If you power on your phone with no SIM card inserted, you will
still be able to connect to a Wi-Fi network to sign into your Google
account and to use some features.
1.2.3 Power off your phone
Hold down the Power key from the Home screen until the Phone
options appear, then select Shut down.
1.3 Home screen
Your phone has two kinds of Home screen that you can use: the
standard Home and the Simple Home screen.
You can set this when you first turn the phone on, or by touching
Settings Home > .
In the simplified Home screen, all the features you need, are
presented in an intuitive and attractive design.
Touching the key always takes you to your main Home Home
screen, and you can personalise all your Home screens by adding
your favourite apps, shortcuts and widgets to them.


13 14
Status icons
GPRS connected GPS is on
EDGE connected No SIM card inserted
3G connected Vibrate mode
4G connected Ringer is silenced
HSDPA (3G) connected Do not disturb mode
HSPA (3G) connected Phone microphone
muted
Data roaming Battery is very low
Signal strength Battery is low
Connected to a Wi-Fi
network
Battery is partially
drained
Bluetooth is on Battery is full
Connected to a
Bluetooth device Battery is charging
Flight mode Headset connected
Alarm is set
Notification icons
New Gmail TM message Call in progress
New text or multimedia
message Missed call
Problem with SMS or
MMS delivery Call on hold
New Hangouts
message Call forwarding is on
New voicemail Uploading data
Upcoming event Download finished
Data is synchronising
Carrier data use
threshold approaching
or exceeded
No microSD card
installed
An open Wi-Fi network
is available
Song is playing Phone is connected via
USB cable
Screenshot error Radio is on
USB tethering is on System update
available
Portable Wi-Fi hotspot
is on Connected to VPN
Screenshot captured International Roaming
is enabled
More notifications are
hidden
International Roaming
is disabled
15 16
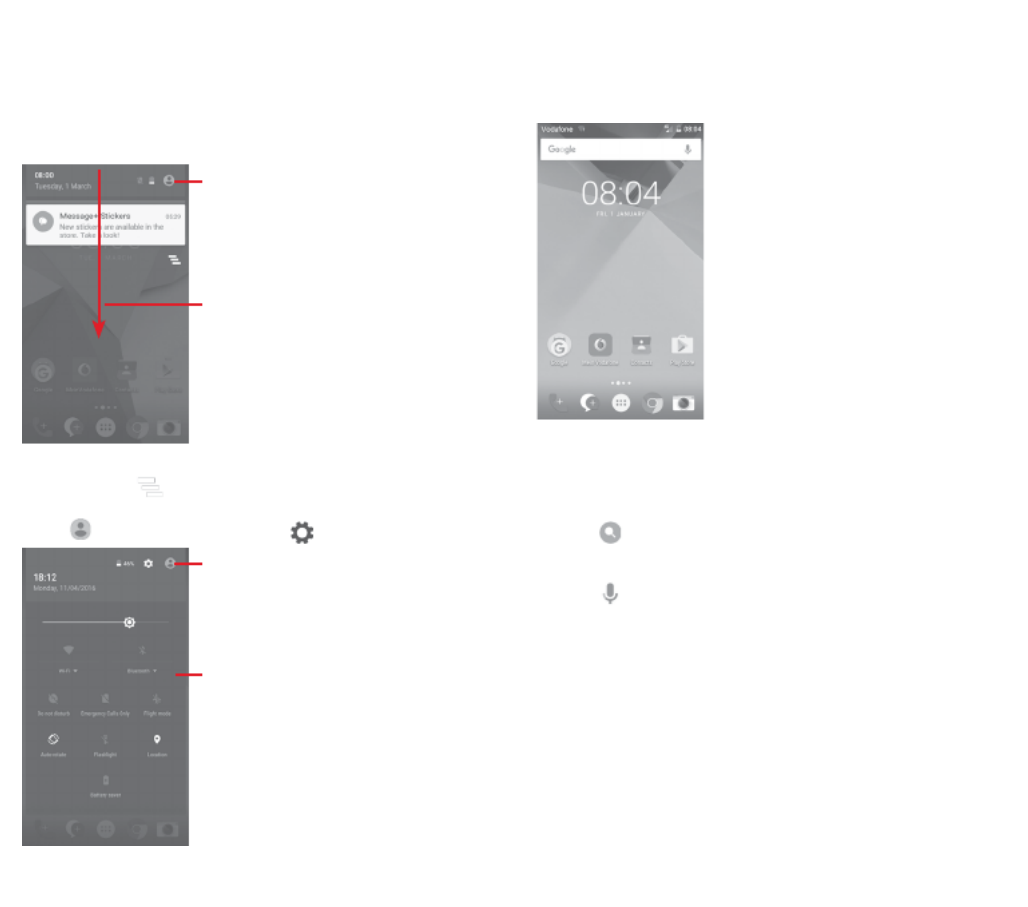
Notification panel
Touch and drag down the Status bar to open the Quick settings
panel and drag down again to open the Quick settings panel. Touch
and drag up to close it. From the Notification panel, you can open
items and other reminders indicated by notification icons or view
wireless service information.
Touch to access the Quick
settings bar
Touch and drag downwards twice
to access the Quick settings bar
Touch a notification and slide it sideways to delete it.
Touch the icon to clear all event–based notifications (other
ongoing notifications will remain).
Touch . and then the Settings icon to access Settings
Quick settings bar
•Touchiconstoenable/disable
functions or to change modes
•Touchthedownarrowtoview
settings
The customised picture will show if you set up
your profile in the Contacts application .(1)
(1) Please refer to "3.3.1 View your contacts"
1.3.3 Search bar
The phone provides a Search function which can be used to find
the information you want on your phone, in your applications or
on the web.
ab
a Search by text
• Touch the Search bar from the Home screen.
• Enter the text/phrase you want to search for.
• Touch on the keyboard if you want to search on the web.
b Search by voice
• Touch from the Search bar to display a dialog screen.
• Speak the word/phrase you want to search for. A list of search
results will display for you to select from.

17 18
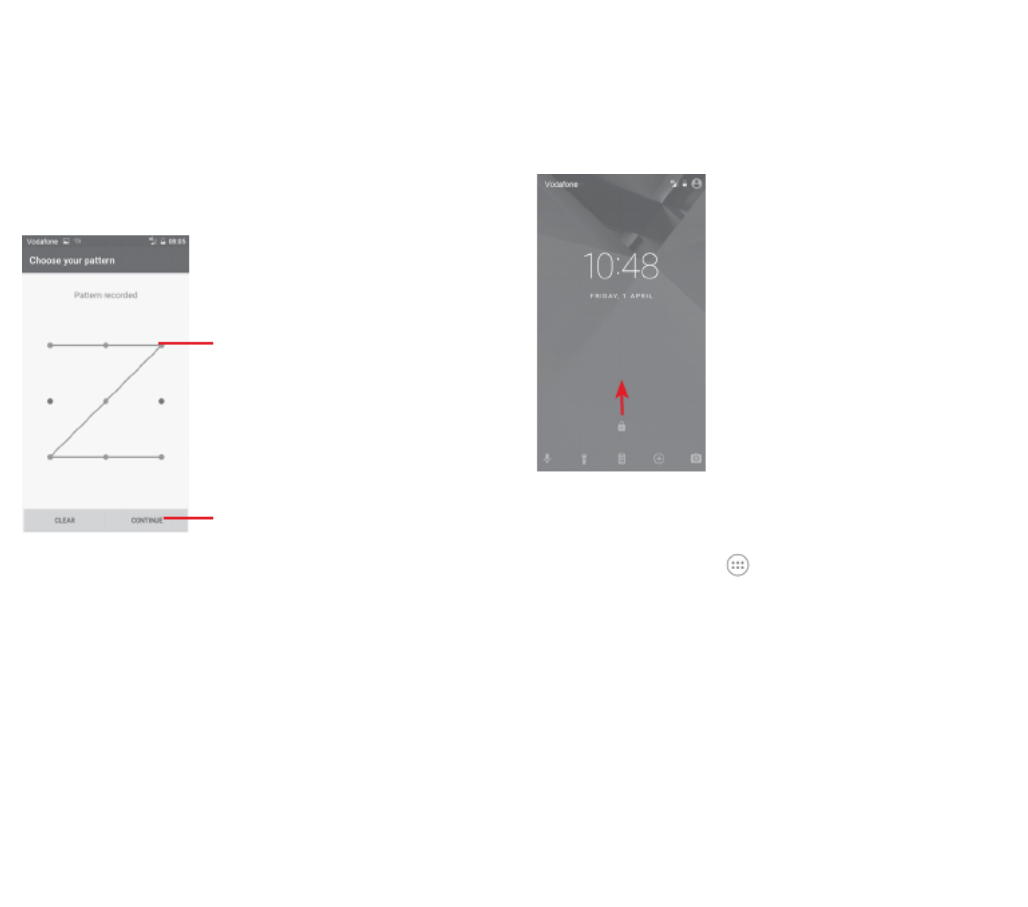
1.3.4 Lock/Unlock your screen
To protect your phone and privacy, you can lock your phone
screen with a variety of patterns, PIN or password, etc. through
Settings > Security > Screen lock.
To create a screen unlock pattern (Follow onscreen
instructions)
• Touch Settings > Security > Screen lock > Pattern.
• Draw your own pattern.
Draw your unlock pattern
Touch to confirm by
drawing pattern again
To create a screen unlock PIN/Password
• Touch orSettings > Security > Screen lock > PIN Password.
• Set your PIN or password.
To lock phone screen
Press the key once to lock the screen.Power
To unlock phone screen
Press the key once to light up the screen, draw the unlock Power
pattern you have created or enter PIN or password to unlock
the screen.
If you have chosen as the screen lock, slide pward to Swipe u
unlock the screen.
1.3.5 Personalise your Home screen
Add an app or widget
Touch the Application tab , then long press the app to activate
the Move mode, and drag the item to any Home screen.
Reposition an app or widget
Long press the item to be repositioned to activate the Move
mode, drag the item to the desired position and then release. You
can move items both on the Home screen and the Favourites tray.
Hold the icon on the left or right edge of the screen to drag the
item to another Home screen.

19 20
Remove
Long press the item to be removed to activate the Move mode,
drag the item up to the top of icon, and release after the Remove
item turns grey.
Create folders
To make it easier to organise apps and shortcuts on the Home
screen and the Favourite tray, you can add them to a folder by
stacking one item on top of another. To rename a folder, open it
and touch the folder’s title bar to input the new name.
Wallpaper customisation
Long press an empty area on the Home screen or go to Settings >
Display > Wallpaper to customise your wallpaper.
1.3.6 Volume adjustment
Using volume key
Press Volume key to adjust the volume. To activate the vibrate
mode, press the Volume down key until the phone vibrates.
Press the Volume down key once more to activate the silent
mode.
Using Settings menu
Drag down twice from the notification panel and touch the
settings icon to open , then touch Settings Sound &
notification. You can set the volume of calls, notification, system
and etc. to your preference.
2 Text input
2.1 Using the onscreen keyboard
Onscreen keyboard settings
Touch the Application tab from the Home screen, select
Settings > Language & input.
Adjust the onscreen keyboard orientation
Turn the phone sideways or upright to adjust the Onscreen
Keyboard orientation. You can also adjust it by changing the
settings (go to Settings > Display > When device is rotated >
Rotate the contents of the screen).
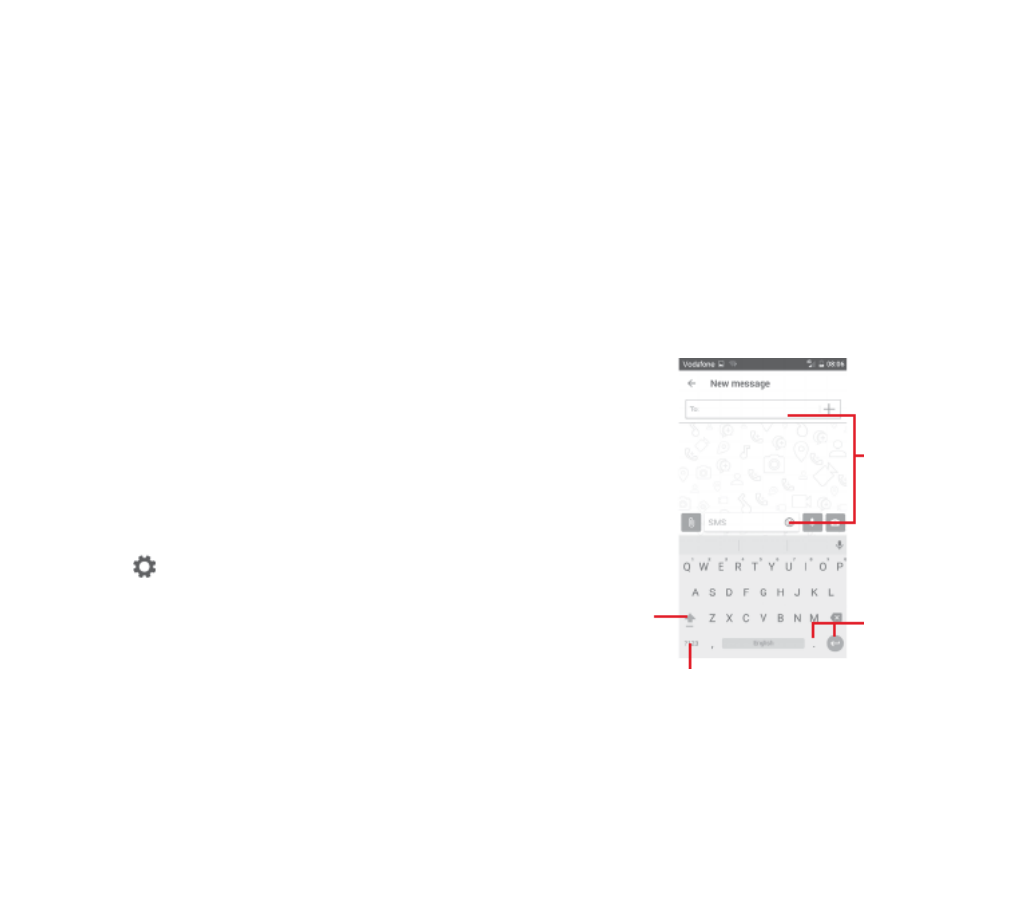
2.1.1 Android keyboard
Touch to switch between the
symbol and numeric keyboard
Long press,
then select to
enter symbols/
emoticons
Touch to enter text
or numbers
Touch to switch
between "abc/
Abc" mode; Long
press to switch
between "abc/
ABC" mode

21 22
2.2 Text editing
You can edit the text you have entered.
• Long press or double touch the text you want to edit.
• Drag the tabs to change the highlighted selection.
• The following options will show: CUT, COPY, PASTE, SHARE
and SELECT ALL.
You can also insert new text
• Touch where you want to type, or long press a blank space, the
cursor will blink and the tab will show. Drag the tab to move
the cursor.
• If you have selected any text, touch the tab to show PASTE
which allows you to paste any text you have previously copied.
3 Phone call, Call log & People
3.1 Phone call
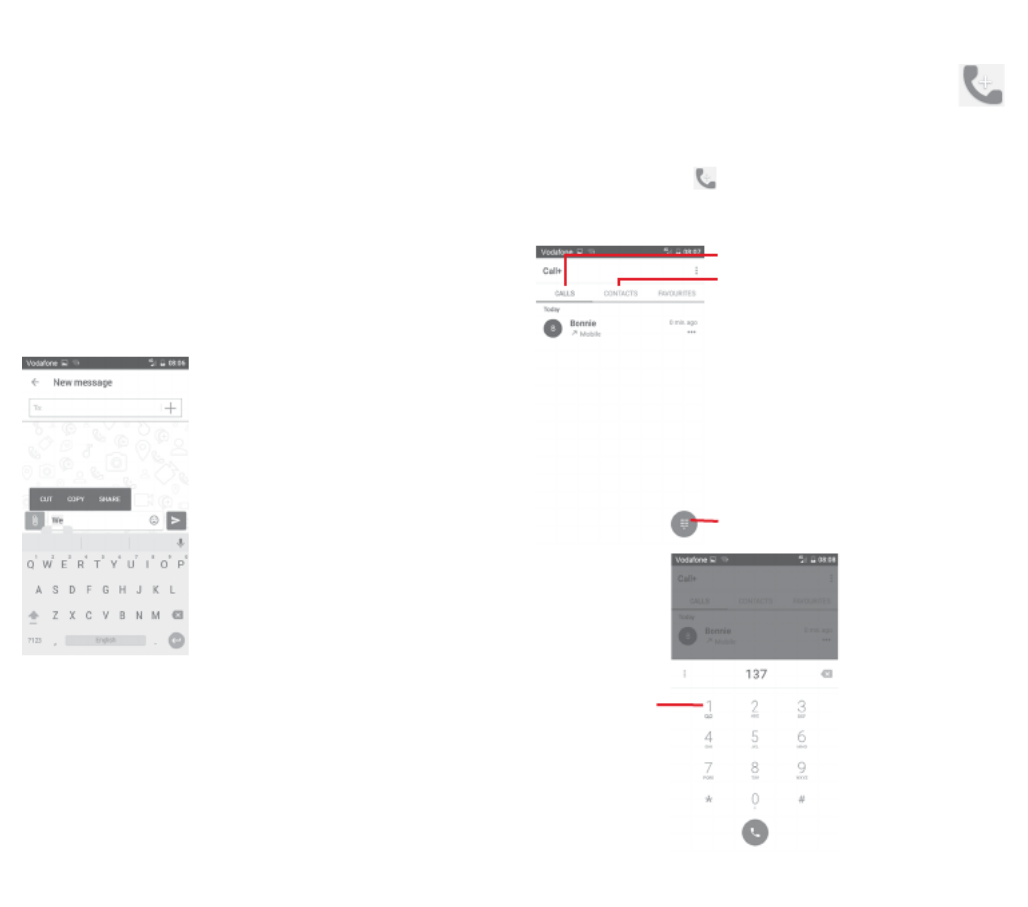
3.1.1 Placing a call
To make a call when the phone is active, go to the Home screen
and touch the Phone icon in the Favourites tray.
If the phone is locked, press the button and then swipe the Power
phone icon to the right.
Touch to show the dial pad
Contacts
Call log
Long press to
access voicemail


23 24
Enter the number you want from the dial pad directly or select a
contact from or CALLS CONTACTS by touching tabs, then touch
to place the call.
The number you entered can be saved to Contacts by touching
and select Add to contacts.
If you make a mistake, you can delete the incorrect digits by
touching .
To hang up a call, touch .
International call
To dial an international call, long press to enter "+", then
enter the international country prefix followed by the full phone
number and finally touch .
Emergency call
If your phone has network coverage, dial the emergency number
and touch to make an emergency call. This works even
without a SIM card and without typing the PIN code.
3.1.2 Answering or rejecting a call
When you receive a call, a call window will be presented on top
of the screen. Touch to dismiss a call or to answer a call.
Touch the call window to open the Phone call screen.
On the Phone call screen, touch
• Slide the icon right to answer the call;
• Slide the icon left to reject the call;
• Slide the icon down to reject the call by sending a preset
message.
To mute incoming calls, press the Volume up/down key.

25 26
3.1.3 Calling your voicemail
Your voicemail is provided by your network to avoid missing
calls. It works like an answering machine that you can access
at any time.
To listen to your voicemail, long press on tab.Phone
To set your voicemail number, touch key and touch Settings >
Calls > Voicemail.
If you receive a voicemail, a voicemail icon appears on the
Status bar. Open the Notification panel, touch New voicemail.
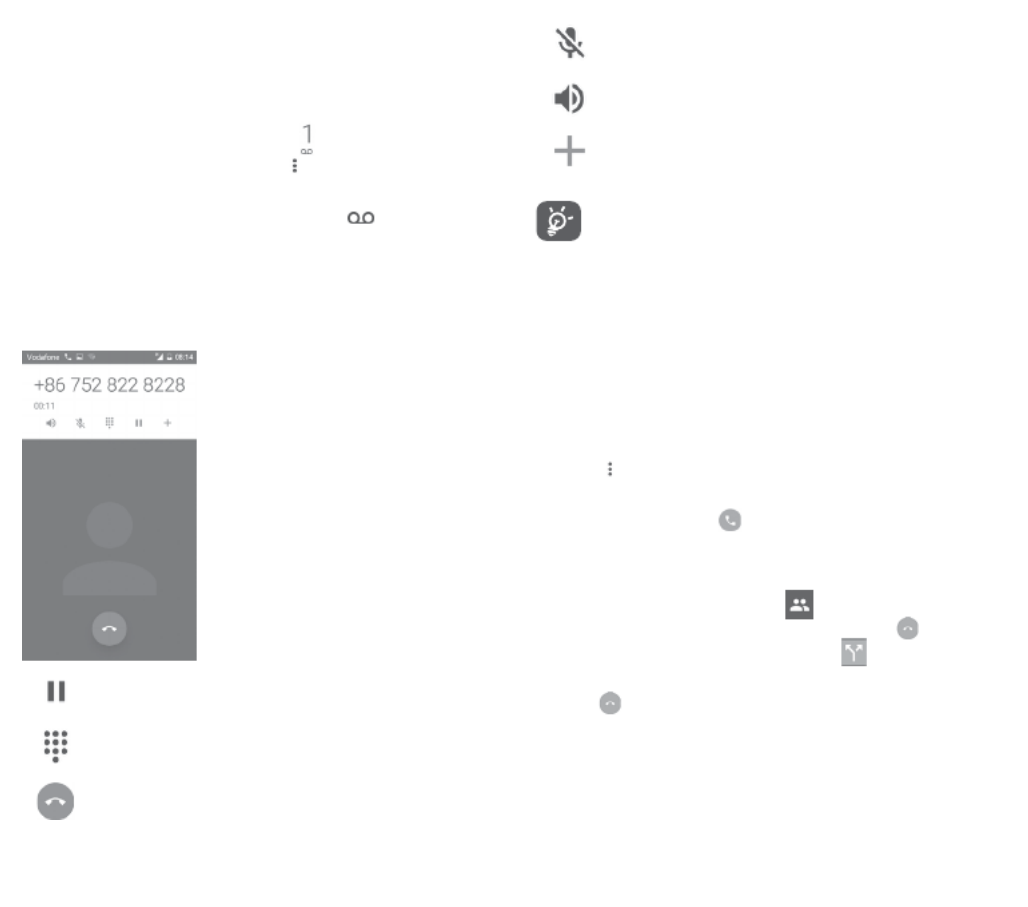
3.1.4 During a call
To adjust the volume during a call, press the Volume up/down
key.
Touch to hold the current call. Touch this icon again to
retrieve the call.
Touch to display dial pad.
Touch to end the current call.
Touch to mute the current call. Touch this icon again to
unmute the call.
Touch to activate the speaker during the current call.
Touch this icon again to deactivate the speaker.
Touch to place call to another contact.
To avoid accidentally pressing the touchscreen during a
call, screen will be locked automatically when you put
your phone close to your ear; and it will be unlocked
when the phone is taken away from your ear.
3.1.5 Managing multiple calls
With this phone you can handle multiple calls at the same time.
Conference calls (1)
You can set up a conference call.
• Place a call to the first participant of the conference call.
• Touch and select Add call.
• Enter the phone number of the person you want to add to
conference and touch . You can also add participants from
CALLS CONTACTS or .
• Press menu icon to start a conference call.
• During a conference call, touch to drop a participant or to
talk privately to one of the participants. Touch to drop the
participant from the conference, touch to talk privately to
the participant and hold on other participants.
• Touch to end the conference call and disconnect all callers.
(1) Depending on your network operator.


27 28
3.1.6 Call+ settings
From phone screen, touch key and select Settings the
following options are available:
General call settings:
• Voicemail
Service Opens a dialog box where you can select
your carrier’s voicemail service or another
service.
Setup If you are using your carrier’s voicemail
service, this opens a dialog box where you
can enter the phone number to use for
listening to and managing your voicemail.
Sound Touch to select the notification sound.
Vibrate Mark the check box to enable vibration
when the call is connected.
• Fixed Dialling Numbers
Fixed Dialling Number (FDN) is a service mode of SIM, where
outgoing calls are restricted to a set of phone numbers. These
numbers are added to the FDN list. The most common practical
application of FDN is for parents to restrict the phone numbers
which their children can dial.
For security reasons, you’ll be prompted to enable FDN by
entering SIM PIN2 which is usually acquired from your service
provider or SIM maker.
• Noise Reduction
Mark the checkbox to suppress your background noise during
calls.
• Call forwarding
Touch to configure how your calls are always forwarded or when
you are busy, unanswered or unreachable.
• Call barring
You can activate or deactivate the call barring for outgoing and
incoming calls. The various options are:
All outgoing calls All outgoing calls are barred.
International
outgoing calls
Outgoing international calls are barred.
International
except home
Outgoing international calls except those
to your country of subscription are barred.
All incoming calls All incoming calls are barred.
Incoming calls
while roaming
Incoming calls are barred when you are
abroad.
Cancel all Deactivate all call barring.
Change barring
password
Change the original barring password for
activating call barring.
• Additional settings
Caller ID Opens a dialog box where you can set
whether your phone number is displayed
when making calls.
Call waiting Mark the check box to notify you of a new
incoming call.
Sounds and vibration
Configure your sounds and vibrations system settings
Quick responses
Edit quick responses for incoming calls.
Accessibility
Touch to configure TTY mode settings

29 30
3.2 Recents
You can view your call history by touching
from the Phone
screen to view call history.
Touch a contact or number to view information or further
operations.
You can view detailed information of a call, launch a new call
or send messages to a contact or number, or add numbers to
Contacts (only available for unsaved phone numbers), etc.
Touch the photo to open the Quick Contact panel.
To clear the entire call memory, touch key from the phone
screen and touch Clear call history.
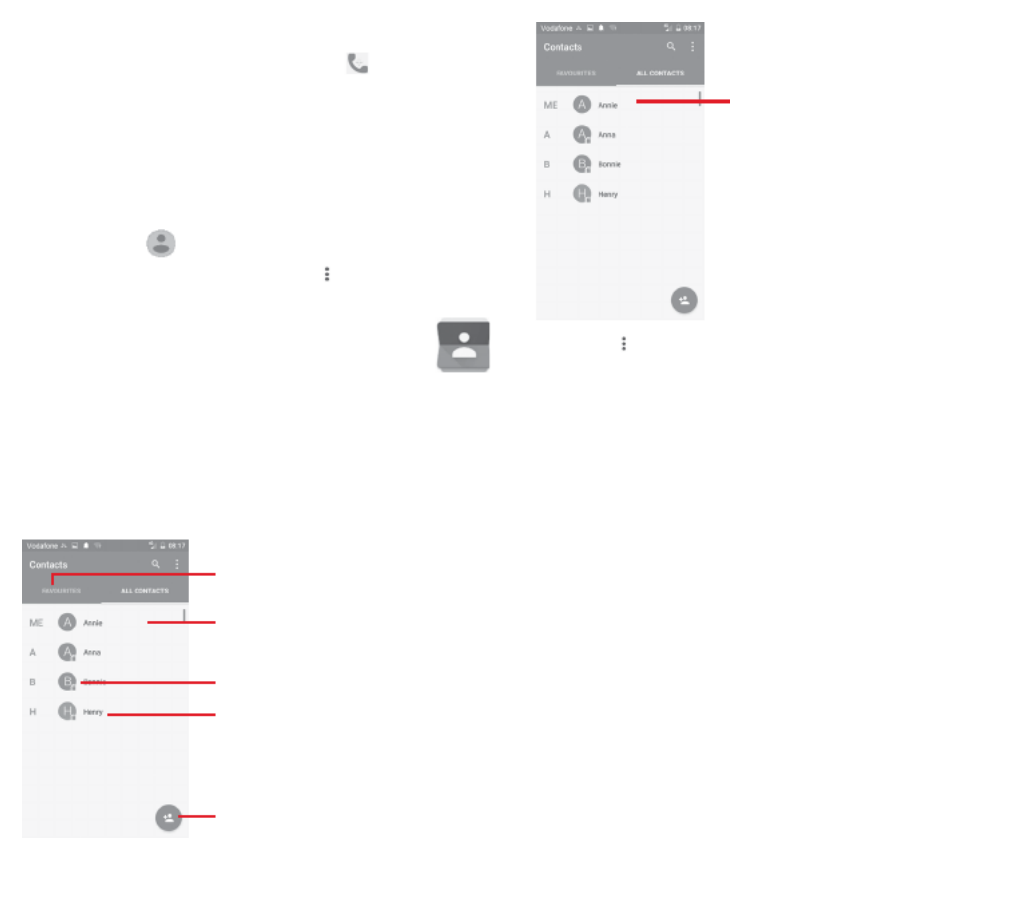
3.3 Contacts
You can view and create contacts on your phone and synchronise
these with your Gmail contacts or other apps on the web or on
your phone.
3.3.1 View your contacts
To access the app, touch the Application tab on the Contacts
Home screen, then select Contacts.
Touch icon to open the Quick Contact
panel and view the contact’s detailed
information
Touch to view your favourite contacts
Contact list
Touch to add a new contact
Touch to set up your profile and your
picture will show
After setting up your profile, your
picture will show and the icon in quick
settings screen will vary together.
Touch the key to display the contacts list option menu.
Following options are available:
• Contacts to
display
Choose which contacts to display.
• Import/Export Import or export contacts between phone,
SIM card, and microSD card, or share
contacts.
• Accounts Manage the synchronisation settings for
different accounts.
• Settings Open the contact display settings.


33 34
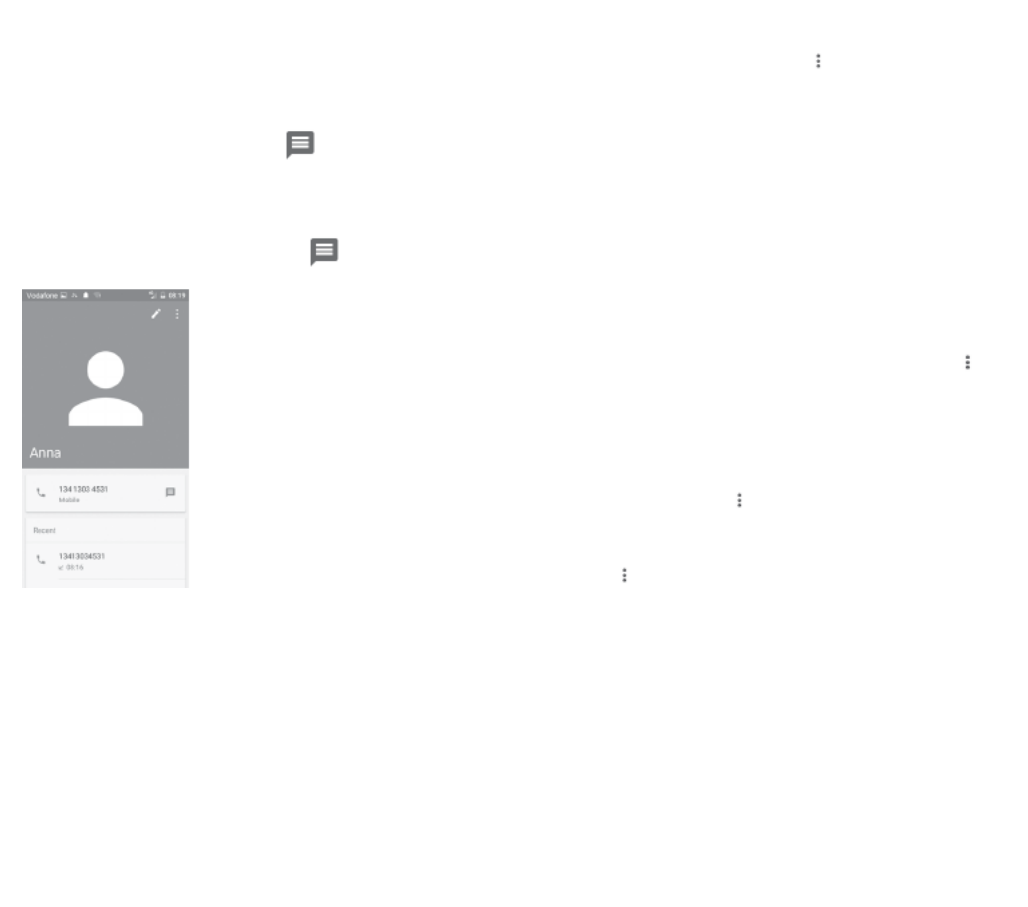
3.3.4 Communicating with your contacts
From contact details screen you can communicate with your
contacts by making a call or sending a message.
To launch a call, touch the phone number.
To send a message, touch the icon on the right side of the
number.
Use Quick Contact for Android
Touch a contact’s picture to open Quick Contact for Android,
then you can touch the number or the icon for the way you
want to connect.
The icons available on the Quick Contact panel depend on the
information you have for the contact and the applications/
accounts on your phone.
3.3.5 Importing, exporting and sharing contacts
From the Contacts screen, touch the key to open the options
menu, touch Import/export, then choose to import/export
contacts from/to your SIM card, Phone, microSD card, Phone
storage, Accounts, etc.
To import/export a single contact from/to your SIM card, choose
an account and target SIM card, select the contact you want to
import/export, and touch to confirm.DONE
To import/export all contacts from/to your SIM card, choose an
account and target SIM card, touch and touch Select all DONE
to confirm.
You can share a single contact or contacts with others via
Bluetooth, Gmail, etc.
To do this, touch a contact you want to share, touch the key
and Share from the contact details screen, then select the app to
perform this action.
3.3.6 Displaying contacts
You can configure which group of contacts you want to display in
the People list. Touch the and then key Contacts to display
from the contacts list screen, then you can choose which
contacts to display.
Touch the and then You can First name key Settings. Sort by
or Last name, as well as as First name first or Last Name format
name first.


35 36
3.3.7 Joining/Discarding contacts
To avoid duplicating information you can easily add a new
contact's details to an existing contact.
Touch the contact which you want to add information to, touch
the key, then touch the in edit screen and touch key
Merge.
Then you'll be asked to choose the contact whose information
you want to join with the first contact. The information from the
second contact is added to the first one, and the second contact
will no longer be displayed in the contacts list.
To separate contact information, touch the contact whose
information you want to separate, touch the key, then touch
the key in the edit screen. Then touch Separate and touch
OK to confirm.
3.3.8 Synchronising contacts in multiple accounts
Contacts, data or other information can be synchronised from
multiple accounts, depending on the apps installed on your
phone.
To add an account, touch on the Quick settings bar to get to
Settings, then touch Accounts > Add account.
You'll be asked to select the kind of account you are adding, like
Google, Exchange, etc.
As with other account setups, you need to enter detailed
information, like username, password, etc.
You can remove an account and all associated information
from the phone. Open the screen, touch the account Settings
you want to delete, touch the key and then select Remove
account, and confirm.
Sync
You can synchronise an account on screen, touch an Accounts
account in the list, then touch the and select key Sync now.
4 Messaging & Email
4.1 Message+
Your phone can create, edit and receive chat, SMS and MMS
messages.
Go to the Home page and touch the Message+ icon in the
Favourites tray.
4.1.1 Create a new message
On the message list screen, touch the new message icon to
write new text/multimedia messages.
Touch to create a new message
or a new group chat
Touch to search in all messages
• Touch to view the whole message thread
• Long press message threads to access
other options available with this contact.


37 38
Sending a text message
Enter the mobile phone number of the recipient on the recipients
bar or touch to add recipients, then touch the content bar to
enter the text of the message. When you ve finished, touch to ’
send the text message.
An SMS of more than 160 characters will be charged as
several SMS. Specific letters (like accents, for example)
will also increase the size of the SMS, so this may cause
multiple SMS to be sent to your recipient.
Sending a multimedia message
MMS enables you to send video clips, images, photos, animations,
slides and audio to other compatible phones and e-mail
addresses.
An SMS will be converted to MMS automatically when media
files (image, video, audio, etc.) are attached or subject or email
addresses are added.
To send a multimedia message, enter the recipient’s phone
number in the recipients bar, touch content bar to enter the
text of the message. Touch to open attach options, select
picture, video, audio or other subjects that you want to add as
attachments.
When finished, touch to send the multimedia message.
Attach options:
• Photo View your Gallery or File Manager to select a
picture as attachment.
• Follow Me Touch to share your current location.
• Contact View your Contacts to select one or more
contact(s) to attach.
• Video View your Gallery or File Manager to select a
video as attachment.
• Audio Select Start recording to share instant
audio or select sounds from phone.
4.1.2 Manage messages
When a new message comes, an icon will appear on status bar
as notification. Drag down the status bar to open the Notification
panel, touch the new message to open it. You can also open
Message+ and touch the new message to open it.
Messages are displayed as a conversation.
To reply to a message, touch the current message to enter the
message-composing screen, enter the text, then touch Send.
If you long press a message in the message details screen, the
following options will be available:
• Copy message
text
This option is only available for SMS. Touch
to copy current message content and past it
to content bar of the new message you are
going to compose.
• Forward Touch to forward the message to another
recipient.
• Delete message Delete the current message.


39 40
4.1.3 Adjust message settings
In the message list screen, touch the key and select Settings.
Look & Feel
• Font size Touch to change the font size.
• Background Touch to customise the background.
• Sort contacts
by…
Touch to sort contacts by or First name
Surname.
• Display contact
names by…
Touch to display contact names by First
name first Surname first or .
• Show call logs in
conversation
Mark the checkbox to enable/disable
the function. Once enabled, photo logs,
messages and media shared during a call
will be highlighted.
Chat
• Service options Touch and mark the checkbox to enable/
disable Call+ & Message+ service.
• Show last active
info
Mark the checkbox to show/hide your last
active info.
• Read
notifications
(chat only)
Mark the checkbox to send a notification
when a chat message was read.
• Chat profile
name
Touch to set up the name on your profile.
• Automatic
download
Touch to give premission to automatically
download media files depending on the
connection status.
SMS & MMS
• Allow conversion
of long SMS to
MMS
Mark the checkbox to enable/disable this
function.
• SMS delivery
reports
Mark the checkbox to allow the request of
SMS delivery reports.
• MMS delivery
reports
Mark the checkbox to allow the request of
MMS delivery reports.
• MMS while
roaming
Mark the checkbox to automatically
retrieve incoming MMS while roaming.
• MMS auto-
retrieve
Mark the checkbox to automatically
retrieve incoming MMS.
• Advanced Touch to access advanced settings.
Notifications
• Notification
sounds
Touch to set your sound notification
preferences.
• Notification light Touch to set your notification light
preferences.
• Vibration Mark the checkbox to enable/disable
vibration with incoming messages.
• Group chat
notifications
Mark the checkbox to notify you about new
group chat messages.
• Privacy mode Mark the checkbox to turn on privacy
mode, under which mode the message text
and sender will not be displayed for new
notifications.


41 42
Help
• Message+ Intro Touch to learn more about Message+ and
all it has to offer.
• Learn about
Call+
Touch to find out what Vodafone Call+ has
to offer.
• Restart hints
and tips
Touch to learn how to use Message+ by
showing all hints and tips again.
• FAQs Touch to see the Frequently Asked Questions
and you’ll probably find the answer for your
question here.
• Contact us Touch to access the website to contact us.
• Terms &
conditions
Touch to view the terms & conditions of the
application.
• Privacy policy Touch to view the privacy policy of the
application.
• More apps by
Vodafone
Touch to view more apps provided by
Vodafone.
4.2 Gmail/Email
The first time you set up your phone, you can select to use an
existing Gmail account or to create a new Email account.
4.2.1 Gmail
As Google’s web-based email service, Gmail is configured when
you first set up your phone. Gmail on your phone can be
automatically synchronised with your Gmail account on the web.
Unlike other kinds of email account, each message and its replies
in Gmail are grouped in your inbox as a single conversation; all
emails are organised by labels instead of folders.
To access Gmail
From the Home screen, touch the Application tab to enter the
applications list, then touch Gmail.
Gmail displays messages and conversations from one single Gmail
account at a time. If you own more than one account, you can add
an account by touching the icon and select from Settings
Inbox screen, then touch ADD ACCOUNT. When finished, you can
switch to another account by touching the account name from
Inbox screen, then select the account you want to view.
To create and send emails
1 Touch from Inbox screen.
2 Enter the recipient(s)’s email address in field. To
3 If necessary, touch the popup menu icon AddCc/Bcc to add
a copy or a blind copy to the message.
4 Enter the subject and the content of the message.
5 Touch icon and select to add an attachment.Attach file
6 Finally, touch the icon to send.

43 44
7 If you do not want to send the mail out right away, you can
touch the icon and then or touch the key Save draft Back
to save a copy. To view the draft, touch your account name to
display all labels, then select Drafts.
If you do not want to send or save the mail, you can touch the
icon and then touch Discard.
To add a signature to emails, touch the icon and then touch
Settings from inbox screen, choose an account, then touch
Signature.
To receive and read your emails
When a new email arrives, you will be notified by a ringtone or
vibration, and an icon will appear on Status bar.
Touch and drag down the Status bar to display the Notification
panel, touch the new email to view it. Or you can also open the
Gmail Inbox label and touch the new mail to read it.
You can search for an email by sender, recipient, subject, etc.
• Touch the icon from Inbox screen.
• Enter the keyword you want to search for in the searching box
and touch on the software keyboard.
To reply or forward emails
• Reply When viewing an email, touch to reply
to it.
• Reply all Touch and select Reply all to send a
message to all people in a mail loop.
• Forward Touch and select Forward to forward the
received mail to other people.
4.2.2 Email
Besides your Gmail account, you can also set up external email
accounts on your phone.
Touch the Application tab from the Home screen, then select
Email.
An email wizard will guide you through the steps to set up an
email account.
1 Select your account from the suggested list, and touch NEXT.
2 Enter the email address and password of the account you want
to set up.
3 Touch Next. If the account you entered is not provided by your
service provider in the phone, you will be prompted to go to the
email account settings screen to enter settings manually. Or
you can touch to directly enter the incoming MANUAL SETUP
and outgoing settings for the email account you are setting up.
4. Set up your account options.
5 Enter the account name and display name in outgoing emails.
6 To add another email account, you can touch key and
Settings. Touch to create a new account.Add account
To create and send emails
1 Touch the icon on Inbox screen.
2 Enter recipient(s) email address(es) in the field.To
3 If necessary, touch the behind the To field. and touch Add
Cc/Bcc to add a copy or a blind copy to other recipients.
4 Enter the subject and the content of the message.
5 Touch the key, then touch to add an attachment.
6 Finally, touch to send .
7 If you do not want to send the mail right away, you can touch
key and Save draft or touch the Back key to save a copy.


45 46
5 Calendar , Alarm clock &
Calculator
5.1 Calendar
Use Calendar to keep track of important meetings, appointments,
etc.
To access this function, touch the Application tab from the Home
screen, then touch Calendar.
5.1.1 Multimode view
To change your Calendar view, touch the date title to open the
month view, or touch and select Schedule, Day, 3-day, Week
or Month to access different view. Touch the icon to return
to Today’s view.
Month view
Week view
Day view
Schedule
view
5.1.2 To create new events
You can add new events from any Calendar view.
• Touch .
• Fill in all required information for this new event. If it is a whole-
day event, you can select All day.
When finished, touch SAVE from the top of the screen.
Before you can add an event, you must add at least one
Calendar account and make a calendar visible.
To delete or edit an event
To edit or delete an event, touch the icon to edit the event
and touch to delete an event.DELETE
5.1.3 Event reminder
If a reminder is set for an event, the upcoming event icon
will appear on the Status bar as a notification when the reminder
time arrives.
Touch and drag down the status bar to open the Notification
panel, touch event name to view the Calendar notification list.
Touch the key to keep the reminders pending in the status Back
bar and the Notification panel.


47 48
5.2 Clock
Your mobile phone has a built-in clock.
To access this function, touch the Application tab from the Home
screen, then touch Clock.
Touch to add or set an alarm.
5.2.1 To set an alarm
From Clock screen, touch to enter the Alarms screen, then
touch to add a new alarm. Following options will show:
• Time Touch numbers to set the time for your
alarm.
• Repeat Touch to select the days you want alarm
to work.
• Ringtone Touch to select an alarm ringtone.
• Vibrate Mark the checkbox to activate/deactivate
vibration.
• Label Touch to set a name for the alarm.
Touch an already existing alarm and touch to delete the
selected alarm.
5.2.2 To adjust alarm settings
Touch the key from screen. The following options will Alarms
be available under Settings:
Clock
• Style Touch to set or style.Analog Digital
• Automatic home
clock
Mark the checkbox to set home clock while
travelling outside.
• Home time
zone
Touch to set home time zone.
Alarms
• Silence after Touch to set time silence.
• Snooze length Touch to choose length of snooze.
• Alarm volume Touch to set alarm volume.
• Volume buttons Touch to choose or Snooze Dismiss, Do
nothing as volume buttons.
• Start week on Touch to select the first day of a week
as per your preference from Saturday,
Sunday Monday or .
5.3 Calculator
With Calculator you can solve many mathematical problems.
To open it, touch the Application tab from the Home screen, then
touch .Calculator
There are two panels available: Basic panel and Advanced panel.


49 50
To switch between panels, select one of the following two ways:
• Touch and drag the basic screen to the left to open the
Advanced panel.
• Or turn the device to the landscape mode from the basic panel
to open the Advanced panel (1).
To view the calculation history, drag down the screen.
(1) If "Settings\Display\When device is rotated\Stay in portrait view”
is on, this item will not display.
6 Getting connected
Your phone can connect to the Internet using either GPRS/
EDGE/3G/4G or Wi-Fi.
6.1 Connecting to the Internet
6.1.1 GPRS/EDGE/3G/4G
The first time you turn on your phone with the SIM card inserted,
it will automatically configure a mobile network service: GPRS,
EDGE, 3G or 4G. If the network is not connected, you can turn on
Mobile data Data usage on Settings > .
To check the network connection you are using, touch the
Application tab on the Home screen, then touch Settings >
More > Mobile networks > Access point names Network or
operators.
To create a new access point
A new mobile network connection can be added to your phone
with the following steps:
1 Touch on the Quick settings bar to get to Settings.
2 Touch More > Mobile networks > Access point names.
3 Then touch key to add new APN.
4 Enter the required APN information.
5 When finished, touch the key and Save.


51 52
To activate/deactivate Data roaming
When roaming, you can decide to connect/disconnect to a data
service.
1 Touch on the Quick settings bar to get to Settings.
2 Touch More > Mobile networks.
3 Touch the switch to activate or deactivate data roaming.
4 When Data roaming is deactivated, you can still perform data
exchange with a Wi-Fi connection (see "6.1.2 Wi-Fi").
When you are abroad, a fixed panel will appear in the notification
drawer to allow you to enable or disable the service.
6.1.2 Wi-Fi
You can connect to the Internet when your phone is within range
of a wireless network. Wi-Fi can be used on your phone even
without a SIM card inserted.
To turn Wi-Fi on and connect to a wireless network
1 Touch on the Quick settings bar to get to Settings, then
touch Wi-Fi.
2 Touch the switch to turn on/off Wi-Fi.
3 Turn on Wi-Fi: detailed information of all detected Wi-Fi
networks is displayed in the Wi-Fi networks section.
4 Touch a Wi-Fi network to connect to it. If the network you
selected is secured, you'll need to enter a password or other
credentials (contact network operator for details). When you’re
finished, touch CONNECT.
To activate notification when a new network is detected
When Wi-Fi is on and the network notification is activated, the
Wi-Fi icon will appear on the status bar whenever the phone
detects an available wireless network within range. The following
steps activate the notification function when Wi-Fi is on:
1 Touch on the Quick settings bar to get to Settings.
2 Touch Wi-Fi, then the key and select Advanced.
3 Touch the switch to activate/deactivate this function.
To add a Wi-Fi network
When Wi-Fi is on, you may add new Wi-Fi networks according to
your preference.
1 Touch on the Quick settings bar to get to Settings.
2 Touch Wi-Fi, and then touch the and select Add network.
3 Enter the name of the network and any required network
information.
4 Touch SAVE.
When successfully connected, your phone will be connected
automatically the next time you are within range of this network.
To forget a Wi-Fi network
The following steps prevent automatic connections to networks
which you no longer wish to use.
1 Turn on Wi-Fi, if it’s not already on.
2 In the Wi-Fi screen, long press the name of the saved network.
3 Touch Forget network in the dialogue that opens.


55 56
To locate data you have transferred or downloaded in the
internal storage:
1 Touch the Application tab from the Home screen to open the
apps list.
2 Touch File Manager.
All data you have downloaded is stored in , where File Manager
you can view media files (videos, photos, music and others),
rename files, install apps onto your phone, etc.
6.5 To safely remove the microSD card from
your phone
The microSD card can be removed from your phone any time
the phone is powered off. To remove the microSD card while the
phone is on, you must unmount the storage card from the phone
first, to prevent corrupting or damaging the storage card.
To remove a microSD card
1 Touch on the Quick settings bar to get to Settings.
2 Touch Storage & USB > SD card.
3 Touch and select Settings > Eject.
Additionally, you can simply touch the icon besides the SD
card to eject it.
With either way, you can safely remove the microSD card from
the phone.
To format a microSD card
1 Touch on the Quick settings bar to get to Settings.
2 Touch Storage & USB > SD card.
3 Touch and select Settings > Format.
4 Touch to confirm.
6.6 Sharing your phone’s mobile data
connection
You can share your phone’s mobile data connection with a single
computer via a USB cable (USB tethering) or with up to eight
devices at once by turning your phone into a portable Wi-Fi
hotspot or via Bluetooth.
Sharing data may incur additional charges from your
network operator. Extra fees may also be charged in
roaming areas.
To share your phone’s data connection via USB
Use the USB cable that came along with your phone to connect
the phone to a USB port on your computer.
1 Touch on the Quick settings bar to go to Settings.
2 Touch More > Tethering & portable hotspot.
3 Touch the switch beside to activate/USB tethering
deactivate this function.
To share your phone’s data connection as a portable Wi-Fi
hotspot
1 Touch on the Quick settings bar to go to Settings.
2 Touch More > Tethering & portable hotspot > Wi-Fi hotspot.
3 Touch the switch to activate/deactivate this function.
To share your phone’s data connection via Bluetooth
1 Touch on the Quick settings bar to go to Settings.
2 Touch More > Tethering & portable hotspot.
3 Touch the switch beside to activate/Bluetooth tethering
deactivate this function.
To rename or secure your portable hotspot
When Portable Wi-Fi hotspot is activated, you could change the
name of your phone’s Wi-Fi network (SSID) and secure its Wi-Fi
network.
1 Touch on the Quick settings bar to go to Settings.


59 60
8 Multimedia applications
8.1 Camera
Your mobile phone is fitted with a Camera for taking photos and
shooting videos.
Before using the Camera, be sure to remove the protective lens
cover before use to avoid it affecting your picture quality.
To take a photo when your phone is active, touch the Camera
icon in the Favourites tray on your Home screen.
If the phone is locked, press the Power button and then swipe the
camera icon to the left to open the camera.
Touch to take a picture
Touch to turn on Flash
Slide to switch camera mode from
Manual, Auto, Pano Collageor .
Pinch/Spread to zoom in/out or.
Touch to switch between front/back camera
Touch to open settings
Touch to view pictures or videos
you have taken
Touch to turn on Timer
Touch to start recording video
Touch to turn on or off night mode
Touch to turn on or off night mode
To take a picture
The screen acts as the viewfinder. First position the object or
landscape in the viewfinder, touch icon to take the picture
which will be automatically saved.
To shoot a video
Touch on the bottom right of the screen to start recording
a video.
Touch to stop recording. The video will be automatically
saved.
Further operations when viewing a picture/video you have
taken
• Touch the image on the bottom left of the screen to quickly
view the picture you've taken.
• Touch the icon then Gmail, Bluetooth, MMS, etc to share
the photo or video you have taken.
• Touch to access the Photos.
• Touch the Back key to return to the Camera or Camcorder.
8.1.1 Camera settings
Before taking a photo/shooting a video, touch the icon to
adjust a number of settings in framing mode.
Back camera shooting mode
• MANUAL Touch to manually set ISO, shutter speed, or
white balance as your wish.
• AUTO Auto mode is turned on.
• PANO Turn on the panorama function. Touch the
shutter button to start taking panoramic
photo and move the phone steadily along
the direction indicated by the onscreen
line. Once the preview frame is filled, the
phone will automatically save the photo.
• Collage Switch to Collage shooting. Touch to
open all options: touch to only capture
one shot in a picture, or to stitch two
shots into one picture, or to stitch
four shots into one picture, or to close
options.
Touch the icon to access camera settings and below options
will display for you to choose from:

Specyfikacje produktu
| Marka: | Vodafone |
| Kategoria: | smartfon |
| Model: | Smart turbo 7 |
Potrzebujesz pomocy?
Jeśli potrzebujesz pomocy z Vodafone Smart turbo 7, zadaj pytanie poniżej, a inni użytkownicy Ci odpowiedzą
Instrukcje smartfon Vodafone

5 Października 2024
27 Września 2024
27 Września 2024
27 Września 2024
27 Września 2024
27 Września 2024
27 Września 2024
27 Września 2024
27 Września 2024
27 Września 2024
Instrukcje smartfon
- smartfon Sony
- smartfon Samsung
- smartfon AEG
- smartfon LG
- smartfon Motorola
- smartfon Xiaomi
- smartfon MyPhone
- smartfon Sharp
- smartfon Huawei
- smartfon TCL
- smartfon Lenovo
- smartfon TP-Link
- smartfon Philips
- smartfon SilverCrest
- smartfon Gigabyte
- smartfon Acer
- smartfon Realme
- smartfon Gigaset
- smartfon Geemarc
- smartfon Nokia
- smartfon Hisense
- smartfon Infiniton
- smartfon Panasonic
- smartfon Mio
- smartfon Asus
- smartfon Nedis
- smartfon Medion
- smartfon OK
- smartfon Audioline
- smartfon Toshiba
- smartfon Tesla
- smartfon Alcatel-Lucent
- smartfon Majestic
- smartfon Bluebird
- smartfon Garmin
- smartfon Blaupunkt
- smartfon Profoon
- smartfon Vivax
- smartfon Evolveo
- smartfon Alcatel
- smartfon Haier
- smartfon HP
- smartfon Hyundai
- smartfon Honeywell
- smartfon Honor
- smartfon Kodak
- smartfon ZTE
- smartfon MaxCom
- smartfon Dell
- smartfon Google
- smartfon Intex
- smartfon Oppo
- smartfon Kyocera
- smartfon Krüger&Matz
- smartfon Qilive
- smartfon Thomson
- smartfon Manta
- smartfon Apple
- smartfon NGS
- smartfon CRUX
- smartfon Emporia
- smartfon Nevir
- smartfon Mitsubishi
- smartfon Razer
- smartfon GoClever
- smartfon SPC
- smartfon Intermec
- smartfon NEC
- smartfon Polaroid
- smartfon Prestigio
- smartfon Aiwa
- smartfon Sanyo
- smartfon Telefunken
- smartfon OnePlus
- smartfon Amazon
- smartfon Olympia
- smartfon Microsoft
- smartfon Bush
- smartfon HTC
- smartfon CAT
- smartfon Denver
- smartfon Saiet
- smartfon Albrecht
- smartfon RCA
- smartfon Media-Tech
- smartfon BenQ
- smartfon Trevi
- smartfon Lexibook
- smartfon Overmax
- smartfon Micromax
- smartfon Sencor
- smartfon NUU Mobile
- smartfon Alecto
- smartfon Binatone
- smartfon Hammer
- smartfon Allview
- smartfon Oukitel
- smartfon Best Buy
- smartfon Cyrus
- smartfon Kazam
- smartfon Tecdesk
- smartfon KPN
- smartfon Swissvoice
- smartfon I.safe Mobile
- smartfon TrekStor
- smartfon Brondi
- smartfon Fysic
- smartfon Wiko
- smartfon Yarvik
- smartfon Aligator
- smartfon Amplicomms
- smartfon AQISTON
- smartfon Amplicom
- smartfon Archos
- smartfon Androidtech
- smartfon Crosscall
- smartfon Ecom
- smartfon Sony Ericsson
- smartfon Vestel
- smartfon Sonim
- smartfon Energy Sistem
- smartfon Doro
- smartfon Sagem
- smartfon Lava
- smartfon Blu
- smartfon Easypix
- smartfon Konrow
- smartfon Brigmton
- smartfon Sunstech
- smartfon Aspera
- smartfon Sunny
- smartfon Nordmende
- smartfon Blackberry
- smartfon Vivo
- smartfon Wolder
- smartfon NGM
- smartfon Switel
- smartfon InFocus
- smartfon GreatCall
- smartfon XD
- smartfon Pantech
- smartfon Alba
- smartfon RugGear
- smartfon Umidigi
- smartfon AT&T
- smartfon Mpman
- smartfon Bury
- smartfon Logicom
- smartfon Karbonn
- smartfon Palm
- smartfon Hannspree
- smartfon Phicomm
- smartfon Plum
- smartfon Lumigon
- smartfon Infinix
- smartfon Keneksi
- smartfon Klipad
- smartfon Iget
- smartfon T-Mobile
- smartfon JCB
- smartfon Casper
- smartfon Unnecto
- smartfon Wileyfox
- smartfon ITT
- smartfon Yota
- smartfon Avus
- smartfon Spice
- smartfon Wolfgang
- smartfon BQ
- smartfon ORA
- smartfon Danew
- smartfon Echo
- smartfon Primux
- smartfon Tiptel
- smartfon UTStarcom
- smartfon Zipy
- smartfon Mediacom
- smartfon Beafon
- smartfon BGH
- smartfon Billow
- smartfon Telstra
- smartfon Ulefone
- smartfon CSL
- smartfon ToughGear
- smartfon Benefon
- smartfon Komu
- smartfon Doogee
- smartfon Energizer
- smartfon Tremay
- smartfon Kurio
- smartfon Piranha
- smartfon Coolpad
- smartfon Syco
- smartfon TAG Heuer
- smartfon Mobistel
- smartfon Itel
- smartfon Garmin-Asus
- smartfon Handheld
- smartfon Fero
- smartfon AT Telecom
- smartfon Xtreamer
- smartfon Verykool
- smartfon O2
- smartfon General Mobile
- smartfon Mustang
- smartfon Kogan
- smartfon Pharos
- smartfon Storex
- smartfon Fairphone
- smartfon Freeman
- smartfon HomTom
- smartfon Leotec
- smartfon Auro
- smartfon Maxx
- smartfon ITTM
- smartfon Posh Mobile
- smartfon THL
- smartfon NGM-Mobile
- smartfon POCO
- smartfon Nothing
- smartfon Lark
- smartfon Senifone
- smartfon Tecno
- smartfon Telme
- smartfon UMi
- smartfon Olitech
- smartfon Mobiola
- smartfon Meizu
- smartfon Neffos
- smartfon Gionee
- smartfon TIM
- smartfon Cubot
- smartfon Leagoo
- smartfon NTech
- smartfon Nubia
- smartfon LeEco
- smartfon GSmart
- smartfon Bea-fon
- smartfon Opticon
- smartfon EStar
- smartfon Facom
- smartfon Jitterbug
- smartfon Custom
- smartfon Aplic
- smartfon HMD
- smartfon Opis
- smartfon Volla
- smartfon Nothing Tech
- smartfon Maxwest
- smartfon Kalley
Najnowsze instrukcje dla smartfon
2 Kwietnia 2025

30 Marca 2025
10 Marca 2025
7 Marca 2025
5 Marca 2025
5 Marca 2025
3 Marca 2025

2 Marca 2025

26 Lutego 2025
26 Lutego 2025