Instrukcja obsługi Toyota Corolla 2013 Navigation
Przeczytaj poniżej 📖 instrukcję obsługi w języku polskim dla Toyota Corolla 2013 Navigation (264 stron) w kategorii nawigator. Ta instrukcja była pomocna dla 15 osób i została oceniona przez 2 użytkowników na średnio 4.5 gwiazdek
Strona 1/264

2
DA_EXT_COROLLA_touch screen_EE
Introduction
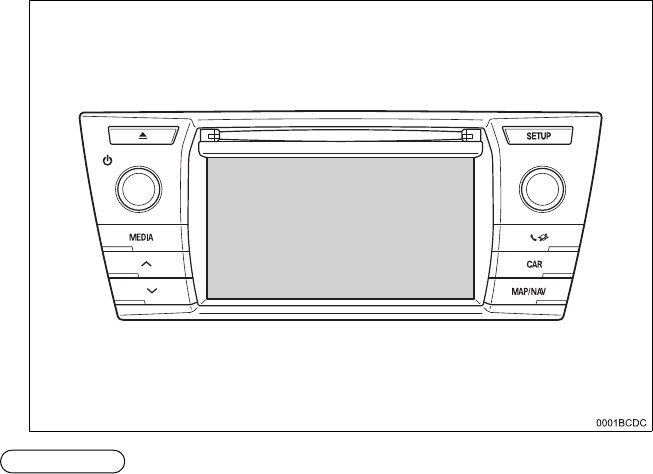
EXISTENCE OF NAVIGATION CAPABILITIES
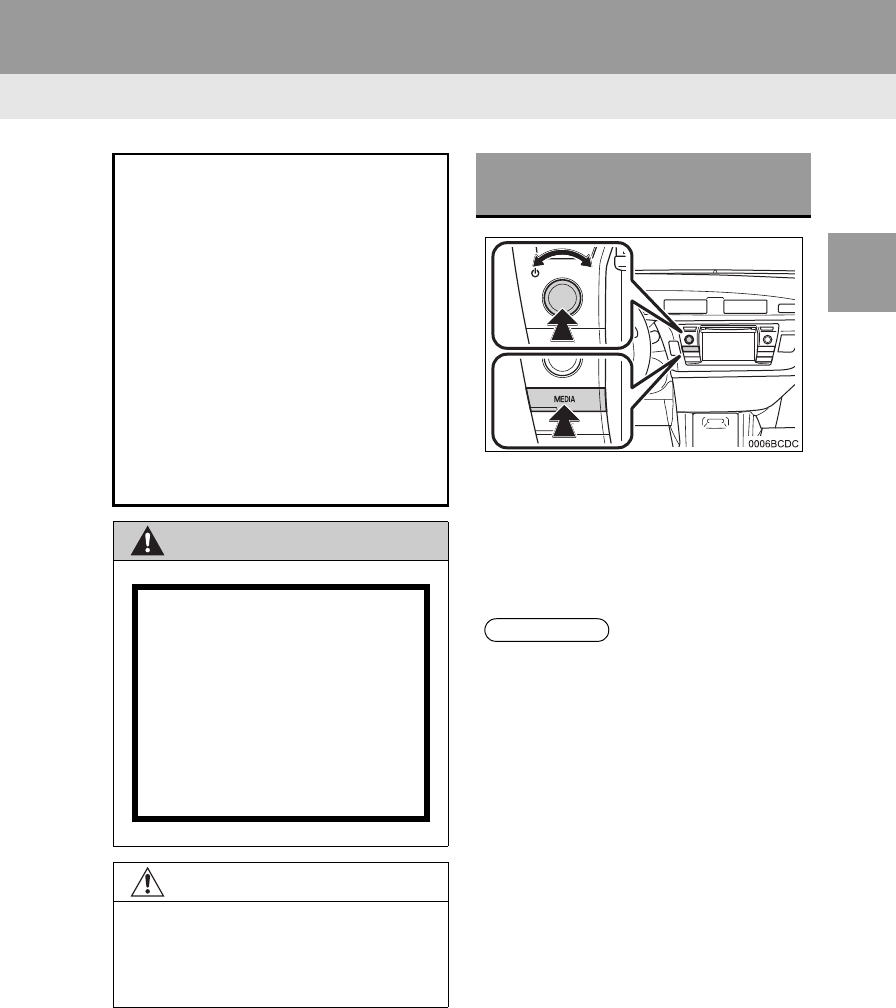
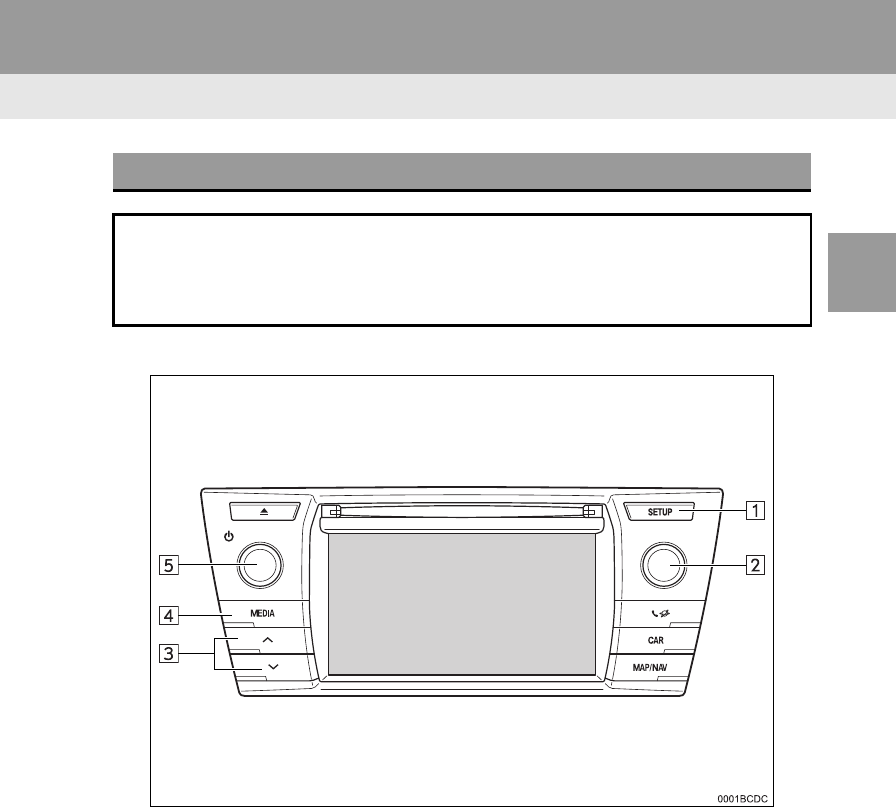
Existence of navigation capabilities can be confirmed by performing the follow-
ing method:
INFORMATION
This illustration is for left-hand drive vehicles.
The button positions and shapes differ for right-hand drive vehicles.

3
DA_EXT_COROLLA_touch screen_EE
Vehicles without smart entry & start system
1 When the engine switch is turned to the “ACC” or “ON” position, the initial
screen will be displayed and the system will begin operating.
Vehicles with smart entry & start system
1 When the engine switch is turned to the ACCESSORY or IGNITION ON
mode, the initial screen will be displayed and the system will begin operating.
2 Press the “MAP/NAV” button.
Either of the following screens will be displayed.
Multimedia system Navigation system

4
DA_EXT_COROLLA_touch screen_EE
SYMBOLS USED IN ILLUSTRATIONS
Safety symbol
The symbol of a circle with a slash through it means “Do not”, “Do not
do this”, or “Do not let this happen”.
Arrows indicating operations
Indicates the action (pushing, turning, etc.)
used to operate switches and other
devices.
Indicates the outcome of an operation (e.g.
a lid opens).
HOW TO READ THIS MANUAL
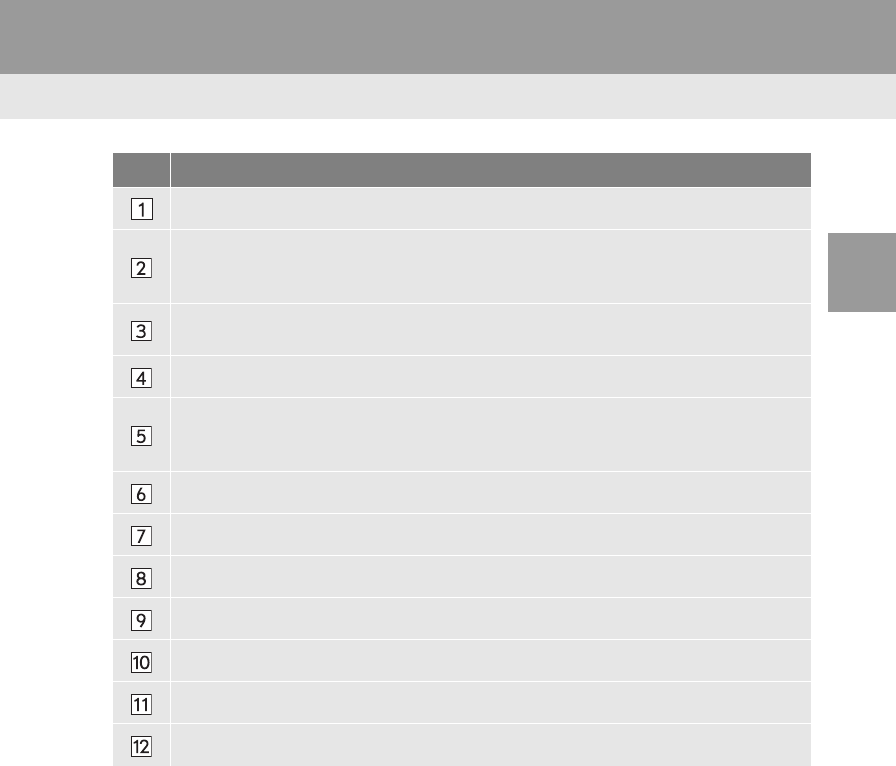
No. Name Description
Operational Outlines An outline of the operation is explained.
Main Operations The steps of an operation are explained.
Related Operations A main operation’s supplementary operations are described.
Information Useful information for the user is described.

5
DA_EXT_COROLLA_touch screen_EE
This manual explains the operation of the navigation/multimedia system.
Please read this manual carefully to ensure proper use. Keep this manual in
your vehicle at all times.
The screen shots in this document and the actual screens of the navigation/mul-
timedia system differ depending on whether the functions and/or a contract ex-
isted and the map data available at the time of producing this document.
Please be aware that the content of this manual may be different from the nav-
igation/multimedia system in some cases, such as when the system’s software
is updated.
The Navigation System is one of the most technologically advanced vehicle ac-
cessories ever developed. The system receives satellite signals from the Global
Positioning System (GPS) operated by the U.S. Department of Defense. Using
these signals and other vehicle sensors, the system indicates your present po-
sition and assists in locating a desired destination.
The navigation system is designed to select efficient routes from your present
starting location to your destination. The system is also designed to direct you
to a destination that is unfamiliar to you in an efficient manner. The system is
developed by “Harman International” using “NAVTEQ” maps. The calculated
routes may not be the shortest nor the least traffic congested. Your own person-
al local knowledge or “short cut” may at times be faster than the calculated
routes.
The navigation system’s database includes Point of Interest categories to allow
you to easily select destinations such as restaurants and hotels. If a destination
is not in the database, you can enter the street address or a major intersection
close to it and the system will guide you there.
The system will provide both a visual map and audio instructions. The audio in-
structions will announce the distance remaining and the direction to turn in ap-
proaching an intersection. These voice instructions will help you keep your eyes
on the road and are timed to provide enough time to allow you to maneuver,
change lanes or slow down.
Please be aware that all current vehicle navigation systems have certain limita-
tions that may affect their ability to perform properly. The accuracy of the vehi-
cle’s position depends on the satellite condition, road configuration, vehicle
condition or other circumstances. For more information on the limitations of the
system, refer to page 217.
NAVIGATION SYSTEM OWNER’S MANUAL
NAVIGATION SYSTEM
6
DA_EXT_COROLLA_touch screen_EE
For safety reasons, this manual indicates items requiring particular attention
with the following marks.
IMPORTANT INFORMATION ABOUT THIS MANUAL
CAUTION
This is a warning against anything which may cause injury to people if the warning is
ignored. You are informed about what you must or must not do in order to reduce the risk
of injury to yourself and others.
NOTICE
This is a warning against anything which may cause damage to the vehicle or its equip-
ment if the warning is ignored. You are informed about what you must or must not do in
order to avoid or reduce the risk of damage to your vehicle and its equipment.
7
DA_EXT_COROLLA_touch screen_EE
To use this system in the safest possible
manner, follow all the safety tips shown
below.
Do not use any feature of this system to
the extent it becomes a distraction and
prevents safe driving. The first priority
while driving should always be the safe op-
eration of the vehicle. While driving, be
sure to observe all traffic regulations.
Prior to the actual use of this system, learn
how to use it and become thoroughly famil-
iar with it. Read the entire Navigation sys-
tem Owner's manual to make sure you
understand the system. Do not allow other
people to use this system until they have
read and understood the instructions in
this manual.
For your safety, some functions may be-
come inoperable when driving. Unavail-
able screen buttons are dimmed.
To use this system in the safest possible
manner, follow all the safety tips shown
below.
This system is intended to assist in reach-
ing the destination and, if used properly,
can do so. The driver is solely responsible
for the safe operation of your vehicle and
the safety of your passengers.
Do not use any feature of this system to
the extent it becomes a distraction and
prevents safe driving. The first priority
while driving should always be the safe op-
eration of the vehicle. While driving, be
sure to observe all traffic regulations.
Prior to the actual use of this system, learn
how to use it and become thoroughly famil-
iar with it. Read the entire Navigation sys-
tem Owner’s manual to make sure you
understand the system. Do not allow other
people to use this system until they have
read and understood the instructions in
this manual.
For your safety, some functions may be-
come inoperable when driving. Unavail-
able screen buttons are dimmed.
SAFETY INSTRUCTION
(MULTIMEDIA SYSTEM)
CAUTION
For safety, the driver should not operate
the multimedia system while he/she is
driving. Insufficient attention to the road
and traffic may cause an accident.
SAFETY INSTRUCTION
(NAVIGATION SYSTEM)

8
DA_EXT_COROLLA_touch screen_EE
While driving, listen to the voice instruc-
tions as much as possible and glance at
the screen briefly and only when it is safe.
However, do not totally rely on voice guid-
ance. Use it just for reference. If the sys-
tem cannot determine the current vehicle
position correctly, there is a possibility of
incorrect, late, or non-voice guidance.
The data in the system may occasionally
be incomplete. Road conditions, including
driving restrictions (no left turns, street clo-
sures, etc.) frequently change. Therefore,
before following any instruction from the
system, look to see whether the instruction
can be done safely and legally.
This system cannot warn about such
things as the safety of an area, condition of
streets, and availability of emergency ser-
vices. If unsure about the safety of an ar-
ea, do not drive into it. Under no
circumstances is this system a substitute
for the driver’s personal judgement.
Use this system only in locations where it
is legal to do so.
CAUTION
For safety, the driver should not operate
the navigation system while he/she is
driving. Insufficient attention to the road
and traffic may cause an accident.
While driving, be sure to obey the traffic
regulations and maintain awareness of
the road conditions. If a traffic sign on
the road has been changed, route guid-
ance may not have the updated informa-
tion such as the direction of a one way
street.
9
DA_EXT_COROLLA_touch screen_EE

10
TABLE OF CONTENTS
DA_EXT_COROLLA_touch screen_EE
1. QUICK GUIDE ................................. 14
SYSTEM FUNCTION INDEX ................ 14
2. CONTROLS AND FEATURES........ 16
OVERVIEW BUTTONS......................... 16
TOUCH SCREEN GESTURES............. 18
TOUCH SCREEN OPERATION ........... 19
1. BASIC OPERATION........................ 26
QUICK REFERENCE............................ 26
SOME BASICS...................................... 27
2. RADIO OPERATION ....................... 30
AM/FM RADIO ...................................... 30
3. MEDIA OPERATION ....................... 36
CD ......................................................... 36
USB MEMORY...................................... 42
iPod ....................................................... 47
AUX....................................................... 52
Bluetooth® AUDIO................................. 55
4. AUDIO REMOTE CONTROLS ........ 62
STEERING SWITCHES ........................ 62
5. TIPS FOR OPERATING
THE AUDIO SYSTEM.................... 64
OPERATING INFORMATION ............... 64
1. BASIC INFORMATION
BEFORE OPERATION ................. 74
QUICK REFERENCE ............................ 74
HANDS-FREE SYSTEM........................ 77
REGISTERING AN ENTRY................... 81
2. PHONE OPERATION ..................... 85
CALLING ON A Bluetooth® PHONE ..... 85
RECEIVING CALLS ON A
Bluetooth® PHONE ............................. 90
TALKING ON A
Bluetooth® PHONE ............................. 91
3. SHORT MESSAGE FUNCTION ..... 95
SHORT MESSAGE FUNCTION............ 95
4. WHAT TO DO IF... ........................ 100
TROUBLESHOOTING......................... 100
1. VEHICLE INFORMATION............. 108
QUICK REFERENCE .......................... 108
FUEL CONSUMPTION........................ 109
1QUICK GUIDE
2AUDIO SYSTEM
3Bluetooth® HANDS-FREE
SYSTEM
4VEHICLE INFORMATION

11
1
2
3
4
5
6
7
8
DA_EXT_COROLLA_touch screen_EE
1. SETUP OPERATION .................... 112
QUICK REFERENCE .......................... 112
GENERAL SETTINGS......................... 114
DISPLAY SETTINGS........................... 117
Bluetooth® SETTINGS......................... 119
CONNECTIVITY SETTINGS ............... 126
TELEPHONE SETTINGS .................... 139
AUDIO SETTINGS............................... 140
VEHICLE SETTINGS........................... 142
1. REAR VIEW MONITOR
SYSTEM ...................................... 144
REAR VIEW MONITOR SYSTEM ....... 144
REAR VIEW MONITOR SYSTEM
PRECAUTIONS ................................ 148
THINGS YOU SHOULD KNOW .......... 154
1. BASIC INFORMATION
BEFORE OPERATION................ 158
QUICK REFERENCE.......................... 158
DISPLAYING THE NAVIGATION
SCREEN........................................... 163
NAVIGATION SYSTEM FUNCTION
INDEX............................................... 165
2. MAP SCREEN OPERATION
AND MAP ICONS ........................ 167
MAP SCREEN OPERATION .............. 167
MAP ICONS ........................................ 170
3. DESTINATION SEARCH .............. 178
DESTINATION SEARCH INDEX ........ 178
SEARCH OPERATION ....................... 179
4. ROUTE GUIDANCE ...................... 186
STARTING ROUTE GUIDANCE......... 186
ROUTE GUIDANCE............................ 189
SETTING AND DELETING
THE ROUTE ..................................... 192
5. MY DESTINATIONS...................... 200
REGISTERING AN ENTRY ................ 200
DISPLAYING AND EDITING
THE ENTRY INFORMATION ........... 206
SENDING AND RESTORING
STORED CONTACTS USING
A USB MEMORY.............................. 209
6. NAVIGATION SETTING................ 211
MAP SETTINGS.................................. 211
ROUTE SETTINGS............................. 214
TRAFFIC MESSAGE SETTINGS ....... 215
7. NAVIGATION SYSTEM
INFORMATION............................ 217
LIMITATIONS OF THE
NAVIGATION SYSTEM.................... 217
NAVIGATION DATABASE
UPDATES......................................... 219
5SETUP
6REAR VIEW MONITOR
SYSTEM
7NAVIGATION SYSTEM

12
TABLE OF CONTENTS
DA_EXT_COROLLA_touch screen_EE
1. APPLICATIONS OPERATION ...... 222
QUICK REFERENCE.......................... 222
PICTURE SLIDESHOW ...................... 225
E-MAIL ................................................ 227
MirrorLink.......................................... 229
TOYOTA EUROCARE ........................ 230
2. CONNECTED SERVICE................ 232
CONNECTED SERVICE
OVERVIEW ...................................... 232
BEFORE USING CONNECTED
SERVICE .......................................... 236
ONLINE SEARCH ............................... 239
LOADING POIs*/ROUTE .................... 244
OPERATING AN APPLICATION
USING CONNECTED SERVICE...... 245
ALPHABETICAL INDEX ................... 248
8APPLICATION
INDEX
*: Point of Interest

1
13
1
2
3
4
5
6
DA_EXT_COROLLA_touch screen_EE
7
8
1. SYSTEM FUNCTION INDEX......... 14
1. OVERVIEW BUTTONS ................. 16
2. TOUCH SCREEN GESTURES...... 18
3. TOUCH SCREEN
OPERATION................................ 19
ENTERING SCREEN OPERATION...... 20
LIST SCREEN OPERATION................. 21
1QUICK GUIDE
2CONTROLS AND FEATURES
QUICK GUIDE

14
DA_EXT_COROLLA_touch screen_EE
1. QUICK GUIDE
1. SYSTEM FUNCTION INDEX
To access the audio system, press the
“MEDIA” button. The audio control screen
will be displayed. (P.25)
To access the Bluetooth® hands-free sys-
tem, press the button. Each time
the button is pressed, the screen
will change between the “Phone” menu
screen and the “Extras”/“Toyota online”
menu screen. The driver can make or re-
ceive phone calls without taking their
hands off the steering wheel. (P.73)
To access the vehicle information system,
press the “CAR” button. Fuel consump-
tion can be checked. (P.108)
To customise the function settings, press
the “SETUP” button. (P.111)
AUDIO SYSTEM
Bluetooth® HANDS-FREE
SYSTEM
VEHICLE INFORMATION
SETUP

15
1. QUICK GUIDE
1
QUICK GUIDE
DA_EXT_COROLLA_touch screen_EE
Shifting into the “R” position will automati-
cally show the view behind the rear of the
vehicle on the display screen. (P.143)
To access the navigation system, press
the “MAP/NAV” button. Each time the
“MAP/NAV” button is pressed, the screen
will change between the map screen and
“Navigation” menu screen. (P.157)
To access the application system, press
the button. Each time the
button is pressed, the screen will change
between the “Phone” menu screen and the
“Extras”/“Toyota online” menu screen. The
driver can use applications. (P.221)
REAR VIEW MONITOR SYSTEM
NAVIGATION SYSTEM
APPLICATION SYSTEM

16
DA_EXT_COROLLA_touch screen_EE
2. CONTROLS AND FEATURES
1. OVERVIEW BUTTONS
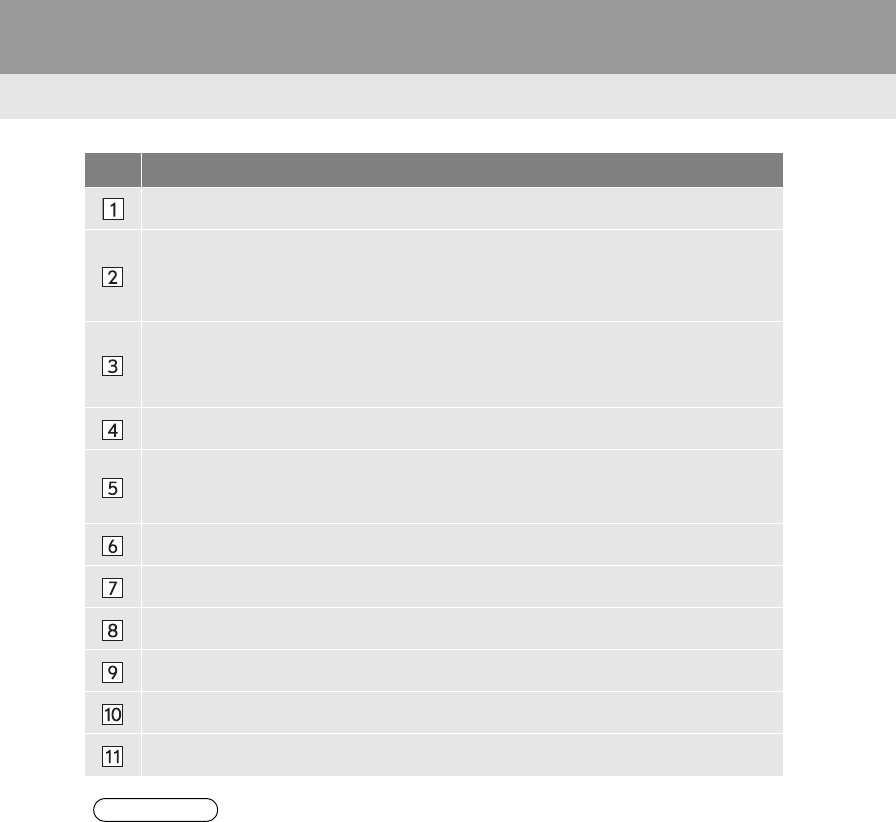
No. Function Page
By touching the screen with your finger, you can control the selected
functions. 18
Insert a disc into this slot. The CD player turns on immediately. 36
Press to customise the function settings. 111
Turn the tune/scroll knob to select a radio station or skip to the next or
previous track. This knob can also be used to magnify or reduce the map
scale. (Navigation system only)
30, 168
Press to access the Bluetooth® hands-free system and applications. 73, 221
Press to access the vehicle information system. 108
Press to access the navigation system. (Navigation system only) 157
2. CONTROLS AND FEATURES

17
2. CONTROLS AND FEATURES
1
QUICK GUIDE
DA_EXT_COROLLA_touch screen_EE
Press the “ ” or “ ” button to seek up or down for a radio station or to
access a desired track or file.
30, 36, 42,
47, 55
Press to access the audio system. The audio system turns on in the last
mode used. 26, 2728
Press the power/volume knob to turn navigation/multimedia system on
and off, and turn it to adjust the volume. 27
Press to eject a disc. 29
INFORMATION
This illustration is for left-hand drive vehicles.
The button positions and shapes differ for right-hand drive vehicles.
No. Function Page

18
DA_EXT_COROLLA_touch screen_EE
2. CONTROLS AND FEATURES
2. TOUCH SCREEN GESTURES
*: The above operations may not be performed on all screens.
Operations are performed by touching the touch screen directly with your finger.
Operation method Outline Main use
Touch
Quickly touch and release
once.
Changing and selecting various set-
tings.
Drag*
Touch the screen with
your finger, and move the
screen to the desired posi-
tion.
Scrolling the lists
Using scroll bar in lists
Adjusting the zoom bar of the map
(P.168)
Adjusting manual tune scales for
FM and AM (P.33)
Adjusting the displayed screen’s
position sliders (P.117)
Adjusting balance/fader (P.141)
Moving position of elements in the
stopover/destination list (P.193,
194)
Flick*
Quickly move the screen
by flicking with your finger.
Scrolling the main screen page
Returning to the menu screen from
the sub-menu screen (screen one
level below)
Going to the next/previous picture
(P.225)
Going to the next/previous traffic
message in the details view
(P.175)
Going to the next/previous route
segment in the full screen view
(turn list) (P.196)
19
1
QUICK GUIDE
DA_EXT_COROLLA_touch screen_EE
2. CONTROLS AND FEATURES
3. TOUCH SCREEN OPERATION
This system is operated mainly by the
screen buttons.
When a screen button is touched, a
beep sounds. (To set a beep sound,
P.114.)
NOTICE
To prevent damaging the screen, lightly
touch the screen buttons with your fin-
ger.
Do not use objects other than your finger
to touch the screen.
Wipe off fingerprints using a glass clean-
ing cloth. Do not use chemical cleaners
to clean the screen, as they may dam-
age the touch screen.
To prevent the battery from being dis-
charged, do not leave the system on lon-
ger than necessary when the engine is
not running.
INFORMATION
If the system does not respond to a
touch on a screen button, move your fin-
ger away from the screen and then
touch it again.
Dimmed screen buttons cannot be oper-
ated.
The displayed image may become
darker and moving images may be
slightly distorted when the display is
cold.
Under extremely cold conditions, the
screen may not be displayed and the
data input by a user may be deleted.
Also, the screen buttons may be harder
than usual to depress.
When you look at the screen through
polarized material such as polarized
sunglasses, the screen may be dark and
hard to see. If so, look at the screen
from different angles, adjust the screen
settings (P.117), or take off your sun-
glasses.
Select to return to the previous
screen.

20
2. CONTROLS AND FEATURES
DA_EXT_COROLLA_touch screen_EE
1Select the keys directly to enter letters
or numbers.
2Select “OK”.
ENTERING SCREEN
OPERATION
When searching for a name, letters
and numbers, etc. can be entered via
the screen.
ENTERING LETTERS AND
NUMBERS
No. Function
Select to delete one letter. Select
and hold to continue deleting letters.
Select to enter symbols.
Select to select lower case or upper
case.
Select to change keyboard types.
INFORMATION
When a character is entered, a hint will
appear displaying a possible match for
the word to be searched.
Currently unavailable screen buttons will
be dimmed.
When an entry is too long to be dis-
played in the enter field, the last section
of the enter text will be displayed with
the initial section displayed as “...”.
In the following situations, the enter
mode will automatically change between
upper and lower case.
• When the keyboard layout is changed
to upper case input, the layout will
automatically change back to lower
case input after one letter has been
entered.
• When “/”, “&”, “.” or “(” is entered,
the keyboard layout will automatically
be changed to upper case input.
• When all characters are deleted, the
keyboard layout will automatically
change to upper case input.

21
2. CONTROLS AND FEATURES
1
QUICK GUIDE
DA_EXT_COROLLA_touch screen_EE
1Enter letters.
If a candidate entry text displayed in the
enter field is what is desired, select “OK”
or the candidate entry text.
Select to display the candi-
date entry text list. The number of match-
ing items is shown. Up to 300 items are
displayed.
The list will be displayed automatically, if
the number of matching entries is 5 or
less.
2Select the desired item.
By selecting and holding or , the
screen can be scrolled up or down. Scroll-
ing will automatically stop when the top/
bottom of the list is reached.
Changing pages can also be changed the
following ways:
• Selecting the desired point on the scroll
bar.
• Dragging the scroll bar marking to the
desired point.
ENTERING FROM THE LIST OF
MATCHING ENTRIES
On certain screens, a candidate entry
text or word prediction list based on the
input letters will be displayed. The de-
sired item can be selected and en-
tered.
LIST SCREEN OPERATION
When a list is displayed, use the appro-
priate screen button to scroll through
the list.
No. Function
Select to shift to the next or previous
page.
This indicates the displayed
screen’s position.
22
2. CONTROLS AND FEATURES
DA_EXT_COROLLA_touch screen_EE
AUTOMATIC TEXT SCROLLING
1Select one of the character screen but-
tons.
Entries that are too long to fit in the cur-
rent field are scrolled automatically
from right to left.
This function is not available while driv-
ing.
INFORMATION
This function can be changed to on or
off. (P.11 4)
CHARACTER JUMP BUTTONS
IN LISTS
Some lists contain character screen
buttons, “A-C”, “D-F” etc., which al-
low a direct jump to list entries that be-
gin with the same letter as the
character screen button.
INFORMATION
Every time the same character screen
button is selected, the list starting with
the subsequent character is displayed.

24
DA_EXT_COROLLA_touch screen_EE

2
25
1
4
3
2
5
6
DA_EXT_COROLLA_touch screen_EE
7
8
1. QUICK REFERENCE .................... 26
2. SOME BASICS.............................. 27
TURNING THE AUDIO SYSTEM
ON OR OFF ........................................ 27
SELECTING AN AUDIO SOURCE........ 28
INSERTING OR EJECTING A DISC ..... 28
USB/AUX PORT .................................... 29
1. AM/FM RADIO .............................. 30
OVERVIEW............................................ 30
PRESETTING A STATION .................... 33
MANUAL TUNING ................................. 33
RDS (RADIO DATA SYSTEM) .............. 34
FM RADIO OPTIONS ............................ 35
1. CD.................................................. 36
OVERVIEW............................................ 36
PLAYING AN AUDIO CD....................... 39
PLAYING AN MP3/WMA/AAC DISC ..... 39
AUDIO CD OR MP3/WMA/AAC
DISC OPTIONS................................... 40
2. USB MEMORY .............................. 42
OVERVIEW........................................... 42
PLAYING A USB MEMORY.................. 46
USB MEMORY OPTIONS..................... 46
3. iPod ............................................... 47
OVERVIEW........................................... 47
iPod AUDIO........................................... 51
iPod AUDIO OPTIONS.......................... 51
4. AUX................................................ 52
OVERVIEW........................................... 52
5. Bluetooth® AUDIO........................ 55
OVERVIEW........................................... 55
CONNECTING Bluetooth® AUDIO ....... 59
LISTENING TO Bluetooth® AUDIO....... 60
Bluetooth® AUDIO OPTIONS ............... 60
1. STEERING SWITCHES................. 62
1. OPERATING INFORMATION ....... 64
RADIO RECEPTION ............................. 64
iPod ....................................................... 66
CARING FOR YOUR CD PLAYER
AND DISCS ........................................ 67
FILE INFORMATION............................. 69
CD-R AND CD-RW DISCS ................... 71
TERMS.................................................. 71
1BASIC OPERATION
2RADIO OPERATION
3MEDIA OPERATION
4AUDIO REMOTE CONTROLS
5TIPS FOR OPERATING THE
AUDIO SYSTEM
AUDIO SYSTEM
Some of the functions cannot be operated while driving.

26
DA_EXT_COROLLA_touch screen_EE
1. BASIC OPERATION
1. QUICK REFERENCE
To access the audio system, press the “MEDIA” button. The audio system turns
on in the last mode used.
Function Page
Using the radio 30
Playing an audio CD or MP3/WMA/AAC disc 36
Playing a USB memory 42
Playing an iPod 47
Using the AUX port 52
Playing a Bluetooth® device 55
Using the steering wheel audio switches 62
Audio settings 140
INFORMATION
This illustration is for left-hand drive vehicles.
The button positions and shapes differ for right-hand drive vehicles.
27
DA_EXT_COROLLA_touch screen_EE
1. BASIC OPERATION
2
AUDIO SYSTEM
2. SOME BASICS
The power/volume knob: Press this knob
to turn the audio system on and off. Turn
this knob to adjust the volume. The system
turns on in the last mode used.
“MEDIA” button: Press this button to dis-
play screen buttons for the audio system.
This section describes some of the ba-
sic features of the audio system. Some
information may not pertain to your
system.
Vehicles without smart entry & start
system
Your audio system works when the en-
gine switch is turned to the “ACC” or
“ON” position.
Vehicles with smart entry & start sys-
tem
Your audio system works when the en-
gine switch is turned to ACCESSORY
or IGNITION ON mode.
CAUTION
NOTICE
To prevent the battery from being dis-
charged, do not leave the audio system
on longer than necessary when the
engine is not running.
CAUTION:
THIS PRODUCT IS A CLASS 1 LASER
PRODUCT. USE OF CONTROLS OR
ADJUSTMENTS OR PERFORMANCE
OF PROCEDURES OTHER THAN
THOSE SPECIFIED HEREIN MAY RE-
SULT IN HAZARDOUS RADIATION
EXPOSURE. DO NOT OPEN COVERS
AND DO NOT REPAIR BY YOUR-
SELF. REFER SERVICING TO QUAL-
IFIED PERSONNEL.
TURNING THE AUDIO
SYSTEM ON OR OFF
INFORMATION
If the volume is adjusted while music is
paused or muted, the pause or mute will
be cancelled.
28
1. BASIC OPERATION
DA_EXT_COROLLA_touch screen_EE
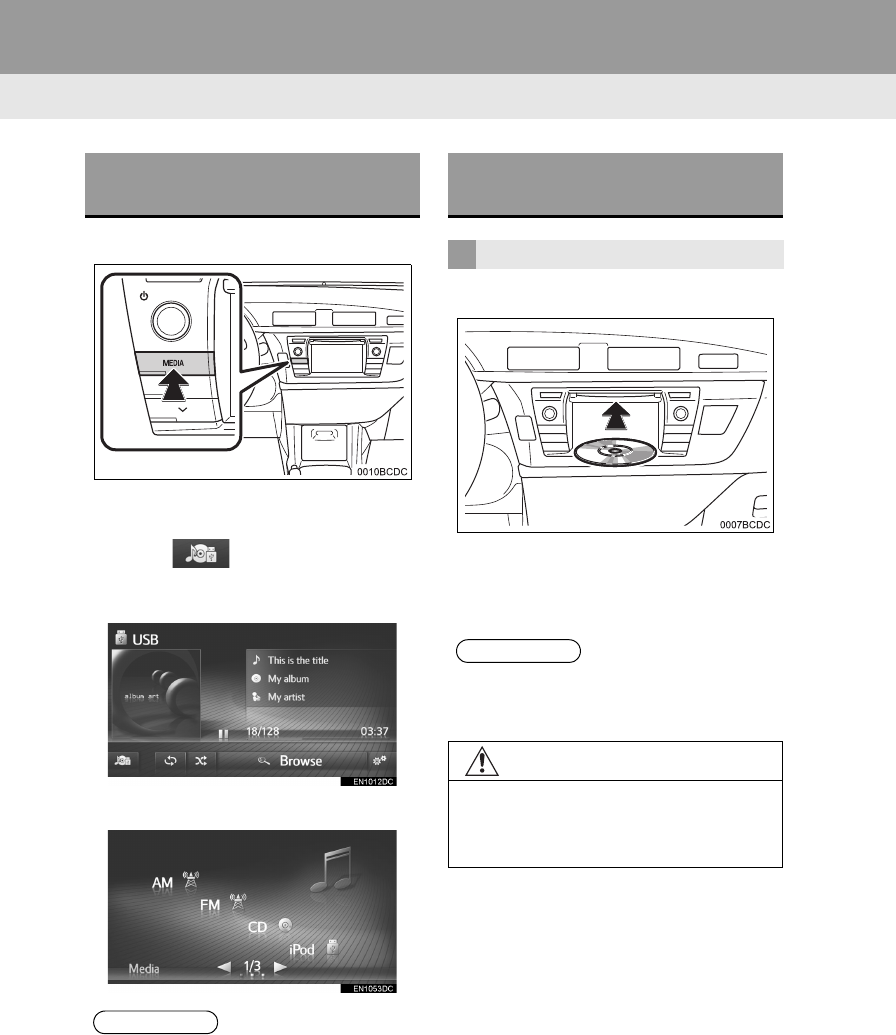
1Press the “MEDIA” button.
The audio system turns on in the last
mode used.
2Select or press the “MEDIA”
button to display the audio source se-
lection screen.
3Select a desired audio source.
1Insert a disc with the label side up.
When a disc is correctly inserted into the
slot, the CD player will automatically start
playing from the first track or the first track
of the first folder on a disc.
SELECTING AN AUDIO
SOURCE
INFORMATION
You cannot select dimmed screen but-
tons.
INSERTING OR EJECTING A
DISC
INSERTING A DISC
INFORMATION
If the label is facing down, “Disc error
occurred” will appear on the screen.
NOTICE
Never try to disassemble or oil any part
of the CD player. Do not insert anything
other than a disc into the slot.

29
1. BASIC OPERATION
2
AUDIO SYSTEM
DA_EXT_COROLLA_touch screen_EE
1Press the button.
The disc will be ejected.
1Open the cover of the auxiliary box and
then open the cover of the USB/AUX
port.
2Connect a device.
If a device is inserted, it starts playing
automatically. As soon as it is ready to
play, the audio control screen is shown
automatically.
If a USB hub is plugged-in, two devices
can be connected at a time.
Even if a USB hub is used to connect
more than two USB devices, only the first
two connected devices will be recognized.
EJECTING A DISC USB/AUX PORT

30
DA_EXT_COROLLA_touch screen_EE
2. RADIO OPERATION
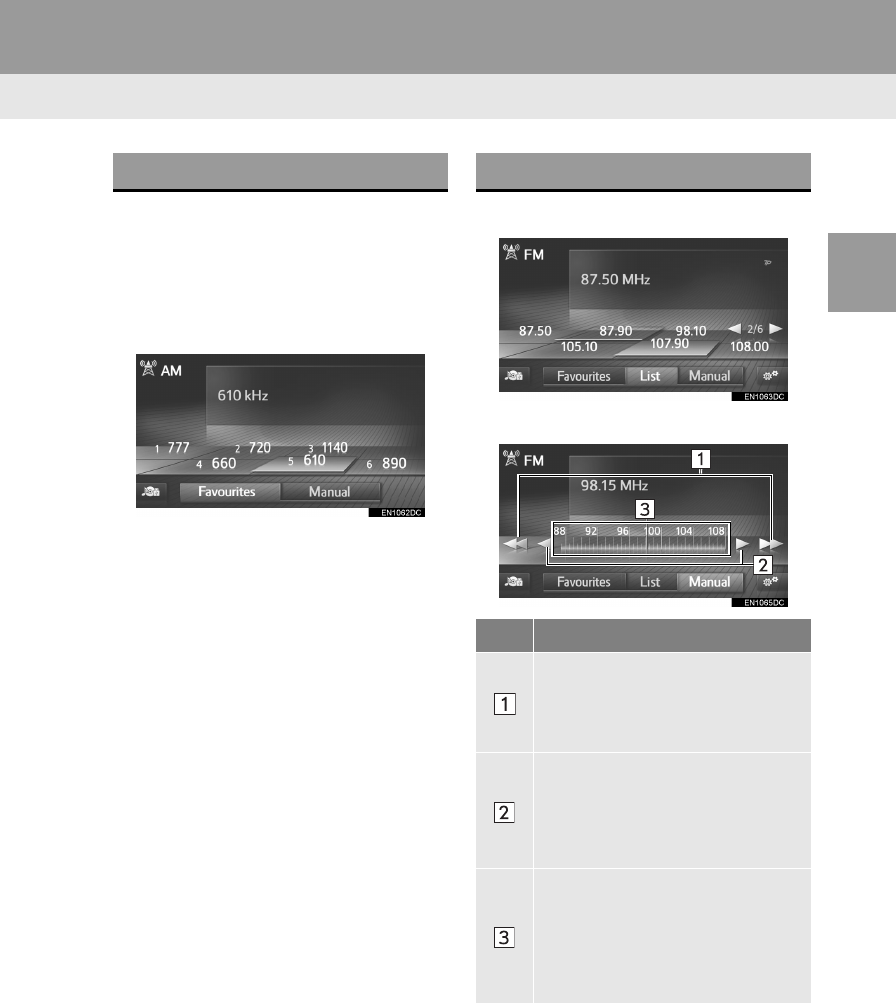
1. AM/FM RADIO
CONTROL PANEL
OVERVIEW
The radio operation screen can be reached by the following method:
Press the “MEDIA” button to display the audio source selection screen, then select
“AM” or “FM” to display the radio control screen.

32
2. RADIO OPERATION
DA_EXT_COROLLA_touch screen_EE
No. Function
Select to set the sound settings. (P.140)
The tune/scroll knob:
Preset tuning screen: Turn to select a preset station.
Station list screen: Turn to move up/down the station list.
Manual tuning screen: Turn to step up/down frequencies.
Preset tuning screen: Press to move up/down the preset stations.
Station list screen: Press to move up/down the station list.
Manual tuning screen: Press and hold to seek up/down available stations while being
pressed.
Press to display the media mode selection screen.
The power/volume knob:
Turn to adjust volume.
Press to turn the audio system on/off.
Select to tune to preset stations.
Select to display the radio options screen.
Select to display the manual tuning screen.
Select to display the station list.
Select to display the preset station.
Select to display the audio source selection screen.
INFORMATION
The radio automatically changes to stereo reception when a stereo broadcast is received.
33
2. RADIO OPERATION
DA_EXT_COROLLA_touch screen_EE
2
AUDIO SYSTEM
1Select “Favourites”.
2Tune in the desired station.
3Select one of the station selector but-
tons (1-6) and hold it until a beep is
heard.
The station’s frequency or name will be
displayed in the screen button.
To change the preset station to a different
one, follow the same procedure.
1Select “Manual”.
2Tune the desired station.
PRESETTING A STATION MANUAL TUNING
No. Function
Select to move up/down a station.
Select and hold to seek stations
non-stop. When released, the cur-
rently received station will be
selected.
Select to step up/down frequen-
cies.
Select and hold to seek frequen-
cies non-stop. When released, the
system will stop at the current fre-
quency.
It is possible to drag and drop the
marker by sliding your finger on the
screen (in the area where the mark-
er is shown). Relocating the marker
by a single select on the frequency
band is also possible.

34
2. RADIO OPERATION
DA_EXT_COROLLA_touch screen_EE
OFF mode: For switching over to a broad-
casting station within the same RDS net-
work; convenient for following the
appropriate stations in a wide region.
ON mode: For switching over to a broad-
casting station within the same local pro-
gram network.
1A pop-up message is displayed on the
screen when the radio seeks out a TP
station.
2Select “Continue”.
TRAFFIC ANNOUNCEMENT VOL-
UME
RDS (RADIO DATA SYSTEM)
Depending on the availability of RDS
infrastructure, the service may not
function.
FM ALTERNATIVE
FREQUENCY (AF)
A better reception frequency of the
same broadcasting program will be au-
tomatically tuned if the reception of the
current frequency degrades.
REGIONAL CODE CHANGE
TA (TRAFFIC
ANNOUNCEMENT) FUNCTION
The tuner will automatically seek a sta-
tion that regularly broadcasts traffic in-
formation and the station broadcasts
when the traffic information program
starts.
INFORMATION
When TA is set to on (P.35), the radio
will begin seeking a TP station.
When the program ends, the initial oper-
ation resumes.
The volume level of a received traffic
information sound is stored in the
memory.
35
2. RADIO OPERATION
DA_EXT_COROLLA_touch screen_EE
2
AUDIO SYSTEM
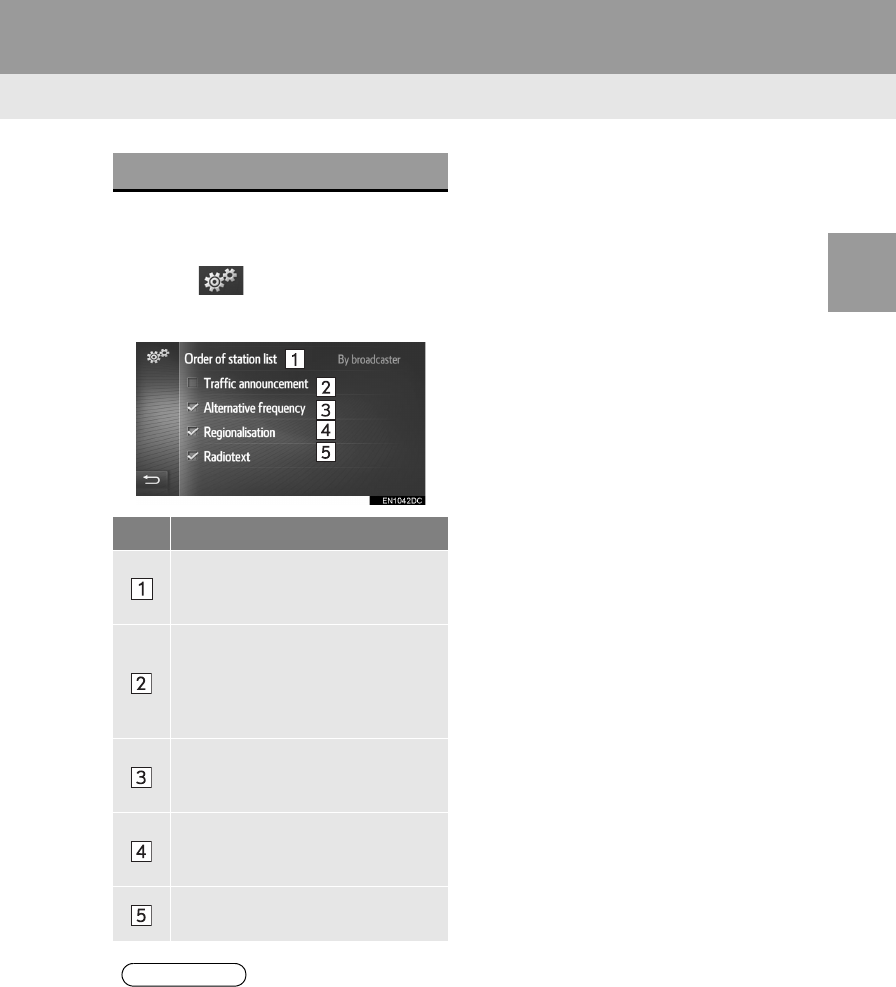
1Display the FM radio control screen.
(P.30)
2Select .
3Select the button to be set.
FM RADIO OPTIONS
No. Function
Select to select “By broadcaster” or
“Alphabetical” for the listing order of
the station list.
The tuner will automatically seek a
station that regularly broadcasts
traffic information and the station
broadcasts when the traffic informa-
tion program starts.
Select to set automatic selection of a
station providing good reception if
current reception worsens on/off.
Select to switch to a broadcasting
station within the same local pro-
gram network.
Select to set the FM radio text fea-
ture on/off.
INFORMATION
The current setting of each item is dis-
played on its right.


38
3. MEDIA OPERATION
DA_EXT_COROLLA_touch screen_EE
No. Function
Select to set the sound settings. (P.140)
The tune/scroll knob:
Turn to select a track.
Turn to move up/down the list.
Press to select a track.
Press and hold to fast forward/rewind.
Press to display the media mode selection screen.
The power/volume knob:
Turn to adjust volume.
Press to turn the audio system on/off.
Press to eject a disc.
Disc slot
Shows progress
Select to display audio CD, MP3/WMA/AAC disc options screen.
Audio CD: Select to display a track list.
MP3/WMA/AAC disc: Select to display a folder list.
Select to set random playback.
Select to set repeat playback.
Select to display the media source selection screen.
Select to play/pause.
INFORMATION
If a disc contains CD-DA files and MP3/WMA/AAC files, only the CD-DA files can be
played back.
If a CD-TEXT disc is inserted, the title of the disc and track will be displayed.
If the disc contains no CD-TEXT, only the track number would be displayed on the
screen.
39
3. MEDIA OPERATION
DA_EXT_COROLLA_touch screen_EE
2
AUDIO SYSTEM
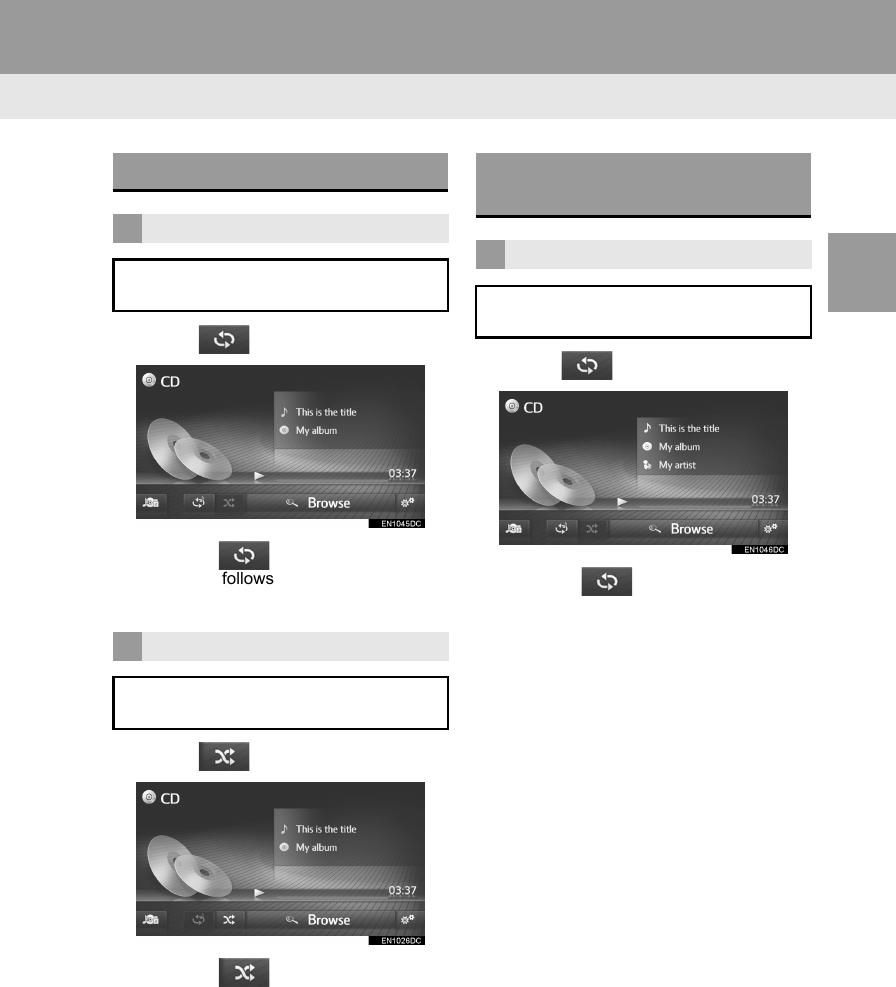
1Select .
Each time is selected, the mode
changes as follows:
• track repeat off
1Select .
Each time is selected, the mode
changes as follows:
• random off
1Select .
Each time is selected, the mode
changes as follows:
• track repeat folder repeat off
PLAYING AN AUDIO CD
REPEATING
The track currently being listened to
can be repeated.
RANDOM ORDER
Tracks can be automatically and ran-
domly selected.
PLAYING AN MP3/WMA/AAC
DISC
REPEATING
The track or folder currently being lis-
tened to can be repeated.


41
3. MEDIA OPERATION
DA_EXT_COROLLA_touch screen_EE
2
AUDIO SYSTEM
1: MP3/WMA/AAC disc only
2: Navigation system only
No. Function Page
Audio CD: Select to
display a track list.
MP3/WMA/AAC disc:
Select to display a
folder list.
Select to resume play-
back of tracks from the
beginning of the track
list when the playback
of the last track on the
list is finished.
Select to set random
playback track.
39,
40
Select to set repeat
playback track. 39
1Select to set repeat
playback folder. 39
1, 2
Select to set random
and repeat playback
folder.
39,
40

42
DA_EXT_COROLLA_touch screen_EE
3. MEDIA OPERATION
2. USB MEMORY
CONTROL PANEL
OVERVIEW
The USB memory operation screen can be reached by the following methods:
Connecting a USB memory (P.29)
Press the “MEDIA” button to display the audio source selection screen, then select
“USB” to display the USB memory control screen.

44
3. MEDIA OPERATION
DA_EXT_COROLLA_touch screen_EE
No. Function
Select to set the sound settings. (P.140)
The tune/scroll knob:
Turn to select a track.
Turn to move up/down the list.
Press to select a track.
Press and hold to fast forward/rewind.
Press to display the media mode selection screen.
The power/volume knob:
Turn to adjust volume.
Press to turn the audio system on/off.
Shows progress
Select to display the USB options screen.
Select to display the browse options selection screen and then select the desired item.
Select to set random playback.
Select to set repeat playback.
Select to display the media source selection screen.
Select to switch between “USB1” and “USB2” when 2 USB memory devices are connect-
ed.
Select to play/pause.
45
3. MEDIA OPERATION
DA_EXT_COROLLA_touch screen_EE
2
AUDIO SYSTEM
CAUTION
Do not operate the player’s controls or connect the USB memory while driving.
NOTICE
Depending on the size and shape of the USB memory that is connected to the system,
the auxiliary box may not close fully.
In this case, do not forcibly close the auxiliary box as this may damage the USB memory
or the terminal, etc.
Do not leave a portable player in the vehicle. In particular, high temperatures inside the
vehicle may damage the portable player.
Do not push down on or apply unnecessary pressure to the portable player while it is con-
nected as this may damage the portable player or its connector.
Do not insert foreign objects into the port as this may damage the portable player or its
connector.
INFORMATION
Navigation system only: This system supports MTP devices.

46
3. MEDIA OPERATION
DA_EXT_COROLLA_touch screen_EE
1Select .
Each time is selected, the mode
changes as follows:
• track repeat off
1Select .
Each time is selected, the mode
changes as follows:
• random off
1Display the USB memory control
screen. (P.42)
2Select .
3Select the button to be set.
PLAYING A USB MEMORY
REPEATING
The track currently being listened to
can be repeated.
RANDOM ORDER
Tracks can be automatically and ran-
domly selected.
USB MEMORY OPTIONS
No. Function Page
Select to display a track
list.
Select to display the
browse options selection
screen and then select the
desired item.
Select to resume playback
of tracks from the begin-
ning of the track list when
the playback of the last
track on the list is finished.
Select to set random play-
back. 46
Select to set repeat play-
back track. 46
47
DA_EXT_COROLLA_touch screen_EE
3. MEDIA OPERATION
2
AUDIO SYSTEM
3. iPod
CONTROL PANEL
OVERVIEW
The iPod operation screen can be reached by the following methods:
Connecting an iPod (P.29)
Press the “MEDIA” button to display the audio source selection screen, then select
“iPod” to display the iPod control screen.

48
3. MEDIA OPERATION
DA_EXT_COROLLA_touch screen_EE
CONTROL SCREEN

49
3. MEDIA OPERATION
DA_EXT_COROLLA_touch screen_EE
2
AUDIO SYSTEM
No. Function
Select to set the sound settings. (P.140)
The tune/scroll knob:
Turn to select a track.
Turn to move up/down the list.
Press to select a track.
Press and hold to fast forward/rewind.
Press to display the media mode selection screen.
The power/volume knob:
Turn to adjust volume.
Press to turn the audio system on/off.
Shows progress
Select to display the iPod audio options screen.
Select to display the browse options selection screen and then select the desired item.
Select to set random playback.
Select to set repeat playback.
Select to display the media source selection screen.
Displays cover art
Select to display a track list.
Select to switch between “iPod1” and “iPod2” when 2 iPods are connected.
Select to play/pause.
50
3. MEDIA OPERATION
DA_EXT_COROLLA_touch screen_EE
CAUTION
Do not operate the player’s controls or connect the iPod while driving.
NOTICE
Depending on the size and shape of the iPod that is connected to the system, the auxil-
iary box may not close fully.
In this case, do not forcibly close the auxiliary box as this may damage the iPod or the
terminal, etc.
Do not leave a portable player in the vehicle. In particular, high temperatures inside the
vehicle may damage the portable player.
Do not push down on or apply unnecessary pressure to the portable player while it is con-
nected as this may damage the portable player or its connector.
Do not insert foreign objects into the port as this may damage the portable player or its
connector.
INFORMATION
When an iPod is connected using a genuine iPod cable, the iPod starts charging its bat-
tery.
Depending on the iPod and the songs in the iPod, iPod cover art may be displayed. It
may take time to display iPod cover art, and the iPod may not be operated while the
cover art display is in process. Only iPod cover art that is saved in JPEG format can be
displayed.
When an iPod is connected and the audio source is changed to iPod mode, the iPod will
resume playing from the same point it was last used.
Depending on the iPod that is connected to the system, certain functions may not be
available.

51
3. MEDIA OPERATION
DA_EXT_COROLLA_touch screen_EE
2
AUDIO SYSTEM
1Select .
Each time is selected, the mode
changes as follows:
• track repeat off
1Select .
Each time is selected, the mode
changes as follows:
• random off
1Display the iPod control screen.
(P.47)
2Select .
3Select the button to be set.
iPod AUDIO
REPEATING
The track currently being listened to
can be repeated.
RANDOM ORDER
Tracks can be automatically and ran-
domly selected.
iPod AUDIO OPTIONS
No. Function Page
Select to display a track
list.
Select to display the
browse options selection
screen and then select the
desired item.
Select to resume playback
of tracks from the begin-
ning of the track list when
the playback of the last
track on the list is finished.
Select to set random play-
back. 51
Select to set repeat play-
back track. 51

52
DA_EXT_COROLLA_touch screen_EE
3. MEDIA OPERATION
4. AUX
CONTROL PANEL
OVERVIEW
The AUX operation screen can be reached by the following methods:
Connecting a device to the AUX port (P.29)
Press the “MEDIA” button to display the audio source selection screen, then select
“AUX” to display the AUX control screen.

53
3. MEDIA OPERATION
DA_EXT_COROLLA_touch screen_EE
2
AUDIO SYSTEM
CONTROL SCREEN
No. Function
Select to set the sound settings. (P.140)
Press to display the media mode selection screen.
The power/volume knob:
Turn to adjust volume.
Press to turn the audio system on/off.
Select to display the media source selection screen.
54
3. MEDIA OPERATION
DA_EXT_COROLLA_touch screen_EE
CAUTION
Do not connect portable audio device or operate the controls while driving.
NOTICE
Depending on the size and shape of the portable audio device that is connected to the
system, the auxiliary box may not close fully.
In this case, do not forcibly close the auxiliary box as this may damage the portable audio
device or the terminal, etc.
Do not leave a portable audio device in the vehicle. The temperature inside the vehicle
may become high, resulting in damage to the player.
Do not push down on or apply unnecessary pressure to the portable audio device while it
is connected as this may damage the portable audio device or its connector.
Do not insert foreign objects into the port as this may damage the portable audio device
or its connector.

55
DA_EXT_COROLLA_touch screen_EE
3. MEDIA OPERATION
2
AUDIO SYSTEM
5. Bluetooth® AUDIO
CONTROL PANEL
*: Bluetooth is a registered trademark of Bluetooth SIG, Inc.
The Bluetooth® audio system enables users to enjoy listening to music that is
played on a portable player on the vehicle speakers via wireless communication.
This audio system supports Bluetooth®, a wireless data system capable of playing
portable audio music without cables. If your device does not support Bluetooth®,
the Bluetooth® audio system will not function.
OVERVIEW
The Bluetooth® audio operation screen can be reached by the following methods.
Depending on the type of portable player connected, some functions may not be
available and/or the screen may look differently than shown in this manual.
Connecting a Bluetooth® audio device (P.59)
Press the “MEDIA” button to display the audio source selection screen, then select
“Bluetooth*” to display the Bluetooth® control screen.

56
3. MEDIA OPERATION
DA_EXT_COROLLA_touch screen_EE
CONTROL SCREEN
57
3. MEDIA OPERATION
DA_EXT_COROLLA_touch screen_EE
2
AUDIO SYSTEM
No. Function
Select to set the sound settings. (P.140)
The tune/scroll knob:
Turn to select a track.
Turn to move up/down the list.
Press to select a track.
Press and hold to fast forward/rewind.
Press to display the media mode selection screen.
The power/volume knob:
Turn to adjust volume.
Press to turn the audio system on/off.
Shows progress
Select to display the Bluetooth® audio options screen.
Select to display the browse options selection screen and then select the desired item.
Select to set random playback.
Select to set repeat playback.
Select to display the media source selection screen.
Select to play/pause.

58
3. MEDIA OPERATION
DA_EXT_COROLLA_touch screen_EE
CAUTION
Do not operate the player’s controls or connect to the Bluetooth® audio system while driv-
ing.
Your audio unit is fitted with Bluetooth® antennas. People with implanted pacemakers or
cardiac defibrillators should maintain a reasonable distance between themselves and the
Bluetooth® antennas. The radio waves may affect the operation of such devices.
Before using Bluetooth® devices, users of any electrical medical device other than
implanted pacemakers and implanted cardiac defibrillators should consult the manufac-
turer of the device for information about its operation under the influence of radio waves.
Radio waves could have unexpected effects on the operation of such medical devices.
NOTICE
Do not leave a portable player in the vehicle. In particular, high temperatures inside the
vehicle may damage the portable player.
INFORMATION
In the following conditions, this system may not function:
• The Bluetooth® device is turned off.
• The Bluetooth® device is not connected.
• The Bluetooth® device has a low battery.
It may take time to connect the telephone when Bluetooth® audio is being played.
For operating a portable player, see the instruction manual that came with it.
If the Bluetooth® device is disconnected due to poor reception from the Bluetooth® net-
work when the engine switch is in the following status, the system will automatically
reconnect to the portable player.
Vehicles without smart entry & start system
The engine switch is turned to the “ACC” or “ON” position.
Vehicles with smart entry & start system
The engine switch is turned to ACCESSORY or IGNITION ON mode.
If the Bluetooth® device is disconnected by turning it off, automatic reconnection will not
take place. Reconnect the portable player manually.
Bluetooth® device information is registered when the portable player is connected to the
Bluetooth® audio system. When selling or disposing of the vehicle, remove the
Bluetooth® audio information from the system.

59
3. MEDIA OPERATION
DA_EXT_COROLLA_touch screen_EE
2
AUDIO SYSTEM
IF NO DEVICE HAS BEEN CON-
NECTED
Multimedia system (P.120)
Navigation system (P.127)
CONNECTING AN ADDITIONAL DE-
VICE
Multimedia system (P.120)
Navigation system (P.127)
SELECTING A CONNECTED DE-
VICE
Multimedia system (P.124)
Navigation system (P.134)
CONNECTING Bluetooth®
AUDIO
In order to use the Bluetooth® audio
system, it is necessary to pair a porta-
ble player and connect the audio pro-
file (A2DP) with the system.
Once you have connected a device
with audio profile (A2DP), you can en-
joy your music on the vehicle’s audio
system.
If you have not yet connected a porta-
ble player with audio profile (A2DP),
you must first connect a portable play-
er with audio profile (A2DP) according
to the following procedures. Connect
your portable player with audio profile
(A2DP) after bringing the vehicle to a
complete stop.

60
3. MEDIA OPERATION
DA_EXT_COROLLA_touch screen_EE
1Select .
Each time is selected, the mode
changes as follows:
• track repeat off
1Select .
Each time is selected, the mode
changes as follows:
• random off
1Display the Bluetooth® control screen.
(P.55)
2Select .
3Select the button to be set.
LISTENING TO Bluetooth®
AUDIO
REPEATING
The track currently being listened to
can be repeated.
RANDOM ORDER
Tracks can be automatically and ran-
domly selected.
Bluetooth® AUDIO OPTIONS
No. Function Page
Select to display a track
list.
Select to display the
browse options selection
screen and then select the
desired item.
Select to resume playback
of tracks from the begin-
ning of the track list when
the playback of the last
track on the list is finished.
Select to set random play-
back. 60
Select to set repeat play-
back track. 60

61
3. MEDIA OPERATION
DA_EXT_COROLLA_touch screen_EE
2
AUDIO SYSTEM
INFORMATION
If a portable device supports AVRCP 1.4
and browsing, title list and browse for
music will be available. (If the device
does not support browsing, these menu
entries will be displayed grayed out.)
Lower grade devices do not support
these features.
For these devices, the title list and
browse for music will be displayed
grayed out.

62
DA_EXT_COROLLA_touch screen_EE
4. AUDIO REMOTE CONTROLS
1. STEERING SWITCHES
“MODE/HOLD” switch
Some parts of the navigation/multimedia system can be adjusted with the switches
on the steering wheel.
No. Switch
Enter switch
“” “” “” “” switch
“MODE/HOLD” switch
Volume control switch
Mode Operation Function
AM/FM Radio,
AUX
Press Change audio modes
Press and hold Mute
Audio CD,
MP3/WMA/AAC
disc, USB, iPod,
Bluetooth® audio
Press Change audio modes
Press and hold Pause

63
4. AUDIO REMOTE CONTROLS
DA_EXT_COROLLA_touch screen_EE
2
AUDIO SYSTEM
“” “” switch
“” “” switch
Enter switch
Volume control switch
Mode Operation Function
AM/FM Radio
Press
Preset station up/down (Preset tuning screen)
Station list up/down (Station list screen)
Seek up/down (Manual tuning screen)
Press and hold Seek up/down continuously while the switch is being
pressed (Manual tuning screen)
Audio CD,
MP3/WMA/AAC
disc, USB, iPod,
Bluetooth® audio
Press Track up/down
Press and hold Fast forward/rewind
Mode Operation Function
Tab screen Press Change the tab
Mode Operation Function
Control screen Press Show list screen
List screen Press Select cursor entry
Mode Operation Function
All Press Volume up/down

64
DA_EXT_COROLLA_touch screen_EE
5. TIPS FOR OPERATING THE AUDIO SYSTEM
1. OPERATING INFORMATION
NOTICE
To avoid damaging the audio system:
• Be careful not to spill beverages over
the audio system.
• Do not put anything other than appro-
priate discs into the CD player slot.
INFORMATION
The use of a cellular phone inside or
near the vehicle may cause a noise from
the speakers of the audio system which
you are listening to. However, this does
not indicate a malfunction.
RADIO RECEPTION
Usually, a problem with radio reception
does not mean there is a problem with
your radio it is just the normal result
of conditions outside the vehicle.
For example, nearby buildings and ter-
rain can interfere with FM reception.
Power lines or telephone wires can in-
terfere with AM signals. And of course,
radio signals have a limited range, and
the farther you are from a station, the
weaker its signal will be. In addition, re-
ception conditions change constantly
as your vehicle moves.
Here are some common reception
problems that probably do not indicate
a problem with your radio.

65
5. TIPS FOR OPERATING THE AUDIO SYSTEM
DA_EXT_COROLLA_touch screen_EE
2
AUDIO SYSTEM
Fading and drifting stations: Generally,
the effective range of FM is about 25 miles
(40 km). Once outside this range, you may
notice fading and drifting, which increase
with the distance from the radio transmit-
ter. They are often accompanied by distor-
tion.
Multi-path: FM signals are reflective, mak-
ing it possible for two signals to reach your
antenna at the same time. If this happens,
the signals will cancel each other out,
causing a momentary flutter or loss of re-
ception.
Static and fluttering: These occur when
signals are blocked by buildings, trees, or
other large objects. Increasing the bass
level may reduce static and fluttering.
Station swapping: If the FM signal you
are listening to is interrupted or weakened,
and there is another strong station nearby
on the FM band, your radio may tune in the
second station until the original signal can
be picked up again.
Fading: AM broadcasts are reflected by
the upper atmosphere especially at
night. These reflected signals can interfere
with those received directly from the radio
station, causing the radio station to sound
alternately strong and weak.
Station interference: When a reflected
signal and a signal received directly from a
radio station are very nearly the same fre-
quency, they can interfere with each other,
making it difficult to hear the broadcast.
Static: AM is easily affected by external
sources of electrical noise, such as high
tension power lines, lightening, or electri-
cal motors. This results in static.
FM AM

66
5. TIPS FOR OPERATING THE AUDIO SYSTEM
DA_EXT_COROLLA_touch screen_EE
“Made for iPod”, “Made for iPhone” and
“Made for iPad” mean that an electronic
accessory has been designed to connect
specifically to iPod, iPhone, or iPad,
respectively, and has been certified by the
developer to meet Apple performance
standards.
Apple is not responsible for the operation
of this device or its compliance with safety
and regulatory standards. Please note
that the use of this accessory with iPod,
iPhone, or iPad may affect wireless perfor-
mance.
iPad, iPhone, iPod, iPod classic, iPod
nano, and iPod touch are trademarks of
Apple Inc., registered in the U.S. and
other countries. Lightning is a trademark
of Apple Inc.
The Lightning connector works with
iPhone 5, iPod touch (5th generation), and
iPod nano (7th generation).
The 30-pin connector works with iPhone
4S, iPhone 4, iPhone 3GS, iPhone 3G,
iPhone, iPod touch (1st through 4th gen-
eration), iPod classic (except 5th genera-
tion), and iPod nano (1st, 3rd, 4th, 5th and
6th generation).
USB works with iPhone 5, iPhone 4S,
iPhone 4, iPhone 3GS, iPhone 3G,
iPhone, iPod touch (1st through 5th gen-
eration), iPod classic (except 5th genera-
tion), and iPod nano (1st, 3rd, 4th, 5th, 6th
and 7th generation).
The following iPod®, iPod nano®, iPod
classic®, iPod touch® and iPhone® devic-
es can be used with this system.
Made for
• iPod touch (5th generation)
• iPod touch (4th generation)
• iPod touch (3rd generation)
• iPod touch (2nd generation)
• iPod touch (1st generation)
• iPod classic (except 5th generation)
• iPod nano (7th generation)
• iPod nano (6th generation)
• iPod nano (5th generation)
• iPod nano (4th generation)
• iPod nano (3rd generation)
• iPod nano (1st generation)
• iPhone 5
• iPhone 4S
• iPhone 4
• iPhone 3GS
• iPhone 3G
• iPhone
Depending on differences between mod-
els or software versions etc., some models
might be incompatible with this system.
iPod COMPATIBLE MODELS

67
5. TIPS FOR OPERATING THE AUDIO SYSTEM
DA_EXT_COROLLA_touch screen_EE
2
AUDIO SYSTEM
Extremely high temperatures can keep
your CD player from working. On hot
days, use air conditioning to cool the vehi-
cle interior before you listen to a disc.
Bumpy roads or other vibrations may
make your CD player skip.
If moisture gets into your CD player, you
may not hear any sound even though your
CD player appears to be working. Remove
the discs from the CD player and wait until
it dries.
Use only discs marked as shown above.
The following products may not be play-
able on your CD player.
• SACDs
•dts CDs
• Copy-protected CDs
• Video CDs
Special shaped discs
Transparent/translucent discs
Low quality discs
Labeled discs
CARING FOR YOUR CD
PLAYER AND DISCS
CAUTION
CD player uses an invisible laser beam
which could cause hazardous radiation
exposure if directed outside the unit. Be
sure to operate the CD player correctly.
Audio CDs
68
5. TIPS FOR OPERATING THE AUDIO SYSTEM
DA_EXT_COROLLA_touch screen_EE
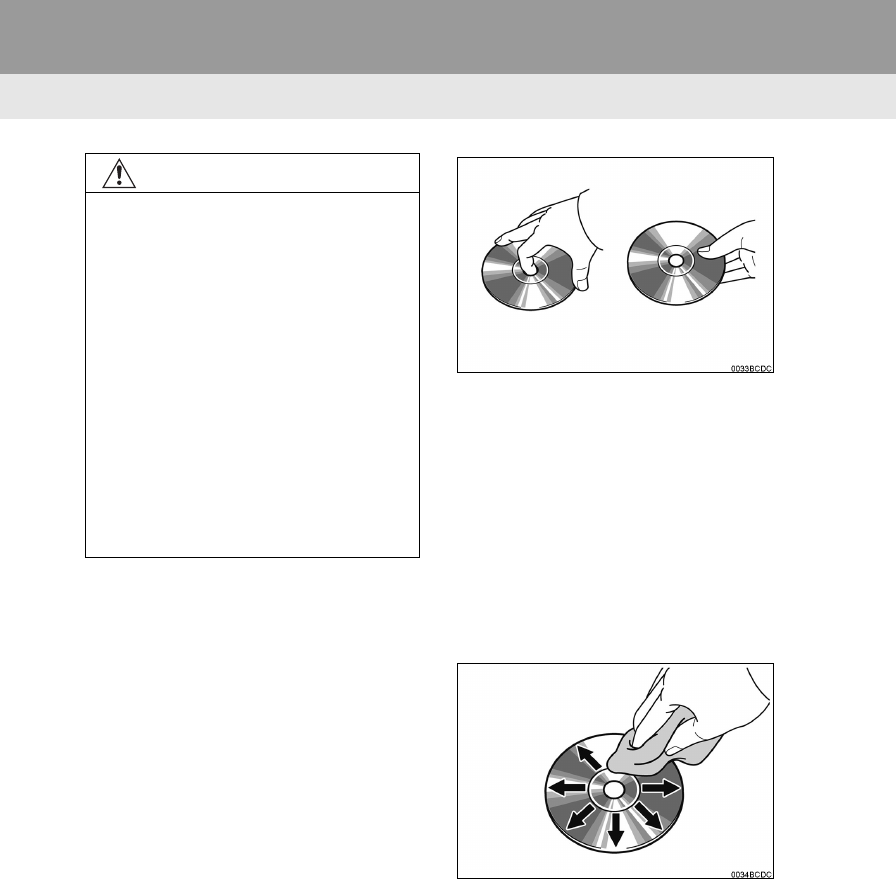
Handle discs carefully, especially when
you are inserting them. Hold them on the
edge and do not bend them. Avoid getting
fingerprints on them, particularly on the
shiny side.
Dirt, scratches, warping, pin holes, or
other disc damage could cause the CD
player to skip or to repeat a section of a
track. (To see a pin hole, hold the disc up
to the light.)
Remove discs from the CD player when
you are not using them. Store them in their
plastic cases away from moisture, heat,
and direct sunlight.
To clean a disc: Wipe it with a soft, lint-
free cloth that has been dampened with
water. Wipe in a straight line from the cen-
tre to the edge of the disc (not in a circle).
Do not use a conventional record cleaner
or anti-static device.
NOTICE
Do not use special shaped, transparent/
translucent, low quality or labeled discs
such as those shown in the illustrations.
The use of such discs may damage the
player, or it may be impossible to eject
the disc.
This system is not designed for use of
Dual Disc. Do not use Dual Disc
because it may cause damage to the
player.
Do not use discs with a protection ring.
The use of such discs may damage the
player, or it may be impossible to eject
the disc.
Do not use printable discs. The use of
such discs may damage the player, or it
may be impossible to eject the disc.
Correct Wrong

69
5. TIPS FOR OPERATING THE AUDIO SYSTEM
DA_EXT_COROLLA_touch screen_EE
2
AUDIO SYSTEM
COMPATIBLE USB DEVICES
COMPATIBLE COMPRESSED
FILES
CORRESPONDING SAMPLING
FREQUENCY
CORRESPONDING BIT RATES
(Variable Bit Rate (VBR) compatible)
FILE INFORMATION
USB communica-
tion formats
USB 2.0 HS (480
Mbps) and FS (12
Mbps)
File formats FAT 16/32
Correspondence
class Mass storage class
Item USB DISC
Compatible file
format (audio) MP3/WMA/AAC
Folders in the
device
Maxi-
mum3000
Maxi-
mum192
Files in the de-
vice
Maxi-
mum9999
Maxi-
mum255
Files per folder Maxi-
mum255
File type Frequency (kHz)
MP3 files:
MPEG 1 LAYER 3 32/44.1/48
MP3 files:
MPEG 2 LSF LAYER 3 16/22.05/24
WMA files:
Ver. 7, 8, 9 (9.1/9.2) 32/44.1/48
AAC files:
MPEG4/AAC-LC
11.025/12/16/
22.05/24/32/
44.1/48
File type Bit rate (kbps)
MP3 files:
MPEG 1 LAYER 3 32 - 320
MP3 files:
MPEG 2 LSF LAYER 3 8 - 160
WMA files:
Ver. 7, 8 CBR 48 - 192
WMA files:
Ver. 9 (9.1/9.2) CBR 48 - 320
AAC files:
MPEG4/AAC-LC 16 - 320

70
5. TIPS FOR OPERATING THE AUDIO SYSTEM
DA_EXT_COROLLA_touch screen_EE
MP3 (MPEG Audio Layer 3), WMA
(Windows Media Audio) and AAC
(Advanced Audio Coding) are audio com-
pression standards.
This system can play MP3/WMA/AAC files
on CD-R, CD-RW discs and USB memory.
This system can play disc recordings com-
patible with ISO 9660 level 1 and level 2
and with the Romeo and Joliet file system.
When naming an MP3/WMA/AAC file, add
an appropriate file extension
(.mp3/.wma/.m4a).
This system plays back files with
.mp3/.wma/.m4a file extensions as
MP3/WMA/AAC files respectively. To pre-
vent noise and playback errors, use the
appropriate file extension.
This system can play only the first session
when using multi-session compatible CDs.
MP3 files are compatible with the ID3 Tag
Ver. 1.0, Ver. 1.1, Ver. 2.2 and Ver. 2.3 for-
mats. This system cannot display disc
title, track title and artist name in other for-
mats.
WMA/AAC files can contain a WMA/AAC
tag that is used in the same way as an ID3
tag. WMA/AAC tags carry information
such as track title and artist name.
The emphasis function is available only
when playing MP3/WMA files recorded at
32, 44.1 and 48 kHz.
This system can play back AAC files
encoded by iTunes.
The sound quality of MP3/WMA files gen-
erally improves with higher bit rates. In
order to achieve a reasonable level of
sound quality, discs recorded with a bit
rate of at least 128 kbps are recom-
mended.
M3u playlists are not compatible with the
CD player.
MP3i (MP3 interactive) and MP3PRO for-
mats are not compatible with the audio
player.
The player is compatible with VBR (Vari-
able Bit Rate).
When playing back files recorded as VBR
(Variable Bit Rate) files, the play time will
not be correctly displayed if the fast for-
ward or reverse operations are used.
It is not possible to check folders that do
not include MP3/WMA/AAC files.
MP3/WMA/AAC files in folders up to 8 lev-
els deep can be played. However, the
start of playback may be delayed when
using discs containing numerous levels of
folders. For this reason, we recommend
creating discs with no more than 2 levels
of folders.
The play order of the compact disc with
the structure shown above is as follows:
The order changes depending on the per-
sonal computer and MP3/WMA/AAC
encoding software you use.
001.mp3
002.wma
Folder 1
003.mp3
Folder 2
004.mp3
005.wma
Folder 3
006.aac
001.mp3 002.wma . . . 006.aac

71
5. TIPS FOR OPERATING THE AUDIO SYSTEM
DA_EXT_COROLLA_touch screen_EE
2
AUDIO SYSTEM
CD-R/CD-RW discs that have not been
subject to the “finalizing process” (a pro-
cess that allows discs to be played on a
conventional CD player) cannot be
played.
It may not be possible to play CD-R/CD-
RW discs recorded on a music CD
recorder or a personal computer because
of disc characteristics, scratches or dirt on
the disc, or dirt, condensation, etc. on the
lens of the unit.
It may not be possible to play discs
recorded on a personal computer depend-
ing on the application settings and the
environment. Record with the correct for-
mat. (For details, contact the appropriate
application manufacturers of the applica-
tions.)
CD-R/CD-RW discs may be damaged by
direct exposure to sunlight, high tempera-
tures or other storage conditions. The unit
may be unable to play some damaged
discs.
If you insert a CD-RW disc into the MP3/
WMA player, playback will begin more
slowly than with a conventional CD or CD-
R disc.
Recordings on CD-R/CD-RW cannot be
played using the DDCD (Double Density
CD) system.
This is a general term that describes the
process of writing data on-demand to CD-
R, etc., in the same way that data is writ-
ten to floppy or hard discs.
This is a method of embedding track-
related information in an MP3 file. This
embedded information can include the
track title, the artist’s name, the album
title, the music genre, the year of produc-
tion, comments, cover art and other data.
The contents can be freely edited using
software with ID3 tag editing functions.
Although the tags are restricted to the
number of characters, the information can
be viewed when the track is played back.
WMA files can contain a WMA tag that is
used in the same way as an ID3 tag. WMA
tags carry information such as track title,
artist name.
CD-R AND CD-RW DISCS TERMS
PACKET WRITE
ID3 TAG
WMA TAG

72
5. TIPS FOR OPERATING THE AUDIO SYSTEM
DA_EXT_COROLLA_touch screen_EE
This is the international standard for the
formatting of CD-ROM folders and files.
For the ISO 9660 format, there are two
levels of regulations.
Level 1: The file name is in 8.3 format (8
character file names, with a 3 character
file extension. File names must be com-
posed of one-byte capital letters and num-
bers. The “_” symbol may also be
included.)
Level 2: The file name can have up to 31
characters (including the separation mark
“.” and file extension). Each folder must
contain fewer than 8 hierarchies.
Playlists created using “WINAMP” soft-
ware have a playlist file extension (.m3u).
MP3 is an audio compression standard
determined by a working group (MPEG) of
the ISO (International Standard Organiza-
tion). MP3 compresses audio data to
about 1/10 the size of that on conventional
discs.
WMA (Windows Media Audio) is an audio
compression format developed by Micro-
soft®. It compresses files into a size
smaller than that of MP3 files. The decod-
ing formats for WMA files are Ver. 7, 8,
and 9.
This product is protected by certain intel-
lectual property rights of Microsoft Corpo-
ration and third parties. Use or distribution
of such technology outside of this product
is prohibited without a license from Micro-
soft or an authorized Microsoft subsidiary
and third parties.
AAC is short for Advanced Audio Coding
and refers to an audio compression tech-
nology standard used with MPEG2 and
MPEG4.
ISO 9660 FORMAT
m3u
MP3
WMA
AAC

3
73
1
2
5
4
3
6
7
8
DA_EXT_COROLLA_touch screen_EE
1. QUICK REFERENCE .................... 74
2. HANDS-FREE SYSTEM ............... 77
USING THE PHONE SWITCH/
MICROPHONE.................................... 78
ABOUT THE PHONE BOOK IN THIS
SYSTEM.............................................. 79
WHEN YOU RELEASE YOUR CAR...... 79
CONNECTING A Bluetooth® PHONE ... 80
3. REGISTERING AN ENTRY........... 81
REGISTERING A NEW ENTRY ............ 81
DISPLAYING AND EDITING
THE ENTRY INFORMATION.............. 83
SENDING STORED CONTACTS
TO A USB MEMORY .......................... 84
1. CALLING ON A Bluetooth®
PHONE........................................ 85
BY DIAL ................................................. 85
BY CONTACTS LIST............................. 86
BY PHONE BOOK................................. 86
BY CALL LISTS ..................................... 87
CALLING USING A SHORT
MESSAGE........................................... 88
BY POI* CALL........................................ 88
BY SELECTING SOS SCREEN
BUTTON.............................................. 89
2. RECEIVING CALLS ON A
Bluetooth® PHONE .................... 90
3. TALKING ON A Bluetooth®
PHONE ........................................ 91
SENDING TONES................................. 92
DIALING A SECOND NUMBER............ 93
ADJUSTING THE RECEIVER
VOLUME............................................. 94
1. SHORT MESSAGE FUNCTION .... 95
RECEIVING A SHORT MESSAGE....... 95
CHECKING RECEIVED SHORT
MESSAGES........................................ 95
CHECKING SENT SHORT
MESSAGES........................................ 96
SENDING A NEW SHORT
MESSAGE .......................................... 97
1. TROUBLESHOOTING................. 100
1BASIC INFORMATION BEFORE
OPERATION
2PHONE OPERATION
3SHORT MESSAGE FUNCTION
4WHAT TO DO IF...
Bluetooth® HANDS-FREE SYSTEM
Some of the functions cannot be operated while driving.
*: Point of Interest
74
DA_EXT_COROLLA_touch screen_EE
1. BASIC INFORMATION BEFORE OPERATION
1. QUICK REFERENCE
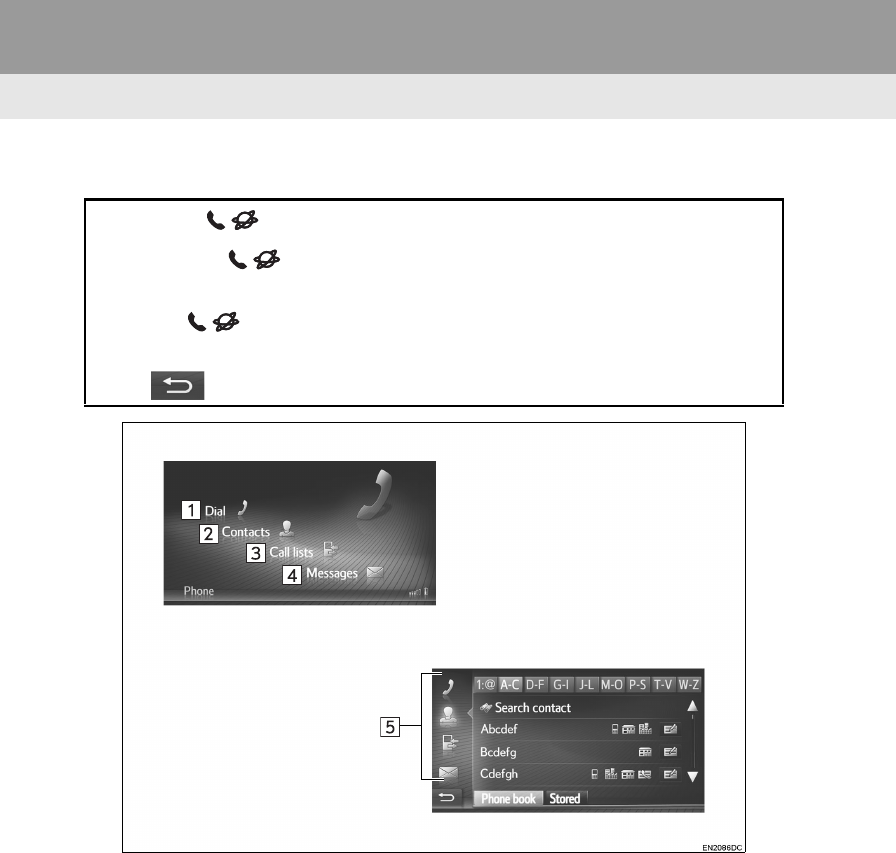
“Phone” MENU SCREEN
Pressing the button allows access to the “Phone” menu screen.
Each time the button is pressed, the screen will change between the
“Phone” menu screen and the “Extras”/“Toyota online” menu screen.
When the button is pressed, the screen that was last displayed will be
shown.
Select to display the “Phone” menu screen.

75
1. BASIC INFORMATION BEFORE OPERATION
3
Bluetooth® HANDS-FREE SYSTEM
DA_EXT_COROLLA_touch screen_EE
No. Function Page
Select to display the “Dial” screen.
A call can be made by dialing the number. 85
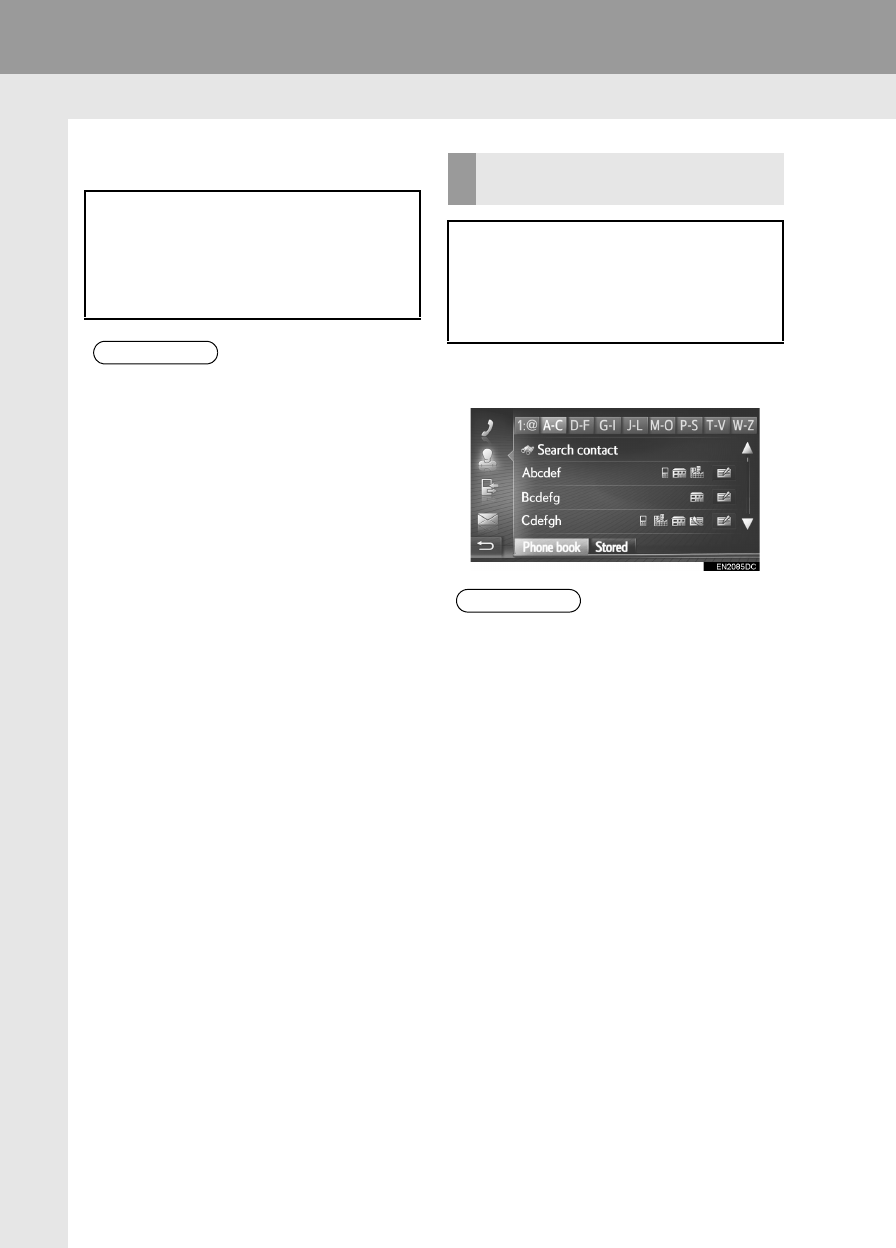
Select to display the “Contacts” screen.
An entry from the list of contacts in the “Stored” and “Phone book” screen
can be selected and called.
86
Select to display the “Call lists” screen.
An entry from the missed, received or dial call lists can be selected and
called.
87
Select to display the “Messages” screen.
A list of received and sent short messages and a menu to create new short
messages can be displayed.
95
Select the corresponding icon to change to the “Dial”, “Contacts”, “Call
lists” or “Messages” screen.
76
1. BASIC INFORMATION BEFORE OPERATION
DA_EXT_COROLLA_touch screen_EE
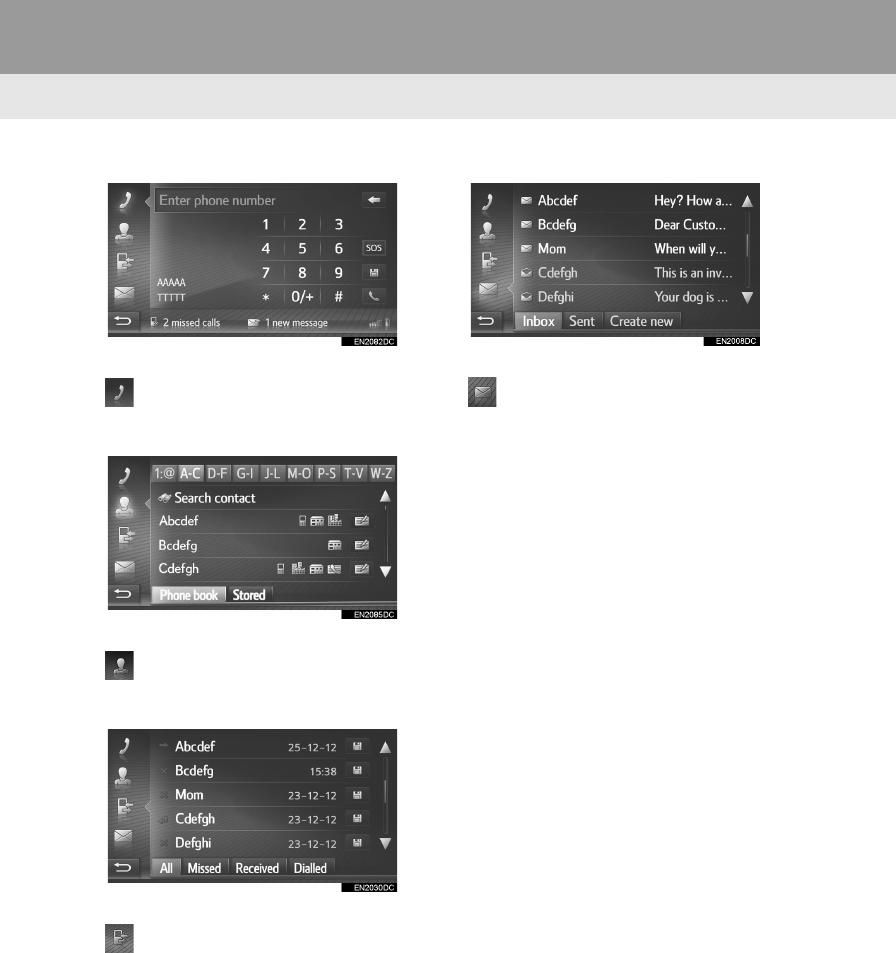
“Dial” SCREEN
This screen can be displayed by selecting
on any of the phone screens.
“Contacts” SCREEN
This screen can be displayed by selecting
on any of the phone screens.
“Call lists” SCREEN
This screen can be displayed by selecting
on any of the phone screens.
“Messages” SCREEN
This screen can be displayed by selecting
on any of the phone screens.
77
1. BASIC INFORMATION BEFORE OPERATION
DA_EXT_COROLLA_touch screen_EE
3
Bluetooth® HANDS-FREE SYSTEM
2. HANDS-FREE SYSTEM
Bluetooth® hands-free system allows
you to make or receive a call without
taking your hands off the steering
wheel by connecting your cellular
phone.
This system supports Bluetooth®.
Bluetooth® is a wireless data system
by which you can call without your
cellular phone being connected with a
cable or placed on a cradle.
The operating procedure of the system
is explained in this section.
CAUTION
Use a cellular phone or connect the
Bluetooth® phone only when safe and
legal to do so.
Your audio unit is fitted with Bluetooth®
antennas. People with implanted pace-
makers or cardiac defibrillators should
maintain a reasonable distance between
themselves and the Bluetooth® anten-
nas. The radio waves may affect the
operation of such devices.
Before using Bluetooth® devices, users
of any electrical medical device other
than implanted pacemakers and
implanted cardiac defibrillators should
consult the manufacturer of the device
for information about its operation under
the influence of radio waves. Radio
waves could have unexpected effects on
the operation of such medical devices.
NOTICE
Do not leave your cellular phone in the
vehicle. The temperature inside may rise
to a level that could damage the phone.
INFORMATION
If your cellular phone does not support
Bluetooth®, this system will not function.
In the following conditions, the system
may not function:
• The cellular phone is turned off.
• The current position is outside the
communication area.
• The cellular phone is not connected.
• The cellular phone has a low battery.
When using Bluetooth® audio and
hands-free at the same time, the follow-
ing problems may occur.
• The Bluetooth® connection may be
cut.
• Noise may be heard on the Bluetooth®
audio playback.

78
1. BASIC INFORMATION BEFORE OPERATION
DA_EXT_COROLLA_touch screen_EE
Steering switch
Volume control switch
Press the “+” side to increase the volume.
Press the “-” side to decrease the volume.
Off hook switch
On hook switch
Microphone
USING THE PHONE SWITCH/
MICROPHONE
By pressing the phone switch, a call
can be received or ended without tak-
ing your hands off the steering wheel.
The microphone is used when talking
on the phone.
INFORMATION
The other party’s voice will be heard
from the front speakers. The audio sys-
tem will be muted during phone calls.
Talk alternately with the other party on
the phone. If you talk at the same time,
your voices may not reach each other. (It
is not a malfunction.)
Keep the volume of receiving voice
down. Otherwise, an echo will be heard
and receiving voice can be heard out-
side of the vehicle. When you talk on the
phone, speak clearly towards the micro-
phone.
In the following situations, your voice
may not reach the other party.
• Driving on an unpaved road. (Due to
traffic noise.)
• Driving at high speed.
• A window is open.
• Turning the air-conditioning vents
towards the microphone.
• The sound of the air-conditioning fan is
loud.
• There is an effect from the cellular
phone network.

79
1. BASIC INFORMATION BEFORE OPERATION
3
Bluetooth® HANDS-FREE SYSTEM
DA_EXT_COROLLA_touch screen_EE
The following data is stored for every reg-
istered phone. When another phone is
connecting, you cannot read the regis-
tered data.
• Phone book data
• Call history data You can initialize the following data in the
system.
• Phone book data
• Call history data
• Volume setting
• Bluetooth® setting
• All telephone settings
• Short message template
ABOUT THE PHONE BOOK IN
THIS SYSTEM
INFORMATION
When you delete the phone, the above-
mentioned data is also deleted.
WHEN YOU RELEASE YOUR
CAR
A lot of personal data is registered
when you use the Hands-free system.
When you release your car, initialize
your data. (P.116)
INFORMATION
Once the data is initialized, all personal
data will be erased. Pay due care when
initializing the data.

80
1. BASIC INFORMATION BEFORE OPERATION
DA_EXT_COROLLA_touch screen_EE
1Press the button.
2Select “Yes”.
This screen can be displayed by pressing
the switch on the steering wheel.
3Follow the steps “PAIRING A
Bluetooth® DEVICE”. (P.120, 127)
CONNECTING A Bluetooth®
PHONE
In order to use the hands-free system,
it is necessary to pair the phone and
connect the phone’s profile (HFP) with
the system.
Once the profile has been connected,
hands-free calls can be made.
If you have not yet connected any
Bluetooth® phones with phone profile
(HFP), you must first connect your
phone with phone profile (HFP)
according to the following procedure.
Connect your Bluetooth® phone with
phone profile (HFP) after bringing the
vehicle to a complete stop.
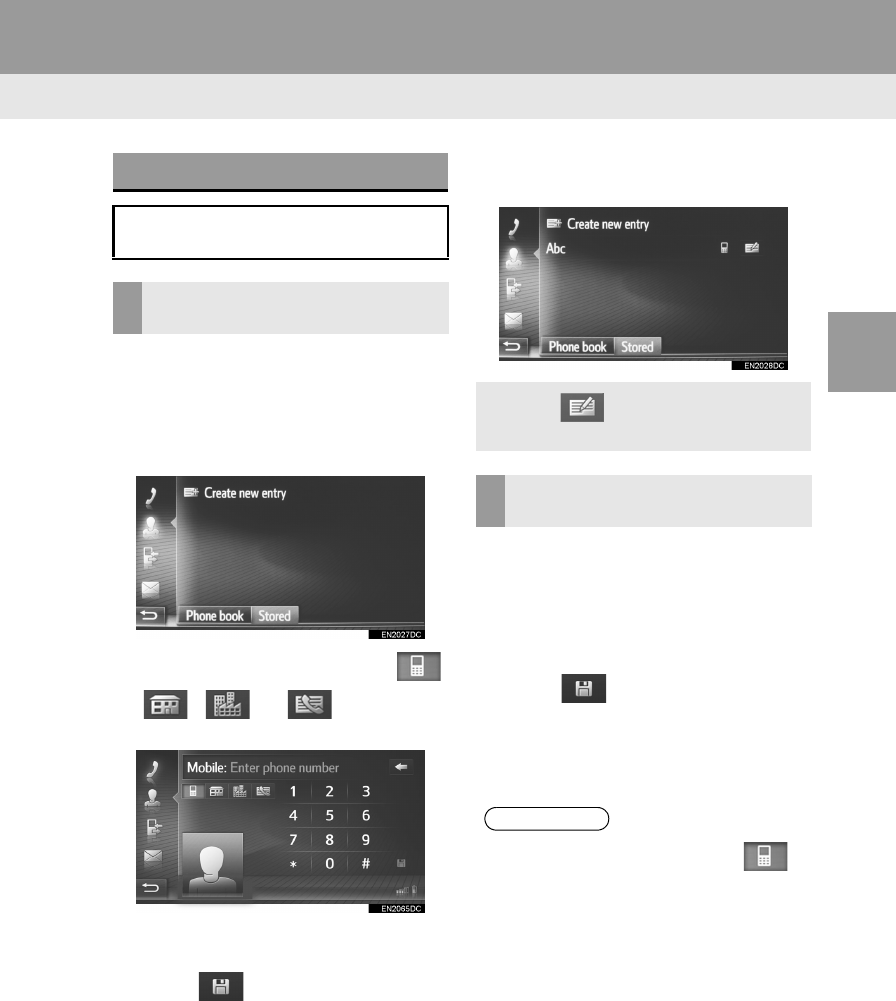
81
1. BASIC INFORMATION BEFORE OPERATION
DA_EXT_COROLLA_touch screen_EE
3
Bluetooth® HANDS-FREE SYSTEM
3. REGISTERING AN ENTRY
1Display the “Phone” menu screen and
select “Contacts”. (P.74)
2Select the “Stored” tab.
3Select “Create new entry”.
4Select one of 4 phone types ( ,
, or ) and enter a
number.
You can enter one phone number for each
phone type.
5Select .
6Enter the entry name and then select
“OK”.
7Check that the entry is registered in the
“Stored” list.
1Display the “Phone” menu screen.
(P.74)
2Select “Dial”.
3Enter the numbers.
4Select .
5Follow the steps “REGISTERING
FROM THE “Contacts” SCREEN” from
“STEP 6”. (P.81)
REGISTERING A NEW ENTRY
Up to 200 numbers can be registered
with this system.
REGISTERING FROM THE
“Contacts” SCREEN
Select to display and edit the
entry information. (P.8 3)
REGISTERING FROM THE
“Dial” SCREEN
INFORMATION
The phone type is registered as .

82
1. BASIC INFORMATION BEFORE OPERATION
DA_EXT_COROLLA_touch screen_EE
1Search the entry by “Phone book”.
P.86)
2Select for desired item.
3Select “Add to stored contacts”.
4Follow the steps “REGISTERING
FROM THE “Contacts” SCREEN” from
“STEP 6”. (P.81)
1Search for the entry by “Call lists”.
(P.87)
2Select next to the desired item.
3Follow the steps “REGISTERING
FROM THE “Contacts” SCREEN” from
“STEP 6”. (P.81)
REGISTERING FROM THE
“Phone book” SCREEN
INFORMATION
The phone type is registered as .
Navigation system only: If the contact
includes an address and a phone num-
ber, they will be stored in the “Stored” list
on the “My destinations” screen and
“Contacts” screen. (P.81, 200)
REGISTERING FROM THE “Call
lists” SCREEN
INFORMATION
The phone type is registered as .
REGISTERING FROM AN
EXTERNAL DEVICE
“vCard” formatted data can be trans-
ferred from a USB memory to this sys-
tem. Transferred addresses and
numbers will be stored in the “Stored”
list on the “My destinations” screen and
“Contacts” screen. (P.81, 200)
: Navigation system only
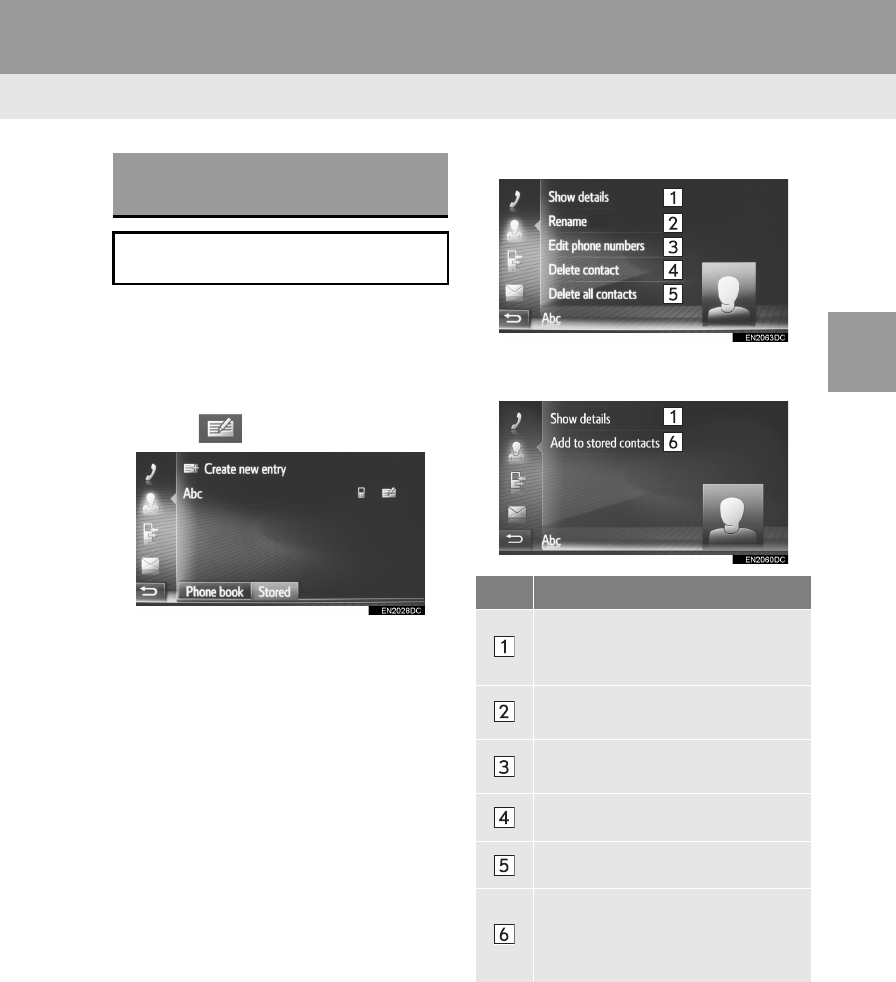
83
1. BASIC INFORMATION BEFORE OPERATION
3
Bluetooth® HANDS-FREE SYSTEM
DA_EXT_COROLLA_touch screen_EE
1Display the “Phone” menu screen and
select “Contacts”. (P.74)
2Select the “Stored” tab or the “Phone
book” tab.
3Select next to the desired entry.
Entry options screen of the “Stored” list
Entry options screen of the “Phone
book” list
DISPLAYING AND EDITING
THE ENTRY INFORMATION
Detailed information of entries in the
list can be displayed or edited.
No. Function
Select to display the details of the
entry information.
Select the desired entry to call it.
Select to change the entry name. (
P.84)
Select to edit phone numbers. (
P.84)
Select to delete the entry.
Select to delete all entries.
Select to register the entry in the
“Stored” list on the “My destinations”
screen (navigation system only) and
“Contacts” screen. ( P.82, 200)
84
1. BASIC INFORMATION BEFORE OPERATION
DA_EXT_COROLLA_touch screen_EE
1Select “Rename”.
2Enter the entry name and then select
“OK”.
1Select “Edit phone numbers”.
2Select one of 4 phone types and enter
a number and then .
CHANGING THE ENTRY NAME
EDITING PHONE NUMBERS
INFORMATION
If an entry that is transferred from a cel-
lular phone is edited, the change will
affect the entry in the “Stored” list on the
“My destinations” screen (navigation
system only) and “Contacts” screen.
(P.81, 200)
SENDING STORED
CONTACTS TO A USB
MEMORY
The entries stored in the “Stored” list
on the “My destinations” screen and
“Contacts” screen can be transferred
to a USB memory. (P.209)
: Navigation system only
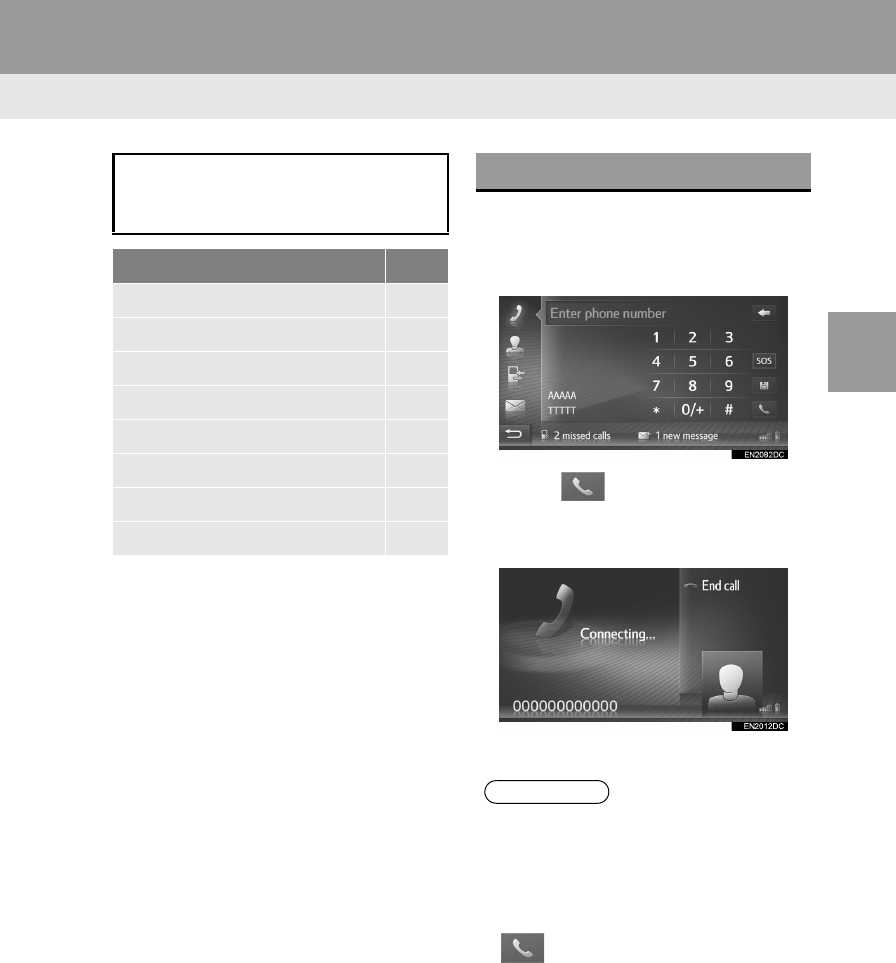
85
DA_EXT_COROLLA_touch screen_EE
3
Bluetooth® HANDS-FREE SYSTEM
2. PHONE OPERATION
1. CALLING ON A Bluetooth® PHONE
1Display the “Phone” menu screen and
select “Dial”. (P.74)
2Enter a phone number.
3Select .
4Check that the connecting screen is
displayed.
To cancel a call, select “End call”.
After a Bluetooth® phone has been
connected, a call can be made using
the hands-free system.
How to make a call list Page
By dial 85
By contacts list 86
By phone book 86
By call lists 87
By using a short message 88
By POI call88
By selecting SOS screen button89
By using the Toyota Eurocare230
: Navigation system only
BY DIAL
INFORMATION
Depending on the type of Bluetooth®
phone being connected, it may be nec-
essary to perform additional steps on
the telephone.
When “Dial” is selected, the last dialed
number will be shown grayed out. Select
to redial the number.
Navigation system only: Select “0/+” to
enter “0”. Select and hold to enter “+” for
international calls.
When the missed calls icon or new short
message icon is displayed at the bot-
tom, selecting the icon will display the
list.
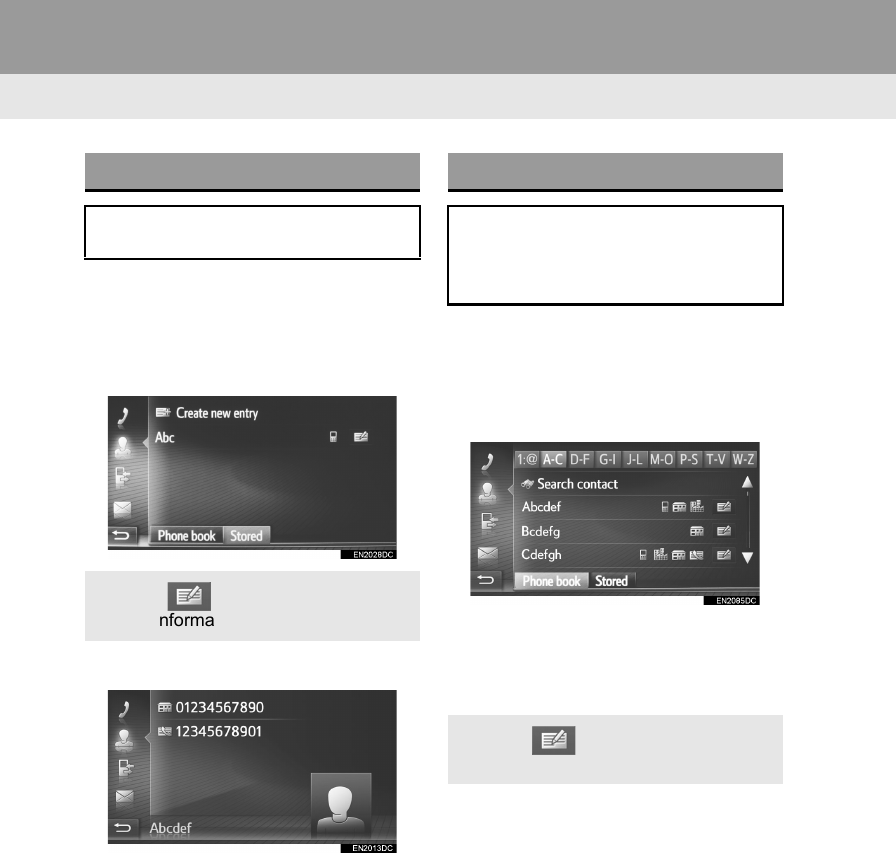
86
2. PHONE OPERATION
DA_EXT_COROLLA_touch screen_EE
1Display the “Phone” menu screen and
select “Contacts”. (P.74)
2Select the “Stored” tab.
3Select the desired entry.
If there are 2 or more phone numbers,
select the desired number in the list.
4Check that the connecting screen is
displayed.
To cancel a call, select “End call”.
1Display the “Phone” menu screen and
select “Contacts”. (P.74)
2Select the “Phone book” tab.
3Select the desired entry.
If there are 2 or more phone numbers,
select the desired number in the list.
“Search contact”: Select to search by the
contact’s name.
4Check that the connecting screen is
displayed.
To cancel a call, select “End call”.
BY CONTACTS LIST
To use this function, it is necessary to
register the entry. (P.81)
Select to display and edit the
entry information. (P.83 )
BY PHONE BOOK
Calls can be made using the phone
book data of the connected cellular
phone. The phone book changes de-
pending on the phone connected.
Select to display and edit the
entry information. (P.8 3 )

87
2. PHONE OPERATION
DA_EXT_COROLLA_touch screen_EE
3
Bluetooth® HANDS-FREE SYSTEM
1Display the “Phone” menu screen and
select “Call lists”. (P.74)
2Select the desired tab.
The state of a call is shown by the follow-
ing icons.
: Missed
: Received
: Dialed
INFORMATION
When a phone is connected for the first
time, its phone book must be down-
loaded. If the phone book can not be
downloaded, a pop-up window will be
displayed.
If the contact does not have phone num-
ber stored, the entry will be dimmed.
The phone book list can be updated.
(P.139)
BY CALL LISTS
Each call list (missed, received, and di-
aled) stores up to 15 entries.
No. Function
Select to display all numbers.
Select to display missed calls.
Select to display received calls.
Select to display dialed numbers.
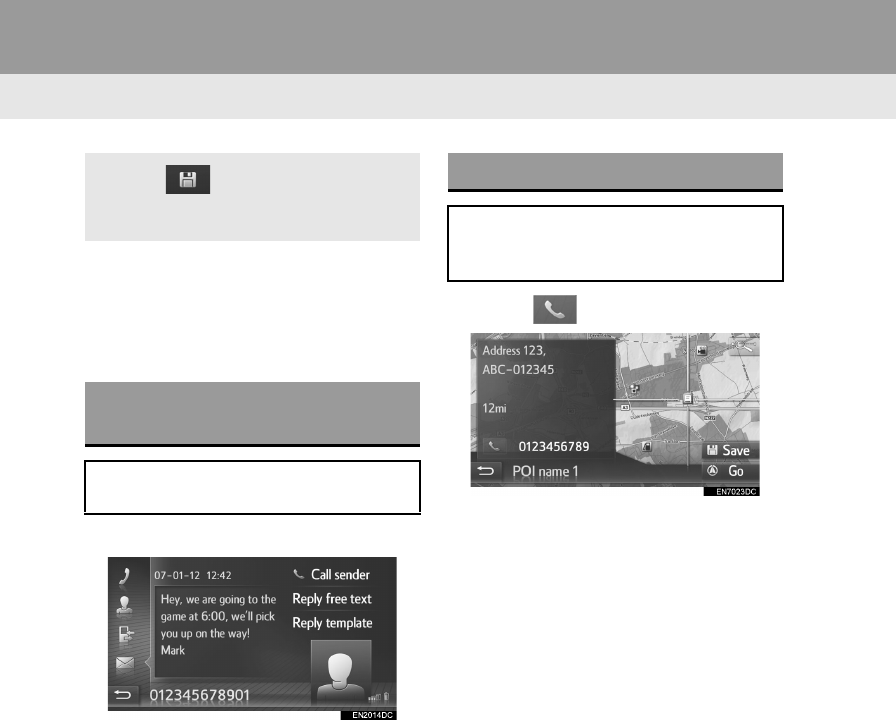
88
2. PHONE OPERATION
DA_EXT_COROLLA_touch screen_EE
3Select the desired entry.
4Check that the connecting screen is
displayed.
To cancel a call, select “End call”.
1Select “Call sender”.
2Check that the connecting screen is
displayed.
To cancel a call, select “End call”.
1Select .
2Check that the connecting screen is
displayed.
To cancel a call, select “End call”.
When is selected, the entry is
registered in the “Stored” list on the
“Contacts” screen. (P. 8 2)
CALLING USING A SHORT
MESSAGE
Calls can be made to a short message
sender’s phone number. (P.95)
BY POI CALL
Calls can be made to a POI when its
details are displayed on the screen.
(P.173, 181)
: Navigation system only

89
2. PHONE OPERATION
DA_EXT_COROLLA_touch screen_EE
3
Bluetooth® HANDS-FREE SYSTEM
1Display the “Phone” menu screen and
select “Dial”. (P.74)
2Select “SOS”.
3Select “Yes” when the confirmation
screen appears.
4The following screen will be displayed.
The geographic coordinates of the current
location will be displayed at the top-left cor-
ner of the screen.
When “...” appears on the screen, select
to display the following position details.
On freeways: Freeway number, driving
direction and next exit.
On other roads: Address information.
Each time “...” is selected, the screen
changes between the geographical coor-
dinates and position details.
BY SELECTING SOS SCREEN
BUTTON
112 EMERGENCY CALL
SUPPORT
This feature is used to make a 112
emergency call with the select of a but-
ton.
This function is not available when the
hands-free system is not connected.
This call can only be placed in a coun-
try where the 112 emergency call ser-
vice is available.
: Navigation system only

90
2. PHONE OPERATION
DA_EXT_COROLLA_touch screen_EE
2. RECEIVING CALLS ON A Bluetooth® PHONE
1Press the switch on the steering
wheel.
“Accept”: Select to talk on the phone.
“Reject”: Select to reject the call.
The layout of the incoming call screen
may differ depending on the information
available from the connected phone.
Pressing the switch on the steering
wheel also reject a call.
Ringtone volume can be adjusted by turn-
ing the power/volume knob.
2The following screen is displayed.
Single call
For details about this screen: P.91
Call waiting
The first call is put on hold and the infor-
mation of the party will be dimmed.
For details about this screen: P.9 1
When a call is received, this screen is
displayed and a sound is heard.
INFORMATION
During international telephone calls, the
other party’s name or number may not
be displayed correctly depending on the
type of cellular phone you have.
Ringtone and ringtone volume can also
be set. (P.139)

91
2. PHONE OPERATION
DA_EXT_COROLLA_touch screen_EE
3
Bluetooth® HANDS-FREE SYSTEM
3. TALKING ON A Bluetooth® PHONE
Single call
Call waiting
While you are talking on a Bluetooth®
phone, a telephone conversation
screen is displayed. The operations
outlined below can be performed on
this screen.
No. Function
Select to hang up the phone.
The switch on the steering
wheel can also be pressed to
hang up the phone.
Select to dial a second number.
(P.93)
Select to send a tone. (P.92)
Select to put a call on hold. To
cancel this function, select “Con-
tinue”.
Select to transfer the call. Select
“Transfer” to change from a
hands-free call to a cellular
phone call. Select “Hands-free”
to change from cellular phone
call to hands-free call.
Displays the other party’s infor-
mation. The information shown
here may differ depending on the
information available from your
phone.
Displays a call duration.
Select to mute your voice to the
other party. The icon will be high-
lighted during mute mode. To
cancel muting your voice, select
this icon again.
Select to change parties.
Select to change to a conference
call.

92
2. PHONE OPERATION
DA_EXT_COROLLA_touch screen_EE
1Select “Keypad”.
2Enter the numbers.
Select to return the previous
screen.
INFORMATION
When you change from a cellular phone
call to a hands-free call, the hands-free
screen will be displayed and the call can
be operated on the screen.
Depending on the cellular phone con-
nected, the Bluetooth® connection may
be canceled if and when a call is trans-
ferred to the cellular phone.
Transferring methods will be different
depending on the type of cellular phone
which you have.
For the operation of the cellular phone,
see the manual that comes with your
cellular phone.
SENDING TONES

94
2. PHONE OPERATION
DA_EXT_COROLLA_touch screen_EE
CHANGING PARTIES
1Select “Swap calls”.
Every time “Swap calls” is selected, the
party who is on hold will be switched.
The other party can also be switched by
selecting the picture of the desired party
(navigation system only) or pressing the
switch on the steering wheel.
CHANGING TO A CONFERENCE
CALL
1Select “Link calls”.
1Turn the power/volume knob to adjust
the volume of the other party’s voice.
INFORMATION
Interrupt call operation may differ
depending on your phone company and
cellular phone.
ADJUSTING THE RECEIVER
VOLUME
INFORMATION
The receiver volume can also be
adjusted using the volume control switch
on the steering wheel.
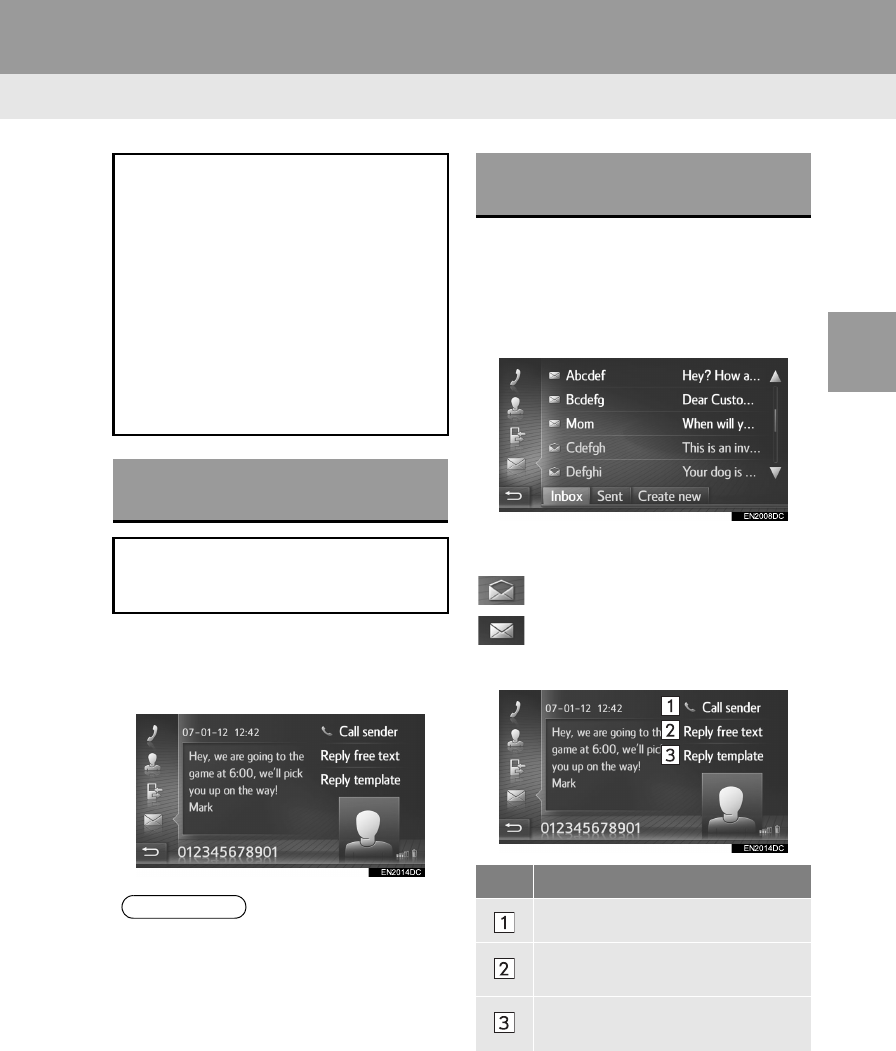
95
DA_EXT_COROLLA_touch screen_EE
3
Bluetooth® HANDS-FREE SYSTEM
3. SHORT MESSAGE FUNCTION
1. SHORT MESSAGE FUNCTION
1Select “Show” to check a received
short message.
2Check that the message is displayed.
1Display the “Phone” menu screen and
select “Messages”. (P.74)
2Select the “Inbox” tab.
3Select the desired short message.
The state of a message is shown by the
following icons.
: Read message
: Unread message
4Check that the message is displayed.
Received short messages can be for-
warded from the connected Bluetooth®
phone, enabling checking and replying
using this system.
Depending on the type of Bluetooth®
phone connected, received short mes-
sage may not be transferred to the
message inbox.
If the phone does not support the short
message function, this function cannot
be used.
RECEIVING A SHORT
MESSAGE
When a new short message is re-
ceived, a pop-up window is displayed
on the screen.
INFORMATION
This function can be set to on or off.
(P.139)
CHECKING RECEIVED
SHORT MESSAGES
No. Function
Select to call the sender.
Select to reply to the short message
by free text.
Select to reply to the short message
by template.
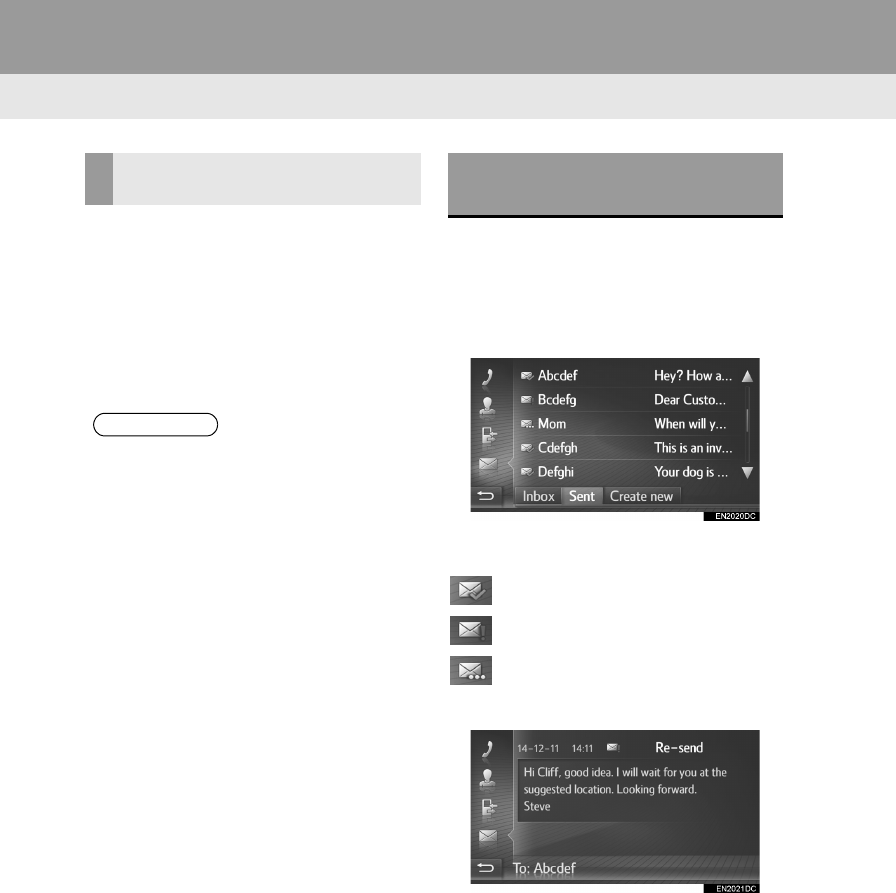
96
3. SHORT MESSAGE FUNCTION
DA_EXT_COROLLA_touch screen_EE
1Select “Reply free text” or “Reply
template”.
When “Reply template” is selected,
select the desired template.
2Enter the message and then select
“OK”.
The short message will be sent.
1Display the “Phone” menu screen and
select “Messages”. (P.74)
2Select the “Sent” tab.
3Select the desired short message.
Navigation system only: The state of a
message is shown by the following icons.
: Sent succeeded
: Sent failed
: Sending
4Check that the message is displayed.
“Re-send”: Select to re-send the mes-
sage.
“Re-send” is displayed if sending the text
message has failed.
REPLYING TO A SHORT
MESSAGE
INFORMATION
“Reply free text” function is not available
while driving.
CHECKING SENT SHORT
MESSAGES
: Navigation system only

97
3. SHORT MESSAGE FUNCTION
DA_EXT_COROLLA_touch screen_EE
3
Bluetooth® HANDS-FREE SYSTEM
1Display the “Phone” menu screen and
select “Messages”. (P.74)
2Select the “Create new” tab.
3Select “Create message” or “Use
template”.
4Enter the message and then select
“OK”. (P.98)
5Select the desired number/contact to
whom the short message should be
sent.
When “New number” is selected
6Enter the number and then select
“OK”.
The short message will be sent.
When “Select contact” or “Select
from call lists” is selected
6Select the desired list.
7Select the desired contact.
If there are 2 or more phone numbers,
select the desired number in the list.
The short message will be sent.
SENDING A NEW SHORT
MESSAGE
INFORMATION
The “Create message” and “Prepare
template message” functions are not
available while driving.
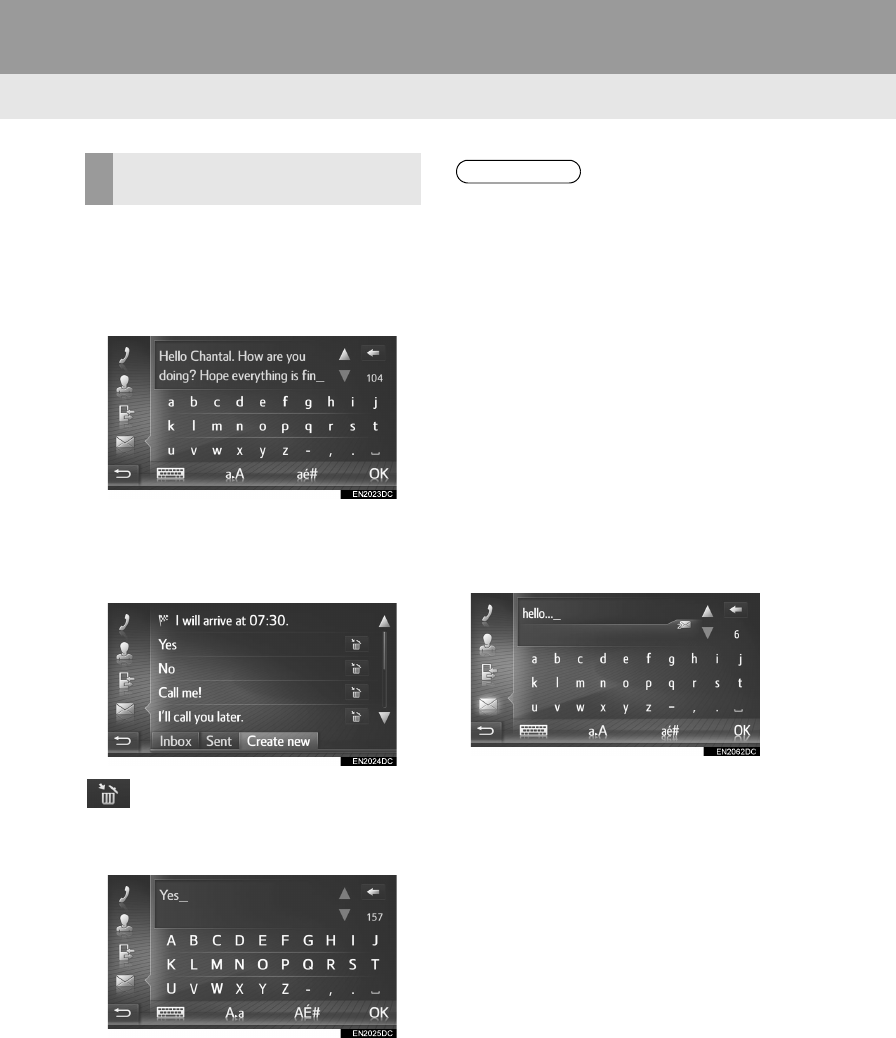
98
3. SHORT MESSAGE FUNCTION
DA_EXT_COROLLA_touch screen_EE
WHEN “Create message” IS SE-
LECTED
1Enter the message and then select
“OK”.
WHEN “Use template” IS SELECT-
ED
1Select the desired template.
: Select to delete the template.
2Edit the short message and then select
“OK”.
CREATE A NEW SHORT
MESSAGE
INFORMATION
10 messages have already been regis-
tered to the message template screen.
Navigation system only: When route
guidance is currently active, “I will arrive
at XX:XX.” template is available.
(“XX:XX” is the current estimated time of
arrival.) This template cannot be
deleted.
The cursor’s position can be moved by
selecting the desired location in the
enter screen.
The short messages can contain up to
160 characters. If the entered text
exceeds the characters available for one
short message, a new short message
will begin automatically. This is indicated
by a separation line and an icon in the
enter field, which is shown as soon as
there are only 10 characters left for the
short message.
The number of characters left for the
short message is displayed.
A maximum of 3 short messages can be
written in series.
Entering the text function is not available
while driving.

99
3. SHORT MESSAGE FUNCTION
DA_EXT_COROLLA_touch screen_EE
3
Bluetooth® HANDS-FREE SYSTEM
1Select “Prepare template message”.
2Enter the message and then select
“OK”.
The message is registered in the template
list.
REGISTER NEW TEMPLATES
New templates can be created. Up to
15 templates can be registered.

100
DA_EXT_COROLLA_touch screen_EE
4. WHAT TO DO IF...
1. TROUBLESHOOTING
When using the hands-free system with a Bluetooth® device
If there is a problem with the hands-free system or a Bluetooth® device, first check
the table below.
Symptom Likely cause Solution
Page
Cellular
phone
This
system
The hands-free sys-
tem or Bluetooth®
device does not
work.
The connected de-
vice may not be a
compatible
Bluetooth® cellular
phone.
For a list of specific
devices which opera-
tion has been con-
firmed on this
system, check with
your Toyota dealer.
The Bluetooth® ver-
sion of the connected
cellular phone may
be older than the
specified version.
Use a cellular phone
with Bluetooth® ver-
sion 1.1 or higher
(recommended: Ver.
3.0 +EDR or higher).
122, 132

101
4. WHAT TO DO IF...
DA_EXT_COROLLA_touch screen_EE
3
Bluetooth® HANDS-FREE SYSTEM
When pairing/connecting a cellular phone
Symptom Likely cause Solution
Page
Cellular
phone
This
system
A cellular phone can-
not be paired.
An incorrect pass-
code was entered on
the cellular phone.
Enter the correct
passcode on the cel-
lular phone.
The pairing operation
has not been com-
pleted on the cellular
phone side.
Complete the pairing
operation on the cel-
lular phone (approve
pairing on the tele-
phone).
Old pairing informa-
tion remains on ei-
ther this system or
the cellular phone.
Delete the existing
pairing information
from both this system
and the cellular
phone, then pair the
cellular phone you
wish to connect to
this system.
124, 134

102
4. WHAT TO DO IF...
DA_EXT_COROLLA_touch screen_EE
A Bluetooth® con-
nection cannot be
made.
Another Bluetooth®
device is already
connected.
Manually connect the
cellular phone you
wish to use to this
system.
124, 134
Bluetooth® function
is not enabled on the
cellular phone.
Enable the
Bluetooth® function
on the cellular
phone.
Automatic
Bluetooth® connec-
tion on this system is
set to off.
Vehicles with-
out smart entry
& start system
Set automatic
Bluetooth®
connection on this
system to on when
the engine switch is
turned to the “ACC”
or “ON” position.
Vehicles with
smart entry &
start system
Set automatic
Bluetooth®
connection on this
system to on when
the engine switch is
turned to
ACCESSORY or
IGNITION ON mode.
119, 126
Old registration infor-
mation remains on
either this system or
the cellular phone.
Delete the existing
registration informa-
tion from both this
system and the cellu-
lar phone, then regis-
ter the cellular phone
you wish to connect
to this system.
124, 134
Symptom Likely cause Solution
Page
Cellular
phone
This
system

103
4. WHAT TO DO IF...
DA_EXT_COROLLA_touch screen_EE
3
Bluetooth® HANDS-FREE SYSTEM
When making/receiving a call
When using the phone book
Symptom Likely cause Solution
Page
Cellular
phone
This
system
A call cannot be
made/received.
Your vehicle is in a
no service area.
Move to an area
where the service
signal appears on
the display.
Symptom Likely cause Solution
Page
Cellular
phone
This
system
Phone book data
cannot be trans-
ferred manually/au-
tomatically.
The profile version of
the connected cellu-
lar phone may not be
compatible with
transferring phone
book data.
For a list of specific
devices which opera-
tion has been con-
firmed on this
system, check with
your Toyota dealer.
Transfer operation
on the cellular phone
has not completed.
Complete transfer
operation on the cel-
lular phone (approve
transfer operation on
the phone).

104
4. WHAT TO DO IF...
DA_EXT_COROLLA_touch screen_EE
When using the Bluetooth® message function
Symptom Likely cause Solution
Page
Cellular
phone
This
system
Messages cannot be
viewed.
Message transfer is
not enabled on the
cellular phone.
Enable message
transfer on the cellu-
lar phone (approve
message transfer on
the telephone).
New message notifi-
cations are not dis-
played.
Notification of SMS/
E-mail reception on
this system is set to
off.
Set notification of
SMS/E-mail recep-
tion on this system to
on.
139

105
4. WHAT TO DO IF...
DA_EXT_COROLLA_touch screen_EE
3
Bluetooth® HANDS-FREE SYSTEM
In other situations
: For details, refer to the owner’s manual that came with the cellular phone.
Symptom Likely cause Solution
Page
Cellular
phone
This
system
Even though all con-
ceivable measures
have been taken, the
symptom status does
not change.
The cellular phone is
not close enough to
this system.
Bring the cellular
phone closer to this
system.
Radio interference
has occurred.
Turn off Wi-Fi® de-
vices or other devic-
es that may emit
radio waves.
The cellular phone is
the most likely cause
of the symptom.
Turn the cellular
phone off, remove
and reinstall the bat-
tery pack, and then
restart the cellular
phone.
Enable the cellular
phone’s Bluetooth®
connection.
Disable the Wi-Fi®
connection of the cel-
lular phone.
Stop the cellular
phone’s security soft-
ware and close all
applications.
Before using an ap-
plication installed on
the cellular phone,
carefully check its
source and how its
operation might af-
fect this system.

113
1. SETUP OPERATION
5
SETUP
DA_EXT_COROLLA_touch screen_EE
No. Function Page
Select to set language, operation sound, etc. 114
Select to adjust the contrast and brightness of the screens, turn the screen
off, etc. 117
Select to adjust sound. 140
Select to connect to Bluetooth® device. Settings are available for Bluetooth®
phones and Bluetooth® audio devices. 119
Select to connect. Settings are available for Bluetooth® phones, Bluetooth®
audio devices, internet devices via Bluetooth®, internet connection methods
and Toyota web account.
126
Select to adjust phone sound, set a phone book, etc. 139
Select to customise the vehicle. 142

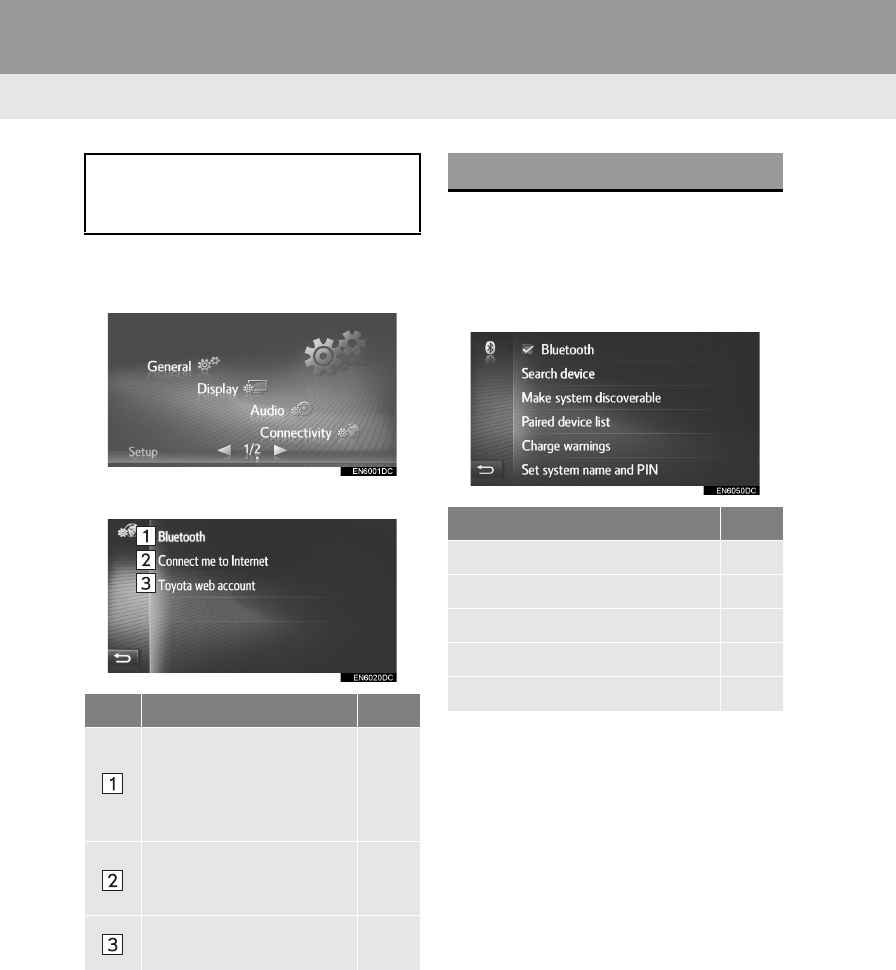
126
DA_EXT_COROLLA_touch screen_EE
1. SETUP OPERATION
5. CONNECTIVITY SETTINGS
1Display the “Setup” screen. (P.112)
2Select “Connectivity”.
3Select items to be set.
1Display the connectivity settings
screen. (P.126)
2Select “Bluetooth*”.
3Select items to be set.
*: Bluetooth is a registered trademark of
Bluetooth SIG, Inc.
Settings are available for Bluetooth®
devices, internet connection methods
and Toyota web account.
No. Function Page
Select to display a sub-
menu for Bluetooth® where
you can connect phone,
audio devices and internet
devices via Bluetooth®.
126
Select to search for avail-
able internet connection
methods.
136
Select to add or change
your Toyota web account. 136
: Navigation system only
Bluetooth® SETTINGS
Function Page
Bluetooth® function on/off 127
Pairing a Bluetooth® device 127
Paired device list 134
Setting charge warnings 135
Setting the system name and PIN 135
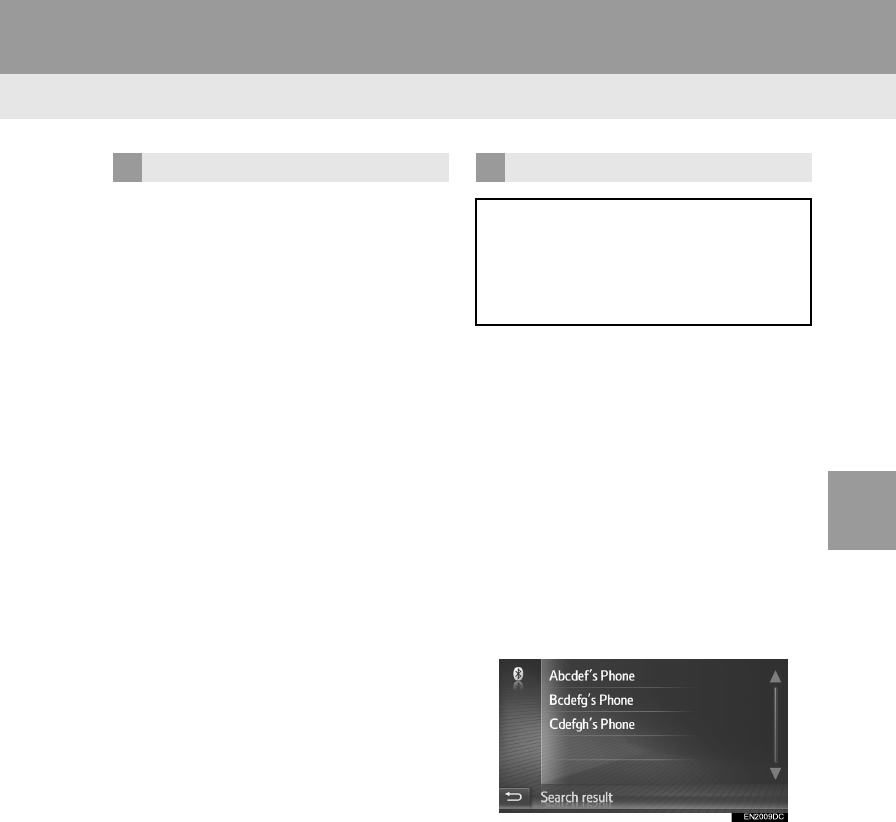
127
1. SETUP OPERATION
5
SETUP
DA_EXT_COROLLA_touch screen_EE
1Select “Bluetooth*”.
When “Bluetooth*” is on:
Vehicles without smart entry & start sys-
tem
The Bluetooth® device is automatically
connected when the engine switch is
turned to the “ACC” or “ON” position.
Vehicles with smart entry & start system
The Bluetooth® device is automatically
connected when the engine switch is
turned to ACCESSORY or IGNITION ON
mode.
When “Bluetooth*” is off:
The Bluetooth® device is disconnected,
and the system will not connect to it next
time.
Even if the Bluetooth® function is set to
off, it will turn on automatically when a
phone or other Bluetooth® device is con-
nected.
*: Bluetooth is a registered trademark of
Bluetooth SIG, Inc.
PAIRING FROM THE SYSTEM
1Select “Search device”.
When another Bluetooth® device is con-
nected
To disconnect the Bluetooth® device,
select “YES”.
When 4 Bluetooth® devices have al-
ready been paired
A paired device needs to be replaced.
Select “OK”, and select the device to be
replaced.
2Select the desired device.
Connectable Bluetooth® devices will be
displayed in the list.
Bluetooth® FUNCTION ON/OFF PAIRING A Bluetooth® DEVICE
Up to 4 Bluetooth® devices can be
paired. A paired device can be con-
nected to any of its supported profiles
such as phone (HFP), music (A2DP)
and/or internet (DUN/PAN).

129
1. SETUP OPERATION
5
SETUP
DA_EXT_COROLLA_touch screen_EE
Once you have connected the Bluetooth®
device, it is automatically connected
whenever the engine switch is in the fol-
lowing status.
Vehicles without smart entry & start sys-
tem
The engine switch is turned to the “ACC”
or “ON” position.
Vehicles with smart entry & start system
The engine switch is turned to ACCESSO-
RY or IGNITION ON mode.
PAIRING FROM THE DEVICE
1Select “Make system discoverable”.
When another Bluetooth® device is con-
nected
To disconnect the Bluetooth® device,
select “YES”.
When 4 Bluetooth® devices have al-
ready been paired
A paired device needs to be replaced.
Select “OK”, and select the device to be
replaced.
2When this screen is displayed, search
for the device on the screen of your
Bluetooth® device.
To cancel the registration, select “Can-
cel”.
3Pairing the Bluetooth® device using
your Bluetooth® device.
A PIN code is not required for SSP
(Secure Simple Pairing) compatible
Bluetooth® devices. Depending on the
type of Bluetooth® device being con-
nected a message confirming registration
may be displayed on the Bluetooth®
device’s screen. Respond and operate the
Bluetooth® device according to the confir-
mation message.
INFORMATION
For details on device detection and the
operation of your Bluetooth® device, see
the manual that comes with the
Bluetooth® device.
The music profiles the paired device
supports can be connected individually
as desired. Some devices do not allow
individual profiles to be connected. In
that case, a pop-up window is displayed.
Specyfikacje produktu
| Marka: | Toyota |
| Kategoria: | nawigator |
| Model: | Corolla 2013 Navigation |
| Typ kontroli: | Dotyk |
| Certyfikat środowiskowy (zrównoważonego rozwoju): | ENERGY STAR |
| Tryb wyłączenia: | 10 W |
| Certyfikaty: | FCC Part 15, Class A, RoHS 2002/95/EC |
| Zgodny z Mac: | Tak |
| Pojemność pamięci wewnętrznej: | 1024 MB |
| Zakres temperatur (eksploatacja): | 10 - 28 °C |
| Zakres wilgotności względnej: | 15 - 85 % |
| Ekran dotykowy: | Tak |
| Taktowanie procesora: | 667 Mhz |
| Wi-Fi: | Nie |
| Pobór mocy w trybie czuwania: | 200 W |
| Przewodowa sieć LAN: | Tak |
| Maksymalna rozdzielczość: | 1200 x 1200 DPI |
| Technologia druku: | Laser |
| Języki opisu strony: | PCL 5c,PCL 6,PDF 1.5,TIFF |
| Zasilanie: | 220-240V, 50 Hz, 10A |
| Pozycjonowanie na rynku: | Biznes |
| Zużycie energii w trybie energooszczędnym: | 85 W |
| Prędkość drukowania (A4/US Letter, w czerni, tryb normal): | 45 stron/min |
| Prędkość druku (w kolorze, z normalną jakością, format A4/US Letter): | 35 stron/min |
| Drukowanie: | Drukowanie w kolorze |
| Liczba wkładów drukujących: | 5 |
| Nadajnik cyfrowy: | Nie |
| Skanowanie: | Skanowanie w kolorze |
| System operacyjny: | Windows XP/Server 2003/Vista, Mac OS 10.3+, AIX 51 v5.3, HP UX 11.0/11i v2, Solaris 8/9/10, \nLinux Fedora Core 1/5, Red Hat ES4, SUSE10.x |
| Funkcje wszystko w jednym: | Copy,Scan |
| Funkcja koloru all-in-one: | copy,print,scan |
| Maksymalny obszar wydruku: | 297 x 420 mm |
| Maksymalny rozmiar papieru ISO (seria A): | A3 |
| Poziom ciśnienia akustycznego (drukowanie): | 56 dB |
| Kopiowanie: | Kopiowanie w kolorze |
| Średni zużycie enegrii (podczas pracy ): | 1080 W |
| Fax: | Nie |
| Cechy sieci: | 10/100BaseTX |
| Podwójne drukowanie: | Tak |
| Maksymalna rozdzielczość kopiowania: | 600 x 600 DPI |
| Zalecana ilość stron drukuwanych miesięcznie: | 130000 stron/mies. |
| Czas wydruku pierwszej strony (a4, w czerni): | 4.8 s |
| Czas rozgrzewania: | 45 s |
| Standardowe wymiary nośników: | A3,A4,A5 |
| Poziom mocy akustycznej (czuwanie): | 28 dB |
| Czas wydruku pierwszej strony (w kolorze): | 7.2 s |
Potrzebujesz pomocy?
Jeśli potrzebujesz pomocy z Toyota Corolla 2013 Navigation, zadaj pytanie poniżej, a inni użytkownicy Ci odpowiedzą
Instrukcje nawigator Toyota

29 Sierpnia 2024
26 Sierpnia 2024
23 Sierpnia 2024
22 Sierpnia 2024
16 Sierpnia 2024
15 Sierpnia 2024
15 Sierpnia 2024
9 Sierpnia 2024
Instrukcje nawigator
- nawigator Sony
- nawigator Motorola
- nawigator Pioneer
- nawigator Honda
- nawigator Philips
- nawigator SilverCrest
- nawigator Acer
- nawigator Audi
- nawigator Sygic
- nawigator Volkswagen
- nawigator Nokia
- nawigator Mio
- nawigator Kia
- nawigator Asus
- nawigator Medion
- nawigator Boss
- nawigator Lenco
- nawigator Marquant
- nawigator Jensen
- nawigator BMW
- nawigator Mazda
- nawigator Skoda
- nawigator Garmin
- nawigator Blaupunkt
- nawigator Chrysler
- nawigator Dual
- nawigator Grundig
- nawigator Kenwood
- nawigator Scosche
- nawigator Alpine
- nawigator MaxCom
- nawigator Zebra
- nawigator Cobra
- nawigator JVC
- nawigator Becker
- nawigator V7
- nawigator Kalkhoff
- nawigator Lowrance
- nawigator Alfa Romeo
- nawigator Zenec
- nawigator Uniden
- nawigator Clarion
- nawigator Thomson
- nawigator Coyote
- nawigator Pyle
- nawigator VDO
- nawigator Midland
- nawigator Navitel
- nawigator GoClever
- nawigator Harman Kardon
- nawigator Parrot
- nawigator Polaroid
- nawigator Prestigio
- nawigator Sanyo
- nawigator ModeCom
- nawigator Insignia
- nawigator Navman
- nawigator TomTom
- nawigator Bushnell
- nawigator Hitachi
- nawigator Wahoo Fitness
- nawigator Magellan
- nawigator Simrad
- nawigator Overmax
- nawigator Nav N Go
- nawigator Raymarine
- nawigator Binatone
- nawigator Humminbird
- nawigator Airis
- nawigator Caliber
- nawigator Sylvania
- nawigator Celestron
- nawigator Audiovox
- nawigator Navigon
- nawigator Eagle
- nawigator Conrad
- nawigator Autovision
- nawigator Lanzar
- nawigator Furuno
- nawigator Teasi
- nawigator Kapsys
- nawigator Coyote Systems
- nawigator Danew
- nawigator Rand McNally
- nawigator GolfBuddy
- nawigator Soundstream
- nawigator VDO Dayton
- nawigator Igo
- nawigator Pentagram
- nawigator Route 66
- nawigator Falk
- nawigator Seecode
- nawigator Pharos
- nawigator Viamichelin
- nawigator Xzent
- nawigator CarTrek
- nawigator Whistler
- nawigator Dynavin
- nawigator Cheetah
- nawigator Cydle
- nawigator ESX
- nawigator Lark
- nawigator LXNAV
- nawigator Planet Audio
- nawigator Eclipse
- nawigator Voice Caddie
- nawigator SkyCaddie
- nawigator TELE System
- nawigator IZZO Golf
- nawigator Zoleo
- nawigator Dashmate
- nawigator GlobalSat
Najnowsze instrukcje dla nawigator

2 Kwietnia 2025

12 Marca 2025
2 Marca 2025
2 Marca 2025
16 Lutego 2025
31 Grudnia 2025
29 Grudnia 2024
29 Grudnia 2024
20 Grudnia 2024
14 Grudnia 2024