Instrukcja obsługi Teradek Cube 505
Przeczytaj poniżej 📖 instrukcję obsługi w języku polskim dla Teradek Cube 505 (2 stron) w kategorii serwer. Ta instrukcja była pomocna dla 5 osób i została oceniona przez 2 użytkowników na średnio 4.5 gwiazdek
Strona 1/2
Stream Joystick:
, : Selects options from streaming/recording prompts
: Returns to main status screen, start/stop recordings and broadcasts(button press)
Menu Joystick:
, : Select menu items, change status screen on main display, select characters
: Back, move to higher menu level
, : Confirm selection, open selected menu (button press)
NETWORK CONNECTION
L: Video Input
M: Status
N: Broadcast/Record
O: Fault/Error
P: Stream Joystick
Q: Menu Joystick
Connect power (via A/C adapter or Cubit) to the
power input and video input to . Attach
(F) (C)
antennas via the threaded RP−SMA connectors.(A)
Move power switch to the ON position . (G)
Use the included hot shoe mount and/or 1/4" screw to mount Cube to your camera, tripod mount
or other accessory mount, if desired . (B)
Cube defaults to Master mode, which will create and
advertise its own network name (SSID). Your computer,
decoder, or mobile device connects directly to Cube,
with no additional network equipment required.
1. On your computer or iOS device, open your
wireless networking utility.
2. Choose your Cube from the list of WiFi devices
in your area and connect to that network.
In Infrastructure mode, Cube connects to an existing network via a wireless access point or Ethernet
connection. Infrastructure mode allows Cube to communicate with all devices on the network and is required
for streaming to the Internet.
Wireless range can be greatly improved by using a wireless access point.
Connecting Cube to an existing wireless network:
POWER & CONNECT 1
2
1
3
2
AC adapter
or
Cubit SDI
HDMI
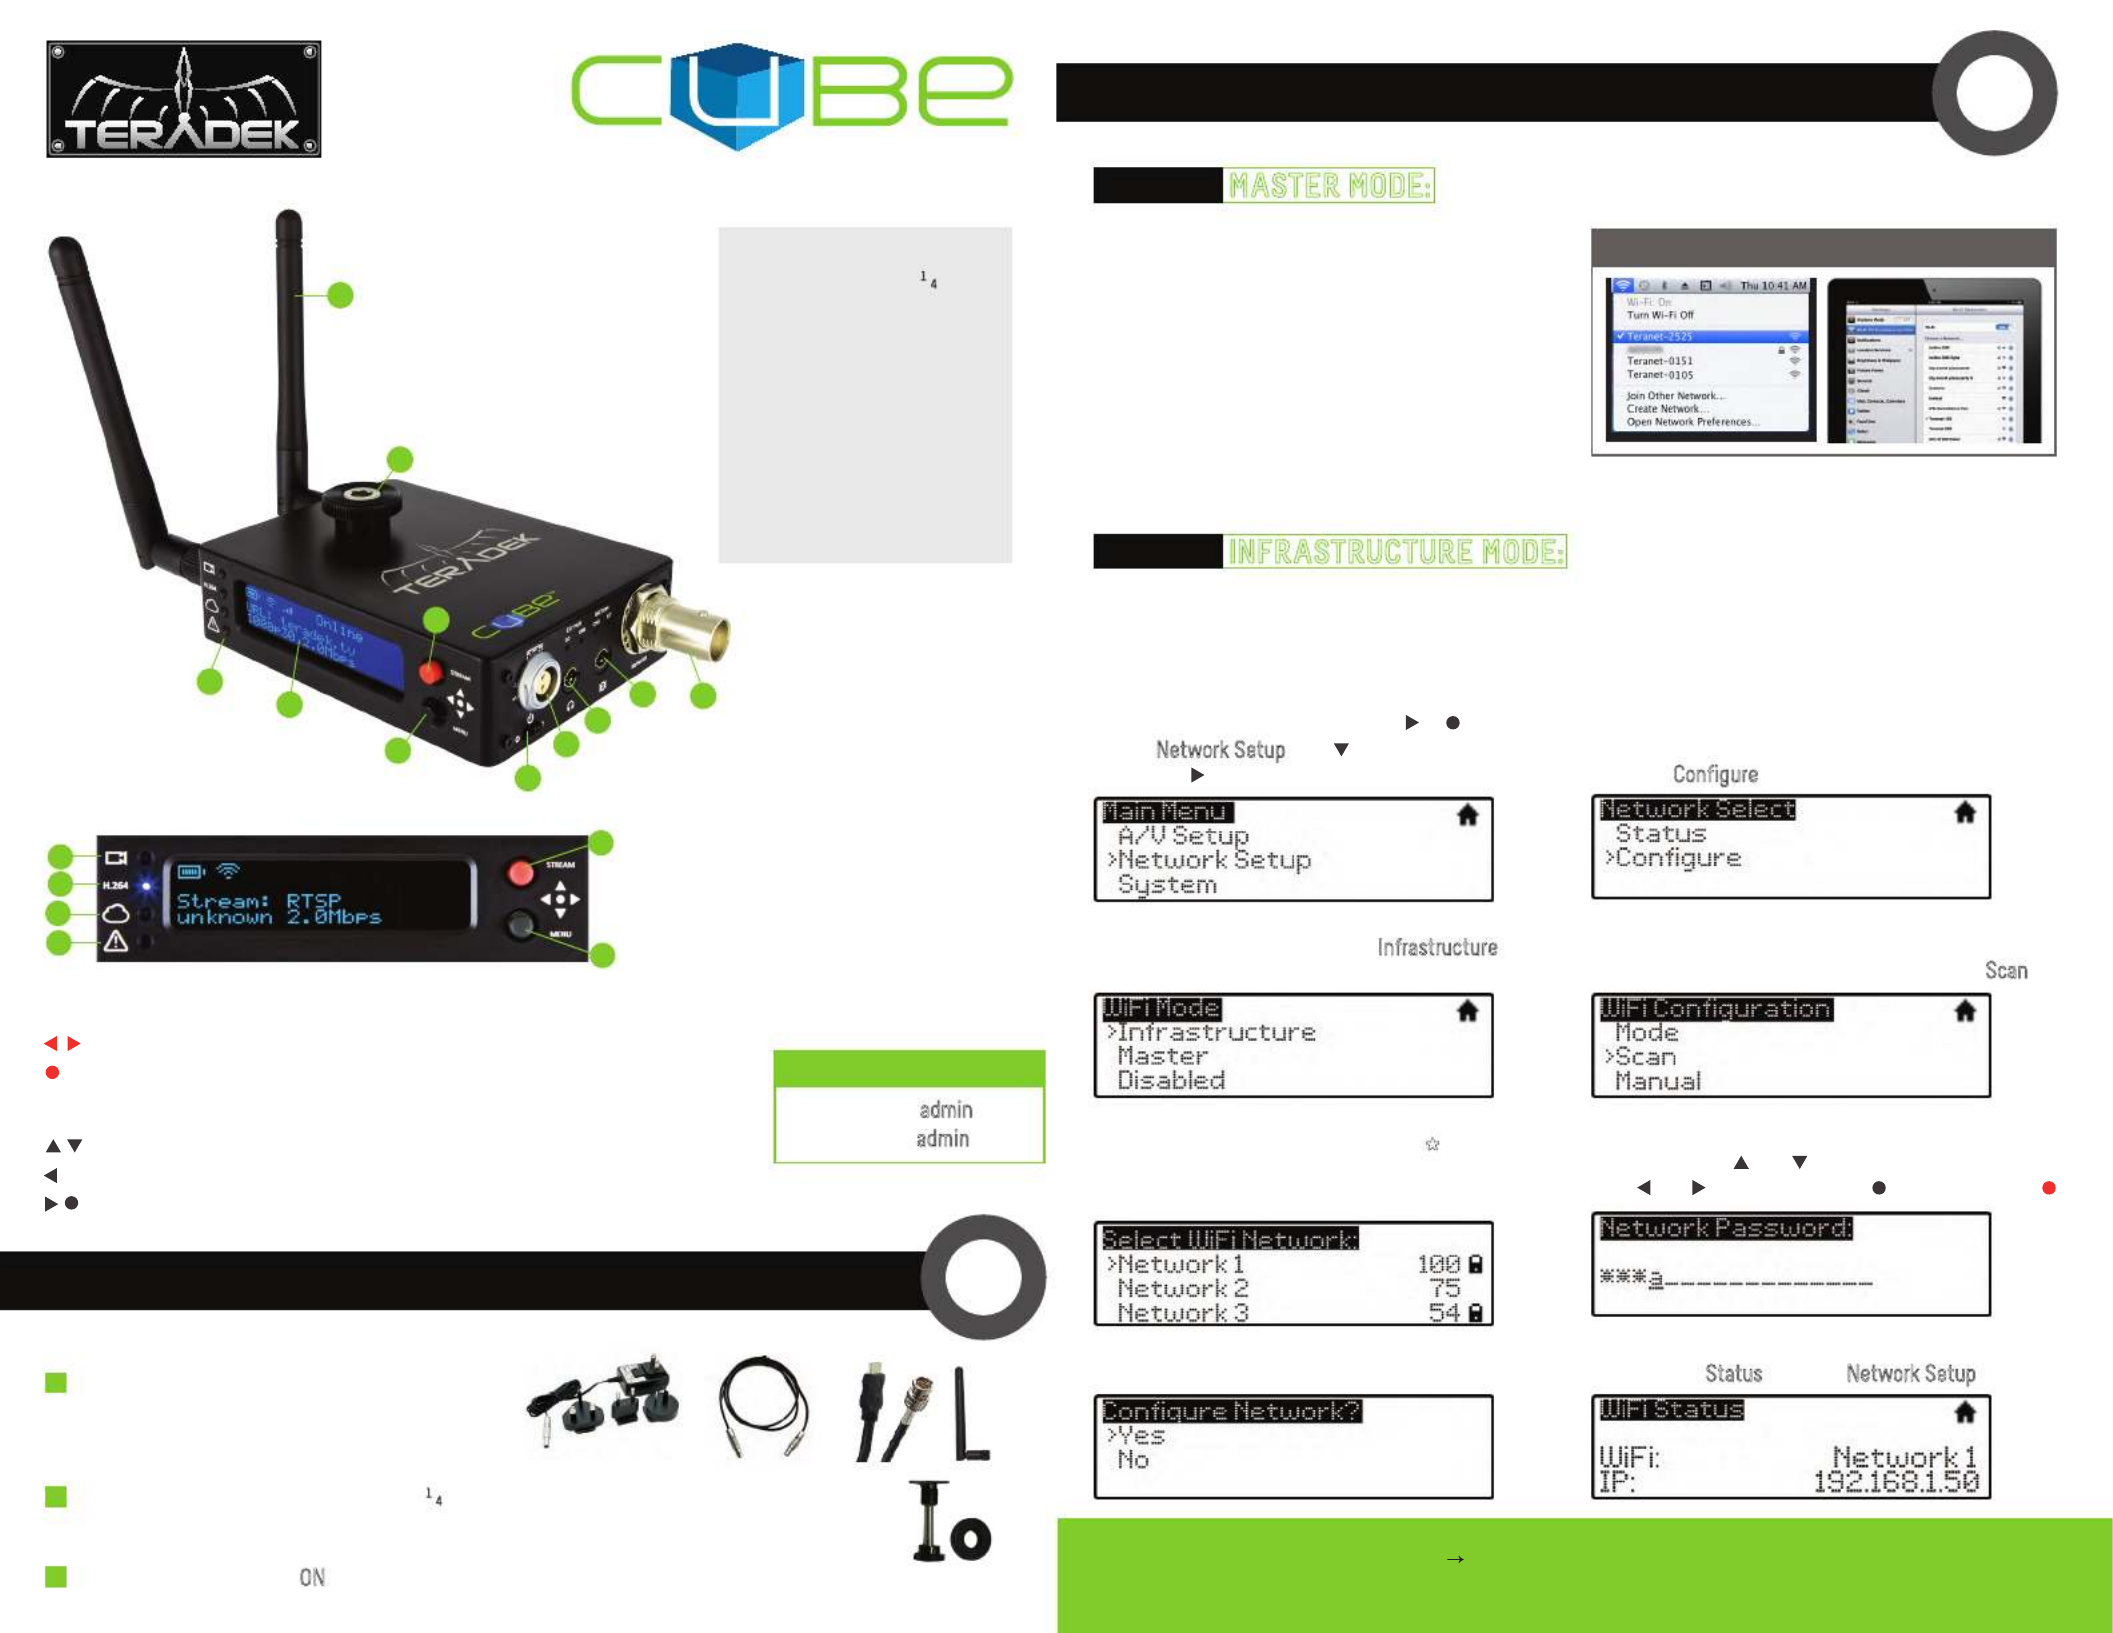
OPTION A: MASTER MODE: Connect Cube to one other device.
OPTION B: INFRASTRUCTURE MODE: Add Cube to an existing network.
WiFi CONNECTION ON MAC/PC OR iPAD
1. Enter the main menu by pressing or .
Select Network Setup with and enter the
menu with .2. Select Configure.
6. If prompted, enter your network password. Choose
characters with and , choose the position
with and , and confirm with . To cancel, press .
4. From the WiFi Configuration menu, choose Scan.
3. Select Mode, and then choose Infrastructure.
The Wireless mode will be set.
8. Once configured, you can view the network status
by selecting Status Network Setup from the menu.
7. Choose Yes to Apply the new Network settings.
5. Select your preferred network, (the * icon
indicates a secured network), and the number
on the far right is the signal strength.
NEED MORE HELP?
1. Support forum: http://forum.teradek.com Contains tips, information and all the latest firmware & software updates.
2. Training videos: http://vimeopro.com/teradek/cube training videos− −
TERADEK SUPPORT STAFF: support teradek.com or call 888 941 2111 ext2 (Mon Fri 9am to 6pm PST)@− − −
L
N
O
P
Q
CUBE’S WEB UI LOGIN
username: admin
password: admin
M
A
B
G
H
I
J
K
F
E
DC
A: Wireless Antenna
B: Hot shoe mount & 1/4" screw
C: Video Input (SDI or HDMI)
D: Line/MIC Audio Input
E: Headphone Audio Output
F: Power Input
G: Power Switch
H: Stream Joystick
I: Menu Joystick
J: OLED Display
K: Status LEDs

2. Open the Wifi Settings and connect to Cube’s
network (see section 2 for more information).
STREAM
3
Selecting which stream to view:
Changing output format:
OPTION C: DECODER SETUP: Output live video to a monitor or switcher.
OPTION A: STREAM FROM CUBE TO THE INTERNET
1. Enter the menu with . Select Decoder Setup.
1. Enter the menu, select .
Output Setup
2. Adjust your output resolution and audio settings
in the appropriate menu.
2. Select Automatic.
3. Choose the stream you want to view and confirm the setting when prompted.
OPTION B: LOCAL MONITORING WITH iOS DEVICES AND TERACENTRAL
1. Download TeraCentral from the iTunes App Store.
3. Open the TeraCentral app. You will see your
Cube’s stream listing. 4. Tap the Play button to open your video stream.
(CUBE’S WEB UI LOGIN: username: admin password: admin)
Configure your Cube for Internet streaming on Cube’s Stream Settings page
1. Launch Cube’s configuration page by clicking Configure in TeraCentral.
2. If the wizard appears, click Skip the Setup Wizard, then log in to Cube’s web UI
(user:
admin
, password:
admin
). Navigate to Video Setup Stream Settings.
1. Select
RTMP
Stream Modeas the .
2. Enter the server URL. Depending on your destination
(local server or CDN), this will look something like
rtmp://server.address:1935/live. The URL varies based on your
streaming provider. Check with them or Teradek Support to get
the proper address. Often the server URL is found with FMLE
instructions or in a downloadable XML file.
3. Enter the stream name. Again this varies by platform,
but should be found with the server URL.
4. Select
enabled
or
disabled
for auto−start broadcast.
If enabled, Cube will attempt to start a broadcast
whenever it powers up.
1. Under Stream Mode, select
Livestream (Live Internet
Streaming).
2. Enter your Livestream username, password, and
channel short name. Click Verify Login to check that
Cube can contact Livestream and that your login
information is valid. NOTE: the channel short name
is case sensitive.
3. Click Apply. Start/stop the stream by clicking Start
Broadcast on the Stream Settings page or by pressing
the Stream joystick on Cube.
5. Click Apply. Start/stop the stream by clicking Start Broadcast
on the Stream Settings page or by pressing the Stream joystick on Cube.
6. See the reference guide for additional information.
RTMP streaming:
Livestream
Specyfikacje produktu
| Marka: | Teradek |
| Kategoria: | serwer |
| Model: | Cube 505 |
Potrzebujesz pomocy?
Jeśli potrzebujesz pomocy z Teradek Cube 505, zadaj pytanie poniżej, a inni użytkownicy Ci odpowiedzą
Instrukcje serwer Teradek

28 Marca 2025
28 Marca 2025
28 Marca 2025
Instrukcje serwer
- serwer Sony
- serwer Supermicro
- serwer Lenovo
- serwer Gigabyte
- serwer Acer
- serwer Technics
- serwer Hikvision
- serwer Fujitsu
- serwer Conceptronic
- serwer StarTech.com
- serwer Asus
- serwer Medion
- serwer TRENDnet
- serwer MSI
- serwer Toshiba
- serwer D-Link
- serwer ATen
- serwer APC
- serwer HP
- serwer Tripp Lite
- serwer Cisco
- serwer Moxa
- serwer Synology
- serwer Lindy
- serwer ZyXEL
- serwer Dell
- serwer Linksys
- serwer Digitus
- serwer Vimar
- serwer Netgear
- serwer Black Box
- serwer ELAC
- serwer Intellinet
- serwer HGST
- serwer Revox
- serwer Naim
- serwer SEH
- serwer Planet
- serwer NEC
- serwer LevelOne
- serwer Digi
- serwer Axis
- serwer Asrock
- serwer Abus
- serwer Rocstor
- serwer Western Digital
- serwer Smart-AVI
- serwer Promise Technology
- serwer QNAP
- serwer Chenbro Micom
- serwer Allnet
- serwer Veritas
- serwer IStarUSA
- serwer Silverstone
- serwer Ernitec
- serwer AVerMedia
- serwer Atlona
- serwer Gefen
- serwer Hanwha
- serwer Quantum
- serwer Blackmagic Design
- serwer Kathrein
- serwer Eaton
- serwer Monacor
- serwer Sonnet
- serwer In Win
- serwer Teo
- serwer Megasat
- serwer Areca
- serwer Kramer
- serwer KanexPro
- serwer Raritan
- serwer AMX
- serwer C2G
- serwer Acti
- serwer Sitecom
- serwer Maxdata
- serwer Matrox
- serwer Flir
- serwer Buffalo
- serwer GeoVision
- serwer LaCie
- serwer Valcom
- serwer Asustor
- serwer Intel
- serwer Fantec
- serwer Freecom
- serwer Seagate
- serwer Iomega
- serwer Luxman
- serwer Ibm
- serwer Provision ISR
- serwer TAIDEN
- serwer SIIG
- serwer Advantech
- serwer Extron
- serwer Avocent
- serwer Silex
- serwer Sun
- serwer MvixUSA
- serwer Dual Bay
- serwer Raidsonic
- serwer EMC
- serwer Infortrend
- serwer Opengear
- serwer G-Technology
- serwer EXSYS
- serwer Middle Atlantic
- serwer Mr. Signal
- serwer Atlantis Land
- serwer Lantronix
- serwer NETSCOUT
- serwer Mobotix
- serwer Origin Storage
Najnowsze instrukcje dla serwer
9 Kwietnia 2025
2 Kwietnia 2025

2 Kwietnia 2025
2 Kwietnia 2025

10 Marca 2025
10 Marca 2025
10 Marca 2025
10 Marca 2025
10 Marca 2025
10 Marca 2025