Instrukcja obsługi Telefunken DPF 9332
Telefunken
Cyfrowy wyświetlacz zdjęć
DPF 9332
Przeczytaj poniżej 📖 instrukcję obsługi w języku polskim dla Telefunken DPF 9332 (113 stron) w kategorii Cyfrowy wyświetlacz zdjęć. Ta instrukcja była pomocna dla 14 osób i została oceniona przez 2 użytkowników na średnio 4.5 gwiazdek
Strona 1/113


1
Non contractual document subject to change in case of typographical errors (Mktg0810) COPYRIGHT SOPEG 2010
The manufacturer reserves the right to modify the product specifications without notice.
ENGLISH
DIGITAL PHOTO FRAME OPERATING INSTRUCTIONS
TELEFUNKEN DPF 9332 DIAMOND
I. Learn about and install your frame......................................................2
1. Box contents..................................................................................................................... 2
2. Frame diagrams ............................................................................................................... 3
3. Remote control................................................................................................................. 3
4. Installation ......................................................................................................................... 4
II. Use your frame........................................................................................4
1. Selecting a language ....................................................................................................... 4
2. “ECO LOGIC” mode ........................................................................................................ 4
3. Reading a memory card or a USB key ......................................................................... 5
III. Selecting the type of files to play.........................................................5
1. Internal memory/Removable media .............................................................................. 5
2. Photos................................................................................................................................5
3. Movies................................................................................................................................6
4. Music.................................................................................................................................. 6
5. Calendar ............................................................................................................................ 6
6. Copying photos, movies or music to the internal memory or Memory Card.......... 7
7. Deleting photos ................................................................................................................ 7
8. Sorting photos.................................................................................................................. 7
IV. WI-FI®........................................................................................................8
1. Wi-Fi Setup ....................................................................................................................... 8
2. Accounts Configuration................................................................................................... 9
3. Applications over Wi-Fi ................................................................................................. 11
V. Settings ..................................................................................................13
VI. Safety instructions................................................................................13
VII. Warranty.................................................................................................14
VIII. Specifications........................................................................................16

2
Non contractual document subject to change in case of typographical errors (Mktg0810) COPYRIGHT SOPEG 2010
The manufacturer reserves the right to modify the product specifications without notice.
ENGLISH
PRELIMINARY NOTICE
During the first use, the animated demo is played. To exit and go to
the frame functions, simply press SETUP on the remote control, or
to press and hold the ◄ (left) key on the digital frame for 3.5 second
to exit the demo mode.
This is a quick user guide. For more information on using your frame,
download the extended user guide from the following address:
Finnish: Suomenkielisen käyttöohjeen löydät
Danish: Önskar du en svensk bruksanvisning, vänligen besøk
Swedish: Dersom du ønsker norsk bruksanvisning, vennligst gå til
Norwegian: Dersom du ønsker norsk bruksanvisning, vennligst gå til
http://www.telefunken-digital.com
I. Learn about and install your frame
Thank you for your recent purchase of a TELEFUNKEN “DIAMOND Series” digital photo frame. Before
using your device, please consult these operating instructions and keep them so you may refer to them
later on.
1. Box contents
- 1 digital photo frame
- 1 AC adaptor
- 1 remote control
- 1 dust cloth
- 1 quick start guide

3
Non contractual document subject to change in case of typographical errors (Mktg0810) COPYRIGHT SOPEG 2010
The manufacturer reserves the right to modify the product specifications without notice.
ENGLISH
2. Frame diagrams
3. Remote control
All functions can be accessed with the remote control. Press the following keys to access the functions:
Key Function
▲ Navigation up in the menus
◄ Navigation left in the menus and skip to the previous file (photo, music or movie)
▼ Navigation down in the menus
► Navigation right in the menus and skip to the next file (photo, music or movie)
ENTER Confirm your selection or switch modes
Switch the digital photo frame on or to standby mode
EXIT Exit current menu and return to previous menu
STOP Stop file playback (photo, music or movie) and return to main menu
Mute/unmute sound, in mute mode the mute icon is displayed
Increase volume, the volume level is displayed
(COPY/DEL) Access copy, delete and sort functions (only in main menu)
(ROTATE) Rotate photo clockwise 90°
Enlarge image, press repeatedly to cycle through zoom modes x2, x4, x8 and x16; press
again to return to normal size
Decrease volume, the volume level is displayed
SETUP Access setup menu (Settings) directly

4
Non contractual document subject to change in case of typographical errors (Mktg0810) COPYRIGHT SOPEG 2010
The manufacturer reserves the right to modify the product specifications without notice.
ENGLISH
4. Installation
- Take your frame and its accessories out of their packaging.
- Remove the plastic film protecting the front of the frame.
- Pull the plastic tab protecting the contacts in the remote control.
- Stand the frame in the desired location, pulling the adjustable stand towards you (see
diagram above).
- Connect the electrical cord to the frame in the space provided.
- Plug your frame into an outlet. Your frame will start up automatically.
II. Use your frame
1. Selecting a language
During the first use, the animated demo is played. To exit and go to the frame functions, simply press
the SETUP key on the remote.
The language selection screen then appears.
- Select your language using the arrow keys on the remote control, then press ENTER.
Once you have selected your language, the frame is ready for use. Simply insert a memory card or flash
drive to begin playback of your pictures.
Caution: The animated demo is located in the folder named “DEMO”. You must delete it for the
frame to keep benefit of the 2 GB internal memory.
2. “ECO LOGIC” mode
ECO LOGIC mode combines 3 essential elements to reduce energy consumption by over 40%
compared to a standard frame:
- An LED screen, which uses less energy while improving picture quality;
- A low-energy and ‘Energy Star’-certified power adapter;
- A light sensor.
This sensor, on by default, will automatically turn off your picture frame at night and turn it on during the
day.
You can deactivate the light sensor in your frame’s system settings menu.
Caution: Depending on where you place the frame (for example, in furniture or under a shelf), there may
not be enough light to turn on the frame or it may unexpectedly turn off. To reactivate it, simply bring
into bright light for 2-3 seconds.

5
Non contractual document subject to change in case of typographical errors (Mktg0810) COPYRIGHT SOPEG 2010
The manufacturer reserves the right to modify the product specifications without notice.
ENGLISH
3. Reading a memory card or a USB key
If your frame is off:
- Insert your card or USB key in the space provided.
- Switch on your frame: The slideshow will automatically play the contents of your memory
card or USB key.
If your frame is on and playing the slideshow from the internal memory:
- Your memory card is not automatically detected.
1. Press EXIT to exit the slideshow, the thumbnails will appear.
2. Press EXIT again to exit the internal memory and return to the Photo menu.
3. Press ▼ to highlight USB or inserted memory card and press ENTER to display the thumbnails
on the media.
4. Press ENTER to display the selected photo in full screen mode.
5. Repeatedly press ENTER to choose between Single, Slide with music and Slide photo only
modes.
6. Press EXIT to exit the slideshow, the thumbnails will appear.
III. Selecting the type of files to play
1. Internal memory/Removable media
If no media has been inserted, the slideshow from the internal memory will launch automatically
whenever the frame is turned on.
If there is a memory card or a flash drive inserted when the frame is turned on, the card’s content will
be played. In this case, you can switch between the card and the internal memory as follows:
- Keep pressing EXIT on your remote to go to the select media screen.
- Press ▲/▼ on the remote to select the media you want to play.
- Press ENTER to confirm.
2. Photos
- Press EXIT on your remote as many times as necessary for the media selection screen to
come up.
- Press ▲/▼ on the remote to select the media you want to play.
- Press ◄/► to select Photo.
- Press ENTER to access the photos in thumbnail mode.
- Press ENTER again to start playback.
- Repeatedly press ENTER to choose between Single, Slide with music and Slide photo
only modes.

6
Non contractual document subject to change in case of typographical errors (Mktg0810) COPYRIGHT SOPEG 2010
The manufacturer reserves the right to modify the product specifications without notice.
ENGLISH
3. Movies
- Press EXIT on your remote as many times as necessary for the media selection screen to
come up.
- Press ▲/▼ on the remote to select the media you want to play.
- Press ◄/► to select Movie.
- Press ENTER to show the movie list.
- Press ENTER again to start playback of the first movie file or select with ▲/▼ to start
playback of the desired movie.
- During playback, press ▲/▼ to select previous or next movie, press ◄/► for fast rewind
or fast forward modes. Press / to adjust the volume, or press MUTE to
mute/unmute.
- Press ENTER key to pause, press again to resume.
- Press EXIT to exit the mode.
4. Music
- Press EXIT on your remote as many times as necessary for the media selection screen to
come up.
- Press ▲/▼ on the remote to select the media you want to play.
- Press ◄/► to select Music.
- Press ENTER to show the music list.
- Press ENTER again to start playback of the first music file or select with ▲/▼ to start
playback of the desired title.
- During playback, press ▲/▼ to select previous or next music. Press / to adjust the
volume, or press MUTE to mute/unmute.
- Press ENTER key to pause, press again to resume.
- Press EXIT to exit the mode.
5. Calendar
- Press EXIT on your remote as many times as necessary for the media selection screen to
come up.
- Press ◄/► to select Calendar.
- Press ENTER to enter the calendar preview screen, the slideshow automatically starts.
- Press ENTER again to enter full screen mode, repeatedly press ENTER to toggle between
Single and Slide photo only modes. Press the ► or ◄ to skip to the next or previous
photo.
- Press EXIT to exit the full screen mode.
Note:
If you have set the alarm, an alarm icon will show on the Calendar screen.

7
Non contractual document subject to change in case of typographical errors (Mktg0810) COPYRIGHT SOPEG 2010
The manufacturer reserves the right to modify the product specifications without notice.
ENGLISH
6. Copying photos, movies or music to the internal memory or Memory Card
Copy your photos, movies or music in the thumbnail mode
Using this method, you can copy all or a selection of photos, music or movies with the ability to resize
photos to the frame’s resolution in order to optimize internal memory capacity.
The procedure is similar for all file types and following we describe it for photos only.
- Copying photos
1. Press EXIT on your remote as many times as necessary for the media selection screen to come
up.
2. Press ▼ to select the internal memory or removable media storing the photos to be copied.
3. Press ◄/► to select Photo mode and press ENTER.
4. Press ▲/▼/◄/► to select the single photo you want to copy.
5. Press COPY/DEL. The screen will display COPY/DELETE/SORT. Press ◄/► to select COPY
and press ENTER.
6. Press ▼ to select Copy One or Copy All and press ENTER to confirm.
7. Press ENTER for Yes to copy to Memory Card or Internal memory, or press ▼ to select No to
abort copying.
7. Deleting photos
You can delete photos (all or a choice of them) that are in your frame’s internal memory/removable
media.
- Delete your photos from the thumbnail mode
1. Press EXIT on your remote as many times as necessary for the media selection screen to come
up.
2. Press ▼ to select the internal memory or removable media.
3. Press ◄/► to select Photo mode and press ENTER.
4. Press ▲/▼/◄/► to select the single photo you want to delete.
5. Press COPY/DEL. The screen will display COPY/DELETE/SORT. Press ◄/► to select
DELETE and press ENTER.
6. Press ▼ to select Delete One or Delete All and press ENTER to confirm.
7. Press ENTER for Yes to delete or press ▼ to select No to abort deleting.
8. Sorting photos
You can sort photos that are in your frame’s internal memory/removable media.
- Sort your photos from the thumbnail mode
1. Press EXIT on your remote as many times as necessary for the media selection screen to come
up.

8
Non contractual document subject to change in case of typographical errors (Mktg0810) COPYRIGHT SOPEG 2010
The manufacturer reserves the right to modify the product specifications without notice.
ENGLISH
2. Press ▼ to select the internal memory or removable media.
3. Press ◄/► to select Photo mode and press ENTER.
4. Press COPY/DEL. The screen will display COPY/DELETE/SORT. Press ◄/► to select SORT
and press ENTER.
5. Press ▼ to select 6 PIC, 12 PIC or 30 PIC to display 6, 12 or 30 thumbnails and press ENTER
to confirm.
IV. WI-FI®
To enjoy the provided web services, such as Picasa™, Flickr® from the photo frame, you need to sign
up for a new account for the web service you want to use on the Internet. Before first time using the Wi-
Fi function of the photo frame, follow the steps below to set up the Wi-Fi® connection and make the
required account configurations, so that you can use the available web services in Wi-Fi List.
1. Wi-Fi Setup
Press EXIT on your remote as many times as necessary for the media selection screen to come up.
Press ◄/► to select Wi-Fi and press ENTER.
Press ► to highlight Wi-Fi Setup and press ENTER to enter the submenu.
Navigate with ▲/▼ in the Wi-Fi Setup submenu.
1.1 If you are using automatic IP network
- Select DHCP for automatic connection in the Wi-Fi Setup submenu.
- The Select Access Point screen appears and shows access points that are available nearby.
- Use the ▲/▼ to select an access point you want to connect to, and then press ENTER.
1. After successful connection to an open access point with no password (security-disabled
network) “Your Connection is successful” will be displayed.
2. To connect to a password-protected access point (security-enabled network), you will be
prompted to enter the password in the Keyboard screen that appears.
Enter the password in the Key field. When finished, select Done, and then press ENTER.
After entering the correct password “Your Connection is successful” will be displayed.
If you enter a wrong password “Connection failure Please try again ” will be displayed.
- Once the connection is established, the icon will be flashing in the top right corner of the
screen. The IP address, Gateway, DNS server and MAC address will be shown at the bottom
of the screen.
- When you have set up Wi-Fi® connection using DHCP, the photo frame will connect to the
Wi-Fi network automatically every time it is powered on.
Tips: On-screen keyboard use
- Press the ◄/►/▲/▼ to select an item, press ENTER to confirm.
- Select shift and press ENTER to toggle between uppercase and lowercase.
- Select Backspace and press ENTER to cancel your input.
- Select space and press ENTER to input a space.
- To go to the next field or move among fields, select Done and then press ENTER.

9
Non contractual document subject to change in case of typographical errors (Mktg0810) COPYRIGHT SOPEG 2010
The manufacturer reserves the right to modify the product specifications without notice.
ENGLISH
1.2 If you are using static IP connection
- Select Static IP Address in the Wi-Fi Setup menu.
- The Choose AP screen appears.
- Use the keyboard to enter your IP address, Subnet Mask, Gateway and DNS Server settings.
- When finished, select Done and then press ENTER.
- Once the connection is established, the icon will be flashing in the top right corner of the
screen. The IP address, Gateway, DNS server and MAC address will be shown at the bottom
of the screen.
- When you have set up Wi-Fi® connection using Static IP Address, the photo frame will save
the settings you have entered in the Choose AP page. However, every time the photo frame
is powered on, you need to select Done in the Choose AP page and press ENTER
repeatedly to manually connect to the Wi-Fi network.
Tips: On-screen keyboard use
- Press the ◄/►/▲/▼ to select an item, press ENTER to confirm.
- Select NEXT and press ENTER to move the cursor forwards.
- Select Prev and press ENTER to move the cursor backwards.
- To go to the next field or move among fields, select Done and then press ENTER.
- Select and press ENTER to cancel your last input.
1.3 Wi-Fi connection status
- Return to the Wi-Fi setup submenu and select Wi-Fi check.
- Press ENTER to display the check menu, connection errors and connection will be shown.
- Re-connect to access point or reset the Wi-Fi setup if an error occurs.
2. Accounts Configuration
2.1 Configuring your Picasa™ account
Note: Before making the following configurations, you need to sign up for a Picasa™ account
on the Internet first if you don’t have an existing account. Go to www.picasa.google.com
- Press EXIT on your remote as many times as necessary for the media selection screen to
come up.
- Press ◄/► to select Wi-Fi and press ENTER.
- Press ► to highlight Account Cfg and press ENTER to enter the submenu.
- Press ▼ to highlight Picasa and press ENTER to enter.
- In the Keyboard screen that appears, enter your account in the Account field.
- Use the ◄/►/▲/▼ to select Done, then press ENTER to move to the next field.
- Enter your password in the Password field.
- Use the ◄/►/▲/▼ to select Done, then press ENTER to complete.
- Now you will be able to use Picasa in the Wi-Fi List.

10
Non contractual document subject to change in case of typographical errors (Mktg0810) COPYRIGHT SOPEG 2010
The manufacturer reserves the right to modify the product specifications without notice.
ENGLISH
2.2 Configuring your Flickr™ account
Note: Before making the following configurations, you need to sign up for a Flickr™ account on
the Internet first if you don’t have an existing account. Go to www.flickr.com
- Press EXIT on your remote as many times as necessary for the media selection screen to
come up.
- Press ◄/► to select Wi-Fi and press ENTER.
- Press ► to highlight Account Cfg and press ENTER to enter the submenu.
- Press ▼ to highlight Flickr and press ENTER to enter.
- In the Keyboard screen that appears, enter your account in the Email Address field.
- Use the ◄/►/▲/▼ to select Done, then press ENTER to complete.
- Now you will be able to use Flickr in the Wi-Fi List.
2.3 Configuring your email account
To avoid the risk of losing important email data in your email account, DO NOT use
your existing personal email account to receive photo emails on this photo frame.
You may create a new Gmail (referred to as Google Mail in some countries/regions) email
account and use it for best compatibility with this photo frame.
The Gmail server settings have been preset on the photo frame. You only need to enter your
email account and password in the Account and Password fields.
- Press EXIT on your remote as many times as necessary for the media selection screen to
come up.
- Press ◄/► to select Wi-Fi and press ENTER.
- Press ► to highlight Account Cfg and press ENTER to enter the submenu.
- Press ▼ to highlight Mail Config and press ENTER to enter the Email configuration.
- Enter your account in the Account field. Select Done and press ENTER.
- Enter your password in the Password field. Select Done and press ENTER.
- For details about email server settings, refer to the table below:
Gmail™ (Referred to as Google Mail in some countries/regions)
POP Serv: pop.gmail.com
POP Port: 995
SSL: 1 (Non-zero = Yes, 0 = No)
SMTP Serv: smtp.gmail.com
SMTP Port: 465
Account: Your Gmail account (no need to enter @gmail.com)
Password: Your password
Depending on server settings, emails may be deleted from server after received by the photo
frame.
If you want to use other email account, please contact your network administrator or network
service provider for the email settings.

11
Non contractual document subject to change in case of typographical errors (Mktg0810) COPYRIGHT SOPEG 2010
The manufacturer reserves the right to modify the product specifications without notice.
ENGLISH
3. Applications over Wi-Fi
Ensure that your photo frame is connected to the Wi-Fi.
Press EXIT on your remote as many times as necessary for the media selection screen to come up.
Press ◄/► to select Wi-Fi and press ENTER.
Press ► to highlight Wi-Fi List and press ENTER to enter the submenu.
Navigate with ▲/▼ in the Wi-Fi List submenu.
If you already configured the Flickr and Picasa accounts, then they will be highlighted, otherwise, they
will stay dark.
3.1 Using the Weather
- Press ▼ to highlight Weather and press ENTER to enter the Weather menu, the system will
automatically show a four-day weather forecast.
- Press ENTER again to enter the name of the city you prefer and press ENTER to confirm.
- The photo frame will retrieve the weather of the new city.
3.2 Using the Email
- Press ▼ to highlight Email and press ENTER to enter the Email menu. The inbox is displayed.
Press the ◄/► to highlight the desired mode.
3.2.1 Receiving photo emails
- Press ► to highlight Inbox and press ENTER to confirm.
- The “Checking email…” message appears accordingly. If no Email was ever received the
inbox is blank.
- The Photo frame will automatically check for incoming Emails every 5 minutes.
- When you have incoming photo email(s), the “Downloading E-mail images …” message
appears.
- Once the download completes, downloaded photo(s) will be saved into the internal memory
of the photo frame.
- After receiving an Email a list of Emails is displayed.
- Press the ▲/▼ to highlight the desired Email to be opened. Press ENTER to open the
Email.
NOTE:
- Do not disconnect the power of the photo frame during email receiving. Otherwise,
internally memory may crash, causing all data lost in memory.
- If there is insufficient free space in the internal memory, photo(s) downloaded from the
email(s) may not be saved.
- When the “Downloading E-mail images…” message appears, all the current activities on
the photo frame, such as copying music and photos, will be interrupted and stopped.
Manually resume the unfinished activities after email downloading is complete.
3.2.2 Sending a photo by email
- Press ► to highlight Send Mail and press ENTER to confirm.
- Press the ▲/▼ to select the source of the photo you want to send and press ENTER to
access the photo viewer menu.
- In the photo viewer menu use ▲/▼/◄/► to select the desired image and press ENTER.

12
Non contractual document subject to change in case of typographical errors (Mktg0810) COPYRIGHT SOPEG 2010
The manufacturer reserves the right to modify the product specifications without notice.
ENGLISH
- When the Send Mail option appears, press ENTER.
- Select Yes and then press the ENTER to continue.
a. To look for history of email address sent before, select Directory inquiries, use ▲/▼
to select an email address, and then press ENTER.
b. To enter the email address directly, select Keyboard to display the virtual keyboard for
entering the Email address.
- Once you have entered an email address, press the ENTER to proceed. The “Sending
photo mail…” message appears.
- When the photo has been sent successfully, the “Send Success” message appears.
- If the photo is not sent successfully, the “Send Fail ” message appears on the screen.
Please verify the email address you entered.
- The photo frame automatically adds the new email address in the “Send Mail directory”.
3.3 Using Picasa™
- Press ▼ to highlight Picasa and press ENTER to enter.
- The screen will display public web albums that have been created on your Picasa™ account.
- Press ▲/▼/◄/► to select an album if you have multiple ones.
- Press ENTER to enter the selected album.
- To play photos in full screen single photo mode, press ENTER.
- To start running slideshow, press ENTER again.
- Press EXIT to exit.
Note:
- Once the Picasa™ account is configured, it will be highlighted.
- To copy a photo, select the photo in thumbnail mode and press the COPY/DEL to select
Copy One to copy the selected image to Internal Memory or Memory Card, then press
ENTER to proceed.
3.4 Using Flickr™
The photo frame is limited to access public photos from Flickr™ account owners over the age
of 18. For details, review the terms and conditions of use on Flickr’s web site.
- Press ▼ to highlight Flickr and press ENTER to enter.
- The screen will display public web albums that have been created on your Flickr™ account.
- Press ▲/▼/◄/► to select an album if you have multiple ones.
- Press ENTER to enter the selected album.
- To play photos in full screen single photo mode, press ENTER.
- To start running slideshow, press ENTER again.
- Press EXIT to exit.
Note:
- Once the Flickr™ account is configured, it will be highlighted.
- To copy a photo, select the photo in thumbnail mode and press the COPY/DEL to select
Copy One to copy the selected image to Internal Memory or Memory Card, then press
ENTER to proceed.

13
Non contractual document subject to change in case of typographical errors (Mktg0810) COPYRIGHT SOPEG 2010
The manufacturer reserves the right to modify the product specifications without notice.
ENGLISH
V. Settings
In the main menu, press the ◄/► to select Settings and press ENTER to enter the setup menu to set
the operating parameters of your frame.
- Light sensor (On/Off)
- Slideshow frequency (5, 10, 30 seconds, 1 minute, 1 hour, 1 day)
- Transition effect (No effect, Random, Fade out, Fade in, Left to Right, Horizontal open,
Horizontal close)
- Date & Time setting (Year, Month, Day, Hour, Minute, Time Format)
- Alarm setting (Alarm on/off, Alarm hour, Alarm minute, Volume, Tone, Day)
- Languages (English, French, German, Italian, Dutch, Portuguese and Spanish)
- On/Off schedule (Auto On/Off, Auto on hour, Auto on minute, Auto off hour, Auto off minute)
- Display (Brightness, Contrast)
- Photo view options (Original, Fit to screen)
- Copy option (Original size, Reduce size)
- Default settings (EXIT, OK)
- Clear internal memory
VI. Safety instructions
Handle the digital photo frame with care, and avoid touching the screen; fingerprints are difficult to
remove.
Always set the digital photo frame on a flat and stable surface to prevent it from falling and being
damaged.
Avoid exposing the digital photo frame to the sun or high temperatures, as these may damage the
frame or reduce its operational life. Do not place it near heat sources like radiators or space heaters. Do
not position the frame facing direct sunlight in order to avoid reflections.
Avoid exposing the digital photo frame to rain, water, or moisture. Do not place it in a sink or basin
where it may come in contact with water.
Never place heavy or sharp objects on the frame, the screen, or the frame’s power supply.
Make sure not to plug the digital photo frame into an outlet or cord with a power supply that is too high.
This may cause overheating, a fire, or electrical shock.
Be careful of the location of the power cord; it must not be walked on or come in contact with other
objects. Do not place the cord under a rug. Regularly check the condition of the cord to prevent
damage. If the cord is damaged, unplug it and replace it.

14
Non contractual document subject to change in case of typographical errors (Mktg0810) COPYRIGHT SOPEG 2010
The manufacturer reserves the right to modify the product specifications without notice.
ENGLISH
Ventilation
The openings and spaces for memory cards allow the frame to vent.
To ensure optimal use of the frame and to prevent overheating, these openings must not be covered or
blocked.
Keep the digital frame at a sufficient distance from the wall to ensure it vents.
Do not place the digital photo frame on a bed or sofa so that it does not overheat. Caution!
Never remove the plastic cover on the back of the frame. The digital photo frame has electrical circuits
and you could be hurt if you touch them.
Do not try to repair the digital photo frame by yourself.
IMPORTANT: This equipment should be installed and operated with minimum distance 20cm between
the radiator and your body.
VII. Warranty
The warranty does not cover damage caused if you (or any unauthorized person) tried to repair the
frame.
If the frame is emitting smoke, noise, or an unusual smell, immediately turn it off and unplug it. Contact
your store.
If you do not use the digital frame for a while, make sure to unplug the power cord.
The warranty concerns the digital photo frame and does not include the accessories. The following are
considered accessories:
The power supply unit,
The remote control (according to model).
However, these accessories may be ordered from our technical division:
By email: assistance@sopeg.fr
Warranty period
This digital frame is under warranty for 12 months. The warranty period begins on the date the frame is
purchased.
The warranty must be proven by presenting the original invoice or receipt on which the date and model
purchased appear.
Coverage
A defective digital frame must be returned complete to your distributor with an explanation.
If this digital frame presents a defect during the warranty period, the authorized After-Sales Service will
repair any defective component or manufacturing defect. The After-Sales Service will unilaterally decide
whether to repair or replace the digital frame, in part or in whole.
The initial purchase date will determine the starting date for the warranty period.
If the digital frame is repaired or exchanged by our After-Sales Service, the warranty period is not
extended.

15
Non contractual document subject to change in case of typographical errors (Mktg0810) COPYRIGHT SOPEG 2010
The manufacturer reserves the right to modify the product specifications without notice.
ENGLISH
Exclusions
Damage or defects caused by the improper use or handling of the digital frame, or by the use of
accessories, which are not original or not recommended in these instructions, are not covered by the
warranty.
The warranty does not cover damage caused by outside elements, like lightning, water, or fire, or any
other damage caused during transport.
No warranty coverage may be claimed if the digital frame’s serial number has been modified, removed,
erased, or made illegible.
No warranty coverage may be claimed if the digital frame has been repaired, altered, or modified by the
buyer or any repair personnel not officially qualified and authorized.
The manufacturer does not guarantee the technical properties described in this manual. The hardware
and accessories described in this manual are subject to change without advance notice. For this reason,
the manufacturer reserves the right to change the related documents, components, options, and
characteristics without advance notice.
Compliance with current regulations:
This digital frame complies with current CE marking standards, and is compatible with the RoHS
standard.
Recycling end-of-life electrical equipment and electronics
Used electrical and electronic devices must not be discarded with ordinary household refuse.
The presence of the symbol on the product or its packaging serves as a reminder of this.
Some materials constituting this product may be recycled if you take them to an appropriate recycling
centre. By reusing the components and raw materials of old devices, you contribute significantly to
protecting the environment.
For further information on collection sites for used equipment, you can enquire at your city hall, the
waste treatment department, or the shop where you purchased the product.

16
Non contractual document subject to change in case of typographical errors (Mktg0810) COPYRIGHT SOPEG 2010
The manufacturer reserves the right to modify the product specifications without notice.
ENGLISH
VIII. Specifications
Specifications DPF 9332 DIAMOND
Screen size 8.4˝ (21.3 cm)
Resolution 800 x 600
Screen type LED
Image ratio 4/3
Internal memory 2 GB
Audio/video YES
Cards supported SD/MMC,SDHC, MS, XD, USB sticks
Files supported JPEG, BMP/WAV, MP3/MPEG1,4, MOTION JPEG
Auto resizing YES
Auto rotation YES
Power input 100-240 V AC 50/60 Hz
Power output 5V DC 2Ah
Energy consumption while in standby <1W
Energy consumption while in use <8W
Dimensions 226*176*25mm
Weight 574 g
System compatibility Windows XP, Vista, 7, Mac OS 9.0 & followings
Wi-Fi compatibility 802.11 b/g
Wi-Fi is a registered trademark of the Wi-Fi Alliance.
Flickr and Yahoo! MAIL are trademarks of Yahoo, Inc., registered in the U.S. and other countries.
Picasa and Gmail are trademarks of Google, Inc., registered in the U.S. and other countries.
All other product or service names are the property of their respective owners.
TELEFUNKEN licensed by TELEFUNKEN Licenses GmbH.

1
Document non contractuel soumis à modifications en cas d’erreurs typographiques (Mktg0810) COPYRIGHT SOPEG 2010
Le fabricant se réserve le droit de modifier les caractéristiques du produit sans préavis.
FRANCAIS
MODE D’EMPLOI CADRE PHOTOS NUMERIQUES
TELEFUNKEN DPF 9332 DIAMOND
I. Découvrez et installez votre cadre ......................................................2
1. Contenu de la boîte ......................................................................................................... 2
2. Schémas............................................................................................................................ 3
3. Télécommande................................................................................................................. 3
4. Installation ......................................................................................................................... 4
II. Utilisez votre cadre.................................................................................4
1. Sélection de la langue ..................................................................................................... 4
2. Le mode “ECO LOGIC”................................................................................................... 4
3. Lecture d’une carte mémoire ou d’une clé USB ......................................................... 5
III. Sélection du type de fichiers à lire.......................................................5
1. Mémoire interne/support amovible ............................................................................... 5
2. Photos................................................................................................................................5
3. Vidéos ................................................................................................................................6
4. Musique ............................................................................................................................. 6
5. Calendrier .......................................................................................................................... 6
6. Copie de photos, de vidéos et de musiques vers la mémoire interne ou la
carte mémoire................................................................................................................... 7
7. Suppression de photos depuis le mode Miniatures ................................................... 7
8. Classement des photos depuis le mode Miniatures................................................... 7
IV. WI-FI®........................................................................................................8
1. Configuration Wi-Fi.......................................................................................................... 8
2. Configuration des comptes ............................................................................................ 9
3. Applications Wi-Fi.......................................................................................................... 11
V. Réglages ................................................................................................13
VI. Instructions de sécurité.......................................................................14
VII. Garantie..................................................................................................14
VIII. Caractéristiques techniques...............................................................16

2
Document non contractuel soumis à modifications en cas d’erreurs typographiques (Mktg0810) COPYRIGHT SOPEG 2010
Le fabricant se réserve le droit de modifier les caractéristiques du produit sans préavis.
FRANCAIS
AVERTISSEMENT PREALABLE :
A la mise en route de votre cadre, le cadre affiche l’animation de
démonstration. Pour en sortir et accéder aux fonctions du cadre,
appuyez simplement sur la touche « SETUP » de votre
télécommande, ou pressez et maintenez enfoncée la touche ◄
(gauche) du cadre photo numérique pendant 3,5 secondes pour
quitter le mode Démonstration.
Ce manuel est un guide rapide d’utilisation. Vous pouvez, si vous
souhaitez avoir plus de détails sur la manipulation du cadre,
télécharger le mode d’emploi complet à l’adresse suivante :
http://www.telefunken-digital.com
I. Découvrez et installez votre cadre
Vous venez d’acheter un cadre photo numérique TELEFUNKEN « Série DIAMOND » et nous vous en
remercions. Avant d’utiliser votre appareil, veuillez consulter le présent mode d’emploi et le conserver
afin de pouvoir vous y reporter ultérieurement.
1. Contenu de la boîte
- 1 Cadre photo numérique
- 1 Adaptateur secteur
- 1 Télécommande
- 1 Chiffonette
- 1 Guide de démarrage rapide
3
Document non contractuel soumis à modifications en cas d’erreurs typographiques (Mktg0810) COPYRIGHT SOPEG 2010
Le fabricant se réserve le droit de modifier les caractéristiques du produit sans préavis.
FRANCAIS
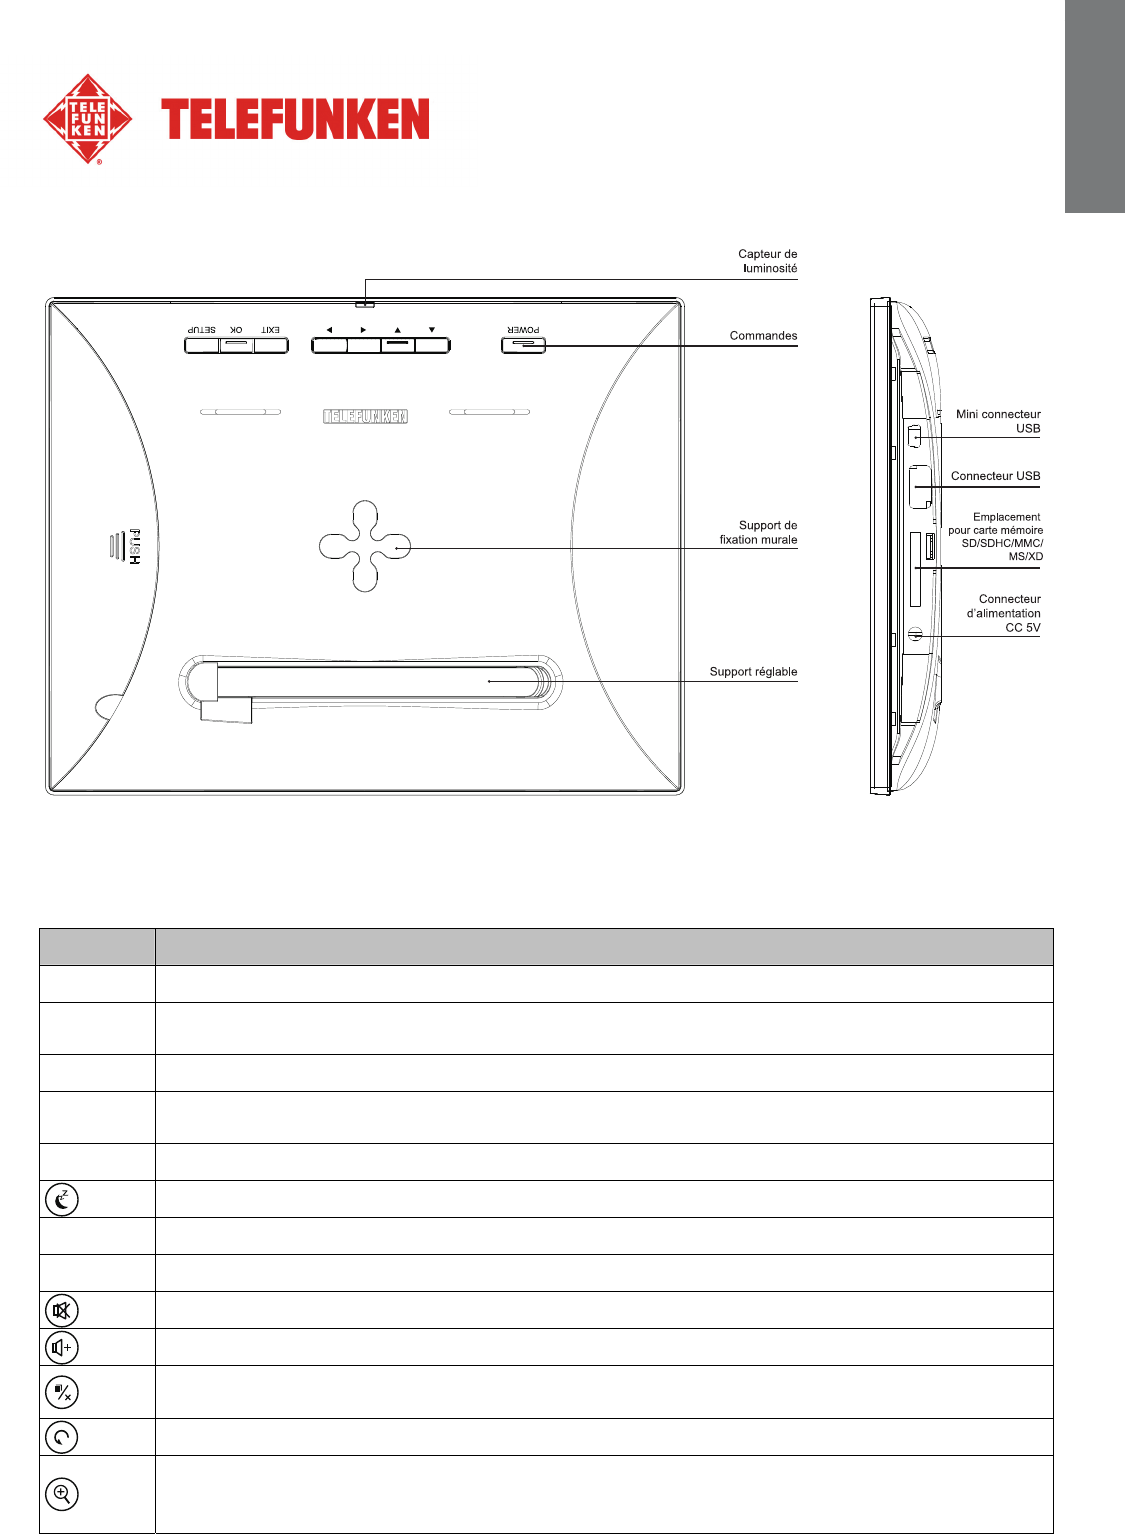
2. Schémas
3. Télécommande
Toutes les fonctions peuvent être contrôlées depuis la télécommande. Utilisez les touches suivantes
pour accéder aux différentes fonctions :
Touche Fonction
▲ Pour sélectionner l’option supérieure du menu.
◄ Pour sélectionner l’option de gauche du menu/sélectionner le fichier précédent (photo,
musique ou vidéo).
▼ Pour sélectionner l’option inférieure du menu.
► Pour sélectionner l’option de droite du menu/sélectionner le fichier suivant (photo,
musique ou vidéo).
ENTER Pour confirmer votre sélection ou sélectionner un autre mode.
Pour mettre en marche le cadre photo numérique ou activer le mode Attente.
EXIT Pour quitter le menu affiché et revenir au menu précédent.
STOP Pour arrêter la lecture du fichier (photo, musique ou vidéo) et revenir au menu principal.
Pour activer/désactiver le son, l’indicateur Muet s’affiche lorsque le son est désactivé.
Pour augmenter le volume, le niveau de volume s’affiche dès la pression de cette touche.
(COPY/DEL) Pour accéder aux fonctions de copie, suppression et classement (seulement
sous le menu principal).
(ROTATE) Pour effectuer une rotation sur image de 90°.
Pour agrandir l’image, appuyez de manière répétée sur cette touche pour permuter entre
les différents modes de zoom : x2, x4, x8 et x16 ; appuyez à nouveau sur cette touche
pour afficher l’image sous sa taille normale.

4
Document non contractuel soumis à modifications en cas d’erreurs typographiques (Mktg0810) COPYRIGHT SOPEG 2010
Le fabricant se réserve le droit de modifier les caractéristiques du produit sans préavis.
FRANCAIS
Touche Fonction
Pour diminuer le volume, le niveau de volume s’affiche dès la pression de cette touche.
SETUP Pour directement accéder au menu Réglages
4. Installation
- Sortez votre cadre et ses accessoires de leur emballage.
- Otez le film plastique de protection sur la façade du cadre.
- Tirez sur la languette plastique destinée à protéger les contacts de la télécommande.
- Posez le cadre à l’endroit souhaité en tirant vers vous le pied ajustable (voir schéma p.2).
- Connectez le cordon secteur au cadre à l’emplacement prévu à cet effet.
- Branchez votre cadre sur une prise de courant.
- Votre cadre se met en route automatiquement.
II. Utilisez votre cadre
1. Sélection de la langue
A la mise en route de votre cadre, le cadre affiche l’animation de démonstration. Pour en sortir et
accéder aux fonctions du cadre, appuyez simplement sur la touche « SETUP » de votre télécommande.
L’écran de sélection des langues s’affiche alors.
- Sélectionnez votre langue à l’aide des touches fléchées de la télécommande puis appuyez sur
« ENTER ».
Une fois votre langue sélectionnée, votre cadre est prêt à être utilisé. Il vous suffit d’insérer une carte ou
une clé USB pour commencer à lire vos images.
Attention : l’animation de démonstration se trouve dans un dossier nommé « DEMO ». Il est
préférable de le supprimer pour conserver la totalité de l’espace mémoire.
2. Le mode “ECO LOGIC”
Le mode ECO LOGIC associe 3 éléments essentiels permettant une réduction de la consommation
d’énergie de plus de 40% par rapport à un cadre standard :
- Un écran LED, moins gourmand en énergie tout en améliorant la qualité de l’image
- Un adaptateur secteur basse consommation certifié « Energy Star »
- Un capteur de luminosité
Ce capteur, activé par défaut, permet à votre cadre photo de s’éteindre automatiquement lorsqu’il fait
nuit, et de s’allumer avec le jour.
Vous pouvez désactiver ce capteur de luminosité dans le menu de réglages système de votre cadre
Attention : Suivant l’endroit où le cadre est positionné (dans un meuble sous une étagère par exemple, il
est possible que la lumière ne soit pas suffisante pour que le cadre se mette en route ou bien encore
qu’il s’éteigne inopinément. Pour le réactiver, il suffit de le présenter à une source de lumière suffisante
durant 2-3 secondes.

5
Document non contractuel soumis à modifications en cas d’erreurs typographiques (Mktg0810) COPYRIGHT SOPEG 2010
Le fabricant se réserve le droit de modifier les caractéristiques du produit sans préavis.
FRANCAIS
3. Lecture d’une carte mémoire ou d’une clé USB
Si votre cadre est éteint :
- Insérez votre carte ou votre clé USB à l’emplacement prévu à cet effet.
- Mettez votre cadre sous tension : Le diaporama lit automatiquement le contenu de votre carte
mémoire ou de votre clé USB.
Lorsque le cadre photo est en marche et le diaporama des fichiers contenus dans la mémoire
interne est en cours de lecture :
- La carte mémoire n’est pas automatiquement détectée.
1. Appuyez sur la touche EXIT pour quitter le diaporama, les fichiers s’affichent sous forme de
miniatures.
2. Appuyez à nouveau sur la touche EXIT pour quitter l’explorateur de fichiers de la mémoire
interne et revenir au menu Photo.
3. Appuyez sur la touche ▼ pour mettre en surbrillance le périphérique USB ou la carte mémoire
insérée puis appuyez sur la touche ENTER pour afficher le contenu du support sous forme de
miniatures.
4. Appuyez sur la touche ENTER pour afficher en plein écran la photo sélectionnée.
5. Appuyez de manière répétée sur la touche ENTER pour permuter entre les modes
Unique, Diaporama musical et Diaporama seul.
6. Appuyez sur la touche EXIT pour quitter le diaporama, les fichiers s’affichent sous forme de
miniatures.
III. Sélection du type de fichiers à lire
1. Mémoire interne/support amovible
Lorsqu’aucun support n’est inséré, le diaporama des fichiers contenus dans la mémoire interne de
l’unité se lance automatiquement dès la mise en marche de l’unité.
Lorsqu’une carte mémoire ou une clé USB est insérée, la lecture du contenu de la carte mémoire se
lance automatiquement dès la mise en marche de l’unité. Dans ce cas, vous pouvez permuter entre le
contenu de la carte mémoire et celui de la mémoire interne de la manière suivante :
- Appuyez de manière répétée sur la touche EXIT de la télécommande pour accéder à
l’interface de sélection du support.
- Utilisez les touches ▲/▼ de la télécommande pour sélectionner le support à lire.
- Appuyez sur la touche ENTER pour confirmer.
2. Photos
- Appuyez autant de fois que nécessaire sur la touche EXIT de la télécommande pour
afficher l’interface de sélection du support.
- Utilisez les touches ▲/▼ de la télécommande pour sélectionner le support à lire.
- Utilisez les touches ◄ ► pour sélectionner l’option Photo.
- Appuyez sur la touche ENTER pour afficher les photos sous forme de miniatures.
- Appuyer à nouveau sur la touche ENTER pour démarrer la lecture.
- Appuyez de manière répétée sur la touche ENTER pour permuter entre les modes
Unique, Diaporama musical et Diaporama seul.

6
Document non contractuel soumis à modifications en cas d’erreurs typographiques (Mktg0810) COPYRIGHT SOPEG 2010
Le fabricant se réserve le droit de modifier les caractéristiques du produit sans préavis.
FRANCAIS
3. Vidéos
- Appuyez autant de fois que nécessaire sur la touche EXIT de la télécommande pour
afficher l’interface de sélection du support.
- Utilisez les touches ▲/▼ de la télécommande pour sélectionner le support à lire.
- Utilisez les touches ◄/► pour sélectionner l’option Vidéo.
- Appuyez sur la touche ENTER pour afficher la liste des vidéos.
- Appuyez à nouveau sur la touche ENTER pour démarrer la lecture du premier fichier vidéo
ou sélectionnez le fichier vidéo désiré à l’aide des touches ▲/▼.
- En cours de lecture, utilisez les touches ▲/▼ pour sélectionner le fichier vidéo précédent
ou suivant, utilisez les touches ◄/► pour effectuer un rembobinage ou une avance rapide.
Utilisez les touches / pour régler le volume, vous pouvez également appuyer sur la
touche MUTE pour activer/désactiver le son.
- Appuyez sur la touche ENTER pour mettre en pause la lecture, appuyez à nouveau sur
cette touche pour reprendre la lecture.
- Appuyez sur la touche EXIT pour quitter ce mode.
4. Musique
- Appuyez autant de fois que nécessaire sur la touche EXIT de la télécommande pour
afficher l’interface de sélection du support.
- Utilisez les touches ▲/▼ de la télécommande pour sélectionner le support à lire.
- Utilisez les touches ◄/► pour sélectionner l’option Musique.
- Appuyez sur la touche ENTER pour afficher la liste des musiques.
- Appuyez à nouveau sur la touche ENTER pour démarrer la lecture du premier fichier
musique ou sélectionnez le fichier musique désiré à l’aide des touches ▲/▼.
- En cours de lecture, utilisez les touches ▲/▼ pour sélectionner le fichier musique
précédent ou suivant. Utilisez les touches / pour régler le volume, vous pouvez
également appuyer sur la touche MUTE pour activer/désactiver le son.
- Appuyez sur la touche ENTER pour mettre en pause la lecture, appuyez à nouveau sur
cette touche pour reprendre la lecture.
- Appuyez sur la touche EXIT pour quitter ce mode.
5. Calendrier
- Appuyez autant de fois que nécessaire sur la touche EXIT de la télécommande pour
afficher l’interface de sélection du support.
- Utilisez les touches ◄/► pour sélectionner l’option Calendrier.
- Appuyez à nouveau sur la touche ENTER pour accéder à l’interface d’aperçu du calendrier,
le diaporama se lance automatiquement.
- Appuyez à nouveau sur la touche ENTER pour accéder au mode Plein écran, appuyez de
manière répétée sur la touche ENTER pour permuter entre les modes Unique
et Diaporama seul. Utilisez les touches ► et ◄ pour sélectionner la photo
suivante/précédente.
- Appuyez sur la touche EXIT pour quitter le mode Plein écran.
Remarque :
Lorsqu’une alarme est définie, l’indicateur de l’alarme s’affiche sur l’interface du calendrier.

7
Document non contractuel soumis à modifications en cas d’erreurs typographiques (Mktg0810) COPYRIGHT SOPEG 2010
Le fabricant se réserve le droit de modifier les caractéristiques du produit sans préavis.
FRANCAIS
6. Copie de photos, de vidéos et de musiques vers la mémoire interne
ou la carte mémoire
Copier des photos, vidéos et musiques en mode Miniatures
Via cette méthode, vous pouvez copier plusieurs photos, musiques ou vidéos ou la totalité de celles-ci,
redimensionner les photos afin de les adapter à la résolution de l’écran du cadre photo et ainsi
optimiser l’espace mémoire de la mémoire interne.
Le mode opératoire est similaire pour les autres types de fichiers, nous prendrons ici les fichiers photo
à titre d’exemple :
- Copie de photos
1. Appuyez autant de fois que nécessaire sur la touche EXIT de la télécommande pour afficher
l’interface de sélection du support.
2. Appuyez sur la touche ▼ pour sélectionner le support amovible ou la mémoire interne contenant
les photos à copier.
3. Utilisez les touches ◄/► pour sélectionner l’option Photo puis appuyez sur la touche ENTER.
4. Utilisez les touches ▲/▼/◄/► pour sélectionner la photo à copier.
5. Appuyez sur la touche COPY/DEL. COPIER/SUPPRIMER/CLASSER s’affiche à l’écran.
Utilisez les touches ◄/► pour sélectionner COPIER puis appuyez sur la touche ENTER.
6. Utilisez la touche ▼ pour sélectionner Copier une ou Tout copier puis appuyez sur la touche
ENTER pour confirmer.
7. Appuyez sur la touche ENTER pour sélectionner Oui et copier les photos vers la Carte
mémoire ou la Mémoire interne, vous pouvez également appuyer sur ▼ pour sélectionner Non
et annuler la copie.
7. Suppression de photos depuis le mode Miniatures
Il est possible de supprimer des photos contenues dans la mémoire interne de l’unité ou dans un
support amovible.
1. Appuyez autant de fois que nécessaire sur la touche EXIT de la télécommande pour afficher
l’interface de sélection du support.
2. Appuyez sur la touche ▼ pour sélectionner la mémoire interne de l’unité ou un support amovible.
3. Utilisez les touches ◄/► pour sélectionner l’option Photo puis appuyez sur la touche ENTER.
4. Utilisez les touches ▲/▼/◄/► pour sélectionner la photo à supprimer.
5. Appuyez sur la touche COPY/DEL. COPIER/SUPPRIMER/CLASSER s’affiche à l’écran.
Utilisez les touches ◄/► pour sélectionner SUPPRIMER puis appuyez sur la touche ENTER.
6. Utilisez la touche ▼ pour sélectionner Suppr. une ou Tout suppr. puis appuyez sur la touche
ENTER pour confirmer.
7. Appuyez sur la touche ENTER pour sélectionner Oui et supprimer les photos ou appuyez sur ▼
pour sélectionner Non et annuler la suppression.
8. Classement des photos depuis le mode Miniatures
Il est possible de classer les photos contenues dans la mémoire interne de l’unité ou dans un support
amovible.
1. Appuyez autant de fois que nécessaire sur la touche EXIT de la télécommande pour afficher
l’interface de sélection du support.
2. Appuyez sur la touche ▼ pour sélectionner la mémoire interne de l’unité ou un support amovible.
3. Utilisez les touches ◄/► pour sélectionner l’option Photo puis appuyez sur la touche ENTER.
4. Appuyez sur la touche COPY/DEL. COPIER/SUPPRIMER/CLASSER s’affiche à l’écran.
Utilisez les touches ◄/► pour sélectionner CLASSER puis appuyez sur la touche ENTER.

8
Document non contractuel soumis à modifications en cas d’erreurs typographiques (Mktg0810) COPYRIGHT SOPEG 2010
Le fabricant se réserve le droit de modifier les caractéristiques du produit sans préavis.
FRANCAIS
5. Appuyez sur la touche ▼ pour sélectionner parmi 6 IMG, 12 IMG ou 30 IMG et afficher 6, 12 ou
30 miniatures par page, appuyez sur la touche ENTER pour confirmer.
IV. WI-FI®
Pour apprécier les services Internet inclus tels que Picasa™, Flickr® depuis le cadre photo numérique, il
est nécessaire de créer un compte sur le service Internet que vous souhaitez utiliser. Avant la première
utilisation de la fonction Wi-Fi du cadre photo, suivez les instructions ci-dessous pour configurer votre
connexion Wi-Fi® et votre compte, de manière à pouvoir ensuite utiliser les services Internet disponibles
dans la liste Wi-Fi.
1. Configuration Wi-Fi
Appuyez autant de fois que nécessaire sur la touche EXIT de la télécommande pour afficher l’interface
de sélection du support.
Utilisez les touches ◄/► pour sélectionner Wi-Fi puis appuyez sur la touche ENTER.
Utilisez les touches ► pour mettre en surbrillance Régl Wi-Fi puis appuyez sur la touche ENTER pour
accéder au sous-menu.
Naviguez dans le menu Régl Wi-Fi à l’aide des touches ▲/▼.
1.1 Si l’adressage d’adresse IP de votre réseau est automatique
- Dans le sous-menu Régl Wi-Fi, sélectionnez DHCP pour effectuer une connexion
automatique.
- L’interface de sélection du point d’accès s’affiche et liste les points d’accès environnants
disponibles.
- Utilisez les touches ▲/▼ pour sélectionner le point d’accès auquel vous souhaitez vous
connecter, appuyez ensuite sur la touche ENTER.
1. Une fois la connexion établie à un point d’accès non protégé par mot de passe (réseau
non protégé) « Connexion établie » s’affiche à l’écran.
2. Pour se connecter à un réseau protégé par mot de passe (réseau protégé), il est
nécessaire de saisir le mot de passe dans l’interface Clavier affichée.
Saisissez le mot de passe dans le champ Key. Une fois la saisie terminée,
sélectionnez Done puis appuyez sur la touche ENTER. Une fois le correct mot de passe
saisi, « Connexion établie » s’affiche à l’écran.
Lorsque le mot de passe saisi est erroné, « Erreur de connexion Veuillez réessayer. »
s’affiche.
- Une fois la connexion établie, l’indicateur s’affiche sur le coin supérieur droit de l’écran.
L’adresse IP, la passerelle, le serveur DNS et l’adresse MAC s’affichent sur la partie inférieure
de l’écran.
- Une fois la connexion Wi-Fi® définie sur DHCP, le cadre photo numérique se connecte
automatiquement au réseau Wi-Fi dès sa mise en marche.
Astuces : Mode opératoire du clavier virtuel
- Utilisez les touches ◄/►/▲/▼ pour sélectionner une option, appuyez sur la touche ENTER
pour confirmer.
- Sélectionnez shift puis appuyez sur la touche ENTER pour permuter entre les majuscules et
les minuscules.
- Sélectionnez Backspace puis appuyez sur la touche ENTER pour corriger la saisie.

9
Document non contractuel soumis à modifications en cas d’erreurs typographiques (Mktg0810) COPYRIGHT SOPEG 2010
Le fabricant se réserve le droit de modifier les caractéristiques du produit sans préavis.
FRANCAIS
- Sélectionnez space puis appuyez sur la touche ENTER pour saisir un espace.
- Pour accéder au champ suivant ou sélectionner un autre champ, sélectionnez Done puis
appuyez sur la touche ENTER.
1.2 Si vous utilisez une adresse IP fixe
- Dans le menu Régl Wi-Fi, sélectionnez Adresse IP statique.
- L’interface de sélection du point d’accès s’affiche.
- Utilisez le clavier pour saisir votre adresse IP, le masque de sous-réseau, la passerelle et le
serveur DNS.
- Une fois la saisie terminée, sélectionnez Done puis appuyez sur la touche ENTER.
- Une fois la connexion établie, l’indicateur s’affiche sur le coin supérieur droit de l’écran.
L’adresse IP, la passerelle, le serveur DNS et l’adresse MAC s’affichent sur la partie inférieure
de l’écran.
- Une fois la connexion Wi-Fi® définie sur Adresse IP statique, les paramètres saisis dans la
page Sélection d’un point d’accès sont mémorisés. Il est cependant nécessaire, à chaque
mise en marche du cadre photo, de sélectionner Done sous la page Choisir PA et d’appuyer
de manière répétée sur la touche ENTER pour se connecter manuellement au réseau Wi-Fi.
Astuces : Mode opératoire du clavier virtuel
- Utilisez les touches ◄/►/▲/▼ pour sélectionner une option, appuyez sur la touche ENTER
pour confirmer.
- Sélectionnez NEXT puis appuyez sur la touche ENTER pour déplacer le curseur vers l’avant.
- Sélectionnez Prev puis appuyez sur la touche ENTER pour déplacer le curseur vers l’arrière.
- Pour accéder au champ suivant ou sélectionner un autre champ, sélectionnez Done puis
appuyez sur la touche ENTER.
- Sélectionnez puis appuyez sur la touche ENTER pour corriger la saisie.
1.3 Etat de la connexion Wi-Fi
- Revenez au menu Régl Wi-Fi puis sélectionnez Vérification Wi-Fi.
- Appuyez sur la touche ENTER pour afficher le menu de vérification, les erreurs de connexion
survenues et l’état de la connexion.
- Lorsqu’une erreur survient, reconnectez-vous au point d’accès ou réinitialisez les paramètres
Wi-Fi.
2. Configuration des comptes
2.1 Configuration de votre compte Picasa™
Remarque : avant d’effectuer les réglages suivants, il est nécessaire de préalablement créer un
compte Picasa™ en ligne si vous ne possédez actuellement aucun compte. Accédez à
l’adresse www.picasa.google.com
- Appuyez autant de fois que nécessaire sur la touche EXIT de la télécommande pour afficher
l’interface de sélection du support.
- Utilisez les touches ◄/► pour sélectionner Wi-Fi puis appuyez sur la touche ENTER.
- Utilisez la touche ► pour mettre en surbrillance Conf. compte puis appuyez sur la touche
ENTER pour accéder au sous-menu.
- Appuyez sur la touche ▼ pour mettre en surbrillance le service Picasa puis appuyez sur la
touche ENTER pour y accéder.
- Dans l’interface du clavier virtuel affichée, saisissez le nom de votre compte dans le champ
Compte.

10
Document non contractuel soumis à modifications en cas d’erreurs typographiques (Mktg0810) COPYRIGHT SOPEG 2010
Le fabricant se réserve le droit de modifier les caractéristiques du produit sans préavis.
FRANCAIS
- Utilisez les touches ◄/►/▲/▼ pour sélectionner Done, appuyez ensuite sur la touche
ENTER pour accéder au champ suivant.
- Saisissez le mot de passe dans le champ Mot de passe.
- Utilisez les touches ◄/►/▲/▼ pour sélectionner Done, appuyez ensuite sur la touche
ENTER pour terminer.
- Le service Picasa™ est désormais visible dans la Liste Wi-Fi.
2.2 Configuration de votre compte Flickr™
Remarque : avant d’effectuer les réglages suivants, il est nécessaire de préalablement créer un
compte Flickr™ en ligne si vous ne possédez actuellement aucun compte. Accédez à
l’adresse www.flickr.com
- Appuyez autant de fois que nécessaire sur la touche EXIT de la télécommande pour afficher
l’interface de sélection du support.
- Utilisez les touches ◄/► pour sélectionner Wi-Fi puis appuyez sur la touche ENTER.
- Utilisez la touche ► pour mettre en surbrillance Conf. compte puis appuyez sur la touche
ENTER pour accéder au sous-menu.
- Appuyez sur la touche ▼ pour mettre en surbrillance le service Flickr puis appuyez sur la
touche ENTER pour y accéder.
- Dans l’interface du clavier virtuel affichée, saisissez le nom de votre compte dans le champ
Adress email.
- Utilisez les touches ◄/►/▲/▼ pour sélectionner Done, appuyez ensuite sur la touche
ENTER pour terminer.
- Le service Flickr™ est désormais visible dans Liste Wi-Fi.
2.3 Configuration de votre compte courriel
Afin de prévenir toute perte de données contenues dans votre compte courriel,
N’utilisez PAS votre compte courriel personnel pour recevoir les courriels photo
envoyés depuis ce cadre photo.
Créez un nouveau compte de courrier électronique Gmail (« Google Mail » dans certains
pays/régions) puis utilisez-le afin de garantir les performances optimales du cadre photo.
Les paramètres du serveur Gmail sont pré configurés dans le cadre photo. Il est seulement
nécessaire de saisir le nom d’utilisateur et le mot de passe de votre compte courriel dans les
champs Compte et Mot de passe.
- Appuyez autant de fois que nécessaire sur la touche EXIT de la télécommande pour afficher
l’interface de sélection du support.
- Utilisez les touches ◄/► pour sélectionner Wi-Fi puis appuyez sur la touche ENTER.
- Utilisez la touche ► pour mettre en surbrillance Conf. compte puis appuyez sur la touche
ENTER pour accéder au sous-menu.
- Appuyez sur la touche ▼ pour mettre en surbrillance Conf.courriel puis appuyez sur la
touche ENTER pour accéder à l’interface de configuration du compte courriel.
- Saisissez le nom du compte dans le champ Compte. Sélectionnez Done puis appuyez sur la
touche ENTER.
- Saisissez le mot de passe dans le champ Mot de passe. Sélectionnez Done puis appuyez
sur la touche ENTER.
- Pour davantage d'informations sur la configuration du serveur courriel, consultez le tableau
suivant :

11
Document non contractuel soumis à modifications en cas d’erreurs typographiques (Mktg0810) COPYRIGHT SOPEG 2010
Le fabricant se réserve le droit de modifier les caractéristiques du produit sans préavis.
FRANCAIS
Gmail™ (« Google Mail » dans certains pays/régions)
Serv POP : pop.gmail.com
Port POP : 995
SSL : 1 (Différent de zéro = Oui, 0 = Non)
Serv SMTP : smtp.gmail.com
Port SMTP : 465
Compte : Votre compte Gmail (il n’est pas nécessaire de saisir @gmail.com)
Mot passe : Votre mot de passe.
Selon la configuration du serveur, les courriels peuvent être supprimés du serveur une fois
ceux-ci reçus sur le cadre photo.
Lorsque vous souhaitez utiliser un autre compte courriel, contactez votre administrateur réseau
ou fournisseur de service de réseau pour que celui-ci vous aide à configurer les paramètres de
votre nouveau compte courriel.
3. Applications Wi-Fi
Assurez-vous que l’unité est connectée à un réseau Wi-Fi.
Appuyez autant de fois que nécessaire sur la touche EXIT de la télécommande pour afficher l’interface
de sélection du support.
Utilisez les touches ◄/► pour sélectionner Wi-Fi puis appuyez sur la touche ENTER.
Utilisez la touche ► pour mettre en surbrillance Liste Wi-Fi puis appuyez sur la touche ENTER pour
accéder au sous-menu.
Naviguez dans le menu Liste Wi-Fi à l’aide des touches ▲/▼.
Lorsque les comptes Flickr™ et Picasa™ sont déjà configurés, ceux-ci sont mis en surbrillance,
autrementils sont grisés.
3.1 Application Météo
- Appuyez sur la touche ▼ pour mettre en surbrillance l’option Météo puis appuyez sur la
touche ENTER pour accéder au menu Météo, la prévision météo des 4 prochains jours
s’affiche automatiquement.
- Appuyez à nouveau sur la touche ENTER pour saisir le nom de la ville de votre choix,
appuyez sur la touche ENTER pour confirmer.
- La prévision météo de la ville sélectionnée s’affiche.
3.2 Application Courriel
- Appuyez sur la touche ▼ pour mettre en surbrillance l’option Courriel puis appuyez sur la
touche ENTER pour accéder au menu Courriel. La boîte de réception s’affiche. Utilisez les
touches ◄/► pour mettre en surbrillance le mode désiré.
3.2.1 Réception de courriels photo
- Appuyez sur la touche ► pour mettre en surbrillance l’option Bte.récep. puis appuyez sur
la touche ENTER pour confirmer.
- Le message « Vérification du courriel… » s’affiche. La boîte de réception est vide lorsque
vous n’avez reçu aucun courriel.
- La réception des nouveaux courriels est effectuée toutes les 5 minutes.
- Lorsque vous avez reçu un ou plusieurs courriel(s) photo, le message « Téléchargement
courriel photo… » s’affiche.

12
Document non contractuel soumis à modifications en cas d’erreurs typographiques (Mktg0810) COPYRIGHT SOPEG 2010
Le fabricant se réserve le droit de modifier les caractéristiques du produit sans préavis.
FRANCAIS
- Une fois le téléchargement terminé, la(les) photo(s) téléchargées sont enregistrées dans la
mémoire interne du cadre photo.
- Lorsque plusieurs courriels ont été reçus, la liste des courriels reçus s’affiche.
- Utilisez les touches ▲/▼ pour mettre en surbrillance le courriel à ouvrir. Appuyez sur la
touche ENTER pour ouvrir le courriel.
REMARQUE :
- N’éteignez pas le cadre photo lors de la réception de courriels. Autrement, ceci pourrait
causer une panne de la mémoire interne ainsi que la perte de toutes les données
contenues dans celle-ci.
- Lorsque l’espace mémoire de la mémoire interne devient insuffisant, la(les) photo(s) jointe(s)
au(x) courriel(s) ne seront pas téléchargées.
- Lorsque le message « Téléchargement courriel photo… » s’affiche, toutes les opérations
en cours telles que la copie de musique et de photos seront automatiquement
interrompues et annulées. Poursuivez manuellement ces opérations une fois le
téléchargement des courriels terminé.
3.2.2 Envoi d’une photo via courriel
- Appuyez sur la touche ► pour mettre en surbrillance l’option Env courriel puis appuyez
sur la touche ENTER pour confirmer.
- Utilisez les touches ▲/▼ pour sélectionner l’emplacement de stockage de la photo à
envoyer puis appuyez sur la touche ENTER pour accéder à l’explorateur de fichiers photo.
- Sous l’explorateur de photos, utilisez les touches ▲/▼/◄/► pour sélectionner la photo
désirée, appuyez ensuite sur la touche ENTER.
- Lorsque l’option Env courriel s’affiche, appuyez sur la touche ENTER.
- Sélectionnez Oui puis appuyez sur la touche ENTER pour continuer.
a. Pour afficher l’historique des adresses courriel d’envoi, sélectionnez Requêtes de
répertoires, utilisez les touches ▲/▼ pour sélectionner une adresse courriel puis
appuyez sur la touche ENTER.
b. Pour directement saisir une adresse courriel, sélectionnez Clavier pour afficher le
clavier numérique et saisir l’adresse courriel.
- Une fois l’adresse courriel saisie, appuyez sur la touche ENTER pour continuer. Le
message « Envoi courriel photo… » s’affiche.
- Une fois la photo envoyée, le message « Envoi réussi » s’affiche.
- Lorsque l’envoi de la photo échoue, le message « Échec de l'envoi » s’affiche. Veuillez
vérifier l'adresse courriel saisie.
- L’adresse courriel saisie est automatiquement ajoutée à « Boîte d'envoi ».
3.3 Application Picasa
- Appuyez sur la touche ▼ pour mettre en surbrillance le service Picasa puis appuyez sur la
touche ENTER pour y accéder.
- L’écran affiche les albums Internet publics créés avec votre compte Picasa™.
- Lorsque plusieurs albums sont présents, utilisez les touches ▲/▼/◄/► pour sélectionner
un album.
- Appuyez sur la touche ENTER pour accéder à l’album sélectionné.
- Appuyez sur la touche ENTER pour afficher les photos en plein écran à raison d’une
photo à la fois.
- Appuyez à nouveau sur la touche ENTER pour démarrer le diaporama.
- Appuyez sur la touche EXIT pour quitter.

13
Document non contractuel soumis à modifications en cas d’erreurs typographiques (Mktg0810) COPYRIGHT SOPEG 2010
Le fabricant se réserve le droit de modifier les caractéristiques du produit sans préavis.
FRANCAIS
Remarque :
- Le compte Picasa™ est mis en surbrillance une fois celui-ci configuré.
- Pour copier une photo, sélectionnez une photo en mode Miniatures puis appuyez sur la
touche COPY/DEL pour sélectionner Copier une pour copier l’image sélectionnée vers la
mémoire interne ou la carte mémoire, appuyez ensuite sur la touche ENTER pour continuer.
3.4 Application Flickr™
Depuis le cadre photo, il est seulement possible d’accéder aux photos publiques partagées par
des utilisateurs âgés d’au moins 18 ans. Pour davantage de détails, référez-vous aux
conditions d’utilisation figurant sur le site Internet du service Flickr™.
- Appuyez sur la touche ▼ pour mettre en surbrillance le service Flickr puis appuyez sur la
touche ENTER pour y accéder.
- L’écran affiche les albums Internet publics créés avec votre compte Flickr™.
- Lorsque plusieurs albums sont présents, utilisez les touches ▲/▼/◄/► pour sélectionner
un album.
- Appuyez sur la touche ENTER pour accéder à l’album sélectionné.
- Appuyez sur la touche ENTER pour afficher les photos en plein écran à raison d’une
photo à la fois.
- Appuyez à nouveau sur la touche ENTER pour démarrer le diaporama.
- Appuyez sur la touche EXIT pour quitter.
Remarque :
- Le compte Flickr est mis en surbrillance une fois celui-ci configuré.
- Pour copier une photo, sélectionnez la photo en mode Miniatures puis appuyez sur la
touche COPY/DEL pour sélectionner Copier une et copier l’image sélectionnée vers la
mémoire interne ou la carte mémoire, appuyez enfin sur la touche ENTER pour continuer.
V. Réglages
Sous le menu principal, utilisez les touches ◄/► pour sélectionner l’option Réglages puis appuyez sur
la touche ENTER pour accéder au menu Configuration et configurer les paramètres du cadre photo.
- Capteur de luminosité (activé/désactivé)
- Fréq. Diaporama (5, 10, 30 secondes, 1 minute, 1 heure, 1 jour)
- Effet transition (Sans effet, Aléatoire, Fondu enchainé, Gauche à droite, Ouvert. Horizont,
Fermet. horizont)
- Régl. date & heure (Année, Mois, Jour, Heure, Minute, Format heure)
- Réglage alarme (Alarme on/off, Heure alarme, Minutes alarme, Volume, Mélodie, Jour)
- Langues (Anglais, Français, Allemand, Italien, Hollandais, Portugais et Espagnol)
- Prog. March/Arrêt (March/Arr aut, Heure marche, Min. marche, Heure arrêt, Min. arrêt)
- Affichage (Luminosité, Contraste)
- Opt. vision.photos (Original, Adapter à l'écran)
- Option copie (Taille originale, Réduire taille)
- Régl. par défaut (SORTIE, OK)
- Effac. mém. interne

14
Document non contractuel soumis à modifications en cas d’erreurs typographiques (Mktg0810) COPYRIGHT SOPEG 2010
Le fabricant se réserve le droit de modifier les caractéristiques du produit sans préavis.
FRANCAIS
VI. Instructions de sécurité
Manipulez le cadre photo numérique avec précaution et évitez de toucher l’écran ; les traces de doigts
sont difficiles à enlever.
Placez toujours le cadre photo numérique sur une surface plane et stable pour éviter qu’il ne tombe et
ne soit endommagé.
Évitez d’exposer le cadre photo numérique au soleil ou aux températures élevées car ceci peut
endommager le cadre ou réduire sa durée d’utilisation.
Ne le placez pas près de sources de chaleurs telles que les radiateurs, les chauffages d’appoints…
Ne positionnez pas le cadre face aux rayons du soleil pour éviter les reflets.
Évitez d’exposer le cadre photo numérique à la pluie, l’eau ou l’humidité. Ne le placez pas dans un
évier ou dans un bassin où il pourrait entrer en contact avec l’eau.
Ne placez jamais d’objets lourds ou coupants sur le cadre, l’écran ou l’alimentation du cadre.
Veillez à ne pas brancher le cadre photo numérique sur une prise ou un cordon à l’alimentation trop
puissante. Ceci pourrait provoquer une surchauffe, un feu ou un choc électrique.
Veillez à l’emplacement du cordon d’alimentation ; celui-ci ne doit pas être piétiné ou en contact avec
d’autres objets. Ne placez pas le cordon sous un tapis. Vérifiez régulièrement l’état du cordon pour
éviter tout dommage. Si le cordon est endommagé, débranchez-le et remplacez-le.
Ventilation
Les emplacements pour cartes mémoires et les ouvertures permettent de ventiler le cadre.
Pour assurer une utilisation optimale du cadre et pour empêcher toute surchauffe, ces ouvertures ne
doivent pas être obstruées ou couvertes.
Gardez le cadre numérique à une distance suffisante du mur pour assurer sa ventilation.
Ne placez pas le cadre photo numérique sur un lit ou un canapé pour éviter toute surchauffe.
Attention !
Ne retirez jamais le capot en plastique situé à l’arrière du cadre. Le cadre photo numérique comporte
des circuits électriques et vous pouvez être blessé si vous les touchez.
Ne tentez pas de réparer votre cadre numérique seul.
IMPORTANT : Cet équipement doit être installé et utilisé à une distance minimale de 20 cm de votre
corps et de tout radiateur.
VII. Garantie
La garantie ne couvre pas les dommages causés si vous (ou toute personne non habilitée) avez tenté
de réparer le cadre.
Si le cadre émet de la fumée, un bruit ou une odeur inhabituelle, éteignez-le et débranchez-le
immédiatement. Contactez votre magasin.
Si vous n’utilisez pas le cadre numérique pendant quelques temps, veillez à débrancher le cordon
d’alimentation.
La garantie porte sur le cadre photo numérique et n’inclut pas les accessoires. Sont considérés comme
accessoires :
Le bloc d’alimentation secteur,
La télécommande (selon modèle).
Toutefois, ces accessoires peuvent être commandés auprès de notre service technique :
(05-45-60-82-51 prix d’un appel local ou par mail : assistance@sopeg.fr )

15
Document non contractuel soumis à modifications en cas d’erreurs typographiques (Mktg0810) COPYRIGHT SOPEG 2010
Le fabricant se réserve le droit de modifier les caractéristiques du produit sans préavis.
FRANCAIS
Période de garantie
Ce cadre numérique bénéficie d’une durée de garantie de 12 mois. La période de garantie débute à la
date d’achat du cadre.
La garantie doit être prouvée par la présentation de la facture d’origine ou du reçu sur lesquels
apparaissent la date et le modèle acheté.
Couverture
Un cadre numérique défectueux doit être retourné complet auprès de votre distributeur avec une note
explicative.
Si ce cadre numérique présente une défectuosité pendant la période de garantie, le Service Après
Vente agréé réparera tous les éléments défectueux ou tout défaut de fabrication. Le Service Après
Vente décidera unilatéralement de la réparation ou du remplacement du cadre numérique en intégralité
ou en partie.
La date d’achat initiale détermine la date de début de période de garantie
La période de garantie n’est pas prolongée en cas de réparation ou d’échange du cadre numérique par
notre Service Après vente.
Exclusion
Les dommages ou défauts causés par une mauvaise utilisation ou manipulation du cadre numérique et
par l’utilisation d’accessoires autres que ceux d’origine ou non recommandés par la présente notice ne
sont pas couverts par la garantie.
La garantie ne couvre pas les dommages causés par des éléments extérieurs comme la foudre, l’eau
ou le feu ou tout autre dommage causé pendant un transport.
Aucune prise sous garantie ne pourra être réclamée si le numéro de série du cadre numérique a été
modifié, enlevé, effacé ou rendu illisible.
Aucune prise sous garantie ne pourra être réclamée si le cadre numérique a été réparé, altéré ou
modifié par l’acquéreur ou tout autre réparateur non officiellement agréé et qualifié.
Le fabricant ne garantit pas les propriétés techniques décrites dans ce manuel. Le matériel et les
accessoires décrits dans ce manuel sont sujets à modification sans préavis. Pour cette raison, le
fabricant se réserve le droit de modifier les composants, les options, les caractéristiques et les
documents s’y rattachant sans préavis.
Conformité au règlement en vigueur :
Ce cadre numérique est conforme aux normes CE en vigueur et compatible avec la norme RoHS.
Recyclage des équipements électriques et électroniques en fin de vie.
Les appareils électriques et électroniques usagés ne doivent pas être éliminés avec les déchets
ménagers ordinaires. La présence de ce symbole sur le produit ou son emballage vous le rappelle.
Certains matériaux composants ce produit peuvent être recyclés si vous le déposez auprès d’un centre
de recyclage approprié. En réutilisant les pièces et matières premières des appareils usagés, vous
apportez une contribution importante à la protection de l’environnement.
Pour plus d’informations sur les lieux de collecte des équipements usagés, vous pouvez vous adresser
à votre mairie, au service de traitement des déchets usagés ou au magasin où vous acheté le produit.

16
Document non contractuel soumis à modifications en cas d’erreurs typographiques (Mktg0810) COPYRIGHT SOPEG 2010
Le fabricant se réserve le droit de modifier les caractéristiques du produit sans préavis.
FRANCAIS
VIII. Caractéristiques techniques
Caractéristiques DPF 9332 DIAMOND
Taille 8,4˝ (21,3 cm)
Définition 800 x 600
Type d’écran LED
Ratio image 4/3
Mémoire interne 2 Go
Audio/vidéo OUI
Cartes compatibles SD/MMC,SDHC, MS, XD, Clés USB
Fichiers lus JPEG, BMP/WAV, MP3/MPEG1,4, MOTION JPEG
Redimensionnement auto OUI
Rotation auto OUI
Entrée alimentation 100-240 V AC 50/60 Hz
Sortie alimentation 5V DC 2Ah
Consommation en veille <1W
Consommation en utilisation <8W
Dimensions 226*176*25mm
Poids 574 g
Compatibilité système Windows XP, Vista, 7, Mac OS 9.0 et suivants
Compatibilité Wi-Fi 802,11 b/g
Wi-Fi est une marche déposée de Wi-Fi Alliance.
Flickr et Yahoo! MAIL sont des marques déposées de Yahoo, Inc., enregistrées aux Etats-Unis et dans
d'autres pays.
Picasa et Gmail sont des marques déposées de Google, Inc., enregistrées aux Etats-Unis et dans
d’autre pays.
Tous les autres produits et noms de services figurant dans ce document sont la propriété de leurs
détenteurs respectifs.
TELEFUNKEN, utilisé sous licence par TELEFUNKEN Licenses GmbH.

1
Dokument ohne vertraglichen Charakter. Änderungen aufgrund von Druckfehlern bleiben vorbehalten (Mktg0810) COPYRIGHT SOPEG 2010
Hersteller behält sich das Recht vor, die Produktmerkmale ohne vorherige Benachrichtigung zu ändern.
DEUTSCH
GEBRAUCHSANWEISUNG FÜR DIGITALEN BILDERRAHMEN
TELEFUNKEN DPF 9332 DIAMOND
I. Auspacken und Installieren Ihres Bilderrahmens..............................2
1. Inhalt der Verpackung ..................................................................................................... 2
2. Abbildungen des Bilderrahmens.................................................................................... 3
3. Fernbedienung.................................................................................................................. 3
4. Installation ......................................................................................................................... 4
II. Benutzung Ihres Bilderrahmens...........................................................4
1. Sprachauswahl ................................................................................................................. 4
2. Der „ECO-Logic“ Modus ................................................................................................ 4
3. Lesen einer Speicherkarte oder eines USB-Sticks..................................................... 5
III. Auswahl der Abspielbaren Dateien......................................................5
1. Interner Speicher / entnehmbare Speichermedien ..................................................... 5
2. Bilder.................................................................................................................................. 5
3. Filme................................................................................................................................... 6
4. Musik.................................................................................................................................. 6
5. Kalender ............................................................................................................................ 6
6. Bild-, Film- oder Musikdateien auf den internen Speicher oder eine
Speicherkarte kopieren ................................................................................................... 7
7. Bilddateien löschen ......................................................................................................... 7
8. Bilddateien sortieren........................................................................................................ 7
IV. WI-FI®........................................................................................................8
1. Wi-Fi-Einstellungen.......................................................................................................... 8
2. Account-Konfiguration .................................................................................................. 10
3. Anwendungen mit Wi-Fi................................................................................................ 11
V. Einstellungen.........................................................................................13
VI. Sicherheitshinweise .............................................................................14
VII. Garantie..................................................................................................15
VIII. Technische Merkmale..........................................................................16

2
Dokument ohne vertraglichen Charakter. Änderungen aufgrund von Druckfehlern bleiben vorbehalten (Mktg0810) COPYRIGHT SOPEG 2010
Hersteller behält sich das Recht vor, die Produktmerkmale ohne vorherige Benachrichtigung zu ändern.
DEUTSCH
HINWEIS FÜR DEN NUTZER:
Bei Inbetriebnahme des Rahmens wird die Demo-Animation
angezeigt. Um diese zu verlassen und auf die Funktionen des
Rahmens zuzugreifen, drücken Sie einfach die Taste
„SETUP“ Ihrer Fernbedienung, oder drücken und halten Sie die
Taste ◄ (links) auf dem digitalen Bilderrahmen für 3,5 Sekunden
gedrückt, um den Demo-Modus zu verlassen.
Dieses Handbuch ist eine Kurzbedienungsanleitung. Wenn Sie
ausführlichere Hinweise zur Nutzung des Bilderrahmens wünschen,
können Sie unter der folgenden Adresse die vollständige
Bedienungsanleitung herunterladen:
http://www.telefunken-digital.com
I. Auspacken und Installieren Ihres Bilderrahmens
Vielen Dank für Ihren Kauf eines digitalen Bilderrahmens der „DIAMOND-Serie“ von TELEFUNKEN.
Bevor Sie Ihr Gerät benutzen, lesen Sie bitte die vorliegende Gebrauchsanweisung durch und bewahren
Sie sie gut auf, um später auf sie zurückgreifen zu können.
1. Inhalt der Verpackung
- 1 digitaler Bilderrahmen
- 1 Netzadapter
- 1 Fernbedienung
- 1 Reinigungstuch
- 1 Schnellstartanleitung

3
Dokument ohne vertraglichen Charakter. Änderungen aufgrund von Druckfehlern bleiben vorbehalten (Mktg0810) COPYRIGHT SOPEG 2010
Hersteller behält sich das Recht vor, die Produktmerkmale ohne vorherige Benachrichtigung zu ändern.
DEUTSCH
2. Abbildungen des Bilderrahmens
3. Fernbedienung
Alle Funktionen können mit der Fernbedienung ausgeführt werden. Drücken Sie die folgenden Tasten,
um die jeweiligen Funktionen zu aktivieren:
Taste Funktion
▲ In den Menüs nach oben navigieren
◄ In den Menüs nach links navigieren und zur vorherigen Datei (Bild, Musik oder Film) springen
▼ In den Menüs nach unten navigieren
► In den Menüs nach rechts navigieren und zur nächsten Datei (Bild, Musik oder Film) springen
ENTER Auswahl bestätigen oder Modi wechseln
Digitalen Bilderrahmen einschalten oder in Standby schalten
EXIT Aktuelles Menü beenden und zum voherigen Menü gehen
STOP Dateiwiedergabe beenden (Bild, Musik oder Film) und zum vorherigen Menü zurück gehen
Ton Stumm schalten oder aktivieren, ist der Ton ausgeschaltet, wird das Symbol angezeigt
Lautstärke erhöhen, die Lautstärke wird angezeigt
(COPY/DEL) Aufrufen der Kopier-, Lösch- und Sortierungsfunktionen (nur im Hauptmenü)
(ROTATE) Bilder 90° drehen
Bild vergrößern, drücken Sie mehrmals, um durch die verschiedenen Zoom-Modi zu
schalten x2, x4, x8 und x16. Drücken Sie nochmals, um zur Ausgangsgröße zu gelangen
Lautstärke verringern, die Lautstärke wird angezeigt
SETUP Einstellungsmenü (Settings) direkt aufrufen

4
Dokument ohne vertraglichen Charakter. Änderungen aufgrund von Druckfehlern bleiben vorbehalten (Mktg0810) COPYRIGHT SOPEG 2010
Hersteller behält sich das Recht vor, die Produktmerkmale ohne vorherige Benachrichtigung zu ändern.
DEUTSCH
4. Installation
- Nehmen Sie Ihren Bilderrahmen und sein Zubehör aus der Verpackung.
- Entfernen Sie die Schutzfolie von der Vorderseite des Bilderrahmens.
- Ziehen Sie den Plastikstreifen zum Schutz der Kontakte der Fernbedienung ab.
- Stellen Sie den Bilderrahmen an der gewünschten Stelle auf, indem Sie den justierbaren
Ständer in Ihre Richtung ziehen (s. Abbildung oben).
- Schließen Sie das Netzkabel an der vorgesehenen Stelle am Bilderrahmen und an einer
Steckdose an.
- Ihr Bilderrahmen schaltet sich automatisch ein.
II. Benutzung Ihres Bilderrahmens
1. Sprachauswahl
Bei Inbetriebnahme des Rahmens wird die Demo-Animation angezeigt. Um diese zu verlassen und auf
die Funktionen des Rahmens zuzugreifen, drücken Sie einfach die Taste „SETUP“ Ihrer Fernbedienung.
Nun wird der Bildschirm „Sprachenauswahl“ angezeigt.
- Wählen Sie Ihre Sprache mithilfe der Pfeiltasten der Fernbedienung aus und drücken Sie
auf „ENTER“.
Wenn Sie die gewünschte Sprache ausgewählt haben, steht Ihr Rahmen zur Nutzung bereit. Legen Sie
einfach eine Karte oder einen USB-Stick ein, und schon können Sie Ihre Bilder abspielen.
Achtung: Die Demo-Animation befindet sich in einem Ordner mit der Bezeichnung „DEMO“.
Diese Animation sollte entfernt werden, damit die 2 GB interner Speicher zur Verfügung stehen.
2. Der „ECO-Logic“ Modus
Der ECO-LOGIC-MODUS verbindet drei wesentliche Elemente, die im Vergleich zu einem
Standardrahmen für eine mehr als 40%-ige Verringerung des Energieverbrauchs sorgen:
- Einen LED-Bildschirm, der bei verbesserter Bildqualität weniger Energie benötigt;
- Einen Energie sparenden Netzadapter mit Energy-Star-Zertifizierung;
- Einen Helligkeitssensor.
Dieser Sensor ist standardmäßig aktiviert und sorgt dafür, dass sich Ihr Fotorahmen bei Dunkelheit
automatisch aus- und bei Helligkeit einschaltet.
Sie können diesen Helligkeitssensor im Systemeinstellungsmenü Ihres Rahmens deaktivieren.
Achtung: Je nach Aufstellort des Rahmens (etwa in einem Möbelstück, unter einem Regal) kann es sein,
dass das Licht für den Betrieb des Rahmens nicht ausreicht oder dass der Rahmen unerwartet
abschaltet. Um ihn wieder zu aktivieren, genügt es, ihn 2-3 Sekunden lang einer ausreichenden
Lichtquelle auszusetzen.

5
Dokument ohne vertraglichen Charakter. Änderungen aufgrund von Druckfehlern bleiben vorbehalten (Mktg0810) COPYRIGHT SOPEG 2010
Hersteller behält sich das Recht vor, die Produktmerkmale ohne vorherige Benachrichtigung zu ändern.
DEUTSCH
3. Lesen einer Speicherkarte oder eines USB-Sticks
Falls Ihr Bilderrahmen ausgeschaltet ist:
- Führen Sie Ihre Speicherkarte oder Ihren USB-Stick an der hierfür vorgesehenen Stelle ein.
- Schalten Sie Ihren Bilderrahmen ein. Die Diashow spielt den Inhalt Ihrer Speicherkarte oder
Ihres USB-Sticks automatisch ab.
Wenn der Bilderrahmen eingeschaltet ist und die Diashow vom internen Speicher abgespielt
wird:
- Ihre Speicherkarte wurde nicht automatisch erkannt.
1. Drücken Sie EXIT, um die Diashow zu beenden, die Miniaturansicht erscheint.
2. Drücken Sie EXIT nochmals, um den internen Speicher zu verlassen und zurück zum Foto–
Menü zu gelangen.
3. Drücken Sie ▼, um USB oder die eingelegte Speicherkarte zu wählen und drücken Sie ENTER,
um die Miniaturansicht der Bilder auf dem Medium anzuzeigen.
4. Drücken Sie ENTER, um das gewählte Bild im Vollbildmodus anzuzeigen.
5. Drücken Sie mehrfach ENTER, um zwischen Einzeln, Diashow mit Musik und Nur Diashow zu
wechseln.
6. Drücken Sie EXIT, um die Diashow zu beenden, die Miniaturansicht erscheint.
III. Auswahl der Abspielbaren Dateien
1. Interner Speicher / entnehmbare Speichermedien
Wurde kein Speichermedium eingelegt, beginnt die Diashow mit dem internen Speicher automatisch,
sobald der Bilderrahmen eingeschaltet wird.
Ist eine Speicherkarte oder ein Flash-Drive eingelegt, wenn der Bilderrahmen eingeschaltet wird, wird
der Inhalt der Karte abgespielt. In diesem Fall können Sie zwischen der Karte und dem internen
Speicher wie folgt wählen:
- Halten Sie EXIT auf der Fernbedienung gedrückt, um zur Anzeige zur Auswahl des
Speichermediums zu gelangen.
- Drücken Sie ▲/▼ auf der Fernbedienung, um das Speichermedium, von dem Sie
abspielen wollen, zu wählen.
- Drücken Sie ENTER zum Bestätigen.
2. Bilder
- Drücken Sie EXIT auf der Fernbedienung so oft wie nötig, um zur Anzeige zur Auswahl von
Speichermedien zu gelangen.
- Drücken Sie ▲/▼ auf der Fernbedienung, um das Speichermedium zu wählen, von dem
Sie abspielen möchten.
- Drücken Sie ◄/►, um Foto zu wählen.
- Drücken Sie ENTER, um die Miniaturansicht aufzurufen.
- Drücken Sie ENTER nochmals, um das Abspielen zu beginnen.
- Drücken Sie mehrfach ENTER, um zwischen Einzeln, Diashow mit Musik und Nur
Diashow zu wechseln.

6
Dokument ohne vertraglichen Charakter. Änderungen aufgrund von Druckfehlern bleiben vorbehalten (Mktg0810) COPYRIGHT SOPEG 2010
Hersteller behält sich das Recht vor, die Produktmerkmale ohne vorherige Benachrichtigung zu ändern.
DEUTSCH
3. Filme
- Drücken Sie EXIT auf der Fernbedienung so oft wie nötig, um zur Anzeige zur Auswahl von
Speichermedien zu gelangen.
- Drücken Sie ▲/▼ auf der Fernbedienung, um das Speichermedium zu wählen, von dem
Sie abspielen möchten.
- Drücken Sie ◄/►, um Filme zu wählen.
- Drücken Sie ENTER, um die Filmeliste zu zeigen.
- Drücken Sie nochmals ENTER, um die Wiedergabe mit der ersten Filmdatei zu starten
oder wählen Sie mit ▲/▼ eine Datei, mit der Sie die Wiedergabe beginnen wollen.
- Drücken Sie während der Wiedergabe ▲/▼, um den vorherigen oder nächsten Film zu
wählen, drücken Sie ◄/► für schnellen Rücklauf oder Vorlauf. Drücken Sie / , um
die Lautstärke einzustellen oder drücken Sie MUTE, um den Ton ein- oder auszuschalten.
- Drücken Sie ENTER für Pause, drücken Sie nochmals für weitere Wiedergabe.
- Drücken Sie EXIT, um diesen Modus zu verlassen.
4. Musik
- Drücken Sie EXIT auf der Fernbedienung so oft wie nötig, um zur Anzeige zur Auswahl von
Speichermedien zu gelangen.
- Drücken Sie ▲/▼ auf der Fernbedienung, um das Speichermedium zu wählen, von dem
Sie abspielen möchten.
- Drücken Sie ◄/►, um Musik zu wählen.
- Drücken Sie ENTER, um die Musikliste zu zeigen.
- Drücken Sie nochmals ENTER, um die Wiedergabe mit der ersten Musikdatei zu starten
oder wählen Sie mit ▲/▼ eine Datei, mit der Sie die Wiedergabe beginnen wollen.
- Drücken Sie während der Wiedergabe ▲/▼, um die vorherige oder nächste Musikdatei zu
wählen. Drücken Sie /, um die Lautstärke einzustellen oder drücken Sie MUTE, um
den Ton ein- oder auszuschalten.
- Drücken Sie ENTER für Pause, drücken Sie nochmals für weitere Wiedergabe.
- Drücken Sie EXIT, um diesen Modus zu verlassen.
5. Kalender
- Drücken Sie EXIT auf der Fernbedienung so oft wie nötig, um zur Anzeige zur Auswahl von
Speichermedien zu gelangen.
- Drücken Sie ◄/►, um Kalender zu wählen.
- Drücken Sie ENTER, um in den Kalender-Vorschaumodus zu gelangen, eine Diashow
startet automatisch.
- Drücken Sie nochmals ENTER, um in den Vollbildmodus zu gelangen, drücken Sie
mehrfach ENTER, um zwischen Einzeln und Nur Diashow zu wechseln. Drücken Sie ►
oder ◄, um zur nächsten oder vorherigen Bilddatei zu springen.
- Drücken Sie EXIT, um den Vollbildmodus zu verlassen.
Hinweis:
Haben Sie eine Alarmzeit eingestellt, wird das Alarmsymbol auf dem Kalender angezeigt.

7
Dokument ohne vertraglichen Charakter. Änderungen aufgrund von Druckfehlern bleiben vorbehalten (Mktg0810) COPYRIGHT SOPEG 2010
Hersteller behält sich das Recht vor, die Produktmerkmale ohne vorherige Benachrichtigung zu ändern.
DEUTSCH
6. Bild-, Film- oder Musikdateien auf den internen Speicher oder eine
Speicherkarte kopieren
Kopieren Sie Ihre Bilder, Filme oder Musik im Miniaturmodus
Mit dieser Methode können Sie alle oder eine Auswahl an Bildern, Musik oder Filmen kopieren, mit der
Möglichkeit der Anpassung der Bilder an die Auflösung des Bilderrahmens, um den internen Speicher
optimal ausnutzen zu können.
Das Vorgehen ist ähnlich für alle Dateitypen und folgend beschreiben wir dies nur am Beispiel der
Bilddateien.
- Bilddateien kopieren
1. Drücken Sie EXIT auf der Fernbedienung so oft wie nötig, um zur Anzeige zur Auswahl von
Speichermedien zu gelangen.
2. Drücken Sie ▼, um den internen Speicher oder das entnehmbare Speichermedium zu wählen,
auf das Bilder kopiert werden sollen.
3. Drücken Sie ◄/►, um den Foto-Modus zu wählen und drücken Sie ENTER.
4. Drücken Sie ▲/▼/◄/►, um ein einzelnes Bild, dass Sie kopieren wollen, zu wählen.
5. Drücken Sie COPY/DEL. Das Display zeigt COPY/LÖSCHEN/SORT. Drücken Sie ◄/►, um
COPY zu wählen und drücken Sie ENTER.
6. Drücken Sie ▼, um Kopieren oder Alle kop. zu wählen und bestätigen Sie mit ENTER.
7. Drücken Sie ENTER für Ja, um zu Speicherkarte oder Interner Speicher zu kopieren, drücken
Sie ▼, um No zu wählen und abzubrechen.
7. Bilddateien löschen
Sie können Bilddateien löschen (alle oder eine Auswahl), die sich in dem internen
Speicher/entnehmbarem Speicher befinden.
- Löschen Sie Ihre Bilder im Miniaturmodus
1. Drücken Sie EXIT auf der Fernbedienung so oft wie nötig, um zur Anzeige zur Auswahl von
Speichermedien zu gelangen.
2. Drücken Sie ▼, um den internen Speicher oder das entnehmbare Speichermedium zu wählen.
3. Drücken Sie ◄/►, um den Foto-Modus zu wählen und drücken Sie ENTER.
4. Drücken Sie ▲/▼/◄/►, um ein einzelnes Bild, dass Sie löschen wollen, zu wählen.
5. Drücken Sie COPY/DEL. Das Display zeigt COPY/LÖSCHEN/SORT. Drücken Sie ◄/►, um
LÖSCH. zu wählen und drücken Sie ENTER.
6. Drücken Sie ▼, um Löschen oder Alle löschen zu wählen und bestätigen Sie mit ENTER.
7. Drücken Sie ENTER für Ja, um zu löschen oder drücken Sie Nein, um das Löschen
abzubrechen.
8. Bilddateien sortieren
Sie können Bilddateien sortieren, die sich in dem internen Speicher/dem entnehmbaren
Speichermedium befinden.
- Sortieren Sie Ihre Bilder im Miniaturmodus

8
Dokument ohne vertraglichen Charakter. Änderungen aufgrund von Druckfehlern bleiben vorbehalten (Mktg0810) COPYRIGHT SOPEG 2010
Hersteller behält sich das Recht vor, die Produktmerkmale ohne vorherige Benachrichtigung zu ändern.
DEUTSCH
1. Drücken Sie EXIT auf der Fernbedienung so oft wie nötig, um zur Anzeige zur Auswahl von
Speichermedien zu gelangen.
2. Drücken Sie ▼, um den internen Speicher oder das entnehmbare Speichermedium zu wählen.
3. Drücken Sie ◄/►, um den Foto-Modus zu wählen und drücken Sie ENTER.
4. Drücken Sie COPY/DEL. Das Display zeigt COPY/LÖSCHEN/SORT. Drücken Sie ◄/►, um
SORT zu wählen und drücken Sie ENTER.
5. Drücken Sie ▼, um 6 BIL, 12 BIL oder 30 BIL anzuzeigen. 6, 12 oder 30 Miniaturansichten
werden gezeigt, drücken Sie ENTER zum Bestätigen.
IV. WI-FI®
Um die Internetdienste Picasa™ oder Flickr® mit dem Bilderrahmen verwenden zu können, müssen Sie
zuerst einen Account bei einem dieser Internetdienste erstellen, die Sie im Internet verwenden möchten.
Bevor Sie das erste Mal die Wi-Fi-Funktion des Bilderrahmens nutzen, folgen Sie den unten stehenden
Schritten, um eine Wi-Fi® Verbindung zu erstellen und die benötigten Account-Konfiguration
vorzunehmen, damit Sie den gewählten Internetdienst in der Wi-Fi-Liste verwenden können.
1. Wi-Fi-Einstellungen
Drücken Sie EXIT auf der Fernbedienung so oft wie nötig, um zur Anzeige zur Auswahl von
Speichermedien zu gelangen.
Drücken Sie ◄/►, um Wi-Fi zu wählen und drücken Sie ENTER.
Drücken Sie ►, um WiFi-Setup zu markieren und drücken Sie ENTER, um in das Untermenü zu
gelangen.
Navigieren Sie mit ▲/▼ im WiFi-Setup Untermenü.
1.1 Wenn Sie ein automatisches IP-Netzwerk verwenden
- Wählen Sie DHCP für automatische Verbindung im WiFi-Setup Untermenü.
- Die Anzeige zur Auswahl des Access Point erscheint und zeigt verfügbare Access Points, die
sich in der Nähe befinden.
- Wählen Sie mit ▲/▼ den gewünschten Access Point, zu dem Sie verbinden möchten und
drücken Sie ENTER.
1. Nach erfolgreicher Verbindung mit einem offenen Access Point ohne Passwort
(ungeschütztes Netzwerk) wird „Verbindung wurde erfolgreich hergestellt!” angezeigt.
2. Um mit einem Netzwerk zu verbinden, dass mit einem Passwort geschützt wird
(geschütztes Netzwerk), werden Sie auf der Tastatur-Anzeige aufgefordert, ein Passwort
einzugeben.
Geben Sie das Passwort in dem Feld Key ein. Wählen Sie Done nach der Eingabe und
drücken Sie ENTER. Nach Eingabe des korrekten Passworts wird „Verbindung wurde
erfolgreich hergestellt!” angezeigt.
Wird ein falsches Passwort eingegeben erscheint „Verbindung konnte nicht hergestellt
werden! Bitte erneut versuchen.”.
- Nachdem die Verbindung besteht, blinkt das Symbol in der rechten oberen Ecke des
Displays. Die IP-Adresse, Gateway, DNS-Server und MAC-Adresse werden am unteren Ende
des Displays gezeigt.

9
Dokument ohne vertraglichen Charakter. Änderungen aufgrund von Druckfehlern bleiben vorbehalten (Mktg0810) COPYRIGHT SOPEG 2010
Hersteller behält sich das Recht vor, die Produktmerkmale ohne vorherige Benachrichtigung zu ändern.
DEUTSCH
- Wenn Sie eine Wi-Fi®-Verbindung mit DHCP eingestellt haben, verbindet sich der
Bilderrahmen jedes Mal automatisch mit dem Wi-Fi-Netzwerk, sobald dieser eingeschaltet
wird.
Tipps: Verwendung der Bildschirm-Tastatur
- Drücken Sie ◄/►/▲/▼, um eine Taste zu wählen, drücken Sie ENTER zum Bestätigen.
- Wählen Sie shift und drücken Sie ENTER, um zwischen Groß- und Kleinbuchstaben zu
wählen.
- Wählen Sie Backspace und drücken Sie ENTER, um die Eingabe zu löschen.
- Wählen Sie space und drücken Sie ENTER, um ein Leerzeichen zu wählen.
- Um zum nächsten Eingabefeld zu gehen oder um zwischen Feldern zu wechseln, wählen Sie
Done und drücken Sie ENTER.
1.2 Wenn Sie eine feste IP-Adresse verwenden
- Wählen Sie Statische IP-Adresse im WiFi-Setup Menü.
- Die Anzeige Choose AP erscheint.
- Verwenden Sie die Tastatur für die Eingabe der IP-Adresse, Subnet-Maske, Gateway und
DNS-Server Einstellungen.
- Wählen Sie nach der Eingabe Done und drücken Sie ENTER.
- Nachdem die Verbindung besteht, blinkt das Symbol in der rechten oberen Ecke des
Displays. Die IP-Adresse, Gateway, DNS-Server und MAC-Adresse werden am unteren Ende
des Displays gezeigt
- Wenn Sie eine Wi-Fi®-Verbindung mit Statische IP-Adresse eingestellt haben, speichert der
Bilderrahmen alle Daten, die unter Choose AP eingegeben wurden. Jedoch muss nach jedem
Einschalten des Bilderrahmens die Verbindung neu erfolgen. Wählen Sie Done unter AP
auswählen und drücken Sie mehrfach ENTER, um manuell mit dem Wi-Fi-Netzwerk zu
verbinden.
Tipps: Verwendung der Bildschirm-Tastatur
- Drücken Sie ◄/►/▲/▼, um eine Taste zu wählen, drücken Sie ENTER zum Bestätigen.
- Wählen Sie NEXT und drücken Sie ENTER, um den Cursor vorwärts zu bewegen.
- Wählen Sie PREV und drücken Sie ENTER, um den Cursor rückwärts zu bewegen.
- Um zum nächsten Eingabefeld zu gehen oder um zwischen Feldern zu wechseln, wählen Sie
Done und drücken Sie ENTER.
- Wählen Sie und drücken Sie ENTER, um Ihre letzte Eingabe zu löschen.
1.3 Wi-Fi-Verbindungsstatus
- Gehen Sie zurück zum WiFi-Setup Untermenü und wählen Sie Wi-Fi Check.
- Drücken Sie ENTER, um das Menü zur Überprüfung aufzurufen, Verbindungsfehler und
Verbindungen werden angezeigt.
- Verbinden Sie nochmals zu einem Access Point oder setzen Sie das Wi-Fi-Setup zurück,
wenn ein Fehler auftritt.

10
Dokument ohne vertraglichen Charakter. Änderungen aufgrund von Druckfehlern bleiben vorbehalten (Mktg0810) COPYRIGHT SOPEG 2010
Hersteller behält sich das Recht vor, die Produktmerkmale ohne vorherige Benachrichtigung zu ändern.
DEUTSCH
2. Account-Konfiguration
2.1 Picasa™ Account konfigurieren
Hinweis: Bevor Sie die folgenden Einstellungen vornehmen, müssen Sie zuerst einen Picasa-
Account im Internet erstellen, wenn Sie nicht bereits über einen verfügen. Gehen Sie dafür zu
www.picasa.google.com
- Drücken Sie EXIT auf der Fernbedienung so oft wie nötig, um zur Anzeige zur Auswahl von
Speichermedien zu gelangen.
- Drücken Sie ◄/►, um Wi-Fi zu wählen und drücken Sie ENTER.
- Drücken Sie ►, um Konto-Konfig zu markieren und drücken Sie ENTER, um in das
Untermenü zu gelangen.
- Drücken Sie ▼, um Picasa zu markieren und drücken Sie ENTER.
- Geben Sie in der erscheinenden Tastaturanzeige Ihre Accountdaten in den Feldern ein.
- Wählen Sie mit ◄/►/▲/▼ Done, drücken Sie dann ENTER, um zum nächsten Feld zu
gehen.
- Geben Sie Ihr Passwort in dem Passwort-Feld ein.
- Wählen Sie mit ◄/►/▲/▼ Done und drücken Sie ENTER zum Beenden.
- Sie können nun Picasa in der WiFi-Liste wählen.
2.2 Flickr™ Account konfigurieren
Hinweis: Bevor Sie die folgenden Einstellungen vornehmen, müssen Sie zuerst einen Flickr-
Account im Internet erstellen, wenn Sie nicht bereits über einen verfügen. Gehen Sie dafür zu
www.flickr.com
- Drücken Sie EXIT auf der Fernbedienung so oft wie nötig, um zur Anzeige zur Auswahl von
Speichermedien zu gelangen.
- Drücken Sie ◄/►, um Wi-Fi zu wählen und drücken Sie ENTER.
- Drücken Sie ►, um Konto-Konfig zu markieren und drücken Sie ENTER, um in das
Untermenü zu gelangen.
- Drücken Sie ▼, um Flickr zu markieren und drücken Sie ENTER.
- Geben Sie in der erscheinenden Tastaturanzeige Ihren Account im Feld E-Mail Ad: ein.
- Wählen Sie mit ◄/►/▲/▼ Done und drücken Sie ENTER zum Beenden.
- Sie können nun Flickr in der WiFi-Liste wählen.
2.3 E-Mail Account konfigurieren
Um zu vermeiden, wichtige E-Mail Daten zu verlieren, verwenden Sie NICHT Ihre
bestehende persönliche E-Mail Adresse, um Foto-E-Mails auf diesem Bilderrahmen
zu empfangen.
Sie können einen neuen Gmail (in manchen Ländern auch als Google Mail bezeichnet) E-Mail
Account erstellen und diesen mit optimaler Kompatibilität mit diesem Bilderrahmen verwenden.
Die Gmail Servereinstellungen sind bereits in dem Bilderrahmen voreingestellt. Sie müssen nur
Ihren E-Mail Account und das Passwort in die Felder Account und Password eingeben.

11
Dokument ohne vertraglichen Charakter. Änderungen aufgrund von Druckfehlern bleiben vorbehalten (Mktg0810) COPYRIGHT SOPEG 2010
Hersteller behält sich das Recht vor, die Produktmerkmale ohne vorherige Benachrichtigung zu ändern.
DEUTSCH
- Drücken Sie EXIT auf der Fernbedienung so oft wie nötig, um zur Anzeige zur Auswahl von
Speichermedien zu gelangen.
- Drücken Sie ◄/►, um Wi-Fi zu wählen und drücken Sie ENTER.
- Drücken Sie ►, um Konto-Konfig zu markieren und drücken Sie ENTER, um in das
Untermenü zu gelangen.
- Drücken Sie ▼, um Mail-Konfig. zu markieren und drücken Sie ENTER, um die E-Mail Daten
einzugeben.
- Geben Sie Ihren Account in dem Feld Konto ein. Wählen Sie Done und drücken Sie ENTER.
- Geben Sie Ihr Passwort in dem Feld Passwort ein. Wählen Sie Done und drücken Sie
ENTER.
- Sehen Sie für Details zu den E-Mail Servereinstellungen die folgende Tabelle:
Gmail™ (in manchen Länder auch als Google Mail bezeichnet)
POP-Serv: pop.gmail.com
POP-Port: 995
SSL: 1 (Non-zero = Ja, 0 = Nein)
SMTP-Serv: smtp.gmail.com
SMTP-Port: 465
Konto: Ihr Gmail Account (@gmail.com muss nicht hinzugefügt werden)
Passwort : Ihr Passwort
Abhängig von den Servereinstellungen, können E-Mails nach dem Empfangen mit dem
Bilderrahmen vom Server gelöscht werden.
Wenn Sie einen anderen E-Mail Account verwenden wollen, kontaktieren Sie Ihren
Administrator oder Netzwerkanbieter, um Informationen zu den E-Mail Einstellungen zu
erhalten.
3. Anwendungen mit Wi-Fi
Stellen Sie sicher, das der Bilderrahmen mit dem Wi-Fi-Netzwerk verbunden ist.
Drücken Sie EXIT auf der Fernbedienung so oft wie nötig, um zur Anzeige zur Auswahl von
Speichermedien zu gelangen.
Drücken Sie ◄/►, um Wi-Fi zu wählen und drücken Sie ENTER.
Drücken Sie ►, um WiFi-Liste zu markieren und drücken Sie ENTER, um in das Untermenü zu
gelangen.
Navigieren Sie mit ▲/▼ in dem WiFi-Liste Untermenü.
Wenn Sie Flickr oder Picasa bereits konfiguriert haben, erscheinen diese hervorgehoben, andernfalls
bleiben diese Dunkel.
3.1 Wettervorhersage Wetter
- Drücken Sie ▼, um Wetter zu markieren und drücken Sie ENTER, um in das Wettermenü zu
gelangen, das System zeigt automatisch eine Wettervorhersage der nächsten vier Tage.

12
Dokument ohne vertraglichen Charakter. Änderungen aufgrund von Druckfehlern bleiben vorbehalten (Mktg0810) COPYRIGHT SOPEG 2010
Hersteller behält sich das Recht vor, die Produktmerkmale ohne vorherige Benachrichtigung zu ändern.
DEUTSCH
- Drücken Sie nochmals ENTER, um den Namen der Stadt einzugeben, zu der Sie eine
Wettervorhersage erhalten möchten. Drücken Sie ENTER zum Bestätigen.
- Der Bilderrahmen lädt nun das Wetter der neuen Stadt.
3.2 Verwendung der E-mail
- Drücken Sie ▼, um E-mail zu markieren und drücken Sie ENTER, um das E-Mail Menü
aufzurufen. Der E-Mail Eingang Inbox wird gezeigt. Drücken Sie ◄/►, um den gewünschten
Modus zu markieren.
3.2.1 Foto-E-Mails empfangen
- Drücken Sie ►, um Eingang zu markieren und drücken Sie ENTER zum Bestätigen.
- Es wird „Posteingang wird überprüft…” angezeigt. Wurde noch keine E-Mail empfangen,
bleibt die Inbox leer.
- Der Bilderrahmen prüft automatisch alle 5 Minuten auf neue E-Mails.
- Wenn Sie E-Mails empfangen haben, erscheint „Foto-Mail wird empfangen…”.
- Nach dem Herunterladen, werden die gespeicherten Bilder im internen Speicher des
Bilderrahmens abgelegt.
- Nach dem Empfang von E-Mails, wird eine Liste der E-Mails angezeigt.
- Drücken Sie ▲/▼, um gewünschte E-Mails zum Öffnen zu markieren. Drücken Sie ENTER,
um E-Mails zu öffnen.
HINWEIS:
- Trennen Sie den Bilderrahmen während des Empfangs von E-Mails nicht von der
Stromversorgung. Der interne Speicher kann Schaden nehmen und alle Daten gehen
verloren.
- Sollte nicht ausreichend Speicher frei sein, können Fotos, die von E-Mails heruntergeladen,
werden nicht gespeichert werden.
- Erscheint „Foto-Mail wird empfangen…”, werden alle anderen Aktivitäten des
Bilderrahmens, wie Kopieren von Musik und Bildern, unterbrochen und gestoppt. Setzen
Sie diese Aktivitäten manuell wieder fort, nachdem die E-Mails heruntergeladen wurden.
3.2.2 Eine Foto-E-Mail senden
- Drücken Sie ►, um Mail senden zu markieren und drücken Sie ENTER zum Bestätigen.
- Drücken Sie ▲/▼, um die Quelle, von der Sie ein Bild senden wollen, zu wählen und
drücken Sie ENTER, um die Miniaturansicht aufzurufen.
- Wählen Sie in der Miniaturansicht mit ▲/▼/◄/► das gewünschte Bild und drücken Sie
ENTER.
- Wenn die Mail senden Option erscheint, drücken Sie ENTER.
- Wählen Sie Ja und drücken Sie ENTER zum Fortfahren.
a. Um nach einer E-Mail Adresse zu suchen, zu der Sie bereits gesendet haben, wählen
Sie Directory inquiries (Adressenverzeichnis) und wählen Sie mit ▲/▼ eine E-Mail
Adresse und bestätigen Sie mit ENTER.
b. Um eine E-Mail Adresse direkt einzugeben, wählen Sie Tastatur, um die virtuelle
Tastatur anzuzeigen und die E-Mail Adresse einzugeben.
- Nachdem Sie die E-Mail Adresse eingegeben haben, drücken Sie ENTER zum Fortfahren.
Es erscheint „Foto-Mail wird verschickt…”.
- Wurde das Bild erfolgreich versendet erscheint „Senden erfolgreich!”.
- Schlug das Senden fehl, erscheint „Senden fehlgeschlagen!” auf dem Display.
Überprüfen Sie nochmals die E-Mail Adresse auf Korrektheit.
- Der Bilderrahmen fügt die neue Adresse automatisch zu dem „Verz. gesendete Mail”
Verzeichnis hinzu.

13
Dokument ohne vertraglichen Charakter. Änderungen aufgrund von Druckfehlern bleiben vorbehalten (Mktg0810) COPYRIGHT SOPEG 2010
Hersteller behält sich das Recht vor, die Produktmerkmale ohne vorherige Benachrichtigung zu ändern.
DEUTSCH
3.3 Picasa™ verwenden
- Drücken Sie ▼, um Picasa zu markieren und drücken Sie ENTER.
- Das Display zeigt öffentliche Internetalben, die Sie mit Ihrem Picasa-Account erstellt haben.
- Drücken Sie ▲/▼/◄/►, um ein einzelnes Album zu wählen, wenn Sie mehrere haben.
- Drücken Sie ENTER, um in das gewählte Album zu gelangen.
- Um Bilder einzeln im Vollbildmodus zu zeigen, drücken Sie ENTER.
- Um eine Diashow zu starten, drücken Sie nochmals ENTER.
- Drücken Sie EXIT zum Beenden.
Hinweis:
- Nachdem der Picasa-Account konfiguiert ist, wird dieser hervorgehoben.
- Um ein Bild zu kopieren, wählen Sie das Bild im Miniaturmodus und drücken Sie
COPY/DEL, um Kopieren zu wählen und das gewählte Bild in den internen Speicher oder
auf die Speicherkarte zu kopieren. Drücken Sie ENTER zum Fortfahren.
3.4 Flickr™ verwenden
Der Bilderrahmen erlaubt nur den Zugriff auf öffentliche Bilder von Besitzern eines Flickr-
Accounts, die über 18 Jahre alt sind. Lesen Sie dazu die Bedingungen auf der Flickr
Internetseite.
- Drücken Sie ▼, um Flickr zu markieren und drücken Sie ENTER.
- Das Display zeigt öffentliche Internetalben, die Sie mit Ihrem Flickr-Account erstellt haben.
- Drücken Sie ▲/▼/◄/►, um ein einzelnes Album zu wählen, wenn Sie mehrere haben.
- Drücken Sie ENTER, um in das gewählte Album zu gelangen.
- Um Bilder einzeln im Vollbildmodus zu zeigen, drücken Sie ENTER.
- Um eine Diashow zu starten, drücken Sie nochmals ENTER.
- Drücken Sie EXIT zum Beenden.
Hinweis:
- Nachdem der Flickr-Account konfiguiert ist, wird dieser hervorgehoben.
- Um ein Bild zu kopieren, wählen Sie das Bild im Miniaturmodus und drücken Sie
COPY/DEL, um Kopieren zu wählen und das gewählte Bild in den internen Speicher oder
auf die Speicherkarte zu kopieren. Drücken Sie ENTER zum Fortfahren.
V. Einstellungen
Drücken Sie im Hauptmenü ◄/►, um Settings (Einstellungen) zu wählen und drücken Sie ENTER, um
in das Einstellungsmenü zu gelangen und die Betriebsparameter des Bilderrahmens einzustellen.
- Lichtsensor (Ein/Aus)
- Diashow-Intervall (5, 10, 30 Sekunden, 1 Minute, 1 Stunde, 1 Tag)
- Übergangseffekt (Kein Effekt, Zufällig, Aufblenden/Abblenden, von Links nach rechts, Horiz.
öffnen, Horiz. schließen)
- Datum & Uhrzeit (Jahr, Monat, Tag, Stunde, Minute, Uhrzeitformat)
- Wecker-Einstell. (Wecker ein/aus, Weckzeit-Std., Weckzeit-Min., Lautstärke, Ton, Tag)
- Sprachen (Englisch, Französisch, Deutsch, Italienisch, Niederländisch, Portugiesisch und
Spanisch)

14
Dokument ohne vertraglichen Charakter. Änderungen aufgrund von Druckfehlern bleiben vorbehalten (Mktg0810) COPYRIGHT SOPEG 2010
Hersteller behält sich das Recht vor, die Produktmerkmale ohne vorherige Benachrichtigung zu ändern.
DEUTSCH
- Ein-/Ausschalten (Aut. Ein/Aus, Aut. Ein/Std., Aut. Ein/Min., Aut. Aus/Std., Aut. Aus/Min.)
- Anzeige (Helligkeit, Kontrast)
- Anzeige-Einstell. (Original, Anpassen)
- Option kopieren (Originalgröße, Verkleinern)
- Standard-Einstell. (BEENDEN, OK)
- Speicher löschen
VI. Sicherheitshinweise
Behandeln Sie den digitalen Bilderrahmen mit Vorsicht und vermeiden Sie es, den Bildschirm zu
berühren, denn Fingerabdrücke lassen sich nur schwer entfernen.
Stellen Sie den digitalen Bilderrahmen stets auf einer ebenen und stabilen Fläche auf, um Schäden
durch Herunterfallen zu vermeiden.
Setzen Sie Ihren Bilderrahmen nicht der Sonne oder hohen Temperaturen aus, da er hierdurch
beschädigt oder seine Gebrauchsdauer verringert werden könnte. Stellen Sie ihn nicht in die Nähe von
Hitzequellen wie Heizkörpern, Zusatzheizgeräten oder ähnlichen auf. Richten Sie ihn nicht gegen das
Sonnenlicht, um Reflektionen zu vermeiden.
Vermeiden Sie es, den Bilderrahmen Regen, Wasser oder Feuchtigkeit auszusetzen. Stellen Sie ihn
nicht in ein Spül- oder anderes Becken, in dem er in Kontakt mit Wasser kommen könnte.
Stellen Sie niemals schwere oder scharfe Objekte auf den Bilderrahmen, den Bildschirm oder sein
Stromkabel.
Achten Sie darauf, den digitalen Bilderrahmen nicht an eine Steckdose oder an ein Stromkabel mit zu
hoher Spannung anzuschließen. Dies könnte zu Überhitzung, Feuer oder einem Elektroschock führen.
Achten Sie auf den Verlauf des Netzkabels; es darf nicht daraufgetreten werden und es darf nicht in
Kontakt mit anderen Gegenständen kommen. Verlegen Sie das Kabel nicht unter einem Teppich.
Überprüfen Sie regelmäßig den Zustand des Kabels, um Schäden zu vermeiden. Sollte das Kabel
beschädigt sein, ziehen Sie es aus der Steckdose und tauschen Sie es aus.
Belüftung
Die Schlitze für die Speicherkarten und die Öffnungen dienen der Belüftung des Bilderrahmens.
Um eine optimale Funktion des Bilderrahmens zu gewährleisten und jegliches Überhitzen zu vermeiden,
dürfen diese Öffnungen nicht blockiert oder abgedeckt werden.
Achten Sie auf genügend Abstand zwischen dem Bilderrahmen und der Wand, um für eine
ausreichende Belüftung zu sorgen.
Stellen Sie den digitalen Bilderrahmen nicht auf ein Bett oder ein Sofa, um Überhitzung zu vermeiden.
Achtung!
Nehmen Sie in keinem Fall die Kunststoffabdeckung auf der Rückseite des Bilderrahmens ab. Der
digitale Bilderrahmen enthält Stromkreise, an denen Sie sich verletzen können, falls Sie sie anfassen.
Versuchen Sie nicht, Ihren digitalen Bilderrahmen selbst zu reparieren.
WICHTIG: Dieses Gerät sollte mit einem Mindestabstand von 20 cm zwischen dem Display und Ihrem
Körper aufgestellt und betrieben werden.
Specyfikacje produktu
| Marka: | Telefunken |
| Kategoria: | Cyfrowy wyświetlacz zdjęć |
| Model: | DPF 9332 |
Potrzebujesz pomocy?
Jeśli potrzebujesz pomocy z Telefunken DPF 9332, zadaj pytanie poniżej, a inni użytkownicy Ci odpowiedzą
Instrukcje Cyfrowy wyświetlacz zdjęć Telefunken

28 Września 2024
28 Września 2024
28 Września 2024
9 Września 2024
9 Września 2024
Instrukcje Cyfrowy wyświetlacz zdjęć
- Cyfrowy wyświetlacz zdjęć Philips
- Cyfrowy wyświetlacz zdjęć Acer
- Cyfrowy wyświetlacz zdjęć Panasonic
- Cyfrowy wyświetlacz zdjęć Lenco
- Cyfrowy wyświetlacz zdjęć Dual
- Cyfrowy wyświetlacz zdjęć Kodak
- Cyfrowy wyświetlacz zdjęć Renkforce
- Cyfrowy wyświetlacz zdjęć Rollei
- Cyfrowy wyświetlacz zdjęć Maginon
- Cyfrowy wyświetlacz zdjęć Intenso
- Cyfrowy wyświetlacz zdjęć Parrot
- Cyfrowy wyświetlacz zdjęć AKAI
- Cyfrowy wyświetlacz zdjęć Aluratek
- Cyfrowy wyświetlacz zdjęć Hama
- Cyfrowy wyświetlacz zdjęć Nextbase
- Cyfrowy wyświetlacz zdjęć Transcend
- Cyfrowy wyświetlacz zdjęć Agfa
- Cyfrowy wyświetlacz zdjęć Aiptek
- Cyfrowy wyświetlacz zdjęć TakeMS
- Cyfrowy wyświetlacz zdjęć Sweex
- Cyfrowy wyświetlacz zdjęć Difrnce
- Cyfrowy wyświetlacz zdjęć Hipstreet
- Cyfrowy wyświetlacz zdjęć Jobo
- Cyfrowy wyświetlacz zdjęć Xoro
- Cyfrowy wyświetlacz zdjęć Traveler
- Cyfrowy wyświetlacz zdjęć Plawa
- Cyfrowy wyświetlacz zdjęć Lavod
- Cyfrowy wyświetlacz zdjęć Wintec
- Cyfrowy wyświetlacz zdjęć Dikom
- Cyfrowy wyświetlacz zdjęć Pandigital
Najnowsze instrukcje dla Cyfrowy wyświetlacz zdjęć
17 Grudnia 2024
28 Września 2024
28 Września 2024
28 Września 2024
28 Września 2024
28 Września 2024
28 Września 2024
28 Września 2024
28 Września 2024
28 Września 2024