Instrukcja obsługi Stabo WLAN outdoorcam_fisheye 180° HD 510914
Stabo
Kamera monitorująca
WLAN outdoorcam_fisheye 180° HD 510914
Przeczytaj poniżej 📖 instrukcję obsługi w języku polskim dla Stabo WLAN outdoorcam_fisheye 180° HD 510914 (64 stron) w kategorii Kamera monitorująca. Ta instrukcja była pomocna dla 13 osób i została oceniona przez 2 użytkowników na średnio 4.5 gwiazdek
Strona 1/64

Wichtig/Important
Lesen Sie vor Inbetriebnahme des Geräts alle Bedienhinweise aufmerksam und vollständig durch.
Bewahren Sie diese Anleitung sorgfältig auf, sie enthält wichtige Betriebshinweise.
Prior to using the device for the first time, carefully and completely read through all operating
instructions. Keep these operating instructions in a safe place;
it contains important hints for operating the device.
digitale Funktechnik 2,4 GHz/digital radio technology 2.4 GHz
WLAN outdoorcam_fisheye HD
Videoüberwachung
video monitoring
Art.-Nr. 51095
per WLAN
mit App für Android/iOS
via App for Android/iOS
Bedienungs-
anleitung
User manual
stabo ist umweltfreundlich.
Um einen Beitrag zur Rettung der Bäume und zur Verringerung von Papierabfall zu leisten, finden Sie
diese Bedienungsanleitung mit Pflege- und Warnhinweisen sowie Garantie-Informationen nur online.
stabo is eco-friendly.
To help us save trees and reduce paper waste, you will find all operating instructions with care
and safety instructions as well as warranty information only online.

2
Hinweis: Bitte achten Sie bei der Ausrichtung und Funktion der Kamera darauf, keinen
nachbarschaftlichen oder öffentlichen Bereich einzusehen! Für den Einsatz der Kamera ist ein
stabiles /schnelles WLAN erforderlich!
Hinweis: Durch die ständige Aktualisierung des Produktes und der Software ergibt sich möglicher-
weise eine Abweichung zwischen der Bedienungsanleitung und der App-Oberfläche. Alle Anwei-
sungen sind abhängig von der tatsächlichen Bedienoberfläche.
Lieferumfang
wetterfeste HD-Farbkamera (1080P) mit integriertem WLAN-Modul
Netzteil (DC 12 V/1 A) mit Stromversorgungskabel (6 m)
Quickstart-Bedienungsanleitung (Android/iOS)
Montagematerial
Bitte überprüfen Sie den Packungsinhalt auf Vollständigkeit.
Prüfen Sie vor der Benutzung der Geräte, ob äußerliche Beschädigungen vorliegen. In diesem
Fall nehmen Sie das Produkt nicht in Betrieb, sondern setzen sich umgehend mit Ihrem Fachhändler
in Verbindung. Bitte entfernen Sie vor der Inbetriebnahme ggf. die Schutzfolie vom Objektiv.
VEREINFACHTE EU-KONFORMITÄTSERKLÄRUNG
Hiermit erklärt stabo Elektronik GmbH, dass die Funkanlage Typ
stabo WLAN outdoorcam_fisheye HD
der Richtlinie 2014/53/EU entspricht.
Der vollständige Text der EU-Konformitätserklärung ist unter
der folgenden Internetadresse verfügbar:
http://stabo.de/fileadmin/DoC/DoC_stabo_WLAN_outdoorcam_fisheye_HD_DE_EN.pdf
3
Produktbeschreibung/Bestimmungsgemäße Verwendung
Die wetterfeste (IP66) WLAN outdoorcam_fisheye HD verfügt über eine 1080 HD Auflösung und
einen 180° Blickwinkel in der Live Ansicht. Die Kamera besitzt eine digitale Schwenk-/ Neigefunktion,
sowie eine digitale Zoomfunktion. Über ein lokales Heimnetzwerk (WLAN-Router) werden Bild
und Ton aus dem Überwachungsbereich auf Ihr Smartphone oder Tablet übertragen. Die Kamera
lässt sich über WLAN (kabellos) mit dem Heimnetzwerk verbinden.
Der WiFi Standard (IEEE 802.11b/g/n) sorgt für eine störungsarme und abhörsichere Übertragung
und schützt so Ihre Privatsphäre, die WPA-Verschlüsselung verhindert den Zugriff Unbefugter
auf Ihre Kamera.
Die Kamera ist für den Betrieb im Außen- und Innenbereich geeignet.
Es stehen zwei Aufzeichnungsarten zur Verfügung: Eine kontinuierliche Aufzeichnung oder eine
Aufzeichnung über ( ideo otion etection). Wird über eine Bewegung registriert,VMD V M D VMD
startet automatisch eine Aufzeichnung, die anschließend gespeichert wird (microSD-Karte benötigt,
max. 128 GB, nicht im Lieferumfang enthalten). Diese Aufzeichnung ist dann auf Ihrem Mobilgerät
abrufbar. Zusätzlich können Sie sich eine Benachrichtigung (Push Notification) senden lassen.
12 Infrarot-LEDs sorgen bei Dunkelheit (Reichweite 10-15 Meter) für beste Sicht.
Mit der Schnappschuss- bzw. der Recording-Funktion können über das Mobilgerät manuell Fotos
bzw. Videosequenzen aufgenommen und gespeichert werden.
Die dazu erforderliche App steht sowohl als iOS-Version im App-Store als auch alsPano360S
Android-Version unter Google Play zum kostenlosen Download zur Verfügung.
Warn- und Sicherheits-Hinweise
Gesetzliche Vorschriften zur Videoüberwachung beachten! Beachten Sie die geltenden
datenschutzrechtlichen Bestimmungen, die im Bundesdatenschutzgesetz festgeschrieben sind!
Die Überwachung von Dritten ist ohne die jeweilige ausdrückliche Erlaubnis unzulässig und kann
rechtliche Schritte nach sich ziehen.
Beachten Sie bei gewerblichen Flächen unbedingt die entsprechenden Hinweispflichten!
Die WLAN outdoorcam_fisheye HD ist wetterfest (Schutzart IP 66) und zur Montage im Außenbereich
geeignet, das Netzteil der Kamera muss jedoch vor Feuchtigkeit und Nässe geschützt
werden!
Nur das mitgelieferte Netzteil verwenden! Nutzen Sie zur Stromversorgung der Kamera
ausschließlich das mitgelieferte Steckernetzteil.
Sollte das Steckernetzteil Beschädigungen aufweisen, so fassen Sie es nicht an: es besteht
Lebensgefahr durch einen elektrischen Schlag! Schalten Sie in diesem Fall zuerst die Netzspannung
für die Steckdose ab und trennen vom Stromnetz. Ersetzen Sie eserst dann das Steckernetzteil
durch ein Original-Netzteil.
Nicht in Kinderhände! Verhindern Sie, dass Kinder mit dem Gerät, Zubehörteilen oder dem
Verpackungsmaterial spielen.
Nicht im Krankenhaus/in Pflegeeinrichtungen benutzen! Ihre stabo
WLAN outdoorcam_fisheye
HD erzeugt Funkwellen, die unter Umständen Geräte im Krankenhaus beeinträchtigen können.
Klären Sie ggf. mit dem verantwortlichen Personal, ob eine Inbetriebnahme möglich ist.
Nicht öffnen keine Veränderungen vornehmen! Öffnen Sie niemals Gehäuseteile und nehmen
Sie keine Veränderungen an den Geräten vor, sonst entfallen Garantieansprüche und
möglicherweise auch die Gerätezulassung!
Bei beschädigtem Gehäuse: Netzstecker ziehen! Trennen Sie das Gerät sofort vom Stromnetz,
wenn Sie Beschädigungen am Gehäuse feststellen. Lassen Sie eventuelle Reparaturen nur von
sachkundigen Personen ausführen.
4
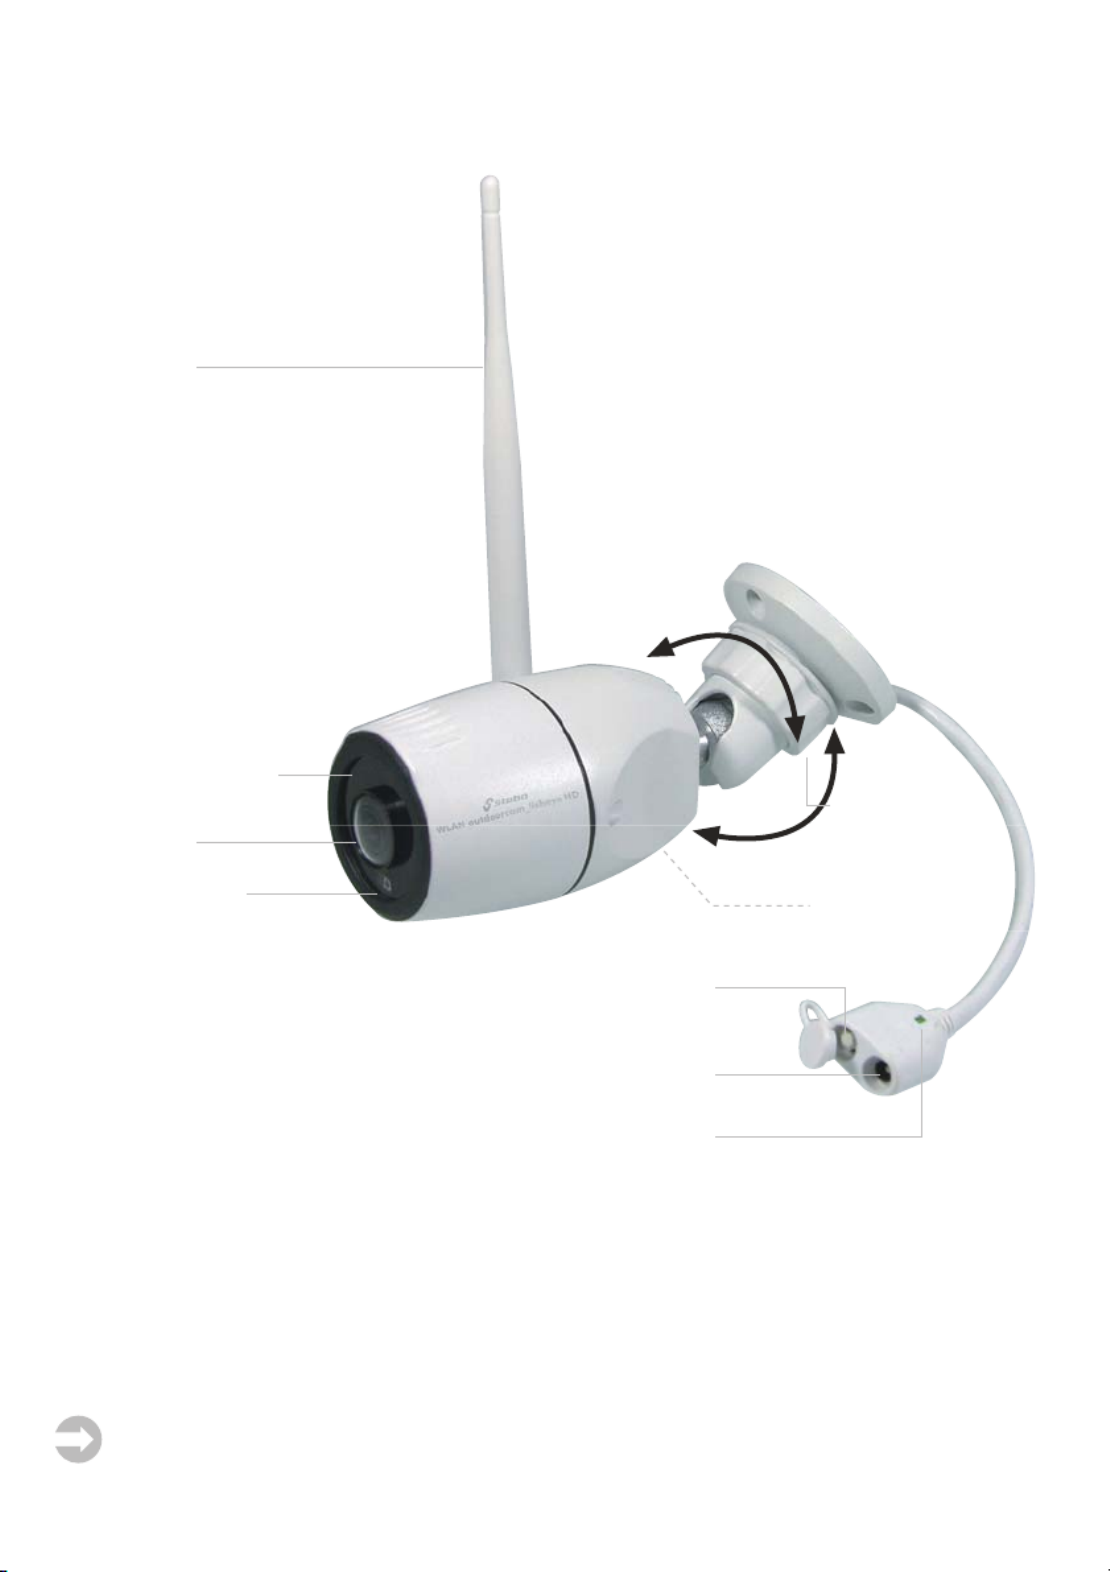
Das Gerät im Überblick
Montage und Anschluss der Kamera siehe Seite 8
Anzeige Status LED
blinkt langsam grün (alle 2 Sek.) Kamera ist zur Einrichtung bereit
leuchtet grün Kamera ist mit dem Internet verbunden und betriebsbereit
blinkt schnell grün (alle 0,5 Sek.) Verbindung zum WLAN Router wird hergestellt
DC IN Buchse
(Netzteil-Anschluss)
microSD-Kartenslot
(Kameraunterseite)
Kamerafuß mit
Kugelgelenk und
Überwurfmutter
Antenne
Dämmerungs-
Sensor
Reset
Betriebs- und Status LED
(grün)
Objektiv
12 Infrarot-LEDs

Inbetriebnahme/Erstinstallation der Kamera
Laden Sie zunächst entsprechend des Betriebssystems Ihres Mobilgeräts die iOS- bzw. Android-
Version der App aus dem App Store bzw. Google Play Store. Geben Sie dazu Pano360S Pano360S
in die Suchleiste ein, markieren die App, laden sie herunter und installieren sie.
Hinweis: In dieser Bedienungsanleitung werden alle Bedienschritte am Beispiel der Android-
Version der App beschrieben.
Montage und Anschluss der Kamera
Hinweis: Es ist unbedingt ratsam, zuerst die Kamera zu konfigurieren und zu testen, bevor Sie
die Montage vornehmen.
Einsetzen einer microSD Karte (Speicherkapazität max. 128 GB)
Entfernen Sie die Abdeckplatte des Micro SD Kartenschachts.
Schieben Sie die Micro SD Karte mit den Kontakten zum
Kamerafuß in den microSD Kartenschacht bis die Karte
eingerastet ist.
Anschließend befestigen Sie die Abdeckplatte des
Kartenschachts wieder.
Einschalten und Verbinden der Kamera
Stecken Sie das Netzteil in eine 230 V-Netzsteckdose und verbinden Sie den Stecker mit der DC
IN-Buchse der Kamera, diese schaltet sich nach dem Einstecken sofort ein.
Nach ca. 30 sec. blinkt die Betriebs-LED langsam grün und die Kamera ist zur Einrichtung bereit.
Einrichtung eines Benutzerkontos und Verbinden von Kamera und
Mobilgerät
1. Stellen Sie sicher, dass
Ihr Mobilgerät mit ihrem
WLAN-Router verbunden
ist.
2. Öffnen Sie die App
Pano360S, um ihr Benut-
zerkonto einzurichten.
Tippen Sie nun auf
Registrieren.
5
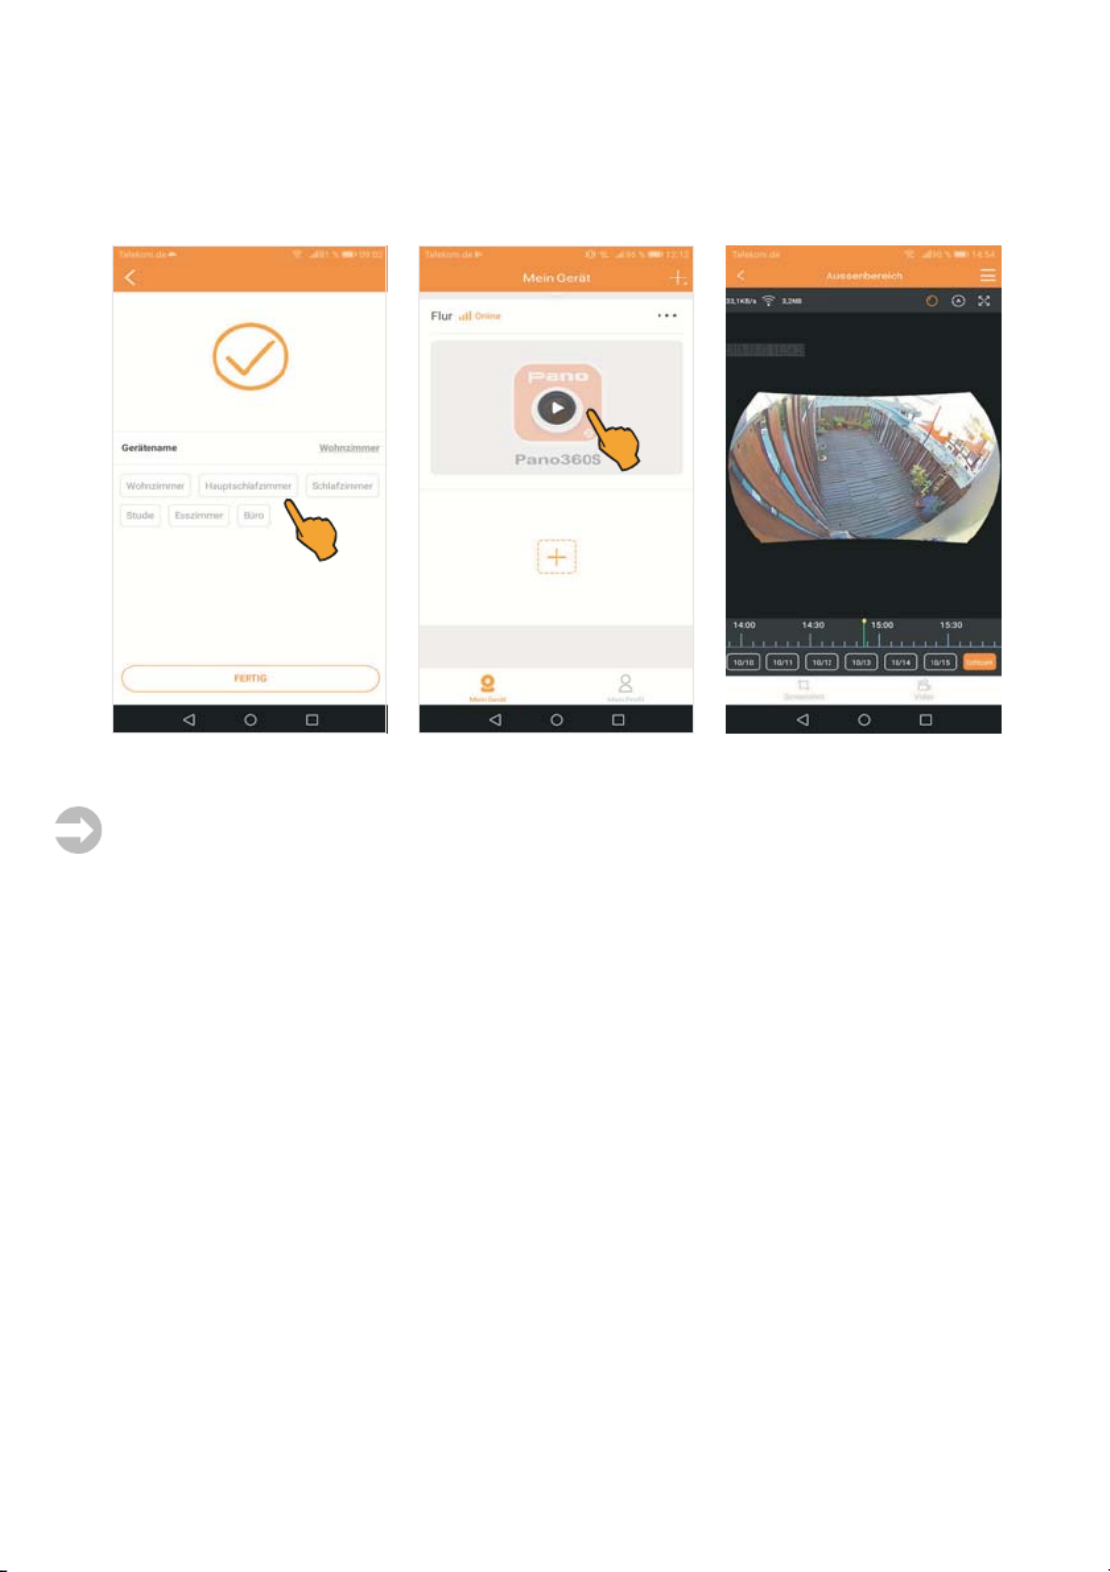
7. Nach erfolgreicher Installation können Sie der Kamera einen Gerätenamen geben. Tippen Sie
nun auf einen der vorgegebenen Namen oder schreiben einen Namen in die Zeile des Geräte-
namens. Tippen Sie anschließend auf Fertig. Die Verbindung zwischen App und Kamera wird
hergestellt. Anschließend schaltet die Kamera online. Um das Livebild der Kamera zu betrachten,
tippen Sie nun auf das .Pano360S Symbol
Montage und Anschluss der Kamera
Wichtige Hinweise:
Bedenken Sie bei der Wahl des Montageortes für die Kamera folgende Punkte:
Reichweite: Prüfen Sie, ob am geplanten Montageort eine stabile Verbindung zwischen Kamera
und Ihrem WLAN-Netzwerk besteht.
Beleuchtungssituation: Die Kamera sollte nicht direkt auf starke/s Lichtquellen/Sonnenlicht
ausgerichtet werden, da dadurch die Aufnahme überbelichtet wird.
Stromversorgung: Das Netzteil der Kamera darf nicht den Witterungseinflüssen im Freien
ausgesetzt werden!
Befestigung: Die Kamerahalterung ist für Decken- und Wandmontage geeignet.
Achten Sie auf einen stabilen Untergrund, der starke Vibrationen und/oder Stürze ausschließt.
Installieren Sie die Kamera zunächst provisorisch und prüfen Sie, ob der gewünschte Überwachungs-
bereich vollständig erfasst wird, bevor Sie Löcher für die Kamerahalterung bohren! Vergewissern
Sie sich, dass an der Stelle keine Kabel/Leitungen in der Wand liegen, die beim Bohren beschädigt
werden könnten!
Markieren Sie die gewünschte Position der Schraublöcher, nutzen Sie den Kamerafuß als Schablone.
Bohren Sie die Montagelöcher und befestigen Sie die Kamera mit für den Untergrund geeigneten
Schrauben.
Um die horizontale und vertikale Ausrichtung der Kamera einzustellen, drehen Sie die Überwurf-
mutter im Gegenuhrzeigersinn, um ihn zu lösen.
Stellen Sie nun die Kamera auf die gewünschte Position und den gewünschten Winkel ein. Drehen
Sie dann die Überwurfmutter im Uhrzeigersinn fest, um die Position zu fixieren.
Stecken Sie das Netzteil in eine 230 V-Steckdose und verbinden Sie den DC-Stecker mit der DC
IN-Buchse der Kamera. Wenn die Betriebs-LED grün leuchtet, ist die Kamera betriebsbereit.
8

10
1
Kamera-Einstellungen: Siehe Seite 13
2
Umschalten zwischen horizontaler- und vertikaler Ansicht
Um von der horizontalen in die vertikale Ansicht zu schalten,
tippen Sie auf das . Um wieder zur hori-Ansichts-Symbol
zontalen Ansicht zurückzukehren, tippen Sie erneut auf das
.Ansichts-Symbol
3
Automatisches Schwenken der 180° Ansicht
Im Livebildmodus können Sie die automatische Schwenk-
funktion aktivieren.
Tippen Sie auf das um die Funktion zuSchwenk-Symbol,
aktivieren bzw. zu deaktivieren. Ist das Schwenk-Symbol
farblich hervorgehoben, ist diese Funktion aktiviert.

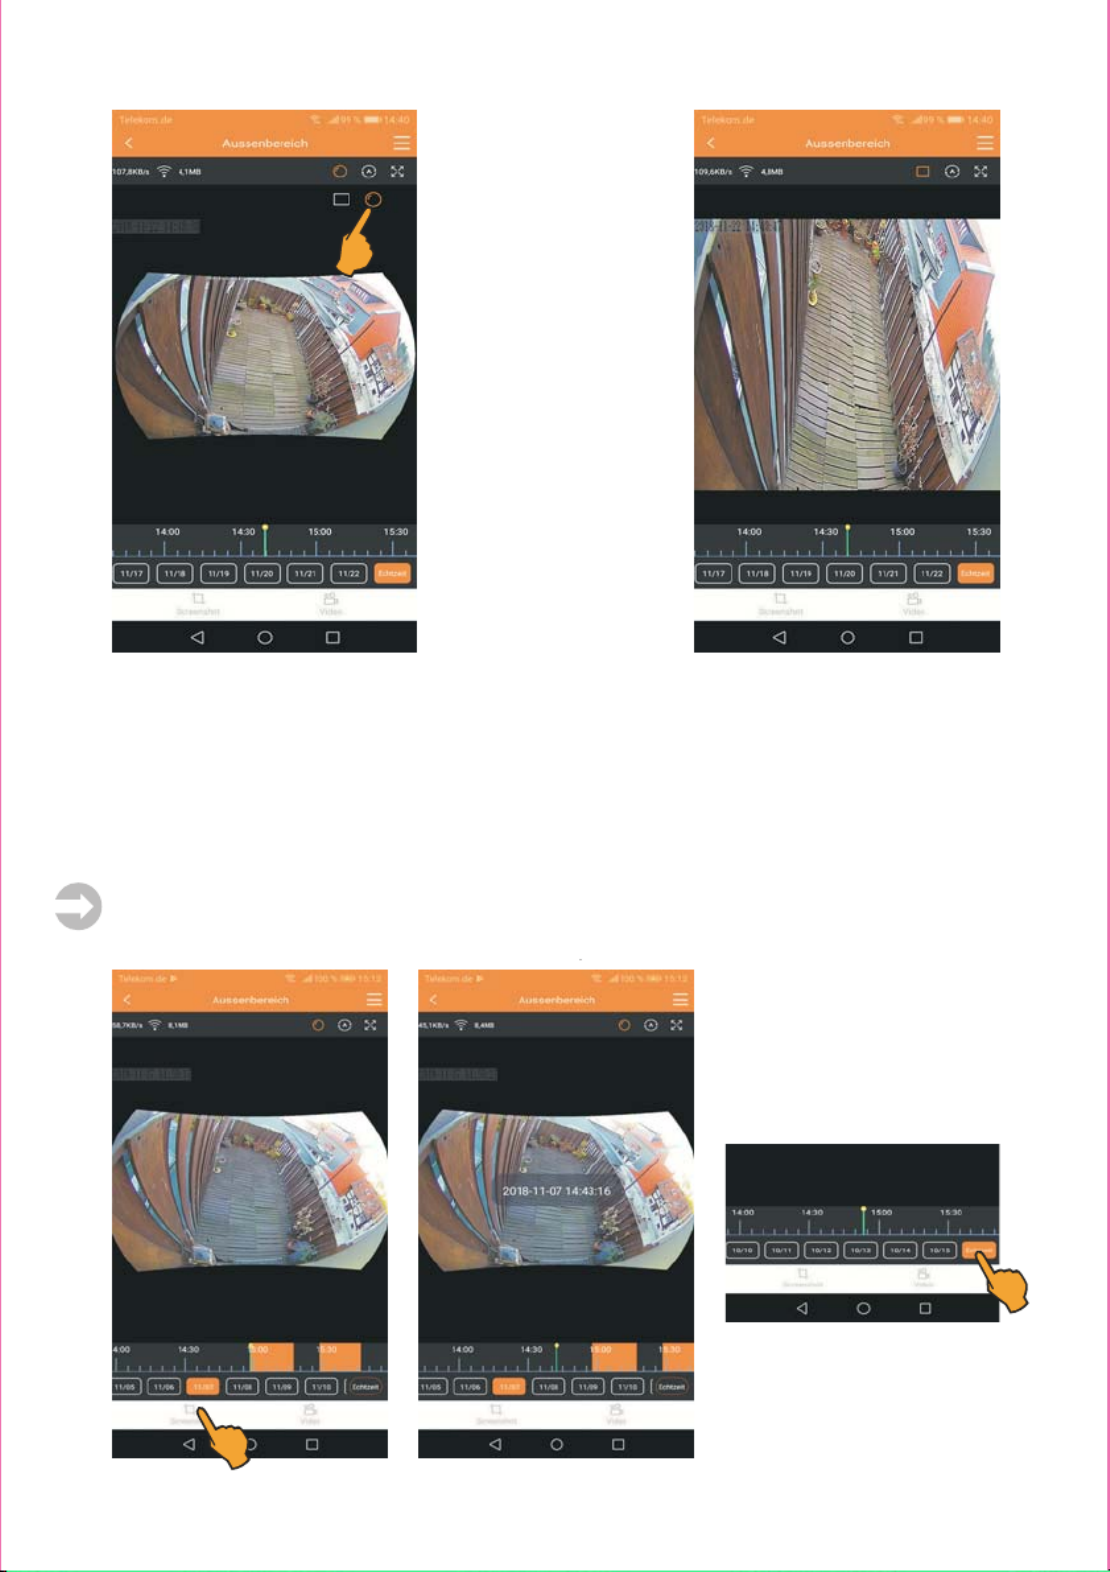
4
Umschalten
zwischen 180°- und
Rechteckig-Ansicht
Tippen Sie auf Bildum-
schalt-Symbol um die
jeweilige Ansicht zu akti-
vieren.
Das farblich hervorgeho-
bene Bildumschalt-
Symbol ist aktiviert.
5
Zeitachse (Video Playback)
Über die Zeitachse können Sie die auf der microSD-Karte gespeicherten Videoaufnahmen aufrufen.
Die Aufnahmen werden durch einen farbigen Block dargestellt.
Um sich die Aufnahmen eines bestimmten Tages anzusehen, tippen Sie bitte auf das entsprechende
Datum (dieses wird nun farblich markiert). Es werden alle Aufnahmen dieses Tages angezeigt.
Hinweis: Die erste Aufnahme eines Tages wird zuerst abgespielt.
Um zu früheren oder späteren Aufzeichnungen zu gelangen, schieben Sie mit dem Finger (swipe)
die Zeitachse nach links oder
rechts. In der Bildschirmmitte
wird das Datum und die Uhrzeit
der aktuellen Position auf der
Zeitachse angezeigt. Die Wie-
dergabe der Aufzeichnung
startet nun von dort, wo Sie
angehalten haben.
Um zur Liveansicht zurück-
zukehren, tippen Sie auf den
Button .Echtzeit
11
6
Schnappschuss-
Auslöser
Schnappschüsse des Live-
Bildes erstellen. Das Foto
wird automatisch auf Ih-
rem Smartphone/Mobil-
gerät gespeichert.
Um ein Foto des Livebilds
zu erstellen, tippen Sie auf
das Screenshot-Symbol.
Anschließend sehen Sie
eine Meldung, an welcher
Stelle auf Ihrem Mobil-
gerät das gerade erstellte
Foto gespeichert wurde.
Hinweis: Das Foto kön-
nen Sie sich im Benut-
zercenter un- Mein Profil
ter Screenshot/Aufzeich-
nen anschauen.
7
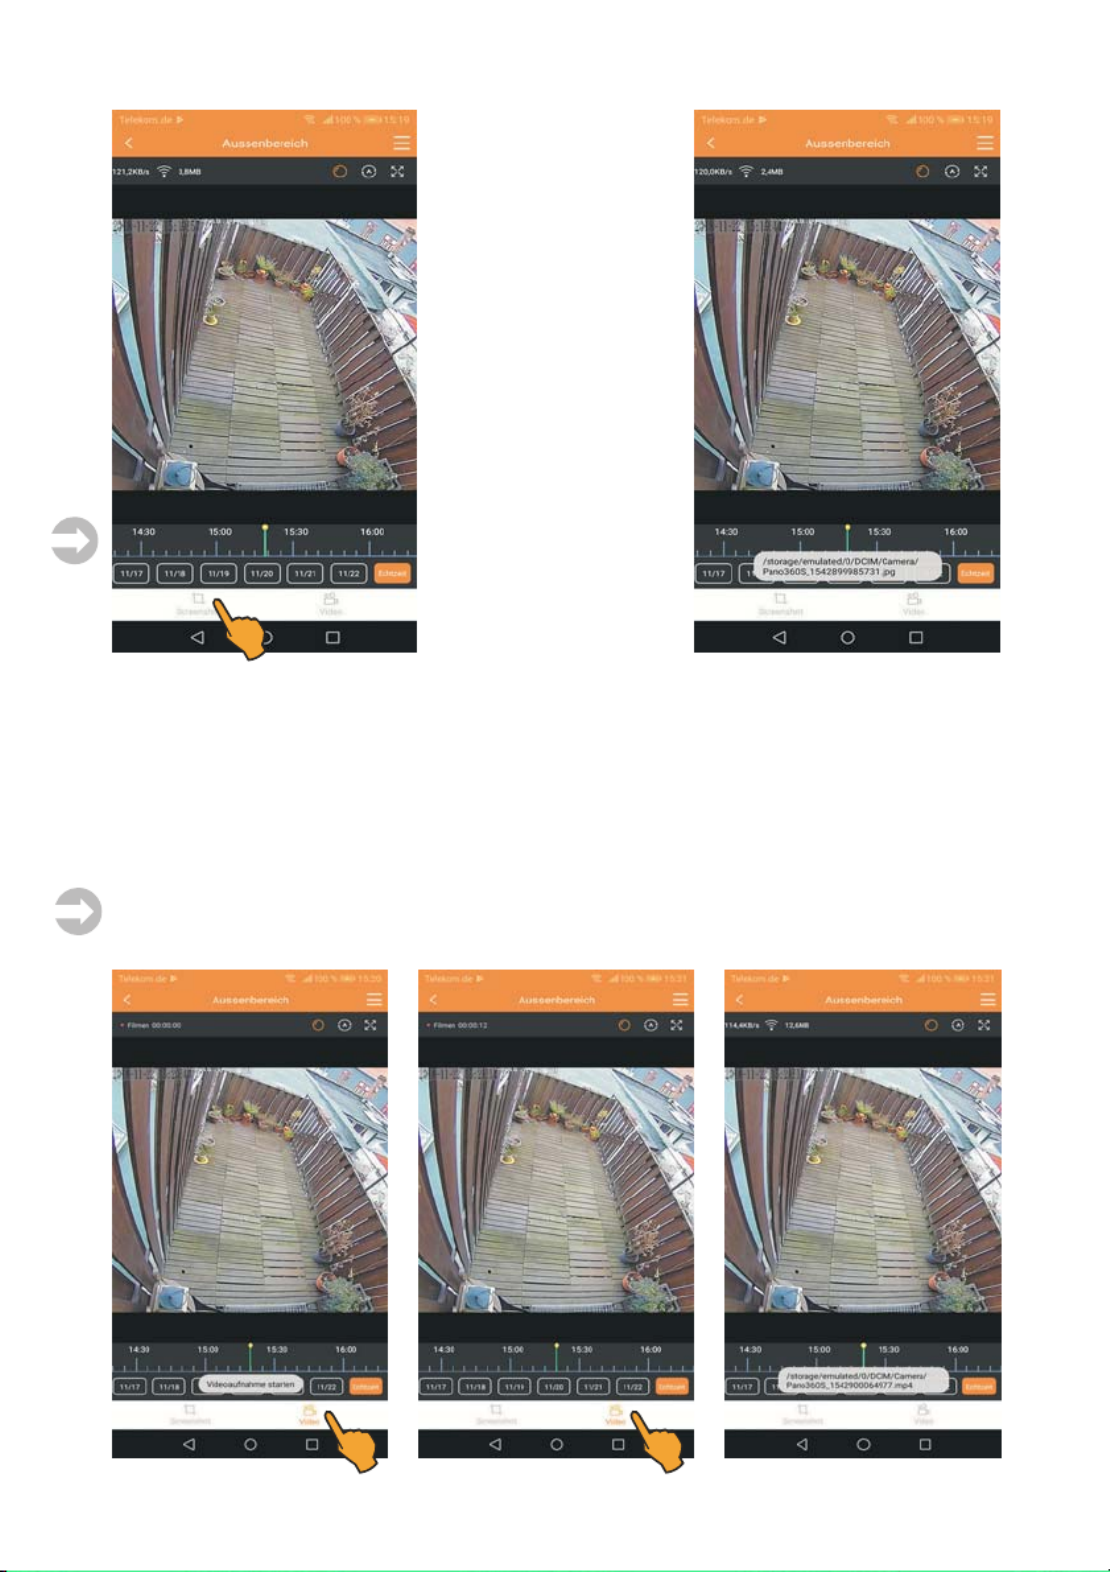
Manuelle Aufzeichnung
Starten und Beenden einer Aufzeichnung des Live-Bildes.
Tippen Sie zum Starten der Aufzeichnung auf das Video-Symbol. Es erscheint die Meldung
Videoaufnahme starten. Oben links im Display erscheint ein roter Punkt, der Schriftzug Filmen
und die aktuelle Aufnahmezeit. Zum Beenden der Aufzeichnung tippen Sie erneut auf das Video-
Symbol. Anschließend sehen Sie die Meldung, an welcher Stelle auf dem Mobilgerät die Video-
aufnahme gespeichert wurde.
Hinweis: Die Aufnahme können Sie sich im Benutzercenter unter Mein Profil Screenshot/
Aufzeichnen anschauen.
12

13
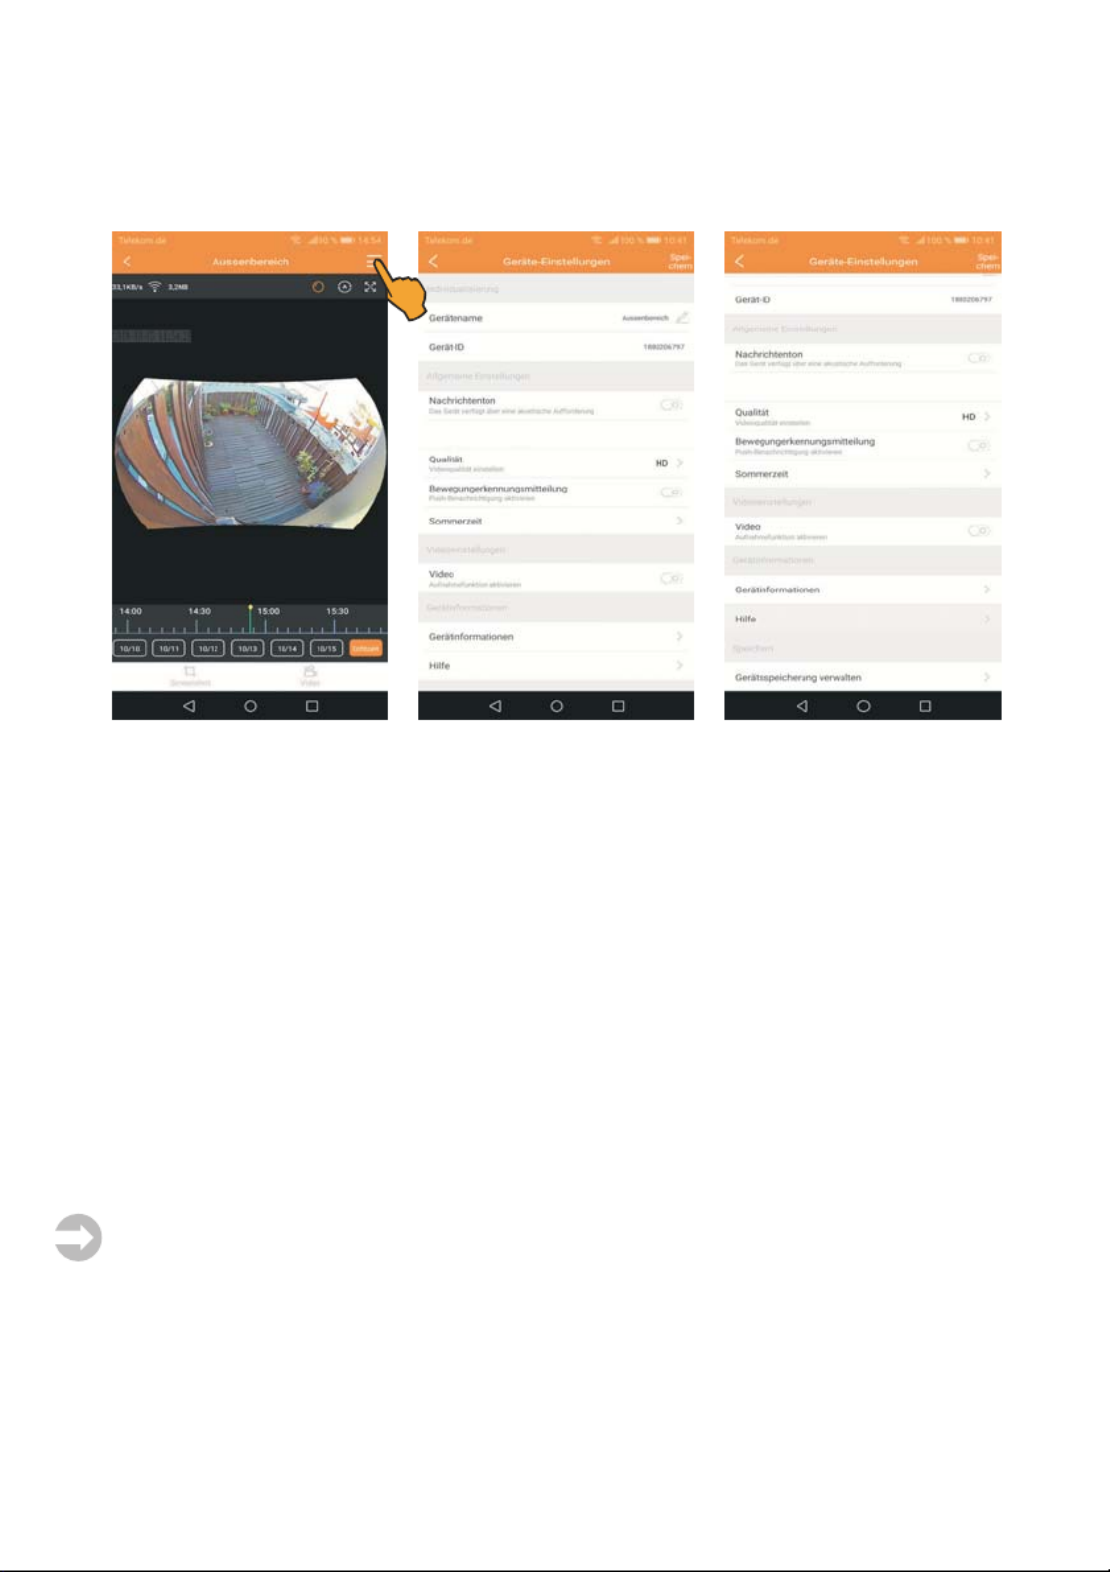
1
Kamera Einstellungen: Individuelle Kameraeinstellungen vornehmen.
Tippen Sie auf das um das Menü zu öffnen Hier stehen Ihnen verschiedene Menü-Symbol .
Informationen zur Verfügung und Sie können individuelle Einstellungen vornehmen.
Informationen und Einstellungen:
Gerätename
Geräte ID der Kamera
Nachrichtenton
Qualität (Bildauflösung)
Push-Benachrichtigung
Sommer-/Winterzeit (Daylight saving time)
Video
Geräteinformationen
Hilfe
Gerätespeicherung verwalten
Wichtiger Hinweis: Um geänderte Einstellungen zu speichern, tippen Sie jeweils oben rechts
auf den Button .Speichern

15
Qualität (Bildauflösung)
Einstellung der Bild-
auflösung:
Automatisch
HD: 1080p
SD: VGA.
Tippen Sie auf das >
Symbol und wählen Sie
die gewünschte Bildauf-
lösung aus. Tippen Sie auf
HD für hohe Auflösung
(1080p) auf SD für
niedrige Auflösung
(VGA) oder auf Automa-
tisch, dann stellt die Ka-
mera die bestmögliche
Auflösung ein. Zum Spei-
chern tippen Sie auf den
Button .Speichern
Bewegungerkennungs-
mitteilung
Um sich eine Benachrich-
tigung (Push Notificati-
on) auf Ihr Mobilgerät
schicken zu lassen, akti-
vieren
Sie die Funktion
Push-
Benachrichtigung.
Um die Funktion einzu-
schalten, ziehen Sie den
weißen Punkt nach rechts
bis der Button grün unter-
legt ist.
Um die Funktion auszu-
schalten, ziehen Sie den
weißen Punkt nach links
bis der Button weiß ist.
Zum Speichern tippen Sie
auf den Button Spei-
chern.
Wichtiger Hinweis: Zusätzlich aktivieren Sie im Benutzercenter Mein Profil im Menü Abrufen
des Standorts fehlgeschlagen Push-Benachrichtigungen die Funktion .

17
Geräteinformationen
Hier können Sie überprüfen, ob die Kamera die aktuelle Firmware-Version nutzt.
Tippen Sie auf das dann auf . Nun wird Ihnen angezeigt, ob die> Symbol, Firmware-Update
Firmware der Kamera auf dem neuesten Stand ist.
Hilfe
Hier steht Ihnen eine Hilfe-
Datei zur Verfügung
Tippen Sie auf das > Sym-
bol, es erscheint die Hilfe-
Datei.
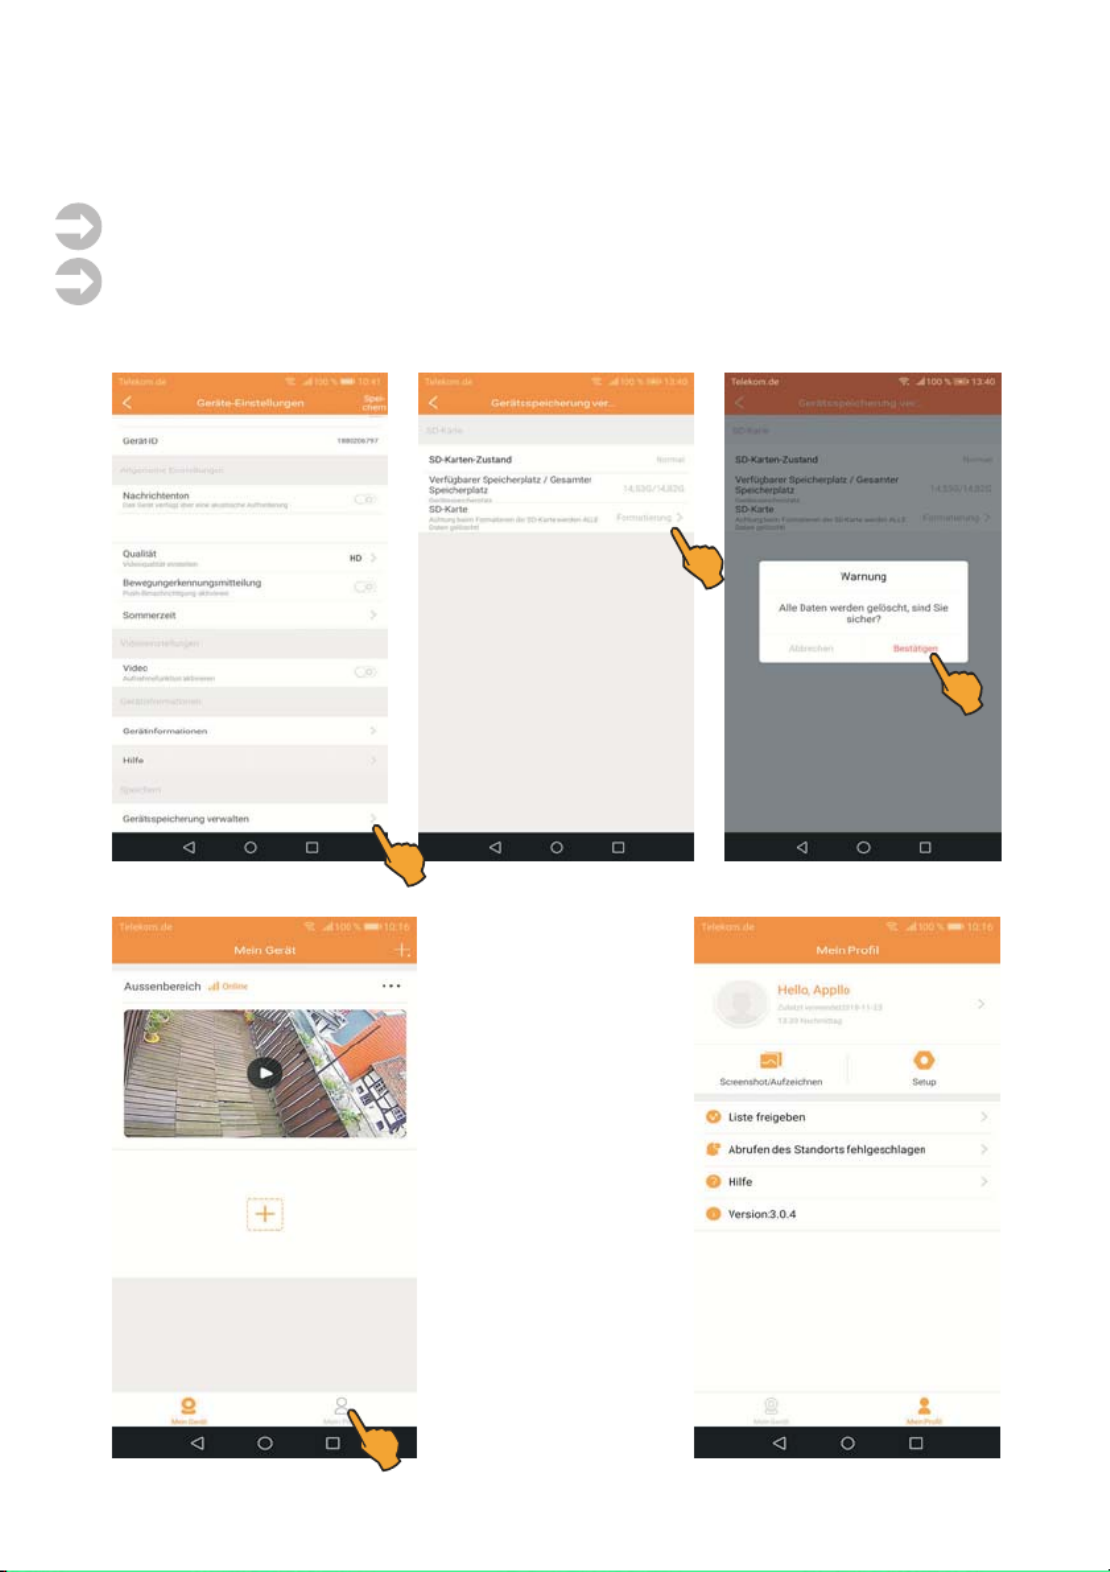
Gerätespeicherung verwalten
Tippen Sie auf das . Die folgenden Informationen zur eingesetzten microSD-Karte> Symbol
stehen hier zur Verfügung: TF-Speicherkartenstatus. Kapazität: Verfügbarer Speicherplatz und
Gesamtspeicherplatz.
Wichtiger Hinweis: Wenn der Gesamtspeicherplatz der SD-Karte belegt ist, wird automatisch
die Funktion (die ältesten Aufnahmen werden gelöscht) aktiviert.File Overwrite
Wichtiger Hinweis: Vor Benutzung der Speicherkarte diese bitte unbedingt formatieren!
Tippen Sie dazu auf das und es erscheint die Meldung > Symbol Warnung Alle Daten werden
gelöscht, sind Sie sicher? Tippen Sie nun auf um mit der Formatierung fortzufahren.Bestätigen,
Mein Profil
Tippen Sie im Startbild-
schirm auf den Mein
Profil Button.
Hier stehen Ihnen ver-
schiedene Informationen
und weitere Menüs zur
Verfügung.
n Account
n
Screenshot/Aufzeichnen
n Setup
n Liste freigeben
n Abrufen des Standorts
fehlgeschlagen
n Hilfe
n App Version
18
20
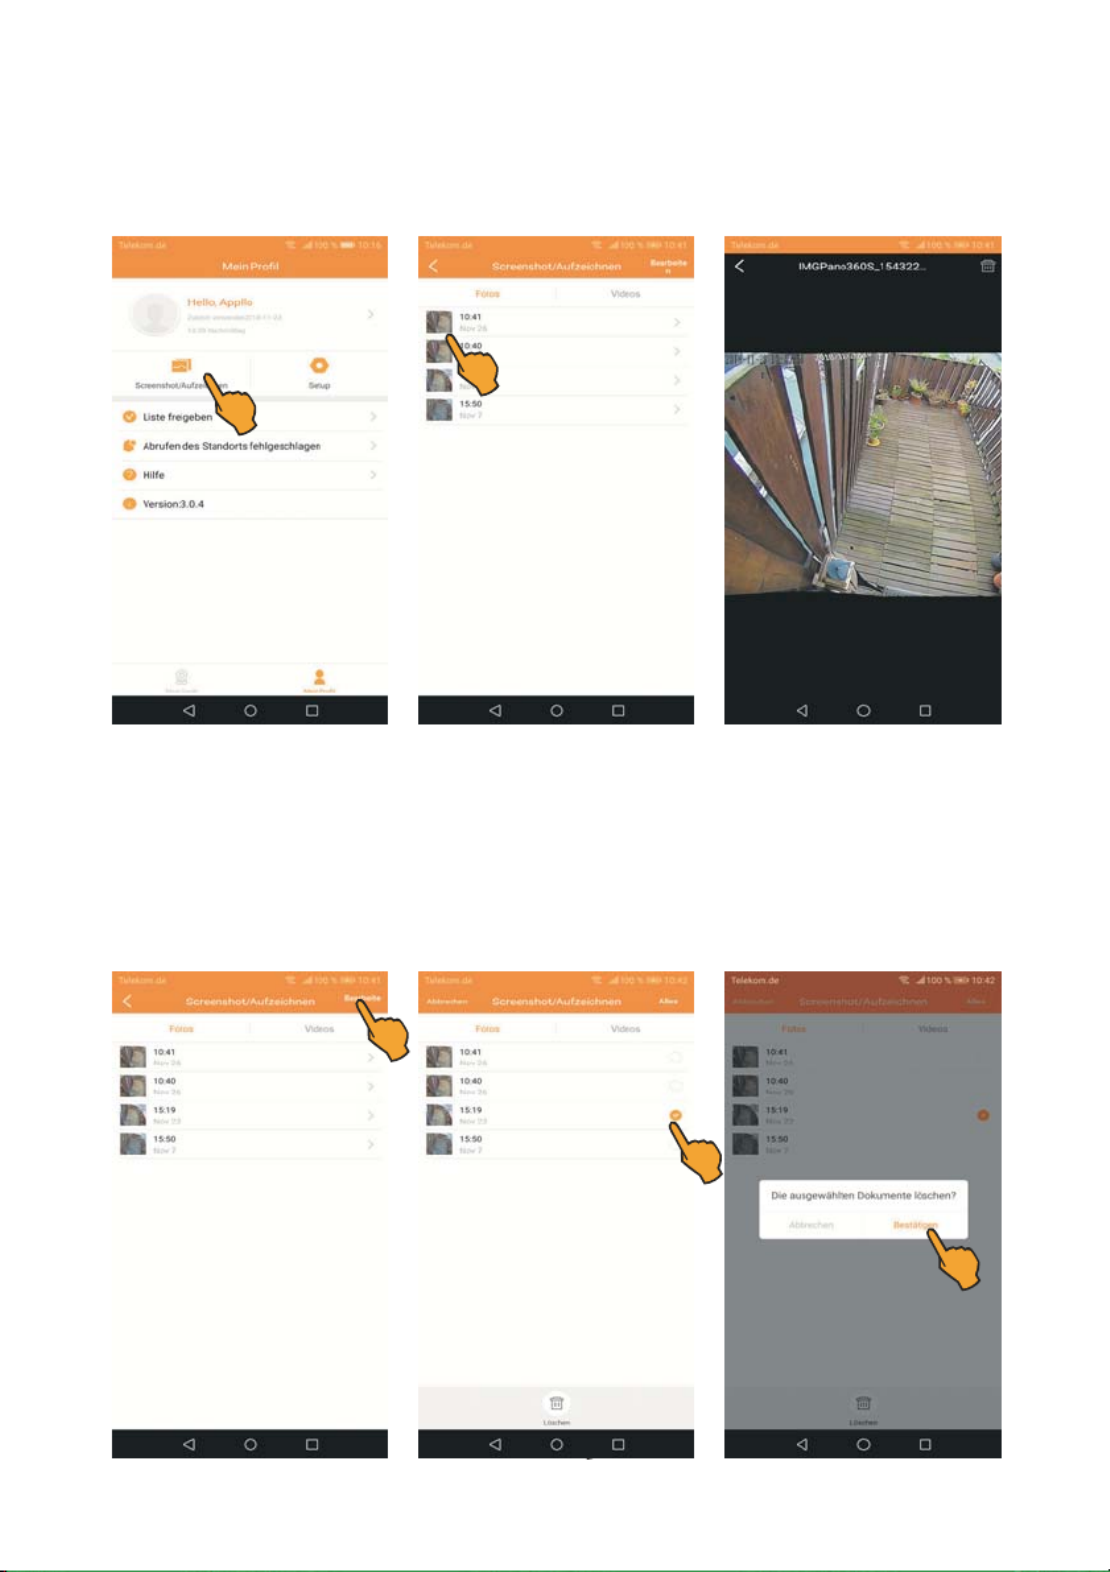
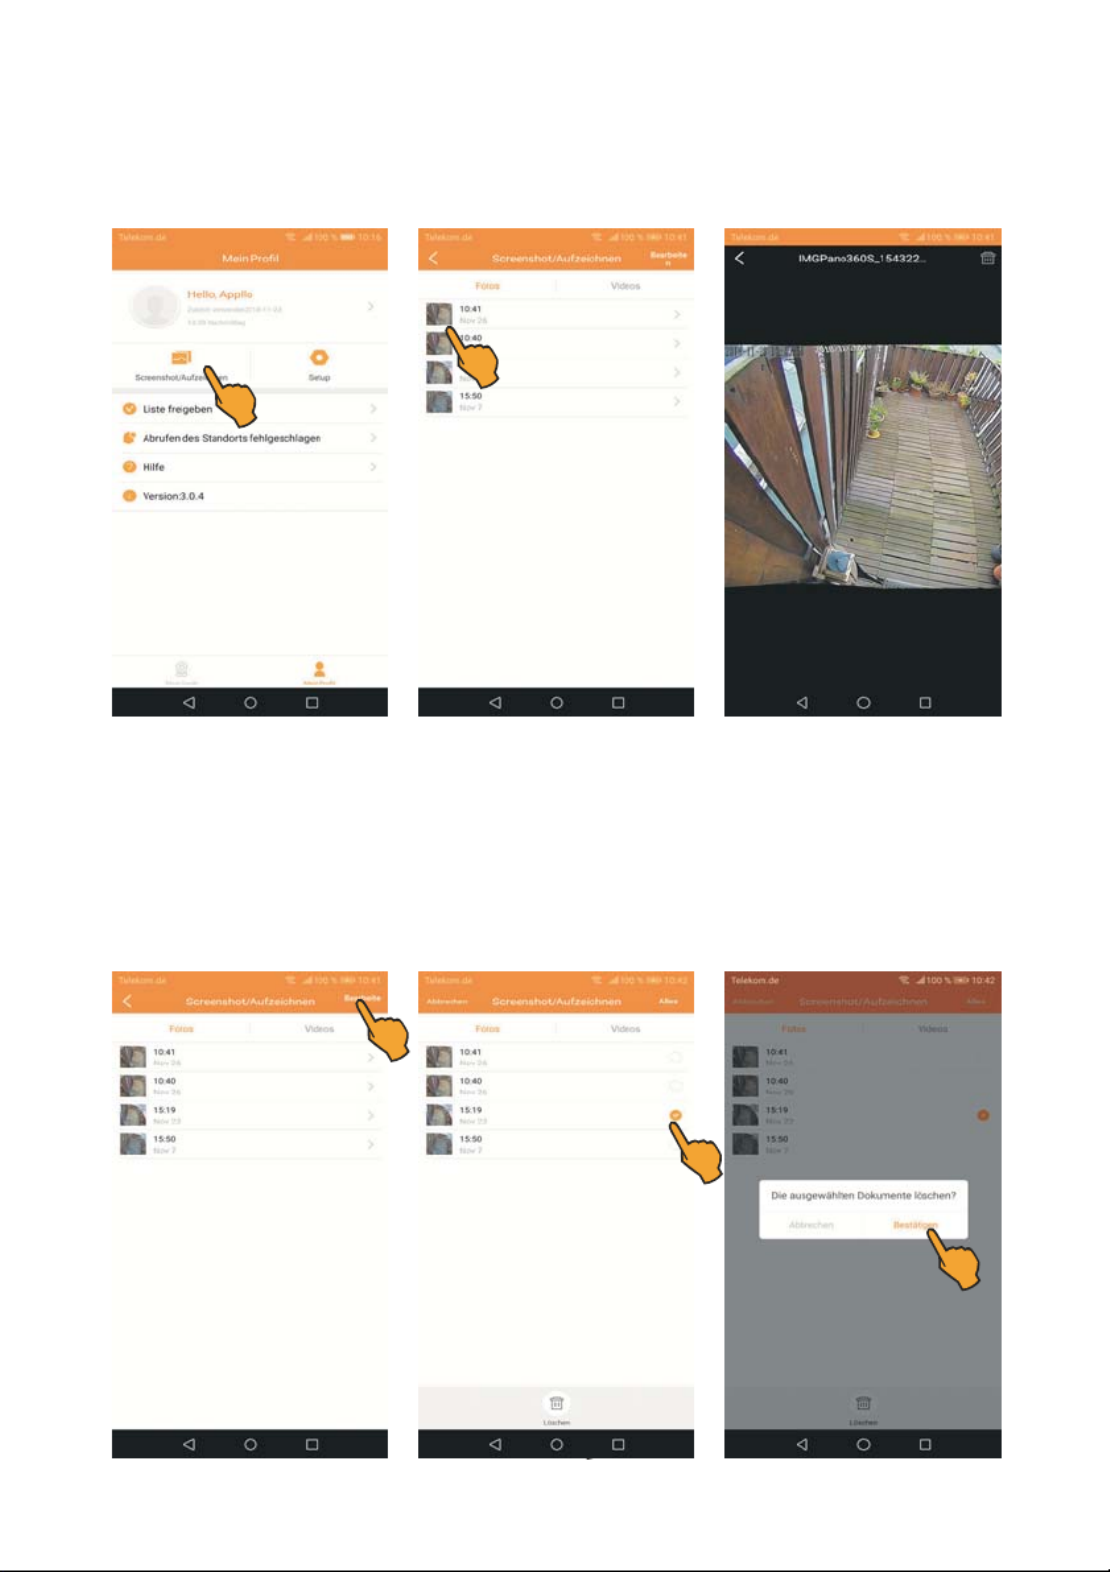
n Screenshot/ Aufzeichnen
Hier können Sie die manuell erstellten Fotos und Videoaufzeichnungen anschauen.
Tippen Sie auf , es öffnet sich automatisch der Ordner mit denScreenshot/ Aufzeichnen
aufgenommenen Fotos. Tippen Sie auf das jeweilige Vorschaubild, um das Foto zu betrachten
Löschen einzelner Fotos
Tippen Sie auf Bearbeiten. Setzen Sie nun bei den Fotos, die Sie löschen möchten, einen Haken
und tippen anschließend auf das . Tippen Sie auf um die FotosMülleimer-Symbol Bestätigen,
endgültig zu löschen.

21
Manuelle Aufzeichnungen ansehen
Tippen Sie auf den Button der Ordner mit den erstellten Aufzeichnungen wird geöffnet.Video,
Tippen Sie auf das Vorschaubild, um die Aufnahme zu betrachten.
Löschen einzelner Aufnahmen
Tippen Sie auf . Setzen Sie nun bei der Aufnahme, die Sie löschen möchten, einenBearbeiten
Haken und tippen anschließend auf das Mülleimer-Symbol. Tippen Sie auf um dieBestätigen,
Aufnahme endgültig zu löschen.
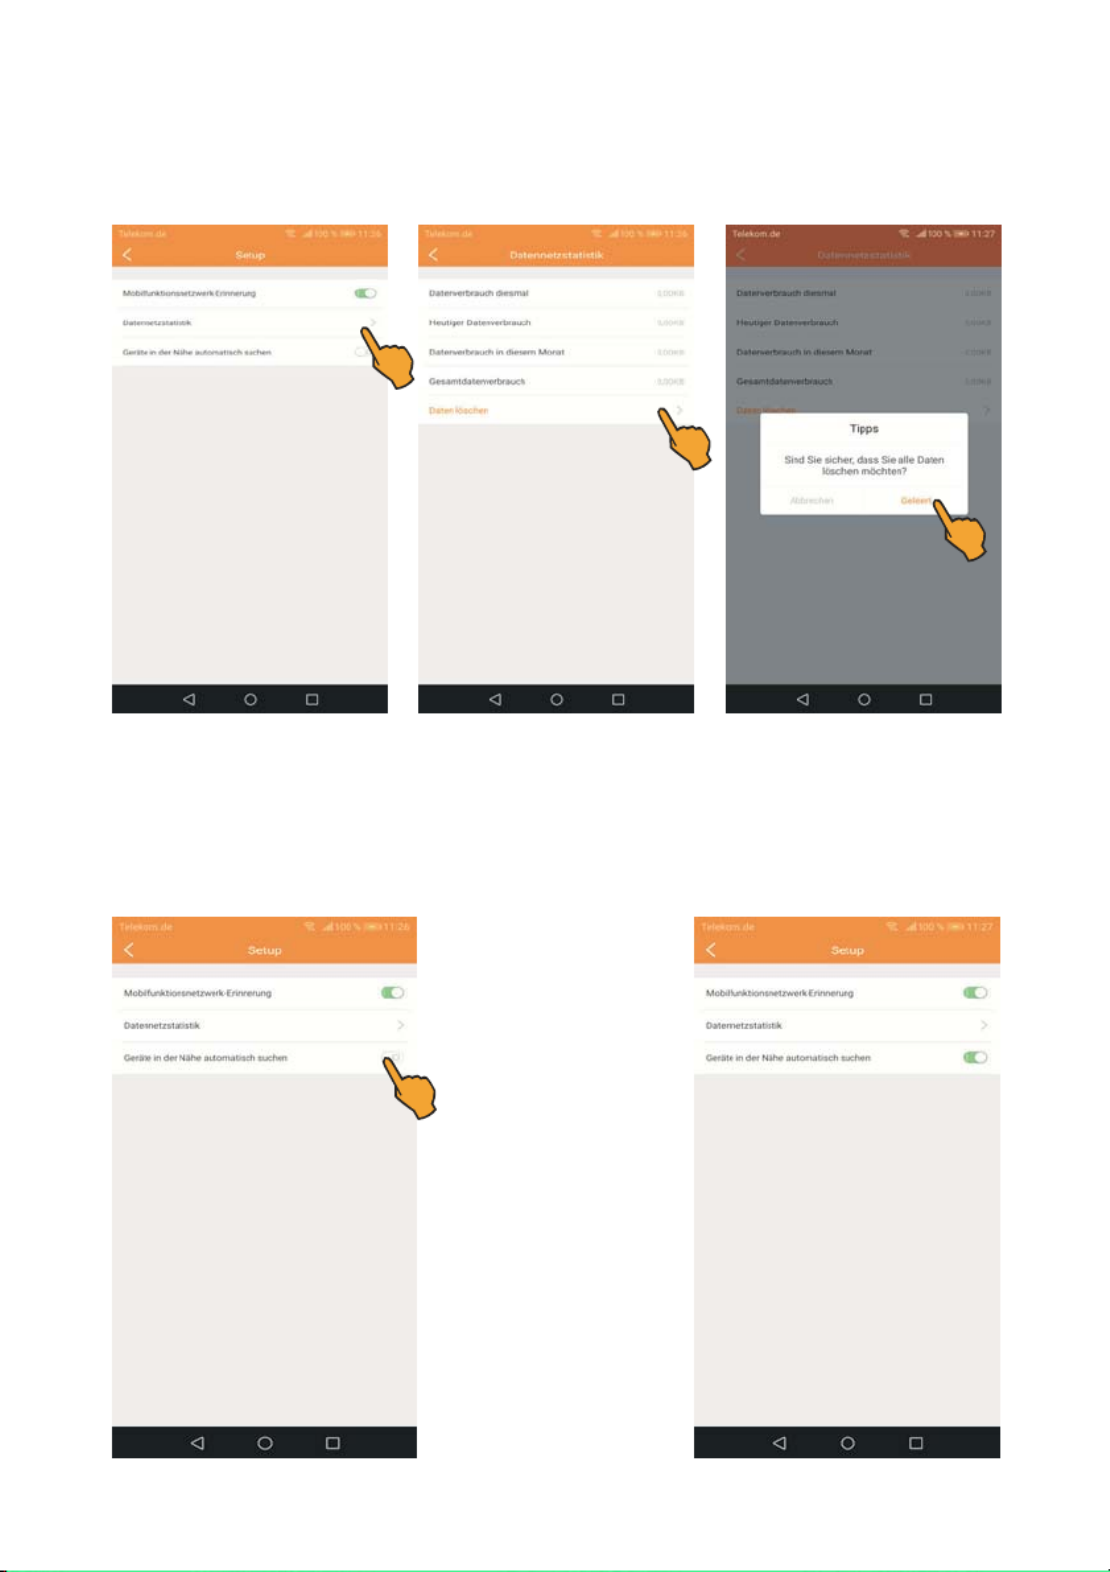
Datennetzstatistik
Um das verbrauchte Datenvolumen zu überprüfen, tippen Sie auf das Um diese> Symbol.
Daten zu löschen, tippen Sie unter auf das Daten löschen > Symbol. Tippen Sie anschließend
im Hinweisfenster auf den Button .Geleert
Geräte in der Nähe automatisch suchen
Es wird automatisch eine eingeschaltete Kamera erkannt und ihre ID-Nummer wird angezeigt.
Ein-/Ausschalten der
Funktion:
Geräte in der Nähe
automatisch suchen
Um die Funktion zu akti-
vieren, ziehen Sie den
weißen Punkt nach rechts
bis der Button grün unter-
legt ist. Um diese Funktion
zu deaktivieren, ziehen
Sie den weißen Punkt
nach links bis der Button
weiß ist.
23
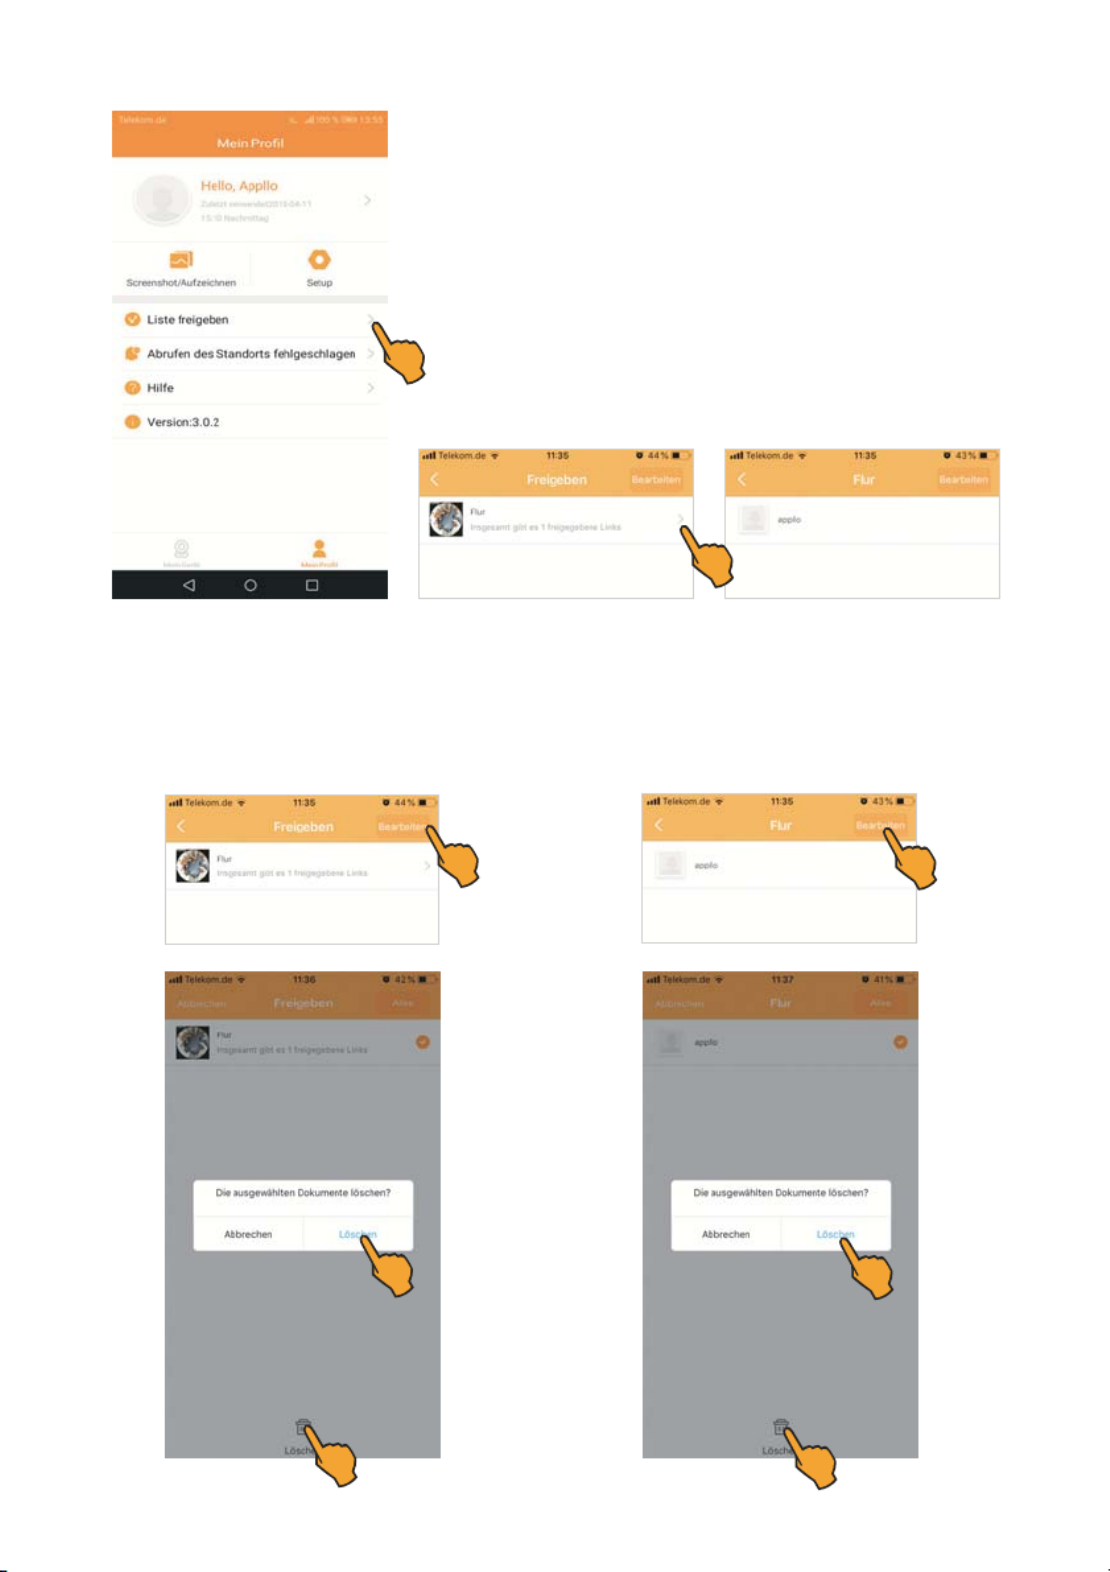
n Liste freigeben
Wenn Sie über die Funktion Freigeben (siehe Seite 29) erlauben,
dass ein weiterer Account auf Ihre Kamera zugreifen darf, werden
die Kamera und der Account in dieser Liste angezeigt.
Tippen Sie auf Es wird Ihre Kamera angezeigt.Liste freigeben.
Tippen Sie auf das > Symbol, es wird nun der Account angezeigt,
der freigegeben wurde.
Freigegebene Kamera und Account aus der Liste löschen
Tippen Sie auf Bearbeiten. Setzen Sie bei der
Kamera einen Haken und tippen anschließend
auf das . Tippen Sie aufMülleimer-Symbol
Löschen, um die Kamera zu löschen.
24
Tippen Sie auf Bearbeiten. Setzen Sie bei dem
Account einen und tippen anschließendHaken
auf das . Tippen Sie aufMülleimer-Symbol
Löschen, um den Account zu löschen.
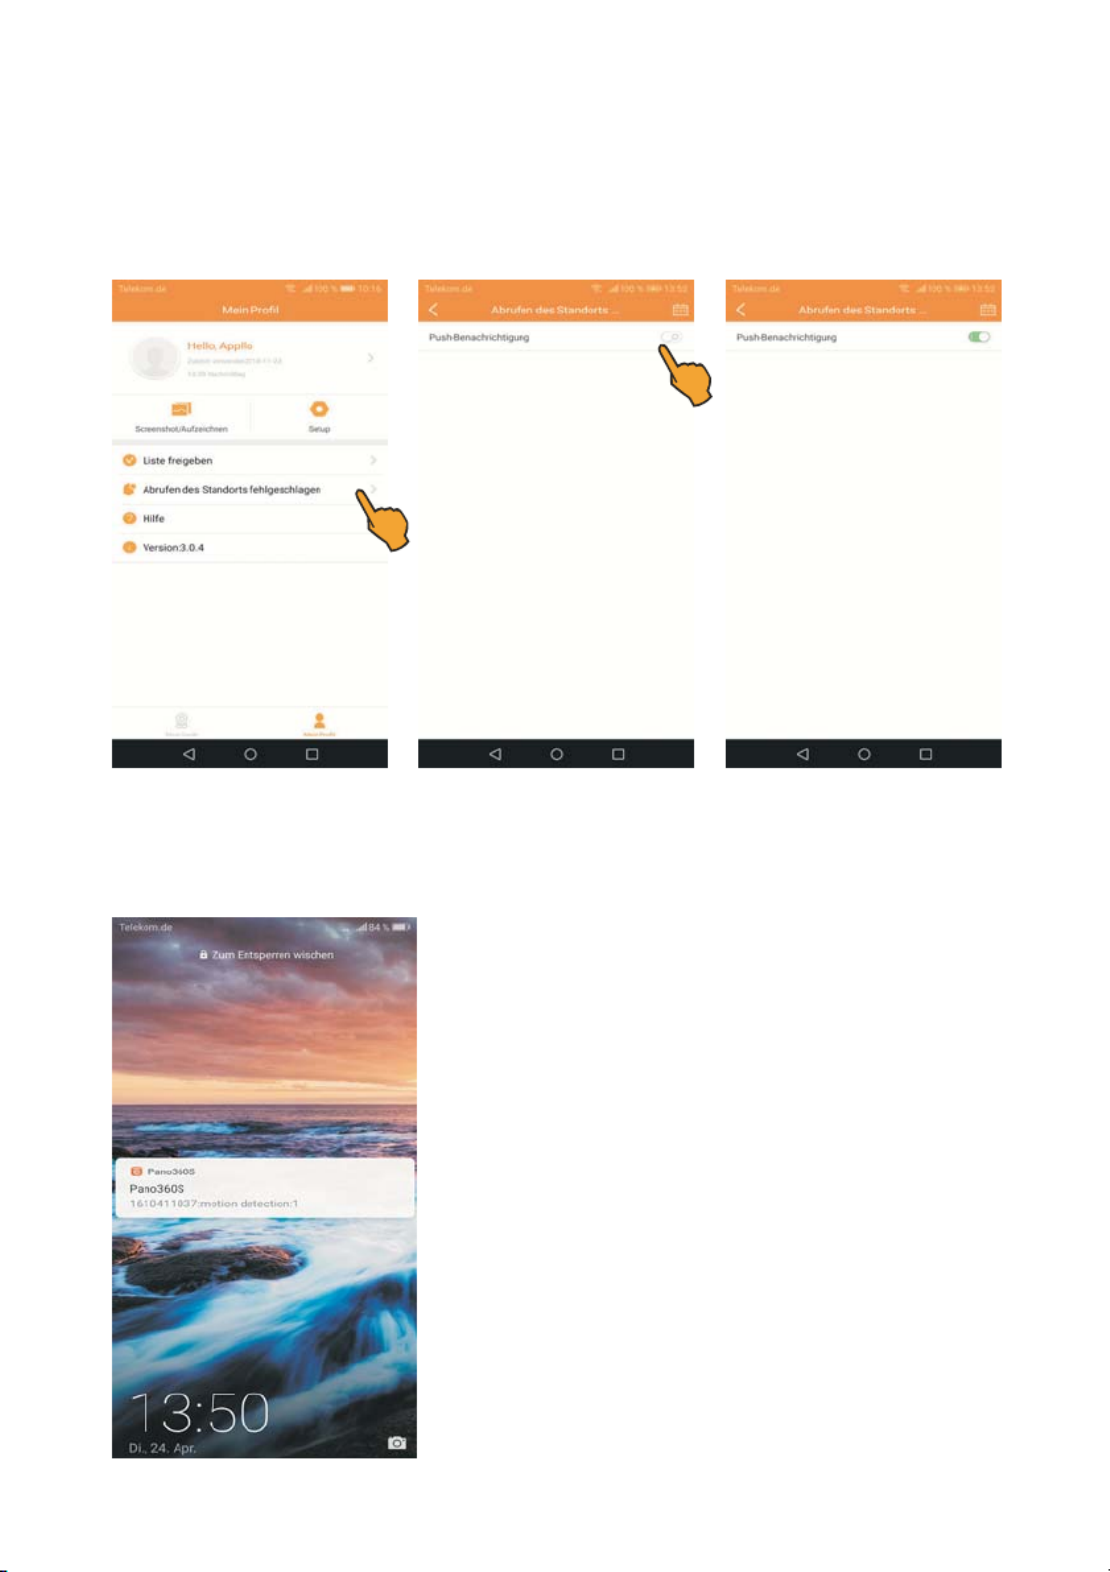
n Abrufen des Standorts fehlgeschlagen
Um eine Benachrichtigung ( ) auf Ihrem Mobilgerät zu erhalten, aktivieren SiePush Notification
in die Funktion .Abrufen des Standorts fehlgeschlagen Push-Benachrichtigungen
Tippen Sie auf Abrufen des Standorts fehlgeschlagen. Um die Funktion zu aktivieren, ziehen
Sie den weißen Punkt nach rechts bis der Button grün unterlegt ist. Um die Funktion zu deaktivieren,
ziehen Sie den weißen Punkt nach links bis der Button weiß ist.
Benachrichtigung auf dem Display vom Mobilgerät
erhalten
Wenn die Kamera eine Bewegung registriert, wird eine Be-
nachrichtigung (Push Notification) an Ihr Mobilgerät gesendet.
Zusätzlich wird jede Benachrichtigung gespeichert.
25

Gespeicherte
Benachrichtigungen
anzeigen
Tippen Sie auf Abrufen
des Standorts fehlge-
schlagen, es erscheint
nun eine Liste mit der An-
zahl der aktuellen ausge-
lösten Bewegungsalarme
mit Datum und Uhrzeit.
Nutzen Sie die Kalender Funktion, um Bewegungsalarme an zurückliegenden Tagen einzusehen.
Tippen Sie auf das . Stellen Sie nun den Tag ein und tippen Sie auf Kalender-Symbol Bestätigen.
Es erscheint eine Liste mit der Anzahl der aktuellen ausgelösten Bewegungsalarme mit Datum
und Uhrzeit.
26

n + Zeichen
Tippen Sie auf das +-
Zeichen, um eine neue
Kamera hinzufügen. Fol-
gen Sie hierzu den Instal-
lationsanweisungen.
Wichtiger Hinweis:
Wichtig für Android-Mobil-
telefone. Vor Gerät hinzu-
fügen: GPS/Standortbe-
stimmung einschalten!
n Menü
Um das Menü aufzurufen,
tippen Sie auf
Hier stehen Ihnen drei
Funktionen zu Verfügung:
Geräte-Einstellungen
Freigeben
Löschen
28

Geräte-Einstellung
Tippen Sie auf Geräte-
Einstellung, um das Ka-
mera Menü zu öffnen.
Kamera Menü: Für indi-
viduelle Einstellungen.
(siehe Seite 13)
Freigeben
Mit dieser Funktion kön-
nen Sie die Kamera für
einen weiteren Account
freigeben. Öffnen Sie bei
einem weiteren Smart-
phone die App und loggen
Sie sich in Ihren Account
ein. Tippen Sie auf Gerät
hinzufügen mit der
Funktion .Scannen
Tippen Sie nun auf Frei-
geben, es erscheint ein
QR-Code. Diesen scan-
nen Sie mit dem zweiten
Smartphone ein. Jetzt
können Sie mit dem zu-
sätzlichen Account auf die
Kamera zugreifen.
29

Löschen
Tippen Sie auf Löschen,
wenn Sie eine Kamera
aus der App entfernen
möchten.
Tippen Sie auf Bestätigen,
um den Löschvorgang
abzuschließen.
Technische Daten
stabo WLAN outdoorcam_fisheye HD
WiFi-Frequenz 2,4 - 2,4835 GHz
WiFi-Sicherheit WPA / PSK
WiFi-Standard IEEE 802.11b/g/n
Bildauflösung 1920 x 1080 HD
Bildsensor ¼" CMOS Sensor
Blickwinkel (Diagonal) 180°
Einzel-Bildrate 25 fps
Objektiv Fisheye, f:1.44mm
Digitaler Schwenk-/Neigebereich 180° / 110°
Alarm-Modus Motion Detection
Betriebsspannung 12 V DC / 1 A
Arbeits-Temperaturbereich -15° C ~ 50° C
Nachtsichtweite 10 - 15 m
microSD card slot max. 128 GB (Karte nicht enthalten)
Maße / Gewicht Ø 63 mm, Länge 102 mm (167 mm m. Fuß), 285 g
Entsorgungshinweis
Elektrische/elektronische Geräte gehören nicht in den Hausmüll!
Bitte geben Sie gebrauchte/defekte Geräte bei den entsprechenden Sammelstellen (z. B. Ihres
kommunalen Entsorgers) ab!
30

32
Product description / intended use
The weatherproof (IP66) WLAN outdoorcam_fisheye HD is equipped with a 1080 HD resolution
and an angle of view of 180° in live view mode. The camera provides a digital panning / tilting
function and a digital zoom. With the help of a local home network (WLAN router), video and
audio signals of the monitored area are transmitted to your smart phone or tablet PC. The camera
can be connected with the local home network via (wireless) WLAN.
Its WiFi standard (IEEE 802.11b/g/n) is used to assure a transmission which is almost free from
interferences and secure against eavesdropping thus protecting your privacy, the WPA encryption
is used to prevent unauthorized persons from having access to your camera.
The camera is suitable for outdoor and indoor applications.
Two recording modes are available: Continuous recording or recording via ( ideo otionVMD V M
D VDMetection). If a movement is detected via , recording is automatically started and stored
afterwards (microSD card required, max. 128 GB, not included in the scope of delivery). This
recording is afterwards available on your mobile radio set. In addition, a notification (push
notification) can be sent.
12 infrared LEDs assure high visibility in the dark (range of 10 15 m).
Thanks to the snapshot or recording function, the mobile device can be used to manually take
photos or record video sequences and to store them.
The required app Pano360S can either be downloaded for free as iOS version from the App Store
or as Android version via Google Play.
Safety notes and warnings
Observe the legal provisions on video surveillance! Please observe the applicable data privacy
regulations which are laid down in the Federal Data Protection Act!
Without the respective express written permission, monitoring third parties is prohibited and may
entail legal actions.
For commercial areas, it is essential to observe the corresponding information duty!
The WLAN outdoorcam_fisheye HD is weatherproof (protection type IP 66) and suitable for
mounting in outdoor areas. However, the camera's power supply unit has to be protected
against humidity and moisture!
The supplied power supply unit should be used only! For powering the camera, the delivered
power supply unit must be used only.
If the power supply unit shows damage, do not touch it: There is danger to life through an electric
shock! In this case, first disconnect the mains voltage to the socket and only afterwards disconnect
the power supply unit from the mains. Replace it only with an original power supply unit.
The devices must be kept out of the reach of children! Prevent children from playing with the
device, accessories, or the packing material!
Do not use in hospitals and/or nursing facilities! Your stabo WLAN outdoorcam_fisheye HD
produces radio waves which might affect the proper functioning of the hospital equipment. If
necessary, contact the responsible personnel to clarify whether safe commissioning is possible.
Do not open the devices or make any modifications to them! Never open parts of the housing
and do not make any modification on the devices. Otherwise, no further guarantee claim can be
accepted and the devices could lose their approval for use!
If the housing is damaged, disconnect the power plug! Immediately disconnect the device
from the mains, if damage on the housing is found. Ensure that possibly required repairs are
performed by a qualified person only.

33
Control elements and connections
Mounting and connecting the camera refer page 37
Status LED indication
flashes green slowly (every 2 sec.) Camera is ready for setup
Green light Camera is connected to the Internet and is operable
flashes green rapidly (every 0.5 sec.) Connection to WLAN router is established
DC IN socket
(power supply connector)
microSD card slot
(bottom side of the camera)
Camera base
with ball joint and
union nut
Antenna
Twilight sensor
Reset
power and status LED
(green)
Objective
12 Infrared LEDs

Commissioning/initial installation of the camera
First download the iOS or Android version of the app from the App Store or GooglePano360S
Play Store according to the operating system of your mobile device. To do so, enter Pano360S
into the search bar, highlight the app, download and install it.
Note: In these operating instructions, all operational steps are described for the Android version
of the app.
Mounting and connecting the camera
Note: It is highly advisable to configure and test the camera before mounting.
Inserting a microSD card (max. storage capacity of 128ÊGB)
Remove the cover from the microSD card slot.
Insert the microSD card with the contacts facing towards
the camera base into the microSD card slot until the SD
card is locked in.
Afterwards install the card slot cover again.
Switching on and connecting the camera
Plug the power supply unit into a socket (230 V) and connect
the plug to the cameras DC IN socket which is automatically
switched on when inserting the plug.
After approx. 30 sec., the power LED slowly flashes green and the camera is ready for setup.
Setting up a user account and connecting the camera and a mobile
device
1. Make sure that your
mobile device is
connected with your
WLAN router.
2. Open the app
Pano360Sfor setting up
your user account. Now
tap
(Register).Registrieren
34

35
3. Enter your e-mail
address and your pass-
word twice. Afterwards tap
(Confirm).Bestätigen
For starting the app, enter
your e-mail address in the
(Konto) field,Account
your password in the
(Passwort)Passwort
field and tap Einloggen
(Login).
Important note: Make a note of your user name and password. You will need both to log in later
to the app via (Login).Einloggen
Important note: Important for Android mobile phones. Before adding the device, activate
GPS/position determination!
4. The following notification window Es wurde ein neues Gerät gefunden (A new device has
been detected) is displayed now: To continue the installation, tap Zum Hinzufügen gehen
(Continue adding), the display shows Geräte hinzufügen (Add devices) afterwards. Now tap
the detected .ID number
Note: If this notification window does not appear, tape the sign to continue the installation.+
36
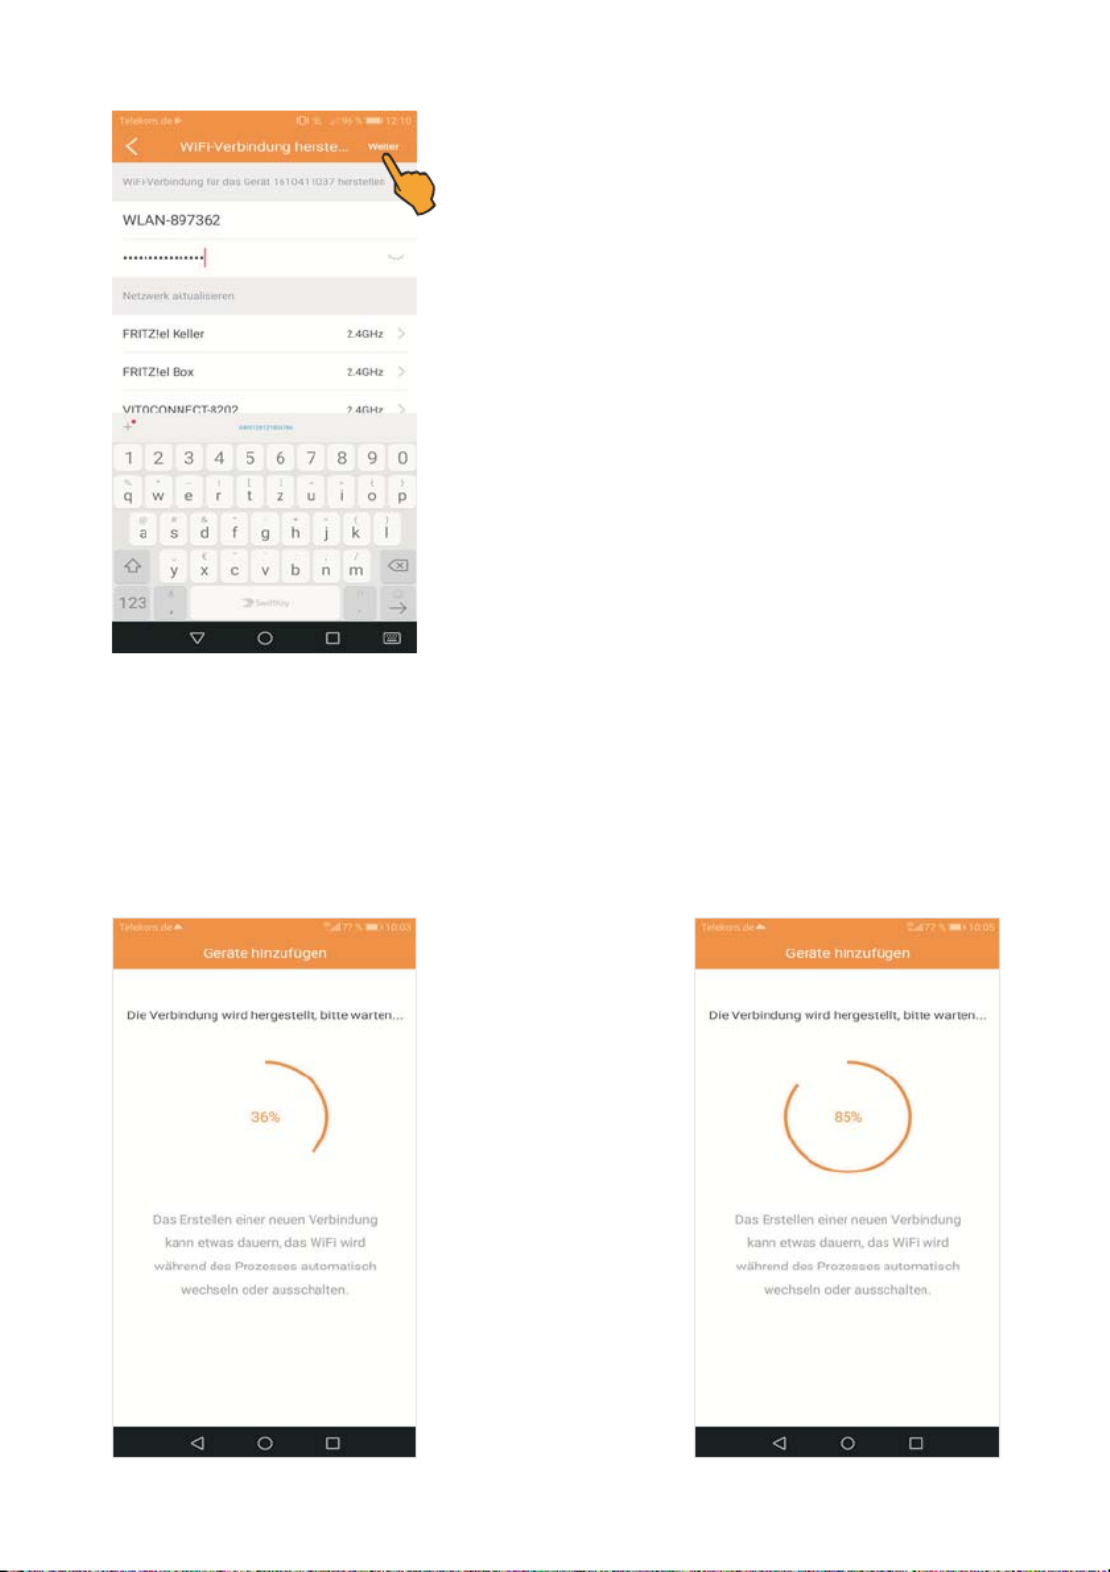
5. Use Password to enter the WPA encryption code for your
WLAN network and tap (Next) afterwards.Weiter
6. The connection
between camera and your
WLAN network is estab-
lished.

7. After successful installation, a device name can be assigned to the camera. Now tap on one
of the default names or enter a name in the device name field. Afterwards tap (Done). Fertig
The connection between app and camera is established. Afterwards the camera switches on-line.
For displaying the cameras live image, tap the .Pano360S icon
Mounting and connecting the camera
Important information:
Consider the following when selecting the camera position:
Range: Check whether the connection between the camera and your WLAN network is stable
at the intended position.
Lighting conditions: The camera should not be orientated towards direct, strong light sour-
ces/sunlight, since overexposed images may result.
Power supply: The camera's power supply unit must not be exposed to the weather in the open!
Mounting: The camera support is suitable for ceiling and wall mounting.
Make sure that the mounting surface is stable and does not give rise to strong vibrations and/or
falls.
First, install the camera only provisionally and check whether the desired monitored area is
completely covered prior to drilling the holes for the camera support! Make sure that no cables
or conducts are placed in the wall which may be damaged when drilling!
Mark the desired position for the drilling holes of the fixing screws and use the camera mount as
drilling jig.
Drill the mounting holes and fix the camera using screws which are suitable for the respective
base material.
For adjusting the horizontal and vertical camera position, undo the union nut by turning it in
counterclockwise direction.
Adjust the camera to the desired position and angle. Afterwards tighten the union nut in clockwise
direction to fix the adjusted position.
Plug the power supply unit into a socket (230 V) and connect the plug to the DC IN socket of the
camera. If the power LED lights green, the camera is operable.
37

38
PTZ function (pan, tilt, zoom)
Digital panning, tilting and zooming
1Changeover between normal and fish eye view (tap twice).
2Digital panning and tilting: Tap the middle of the live image and swipe in the desired direction.
3Digital zoom: For zooming the live image, use the familiar pinch gesture.
Functions of live view mode
1 Camera settings
2 Switchover between horizontal and vertical view
3 Automatic panning the 180° view
4 Image switchover between 180° view
and rectangular view
5 Timeline
6 Snapshot trigger
7 Manual recording
76
4 3
2
1
5

39
1
Camera settings: Refer to page 42
2
Switchover between horizontal and vertical view
For switching over from horizontal to vertical view, tap the
View icon. For returning again to horizontal view, tap the
View icon again.
3
Automatic panning the 180° view
In live image mode, the panning function can be activated.
Tap the to activate or deactivate this function.Panning icon
If the is color-marked, the function is activated.Panning icon
4
Switchover
between 180° view
and rectangular view
Tap the Image switcho-
ver icon to activate the
respective view.
The color-marked Image
switchover symbol is
activated.
5
Timeline (video playback)
With the help of the timeline, the video recordings stored on the microSD card can be activated.
A colored block is used for presenting the recordings.
For displaying the recordings of a certain day, tape the corresponding (Date) button (whichDatum
is color-marked now). All recording of this day are displayed.
Note: The first recording of a day is played at first.
For accessing earlier or later recordings, use your finer to swipe the timeline to the left or right.
Date and time or the current
position on the timeline are
shown in the center of the dis-
play. Playback of the recording
is now started at the position
where you stopped.
For returning to the live image,
tap the (Real time)Echtzeit
button.
40

6
Snapshot trigger
Creates snapshots of the
live image. The photo is
automatically stored on
your smart phone/mobile
device.
For making a photo from
the live image, tap the
screenshot icon. After-
wards a message is
shown to inform you
where the taken photo is
stored on your mobile de-
vice.
Note: You can use the
user center Mein Profil
(My profile) to view the
photo under Screens-
hot/Aufzeichnen
(Screenshot/record).
7
Manual recording
Starts and stops the recording of the live image.
Tap the video icon to start recording. The message Videoaufnahme starten (Start video recording)
is displayed. A red dot, Filmen (Film) and the current recording time appear in the top left corner
of the display. For stopping the recording, tap the video icon once again. Afterwards a message
is shown to inform you where the video recording is stored on your mobile device.
Note: You can use the user center Mein Profil (My profile) to view the recording under Screens-
hot/Aufzeichnen (Screenshot/record).
41
42
1
Camera settings: Applies individual camera settings.
Tap the Menu icon to open the menu. This menu is used to indicate different information and to
apply individual settings.
Information and settings:
Device name
Device ID of the camera
Message tone
Quality (image resolution)
Push notification
Summer/winter time (daylight saving time)
Video
Device info
Help
Administration of device storage
Important note: For storing modified settings, tap the (Save) button in the upperSpeichern
right corner.

Device name
Assigns a new device name.
Tape the last letter of the name,
delete the name and assign a
new one afterwards. For saving
the new name, tap the Spei-
chern (Save) button.
Message tone
Switches the speech an-
nouncement of the came-
ra on and off.
For activating the mes-
sage tone, move the white
dot to the right until the
button has a green
background. For deacti-
vating the message tone,
move the white dot to the
left until the button is
shown in white. Save the
settings by tapping the
Speichern (Save) button.
43

44
Quality
(image resolution)
Setting of the image re-
solution:
Automatic
HD: 1080p
SD: VGA.
Tap the and select> icon
the requested image re-
solution. Tap HD for high
resolution (1080p), SD
for low resolution
(VGA) or Automatisch
(Automatic) so that the
camera automatically ad-
justs the best possible re-
solution. For saving, tap
the (Save)Speichern
button.
Movement detection
notification
Activate the function Push-
Benachrichtigung
(Push notification) and
notifications (Push noti-
fications) are sent to your
mobile device.
For activating the function,
move the white dot to the
right until the button has
a green background.
For deactivating the
function, move the white
dot to the left until the
button is shown in white.
For saving, tap the
Speichern (Save) button.
Important note: In addition, the function (Push notifications) mustPush-Benachrichtigungen
be activated in the menu Abrufen des Standorts fehlgeschlagen (Location detection failed)
in the user center (My profile).Mein Profil

45
Setting
summer/winter time
Tap Daylight saving time.
For activating the summer
or daylight savings time,
move the white dot to the
right until the button has
a green background.
Now select the requested
region. Afterwards tap
Speichern (Save) to ac-
cept the adjusted settings.
For returning to normal
standard time, move the
white dot to the left and
save.
Video
Activates the recording function. You can choose between two recording modes: Continuous
recording or recording at movement detection.
For activating the function, move the white dot to the right until the button has a green background.
Now tap the > icon and the recording mode afterwards. For storing the settings, tap the Speichern
(Save) button. For deactivating the function, move the white dot to the left until the button is shown
in white.

46
Device info
This options allows you to check whether the camera uses the current firmware version.
Tap the > and icon Firmware update afterwards. Firmware-Update. You should see now whether
the latest firmware is used on your camera.
Help
The help file is available
here.
Tap the and the> icon
help file is displayed.

n Account
For opening the menu tap the .> icon
The following information is available here:
The account name, nick name (if assigned), e-mail address (is not displayed for confidentiality
reasons).
Furthermore, you can modify your old password.
Tap the > icon. Enter your old password and afterwards your new password. Now tap Bestätigen
(Confirm).
Important note: Make a note of the new password. You will need it to log in later to the app via
Einloggen (Login).
Logout from the app
If you do not use the app
anymore, log off from your
account. If you doNote:
not log off, the app re-
mains active in the back-
ground.
Tap (LogAusloggen
off). The message
Möchten Sie sich vom
derzeitigen Account ab-
melden? (Do you want
to log off from your current
account). Tap Log off.
48
49
n Screenshot/ Aufzeichnen (Screenshot record)
Manually created photos and video recordings can be shown with this menu item.
Tap Screenshot/ Aufzeichnen (Screenshot/record), the folder including the taken photos
automatically opens. Tap the respective to display the photo.thumbnail
Deleting individual photos
Tap (Edit). Check the photos to be deleted by tapping to place a Bearbeiten checkmark and tap
the . Tap (Confirm) to definitely delete the photos.wastebin icon Bestätigen

50
Viewing manual recordings
Tap the Video button and the folder including the recordings opens. Tap the to viewthumbnail
the recording.
Deleting individual recordings
Tap Bearbeiten (Edit). Check the recording to be deleted by tapping to place a checkmark and
tap the . Tap (Confirm) to definitely delete the recording.wastebin icon Bestätigen
51
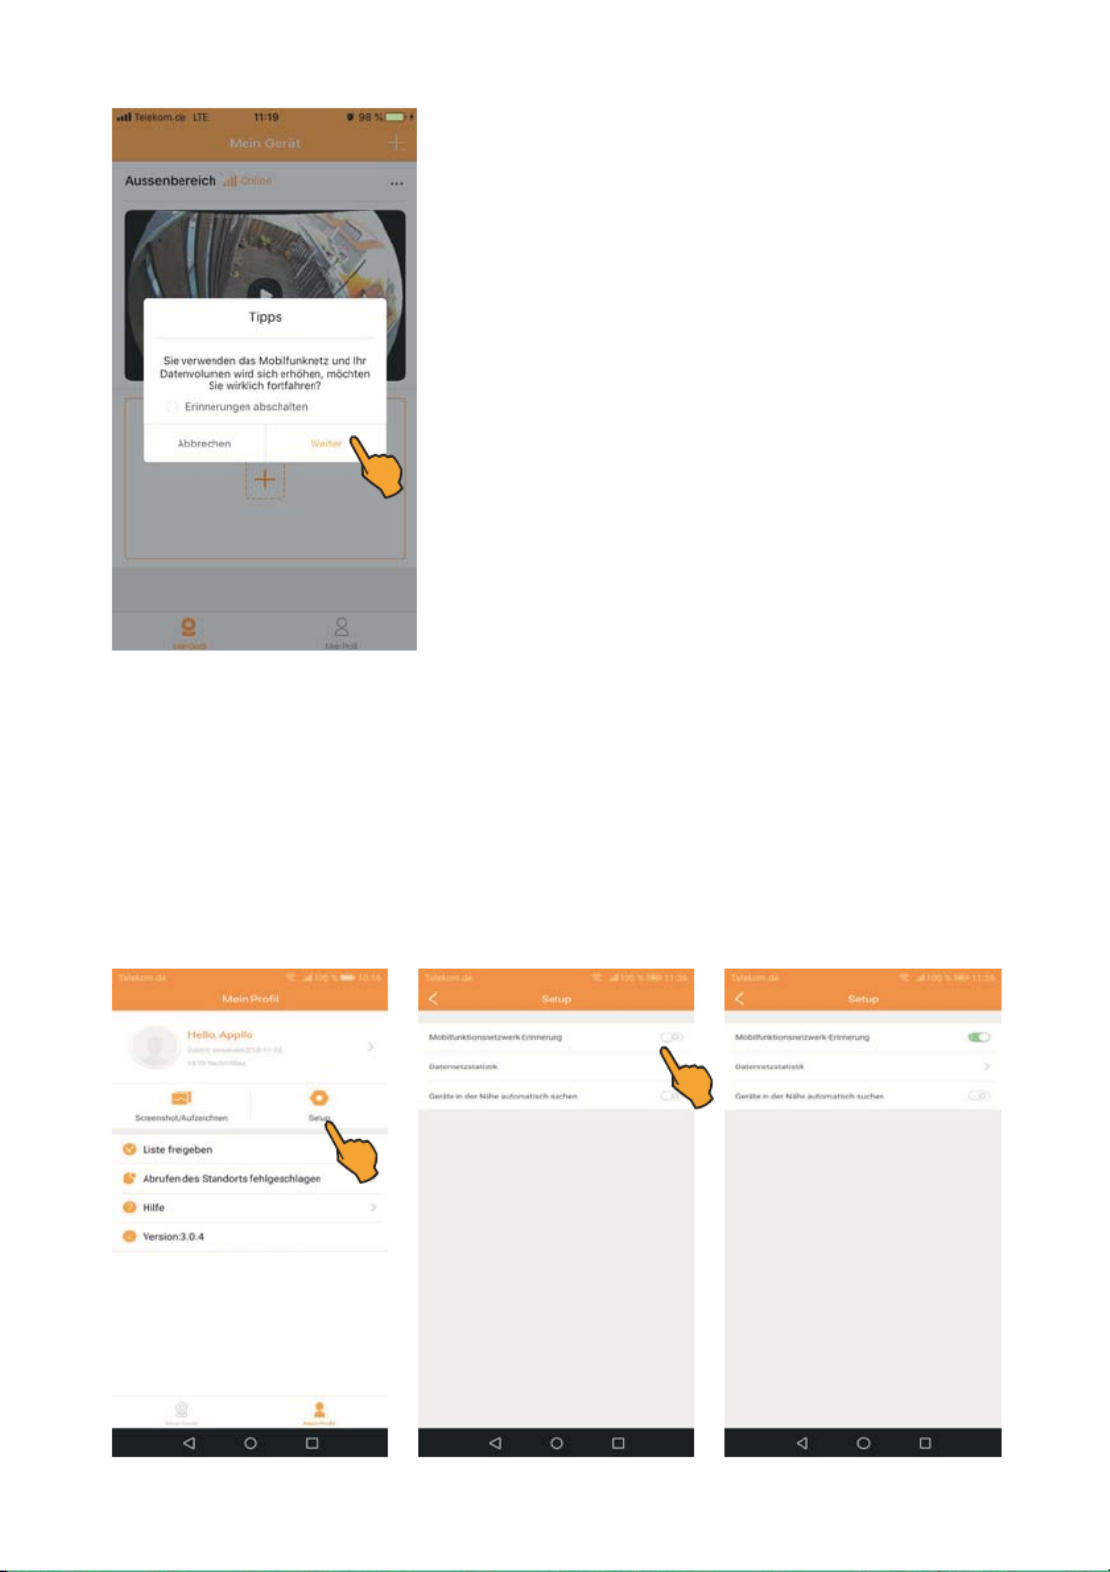
n Setup
The following functions are available in the menu:Setup
Reminder of mobile phone network usage
Data network statistics
Automatic search for nearby devices
Reminder of mobile phone network usage
If your smartphone is connected to the mobile phone network
and you activate the live image function of your camera, a
message is displayed informing you that you use the mobile
phone network and thus you data volume can be increased.
Tap (Next) to continue.Weiter
Switching the reminder of mobile phone network usage on/off
Tap For activating this function, move the white dot to the right until the button has a greenSetup.
background. For deactivating the function, move the white dot to the left until the button is shown
in white.
Specyfikacje produktu
| Marka: | Stabo |
| Kategoria: | Kamera monitorująca |
| Model: | WLAN outdoorcam_fisheye 180° HD 510914 |
Potrzebujesz pomocy?
Jeśli potrzebujesz pomocy z Stabo WLAN outdoorcam_fisheye 180° HD 510914, zadaj pytanie poniżej, a inni użytkownicy Ci odpowiedzą
Instrukcje Kamera monitorująca Stabo

24 Września 2024
20 Września 2024
16 Września 2024
15 Września 2024
15 Września 2024
15 Września 2024
15 Września 2024
13 Września 2024
13 Września 2024
13 Września 2024
Instrukcje Kamera monitorująca
- Kamera monitorująca Sony
- Kamera monitorująca Samsung
- Kamera monitorująca Tenda
- Kamera monitorująca Motorola
- Kamera monitorująca Logitech
- Kamera monitorująca Xiaomi
- Kamera monitorująca Braun
- Kamera monitorująca Pioneer
- Kamera monitorująca TP-Link
- Kamera monitorująca Philips
- Kamera monitorująca Bosch
- Kamera monitorująca Gigaset
- Kamera monitorująca Hikvision
- Kamera monitorująca EZVIZ
- Kamera monitorująca Conceptronic
- Kamera monitorująca Panasonic
- Kamera monitorująca Canon
- Kamera monitorująca Crestron
- Kamera monitorująca Withings
- Kamera monitorująca Asus
- Kamera monitorująca Nedis
- Kamera monitorująca AG Neovo
- Kamera monitorująca Reolink
- Kamera monitorująca Boss
- Kamera monitorująca TRENDnet
- Kamera monitorująca Marquant
- Kamera monitorująca Toshiba
- Kamera monitorująca D-Link
- Kamera monitorująca August
- Kamera monitorująca Niceboy
- Kamera monitorująca Ring
- Kamera monitorująca Garmin
- Kamera monitorująca Imou
- Kamera monitorująca Blaupunkt
- Kamera monitorująca Grundig
- Kamera monitorująca APC
- Kamera monitorująca Honeywell
- Kamera monitorująca BLOW
- Kamera monitorująca Manhattan
- Kamera monitorująca Strong
- Kamera monitorująca Swann
- Kamera monitorująca Kwikset
- Kamera monitorująca Kodak
- Kamera monitorująca Cisco
- Kamera monitorująca ORNO
- Kamera monitorująca Broan
- Kamera monitorująca Moxa
- Kamera monitorująca Synology
- Kamera monitorująca Gembird
- Kamera monitorująca ZTE
- Kamera monitorująca Turing
- Kamera monitorująca Lindy
- Kamera monitorująca Minox
- Kamera monitorująca Zebra
- Kamera monitorująca DSC
- Kamera monitorująca JVC
- Kamera monitorująca ZyXEL
- Kamera monitorująca Trust
- Kamera monitorująca LogiLink
- Kamera monitorująca Furrion
- Kamera monitorująca Linksys
- Kamera monitorująca Google
- Kamera monitorująca Digitus
- Kamera monitorująca Vimar
- Kamera monitorująca V-TAC
- Kamera monitorująca Dahua Technology
- Kamera monitorująca Schneider
- Kamera monitorująca Eufy
- Kamera monitorująca Ricoh
- Kamera monitorująca Emos
- Kamera monitorująca AVMATRIX
- Kamera monitorująca Renkforce
- Kamera monitorująca Rollei
- Kamera monitorująca Marshall
- Kamera monitorująca Perel
- Kamera monitorująca Somfy
- Kamera monitorująca Uniden
- Kamera monitorująca Netgear
- Kamera monitorująca Thomson
- Kamera monitorująca DiO
- Kamera monitorująca Velleman
- Kamera monitorująca Ferguson
- Kamera monitorująca DataVideo
- Kamera monitorująca Delta Dore
- Kamera monitorująca Pyle
- Kamera monitorująca Intellinet
- Kamera monitorująca CRUX
- Kamera monitorująca Setti+
- Kamera monitorująca Waeco
- Kamera monitorująca Vivotek
- Kamera monitorująca Vtech
- Kamera monitorująca Speco Technologies
- Kamera monitorująca EtiamPro
- Kamera monitorująca Edimax
- Kamera monitorująca Petcube
- Kamera monitorująca ION
- Kamera monitorująca First Alert
- Kamera monitorująca AirLive
- Kamera monitorująca Maginon
- Kamera monitorująca EnGenius
- Kamera monitorująca SPC
- Kamera monitorująca Planet
- Kamera monitorująca Brilliant
- Kamera monitorująca Genie
- Kamera monitorująca LevelOne
- Kamera monitorująca Axis
- Kamera monitorująca Sanyo
- Kamera monitorująca Lorex
- Kamera monitorująca Control4
- Kamera monitorująca Milesight
- Kamera monitorująca Aluratek
- Kamera monitorująca Abus
- Kamera monitorująca Elro
- Kamera monitorująca Olympia
- Kamera monitorująca Hama
- Kamera monitorująca Marmitek
- Kamera monitorująca Ubiquiti Networks
- Kamera monitorująca Western Digital
- Kamera monitorująca Netatmo
- Kamera monitorująca Schwaiger
- Kamera monitorująca Promise Technology
- Kamera monitorująca GVI Security
- Kamera monitorująca AVer
- Kamera monitorująca ZKTeco
- Kamera monitorująca Netis
- Kamera monitorująca Extech
- Kamera monitorująca Denver
- Kamera monitorująca Anker
- Kamera monitorująca Allnet
- Kamera monitorująca Marshall Electronics
- Kamera monitorująca Orion
- Kamera monitorująca Yale
- Kamera monitorująca SereneLife
- Kamera monitorująca Ernitec
- Kamera monitorująca AVerMedia
- Kamera monitorująca MEE Audio
- Kamera monitorująca Genius
- Kamera monitorująca Trevi
- Kamera monitorująca Technaxx
- Kamera monitorująca Atlona
- Kamera monitorująca Hanwha
- Kamera monitorująca Overmax
- Kamera monitorująca Quantum
- Kamera monitorująca Y-cam
- Kamera monitorująca Grandstream
- Kamera monitorująca Raymarine
- Kamera monitorująca Powerfix
- Kamera monitorująca Avanti
- Kamera monitorująca Ikan
- Kamera monitorująca Alecto
- Kamera monitorująca Avidsen
- Kamera monitorująca JUNG
- Kamera monitorująca Burg Wächter
- Kamera monitorująca Foscam
- Kamera monitorująca Lumens
- Kamera monitorująca Monacor
- Kamera monitorująca Dörr
- Kamera monitorująca M-e
- Kamera monitorująca EVE
- Kamera monitorująca Smartwares
- Kamera monitorująca Adj
- Kamera monitorująca Qian
- Kamera monitorująca Arenti
- Kamera monitorująca Elmo
- Kamera monitorująca Vitek
- Kamera monitorująca Alfatron
- Kamera monitorująca UniView
- Kamera monitorująca Clas Ohlson
- Kamera monitorująca Laserliner
- Kamera monitorująca Megasat
- Kamera monitorująca REVO
- Kamera monitorująca BZBGear
- Kamera monitorująca BirdDog
- Kamera monitorująca KJB Security Products
- Kamera monitorująca HiLook
- Kamera monitorująca Profile
- Kamera monitorująca Aldi
- Kamera monitorująca Aritech
- Kamera monitorująca Acti
- Kamera monitorująca ACME
- Kamera monitorująca Flamingo
- Kamera monitorująca Caliber
- Kamera monitorująca Eminent
- Kamera monitorująca Sitecom
- Kamera monitorująca Exibel
- Kamera monitorująca Fortinet
- Kamera monitorująca KlikaanKlikuit
- Kamera monitorująca Trebs
- Kamera monitorująca Ednet
- Kamera monitorująca Steren
- Kamera monitorująca Flir
- Kamera monitorująca Buffalo
- Kamera monitorująca Arlo
- Kamera monitorująca Nest
- Kamera monitorująca Siedle
- Kamera monitorująca Hive
- Kamera monitorująca Switel
- Kamera monitorująca Chacon
- Kamera monitorująca InFocus
- Kamera monitorująca Hombli
- Kamera monitorująca Naxa
- Kamera monitorująca Konig
- Kamera monitorująca Valueline
- Kamera monitorująca BRK
- Kamera monitorująca QSC
- Kamera monitorująca Xavax
- Kamera monitorująca Vaddio
- Kamera monitorująca Gira
- Kamera monitorująca Interlogix
- Kamera monitorująca Boyo
- Kamera monitorująca IC Intracom
- Kamera monitorująca Iget
- Kamera monitorująca EverFocus
- Kamera monitorująca Adesso
- Kamera monitorująca Satel
- Kamera monitorująca POSline
- Kamera monitorująca Notifier
- Kamera monitorująca Hawking Technologies
- Kamera monitorująca Friedland
- Kamera monitorująca Nexxt
- Kamera monitorująca Monoprice
- Kamera monitorująca Watec
- Kamera monitorująca Beafon
- Kamera monitorująca Chuango
- Kamera monitorująca ETiger
- Kamera monitorująca Videcon
- Kamera monitorująca INSTAR
- Kamera monitorująca Provision ISR
- Kamera monitorująca Aqara
- Kamera monitorująca Advantech
- Kamera monitorująca Digital Watchdog
- Kamera monitorująca Ganz
- Kamera monitorująca AViPAS
- Kamera monitorująca ClearOne
- Kamera monitorująca Ebode
- Kamera monitorująca Oplink
- Kamera monitorująca Sonic Alert
- Kamera monitorująca Linear PRO Access
- Kamera monitorująca Summer Infant
- Kamera monitorująca SMC
- Kamera monitorująca Topica
- Kamera monitorująca Kogan
- Kamera monitorująca Iiquu
- Kamera monitorująca Verint
- Kamera monitorująca Brinno
- Kamera monitorująca Rostra
- Kamera monitorująca Caddx
- Kamera monitorująca Spyclops
- Kamera monitorująca EKO
- Kamera monitorująca Kguard
- Kamera monitorująca Woonveilig
- Kamera monitorująca Mobi
- Kamera monitorująca Surveon
- Kamera monitorująca Hollyland
- Kamera monitorująca Epcom
- Kamera monitorująca Indexa
- Kamera monitorująca Lutec
- Kamera monitorująca Whistler
- Kamera monitorująca ClearView
- Kamera monitorująca VideoComm
- Kamera monitorująca IMILAB
- Kamera monitorująca 3xLOGIC
- Kamera monitorująca Pelco
- Kamera monitorująca Leviton
- Kamera monitorująca Inkovideo
- Kamera monitorująca Pentatech
- Kamera monitorująca Weldex
- Kamera monitorująca SecurityMan
- Kamera monitorująca Canyon
- Kamera monitorująca CNB Technology
- Kamera monitorująca Tapo
- Kamera monitorująca Aigis
- Kamera monitorująca Exacq
- Kamera monitorująca Brickcom
- Kamera monitorująca Laxihub
- Kamera monitorująca Securetech
- Kamera monitorująca EFB Elektronik
- Kamera monitorująca NetMedia
- Kamera monitorująca Videotec
- Kamera monitorująca Illustra
- Kamera monitorująca Nivian
- Kamera monitorująca E-bench
- Kamera monitorująca Syscom
- Kamera monitorująca Tecno
- Kamera monitorująca Night Owl
- Kamera monitorująca Guardzilla
- Kamera monitorująca Astak
- Kamera monitorująca Blink
- Kamera monitorująca Milestone Systems
- Kamera monitorująca Zavio
- Kamera monitorująca Campark
- Kamera monitorująca IPX
- Kamera monitorująca Dedicated Micros
- Kamera monitorująca Hamlet
- Kamera monitorująca Annke
- Kamera monitorująca AVTech
- Kamera monitorująca Qoltec
- Kamera monitorująca Approx
- Kamera monitorująca Digimerge
- Kamera monitorująca Wisenet
- Kamera monitorująca Infortrend
- Kamera monitorująca Epiphan
- Kamera monitorująca Mach Power
- Kamera monitorująca Compro
- Kamera monitorująca Aida
- Kamera monitorująca Ikegami
- Kamera monitorująca Accsoon
- Kamera monitorująca Vimtag
- Kamera monitorująca Gewiss
- Kamera monitorująca Alula
- Kamera monitorująca Insteon
- Kamera monitorująca Costar
- Kamera monitorująca ALC
- Kamera monitorująca Security Labs
- Kamera monitorująca Comtrend
- Kamera monitorująca Seneca
- Kamera monitorująca Avigilon
- Kamera monitorująca American Dynamics
- Kamera monitorująca Vosker
- Kamera monitorująca Sentry360
- Kamera monitorująca Bea-fon
- Kamera monitorująca Owltron
- Kamera monitorująca Enabot
- Kamera monitorująca Luis Energy
- Kamera monitorująca Sir Gawain
- Kamera monitorująca VisorTech
- Kamera monitorująca Atlantis Land
- Kamera monitorująca B & S Technology
- Kamera monitorująca I3International
- Kamera monitorująca IDIS
- Kamera monitorująca Ecobee
- Kamera monitorująca Conbrov
- Kamera monitorująca HuddleCamHD
- Kamera monitorująca Mobotix
- Kamera monitorująca IOIO
- Kamera monitorująca BIRDFY
- Kamera monitorująca I-PRO
- Kamera monitorująca DVDO
- Kamera monitorująca TCP
- Kamera monitorująca Bolin Technology
- Kamera monitorująca Nextech
Najnowsze instrukcje dla Kamera monitorująca
28 Stycznia 2025
25 Stycznia 2025
17 Stycznia 2025
17 Stycznia 2025
15 Stycznia 2025

13 Stycznia 2025

13 Stycznia 2025
13 Stycznia 2025

12 Stycznia 2025
12 Stycznia 2025