Instrukcja obsługi Samsung WE357A7P
Samsung
Vaatwasser
WE357A7P
Przeczytaj poniżej 📖 instrukcję obsługi w języku polskim dla Samsung WE357A7P (4 stron) w kategorii Vaatwasser. Ta instrukcja była pomocna dla 3 osób i została oceniona przez 2 użytkowników na średnio 4.5 gwiazdek
Strona 1/4
- 1 -
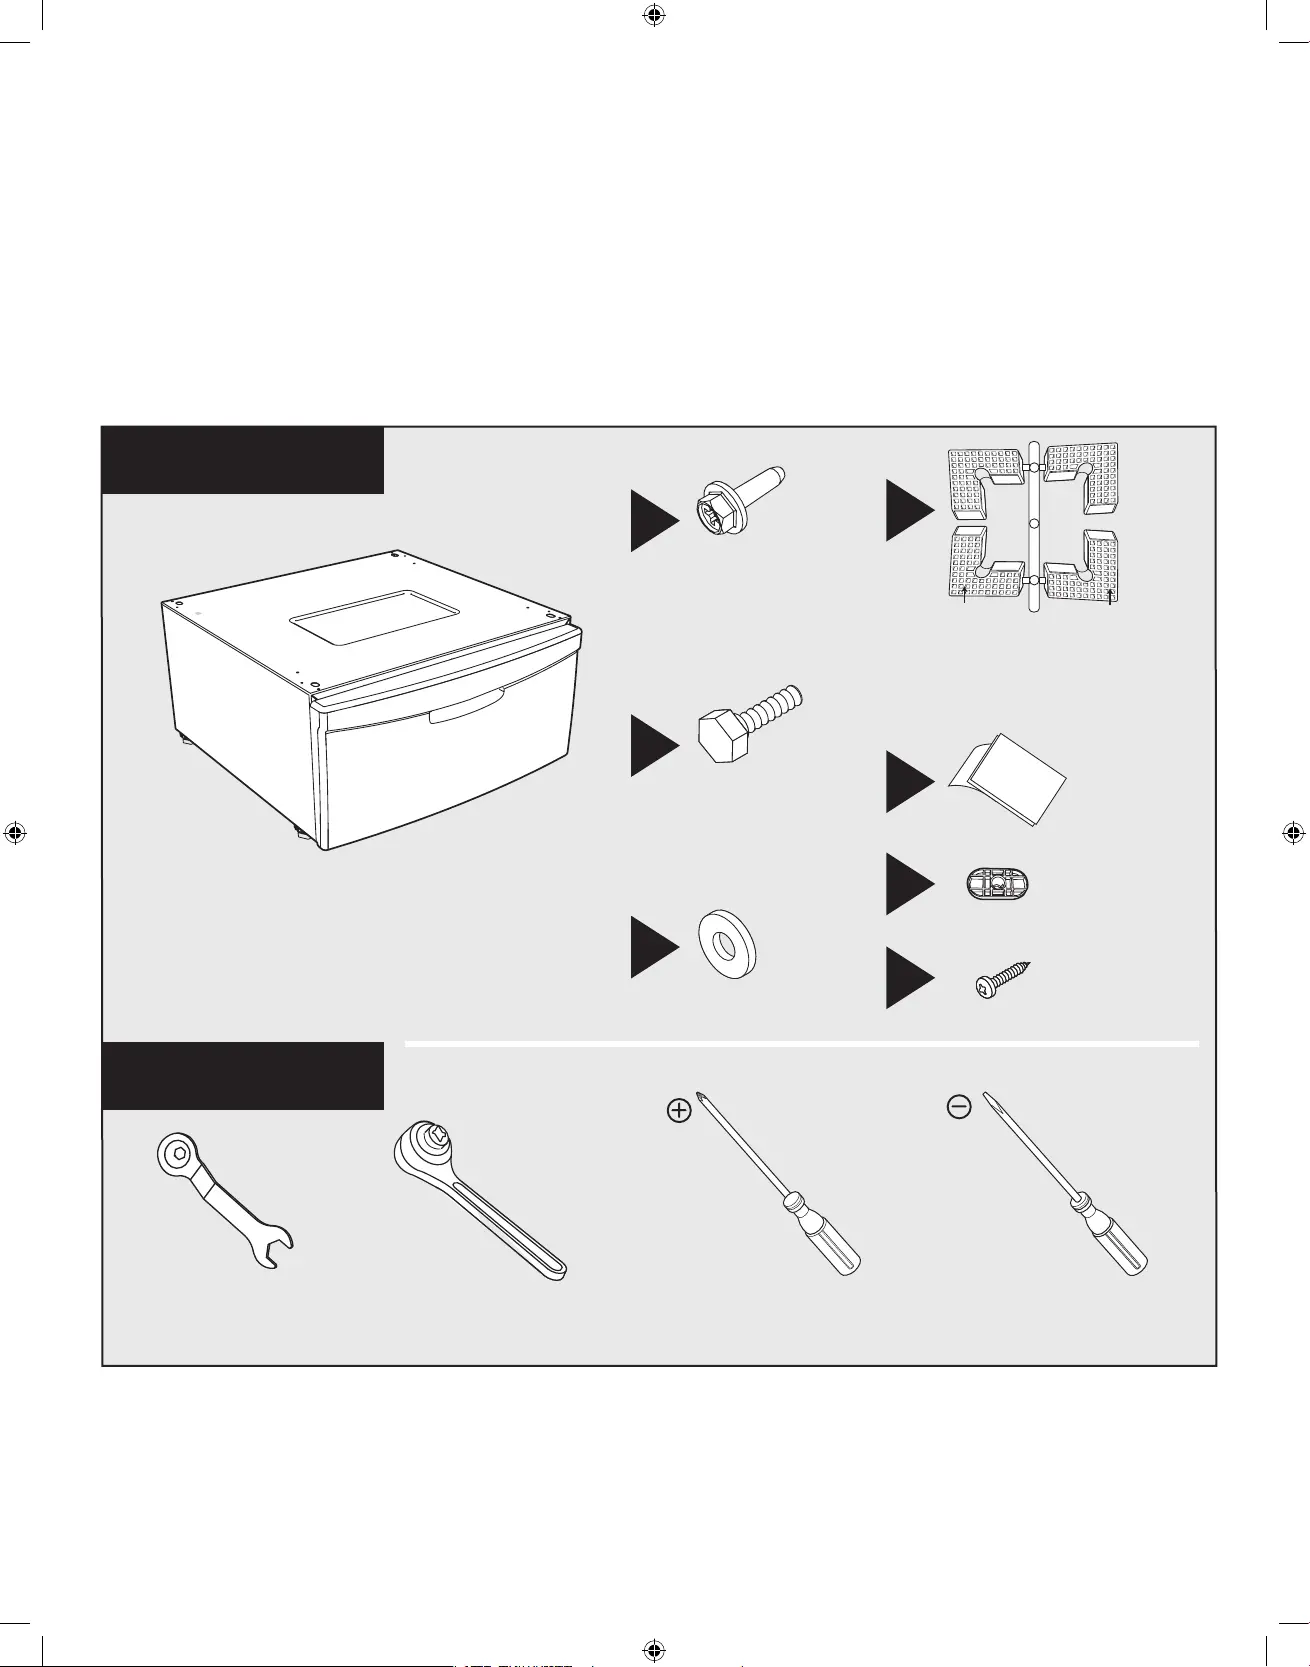
Pedestal Installation Instructions
Instructions d'installation du socle
Instrucciones de instalació del pedestal
Components
X1 D
X4
B
X4 C
X4 E
X4 F
X5 G
X4 A
D -
2
D-1
Tools
Code No. : DC68-02436A-03
Wrench
Supplied with Washing
Machine or General Wrench
(9/16inch or 14mm)
Socket Wrench
[11/16 inch, or 17mm] Phillips Screwdriver Flat Screwdriver
0203-002150
DC60-60044A
DC60-40017A
6002-001313
D-1 : DC61-01811A
Guide-leg(A)
D-2 : DC61-01812A
Guide-leg(B)
DC61-01813B
ATLAS-02436A-03.indd 1 2007-09-20 ¿ÀÈÄ 2:17:36
- 2 -
• Remove the screw with a Phillips screwdriver
and the drawer.
• Retirez la vis à l’aide d’un tournevis Phillips
puis retirez le tiroir.
• Quite el tornillo con un destornillador Phillips
y saque el cajón.
• Clean the floor for the installation and put the
pedestal on the final location.
• Nettoyez l’endroit où l’appareil sera installé et
placez-y le socle.
• Limpie el suelo donde va hacer la instalación y
ponga el pedestal en su ubicación final.
• (A) Level it with a wrench and (b) tighten up the lock
nut with a flat screw driver.
• (A) Mettez-le à niveau à l’aide d’une clé anglaise puis
(b) serrez l’écrou de blocage à l’aide d’un tournevis plat.
• (A) Nivelar con una llave inglesa y (b) ajustar las
contratuercas con un destornillador de punta plana.
1 2 3
D
• Remove the screws (3ea) on the back panel and
snap the guide-leg into the hole on the frame (4ea).
• Retirez les vis (3ea) du panneau arrière et enfoncez
ce dernier dans les supports (4ea).
• Quite los tornillos (3ea) del panel posterior y
enganche las ménsulas (4ea).
• Put a soft pad (cardboard) on the floor to prevent
scratches during installation.
• Pendant l’installation, protégez le sol des griffures,
par exemple avec un carton.
• Ponga algo blando (un cartón) en el suelo para
evitar rayaduras durante la instalación.
• Put Washer/Dryer on the soft pad.
For the pedestal installation, the shipping bolts at the
back of the washer shall not be removed.
Remove them after putting the unit back to its upright
position (at Step 10).
• Placez le lave-linge/sèche-linge sur la protection.
Pour l’installation du socle, les vis de transport situées à
l’arrière du lave-linge ne doivent pas être retirées.
Ne les enlevez qu’une fois que l’appareil est replacé en
position verticale (à l’étape 10).
• Coloque la lavadora o secadora sobre el cartón.
Para la instalación del pedestal, los tornillos de transporte
de la parte posterior de la lavadora no se deben quitar.
Quítelos después de poner la parte posterior de la
unidad en su posición vertical (en el paso 10).
456
• Installation for Dryer, go to step 7a.
• Pour l’installation du séchoir, reportez-vous à l’étape 7a.
• Instalación de la secadora,ir al paso 7a.
• Installation for Washer, go to step 7b.
• Pour l’installation du lave- linge, reportez-vous à l’étape 7b.
• Instalación de la lavadora, ir al paso 7b.
Dryer/Nouvelle sécheuse Secadora
F
A
C
• Remove the leg assemblies (4ea) and snap the
Bracket-screw into the holes (4ea).
• Retirez les piètements (4ea) et enfoncez les caches
carrés dans les orifices (4ea).
• Quite los montajes de las patas (4ea) y encaje los
tapones cuadrados en sus orificios (4ea).
• Put the pedestal on the bottom.
• Placez le socle en bas.
• Ponga el pedestal en la parte inferior.
• Secure them with screws (4ea). Go to Step 10.
• Fixez-les à l’aide de vis (4ea). Passez à l’étape 10.
• Asegúrelo con los tornillos (4ea). Vaya al paso 10.
7a 8a 9a
ATLAS-02436A-03.indd 2 2007-09-20 ¿ÀÈÄ 2:17:38
- 3 -
Washer /Laveuse/ Lavadora
1
• Remove the leg assemblies (4ea).
• Otez les piètements (4ea).
• Quite los montajes de las patas (4ea).
• Put the pedestal on the bottom.
• Placez le socle en bas.
• Ponga el pedestal en la parte inferior.
Caution / Attention / Precaui
ón
•
Make sure to tighten up all the bolts between the
washer and the pedestal until they cannot be
tightened up anymore.
→ Use a socket wrench.
•
Veillez à serrer à fond tous les boulons entre le
lave-linge et le support.
→ Utilisez une clé à douille.
• Asegúrese de ajustar bien todos los pernos entre
la lavadora y el pedestal hasta que no se los pueda
ajustar más.
→ Use una llave de cubo.
7b 8b 9b
G
• Put the assembled unit back to upright position.
• Replacez l’appareil en position verticale.
• Ponga la parte posterior de la unidad ensamblada
en posición vertical.
• Screw up (8ea) the back panel.
Make sure all the screws are completely fastened
to prevent buzzing noise during unit operation.
• Fixez le panneau arrière à l’aide de vis (8ea).
Assurez-vous que toutes les vis sont correctement
serrées afin d’éviter tout bourdonnement pendant
le fonctionnement.
• Atornille (8ea) el panel posterior.
Asegúrese de que todos los tornillos estén bien
apretados para evitar ruidos de zumbidos
durante el funcionamiento.
• Put the assembled units to the installation sites.
• Posez les appareils assemblés à leur place
définitive.
• Ponga las unidades ensambladas en el lugar de
instalación.
10 11 12
• Check leveling and when needed, do additional
leveling.
• Vérifiez qu’ils sont à niveau.
• Controle el nivel y, si es necesario, haga los ajustes
precisos.
13
• Put the legs on the same floor panels and
keep them away from the floor lines.
• Placez les pieds sur les mêmes panneaux
de parquet, entre les rainures.
• Ponga las patas sobre los mismos paneles
del suelo y apártelas de las líneas del suelo.
Test-1. • Put it into the Spin cycle and check its vibration.
• Mettez-le en cycle Essorage et contrôlez ses
vibrations.
• Seleccione el ciclo Spin (Centrifugado) y verifique
si hay vibraciones.
Test-2. • If there is too much vibration, repeat the above.
• S’il y a trop de vibrations, répétez les opérations
ci-dessus.
• Si hay demasiadas vibraciones, repita los pasos
anteriores.
Tips for Wooden Panel Floor and Vibration Test / Conseils pour les sols en bois et Test de vibration /
Consejos para los suelos de paneles de madera y test de vibraciones
ATLAS-02436A-03.indd 3 2007-09-20 ¿ÀÈÄ 2:17:42
Specyfikacje produktu
Marka: | Samsung |
Kategoria: | Vaatwasser |
Model: | WE357A7P |
Potrzebujesz pomocy?
Jeśli potrzebujesz pomocy z Samsung WE357A7P, zadaj pytanie poniżej, a inni użytkownicy Ci odpowiedzą
Instrukcje Vaatwasser Samsung
30 Września 2024
30 Września 2024
18 Września 2024
7 Września 2024
5 Września 2024
1 Września 2024
30 Sierpnia 2024
28 Sierpnia 2024
26 Sierpnia 2024
21 Sierpnia 2024
Instrukcje Vaatwasser
- Vaatwasser Bauknecht
- Vaatwasser Ikea
- Vaatwasser Bertazzoni
- Vaatwasser Electrolux
- Vaatwasser DeLonghi
- Vaatwasser AEG
- Vaatwasser Balay
- Vaatwasser Beko
- Vaatwasser LG
- Vaatwasser Küppersbusch
- Vaatwasser Smeg
- Vaatwasser Gram
- Vaatwasser Amica
- Vaatwasser Gorenje
- Vaatwasser Etna
- Vaatwasser Sharp
- Vaatwasser Russell Hobbs
- Vaatwasser Simpson
- Vaatwasser Dometic
- Vaatwasser Bosch
- Vaatwasser Candy
- Vaatwasser Whirlpool
- Vaatwasser Miele
- Vaatwasser Midea
- Vaatwasser Hisense
- Vaatwasser Infiniton
- Vaatwasser Baumatic
- Vaatwasser OK
- Vaatwasser Hoover
- Vaatwasser Westinghouse
- Vaatwasser Romo
- Vaatwasser Maytag
- Vaatwasser GE
- Vaatwasser Blaupunkt
- Vaatwasser Brandt
- Vaatwasser Siemens
- Vaatwasser Danby
- Vaatwasser Grundig
- Vaatwasser Haier
- Vaatwasser KKT Kolbe
- Vaatwasser Cylinda
- Vaatwasser Hyundai
- Vaatwasser Silverline
- Vaatwasser Blomberg
- Vaatwasser Fisher & Paykel
- Vaatwasser ECG
- Vaatwasser Indesit
- Vaatwasser Ilve
- Vaatwasser Viking
- Vaatwasser CATA
- Vaatwasser Hotpoint
- Vaatwasser Kenwood
- Vaatwasser V-Zug
- Vaatwasser Ariston Thermo
- Vaatwasser Zelmer
- Vaatwasser PKM
- Vaatwasser Thor
- Vaatwasser Amana
- Vaatwasser Dacor
- Vaatwasser Hotpoint Ariston
- Vaatwasser Bomann
- Vaatwasser Moulinex
- Vaatwasser Meireles
- Vaatwasser Schneider
- Vaatwasser Stirling
- Vaatwasser Philco
- Vaatwasser Neff
- Vaatwasser Corbero
- Vaatwasser Zanussi
- Vaatwasser Fagor
- Vaatwasser Koenic
- Vaatwasser Thomson
- Vaatwasser Ardo
- Vaatwasser Klarstein
- Vaatwasser Wolkenstein
- Vaatwasser Artusi
- Vaatwasser KitchenAid
- Vaatwasser Eta
- Vaatwasser Imperial
- Vaatwasser Nevir
- Vaatwasser Exquisit
- Vaatwasser Bartscher
- Vaatwasser Privileg
- Vaatwasser Hanseatic
- Vaatwasser Continental Edison
- Vaatwasser Atag
- Vaatwasser Rosieres
- Vaatwasser Novy
- Vaatwasser Inventum
- Vaatwasser AEG-Electrolux
- Vaatwasser Comfee
- Vaatwasser Bush
- Vaatwasser New Pol
- Vaatwasser Kenmore
- Vaatwasser VOX
- Vaatwasser Hiberg
- Vaatwasser Pelgrim
- Vaatwasser Frilec
- Vaatwasser Element
- Vaatwasser Orima
- Vaatwasser Aspes
- Vaatwasser Zerowatt
- Vaatwasser Vedette
- Vaatwasser JennAir
- Vaatwasser Frigidaire
- Vaatwasser RCA
- Vaatwasser Foster
- Vaatwasser Electra
- Vaatwasser Fulgor Milano
- Vaatwasser Gaggenau
- Vaatwasser Hobart
- Vaatwasser Avanti
- Vaatwasser Asko
- Vaatwasser Flavel
- Vaatwasser Kunft
- Vaatwasser Scandomestic
- Vaatwasser Ignis
- Vaatwasser Guzzanti
- Vaatwasser Mach
- Vaatwasser Eurom
- Vaatwasser Crosley
- Vaatwasser Constructa
- Vaatwasser BLANCO
- Vaatwasser Swan
- Vaatwasser Zanker
- Vaatwasser Ariston
- Vaatwasser Progress
- Vaatwasser Tomado
- Vaatwasser Bellini
- Vaatwasser Vestel
- Vaatwasser John Lewis
- Vaatwasser Scholtes
- Vaatwasser Bella
- Vaatwasser Juno
- Vaatwasser White Knight
- Vaatwasser Luxor
- Vaatwasser Nordmende
- Vaatwasser Rangemaster
- Vaatwasser Friac
- Vaatwasser Boretti
- Vaatwasser Hansa
- Vaatwasser Rhima
- Vaatwasser WLA
- Vaatwasser Listo
- Vaatwasser Milectric
- Vaatwasser Leonard
- Vaatwasser WhiteLine
- Vaatwasser Sammic
- Vaatwasser M-System
- Vaatwasser Godrej
- Vaatwasser Stoves
- Vaatwasser Edy
- Vaatwasser Parmco
- Vaatwasser Equator
- Vaatwasser Jolly
- Vaatwasser Vestfrost
- Vaatwasser Upo
- Vaatwasser Elettrobar
- Vaatwasser Trieste
- Vaatwasser Sauter
- Vaatwasser Marynen
- Vaatwasser Hoonved
- Vaatwasser Kucht
- Vaatwasser Kogan
- Vaatwasser Noble
- Vaatwasser General Electric
- Vaatwasser Winia
- Vaatwasser Elektron
- Vaatwasser Eurolux
Najnowsze instrukcje dla Vaatwasser
30 Września 2024
30 Września 2024
30 Września 2024
30 Września 2024
30 Września 2024
30 Września 2024
29 Września 2024
29 Września 2024
29 Września 2024
29 Września 2024