Instrukcja obsługi Roland Octa-Capture UA-1010
Roland
system hi-fi
Octa-Capture UA-1010
Przeczytaj poniżej 📖 instrukcję obsługi w języku polskim dla Roland Octa-Capture UA-1010 (100 stron) w kategorii system hi-fi. Ta instrukcja była pomocna dla 14 osób i została oceniona przez 2 użytkowników na średnio 4.5 gwiazdek
Strona 1/100

2
Used for instructions intended to alert the
user to the risk of injury or material
damage should the unit be used
improperly.
* Material damage refers to damage or
other adverse effects caused with
respect to the home and all its
furnishings, as well to domestic animals
or pets.
Used for instructions intended to alert the
user to the risk of death or severe injury
should the unit be used improperly.
The symbol alerts the user to things that must be
carried out. The specific thing that must be done is
indicated by the design contained within the circle. In the
case of the symbol at left, it means that the power-cord
plug must be unplugged from the outlet.
The symbol alerts the user to important instructions or
warnings.The specific meaning of the symbol is
determined by the design contained within the triangle. In
the case of the symbol at left, it is used for general
cautions, warnings, or alerts to danger.
The symbol alerts the user to items that must never be
carried out (are forbidden). The specific thing that must
not be done is indicated by the design contained within
the circle. In the case of the symbol at left, it means that
the unit must never be disassembled.
About WARNING and CAUTION Notices About the Symbols
ALWAYS OBSERVE THE FOLLOWING
002c
• Do not open (or modify in any way) the unit or its AC
adaptor.
003
• Do not attempt to repair the unit, or replace parts
within it (except when this manual provides specic
instructions directing you to do so). Refer all servicing
to your retailer, the nearest Roland Service Center,
or an authorized Roland distributor, as listed on the
“Information” page.
004
• Never install the unit in any of the following locations.
• Subject to temperature extremes (e.g., direct
sunlight in an enclosed vehicle, near a heating duct,
on top of heat-generating equipment); or are
• Damp (e.g., baths, washrooms, on wet oors); or are
• Exposed to steam or smoke; or are
• Subject to salt exposure; or are
• Humid; or are
• Exposed to rain; or are
• Dusty or sandy; or are
• Subject to high levels of vibration and shakiness.
005edit
• If you want to install this unit in a rack, please use the
included rack mount adaptors.
007
• Make sure you always have the unit placed so it is level
and sure to remain stable. Never place it on stands that
could wobble, or on inclined surfaces.
008c
• Be sure to use only the AC adaptor supplied with the
unit. Also, make sure the line voltage at the installation
matches the input voltage specied on the AC adaptor’s
body. Other AC adaptors may use a dierent polarity, or
be designed for a dierent voltage, so their use could
result in damage, malfunction, or electric shock.
008e
• Use only the attached power-supply cord. Also, the
supplied power cord must not be used with any other
device.
009
• Do not excessively twist or bend the power cord, nor
place heavy objects on it. Doing so can damage the
cord, producing severed elements and short circuits.
Damaged cords are re and shock hazards!
010
• This unit, either alone or in combination with an
amplier and headphones or speakers, may be capable
of producing sound levels that could cause permanent
hearing loss. Do not operate for a long period of time at
a high volume level, or at a level that is uncomfortable.
If you experience any hearing loss or ringing in the ears,
you should immediately stop using the unit, and consult
an audiologist.
011
• Do not place containers containing liquid on this
product. Never allow foreign objects (e.g., ammable
objects, coins, wires) or liquids (e.g., water or juice) to
enter this product. Doing so may cause short circuits,
faulty operation, or other malfunctions.
201a
Before using this unit, carefully read the sections entitled: “USING THE UNIT SAFELY” and “IMPORTANT NOTES” (p. 2; p. 4). These sections provide
important information concerning the proper operation of the unit. Additionally, in order to feel assured that you have gained a good grasp of every
feature provided by your new unit, Owner’s Manual should be read in its entirety. The manual should be saved and kept on hand as a convenient
reference.

3
012b
• Immediately turn the power o, remove the AC adaptor
from the outlet, and request servicing by your retailer,
the nearest Roland Service Center, or an authorized
Roland distributor, as listed on the “Information” page
when:
• The AC adaptor, the power-supply cord, or the plug
has been damaged; or
• If smoke or unusual odor occurs
• Objects have fallen into, or liquid has been spilled
onto the unit; or
• The unit has been exposed to rain (or otherwise has
become wet); or
• The unit does not appear to operate normally or
exhibits a marked change in performance.
013
• In households with small children, an adult should
provide supervision until the child is capable of
following all the rules essential for the safe operation
of the unit.
014
• Protect the unit from strong impact.
(Do not drop it!)
015
• Do not force the unit’s power-supply cord to share an
outlet with an unreasonable number of other devices.
Be especially careful when using extension cords—the
total power used by all devices you have connected to
the extension cord’s outlet must never exceed the power
rating (watts/amperes) for the extension cord. Excessive
loads can cause the insulation on the cord to heat up
and eventually melt through.
016
• Before using the unit in a foreign country, consult
with your retailer, the nearest Roland Service Center,
or an authorized Roland distributor, as listed on the
“Information” page.
023
• DO NOT play a CD-ROM disc on a conventional audio CD
player. The resulting sound may be of a level that could
cause permanent hearing loss. Damage to speakers or
other system components may result.
101b
• The unit and the AC adaptor should be located so their
location or position does not interfere with their proper
ventilation.
102c
• Always grasp only the plug on the AC adaptor cord
when plugging into, or unplugging from, an outlet or
this unit.
103b
• At regular intervals, you should unplug the AC adaptor
and clean it by using a dry cloth to wipe all dust and
other accumulations away from its prongs. Also,
disconnect the power plug from the power outlet
whenever the unit is to remain unused for an extended
period of time. Any accumulation of dust between the
power plug and the power outlet can result in poor
insulation and lead to re.
104
• Try to prevent cords and cables from becoming
entangled. Also, all cords and cables should be placed so
they are out of the reach of children.
106
• Never climb on top of, nor place heavy objects on the
unit.
107c
• Never handle the AC adaptor or its plugs with wet hands
when plugging into, or unplugging from, an outlet or
this unit.
108b
• Before moving the unit, disconnect the AC adaptor and
all cords coming from external devices.
109b
• Before cleaning the unit, turn o the power and unplug
the AC adaptor from the outlet (p. 30).
110b
• Whenever you suspect the possibility of lightning in
your area, disconnect the AC adaptor from the outlet.
118a
• Should you remove screws, keep them in a safe place
out of children’s reach, so there is no chance of them
being swallowed accidentally.
120
• Always turn the phantom power o when connecting any
device other than condenser microphones that require
phantom power. You risk causing damage if you mistakenly
supply phantom power to dynamic microphones, audio
playback devices, or other devices that don’t require such
power. Be sure to check the specications of any microphone
you intend to use by referring to the manual that came with it.
(This device’s phantom power: 48 V DC, 6 mA Max)

4
Power Supply
301
• Do not connect this unit to same electrical outlet that is being used
by an electrical appliance that is controlled by an inverter (such as a
refrigerator, washing machine, microwave oven, or air conditioner),
or that contains a motor. Depending on the way in which the
electrical appliance is used, power supply noise may cause this unit to
malfunction or may produce audible noise. If it is not practical to use a
separate electrical outlet, connect a power supply noise lter between
this unit and the electrical outlet.
302
• The AC adaptor will begin to generate heat after long hours of
consecutive use. This is normal, and is not a cause for concern.
307
• Before connecting this unit to other devices, turn o the power to all
units. This will help prevent malfunctions and/or damage to speakers
or other devices.
Placement
351
• Using the unit near power ampliers (or other equipment containing
large power transformers) may induce hum. To alleviate the problem,
change the orientation of this unit; or move it farther away from the
source of interference.
352a
• This device may interfere with radio and television reception. Do not
use this device in the vicinity of such receivers.
352b
• Noise may be produced if wireless communications devices, such as cell
phones, are operated in the vicinity of this unit. Such noise could occur
when receiving or initiating a call, or while conversing. Should you
experience such problems, you should relocate such wireless devices so
they are at a greater distance from this unit, or switch them o.
354a
• Do not expose the unit to direct sunlight, place it near devices that
radiate heat, leave it inside an enclosed vehicle, or otherwise subject
it to temperature extremes. Excessive heat can deform or discolor the
unit.
355b
• When moved from one location to another where the temperature
and/or humidity is very dierent, water droplets (condensation) may
form inside the unit. Damage or malfunction may result if you attempt
to use the unit in this condition. Therefore, before using the unit, you
must allow it to stand for several hours, until the condensation has
completely evaporated.
360
• Depending on the material and temperature of the surface on which
you place the unit, its rubber feet may discolor or mar the surface.
You can place a piece of felt or cloth under the rubber feet to prevent
this from happening. If you do so, please make sure that the unit will
not slip or move accidentally.
Maintenance
401a
• For everyday cleaning wipe the unit with a soft, dry cloth or one that
has been slightly dampened with water. To remove stubborn dirt, use a
cloth impregnated with a mild, non-abrasive detergent. Afterwards, be
sure to wipe the unit thoroughly with a soft, dry cloth.
402
• Never use benzine, thinners, alcohol or solvents of any kind, to avoid
the possibility of discoloration and/or deformation.
Repairs and Data
452
• Please be aware that all data contained in the unit’s memory may be
lost when the unit is sent for repairs. Important data should always
be written down on paper (when possible). During repairs, due care is
taken to avoid the loss of data. However, in certain cases (such as when
circuitry related to memory itself is out of order), we regret that it may
not be possible to restore the data, and Roland assumes no liability
concerning such loss of data.
IMPORTANT NOTES

5
Additional Precautions
551
• Please be aware that the contents of memory can be irretrievably lost
as a result of a malfunction, or the improper operation of the unit.
To protect yourself against the risk of loosing important data, we
recommend that you periodically save a backup copy of important data
you have stored in the unit’s memory.
552
• Unfortunately, it may be impossible to restore the contents of data
that was stored in the unit’s memory once it has been lost. Roland
Corporation assumes no liability concerning such loss of data.
553
• Use a reasonable amount of care when using the unit’s buttons, sliders,
or other controls; and when using its jacks and connectors. Rough
handling can lead to malfunctions.
556
• When connecting / disconnecting all cables, grasp the connector
itself—never pull on the cable. This way you will avoid causing shorts, or
damage to the cable’s internal elements.
558a
• To avoid disturbing your neighbors, try to keep the unit’s volume at
reasonable levels. You may prefer to use headphones, so you do not
need to be concerned about those around you.
559a
• When you need to transport the unit, package it in the box (including
padding) that it came in, if possible. Otherwise, you will need to use
equivalent packaging materials.
562
• Some connection cables contain resistors. Do not use cables that
incorporate resistors for connecting to this unit. The use of such cables
can cause the sound level to be extremely low, or impossible to hear.
For information on cable specications, contact the manufacturer of
the cable.
Handling CDs / DVDs
801
• Avoid touching or scratching the shiny underside (encoded surface)
of the disc. Damaged or dirty CD/DVD discs may not be read properly.
Keep your discs clean using a commercially available CD/DVD cleaner.
Copyright
851
• Recording, duplication, distribution, sale, lease, performance, or
broadcast of copyrighted material (musical works, visual works,
broadcasts, live performances, etc.) belonging to a third party in part or
in whole without the permission of the copyright owner is forbidden
by law.
852
• This product can be used to record or duplicate audio or visual material
without being limited by certain technological copy-protection
measures. This is due to the fact that this product is intended to be used
for the purpose of producing original music or video material, and is
therefore designed so that material that does not infringe copyrights
belonging to others (for example, your own original works) can be
recorded or duplicated freely.
853
• Do not use this unit for purposes that could infringe on a copyright held
by a third party. We assume no responsibility whatsoever with regard
to any infringements of third-party copyrights arising through your use
of this unit.
204 edit
• Microsoft, Windows and Windows Vista are either registered trademarks
or trademarks of Microsoft Corporation in the United States and/or
other countries.
206e
• The screen shots in this document are used in compliance with the
guidelines of the Microsoft Corporation.
206j
• Windows® is known ocially as: “Microsoft® Windows® operating
system.”
207+209 edit
• Apple, Macintosh, Logic and Mac OS are trademarks of Apple Inc.,
registered in U.S. and other countries.
220
• All product names mentioned in this document are trademarks or
registered trademarks of their respective owners.
238
• MPEG Layer-3 audio compression technology is licensed from
Fraunhofer IIS Corporation and THOMSON Multimedia Corporation.
add (240)
• MMP (Moore Microprocessor Portfolio) refers to a patent portfolio
concerned with microprocessor architecture, which was developed
by Technology Properties Limited (TPL). Roland has licensed this
technology from the TPL Group.

6
Contents
Contents of the Package . . . . . . . . . . . . . . . . . . . . . . . . . . . . . . . . . . . . . . . . . . . . . . . . . . .8
Panel Descriptions . . . . . . . . . . . . . . . . . . . . . . . . . . . . . . . . . . . . . . . . . . . . . . . . . . . . . . . .10
Front panel . . . . . . . . . . . . . . . . . . . . . . . . . . . . . . . . . . . . . . . . . . . . . . . . . . . . . . . . . . . . . . . . . . . . . . . . . . . . . . . . .
Rear Panel . . . . . . . . . . . . . . . . . . . . . . . . . . . . . . . . . . . . . . . . . . . . . . . . . . . . . . . . . . . . . . . . . . . . . . . . . . . . . . . . . .
Driver Installation and Settings . . . . . . . . . . . . . . . . . . . . . . . . . . . . . . . . . . . . . . . . . . . .14
Windows 7/Windows Vista Users . . . . . . . . . . . . . . . . . . . . . . . . . . . . . . . . . . . . . . . . . . . . . . . . . . . . . . . . . . . . . . 15
Installing the Driver . . . . . . . . . . . . . . . . . . . . . . . . . . . . . . . . . . . . . . . . . . . . . . . . . . . . . . . . . . . . . . . . . . . . 1
Input/Output Device Settings . . . . . . . . . . . . . . . . . . . . . . . . . . . . . . . . . . . . . . . . . . . . . . . . . . . . . . . . . . . 17
Windows XP Users . . . . . . . . . . . . . . . . . . . . . . . . . . . . . . . . . . . . . . . . . . . . . . . . . . . . . . . . . . . . . . . . . . . . . . . . . . .
Installing the Driver . . . . . . . . . . . . . . . . . . . . . . . . . . . . . . . . . . . . . . . . . . . . . . . . . . . . . . . . . . . . . . . . . . . . 1
Input/Output Device Settings . . . . . . . . . . . . . . . . . . . . . . . . . . . . . . . . . . . . . . . . . . . . . . . . . . . . . . . . . . . 21
Mac OS X Users. . . . . . . . . . . . . . . . . . . . . . . . . . . . . . . . . . . . . . . . . . . . . . . . . . . . . . . . . . . . . . . . . . . . . . . . . . . . .
Installing the Driver . . . . . . . . . . . . . . . . . . . . . . . . . . . . . . . . . . . . . . . . . . . . . . . . . . . . . . . . . . . . . . . . . . . . 2
Audio Input/Output Device Settings . . . . . . . . . . . . . . . . . . . . . . . . . . . . . . . . . . . . . . . . . . . . . . . . . . . . 24
MIDI Input/Output Device Settings . . . . . . . . . . . . . . . . . . . . . . . . . . . . . . . . . . . . . . . . . . . . . . . . . . . . . 25
Verifying That You Hear Sound . . . . . . . . . . . . . . . . . . . . . . . . . . . . . . . . . . . . . . . . . . . . . . . . . . . . . . . . . . . . . . . . 2
Connecting Your Audio Playback System . . . . . . . . . . . . . . . . . . . . . . . . . . . . . . . . . . . . . . . . . . . . . . . . 27
Playing Back the Sample Data . . . . . . . . . . . . . . . . . . . . . . . . . . . . . . . . . . . . . . . . . . . . . . . . . . . . . . . . . . 28
Basic Operation . . . . . . . . . . . . . . . . . . . . . . . . . . . . . . . . . . . . . . . . . . . . . . . . . . . . . . . . . . .29
Basic Connections . . . . . . . . . . . . . . . . . . . . . . . . . . . . . . . . . . . . . . . . . . . . . . . . . . . . . . . . . . . . . . . . . . . . . . . . . . . .
Turning the Power On/O . . . . . . . . . . . . . . . . . . . . . . . . . . . . . . . . . . . . . . . . . . . . . . . . . . . . . . . . . . . . . . . . . . . . 31
Turning the Power On . . . . . . . . . . . . . . . . . . . . . . . . . . . . . . . . . . . . . . . . . . . . . . . . . . . . . . . . . . . . . . . . . . 31
Turning the Power O . . . . . . . . . . . . . . . . . . . . . . . . . . . . . . . . . . . . . . . . . . . . . . . . . . . . . . . . . . . . . . . . . . 31
Auto Power O . . . . . . . . . . . . . . . . . . . . . . . . . . . . . . . . . . . . . . . . . . . . . . . . . . . . . . . . . . . . . . . . . . . . . . . . . . . . . . .
Controlling the Preamp . . . . . . . . . . . . . . . . . . . . . . . . . . . . . . . . . . . . . . . . . . . . . . . . . . . . . . . . . . . . . . . . . . . . . . . 3
Recording a Microphone or Guitar . . . . . . . . . . . . . . . . . . . . . . . . . . . . . . . . . . . . . . . . . . . . . . . . . . . . . . 35
Simultaneously Recording Multiple Inputs (Multi Recording) . . . . . . . . . . . . . . . . . . . . . . . . . . . . . 40
Advanced Operation . . . . . . . . . . . . . . . . . . . . . . . . . . . . . . . . . . . . . . . . . . . . . . . . . . . . . .42
Direct Mixers and Routing . . . . . . . . . . . . . . . . . . . . . . . . . . . . . . . . . . . . . . . . . . . . . . . . . . . . . . . . . . . . . . . . . . . . 4
Control Panel . . . . . . . . . . . . . . . . . . . . . . . . . . . . . . . . . . . . . . . . . . . . . . . . . . . . . . . . . . . . . . . . . . . . . . . . . . . . . . .
Startup . . . . . . . . . . . . . . . . . . . . . . . . . . . . . . . . . . . . . . . . . . . . . . . . . . . . . . . . . . . . . . . . . . . . . . . . . . . . . . .
Screen Items and what They Do . . . . . . . . . . . . . . . . . . . . . . . . . . . . . . . . . . . . . . . . . . . . . . . . . . . . . . . . . 44
Saving and Loading Your Settings . . . . . . . . . . . . . . . . . . . . . . . . . . . . . . . . . . . . . . . . . . . . . . . . . . . . . . . 52
Initializing the Settings . . . . . . . . . . . . . . . . . . . . . . . . . . . . . . . . . . . . . . . . . . . . . . . . . . . . . . . . . . . . . . . . . 52
Checking the signal ow. . . . . . . . . . . . . . . . . . . . . . . . . . . . . . . . . . . . . . . . . . . . . . . . . . . . . . . . . . . . . . . . 53

7
Driver settings . . . . . . . . . . . . . . . . . . . . . . . . . . . . . . . . . . . . . . . . . . . . . . . . . . . . . . . . . . . . . . . . . . . . . . . . .
View in foreground . . . . . . . . . . . . . . . . . . . . . . . . . . . . . . . . . . . . . . . . . . . . . . . . . . . . . . . . . . . . . . . . . . . . . 5
Operations in the OCTA-CAPTURE’s Panel . . . . . . . . . . . . . . . . . . . . . . . . . . . . . . . . . . . . . . . . . . . . . . . . . . . . . 54
Live Set-up with Four Stage Monitors . . . . . . . . . . . . . . . . . . . . . . . . . . . . . . . . . . . . . . . . . . . . . . . . . . . . . . . . . 62
Connecting Two OCTA-CAPTURE Units . . . . . . . . . . . . . . . . . . . . . . . . . . . . . . . . . . . . . . . . . . . . . . . . . . . . . . . . 6
Appendices . . . . . . . . . . . . . . . . . . . . . . . . . . . . . . . . . . . . . . . . . . . . . . . . . . . . . . . . . . . . . .68
Sampling Frequency Setting . . . . . . . . . . . . . . . . . . . . . . . . . . . . . . . . . . . . . . . . . . . . . . . . . . . . . . . . . . . . . . . . . . 68
Limitations when using the 192 kHz setting . . . . . . . . . . . . . . . . . . . . . . . . . . . . . . . . . . . . . . . . . . . . . . . . . . . 68
Restoring the Factory Settings (Factory Reset) . . . . . . . . . . . . . . . . . . . . . . . . . . . . . . . . . . . . . . . . . . . . . . . . . 69
Driver Settings . . . . . . . . . . . . . . . . . . . . . . . . . . . . . . . . . . . . . . . . . . . . . . . . . . . . . . . . . . . . . . . . . . . . . . . . . . . . . .
Driver Signing Option Settings (Windows XP) . . . . . . . . . . . . . . . . . . . . . . . . . . . . . . . . . . . . . . . . . . . . . . . . . 72
Hardware Acceleration Settings (Windows XP) . . . . . . . . . . . . . . . . . . . . . . . . . . . . . . . . . . . . . . . . . . . . . . . . 72
Reinstalling the Driver . . . . . . . . . . . . . . . . . . . . . . . . . . . . . . . . . . . . . . . . . . . . . . . . . . . . . . . . . . . . . . . . . . . . . . . .
Removing the Driver . . . . . . . . . . . . . . . . . . . . . . . . . . . . . . . . . . . . . . . . . . . . . . . . . . . . . . . . . . . . . . . . . . . . . . . . .
Power Management Settings . . . . . . . . . . . . . . . . . . . . . . . . . . . . . . . . . . . . . . . . . . . . . . . . . . . . . . . . . . . . . . . . . 74
System “Performance” Settings (Windows) . . . . . . . . . . . . . . . . . . . . . . . . . . . . . . . . . . . . . . . . . . . . . . . . . . . . 76
System Volume Settings . . . . . . . . . . . . . . . . . . . . . . . . . . . . . . . . . . . . . . . . . . . . . . . . . . . . . . . . . . . . . . . . . . . . . . 7
Voice Communication Software Settings (Windows 7) . . . . . . . . . . . . . . . . . . . . . . . . . . . . . . . . . . . . . . . . . 78
Windows Monitoring Function Settings (Windows 7) . . . . . . . . . . . . . . . . . . . . . . . . . . . . . . . . . . . . . . . . . . 79
Device Name (Windows) . . . . . . . . . . . . . . . . . . . . . . . . . . . . . . . . . . . . . . . . . . . . . . . . . . . . . . . . . . . . . . . . . . . . . 8
Troubleshooting . . . . . . . . . . . . . . . . . . . . . . . . . . . . . . . . . . . . . . . . . . . . . . . . . . . . . . . . . .82
Overall . . . . . . . . . . . . . . . . . . . . . . . . . . . . . . . . . . . . . . . . . . . . . . . . . . . . . . . . . . . . . . . . . . . . . . . . . . . . . . . . . . . . .
Problems when Installing the Driver . . . . . . . . . . . . . . . . . . . . . . . . . . . . . . . . . . . . . . . . . . . . . . . . . . . . . . . . . . 82
Problems with Settings . . . . . . . . . . . . . . . . . . . . . . . . . . . . . . . . . . . . . . . . . . . . . . . . . . . . . . . . . . . . . . . . . . . . . . . 8
Problems with Playback or Recording . . . . . . . . . . . . . . . . . . . . . . . . . . . . . . . . . . . . . . . . . . . . . . . . . . . . . . . . . 85
Problems when Two Units are Connected . . . . . . . . . . . . . . . . . . . . . . . . . . . . . . . . . . . . . . . . . . . . . . . . . . . . . 91
Problems with SONAR LE . . . . . . . . . . . . . . . . . . . . . . . . . . . . . . . . . . . . . . . . . . . . . . . . . . . . . . . . . . . . . . . . . . . . .
Main Specications . . . . . . . . . . . . . . . . . . . . . . . . . . . . . . . . . . . . . . . . . . . . . . . . . . . . . . .94
Index . . . . . . . . . . . . . . . . . . . . . . . . . . . . . . . . . . . . . . . . . . . . . . . . . . . . . . . . . . . . . . . . . . . .96
202
Copyright © 2010 ROLAND CORPORATION
All rights reserved. No part of this publication may be reproduced in any form without the written permission of ROLAND CORPORATION.
Roland is a registered trademark of Roland Corporation in the United States and/or other countries.

9
USB cable
Use this cable to connect the OCTA-CAPTURE to the USB connector of your computer.
* Please use only the included USB cable. If you require a replacement due to loss or damage,
please contact the nearest Roland Service Center, or an authorized Roland distributor, as listed
on the separate sheet titled “Information.”
License agreement
This is a license agreement allowing you to use certain software that is copyrighted by Roland
Corporation.
You must read this before opening the envelope containing the included CD-ROM.
Rack mount angle
If you want to install the OCTA-CAPTURE in an
19-inch rack, please use the included rack mount
adaptors.
1. Remove the silver-colored screws from the
left and right sides of the OCTA-CAPTURE
(three screws on each side).
2. Fasten the rack mount adaptors to the OCTA-CAPTURE using the screws you removed
in step 1.
Be sure to attach the rack mount adaptors using the screws you removed.
3. Remove the four rubber feet from the bottom of the OCTA-CAPTURE.
Rack mount angle
You’ll need to provide the following items
The external amplier, speakers, or headphones that you’ll need in order to listen to sounds
that are output via the OCTA-CAPTURE are not included. Nor is there included a microphone
for connection to the OCTA-CAPTURE to input audio. You’ll need to obtain these items
separately.
You can use an MD or DAT digital recorder to record digital audio, but a cable for connecting
your digital device to the OCTA-CAPTURE is not included. You’ll need to obtain this separately.

11
2. Preamp control section (p. 33)
The OCTA-CAPTURE provides preamps for eight audio inputs (INPUT 1–8).
You can adjust the parameters of these preamps.
3. Display (p. 54)/utility section (p. 59)
The LCD shows the status of the OCTA-CAPTURE’s input jacks.
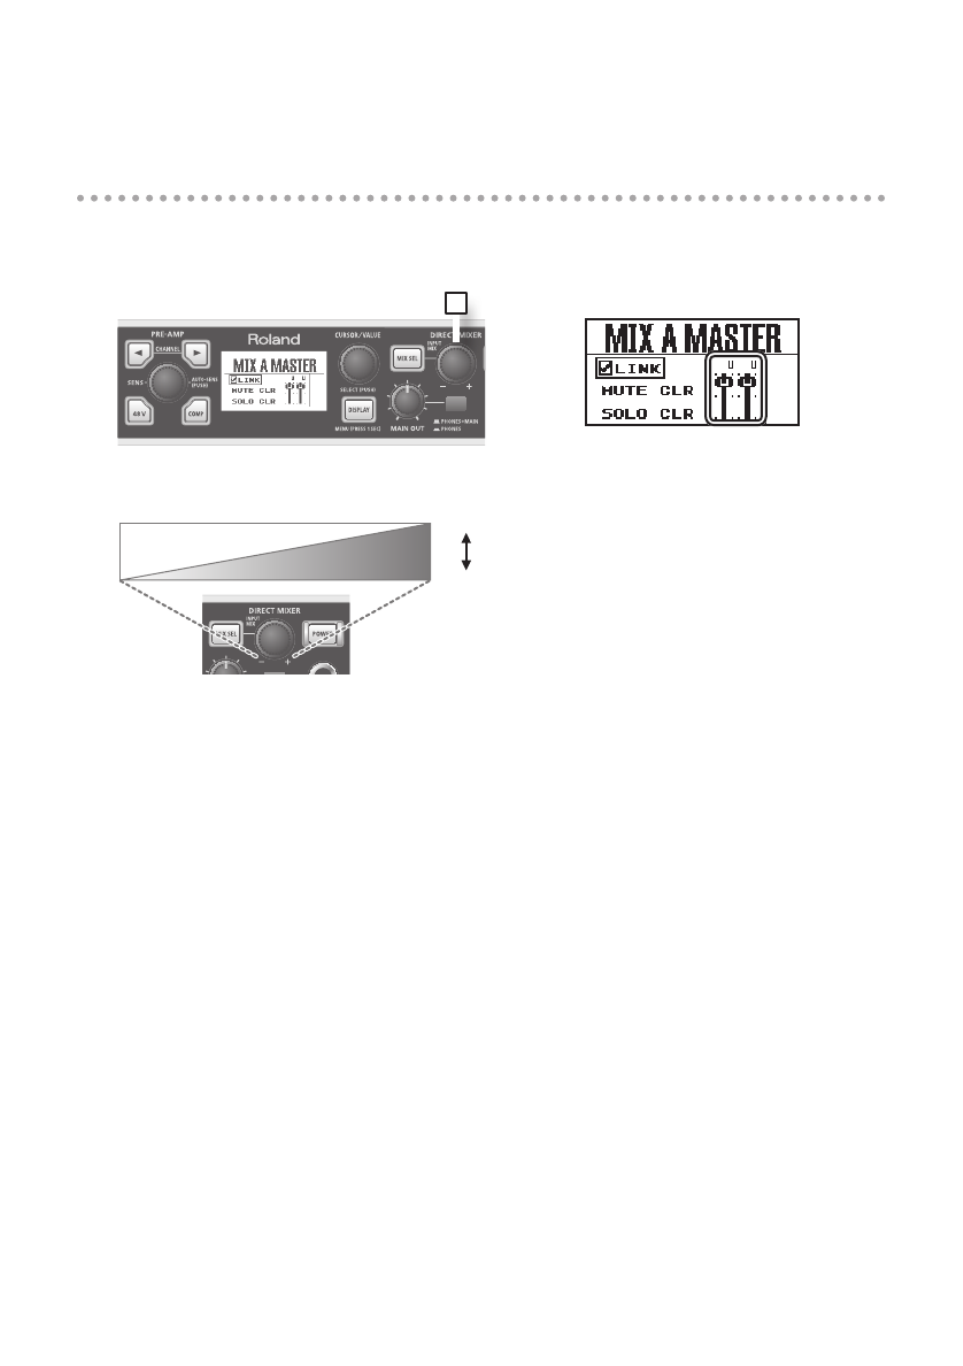
4. [MIX SEL] button
The OCTA-CAPTURE contains four independent mixers (input mixers A–D).
Use this button to select the input mixer that’s shown in the screen (p. 55).
5. [INPUT MIX] knob
This knob adjusts the monitor volume. As you
turn the knob toward the left (-), the level of
the sound being input from each input jack will
decrease. As you turn the knob toward the right
(+), the level of the sound from the input jacks
will increase up to +12 dB (four times).
6. [POWER] switch
This turns the power on/o. When the power is on, the button will light. To turn the power on/o,
hold down the [POWER] switch for at least one second.
7. [MAIN OUT] knob
This knob adjusts the volume of the output from the headphone jack and the main output jacks.
8. Monitor select switch
This selects whether the monitor output will be sent from both the headphone jack and the main
output jacks (PHONES + MAIN), or only from the headphone jack (PHONES).
When recording from a microphone, it’s convenient to monitor only through headphones.
9. Headphones jack
This jack outputs a mix of the sound from the input jacks and the sound from the computer. Use the
[INPUT MIX] knob to adjust the balance of the input sound.
Even if headphones are connected, sound will be output from the main output jacks on the rear
panel.
Volume +12 dB
-∞
INPUT MONITOR

12
Rear Panel
10 11 12 13 15
1716
14
10. DC IN jack
Connect the DC plug of the included AC adaptor to this jack.
* Do not use anything other than the included AC adaptor; doing so will cause malfunctions.
11. Ground terminal
Depending on the circumstances of a particular setup, you may experience a discomforting
sensation, or perceive that the surface feels gritty to the touch when you touch this device,
microphones connected to it, or the metal portions of other objects, such as guitars. This is due to
an innitesimal electrical charge, which is absolutely harmless. However, if you are concerned about
this, connect the ground terminal with an external ground. When the unit is grounded, a slight hum
may occur, depending on the particulars of your installation. If you are unsure of the connection
method, contact the nearest Roland Service Center, or an authorized Roland distributor, as listed on
the “Information” page.
Unsuitable places for connection
• Water pipes (may result in shock or electrocution)
• Gas pipes (may result in re or explosion)
• Telephone-line ground or lightning rod (may be dangerous in the event of lightning)
12. Digital input/output jacks
COAXIAL IN (9/10) jack
Use this when you want to digitally input a two-channel (stereo) signal.
Use this jack when two OCTA-CAPTURE units are connected (p. 63).
COAXIAL OUT (9/10) jack
Use this when you want to digitally send a two-channel (stereo) signal to a digital audio device.
Use this jack when two OCTA-CAPTURE units are connected (p. 63).
927

13
13. OUTPUT jacks 1–8 (nominal output 0 dBu)
These jacks output analog audio signals. They are balanced TRS phone jack outputs.
* You can also connect phone plugs (unbalanced).
14. Main output jacks
These output jacks can be controlled by the [MAIN OUT] knob.
15. Combo input jacks (INPUT 5–8)
These are analog audio signal input jacks with microphone
preamps. Since they can accommodate either XLR type or phone
type plugs, you can use the type of connector most suitable for
your equipment. You may connect either balanced or unbalanced
devices.
XLR type: INPUT 5-6 -56–-6 dBu
INPUT 7-8 -50–+0 dBu
Phone type: INPUT 5-8 -46–+4 dBu
* INPUT 5–8 are xed at low-impedance (Lo-Z).
XLR input jacks 7 and 8 support high input levels of +16 dBu. You’ll have plenty of headroom even
when using microphones to record loud sources such as a bass drum.
Use the XLR jacks to connect microphones, and use the phone jacks to connect other devices.
The XLR type connection can provide 48 V phantom power, allowing you to connect condenser
microphones that require a phantom power supply. In this case, turn on phantom power switch on
(p. 36).
* This device is equipped with balanced
(XLR/TRS) type input jacks. Wiring
diagrams for these jacks are shown on
the right. Make connections after rst
checking the wiring diagrams of other
equipment you intend to connect.
16. USB connector
Connect this to a computer.
Before connecting the OCTA-CAPTURE for the rst time, you must install the driver as described in
“Driver Installation and Settings” (p. 14).
17. MIDI connectors
MIDI IN connector
This is a MIDI input connector. You can connect your MIDI keyboard or MIDI controller here.
MIDI OUT connector
This is a MIDI output connector. You can connect it to your MIDI sound module.
XLR plug
Phone plug
(unbalanced)
TRS phone
plug
(balanced)
922 edit 1: GND
2: HOT
3: COLD
GND (SLEEVE)
HOT (TIP)
COLD (RING)

15
Windows 7/Windows Vista Users
Installing the Driver
Steps to be performed on the OCTA-CAPTURE keyboard itself are marked by a
Operation of the OCTA-CAPTURE
symbol. Don’t connect the OCTA-CAPTURE to your computer
until you are told to do so.
* The example screen shots included here are taken from Windows 7.
1. With the OCTA-CAPTURE disconnected, start up Windows.
Disconnect all USB cables from your computer, with the exception of those for a USB keyboard and
USB mouse (if used).
2. Close all currently running software.
3. Insert the included OCTA-CAPTURE CD-ROM into your DVD-ROM drive.
When the auto-play dialog box appears, click [Open folder to view les].
4. In the appropriate folder within the CD-ROM, double-click the [Setup] icon to start up
the installer.
OS Installer
Windows 7: Open the folders [Driver] and then [Win7]
Windows Vista: Open the folders [Driver] and then [Vista]
Windows 7 64-bit edition: Open the folders [x64Driver] and then [Win7]
Windows Vista 64-bit edition: Open the folders [x64Driver] and then [Vista]
If you get a message saying “The operating system you are using is not supported” or “The version
of this le is not compatible with the version of Windows you’re running,” or if you don’t know the
version of your operating system, check your operating system as described below.
If “System type” indicates “64-bit Operating System,” you have the 64-bit version.
Windows 7 users
Open “Control Panel,” click “System and Security,” and then click [System].
If the Control Panel shows the icon view, click [System] icon.
Windows Vista users
Open “Control Panel,” click [System and Maintenance], and then click [System].
If the Control Panel shows the classic view, double-click the “System” icon.

16
5. A user account control conrmation
screen will appear.
Click [Yes] if you’re using Windows 7, or click
[Continue] if you’re using Windows Vista
6. The screen will indicate “OCTA-CAPTURE Driver will be installed on your computer.”
Click [Next].
If any other message appears, proceed as directed by the message.
7. To begin the installation, click [Next] once again.
Installation will begin.
If a Windows security dialog box appears, click [Install].
8.
Operation of the OCTA-CAPTURE
The screen indicates “Ready to install
the driver.” With power to the OCTA-
CAPTURE switched o, use a USB
cable to connect it to your computer.
If any other message appears, proceed as
directed by the message.

20
7.
Operation of the OCTA-CAPTURE
The screen indicates “Ready to install
the driver.” With power to the OCTA-
CAPTURE switched o, use a USB
cable to connect it to your computer.
If any other message appears, proceed as
directed by the message.
8.
Operation of the OCTA-CAPTURE
Switch on the OCTA-CAPTURE’s power (p. 31).
The indication “Found New Hardware” will appear in the lower right corner of your screen.
* It may take between ten seconds to several minutes for the “Found New Hardware Wizard” to
appear.
9. If you are asked whether you want to connect to Windows Update, choose [No, not
this time] and click [Next].
10. Choose [Install the software
automatically (Recommended)], and
click [Next].

21
11. If the “Hardware Installation” dialog
box appears, click [Continue Anyway]
to continue the installation.
If you are unable to proceed, click [OK] in the
dialog box to terminate the installation. Then
change the setting as described in “Driver
Signing Option Settings (Windows XP)” (p. 72),
and perform the installation once again.
12. The screen will indicate “Completing the Found New Hardware Wizard.” Click [Finish].
When installation is complete, the “OCTA-CAPTURE Driver Setup” dialog box will indicate “Installation
has been completed.”
13. Click [Close] to close the “OCTA-CAPTURE Driver Setup” dialog box.
If the “System Settings Change” dialog box appears, click [Yes] to restart Windows.
Input/Output Device Settings
In order to use the OCTA-CAPTURE with your software, you must select the OCTA-CAPTURE as the
audio input/output device. For details on how to make this setting, refer to the documentation for
the software you’re using.
* If you’re unable to select the OCTA-CAPTURE as the audio input/output device in your software,
it may be that a problem has occurred. Refer to “Problems with Settings” (p. 84) in the Trouble-
shooting section.
Audio input/output device
For details about this device, refer to “Device Name (Windows)” (p. 81).
If you’re using ASIO compatible software, select the OCTA-CAPTURE in the ASIO settings of your
software.
MIDI input/output device
For details about this device, refer to “Device Name (Windows)” (p. 81).

23
Mac OS X Users
Steps to be performed on the OCTA-CAPTURE keyboard itself are marked by a
Operation of the OCTA-CAPTURE
symbol. Don’t connect the OCTA-CAPTURE to your computer
until you are told to do so.
* What you actually see on the screen may dier depending on your system.
Installing the Driver
* During the installation process, when you are presented with a dialog box asking you to supply
your password, enter an administrator’s password and click [OK].
1. With the OCTA-CAPTURE disconnected, start up your computer.
Disconnect all USB cables from your computer, with the exception of those for a USB keyboard and
USB mouse (if used).
2. Close all currently running software.
3. Insert the included OCTA-CAPTURE CD-ROM into your DVD-ROM drive.
4. Double-click one of the following icons on the CD-ROM to start up the installer.
OS Installer Folder
Mac OS X 10.6 or later [OctaCapture_USBDriver.pkg] /Driver (10.6)
Mac OS X 10.5 or earlier [OctaCaptureUSBDriver.pkg] /Driver (10.4_10.5)
A message concerned with checking whether installation is possible may appear.
If so, click [Continue].
If a message indicating that installation is not possible appears, check the operating system you’re
using, and perform step 4.
5. The screen will indicate “Welcome to the OCTA-CAPTURE Driver Installer.” Click
[Continue].
6. If the screen asks you to select a destination, click your start-up disk to select it, and
then click [Continue].
7. When the display asks you to select the type of installation, click [Install] or [Upgrade].
8. In the next screen, click [Continue Installation].
9. When installation is completed, click [Restart] to restart your computer.
* It may take some time for your computer to restart.
25
MIDI Input/Output Device Settings
1. Double-click [Audio MIDI Setup] (/Applications/Utilities) to start it up.
2. Access the dialog box.
Mac OS X 10.6 or later
From the [Window] menu, choose [Show MIDI Window] to open “MIDI Studio.”
Mac OS X 10.5 or earlier
Click the [MIDI Devices] tab.
3. Verify that [OCTA-CAPTURE] is shown in the “MIDI Studio” or “Audio MIDI Setup” dialog
box.
If the OCTA-CAPTURE is not shown or is grayed-out, the OCTA-CAPTURE has not been recognized
correctly.
Try clicking [Rescan MIDI]. You can also try disconnecting the USB cable connected to the OCTA-
CAPTURE, then re-connecting it.
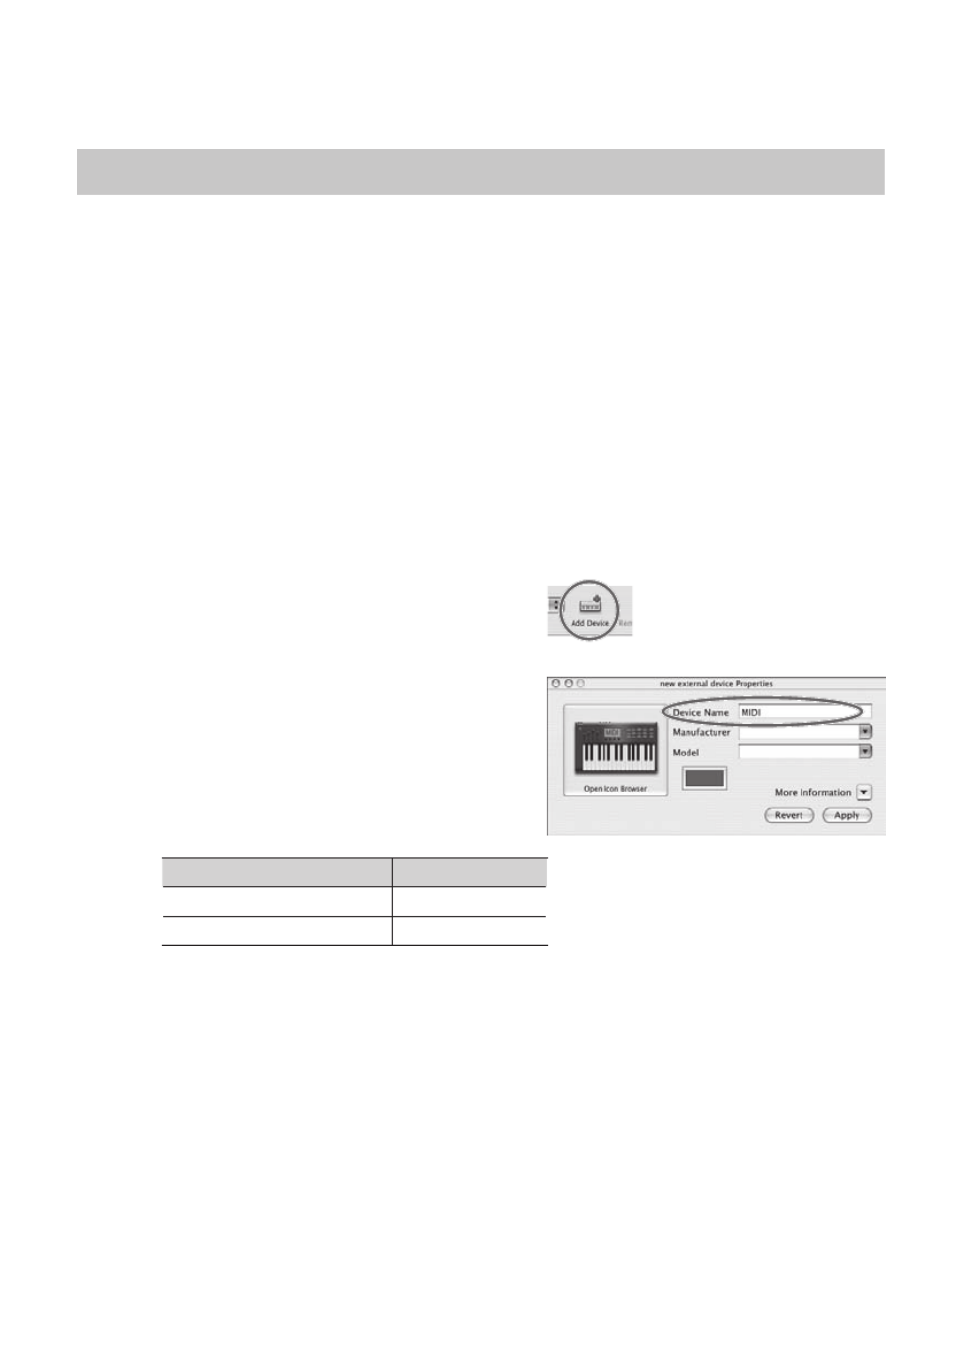
4. Click [Add Device] two times.
Two [new external device] items will appear.
5. Specify the device name for each [new external
device].
1. Select the [new external device] you added,
and click [Show Info].
2. Enter the name in the [Device Name] eld. For
each [new external device], enter the following
names.
New Device Device Name
First [new external device] MIDI
Second [new external device] CTRL
* You don’t have to enter anything for the “Manufacturer” and “Model” elds.

26
6. Use the mouse to drag between the and symbols (representing input and
output, respectively) of [OCTA-CAPTURE] and each [new external device] so that they
are connected as shown in the illustration below.
7. Check to make sure that MIDI transmission and reception takes place normally.
1. Click “Test Setup.”
* If you have a sound module connected to the OCTA-CAPTURE’s MIDI OUT connector, the following step
will cause it to produce a fairly loud sound, so please reduce the volume of your sound module before
continuing.
2. If you have a sound module connected to the OCTA-CAPTURE’s MIDI OUT connector, you
need to click the for the OCTA-CAPTURE that appeared in step 3. If the sound module
produces sound, the settings are correct.
3. Click Test Setup once again to end the test.
8. From the [Audio MIDI Setup] menu, select [Quit Audio MIDI Setup] to nish making
settings.
Caution when recording or playing back with your software
Check the following points before you use the OCTA-CAPTURE to record or play back.
• Connect the OCTA-CAPTURE to your Macintosh before you start up the software you’re
using.
• Do not switch o the OCTA-CAPTURE’s power or disconnect the USB cable from your
computer while your software is running. Close the software you’re using before you
disconnect the OCTA-CAPTURE’s USB cable from your Macintosh.
This completes driver installation and settings.
Next, verify that you hear sound from the OCTA-CAPTURE. -> “Verifying That You Hear Sound” (p. 27)

28
Playing Back the Sample Data
Here we will play back sample data using the standard functionality provided by your operating
system. The sample data “TTears(.mp3)” is in the included Driver CD-ROM.
981b
* Use of the song data supplied with this product for any purpose other than private, personal
enjoyment without the permission of the copyright holder is prohibited by law. Additionally, this
data must not be copied, nor used in a secondary copyrighted work without the permission of
the copyright holder.
1. Insert the included Driver CD-ROM into the DVD-ROM drive of your computer.
2. From the Sample folder of the CD-ROM, copy the le TTears(.mp3) to your desktop.
3. Play back the sample data “TTears”(.mp3).
Double-click the TTears(.mp3) le you copied to your desktop.
If you’re using Windows, Windows Media Player will start. If you’re using Macintosh, iTunes will start.
Click the play button, and the sample data will start playing.
* Depending on your system, other playback software may start up. If so, play the sample data as
described in the documentation for the software you’re using.
4. Adjust the volume.
Use the OCTA-CAPTURE’s [MAIN OUT] Knob to adjust the volume.
You should hear the sample data played from the headphones or speakers connected to the
OCTA-CAPTURE.
Did you hear the sample data?
If you could hear the sample data, the OCTA-CAPTURE is correctly connected to your
computer and the driver has been installed correctly.
If you could not hear the sample data, refer to “Problems with Playback or Recording”
(p. 85). If there’s no sound, or if there’s something wrong with the playback, information
provided in that section will help you solve the problem.
You’ve nished connecting the OCTA-CAPTURE and installing the driver.
Proceed to one of the following sections, depending on what you want to do next.
For details on settings and operation, refer to “Basic Operation” (p. 29).
If you’ll be using the OCTA-CAPTURE with your DAW software, make the appropriate settings for the
audio port names listed on page “Device Name (Windows)” (p. 81).
“Recording a Microphone or Guitar” (p. 35)
“Simultaneously Recording Multiple Inputs (Multi Recording)” (p. 40)
“Live Set-up with Four Stage Monitors” (p. 62)
“Connecting Two OCTA-CAPTURE Units” (p. 63)

32
Auto Power O
The OCTA-CAPTURE is able to turn itself o automatically.
The power is turned o automatically after a predetermined amount of time has passed since you’ve
operated anything on the panel.
* Auto Power O will not function if the OCTA-CAPTURE is connected to your computer, or if a
microphone/instrument is connected.
The [POWER] switch will blink approximately 15 minutes before the power turns o.
When the OCTA-CAPTURE left the factory, all of this functions was set to “4HOURS.”
To set a function to “OFF,” follow the procedure below.
2 43 5
1 6
1. Press and hold the [DISPLAY] button for one second.
The System screen will appear.
2. Turn the [CURSOR/VALUE] knob to move the cursor to “POWER OFF.”
3. Press the [CURSOR/VALUE] knob.
The parameter value will be highlighted.
4. Turn the [CURSOR/VALUE] knob to change the setting to “OFF.”
5. Press the [CURSOR/VALUE] knob to nalize the setting.
6. Press the [DISPLAY] button.
You will return to the previous screen.

35
Recording a Microphone or Guitar
When you record on your DAW software by singing or playing your guitar along with audio data
that’s played back by your computer, only your vocal or guitar performance will be recorded on the
computer.
Connections
The sound from the microphone connected to INPUT 1 will be recorded into your computer on the
left (L) channel. If you connect it to INPUT 2, the sound will be recorded on the right (R) channel.
Connect to
INPUT 2.
Connect to
INPUT 1.
Turn the knob toward the right if you
want the sound being input from
the input jacks to be louder than the
playback from the computer.
The following items can be adjusted
from the control panel or from the
OCTA-CAPTURE itself.
• Input sensitivity
• Input impedance
• Compressor on/o
• Sampling rate
• Direct monitor volume
• Phantom power on/o
Guitar/Bass
Microphone
* You must turn the phantom power o unless you’ve connected a condenser microphone that
requires phantom power.
Supplying phantom power to a dynamic microphone or audio playback device will cause
malfunctions: For details on the specications of your microphone, refer to the owner’s manual
that came with your microphone.
* If you’re connecting a guitar directly, connect it to INPUT 1 or INPUT 2.
* Don’t connect anything to input jacks you’re not using.
983
* Howling could be produced depending on the location of microphones relative to speakers. This
can be remedied by:
1. Changing the orientation of the microphone(s).
2. Relocating microphone(s) at a greater distance from speakers.
3. Lowering volume levels.

37
Input sensitivity setting
To record at the highest quality, raise the input sensitivity until it is as high as you can get it without
causing the SIG indicator (p. 33) to reach the rightmost position.
1 2
3
21
1. Press the CHANNEL [ ] or [ ] button.
The CHANNEL [ ] [ ] buttons will light, and the preamp setting screen will appear.
2. Use the CHANNEL [ ] [ ] buttons to select the channel that you want to adjust.
3. Use the [SENS] knob to adjust the input level.
* In some cases you might hear crackling while you turn the [SENS] knob; this does not indicate a
malfunction.
Auto Sens setting
The Auto Sens setting automatically sets the recording level to the best setting after analyzing the
audio that was input during the specied interval of time.
41 2 21
356
1. Press the CHANNEL [ ] or [ ] button.
The CHANNEL [ ] [ ] buttons will light, and the preamp setting screen will appear.
2. Use the CHANNEL [ ] [ ] buttons to select the channel that you want to adjust.
3. Press the [AUTO-SENS] button.
4. Turn the [CURSOR/VALUE] knob to select the number of channels you want to adjust.

38
5. Press the [AUTO-SENS] button.
Auto Sens setting will begin. Play the loudest section of the song.
If you decide to cancel the operation, press the [DISPLAY] Button.
While the Auto Sens setting is taking place, the sensitivity will temporarily be set to the minimum.
6. Press the [AUTO-SENS] button once again.
MEMO
The time used by the Auto Sens setting is specied in the Utility section (p. 59).
Auto Sens Setting Time Explanation
Manual
The recording level will be set according to the maximum volume that was
input between the moment you initiated Auto Sens and the moment you
pressed the [AUTO-SENS] button once again. There is no limitation on the Auto
Sens time.
30 sec, 1 min, 3 min, 5 min
If you press the [AUTO-SENS] button once again while the Auto Sens setting
is in progress, the recording level will automatically be set according to the
maximum volume that was received up to that point during Auto Sens.
Compressor on/o
If the compressor is turned on, the input level will automatically be adjusted when a sudden high-
volume input is received at the combo input jack, preventing clipping distortion from occurring.
The volume will also be boosted automatically when the input is low, making the volume of your
recording more consistent.
1 2 21
3
1. Press the CHANNEL [ ] or [ ] button.
The CHANNEL [ ] [ ] buttons will light, and the preamp setting screen will appear.
2. Use the CHANNEL [ ] [ ] buttons to select the channel that you want to adjust.
3. Press the [ ] button.
When the compressor is turned on, the [ ] button will light.
For details on the parameters, refer to “Compressor parameter settings” (p. 58)
39
Direct monitor volume adjustment
Here’s how to adjust the balance between the monitor sound and the volume of the audio playback
from your computer. Using the direct monitor volume to adjust the volume won’t aect the
recording level.
1
1. Turn the [INPUT MIX] knob to adjust the overall volume of input mixer section.
Volume +12 dB
-∞
INPUT MONITOR

41
Input sensitivity adjustments
To record at the highest quality, raise the input sensitivity until it is as high as you can get it without
causing the SIG indicator (p. 33) to reach the rightmost position.
1 1
2
1. Use the CHANNEL [ ] [ ] buttons to select the channel that you want to adjust.
2. Use the [SENS] knob to adjust the input level.
Direct monitor volume adjustments
Adjust the balance between the monitor sound and the volume of the audio playback from your
computer. Using the direct monitor volume to adjust the volume will not aect the recording level.
1 2
1. Press the [MIX SEL] button to access the INPUT MIXER screen.
2. Turn the [INPUT MIX] knob to adjust the overall volume of input mixer section.
MEMO
You can provide separate monitor signals to the musicians. For details, refer to “Live Set-up with
Four Stage Monitors” (p. 62).
Specyfikacje produktu
| Marka: | Roland |
| Kategoria: | system hi-fi |
| Model: | Octa-Capture UA-1010 |
Potrzebujesz pomocy?
Jeśli potrzebujesz pomocy z Roland Octa-Capture UA-1010, zadaj pytanie poniżej, a inni użytkownicy Ci odpowiedzą
Instrukcje system hi-fi Roland

21 Września 2024
15 Września 2024
14 Września 2024
14 Września 2024
13 Września 2024
12 Września 2024
12 Września 2024
11 Września 2024
10 Września 2024
8 Września 2024
Instrukcje system hi-fi
- system hi-fi Sony
- system hi-fi Yamaha
- system hi-fi Samsung
- system hi-fi AEG
- system hi-fi Sven
- system hi-fi LG
- system hi-fi Motorola
- system hi-fi Logitech
- system hi-fi Sharp
- system hi-fi BeamZ
- system hi-fi Huawei
- system hi-fi Pioneer
- system hi-fi Philips
- system hi-fi Plantronics
- system hi-fi SilverCrest
- system hi-fi Technics
- system hi-fi JBL
- system hi-fi Onkyo
- system hi-fi Geemarc
- system hi-fi Nokia
- system hi-fi Scott
- system hi-fi KEF
- system hi-fi Kärcher
- system hi-fi Bose
- system hi-fi Panasonic
- system hi-fi Klipsch
- system hi-fi Muse
- system hi-fi Crestron
- system hi-fi Behringer
- system hi-fi Asus
- system hi-fi Nedis
- system hi-fi IK Multimedia
- system hi-fi Medion
- system hi-fi Boss
- system hi-fi OK
- system hi-fi Lenco
- system hi-fi Marquant
- system hi-fi Majestic
- system hi-fi Jensen
- system hi-fi ILive
- system hi-fi Native Instruments
- system hi-fi Garmin
- system hi-fi Blaupunkt
- system hi-fi Vivax
- system hi-fi ATen
- system hi-fi Salora
- system hi-fi Teac
- system hi-fi Dual
- system hi-fi Grundig
- system hi-fi Kiloview
- system hi-fi Homedics
- system hi-fi Soundmaster
- system hi-fi Hyundai
- system hi-fi DAP-Audio
- system hi-fi Creative
- system hi-fi Manhattan
- system hi-fi Honor
- system hi-fi Tripp Lite
- system hi-fi Shure
- system hi-fi ECG
- system hi-fi Matsui
- system hi-fi Denon
- system hi-fi Block
- system hi-fi Cambridge
- system hi-fi Sanus
- system hi-fi Kenwood
- system hi-fi Scosche
- system hi-fi Polk
- system hi-fi Alpine
- system hi-fi Gembird
- system hi-fi Røde
- system hi-fi Dynaudio
- system hi-fi Paradigm
- system hi-fi Bang & Olufsen
- system hi-fi Cobra
- system hi-fi JVC
- system hi-fi Konig & Meyer
- system hi-fi Memphis Audio
- system hi-fi Jamo
- system hi-fi Focusrite
- system hi-fi Rega
- system hi-fi Steelseries
- system hi-fi Oppo
- system hi-fi Lowrance
- system hi-fi TechniSat
- system hi-fi Auna
- system hi-fi Vimar
- system hi-fi Schneider
- system hi-fi LD Systems
- system hi-fi Krüger&Matz
- system hi-fi Audioengine
- system hi-fi OneConcept
- system hi-fi Pure
- system hi-fi Marshall
- system hi-fi Clarion
- system hi-fi Netgear
- system hi-fi Thomson
- system hi-fi Pro-Ject
- system hi-fi AVM
- system hi-fi Velleman
- system hi-fi Ferguson
- system hi-fi Korg
- system hi-fi DataVideo
- system hi-fi Magnat
- system hi-fi DreamGEAR
- system hi-fi Pyle
- system hi-fi ELAC
- system hi-fi Zoom
- system hi-fi Cardo
- system hi-fi NGS
- system hi-fi Midland
- system hi-fi Marantz
- system hi-fi AOC
- system hi-fi Monster
- system hi-fi Sennheiser
- system hi-fi Esoteric
- system hi-fi Jabra
- system hi-fi Chord
- system hi-fi Camry
- system hi-fi Vtech
- system hi-fi Werma
- system hi-fi Speco Technologies
- system hi-fi Lenoxx
- system hi-fi Bowers & Wilkins
- system hi-fi Samson
- system hi-fi Imperial
- system hi-fi PreSonus
- system hi-fi Monitor Audio
- system hi-fi Audio Pro
- system hi-fi NACON
- system hi-fi Revox
- system hi-fi Nevir
- system hi-fi Olympus
- system hi-fi TriStar
- system hi-fi Ibiza Sound
- system hi-fi Vonyx
- system hi-fi Musical Fidelity
- system hi-fi Alto
- system hi-fi Fluid
- system hi-fi Razer
- system hi-fi Peavey
- system hi-fi ION
- system hi-fi ART
- system hi-fi NAD
- system hi-fi Continental Edison
- system hi-fi RCF
- system hi-fi Harman Kardon
- system hi-fi Rolls
- system hi-fi Audio-Technica
- system hi-fi SPC
- system hi-fi GoGen
- system hi-fi TC Helicon
- system hi-fi Brandson
- system hi-fi Sonoro
- system hi-fi Parrot
- system hi-fi Aiwa
- system hi-fi JL Audio
- system hi-fi AKAI
- system hi-fi Majority
- system hi-fi Teufel
- system hi-fi Clatronic
- system hi-fi Dali
- system hi-fi Vision
- system hi-fi Telefunken
- system hi-fi Oregon Scientific
- system hi-fi Focal
- system hi-fi DBX
- system hi-fi Kicker
- system hi-fi Omnitronic
- system hi-fi Hama
- system hi-fi Mackie
- system hi-fi Shokz
- system hi-fi Marmitek
- system hi-fi FiiO
- system hi-fi Duronic
- system hi-fi Smart-AVI
- system hi-fi MXL
- system hi-fi Lotronic
- system hi-fi Bush
- system hi-fi Sharkoon
- system hi-fi Watson
- system hi-fi Saramonic
- system hi-fi Loewe
- system hi-fi Bluesound
- system hi-fi Sangean
- system hi-fi AVer
- system hi-fi Walrus Audio
- system hi-fi SVS
- system hi-fi Franklin
- system hi-fi Victrola
- system hi-fi Arcam
- system hi-fi Elta
- system hi-fi Mac Audio
- system hi-fi Infinity
- system hi-fi McIntosh
- system hi-fi Denver
- system hi-fi Albrecht
- system hi-fi Hitachi
- system hi-fi Fender
- system hi-fi AKG
- system hi-fi SmallHD
- system hi-fi RCA
- system hi-fi Electro Harmonix
- system hi-fi Atlas Sound
- system hi-fi Gemini
- system hi-fi Trevi
- system hi-fi Technaxx
- system hi-fi Atlona
- system hi-fi GPX
- system hi-fi Arturia
- system hi-fi Sencor
- system hi-fi Polsen
- system hi-fi PowerBass
- system hi-fi Power Dynamics
- system hi-fi Rockford Fosgate
- system hi-fi Steinberg
- system hi-fi Canton
- system hi-fi Nextbase
- system hi-fi Senal
- system hi-fi TOA
- system hi-fi Monacor
- system hi-fi Daewoo
- system hi-fi ADE
- system hi-fi Tannoy
- system hi-fi Electro-Voice
- system hi-fi Anthem
- system hi-fi Audizio
- system hi-fi Tascam
- system hi-fi RME
- system hi-fi Laser
- system hi-fi WAGAN
- system hi-fi Kunft
- system hi-fi Best Buy
- system hi-fi AudioControl
- system hi-fi Audiolab
- system hi-fi Vocopro
- system hi-fi Technical Pro
- system hi-fi WiiM
- system hi-fi SPL
- system hi-fi Cyrus
- system hi-fi Terratec
- system hi-fi Crunch
- system hi-fi Geneva
- system hi-fi Sound Devices
- system hi-fi House Of Marley
- system hi-fi Reflexion
- system hi-fi REVO
- system hi-fi DPA
- system hi-fi Crosley
- system hi-fi HK Audio
- system hi-fi Swissvoice
- system hi-fi Fenton
- system hi-fi BSS Audio
- system hi-fi Belkin
- system hi-fi SWIT
- system hi-fi Kramer
- system hi-fi KanexPro
- system hi-fi RGBlink
- system hi-fi Glide Gear
- system hi-fi Hosa
- system hi-fi Key Digital
- system hi-fi Music Hall
- system hi-fi AMX
- system hi-fi Goodis
- system hi-fi Sonance
- system hi-fi Rotel
- system hi-fi Altec Lansing
- system hi-fi American Audio
- system hi-fi Devialet
- system hi-fi IFi Audio
- system hi-fi Audison
- system hi-fi Caliber
- system hi-fi Sony Ericsson
- system hi-fi Proscan
- system hi-fi Exibel
- system hi-fi Logik
- system hi-fi Energy Sistem
- system hi-fi Sagem
- system hi-fi Sonos
- system hi-fi Brigmton
- system hi-fi Sunstech
- system hi-fi AudioAffairs
- system hi-fi Magnum
- system hi-fi Steren
- system hi-fi Audiosonic
- system hi-fi Coby
- system hi-fi Envivo
- system hi-fi Galaxy Audio
- system hi-fi Bigben Interactive
- system hi-fi Apogee
- system hi-fi Pyle Pro
- system hi-fi Autotek
- system hi-fi MB Quart
- system hi-fi Bigben
- system hi-fi Massive
- system hi-fi IDance
- system hi-fi Alba
- system hi-fi Naxa
- system hi-fi QTX
- system hi-fi Konig
- system hi-fi Boston Acoustics
- system hi-fi Mpman
- system hi-fi Vizio
- system hi-fi Nikkei
- system hi-fi Peaq
- system hi-fi Ematic
- system hi-fi ESI
- system hi-fi Roadstar
- system hi-fi Anchor Audio
- system hi-fi Superior
- system hi-fi Quantis
- system hi-fi Irradio
- system hi-fi Karcher Audio
- system hi-fi Cmx
- system hi-fi Russound
- system hi-fi Comica
- system hi-fi Audient
- system hi-fi Bluetrek
- system hi-fi Starkey
- system hi-fi PAC
- system hi-fi Skytec
- system hi-fi Luxman
- system hi-fi M-Audio
- system hi-fi Stereoboomm
- system hi-fi Tivoli Audio
- system hi-fi Wolfgang
- system hi-fi Numan
- system hi-fi Iluv
- system hi-fi Vankyo
- system hi-fi WyreStorm
- system hi-fi Sonifex
- system hi-fi TV One
- system hi-fi Nxg
- system hi-fi Lynx
- system hi-fi MIPRO
- system hi-fi Solid State Logic
- system hi-fi HiFi ROSE
- system hi-fi OSD Audio
- system hi-fi Andover
- system hi-fi Mark Levinson
- system hi-fi Auto-T
- system hi-fi Soundstream
- system hi-fi Xoro
- system hi-fi Adastra
- system hi-fi Avante
- system hi-fi Titanwolf
- system hi-fi CSL
- system hi-fi Liam&Daan
- system hi-fi Universal Audio
- system hi-fi JB Systems
- system hi-fi Orbitsound
- system hi-fi HUMANTECHNIK
- system hi-fi SIIG
- system hi-fi Hercules
- system hi-fi Primare
- system hi-fi Griffin
- system hi-fi Xantech
- system hi-fi Eissound
- system hi-fi Extron
- system hi-fi ClearOne
- system hi-fi Ebode
- system hi-fi Motu
- system hi-fi Mission
- system hi-fi Teradek
- system hi-fi TCM
- system hi-fi Crown
- system hi-fi Morel
- system hi-fi Zvox
- system hi-fi Antelope Audio
- system hi-fi CE Labs
- system hi-fi Z CAM
- system hi-fi Avid
- system hi-fi Icon
- system hi-fi Mtx Audio
- system hi-fi General Electric
- system hi-fi Aquatic AV
- system hi-fi Parasound
- system hi-fi Promate
- system hi-fi SoundCast
- system hi-fi Hollyland
- system hi-fi Defender
- system hi-fi Boytone
- system hi-fi Astell&Kern
- system hi-fi Glorious
- system hi-fi Maretron
- system hi-fi JK Audio
- system hi-fi Xact
- system hi-fi Ruark Audio
- system hi-fi Magnavox
- system hi-fi ANT
- system hi-fi Leviton
- system hi-fi Rane
- system hi-fi ESX
- system hi-fi NUVO
- system hi-fi Lexicon
- system hi-fi Fluance
- system hi-fi Altra
- system hi-fi On-Q
- system hi-fi Vantage Point
- system hi-fi Planet Audio
- system hi-fi CAD Audio
- system hi-fi IFi
- system hi-fi E-bench
- system hi-fi Digigram
- system hi-fi Roon
- system hi-fi Voco
- system hi-fi Linear
- system hi-fi SSV Works
- system hi-fi DAP
- system hi-fi The Box
- system hi-fi AmpliVox
- system hi-fi Audiofrog
- system hi-fi Accsoon
- system hi-fi Juke Audio
- system hi-fi Meridian
- system hi-fi DiGiGrid
- system hi-fi CLXmusic
- system hi-fi Nuheara
- system hi-fi Acoustic Solutions
- system hi-fi Metric Halo
- system hi-fi Universal Remote Control
- system hi-fi Prism Sound
- system hi-fi MoFi
- system hi-fi Antelope
- system hi-fi Auvi
- system hi-fi Switchcraft
- system hi-fi Aplic
- system hi-fi Crystal Video
- system hi-fi Atoll
- system hi-fi Bennett & Ross
- system hi-fi Pronomic
- system hi-fi Beatfoxx
- system hi-fi NEAR
- system hi-fi Vaxis
- system hi-fi INKEE
Najnowsze instrukcje dla system hi-fi

5 Kwietnia 2025
3 Kwietnia 2025
2 Kwietnia 2025
2 Kwietnia 2025
1 Kwietnia 2025
1 Kwietnia 2025
29 Marca 2025
28 Marca 2025
28 Marca 2025
28 Marca 2025