Instrukcja obsługi Olympus Camedia X-300
Przeczytaj poniżej 📖 instrukcję obsługi w języku polskim dla Olympus Camedia X-300 (171 stron) w kategorii kamera. Ta instrukcja była pomocna dla 8 osób i została oceniona przez 2 użytkowników na średnio 4.5 gwiazdek
Strona 1/171

DIGITAL CAMERA
D-565ZOOM
C-450ZOOM
X-300
REFERENCE MANUAL
<Click Here>
Explanation of digital camera functions and operating instructions.
Explanation of how to download images between your digital camera and PC.
DIGITAL CAMERA - PC CONNECTION
OPERATION MANUAL
CAMERA OPERATION MANUAL

Thank you for purchasing an Olympus digital camera. Before you
start to use your new camera, please read these instructions care-
fully to enjoy optimum performance and a longer service life. Keep
this manual in a safe place for future reference.
We recommend that you take test shots to get accustomed to your
camera before taking important photographs.
Screen and camera illustrations shown in this manual may differ
from those of the actual product.
DIGITAL CAMERA
D-565ZOOM
C-450ZOOM
X-300
REFERENCE MANUAL

2
For customers in North and South America
For customers in Europe
Trademarks
• IBM is a registered trademark of International Business Machines Corporation.
• Microsoft and Windows are registered trademarks of Microsoft Corporation.
• Macintosh is a trademark of Apple Computer Inc.
• All other company and product names are registered trademarks and/or
trademarks of their respective owners.
• The standards for camera file systems referred to in this manual are the “Design
Rule for Camera File System/DCF” standards stipulated by the Japan Electronics
and Information Technology Industries Association (JEITA).
“CE” mark indicates that this product complies with the European
requirements for safety, health, environment and customer protection.
“CE” mark cameras are intended for sales in Europe.
For customers in USA
Declaration of Conformity
Model Number : D-565ZOOM/C-450ZOOM/X-300
Trade Name : OLYMPUS
Responsible Party : Olympus America Inc.
Address : 2 Corporate Center Drive, Melville, New York
11747-3157 U.S.A.
Telephone Number : 631-844-5000
Tested To Comply With FCC Standards
FOR HOME OR OFFICE USE
This device complies with Part 15 of the FCC rules. Operation is subject to
the following two conditions:
(1) This device may not cause harmful interference.
(2) This device must accept any interference received, including
interference that may cause undesired operation.
For customers in Canada
This Class B digital apparatus meets all requirements of the Canadian
Interference-Causing Equipment Regulations.

3
1
2
3
4
5
6
7
8
10
11
For fine- tuning the settings
to get that particular shot.
Getting started
About the menus
Shooting basics
Advanced shooting
Playback
Useful functions
Miscellaneous
Troubleshooting and other
information.
Contents P.4
P.8
P.31
P.40
P.61
P.78
P.96
P.108
P.117
Print setting
Specifications
Glossary of terms
P.131
P.133
For playing back and
arranging pictures.
Settings that make the
camera easier to operate.
Printing pictures.
Index P.135
For shooting and learning the
basic operations.
Introduction of the camera’s
functions.

5
Contents
3 Shooting basics 40
Shooting mode . . . . . . . . . . . . . . . . . . . . . . . . . . . . . . . . . . . . 40
Taking still pictures . . . . . . . . . . . . . . . . . . . . . . . . . . 43
Taking still pictures using the viewfinder . . . . . . . . . . . . . . 43
Taking still pictures using the monitor . . . . . . . . . . . . . . . . 45
Comparison of the viewfinder & monitor . . . . . . . . . . . . . . 47
If correct focus cannot be obtained . . . . . . . . . . . . . . . . . . . . . 48
Determine the position of the subject after focusing
(Focus Lock) . . . . . . . . . . . . . . . . . . . . 48
Subjects that are difficult to focus on . . . . . . . . . . . . . . . . 50
Night scene mode . . . . . . . . . . . . . . . . . . . . . . . . . . . . . . . 51
Recording movies . . . . . . . . . . . . . . . . . . . . . . . . . . . . . . . 53
Zoom . . . . . . . . . . . . . . . . . . . . . . . . . . . . . . . . . . . . . . . . . . . . 55
Using the optical zoom . . . . . . . . . . . . . . . . . . . . . . . . . . . 55
Using the digital zoom . . . . . . . . . . . . . . . . . . . . . . . . . . . . 56
Using the flash . . . . . . . . . . . . . . . . . . . . . . . . . . . . . . . . . . 58
4 Advanced shooting 61
Macro mode shooting . . . . . . . . . . . . . . . . . . . . . . . . . . . . 61
Self-timer shooting . . . . . . . . . . . . . . . . . . . . . . . . . . . . . . 63
Selecting the metering area . . . . . . . . . . . . . . . . . . . . . . . 64
Sequential shooting . . . . . . . . . . . . . . . . . . . . . . . . . . . . 65
PANORAMA . . . . . . . . . . . . . . . . . . . . . . . . . . . . . . . . . . . . . . 66
Taking two-in-one pictures . . . . . . . . . . . . . . . . . . . . . 68
Selecting a record mode . . . . . . . . . . . . . . . . . . . . . . . . . 70
Varying the image brightness (Exposure compensation) . . 74
Adjusting the white balance . . . . . . . . . . . . . . . . . . . . . . 76
6
Contents
5 Playback 78
Viewing still pictures . . . . . . . . . . . . . . . . . . . . . . . . . . . . . 78
QUICK VIEW. . . . . . . . . . . . . . . . . . . . . . . . . . . . . . . . . . . 79
Close-up playback . . . . . . . . . . . . . . . . . . . . . . . . . . . 80
Index display . . . . . . . . . . . . . . . . . . . . . . . . . . . . . . . . . . 81
Selecting the number of pictures. . . . . . . . . . . . . . . . . . . . 82
Slideshow . . . . . . . . . . . . . . . . . . . . . . . . . . . . . . . . . . . . . 83
Playback on a TV . . . . . . . . . . . . . . . . . . . . . . . . . . . . . . . . . . 84
Picture rotation . . . . . . . . . . . . . . . . . . . . . . . . . . . . . . 85
MOVIE PLAY - Viewing movies . . . . . . . . . . . . . . . . . . . . 86
Protecting pictures . . . . . . . . . . . . . . . . . . . . . . . . . . . . . . 88
Erasing pictures . . . . . . . . . . . . . . . . . . . . . . . . . . . . . . . . . 89
Single-frame erase . . . . . . . . . . . . . . . . . . . . . . . . . . . . . . 89
All-frame erase . . . . . . . . . . . . . . . . . . . . . . . . . . . . . . . . . 90
Editing still pictures . . . . . . . . . . . . . . . . . . . . . . . . . . . . . . . . . 91
Creating black and white pictures . . . . . . . . . . . . . . . . . . . 92
Creating sepia-toned pictures . . . . . . . . . . . . . . . . . . . . . . 92
Resizing . . . . . . . . . . . . . . . . . . . . . . . . . . . . . . . . . . . 93
INDEX - Creating an index . . . . . . . . . . . . . . . . . . . . . . . . . . . 94
6 Useful functions 96
MODE RESET - Reset the settings you changed . . . . . . . . . . 96
ALL RESET - Saving the camera's settings . . . . . . . . . . . . . . 97
CARD SETUP - Formatting cards . . . . . . . . . . . . . . . . . . . 99
Displaying shooting information . . . . . . . . . . . . . . . . . 101
Adjusting the monitor brightness . . . . . . . . . . . . . . . . . . 102
REC VIEW. . . . . . . . . . . . . . . . . . . . . . . . . . . . . . . . . . . . . . . 103
Turning the beep sound off . . . . . . . . . . . . . . . . . . . . . . 104
FILE NAME . . . . . . . . . . . . . . . . . . . . . . . . . . . . . . . . . . . . . . 105
PIXEL MAPPING. . . . . . . . . . . . . . . . . . . . . . . . . . . . . . . . . . 106
VIDEO OUT - Video output selection . . . . . . . . . . . . . . . . . . 107

7
Contents
7 Print setting 108
How to print pictures . . . . . . . . . . . . . . . . . . . . . . . . . . . . 108
All-frame reservation . . . . . . . . . . . . . . . . . . . . . . . . . . . 110
Single-frame reservation . . . . . . . . . . . . . . . . . . . . . . . . . 112
Resetting print reservation data . . . . . . . . . . . . . . . . . . . 115
8 Miscellaneous 117
Error codes . . . . . . . . . . . . . . . . . . . . . . . . . . . . . . . . . . . . . . 117
Troubleshooting . . . . . . . . . . . . . . . . . . . . . . . . . . . . . . . . . . . 118
The camera does not work . . . . . . . . . . . . . . . . . . . . . . . 118
The image quality is poor . . . . . . . . . . . . . . . . . . . . . . . . 122
List of menus . . . . . . . . . . . . . . . . . . . . . . . . . . . . . . . . . . . . . 124
List of factory default settings . . . . . . . . . . . . . . . . . . . . . . . . 128
List of items by shooting mode . . . . . . . . . . . . . . . . . . . . . . . 129
Camera maintenance . . . . . . . . . . . . . . . . . . . . . . . . . . . . . . 130
Specifications . . . . . . . . . . . . . . . . . . . . . . . . . . . . . . . . . . . . 131
Glossary of terms . . . . . . . . . . . . . . . . . . . . . . . . . . . . . . . . . 133
Index . . . . . . . . . . . . . . . . . . . . . . . . . . . . . . . . . . . . . . . . . . . 135
10
1
Names of parts
Getting started
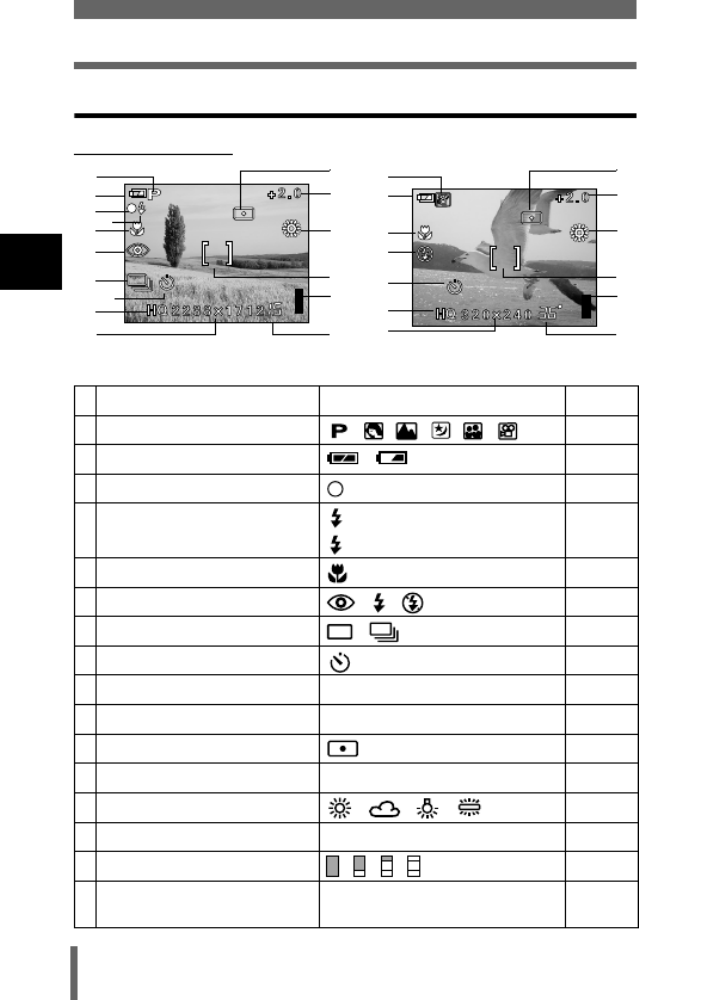
Monitor indications
Shooting mode
Items Indications
Ref. Page
1 Scene select/movie , , , , , P.40
2 Battery check , P.12
3 Green lamp P.43
4 Flash standby
Camera movement warning/ Flash charge
(lit)
(Blinks) P.43
5 Macro mode P.61
6 Flash mode , , P.58
7 Sequential shooting , P.65
8 Self-timer P.63
9 Record mode SHQ, HQ, SQ1, SQ2 P.70
10 Resolution 2288×1712, 1024×768, 640×480, etc. P.70
11 Metering P.64
12 Exposure compensation
-2.0, -1.5, -1.0, -0.5, +0.5, +1.0, +1.5, +2.0
P.74
13 White balance , , , P.76
14 AF target mark [ ] P.43
15 Memory gauge , , , P.12
16 Number of storable still pictures
Seconds remaining
15
36”
P.45
P.53
2
111
13 5
12
13
12
16
5
7
9
15
14
1
Still picture Movie
2
34
6
10 10
9
8
6
8
11
16
15
14

11
Names of parts
1
Getting started
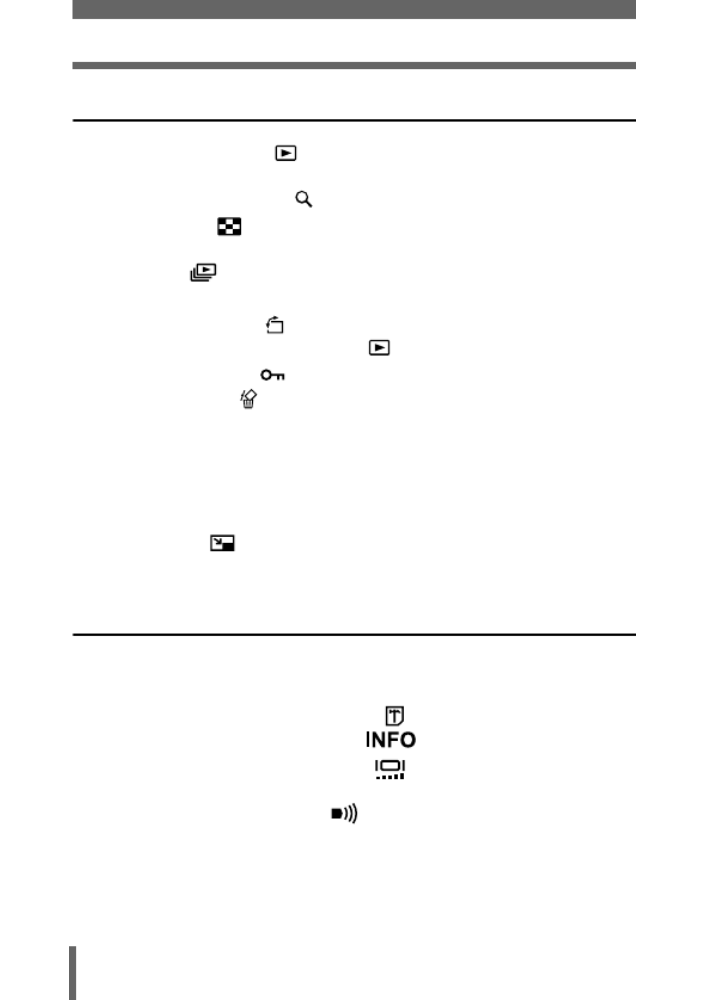
Playback mode
INFO setting allows you to select how much information to display on the
monitor. Screens when the Information display is set to ON are shown below.
"Displaying shooting information" (P.101)
• The indications that appear on a movie picture that has been
selected and displayed from the index display are different from
those that appear when the movie picture is displayed using the
movie playback function.
Items Indications Ref. Page
1 Print reservation,
Number of prints
x
10 P.110
2 Battery check , P.12
3 Protect P.88
4 Record mode SHQ, HQ, SQ1, SQ2 P.70
5 Resolution 2288×1712, 1024×768, 640×480, etc. P.70
6 Exposure compensation
-2.0, -1.5, -1.0, -0.5, +0.5, +1.0, +1.5, +2.0
P.74
7 White balance WB AUTO, , , , P.76
8 Date and time ’03.04.01 12:00 P.28
9
File number (still picture), Number of frames
Playing time/Total recording time (movie)
100-0016
, 16
0”/15” -
10 Movie P.86
2
1
4
6
2
7
8
9
4
5
5
9
7
8
10
Still picture Movie
33
Note
12
1
Names of parts
Getting started
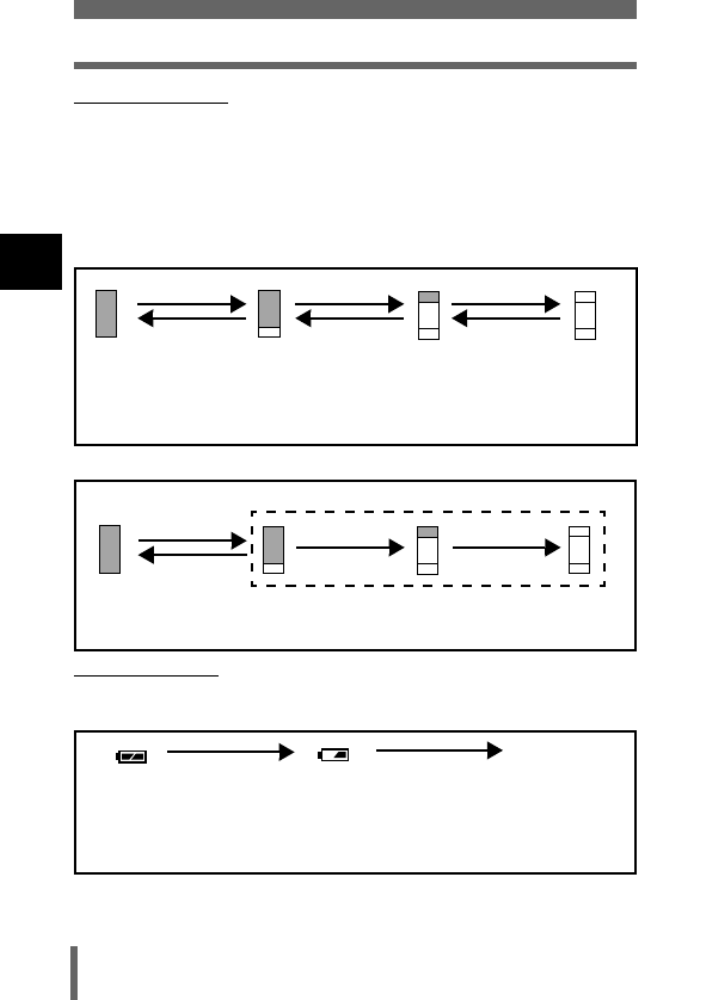
Memory gauge
The memory gauge lights up when you take a picture or record a movie. While
the gauge is lit, the camera is storing the picture or the movie on the card. The
memory gauge indication changes as shown below depending on the
shooting status.
If the memory gauge is fully lit, wait a few seconds until it goes off to take the
next shot.
When taking still pictures
When recording movies
Battery check
If the remaining battery power is low, the battery check indication on the
monitor changes as follows while the camera is turned on.
Before
shooting
(Gauge is off)
No more pictures can be
taken (Fully lit)
Wait until the gauge returns
to the status on the left to
take the next shot.
One picture
taken
(Lit)
More than two
taken
(Lit)
Shoot Shoot Shoot
Wait
Before shooting
(Gauge is off)
Shoot
Wait
If you continue shooting
During shooting (Lit)
• Shooting is not possible until the lit area goes off completely.
• Movie recording ends automatically when the memory gauge is full.
Lit (Green)
(The indicator turns
off after a while)
Remaining power
level: high.
Green lamp and orange lamp on
the right of the viewfinder blink.
Remaining power level: exhausted.
Replace with new batteries.
Blinks (Red)
Remaining power level: low.
Prepare new batteries.
No indication

15
1
Getting started
Loading the batteries
This camera uses 1 CR-V3 lithium battery pack or 2 AA (R6) alkaline batteries
or NiMH batteries.
1Make sure that:
2Slide the battery compartment
cover in the direction of .
• The battery compartment cover is
unlocked and opened in the direction of
.
• Use the ball of your finger to slide the
cover. Do not use your fingernail as this
could result in injury.
Important
• CR-V3 lithium battery cannot be recharged.
• Do not peel off the label from a CR-V3 lithium battery pack.
• Manganese (zinc-carbon) batteries cannot be used.
The lens barrier is
closed.
The lamp on
the right of the viewfinder
is off.
The monitor is
off.
Battery compartment
cover

17
Loading the batteries
1
Getting started
Selecting optional batteries or an AC adapter
In addition to the batteries provided with the camera, the following types of
battery or AC adapter can be used. Choose the power source best suited to
the situation.
CR-V3 lithium battery pack (Not rechargeable)
Since the CR-V3 lithium battery pack has a long service life, it is convenient
when traveling.
NiMH batteries (Rechargeable batteries)
Olympus NiMH batteries are rechargeable and economical. However,
charging the batteries repeatedly before using up their capacity will shorten
the life of the batteries per charge gradually.
AA (R6) alkaline batteries
When you need batteries in a hurry, you can use AA (R6) alkaline batteries,
which are easy to obtain anywhere. However, the number of pictures that you
can take may vary considerably depending on the battery manufacturer,
shooting conditions, etc. Turn off the monitor whenever possible to save
power.
AC adapter
An optional Olympus CAMEDIA-brand AC adapter allows you to power your
digital camera from a common AC wall outlet. Be sure to use the specified AC
adapter. An AC adapter is useful for time-consuming tasks such as image
downloads.
Use an AC adapter designed to operate on the AC voltage in the area the
camera is being used.
Consult your nearest Olympus dealer or Service center for details.
DC-IN jack (black)
AC wall outlet
Power plug
AC adapter
Connection cord
plug
DC-IN jack/
VIDEO OUT jack cover

18
1
Loading the batteries
Getting started
• Manganese (zinc-carbon) batteries cannot be used.
• If the battery power runs out while the camera is connected to a PC, the
image data may be lost or damaged. You are recommended to use the
AC adapter when transferring images to a PC. Do not connect or
disconnect the AC adapter while the camera is communicating with the
PC.
• Do not remove or load the batteries or connect or disconnect the AC
adapter while the camera is turned on. Doing so could affect the
camera’s internal settings or functions.
• The life of battery packs may vary according to the type of battery,
manufacturer, shooting conditions, etc.
• Power is consumed continuously during the conditions below. This
could shorten the life of the batteries.
• When the monitor is in the playback mode for an extended period
of time.
• Repeated zoom adjustments.
• Repeated auto-focus by depressing the shutter button halfway.
• When the camera is connected to a PC.
• Carefully read the AC adapter’s instructions before use.
• When using an AC adapter, the AC adapter supplies power to the
camera even if batteries are loaded in the camera. The AC adapter does
not charge batteries in the camera.
Note

19
1
Getting started
Inserting a card
"Card" in this manual refers to the xD-Picture Card. The camera uses the card
to record pictures.
Card basics
The card corresponds to normal camera film for recording the pictures you
have taken.
Pictures recorded and stored on the card can easily be erased, overwritten,
and/or edited on a PC.
1 Index area
You can write down the card’s contents.
2 Contact area
Comes into contact with the camera’s signal read
contacts.
Compatible cards
• xD-Picture Card (16 to 256 MB)
• This camera may not recognize a non-Olympus card or a card that was
formatted on another device (such as a PC, etc.). Before use, be sure to
format the card on this camera. "CARD SETUP - Formatting cards"
(P.99)
1
2
Note

20
1
Inserting a card
Getting started
1Make sure that:
2Open the card cover.
3Face the card the correct way and
insert it into the card slot as
shown in the illustration.
• Insert the card keeping it straight.
• The card stops with a click when it is
inserted all the way.
• Inserting the card the wrong way or at an
angle could damage the contact area or
cause the card to jam.
• If the card is not inserted all the way,
data may not be written to the card.
4Close the card cover securely.
The lens barrier is
closed.
The lamp on
the right of the viewfinder
is off.
The monitor is
off.
Notch
The position of the card
inserted correctly
Index area side of the card

21
Inserting a card
1
Getting started
Removing the card
1Make sure that:
2Open the card cover.
3Push the card all the way in to
unlock it, and let it return slowly.
• The card is ejected a short way and then
stops.
4Hold the card straight and pull it
out.
• Do not use a sharp-pointed object such as a pen or any other rigid object
when pushing the card.
• Never open the card cover, or remove the card or the batteries while the
camera is turned on. Doing so could destroy the data on the card. Once
destroyed, data cannot be restored.
The lens barrier is
closed.
The lamp on
the right of the viewfinder
is off.
The monitor is
off.
Releasing your finger quickly after pushing the
card all the way in may cause it to eject forcefully
out of the slot.
Note
Note

22
1
Getting started
Power on/off
When shooting pictures (Shooting mode)
Power on: Open the lens barrier fully.
The camera turns on in the shooting mode and the lens
extends.
If the lens does not extend when the lens barrier is opened,
there is a possibility that the barrier is not fully open. Open
the lens barrier fully until you feel it click.
Power off: Close the lens barrier slightly until it almost touches
the lens barrel.
The lens barrier stops just before it touches the lens and the
lens retracts. Wait until the lens is fully retracted before
closing the lens barrier completely.
The camera turns off.

23
Power on/off
1
Getting started
TIPS
• To save battery power, the camera automatically enters the sleep mode
and stops operating if not used for 3 minutes. If the monitor is on, it will
automatically turn off. The lens retracts automatically 5 minutes after
that. The camera activates again as soon as you lightly press the shutter
button or zoom lever. Whenever possible, turn the camera off when you
do not intend to take any pictures for a while.
• Do not push the lens barrier forcefully against the lens as this may
damage the lens or cause it to malfunction.
When playing back pictures (Playback mode)
Power on: Press (playback) with the lens barrier closed.
The camera turns on in the playback mode. The monitor
turns on and the last picture taken is displayed.
If no pictures have been taken yet, or the xD-Picture card is
empty, the message “NO PICTURE” is displayed on the
monitor.
Power off: Press .
The monitor and the camera turn off.
Note
Playback button ( )
Playback button ( )

24
1
Power on/off
Getting started
TIPS
• When the camera turns on, the monitor may light up momentarily and a
picture may be displayed briefly. This is not a malfunction.
• Never open the card cover, remove the card or the batteries, or connect
or disconnect the AC adapter while the camera is turned on. Doing so
could destroy all data on the card. Destroyed data cannot be restored.
When changing the card, be sure to turn the camera off before opening
the card cover.
The power is on when:
The lens is extended The monitor is turned on
• Even if the monitor is turned off, the camera still consumes battery power
when the lens is extended.
The power is off when:
The lens barrier is closed The monitor is turned off
Note
or
and
25
Power on/off
1
Getting started
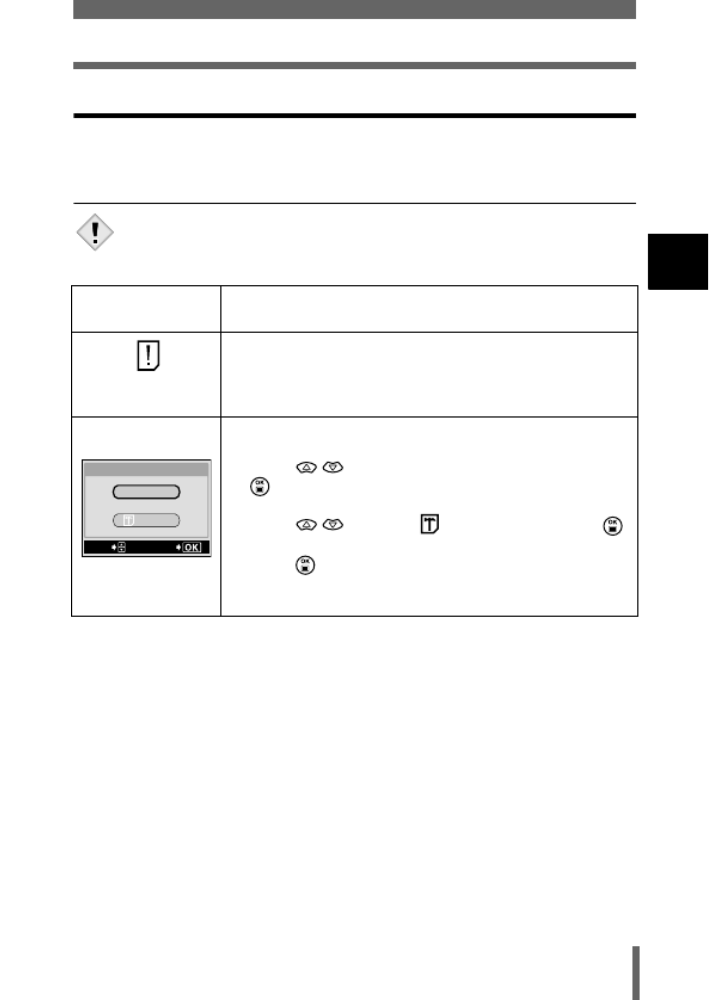
If the card is not recognized (card check)
When the power is turned on, the camera checks the card automatically.
If there is no card in the camera or a card that is not supported by this camera
is inserted, one of the following screens will be displayed.
• All data stored on the card is erased when the card is formatted.
Monitor
indication Corrective action
NO CARD
There is no card in the camera or the card is not
inserted properly.
→Insert a card. If a card is already inserted, remove it
and insert it again correctly.
The card cannot record, play back or erase pictures.
Replace with a new card, or format the card.
→Press to select POWER OFF, and press
. Replace it with a new one.
→Format the card.
Press to select FORMAT, and press
to display the confirmation screen. Select YES and
press .
Formatting starts. If the card was successfully
formatted, the camera is ready to take pictures.
Note
POWER%OFF
FORMAt
CARD%SEtUP
SELECt
GO

26
1
Getting started
Selecting a language
You can select a language for on-screen display. This reference manual
shows the English on-screen display in the illustrations and explanations.
Available languages vary depending on the area where you purchased this
camera.
1Open the lens barrier fully.
2Press .
• The top menu is displayed.
3Press on the arrow pad to select
MODE MENU.
4Press to select the SETUP
tab, and press .
5Press to select , and
press .
OK button
Arrow pad
Top menu
SETUP tab
27
Selecting a language
1
Getting started
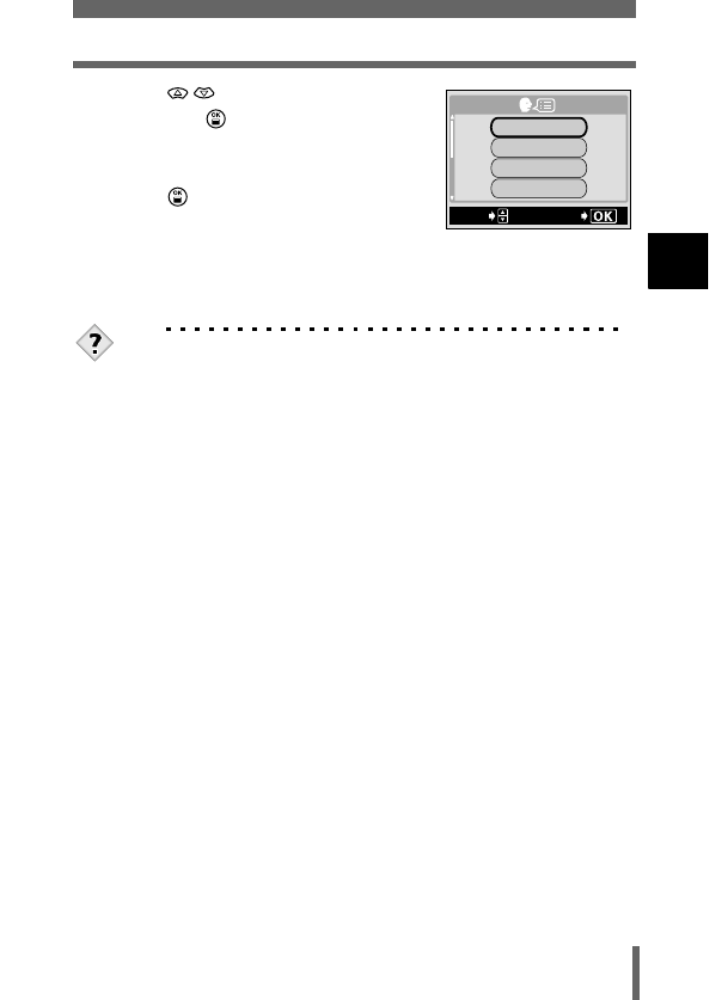
6Press to select a language,
and press .
7Press again to exit the menu.
8Close the lens barrier to turn the
camera off.
TIPS
• The language can also be set from the playback mode.
ENGLISH
DEUtSCH
SELECt
GO
FRANCAIS
ESPAÑOL

28
1
Getting started
Setting the date and time
1Open the lens barrier fully.
2Press .
• The top menu is displayed.
3Press on the arrow pad to select
MODE MENU.
4Press to select the SETUP
tab, and press .
5Press to select , and
press .
• The green frame moves to the selected
item.
OK button
Arrow pad
Top menu
SETUP tab

29
Setting the date and time
1
Getting started
6Press to select one of the
following date formats: Y-M-D
(Year/Month/Day), M-D-Y (Month/
Day/Year), D-M-Y (Day/Month/Year).
Then press .
• Move to the year setting.
• The following steps show the procedure
used when the date and time settings are
set to Y-M-D.
7Press to set the year, and
press to move to the month
setting.
• To move back to the previous setting,
press .
• The first two digits of the year are fixed.
8Repeat this procedure until the
date and time are completely set.
• The camera only displays the time in 24-hour time sysytem ("2.pm"
would be "14:00").
9Press .
• For a more accurate setting, press
when the time signal hits 00 seconds.
The clock starts when you press the
button.
10 Close the lens barrier to turn the
camera off.
• The current settings are retained even when the power is turned off,
unless they are readjusted.
• The date and time settings will be canceled if the camera is left without
batteries for approximately 30 minutes. The settings will be canceled
more quickly if the batteries were only loaded in the camera for a short
time before being removed. Before taking important pictures, check that
the date and time settings are correct.
TIPS
• The date and time can also be set from the playback mode.
OK button
Note

31
2
About the menus
2 About the menus
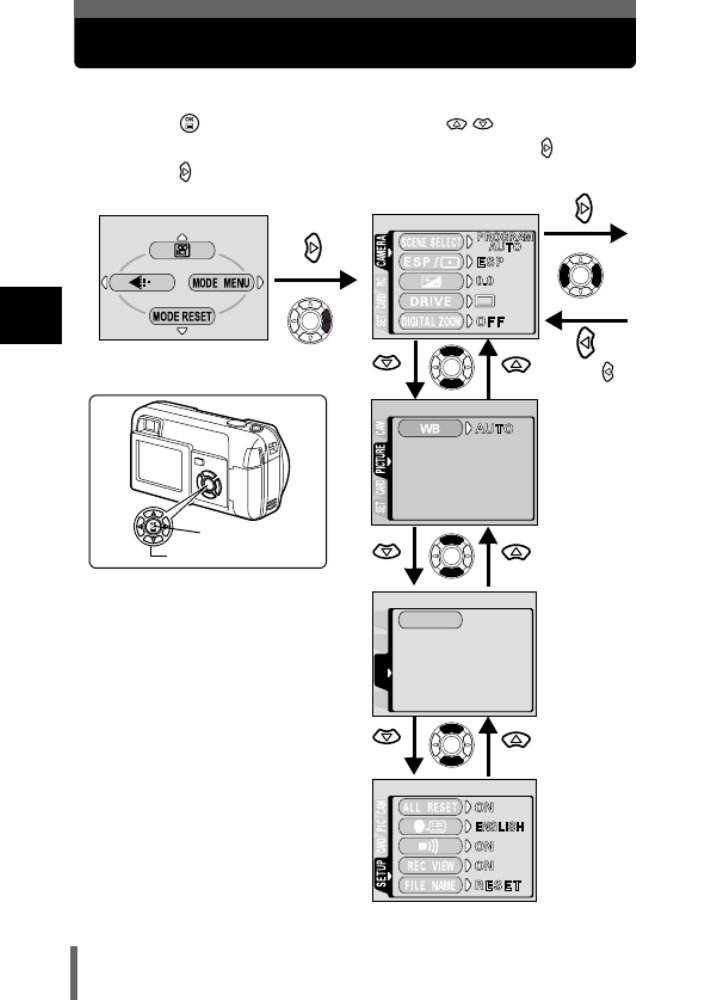
Types of menus
When you turn on the camera and press , the top menu is displayed on
the monitor. The functions of this camera are set from the menus.
This chapter explains how the menus work, using the shooting mode screens.
Shortcut Menus
• Take you directly to the setting
screens.
• Display operational buttons at
the bottom of the screen.
Mode Menus
• Categorizes the settings into
tabs.
• Displays the tabs of each
menu.
Select the desired tab on the
left of the screen by pressing
.
Select a menu using the
arrow pad.
Press .
The top menu is displayed.
Arrow pad ( )
OK button
Tab
32
2
About the menus
How to use the menus
1Press to display
the top menu.
Press .
Top menu CAMERA tab
PICTURE tab
CARD tab
SETUP tab
2Press to select
a tab, and press .
Press
to return to
the tab
selection
screen.
SEt
CAM
PIC
CARD
CARD%SEtUP
OK button
Arrow pad

34
2
About the menus
Shortcut menus
Shooting mode
Shortcut menus are frequently used menus that can be accessed from the top
menu.
Select this mode to record movies. It is displayed when the
camera is in the still picture mode. P.53
Select this mode to take still pictures. This method is easy as all
you have to do is to press the shutter button. It is displayed when
the camera is in the movie mode.
P.43
Sets the image quality and resolution.
Still picture : SHQ, HQ, SQ1, SQ2
Movie : HQ, SQ
P.70
Resets all settings including the exposure compensation and
white balance to the factory default settings. When the shooting
mode is set to , this menu resets the mode to (Still
picture).
P.96
PHOTO
Top menu in still
picture shooting
Top menu in movie
recording
(Movie)
(Still picture)
MODE RESET

35
Shortcut menus
2
About the menus
Playback mode
Runs through all saved pictures one after another. It is displayed
when the camera is playing back still pictures. P.83
Plays back movies. It is displayed when a movie is selected. P.86
Displays all the shooting information on the monitor. P.101
Erases the selected still picture or movie. P.89
MODE%MENU
INFO
ERASE
MODE%MENU
MOVIE%PLAY
INFO
ERASE
Top menu when playing
back still pictures
Top menu when playing
back a movie
MOVIE PLAY
INFO
ERASE

36
2
About the menus
Mode Menus
The MODE MENU has 4 tabs. Press to select a tab and display the
associated menu items.
Shooting mode
CAMERA tab
SCENE SELECT
Selects the shooting mode from
PROGRAM AUTO, (portrait),
(landscape), (night scene) and
(self-portrait).
P.40
ESP/ Selects the metering method from ESP
and . P.64
Adjusts the brightness of the image
(Exposure compensation). P.74
DRIVE
Selects the shooting mode from
(Single-frame shooting) and
(sequential shooting).
P.65
DIGITAL ZOOM
Enables the zoom shooting at larger
magnification than the maximum optical
zoom.
P.56
PANORAMA Allows panorama pictures to be taken
with Olympus CAMEDIA-brand cards. P.66
2 IN 1
Combines two still pictures taken in
succession and stores them as a single
picture.
P.68
PICTURE tab
WB Sets the appropriate white balance
according to the light source. P.76
CAMERA tab
PICTURE tab
CARD tab
SETUP tab

38
2
Mode Menus
About the menus
Playback mode
PLAY tab
Protects pictures from accidental
erasure. P.88
Rotates pictures 90 degrees clockwise
or counterclockwise. P.85
Stores print reservation information on
the card. P.108
EDIT tab
BLACK&WHITE Creates a black and white picture and
saves it as a new picture. P.92
SEPIA Creates a sepia-toned picture and saves
it as a new picture. P.92
Makes the file size smaller and saves it
as a new file. P.93
INDEX Creates an index picture of a movie in 9
frames. P.94
CARD tab
CARD SETUP Erases all image data stored on the card.
(ALL ERASE, FORMAT)
P.90
P.99
PLAY tab
EDIT tab
CARD tab
SETUP tab
CARDSEt EDIt
PLAY

39
Mode Menus
2
About the menus
SETUP tab
ALL RESET
Selects whether to keep the current
camera settings when you turn off the
power.
P.97
Selects a language for on-screen
display. P.26
Turns the beep sound (used for
warnings, etc.) on and off. P.104
Adjusts the brightness of the monitor. P.102
Sets the date and time. P.28
VIDEO OUT
Selects NTSC or PAL according to your
TV’s video signal type. TV video signal
types differ depending on the region.
P.107
Selects the number of frames in the
index display. P.81
PLAY tab
EDIT tab
CARD tab
SETUP tab
41
Shooting mode
3
Shooting basics
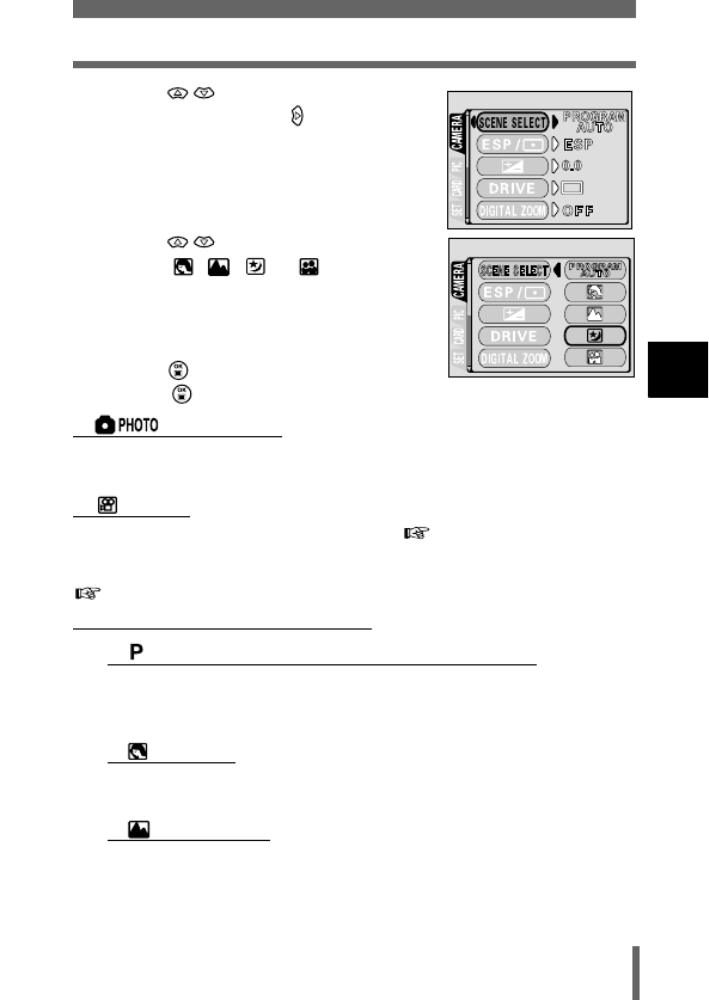
5Press to select SCENE
SELECT, and press .
• The green frame moves to the selected
item.
6Press to select PROGRAM
AUTO, , , or depending
on the shooting conditions and the
effect you want to achieve.
7Press .
• Press again to exit the menu.
(Still picture)
Lets you take a still picture. You can select one of the five shooting modes
depending on the situation.
(Movie)
Selected from the shooting mode top menu. "Types of menus" (P.31)
Lets you record movies. The camera maintains the correct focus and
exposure even if your subject moves. You cannot record movies with sound.
"Recording movies" (P.53)
Shooting modes for still pictures
PROGRAM AUTO (Factory default setting)
Used for regular photography. The camera automatically makes the
settings for natural color balance. Other functions, such as the flash
mode and metering, can be adjusted manually.
(Portrait)
Suitable for taking a portrait-style shot of a person. The camera
automatically sets the optimal shooting conditions.
(Landscape)
Suitable for taking pictures of landscapes and other outdoor scenes. The
camera automatically sets the optimal shooting conditions.
43
3
Shooting basics
Taking still pictures
You can take still pictures using either the viewfinder or the monitor. Both
methods are easy as all you have to do is to press the shutter button.
If the camera is in the movie record mode, press , and from the top menu,
select (Still picture).
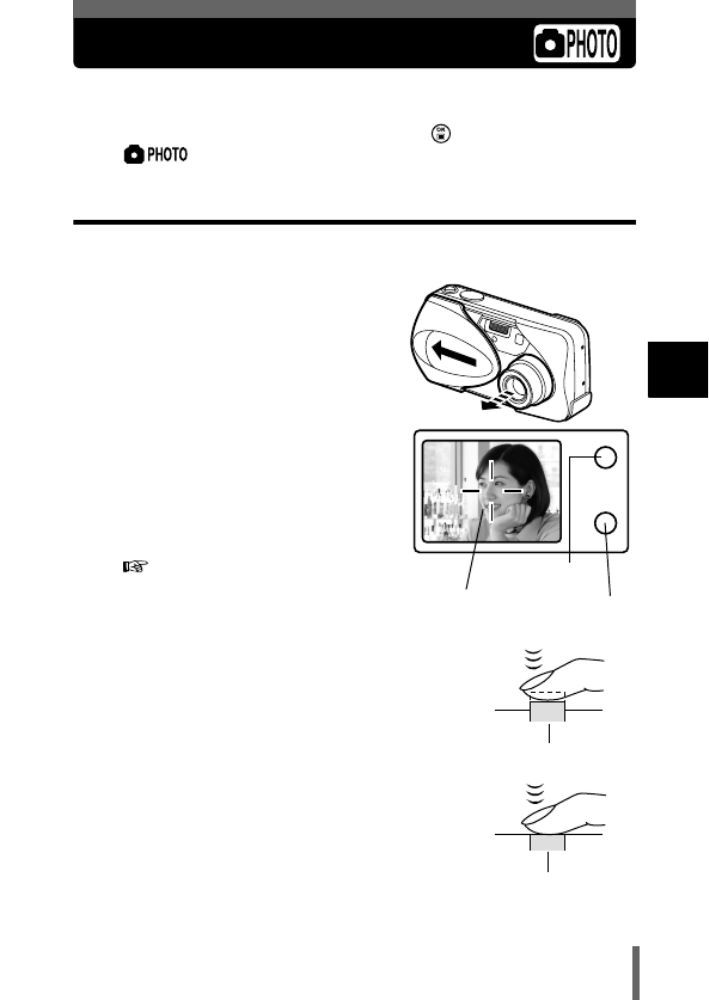
Taking still pictures using the viewfinder
The camera actually records a wider area than the picture you compose while
looking through the viewfinder.
1Open the lens barrier fully.
• Slide the lens barrier fully open until
it clicks.
2Decide the composition while
looking at the image in the
viewfinder.
• When the distance from the camera
to the subject is less than 50 cm/1.6
ft., select the macro mode.
"Macro mode shooting" (P.61)
3Press the shutter button gently
(halfway) to adjust the focus.
• Focus and exposure are locked, when the
green lamp lights steadily. (Focus Lock)
• When the flash is ready to fire, the orange lamp
lights.
4Press the shutter button all the way
(fully).
• The camera takes the picture, and a beep
sounds.
• When the green lamp stops blinking, you can
take the next picture.
AF target mark
Orange lamp
Green lamp
Shutter button
Shutter button

44
3
Taking still pictures
Shooting basics
• The orange lamp blinks while the picture is stored on the card.
TIPS
Correct focus cannot be obtained on the subject you want to shoot.
→"If correct focus cannot be obtained" (P.48)
The green lamp blinks.
→You are too close to the subject. Take the picture at least 50 cm/1.6
ft. away from the subject. When the distance from the camera to the
subject is less than 50 cm/1.6 ft., select the macro mode.
"Macro mode shooting" (P.61)
→Depending on the subject, the focus may not be locked.
"If correct focus cannot be obtained" (P.48)
The orange lamp blinks when the shutter button is pressed halfway.
→The flash is charging. While the orange lamp is blinking quickly after
shooting, the picture you just took is being stored. Wait until the lamp
goes off.
To check the picture you have just taken immediately.
→Set REC VIEW to ON.
"REC VIEW" (P.103)

45
Taking still pictures
3
Shooting basics
Taking still pictures using the monitor
With the monitor, you can shoot while checking the picture area that the
camera actually records.
1Open the lens barrier fully.
• Slide the lens barrier fully open until it
clicks.
2Press .
• The monitor turns on.
"Monitor indications" (P.10)
3Decide the composition
while looking at the
image on the monitor.
4Take the picture by
following the same
procedure as for
shooting using the
viewfinder.
"Taking still pictures
using the viewfinder" (P.43)
• When you want to take
pictures with the monitor off,
press again.
Monitor button ( )
Shooting mode (P.40)
AF target mark (P.10)
Number of storable still
pictures (P.70)
Memory gauge (P.12)
Flash standby/Flash charge (P.43)
Green lamp
This indicates the same status as
the green lamp on the right of the
viewfinder. (P.43)

46
3
Taking still pictures
Shooting basics
TIPS
The monitor turns off automatically.
→If the camera is not used for over 3 minutes, the monitor turns off
automatically. The lens retracts automatically 5 minutes after that.
Touch the shutter button or zoom lever to turn the monitor on.
The monitor is hard to see.
→Bright light, such as direct sunlight, may cause vertical lines to appear
on the monitor screen. In this case, use the viewfinder. (Note that this
does not affect recorded pictures.)
• Press the shutter button gently using the ball of your finger. If it is
pressed hard, the camera may move, resulting in a blur.
• Never open the card cover, remove the batteries or disconnect the AC
adapter while the orange lamp is blinking. Doing so could destroy stored
pictures and prevent storage of pictures you have just taken.
• When taking pictures against strong backlight, the area of the picture in
shadow may appear colored.
Note
47
Taking still pictures
3
Shooting basics
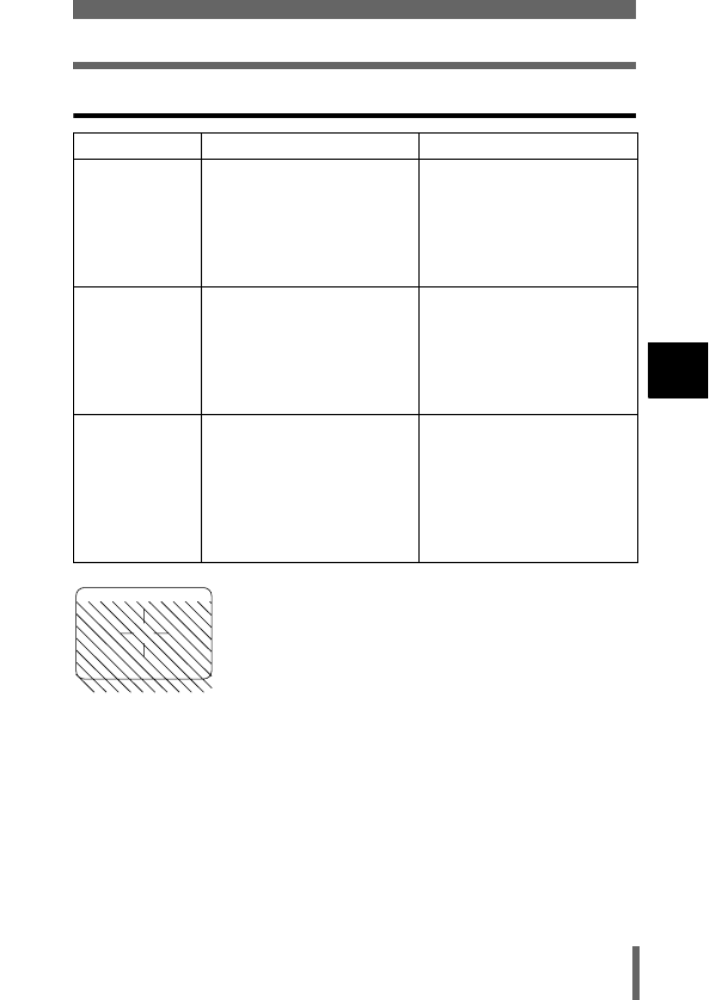
Comparison of the viewfinder & monitor
Viewfinder Monitor
Advantages Camera movement does
not occur easily and
subjects can be seen
clearly even in bright
places.
Little battery power is used.
You can check the picture
area that the camera
actually records more
accurately.
Disadvantages When close to a subject,
the image in the viewfinder
is a little different from the
picture that the camera
actually records.
Camera movement can
occur easily and subjects
may be difficult to see in
bright/dark places. The
monitor uses more battery
power than the viewfinder.
Tips Use the viewfinder for
general snapshots
(landscape pictures, casual
shots, etc.).
Use the monitor when you
want to shoot while
checking the picture area
that the camera actually
records, or when you take
close-up shots of people or
flowers (macro shooting).
• The camera records a wider area than the image in
the viewfinder.
• As you get closer to the subject, the actual image
recorded becomes lower than the one in the
viewfinder (see left).
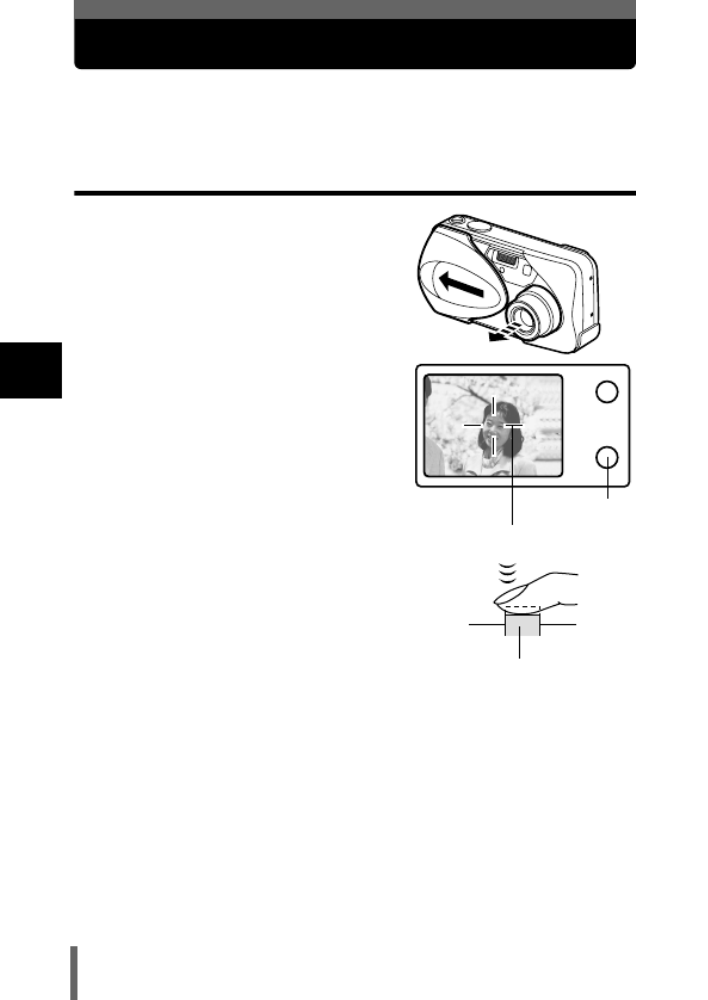
48
3
Shooting basics
If correct focus cannot be obtained
When correct focus cannot be obtained on the subject you want to shoot, you
can focus the camera on another point at roughly the same distance (focus
lock) and take the picture as explained below.
Determine the position of the subject after focusing (Focus Lock)
1Open the lens barrier fully.
• The camera turns on in the shooting
mode.
2Position the AF target mark on
the subject you want to focus on.
• When shooting a hard-to-focus
subject, point the camera at an object
about the same distance away as the
subject.
3Press the shutter button
halfway until the green lamp
lights.
• When the green lamp lights steadily,
the focus and the exposure are locked.
• When the green lamp blinks, the
focus and exposure are not locked.
Release your finger from the shutter button, re-position your subject
and press the shutter button halfway again.
Green lamp
Viewfinder
AF target mark
Shutter button

49
If correct focus cannot be obtained
3
Shooting basics
4Keeping the shutter button
pressed halfway, recompose
your shot.
5Press the shutter button fully.
TIPS
The green lamp blinks.
→You are too close to the subject. Take the picture at least 50 cm/1.6
ft. away from the subject. When the distance from the camera to the
subject is less than 50 cm/1.6 ft., select the macro mode.
"Macro mode shooting" (P.61)
→Depending on the subject, the focus may not be locked.
"Subjects that are difficult to focus on" (P.50)
Shutter button
50
3
If correct focus cannot be obtained
Shooting basics
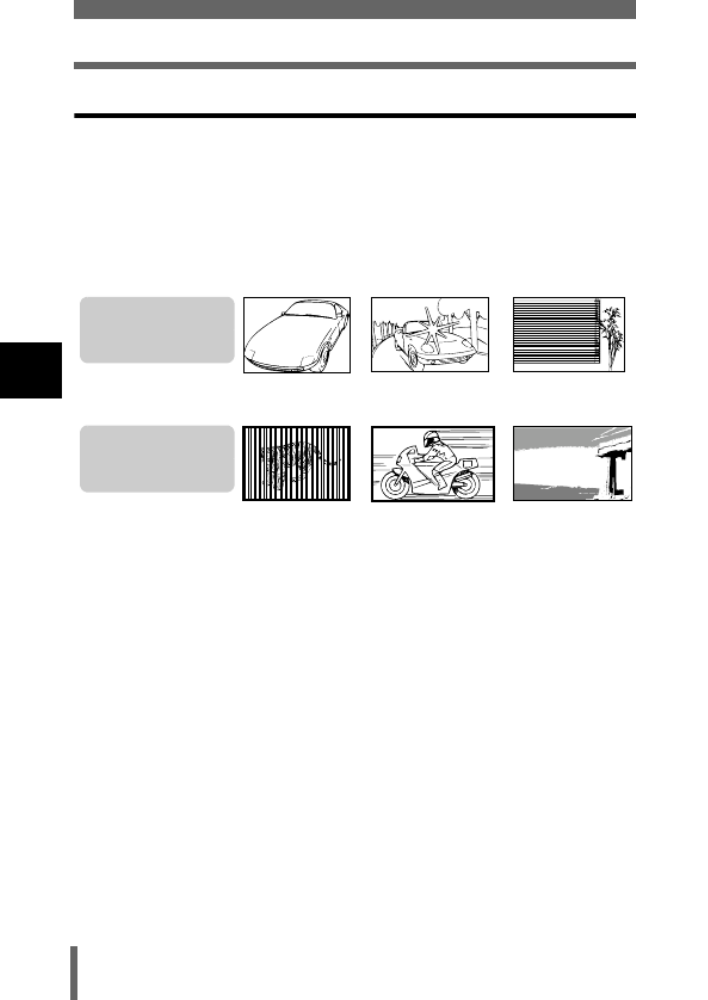
Subjects that are difficult to focus on
Under certain types of conditions, the auto focus may not work properly. If this
happens, focus on an object with high contrast at the same distance as the
intended subject (focus lock), recompose your shot and then take the picture.
If the subject has no vertical lines, hold the camera vertically and focus the
camera using the focus lock function by pressing the shutter button halfway,
and return the camera to the horizontal position while keeping the button
pressed halfway and take the picture.
The green lamp
blinks.
The subject cannot
be brought into focus.
The green lamp lights,
but the subject cannot
be brought into focus.
Subject with low
contrast
Subject with an
extremely bright area in
the center of the frame
Subject without
vertical lines
Subjects at different
distances
Fast-moving subject The subject to be
focused on is not in the
center of the frame.
51
3
Shooting basics
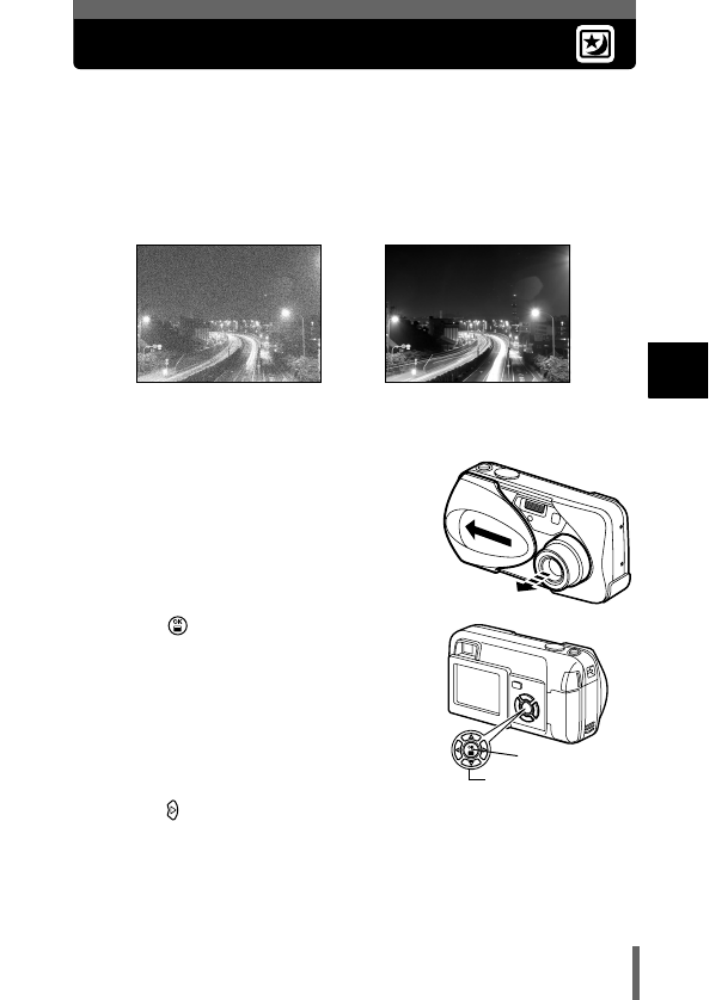
Night scene mode
Setting the mode to Night scene allows you to take landscape shots at night
under optimum conditions. In this mode, the shutter speed is not fixed to 1/30
second maximum when the flash is activated. Depending upon the subject or
shooting conditions, shutter speed may extend up to 2 seconds. The noise
reduction function activates automatically reducing ‘noise’ when the shutter
speed is over 1 second.This function reduces electrostatic ‘noise’ that occurs
with long exposure shots.
1Open the lens barrier fully.
• The camera turns on in the shooting
mode.
2Press .
• The top menu is displayed.
3Press on the arrow pad to select
MODE MENU.
Noise Reduction: Off Noise Reduction: On
OK button
Arrow pad

52
3
Night scene mode
Shooting basics
4Press to select the CAMERA
tab, and press .
5Press to select SCENE
SELECT, and press .
• The green frame moves to the selected
item.
6Press to select , and
press .
• The setting is set to the night scene mode
and the camera returns to the shooting
mode.
• The night scene mark appears on the
monitor.
7Take the picture.
• If the shutter speed is more than 1 second, the noise reduction function
will automatically be activated. The green and orange lamps will blink
during processing.
• This function may not work effectively with some shooting conditions or
subjects.
• The prior flash setting is maintained in the night scene mode.
• The flash mode is set independently from the night scene mode.
"Using the flash" (P.58)
• Since the shutter speed is slow, make sure you stabilize the camera by
using a tripod or set it on a level surface.
Note

53
3
Shooting basics
Recording movies
You can record movies with this camera. Recorded movies can be played
back or stored separately as still pictures using the index function.
"INDEX - Creating an index" (P.94)
1Open the lens barrier fully.
• The camera turns on in the shooting
mode.
2Press .
• The top menu is displayed.
3Press to select .
• Movie recording is set and the menu is
closed.
• The mark and the total recordable
time depending on the card memory
capacity are displayed on the monitor.
4Decide the composition while
looking at the image on the
monitor.
• The optical zoom can be used to enlarge
the subject.
5Press the shutter button halfway.
OK button
Arrow pad
Seconds remaining
mark

54
3
Recording movies
Shooting basics
6Press the shutter button fully to start recording.
• The orange lamp on the right of the viewfinder lights.
• When recording a movie, the camera automatically adjusts the focus
and exposure according to the moving subject.
• During movie recording, lights red and the time you can shoot is
displayed.
7Press the shutter button again to stop recording.
• The orange lamp blinks while the movie is stored on the card.
• When the remaining recording time has been used up, recording stops
automatically.
• To return to the still picture shooting mode, press in the top menu,
and select (Still picture).
• The movie mode is canceled when the lens barrier is closed.
"ALL RESET - Saving the camera's settings" (P.97)
• During movie recording, the flash is disabled.
• It takes longer to store movies than still pictures.
• The seconds remaining varies depending on the record mode.
• You cannot record movies with sound.
Note

56
3
Zoom
Shooting basics
Using the digital zoom
1Open the lens barrier fully.
2Press .
• The top menu is displayed.
3Press to select MODE MENU.
4Press to select the CAMERA
tab, and press .
5Press to select DIGITAL
ZOOM, and press .
OK button
Arrow pad
Zoom lever
57
Zoom
3
Shooting basics
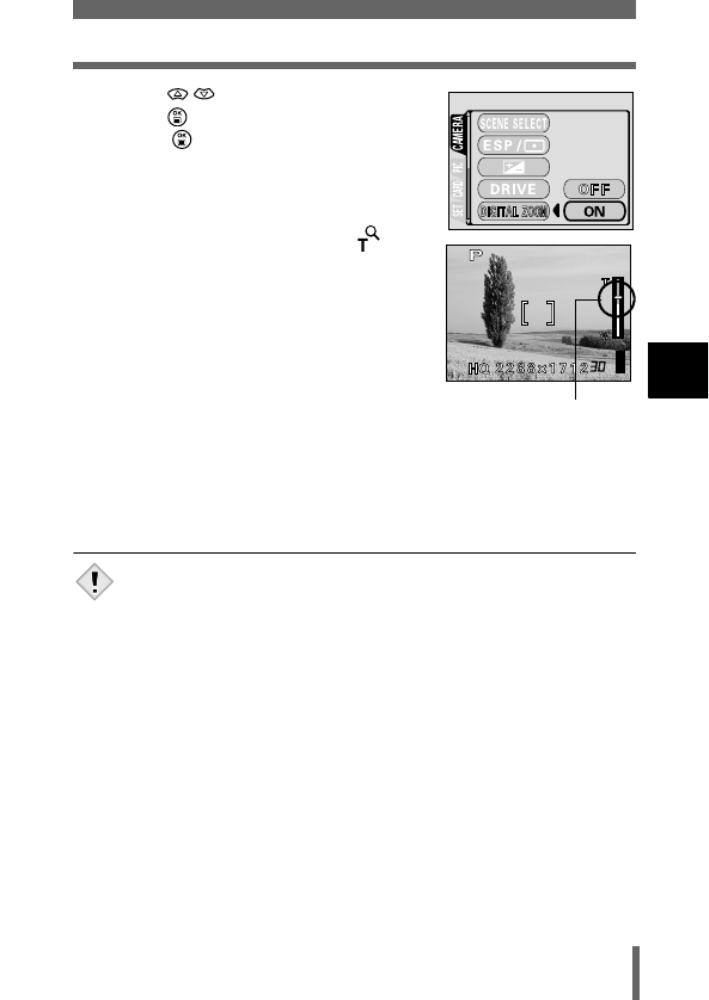
6Press to select ON, and
press .
• Press again to exit the menu and
return to the shooting status.
7Pull the zoom lever toward .
• The white area of the zoom indicator
indicates the optical zoom. If the digital
zoom is set to ON, a red area appears on
the zoom indicator. The digital zoom is
enabled when you reach the limit of the
optical zoom and then pull the zoom lever
toward T.
8Take the picture.
• Pictures taken with the digital zoom may appear grainy.
• Camera movement is likely to occur at higher magnifications. Stabilize
the camera with a tripod, etc. to avoid camera movement.
• Turning the monitor off cancels the digital zoom, and the camera takes
a picture at the specified optical zoom magnification. It will be
automatically enabled the next time you turn the monitor on.
• You cannot use the digital zoom in Self-Portrait mode.
The cursor moves up and
down on the zoom
indicator according to the
zoom magnification.
Note
58
3
Shooting basics
Using the flash
Select the flash mode best suited to the light conditions and the effect you
want to achieve.
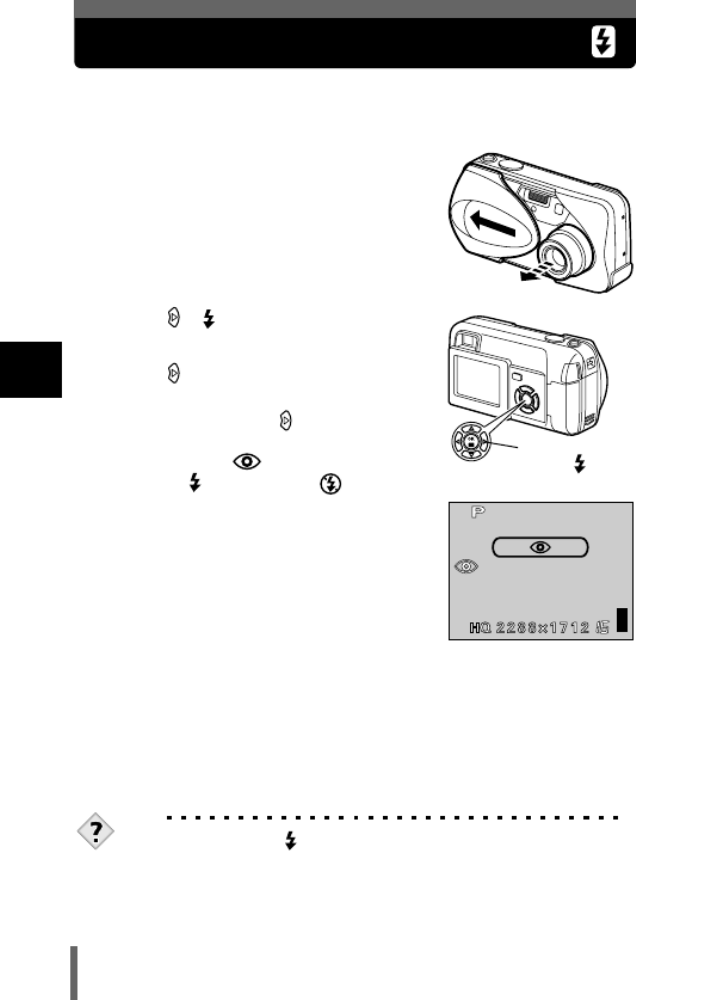
1Open the lens barrier fully.
• The camera turns on in the shooting
mode.
2Press ( ).
• The current flash setting is displayed.
3Press to change the flash mode
to your desired setting.
• Each time you press , the flash mode
changes in the following sequence:
"Auto-flash" - " Red-eye reduction
flash" - " Fill-in flash" - " Flash off".
4Press the shutter button halfway.
• When the flash is set to fire, the orange lamp remains lit.
5Press the shutter button fully to take the picture.
Flash working range
W (max.): Approx. 20 cm to 3.4 m (0.7 ft. to 11 ft.)
T (max.) : Approx. 20 cm to 2.0 m (0.7 ft. to 7 ft.)
TIPS
The orange lamp or (flash standby) indication blinks.
→The flash is charging. Wait until the orange lamp goes off.
Flash mode
button ( )

60
3
Using the flash
Shooting basics
Fill-in flash ( )
The flash fires regardless of the available light.This mode is useful for
eliminating shadows on the subject’s face (such as shadows from tree
leaves), in a backlight situation, or for correcting the color shift produced by
artificial lighting (especially fluorescent light).
• The fill-in flash may not have the desired effect under excessively bright
light.
Flash off ( )
The flash does not fire even in low light conditions. Use this mode in situations
where flash photography is not desired or is prohibited, such as in an art
museum. You can also use this mode when you want to shoot a natural-
looking twilight or night scene.
• Since a slow shutter speed is automatically selected in low light
situations when in the flash off mode, the use of a tripod is
recommended to prevent your pictures from being blurred by camera
movement.
Note
Note
61
4
Advanced shooting
4 Advanced shooting
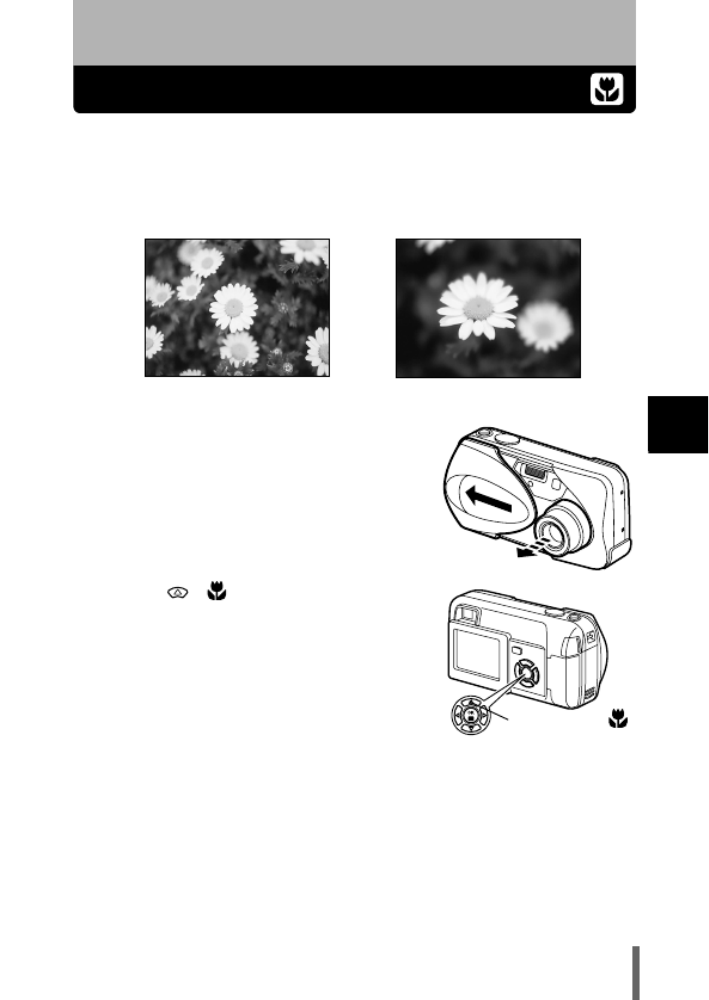
Macro mode shooting
The macro mode allows you to shoot at a distance of 20 cm to 50 cm (0.7 ft.
to 1.6 ft.) from your subject.
Regular photographs can be taken, but the camera may take time to focus on
distant subjects.
1Open the lens barrier fully.
• The camera turns on in the shooting
mode.
2Press ( ).
• The monitor turns on and the current
setting is displayed.
Normal shooting With macro mode
Macro button (
)

62
4
Macro mode shooting
Advanced shooting
3Press ( ) to switch the macro
mode on or off.
• The setting changes between and
OFF each time is pressed.
When the macro mode is selected, is
displayed on the monitor.
4Take the picture.
• If you are close to a subject, the picture in the viewfinder is different from
the area that the camera actually records. For macro mode shooting, we
recommend using the monitor.
• If you use the flash in macro shooting, shadows may be conspicuous
and the correct exposure may not be achieved.
Note

65
4
Advanced shooting
Sequential shooting
This function allows you to take a rapid succession of still pictures by pressing
and holding the shutter button (9 pictures or more at 1.5 frames per second
by Sequential shooting in HQ mode). As you can choose the best picture from
a series of sequential shots, you are recommended to use this mode when
taking pictures of a moving subject. Focus, exposure and white balance are
locked at the first frame. You can also erase the unwanted shots afterwards.
"Single-frame erase" (P.89)
1In the shooting mode top menu,
select MODE MENU → CAMERA
→ DRIVE, and press .
"How to use the menus" (P.32)
2Press to select , and
press .
• Press again to exit the menu.
3Take the picture.
• Press the shutter button fully and keep it pressed. The camera will take
pictures in sequence until you release the button.
• You are recommended to use the viewfinder for sequential shooting.
During sequential shooting, the subject does not appear on the
monitor.
• The sequential shooting mode is canceled when the lens barrier is
closed. "ALL RESET - Saving the camera's settings" (P.97)
• During sequential shooting, the flash is disabled.
• If the battery power is low and the battery check blinks during sequential
shooting, shooting stops and the camera starts saving the pictures you
have taken. Whether or not all of the shots are saved depends on how
much battery power remains.
OK button
Arrow pad
Note

66
4
Advanced shooting
PANORAMA
You can take advantage of panorama shooting with the Olympus xD-Picture
Card. Panorama shooting lets you connect pictures with overlapping edges
into a single panoramic picture, using the CAMEDIA Master software.
1In the shooting mode top menu,
select MODE MENU → CAMERA
→ PANORAMA, and press .
"How to use the menus" (P.32)
• The PANORAMA mode is set. The
subject is displayed on the monitor.
2On the monitor, use the arrow pad
to choose the direction you want
the pictures connected.
: Connects the pictures from left to
right.
: Connects the pictures from right to
left.
: Connects the pictures from bottom to
top.
: Connects the pictures from top to
bottom.
OK button
Arrow pad
Connects the pictures from
left to right.
Connects pictures from
bottom to top.
67
PANORAMA
4
Advanced shooting
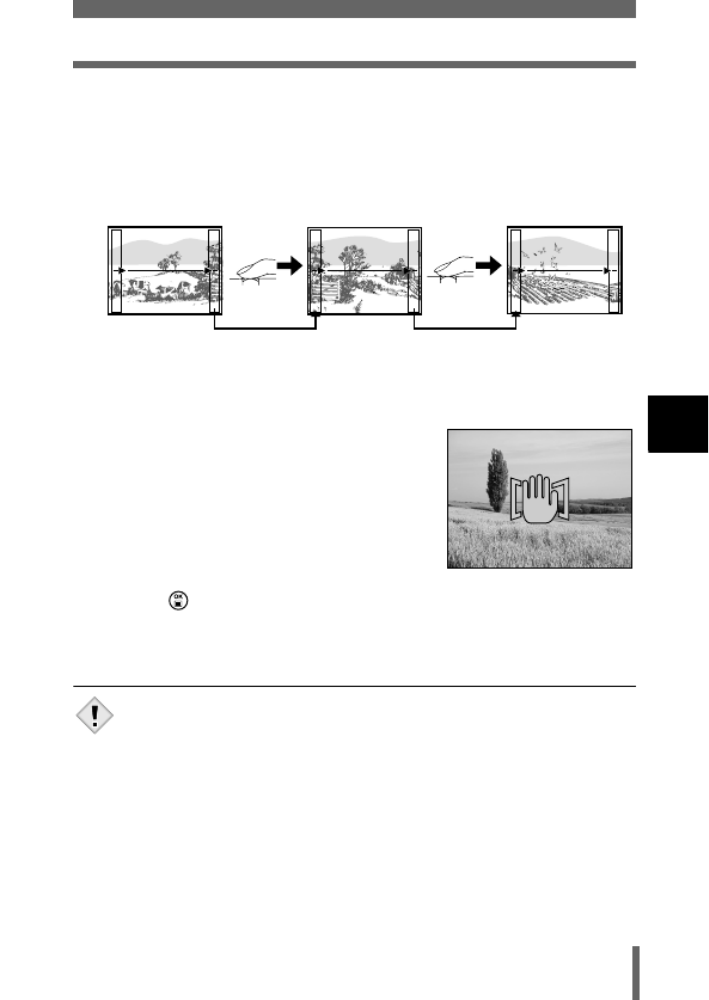
3Make sure that the edges of the pictures overlap, and take
pictures.
• Focus, exposure and white balance are set by the first picture. Do not
select an extremely bright subject (such as the sun) for the first picture.
• You cannot adjust the zoom after the first picture.
• Panorama shooting is possible for up to 10 pictures.
• When you have taken 10 pictures, a
warning mark appears.
4Press to finish panorama shooting.
• The frame on the screen disappears and the camera returns to the
normal shooting mode.
• The panorama mode is only available with Olympus CAMEDIA-brand
cards.
• Your computer’s memory may be insufficient if you take too many
panorama pictures in HQ or SHQ mode. You are recommended to use
SQ mode for panorama shooting.
• During panorama shooting, sequential shooting is not available.
• The camera itself cannot connect panorama pictures. The CAMEDIA
Master software is necessary to connect the pictures.
When shooting, make sure that the edges (right/left/top/bottom) of the
images overlap, so that the CAMEDIA Master software can correctly
connect the pictures.
Note

68
4
Advanced shooting
Taking two-in-one pictures
This function allows you to combine two pictures
taken in succession and store them as a single
picture. You can combine two different subjects
in one picture.
1In the shooting mode top menu,
select MODE MENU → CAMERA →
2 IN 1, and press .
"How to use the menus" (P.32)
• The 2 IN 1 mode is set. The subject is
displayed on the monitor.
2Take the first shot while observing
your subject on the monitor.
• The subject will be positioned on the left in
the combined picture.
3Take the second shot.
• The subject will be positioned on the right
in the combined picture.
Picture when played back
OK button
Arrow pad
Picture when shooting

69
Taking two-in-one pictures
4
Advanced shooting
• During 2 IN 1 mode shooting, the panorama and sequential shooting are
not available.
• When the batteries are exhausted ( is displayed), the flash
automatically turns off.
• The 2 IN 1 mode is canceled when is pressed or the lens barrier is
closed. Press to cancel the 2 IN 1 picture mode after the first shot
has been taken. The first picture will not be stored.
• The 2 IN 1 mode is canceled when the camera enters the sleep mode
after shooting the first picture.
Note

75
Varying the image brightness (Exposure compensation)
4
Advanced shooting
• The exposure compensation value returns to 0.0 (factory default setting)
when the lens barrier is closed. "ALL RESET - Saving the camera's
settings" (P.97)
• If the flash is used, the image brightness (exposure) may differ from the
intended brightness.
• Exposure compensation cannot correct the image if the surroundings of
the subject are extremely bright or dark.
Note
Specyfikacje produktu
| Marka: | Olympus |
| Kategoria: | kamera |
| Model: | Camedia X-300 |
Potrzebujesz pomocy?
Jeśli potrzebujesz pomocy z Olympus Camedia X-300, zadaj pytanie poniżej, a inni użytkownicy Ci odpowiedzą
Instrukcje kamera Olympus

30 Grudnia 2025
3 Października 2024
16 Września 2024
10 Września 2024
8 Września 2024
7 Września 2024
7 Września 2024
6 Września 2024
6 Września 2024
5 Września 2024
Instrukcje kamera
- kamera Sony
- kamera Samsung
- kamera Leica
- kamera Logitech
- kamera Xiaomi
- kamera Joy-It
- kamera Braun
- kamera Lenovo
- kamera TP-Link
- kamera Philips
- kamera SilverCrest
- kamera Acer
- kamera Epson
- kamera Hikvision
- kamera EZVIZ
- kamera Panasonic
- kamera Canon
- kamera Mio
- kamera Viewsonic
- kamera Nedis
- kamera Reolink
- kamera Medion
- kamera Lenco
- kamera Fujifilm
- kamera D-Link
- kamera GE
- kamera Ring
- kamera Garmin
- kamera Imou
- kamera Blaupunkt
- kamera IOptron
- kamera Casio
- kamera Sigma
- kamera HP
- kamera Prixton
- kamera SJCAM
- kamera Creative
- kamera Swann
- kamera Nikon
- kamera Ozito
- kamera Kodak
- kamera Cisco
- kamera Scosche
- kamera DJI
- kamera Zenit
- kamera Gembird
- kamera Minox
- kamera Cobra
- kamera JVC
- kamera Trust
- kamera Fimi
- kamera AgfaPhoto
- kamera Vimar
- kamera Dahua Technology
- kamera Kyocera
- kamera Eufy
- kamera Ricoh
- kamera Rollei
- kamera Netgear
- kamera Velleman
- kamera Bolex
- kamera Pyle
- kamera Vtech
- kamera Speco Technologies
- kamera ARRI
- kamera Fluke
- kamera Avaya
- kamera National Geographic
- kamera Maginon
- kamera SPC
- kamera Polaroid
- kamera Konica Minolta
- kamera Sanyo
- kamera Red Digital Cinema
- kamera Oregon Scientific
- kamera Lorex
- kamera Optoma
- kamera Bresser
- kamera Hama
- kamera GoPro
- kamera TomTom
- kamera Denver
- kamera Anker
- kamera Pentax
- kamera Bushnell
- kamera Berger & Schröter
- kamera Marshall Electronics
- kamera Hitachi
- kamera Emerson
- kamera SereneLife
- kamera Vemer
- kamera Azden
- kamera AVerMedia
- kamera RCA
- kamera Genius
- kamera Levenhuk
- kamera BenQ
- kamera Trevi
- kamera Technaxx
- kamera Lexibook
- kamera Hanwha
- kamera Sencor
- kamera Powerfix
- kamera Blackmagic Design
- kamera Foscam
- kamera Lumens
- kamera Daewoo
- kamera Dörr
- kamera Best Buy
- kamera EVE
- kamera POV
- kamera Elmo
- kamera UniView
- kamera Laserliner
- kamera Vivitar
- kamera PTZ Optics
- kamera Agfa
- kamera Argus
- kamera Easypix
- kamera Celestron
- kamera Yashica
- kamera Flir
- kamera Daitsu
- kamera Arlo
- kamera Nest
- kamera Ansco
- kamera Intel
- kamera Mamiya
- kamera Konig
- kamera Fuji
- kamera Minolta
- kamera Zorki
- kamera EverFocus
- kamera RunCam
- kamera SeaLife
- kamera Burris
- kamera Liiv360
- kamera Watec
- kamera Meade
- kamera Contax
- kamera Sinji
- kamera Traveler
- kamera Exakta
- kamera Digital Watchdog
- kamera MuxLab
- kamera AViPAS
- kamera ZeissIkon
- kamera Silvergear
- kamera Spypoint
- kamera HOLGA
- kamera Praktica
- kamera Hasselblad
- kamera Moto Mods (Motorola)
- kamera Fantasea Line
- kamera Kogan
- kamera Getac
- kamera Brinno
- kamera Z CAM
- kamera General
- kamera Ergoguys
- kamera Strex
- kamera General Electric
- kamera Leotec
- kamera Leitz Focomat IIc
- kamera Syrp
- kamera Cosina
- kamera Videology
- kamera InfiRay
- kamera Pelco
- kamera Videotec
- kamera Cambo
- kamera Kobian
- kamera Kyocera Yashica
- kamera Bauhn
- kamera Konica
- kamera Akaso
- kamera Seek Thermal
- kamera Aida
- kamera Ikegami
- kamera Ikelite
- kamera Adeunis
- kamera Hoppstar
- kamera Moultrie
- kamera PatrolEyes
- kamera Camouflage
- kamera HuddleCamHD
- kamera Aplic
- kamera Linhof
- kamera GoXtreme
- kamera KanDao
- kamera Aquapix
- kamera Kraken Sports
- kamera Voigtlander
Najnowsze instrukcje dla kamera

9 Kwietnia 2025

9 Kwietnia 2025

3 Kwietnia 2025
2 Kwietnia 2025
1 Kwietnia 2025
29 Marca 2025
29 Marca 2025
27 Marca 2025
27 Marca 2025
27 Marca 2025