Instrukcja obsługi Odys Connect 8+
Przeczytaj poniżej 📖 instrukcję obsługi w języku polskim dla Odys Connect 8+ (1 stron) w kategorii tabletka. Ta instrukcja była pomocna dla 20 osób i została oceniona przez 2 użytkowników na średnio 4.5 gwiazdek
Strona 1/1
ODYSCONNECT8+QUICKSTARTGUIDE
Introduction
ODYSCONNECT8+ is a MID with full colorscreen.
Althoughthisproductissafe,pleaseobservetheinformationandwarningsfrom the usermanual.
The user manual is installed at the devices internalmemoryand can be accessed over the
mainmenu.Pleaserefertotheusermanualfordetailedinstructions,conformityand
supportinformation.
‐To open theuser’smanual please tap on the manual icon you can see at the home screen
toopenthefolderwherethemanualsare stored in.
TurningOn/Off
Toturnonthedevice, press and hold the Powerbutton on the unit until you ‐ see the boot up screen
then mayrelease.It take a fewminutesto thestartup system,pleasewaitbeforeyouproceed.
Toturnoffthedevice, press and hold the Powerbuttonuntil you see the option “Power Off”, tap on
“PowerOff”and tapthen on“OK”.
Tip:This device will sleep with the screen off if it stays inactive for a few seconds. You can brieflypress
the thePowerbuttontoturnon screenandwakeitup.
PowerOnandOfftheDisplay
‐Shortly press the [Power] button to turn off the display.
‐Press the [Power] button again shortly turn the display onagain.
LanguageSetting
‐Confirmthetworequestsat the taping at beginningby OK.
‐Tap on [Settings] and select [Language & Input]
‐Tapon[Language]andselectyourdesiredlanguageontherightside.
GettingStarted
1. HeadphonejackAudiooutputconnectionforhead‐phones
Note: Speaker output is automatically disabled when headphones are
connectedtotheplayer.
2. 2.0 MicroUSB Hi‐
speed
Connectto data a computertotransfer (e.g.,music,videos,photos,files).
SupportUSBstick,Surfstick,KeyBoardandMouse.
Note:
A
OTG supporting adaptor cable is required (optional)
3. SimCardSlotAccommodatesanySimCard.
4. MicroSDCardSlot AccommodatesanystandardSD/SDHC memory card.
5. Microphone
6. PowerButtonPressand to turn theholdthepowerswitch on offor device;
Brieflypresstheswitchtoturnthescreenonoroff.
Pressand toholdfor10Seconds resetandrestartthedeviseif it freezes
orotherwisebehavesabnormal.
7. ChargeIndicator
8. FrontCameraFront‐ facing camera for taking avatar pictures
9. Volumekey+ Shortlypresstoincreasevolumelevel.
10. Volumekey‐ Shortlypresstodecreasevolumelevel.
11. RearCameraRear‐facingcamerafortakingpictures
12. Speaker
ChargingBattery
Thedevicehas ‐ a built in rechargeable battery. No extra battery installation is required. Just charge
the battery.devicewhenitindicateslow
Tochargethe thebattery,connectthe todevice anystandardwalloutlet via USBportusingthe
poweradaptor. aboutIttakes 5 hourstofullycharge the battery.
Note:
a. advice We touseonlythedeliveredpoweradapterwiththistablet.
b. Youcanoperatethedeviceevenwhenit is beingcharged.Butforextendedbatterylife,it is
suggested NOT to use the device when it is charging.
c. Itisrecommendedto thechargethebatterybeforeyouusethedevicefor firsttime.
d. be used Formaximumperformance,lithium ion‐ batteriesneedto often. If you don’t use the
deviceoften, be sure to recharge the battery at least once per month.
e. Shouldtherechargeablebatteryofthedevicedischargecompletely,connectthedevice(usingthe
adapter)tothemainpowersourceforapproximately ‐5 10minutesbefore attempting normal
operation.
f. some In cases,deviceswhichhavebeenchargedforlongerperiodsoftimemaynotbe able tobe
switchedback andon.Shouldthisoccuryouhavetomake a Reset.Press holdfor10Secondsto
resetandrestartthedevice.
Touchscreen
Thetouchscreenis a capacitivedisplay and designedforprecisionand
respondsbestwhentouchedwiththesmallestpointpossible.Usethe
flatpadofyour finger to touch the screen.
Connect via USB
Pleasenote: Only use connectingcablewith a maximumlengthof
80cm.PleasemakesurewhenconnectingtheUSB adapter or
connectorcablesattentionto the correctalignment of the connector
beforeinsertingit into theUSBsocket insertionontheun it.Incorrect
maycausedamagetoplugandsocket.
Onthesideof oftheplugthere are usuallysmallsizes hooks
thatsecurethefixation.
Payspecialattentionon oftheposition thehooks,theyshow
upwards when connecting cables while the screen is above.
Installing Memory Card
Thisdevice can read files directly from memory card and
USBmemory.
Touse memory acard, cardfindthe slotatthesideof
thedeviceandtheninsertthememorycardintotheslot
inthecorrectorientationorConnect USB Memory using
theprovidedUSBadaptorcable.To access the files
storedinthe thememorycard,enter Explorer modeby
tapping the Explorericonandselectthe“SDCard”
directory.
‐Check that the Micro SD card is in the correct position
withthecontactpinfacingdownwardsasillustrated.You
maydamagethecardandthereader if Micro SD card is not inserted in correct position.
‐Push the Micro SD card into the card slot until it clicks.
‐To remove Mi cro SD card, push the card once again u ntil it clicks.
Note:We recommend using only Micro SD or SDHC cards up to 32GB capacity.
‐When a MicroSDcardisinserted frominorejected thedevice,itmaytake thefewsecondsfor
device to update the content.
‐Please avoid insertingorejectingMicroSDcardwhenotheroperationisrunningasthismaycause
the system hang.
‐DoNotremovethecardifthecontent cardinsidethe isbeingplayed.Thiswillhaltthe
operation of the device and might cause a systemhang.
‐Only use the provided USB adaptor cable to attach USB memory devices.
‐Please use your fingernailstoproperlyinsertorremove the card.
Installing SIM card
Touse a SIM SIMcard,findthe the andcardslotat backsideofthedevice theninsertthe cardinto
the theslotin correctorientation
‐Check that the SIM card is in the correct position with the contact pin facing downwards as
illustrated.Youmaydamagethecardand the position. readerif isSIMcard notinsertedincorrect
‐Push the SIM card into the card slot until it clicks.
‐To remove SIM card, push the SIM card once again until it clicks.
Note:The SIM Card can only be recognized if the devicewasturnedoffwhileinserting.
MicroSIMCardsarenotsupported.
TransferringFiles
Beforereadingorplayingfiles,youneedto totransfermediafilesfrom a computer thedevice.
(1) supplied Connectthedeviceto the a computerwith USBcable.
(2) Onceconnected,oneremovabledisk Itdrivewillshowonyour computer. representstheinternal
memoryofthe thedeviceand memory card insertedintothedevice.Nowyoucancopyfilesfromor
to asthesediskdrivejust youwouldonyourharddrive.
3) Disconnectthe thedevicefrom computer.
Note: ‐ The pre installed applications and Android OS occupy a considerable part ofcapacity – nearlymorethan
1GB,itisnormal hugethatyousee differencebetweenavailablememoryspaceandtotalcapacity.
Caution!Thedevice supports Ad ob e DRM contents.AdobeDigital Editions (ADE) is required. Please refer to the
user’smanualforcloserinformation’sonhow to use DRM protectedfiles.
Screenlock
Thescreen automatically turnsoffand afterlocksitself a setperiodoftime.
Whenthescreenturnedoff,pressthe the Power buttonto light up screen.
Pushthelockiconand drag it to the open lock at the right side to
unlock.
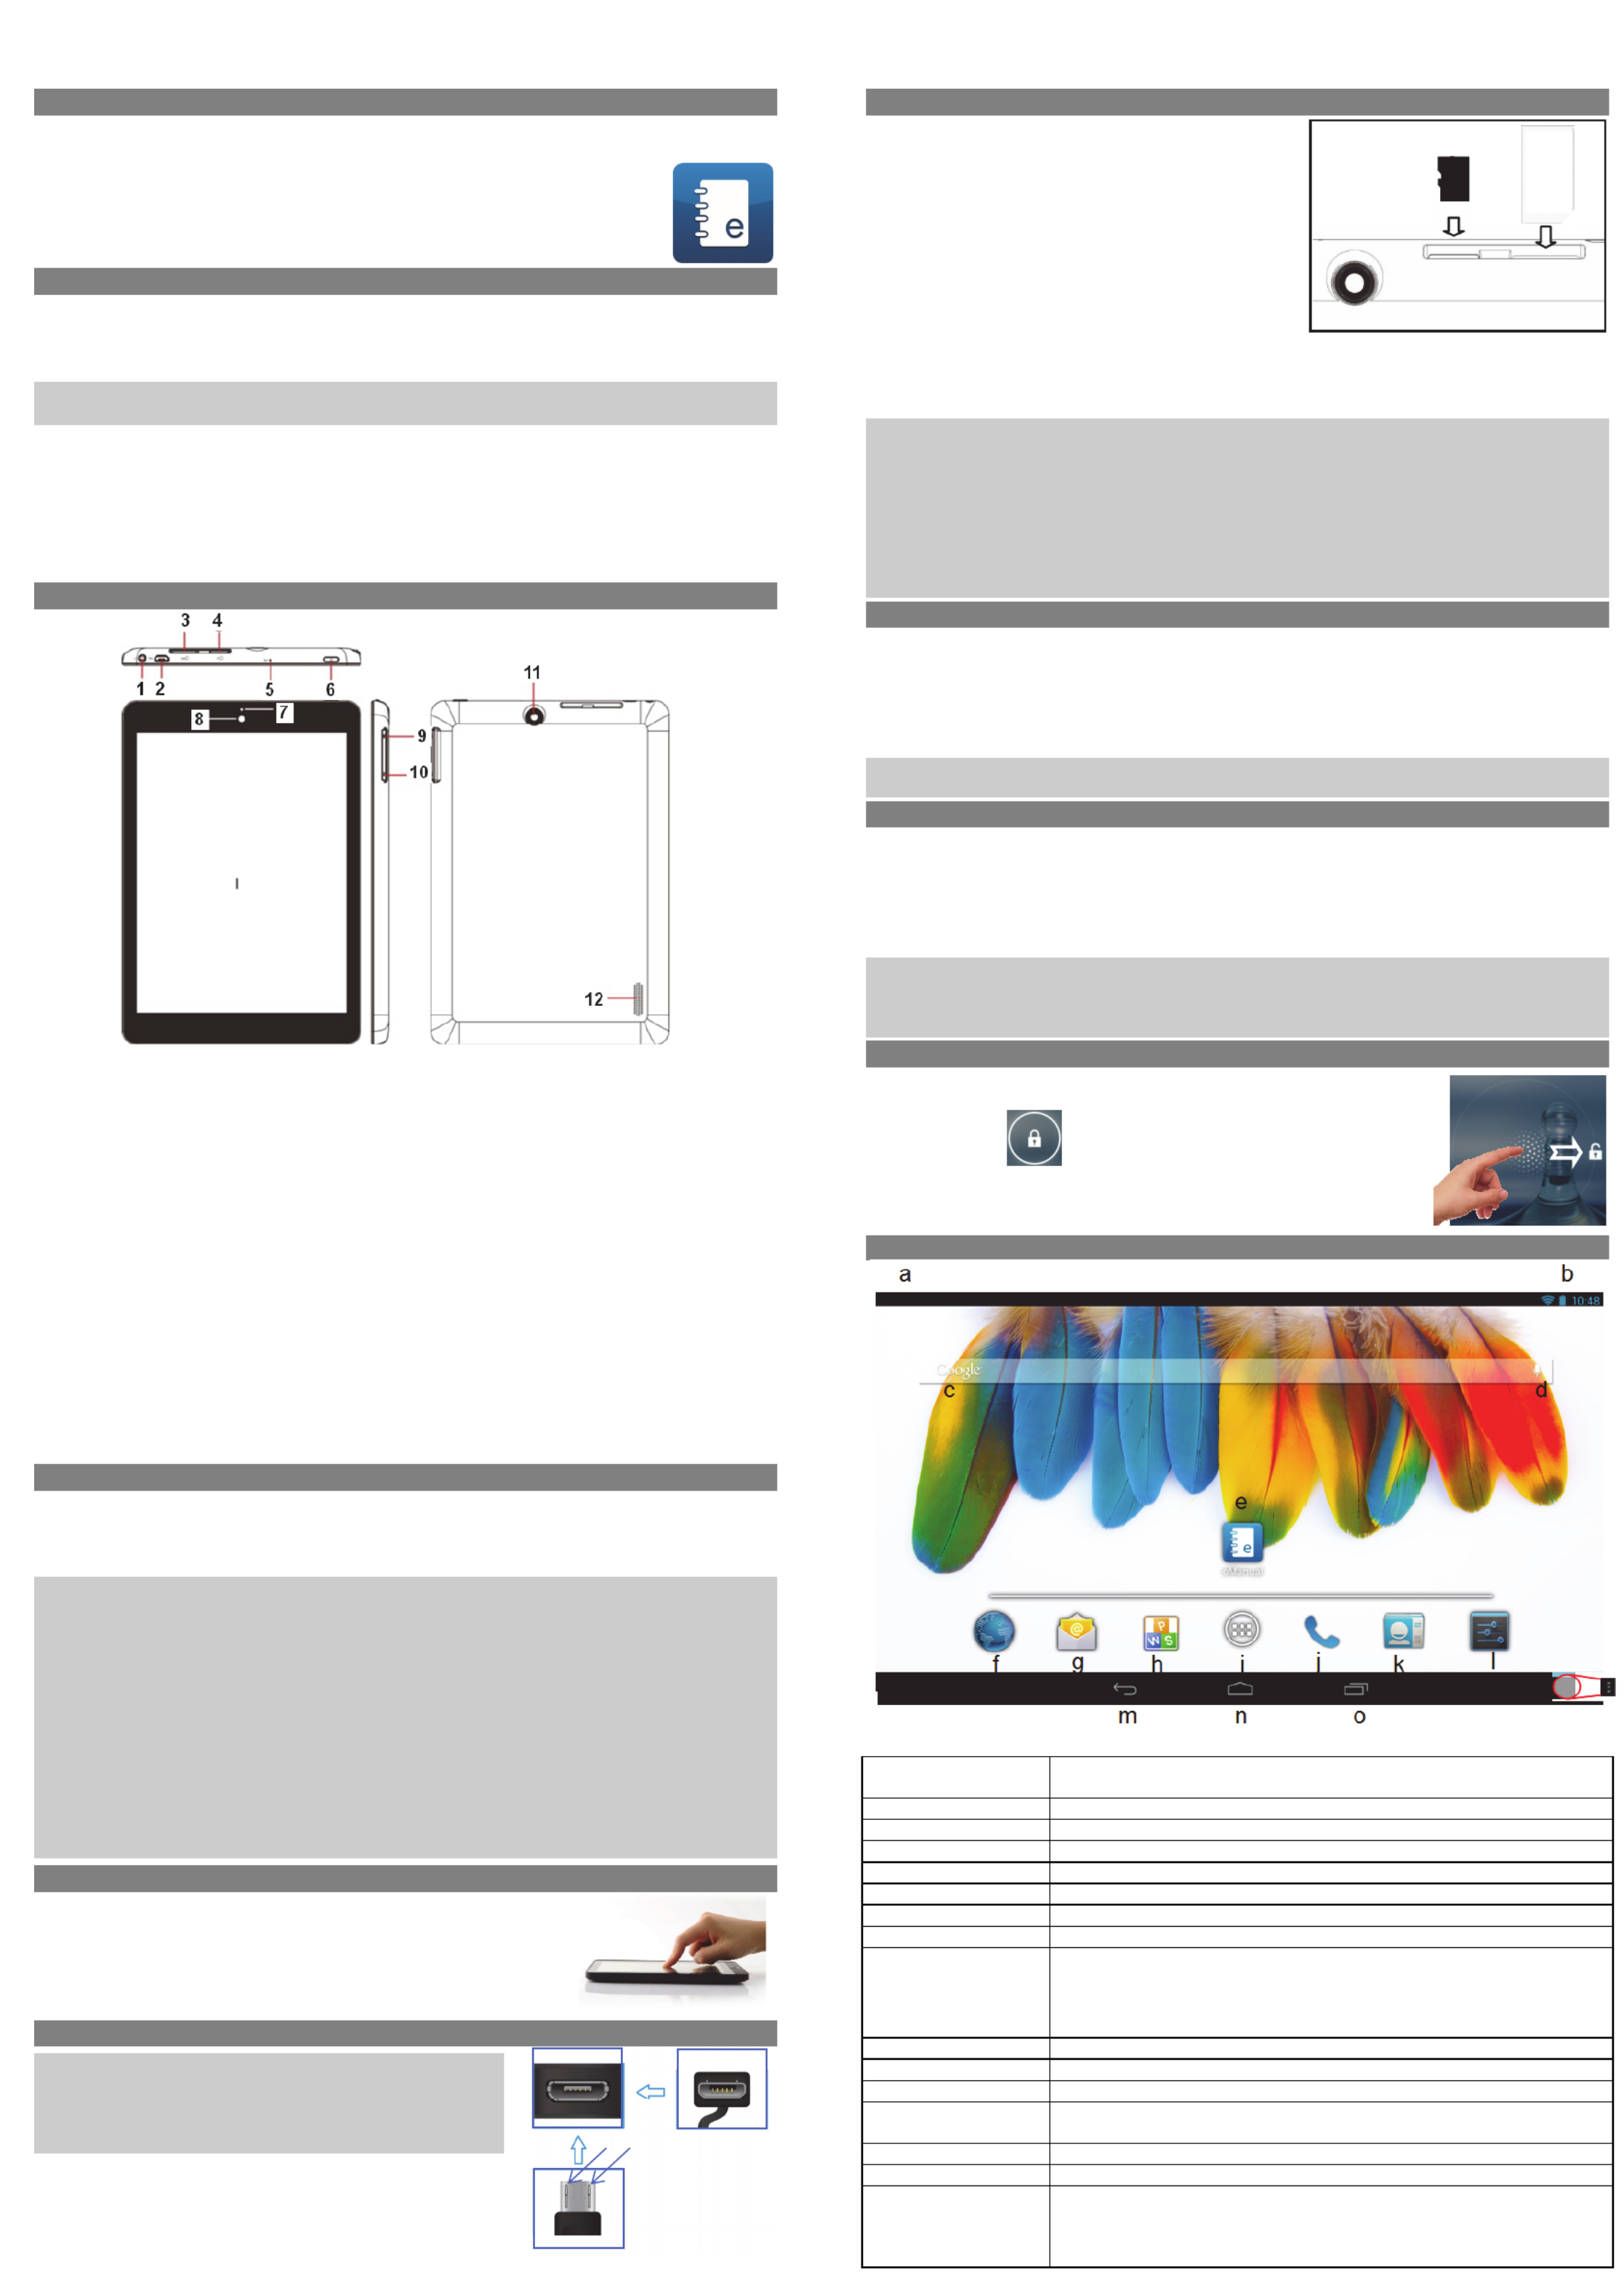
Home Screen
a. SystemHints Informstheuserifattachedmemory orupdatesare andavailable othersystem
statusinformation’s
b. Systemsettings
c. GoogleSearchBar
d. GoogleVoiceSearch
e. ebook eManualManualin format
f. BrowserTapto tolaunchtheBrowser visityourfavoritewebsites.
g. E‐MailToopenthemailclient
h. KingsoftOffice
i. ApplicationsiconTaponthisicon to reveal all applicationsinstalledonyourTablet
- Youcancopythe applications onto theHomescreenbypressing
andholdingontheiricons.
- You can delete the application from the Home Screen by dragging
theiriconstotheCrossthatappearsatthetopofthescreen .
j. Telephone
k. Contacts
l. SystemSettings
m. Backsoftkey Tapto to the the thereturn previousscreen.If keyboardison screen,tap to close
thekeyboard.
n. Homesoftkey Tapto to thereturn homescreen.
o. RunningappsShowappswhicharecurrentlyrunninginbackground.
p. MenusoftKey Tap to view the option menu
Note: When you Tap the Menu key from within an application, you will see the
optionsforthatapplication.Butyouwillnot see them on start screen.
Caution! Some apps may show this icon at the top right corner.
v1.0
Top
Bottom
Hooks
Screen
p
Backside
Sim SlotCard MicroSDSlot
Camera
Pr ovice r
523503423048WD
MC
UM
TS/GSM
SIM
Specyfikacje produktu
| Marka: | Odys |
| Kategoria: | tabletka |
| Model: | Connect 8+ |
Potrzebujesz pomocy?
Jeśli potrzebujesz pomocy z Odys Connect 8+, zadaj pytanie poniżej, a inni użytkownicy Ci odpowiedzą
Instrukcje tabletka Odys

3 Października 2024
3 Października 2024
3 Października 2024
3 Października 2024
3 Października 2024
Instrukcje tabletka
- tabletka Sony
- tabletka Samsung
- tabletka LG
- tabletka Motorola
- tabletka Logitech
- tabletka Xiaomi
- tabletka Huawei
- tabletka TCL
- tabletka Lenovo
- tabletka Philips
- tabletka SilverCrest
- tabletka Gigabyte
- tabletka Acer
- tabletka Realme
- tabletka Gigaset
- tabletka Fujitsu
- tabletka Nokia
- tabletka Hisense
- tabletka Panasonic
- tabletka Viewsonic
- tabletka Asus
- tabletka Medion
- tabletka Lenco
- tabletka MSI
- tabletka Toshiba
- tabletka Tesla
- tabletka Majestic
- tabletka Bluebird
- tabletka Blaupunkt
- tabletka Salora
- tabletka Iiyama
- tabletka Evolveo
- tabletka Grundig
- tabletka Alcatel
- tabletka Haier
- tabletka HP
- tabletka Hyundai
- tabletka Honeywell
- tabletka Creative
- tabletka Honor
- tabletka ECG
- tabletka ZTE
- tabletka Olivetti
- tabletka Zebra
- tabletka Dell
- tabletka Google
- tabletka IRiver
- tabletka TechniSat
- tabletka Krüger&Matz
- tabletka Wacom
- tabletka Thomson
- tabletka Ferguson
- tabletka Manta
- tabletka Pyle
- tabletka Apple
- tabletka AOC
- tabletka Vtech
- tabletka Nevir
- tabletka Navitel
- tabletka Razer
- tabletka GoClever
- tabletka Huion
- tabletka SPC
- tabletka Kobo
- tabletka GoGen
- tabletka Intenso
- tabletka Polaroid
- tabletka Prestigio
- tabletka Aiwa
- tabletka AKAI
- tabletka Digiland
- tabletka Telefunken
- tabletka Oregon Scientific
- tabletka Control4
- tabletka OnePlus
- tabletka Amazon
- tabletka Aluratek
- tabletka Microsoft
- tabletka PocketBook
- tabletka ModeCom
- tabletka Bush
- tabletka Insignia
- tabletka ECS
- tabletka CAT
- tabletka Denver
- tabletka Orion
- tabletka RCA
- tabletka Media-Tech
- tabletka Gemini
- tabletka Trevi
- tabletka Lexibook
- tabletka Overmax
- tabletka Micromax
- tabletka Sencor
- tabletka Tesco
- tabletka Binatone
- tabletka Newland
- tabletka Allview
- tabletka Laser
- tabletka Best Buy
- tabletka Adj
- tabletka Cyrus
- tabletka Terratec
- tabletka TechBite
- tabletka Logic
- tabletka I.safe Mobile
- tabletka Vivitar
- tabletka TrekStor
- tabletka Xiron
- tabletka Yarvik
- tabletka Archos
- tabletka Proscan
- tabletka Sonim
- tabletka Energy Sistem
- tabletka Doro
- tabletka Lava
- tabletka Easypix
- tabletka Konrow
- tabletka Cresta
- tabletka Brigmton
- tabletka Sunstech
- tabletka Sylvania
- tabletka Blackberry
- tabletka Audiosonic
- tabletka Exagerate
- tabletka Coby
- tabletka Bigben Interactive
- tabletka Wolder
- tabletka Audiovox
- tabletka Disgo
- tabletka Vodafone
- tabletka Pantech
- tabletka Naxa
- tabletka RugGear
- tabletka Ricatech
- tabletka Hema
- tabletka Arnova
- tabletka Mpman
- tabletka Vizio
- tabletka Cello
- tabletka Logicom
- tabletka Ematic
- tabletka Hannspree
- tabletka Zagg
- tabletka Ingo
- tabletka Plum
- tabletka Difrnce
- tabletka Vorago
- tabletka Iget
- tabletka Nextbook
- tabletka Memup
- tabletka Engel Axil
- tabletka BQ
- tabletka Butler
- tabletka Rand McNally
- tabletka Dragon Touch
- tabletka Primux
- tabletka DEXP
- tabletka Eken
- tabletka Tom-tec
- tabletka Mediacom
- tabletka Xoro
- tabletka Billow
- tabletka Empire
- tabletka Woxter
- tabletka Maxell
- tabletka Packard Bell
- tabletka Storage Options
- tabletka Advantech
- tabletka Kurio
- tabletka Linx
- tabletka Leap Frog
- tabletka Pentagram
- tabletka I-onik
- tabletka Microtech
- tabletka Empire Electronix
- tabletka Kogan
- tabletka Getac
- tabletka Vulcan
- tabletka Motion
- tabletka Storex
- tabletka Skytex
- tabletka Leotec
- tabletka Electrovaya
- tabletka Durabook
- tabletka Mymaga
- tabletka Vinci
- tabletka Vizmo
- tabletka General Dynamics Itronix
- tabletka Xplore
- tabletka Lark
- tabletka Bookeen
- tabletka Elements
- tabletka I-Joy
- tabletka Hamlet
- tabletka Approx
- tabletka Bauhn
- tabletka ADS-TEC
- tabletka Nabi
- tabletka Barnes And Noble
- tabletka Sungale
- tabletka Aqprox
- tabletka Unitech
- tabletka Fossibot
- tabletka Hip Street
Najnowsze instrukcje dla tabletka

9 Kwietnia 2025
3 Kwietnia 2025
3 Kwietnia 2025
3 Kwietnia 2025
1 Kwietnia 2025
1 Kwietnia 2025
1 Kwietnia 2025
1 Kwietnia 2025
31 Marca 2025
30 Marca 2025