Instrukcja obsługi Nokia 3152
Przeczytaj poniżej 📖 instrukcję obsługi w języku polskim dla Nokia 3152 (201 stron) w kategorii smartfon. Ta instrukcja była pomocna dla 5 osób i została oceniona przez 2 użytkowników na średnio 4.5 gwiazdek
Strona 1/201

User Guide Manual del Usuario

1
Nokia 3155, Nokia 3155i, and
Nokia 3152 User Guide
Nota: La traducción en español de este manual inicia en la Página 95.

2
LEGAL INFORMATION
PART NO. 9238280, ISSUE NO. 1
Copyright ©2005 Nokia. All rights reserved.
Nokia, Nokia Connecting People, Nokia 3155, Nokia 3155i, Nokia 3152, Pop-Port™, and the Nokia
Original Enhancements logos are trademarks or registered trademarks of Nokia Corporation.
Other company and product names mentioned herein may be trademarks or trade names of their
respective owners.
US Patent No. 5818437 and other pending patents. T9 text input software
Copyright ©1999-2005. Tegic Communications, Inc. All rights reserved.
Includes RSA BSAFE cryptographic or security protocol software from
RSA Security.
Java™ is a trademark of Sun Microsystems, Inc.
The information contained in this user guide was written for the Nokia 3155, Nokia 3155i, and
Nokia 3152 products. Nokia operates a policy of ongoing development. Nokia reserves the right
to make changes to any of the products described in this document without prior notice.
UNDER NO CIRCUMSTANCES SHALL NOKIA BE RESPONSIBLE FOR ANY LOSS OF DATA OR
INCOME OR ANY SPECIAL, INCIDENTAL, AND CONSEQUENTIAL OR INDIRECT DAMAGES
HOWSOEVER CAUSED. THE CONTENTS OF THIS DOCUMENT ARE PROVIDED “AS IS.” EXCEPT
AS REQUIRED BY APPLICABLE LAW, NO WARRANTIES OF ANY KIND, EITHER EXPRESS OR
IMPLIED, INCLUDING, BUT NOT LIMITED TO, THE IMPLIED WARRANTIES OF MERCHANTABILITY
AND FITNESS FOR A PARTICULAR PURPOSE, ARE MADE IN RELATION TO THE ACCURACY AND
RELIABILITY OR CONTENTS OF THIS DOCUMENT. NOKIA RESERVES THE RIGHT TO REVISE THIS
DOCUMENT OR WITHDRAW IT AT ANYTIME WITHOUT PRIOR NOTICE.
EXPORT CONTROLS
This device may contain commodities, technology, or software subject to export laws and
regulations from the U.S. and other countries. Diversion contrary to law is prohibited.
FCC/INDUSTRY CANADA NOTICE
Your device may cause TV or radio interference (for example, when using a telephone in close
proximity to receiving equipment). The FCC or Industry Canada can require you to stop using
your telephone if such interference cannot be eliminated. If you require assistance, contact
your local service facility. This device complies with part 15 of the FCC rules. Operation is
subject to the condition that this device does not cause harmful interference.

C o n t e n t s
3
Contents
For your safety..................................................................................... 4
Welcome ............................................................................................... 7
1. Phone at a glance.......................................................................... 8
2. Set up your phone....................................................................... 13
3. Text entry..................................................................................... 20
4. Messages ...................................................................................... 22
5. Call log......................................................................................... 36
6. Contacts ....................................................................................... 39
7. Gallery .......................................................................................... 45
8. Media ........................................................................................... 47
9. Settings ........................................................................................ 51
10. Organizer...................................................................................... 67
11. Extras ........................................................................................... 75
12. Mobile web ................................................................................. 76
13. PC connectivity............................................................................ 78
14. Enhancements.............................................................................. 80
15. Battery information .................................................................... 81
Care and maintenance....................................................................... 84
Additional safety information .......................................................... 85
Index ................................................................................................... 90

F o r y o u r s a f e t y
4
For your safety
Read these simple guidelines. Not following them may be dangerous or illegal.
Read the complete user guide for further information.
SWITCH ON SAFELY
Do not switch the device on when wireless phone use is prohibited or
when it may cause interference or danger.
ROAD SAFETY COMES FIRST
Obey all local laws. Always keep your hands free to operate the vehicle
while driving. Your first consideration while driving should be road safety.
INTERFERENCE
Do not switch the device on when wireless phone use is prohibited or
when it may cause interference or danger.
SWITCH OFF IN HOSPITALS
Follow any restrictions. Switch the device off near medical equipment.
SWITCH OFF IN AIRCRAFT
Follow any restrictions. Wireless devices can cause interference
in aircraft.
SWITCH OFF WHEN REFUELING
Don't use the device at a refueling point. Don't use near fuel or chemicals.
SWITCH OFF NEAR BLASTING
Follow any restrictions. Don't use the device where blasting is in progress.
USE SENSIBLY
Use only in the normal position as explained in the product
documentation. Don't touch the antenna unnecessarily.
QUALIFIED SERVICE
Only qualified personnel may install or repair this product.
ENHANCEMENTS AND BATTERIES
Use only approved enhancements and batteries. Do not connect
incompatible products.

F o r y o u r s a f e t y
5
WATER-RESISTANCE
Your phone is not water-resistant. Keep it dry.
BACK-UP COPIES
Remember to make back-up copies or keep a written record of all
important information.
CONNECTING TO OTHER DEVICES
When connecting to any other device, read its user guide for detailed
safety instructions. Do not connect incompatible products.
EMERGENCY CALLS
Ensure the device is switched on and in service. Press the end key as
many times as needed to clear the display and return to the main
screen. Enter the emergency number, then press the call key. Give
your location. Do not end the call until given permission to do so.
■About your device
The wireless devices described in this guide are approved for use on the CDMA
800 and 1900, AMPS, and GPS networks. Contact your service provider for more
information about networks.
When using the features in this device, obey all laws and respect privacy and the
legitimate rights of others.
Warning: To use any features in this device, other than the alarm clock, the
device must be switched on. Do not switch the device on when wireless
phone use may cause interference or danger.
■Network Services
To use the device you must have service from a wireless service provider. Many of
the features in this device depend on features in the wireless network to function.
These network services may not be available on all networks or you may have to
make specific arrangements with your service provider before you can utilize
them. Your service provider may need to give you additional instructions for their
use and explain what charges will apply. Some networks may have limitations
that affect how you can use network services. For instance, some networks may
not support all language-dependent characters and services.
Your service provider may have requested that certain features be disabled or not
activated in your device. If so, they will not appear on your device menu. Contact
your service provider for more information.

F o r y o u r s a f e t y
6
■Shared memory
The following device features may share memory: contacts; text messages; photos,
images, and tones in gallery; calendar notes; games; and applications. Use of one
or more of these features may reduce the memory available for the remaining
features sharing memory. If your phone displays a message that the memory is
full when you try to use a shared memory feature, delete some of the information
or entries stored in the shared memory features before continuing. Some of the
features, such as photos, images, and tones in gallery; text messages; and applications
may have a certain amount of memory specially allotted to them in addition to
the memory shared with other features.

W e l c o m e
7
Welcome
Congratulations on your purchase of the Nokia 3155, Nokia 3155i, or Nokia 3152
mobile phone. Your phone provides many functions practical for daily use, such
as a hands-free loudspeaker, alarm clock, calculator, calendar, and more. Your
phone can also connect to a PC, laptop, or other device using a data cable. To
personalize your phone, you can set your favorite ring tones.
■Register your phone
Make sure to register your phone at www.warranty.nokiausa.com or call
1-888-NOKIA-2U (1-888-665-4228) so that we can serve your needs better if
you should need to call a customer center or to have your phone repaired.
■Getting help
Find your phone label
If you need help, Nokia Customer
Care is available for assistance.
Before calling, we recommend
that you write down the following
information and have it available:
• Electronic serial number (ESN)
• Your zip code (only in the US)
The ESN is found on the type label, which is located beneath the battery on the back
of the phone. See "Remove the back cover," p. 14 and "Remove the battery," p. 14.
Nokia support and contact information
Check www.nokiausa.com/support or your local Nokia Web site for the latest
version of this guide, additional information, downloads, and services related to
your Nokia product.
On the Web site, you can get information on the use of Nokia products and
services. If you need to contact customer service, check the list of local Nokia
Care contact centers at www.nokia.com/customerservice.
For maintenance services, check your nearest Nokia Care services location at
www.nokiausa.com/support.
Accessibility solutions
Nokia is committed to making mobile phones easy to use for all individuals, including
those with disabilities. For more information visit www.nokiaaccessibility.com
.
P h o n e a t a g l a n c e
8
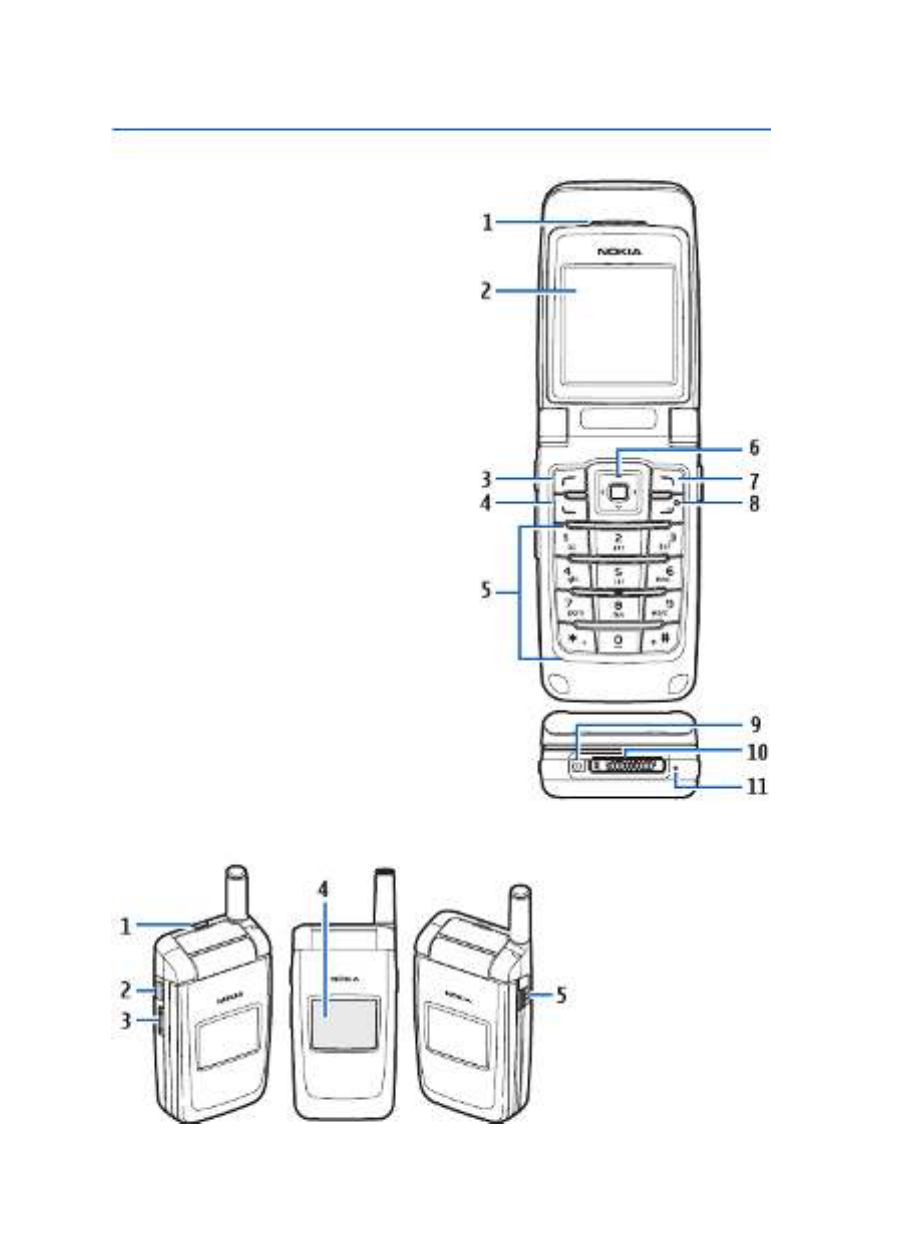
1. Phone at a glance
• Earpiece port (1)
• Display screen (2)
• Left selection key (3)
• Call key (4)
• Keypad (5)
• Four-way scroll and selection key (6)
• Right selection key (7)
• Power key/end key (8)
• Charger port (9)
• Pop-Port™ connector (10)
• Microphone (11)
■Keys and parts
• Loudspeaker (1)
• Voice key (2)
• Volume key (3)
• Front display (4)
• Headset jack (5)

P h o n e a t a g l a n c e
9
The voice key functions as follows:
• Short press—Answer an incoming call.
• Long press—Answer or make a voice dialing.
■Standby mode
Depending on your wireless service provider and the model number of your phone,
some or all of the following selection keys may appear in the standby mode.
The standby mode is home base and indicates
your phone is in the idle state.
Signal strength (1)—A higher bar indicates a
stronger network signal.
Menu (2)—Press the center selection key to
select this option.
Go to (3)—Press the left selection key to select
this option.
Names or network operator menu (4)—Press the right selection key to select
this option.
Battery level (5)—A higher bar indicates more power in the battery.
■Quick keys
Note: Depending on your wireless service provider and the model number
of your phone, some or all of the following Quick keys may appear in the
standby mode.
In the standby mode, the four-way scroll key instantly takes you to frequently
accessed menus:
Scroll up key—Go to the contacts list.
Scroll right key—View the calendar or network operator menu.
Scroll down key—Go to the contacts list.
Scroll left key—Quickly create a text message.
Center selection key—Go to the main menu or a selected submenu.

P h o n e a t a g l a n c e
10
■Indicators and icons
Depending on your wireless service provider and the model number of your phone,
some or all of the following indicators and icons may appear in the standby mode.
You have new text or picture messages. See "Text messages," p. 22.
You have new voice messages. See "Voice messages," p. 33.
Your phone keypad is locked. See "Keyguard," p. 19.
Your phone is set to the silent profile. See "Profiles," p. 51.
The alarm clock is set to on. See "Alarm clock," p. 67.
The countdown timer is running.
The stopwatch timer is running in the background.
Integrated hands-free is active. See "Loudspeaker," p. 18.
The timed profile is selected. See "Profiles," p. 51.
or An enhancement is connected to the phone.
See "Enhancement settings," p. 60.
Voice privacy encryption is active (or is not active) in the network.
or Location info sharing is set to emergency or on.
See "Location info sharing," p. 54.
You are in a digital network. See "Network Services," p. 5.
You are in an analog network. See "Network Services," p. 5.
You are in a 1XRTT network. See "Network Services," p. 5.
You are roaming outside your home network. See "Roaming options," p. 64.
■Get the most out of this guide
The following sections illustrate the various components of your phone. Familiarize
yourself with these sections to help you understand the instructions that follow.
This guide uses certain terms for the steps you need to perform.
• Press means to press and release a key quickly (short press). For example,
press 7 means press the key on the keypad labeled with the number 7 and the
letters pqrs.
• Press and hold means to press and hold a key for 2–3 seconds; then release
the key (long press).
• Use selection keys to select a menu option. To select an option, press the
selection key below the menu item on the phone screen.
• Use scroll keys to move up, down, left, or right in the menus.

P h o n e a t a g l a n c e
11
• Call and end keys: Press the call key to place a call or to answer an incoming
call. Press the end key to end a call or return to the idle state (standby mode).
■Phone menus
Phone features are grouped according to function and are accessed through the
main menus. Each main menu contains submenus and lists from which you can
select or view items and customize your phone features. To access these menus
and submenus, use the scroll method or a shortcut.
You can change your menu view from list to grid. Select Menu > Options > Main
menu view > List or Grid.
Note: Some features may not be available, depending on your network.
For more information, contact your wireless service provider.
Scroll method
You can use the four-way scroll key to scroll up, down, left, and
right through the options.
1. In the standby mode, select Menu, and scroll through the main
menus using the scroll key.
As you scroll through the menus, the menu number appears in the upper right
corner of the display. Below the battery level indicator is a scroll bar with a
tab that moves up or down on the right side of the display screen as you scroll
through the menus, providing a visual representation of your current position
in the menu structure.
2. When you arrive at a menu, press the center selection key to select submenus.
• Select Back (the right selection key) to return to the previous menu.
• Press the end key to return to the standby mode from any menu or submenu.
In-phone help
Many features have brief descriptions (help text) you can view on the display.
To view these descriptions, you must first activate help text as follows.
In the standby mode, select Menu > > > > Settings Phone Help text activation
On or Off.
Scroll to a feature and wait about 14 seconds. Scroll down to view all of the
description, or select Back to exit.

P h o n e a t a g l a n c e
12
■Security feature
The security feature protects your device from unauthorized outgoing calls or
access to the stored information with the lock and security codes. The lock code is a
four digit number while the security code a five digit one. By default, the security
feature uses the lock code (defaulted to the last four digits of your phone number)
instead of the security code to protect your phone.
You need to enter the lock code to access the following Security option:
1. In the standby mode, select Menu > > Settings Security.
2. Enter the lock code, and select OK. See "Security settings," p. 61.
Note: Depending on your wireless service provider, the preset lock code
may be 1234 or 0000 instead of the last four digits of your phone number.
If none of these work, contact your wireless service provider for help.
Your device, by default, requires you to enter the lock code to restore factory settings:
1. In the standby mode, select Menu > > Settings Restore settings.
2. Enter the lock code, and select OK. See "Change lock code," p. 62.
Note: Depending on your wireless service provider, your device may
sometimes ask you for the security code (defaulted to 12345) instead of
the lock code.
■Go to functions
The Go to menu enables you to change the function of the left selection key on
your phone. With this function, you can quickly access your most frequently used
functions from the menu in the standby mode. Go to
Choose Go to functions
1. In the standby mode, select Go to > Options > Select options.
2. Scroll up or down to highlight the desired function.
3. Select Mark to add a function or Unmark to remove a function.
4. Select Done when you have added all desired functions.
5. Select Yes to save the changes.
6. In the standby mode, select Go to to display a list of the functions you
selected in step 2.
Organize functions
1. In the standby mode, select Go to > Options > Organize.
2. Scroll up or down to highlight the function you want to rearrange, and select
Move > Move up, Move down, Move to top, or Move to bottom.
3. Select Done > Yes to save the changes.

S e t u p y o u r p h o n e
13
2. Set up your phone
■Antenna
Your device has two antennas—the fixed antenna is active unless
the extendable antenna is fully extended.
In the Nokia 3155i phone, the GPS antenna is also internal and is
activated when placing emergency calls or when On is selected
from the Location info sharing menu (a carrier-dependent
feature). See "Location info sharing," p. 54.
Your device has a fixed and extendable antenna located
towards the top of the phone with the fold closed. Hold
the phone with the antenna area pointed up and over
your shoulder.
Note: Do not touch the antenna unnecessarily with
the device switched on. Contact with the antenna
affects call quality and may cause the device to
operate at a higher power level than otherwise
needed. Not touching the antenna area during a
phone call optimizes the antenna performance and
battery life.
S e t u p y o u r p h o n e
14
■Battery
Note: Always switch off the power, and disconnect the charger and any
other device before removing the cover. Avoid touching electronic
components while changing the cover. Always store and use the device
with the cover attached.
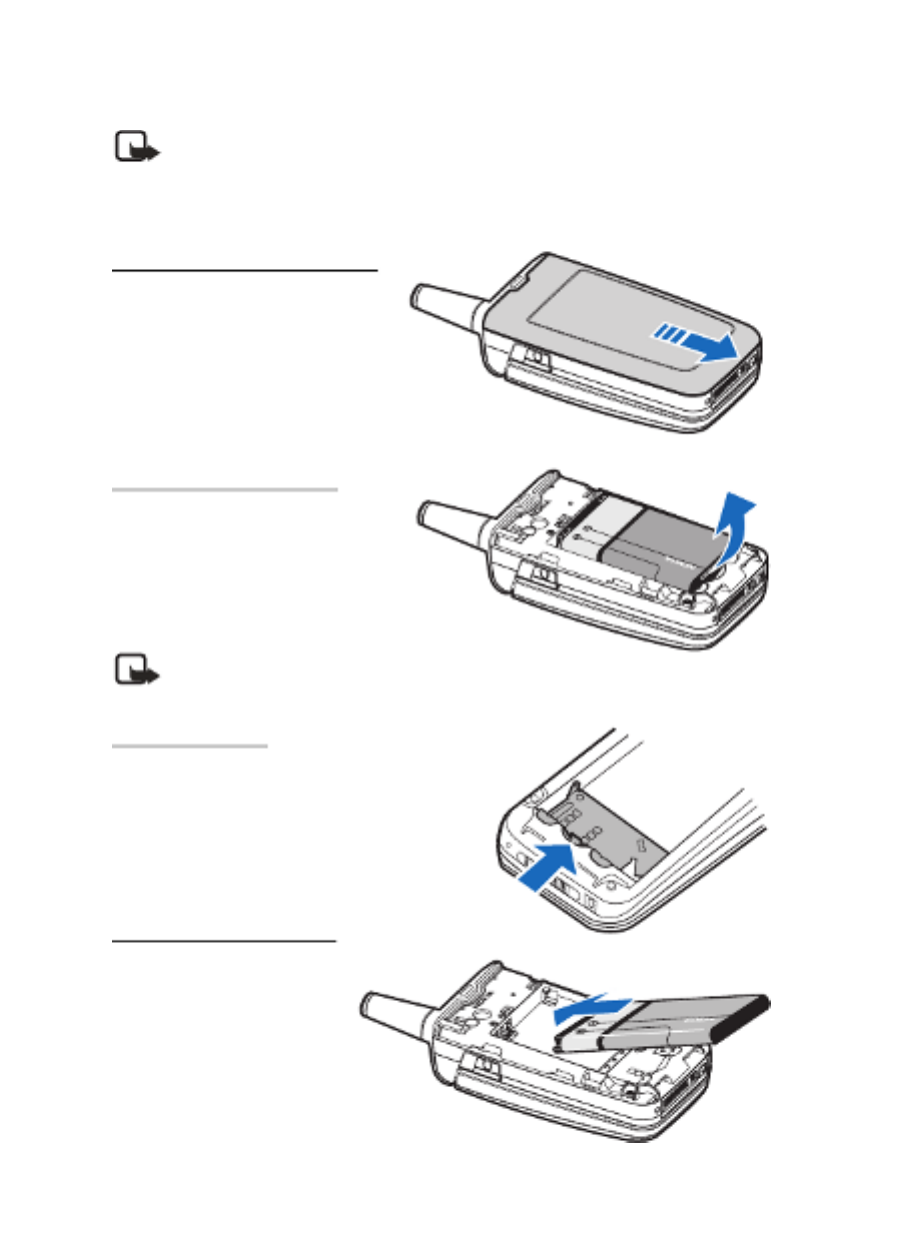
Remove the back cover
1. With the back of the phone
facing you, push down on the
back cover.
2. Slide the back cover toward
the bottom of the phone
and remove.
Remove the battery
After you have removed the back
cover, insert your finger into the
finger grip, and lift the battery
from its compartment.
Note: Always switch off
the device, and disconnect the charger before removing the battery.
UIM card slot
Your phone has a UIM (CDMA SIM) card slot
built into the mechanics. However, the UIM
is not functional in this phone model. Avoid
placing anything into the UIM card slot.
Replace the battery
1. Insert the battery, gold-
colored contact end first,
into the battery slot.
2. Push down on the other
end of the battery to snap
the battery into place.

S e t u p y o u r p h o n e
15
Replace the back cover
1. Set the back cover on the
phone with the cover tabs
aligned with the slots in the
phone.
2. Slide the back cover toward
the top of the phone until the
back cover is securely in place.
Charge the battery
Note: Check the model number of any charger before use with this
device. This device is intended for use when supplied with power from
the AC-3 or AC-4 charger.
1. Plug the charger transformer into a standard AC outlet.
2. Insert the charger output
plug into the round jack at
the bottom end of the phone.
After a few seconds, the
battery indicator in the display
starts to scroll from bottom to
top. If the battery is completely
discharged, it may take a few
minutes before the charging indicator appears on the display or before any calls
can be made.
You can also use the CA-44 charger adapter to connect the phone with Nokia
chargers having a larger barrel size, including ACP-7, ACP-8, ACP-9, ACP-12,
AC-1 (retractable charger), and LCH-12 (mobile charger).
1. Plug the charger transformer into a standard AC outlet.

S e t u p y o u r p h o n e
17
■Make a call
Note: Before making or receiving a call, fully extend the whip antenna.
Keypad
1. Enter the phone number (including the area code), and press the call key.
(To delete a character to the left of the cursor, select Clear.)
2. Press the end key to end the call, or select End call to cancel the call attempt.
Contacts list
1. In the standby mode, scroll down to display your contacts list and highlight
your desired entry.
2. Select Details to highlight your desired number, and then select Call.
Last dialed number
1. In the standby mode, press the call key to display the last 30 numbers dialed.
2. Scroll to the number (or name) you want to redial, and press the call key.
Conference calling
Conference calling is a network service that allows you to take part in a
conference call with two other participants.
1. Make a call to the first participant.
2. With the first participant on the line, select Options > New call.
3. Enter the phone number of the second participant, or select Search to retrieve a
number from the contacts list. Select Call. The first participant is put on hold.
4. When the second participant picks up, press the call key to connect the calls.
5. To end the conference call, select Options > End all calls, or press the end key.
■Answer calls
An incoming call
1. With the fold open, press the call key, or select Answer to answer the call.
2. Press the end key to reject the call.
Select Silence to mute the ringing tone, then Dismiss, or do nothing. The call
is eventually diverted to voicemail.
With your phone set to silent in the profiles menu, select Dismiss to divert the
call to voicemail.

S e t u p y o u r p h o n e
18
3. With the fold closed, press the volume key to mute the ringing tone.
A short press of the voice key answers an incoming call with the loudspeaker.
By default, your phone answers an incoming call when you open the fold. You can
change the setting to not answer the call when the fold opens.
In the standby mode, select Menu > > Settings Call > Answer when fold is
opened > On or Off.
Adjust the earpiece volume
Whether in or out of a call, you can scroll the volume key located on the left side
of your device up or down to adjust the volume of the earpiece. When you adjust
the volume, a bar chart indicates the volume level.
Answer a call with the keypad locked
To answer a call with the keypad locked, press the call key with the fold open.
To answer a call with the fold closed and the keypad locked, press and hold the
voice key to answer with the loudspeaker. During the call, all features function
as normal. When you end or reject the call, the keypad automatically relocks.
See "Keyguard," p. 19.
When the keypad lock is on, calls still may be possible to the official emergency
number programmed into your device. Enter the emergency number, and press
the call key.
Loudspeaker
Warning: Do not hold the device near your ear when the loudspeaker is
in use, because the volume may be extremely loud.
You can use your phone as a loudspeaker during a call.
• To activate the loudspeaker while in a call with the fold open, select Loudsp..
• To activate the loudspeaker when answering a call with the fold closed, press
the voice key.
• To deactivate the loudspeaker during a call, with the fold open, select Normal.
The loudspeaker is deactivated automatically when a call (or a call attempt) ends
or when certain enhancements are connected.
Call options
Many of the options you can use during a call are network services. Check with
your wireless service provider for more information.

S e t u p y o u r p h o n e
19
1. Select Options during a call to display the following options:
Loudspeaker or Handset—Activate or deactivate the loudspeaker while in a call.
New call—Initiate a conference call. See "Conference calling," p. 17.
Save—Save a number while in a call to your contacts list. This option is
available only when entering numbers during a call.
Add to contact—Add a phone number to an existing contact in your contacts
list while in a call. This option is available only when entering numbers during
a call.
End all calls—Disconnect from all active calls.
Touch tones—Enter the numbers, and select Tones to send the numbers as tones.
Contacts—View the contacts menu.
Menu—View the phone menu.
2. Scroll to and select an option to activate the option or enter its submenu.
■Keyguard
With keyguard, you can lock the keypad to prevent keys from being pressed
accidentally. The locked keypad unlocks when you receive a call. After the call,
the lock automatically reactivates.
With the keyguard on, calls still may be possible to the official emergency number
programmed into your phone. Enter the emergency number, and press the call key.
Lock the keypad
Select Menu with the center selection key; then press * within 2 seconds.
Unlock the keypad
Select Unlock with the center selection key; then press * within 2 seconds.

T e x t e n t r y
21
Activate or deactivate
1. At any text entry screen, select Options > Dictionary on to activate or
Dictionary off to deactivate.
2. If you are turning predictive text on, select the language of your choice.
Text entry
The following illustration shows your text entry of the word Nokia in predictive text
mode. With the English dictionary selected, press each of the following number
keys once, and the screen will display Nokia by predicting the appropriate letter
to use based on your keypad entry:
Enter: 6 6 5 4 2
• Press 0 to enter a space, and begin writing the next word.
• If a displayed word is not correct, press * to see other matches. To return to
the previous word in the list of matches, select Prev.
• If ? appears after a word, select Spell to add the word to the dictionary.
• Press 1 to insert a period into your message.
• Press and hold * to display special characters. Press * again to cycle through
all available characters.
■Change case and mode
Press # to switch between uppercase, lowercase, and sentence case text. As you
press #, the following icons (not the descriptions) appear in the upper left of the
display screen:
Uppercase text: standard mode is on.
Lowercase text: standard mode is on.
Sentence case text: standard mode is on. This option is available
only at the beginning of a sentence.
Note: You can press # within 2 seconds to switch between standard
mode and predictive text mode.
Uppercase text: predictive text is on.
Lowercase text: predictive text is on.
Sentence case text: predictive text is on. This option is available
only at the beginning of a sentence.

M e s s a g e s
22
4. Messages
If you have subscribed to a message network service, you can send and receive
messages to compatible phones also subscribed to a message service. You can also
send and receive picture, multimedia, and e-mail messages if supported by your
service provider. Also, you can make distribution lists that contain phone numbers
and names from your contacts list. See "Text entry," p. 20.
When composing text, picture, or multimedia messages, check the number of
characters allowed in the top right corner of the message. Using Unicode characters
takes up more space. With Unicode characters in your message, the indicator may
not show the message length correctly. Before sending the message, the phone tells
you if the message exceeds the maximum length allowed for one message.
Important: Exercise caution opening messages. Messages may contain
malicious software or otherwise be harmful to your device or PC.
Note: When you send a message, your device may display Message sent,
indicating your device has sent the message to the message center number
programmed into your device. This is not an indication that the message
has been received at the intended destination. For more details about
messaging services, check with your service provider.
■Text messages
Compose and send
1. In the standby mode, select Menu > > > Messages Text messages
Create message.
To go quickly to Create message, scroll left in the standby mode.
2. Compose and send a message using the keypad.
Depending on the messaging service enabled, some or all of the following
options are available while composing your message:
Preview—Preview the message when sending a picture message
(only available with a picture inserted).
Sending options—Mark or Unmark the sending options of a single message as
Urgent, Delivery note, Callback no., or Signature (not available with a picture
inserted). See "Change sending options," p. 26.
Clear text—Erase all the text from the message editor.
Insert picture—Insert a picture from a templates folder into your message.

M e s s a g e s
23
Change picture—Change the picture in a picture message (only available with
a picture inserted).
Delete picture—Delete the picture in a picture message (only available with a
picture inserted).
Add-ins—Add the following objects: Sound, Animation, and Picture
(only available with EMS enabled).
Styles—Select the following options to set font style and text alignment:
Font type, Font size, and Text alignment (only available with EMS enabled).
Insert contact—Insert a name from your contacts list into your message.
Insert number—Insert a phone number or find a phone number in the
contacts list.
Save—Select Drafts to save the message in the drafts folder; select Templates to
save the message as one of your predefined templates in the templates folder.
Exit editor—Exits the message editor.
Use template—Insert a predefined template into your message.
Insert smiley—Insert a smiley into your message.
Insert word or Edit word—Enter or edit the text of a new word that might not
appear in the predictive text dictionary (only available with predictive text on).
Insert symbol—Insert a special character into your message (only available
with predictive text on).
Writing language—Choose the language you want to use.
Dictionary on or Dictionary off—Turn the predictive text on or off.
Matches—View matches in the dictionary for the word you want to use (only
available with predictive text on and when the same set of key strokes can
produce multiple words).
3. To send the message, select Send to Send to number > , Send to e-mail, Send
to many, or Send to distrib. list (if a distribution list has been created). Enter
the recipient’s phone number or e-mail address; or select Search to retrieve a
number or e-mail address from your contacts list, and select OK.
Read message
When you receive a message, a notification message and are displayed.
1. Select Show to read the message or Exit to dismiss the notification and read
the message later from your inbox. See "View saved messages," p. 25.
2. Scroll up or down to view the whole message, if necessary.

M e s s a g e s
24
Options
When reading a text message, select Options to access some or all of the
following options:
Delete—Discard the message.
Use detail—Access the following three options:
•Number—Uses or saves the number. Select Options > Add to contact,
Send message, or Call.
•E-mail address—Lists the e-mail addresses included in the message (available
only if the message contains an e-mail address). Select Save to save the email
address as a new phone book entry or Options > Add to contact or Send message.
•Web address—Displays if a URL is included in the message.
Move—Save the message to Templates, Archive, or a folder you have created.
Forward—Forward the message to another phone number or e-mail address.
Lock or Unlock—Lock or unlock the message.
Save picture—Save the picture to your Templates folder for later use. You can
enter a title for the picture, and select OK.
Rename—Edit the title of the message.
Reply to message
1. In the standby mode, select Menu > > > Messages Text messages Inbox and
your desired message, or when you receive a message, select Show.
2. Select Reply > Empty screen, Original text, Template, or one of the predefined
answers; then compose your reply using the keypad.
3. After creating the reply, select Send. The sender’s phone number or e-mail is
used as the default.
Templates
Templates are short, prewritten messages you can recall and insert into new text
messages when you are short on time.
1. In the standby mode, select Menu > > > Messages Text messages Create
message > Options > Use template.
2. Select your desired template.
3. Select Send to > Send to number, Send to e-mail, Send to many Send to , or
distrib. list (with a distribution list created).
4. Enter the recipient’s phone number or e-mail address, or select Search to
retrieve a number or e-mail address from your contacts list; and select Send.
A distribution list only contains phone numbers of recipients and is selected from
a list of predefined groups you create.

M e s s a g e s
25
Text message folders
Save messages
You can save drafts of messages or received messages to an existing folder or to a
folder that you have created.
1. Open the received message or create a new message, and select Options.
2. To save a received message, select Move > Archive, Templates, or a folder you
have created.
3. To save the draft of a message you have created, select Save > Drafts or Templates.
View saved messages
1. In the standby mode, select Menu > Messages > Text messages.
2. Select the folder containing the message you want to view:
Inbox—Automatically stores any incoming messages.
Outbox—Stores messages that have not been sent
Sent items—Stores messages that have been sent.
Drafts—Stores messages created as drafts.
Archive—Stores messages that you choose to archive, including unread ones.
Templates—Stores pictures and prewritten templates. Preloaded templates
can be edited and customized.
My folders—Allows you to organize your messages by creating custom folders
and saving some of your messages here. Select Options > Add folder, Rename
folder, or Delete folder to add a custom folder or rename or delete a folder you
have created.
You can only delete folders created in my folders; the inbox, sent items,
archive, and templates folders are protected. When deleting a folder, you are
also deleting all messages in the folder.
Distribution lists—Stores created distribution lists.
3. When the folder opens, select the message you want to view.
Distribution list
The distribution list enables you to send messages to a group of contacts. In the
standby mode, select Menu > Messages > Text messages > Distribution lists.
To create a distribution list, select New list with no list created or Options >
Create new list to create additional lists. To populate your list, select Add new and
a contact from your contacts list.
To use, rename, or modify a distribution list, highlight the distribution list; and
select Options > Send message, Rename list, Clear list, or Delete list.

M e s s a g e s
26
Delete messages
If your message memory is full and you have more messages waiting at the
network, No space for new text messages appears in the standby mode.
You can do the following:
• Read some of the unread messages, and delete them individually.
• Delete messages from some of your folders.
Delete a single message
1. In the standby mode, select Menu > > Messages Text messages.
2. Select the folder containing the message you want to delete.
3. Highlight the message you want to delete.
4. Select Options > Delete.
5. Select Yes to delete the message or No to exit.
Delete all messages in a folder
1. In the standby mode, select Menu > > > Messages Text messages
Delete messages.
2. Select the messages you want to delete:
All—Deletes all messages in all of the folders.
All read—Deletes any messages that have been read in all of the folders.
All unread—Deletes any messages that have not been read in all of the folders.
3. Select and Mark the folders that have messages you want to delete:
Inbox—Deletes all messages from the inbox folder.
Sent items—Deletes all messages from the Sent items folder.
Outbox—Deletes all messages from the outbox folder.
Drafts—Deletes all messages from the drafts folder.
Archive—Deletes all messages from the archive folder.
User defined folders—Deletes all messages from the user defined folder.
4. Select Done > Yes to empty the marked folder.
Change sending options
To change sending options for all future text messages, in the standby mode,
select Menu > Messages > Text messages > Message settings > Sending options
and the setting you want to change:
Priority—Set the priority of the note as Normal or Urgent.
Delivery note—Send a note to yourself confirming delivery of the message.
Select On or Off.

M e s s a g e s
27
Send callback number—Send a callback number to the recipient. Select Off or
enter your desired phone number to send to the recipient as a callback number,
and select OK.
Signature—Select On to create a signature to send with text messages or Off to
turn this feature off.
To change sending options for one message, in the standby mode, select Menu >
Messages > Text messages > Create message > Options > Sending options, and
Mark or Unmark the setting you want to change:
Urgent—Set the priority of the note as urgent.
Delivery note—Send a note to yourself confirming delivery of the message.
Callback no.—Enter your desired phone number to send to the recipient as a
callback number, and select OK.
Signature—Create a signature to send with text messages.
Change message settings
In the standby mode, select Menu > Messages > Text messages > Message
settings > Other settings and the setting you want to change:
Message font size—Select Small font or Large font.
Message overwriting—Select Sent items only, Inbox only, S. items & Inbox, or Off.
Note: When the message memory is full, your phone cannot send or
receive any new messages. To free up the memory, you can select
Message overwriting to make your phone automatically replace old
messages in the inbox and outbox folders when new ones arrive.
Save sent messages—Select Always save, Always prompt, or Off.
Queue msgs. when digital unavailable—Select On, On prompt, or Off. Messages
are stored in the outbox until they can be sent with digital service.
Auto-playback of sounds—Select On or Off (for EMS only).
■Picture messages
Your phone comes with five preloaded pictures. If necessary, you can overwrite
any of the preloaded pictures. You can send a text message with pictures
attached to compatible phones. However, pictures take up more space than text.
To select your desired picture in the templates folder, in the standby mode, select
Menu > Messages > Text messages > Templates.
You cannot send a picture message using e-mail.

M e s s a g e s
28
Receive and save
Note: Only compatible devices that offer picture message features can
receive and display picture messages.
When you receive a picture message, your device beeps and displays a message
notification with the messaging icon in the upper left corner in the standby
mode as a reminder. When you have unopened picture messages in your inbox,
appears.
Select Show to view the picture message or Exit to view the picture message in
your inbox later. If you have more than one picture message, scroll to and select
the message you want to view. Scroll to view the whole picture if necessary.
To save a received picture in your templates folder, select Options > Save picture.
Enter a title, and select OK. If your templates folder is full of pictures, scroll to
and select a picture you want to replace.
Compose and send
When you insert a standard picture into a message, the number of characters you
can add changes as shown in the upper right corner of the display screen.
1. In the standby mode, select Menu > Messages > Text messages > Create message.
2. Write the message, and select Options > Insert picture.
3. Scroll to a picture, and select Use or View > Insert.
To replace with another picture, select Options > Change picture, scroll to
another picture, and select Use or View > Insert.
4. Select Send to > Send to number, Send to many, or Send to distrib. list if
distribution list exists.
5. Enter the phone number of the recipient, or select Search to retrieve a
number from contacts list.
To view, change, or delete the picture, select Options > Preview, , Change picture
or Delete picture.
■Multimedia messages
A multimedia message (MMS) can contain text, sound, a picture, and a video clip.
Your device supports multimedia messages up to 300 KB. With the maximum size
exceeded, the device may not be able to receive the message. Depending on your
network, you may receive a message that includes an Internet address where you
can go to view the multimedia message. Pictures are scaled to fit the display area
of the device. Your device has a multimedia message viewer for playing messages
and a multimedia folder for storing saved messages. When you save the multimedia
message, you can use the image as a screen saver or the sound as a ringing tone
unless protected by copyright.

M e s s a g e s
30
Yes—Allow all incoming messages.
In home network—Allow incoming messages only if you are in the wireless service
provider’s home system. This is a network service. Check with your service provider
for more information.
No—Block all incoming messages.
Retrieve or reject multimedia messages
This setting is unavailable with multimedia reception blocked.
In the standby mode, select Menu > Messages > Multimedia messages > Message
settings > Incoming multi- media messages and one of the following options:
Retrieve—Automatically retrieve all messages to your inbox.
Retrieve manually—Enable choosing from a notification whether to retrieve a
message waiting on the network.
Reject—Reject incoming multimedia messages.
When you receive messages, Multimedia message received appears.
Allow or block advertisements
This setting is unavailable with multimedia reception blocked.
In the standby mode, select Menu > Messages > > Multimedia messages
Message settings > Allow advertisements > Yes or No.
Other MMS settings
Other multimedia settings include saving your messages to Sent items. In the standby
mode, select Menu > Messages > Multimedia messages > Message settings and one
of the following:
Save sent messages—Select Yes to save sent multimedia messages to the Sent
items folder or No to discard.
Delivery reports—Select On to be informed if the message was delivered or Off to
not be informed.
Scale image down—Select Yes or No to define whether to scale image down.
Default slide timing—Set the default time in mm:ss format for each slide in an
MMS to remain on the screen.
MMS folders
To use and arrange messages, select Messages > Multimedia messages and one
of the following:
Inbox—Contains received multimedia messages.
Outbox—Contains multimedia messages which you have sent and are still
waiting to be transmitted, or failed to be sent out.

M e s s a g e s
34
Listen to voice messages
After you set up voice mail, in the standby mode, press and hold 1; or select
Menu > Messages > Voice messages > Listen to voice messages to dial the voice
mailbox number. When you connect and the prerecorded greeting begins, follow
the automated instructions to listen to your voice messages.
Automate voice mail
You can insert special characters called dialing codes into phone numbers such
as voice mail, and save the number to a 1-touch dialing location. Dialing codes
instruct the receiving system to pause, wait, bypass, or accept the numbers that
follow them in the dialing string. See "Phone numbers with dialing codes," p. 34.
Voice mail services vary by wireless service provider. The following instructions
are examples of common operations. Please check with your wireless service
provider for specific instructions on using your voice mail service.
Write down voice mailbox number and process
1. Write down your voice mailbox number.
2. Call and check your voice mail as you normally would.
3. Write down your interaction with the recorded prompts step-by-step. Keep in
mind that each voice mail service may vary. However, it should look similar to
the following:
Dial 8585551212, pause 5 seconds, press 1, pause 2 seconds, press 1234,
and press #.
Phone numbers with dialing codes
Dialing codes instruct the receiving system to pause, wait, bypass, or accept
the numbers that follow them in the dialing string. To set up dialing codes,
do the following:
1. In the standby mode, select Menu > Contacts > 1-touch dialing.
2. Scroll to an (empty) 1-touch dialing slot, and select Assign.
3. Enter your mailbox phone number, including the area code.
4. Enter any dialing codes as necessary after the entered phone number.
For example, if you pause for 5 seconds after connecting to voice mail, enter p
twice (two times 2.5 seconds) after the voice mailbox number: 2145551212pp.
5. Enter any remaining pauses or other information that enables you to listen to
your messages, and select OK.
6. Enter a name (such as voice mail), and select OK.
To dial and listen to your voice mail, press and hold the assigned 1-touch dialing
key in the standby mode.

C a l l l o g
36
5. Call log
Call log stores information about your last 30 missed, received, and dialed calls
respectively and adds the total duration of all calls. When the number of calls
exceeds the maximum, the most recent call replaces the oldest.
Whether viewing missed, received, or dialed calls, select Options to access these
menu options:
Time of call—Displays the date and time of the call.
Send message—Sends a message to the number.
Use number—Edits the number and associates a name with the number.
Save—Enters a name for the number and saves it to your contacts list.
Add to contact—Adds a number to a contact and saves it to your contacts list
(available only with the number not yet stored in your contacts list).
Delete—Clears the number from memory.
Call—Calls the number.
■View missed calls
The missed calls feature does not function with your device switched off. Missed
calls are calls you have never answered. To view missed calls, do the following:
1. In the standby mode, select Menu > > Call log Missed calls, or with missed
call notification displayed, select List.
2. Scroll to a name or number, and select Options and an option to view or
activate.
■View received calls
Received calls are calls that have been answered.
1. In the standby mode, select Menu > > Call log Received calls.
2. Scroll to a name or number, and select Options and an option to view or
activate.
■View dialed numbers
Dialed calls are previous numbers you have dialed from your device:

C a l l l o g
37
1. In the standby mode, press the call key, or select Menu > Call log >
Dialed numbers.
2. Scroll to a name or number, and select Options.
3. Select an option to view or activate.
View call times
You can make or receive calls to or from the same number and view up to five
calls displayed with the time each call occurred. Your device clock must be set for
this feature to work accurately.
1. In the standby mode, select Menu > Call log > Missed calls, Received calls, or
Dialed numbers.
2. Highlight your desired name or number, and select Options > Time of call.
3. Scroll down to view the call times from this number; select Back to return to
the options list.
■Delete call logs
You can delete any missed, dialed, or received calls from your device memory.
1. In the standby mode, select Menu > Call log > Delete recent calls.
2. Select the call type you want to clear: All, Missed, Received, or Dialed.
■Call duration
Contact your wireless service provider for the actual calls and services invoice,
which may vary depending on network features, rounding off for billing, taxes,
and so forth.
You can view the duration of your last call, all your dialed calls, all your received
calls, all your calls, and your life timer, as well as clear your timers. Select Menu >
Call log > Call timers > Last call duration, Dialed calls' duration, Received calls'
duration, All calls' duration, Life timer, or Clear timers. After you select Clear
timers, enter your lock code, and select OK. See "Change lock code," p. 62.
Note: All call timers, except the life timer, are reset to zero with Clear
timers selected.
Note: Some timers, including the life timer, may be reset during service
or software upgrades.
To activate the call timer in the standby mode while in a call, select Details >
Show call time on display > On or Off.
To view the duration of dialed or received calls placed while in the home network
or while roaming, select Details > Home or Roaming.

C a l l l o g
38
■Data and fax call duration
Data and fax calls are a network service. See "Network Services," p. 5. If your
wireless service provider supports this feature, you can view the size or duration
of sent or received data and fax calls.
Note: The actual time invoiced for calls and services by your service
provider may vary, depending on network features, rounding off for
billing, taxes, and so forth.
In the standby mode, select Menu > Call log > Data/fax calls and one of the
following options:
Last sent data/fax— View the size (KB) of the last sent data or fax call.
Last received data/fax—View the size (KB) of the last received data or fax call.
All sent data/fax—View the size (KB) of all sent data and fax calls.
All received data/fax—View the size (KB) of all received data and fax calls.
Duration of last data/fax call—View the duration time of the last data or fax call.
Duration of all data/fax calls—View the duration time of all calls.
Clear all data/fax logs—Select OK > Yes to clear all data or fax logs.
■Minibrowser duration
Minibrowser is a network service. See "Network Services," p. 5. If your wireless
service provider supports this feature, you can view the size or duration of sent or
received data from the minibrowser.
Note: The actual time invoiced for calls and services by your service
provider may vary, depending on network features, rounding off for
billing, taxes, and so forth.
In the standby mode, select Menu > Call log > Minibrowser calls and one of the
following options:
Last sent browser data—View the size (KB) of the last sent browser data.
Last received browser data—View the size (KB) of the last received data.
All sent browser data—View the size (KB) of all sent browser data.
All received browser data—View the size (KB) of all received browser data.
Last browser session—View the duration time of the last browser session.
All browser sessions—View the duration time of all browser sessions.
Clear all browser logs—Select OK > Yes to clear all browser logs.

C o n t a c t s
39
6. Contacts
The contacts list can hold up to 500 contacts with multiple numbers and text notes
for each contact. The amount of numbers and text entries you can save may vary,
depending on the length and total number of entries in the contacts list.
■Add new contacts
To access the contacts list in the standby mode, press the right selection key, or
select Menu > Contacts > Names if the right selection key on your device has a
network operator menu.
Save contact name and number
1. In the standby mode, enter the phone number you want to save.
2. Select Save.
3. Enter the name, and select OK.
Save contact number only
1. In the standby mode, enter the phone number you want to save.
2. Select and hold Options.
Save an entry
1. In the standby mode, select Menu > Contacts > Names > Options > Add new.
2. Enter the name, and select OK.
3. Enter the phone number, and select OK > Back.
Save numbers and text items
You can save different types of phone numbers and short text items per name to
the contacts list. The first number you save for any entry is automatically set as
the default, or primary number, which you can always change.
1. In the standby mode, scroll down to display your contacts list, and highlight
the entry to which you want to add a phone number or text item.
2. Select Details > Options > Add detail > Number (General, Mobile, Home, Work,
or Fax), E-mail address, Web address, Street address, Note, Image, or Tone.
3. Enter the number or text for the type you have selected, and select OK.
4. To change a number type (General, Mobile, Home, Work, or Fax), highlight the
number, and select Options > Change type.

C o n t a c t s
40
Change default number
You can also change which phone number is the default (primary) number for the
contact entry.
1. In the standby mode, scroll down to select the contact entry you want to
change, and select Details.
2. Scroll to the number you want to set as default, and select Options >
Set as default.
Caller groups
You can add contacts list entries to any of five caller groups, and assign a unique
ringing tone or graphic to that group. This enables you to identify callers from the
group by their unique ringing tone or graphic.
1. To assign an entry in your contacts list to a caller group, scroll to your desired
contact entry, and select Details > Options > > Caller groups Family, VIP,
Friends, Business, Other, or No group.
2. To manage your caller groups, in the standby mode, select Menu > Contacts >
Caller groups > Family, VIP, Friends, Business, or Other to display the
following caller group options:
Rename group—Rename the group to your preference.
Group ringing tone—Set the ringing tone for the group.
Group logo—Turn the graphic for the caller group On or Off, or View the graphic.
Group members—Add or remove members from the caller group.
Set up 1-touch dialing
You can associate any entry in the contacts list with a key from 2–9. To dial those
entries, press and hold the assigned key. See "1-touch dialing," p. 55 to activate
or deactivate 1-touch dialing.
Assign a key to 1-touch dialing
1. In the standby mode, select Menu > Contacts > 1-touch dialing.
2. Scroll to an (empty) 1-touch dialing slot, and select Assign.
3. Enter the number (including the area code) and a name for the number, and
select OK; or select Search to retrieve a number from the contacts list.
If 1-touch dialing is off, the device displays a prompt and asks if you want to
turn 1-touch dialing on.
4. Select Yes to activate 1-touch dialing.

C o n t a c t s
41
Change 1-touch dialing numbers
1. In the standby mode, select Menu > Contacts > 1-touch dialing.
2. Scroll to the 1-touch dialing entry you want to change, and select
Options > Change.
3. Enter the new number and a name for the entry, and select OK; or select
Search to retrieve a number from the contacts list.
Delete 1-touch dialing numbers
1. In the standby mode, select Menu > Contacts > 1-touch dialing.
2. Scroll to the 1-touch dialing entry you want to delete, and select Options >
Delete > Yes.
■Voice tags
You can dial up to 25 stored numbers using voice dialing.
Before using voice tags, note the following:
• Voice tags are not language-dependent. They depend on the speaker’s voice.
• You must say the name exactly as you said it when you recorded it.
• Voice tags are sensitive to background noise. Record voice tags, and use them
in a quiet environment.
• Very short names are not accepted. Use long names and avoid similar names
for different numbers.
Note: Using voice tags may be difficult in a noisy environment or during
an emergency, so you should not rely on voice dialing in all
circumstances.
Assign a voice tag to an entry
Before you can use voice dialing, you must first assign a voice tag to the number.
1. In the standby mode, scroll to the entry in your contacts list to which you
want to assign a voice tag.
2. Select Details > Options > Add voice tag > Start.
3. Speak clearly into the microphone. Do not select Quit unless you want to
cancel the recording. The device automatically stops recording, and saves and
replays the voice tag.
appears next to commands that have voice tags assigned.

C o n t a c t s
42
Dial a number
1. In the standby mode, press and hold the right selection key with the fold open,
or press and hold the voice key regardless of the fold being open or closed.
2. When you hear several beeps and Speak now appears, release the key.
3. Pronounce the voice tag clearly into the microphone.
When the device finds the voice tag, Found: appears, and the device
automatically dials the number. If the device does not locate a number or
recognize the voice tag, No match found appears.
Voice tags
1. After you have associated a voice tag to a contact, select Menu > Contacts >
Voice tags and your desired voice tag entry.
2. Select Playback, Change, or Delete.
■Edit contacts list entries
1. In the standby mode, scroll to the entry you want to edit in your contacts list.
2. Select Details > Options.
3. Select one of the following options, which may vary depending on whether
you are editing a contact listed by phone number or contact name:
View—View the phone number of the contact.
Add detail—Add more details to the contact: Name (only available with no
name added), Number (General, Mobile, Home, Work, or Fax), E-mail address,
Web address, Street address, Note, Image (only available with no image
added), or Tone.
Edit name, Edit number, Edit detail, or Change image—Edit an existing
contact name, phone number, details, or image attached to the contact.
Delete—Delete more details (Delete number, Delete detail, or Delete image) or
the entire contact entry (Delete contact) of the contact.
Send message—Create and send the contact a text message or
multimedia message.
Use number—Use or save the number (available when you select a contact
listed with a contact name). Select Options to use the number.
Set as default—Change the default number of the contact.
Change type—Change the number type to General, Mobile, Home, Work, or Fax.

C o n t a c t s
43
Add voice tag or Voice tag—Add a voice tag to the contact with no voice tag
assigned, or select Playback, Change, or Delete with a voice tag assigned.
Send bus. card—Send the contact as a business card to another device.
Caller groups—Add the contact to an existing caller group.
1-touch dialing—Add the contact to your 1-touch dialing list.
4. Edit the option to your preference, and select OK.
■Delete contacts entries
To delete all entries in your contacts list, in the standby mode, select Menu >
Contacts > Delete all contacts.
■Access the contacts menu
1. In the standby mode, select Menu > Contacts and one of the following options:
Names—View the entries in your contacts list, and select Details or Options >
Search, Add new, or Delete contact for your selected entry.
Settings—Change the contacts list view or check the memory status of your
device.
Caller groups—View and edit the properties of any of the caller groups,
including Family, VIP, Friends, Business, or Other.
Voice tags—Listen to, modify, or delete a voice tag to a contact in the
contacts list.
1-touch dialing—View or modify the list of 1-touch dialing numbers.
My number—View your own phone number.
Delete all contacts—Delete all entries in your contacts list.
2. Select an option to activate the feature or access its submenu.
Search for a name
1. In the standby mode, scroll down to display the contents of your contacts list.
2. Press the key corresponding to the first letter of the name for which you
are searching.
3. Scroll to select a contact, and select Details to view the details.
Configure settings
You can select how the contacts appear in your contacts list and view the amount
of memory used or available in your device.
In the standby mode, select Menu > Contacts > Settings > Scrolling view to change
view of name list or Memory status to view the device memory used and remaining.

C o n t a c t s
44
■Send and receive contacts
You can send and receive an entry in your contacts list using text messaging, if
supported by your wireless service provider.
Send a business card
You can send a business card as a text message to a compatible phone or other
handheld device.
1. Highlight your desired entry from your contacts list, and select Details >
Options > Send bus. card > Via multimedia or Via text message. Primary
number and All details options appear only if you have more than one number
or detail saved to the contact entry.
2. Enter the number for your recipient, or select Search to retrieve a number
from your contacts list.
3. Select OK and the business card is sent.

G a l l e r y
46
Sort—Sort the contents of the selected folder by name, date, format, or size.
Add folder—Create a new folder.
Memory status—Check the available memory for the device handset.
Activation key list—View the list of available activation keys. You can delete
activation keys if desired.

M e d i a
47
8. Media
■Media player
With the media player you can download, view, and play compatible images, audio
and video files, and animated images from a variety of sources.
The media player enables you to play streaming videos and streaming audio from a
network server. Streaming functionality is a network service and requires network
support. Check the availability of these services, pricing, and tariffs with your network
operator or the service provider whose service you want to use. Service providers
will also give you instructions on how to use their services.
In the standby mode, select Menu > > Media Media player and one of the following:
Online media—Connect to the operator’s network. This is a network service.
Check with your service provider for pricing and information.
Open Gallery—Open the Gallery. From Gallery, you can play stored audio and
video files. See "Gallery," p. 45.
Go to address—Enter the address of a mobile Internet service, and select OK.
■Radio
Your phone has an FM radio that also functions as an alarm clock radio. To listen
to the FM radio on your phone, connect a compatible music stand or stereo
headset to the connector on the bottom of the phone. The FM radio uses the wire
of the headset as an antenna. A compatible headset needs to be attached to the
device for the FM radio to function properly. The quality of a radio broadcast
depends on coverage of the radio station in that particular area.
Warning: Listen to music at a moderate level. Continuous exposure to high
volume may damage your hearing. Do not hold the device near your ear
when the loudspeaker is in use, because the volume may be extremely loud.
Turn the radio on and off
1. Connect the phone to a compatible headset or music stand.
2. In the standby mode, select Menu > > Media Radio. The channel location
number, the name of the radio channel (if you have saved the channel), and
the frequency of the radio channel are displayed.
To use the graphical keys , , , or on the display, scroll left or
right to the desired key, and select it.

M e d i a
48
3. If you have already saved radio channels, select or to scroll to the
channel you would like to listen to.
To select a radio channel location, briefly press the corresponding number keys.
4. To turn off the radio, press and hold the end key, or select Options > Turn off.
Options
With the radio on, select Options and one of the following:
Turn off—Turn off the radio.
Save channel—Save the current station to one of 20 locations (only available
with a new station entered).
Channels—Scroll up or down to select a channel from 20 locations. With an
existing channel highlighted, select Options > Delete channel or Rename to
delete or rename the saved channel.
Mono output or Stereo output—Listen to the radio in monaural mode (default) or
in stereo. Stereo output is available through a stereo enhancement.
Loudspeaker or Headset—Listen to the radio through the speakerphone or
through the headset.
Set frequency—Manually enter the frequency of a known radio station.
To set the radio frequency, press * and use the keypad to enter the frequency of a
known radio station.
To adjust the radio volume, press the volume up and down keys.
When an application using a browser connection is sending or receiving data, it
may interfere with the radio.
When you place or receive a call, the radio automatically mutes. When the call
ends, the radio switches back on.
Tune and save a radio channel
You can save a preset station to any one of 20 locations in memory.
1. With the radio on, select or to change the radio frequency in 0.1 MHz
steps, or select and hold or to start the channel search. Searching stops
when a channel is found.
2. To save the channel, select Options > Save channel.
3. Enter a name for the channel, and select OK.

M e d i a
49
■Voice recorder
This feature enables you to record pieces of speech or sound with your device and
listen to them later. The total available time is 3 minutes with no memos stored.
The maximum length of a recording depends on how much memory remains available.
In the standby mode, select Menu > > > Media Recorder Record to start the recording
or Recordings list to manage the folder you have defined for recording storage.
Record speech or sound
1. In the standby mode, select Menu > Media > Recorder > Record.
2. After you hear the recorder start tone, begin recording speech or sound.
3. When you finish recording, select Stop and your recording is saved to the
Recordings folder in the Gallery.
Options
After you have saved the recording to the Recordings folder, highlight the recording,
and select Open to listen to the recording using the earpiece; or select Options
and one of the following.
Delete—Erase the recording.
Rename—Change the name of the recording.
Set as ring tone—Use your recording as a ringtone (a carrier-dependent feature).
Details—Show the name, size, and date of creation of the recording.
Type of view—Select List with details, List, or Grid to determine how to display
the recording
Sort—Sort the contents of the recording by name, date, format, or size.
■Media equalizer
The equalizer enhances the sound quality when using the music player by
amplifying or attenuating frequency bands. You can access five preset equalizer
settings (Normal, Pop, Rock, Jazz, and Classical) and two customizable settings.
Activate an equalizer set
In the standby mode, select Menu > Media > Equalizer, scroll to the desired
setting, and select Activate.

M e d i a
50
Create a custom equalizer set
1. In the standby mode, select Menu > > Media Equalizer.
2. Scroll to Set 1 or Set 2, and select Options > Edit.
The selected set appears in the display with the
bar on the far left highlighted. The bars adjust
frequencies, from the lowest (the leftmost bar) to
the highest (the rightmost bar). The higher the
indicator on a particular bar, the more that
frequency is amplified.
3. To adjust the lowest frequency, scroll up and down
on the bar.
4. To adjust other frequencies, scroll left or right to
the other bars.
5. Repeat steps 3 and 4 to adjust the setting for each frequency; then select Save.
6. To rename the setting, select Options > Rename, enter a new name, and
select OK.
7. To activate the setting, select Activate.

S e t t i n g s
51
9. Settings
Use this menu to change profiles, themes, main display settings, mini display settings,
tone settings, time and date settings, call settings, phone settings, voice commands,
enhancement settings, security settings, application settings, network settings,
network services, and restore factory settings.
■Profiles
Profiles define how your device reacts when you receive a call or message and
how your keypad sounds when you press a key. You can leave ringing options,
keypad tones, and other settings for each of the available profiles at their default
setting, or customize them to suit your needs.
Profiles are also available for enhancements such as the headset and car kit.
See "Enhancement settings," p. 60.
To activate a profile, in the standby mode, select Menu > Settings > Profiles >
Normal, Silent, Meeting, Outdoor, or Pager > Activate.
Customize a profile
You can customize any of the profiles in various ways.
1. In the standby mode, select Menu > Settings > Profiles.
2. Select the profile you want to customize.
3. Select Customize and the option you want to customize.
Set a timed profile
You can use timed profiles to prevent missed calls. For example, suppose you
attend an event requiring your device set to Silent before the event starts, but
you forget to return it to Normal until long after the event. A timed profile can
prevent missed calls by returning your device to the default profile at a time you
specify. You can set timed profiles up to 24 hours in advance.
1. In the standby mode, select Menu > Settings > Profiles.
2. Select the profile you want to activate and Timed for timed expiration.
3. Enter the time in hh:mm format for the profile to expire, and select OK.

S e t t i n g s
52
■Tone settings
You can adjust the ringing volume, keypad tones, and more for the active profile.
See "Customize a profile," p. 51 for more information on profile settings.
Select Menu > Settings > Tones and one of the following:
Incoming call alert—Select how the device notifies you of an incoming call.
Video ringing tone—Select On or Off to indicate whether to replace the default
audio ringing tone with the selected video.
Ringing tone—Select the ringing tone for incoming calls.
Ringing volume—Set the volume of your ringing tone.
Light indicator—Turn the light indicator on or off with On or Off.
Vibrating alert—Turn the vibrating alert On or Off.
Message alert tone—Select the tone for received messages.
Keypad tones—Set the volume of your keypad tones (or turn them off).
Warning tones—Turn warning and confirmation tones On or Off.
Alert for—Define which caller groups the selected profile will accept or decline.
See "Caller groups," p. 40.
■Themes
A theme contains many elements for personalizing your phone, such as wallpaper,
screen saver, color scheme, and a ringing tone.
To choose the theme of your display, in the standby mode, select Menu > Settings >
Themes > Select theme > Tones, Recordings, Themes, Images, Video clips, Graphics,
or a user-created folder.
■Main display settings
Wallpaper
You can set your device to display a background picture (wallpaper).
1. In the standby mode, select Menu > > Settings Main display > > Wallpaper
Select wallpaper > Images, Video clips, Graphics, Tones, Recordings, Themes,
or a user-created folder > Open.
2. Browse your selected folder containing the graphics or image of your
desired wallpaper.
3. When you arrive at the image of your choice, select Options > Set as wallpaper.
4. To activate or deactivate wallpaper, in the standby mode, select Menu >
Settings > Main display > Wallpaper > On or Off.

S e t t i n g s
53
Screen saver
In the standby mode, select Menu > > > Settings Main display Screen saver >
On, Off, Screen savers (Image, Slide set, or Video clip), or Time-out.
Power saver
You can turn the power saver on and off. In the standby mode, select Menu >
Settings > Main display > Power saver > On or Off.
Color schemes
You can change the color of some display components in your device, such as
indicators and signal bars.
In the standby mode, select Menu > Settings > > Main display Color schemes and
the color scheme of your choice.
Choose a banner
Banner is a carrier-dependent feature.
If your wireless service provider supports this feature, you can choose whether
the display shows the operator logo when the phone is in the idle state.
In the standby mode, select Menu > > > > Settings Main display Banner
Default or Customize.
Backlight time-out
You can choose how long to set the backlights on. In the standby mode, select
Menu > Settings > Main display > Backlight time-out > 15 seconds or Customize
(to enter the time-out ranging from 15 seconds to 5 minutes).
■Mini display settings
Power saver
You can turn the power saver on and off. In the standby mode, select Menu >
Settings > Mini display > Power saver > On or Off.
■Time and date settings
Clock
In the standby mode, select Menu > > > > Settings Time and date Clock Show
clock or Hide clock, Set the time, Time zone or Time format.

S e t t i n g s
54
Date
In the standby mode, select Menu > > Settings Time and date > > Date Show date
or Hide date, Set the date, Date format, or Date separator.
Date and time auto-update
Auto-update is a network service. See "Network Services," p. 5. If your wireless
service provider supports this feature, you can allow the digital network to set
the clock, which is useful when you are out of your home area, for instance when
you have traveled to another network or time zone.
In the standby mode, select Menu > > > Settings Time and date Auto-update of
date & time > On Off, Confirm first, or .
If you use the Auto-update of date & time option while outside your digital
network, you may be prompted to enter the time manually. Network time will
replace the time and date when you reenter your digital network.
If your battery has been removed or has discharged outside the digital network,
you may be prompted to enter the time manually (when the battery is replaced or
recharged, and you are still outside of the digital network).
■Call settings
Location info sharing
Location info sharing is only available for the Nokia 3155i device. Location info
sharing is a network service. See "Network Services," p. 5.
If your wireless service provider supports this feature, then location info sharing
allows the device to share position information over the network. For calls to
emergency numbers, this position information may be used by the emergency
operator to determine the position of the device. The functionality and accuracy
of this feature are dependent on the network, satellite systems, and the agency
receiving the information. This feature may not function in all areas or at all times.
In the standby mode, select Menu > > Settings Call > > Location info sharing
Emergency or On > Yes or No.
Emergency—This is the default profile. The device location information is shared
only during an emergency call to the official emergency number programmed
into your device. The screen displays in the upper left hand corner in the
standby mode.
On—The device location information is shared with the network whenever the
device is powered on and activated. The screen displays in the upper left
hand corner in the standby mode.

S e t t i n g s
55
Location information will always be shared with the network during emergency
calls to the official emergency number programmed into the device, regardless of
which setting is selected. After placing an emergency call the device remains in
emergency mode for 5 minutes. During this time, the location information will be
shared with the network. See "Emergency calls," p. 87.
Anykey answer
Anykey answer enables you to answer an incoming call. Briefly press any key
except the right selection key or end key.
In the standby mode, select Menu > > > Settings Call > Anykey answer On or Off.
Automatic redial
Occasionally, your network may experience heavy traffic, resulting in a fast busy
signal when you dial. With automatic redial activated, your device redials the
number (number of times is specified by the network), and notifies you when the
network is available.
In the standby mode, select Menu > Settings > Call > Automatic redial > On or Off.
1-touch dialing
You can activate or deactivate 1-touch dialing. In the standby mode, select Menu >
Settings > > Call > 1-touch dialing On or Off. See "Set up 1-touch dialing," p. 40.
Automatic service update
Your device is capable of receiving updates to wireless services sent to your
device by your service provider. In the standby mode, select Menu > > Settings
Call > Automatic update of service > On or Off.
Open fold to answer
By default, your phone answers an incoming call when you open the fold. You can
change the default setting to have your phone not answer calls with the fold open.
In the standby mode, select Menu > Settings > Call > Answer when fold is opened >
On or Off.
Calling card
If you use a calling card for long distance calls, you can save the calling card
numbers in your device. Your device can store up to four calling cards. Contact
your calling card company for more information.

S e t t i n g s
56
Save information
1. In the standby mode, select Menu > > > Settings Call Calling card.
2. Enter your lock code, and select OK. See "Change lock code," p. 62.
3. Scroll to one of the four card memory locations, and select Options > > Edit
Dialing sequence and one of the following sequence types:
Access no.+ phone no.+ card no.—Dial the access number, the phone number,
then the card number (and the PIN, if required).
Access no.+ card no.+ phone no.—Dial the access number, the card number
(and the PIN, if required), then the phone number.
Prefix+ phone no.+ card no.—Dial the prefix (numbers that must precede the
phone number) and phone number you want to dial, then the card number
(and the PIN, if required).
4. Enter the required information (access number or prefix and card number),
and select OK to confirm your entries.
5. Select Card name, enter the card name, and select OK.
Make calls
After you have saved your calling card information in your device, you can make a
call using your calling card.
1. In the standby mode, select Menu > > > Settings Call Calling card.
2. Enter your lock code, and select OK. See "Change lock code," p. 62.
3. Select your desired calling card.
4. Press the end key to return to the standby mode; then enter the phone
number, including any prefix (such as 0 or 1) that your calling card may
require when you make a calling card call. See your calling card for
instructions
5. Press and hold the call key for a few seconds until Card call appears.
6. When you hear the tone or system message, select OK.
Abbreviated dialing
Abbreviated dialing creates 4-5 digit numbers for your contacts.
In the standby mode, select Menu > > Settings Call > Abbreviated dialing > On Off or .
International prefix
You can store an international dialing prefix into your device. In the standby
mode, select Menu > > > Settings Call International prefix.

S e t t i n g s
58
■Phone settings
Phone language
The phone language affects the time and date formats of the clock, alarm clock,
and calendar. In the standby mode, select Menu > > > Settings Phone Phone
language and the language of your choice.
Memory status
You can view the size of memory available on your device. In the standby mode,
select Menu > Settings > Phone > Memory status.
You can view the size of memory available for application installations. In the
standby mode, select Menu > Extras > Memory.
Automatic keyguard
You can set the keypad of your device to lock automatically after a preset time delay.
1. In the standby mode, select Menu > > > Settings Phone Automatic keyguard >
On or Off.
2. If you select On, Set delay: is displayed.
3. Enter the delay time (in mm:ss format), and select OK.
When keyguard is on, it may be possible to dial the emergency number
programmed into your device.
Touch tones
Touch tones, or DTMF tones, are the tones that sound when you press the keys on
your device keypad. You can use touch tones for many automated dial-up services
such as banking and airlines or for entering your voice mailbox number and password.
Touch tones are sent during an active call. You can send them manually from
your device keypad, or send them automatically by saving them in your device.
Set type
In the standby mode, select Menu > > Settings Phone > Touch tones > Manual
touch tones and one of the following options:
Continuous—Used to set the tone sound for as long as you press and hold a key.
Fixed—Used to send tones of the duration you specify in the Touch tone length option.
Off—Used to turn off tones. No tones are sent when you press a key.

S e t t i n g s
59
Set length
You can specify touch-tone length for the Fixed option. In the standby mode,
select Menu > Settings > Phone > Touch tones > Touch tone length > Short
(0.1 seconds) or Long (0.5 seconds).
Start-up tone
You can select to have a start-up tone when you first turn on your device. In the
standby mode, select Menu > > > Settings Phone > Start-up tone On or Off.
Help text activation
Your device displays brief descriptions for most menu items. When you arrive at a
feature or menu, pause for about 14 seconds and wait for the help text to display.
If necessary, use the scroll key to page through the full help text.
The default setting for help text is On. However, you can turn help text on or off.
In the standby mode, select Menu > > > > Settings Phone Help text activation
On or Off.
■Voice commands
Before using voice tags, note the following:
• Voice tags are not language-dependent, but depend on the speaker’s voice.
• You must say the name exactly as you said it when you recorded it.
• Voice tags are sensitive to background noise. Record voice tags, and use them
in a quiet environment.
• Very short names are not accepted. Use long names, and avoid similar names
for different numbers.
Note: Using voice tags may be difficult in a noisy environment or during
an emergency, so you should not rely on voice dialing in all circumstances.
Hands-free operation
You can set as many as 16 voice commands to enable hands-free operation of
certain features in your device.
Assign a voice tag to a command
Before using voice commands, you must first add a voice tag to the device function.
1. In the standby mode, select Menu > Settings > Voice commands.
2. Select the device function you want to tag: Profiles, Voice mailbox, Radio,
Voice recorder, or Call log.

S e t t i n g s
60
3. If necessary, select an option associated with that function.
4. Select Start, and speak the voice tag clearly into the microphone. Do not
select Quit unless you want to cancel the recording.
The device replays and saves the recorded tag. appears next to commands
with voice tags assigned.
Activate a voice command
After you have associated a voice tag with a function in your device, to issue a
command, speak the voice tag.
1. In the standby mode, press and hold the right selection key or voice key.
2. With Speak now displayed, pronounce the voice tag clearly into the microphone.
With the voice tag found, the device displays Found:, and plays the recognized
voice tag through the earpiece. The function you requested is activated.
Options
After you have associated a voice tag to a command, you can select one of the
following options:
Playback—Listen to the voice command tag.
Change—Change the voice command.
Delete—Erase the voice command tag.
■Enhancement settings
The enhancement settings menu is shown only if the device has been connected
to a compatible enhancement. In the standby mode, select Menu > > Settings
Enhance-ments > Headset, TTY/TDD, or Charger.
Headset
Important: The headset may affect your ability to hear sounds around
you. Do not use the headset in situations that may endanger your safety.
Select the option of your choice to enter the submenu and modify its settings.
Default profile—Choose the profile you want automatically activated with a
headset connected.
Automatic answer—Answer calls automatically after one ring with a headset
connected. Select On or Off.

S e t t i n g s
61
TTY/TDD
Check with the manufacturer of the TTY/TDD device for a connecting cable that is
compatible with the Nokia device. TTY/TDD communications depend on network
availability. Check with your wireless service provider for availability and
description of services.
Charger
Select the option of your choice to enter the submenu and modify its settings.
Default profile—Choose the profile you want automatically activated with your
device connected to the charger.
Lights—Choose to keep the device lights always on, or to shut off automatically
after several seconds. Select On or Automatic.
■Security settings
When first accessing the security settings, enter the preset lock code, by default,
the last four digits of your phone number. Depending on your wireless service
provider, the preset lock code can be a four digit number such as 1234 or 0000. If
none of these work, contact your wireless service provider for help.
Phone lock
The phone lock feature protects your device from unauthorized outgoing calls or
unauthorized access to information stored in the device. With phone lock activated,
Phone locked appears each time you turn your device on or off.
With the device locked, calls may still be possible to the official emergency number
programmed into your device.
1. In the standby mode, select Menu > Settings > Security.
2. Enter the lock code, and select OK. See "Change lock code," p. 62.
3. Select Phone lock and one of the following options:
Off—Immediately turns off the device lock feature.
Lock now—Immediately turns on the device lock feature.
On power-up—Turns on the device lock feature the next time you turn the
device on.
With Lock now selected, you must enter your lock code before the device can
function normally. With the lock code accepted, your device functions normally.
Call not allowed appears if you attempt to place a call with your device locked.
To answer a call with phone lock on, select Answer, or press the call key.

S e t t i n g s
62
Allow numbers
With phone lock on, the only outgoing calls you can make are to the emergency
number programmed into your device (for example, 911) or the number stored in
the Allowed no. when phone locked location:
1. In the standby mode, select Menu > > Settings Security.
2. Enter the lock code, and select OK. See "Change lock code," p. 62.
3. Select Allowed no. when phone locked. With an empty folder selected, select
Assign, and enter the phone number; or select Assign > Search to recall the
number from your contacts list. Select OK.
To call the allowed phone number, in the standby mode, scroll down to highlight
the number you want to call, or enter it on the keypad, and then press the call key
to place the call.
Change lock code
The preset lock code, by default, is the last four digits of your phone number.
Depending on your wireless service provider, the preset lock code can be a four
digit number such as 1234 or 0000. If none of these work, contact your wireless
service provider for help.
To ensure the security of your device, you may want to change the preset lock code
to your own selected four digit number. Avoid using codes similar to emergency
numbers such as 911 to prevent accidental dialing of the emergency number.
If you enter an incorrect lock code five times in a row, your device may ask you
for the security code. By default, the security code is 12345, a five digit number.
Note: With the wrong lock code entered five times in succession, your
phone will not accept your correct lock code for 5 minutes, even if you
power off the device between incorrect entries.
1. In the standby mode, select Menu > > Settings Security.
2. Enter the lock code, and select OK.
3. Select Change lock code.
4. Enter the new lock code (must be 4 characters in length).
5. Reenter the new lock code for verification, and select OK.
When changing your lock code, make sure you store it in a safe place, away from
your device. Avoid entering access codes similar to emergency numbers to prevent
accidental emergency calls.

S e t t i n g s
63
Call restrictions
Select call restrictions to block or allow numbers for incoming and outgoing calls.
With any numbers entered as allowed numbers, all those entered as blocked
numbers are ignored. With a number blocked, the phone blocks any call from it,
and send the caller to the voice mail.
1. In the standby mode, select Menu > Settings > Security.
2. Enter the lock code, and select OK. See "Change lock code," p. 62.
3. Select Call restrictions.
4. Select the types of calls you want to restrict:
Restrict outgoing calls—Set restrictions on making calls.
Restrict incoming calls—Set restrictions on receiving calls.
5. Select whether to block or allow numbers:
Blocked numbers—Set the numbers the phone can only block, allowing all
the rest.
Allowed numbers—Set the numbers the phone can only call or receive,
blocking all the rest.
6. Select one of these options: Select, Add restriction (unavailable with memory
full), Edit (unavailable with no number added), or Delete (unavailable with no
number added).
Note: With restricted calls, you may still call the official emergency
number programmed into your device.
Voice privacy
Voice privacy is a network service. See "Network Services," p. 5. If your wireless
service provider supports this feature, the voice privacy feature protects the privacy
of your current phone conversation from other callers placing phone calls on your
same network.
1. In the standby mode, select Menu > Settings > Security.
2. Enter the lock code, and select OK. See "Change lock code," p. 62.
3. Select Voice privacy > On or Off.
■Application settings
1. In the standby mode, select Menu > Settings > Application settings.

S e t t i n g s
64
2. Scroll to one of the following submenus to activate options for preset or
downloaded games or applications.
Application sounds—Select On or Off.
Application lights—Select App. defined or Default.
Application vibration—Select On or Off.
■Network
The menu options you see in your device depend on your service provider’s network.
The network determines which options actually appear in the device menu.
Check with your service provider for more information.
The Network menu enables you to customize the way your device chooses a
network in which to operate while you are within or outside of your primary or
home system. Your device is set to search for the most cost-effective network. If
your device cannot find a preferred network, it selects a network automatically
based on the option you choose in the Network menu.
Roaming options
You can set your device to roam or search for another network when you are not
in your home area.
1. In the standby mode, select Menu > > > Settings Network Roaming options
and one of the following options:
Home only—You can make and receive calls in your home area only.
Automatic—The device automatically searches for service in another digital
network. With no service found, the device uses analog service. The roaming
rate applies when not in the home service area.
2. Select OK, if necessary, to confirm the activation.
Mode
You can choose whether your device uses digital or analog service.
In the standby mode, select Menu > > Settings Network > Mode and one of the
following service options:
Digital preferred—The device works in digital mode but will also work in analog
mode with digital mode unavailable.
Digital only—The device only works in digital mode.
Analog only—The device only works in analog mode.

S e t t i n g s
65
■Network services
The following features are network services. See "Network Services," p. 5.
Store a feature code
1. In the standby mode, select Menu > Settings > Network services > Network
feature setting.
2. Enter the feature code from your service provider (for example, *633), and
select OK.
3. Select the type of service that matches the feature code you entered (for
example, Call forwarding).
The activated feature code is now stored in your device, and you are returned
to the Feature code: field. Continue entering other feature codes (for
example, *633), or press the end key to return to the standby mode. When you
enter a network feature code successfully, the feature becomes visible in the
Network services menu.
Call forwarding
Call forwarding tells your network to redirect incoming calls to another number.
Call forwarding is a network service and may not work the same in all networks,
so contact your wireless service provider for availability.
Activate
The following options may not all appear in the display. Contact your wireless
service provider for more information.
1. In the standby mode, select Menu > Settings > Network services > Call
forwarding and one of the following options:
Forward all calls—Forward all calls to the number you specify.
Forward if busy—Forward incoming calls when you are in a call.
Forward if not answered—Forward incoming calls to another number if you
are unable to answer. You can set a delay before forwarding takes place.
Forward if out of reach—Forward incoming calls when your device is off.
2. Select Activate.
3. Enter the number to which your calls, data, or other information will be
forwarded, and select OK.

S e t t i n g s
66
Cancel
In the standby mode, select Menu > > Settings Network services > Call
forwarding > Cancel all call forwarding. Cancel all call forwarding may affect
your ability to receive voice mail messages. Contact your wireless service provider
for specific details.
Call waiting
If your wireless service provider supports this feature, call waiting notifies you of
an incoming call even while you are in a call. You can then accept, reject, or
ignore the incoming call.
1. In the standby mode, select Menu > > > Settings Network services Call
waiting > Activate or Cancel.
2. During a call, select Answer, or press the call key or voice key to answer the
waiting call. The first call is put on hold.
3. Press the end key to end the active call.
Send caller ID
If your wireless service provider supports this feature, you can allow or prevent
your number from appearing on the receiving caller ID.
In the standby mode, select Menu > Settings > > Network services Send my caller
ID > Yes or No.
View your phone number
In the standby mode, select Menu > > Settings Network services >
My number selection.
■Restore factory settings
You can reset some of the menu settings to their original values. Data that you
have entered or downloaded is not deleted (for example, entries in your contacts
list are not affected).
1. In the standby mode, select Menu > > Settings Restore settings.
2. Enter the lock code, and select OK. See "Change lock code," p. 62.
Note: Depending on your wireless service provider, your device may
sometimes ask you for the security code (defaulted to 12345) instead of
the lock code.

O r g a n i z e r
67
10. Organizer
Your device contains features to help organize your everyday life, including an
alarm clock, calendar, notes, todo list, calculator, countdown timer, and stopwatch.
■Alarm clock
If the alarm time arrives with the device switched off, the device switches itself
on and starts sounding the alarm tone. If you select Stop, the device asks whether
you want to activate the device for calls. Select No to switch off the device or Yes
to make and receive calls. Do not select Yes when wireless phone use may cause
interference or danger.
Set or change alarm setting
The alarm clock depends on the device clock, which sounds an alert anytime you
specify and even works with the device turned off.
1. In the standby mode, select Menu > Organizer > Alarm clock > Alarm time > On.
2. Enter the time for the alarm in hh:mm format.
3. Select am pm or (with 12-hour format selected), and select OK. Alarm on appears
briefly in the display, and appears in the standby mode.
Repeat alarm
You can set the alarm to repeat. In the standby mode, select Menu > Organizer >
Alarm clock > Repeat alarm.
Set the alarm tone
You can set which tone to play when the alarm sounds. In the standby mode,
select Menu > Organizer > Alarm clock > Alarm tone > Standard, Radio, or Open
Gallery to choose the tone you want to use.
If you set your alarm to Radio, use an accessory that supports FM stereo.
Snooze time-out
To set the alarm snooze time, select Menu > > Organizer > Alarm clock Snooze
time-out > 5 minutes, 10 minutes, 15 minutes, 30 minutes, 60 minutes, or Other
(to enter up to 60 minutes snooze time).

O r g a n i z e r
68
Alarm conditions
When the alarm sounds, your device beeps, vibrates (if vibrating alert is on for
currently active profile), and the display lights up.
With the device on, select Stop to shut the alarm off or Snooze. With Snooze
selected, the alarm stops for 10 minutes, and Snooze on appears in the display.
If you do not press a key, the alarms stops (snoozes) for 10 minutes, then sounds
again. You can also select Menu > > Organizer Alarm clock > Snooze time-out to
reset the snooze time.
Turn an alarm off
In the standby mode, select Menu > Organizer > > > Alarm clock Alarm time Off.
■Calendar
The calendar keeps track of reminders, calls you need to make, meetings, and
birthdays, which can even sound an alarm for any of these events.
Monthly view provides an overview of the selected month and weeks, enabling
you to jump to a specific date. Any days or dates that appear in bold font contain
calendar notes such as a meeting or reminder.
Open
In the standby mode, select Menu > Organizer > Calendar, or press the right
scroll key. Scroll to move the cursor in some calendar views.
Go to a date
1. In the standby mode, select Menu > > Organizer Calendar > Options > Go to date.
2. Enter the date (mm/dd/yyyy), and select OK.
Note a specific date
You can apply five types of notes to your calendar. Your device asks for further
information depending on which note you choose. You also have the option to
set an alarm for any note you select.
1. Go to the date for which you want to set a reminder. See "Go to a date," p. 68.
2. From the monthly view (with the go-to date highlighted), select Options >
Make a note and one of the following note types:
Meeting—Enter a subject, location, and a start and end date and time.
Call—Enter a phone number, a name, and the date and time.
Birthday—Enter the person’s name, date and year of birth.

O r g a n i z e r
69
Memo—Enter a subject and a start and end date.
Reminder—Enter the subject and date of your reminder.
You are given the option to set an alarm.
3. Enter your note, and select Save.
View notes (day view)
After you have created calendar notes, you can view them.
1. In the standby mode, select Menu > Organizer > Calendar.
2. Scroll to the date containing the note that appears in bold type, and select View.
Options while viewing a list of notes
1. Select Options while viewing a day’s note to display the following:
The options listed below are available while viewing the header of a note.
Make a note—Create a new note for the selected date.
Delete—Delete the note.
Edit—Edit the note.
Move—Move the note to another date on your calendar.
Repeat—Set the note (except for birthday note) to recur on a regular basis
(daily, weekly, biweekly, monthly, and yearly).
Go to date—Jump to another date on your calendar.
Go to today—Jump to the current date on your calendar.
Send note—Send the note to another device as a text message or in calendar-
to-calendar format by way of multimedia messages or SMS.
Copy—Copy the note for you to paste to another date.
Settings—Set the date and time, date and time format, the day each week
starts and whether you want your notes to autodelete after a specified time.
Go to to-do list—Jump to the to-do list on your calendar.
2. Select an option to activate it or enter its submenu.
Send a note
1. In the standby mode, select Menu > Organizer > Calendar.
2. Scroll to the date that appears in bold type, containing the note you want to
send, and select View.
3. Scroll to the note you want to send, and select Options > Send note > Send as
message (Text message or Multimedia msg.) or Via calendar.

O r g a n i z e r
70
4. If you selected Via calendar, enter the number for the recipient, or select
Search to retrieve a number from the contacts list, and select OK.
5. If you selected Send as message (Text message or Multimedia msg.), the note
appears as a text message in the display.
• Select Send to > Send to number, Send to e-mail, Send to many, or Send to
distrib. list.
• Enter the number for the recipient, or select Search to retrieve a number
from the contacts list, and select Send.
Receive notes
When you receive a calendar note in calendar-to-calendar format, your device
displays Calendar note received.
• To view calendar notes, select Show, and if necessary, scroll to view the
entire message.
• To save calendar notes after viewing, select Options > Save.
• To discard calendar notes after viewing, select Exit or Options > Discard.
When you receive a calendar note or text message, a message notification
appears in the standby mode. You can save the note in your calendar and set
an alarm for any date and time.
■Notes
You can write and save information in Notes and send notes using multimedia or
text message. In the standby mode, select Menu > Organizer > Notes. With no
notes created, select Add note, create your note, and select Save when done.
With notes already created, highlight the note you want to use, and select View
to read or Options > Make a note, Delete, Edit, Send note (Send as message), or
Delete all notes.
■To-do list
Use the to-do list feature to keep track of your tasks. You can save a note for a task,
select a priority level for the note and mark it as done when you have completed it.
You can sort the notes by priority or by date.
Add a to-do note
1. In the standby mode, select Menu > Organizer > To-do list.
2. If there are no notes, select Add note.
3. Enter the subject of the to-do note, and select Save.

O r g a n i z e r
71
4. Select High, Medium, or Low priority.
5. Enter the due date and time to set the alarm.
View a to-do note
1. In the standby mode, select Menu > Organizer > To-do list.
2. Highlight a to-do note, and select Options and one of the following:
Add—Add another note.
Delete—Delete the note.
Mark note as done or Mark as not done—Mark a note or task as completed or
not; if completed, no more reminders will follow.
Sort by deadline—Sort the notes according to their deadline.
Send—Send the note to another device, as a text or multimedia message, or
as a calendar note to another compatible device.
Go to calendar—Leave the to-do list, and go to the calendar.
Save to calendar—Save the to-do note to a date on your calendar.
Delete done notes—Delete all the completed to-do notes.
Delete all notes—Delete all the to-do notes in the list.
3. View the to-do note, and select Edit to edit the note or Options to select from
the following:
Deadline—Set a deadline for the note, listing any uncompleted notes if existing.
Mark note as done or Mark as not done—Mark a note or task as completed or
not; if completed, no more reminders will follow.
Delete—Delete the note.
Edit priority—Change the priority to high, medium, or low.
Send—Send the note to another device, as a text or multimedia message, or
as a calendar note to another compatible device.
Go to calendar—Leave the to-do list, and go to the calendar.
Save to calendar—Save the to-do note to a date on your calendar.
■Calculator
The calculator in your device adds, subtracts, multiplies, divides, calculates the
square and the square root, changes the sign of the number entered, and converts
currency values.
Note: This calculator, designed for simple calculations, has limited accuracy.
1. In the standby mode, select Menu > > Organizer Calculator.

O r g a n i z e r
72
2. Enter the first number in the calculation. Press # for a decimal point if necessary.
To change the sign, select Options > Change sign, or scroll up or down.
To perform a square or square root calculation, select Options > Square or
Square root.
To cycle through the add (+), subtract (-), multiply (*), and divide (/) characters,
press *.
3. Enter the second number in your calculation.
4. Select Equals to complete calculation or Options if more functions are required.
Currency converter
You can convert foreign currency to domestic, or vice versa, directly in the standby
mode or from the Calculator menu.
Note: When you change base currency, you must enter the new rates
because all previously set exchange rates are set to zero.
1. In the standby mode, select Menu > Organizer > Calculator > Options >
Exchange rate > Foreign units in home units or Home units in foreign units.
Foreign units in home units—The number of home units cost to make one unit
of foreign currency.
Home units in foreign units—The number of foreign units cost to make one
unit of your home currency.
2. Enter the exchange rate (press # to insert a decimal), and select OK.
3. In the standby mode, enter the currency amount to be converted.
4. Select Options > To home or To foreign.
To home—converts foreign currency to domestic currency.
To foreign—converts domestic currency to foreign currency.
5. If you do not enter an exchange rate, the device will prompt you to do so.
Select OK. You can edit the exchange rate at anytime.
■Countdown timer
The countdown timer in your device enables you to enter a specific time (up to
99 hours, 59 minutes, and 59 seconds). When the time runs out, your device
sounds an alarm.
Note: The countdown timer only works when the device is on. When you
turn off your device, the timer is no longer active.

O r g a n i z e r
73
Set the timer
1. In the standby mode, select Menu > Organizer > Timer > Normal timer,
Interval timer, or Settings.
Use Normal timer to measure the countdown time for tasks that have one
period (timer name). Select Interval timer to save sets of countdown times
with more than one period.
2. Enter the time (in hh:mm:ss format), and select OK.
3. Enter a note for the timer, and select Start.
appears in the standby mode with the countdown timer set. When the time
runs out, your device sounds an alarm, displays the timer note, vibrates (if set),
and flashes its lights.
Press any key during the alarm to stop the alarm. After 1 minute the timer alert
stops automatically.
Change the time
After you have set the timer, you can change the time.
1. With a normal timer set, in the standby mode, select Menu > Organizer >
Timer > Change time.
2. Enter the new time, and select OK.
3. Leave the note as it was, or enter a new note, and select Start.
Interrupt the timer
After you have set the timer, you can stop the timer. In the standby mode, select
Menu > Organizer > Timer > Stop timer.
■Stopwatch
You can use the stopwatch in your device to track time. The stopwatch displays
time in hours, minutes, seconds, and fractions of a second in hh:mm:ss.ss format.
Using the stopwatch or allowing it to run in the background when using other
features increases the demand on battery power and reduces the battery life.
Measure time
1. In the standby mode, select Menu > Organizer > Stopwatch > Split timing or
Lap timing > Start. The running time is displayed.
Split timing—You can use the split time function for such things as a long
distance race when you need to pace yourself. Select Split to note the lapsed
time. The timer continues to run and the split time appears below the running
time. Each time you select Split, the new measured time appears at the
beginning of the list.

O r g a n i z e r
74
Lap timing—You can use the lap time function when you want to track how
long it takes to complete each cycle or lap. Select Lap to note the lap time.
The clock stops, then starts immediately from zero. The lap time appears
below the running time. Each time you select Lap, the new measured time
appears at the beginning of the list.
2. Select Stop to end the timing and display the total time or Stop > > Options
Start or Reset to continue or reset timing.
Lap and split times
To save a time while the clock is running, select Stop > Save, enter a name for the
measurement, and select OK. If you do not enter a name, the total time is used as
the default title for the lap or split time.
To view a saved time, in the standby mode, select Menu > Organizer > Stopwatch >
Show last time or View times.
To delete a saved time from Stopwatch, select View times and the time to delete,
and select Delete > Yes; or select Delete times > One by one or Delete all.
Operation note
If you press the end key and return to the standby mode, the clock continues to
run in the background, and appears in the upper left corner.
To return to the stopwatch screens, in the standby mode, select Menu > Organizer >
Stopwatch > Continue. To stop the clock, select Stop.
Options
You can choose the following options when you use the stopwatch:
Continue—Appears when the stopwatch is working in the background.
Show last time— Appears when you have saved a split or lap time and displays the
last time saved.
Split timing—Asks if you want to discontinue previous timing.
Lap timing—Asks if you want to discontinue previous timing.
View times—Enables you to browse the saved times.
Delete times—Enables you to delete any saved times. You can delete the saved
times one by one or all at once.

E x t r a s
75
11. Extras
Challenge yourself or a friend to one of the fun games in your device. Some
menus listed are network services. Contact your wireless service provider for
more information. To download games or applications, select either the Games
or Collection menu.
■Games
In the standby mode, select Menu > > Extras Games to display the games on your
device: 3D Snow Boarding, Nokia Puzzle, Club Pinball, and Bounce.
■Collection
Collections is a network service. See "Network Services," p. 5. If your wireless
service provider supports this feature, you will find useful applications preinstalled
on your device. Also, you can manage and download new Java applications that may
be offered by your wireless service provider.
An application may require a few seconds to load. When you open an application,
wait for the launch screen to disappear. At that point, the application is ready.
In the standby mode, select Menu > Extras > Collection and an application.
Note: Only install applications from sources that offer adequate
protection against harmful software.
■Memory
You can view the size of memory available for games or application installations.
In the standby mode, select Menu > Extras > Memory.
Note: Only install applications from sources that offer adequate
protection against harmful software.

M o b i l e w e b
76
12. Mobile web
Minibrowser is a network service. See "Network Services," p. 5.
Your device has a built-in browser you can use to connect to selected services on
the mobile internet. If your wireless service provider supports this feature, then you
can view weather reports, check news or flight times, view financial information,
and much more. The web browser on your device can display WAP-based content.
Your device may have some bookmarks loaded for sites not affiliated with Nokia.
Nokia does not warrant or endorse these sites. If you choose to access them, you
should take the same precautions, for security or content, as you would with any
internet site.
The security icon does not indicate that the data transmission between the gateway
and the content server (or place where the requested resource is stored) is secure.
The service provider secures the data transmission between the gateway and the
content server.
■Mobile Internet access
Because mobile Internet content is designed to be viewed from your device, your
wireless service provider is now your mobile Internet service provider as well.
It is likely that your wireless service provider has created a home page and set up
your browser to go to this page when you log on to the mobile Internet. At your
service provider’s home page, you may find links to a number of other sites.
It should not be necessary to manually configure the browser on your device.
Normally this is done by your wireless service provider after you subscribe to
the feature. Contact your wireless service provider if you have problems using
the browser.
■Sign on
In the standby mode, select Menu > > Mobile web Minibrowser > Connect or the
operator provided menu item.
After a brief pause, your device attempts to connect to your wireless service
provider’s home page. If you receive an error message, your device may not be set
up for browsing. Contact your wireless service provider to make sure that your
device is configured properly.
M o b i l e w e b
77
■Navigate the mobile Internet
Since your device screen is much smaller than a computer screen, mobile Internet
content is displayed differently than you may be accustomed to seeing. This
section contains guidelines for using the keys to navigate a WAP site.
Phone keys
• Press the power key to display the minibrowser home screen.
• Scroll up or down to browse the WAP site.
• Select an item.
• To enter letters and numbers, press a key from 0–9.
• To enter special characters, press *.
Receive a call while online
If your data connection is not active, you may still be able to receive a voice call
while using the WAP browser.
• To answer the incoming call, press the call key.
• To reject the incoming call, press the end key (a carrier-dependent feature).
While in the voice call, you are not able to load new pages in the browser.
Note: If your data connection is active, the incoming calls are
automatically forwarded to voice mail, depending on your carrier.
Make an emergency call while online
You can end your data connection and make an emergency call.
1. To close your mobile Internet connection, press the end key.
2. Press the end key as many times as needed to clear the display and ready the
device for calls.
3. Enter the emergency number for your present location (for example, 911).
Emergency numbers vary by location.
4. Press the call key.
Clear the cache and disconnect
A cache is a memory location that is used to store data temporarily. If you have
tried to access or have accessed confidential information requiring passwords,
empty the cache after each use. The information or services you have accessed
are stored in the cache. To empty the cache while in the browser menu, select
Navigate > Advanced > Clear > Cache from the home page. To clear the cache
and power off your device, press and hold the power key.
To close your mobile internet connection while browsing, press the end key.

P C c o n n e c t i v i t y
78
13. PC connectivity
■USB data transfer
You can transfer data such as music, photos, and videos from your device to a
compatible PC or from a compatible PC to your device using a DKU-2 USB data
cable. The cable is connected to your device correctly when the arrowhead points
toward the display screen. Disconnect the USB data cable from the device to
make a call.
Use the Nokia Audio Manager software to handle your music files, and transfer
them from the PC to your device. See "Nokia PC Suite," p. 79.
Transfer with Windows Explorer
After you have installed the Nokia Audio Manager, it is possible to use Windows
Explorer to transfer music, photo, and video files to your device and from your
device to your PC.
1. Connect your PC and your device with a DKU-2 USB cable. Data enhancement
connected is displayed on your device.
2. Open Windows Explorer. Your device appears as a local drive (named by Nokia
3155, Nokia 3155i, and Nokia 3152) with a drive letter assigned to it.
3. Click on the folders to display a window that shows the contents of the folder
on the device.
4. Open a second instance of Windows Explorer, and display the contents of the
folder on your PC where you have MP3 files, photo files, or video files stored.
5. Select the files on your PC that you want to transfer to the device.
6. Drag and drop the files from the second window into the first window, and
place them in a folder.
7. The files are transferred to the device and can be played or accessed by the
media player.
If you select files that require more memory than the memory capacity of the
device, an error note appears. Deselect some of the files until the selected
files fit the memory.
8. Disconnect the USB cable by double-clicking the green arrow on the taskbar
at the bottom of your PC screen. A pop-up window displays Unplug or
Eject Hardware.
9. Click on USB device in the hardware devices window. A pop-up window
displays Stop a Hardware device.

P C c o n n e c t i v i t y
79
10. Highlight USB device and click OK. The pop-up window displays Safe to
Remove Hardware, with The ‘USB Device’ device can now be safely
removed from the system. Select OK.
Important: To ensure that all memory card operations are completed in
a controlled way, do not unplug the connectivity cable until Windows
notifies you that it is safe to do so. Uncontrolled completion of the memory
card operations may cause the memory card and the information stored
on it to become corrupted. A corrupted memory card may have to be
formatted before it can be used again. When a memory card is formatted,
all information on the card is permanently lost.
■Nokia PC Suite
Nokia PC Suite software is available for the Nokia 3155, Nokia 3155i, and Nokia 3152
phones. Nokia PC Suite is a collection of powerful tools that you can use to manage
your device features and data. Each component is a separate program that includes
online helps. Nokia PC Suite software, installation instructions, and other
documentation, which are provided free of charge and can be downloaded from the
software downloads of the Nokia web site: www.nokia.com/us
.
Some of the features in your device require network support. Contact your
service provider for availability and configuration instructions.
• Nokia Image Converter makes images usable for multimedia messages or
wallpapers and transfers them to your device.
• Nokia Sound Converter edits polyphonic ringing tones to be compatible with
your device and transfers them to your device.
• Nokia Content Copier copies information or backs up information from your
device to the PC or to another compatible Nokia device.
• Nokia Phone Editor sends text messages and edits the contact directory and
message settings of your device.
• Nokia PC Sync synchronizes the contacts directory and calendar between
your device and a compatible PC.
• Nokia Connection Manager selects the connection type between the PC and
the device.
• Nokia Phone Browser copies images and tones from your device to your PC
and vice versa.
Copyright protection may prevent some images, ring tones, and other content
from being copied, modified, transferred, or forwarded.

B a t t e r y i n f o r m a t i o n
81
15. Battery information
■Charging and discharging
Your device is powered by a rechargeable battery. The full performance of a new
battery is achieved only after two or three complete charge and discharge cycles.
The battery can be charged and discharged hundreds of times, but it will eventually
wear out. When the talk and standby times are noticeably shorter than normal,
replace the battery. Use only Nokia approved batteries, and recharge your battery
only with Nokia approved chargers designated for this device.
If a replacement battery is being used for the first time or if the battery has not
been used for a prolonged period, it may be necessary to connect the charger
then disconnect and reconnect it to begin charging the battery.
Unplug the charger from the electrical plug and the device when not in use. Do not
leave a fully charged battery connected to a charger, since overcharging may shorten
its lifetime. If left unused, a fully charged battery will lose its charge over time.
If the battery is completely discharged, it may take a few minutes before the
charging indicator appears on the display or before any calls can be made.
Use the battery only for its intended purpose. Never use any charger or battery
that is damaged.
Do not short-circuit the battery. Accidental short-circuiting can occur when a
metallic object such as a coin, clip, or pen causes direct connection of the
positive (+) and negative (-) terminals of the battery. (These look like metal strips
on the battery.) This might happen, for example, when you carry a spare battery
in your pocket or purse. Short-circuiting the terminals may damage the battery
or the connecting object.
Leaving the battery in hot or cold places, such as in a closed car in summer or
winter conditions, will reduce the capacity and lifetime of the battery. Always try
to keep the battery between 15°C and 25°C (59°F and 77°F). A device with a hot
or cold battery may not work temporarily, even when the battery is fully charged.
Battery performance is particularly limited in temperatures well below freezing.
Do not dispose of batteries in a fire as they may explode. Batteries may also
explode if damaged. Dispose of batteries according to local regulations. Please
recycle when possible. Do not dispose as household waste.
B a t t e r y i n f o r m a t i o n
82
■Nokia battery authentication guidelines
Always use original Nokia batteries for your safety. To check that you are getting
an original Nokia battery, purchase it from an authorized Nokia dealer, look for
the Nokia Original Enhancements logo on the packaging, and inspect the hologram
label using the following steps:
Successful completion of the four steps is not a total assurance of the authenticity
of the battery. If you have any reason to believe that your battery is not an authentic
original Nokia battery, you should refrain from using it, and take it to the nearest
authorized Nokia service point or dealer for assistance. Your authorized Nokia
service point or dealer will inspect the battery for authenticity. If authenticity
cannot be verified, return the battery to the place of purchase.
Authenticate hologram
1. W hen looking at the hologram on the label, you
should see the Nokia connecting hands symbol from
one angle and the Nokia Original Enhancements
logo when looking from another angle.
2. When you angle the hologram left, right, down,
and up, you should see 1, 2, 3, and 4 dots on each
side respectively.
3. Scratch the side of the label to reveal a 20-digit code,
for example, 12345678919876543210. Turn the
battery so that the numbers are facing upwards.
The 20-digit code reads starting from the number
at the top row followed by the bottom row.
4. Confirm that the 20-digit code is valid by following
the instructions at www.nokia.com/batterycheck
.
To create a text message enter the 20-digit code, for example,
12345678919876543210, and send to +44 7786 200276.

B a t t e r y i n f o r m a t i o n
83
To create a text message,
• For countries in Asia Pacific, excluding India: Enter the 20-digit code, for example,
12345678919876543210, and send to +61 427151515.
• For India only: Enter Battery followed by the 20-digit battery code, for example,
Battery 12345678919876543210, and send to 5555.
National and international operator charges will apply.
You should receive a message indicating whether the code can be authenticated.
What if your battery is not authentic?
If you cannot confirm that your Nokia battery with the hologram on the label is
an authentic Nokia battery, please do not use the battery. Take it to the nearest
authorized Nokia service point or dealer for assistance. The use of a battery that
is not approved by the manufacturer may be dangerous and may result in poor
performance and damage to your device and its enhancements. It may also
invalidate any approval or warranty applying to the device.
To find out more about original Nokia batteries, visit www.nokia.com/battery
.

C a r e a n d m a i n t e n a n c e
84
Care and maintenance
Your device is a product of superior design and craftsmanship and should be treated
with care. The suggestions below will help you protect your warranty coverage.
• Keep the device dry. Precipitation, humidity, and all types of liquids or moisture
can contain minerals that will corrode electronic circuits. If your device does
get wet, remove the battery, and allow the device to dry completely before
replacing it.
• Do not attempt to remove the battery from the device. Nokia recommends that
you take the device to the nearest authorized service facility for replacement
of the battery.
• Do not use or store the device in dusty, dirty areas. Its moving parts and
electronic components can be damaged.
• Do not store the device in hot areas. High temperatures can shorten the life of
electronic devices, damage batteries, and warp or melt certain plastics.
• Do not store the device in cold areas. When the device returns to its normal
temperature, moisture can form inside the device and damage electronic
circuit boards.
• Do not attempt to open the device other than as instructed in this guide.
• Do not drop, knock, or shake the device. Rough handling can break internal
circuit boards and fine mechanics.
• Do not use harsh chemicals, cleaning solvents, or strong detergents to clean
the device.
• Do not paint the device. Paint can clog the moving parts and prevent
proper operation.
• Use a soft, clean, dry cloth to clean any lenses, such as camera, proximity sensor,
and light sensor lenses.
• Use only the supplied or an approved replacement antenna. Unauthorized
antennas, modifications, or attachments could damage the device and may
violate regulations governing radio devices.
• Use chargers indoors.
• Always create a backup of data you want to keep, such as contacts and calendar
notes, before sending your device to a service facility.
All of the above suggestions apply equally to your device, battery, charger, or any
enhancement. If any device is not working properly, take it to the nearest authorized
service facility for service.

A d d i t i o n a l s a f e t y i n f o r m a t i o n
86
HEARING AIDS
Some digital wireless devices may interfere with some hearing aids. If interference
occurs, consult your service provider.
■Vehicles
RF signals may affect improperly installed or inadequately shielded electronic
systems in motor vehicles such as electronic fuel injection systems, electronic
antiskid (antilock) braking systems, electronic speed control systems, air bag
systems. For more information, check with the manufacturer or its representative
of your vehicle or any equipment that has been added.
Only qualified personnel should service the device, or install the device in a vehicle.
Faulty installation or service may be dangerous and may invalidate any warranty
that may apply to the device. Check regularly that all wireless device equipment
in your vehicle is mounted and operating properly. Do not store or carry flammable
liquids, gases, or explosive materials in the same compartment as the device, its
parts, or enhancements. For vehicles equipped with an air bag, remember that an
air bags inflate with great force. Do not place objects, including installed or portable
wireless equipment in the area over the air bag or in the air bag deployment area.
If in-vehicle wireless equipment is improperly installed and the air bag inflates,
serious injury could result.
FCC regulations prohibit using your wireless device while in the air. The use of
wireless telephones in an aircraft may be dangerous to the operation of the aircraft,
disrupt the wireless telephone network, and may be illegal.
■Potentially explosive environments
Switch off your device when in any area with a potentially explosive atmosphere
and obey all signs and instructions. Potentially explosive atmospheres include areas
where you would normally be advised to turn off your vehicle engine. Sparks in such
areas could cause an explosion or fire resulting in bodily injury or even death. Switch
off the device at refuelling points such as near gas pumps at service stations. Observe
restrictions on the use of radio equipment in fuel depots, storage, and distribution
areas, chemical plants or where blasting operations are in progress. Areas with a
potentially explosive atmosphere are often but not always clearly marked. They
include below deck on boats, chemical transfer or storage facilities, vehicles using
liquefied petroleum gas (such as propane or butane), and areas where the air
contains chemicals or particles such as grain, dust or metal powders.
Failure to observe these instructions may lead to suspension or denial of telephone
services to the offender, legal action, or both.

A d d i t i o n a l s a f e t y i n f o r m a t i o n
87
■Emergency calls
Important: Wireless phones, including this device, operate using radio
signals, wireless networks, landline networks, and user-programmed
functions. Because of this, connections in all conditions cannot be
guaranteed. You should never rely solely on any wireless device for
essential communications like medical emergencies.
To make an emergency call, make sure your device is properly charged before
attempting any emergency calls. If your battery becomes empty, you cannot
receive or make calls, including emergency calls and must wait a few minutes
after the charging begins to place your call.
1. If the device is not on, switch it on. Check for adequate signal strength.
Some networks may require that a valid UIM (CDMA SIM) card is properly
inserted in the device.
2. Press the end key as many times as needed to clear the display and ready the
device for calls.
3. Enter the official emergency number for your present location, and press the
call key. Emergency numbers vary by location
If certain features are in use, you may first need to turn those features off before
you can make an emergency call. If the device is in an offline or flight mode you
must change the profile to activate the device function before you can make an
emergency call. Consult this guide or your service provider. When making an
emergency call, give all the necessary information as accurately as possible. Your
wireless device may be the only means of communication at the scene of an
accident. Do not end the call until given permission to do so.

A d d i t i o n a l s a f e t y i n f o r m a t i o n
88
■Certification information (SAR)
This mobile device meets guidelines for exposure to radio waves.
Your mobile device is a radio transmitter and receiver. It is designed not to exceed
the limits for exposure to radio waves recommended by international guidelines.
These guidelines were developed by the independent scientific organization
ICNIRP and include safety margins designed to assure the protection of all persons,
regardless of age and health.
The exposure guidelines for mobile devices employ a unit of measurement known as
the Specific Absorption Rate or SAR. The SAR limit stated in the ICNIRP guidelines
is 2.0 watts/kilogram (W/kg) averaged over 10 grams of tissue. Tests for SAR are
conducted using standard operating positions with the device transmitting at its
highest certified power level in all tested frequency bands. The actual SAR level
of an operating device can be below the maximum value because the device is
designed to use only the power required to reach the network. That amount changes
depending on a number of factors such as how close you are to a network base
station. The highest SAR value under the ICNIRP guidelines for use of the device
at the ear is 0.84 W/kg (for Nokia 3155/3155i) or 0.86 W/kg (for Nokia 3152).
Use of device accessories and enhancements may result in different SAR values.
SAR values may vary depending on national reporting and testing requirements
and the network band. Additional SAR information may be provided under product
information at www.nokia.com
.
Your mobile device is also designed to meet the requirements for exposure to
radio waves established by the Federal Communications Commission (USA) and
Industry Canada. These requirements set a SAR limit of 1.6 W/kg averaged over
1 gram of tissue. The highest SAR value reported under this standard during
product certification for use at the ear is 1.22 W/kg (for Nokia 3155/3155i) or
1.25 W/kg (for Nokia 3152) and when properly worn on the body is 0.78 W/kg
(for Nokia 3155/3155i) or 0.73 W/kg (for Nokia 3152). Information about this
device model can be found at http://www.fcc.gov/oet/fccid
by searching the
equipment authorization system using FCC ID: QMNRM-41 for
Nokia 3155/3155i or QMNRM-61 for Nokia 3152.

A d d i t i o n a l s a f e t y i n f o r m a t i o n
89
■Technical information
Type designation—RM-41 (for Nokia 3155/3155i) and RM-61 (for Nokia 3152)
Dimensions—Width, 45.5 mm; length, 84.8 mm; depth, 24.5 mm
Weight—84.4 g without BL-6C Li-Ion Battery
Volume—86 cm3
Wireless networks—CDMA 800 and 1900 MHz, AMPS, and GPS
Frequency range (Tx)—AMPS: 824.04–848.97 MHz, PCS:
1851.25–1908.75 MHz, Cellular: 824.70–848.37 MHz
Frequency range (Rx)—AMPS: 869.04–893.97 MHz, PCS:
1931.25–1988.75 MHz, Cellular: 869.70–893.37 MHz
GPS frequency—1575.42 MHz
■Battery information
This section provides information about battery charging times with the Travel
Charger (AC-4) and the Standard Travel Charger (AC-3), talk and standby times.
Be aware that the information in this section is subject to change. For more
information, contact your service provider.
Charging times
The following charging times are approximate with the BL-6C 1070 mAh
Li-Ion battery:
Travel Charger (AC-4): Up to 1 hour 45 minutes
Standard Travel Charger (AC-3): Up to 3 hours 30 minutes
Talk and standby times
Operation times are estimates only and depend on signal strength, phone use,
network conditions, features used, battery age and condition (including charging
habits), temperatures to which the battery is exposed, and other factors.
Talk time: 3 to 4 hours (digital)
Standby time: 6 to 10 days

I n d e x
90
Index
NUMERICS
1-touch dialing 40
A
abbreviated dialing 56
alarm clock 67
antenna 13
automate voicemail 34
automatic redial 55
B
back cover
removing 14
replacing 15
backlight timeout 53
batteries and chargers 81
battery
authentication 82
charging 15
charging times
89
information 81, 89
removing 14
replacing 14
talk and standby times 89
business cards 44
C
calculator 71
calendar 68
call duration
37
call forwarding 65
call log 36
call restrictions 63
call settings 54
call waiting 66
caller groups 40
calling card 55
calls
answering 17
in-call options 18
making 17
care and maintenance 84
change time 73
charger
connecting 15
information 81
settings 61
times 89
clear the cache 77
collections 75
color schemes
53
contacts list 39
add 39
delete 43
edit
42
send 44
view 43
countdown timer 72
currency converter 72
D
data or fax calls 57
date setting 54
deleting call logs 37
dialing codes
35
dimensions
89
display language 58
display settings 52, 53
distribution list 25
E
emergency calls 87
while using wireless Internet
77
with keypad locked 58

I n d e x
91
enhancement settings 60
headset 60
TTY/TDD 61
enhancements 80
ESN 7
extras 75
F
factory settings 66
feature codes 65
folders 45
G
gallery 45, 47
games 75
Go to functions 12
H
headset 60 16,
help 7
help text 11, 59
I
indicators and icons 10
international prefix 56
interrupt timer
73
K
keyguard 19
automatic
58
L
languages 58
location info sharing 54
lock code 62
loudspeaker 18
M
Media equalizer 49
memory 58, 75
message folders 25
messages
delete 26
minibrowser messages 35
text messages 22
voice messages 33
minibrowser 76
minibrowser duration 38
minibrowser messages 35
mobile web 76
multimedia messages 28
N
network services 5, 65
notes 70
O
organizer –67 71
P
PC connectivity 78
phone lock 61
change lock code 62
phone settings 58
picture messages 27
predictive text 20
Q
quick keys 9
R
radio 47
registering phone 7
restore factory settings 66

93
NOTES

95
Manual del Usuario Nokia 3155,
Nokia 3155i y Nokia 3152
Importante: Para prevenir cualquier malfuncionamiento y evitar daños, lea
detalladamente este manual de instrucciones antes de conectar y operar
este aparato. Conserve el manual para referencias futuras.

96
INFORMACIÓN LEGAL
PARTE Nº 9238280, Edición Nº. 1
Copyright ©2005 Nokia. Todos los derechos reservados.
Nokia, Nokia Connecting People, Nokia 3155, Nokia 3155i, Nokia 3152, Pop-Port™, y los
logos Nokia Original Enhancements son marcas, registradas o no, de Nokia Corporation.
Otros nombres de productos y compañías aquí mencionados podrían ser marcas o nombres,
registrados o no, de sus respectivos propietarios.
Nº de Patente EE.UU. 5818437 y otras patentes pendientes. Software Ingreso Intuitivo de
Texto T9
Copyright ©1999-2005. Tegic Communications, Inc. Todos los derechos reservados.
Se incluye el software de protocolo de seguridad o criptográfico RSA BSAFE de
RSA Security.
Java™ es marca registrada de Sun Microsystems, Inc.
La información contenida en este manual del usuario fue escrita para los productos Nokia
3155, Nokia 3155i y Nokia 3152. Nokia opera bajo un sistema de desarrollo continuo. Nokia
se reserva el derecho de hacer cambios y mejoras en cualquier producto descrito en este
manual sin previo aviso.
BAJO NINGÚN CONCEPTO NOKIA SERÁ RESPONSABLE POR CUALQUIER PÉRDIDA DE DATOS
O GANANCIAS O POR CUALQUIER OTRO DAÑO ESPECIAL O INCIDENTAL, POR CUALQUIER
CAUSA DIRECTA O INDIRECTA. EL CONTENIDO DE ESTE DOCUMENTO ESTÁ PROVISTO "TAL
CUAL". ADEMÁS DE LAS EXIGIDAS POR LAS LEYES, NO SE EMITE NINGUNA OTRA GARANTÍA
DE NINGÚN TIPO, SEA EXPRESA O IMPLÍCITA, INCLUYENDO, PERO SIN LIMITARSE A,
GARANTÍAS IMPLÍCITAS DE MERCADEO Y DE CAPACIDAD PARA UN PROPÓSITO PARTICULAR,
EN CUANTO A LA PRECISIÓN Y FIABILIDAD O CONTENIDO DE ESTE DOCUMENTO. NOKIA SE
RESERVA EL DERECHO DE REVISAR ESTE DOCUMENTO O DESCONTINUAR SU USO EN
CUALQUIER MOMENTO SIN PREVIO AVISO.
CONNTROL DE EXPORTACIÓN
Este dispositivo podría contener bienes, tecnología o software sujeto a leyes y regulaciones
de exportación de los Estados Unidos y otros países. Se prohíbe su desvío contraviniendo
las leyes.
AVISO FCC/INDUSTRIA CANADIENSE
Su dispositivo podría causar interferencias radioeléctricas y televisivas (por ejemplo., cuando
usted usa su teléfono muy próximo a equipos receptores electrónicos). La FCC/Industria
Canadiense puede exigirle que deje de usar su teléfono si tales interferencias no se pueden
eliminar. Si necesita ayuda, póngase en contacto con su centro de servicio local. Este aparato
cumple con la sección 15 de los reglamentos de la FCC. El funcionamiento de este aparato
está sujeto a la condición de que no cause interferencia perjudicial.

C o n t e n i d o
97
Contenido
Para su seguridad............................................................................... 98
Bienvenido........................................................................................ 101
1. Su teléfono ................................................................................ 103
2. Configurar su teléfono.............................................................. 109
3. Ingreso de texto ........................................................................ 117
4. Mensajes .................................................................................... 120
5. Registro ...................................................................................... 136
6. Contactos (directorio)............................................................... 140
7. Galería........................................................................................ 146
8. Multimedia ................................................................................ 148
9. Configuraciones......................................................................... 152
10. Organizador ............................................................................... 169
11. Extras ......................................................................................... 178
12. Web móvil ................................................................................. 179
13. Conectividad PC......................................................................... 182
14. Accesorios .................................................................................. 184
15. Información sobre las baterías ................................................. 185
Cuidado y mantenimiento............................................................... 188
Información adicional de seguridad ............................................... 189
Índice ................................................................................................ 194
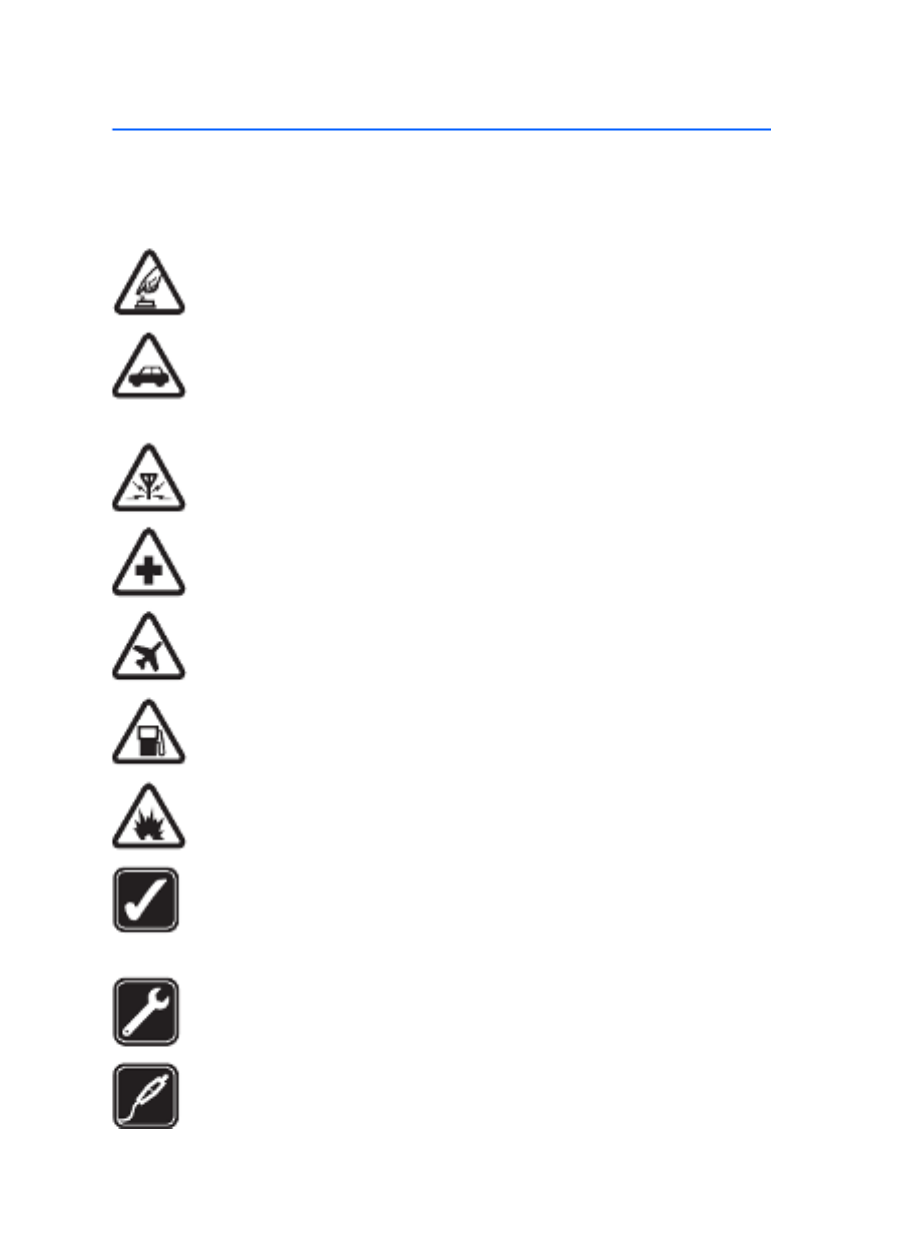
P a r a s u s e g u r i d a d
98
Para su seguridad
Lea esta información antes de utilizar su teléfono celular. El no seguir estas normas
podría ser peligroso o ilegal. Lea todo el manual del usuario para mayor información.
ENCIENDA EL TELÉFONO CON SEGURIDAD
No encienda el dispositivo cuando el uso de teléfonos celulares esté
prohibido o cuando pueda causar interferencia o peligro.
LA SEGURIDAD DEL TRÁFICO ANTE TODO
Obedezca todas las leyes locales. No ocupe las manos en otras tareas
mientras conduce. Su primera consideración cuando conduce debe
ser la seguridad en la carretera.
INTERFERENCIAS
No encienda el dispositivo cuando el uso de teléfonos celulares esté
prohibido o cuando pueda causar interferencia o peligro.
APAGUE EL TELÉFONO EN LOS HOSPITALES
Siga cualquier restricción. Apague el dispositivo cuando esté cerca de
equipos médicos.
APAGUE EL TELÉFONO EN LAS AERONAVES
Siga cualquier restricción. Los dispositivos celulares pueden causar
interferencias en las aeronaves.
APAGUE EL TELÉFONO CUANDO CARGUE COMBUSTIBLE
No use el dispositivo en estaciones de servicio. Tampoco cerca de
combustibles o elementos químicos.
APAGUE EL TELÉFONO CERCA DE DONDE SE REALIZAN EXPLOSIONES
Siga cualquier restricción. No utilice el dispositivo donde se estén
realizando explosiones.
ÚSELO SENSATAMENTE
Use el teléfono sólo en la posición normal como se explica en la
documentación del producto. No toque la antena a no ser que sea
necesario.
SERVICIO ESPECIALIZADO
Sólo personal de servicio especializado puede instalar o reparar
este producto.
ACCESORIOS Y BATERÍAS
Utilice sólo baterías y accesorios homologados. No conecte
productos incompatibles.

B i e n v e n i d o
102
Para servicios de mantenimiento, refiérase a la localidad más cercana de Servicio
al Cliente Nokia en www.nokiausa.com/support
.
Soluciones de acceso
Nokia ha asumido el reto a hacer teléfonos móviles más manejables y amigables,
incluso para los usuarios con dificultades. Para más información, visite la página
Web www.nokiaaccessibility.com
.

S u t e l é f o n o
103
1. Su teléfono
• Puerto del auricular (1)
• Pantalla (2)
• Tecla de selección izquierda (3)
• Tecla Llamar (4)
• Teclado (5)
• Tecla direccional y de selección de
cuatro sentidos (6)
• Tecla de selección derecha (7)
• Tecla Encender/Apagar (8)
• Puerto del cargador (9)
• Conector Pop-Port™ (10)
• Micrófono (11)
■Teclas y partes
• Altavoz (1)
• Tecla Voz (2)
• Tecla Volumen (3)
• Pantalla delantera (4)
• Puerto para el conector del equipo auricular (5)
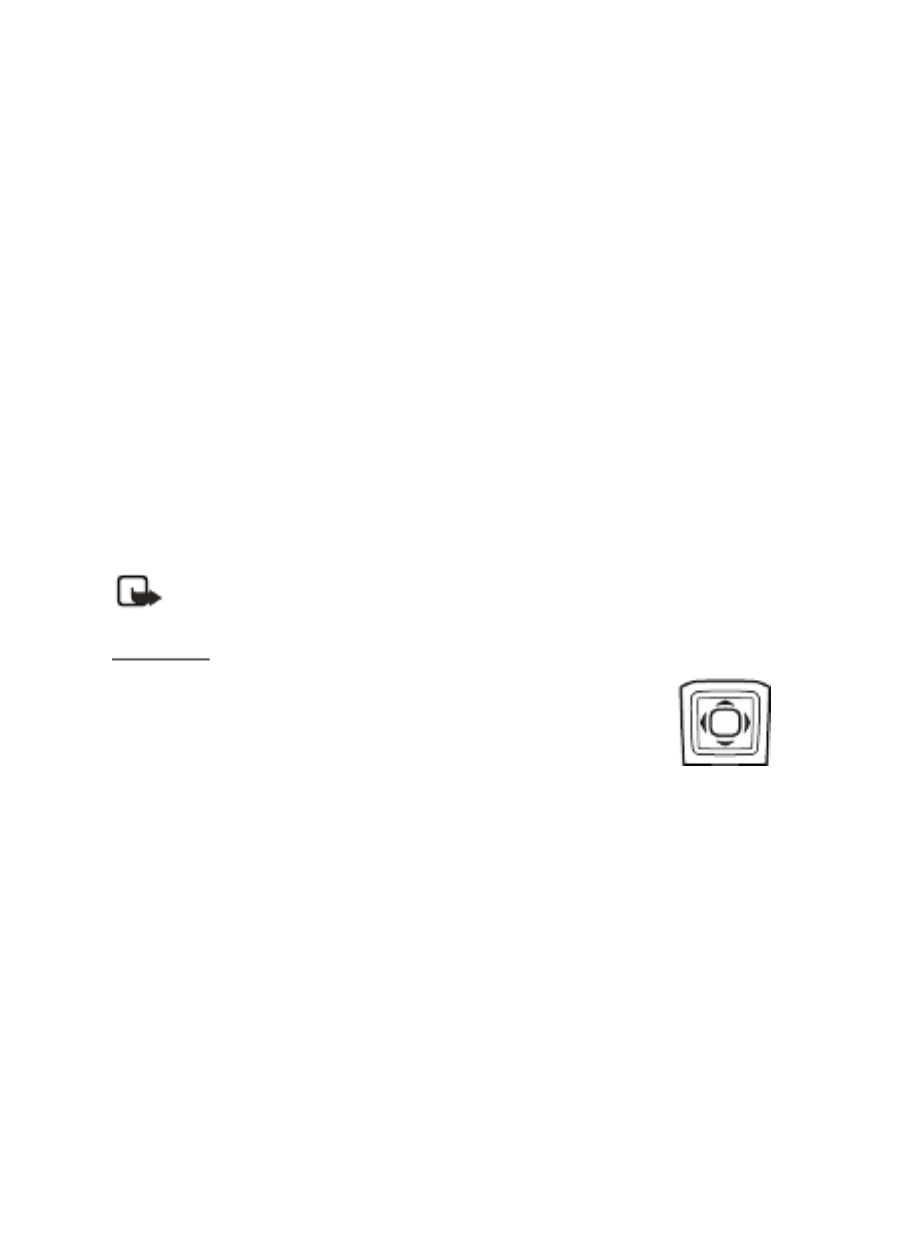
S u t e l é f o n o
106
• Mantener oprimida significa oprimir una tecla y mantenerla oprimida de 2 a 3
segundos y soltarla (tecleo sostenido).
• Use las teclas de selección para elegir una opción del menú. Para elegir una
opción, oprima la tecla de selección debajo del menú en la pantalla.
• Las teclas direccionales se usan para navegar por los menús hacia arriba,
abajo, izquierda o derecha.
• Teclas Llamar y Finalizar: Oprima la tecla Llamar para hacer o contestar una
llamada. Oprima la tecla Finalizar para terminar una llamada o regresar a la
modalidad inactiva (modo inactivo).
■Los menús del teléfono
Las funciones de su teléfono están agrupadas de acuerdo a la función y puede
accederlas por los menús principales. Cada menú principal tiene submenús y listas
desde las cuales puede elegir o ver ítems, y personalizar las funciones de su teléfono.
Para acceder a estos menús y submenús, use la tecla direccional o un acceso directo.
Puede cambiar la vista del menú de lista a cuadrícula. Elija Menú > > Opc. Vista
menú princ. > Lista o Cuadrícula.
Nota: Algunas funciones podrían no estar disponibles, dependiendo de
su red. Para más información, contacte a su proveedor de servicio móvil.
Recorrer
Puede usar la tecla direccional de cuatro sentidos para recorrer las
opciones hacia arriba, abajo, izquierda y derecha.
1. En la modalidad inactiva, elija Menú y recorra el menú principal
usando la tecla direccional.
Mientras recorre los menús, el número del menú aparece en la esquina superior
derecha de la pantalla. Debajo del indicador del nivel de la batería, se ve una barra
que oscila hacia arriba/abajo a la derecha de la pantalla al recorrer los menús, la
cual representa visualmente su posición actual en la estructura del menú.
2. Cuando llegue a un menú, oprima la tecla de selección intermedia para
escoger los submenús.
• Elija Atrás (la tecla de selección derecha) para regresar al menú anterior.
• Oprima la tecla Finalizar para regresar a la modalidad inactiva desde
cualquier menú o submenú.

S u t e l é f o n o
107
Ayuda durante la llamada
Muchas funciones tienen breves descripciones (texto de ayuda) que se pueden ver
en el teléfono. Para ver estas descripciones, deberá primero activar el texto de ayuda.
En la modalidad inactiva, elija Menú > > > Config. Teléfono Activación textos de
ayuda > Activar o Desactivar.
Recorra hasta una función y espere unos 14 segundos. Recorra hacia abajo para
ver toda la descripción, o elija Atrás para salir.
■Función de seguridad
La función de seguridad protege su dispositivo de llamadas salientes no autorizadas o
acceso a la información almacenada con códigos de bloqueo y de seguridad. El código
de bloqueo es un número de cuatro dígitos, y el código de seguridad tiene cinco
dígitos. Por programación predeterminada, la función de seguridad usa el código
de bloqueo (con programación predeterminada hasta los últimos cuatro dígitos
de su número telefónico) en lugar del código de seguridad para proteger su teléfono.
Deberá ingresar el código de bloqueo para acceder a las siguientes opciones
de Seguridad:
1. En la modalidad inactiva, elija Menú > Config.> Seguridad.
2. Ingrese el código de bloqueo, y elija OK. Ver "Configuraciones de seguridad,"
pág. 163.
Nota: Dependiendo de su proveedor de servicio móvil, el código de bloqueo
preconfigurado podría ser 1234 ó 0000 en lugar de los cuatro últimos
dígitos de su número telefónico. Si ninguno de estos funciona, póngase en
contacto con su proveedor de servicio móvil para pedir ayuda.
Por programación predeterminada, su dispositivo le requiere ingresar el código de
bloqueo para restaurar las configuraciones de fábrica.
1. En la modalidad inactiva, elija Menú > Config.> Restaurar config. fáb..
2. Ingrese el código de bloqueo, y elija OK. Ver "Cambiar código de bloqueo,"
pág. 164.
Nota: Dependiendo de su proveedor de servicio móvil, su dispositivo le
puede requerir que ingrese su código de seguridad (12345- programación
predeterminada) en lugar del código de bloqueo.

S u t e l é f o n o
108
■Funciones Ir a
El menú Ir a le permite cambiar la función de la tecla de selección izquierda en su
teléfono. Con esta función, puede acceder rápidamente a funciones de uso
frecuente desde el menú Ir a en la modalidad inactiva.
Elegir las funciones Ir a
1. En la modalidad inactiva, elija Ir a > Opc. > Selec. opciones.
2. Recorra verticalmente para resaltar la función deseada.
3. Elija Marcar para agregar una función, o Deshac. para eliminar una función.
4. Elija Listo cuando haya terminado de agregar todas las funciones deseadas.
5. Elija Sí para guardar los cambios.
6. En la modalidad inactiva, elija Ir a para mostrar una lista de las funciones que
eligió en el paso 2.
Organizar las funciones
1. En la modalidad inactiva, elija Ir a > Opc. > Organizar.
2. Recorra verticalmente para resaltar la función que desea reorganizar, y elija
Mover > Subir, Bajar, Mover al principio o Mover al final.
3. Elija Listo > Sí para guardar los cambios.
Specyfikacje produktu
| Marka: | Nokia |
| Kategoria: | smartfon |
| Model: | 3152 |
Potrzebujesz pomocy?
Jeśli potrzebujesz pomocy z Nokia 3152, zadaj pytanie poniżej, a inni użytkownicy Ci odpowiedzą
Instrukcje smartfon Nokia

26 Stycznia 2025
5 Października 2024
26 Września 2024
23 Września 2024
18 Września 2024
18 Września 2024
18 Września 2024
17 Września 2024
17 Września 2024
16 Września 2024
Instrukcje smartfon
- smartfon Sony
- smartfon Samsung
- smartfon AEG
- smartfon LG
- smartfon Motorola
- smartfon Xiaomi
- smartfon MyPhone
- smartfon Sharp
- smartfon Huawei
- smartfon TCL
- smartfon Lenovo
- smartfon TP-Link
- smartfon Philips
- smartfon SilverCrest
- smartfon Gigabyte
- smartfon Acer
- smartfon Realme
- smartfon Gigaset
- smartfon Geemarc
- smartfon Hisense
- smartfon Infiniton
- smartfon Panasonic
- smartfon Mio
- smartfon Asus
- smartfon Nedis
- smartfon Medion
- smartfon OK
- smartfon Audioline
- smartfon Toshiba
- smartfon Tesla
- smartfon Alcatel-Lucent
- smartfon Majestic
- smartfon Bluebird
- smartfon Garmin
- smartfon Blaupunkt
- smartfon Profoon
- smartfon Vivax
- smartfon Evolveo
- smartfon Alcatel
- smartfon Haier
- smartfon HP
- smartfon Hyundai
- smartfon Honeywell
- smartfon Honor
- smartfon Kodak
- smartfon ZTE
- smartfon MaxCom
- smartfon Dell
- smartfon Google
- smartfon Intex
- smartfon Oppo
- smartfon Kyocera
- smartfon Krüger&Matz
- smartfon Qilive
- smartfon Thomson
- smartfon Manta
- smartfon Apple
- smartfon NGS
- smartfon CRUX
- smartfon Emporia
- smartfon Nevir
- smartfon Mitsubishi
- smartfon Razer
- smartfon GoClever
- smartfon SPC
- smartfon Intermec
- smartfon NEC
- smartfon Polaroid
- smartfon Prestigio
- smartfon Aiwa
- smartfon Sanyo
- smartfon Telefunken
- smartfon OnePlus
- smartfon Amazon
- smartfon Olympia
- smartfon Microsoft
- smartfon Bush
- smartfon HTC
- smartfon CAT
- smartfon Denver
- smartfon Saiet
- smartfon Albrecht
- smartfon RCA
- smartfon Media-Tech
- smartfon BenQ
- smartfon Trevi
- smartfon Lexibook
- smartfon Overmax
- smartfon Micromax
- smartfon Sencor
- smartfon NUU Mobile
- smartfon Alecto
- smartfon Binatone
- smartfon Hammer
- smartfon Allview
- smartfon Oukitel
- smartfon Best Buy
- smartfon Cyrus
- smartfon Kazam
- smartfon Tecdesk
- smartfon KPN
- smartfon Swissvoice
- smartfon I.safe Mobile
- smartfon TrekStor
- smartfon Brondi
- smartfon Fysic
- smartfon Wiko
- smartfon Yarvik
- smartfon Aligator
- smartfon Amplicomms
- smartfon AQISTON
- smartfon Amplicom
- smartfon Archos
- smartfon Androidtech
- smartfon Crosscall
- smartfon Ecom
- smartfon Sony Ericsson
- smartfon Vestel
- smartfon Sonim
- smartfon Energy Sistem
- smartfon Doro
- smartfon Sagem
- smartfon Lava
- smartfon Blu
- smartfon Easypix
- smartfon Konrow
- smartfon Brigmton
- smartfon Sunstech
- smartfon Aspera
- smartfon Sunny
- smartfon Nordmende
- smartfon Blackberry
- smartfon Vivo
- smartfon Wolder
- smartfon NGM
- smartfon Vodafone
- smartfon Switel
- smartfon InFocus
- smartfon GreatCall
- smartfon XD
- smartfon Pantech
- smartfon Alba
- smartfon RugGear
- smartfon Umidigi
- smartfon AT&T
- smartfon Mpman
- smartfon Bury
- smartfon Logicom
- smartfon Karbonn
- smartfon Palm
- smartfon Hannspree
- smartfon Phicomm
- smartfon Plum
- smartfon Lumigon
- smartfon Infinix
- smartfon Keneksi
- smartfon Klipad
- smartfon Iget
- smartfon T-Mobile
- smartfon JCB
- smartfon Casper
- smartfon Unnecto
- smartfon Wileyfox
- smartfon ITT
- smartfon Yota
- smartfon Avus
- smartfon Spice
- smartfon Wolfgang
- smartfon BQ
- smartfon ORA
- smartfon Danew
- smartfon Echo
- smartfon Primux
- smartfon Tiptel
- smartfon UTStarcom
- smartfon Zipy
- smartfon Mediacom
- smartfon Beafon
- smartfon BGH
- smartfon Billow
- smartfon Telstra
- smartfon Ulefone
- smartfon CSL
- smartfon ToughGear
- smartfon Benefon
- smartfon Komu
- smartfon Doogee
- smartfon Energizer
- smartfon Tremay
- smartfon Kurio
- smartfon Piranha
- smartfon Coolpad
- smartfon Syco
- smartfon TAG Heuer
- smartfon Mobistel
- smartfon Itel
- smartfon Garmin-Asus
- smartfon Handheld
- smartfon Fero
- smartfon AT Telecom
- smartfon Xtreamer
- smartfon Verykool
- smartfon O2
- smartfon General Mobile
- smartfon Mustang
- smartfon Kogan
- smartfon Pharos
- smartfon Storex
- smartfon Fairphone
- smartfon Freeman
- smartfon HomTom
- smartfon Leotec
- smartfon Auro
- smartfon Maxx
- smartfon ITTM
- smartfon Posh Mobile
- smartfon THL
- smartfon NGM-Mobile
- smartfon POCO
- smartfon Nothing
- smartfon Lark
- smartfon Senifone
- smartfon Tecno
- smartfon Telme
- smartfon UMi
- smartfon Olitech
- smartfon Mobiola
- smartfon Meizu
- smartfon Neffos
- smartfon Gionee
- smartfon TIM
- smartfon Cubot
- smartfon Leagoo
- smartfon NTech
- smartfon Nubia
- smartfon LeEco
- smartfon GSmart
- smartfon Bea-fon
- smartfon Opticon
- smartfon EStar
- smartfon Facom
- smartfon Jitterbug
- smartfon Custom
- smartfon Aplic
- smartfon HMD
- smartfon Opis
- smartfon Volla
- smartfon Nothing Tech
- smartfon Maxwest
- smartfon Kalley
Najnowsze instrukcje dla smartfon

2 Kwietnia 2025

30 Marca 2025
10 Marca 2025
7 Marca 2025
5 Marca 2025
5 Marca 2025
3 Marca 2025

2 Marca 2025

26 Lutego 2025
26 Lutego 2025