Instrukcja obsługi Netgear Nighthawk RAXE500
Przeczytaj poniżej 📖 instrukcję obsługi w języku polskim dla Netgear Nighthawk RAXE500 (170 stron) w kategorii router. Ta instrukcja była pomocna dla 5 osób i została oceniona przez 2 użytkowników na średnio 4.5 gwiazdek
Strona 1/170

User Manual
Nighthawk AXE10000 Tri-Band WiFi 6E
Router (Model RAXE450)
Nighthawk AXE11000 Tri-Band WiFi 6E
Router (Model RAXE500)
NETGEAR, Inc.
350 E. Plumeria DriveFebruary 2022
San Jose, CA 95134, USA202-12212-02

Support and Community
Visit netgear.com/support to get your questions answered and access the latest
downloads.
You can also check out our NETGEAR Community for helpful advice at
community.netgear.com.
Regulatory and Legal
Si ce produit est vendu au Canada, vous pouvez accéder à ce document en français
canadien à https://www.netgear.com/support/download/.
(If this product is sold in Canada, you can access this document in Canadian French at
https://www.netgear.com/support/download/.)
For regulatory compliance information including the EU Declaration of Conformity, visit
https://www.netgear.com/about/regulatory/.
See the regulatory compliance document before connecting the power supply.
For NETGEAR’s Privacy Policy, visit https://www.netgear.com/about/privacy-policy.
By using this device, you are agreeing to NETGEAR’s Terms and Conditions at
https://www.netgear.com/about/terms-and-conditions. If you do not agree, return the
device to your place of purchase within your return period.
Do not use this device outdoors.
Applicable to 6 GHz devices only: Only use the device indoors. The operation of 6 GHz
devices is prohibited on oil platforms, cars, trains, boats, and aircraft, except that
operation of this device is permitted in large aircraft while ying above 10,000 feet.
Operation of transmitters in the 5.925-7.125 GHz band is prohibited for control of or
communications with unmanned aircraft systems.
Trademarks
Trademarks© NETGEAR, Inc., NETGEAR, and the NETGEAR Logo are trademarks of
NETGEAR, Inc. Any non-NETGEAR trademarks are used for reference purposes only.
2
Nighthawk AXE10000/AXE11000 Tri-Band WiFi 6E Router Model RAX450/RAX500

Contents
Chapter 1 Hardware Setup
Unpack your router...............................................................................9
Top panel LEDs and buttons.............................................................10
Rear panel............................................................................................13
Router label.........................................................................................14
Extend the antennas...........................................................................15
Position your router............................................................................15
Connect your router to a modem.....................................................16
Wall-mount your router.....................................................................18
Chapter 2 Connect to the network and access the router
Connect to the router network.........................................................20
Connect to the router using a wired connection.......................20
Connect to the router WiFi network............................................20
Connect to the WiFi network using WPS....................................20
Types of logins....................................................................................21
Install and manage your router with the Nighthawk app..............21
Use a web browser to access the router..........................................22
Automatic Internet setup..............................................................22
Log in to the router........................................................................24
Change the language........................................................................24
Chapter 3 Specify Your Internet Settings
Use the Internet Setup Wizard..........................................................27
Manually set up the Internet connection.........................................27
Specify an Internet connection without a login..........................27
Specify an Internet connection that uses a login.......................29
Manage a Multi-Gig Internet connection........................................31
Get Multi-Gig Internet with the Multi-Gig port...........................32
Get Multi-Gig Internet with Internet port aggregation.............32
Specify IPv6 Internet connections....................................................34
Requirements for entering IPv6 addresses.................................34
Use auto detect for an IPv6 Internet connection........................35
Set up an IPv6 6to4 tunnel Internet connection.........................36
Set up an IPv6 pass-through Internet connection......................37
Set up an IPv6 xed Internet connection....................................38
3

Set up an IPv6 DHCP Internet connection..................................39
Set up an IPv6 PPPoE Internet connection..................................41
Use auto cong for an IPv6 Internet connection........................42
Set up an IPv6 6rd Internet connection.......................................44
Manage the MTU size.........................................................................46
MTU concepts.................................................................................46
Change the MTU size....................................................................47
Chapter 4 Control Access to the Internet
Manage NETGEAR Armor.................................................................49
Activate Armor using the Nighthawk app...................................49
View or change your NETGEAR Armor settings using the
Nighthawk app...............................................................................49
Enable access control to allow or block access to the Internet....50
Use keywords to block Internet sites...............................................51
Delete keywords from the blocked list............................................52
Block services from the Internet.......................................................53
Prevent blocking on a trusted computer.........................................54
Manage network access control lists...............................................55
Schedule when to block Internet sites and services......................55
Set up security event email notications.........................................56
Chapter 5 Manage Network Settings
View or change the WAN settings....................................................60
Set up a default DMZ server..............................................................61
Change the router’s device name....................................................62
Change the LAN TCP/IP settings......................................................62
Specify the IP addresses that the router assigns............................64
Disable the DHCP server feature in the router...............................65
Manage reserved LAN IP addresses................................................66
Reserve an IP address....................................................................66
Edit a reserved IP address............................................................67
Delete a reserved IP address entry..............................................68
Use the WPS Wizard for WiFi connections......................................68
Specify basic WiFi settings................................................................69
Change the WiFi mode......................................................................71
Change the WiFi mode if AX WiFi is enabled............................71
Change the WiFi mode if AX WiFi is disabled...........................73
Change the WiFi password or the WiFi security.............................74
Set up a guest WiFi network.............................................................76
Control the WiFi radios......................................................................78
Use the WiFi On/Off button..........................................................78
Enable or disable the WiFi radios................................................79
Enable or disable AX WiFi.................................................................79
4
Nighthawk AXE10000/AXE11000 Tri-Band WiFi 6E Router Model RAX450/RAX500

Enable or disable 20/40 MHz coexistence for the 2.4 GHz radio.80
Enable or disable OFDMA................................................................81
Change the transmission power control.........................................82
Set up a WiFi schedule.......................................................................83
Set up a bridge for a port group or VLAN tag group....................84
Set up a bridge for a port group..................................................84
Set up a bridge for a VLAN tag group........................................85
Set up an IPTV port........................................................................86
Manage custom static routes............................................................87
Set up a static route.......................................................................88
Edit a static route...........................................................................89
Delete a static route.......................................................................90
Enable or disable implicit beamforming.........................................91
Enable or disable MU-MIMO............................................................91
Enable or disable Smart Connect.....................................................92
Improve network connections with Universal Plug and Play........93
Set up the router as a WiFi access point..........................................94
Return the router to router mode.....................................................95
Set up the router in bridge mode....................................................96
Manage Ethernet port aggregation to a LAN device....................97
Set up Ethernet port aggregation to a LAN device...................98
View or change the router Ethernet port aggregation mode...99
Chapter 6 Manage Your Router
Update the router rmware............................................................102
Check for new rmware and update the router......................102
Manually upload rmware to the router...................................103
Manage the rmware update settings......................................104
Change the admin password..........................................................104
Enable admin password reset........................................................105
Reset the admin password..............................................................106
View information about the router and the Internet and WiFi
settings 107...............................................................................................
Display the statistics of the Internet port.......................................107
Check the Internet connection status............................................109
View and manage logs of router activity.......................................110
View devices currently on the network..........................................111
Monitor Internet trafc.....................................................................111
Manage the router conguration le.............................................113
Back up the settings....................................................................113
Erase the settings.........................................................................113
Restore the settings.....................................................................114
Connect to your router with Anywhere Access............................115
Disable LED blinking or turn off LEDs............................................115
5
Nighthawk AXE10000/AXE11000 Tri-Band WiFi 6E Router Model RAX450/RAX500

Set your time zone............................................................................116
Set the NTP server............................................................................116
Specify ReadyDLNA media server settings...................................117
Return the router to its factory default settings............................118
Use the Reset button...................................................................118
Erase the settings.........................................................................119
Chapter 7 Share USB Storage Devices Attached to the Router
USB device requirements................................................................121
Connect a USB storage device to the router................................121
Access a storage device connected to the router from a
Windows-based computer..............................................................122
Map a USB device to a Windows network drive...........................122
Access a storage device that is connected to the router from a
Mac 123.....................................................................................................
Enable FTP access within your network.........................................124
View network folders on a storage device....................................124
Add a network folder on a USB storage device...........................125
Edit a network folder on a USB storage device............................126
Safely remove a USB storage device.............................................127
Chapter 8 Use Dynamic DNS to Access USB Storage Devices
Through the Internet
Set up and manage Dynamic DNS.................................................130
Set up a new Dynamic DNS account.........................................130
Specify a DNS account that you already created.....................131
Change the Dynamic DNS settings...........................................132
Your personal FTP server................................................................132
Set up your personal FTP server................................................133
Set up FTP access through the Internet....................................133
Set up HTTPS access through the Internet....................................134
Access USB storage devices through the Internet.......................135
Chapter 9 Use OpenVPN to Access Your Network
About VPN connections..................................................................138
Enable OpenVPN service in the router..........................................139
LAN IP addressing in VPN networks..............................................140
Install OpenVPN software on a VPN client....................................140
Install OpenVPN software on a Windows-based computer....141
Install OpenVPN software on a Mac computer........................142
Install OpenVPN software on an iOS device............................143
Install OpenVPN software on an Android device....................144
Use VPN to access your Internet service at home........................145
Allow VPN client Internet access in the router.........................145
6
Nighthawk AXE10000/AXE11000 Tri-Band WiFi 6E Router Model RAX450/RAX500

Block VPN client Internet access in the router.........................146
Use VPN to remotely access a USB storage device attached to the
router 147.................................................................................................
Chapter 10 Manage port forwarding and port triggering
Manage port forwarding to a local server.....................................149
Set up port forwarding to a local server...................................149
Add a custom port forwarding service.....................................150
Edit a port forwarding service....................................................151
Delete a port forwarding entry..................................................152
Application example: Make a local web server public...........152
How the router implements the port forwarding rule.............153
Port triggering..................................................................................153
Add a port triggering service.....................................................154
Enable port triggering................................................................155
Application example: Port triggering for Internet relay chat port
triggering 155......................................................................................
Chapter 11 Troubleshooting
Quick tips...........................................................................................158
Sequence to restart your network.............................................158
Check the power adapter and Ethernet cable connections...158
Check the WiFi settings..............................................................158
Check the network settings........................................................158
Troubleshoot with the LEDs............................................................159
Standard LED behavior when the router is powered on........159
Power LED is off or blinking.......................................................159
LEDs never turn off......................................................................159
Internet or Ethernet LAN port LEDs are off..............................160
WiFi LED is off..............................................................................160
You cannot log in to the router.......................................................160
You cannot access the Internet.......................................................161
Troubleshoot Internet browsing.....................................................163
Changes are not saved....................................................................163
Troubleshoot WiFi connectivity......................................................164
Troubleshoot your network using the ping utility........................164
Test the LAN path to your router...............................................164
Test the path from a Windows-based computer to a remote
device 165............................................................................................
Chapter 12 Supplemental Information
Factory settings.................................................................................168
Technical specications...................................................................169
7
Nighthawk AXE10000/AXE11000 Tri-Band WiFi 6E Router Model RAX450/RAX500

1
Hardware Setup
This chapter contains the following sections:
• Unpack your router
• Top panel LEDs and buttons
• Rear panel
• Router label
• Extend the antennas
• Position your router
• Connect your router to a modem
• Wall-mount your router
For more information about the topics covered in this manual, visit the support website
at netgear.com/support.
8
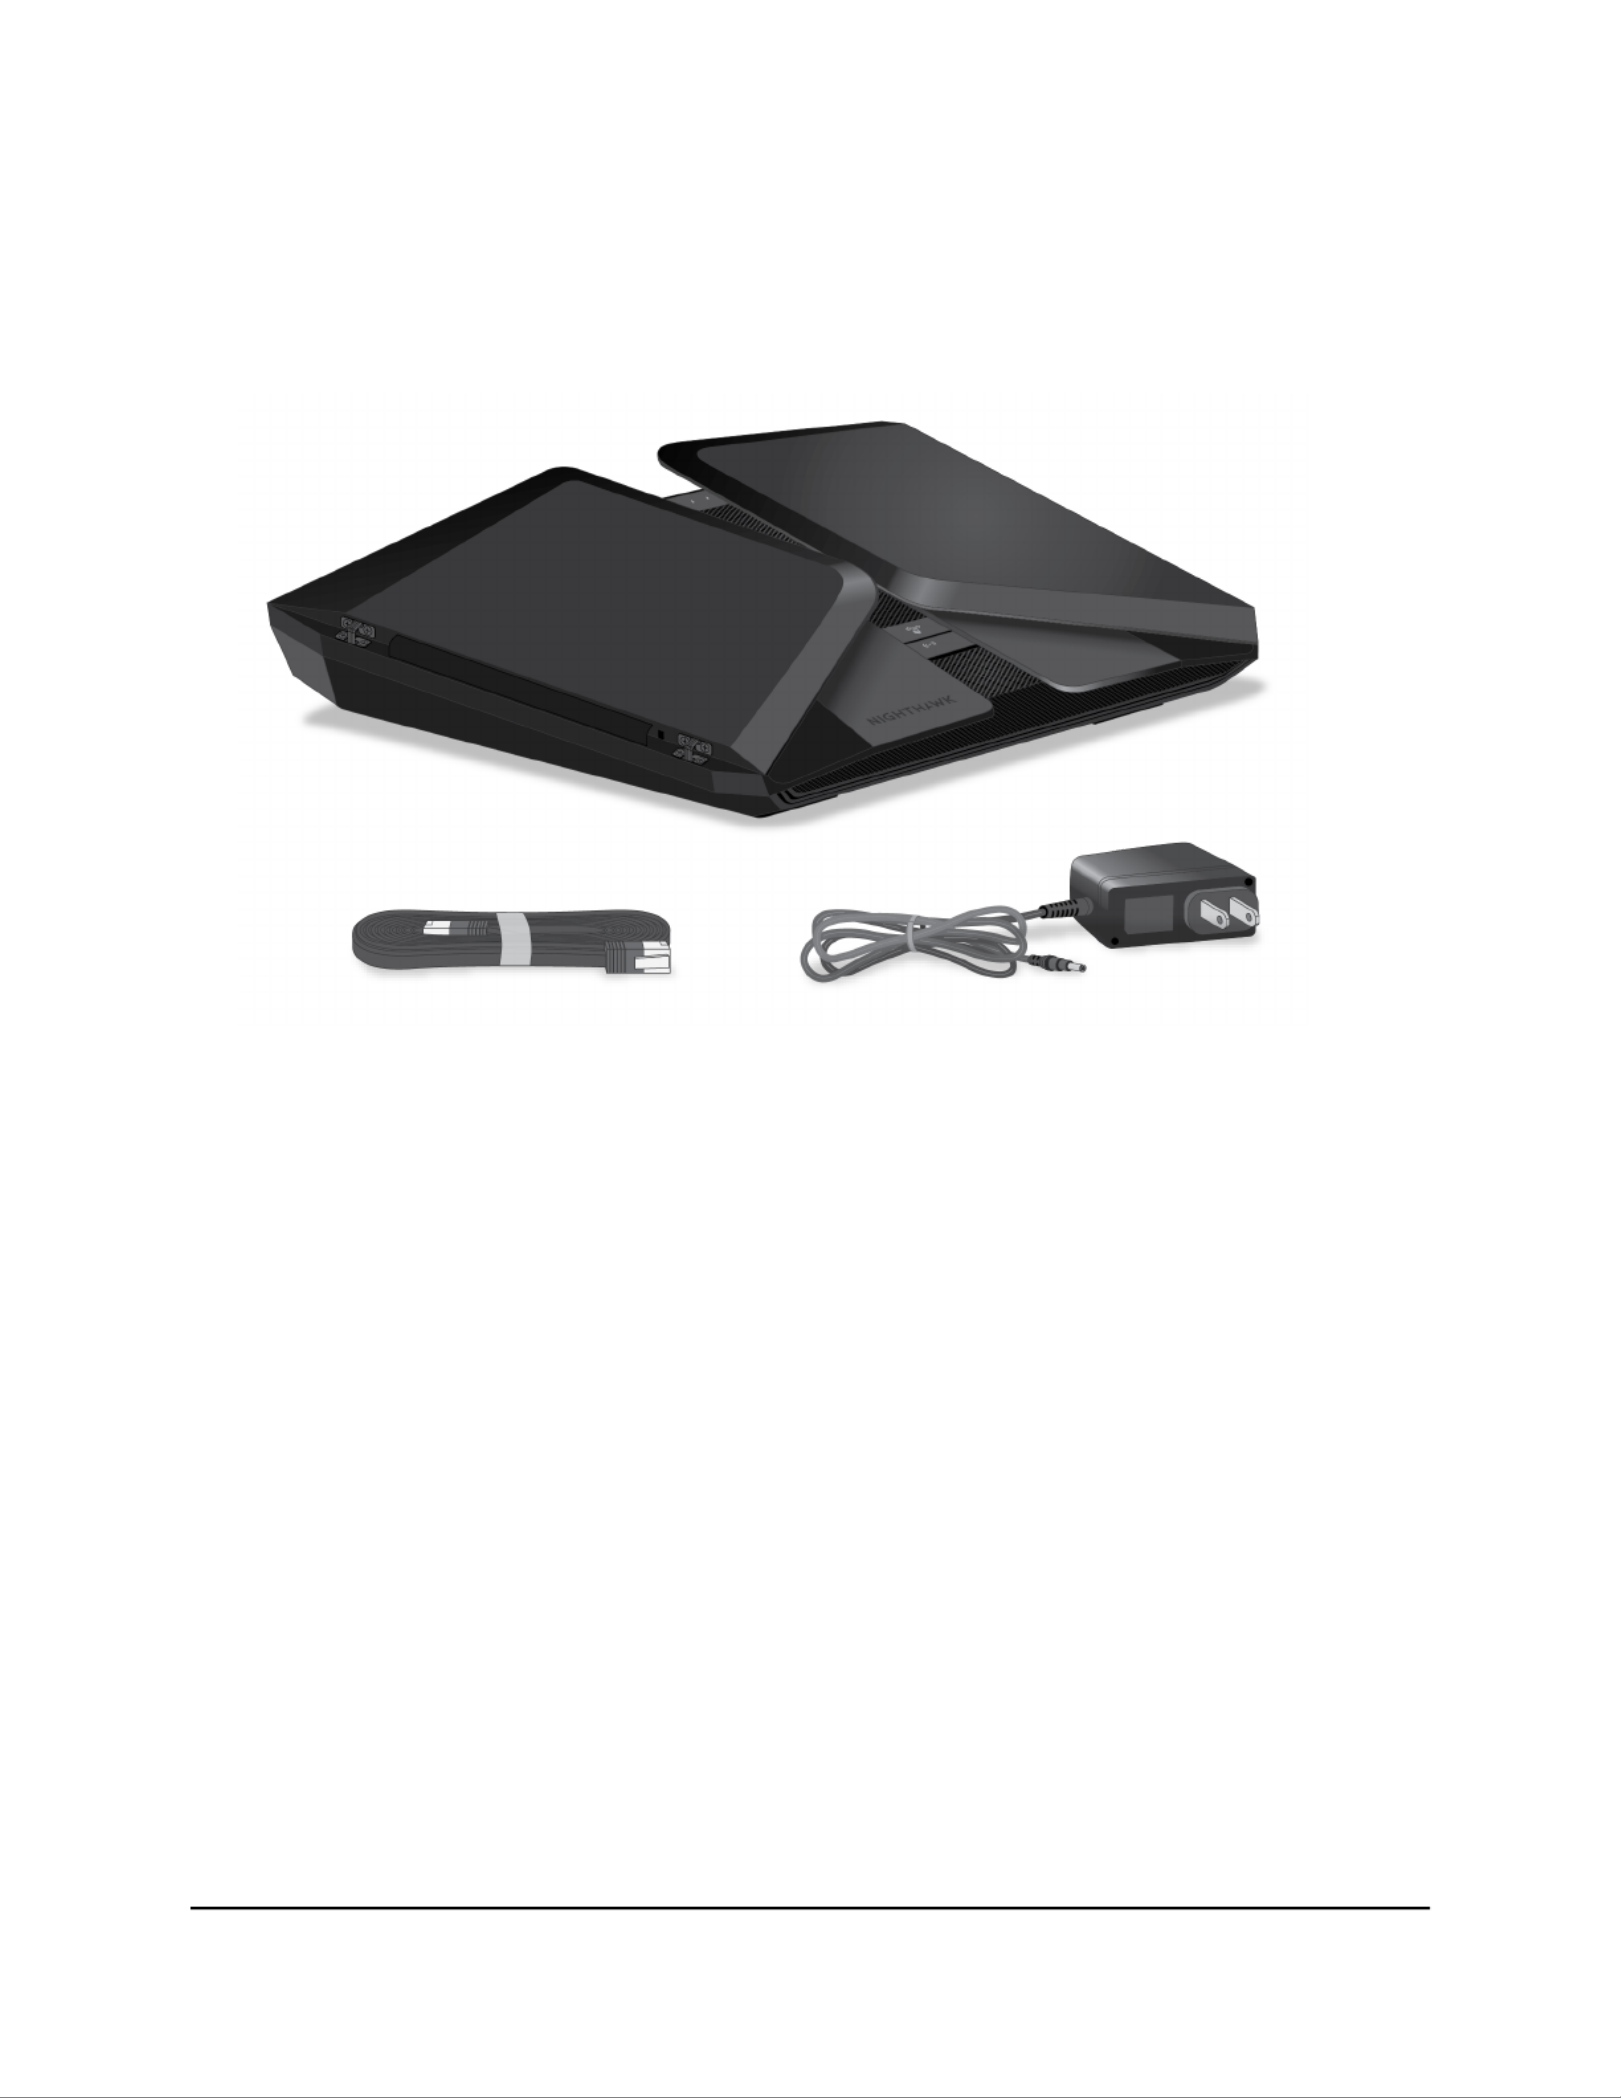
Unpack your router
Your package contains the router, the power adapter, and an Ethernet cable.
Figure 1. Package contents
User Manual9Hardware Setup
Nighthawk AXE10000/AXE11000 Tri-Band WiFi 6E Router Model RAX450/RAX500

Top panel LEDs and buttons
The status LEDs and two buttons are located on the top panel of the router.
Figure 2. Top view
Table 1. LED descriptions
DescriptionLED and Button
Solid white. The router is ready.
Blinking white Reset. The router is not ready, rmware is upgrading, or the
button was pressed.
Off. Power is not supplied to the router.
Power LED
Solid white. The Internet connection is ready.
Blinking white. The port is sending or receiving trafc.
Off. No Ethernet cable is connected between the router and the modem.
Internet LED
User Manual10Hardware Setup
Nighthawk AXE10000/AXE11000 Tri-Band WiFi 6E Router Model RAX450/RAX500

Table 1. LED descriptions (Continued)
DescriptionLED and Button
Solid white. The 6 GHz WiFi radio is operating.
Blinking white. The router is sending or receiving WiFi trafc.
Off. The 6 GHz WiFi radio is off.
6 GHz WiFi LED
Solid white. The 5 GHz WiFi radio is operating.
Blinking white. The router is sending or receiving WiFi trafc.
Off. The 5 GHz WiFi radio is off.
5 GHz WiFi LED
Solid white. The 2.4 GHz WiFi radio is operating.
Blinking white. The router is sending or receiving WiFi trafc.
Off. The 2.4 GHz WiFi radio is off.
2.4 GHz WiFi LED
The LED color indicates the speed: white for a 2.5 Gbps connection (Multi-Gig
Internet port only) and amber for a 1 Gbps, 100 Mbps, or 10 Mbps Ethernet
connection.
Solid white. The router detected a 2.5 Gbps link with a powered-on device.
Blinking white. The port is sending or receiving trafc at 2.5 Gbps.
Solid amber. The router detected a 1 Gbps, 100 Mbps, or 10 Mbps link with a
powered-on device.
Blinking amber. The port is sending or receiving trafc at 1 Gbps, 100 Mbps,
or 10 Mbps link.
Off. No device is connected to this Ethernet port.
Multi-Gig 2.5G/1G Ethernet
port 5 LED
The LED color indicates the speed: white for Gigabit Ethernet connections and
amber for 100 Mbps or 10 Mbps Ethernet connections.
Solid white. The router detected a 1 Gbps link with a powered-on device.
Blinking white. The port is sending or receiving trafc at 1 Gbps.
Solid amber. The router detected a 100 Mbps or 10 Mbps link with a powered-on
device.
Blinking amber. The port is sending or receiving traffic at 100 Mbps or 10 Mbps.
Off. No device is connected to this Ethernet port.
Ethernet ports 1–4 LEDs
Solid white. A USB device is connected to USB 3.0 port 1 and is ready.
Blinking white. A USB device is plugged in to USB 3.0 port 1 and is trying to
connect.
Off. No USB device is connected to USB 3.0 port 1, or someone clicked the
Safely Remove Hardware button and it is now safe to remove the attached
USB device.
USB 3.0 port 1 LED
User Manual11Hardware Setup
Nighthawk AXE10000/AXE11000 Tri-Band WiFi 6E Router Model RAX450/RAX500

Table 1. LED descriptions (Continued)
DescriptionLED and Button
Solid white. A USB device is connected to USB 3.0 port 2 and is ready.
Blinking white. A USB device is plugged in to USB 3.0 port 2 and is trying to
connect.
Off Safely Remove. No USB device is connected, or someone clicked the
Hardware button and it is now safe to remove the attached USB device.
USB 3.0 port 2 LED
Pressing the button for two seconds turns WiFi LED and WiFi radios onWiFi
and off.
If this LED is lit, the WiFi radios are on. If this LED is off, the WiFi radios are turned
off and you cannot use WiFi to connect to the router.
WiFi LED
Pressing the button lets your WPS-enabled device join your router's WiFiWPS
network without typing the WiFi password. The WPS LED blinks white during
the WPS process and then lights solid white when the WPS-enabled device
connects to your router's WiFi network.
WPS LED
Note: LED On/OffIf the switch on the rear panel is moved to the Off position, all the
LEDs except the LED are turned off.Power
User Manual12Hardware Setup
Nighthawk AXE10000/AXE11000 Tri-Band WiFi 6E Router Model RAX450/RAX500

Rear panel
The following gure shows the rear panel connectors and buttons.
Figure 3. Rear panel
The rear panel contains the following components:
1. . Move the switch to the Off position to turn off theLED On/Off switch LED On/Off
router LEDs. The Power LED stays lit even if the switch is in the OffLED On/Off
position.
2. . Pressing the button resets the router.Reset button Reset
If the button is pressed for at least 10 seconds and the Power LED blinks white,Reset
the router returns to its factory settings. For information about the factory settings,
see Factory settings on page 168.
3. . Use the two USB 3.0 ports to connect USB storage devicesUSB 3.0 ports 1 and 2
to your router.
4. . One Gigabit Ethernet RJ-45 WAN port to connect your router to anInternet port
Internet modem such as a cable modem or DSL modem.
If you do not use the Internet port for your Internet connection (for example, if you
set up a Multi-Gig Internet connection using the Multi-Gig 2.5G/1G Ethernet port
5), you can use the Internet port as an extra LAN port.
User Manual13Hardware Setup
Nighthawk AXE10000/AXE11000 Tri-Band WiFi 6E Router Model RAX450/RAX500

5. . Use the four Gigabit Ethernet RJ-45 LAN ports to connect EthernetEthernet ports
LAN devices to your router.
The router supports port aggregation:
•Internet (WAN) aggregation. Use Ethernet port 1 with the Internet port to set
up a Multi-Gig Internet connection with port aggregation. For more information,
see Get Multi-Gig Internet with Internet port aggregation on page 32.
•LAN aggregation. Use Ethernet ports 3 and 4 to set up a port aggregation link
to a LAN device that also supports Ethernet port aggregation. For more
information, see Manage Ethernet port aggregation to a LAN device on page
97.
You can set up both Internet (WAN) aggregation and LAN aggregation.
6. . Use a Category 5e (Cat5e) Ethernet cable orMulti-Gig 2.5G/1G Ethernet port 5
higher rated Ethernet cable to connect a high-speed modem for a high-speed
Internet connection. For more information, see Get Multi-Gig Internet with the
Multi-Gig port on page 32.
If you do not use the Multi-Gig port for an Internet connection, you can connect a
high-speed LAN device such as a Multi-Gig Ethernet switch to the port.
7. . Press the button to provide power to thePower On/Off button Power On/Off
router.
8. DC power connector. Connect the power adapter that came in your product package
to the DC power connector.
Router label
The router label shows the login information, WiFi Network Name (SSID), network key
(password), serial number, and MAC address.
The following images are examples of what your router label might look like:
Figure 4. RAXE450 router label
User Manual14Hardware Setup
Nighthawk AXE10000/AXE11000 Tri-Band WiFi 6E Router Model RAX450/RAX500

Figure 5. RAXE500 router label
Extend the antennas
Before you install your router, extend the antennas as shown in the following gure.
Figure 6. Position the antennas
Position your router
The router lets you access your network anywhere within the operating range of your
WiFi network. However, the operating distance or range of your WiFi connection can
vary signicantly depending on the physical placement of your router.
In addition, position your router according to the following guidelines:
•Place your router near the center of the area where your computers and other devices
operate, and within line of sight to your WiFi devices.
•Make sure that the router is within reach of an AC power outlet and near Ethernet
cables for wired computers.
•Place the router in an elevated location, minimizing the number walls and ceilings
between the router and your other devices.
User Manual15Hardware Setup
Nighthawk AXE10000/AXE11000 Tri-Band WiFi 6E Router Model RAX450/RAX500

•Place the router away from electrical devices such as these:
- Ceiling fans
- Home security systems
- Microwaves
- Computers
- Base of a cordless phone
- 2.4 GHz or 5 GHz cordless phones
•Place the router away from large metal surfaces, large glass surfaces, insulated walls,
and items such as these:
- Solid metal door
- Aluminum studs
- Fish tanks
- Mirrors
- Brick
- Concrete
The following factors might limit the range of your WiFi:
•The thickness and number of walls the WiFi signal passes through can limit the range.
•Other WiFi access points in and around your home might affect your router’s signal.
WiFi access points are routers, repeaters, WiFi range extenders, and any other
devices that emit a WiFi signal for network access.
Connect your router to a modem
Before you can set up your router, you need to connect it to your existing modem.
Note: If your Internet connection does not require a modem, you can connect your
main Internet Ethernet cable to your router.
User Manual16Hardware Setup
Nighthawk AXE10000/AXE11000 Tri-Band WiFi 6E Router Model RAX450/RAX500

After you connected your router to a modem and powered it on, nish your router's
installation process using the Nighthawk app or router web interface. For more
information, see Connect to the network and access the router on page 19.
Figure 7. Router connected to a modem
To connect your router to a modem and power it on:
1. If you own a modem, unplug the power from your modem, remove and reinsert the
modem's backup battery if it uses one, and then plug the modem back in.
2. Use the Ethernet cable that came with your router to connect an Ethernet port on
the modem to the yellow Internet port on the router.
Note: If your Internet connection does not require a modem, connect your main
Ethernet cable to the yellow Internet port on the router.
3. Connect the power adapter to your router and plug the power adapter into a power
outlet.
4. If the Power LED does not automatically light, press the button onPower On/Off
the rear panel of the router.
The router’s Power LED lights solid white when the router is ready.
User Manual17Hardware Setup
Nighthawk AXE10000/AXE11000 Tri-Band WiFi 6E Router Model RAX450/RAX500

2
Connect to the network and access
the router
You can connect to the router’s WiFi networks or use a wired Ethernet connection. This
chapter explains the ways you can connect and how to access the router and log in.
The chapter contains the following sections:
• Connect to the router network
• Types of logins
• Install and manage your router with the Nighthawk app
• Use a web browser to access the router
• Change the language
19

4. In the upper right corner, select a language from the menu.
5. When prompted, click the button to conrm this change.OK
The page refreshes with the language that you selected.
User Manual25Connect to the network and
access the router
Nighthawk AXE10000/AXE11000 Tri-Band WiFi 6E Router Model RAX450/RAX500

Note: For information about port aggregation to a LAN device, see Manage Ethernet
port aggregation to a LAN device on page 97.
To set up Internet port aggregation, you need the following:
•A service provider that offers an Internet speed that’s over 1 Gbps.
•A modem that support both an Internet speed that’s over 1 Gbps and two Ethernet
ports that support static Link Aggregation Control Protocol (LACP), for example, a
NETGEAR Nighthawk multi-speed cable modem, model CM1200.
To set up Internet port aggregation:
1. Set up Internet port aggregation on your modem.
For information about how to set up Internet port aggregation on your modem, see
the documentation that came with your modem.
2. Log in to your router and enable Internet port aggregation:
a. Launch a web browser from a computer or mobile device that is connected to
the router network.
b. Enter .http://www.routerlogin.net
A login window opens.
c. Enter the router admin user name and password.
The user name is . The password is the one that you specied the rst timeadmin
that you logged in. The user name and password are case-sensitive.
The BASIC Home page displays.
d. Select .Internet
The Internet Setup page displays.
e. In the section, select theWAN Preference Multi-Gig Internet (1 Gbps + 1 Gbps)
radio button.
f. Click the button.Apply
Your settings are saved.
3. Connect the Internet port and Ethernet port 1 on your router to two Ethernet ports
on your modem.
User Manual33Specify Your Internet Settings
Nighthawk AXE10000/AXE11000 Tri-Band WiFi 6E Router Model RAX450/RAX500

Specify IPv6 Internet connections
You can set up an IPv6 Internet connection if the router does not detect it automatically.
To set up an IPv6 Internet connection:
1. Launch a web browser from a computer or mobile device that is connected to the
router network.
2. Enter .http://www.routerlogin.net
A login window opens.
3. Enter the router admin user name and password.
The user name is . The password is the one that you specied the rst timeadmin
that you logged in. The user name and password are case-sensitive.
The BASIC Home page displays.
4. Select .ADVANCED > Advanced Setup > IPv6
The IPv6 page displays.
5. From the menu, select the IPv6 connection type:Internet Connection Type
•If you are not sure, select so that the router detects the IPv6 typeAuto Detect
that is in use.
•If your Internet connection does not use PPPoE or DHCP, or is not xed, but is
IPv6, select .Auto Cong
If you are not sure about your type of IPv6 connection, you can also ask your Internet
service provider (ISP).
6. Click the button.Apply
Your settings are saved.
Requirements for entering IPv6 addresses
IPv6 addresses are denoted by eight groups of hexadecimal quartets that are separated
by colons. You can reduce any four-digit group of zeros within an IPv6 address to a
single zero or omit it. The following errors invalidate an IPv6 address:
•More than eight groups of hexadecimal quartets
•More than four hexadecimal characters in a quartet
•More than two colons in a row
User Manual34Specify Your Internet Settings
Nighthawk AXE10000/AXE11000 Tri-Band WiFi 6E Router Model RAX450/RAX500
Specyfikacje produktu
| Marka: | Netgear |
| Kategoria: | router |
| Model: | Nighthawk RAXE500 |
Potrzebujesz pomocy?
Jeśli potrzebujesz pomocy z Netgear Nighthawk RAXE500, zadaj pytanie poniżej, a inni użytkownicy Ci odpowiedzą
Instrukcje router Netgear

12 Stycznia 2025
11 Stycznia 2025
15 Października 2024
10 Października 2024
10 Października 2024
9 Października 2024
9 Października 2024
8 Października 2024
3 Października 2024
3 Października 2024
Instrukcje router
- router Samsung
- router Tenda
- router AEG
- router Motorola
- router Xiaomi
- router Huawei
- router TCL
- router TP-Link
- router Milwaukee
- router Gigabyte
- router Acer
- router Bosch
- router Hikvision
- router Roland
- router Nokia
- router Toolcraft
- router Festool
- router EZVIZ
- router Conceptronic
- router StarTech.com
- router Asus
- router Medion
- router Black & Decker
- router TRENDnet
- router MSI
- router D-Link
- router ATen
- router Siemens
- router Thrustmaster
- router DeWalt
- router Einhell
- router Alcatel
- router Sigma
- router HP
- router Teltonika
- router Silverline
- router Manhattan
- router Strong
- router Makita
- router Mikrotik
- router Cisco
- router Moxa
- router Synology
- router Gembird
- router ZTE
- router Lindy
- router Zebra
- router ZyXEL
- router Trust
- router LogiLink
- router Dell
- router IFM
- router Linksys
- router Google
- router Digitus
- router Vimar
- router Dahua Technology
- router Schneider
- router Kyocera
- router Sabrent
- router AVMATRIX
- router Renkforce
- router Thomson
- router AVM
- router BT
- router Totolink
- router Black Box
- router Güde
- router Apple
- router Lancom
- router Zoom
- router Iogear
- router Intellinet
- router Devolo
- router Vtech
- router Mercusys
- router I-TEC
- router Draytek
- router Edimax
- router Razer
- router AirLive
- router EnGenius
- router Planet
- router NEC
- router Blustream
- router LevelOne
- router Digi
- router Milesight
- router Rocstor
- router Hama
- router Ubiquiti Networks
- router Western Digital
- router ModeCom
- router Smart-AVI
- router Barco
- router Sagemcom
- router Juniper
- router Cudy
- router QNAP
- router Arris
- router Netis
- router Anker
- router Allnet
- router Marshall Electronics
- router Hitachi
- router M-life
- router AJA
- router Media-Tech
- router BenQ
- router Atlona
- router FSR
- router Gefen
- router Vivanco
- router Topcom
- router PowerPlus
- router HiKOKI
- router Blackmagic Design
- router Kathrein
- router JUNG
- router Foscam
- router Alfa
- router Porter-Cable
- router Metabo
- router Starlink
- router Keewifi
- router Digital Forecast
- router Keenetic
- router SPL
- router Cotech
- router Skil
- router Alfatron
- router Digitalinx
- router Clas Ohlson
- router KPN
- router Belkin
- router Kramer
- router KanexPro
- router Kopul
- router BZBGear
- router RGBlink
- router Key Digital
- router UPC
- router Lumantek
- router Allied Telesis
- router Actiontec
- router Proximus
- router Eminent
- router Sitecom
- router Sagem
- router Nilox
- router Sonos
- router Patton
- router Techly
- router Envivo
- router Buffalo
- router Nest
- router Vodafone
- router ICIDU
- router Milan
- router Konig
- router AT&T
- router Sweex
- router Aruba
- router Phicomm
- router Kasda
- router Technicolor
- router Verizon
- router Billion
- router T-Mobile
- router RAVPower
- router Hawking Technologies
- router Nexxt
- router WyreStorm
- router Beafon
- router Kraun
- router LTS
- router Zolid
- router Telstra
- router Holzmann
- router SIIG
- router Eero
- router Advantech
- router Mercku
- router Hercules
- router Xantech
- router Intelix
- router MuxLab
- router Pentagram
- router Ocean Matrix
- router Comprehensive
- router Arcadyan
- router Digiconnect
- router Ubee
- router SMC
- router Tele 2
- router Kogan
- router Peak
- router CradlePoint
- router Davolink
- router Sixnet
- router AVPro Edge
- router Evolution
- router 7inova
- router Predator
- router A-NeuVideo
- router United Telecom
- router F-Secure
- router Rosewill
- router Digicom
- router On Networks
- router Wisetiger
- router Leoxsys
- router Readynet
- router OneAccess
- router Accelerated
- router Nexaira
- router Hamlet
- router Approx
- router T-com
- router Amped Wireless
- router Cambium Networks
- router 3Com
- router Avenview
- router Ruckus Wireless
- router Dovado
- router Mach Power
- router EXSYS
- router NetComm
- router Comtrend
- router Premiertek
- router Bea-fon
- router GL.iNet
- router Shinybow
- router Edgewater
- router Atlantis Land
- router Lantronix
- router PulseAudio
- router Luxul
- router DVDO
- router StarIink
- router Silentwind
- router Keezel
- router VigilLink
Najnowsze instrukcje dla router

9 Kwietnia 2025
9 Kwietnia 2025

8 Kwietnia 2025

3 Kwietnia 2025

2 Kwietnia 2025
1 Kwietnia 2025
30 Marca 2025
30 Marca 2025
30 Marca 2025
30 Marca 2025