Instrukcja obsługi Micro Connect MC-HM-MT404L
Micro Connect
przełącznik
MC-HM-MT404L
Przeczytaj poniżej 📖 instrukcję obsługi w języku polskim dla Micro Connect MC-HM-MT404L (4 stron) w kategorii przełącznik. Ta instrukcja była pomocna dla 20 osób i została oceniona przez 2 użytkowników na średnio 4.5 gwiazdek
Strona 1/4

12
INTRODUCTION:
FEATURES:
34
HDMI 2.0 4X4 Matrix Switcher 4:4:4
This 4x4 4K UHD Matrix provides a high level of audio and video performance with
support for resolutions up to 4K@60Hz (YUV 4:4:4, 8-bit) and pass-through support of
digital audio formats including LPCM 7.1 (with sampling rates up to 192kHz), bitstream,
and HD bitstream. The 4 HDMI inputs and 4 HDMI outputs support fully matrixed
switching. A sophisticated WebGUI interface supports storing and recalling up to four
routing presets, making remote control and configuration of the unit a breeze.
Before attempting to use this unit, please check the packaging and make sure the
following items are contained in the shipping carton:
1) Main unit.
2) 12 V/2A DC Power Supply.
3) Remote Control.
4) User’s Manual.
● HDMI inputs and outputs with 18Gbps (600MHz) 4K UHD support
● DVI 1.0 compliant with the use of an HDMI-DVI adaptor
● HDCP 1.4 and 2.2 compliant
● HDR 4:2:2 12 Bit Support
● Supports HD resolutions up to 3840x2160@60 Hz (YUV 4:4:4, 8-bit) &
4096x2160@60 Hz (YUV 4:4:4, 8-bit)
● Supports 48-bit Deep Color up to 1080p60
● Supports 3D signal bypass
● Supports pass-through of LPCM 7.1, bitstream and HD bitstream audio formats over
HDMI
● Supports storing and recall of up to four routing presets
● Controllable via front-panel buttons, RS-232, telnet, WebGUI, and IR remote
CONNECTION DIAGRAM:
OPERATION CONTROLS AND FUNCTIONS:
SPECIFICATIONS:
Note: Specifications are subject to change without notice.
PACKAGE CONTENTS:
Quick Installation Guide
Ver. 1.0
All brand names and trademarks are properties of
their respective owners
REMOTE CONTROL:
①Remote control sensor
②Input Select/Indicators (A):
Press the “HDMI OUT A” button repeatedly to switch to your desired source, and the LED
will illuminate to indicate which input source is being selected, and routed to HDMI A
display.
③ Input Select/Indicators (B):
Press the “HDMI OUT B” button repeatedly to switch to your desired source, and the LED
will illuminate to indicate which input source is being selected, and routed to HDMI B
display.
④ Input Select/Indicators (C):
Press the “HDMI OUT C” button repeatedly to switch to your desired source, and the LED
will illuminate to indicate which input source is being selected, and routed to HDMI C
display.
⑤ Input Select/Indicators (D):
Press the “HDMI OUT D” button repeatedly to switch to your desired source, and the LED
will illuminate to indicate which input source is being selected, and routed to HDMI D
display.
⑥ Power Switch & LED Indicator:
The LED will illuminate when the power is turned on.
ON/OFF
Power
IR
1 2 3 4
Output A
Select
1 2 3 4
Output B
Select
1 2 3 4
Output C
Select
1 2 3 4
Output D
Select
① ② ③ ④ ⑤ ⑥
Output D Output C Output B Output AInput4 Input3 Input2 Input1 RS232 Ethernet
12 V/DC, 2 A
① Power:
Plug the 12V/2A DC power supply adapter into the unit and connect the adaptor to AC
wall outlet.
② HDMI inputs 1~4:
Connect to the HDMI output of your source equipment such as DVD player or set-top-
box.
③ HDMI outputs A~D:
Connect each of these output ports to the HDMI input of an HDMI display.
④ RS232 Communication Port:
Connect to a PC or Laptop via RS232 terminal to D-Sub 9-pin cable for the
transmission of RS-232 commands.
⑤ Ethernet:
Connect to an internet or network activate device.
④③① ② ⑤
HDMI version
HDCP version
Video Bandwidth
HDMI resolution
supported
HDMI connector
Operation temperaure
Relative humidity
HDMI 2.0
HDCP 2.2
18G
1920*1080@60Hz
1920*1080 3D@24Hz
1080P@120Hz
4K2K@30Hz
4K2K@60Hz(4:2:0)
4K2K@50/60Hz(4:4:4)
Type A ,19 pin, Female
0 50℃~ ℃
0 95%(no condensation)~
① Power:
Press the button to turn on/off the unit.
② Input Select for HDMI OUT A:
Press 1, 2, 3 or 4 to select the desired input source for
HDMI OUT A.
③ Input Select for HDMI OUT B:
Press 1, 2, 3 or 4 to select the desired input source for
HDMI OUT B.
④ Input Select for HDMI OUT C:
Press 1, 2, 3 or 4 to select the desired input source for
HDMI OUT C.
Blu-Ray DVD Player PS4
HD DVD STB
HD TV HD TV HD TVHD TV
Output D Output C Output B Output AInput4 Input3 Input2 Input1 RS232 Ethernet
12 V/DC, 2 A
RS232 Equipped
PC or Notebook
Routor
56
78
1.Use an Ethernet cable to connect the LAN port on the switch to an unused, active port
on the router.
2.Open “HDMI2.0 Matrix.exe”
3.select the “IP Host” and enter the IP address click “Start” button into PC Software
Control Interface
Note: see Web GUI Control below for how to get the IP address
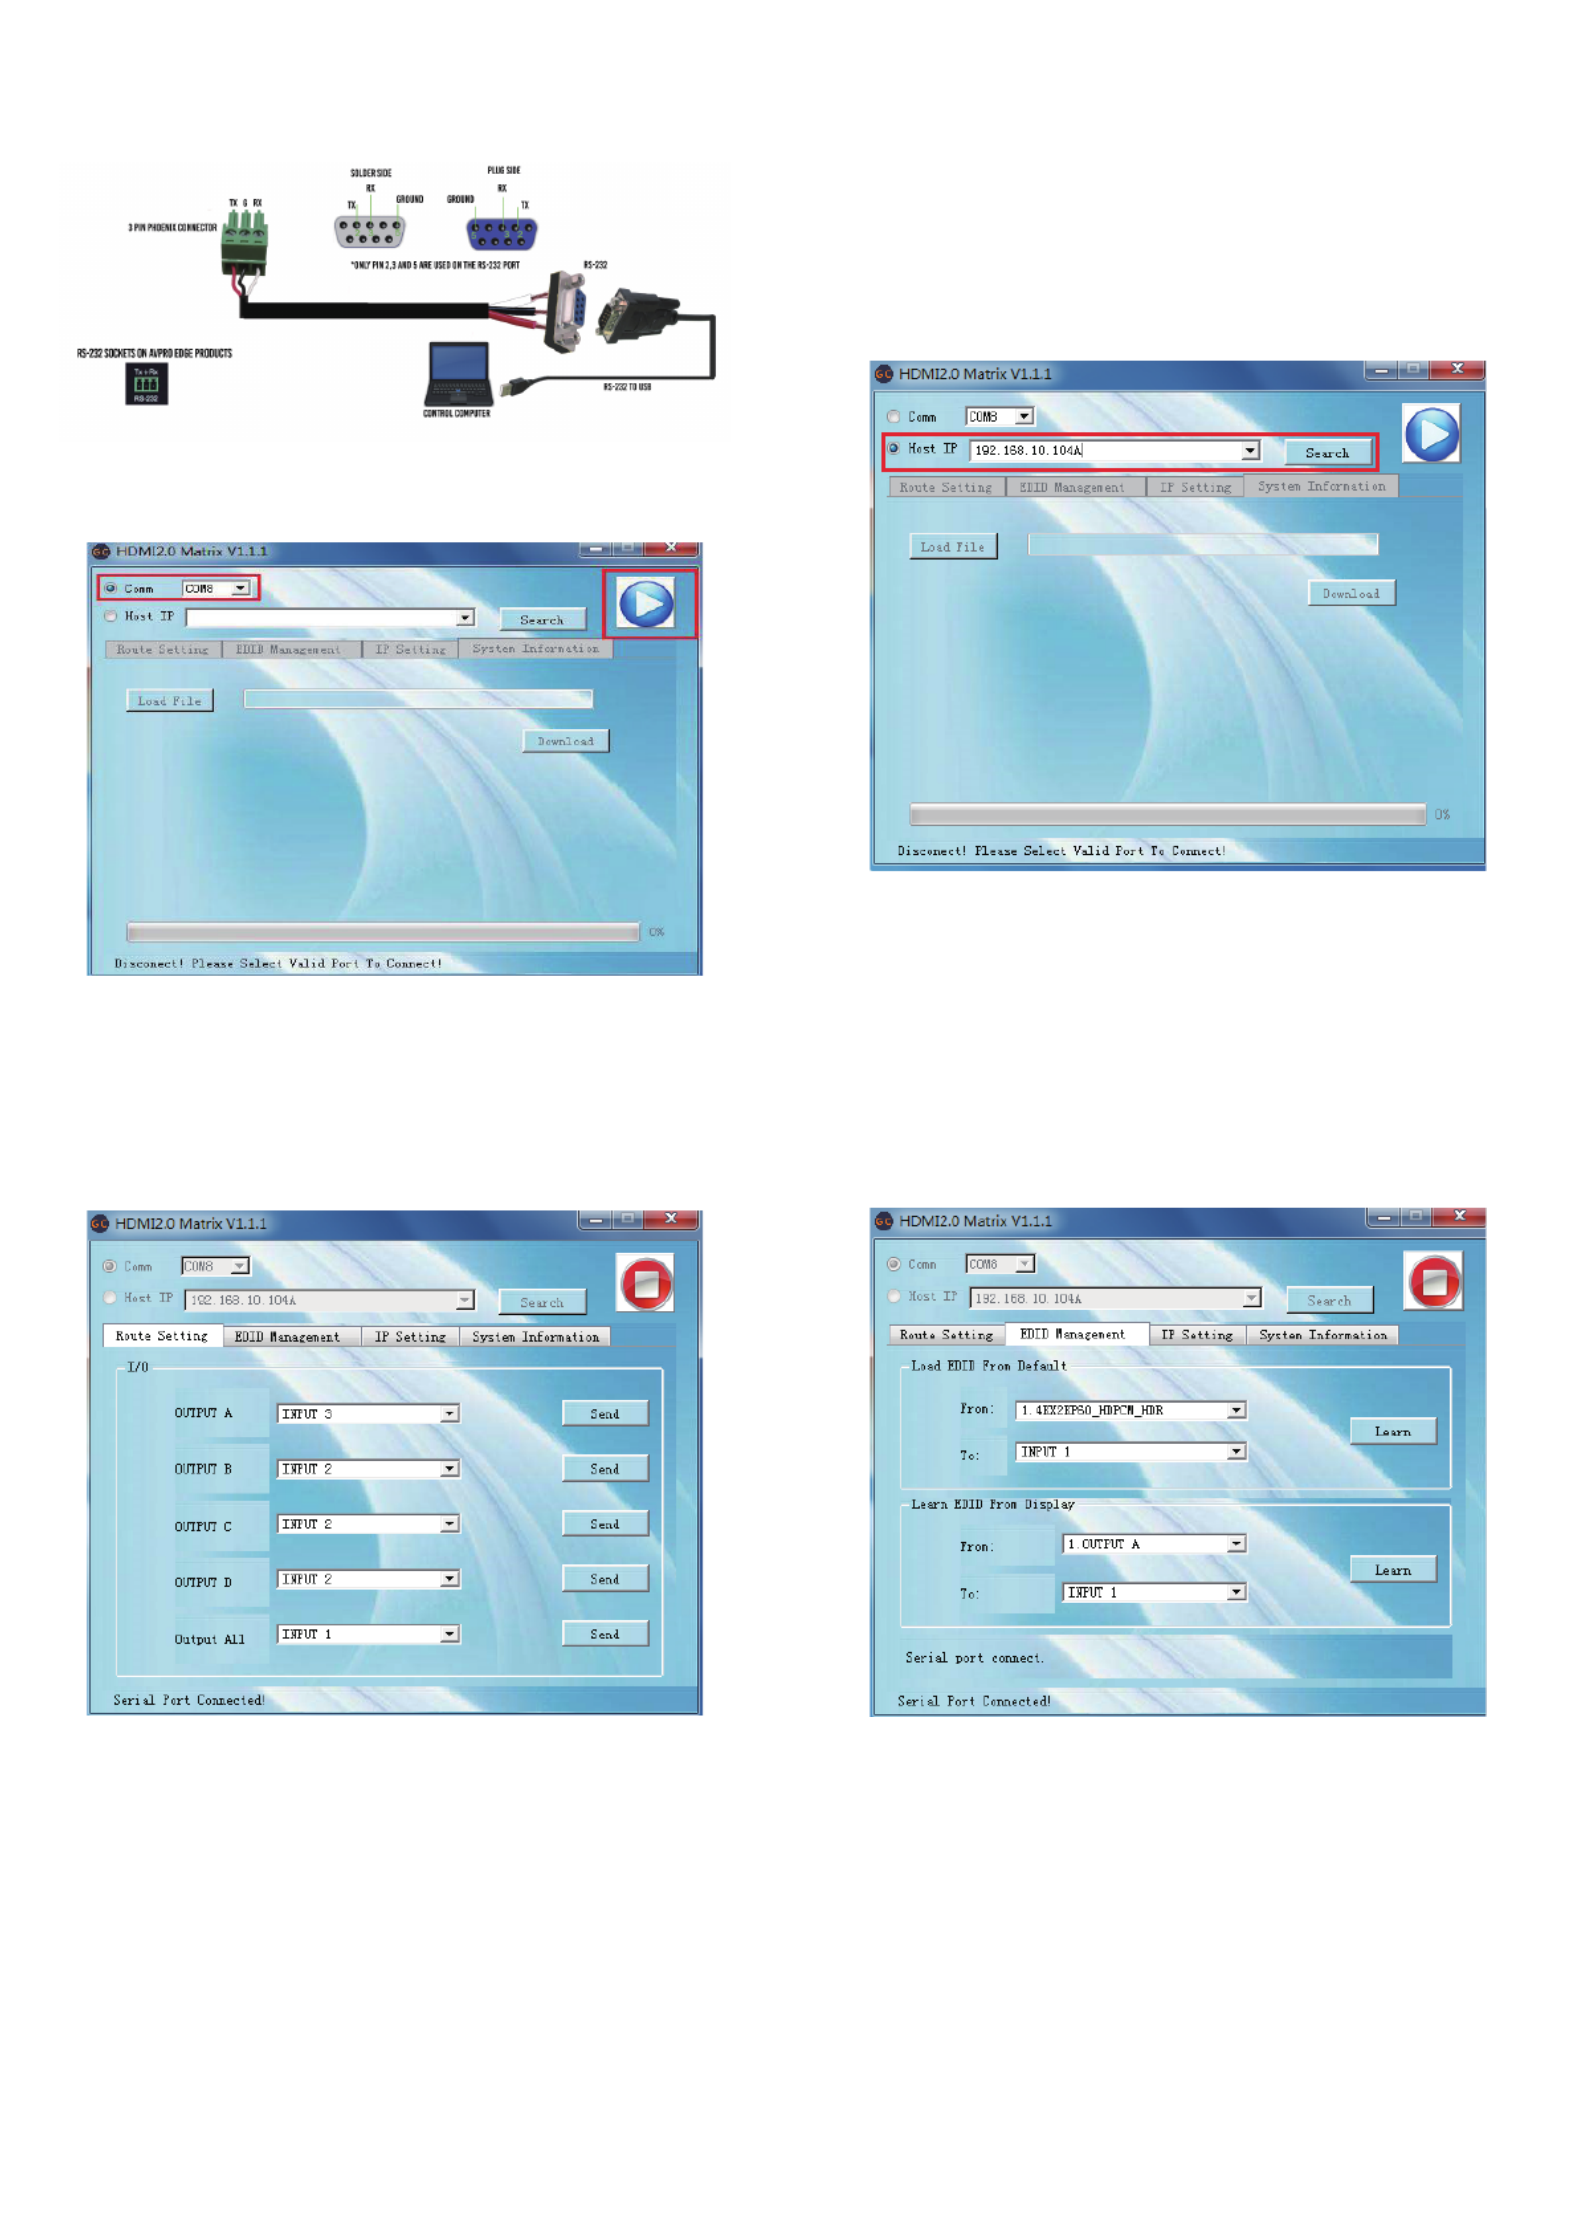
At EDID Management interface, you can load default EDID to any input port, You can
also learn EDID from any output port to any input port
At the Route Setting interface, you can set any input port to any output port one by one,
or anyone input port to all output port.
PC Software Control
Connect by RS232
1. Connect PC to device by USB to RS232 tool
2. Open “HDMI2.0 Matrix.exe”
3. select the “comm” and click “Start” button into PC Software Control Interfac
Connect by LAN
PC Software Control Interface: Route Setting PC Software Control Interface: EDID Management

9 10
11 12
At System Information you can Upgrade the Firmware of Matrix Switch
NOTE: The Firmware File need to be supplied by the manufacturer
Use the step to quickly and immediately set User name and Password
Default User name : admin
Default Password : 123456
Set IP settings such as:
• Enable DHCP
• HostIP
• Net Mask
• Gateway
NOTE: Default IP setting is “Enable DHCP”
1.Use an Ethernet cable to connect the LAN port on the switch to an unused, active port
on the router.
2.Get the IP Address by CMD.exe
Enter ”ping matrix” into CMD windows as following picture shows
PC Software Control Interface: IP Setting PC Software Control Interface: System Information
Web GUI Control
3.Enter the IP Address into any web browser as following picture shows
4.Enter User name and Password to gogin the Web GUI
Default User name: admin default Password:123456
Web GUI Interface: Regist User name and Password
Specyfikacje produktu
| Marka: | Micro Connect |
| Kategoria: | przełącznik |
| Model: | MC-HM-MT404L |
Potrzebujesz pomocy?
Jeśli potrzebujesz pomocy z Micro Connect MC-HM-MT404L, zadaj pytanie poniżej, a inni użytkownicy Ci odpowiedzą
Instrukcje przełącznik Micro Connect

4 Października 2024
22 Września 2024
20 Września 2024
Instrukcje przełącznik
- przełącznik Yamaha
- przełącznik Ikea
- przełącznik Tenda
- przełącznik Worx
- przełącznik Huawei
- przełącznik TP-Link
- przełącznik Philips
- przełącznik Plantronics
- przełącznik SilverCrest
- przełącznik Bosch
- przełącznik Hikvision
- przełącznik IPGARD
- przełącznik Toolcraft
- przełącznik Panasonic
- przełącznik StarTech.com
- przełącznik Theben
- przełącznik Crestron
- przełącznik Behringer
- przełącznik Asus
- przełącznik Nedis
- przełącznik Nexa
- przełącznik Boss
- przełącznik TRENDnet
- przełącznik Tesla
- przełącznik D-Link
- przełącznik ATen
- przełącznik Metra
- przełącznik APC
- przełącznik Alcatel
- przełącznik Eberle
- przełącznik HP
- przełącznik Honeywell
- przełącznik Manhattan
- przełącznik Tripp Lite
- przełącznik Mikrotik
- przełącznik Mercury
- przełącznik Shimano
- przełącznik Audac
- przełącznik Cisco
- przełącznik ORNO
- przełącznik Alpine
- przełącznik Chamberlain
- przełącznik Paladin
- przełącznik Lindy
- przełącznik ZyXEL
- przełącznik LogiLink
- przełącznik IFM
- przełącznik Linksys
- przełącznik Digitus
- przełącznik Vimar
- przełącznik Dahua Technology
- przełącznik Schneider
- przełącznik Renkforce
- przełącznik BaseTech
- przełącznik Perel
- przełącznik Trotec
- przełącznik Adder
- przełącznik Ansmann
- przełącznik Netgear
- przełącznik Velleman
- przełącznik Homematic IP
- przełącznik DataVideo
- przełącznik One For All
- przełącznik Totolink
- przełącznik Intertechno
- przełącznik Black Box
- przełącznik Victron Energy
- przełącznik Delta Dore
- przełącznik Pyle
- przełącznik Lancom
- przełącznik Adviti
- przełącznik Iogear
- przełącznik Intellinet
- przełącznik Setti+
- przełącznik Jabra
- przełącznik Vivotek
- przełącznik PreSonus
- przełącznik Mercusys
- przełącznik Shelly
- przełącznik Edimax
- przełącznik AirLive
- przełącznik EnGenius
- przełącznik SPC
- przełącznik Planet
- przełącznik Brilliant
- przełącznik Blustream
- przełącznik LevelOne
- przełącznik Vivolink
- przełącznik Suevia
- przełącznik Abus
- przełącznik Omnitronic
- przełącznik Elro
- przełącznik Hama
- przełącznik Marmitek
- przełącznik Ubiquiti Networks
- przełącznik Smart-AVI
- przełącznik Goobay
- przełącznik Kaiser
- przełącznik Equip
- przełącznik Kemo
- przełącznik Juniper
- przełącznik Cudy
- przełącznik QNAP
- przełącznik Hager
- przełącznik Extech
- przełącznik Elation
- przełącznik Rex
- przełącznik Emerson
- przełącznik Ernitec
- przełącznik Vemer
- przełącznik CyberPower
- przełącznik Electro Harmonix
- przełącznik Atlona
- przełącznik Elektrobock
- przełącznik Fibaro
- przełącznik Gefen
- przełącznik SEADA
- przełącznik Vivanco
- przełącznik Grandstream
- przełącznik Powerfix
- przełącznik Alecto
- przełącznik Vacmaster
- przełącznik Kathrein
- przełącznik JUNG
- przełącznik Eaton
- przełącznik Monacor
- przełącznik H-Tronic
- przełącznik EVE
- przełącznik Smartwares
- przełącznik Sygonix
- przełącznik Cotech
- przełącznik Dormakaba
- przełącznik Alfatron
- przełącznik Clas Ohlson
- przełącznik Kopp
- przełącznik Speaka
- przełącznik Belkin
- przełącznik Generac
- przełącznik Kramer
- przełącznik KanexPro
- przełącznik BZBGear
- przełącznik RGBlink
- przełącznik Raritan
- przełącznik AMX
- przełącznik Sonance
- przełącznik Profile
- przełącznik Intermatic
- przełącznik Flamingo
- przełącznik Brennenstuhl
- przełącznik Eminent
- przełącznik KlikaanKlikuit
- przełącznik Ei Electronics
- przełącznik Sylvania
- przełącznik Tork
- przełącznik Techly
- przełącznik Matrox
- przełącznik Steren
- przełącznik AV:link
- przełącznik Buffalo
- przełącznik Audiovox
- przełącznik Merten
- przełącznik Chacon
- przełącznik Konig
- przełącznik UPM
- przełącznik Finder
- przełącznik Fantini Cosmi
- przełącznik DoorBird
- przełącznik Grasslin
- przełącznik Gira
- przełącznik WHALE
- przełącznik PAC
- przełącznik Wentronic
- przełącznik Wago
- przełącznik Lanberg
- przełącznik Monoprice
- przełącznik Nous
- przełącznik Tiptel
- przełącznik OSD Audio
- przełącznik Unify
- przełącznik Berker
- przełącznik Aeon Labs
- przełącznik Provision ISR
- przełącznik CSL
- przełącznik PCE
- przełącznik SIIG
- przełącznik Advantech
- przełącznik Merlin Gerin
- przełącznik Intelix
- przełącznik Extron
- przełącznik Avocent
- przełącznik Heitronic
- przełącznik Ebode
- przełącznik Robbe
- przełącznik ICasa
- przełącznik B-tech
- przełącznik GAO
- przełącznik Legrand
- przełącznik Kraus & Naimer
- przełącznik Noble
- przełącznik Ecler
- przełącznik Inverto
- przełącznik Triax
- przełącznik Rule
- przełącznik CYP
- przełącznik Phoenix Contact
- przełącznik Seuthe
- przełącznik Maclean Energy
- przełącznik SmartAVI
- przełącznik Leviton
- przełącznik DEHN
- przełącznik SEC24
- przełącznik Cooking Performance Group
- przełącznik Flic
- przełącznik HELGI
- przełącznik IB Connect
- przełącznik Liberty
- przełącznik PureTools
- przełącznik SunBriteTV
- przełącznik Hamlet
- przełącznik Noark
- przełącznik Cambium Networks
- przełącznik 2USB
- przełącznik Roline
- przełącznik KVM-TEC
- przełącznik STI
- przełącznik Epiphan
- przełącznik Ebara
- przełącznik Mach Power
- przełącznik Axing
- przełącznik ConnectPro
- przełącznik Atlantis Land
- przełącznik GEV
- przełącznik Pizzato Elettrica
- przełącznik Baco
- przełącznik Doepke
- przełącznik Comet
- przełącznik PureLink
- przełącznik INOGENI
- przełącznik Luxul
Najnowsze instrukcje dla przełącznik
9 Kwietnia 2025
9 Kwietnia 2025
7 Kwietnia 2025
5 Kwietnia 2025
4 Kwietnia 2025
4 Kwietnia 2025
4 Kwietnia 2025
3 Kwietnia 2025
3 Kwietnia 2025
2 Kwietnia 2025