Instrukcja obsługi Lectrosonics DSQD/AES3
Lectrosonics
odbiornik
DSQD/AES3
Przeczytaj poniżej 📖 instrukcję obsługi w języku polskim dla Lectrosonics DSQD/AES3 (24 stron) w kategorii odbiornik. Ta instrukcja była pomocna dla 12 osób i została oceniona przez 2 użytkowników na średnio 4.5 gwiazdek
Strona 1/24
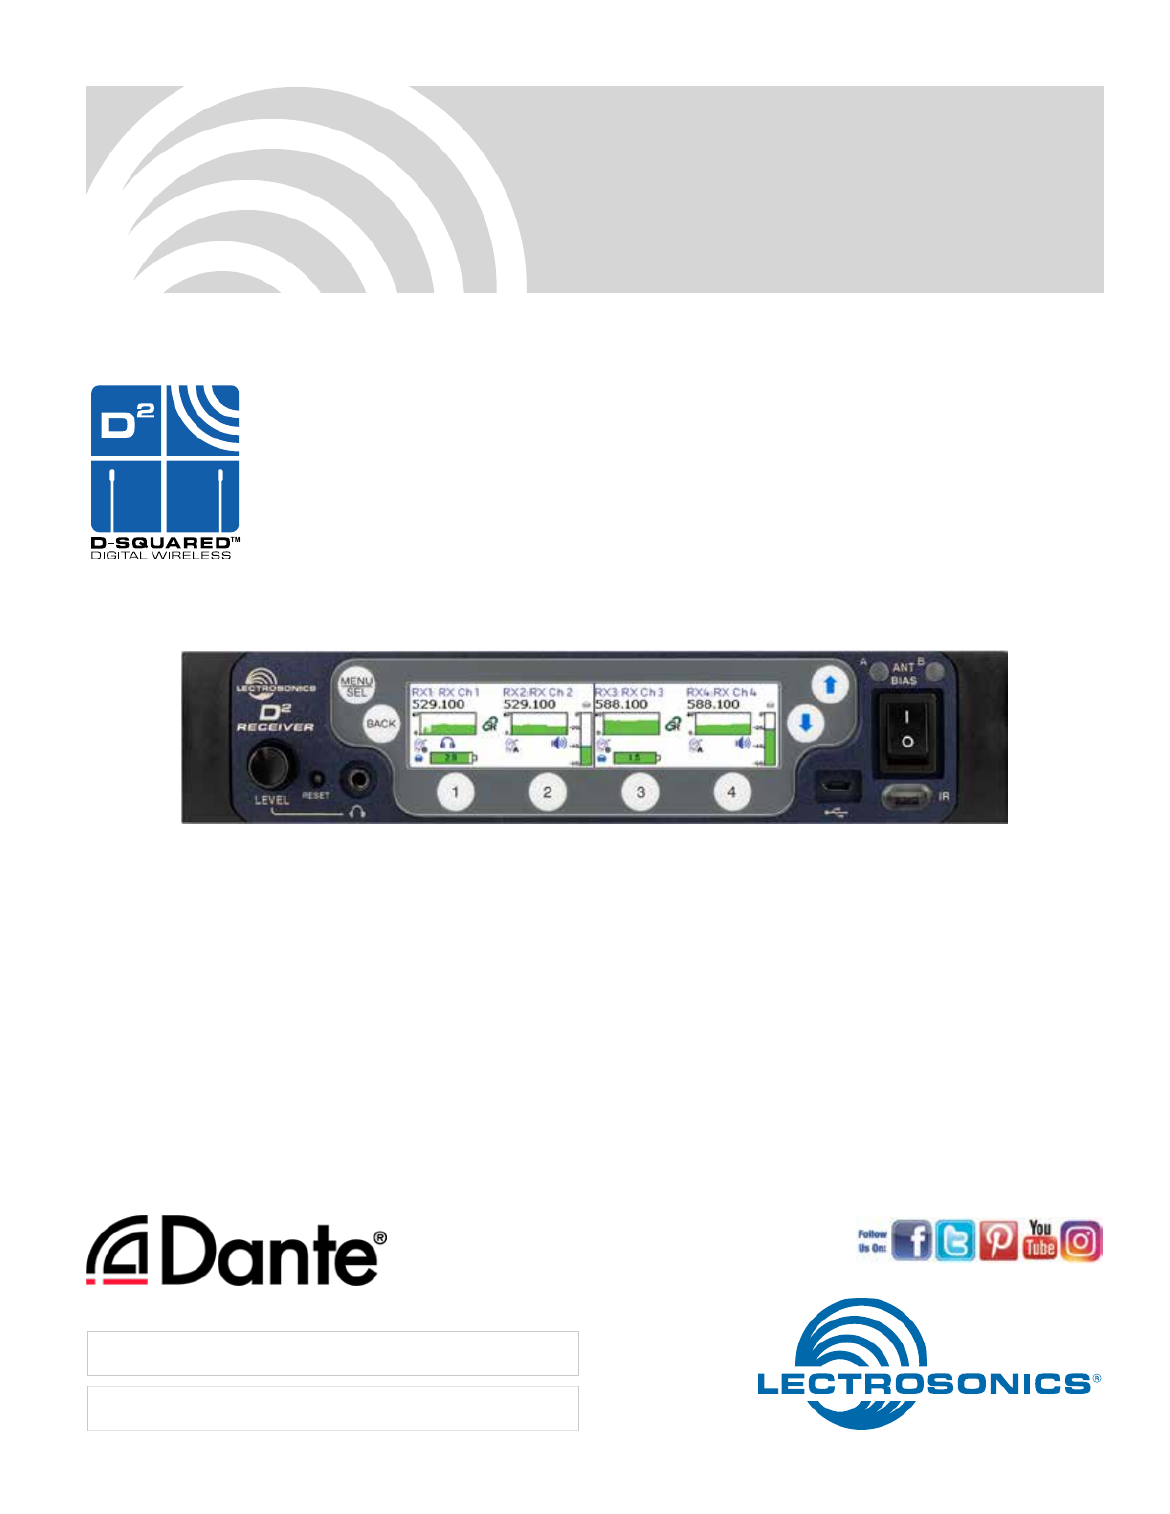
DSQD
4 Channel Digital Receiver
DSQD, DSQD/AES3
INSTRUCTION MANUAL
Rio Rancho, NM, USA
www.lectrosonics.com
Fill in for your records:
Serial Number:
Purchase Date:

DSQD Manual
LECTROSONICS, INC.
2
Introduction
The latest digital radio technology is employed in the
DSQD receiver to set a new standard for performance
and flexibility. Four discrete audio channels are packed
into a single half-rack chassis, with balanced analog
and Dante® digital network outputs. The receiver tunes
continuously across the UHF band from 470.100 to
614.375 MHz.
The digital architecture delivers studio quality audio with
ultra-low latency. The receiver includes an extended
operating range rivaling the best analog and Digital
Hybrid Wireless® systems with tracking filters that stay
centered on the selected frequency.
The DSQD is also backward compatible with any Digital
Hybrid Wireless® transmitters including the SM Series,
LT, HM Series, SSM, HH Series, UM400, UM400a, LM
Series, MM Series, and WM.
The receiver provides a USB port for firmware up-
dates, an IR port for fast setup and an ethernet port for
control. A large, high resolution, backlit LCD and large
membrane switches provide an intuitive interface that is
highly visible in daylight or dimly lit conditions.
Wireless Designer™ software integrates the digital and
Digital Hybrid Wireless® into a single control panel with
site scanning and frequency coordination. The software
is free and can be used while connected to equipment
or offline in planning a multi-channel system.
Antenna ports on the rear panel accept input from
remote antennas, with a “loop-thru” output to another
mainframe using the internal multicoupler. A kit is also
available to mount antenna inputs (BNC connectors) on
the front panel.
General Technical
Description
Encryption
When transmitting audio, there are situations where
privacy is essential, such as during professional sport-
ing events, in court rooms or private meetings. For
instances where your audio transmission needs to be
kept secure, without sacrificing audio quality, Lectroson-
ics implements AES256 encryption in our digital wire-
less microphone systems. High entropy encryption keys
are first created by the DSQD Receiver. The key is then
synced with an encryption-capable digital transmitter,
via the IR port. The audio will be encrypted and can
only be decoded if both DSQD and transmitter have the
matching encryption key. If you are trying to transmit
an audio signal and keys do not match, all that will be
heard is silence.
Table of Contents
Introduction 2 ...........................................................................
General Technical Description ............................................ 2
Encryption 2 ............................................................................
Digital Hybrid Wireless® Technology .................................... 3
LCD Screen 3 .........................................................................
Diversity Reception 3 ..............................................................
Infrared Sync 3 ........................................................................
What is Dante? 3 ....................................................................
Panels and Features 4 ..............................................................
DSQD Front Panel 4 ...............................................................
DSQD Rear Panel 4 ................................................................
IR (infrared) Port 5 ..................................................................
USB Port 5 ..............................................................................
Headphone Volume Adjustment ........................................... 5
Channel Selector Buttons 5 ....................................................
Dante Ports (if Dante module is installed) 5 ............................
Ethernet Port 5 ........................................................................
Multi-Frame Communication 5 ................................................
Power Inlet 5 ...........................................................................
LCD Menu Map 6 .......................................................................
Navigating the Menus 8 ...........................................................
RF Setup Menu 8 ......................................................................
RF Frequency 8 ......................................................................
Frequency Scan 8 ...................................................................
Group Tune .......................................................................... 9
Group Tune Setup ................................................................ 9
Diversity Setup 10 .....................................................................
Audio Setup Menu 12 .................................................................
Audio Level 12 ..........................................................................
Audio Polarity 12 .......................................................................
Smart Noise Reduction 12 ........................................................
Compatibility Modes 12 .............................................................
Talkback Setup 12 .....................................................................
IR Sync & Encryption Menu 13 ..................................................
Encryption Key Management 13 ...............................................
Encryption Keys 13 ...................................................................
Sync Settings 13 .......................................................................
Tools and Settings Menu 14 ......................................................
RX On/Off 14 ............................................................................
TX Battery Type ................................................................... 14
Front Panel Setup 14 ................................................................
Antenna Bias Power 14 .............................................................
Network Settings 14 .................................................................
Edit Names 15 ..........................................................................
Restore Defaults 15 ..................................................................
Pilot Tone Bypass ................................................................. 15
About 15 ....................................................................................
Links 15 .....................................................................................
Specifications and Features 15 .................................................
Wireless Designer 15 .................................................................
Firmware Update Instructions 15 ..............................................
Supplied Hardware 16 ................................................................
Unpacking the Unit 16 ...............................................................
Items Included in the Box: .................................................... 16
Optional Accessories 17 ............................................................
Installing two DSQD Receivers into a SingleRack Space 18 ..
Service and Repair 20 ................................................................
Returning Units for Repair 20 ...................................................

Digital Receiver
Rio Rancho, NM 3
Digital Hybrid Wireless® Technology
All wireless links suffer from channel noise to some de-
gree, and all wireless microphone systems seek to mini-
mize the impact of that noise on the desired signal. Con-
ventional analog systems use compandors for enhanced
dynamic range, at the cost of subtle artifacts (known as
“pumping” and “breathing”). Wholly digital systems defeat
the noise by sending the audio information in digital form.
To support the installed base of Digital Hybrid Wireless
systems, the DSQD receiver includes DSP algorithms
for compatibility with Digital Hybrid Transmitters.
The DSQD receiver uses a DSP generated ultrasonic
pilot tone to reliably mute the audio when no RF carrier
is present. The pilot tone must be present in conjunc-
tion with a usable RF signal before the audio output
will be enabled. 256 pilot tone frequencies are used
across each 25.6 MHz block within the tuning range of
the system. This alleviates erroneous squelch activity in
multichannel systems where a pilot tone signal can ap-
pear in the wrong receiver via IM (intermodulation).
LCD Screen
Easy navigation of all setup parameters is provided by a
full color, backlit LCD screen and membrane push but-
tons. The high resolution display provides comprehen-
sive monitoring of all receiver parameters.
Diversity Reception
Three different receiver diversity schemes can be
employed depending on the needs of the application,
including antenna switching (during packet headers
for seamless audio), Digital Ratio Diversity, or Digital
Frequency Diversity.
Infrared Sync
The DSQD has a bi-directional IrDA interface which
allows quick syncing of settings and encryption keys
to transmitters (including legacy transmitters) with the
push of a button. The receiver also offers tuning groups
to allow the user to set up a list of frequencies, allowing
for easy tracking of frequency tuning in the transmitters.
What is Dante?
Audinate’s patent pending Dante™ technology is a
flexible Internet Protocol (IP) and Ethernet based digital
AV network technology that eliminates the many bulky
cables needed to provide point-to-point wiring for ana-
log AV installations.
With Dante, existing infrastructure can be used for high
performance audio as well as for ordinary control, moni-
toring or business data traffic. Digital networks utilize
standard IP over Ethernet offering high bandwidth ca-
pable of transporting hundreds of high quality channels
over Gigabit Ethernet.
Set-up and configuring the system is made easy as
well, saving enormous installation costs and long term
cost of ownership on a digital network. The physical
connecting point is irrelevant: audio signals can be
made available anywhere and everywhere. Patching
and routing now become logical functions configured in
software, not via physical wired links.
Summary of Dante Benefits
• Plug-and-play technology – automatic discovery
and simple signal routing
• Reduced Cost & Complexity- No special skills
required to set up audio networking
• Sample accurate playback synchronization
• Add/remove/rearrange components at will
• Deterministic latency throughout the network
• Support mixed bit depths and mixed sample
rates over one network
• Scalable, flexible network topology, supporting a
large number of senders and receivers
• Supports 1Gbps networks
• Supports a single integrated network for audio,
video, control, monitoring
• Uses inexpensive, off-the-shelf computer
networking equipment
DSQD Manual
LECTROSONICS, INC.
4
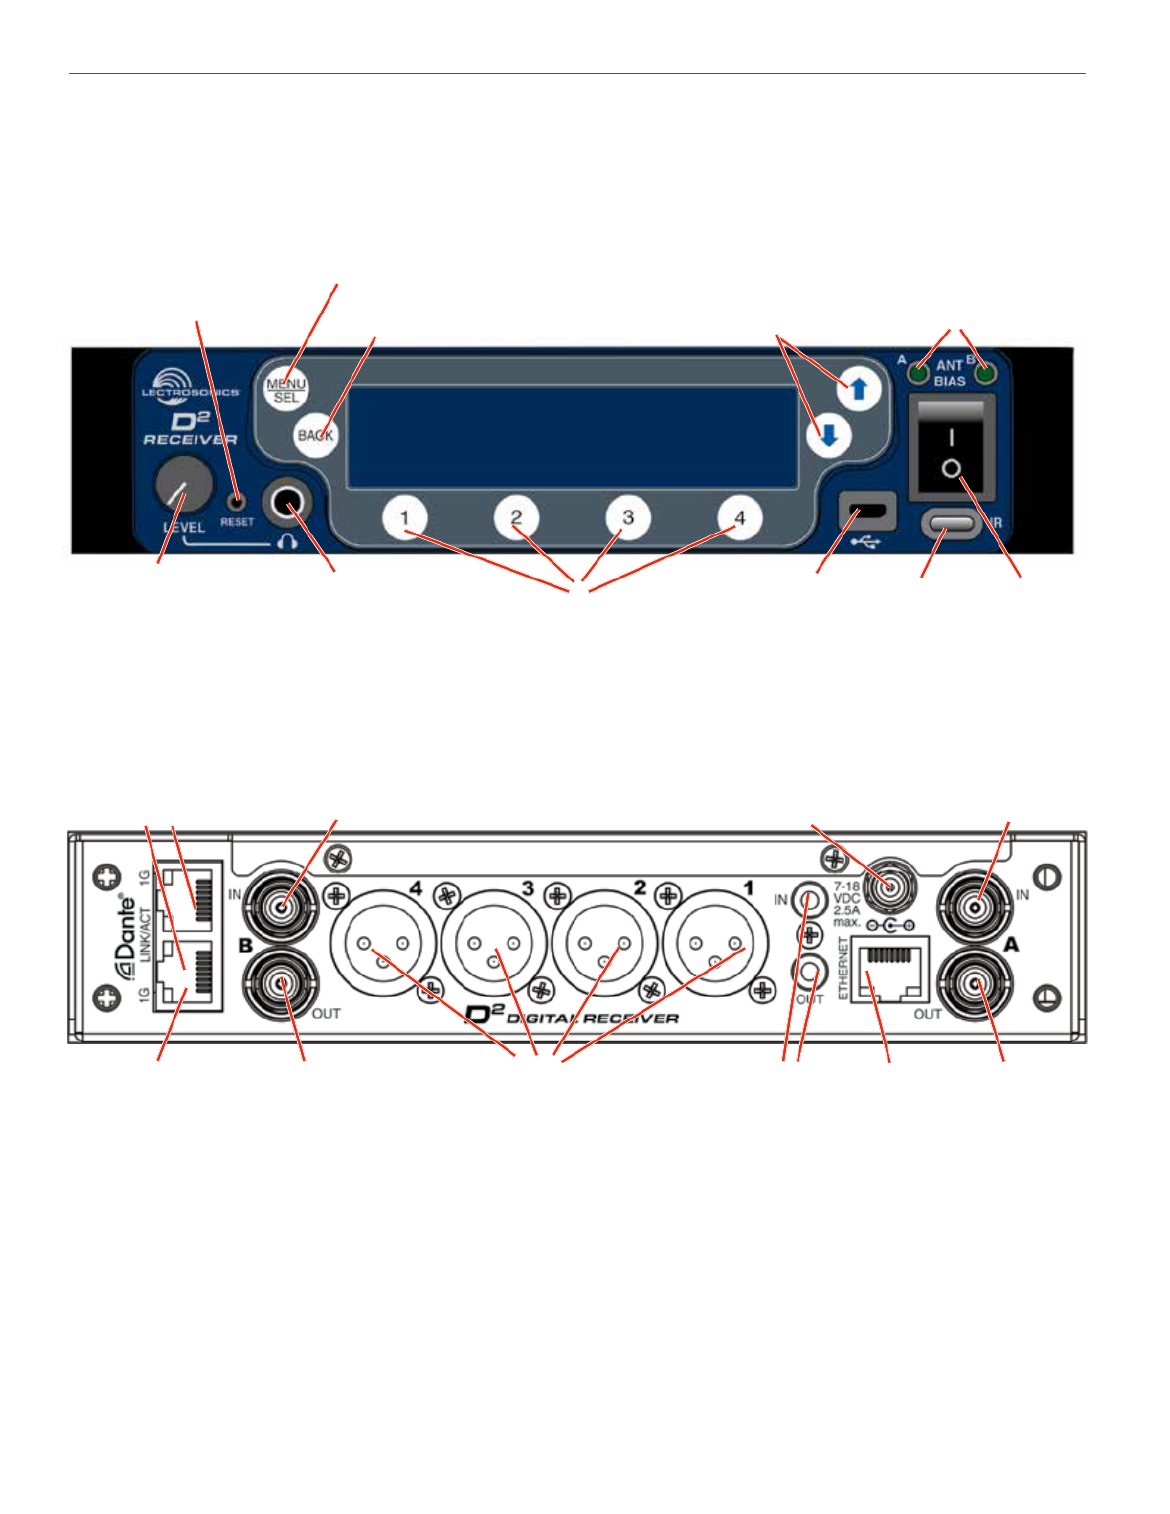
USB Port
Menu navigation
buttons
Power switch
Return to
previous screen
Panels and Features
IR Port
Headphone Volume
Adjustment Headphone Jack
Reset Button
DSQD Front Panel
DSQD Rear Panel
Menu/Select
Channel Selector Buttons
Power Inlet
Dante Ports
Antenna B Input
50 Ohm BNC
XLR Analog Output
Connectors
Ethernet
Port
Antenna Bias
Power LEDs
Antenna A
Loop-thru Output
50 Ohm BNC
Multi-Frame
Communication
Antenna B
Loop-thru Output
50 Ohm BNC
Antenna A Input
50 Ohm BNC
Or AES3 Outputs on 2
TA3M Jacks (in Place
of The 2 Dante Ports
Shown)

Digital Receiver
Rio Rancho, NM 5
IR (infrared) Port
Frequency and settings can be transferred to and from
the DSQD receiver via this port to an IR enabled trans-
mitter to simplify setup.
USB Port
For firmware updates and connection to Wireless De-
signer software.
Reset Button
For MCU recovery in the event of an interrupted firm-
ware update.
Headphone Volume Adjustment
Knob adjusts the headphone monitor.
Antenna Bias LEDs
Illuminated when antenna bias power is turned on.
Channel Selector Buttons
From the main screen, pressing a Channel Selector
Button Quick will show a detailed channel screen (see
Start for more information).
NOTE: Press and holding channel selector buttons
will initiate a sync with a transmitter from most
screens.
Antenna Loop-thru
For multiple DSQD installations in a rack, a “loop-thru”
is available to feed two or three receivers from a single
antenna pair. Connect coaxial cables from the multicou-
pler loop-thru outputs on the first receiver to the anten-
na inputs on the next receiver in the stack.
WARNING: Do not enable antenna power if
connecting antenna loop-thru outputs on one
receiver to the antenna inputs on another
receiver.
Dante Ports (if Dante module is installed)
Connects to a Dante digital audio network.
AES3 Ports (DSQD/AES3 option)
AES3 outputs on two TA3M jacks (in place of the two
Dante ports shown)
Ethernet Port
Used for setup, monitoring and control with Wireless
Designer software or 3rd party control systems con-
nected via a network.
Multi-Frame Communication
Allows offline, multi-frame communication and frequen-
cy coordination (coming soon).
Power Inlet
The locking DC coaxial inlet requires 7-18 VDC and
draws a maximum of 2.5 A at 7 V (with all channels
powered, Dante module powered, and antenna bias
power on both channels).
Operating Instructions
To begin using the DSQD quickly, follow the steps be-
low. The other settings can be adjusted as needed.
1. Set Channel Frequency: Assign a frequency to
each channel, which will correlate to the accom-
panying (1-4). From Channel Selector Button
the Quick Access Menu RF Setup Menuor the ,
manually set frequency on the RF Frequency
screen or scan for available frequencies and assign
a frequency to each channel from the Frequency
Scan screen.
2. Set Compatibility Mode: From the Quick Access
Menu Audio Setup Menuor the , set compatibility
modes for each channel.
3. Set Encryption Keys: From the IR Sync & En-
cryption Menu, select a key type and then create a
key (if needed).
NOTE: See for Encryption Key Management
more instruction.
4. Sync Settings: From the Quick Access Menu or
the , initiate sync for IR Sync & Encryption Menu
each channel via the IR port. Hold the target trans-
mitter close to the IR port on the front panel of the
DSQD. Select . A message will appear SEND ALL
on the main screen letting you know the sync was
successful. Messages will appear letting you know
if the sync was successful.
NOTE: See for more instruction.Sync Settings
5. You can also quickly check a channel’s status by
pressing a from the Channel Selector Button
DSQD home screen. This screen allows you to
change a variety of settings, including status of the
compatibility mode, diversity setting, transmitter bat-
tery status, audio level and audio mute status.
Carrier
frequency
Compatibility
Mode
Audio
Level
Channel Selector
Buttons
Transmitter
Battery Status
Group Tune
On/Off
Mute
On/Off
Diversity
Setting
RF Level
with 10 seconds
of history
DSQD Manual
LECTROSONICS, INC.
8
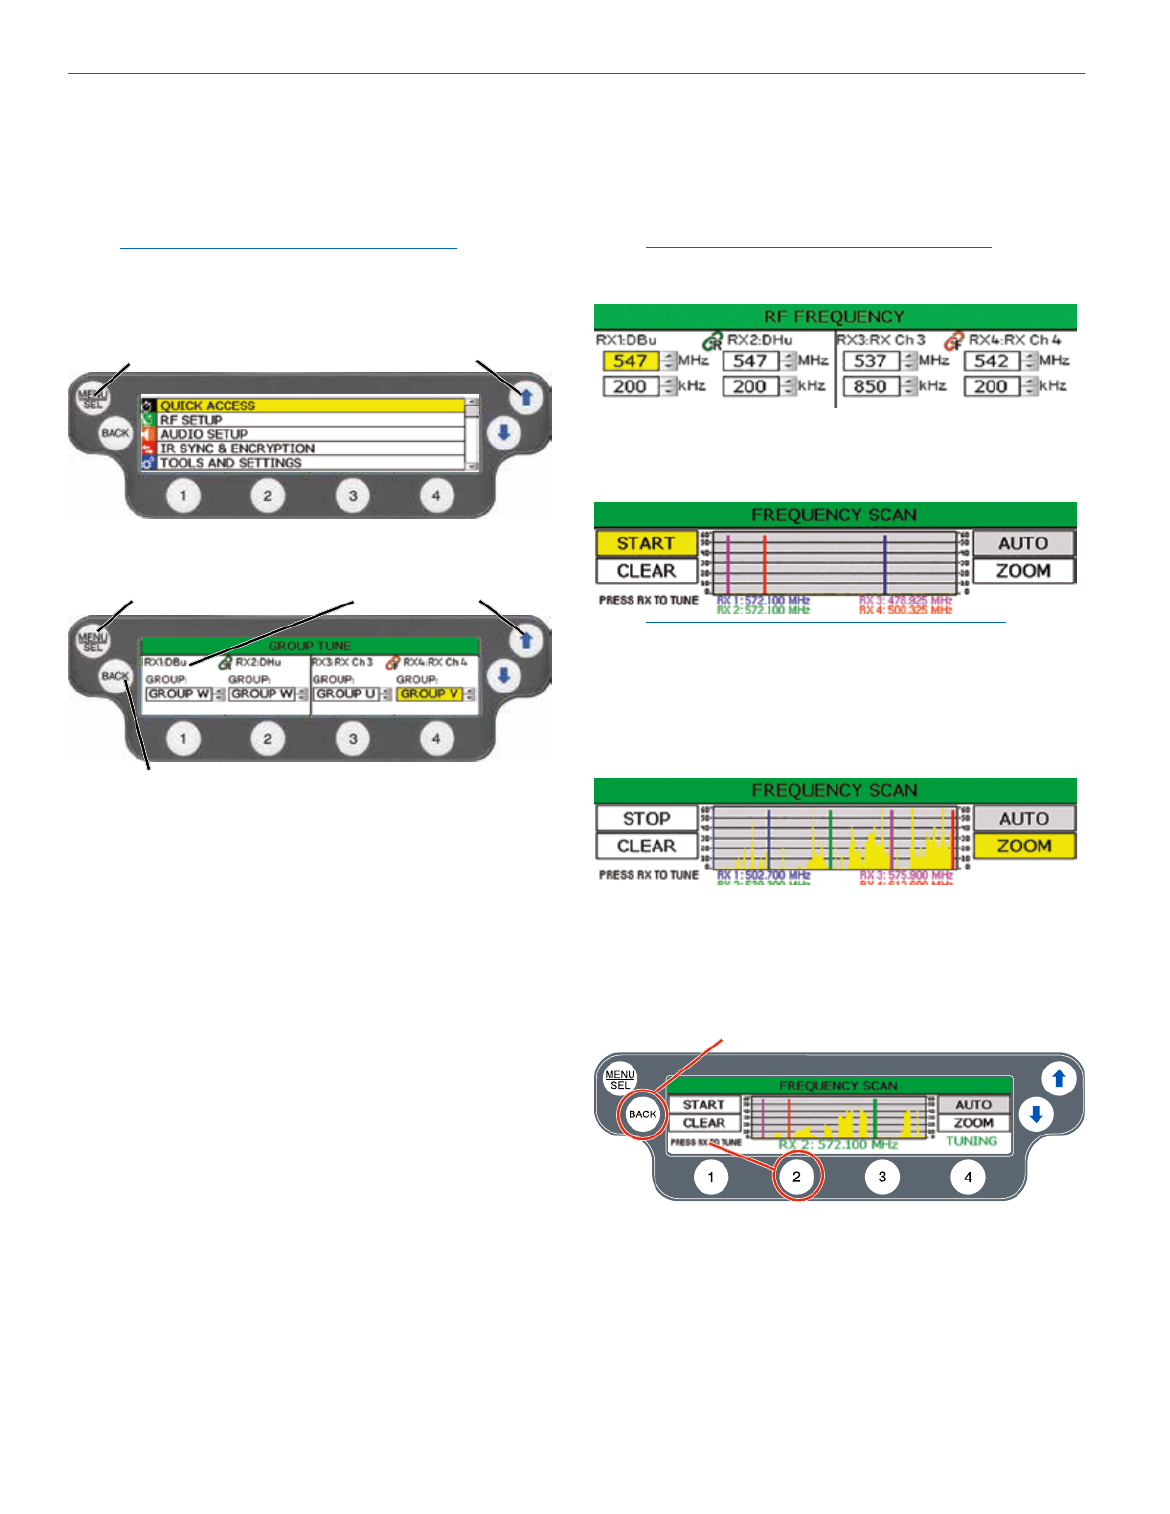
Navigating the Menus
All Setup Menu items are arranged in a vertical list on
the LCD. Press to enter the menu, then MENU/SEL
navigate with the and UP DOWN arrows to highlight the
desired setup item.
NOTE: To guarantee chosen parameters are
saved, exit a setup screen powering BEFORE
down DSQD.
Press MENU/
SEL to enter
the menu
Press the UP and DOWN arrows
to navigate and highlight the
desired menu item
Press MENU/SEL
to enter the setup
of the highlighted
item
Press BACK to return to the previous
screen and save selected settings
Press the UP and DOWN
arrows to navigate and highlight
the desired item or edit
selected field
Quick Access Menu
The quick access menu is a list of menu items grouped
together for DSQD quick start:
• RF Frequency • Sync Settings
• Frequency Scan • Compatibility Modes
• Group Tune
RF Setup Menu
RF Frequency
Allows manual selection of the operating frequency for
each channel.
NOTE: Display varies with compatibility mode
selection.
Frequency Scan
1. To begin, press to start the scan. MENU/SEL
NOTE: All four channels scan at the same time.
You can also select individual channels for
scanning by pressing the channel selector buttons.
2. Once the scan has completed, use and UP DOWN
arrows to navigate to , then press ZOOM MENU/
SEL.
3. Press one of the four channel selector buttons. The
word TUNING will flash on the screen to let you
know you are tuning. Press the andUP DOWN ar-
rows to tune the channel into the area of lowest RF
activity.
Press BACK to save
frequency to channel
DSQD Manual
LECTROSONICS, INC.
18
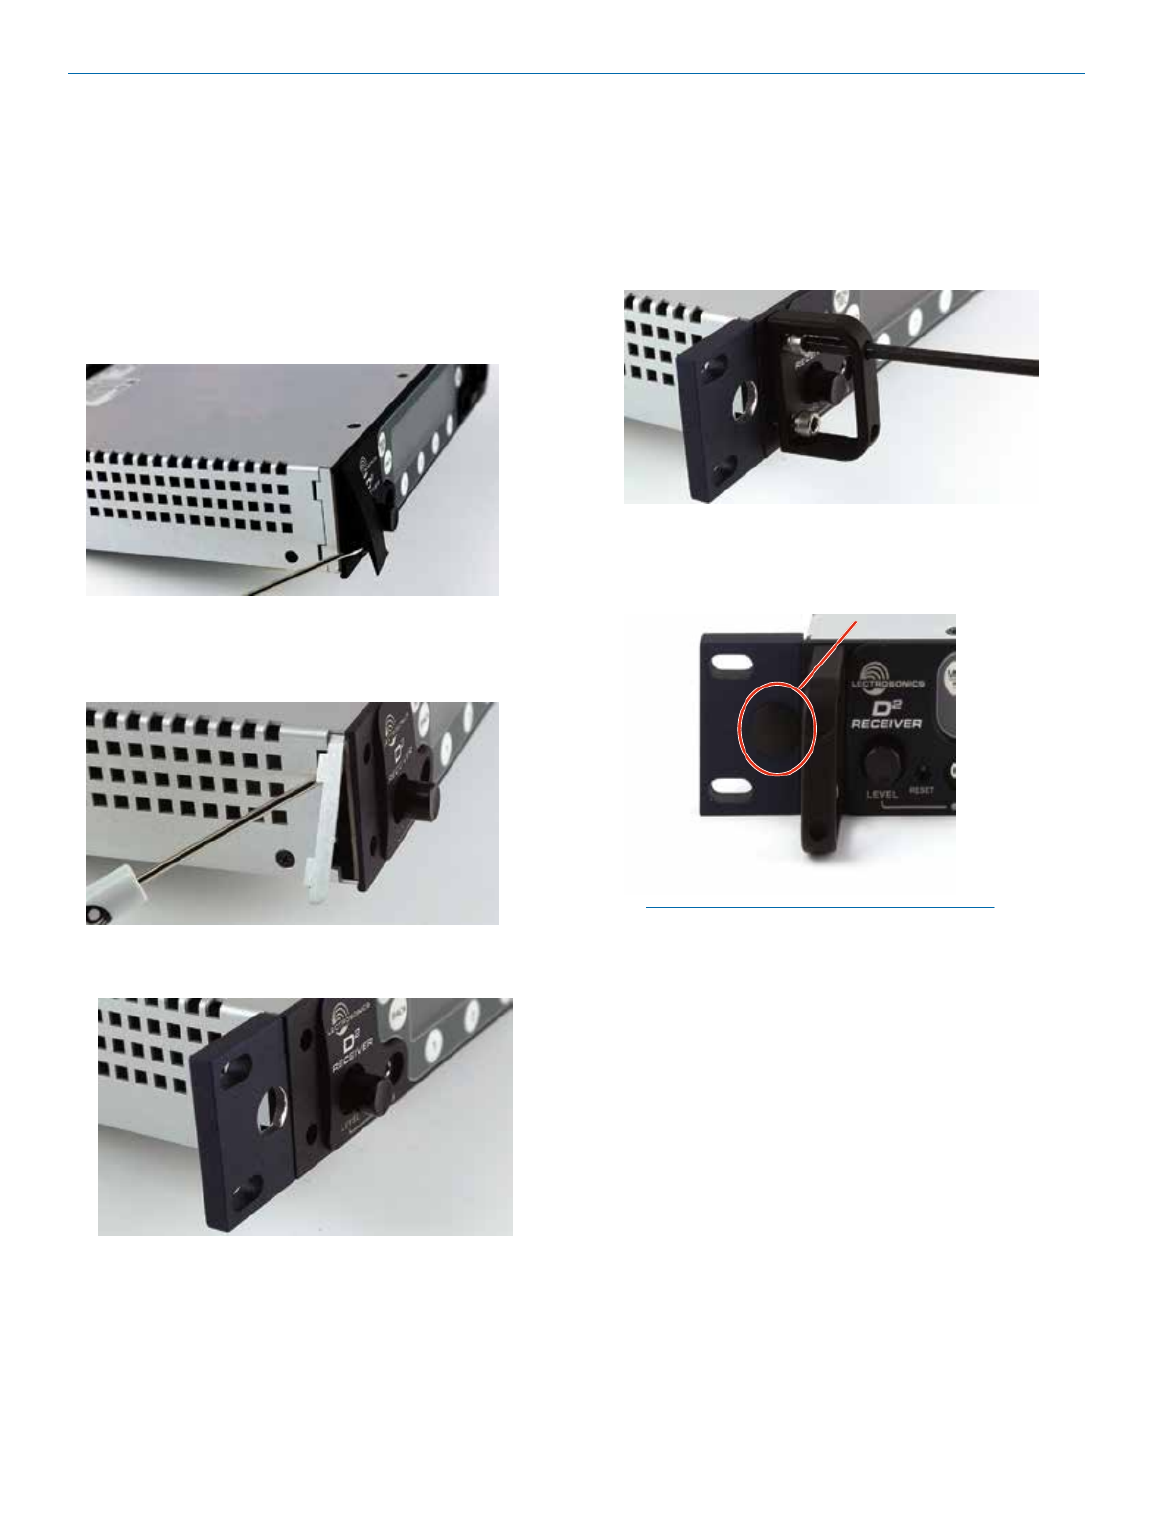
4. Insert two (2) cap screws (Part #28885) through the
rack handle (Part #27082) holes and install the rack
handle onto the flange bracket through the holes in
the unit’s front panel. Firmly tighten the cap screws
using the hex key (Allen wrench) as shown.
5. If antennas will NOT be mounted on the front panel
of the receivers, install the hole cap (Part #35959)
by aligning the flat on the cap with the flat on the
opening.
Installing two DSQD
Receivers into a Single
Rack Space
The DSQD receiver occupies a half rack space, and
comes with hardware to mount two receivers into a
single rack space.
1. Remove the Trim Cap (Part #P1330) from both
sides of the front panel on both receivers.
2. Remove the breakaway tabs on both sides of the
chassis side panels. Use a flat blade screwdriver
to pry the tabs outward and snap them off of the
chassis.
3. Insert the flange bracket (Part #27076) into the
open slot in the side of the chassis cover panel.
NOTE: The retaining nuts on the panel and tie
brackets are “tensioning lock nut” types designed
to prevent the screws from coming loose due to
vibration. You will usually feel resistance as you
tighten the screws - this is normal.
Specyfikacje produktu
| Marka: | Lectrosonics |
| Kategoria: | odbiornik |
| Model: | DSQD/AES3 |
Potrzebujesz pomocy?
Jeśli potrzebujesz pomocy z Lectrosonics DSQD/AES3, zadaj pytanie poniżej, a inni użytkownicy Ci odpowiedzą
Instrukcje odbiornik Lectrosonics

27 Lutego 2025
29 Września 2024
29 Września 2024
29 Września 2024
29 Września 2024
29 Września 2024
29 Września 2024
29 Września 2024
29 Września 2024
29 Września 2024
Instrukcje odbiornik
- odbiornik Sony
- odbiornik Yamaha
- odbiornik Motorola
- odbiornik Logitech
- odbiornik Sharp
- odbiornik Pioneer
- odbiornik Philips
- odbiornik Plantronics
- odbiornik SilverCrest
- odbiornik Technics
- odbiornik Bosch
- odbiornik JBL
- odbiornik Onkyo
- odbiornik Edision
- odbiornik Roland
- odbiornik Geemarc
- odbiornik Nokia
- odbiornik KEF
- odbiornik Bose
- odbiornik Zgemma
- odbiornik Panasonic
- odbiornik StarTech.com
- odbiornik Klipsch
- odbiornik Crestron
- odbiornik Behringer
- odbiornik Asus
- odbiornik Nedis
- odbiornik Nexa
- odbiornik Medion
- odbiornik Tangent
- odbiornik Boss
- odbiornik Peiying
- odbiornik Marquant
- odbiornik Majestic
- odbiornik Jensen
- odbiornik August
- odbiornik Garmin
- odbiornik Blaupunkt
- odbiornik ATen
- odbiornik Salora
- odbiornik Teac
- odbiornik Metra
- odbiornik Martin Logan
- odbiornik Dual
- odbiornik Hegel
- odbiornik S.M.S.L
- odbiornik Line 6
- odbiornik DAP-Audio
- odbiornik Manhattan
- odbiornik Strong
- odbiornik Tripp Lite
- odbiornik Shure
- odbiornik Denon
- odbiornik Mercury
- odbiornik Block
- odbiornik Phoenix Gold
- odbiornik Audac
- odbiornik Cisco
- odbiornik Cambridge
- odbiornik Smart
- odbiornik Kenwood
- odbiornik Scosche
- odbiornik NuPrime
- odbiornik Polk
- odbiornik DJI
- odbiornik Alpine
- odbiornik Ibanez
- odbiornik Godox
- odbiornik Chamberlain
- odbiornik Lindy
- odbiornik Bang & Olufsen
- odbiornik JVC
- odbiornik Konig & Meyer
- odbiornik Trust
- odbiornik LogiLink
- odbiornik Memphis Audio
- odbiornik IFM
- odbiornik Datapath
- odbiornik Jamo
- odbiornik Focusrite
- odbiornik Rega
- odbiornik IRiver
- odbiornik Hilti
- odbiornik TechniSat
- odbiornik Auna
- odbiornik Vimar
- odbiornik Nubert
- odbiornik Dahua Technology
- odbiornik LD Systems
- odbiornik Krüger&Matz
- odbiornik Audioengine
- odbiornik Emos
- odbiornik AVMATRIX
- odbiornik Renkforce
- odbiornik Marshall
- odbiornik Audiotec Fischer
- odbiornik Clarion
- odbiornik Thomson
- odbiornik DiO
- odbiornik Pro-Ject
- odbiornik AVM
- odbiornik Velleman
- odbiornik Ferguson
- odbiornik Fusion
- odbiornik BOYA
- odbiornik Homematic IP
- odbiornik Neumann
- odbiornik DataVideo
- odbiornik Wharfedale
- odbiornik Intertechno
- odbiornik Magnat
- odbiornik Delta Dore
- odbiornik Pyle
- odbiornik ELAC
- odbiornik Zoom
- odbiornik Panduit
- odbiornik Devolo
- odbiornik Marantz
- odbiornik Sennheiser
- odbiornik Esoteric
- odbiornik Jabra
- odbiornik Chord
- odbiornik Vivotek
- odbiornik Speco Technologies
- odbiornik Medeli
- odbiornik Bowers & Wilkins
- odbiornik Samson
- odbiornik Imperial
- odbiornik PreSonus
- odbiornik Monitor Audio
- odbiornik Audio Pro
- odbiornik Blackstar
- odbiornik Fosi Audio
- odbiornik Revox
- odbiornik Ibiza Sound
- odbiornik Vonyx
- odbiornik Musical Fidelity
- odbiornik Bogen
- odbiornik Alto
- odbiornik Naim
- odbiornik Peavey
- odbiornik Camille Bauer
- odbiornik ART
- odbiornik NAD
- odbiornik RCF
- odbiornik Harman Kardon
- odbiornik Rolls
- odbiornik Audio-Technica
- odbiornik GoGen
- odbiornik Genie
- odbiornik Blustream
- odbiornik Aiwa
- odbiornik JL Audio
- odbiornik AKAI
- odbiornik Axis
- odbiornik ICOM
- odbiornik Vivolink
- odbiornik REL Acoustics
- odbiornik Teufel
- odbiornik Sunfire
- odbiornik Hartke
- odbiornik Klark Teknik
- odbiornik Vision
- odbiornik Telefunken
- odbiornik Eventide
- odbiornik Optoma
- odbiornik Proel
- odbiornik Hifonics
- odbiornik Focal
- odbiornik Taga Harmony
- odbiornik Audix
- odbiornik DBX
- odbiornik Kicker
- odbiornik Amazon
- odbiornik Thorens
- odbiornik Bresser
- odbiornik Rocstor
- odbiornik Omnitronic
- odbiornik Hama
- odbiornik Mackie
- odbiornik Marmitek
- odbiornik Palmer
- odbiornik FiiO
- odbiornik Lindell Audio
- odbiornik Vincent
- odbiornik Smart-AVI
- odbiornik MXL
- odbiornik Goobay
- odbiornik Optex
- odbiornik Reely
- odbiornik BC Acoustique
- odbiornik Lotronic
- odbiornik Bush
- odbiornik Dreambox
- odbiornik Saramonic
- odbiornik Bluesound
- odbiornik Kemo
- odbiornik Deaf Bonce
- odbiornik Sangean
- odbiornik VOX
- odbiornik Insignia
- odbiornik SVS
- odbiornik Hager
- odbiornik Inateck
- odbiornik Arcam
- odbiornik Mac Audio
- odbiornik Infinity
- odbiornik McIntosh
- odbiornik Advance Acoustic
- odbiornik Revel
- odbiornik Denver
- odbiornik ACV
- odbiornik Dynacord
- odbiornik Marshall Electronics
- odbiornik Ashly
- odbiornik Fender
- odbiornik Hertz
- odbiornik InLine
- odbiornik Inter-M
- odbiornik Kali Audio
- odbiornik Mooer
- odbiornik AKG
- odbiornik MEE Audio
- odbiornik Atlas Sound
- odbiornik The T.amp
- odbiornik IOTAVX
- odbiornik Futaba
- odbiornik Trevi
- odbiornik Atlona
- odbiornik Elektrobock
- odbiornik FSR
- odbiornik Simrad
- odbiornik Salus
- odbiornik Gefen
- odbiornik Vivanco
- odbiornik Fishman
- odbiornik Radial Engineering
- odbiornik Sencor
- odbiornik Definitive Technology
- odbiornik Ground Zero
- odbiornik Polsen
- odbiornik Raymarine
- odbiornik Stinger
- odbiornik Power Dynamics
- odbiornik AEA
- odbiornik Kanto
- odbiornik Alecto
- odbiornik Kathrein
- odbiornik Rockford Fosgate
- odbiornik Clare Controls
- odbiornik Canton
- odbiornik JUNG
- odbiornik TOA
- odbiornik Monacor
- odbiornik HQ Power
- odbiornik Hotone
- odbiornik Electro-Voice
- odbiornik Anthem
- odbiornik Audizio
- odbiornik Tascam
- odbiornik RME
- odbiornik AudioControl
- odbiornik Karma
- odbiornik Smartwares
- odbiornik Audiolab
- odbiornik Vocopro
- odbiornik Technical Pro
- odbiornik SPL
- odbiornik Fontastic
- odbiornik Cyrus
- odbiornik Gold Note
- odbiornik Terratec
- odbiornik Crunch
- odbiornik Alfatron
- odbiornik Sound Devices
- odbiornik Match
- odbiornik Megasat
- odbiornik Sogo
- odbiornik Classé
- odbiornik Reloop
- odbiornik Fenton
- odbiornik Artsound
- odbiornik Chandler
- odbiornik Belkin
- odbiornik Kramer
- odbiornik KanexPro
- odbiornik Kopul
- odbiornik BZBGear
- odbiornik Cranborne Audio
- odbiornik Rupert Neve Designs
- odbiornik Key Digital
- odbiornik Ram Audio
- odbiornik Whirlwind
- odbiornik Music Hall
- odbiornik Apantac
- odbiornik AMX
- odbiornik Inovonics
- odbiornik SRS
- odbiornik Sonance
- odbiornik Rotel
- odbiornik Atlas
- odbiornik C2G
- odbiornik Brondi
- odbiornik Lumantek
- odbiornik Ampeg
- odbiornik Amplicom
- odbiornik American Audio
- odbiornik Devialet
- odbiornik IFi Audio
- odbiornik Cabasse
- odbiornik Amiko
- odbiornik Hirschmann
- odbiornik Audison
- odbiornik Palsonic
- odbiornik Caliber
- odbiornik Meliconi
- odbiornik Exibel
- odbiornik Telestar
- odbiornik Sagem
- odbiornik Summit Audio
- odbiornik Musway
- odbiornik Brigmton
- odbiornik Sunstech
- odbiornik Avalon
- odbiornik Oculus VR
- odbiornik Redline
- odbiornik Matrox
- odbiornik Steren
- odbiornik Sandberg
- odbiornik Galaxy Audio
- odbiornik Denson
- odbiornik Renegade
- odbiornik Yaesu
- odbiornik Pyle Pro
- odbiornik Roksan
- odbiornik MB Quart
- odbiornik Valcom
- odbiornik Astro
- odbiornik Maxview
- odbiornik Rocketfish
- odbiornik Naxa
- odbiornik Sherwood
- odbiornik QTX
- odbiornik Konig
- odbiornik Valueline
- odbiornik Conrad
- odbiornik RDL
- odbiornik Zehnder
- odbiornik Mx Onda
- odbiornik Fredenstein
- odbiornik Metronic
- odbiornik Harper
- odbiornik TV STAR
- odbiornik QSC
- odbiornik Lanzar
- odbiornik Humax
- odbiornik Vaddio
- odbiornik Gira
- odbiornik Golden Age Project
- odbiornik Apart
- odbiornik Pinnacle
- odbiornik HQ
- odbiornik Max
- odbiornik Homecast
- odbiornik Graupner
- odbiornik Integra
- odbiornik Russound
- odbiornik Engel Axil
- odbiornik Comica
- odbiornik Audient
- odbiornik PAC
- odbiornik Skytec
- odbiornik Luxman
- odbiornik JETI
- odbiornik Linn
- odbiornik Monoprice
- odbiornik Yorkville
- odbiornik Advance
- odbiornik WyreStorm
- odbiornik Sonifex
- odbiornik TV One
- odbiornik Exposure
- odbiornik Axton
- odbiornik Fostex
- odbiornik FBT
- odbiornik MIPRO
- odbiornik Solid State Logic
- odbiornik Neets
- odbiornik NAV-TV
- odbiornik HiFi ROSE
- odbiornik OSD Audio
- odbiornik Mark Levinson
- odbiornik Black Lion Audio
- odbiornik Soundstream
- odbiornik Xoro
- odbiornik DLS
- odbiornik Adastra
- odbiornik PSB
- odbiornik Aeon Labs
- odbiornik Citronic
- odbiornik CSL
- odbiornik Formuler
- odbiornik Universal Audio
- odbiornik Warm Audio
- odbiornik LTC
- odbiornik JB Systems
- odbiornik Zalman
- odbiornik Orava
- odbiornik Thomann
- odbiornik James
- odbiornik HUMANTECHNIK
- odbiornik SIIG
- odbiornik PSSO
- odbiornik Crest Audio
- odbiornik Grace Design
- odbiornik Primare
- odbiornik Xantech
- odbiornik Wet Sounds
- odbiornik Televés
- odbiornik Hughes & Kettner
- odbiornik Manley
- odbiornik Intelix
- odbiornik MuxLab
- odbiornik Extron
- odbiornik Ocean Matrix
- odbiornik Comprehensive
- odbiornik HEOS
- odbiornik Legamaster
- odbiornik Madison
- odbiornik Ebode
- odbiornik Phonocar
- odbiornik Xtrend
- odbiornik Scansonic
- odbiornik Helix
- odbiornik Winegard
- odbiornik Laney
- odbiornik ETON
- odbiornik Xsarius
- odbiornik EA
- odbiornik DirecTV
- odbiornik Octagon
- odbiornik GOgroove
- odbiornik Crown
- odbiornik Kogan
- odbiornik Morel
- odbiornik Avantree
- odbiornik LYYT
- odbiornik Antelope Audio
- odbiornik CE Labs
- odbiornik Pharos
- odbiornik Accell
- odbiornik Jolida
- odbiornik Ecler
- odbiornik Lab Gruppen
- odbiornik Viscount
- odbiornik Ashdown Engineering
- odbiornik Triax
- odbiornik Synq
- odbiornik Mtx Audio
- odbiornik Aquatic AV
- odbiornik Parasound
- odbiornik DB Technologies
- odbiornik Roswell
- odbiornik Velodyne
- odbiornik Epcom
- odbiornik Selfsat
- odbiornik AVPro Edge
- odbiornik Evolution
- odbiornik Skytronic
- odbiornik CYP
- odbiornik Topp Pro
- odbiornik Whistler
- odbiornik Astell&Kern
- odbiornik Bellari
- odbiornik Dimavery
- odbiornik AMS Neve
- odbiornik A-NeuVideo
- odbiornik Aguilar
- odbiornik Powersoft
- odbiornik LinksPoint
- odbiornik Markbass
- odbiornik IMG Stage Line
- odbiornik Wireless Solution
- odbiornik Leviton
- odbiornik Aurel
- odbiornik ESX
- odbiornik NUVO
- odbiornik Phoenix Audio
- odbiornik Comtek
- odbiornik RetroSound
- odbiornik Pyramid
- odbiornik LEA
- odbiornik Sound Ordnance
- odbiornik Canyon
- odbiornik FiveO
- odbiornik Planet Audio
- odbiornik SureCall
- odbiornik CAD Audio
- odbiornik Black Hydra
- odbiornik Elipson
- odbiornik Phonic
- odbiornik Koda
- odbiornik Trace Elliot
- odbiornik Bang Olufsen
- odbiornik JTS
- odbiornik AER
- odbiornik Dynavox
- odbiornik Modelcraft
- odbiornik Simaudio
- odbiornik TIC
- odbiornik Niles
- odbiornik Knoll
- odbiornik Creek
- odbiornik Mobile Crossing
- odbiornik DAP
- odbiornik Krell
- odbiornik Edwards Signaling
- odbiornik GigaBlue
- odbiornik ANKARO
- odbiornik Bugera
- odbiornik Triangle
- odbiornik Wavtech
- odbiornik AmpliVox
- odbiornik Audiofrog
- odbiornik CyberData Systems
- odbiornik Williams Sound
- odbiornik Lyngdorf
- odbiornik SoundTube
- odbiornik WesAudio
- odbiornik AudioSource
- odbiornik Stewart
- odbiornik Leema
- odbiornik Axing
- odbiornik Seco-Larm
- odbiornik Mosconi
- odbiornik Crest
- odbiornik TechLogix Networx
- odbiornik Audibax
- odbiornik Meridian
- odbiornik Quad
- odbiornik Shinybow
- odbiornik Rexing
- odbiornik Shanling
- odbiornik Sinus Live
- odbiornik Soundtrack
- odbiornik Canor
- odbiornik Unison Research
- odbiornik Cerwin-Vega
- odbiornik Universal Remote Control
- odbiornik BMB
- odbiornik Cloud
- odbiornik Antelope
- odbiornik PTN-electronics
- odbiornik Loxjie
- odbiornik Cayin
- odbiornik VMV
- odbiornik GlobalSat
- odbiornik Aplic
- odbiornik PureLink
- odbiornik FoneStar
- odbiornik Henry Engineering
- odbiornik Glemm
- odbiornik ButtKicker
- odbiornik Atoll
- odbiornik Benchmark
- odbiornik VigilLink
- odbiornik SmartSystem
- odbiornik DARTS
- odbiornik Streacom
Najnowsze instrukcje dla odbiornik

9 Kwietnia 2025
9 Kwietnia 2025
5 Kwietnia 2025
4 Kwietnia 2025

3 Kwietnia 2025
2 Kwietnia 2025
2 Kwietnia 2025
1 Kwietnia 2025
30 Marca 2025
30 Marca 2025