Instrukcja obsługi Kramer KIT-500
Kramer
przełącznik
KIT-500
Przeczytaj poniżej 📖 instrukcję obsługi w języku polskim dla Kramer KIT-500 (4 stron) w kategorii przełącznik. Ta instrukcja była pomocna dla 19 osób i została oceniona przez 2 użytkowników na średnio 4.5 gwiazdek
Strona 1/4

KIT- 500 Quick Start
P/N:
2900- 301656QS
Rev:
7
Scan for full manual
KIT- Quick Start Guide 500
This guide helps you install and use your KIT-500 for the first time.
Go to www.kramerav.com/downloads/KIT-500 to download the latest user manual and check if rmware
upgrades are available.
Step 1: Check what’s in the box
KIT-500 including:
KIT- 4K HDMI/USB-C Auto Transmitter500T
KIT- 4K HDBT/HDMI Receiver/Scaler500R
2 Bracket sets
8 Rubber feet
1 Power adapter
1 Quick start guide
1 Multi-signal USB- cable (1m) C
Power cord
On customer request, USA&CA UL Listed Power supply: Input 100-240VAC 50-60Hz, output 24VDC 5A with the appropriate AC
plugs could be delivered in the same package with KIT-500/MTX2- -T. 42
Step 2: Get to know your KIT-500
KIT-500T
#
Feature
Function
1
OUTPUT
Select Button
Press to select the output to be switched when a selected input button is pressed.
HDMI/HDBT LEDs
LED lights green when selected.
2
INPUT
Buttons
USB-C (1 and 2)
Press to select a USB-C input. Button illuminates when that input is selected.
HDMI (1 and 2)
Press to select an HDMI input. Button illuminates when that input is selected.
REMOTE
Press to select the HDMI (REMOTE) input as the input to . Button KIT-500R
illuminates when that input is selected.
Note that this button is only operational if HDBT is selected via the OUTPUT button.
3
USB
Select Button
Press to select the USB HOST port to connect to the USB HUB devices .
1/2 LEDs
Lights green when selected.
4
MENU Button
Press to display the OSD menu.KIT-500
The OSD menu can be viewed on the acceptor that is connected to the
KIT-500R.
5
Navigation
Buttons
Press to decrease numerical values or select from several denitions.
When not in the OSD menu, press to reduce the output volume.
Press to move up the menu list values.
Press to increase numerical values or select from several denitions.
When not in the OSD menu, press to increase the output volume.
Press to move down the menu list.
ENTER
Press to accept changes and change the SETUP parameters.
6
RESET TO 1080p Button
Press and hold for about 5 seconds to reset the output resolution The rst press .
resets the resolution to 720p and the next press resets 1080p.to
7
PANEL LOCK Button
Press to lock/unlock the front panel buttons.

# Feature Function
8
USB HUB USB 3.0 Type A
Ports (3)
Connect to USB devices. The user can select which USB host (USB 1 or USB 2 on
the transmitter) is connected to the USB devices.
9
USB 3.0 Host Port (1 and 2)
Connect to USB hosts.
10
AUDIO IN
AUX 3.5mm
Mini Jack
Connect to unbalanced, analog audio source (for example, the audio output of the an
laptop).
MIC 3-pin
Terminal Block
Connect to a dynamic or condenser (with 48V phantom power) microphone.
11
AUDIO OUT 5-pin Terminal
Block
Connect to a balanced, stereo audio acceptor (for example, active speakers).
12
RS- 232
DATA 3-pin Terminal
Block Connector
Connect to a serial data source or acceptor to extend RS-232 between KIT-500T and
KIT-500R.
CONTROL 3-pin
Terminal Block
Connector
Connect to a serial controller or PC to control or for to control an KIT-500 KIT-500
external device.
13
PROGRAM USB Connector
Connect to a PC to perform a rmware upgrade.
14
ETH -45 Connector RJ
Connect to the LAN (Ethernet trac or PC controller).
15
USB-C Port (1 and 2)
Connect to USB- sources. C
Both USB-C ports support DP Alt mode, Ethernet and USB data transfer.
USB-C 1 supports up to 60W charging.
Power delivery to USB-C 1 is not supported when KIT-500R delivers power
to via PoC. KIT-500T
16
HDMI Connector
Connect to an HDMI source.
17
HDMI OUT Connector
Connect to an HDMI acceptor.
18
HDBT OUT RJ- Connector 45
Connect to . KIT-500R
Follow powering instructions in Step 5 Connect power: .
Failure to use PoC and power connector correctly may destroy the devices!
19
PoC (Power over Cable) Switch
Set the PoC switch to ON on both . KIT-500T and KIT-500R
20
24V DC Connector
Connect to the supplied power adapter, unless the power adapter is connected
to .
KIT-500R
KIT 500R-
#
Feature
Function
21
PROG USB Connector
Connect to a USB stick to perform rmware upgrades.
22
INPUTS
SELECT Button
Press to toggle between the HDBT and HDMI inputs to select the input (HDBT
or HDMI).
By default, the SELECT button is locked. You can unlock it via the ADVANCED
menu in the OSD.
HDBT LED
Lights blue when the HDBT input is selected.
HDMI LED
Lights blue when the HDMI input is selected.
23
USB DEVICE USB 2.0 Type A Ports (2)
Connect to USB devices The user can select which USB host (USB 1 or USB .
2 on the transmitter) is connected to the USB devices.
24
MENU Button
Press to enter/exit the on-screen display (OSD) menu.
Press together with the button to reset to 108 . –0p
25
ENTER Button
In OSD, press to choose the highlighted menu item. Press together with the
FREEZE/+ button to reset to XGA.
26
–
In OSD, to move back through menus or decrement parameter value PRESS s.
27
FREEZE Button/+
In OSD, press to move forward through menus or increment parameter values.
When not in OSD, press to freeze the display.
28
LINK LED
Lights blue when a link is established with the transmitter.
29
ON LED
Lights green when device is powered.
30
INPUTS
HDBT -45 Connector RJ
Connect to . KIT-500T
31
HDMI (REMOTE)
Connector
Connect to an HDMI source.
32
REMOTE Contact-Closure 4-pin
Terminal Block Connector
Connect to contact closure switches to send CEC commands to the display.
The TOGGLE pin may be congured for toggling (edge-triggered), or for ON /
OFF (level-triggered). See . Step 6: Operate KIT-500
# Feature Function
33
RS- 232
CONTROL 3-pin Terminal
Block Connector
Connect to a serial controller or PC to control using P3K, or for KIT-500
KIT-500 to control an external device.
34
DATA 3-pin Terminal Block
Connector
Connect to a serial data source or acceptor for extending RS-232 between
KIT- KIT-500T and 500R via HDBT.
35
RELAY SPDT 3-pin Terminal Block
Connector
Connections to the internal relay Normally open (NO), ’s contact terminals:
normally closed (NC), and common (C) Connect to devices to be controlled by .
relay (for example, a motorized projection screen).
36
OUTPUT
AUDIO 5-pin Terminal
Block Connector
Connect to a balanced analog stereo audio acceptor.
37
HDMI Connector
Connect to an HDMI acceptor.
Follow powering instructions in Step 5 Connect power: .
Failure to use PoC and power connector correctly may destroy the devices!
38
PoC (Power Over Cable) Switch
Set the PoC switch to ON on both . KIT-500T and KIT-500R
39
24V DC Connector
Connect to the supplied power adapter, unless the power adapter is connected
to .
KIT-500T
Step 3: Mount - KIT 500
Install using one of the following methods: KIT-500
• Attach the rubber feet and place the unit on a at surface.
• Fasten a bracket (included) on each side of the unit and attach it to a at surface
(see
www.kramerav.com/downloads/KIT-500).
• Mount the unit in a rack using the recommended rack adapter
(see
www.kramerav.com/product/KIT-500).
• Ensure that the environment (e.g., maximum ambient temperature &
air ow) is compatible for the device.
• Avoid uneven mechanical loading.
• Appropriate consideration of equipment nameplate ratings should be
used for avoiding overloading of the circuits.
• Reliable earthing of rack-mounted equipment should be maintained.
• Maximum mounting height for the device is 2 meters.
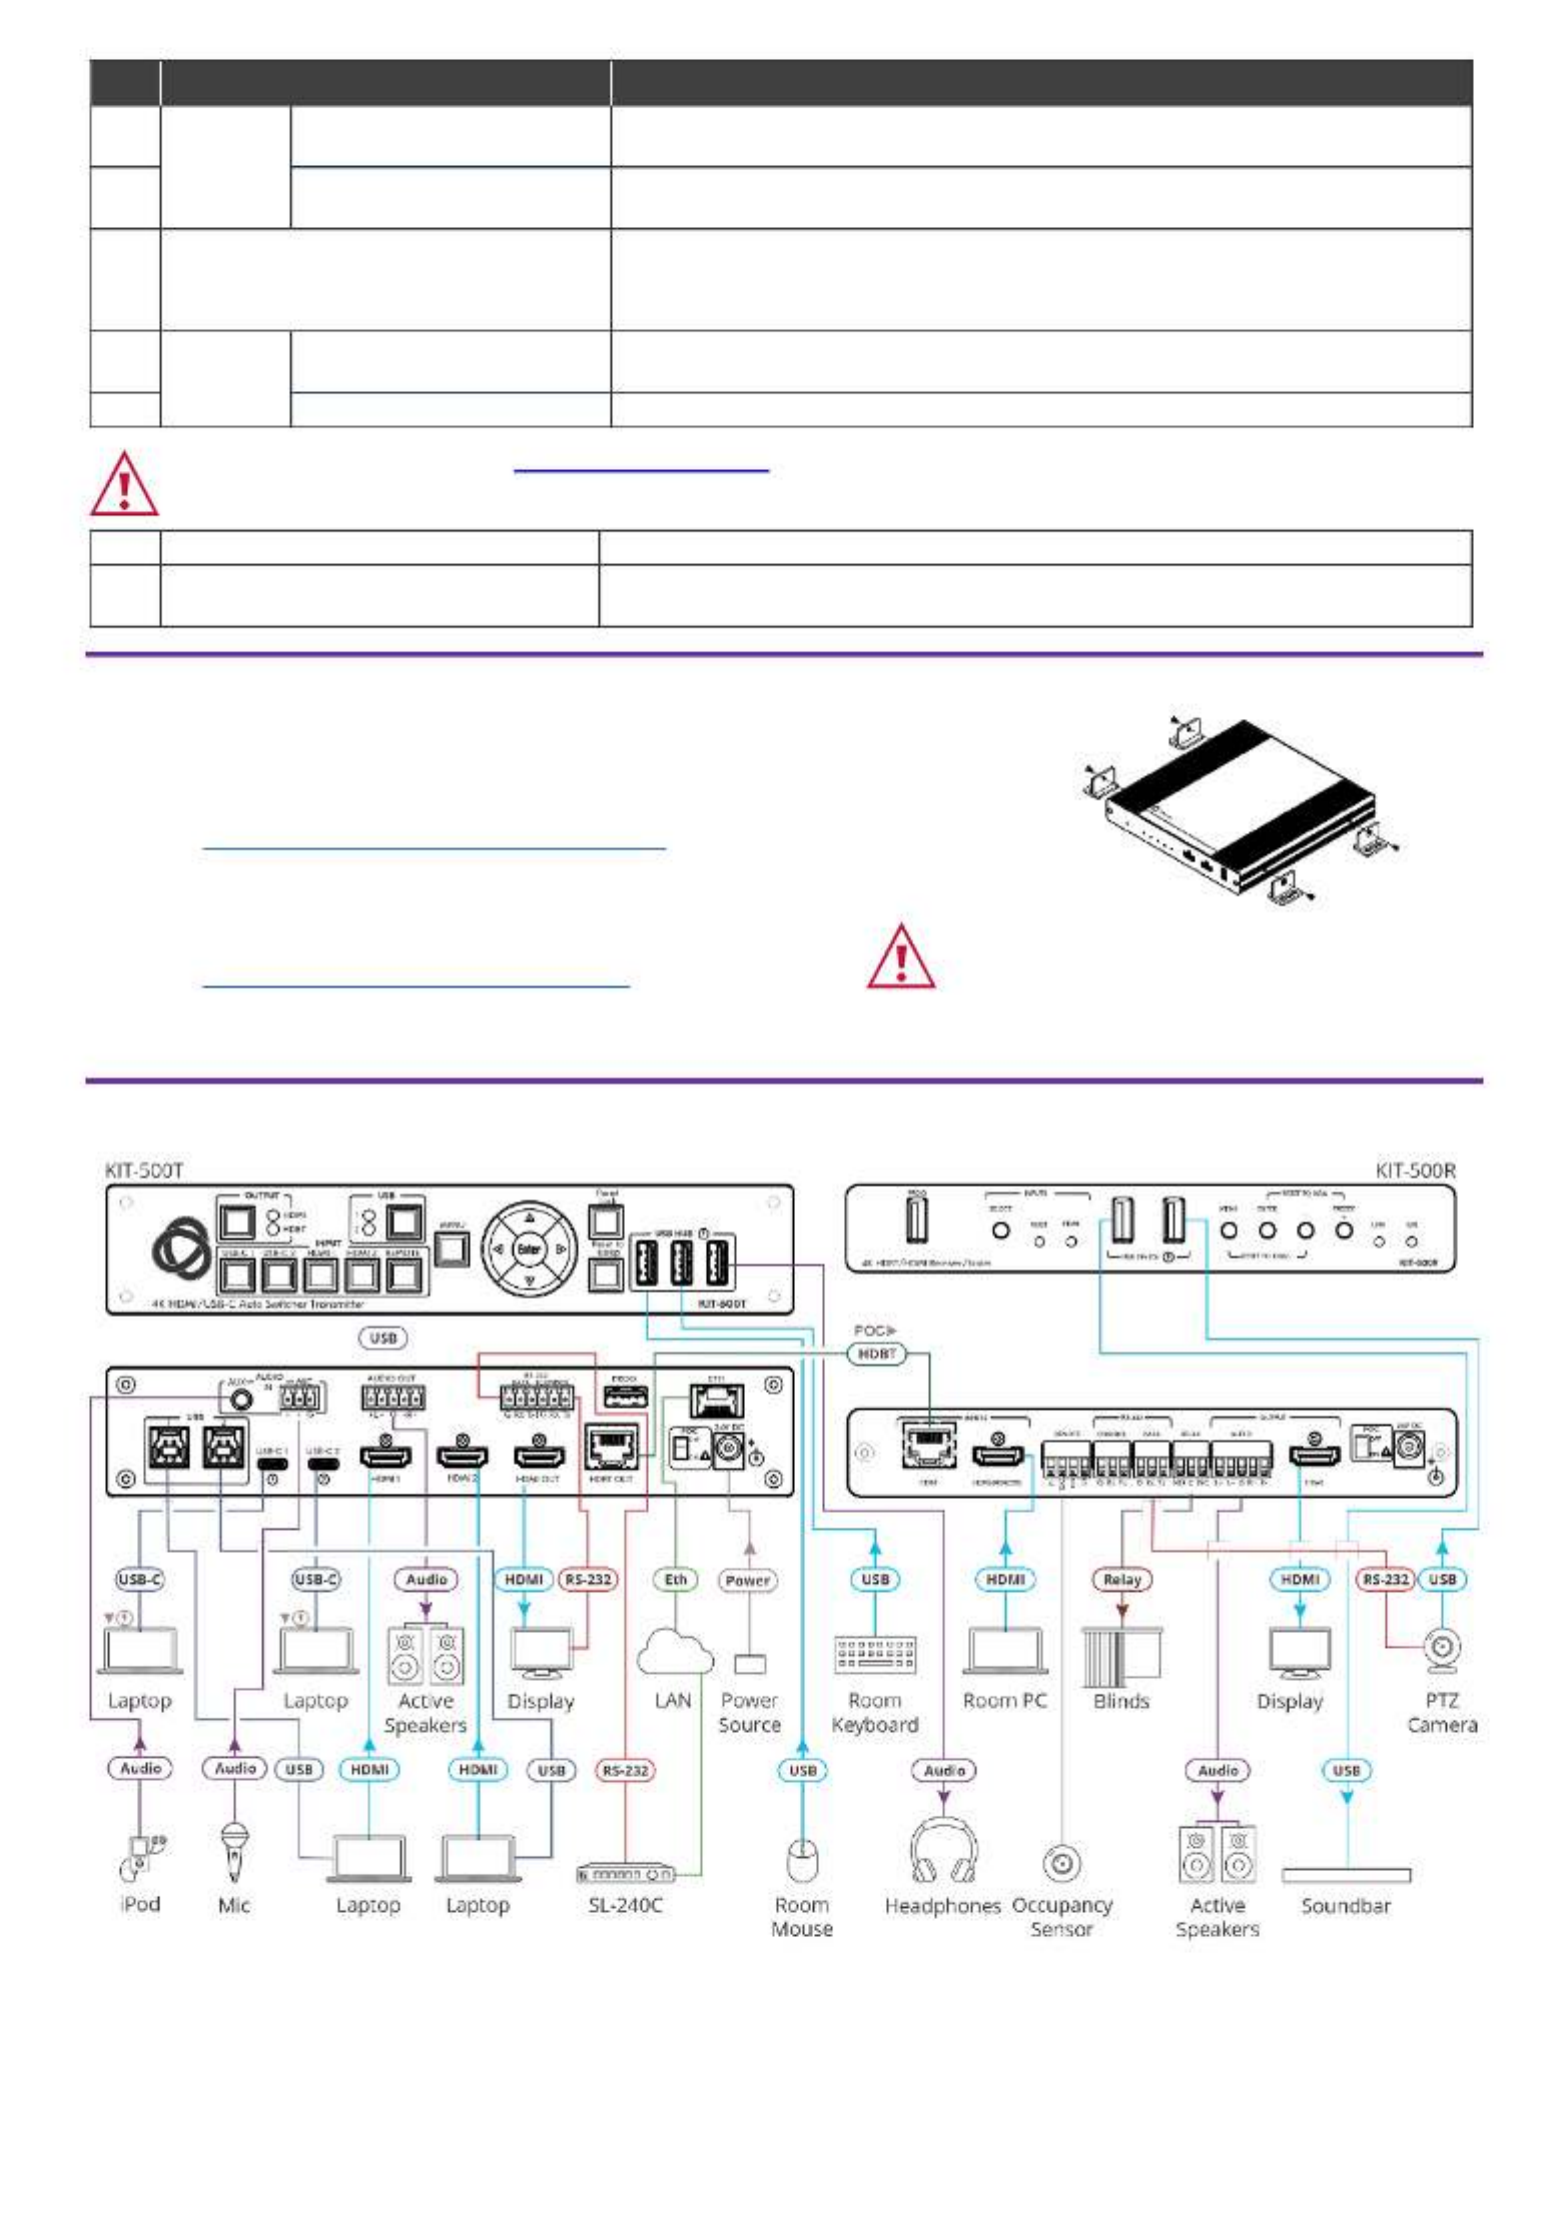
Step 4: Connect inputs and outputs
Specyfikacje produktu
| Marka: | Kramer |
| Kategoria: | przełącznik |
| Model: | KIT-500 |
Potrzebujesz pomocy?
Jeśli potrzebujesz pomocy z Kramer KIT-500, zadaj pytanie poniżej, a inni użytkownicy Ci odpowiedzą
Instrukcje przełącznik Kramer

2 Lutego 2025
19 Grudnia 2024
19 Grudnia 2024
19 Grudnia 2024
19 Grudnia 2024
19 Grudnia 2024
18 Grudnia 2024
20 Września 2024
4 Sierpnia 2024
3 Sierpnia 2024
Instrukcje przełącznik
- przełącznik Yamaha
- przełącznik Ikea
- przełącznik Tenda
- przełącznik Worx
- przełącznik Huawei
- przełącznik TP-Link
- przełącznik Philips
- przełącznik Plantronics
- przełącznik SilverCrest
- przełącznik Bosch
- przełącznik Hikvision
- przełącznik IPGARD
- przełącznik Toolcraft
- przełącznik Panasonic
- przełącznik StarTech.com
- przełącznik Theben
- przełącznik Crestron
- przełącznik Behringer
- przełącznik Asus
- przełącznik Nedis
- przełącznik Nexa
- przełącznik Boss
- przełącznik TRENDnet
- przełącznik Tesla
- przełącznik D-Link
- przełącznik ATen
- przełącznik Metra
- przełącznik APC
- przełącznik Alcatel
- przełącznik Eberle
- przełącznik HP
- przełącznik Honeywell
- przełącznik Manhattan
- przełącznik Tripp Lite
- przełącznik Mikrotik
- przełącznik Mercury
- przełącznik Shimano
- przełącznik Audac
- przełącznik Cisco
- przełącznik ORNO
- przełącznik Alpine
- przełącznik Chamberlain
- przełącznik Paladin
- przełącznik Lindy
- przełącznik ZyXEL
- przełącznik LogiLink
- przełącznik IFM
- przełącznik Linksys
- przełącznik Digitus
- przełącznik Vimar
- przełącznik Dahua Technology
- przełącznik Schneider
- przełącznik Renkforce
- przełącznik BaseTech
- przełącznik Perel
- przełącznik Trotec
- przełącznik Adder
- przełącznik Ansmann
- przełącznik Netgear
- przełącznik Velleman
- przełącznik Homematic IP
- przełącznik DataVideo
- przełącznik One For All
- przełącznik Totolink
- przełącznik Intertechno
- przełącznik Black Box
- przełącznik Victron Energy
- przełącznik Delta Dore
- przełącznik Pyle
- przełącznik Lancom
- przełącznik Adviti
- przełącznik Iogear
- przełącznik Intellinet
- przełącznik Setti+
- przełącznik Jabra
- przełącznik Vivotek
- przełącznik PreSonus
- przełącznik Mercusys
- przełącznik Shelly
- przełącznik Edimax
- przełącznik AirLive
- przełącznik EnGenius
- przełącznik SPC
- przełącznik Planet
- przełącznik Brilliant
- przełącznik Blustream
- przełącznik LevelOne
- przełącznik Vivolink
- przełącznik Suevia
- przełącznik Abus
- przełącznik Omnitronic
- przełącznik Elro
- przełącznik Hama
- przełącznik Marmitek
- przełącznik Ubiquiti Networks
- przełącznik Smart-AVI
- przełącznik Goobay
- przełącznik Kaiser
- przełącznik Equip
- przełącznik Kemo
- przełącznik Juniper
- przełącznik Cudy
- przełącznik QNAP
- przełącznik Micro Connect
- przełącznik Hager
- przełącznik Extech
- przełącznik Elation
- przełącznik Rex
- przełącznik Emerson
- przełącznik Ernitec
- przełącznik Vemer
- przełącznik CyberPower
- przełącznik Electro Harmonix
- przełącznik Atlona
- przełącznik Elektrobock
- przełącznik Fibaro
- przełącznik Gefen
- przełącznik SEADA
- przełącznik Vivanco
- przełącznik Grandstream
- przełącznik Powerfix
- przełącznik Alecto
- przełącznik Vacmaster
- przełącznik Kathrein
- przełącznik JUNG
- przełącznik Eaton
- przełącznik Monacor
- przełącznik H-Tronic
- przełącznik EVE
- przełącznik Smartwares
- przełącznik Sygonix
- przełącznik Cotech
- przełącznik Dormakaba
- przełącznik Alfatron
- przełącznik Clas Ohlson
- przełącznik Kopp
- przełącznik Speaka
- przełącznik Belkin
- przełącznik Generac
- przełącznik KanexPro
- przełącznik BZBGear
- przełącznik RGBlink
- przełącznik Raritan
- przełącznik AMX
- przełącznik Sonance
- przełącznik Profile
- przełącznik Intermatic
- przełącznik Flamingo
- przełącznik Brennenstuhl
- przełącznik Eminent
- przełącznik KlikaanKlikuit
- przełącznik Ei Electronics
- przełącznik Sylvania
- przełącznik Tork
- przełącznik Techly
- przełącznik Matrox
- przełącznik Steren
- przełącznik AV:link
- przełącznik Buffalo
- przełącznik Audiovox
- przełącznik Merten
- przełącznik Chacon
- przełącznik Konig
- przełącznik UPM
- przełącznik Finder
- przełącznik Fantini Cosmi
- przełącznik DoorBird
- przełącznik Grasslin
- przełącznik Gira
- przełącznik WHALE
- przełącznik PAC
- przełącznik Wentronic
- przełącznik Wago
- przełącznik Lanberg
- przełącznik Monoprice
- przełącznik Nous
- przełącznik Tiptel
- przełącznik OSD Audio
- przełącznik Unify
- przełącznik Berker
- przełącznik Aeon Labs
- przełącznik Provision ISR
- przełącznik CSL
- przełącznik PCE
- przełącznik SIIG
- przełącznik Advantech
- przełącznik Merlin Gerin
- przełącznik Intelix
- przełącznik Extron
- przełącznik Avocent
- przełącznik Heitronic
- przełącznik Ebode
- przełącznik Robbe
- przełącznik ICasa
- przełącznik B-tech
- przełącznik GAO
- przełącznik Legrand
- przełącznik Kraus & Naimer
- przełącznik Noble
- przełącznik Ecler
- przełącznik Inverto
- przełącznik Triax
- przełącznik Rule
- przełącznik CYP
- przełącznik Phoenix Contact
- przełącznik Seuthe
- przełącznik Maclean Energy
- przełącznik SmartAVI
- przełącznik Leviton
- przełącznik DEHN
- przełącznik SEC24
- przełącznik Cooking Performance Group
- przełącznik Flic
- przełącznik HELGI
- przełącznik IB Connect
- przełącznik Liberty
- przełącznik PureTools
- przełącznik SunBriteTV
- przełącznik Hamlet
- przełącznik Noark
- przełącznik Cambium Networks
- przełącznik 2USB
- przełącznik Roline
- przełącznik KVM-TEC
- przełącznik STI
- przełącznik Epiphan
- przełącznik Ebara
- przełącznik Mach Power
- przełącznik Axing
- przełącznik ConnectPro
- przełącznik Atlantis Land
- przełącznik GEV
- przełącznik Pizzato Elettrica
- przełącznik Baco
- przełącznik Doepke
- przełącznik Comet
- przełącznik PureLink
- przełącznik INOGENI
- przełącznik Luxul
Najnowsze instrukcje dla przełącznik
9 Kwietnia 2025
9 Kwietnia 2025
7 Kwietnia 2025
5 Kwietnia 2025
4 Kwietnia 2025
4 Kwietnia 2025
4 Kwietnia 2025
3 Kwietnia 2025
3 Kwietnia 2025
2 Kwietnia 2025