Instrukcja obsługi Konig Electronic CMP-USBVG6 - USB Video grabber
Konig Electronic
Edycja wideo
CMP-USBVG6 - USB Video grabber
Przeczytaj poniżej 📖 instrukcję obsługi w języku polskim dla Konig Electronic CMP-USBVG6 - USB Video grabber (69 stron) w kategorii Edycja wideo. Ta instrukcja była pomocna dla 20 osób i została oceniona przez 2 użytkowników na średnio 4.5 gwiazdek
Strona 1/69
CMP-USBVG6
MANUAL (p. 2)
Video grabber with software
MODE D’EMPLOI (p. 10)
Capture Vidéo avec Logiciel
MANUALE (p. 18)
Scheda acquisizione video con Software
BRUKSANVISNING (s. 38)
Videograbber med programvara
MANUAL DE UTILIZARE (p. 46)
Placă de captură video cu software
BRUGERVEJLEDNING (s. 54)
Video registreringsenhed med software
HASZNÁLATI ÚTMUTATÓ (o. 30)
USB videó digitalizáló, szoftverrel
KÄYTTÖOHJE (s. 34)
Videograpper + ohjelmisto
ANLEITUNG (S. 6)
Video Grabber mit Software
GEBRUIKSAANWIJZING (p. 14)
Videograbber met software
MANUAL DE USO (p. 22)
Grabador de video con software
NÁVOD K POUŽITÍ (s. 42)
Video Grabber se softwarem
ΕΓΧΕΙΡΙΔΙΟ XPHΣHΣ (σελ. 50)
Εγγραφή Βίντεο με Λογισμικό
VEILEDNING (s. 58)
Videoopptaker med programvare
MANUAL (p. 26)
Captura de vídeo com software
ИНСТРУКЦИЯ (стр. 62)
Устройство захвата видео с программным
обеспечением
KILAVUZ (s. 66)
Yazılımlı video tutucu
2014-01-14
2
ENGLISH
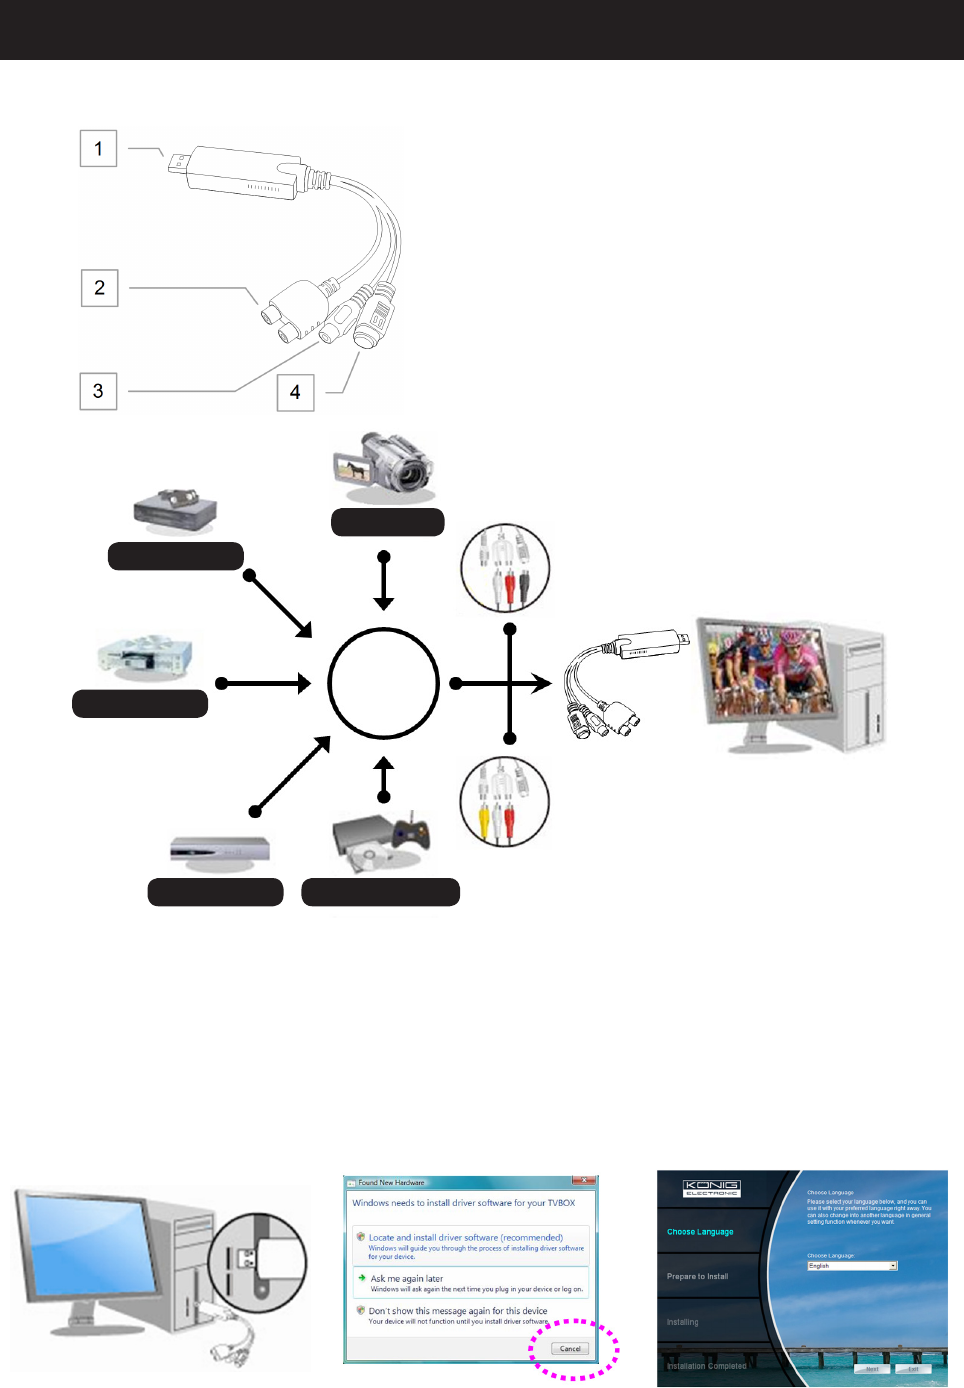
1.) Hardware Introduction
1. USB 2.0 connector
2. Audio input Left / Right
3. Composite Input
4. S-Video Input
Camera
VHS Player
DVD Player
Set-top Box Game Console
Multiple
devices
S-Video
Composite
2.) Installation
Step 1: Plug the CMP-USBVG6 into the USB port of your computer before inserting the installation CD into
the CD-ROM drive. (See picture A)
Step 2: When a window pops up after you plugged in the adapter, click “Cancel”. (See picture B)
Step 3: Insert the installation CD into the CD-ROM drive in order to install the driver and software.
The application will run automatically. When the installation main screen appears, click the “Next”
button to start the driver installation. (See picture C)
picture A picture B picture C
3
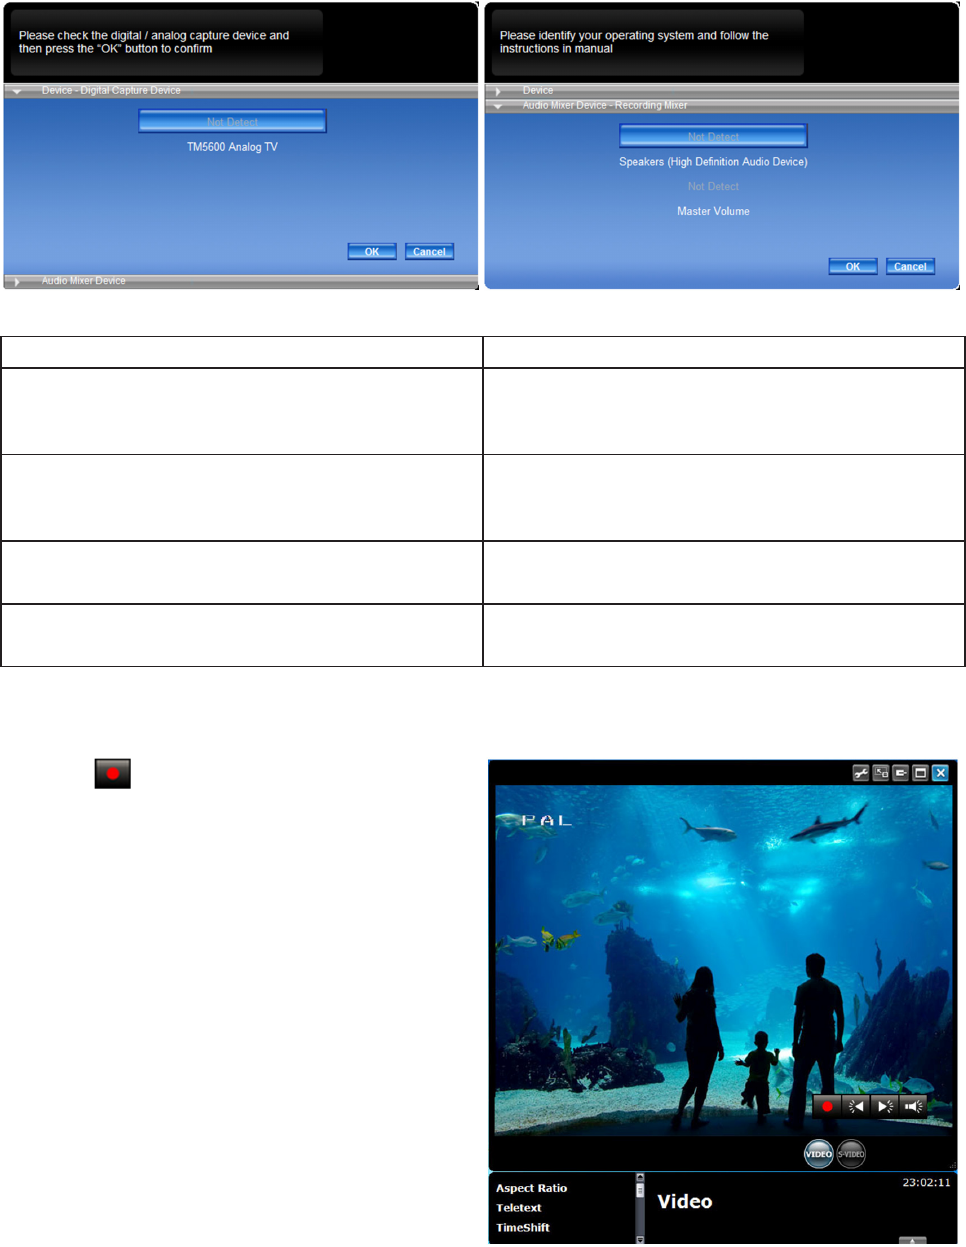
Step 4: When the program is activated for the first time, it will ask you to identify your device.
Press the “OK” button to confirm. (See picture D)
After you have identified your device, the program will ask you to set up the audio mixer device.
The information listed here is related to the recording and the playback audio settings. Identify your
operating system and follow the instructions as listed below. (See picture E)
picture D picture E
• For Windows XP AC 97 • For Windows Vista / Windows 7
Recording mixer Recording mixer
Shows the default value related to the volume
control of the input source.
Shows the default value related to the volume
control of the input source.
Playback mixer Playback mixer
Shows the default value related to the volume
control of the speaker.
Shows the default value related to the volume
control of the application.
Recording control Recording control
Select the “Line in” option. Select the “Line in” option.
Playback control Playback control
Select the “Wave” option. Select the “Wave” option.
3.) Navigate the function
3.1) Record
Click the button to record the current program.
You can watch your programs and record them at
the same time to see them at a future date.
(See picture F)
picture F
Specyfikacje produktu
| Marka: | Konig Electronic |
| Kategoria: | Edycja wideo |
| Model: | CMP-USBVG6 - USB Video grabber |
Potrzebujesz pomocy?
Jeśli potrzebujesz pomocy z Konig Electronic CMP-USBVG6 - USB Video grabber, zadaj pytanie poniżej, a inni użytkownicy Ci odpowiedzą
Instrukcje Edycja wideo Konig Electronic

25 Września 2024
24 Września 2024
Instrukcje Edycja wideo
- Edycja wideo SilverCrest
- Edycja wideo Manhattan
- Edycja wideo LogiLink
- Edycja wideo Digitus
- Edycja wideo BaseTech
- Edycja wideo Ewent
- Edycja wideo Elgato
- Edycja wideo Tevion
- Edycja wideo Envivo
- Edycja wideo ProDAD
- Edycja wideo Metronic
- Edycja wideo Pinnacle
- Edycja wideo Roxio
- Edycja wideo ELV
- Edycja wideo Magix
- Edycja wideo Q-Sonic
- Edycja wideo Tjilla
Najnowsze instrukcje dla Edycja wideo
11 Stycznia 2025
11 Stycznia 2025
28 Września 2024
28 Września 2024
27 Września 2024
Manhattan 164115 Hi-Speed USB 2.0 Audio-Video Grabber Instrukcja
27 Września 2024
25 Września 2024
24 Września 2024
23 Września 2024
23 Września 2024