Instrukcja obsługi Kenwood DPX302U
Przeczytaj poniżej 📖 instrukcję obsługi w języku polskim dla Kenwood DPX302U (76 stron) w kategorii odbiornik. Ta instrukcja była pomocna dla 6 osób i została oceniona przez 2 użytkowników na średnio 4.5 gwiazdek
Strona 1/76

For your records
Record the serial number, found on the back of the unit, in the
spaces designated on the warranty card, and in the space provided
below. Refer to the model and serial numbers whenever you
call upon your Kenwood dealer for information or service on the
product.
Model DPX302U
Serial number
US Residents Only
Register Online
Register your Kenwood product at www.Kenwoodusa.com
B5A-0903-00 (KN)© 2015 JVC KENWOOD Corporation
DPX302U
DUAL DIN SIZED CD RECEIVER
INSTRUCTION MANUAL
RECEPTEUR CD FORMAT DUAL DIN
MODE D’EMPLOI
RECEPTOR DUAL DE CD TAMAÑO DIN
MANUAL DE INSTRUCCIONES

2
CONTENTS BEFORE USE
IMPORTANT
• To ensure proper use, please read through this manual before using this product. It is especially important
that you read and observe Warning and Caution in this manual.
• Please keep the manual in a safe and accessible place for future reference.
Warning
Do not operate any function that takes your attention away from safe driving.
Caution
Volume setting:
• Adjust the volume so that you can hear sounds outside the car to prevent accidents.
• Lower the volume before playing digital sources to avoid damaging the speakers by the sudden increase of
the output level.
General:
• Avoid using the external device if it might hinder safe driving.
•
Make sure all important data has been backed up. We shall bear no responsibility for any loss of recorded data.
• Never put or leave any metallic objects (such as coins or metal tools) inside the unit to prevent a short
circuit.
• If a disc error occurs due to condensation on the laser lens, eject the disc and wait for the moisture to
evaporate.
• Depending on the types of cars, the antenna will automatically extend when you turn on the unit with the
antenna control wire connected (
23
). Turn off the unit or change the source to STANDBY when parking at
a low ceiling area.
Remote control (RC-406):
• Do not leave the remote control in hot places such as on the dashboard.
• The Lithium battery is in danger of explosion if replaced incorrectly. Replace it only with the same or
equivalent type.
• The battery pack or batteries shall not be exposed to excessive heat such as sunshine, fire or the like.
• Keep the battery out of reach of children and in its original packaging when not in used. Dispose of used
batteries promptly. If swallowed, contact a physician immediately.
How to read this manual
• Operations are explained mainly using buttons on the faceplate.
• English indications are used for the purpose of explanation. You can select the display language from the
[
FUNCTION
] menu. (
5
)
• [
XX
] indicates the selected items.
• (
XX
) indicates references are available on the stated page.
BEFORE USE 2
BASICS 3
GETTING STARTED 4
1 Select the display language
and cancel the demonstration
2 Set the clock and date
3 Set the initial settings
RADIO 5
AUX 7
CD / USB / iPod / ANDROID 7
Pandora® 10
iHeartRadio® 11
SiriusXM® Radio 12
AUDIO SETTINGS 15
DISPLAY SETTINGS 16
TROUBLESHOOTING 17
REFERENCES 20
Maintenance
More information
INSTALLATION /
CONNECTION 22
SPECIFICATIONS 24

3
BASICS
To On the faceplate On the remote control
Turn on the power Press .
• Press and hold to turn off the power.
Press and hold to turn off the power.SRC
( Pressing does not turn on the power. )SRC
Adjust the volume Turn the volume knob. Press or .
Press during playback to attenuate the sound.ATT
• Press again to cancel.
Select a source Press repeatedly. Press repeatedly.SRC
Change the display information* Press repeatedly. (DISP
21
) ( Not available )
*
You can also turn off the display information by pressing
DISP
repeatedly.
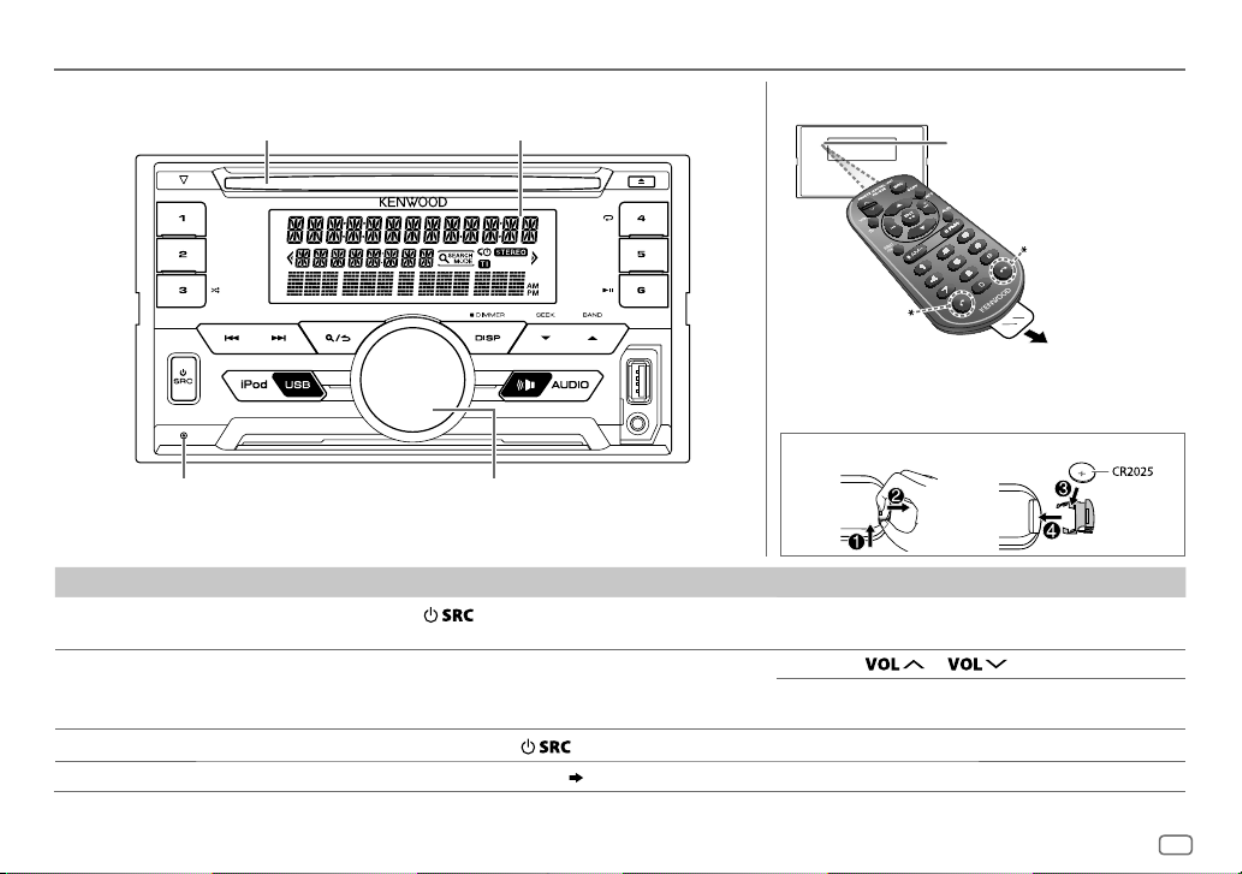
Faceplate Remote control (RC-406)
ENGLISH
Display window
Pull out the insulation
sheet when using for the
first time.
Reset button
• Your preset adjustments will be
erased except stored radio stations.
How to replace the battery
Remote sensor (Do not
expose to bright sunlight.)
Volume knob
Loading slot
*
Not used

4
GETTING STARTED
Select the display language and cancel the demonstration
When you turn on the power (or after you reset the unit), the display shows:
“SEL LANGUAGE” “PRESS” “VOLUME KNOB”
1 Turn the volume knob to select [
ENG
] (English) or [
SPA
] (Spanish), then
press the knob.
[
ENG
] is selected for the initial setup.
Then, the display shows: “CANCEL DEMO” “PRESS” “VOLUME KNOB”.
2 Press the volume knob.
[
YES
] is selected for the initial setup.
3 Press the volume knob again.
“DEMO OFF” appears.
Set the clock and date
1 Press the volume knob to enter [
FUNCTION
].
2 Turn the volume knob to select [
CLOCK
], then press the knob.
To adjust the clock
3 Turn the volume knob to select [
CLOCK ADJUST
], then press the knob.
4 Turn the volume knob to make the settings, then press the knob.
Hour Minute
5 Turn the volume knob to select [
CLOCK FORMAT
], then press the knob.
6 Turn the volume knob to select [
12H
] or [
24H
], then press the knob.
1
To set the date
7 Turn the volume knob to select [
DATE FORMAT
], then press the
knob.
8 Turn the volume knob to select [
DD/MM/YY
] or [
MM/DD/YY
], then
press the knob.
9 Turn the volume knob to select [
DATE SET
], then press the knob.
10 Turn the volume knob to make the settings, then press the
knob.
Day Month Year or Month Day Year
11 Press and hold to exit.
To return to the previous setting item, press .
Set the initial settings
1 Press repeatedly to enter STANDBY.
2 Press the volume knob to enter [
FUNCTION
].
• Pressing enter [
AUDIO CONTROL
] directly.
3 Turn the volume knob to select an item (see the following
table), then press the knob.
4 3Repeat step until the desired item is selected or activated.
5 Press and hold to exit.
To return to the previous setting item, press .
Default:
XX
AUDIO CONTROL
SWITCH
PREOUT
REAR
/
SUBWOOFER
: Selects whether rear speakers or a subwoofer
are connected to the line out terminals on the rear (through an
external amplifier).
SP SELECT OFF
/
5/4
/
6 × 9/6
/
OEM
: Selects according to the speaker size
(5inches or 4inches, 6×9inches or 6inches) or OEM speakers for
optimum performance.
3
2

ENGLISH 5
DISPLAY
EASY MENU
When entering [
FUNCTION
]...
ON
:ZONE1 and ZONE2 illuminations change to white color.;
OFF
:ZONE2 illumination changes to white color while ZONE1 illumination remains
as [
COLOR
SELECT
] color. (
17
)
(Refer to the illustration on page 16 for zone identification.)
TUNER SETTING
PRESET TYPE NORMAL
:Memorizes one station for each preset button in each band (FM1/
FM2/ FM3/ AM).;
MIX
:Memorizes one station or SiriusXM channel for each preset
button, regardless of the selected band or SiriusXM channel.
SYSTEM
KEY BEEP ON
:Activates the keypress tone.;
OFF
:Deactivates.
SOURCE SELECT
PANDORA SRC ON
:Enables PANDORA in source selection.;
OFF
:Disables. (
10
)
IHEART SRC ON
:Enables IHEARTRADIO in source selection.;
OFF
:Disables. (
11
)
BUILT-IN AUX ON
:Enables AUX in source selection.;
OFF
:Disables. (
7
)
CD READ 1
:Automatically distinguishes between audio file disc and music CD.;
2
:Forces to
play as a music CD. No sound can be heard if an audio file disc is played.
F/W UPDATE
UPDATE SYSTEM
F/W UP xx.xx YES
:Starts upgrading the firmware.;
NO
:Cancels (upgrading is not activated).
For details on how to update the firmware, see: www.kenwood.com/cs/ce/
CLOCK
CLOCK DISPLAY ON
:The clock time is shown on the display even when the unit is turned off.;
OFF
:Cancels.
ENGLISH
Select the display language for [
FUNCTION
] menu and music information if
applicable.
By default, [
ENGLISH
] is selected.
ESPANOL
GETTING STARTED RADIO
Search for a station
1 Press repeatedly to select TUNER.
2 Press repeatedly (or press / on
RC-406) to select FM1/ FM2/ FM3/ AM.
3 Press / (or press / on RC-406) to search S T S
for a station.
• : Press To change the searching method for /S T
repeatedly.
: Automatically search for a station.AUTO1
: Search for a preset station.AUTO2
: Manually search for a station.MANUAL
• : Press and hold one of the number buttons To store a station
( to ).1 6
• : Press one of the number buttons To select a stored station
( to ) (or press one of the number buttons ( to ) on RC-406).1 6 1 6
6
RADIO
Direct Access Tuning (using RC-406)
1 Press to enter Direct Access Tuning.DIRECT
2 Press the number buttons to enter a frequency.
3 Press to search for a station.
• To cancel, press or .DIRECT
• If no operation is done for 10seconds after step2, Direct Access Tuning
is automatically canceled.
Other settings
1 Press the volume knob to enter [
FUNCTION
].
2 Turn the volume knob to select an item (see the following table),
then press the knob.
3 2Repeat step until the desired item is selected or activated.
4 Press and hold to exit.
To return to the previous setting item, press .
Default:
XX
TUNER SETTING
AUTO MEMORY YES
:Automatically starts memorizing 6 stations with good reception.;
NO
:Cancels.
•
Selectable only if [
NORMAL
] is selected for [
PRESET TYPE
]. (
5
)
MONO SET ON
:Improves the FM reception, but the stereo effect may be lost.;
OFF
:Cancels.
TI ON
:Allows the unit to temporarily switch to Traffic Information if
available (“TI” lights up).;
OFF
:Cancels.
PTY SEARCH
Select the available Program Type (see the following), then, press
S
/
T
to start.
CLOCK
TIME SYNC ON
:Synchronizes the unit’s time to the Radio Broadcast Data System
station time.;
OFF
:Cancels.
Available Program Type for PTY SEARCH
SPEECH
:
NEWS
,
INFORM
(information),
SPORTS
,
TALK
,
LANGUAGE
,
REL TALK
(religious talk),
PERSNLTY
(personality),
PUBLIC
,
COLLEGE
,
HABL ESP
(spanish talk),
WEATHER
MUSIC
:
ROCK
,
CLS ROCK
(classic rock),
ADLT HIT
(adult hits),
SOFT RCK
(softrock),
TOP 40
,
COUNTRY
,
OLDIES
,
SOFT
,
NOSTALGA
(nostalgia),
JAZZ
,
CLASSICL
(classical),
R & B
(rhythm and blues),
SOFT R&B
(soft rhythm and blues),
REL MUSC
(religious music),
MUSC ESP
(spanish music),
HIP HOP
The unit will search for the Program Type categorized under [
SPEECH
] or
[
MUSIC
] if selected.
• [
MONO SET
]/ [
TI
]/ [
PTY SEARCH
] is selectable only when the band is FM1/
FM2/ FM3.
• If the volume is adjusted during reception of traffic information or news
bulletin, the adjusted volume is memorized automatically. It will be
applied the next time traffic information or news bulletin is turned on.

ENGLISH 7
CD / USB / iPod / ANDROID
Start playback
The source changes automatically and playback starts.
*1
KCA-iP102 : 30-pin type, KCA-iP103 : Lightning type
*2
Do not leave the cable inside the car when not using.
*3
When connecting an Android device, “Press [VIEW] to install KENWOOD MUSIC PLAY APP” is
shown. Follow the instructions to install the application. You can also install the latest version of
KENWOOD MUSIC PLAY application on your Android device before connecting. (
20
)
AUX
Preparation:
Select [
ON
] for [
BUILT-IN AUX
]. (
5
)
Start listening
1 Connect a portable audio player (commercially available).
2 Press repeatedly to select AUX.
3 Turn on the portable audio player and start playback.
Set the AUX name
While listening to a portable audio player connected to the unit...
1 Press the volume knob to enter [
FUNCTION
].
2 Turn the volume knob to select [
SYSTEM
], then press the
knob.
3 Turn the volume knob to select [
AUX NAME SET
], then press the
knob.
4 Turn the volume knob to select an item, then press the
knob.
AUX
(default)/
DVD
/
PORTABLE
/
GAME
/
VIDEO
/
TV
5 Press and hold to exit.
To return to the previous setting item, press .
Auxiliary input jack
Portable audio player
3.5mm (1/8") stereo mini plug with “L”
shaped connector (commercially available)
Label side
M
Eject disc
USB input terminal
CA-U1EX (max.: 500mA) (optional accessory)
Micro USB 2.0 cable
*2
(commercially available)
KCA-iP102 / KCA-iP103 (optional accessory)
*1
or accessory cable of the iPod/iPhone
*2
USB
iPod/iPhone
ANDROID*3

8
CD / USB / iPod / ANDROID
To On the faceplate On the remote control
Playback / pause Press . Press .
Reverse / Fast-forward *4Press and hold / . Press and hold / .S T S
Select a track/file Press / . Press /S T S .
Select a folder *5Press / .J K Press / .
Repeat play *6Press repeatedly.
TRACK REPEAT
/
ALL REPEAT
: Audio CD
FILE REPEAT
/
FOLDER REPEAT
/
ALL REPEAT
: MP3/WMA/WAV/FLAC file
FILE REPEAT
/
FOLDER REPEAT
/
REPEAT OFF
: iPod or ANDROID
Random play *6Press repeatedly.
DISC RANDOM
/
RANDOM OFF
: Audio CD
FOLDER RANDOM
/
RANDOM OFF
: MP3/WMA/WAV/FLAC file, iPod or
ANDROID
Press and hold to select
ALL RANDOM
.*7
*
4
For ANDROID: Applicable only when [
BROWSE MODE
] is selected.
*
5
For CD: Only for MP3/WMA files. This does not work for iPod/ ANDROID.
*
6
For iPod/ ANDROID: Applicable only when [
MODE OFF
]/ [
BROWSE MODE
] is selected.
*
7
For CD: Only for MP3/WMA files.
Select control mode
While in IPOD source, press iPod USB
repeatedly.
MODE ON
: Control iPod using the iPod itself.
However, you can still play/pause, file
skip, fast-forward or reverse from this
unit.
MODE OFF
: Control iPod from this unit.
While in ANDROID source, press iPod USB
repeatedly.
BROWSE MODE
: Control Android device from
this unit via KENWOOD MUSIC
PLAY application installed in the
Android device.
HAND MODE
: Control Android device using the
Android device itself via other
media player applications installed
in the Android device. However,
you can still play/pause and file
skip from this unit.
Select music drive
Press repeatedly.iPod USB
Stored songs in the following drive will be played
back.
• Selected internal or external memory of a
smartphone (Mass Storage Class).
• Selected drive of a multiple drives device.
To directly select USB/
IPOD/ ANDROID source,
press .iPod USB

ENGLISH 9
CD / USB / iPod / ANDROID
Listen to TuneIn Radio/ TuneIn Radio Pro/ Aupeo
While listening to TuneIn Radio, TuneIn Radio Pro or Aupeo, connect the
iPod/iPhone to the USB input terminal of the unit.
• The unit will output the sound from these applications.
Select a file from a folder/list
1 Press .
2 Turn the volume knob to select a folder/list, then press the knob.
3 Turn the volume knob to select a file, then press the knob.
Quick Search
If you have many files in the iPod, you can search through them
quickly according to the first character of the file name.
Turn the volume knob quickly to enter character search.
Turn the volume knob to select the character.
To search for a character other than A to Z and 0to9, enter only
“
* ”.
Press S T/ to move to the entry position.
• You can enter up to 3characters.
Press the volume knob to start searching.
• To return to the root folder/ first file/ top menu, press .5
• To return to the previous setting item, press .
• To cancel, press and hold .
• For iPod, applicable only when [
MODE OFF
] is selected.
(
8
)
• For ANDROID, applicable only when [
BROWSE MODE
] is selected. (
8
)
Direct Music Search (using RC-406)
1 Press .DIRECT
2 Press the number buttons to enter a track/file number.
3 Press to search for music.
• To cancel, press or .DIRECT
• Not available if Random Play is selected.
• Not applicable for iPod and ANDROID.
Other settings
1 Press the volume knob to enter [
FUNCTION
].
2 Turn the volume knob to select an item (see the following table),
then press the knob.
3 2Repeat step until the desired item is selected or activated.
4 Press and hold to exit.
To return to the previous setting item, press .
Default:
XX
USB
MUSIC DRIVE DRIVE CHANGE
:The next drive ([
DRIVE 1
] to [
DRIVE 5
]) is selected
automatically and playback starts.
Repeat steps
1
to
3
to select the following drives.
SKIP SEARCH 0.5%
/
1%
/
5%
/
10%
: While listening to iPod or ANDROID, select
skip search ratio over the total files.

10
Pandora®
Preparation:
Install the latest version of the Pandora application on your device
(iPhone/ iPod touch), then create an account and log in to Pandora.
• Select [
ON
] for [
PANDORA SRC
]. (
5
)
Start listening
1 Open the Pandora application on your device.
2 Connect your device to the USB input terminal.
The source changes to PANDORA and broadcast starts.
To On the faceplate On the remote control
Playback / pause Press . Press .
Skip a track Press .T Press .
Thumbs up or thumbs
down *3Press / .J K Press / .
*1
KCA-iP102 : 30-pin type, KCA-iP103 : Lightning type
*2
Do not leave the cable inside the car when not using.
*3
If thumbs down is selected, the current track is skipped.
USB input terminal
KCA-iP102 / KCA-iP103 (optional accessory)
*1
or
accessory cable of the iPod/iPhone
*2
Create and save a new station
1 Press .
2 Turn the volume knob to select [
NEW STATION
], then press the knob.
3 Turn the volume knob to select [
FROM TRACK
] or [
FROM ARTIST
], then
press the knob.
A new station is created based on the current song or artist.
4 Press and hold one of the number buttons ( to ) to store.1 5
To select a stored station, press one of the number buttons ( to ).1 5
Search for a registered station
1 Press .
2 Turn the volume knob to select an item, then press the knob.
[
BY DATE
]:According to the registered date
[
A-Z
]:Alphabetical order
3 Turn the volume knob to select the desired station, then press the
knob.
To cancel, press and hold .
(or using RC-406)
Press J K / to search for a station, then press .
Bookmark current song information
Press and hold the volume knob.
“BOOKMARKED” appears and the information is stored to your device.
The bookmark is available on your Pandora account but not on this unit.

ENGLISH 11
iHeartRadio®
Preparation:
Install the latest version of iHeart Link for KENWOOD application on your device
(iPhone/ iPod touch), then create an account and log in to iHeartRadio.
• Select [
ON
] for [
IHEART SRC
]. (
5
)
Start listening
1 Open the iHeart Link application on your device.
2 Connect your device to the USB input terminal.
3 Press repeatedly to select IHEARTRADIO.
Broadcast starts automatically.
To On the faceplate On the remote control
Playback / pause Press . Press .
Skip a track for custom station Press .T Press .
Thumbs up or thumbs down *3 for
custom station
Press / .J K ( Not available )
Create a new/custom station Press .1 ( Not available )
Add to favorite stations for live
station
Press .2 ( Not available )
Scan for live station Press .3 ( Not available )
*1
KCA-iP102 : 30-pin type, KCA-iP103 : Lightning type
*2
Do not leave the cable inside the car when not using.
*3
If thumbs down is selected, the current track is skipped.
USB input terminal
KCA-iP102 / KCA-iP103 (optional accessory)
*1
or accessory cable of the iPod/iPhone
*2
Delete a station
While listening to PANDORA...
1 Press the volume knob to enter [
FUNCTION
].
2 Turn the volume knob to select [
SYSTEM
], then press the
knob.
3 Turn the volume knob to select [
STATION DEL
], then
press the knob.
4 Turn the volume knob to select [
A-Z
] or [
BY DATE
], then
press the knob.
5 Turn the volume knob to select the desired station to
delete, then press the knob.
6 Turn the volume knob to select [
YES
], then press the
knob.
7 Press and hold to exit.
To return to the previous setting item, press .
Pandora®

12
iHeartRadio®
Search for a station
1 Press .
2 Turn the volume knob to select a category, then press the knob.
3 Turn the volume knob to select the desired station, then press the knob.
When a city list appears, you can skip cities in alphabetical order.
To cancel, press and hold .
(or using RC-406)
Press J K / to search for a station, then press .
Skip cities by alphabetical order
While a city list appears during search...
1 Turn the volume knob quickly to enter character search.
2 Turn the volume knob or press / to select the character to be S T
searched for.
3 Press J / K to move to the previous/next page.
4 Press the volume knob to start searching.
To cancel, press and hold .
Delete a station
While listening to IHEARTRADIO...
1 Press the volume knob to enter [
FUNCTION
].
2 Turn the volume knob to select [
SYSTEM
], then press the knob.
3 Turn the volume knob to select [
STATION DEL
], then press the knob.
4 Turn the volume knob to select [
LIVE
] or [
CUSTOM
], then press the knob.
5 Turn the volume knob to select the desired station to delete, then press
the knob.
6 Turn the volume knob to select [
YES
], then press the knob.
7 Press and hold to exit.
To return to the previous setting item, press .
SiriusXM® Radio
Only SiriusXM® brings you more of what you love to listen to, all
in one place. Get over 140 channels, including commercial-free
music plus the best sports, news, talk, comedy and entertainment.
Welcome to the world of satellite radio. A SiriusXM Vehicle
Tuner and Subscription are required. For more information, visit
www.siriusxm.com.
Preparation:
1 Connect the optional SiriusXM Vehicle Tuner (commercially
available).
2 Check your Radio ID for activation.
The SiriusXM Radio ID is required for activation and can be
found by tuning to Channel 0 as well as on the label found on
the SiriusXM Connect tuner and its packaging.
The Radio ID does not include the letters I, O, S or F.
3 Activate the subscription.
For users in the U.S.A.:
Online: Go to www.siriusxm.com
Phone: Call 1-866-635-2349
For users in Canada:
Online: Go to www.siriusxm.ca/activatexm
Phone: Call 1-877-438-9677
4 Press repeatedly to select SIRIUSXM to start updating.
Expansion port on
the rear panel
SiriusXM Vehicle Tuner
Antenna

ENGLISH 13
Start listening
1 Press repeatedly to select SIRIUSXM.
2 Press repeatedly to select a band.
3 Press .
“ ” lights up.
4 Turn the volume knob to select a category, then press
the knob.
If “ALL CHANNELS” is selected, all the available channels
will be shown.
5 Turn the volume knob to select a channel, then press
the knob.
(or)
Press to search for a channel manually.S T /
• Pressing and holding changes the channel S T /
rapidly.
If a locked channel or a mature channel is selected, a pass
code input screen appears. Enter the pass code to receive
the channel. (
14
)
To change the tuning method for /S T: Press .
Each time you press , the tuning method switches
between “CHANNEL” (manually search for a channel) and
“PRESET” (searches for a preset channel of the selected
band).
Direct Access Tuning (using RC-406)
1 Press to enter Direct Access Tuning.DIRECT
2 Press the number buttons to enter a channel number.
3 Press to start searching.
• To cancel, press or .DIRECT
• If no operation is done for 10seconds after step 2, Direct
Access Tuning is automatically canceled.
SiriusXM® Radio
SiriusXM Keymode
Press and hold to change the keymode (channel or replay).
(Default: Channel keymode)
“ ” lights up when replay keymode is selected.
When channel keymode is selected...
To On the faceplate On the remote control
Select a channel Press / . Press .S T S /
Change a channel
rapidly Press and hold / . Press and hold S T S / .
Store a channel of the
current band
Press and hold one of the
number buttons ( to ).1 6 (Not available)
Select a stored
channel of the current
band
Press one of the number buttons ( to ).1 6
When replay keymode is selected...
To On the faceplate On the remote control
Playback / pause Press . Press .
Select a track Press / . Press /S T S .
Rewind / Fast-forward Press and hold / . Press and hold / S T S .
Go to Live Press .1

14
SmartFavorites and TuneStart™
User stored channels are recognized as SmartFavorite channels*.
The SiriusXM Vehicle Tuner automatically buffers the broadcast
content in the background.
• SmartFavorites feature is available with SXV200 or later SiriusXM
Vehicle Tuner.
*
SXV300 (and later) SiriusXM Vehicle Tuner can use all 18 stored channels as
SmartFavorites. The SXV200 SiriusXM Vehicle Tuner can use 6 stored channels from
the current band as SmartFavorites.
When you select a SmartFavorite channel, you can rewind and
replay up to 30minutes of any of the missed news, talk, sports or
music content.
• Playback starts from the beginning of the song if [
TUNE START
]
is set to [
ON
] (
15
) for most music channels stored as a
SmartFavorite.
Press one of the number buttons ( to ) to select a stored 1 6
channel.
TuneScan™
You can get a short preview of the songs that you have missed
on each of your SmartFavorite music channels or currently tuned
music channel.
Press and hold to start scanning the first 6 seconds of
the recorded music contents.
• To listen to the current song, press the volume knob to stop
scanning. The unit continues playing the current song.
• To select the previous/next song, press .S T/
• To cancel scanning, press and hold the volume knob. Playback
returns to the channel before you entered TuneScan.
SiriusXM settings
1 Press the volume knob to enter [
FUNCTION
].
2 Turn the volume knob to select [
SIRIUS XM
], then press the knob.
3 Turn the volume knob to select an item (see the following table), then
press the knob.
4 3Repeat step until the desired item is selected/activated or follow the
instructions stated on the selected item.
5 Press and hold to exit.
To return to the previous setting item, press .
Default:
XX
CHANNEL LOCK
To unlock settings:
1
Turn the volume knob to select a number.
2
Press
S T /
to move to the entry position.
3
Repeat steps
1
and
2
to enter the current pass code.
(Initial pass code is 0000.)
4
Press the volume knob to confirm.
CODE SET
1
Turn the volume knob to select a number.
2
Press
S T /
to move to the entry position.
3
Repeat steps
1
and
2
to enter a new 4-digit pass code.
4
Press the volume knob to confirm.
5
Repeat steps
1
to
4
to reconfirm the pass code.
•
Make a note of the new pass code to enter channel lock settings fo
time.
LOCK SETTING MATURE CH
:Selects the SiriusXM-defined lock setting.;
USER DEFINED
:
Selects the individual channels the user wants to lock..;
OFF
:Cancels.
CHANNEL EDIT
*11
Turn the volume knob to select a category, then press the knob.
2
Turn the volume knob to select a channel you want to lock, then
knob.
“L” appears in front of the channel number.
3
Press and hold to exit.
CHANNEL CLEAR
*1
YES
:Clears all the locked channels.;
NO
:Cancels.
SiriusXM® Radio

ENGLISH 15
TUNE START
*2
ON
:All qualified music channels in the SmartFavorite
will start playback from the beginning of the song.;
OFF
:Cancels.
SIGNAL LEVEL NO SIGNAL
/
WEAK
/
GOOD
/
STRONG
:Shows the
strength of the current received signal.
BUFFER USAGE 0%
—
100%
(
0
):Shows the memory usage for
Replay buffer.
SXM RESET YES
:Resets stored channel and lock setting to
default.;
NO
:Cancels.
*1
Displayed only when [
USER DEFINED
] is selected.
*2
Available only if the connected SiriusXM Vehicle Tuner is SXV200 or later that
supports SmartFavorites.
SiriusXM® Radio AUDIO SETTINGS
While listening to any source...
1 Press to enter [
AUDIO CONTROL
] directly.
2 Turn the volume knob to select an item (see the following table), then press
the knob.
3 2Repeat step until the desired item is selected or activated.
4 Press and hold to exit.
(or using RC-406)
1 Press to enter [AUD
AUDIO CONTROL
].
2 Press to select an item, then press .J / K
To return to the previous setting item, press .
Default:
XX
SUB-W LEVEL –15
to
+15
(
0
) Adjusts the subwoofer output level.
BASS LEVEL –8
to
+8
(
+2
)Adjusts the level to memorize for each source. (Before mak
adjustment, select the source you want to adjust.)
MID LEVEL –8
to
+8
(
+1
)
TRE LEVEL –8
to
+8
(
+1
)
EQ PRO
(This setting is stored to [
USER
].)
BASS ADJUST BASS CTR FRQ 60HZ
/
80HZ
/
100HZ
/
200HZ
: Selects the center frequency.
BASS LEVEL –8
to
+8
(
+2
):Adjusts the level.
BASS Q FACTOR 1.00
/
1.25
/
1.50
/
2.00
:Adjusts the quality factor.
BASS EXTEND ON
:Turns on the extended bass.;
OFF
:Cancels.
MID ADJUST MID CTR FRQ 0.5KHZ
/
1.0KHZ
/
1.5KHZ
/
2.5KHZ
:Selects the center frequency.
MID LEVEL –8
to
+8
(
+1
):Adjusts the level.
MID Q FACTOR 0.75
/
1.00
/
1.25
:Adjusts the quality factor.
TRE ADJUST TRE CTR FRQ 10.0KHZ
/
12.5KHZ
/
15.0KHZ
/
17.5KHZ
:Selects the center
frequency.
TRE LEVEL –8
to
+8
(
+1
):Adjusts the level.

16
PRESET EQ DRIVE EQ
/
TOP40
/
POWERFUL
/
ROCK
/
POPS
/
EASY
/
JAZZ
/
NATURAL
/
USER
:Selects a preset equalizer suitable to the music
genre. (Select [
USER
] to use the settings made in [
EQ PRO
].)
[
DRIVE EQ
] is a preset equalizer that reduces noise outside the car or
running noise of the tyres.
BASS BOOST LEVEL1
/
LEVEL2
/
LEVEL3
:Selects your preferred bass boost level.;
OFF
:Cancels.
LOUDNESS LEVEL1
/
LEVEL2
:Selects your preferred low and high frequencies
boost to produce a well-balanced sound at a low volume level.;
OFF
:Cancels.
SUBWOOFER SET ON
:Turns on the subwoofer output.;
OFF
:Cancels.
LPF SUBWOOFER THROUGH
:All signals are sent to the subwoofer.;
85HZ
/
120HZ
/
160HZ
:Audio signals with frequencies lower than 85Hz/ 120Hz/
160Hz are sent to the subwoofer.
SUB-W PHASE REVERSE
(180°)/
NORMAL
(0°):Selects the phase of the subwoofer
output to be in line with the speaker output for optimum performance.
(Selectable only if a setting other than [
THROUGH
] is selected for
[
LPF SUBWOOFER
].)
FADER R15
to
F15
(
0
):Adjusts the rear and front speaker output balance.
BALANCE L15
to
R15
(
0
):Adjusts the left and right speaker output balance.
VOLUME OFFSET
For AUX:
–8
to
+8
(
0
) ; For other sources:
–8
to
0
:Preset the initial
volume level of each source. (Before adjustment, select the source you
want to adjust.)
SOUND RECNSTR
(Sound
reconstruction)
ON
:Creates realistic sound by compensating the high-frequency
components and restoring the rise-time of the waveform that are lost
in audio data compression.;
OFF
:Cancels.
• [
SUB-W LEVEL
]/ [
SUBWOOFER SET
]/ [
LPF SUBWOOFER
]/ [
SUB-W PHASE
] is
selectable only if [
SWITCH PREOUT
] is set to [
SUBWOOFER
]. (
4
)
• [
SUB-W LEVEL
]/ [
LPF SUBWOOFER
]/ [
SUB-W PHASE
] is selectable only if
[
SUBWOOFER SET
] is set to [
ON
].
DISPLAY SETTINGS
Set the dimmer
Press and hold to turn on or off the dimmer.DISP (DIMMER)
• If you have set [
DIMMER TIME
], it will be canceled once you press and
hold this button.
Other settings
1 Press the volume knob to enter [
FUNCTION
].
2 Turn the volume knob to select [
DISPLAY
], then press the knob.
3 Turn the volume knob to select an item
(
17
)
, then press the knob.
4 3Repeat step until the desired item is selected/activated or follow
the instructions stated on the selected item.
5 Press and hold to exit.
To return to the previous setting item, press .
AUDIO SETTINGS
ENGLISH 17
DISPLAY SETTINGS
Default:
XX
COLOR SELECT
Select color for
ALL ZONE
,
ZONE 1
and
ZONE 2
separately.
1
Select a zone. (
16
)
2
Select a color for the selected zone.
VARIABLE SCAN
/
CUSTOM R/G/B
/
preset colors*
To make your own color, select [
CUSTOM R/G/B
]. The color you have
made will be stored in [
CUSTOM R/G/B
].
1
Press the volume knob to enter the detailed color adjustment.
2
Press
S
/
T
to select the color (
R
/
G
/
B
) to adjust.
3
Turn the volume knob to adjust the level (
0
—
9
), then press the
knob.
DIMMER
Dim the display illumination and button illumination.
ON
:Dimmer is turned on.;
OFF
:Cancels.
DIMMER TIME
:Set the dimmer on and off time.
1
Turn the volume knob to adjust the [
ON
] time, then press the knob.
2
Turn the volume knob to adjust the [
OFF
] time, then press the knob.
(Default: [
ON
]:
6:00 PM
; [
OFF
]:
6:00 AM
)
BRIGHTNESS
1
Select a zone. (
16
)
2
0
—
31
: Select your preferred brightness level for display and button
illumination.
TEXT SCROLL AUTO
/
ONCE
:Select whether to scroll the display information
automatically, or scroll only once.;
OFF
:Cancels.
*
Preset colors:
RED1
/
RED2
/
RED3
/
PURPLE1
/
PURPLE2
/
PURPLE3
/
PURPLE4
/
BLUE1
/
BLUE2
/
BLUE3
/
SKYBLUE1
/
SKYBLUE2
/
LIGHTBLUE
/
AQUA1
/
AQUA2
/
GREEN1
/
GREEN2
/
GREEN3
/
YELLOWGREEN1
/
YELLOWGREEN2
/
YELLOW
/
ORANGE1
/
ORANGE2
/
ORANGERED
TROUBLESHOOTING
Symptom Remedy
General
Sound cannot be heard.
•
Adjust the volume to the optimum level.
•
Check the cords and connections.
“MISWIRING CHECK WIRING
THEN PWR ON” appears.
Turn the power off, then check to be sure the term
of the speaker wires are insulated properly. Turn t
power on again.
“PROTECTING SEND SERVICE”
appears.
Send the unit to the nearest service center.
The unit does not work at all. Reset the unit. (
3
)
Radio
•
Radio reception is poor.
•
Static noise while listening
to the radio.
Connect the antenna firmly.
CD / USB / iPod
Disc cannot be ejected. Press and hold
M
to forcibly eject the disc. Be careful
not to drop the disc when it is ejected. If this does
solve the problem, reset the unit. (
3
)
Noise is generated. Skip to another track or change the disc.
Tracks do not play back as
you intended them to play.
Playback order is determined when files are recor
“READING” keeps flashing. Do not use too many hierarchical levels o
Elapsed playing time is not
correct.
This is caused by how the tracks are recorded.
Correct characters are not
displayed (e.g. album name).
•
This unit can only display uppercase letters,
numbers, and a limited number of symbols.
•
Depending on the display language you have
selected (
5
), some characters may not be
displayed correctly.

18
Symptom Remedy
CD / USB / iPod
“NA FILE” Make sure the disc contains supported audio files. (
20
)
“NO DISC” Insert a playable disc into the loading slot.
“TOC ERROR” Make sure the disc is clean and inserted properly.
“PLEASE EJECT” Reset the unit. If this does not solve the problem, consult
your nearest service center.
“READ ERROR” Copy the files and folders onto the USB device again. If this
does not solve the problem, reset the USB device or use
another USB device.
“NO DEVICE” Connect a USB device, and change the source to USB again.
“COPY PRO” A copy-protected file is played.
“NA DEVICE”
Connect a supported USB device, and check the connections.
“NO MUSIC” Connect a USB device that contains playable audio files.
“iPod ERROR”
•
Reconnect the iPod.
•
Reset the iPod.
ANDROID
•
Sound cannot
be heard during
playback.
•
Sound output only
from the Android
device.
•
Reconnect the Android device.
•
If in [
HAND MODE
], launch any media player application
on the Android device and start playback.
•
If in [
HAND MODE
], relaunch the current media player
application or use another media player application.
•
Restart the Android device.
•
If this does not solve the problem, the connected Android
device is unable to route the audio signal to unit. (
20
)
Cannot playback at
[
BROWSE MODE
].
•
Make sure KENWOOD MUSIC PLAY APP is installed on the
Android device. (
7
)
•
Reconnect the Android device and select the appropriate
control mode.
•
If this does not solve the problem, the connected Android
device does not support [
BROWSE MODE
]. (
20
)
TROUBLESHOOTING
Symptom Remedy
ANDROID
“NO DEVICE” or
“READING” keeps
flashing.
•
Switch off the developer options on the Android de
•
Reconnect the Android device.
•
If this does not solve the problem, the connected An
device does not support [
BROWSE MODE
]. (
20
)
Playback is intermittent
or sound skips.
Turn off the power saving mode on the Android devic
“ANDROID ERROR” /
“NADEVICE”
•
Reconnect the Android device.
•
Restart the Android device.
Pandora
“ADDERROR” New station creation is unsuccessful.
“CHECKDEVICE” Check the Pandora application on your devic
“NOSKIPS” The skip limit has been reached.
“NOSTATIONS” No stations are found.
“STATIONLIMIT”
The number of registered stations has reached its limit.
after deleting unnecessary stations from your device.
“CONNECT ERROR” Communication is unstable.
“RATING ERROR” Registration of thumbs up/thumbs down has f
insufficient network connectivity.
“THUMBS N/A” Registration of thumbs up/thumbs down is not
“LICENSE ERROR” You try to access from a country which Pand
deliverable.
iHeartRadio
iHeartRadio station
cannot be selected.
If “Explicit Content” in [Account Settings] is checked in th
version of iHeartRADIO, custom stations become unavail
“CANNOT CREATE” Custom station name creation is unsuccessfu
“CANNOT SAVE” Addition to the favorite category failed.
“DISCONNECTED” Check the connection to the device.
“NOSKIPS” The skip limit has been reached. Retry later.

ENGLISH 19
TROUBLESHOOTING
Symptom Remedy
iHeartRadio
“NOSTATIONS” No stations are found.
“NOT CONNECTED” Link to the application is impossible.
“IHEARTLINK UP” Make sure you have installed the latest version of the iHeart
Link for KENWOOD application on your device.
“PLEASE LOGIN” You haven’t log in. Log in again.
“STATION NOT AVAILABLE”
Broadcast from the station is over.
“STATION NOT SELECTED” No station is selected.
“STREAM ERROR” Broadcast data is interrupted.
“THUMB FAILED” Registration of Thumbs Up/Down has failed.
“TIMED OUT” The request has resulted in time-out.
SiriusXM® Radio
“CHLOCKED LOCK
CODE?”
The selected channel is locked. Enter the correct pass code
to unlock. (
14
)
“CHANUNSUB” The selected channel is unsubscribed. Call
1-866-635-2349 in the U.S.A. or 1-877-438-9677 in Canada
to subscribe. (
12
)
“CHUNAVAIL” The selected channel is unavailable. Visit
www.siriusxm.com for more information about the
SiriusXM channel lineup.
“CHECKANTENNA”
Check that the antenna and its connection are in good
condition.
“CHECKTUNER”
Make sure the SiriusXM Vehicle Tuner is connected to the
unit.
“NOSIGNAL” Make sure the antenna is mounted outside the vehicle.
“
SUBSCRIPTION
UPDATED – PRESS ENTER
TO CONTINUE.
”
Your subscription is updated. Press the volume knob to
continue.
Symptom Remedy
SiriusXM® Radio
“CODE ERROR” Make sure you have entered the correct pass c
(
14
)
“NO CONTENT”
There is insufficient content to start TuneScan.
“SCAN CANCEL”
TuneScan has been aborted.
Muting upon the reception of a phone call
Connect the MUTE wire to your telephone using a commercial telephone acces
23
)
When a call comes in, “CALL” appears.
(The audio system pauses.)
•
To continue listening to the audio system during a call, press . “CALL
and the audio system resumes.
When the call ends, “CALL” disappears.
(The audio system resumes.)

20
REFERENCES
Unplayable discs
•
Discs that are not round.
•
Discs with coloring on the recording surface or discs that are dirty.
•
Recordable/ReWritable discs that have not been finalized.
•
8cm CD. Attempting to insert using an adapter may cause malfunction.
About USB devices
•
This unit can play MP3/WMA/WAV/FLAC files stored on a USB mass storag
•
You cannot connect a USB device via a USB hub.
•
Connecting a cable whose total length is longer than 5m may result in abnorm
•
This unit cannot recognize a USB device whose rating is other than 5V and ex
About iPod/iPhone
Made for
-
iPod touch (2nd, 3rd, 4th, and 5th generation)
-
iPod classic
-
iPod nano (3rd, 4th, 5th, 6th, and 7th generation)
-
iPhone 3G, 3GS, 4, 4S, 5, 5S, 5C, 6, 6 Plus
•
You cannot operate iPod if “KENWOOD” or “ ” is displayed on iPod.
•
Depending on the version of the operating system of the iPod/iPhone, some fu
not operate on this unit.
About Android device
•
This unit supports Android OS 4.1 and above.
•
Some Android devices (with OS 4.1 and above) may not fully support Android
(AOA) 2.0.
•
If the Android device supports both mass storage class device and AOA 2.0, th
playback via AOA 2.0 as priority.
Maintenance
Cleaning the unit
Wipe off dirt on the faceplate with a dry silicone or soft cloth.
Handling discs
•
Do not touch the recording surface of the disc.
•
Do not stick tape etc. on the disc, or use a disc with tape stuck on it.
•
Do not use any accessories for the disc.
•
Clean from the center of the disc and move outward.
•
Clean the disc with a dry silicone or soft cloth. Do not use any solvents.
•
When removing discs from this unit, pull them out horizontally.
•
Remove burrs from the center hole and disc edge before inserting a disc.
More information
Visit also the following website <www.kenwood.com/cs/ce/> for:
–
Latest firmware updates and latest compatible item list
–
Android™ application KENWOOD MUSIC PLAY
–
Any other latest information
General
•
This unit can only play the following CDs:
•
Detailed information and notes about the playable audio files are stated in an online manual
on the following website: www.kenwood.com/cs/ce/audiofile/
Playable files
•
Playable audio file: MP3 (.mp3), WMA (.wma)
•
Playable disc media: CD-R/CD-RW/CD-ROM
•
Playable disc file format: ISO 9660 Level 1/2, Joliet, Long file name.
•
Playable USB device file system: FAT12, FAT16, FAT32
Even when audio files comply with the standards listed above, playback may be impossible
depending on the types or conditions of media or device.

ENGLISH 21
About Pandora
•
Pandora is only available in certain countries.
Please visit <http://www.pandora.com/legal> for
more information.
•
Because Pandora is a third-party service, the
specifications are subject to change without
prior notice. Accordingly, compatibility may be
impaired, or some or all of the services may become
unavailable.
•
Some functions of Pandora cannot be operated
from this unit.
•
For issues using the application, please contact
Pandora at pandora-support@pandora.com.
About iHeartRadio
•
iHeartRadio® is a third-party service, therefore
the specifications are subject to change without
prior notice. Accordingly, compatibility may be
impaired or some or all of the services may become
unavailable.
•
Some iHeartRadio® functionality cannot be
operated from this unit.
REFERENCES
Change the display information
Each time you press
DISP
, the display information changes.
•
If the information is unavailable or not recorded,
“NO TEXT”, “NO INFO”, or other information (eg. station name, playing ti
Source name Display information
STANDBY
Source name (Date/Clock) (*) (back to the beginning)
TUNER
Frequency (Date/Clock) (*) (back to the beginning)
(For FM Radio Broadcast Data System stations only)
Station name (Date/Clock) (*) Radio text (Date/Clock) Radio text+ (R.TEXT+) Title (Art
Title (Date/Clock) Frequency (Date/Clock) (back to the beginning)
CD or USB
(For CD-DA)
Track title (Artist) (*) Track title (Disc name) Track title (Date/Clock) Playing time (Date
(back to the beginning)
(For MP3/WMA/WAV/FLAC files)
Track title (Artist) (*) Track title (Album title) Track title (Date/Clock) File name (Folder
File name (Date/Clock) Playing time (Date/Clock) (back to the beginning)
IPOD or ANDROID
Track title (Artist) (*) Track title (Album name) Track title (Date/Clock) Playing time (Da
(back to the beginning)
PANDORA
Station name (Date/Clock) (*) Shared / Radio station (Date/Clock) Track title (Artist) Tra
(Album title) Track title (Date/Clock) Playing time (Date/Clock) (back to the beginning)
IHEARTRADIO
Station name (Date/Clock) (*) Track title (Artist) Track title (Date/Clock) (back to the be
SIRIUS XM Channel number (Status)
(*)
Channel name (Status)
Artist name (Status)
Song title (Status)
Content information (Status)
Category name (Status)
Clock (Status)
(back to the beginning)
AUX
Source name (Date/Clock) (*) (back to the beginning)
*
Turn off the display information.

22
INSTALLATION / CONNECTION
Warning
•
The unit can only be used with a 12V DC power supply, negative
ground.
•
Disconnect the battery’s negative terminal before wiring and
mounting.
•
Do not connect Battery wire (yellow) and Ignition wire (red) to the
car chassis or Ground wire (black) to prevent a short circuit.
•
Insulate unconnected wires with vinyl tape to prevent a short circuit.
•
Be sure to ground this unit to the car’s chassis again after
installation.
Caution
•
For safety’s sake, leave wiring and mounting to professionals.
Consult the car audio dealer.
•
Install this unit in the console of your vehicle. Do not touch the
metal parts of this unit during and shortly after use of the unit.
Metal parts such as the heat sink and enclosure become hot.
•
Do not connect the
[
wires of speakers to the car chassis or Ground
wire (black), or connect them in parallel.
•
Mount the unit at an angle of less than 30º.
•
If your vehicle wiring harness does not have the ignition terminal,
connect Ignition wire (red) to the terminal on the vehicle’s fuse box
which provides 12 V DC power supply and is turned on and off by
the ignition key.
•
Keep all cables away from heat dissipate metal parts.
•
After the unit is installed, check whether the brake lamps, blinkers,
wipers, etc. on the car are working properly.
•
If the fuse blows, first make sure the wires are not touching car’s
chassis, then replace the old fuse with one that has the same rating.
Basic procedure
1 Remove the key from the ignition switch, then
disconnect the terminal of the car battery.[
2 Connect the wires properly.
See Wiring connection. (
23
)
3 Install the unit to your car.
See Installing the unit (in-dash mounting).
4 Connect the terminal of the car battery.[
5 Reset the unit. (
3
)
Do the required wiring.
(
23
)
Dashboard of your car
Bend the appropriate tabs to hold
the mounting sleeve firmly in place.
Installing the unit (in-dash mounting)
When installing without the mounting sleeve
1 Remove the mounting sleeve and trim
plate from the unit.
2 Align the holes in the unit (on both sides)
with the vehicle mounting bracket and
secure the unit with screws (commercially
available).
How to remove the unit
Insert the extraction keys deeply
into the slots on each side, then
follow the arrows as shown on
below.
Part list for installation
(A)
Mounting sleeve
(B)
Trim plate
(C)
Wiring harness
(D)
Extraction key
Use only the specified screws.
Using wrong screws might damage
the unit.

ENGLISH 23
IMPORTANT :
We recommend installing the unit with a commerc
available custom wiring harness specific for your car and leave
to professionals for your safety. Consult your car audio dealer.
Wiring connection
Fuse (10A)
Front/ Rear/ subwoofer output
Antenna terminal
Car fuse box
Car fuse box
Battery
Ignition switch
Blue/White
(Power control wire/
Antenna control wire)
Light blue/yellow
(Steering remote control
wire)
Red (Ignition wire)
Yellow (Battery wire)
Black (Ground wire)
To the metallic body or chassis of the car
To the power control terminal when using the
optional power amplifier or to the antenna
control terminal in the vehicle
Brown
(Mute control wire)
White
Gray
Green
Purple
White/Black
Gray/Black
Green/Black
Purple/Black
To the terminal that is grounded when the
telephone rings or during conversation
(
19
)
(To connect the Kenwood navigation system,
refer your navigation manual.)
To front speaker (left)
To rear speaker (left)
To front speaker (right)
To rear speaker (right)
If no connections are made, do not let the wire come out from the tab.
To the steering wheel remote control adapter
To the optional SiriusXM Vehicle Tuner
(commercially available) (
12
)
When connecting to an external amplifier, connect its ground w
the car’s chassis to avoid damaging the unit.

24
SPECIFICATIONS
Tuner
FM Frequency Range 87.9 MHz — 107.9 MHz (200 kHz space)
Usable Sensitivity
(S/N=26dB)
8.2dBf (0.71μV/75Ω)
Quieting Sensitivity
(S/N=46dB)
17.2dBf (2.0μV/75Ω)
Frequency Response (±3dB) 30 Hz — 15 kHz
Signal-to-Noise Ratio (MONO) 64 dB
Stereo Separation (1kHz) 40dB
AM Frequency Range 530kHz — 1700kHz (10kHz space)
Usable Sensitivity (S/N=20dB) 29dBμ (28.2μV)
CD player
Laser Diode GaAIAs
Digital Filter (D/A) 8 times over sampling
Spindle Speed 500rpm — 200rpm (CLV)
Wow & Flutter Below measurable limit
Frequency Response (±1dB) 20Hz — 20kHz
Total Harmonic Distortion (1kHz) 0.01%
Signal-to-Noise Ratio (1kHz) 105 dB
Dynamic Range 90dB
Channel Separation 85dB
MP3 Decode Compliant with MPEG-1/2 Audio Layer-3
WMA Decode Compliant with Windows Media Audio
USB
USB Standard USB1.1, USB2.0 Full Speed
File System FAT12/16/32
Maximum Supply Current DC5V1A
MP3 Decode Compliant with MPEG-1/2 Audio Laye
WMA Decode Compliant with Windows Media Audio
WAV Decode Linear-PCM
FLAC Decode FLAC file (Up to 48kHz / 16bit)
Audio
Maximum Output Power 50W×4
Full Bandwidth Power 22W×4 (at less than 1% THD)
Speaker Impedance 4Ω—8Ω
Tone Action Bass 100Hz±8dB
Middle 1.0kHz±8dB
Treble 12.5kHz±8dB
Preout Level/Load (CD) 2500mV/10kΩ
Preout Impedance ≤600Ω
Auxiliary
Frequency Response (±3dB) 20Hz—20kHz
Input Maximum Voltage 1000mV
Input Impedance 30kΩ
General
Operating Voltage 14.4V (10.5V—16V allowable)
Maximum Current Consumption 10A
Operational Temperature Range –10°C—+60°C
Installation Size (W×H×D) 182mm×111mm×158mm
(7-3/16"×4-3/8"×6-1/4")
Weight 1.6kg (3.6lbs)
Subject to change without notice.


2
TABLE DES MATIERES
AVANT L’UTILISATION
IMPORTANTES
•
Pour utiliser correctement l’appareil, veuillez ce manuel complément avant de l’utiliser. Il est particulièrement important que
vous lisiez et acceptiez les avertissements et les précautions de ce manuel.
•
Veuillez garder ce manuel dans un endroit sûr et accessible pour une utilisation future.
Avertissement
N’utilisez aucune fonction qui risque de vous distraire de la conduite sure de votre véhicule.
Précautions
Réglage du volume:
•
Ajustez le volume de façon à pouvoir entendre les sons extérieurs à la voiture afin d’éviter tout risque d’accident.
•
Réduisez le volume avant de reproduire des sources numériques afin d’éviter d’endommager les enceintes par la soudaine
augmentation du niveau de sortie.
Généralités:
•
Éviter d’utiliser le périphérique extérieur s’il peut gêner une conduite en toute sécurité.
•
Assurez-vous que toutes les données importantes ont été sauvegardées. Nous ne pouvons pas être tenu responsable pour toute
perte des données enregistrées.
•
Veuillez faire en sorte de ne jamais mettre ou laisser d’objets métalliques (tels que des pièces ou des outils) dans l’appareil, afin
d’éviter tout risque de court-circuit.
•
Si une erreur de disque se produit à cause de la condensation sur l’objectif laser, éjectez le disque et attendez que l’humidité
s’évapore.
•
En fonction du type de voiture, l’antenne s’étendra automatiquement quand vous mettrez l’appareil sous tension si le câble de
commande d’antenne est connecté (
23
). Mettez l’appareil hors tension ou changez la source sur STANDBY quand vous vous
garez dans un parking avec un plafond bas.
Télécommande (RC-406):
•
Ne laissez pas la télécommande dans des endroits exposés à la chaleur, comme sur le tableau de bord par exemple.
•
La pile au lithium risque d’exploser si elle est remplacée incorrectement. Ne la remplacez uniquement qu’avec le même type de
pile ou son équivalent.
•
Le boîtier de la pile ou les piles ne doivent pas être exposés à des chaleurs excessives telles que les rayons du soleil, du feu, etc.
•
Gardez la pile hors de la portée des enfants et dans son emballage d’origine quand elle n’est pas utilisée. Débarrassez-vous des
piles usagées rapidement. En cas d’ingestion, contactez un médecin immédiatement.
Comment lire ce manuel
•
Les opérations sont expliquées principalement en utilisant les touches de la façade.
•
Les indications en anglais sont utilisées dans un but explicatif. Vous pouvez choisir la langue d’affichage à partir du menu
[
FUNCTION
]. (
5
)
•
[
XX
] indique les éléments choisis.
•
(
XX
) indique que des références sont disponibles aux page citées.
AVANT L’UTILISATION 2
FONCTIONNEMENT DE BASE 3
PRISE EN MAIN 4
1 Sélectionne la langue
d’affichage et annule la
démonstration
2 Réglez l’horloge et la date
3 Faites les réglages initiaux
RADIO 5
AUX 7
CD / USB / iPod / ANDROID 7
Pandora® 10
iHeartRadio® 11
Radio SiriusXM® 12
RÉGLAGES AUDIO 15
RÉGLAGES D’AFFICHAGE 16
GUIDE DE DÉPANNAGE 17
RÉFÉRENCES 20
Entretien
Plus d’informations
INSTALLATION /
RACCORDEMENT 22
SPÉCIFICATIONS 24
3
FONCTIONNEMENT DE BASE
Pour Sur la façade Sur la télécommande
Mettez l’appareil sous tension Appuyez sur .
•
Maintenez la touche enfoncée pour mettre l’appareil hors tension.
Maintenez
SRC
enfoncée pour mettre l’appareil hors tension.
( Appuyer sur
SRC
ne met pas l’appareil hors tension. )
Ajustez le volume Tournez le bouton de volume. Appuyez sur ou .
Appuyez sur
ATT
pendant la lecture pour atténuer le son.
•
Appuyez une nouvelle fois pour annuler.
Sélectionner la source Appuyez répétitivement sur . Appuyez répétitivement sur
SRC
.
Changez l’information sur l’affichage* Appuyez répétitivement sur
DISP
. (
21
)( Non disponible )
*
Vous pouvez aussi mettre hors service les informations sur l’affichage en appuyant répétitivement sur
DISP
.
Façade Télécommande (RC-406)
FRANÇAIS
Fenêtre d’affichage
Retirez la feuille d’isolant lors de
la première utilisation.
Bouton de réinitialisation
•
Vos ajustements préréglés seront effacés sauf
les stations radio mémorisées.
Comment remplacer la pile
Capteur de télécommande (Ne
l’exposez Pas à la lumière directe
du soleil.)
Bouton de volume
Fente d’insertion
*
Non utilisé

4
PRISE EN MAIN
Sélectionne la langue d’affichage et annule la démonstration
Quand vous mettez l’appareil sous tension (ou après une réinitialisation de l’appareil),
l’affichage apparaît: “SEL LANGUAGE” “PRESS” “VOLUME KNOB”
1 Tournez le bouton de volume pour sélectionner [
ENG
] (anglais) ou
[
SPA
] (espagnol), puis appuyez sur le bouton.
[
ENG
] est choisi pour le réglage initial.
Puis, l’affichage montre: “CANCEL DEMO” “PRESS” “VOLUME KNOB”.
2 Appuyez sur le bouton de volume.
[
YES
] est choisi pour le réglage initial.
3 Appuyez de nouveau sur le bouton de volume.
“DEMO OFF” apparaît.
Réglez l’horloge et la date
1 Appuyez sur le bouton de volume pour entrer [
FUNCTION
].
2
Tournez le bouton de volume pour choisir
[
CLOCK
]
, puis appuyez sur le bouton.
Pour ajuster l’horloge
3 Tournez le bouton de volume pour choisir [
CLOCK ADJUST
], puis appuyez sur
le bouton.
4
Tournez le bouton de volume pour faire les réglages, puis appuyez sur le bouton.
Heure Minute
5 Tournez le bouton de volume pour choisir [
CLOCK FORMAT
], puis appuyez sur
le bouton.
6 Tournez le bouton de volume pour choisir [
12H
] ou [
24H
], puis appuyez sur le
bouton.
1
Pour régler la date
7 Tournez le bouton de volume pour choisir [
DATE FORMAT
], puis
appuyez sur le bouton.
8 Tournez le bouton de volume pour choisir [
DD/MM/YY
] ou
[
MM/DD/YY
], puis appuyez sur le bouton.
9 Tournez le bouton de volume pour choisir [
DATE SET
], puis appuyez
sur le bouton.
10 Tournez le bouton de volume pour faire les réglages, puis appuyez
sur le bouton.
Jour Mois Jour Année ou Mois Année
11 Maintenez enfoncée pour quitter.
Pour retourner à l’option de réglage précédente, appuyez sur .
Faites les réglages initiaux
1 Appuyez répétitivement sur pour entrer en veille STANDBY.
2 Appuyez sur le bouton de volume pour entrer [
FUNCTION
].
• Appuyez sur pour accéder directement à [
AUDIO CONTROL
].
3 Tournez le bouton de volume pour sélectionner un élément (voir le
tableau suivant), puis appuyez sur le bouton.
4 Répétez l’étape 3 jusqu’à ce que l’élément souhaité soit sélectionné
ou activé.
5 Maintenez enfoncée pour quitter.
Pour retourner à l’option de réglage précédente, appuyez sur .
Défaut:
XX
AUDIO CONTROL
SWITCH
PREOUT
REAR
/
SUBWOOFER
: Choisit si les enceintes arrière ou un caisson de grave
sont connectés aux prises de sortie de ligne à l’arrière (à travers un amplificateur
extérieur).
SP SELECT OFF
/
5/4
/
6 × 9/6
/
OEM
: La sélection est faite en fonction de la taille des
enceintes (5 pouces ou 4 pouces, 6×9 pouces ou 6 pouces) ou des enceintes OEM
pour obtenir une performance optimale.
3
2

FRANÇAIS 5
DISPLAY
EASY MENU
Quand vous entrez dans [
FUNCTION
]...
ON
:L’éclairage de ZONE1 et ZONE2 change sur la couleur blanche.;
OFF
:L’éclairage de ZONE2 change sur la couleur blanche tandis que l’éclairage de ZONE1 reste sur la
couleur [
COLOR
SELECT
]. (
17
)
(Reportez-vous à l’illustration de la page 16 pour l’identification de zone.)
TUNER SETTING
PRESET TYPE NORMAL
:Mémorise une station pour chaque touche de préréglage dans chaque bande
(FM1/ FM2/ FM3/ AM).;
MIX
:Mémorise une station ou un canal SiriusXM pour chaque touche de
préréglage, quelle que soit la bande ou le canal SiriusXM sélectionné.
SYSTEM
KEY BEEP ON
:Met en service la tonalité des touches.;
OFF
:Met hors service la fonction.
SOURCE SELECT
PANDORA SRC ON
:Met en service PANDORA dans la sélection de la source.;
OFF
:Hors service. (
10
)
IHEART SRC ON
:Met en service IHEARTRADIO dans la sélection de la source.;
OFF
:Hors service. (
11
)
BUILT-IN AUX ON
:Met en service AUX dans la sélection de la source.;
OFF
:Hors service. (
7
)
CD READ 1
:Distingue automatiquement les disques de fichiers audio et les CD de musique.;
2
:Reproduit de
force le disque comme un CD de musique. Aucun son n’est entendu si un disque de fichiers audio est
reproduit.
F/W UPDATE
UPDATE SYSTEM
F/W UP xx.xx YES
:Démarrer la mise à niveau du micrologiciel.;
NO
:Annulation (la mise à niveau n’est pas activée).
Pour en savoir plus sur la mise à niveau du micrologiciel, référez-vous à: www.kenwood.com/cs/ce/
CLOCK
CLOCK DISPLAY ON
:L’horloge apparaît sur l’affichage même quand l’appareil est hors tension.;
OFF
:Annulation.
ENGLISH
Sélectionnez la langue d’affichage pour le menu [
FUNCTION
] et l’information sur le morceau si elle
est disponible.
Par défaut, [
ENGLISH
] est sélectionné.
ESPANOL
PRISE EN MAIN RADIO
Recherchez une station
1 Appuyez répétitivement sur pour sélectionner TUNER.
2 Appuyez répétitivement sur (ou appuyez sur
/ sur la RC-406) pour sélectionner
FM1/ FM2/ FM3/ AM.
3 Appuyez sur S T S/ (ou appuyez sur / sur la
RC-406) pour rechercher une station.
•
Pour changer la méthode de recherche pour
S
/
T
: Appuyez
répétitivement sur .
AUTO1 : Recherche automatiquement une station.
AUTO2 : Recherche d’une station préréglée.
MANUAL : Recherche manuellement une station.
•
Pour mémoriser une station: Maintenez pressée une des touches
numériques (
1
à
6
).
•
Pour choisir une station mémorisée: Appuyez sur une des touches
numériques (
1
à
6
) (ou appuyez sur une des touches numériques (
1
à
6
) sur
la RC-406).

6
RADIO
Syntonisation à accès direct (en utilisant la RC-406)
1 Appuyez sur DIRECT pour entrer en mode de Syntonisation à accès
direct.
2 A l’aide des touches numériques, entrez une fréquence.
3 Appuyez sur pour recherche une station.
•
Pour annuler, appuyez sur ou
DIRECT
.
•
Si aucune opération n’est effectuée pendant 10 secondes après l’étape
2
, la
syntonisation à accès direct est annulée automatiquement.
Autres paramètres
1 Appuyez sur le bouton de volume pour entrer [
FUNCTION
].
2 Tournez le bouton de volume pour sélectionner un élément (voir le
tableau suivant), puis appuyez sur le bouton.
3 Répétez l’étape 2 jusqu’à ce que l’élément souhaité soit sélectionné ou
activé.
4 Maintenez enfoncée pour quitter.
Pour retourner à l’option de réglage précédente, appuyez sur .
Défaut:
XX
TUNER SETTING
AUTO MEMORY YES
:Mémorise automatiquement 6 stations dont la réception est bonne.;
NO
:Annulation.
•
Peut être sélectionné uniquement si [
NORMAL
] est sélectionné pour
[
PRESET TYPE
]. (
5
)
MONO SET ON
:Améliore la réception FM mais l’effet stéréo peut être perdu.;
OFF
:Annulation.
TI ON
:Permet à l’appareil de commuter temporairement sur les informations routières si
elles sont disponibles (“TI” s’allume).;
OFF
:Annulation.
PTY SEARCH
Sélectionne le type de programme disponible (voir ci-après), puis appuyez sur
S
/
T
pour démarrer.
CLOCK
TIME SYNC ON
:Synchronise l’heure de l’appareil à l’heure de la station Radio Broadcast Data System.;
OFF
:Annulation.
Type de programme disponible pour PTY SEARCH
SPEECH
:
NEWS
,
INFORM
(information),
SPORTS
,
TALK
,
LANGUAGE
,
REL TALK
(discussion religieuse),
PERSNLTY
(personnalité),
PUBLIC
,
COLLEGE
,
HABL ESP
(discussion en espagnol),
WEATHER
MUSIC
:
ROCK
,
CLS ROCK
(rock classique),
ADLT HIT
(hit adulte),
SOFT RCK
(rock
soft),
TOP 40
,
COUNTRY
,
OLDIES
,
SOFT
,
NOSTALGA
(nostalgique),
JAZZ
,
CLASSICL
(classique),
R & B
(rhythm et blues),
SOFT R&B
(rhythm et blues
soft),
REL MUSC
(musique religieuse),
MUSC ESP
(musique espagnole),
HIP HOP
L’appareil recherche le type de programme catégorisé dans [
SPEECH
] ou [
MUSIC
] s’il
a été choisi.
•
[
MONO SET
]/ [
TI
]/ [
PTY SEARCH
] peut être choisi uniquement quand la bande est
FM1/ FM2/ FM3.
•
Si le volume est ajusté pendant la réception des informations routières ou de
bulletins d’information, le volume ajusté est automatiquement mémorisé. Il sera
appliqué la prochaine fois que les informations routières ou de bulletin d’information
seront activées.

FRANÇAIS 7
CD / USB / iPod / ANDROID
Démarrez la lecture
La source change automatiquement et le lecture démarre.
*1
KCA-iP102 : Type à 30 broches, KCA-iP103 : Type d’éclairage
*2
Ne laissez pas le câble à l’intérieur de la voiture quand il n’est pas utilisé.
*3
Lors de la connexion d’un périphérique Android, “Press [VIEW] to install KENWOOD MUSIC PLAY APP” apparaît. Suivez les
instructions pour installer l’application. Vous pouvez aussi intaller la dernière version de l’application KENWOOD MUSIC PLAY
sur votre périphérique Android avant la connexion. (
20
)
AUX
Préparation:
Sélectionnez [
ON
] pour [
BUILT-IN AUX
]. (
5
)
Démarrez l’écoute
1 Connectez un lecteur audio portable (en vente dans le
commerce).
2 Appuyez répétitivement sur pour sélectionner AUX.
3 Mettez sous tension le lecteur audio portable et démarrez la
lecture.
Réglez le nom pour AUX
Lors de l’écoute d’un lecteur audio portable connecté à l’appareil...
1 Appuyez sur le bouton de volume pour entrer [
FUNCTION
].
2 Tournez le bouton de volume pour choisir [
SYSTEM
], puis appuyez
sur le bouton.
3 Tournez le bouton de volume pour choisir [
AUX NAME SET
], puis
appuyez sur le bouton.
4 Tournez le bouton de volume pour choisir un élément, puis
appuyez sur le bouton.
AUX
(défaut)/
DVD
/
PORTABLE
/
GAME
/
VIDEO
/
TV
5 Maintenez enfoncée pour quitter.
Pour retourner à l’option de réglage précédente, appuyez sur .
Prise d’entrée auxiliaire Lecteur audio portable
Mini fiche stéréo de 3,5 mm (1/8 pouces) avec
connecteur en forme de “L” (en vente dans le commerce)
Face portant l’étiquette
M
Éjectiez le disque
Prise d’entrée USB
CA-U1EX (max.: 500mA) (accessoire en option)
Câble Micro USB 2.0
*2
(en vente dans le commerce)
KCA-iP102 / KCA-iP103 (accessoire en option)
*1
ou accessoire câble du iPod/iPhone
*2
USB
iPod/iPhone
ANDROID*3

8
CD / USB / iPod / ANDROID
Pour Sur la façade Sur la télécommande
Lecture / pause Appuyez sur . Appuyez sur .
Recherche rapide vers
l’arrière / vers l’avant*4
Maintenez enfoncée S T/ . Maintenez enfoncée S/ .
Sélectionnez un une
plage ou un fichier
Appuyez sur S T S/ . Appuyez sur / .
Sélectionnez un dossier
*5Appuyez sur J K/ . Appuyez sur / .
Répéter la lecture*6Appuyez répétitivement sur .
TRACK REPEAT
/
ALL REPEAT
: CD Audio
FILE REPEAT
/
FOLDER REPEAT
/
ALL REPEAT
: Fichier MP3/WMA/WAV/FLAC
FILE REPEAT
/
FOLDER REPEAT
/
REPEAT OFF
: iPod ou ANDROID
Lecture aléatoire*6Appuyez répétitivement sur .
DISC RANDOM
/
RANDOM OFF
: CD Audio
FOLDER RANDOM
/
RANDOM OFF
:
Fichier MP3/WMA/WAV/FLAC, iPod ou ANDROID
Maintenez enfoncée pour sélectionner
ALL RANDOM
.*7
*4
Pour ANDROID: Fonctionne uniquement quand [
BROWSE MODE
] est sélectionné.
*5
Pour CD: Uniquement pour les fichiers MP3/WMA. Cela ne fonctionne pas pour l’iPod/ ANDROID.
*6
Pour l’iPod/ ANDROID: Fonctionne uniquement quand [
MODE OFF
]/ [
BROWSE MODE
] est sélectionné.
*7
Pour CD: Uniquement pour les fichiers MP3/WMA.
Sélectionnez le mode de commande
Quand la source est IPOD, appuyez répétitivement
sur iPodUSB.
MODE ON
: Commande l’iPod en utilisant l’iPod lui-même.
Cependant, vous pouvez toujours faire une
lecture/pause, sauter des fichiers, et faire une
recherche rapide vers l’arrière/vers l’avant à
partir de cet appareil.
MODE OFF
: Commande l’iPod à partir de cet appareil.
Quand la source est ANDROID, appuyez
répétitivement sur iPodUSB.
BROWSE MODE
: Commandez le périphérique Android
à partir de cet appareil via l’application
KENWOOD MUSIC PLAY installée sur le
périphérique Android.
HAND MODE
: Commandez le périphérique Android
en utilisant le périphérique Android
lui-même via une autre application
multimédia installée sur le périphérique
Android. Cependant, vous pouvez encore
utiliser la lecture/pause et le saut de
fichier de cet appareil.
Sélectionnez le lecteur de musique
Appuyez répétitivement sur iPodUSB.
Les morceaux mémorisés dans le lecture suivant seront lus.
•
Mémoire sélectionnée interne ou externe d’un
smartphone (Mass Storage Class).
•
Lecteur sélectionné parmi plusieurs lecteurs.
Pour sélectionner directement
la source USB/ IPOD/ ANDROID,
appuyez sur
iPodUSB
.
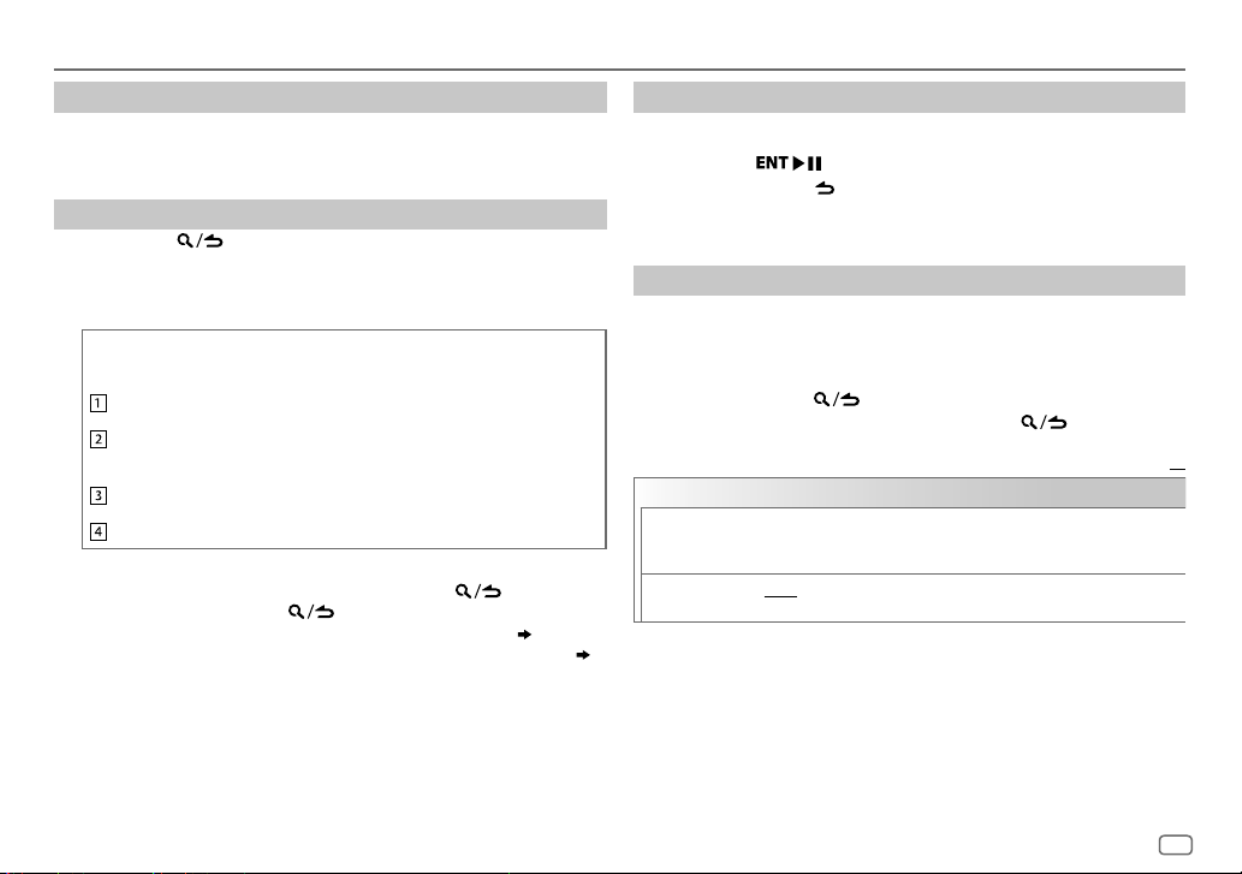
FRANÇAIS 9
CD / USB / iPod / ANDROID
Écoute de TuneIn Radio/ TuneIn Radio Pro/ Aupeo
Lors de l’écoute de TuneIn Radio, TuneIn Radio Pro ou Aupeo, connectez l’iPod/iPhone à
la prise d’entrée USB de l’appareil.
•
L’appareil sort le son de ces applications.
Sélectionnez un fichier à partir d’un dossier/liste
1 Appuyez sur .
2 Tournez le bouton de volume pour sélectionner un dossier/liste, puis
appuyez sur le bouton.
3 Tournez le bouton de volume pour choisir un fichier, puis appuyez sur le
bouton.
Recherche rapide
Si vous avez beaucoup de fichiers dans l’iPod, vous pouvez faire une recherche
parmi eux rapidement à partir du premier caractère du nom de fichier.
Tournez le bouton de volume rapidement pour entrer en recherche de
caractères.
Tournez le bouton de volume pour sélectionner un caractère.
Pour rechercher un autre caractère qu’une lettre de A à Z et un chiffre de
0 à 9, entrez seulement “
*
”.
Appuyez sur
S
/
T
pour déplacer la position d’entrée.
• Vous pouvez entrer un maximum de trois caractères.
Appuyez sur le bouton de volume pour démarrer la recherche.
•
Pour retourner au dossier racine/ premier fichier/ menu supérieur, appuyez sur
5
.
•
Pour retourner à l’option de réglage précédente, appuyez sur .
•
Pour annuler, maintenez enfoncée .
•
Pour l’iPod, applicable uniquement quand [
MODE OFF
] est sélectionné.
(
8
)
•
Pour ANDROID, applicable uniquement quand [
BROWSE MODE
] est sélectionné. (
8
)
Recherche directe de morceau (en utilisant la RC-406)
1 Appuyez sur DIRECT.
2 A l’aide des touches numériques, entrez le numéro de plage/fichier.
3 Appuyez sur pour rechercher un morceau.
•
Pour annuler, appuyez sur ou
DIRECT
.
•
Non disponible si la lecture aléatoire est sélectionné.
•
Non applicable pour iPod et ANDROID.
Autres paramètres
1 Appuyez sur le bouton de volume pour entrer [
FUNCTION
].
2 Tournez le bouton de volume pour sélectionner un élément (voir le
tableau suivant), puis appuyez sur le bouton.
3 Répétez l’étape 2 jusqu’à ce que l’élément souhaité soit sélectionné ou
activé.
4 Maintenez enfoncée pour quitter.
Pour retourner à l’option de réglage précédente, appuyez sur .
Défaut:
XX
USB
MUSIC DRIVE DRIVE CHANGE
:Le lecteur suivant ([
DRIVE 1
] à [
DRIVE 5
]) est sélectionné
automatiquement et la lecture démarre.
Répétez les étapes
1
à
3
pour choisir les lecteurs suivants.
SKIP SEARCH 0.5%
/
1%
/
5%
/
10%
: Lors de l’écoute de l’iPod ou ANDROID, sélectionnez l’ampleur
de saut sur le total des fichiers.
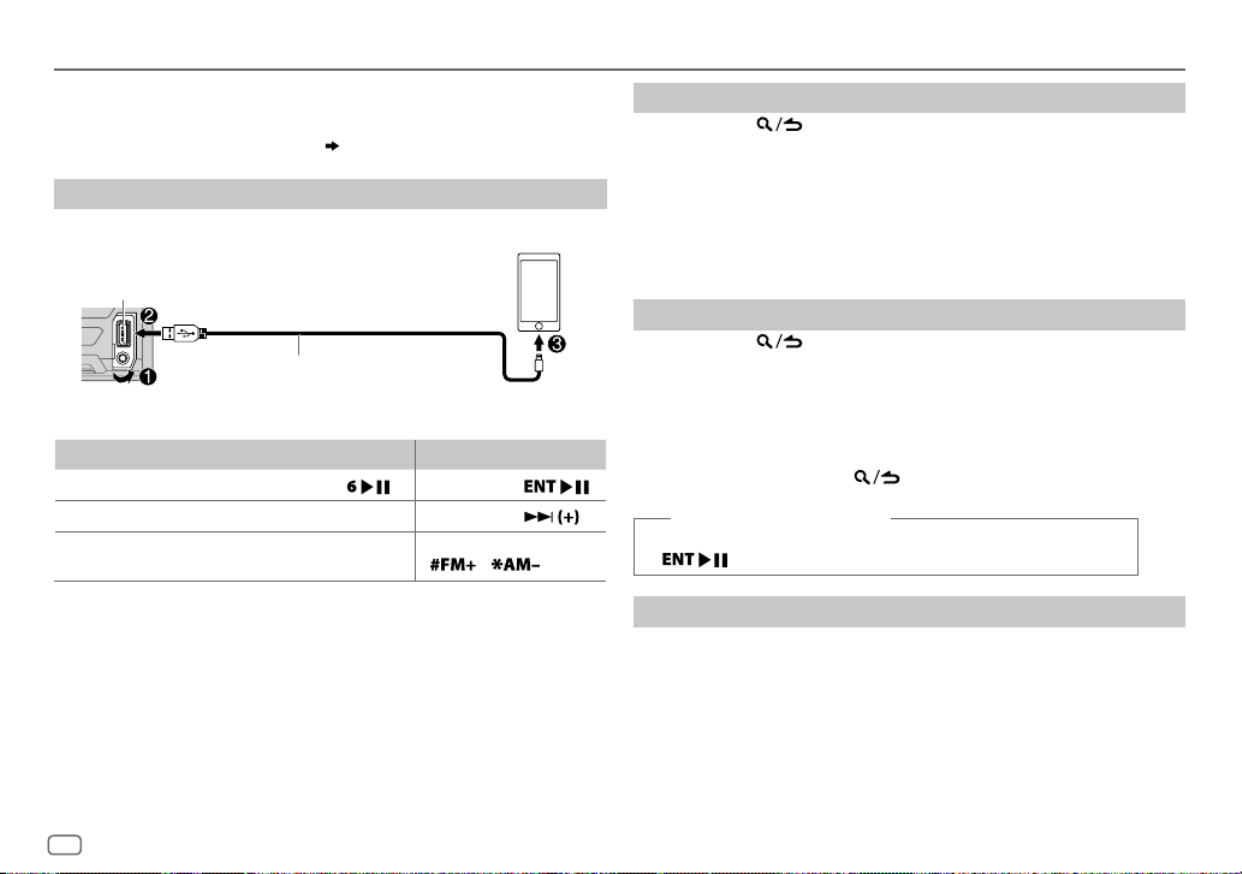
10
Pandora®
Préparation:
Installez la dernière version de l’application Pandora sur votre appareil
(iPhone/ iPod touch), puis créez un compte et connectez-vous sur Pandora.
•
Sélectionnez [
ON
] pour [
PANDORA SRC
]. (
5
)
Démarrez l’écoute
1 Ouvrez l’application Pandora sur votre appareil.
2 Connectez votre appareil à la prise d’entrée USB.
La source change sur PANDORA et la diffusion démarre.
Pour Sur la façade Sur la télécommande
Lecture / pause Appuyez sur . Appuyez sur .
Sauter une plage Appuyez sur T.Appuyez sur .
Fait défiler vers le haut
ou vers le bas*3
Appuyez sur J K/ . Appuyez sur
/ .
*
1
KCA-iP102 : Type à 30 broches, KCA-iP103 : Type d’éclairage
*
2
Ne laissez pas le câble à l’intérieur de la voiture quand il n’est pas utilisé.
*
3
Si le défilement vers le bas est sélectionné, la plage actuelle est sautée.
Prise d’entrée USB
KCA-iP102 / KCA-iP103 (accessoire en option)
*1
ou accessoire câble du iPod/iPhone
*2
Création et sauvegarde d’une nouvelle station
1 Appuyez sur .
2 Tournez le bouton de volume pour choisir [
NEW STATION
], puis appuyez
sur le bouton.
3 Tournez le bouton de volume pour choisir [
FROM TRACK
] ou [
FROM ARTIST
],
puis appuyez sur le bouton.
Une nouvelle station est créée sur la base du morceau ou de l’artiste actuel.
4 Maintenez pressée une des touches numériques ( à ) pour mémoriser.1 5
Pour sélectionner une station mémorisée, appuyez sur les touches numériques (
1
à
5
).
Recherchez une station mémorisée
1 Appuyez sur .
2 Tournez le bouton de volume pour choisir un élément, puis appuyez sur
le bouton.
[
BY DATE
]:En fonction de la date d’enregistrement
[
A-Z
]:Ordre alphabétique
3 Tournez le bouton de volume pour choisir la station souhaitée, puis
appuyez sur le bouton.
Pour annuler, maintenez enfoncée .
(ou lors de l’utilisation de RC-406)
Appuyez sur J K / pour rechercher une station, puis appuyez sur
.
Enregistrez un signet sur le morceau actuel
Maintenez enfoncé le bouton de volume.
“BOOKMARKED” apparaît et l’information est mémorisée sur votre périphérique. Le
signet est disponible sur votre compte Pandora mais pas sur cet appareil.

FRANÇAIS 11
iHeartRadio®
Préparation:
Installez la dernière version de l’application iHeart Link for KENWOOD sur votre appareil
(iPhone/ iPod touch), puis créez un compte et connectez-vous sur iHeartRadio.
•
Sélectionnez [
ON
] pour [
IHEART SRC
]. (
5
)
Démarrez l’écoute
1 Ouvrez l’application iHeart Link sur votre appareil.
2 Connectez votre appareil à la prise d’entrée USB.
3 Appuyez répétitivement sur pour sélectionner IHEARTRADIO.
La diffusion démarre automatiquement.
Pour Sur la façade Sur la télécommande
Lecture / pause Appuyez sur . Appuyez sur .
Saute une plage pour choisir une
station personnalisée
Appuyez sur T.Appuyez sur .
Fait défiler vers le haut ou le bas*3
pour choisir une station personnalisée
Appuyez sur J K/ .
( Non disponible )
Crée une nouvelle station/station
personnalisée
Appuyez sur 1.
( Non disponible )
Ajoute la station actuelle aux stations
préférées
Appuyez sur 2.
( Non disponible )
Recherche d’une station en direct Appuyez sur 3.
( Non disponible )
*1
KCA-iP102 : Type à 30 broches, KCA-iP103 : Type d’éclairage
*2
Ne laissez pas le câble à l’intérieur de la voiture quand il n’est pas utilisé.
*3
Si le défilement vers le bas est sélectionné, la plage actuelle est sautée.
Prise d’entrée USB
KCA-iP102 / KCA-iP103 (accessoire en option)
*1
ou accessoire câble du iPod/iPhone
*2
Suppression d’une station
Lors de l’écoute de PANDORA...
1 Appuyez sur le bouton de volume pour entrer [
FUNCTION
].
2 Tournez le bouton de volume pour choisir [
SYSTEM
], puis
appuyez sur le bouton.
3 Tournez le bouton de volume pour choisir [
STATION DEL
],
puis appuyez sur le bouton.
4 Tournez le bouton de volume pour choisir [
A-Z
] ou
[
BY DATE
], puis appuyez sur le bouton.
5 Tournez le bouton de volume pour choisir la station à
supprimer, puis appuyez sur le bouton.
6 Tournez le bouton de volume pour choisir [
YES
], puis
appuyez sur le bouton.
7 Maintenez enfoncée pour quitter.
Pour retourner à l’option de réglage précédente, appuyez sur .
Pandora®
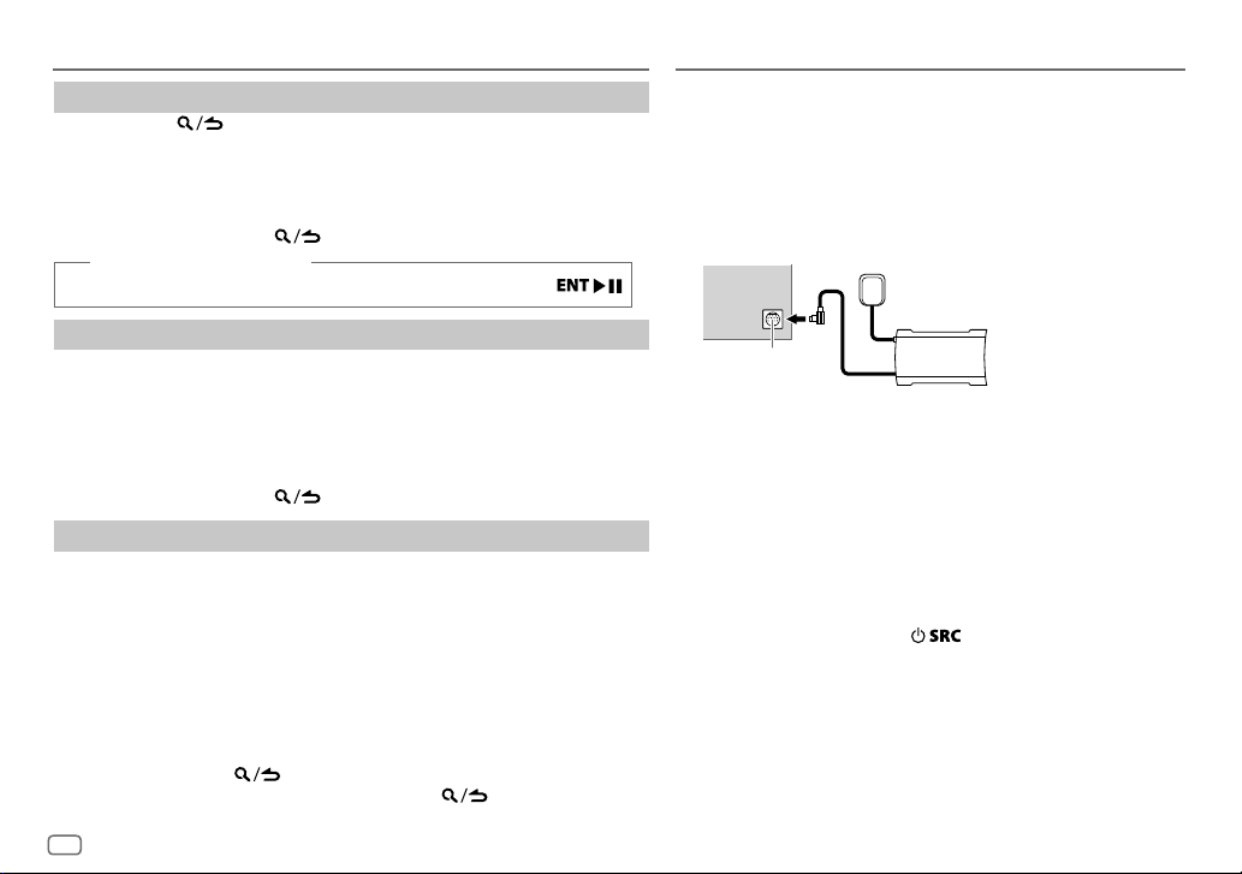
12
iHeartRadio®
Recherchez une station
1 Appuyez sur .
2 Tournez le bouton de volume pour choisir une catégorie, puis appuyez sur le
bouton.
3 Tournez le bouton de volume pour choisir la station souhaitée, puis appuyez
sur le bouton.
Quand une liste des villes apparaît, vous pouvez sauter les villes dans l’ordre alphabétique.
Pour annuler, maintenez enfoncée .
(ou lors de l’utilisation de RC-406)
Appuyez sur J K / pour rechercher une station, puis appuyez sur .
Saute les villes dans l’ordre alphabétique
Quand une liste de villes apparaît pendant la recherche...
1 Tournez le bouton de volume rapidement pour entrer en recherche de
caractères.
2 Tournez le bouton du volume ou appuyez sur / pour choisir le S T
caractère à rechercher.
3 Appuyez sur J / K pour passer à la page précédente/suivante.
4 Appuyez sur le bouton de volume pour démarrer la recherche.
Pour annuler, maintenez enfoncée .
Suppression d’une station
Lors de l’écoute de IHEARTRADIO...
1 Appuyez sur le bouton de volume pour entrer [
FUNCTION
].
2 Tournez le bouton de volume pour choisir [
SYSTEM
], puis appuyez sur le
bouton.
3 Tournez le bouton de volume pour choisir [
STATION DEL
], puis appuyez sur le
bouton.
4 Tournez le bouton de volume pour choisir [
LIVE
] ou [
CUSTOM
], puis appuyez sur
le bouton.
5 Tournez le bouton de volume pour choisir la station à supprimer, puis appuyez
sur le bouton.
6 Tournez le bouton de volume pour choisir [
YES
], puis appuyez sur le bouton.
7 Maintenez enfoncée pour quitter.
Pour retourner à l’option de réglage précédente, appuyez sur .
Radio SiriusXM®
Seul SiriusXM® vous apporte plus de ce que vous aimez écouter, en un seul
endroit. Obtenez plus de 140 canaux, y compris de la musique sans pauses
publicitaires, le meilleur du sport, les nouvelles, les discussions, les comédies et
de les divertissements. Bienvenue dans le monde de la radio satellite. Un tuner
SiriusXM Vehicle et un abonnement sont nécessaires. Pour plus d’informations,
consultez www.siriusxm.com.
Préparation:
1 Connectez le tuner SiriusXM Vehicle optionnel (en vente dans le
commerce).
2 Vérifiez votre numéro d’identification radio pour l’activation.
Le numéro d’identification de SiriusXM Radio est nécessaire pour l’activation
et peut être trouvé en accordant le canal 0 de même que sur l’étiquette qui
se trouve sur le tuner SiriusXM Connect et sur son emballage.
Le numéro d’identification radio ne comprend pas les lettres I, O, S ou F.
3 Activez l’abonnement.
Pour les utilisateurs aux États-Unis:
En ligne: Allez sur www.siriusxm.com
Téléphone: Appelez le 1-866-635-2349
Pour les utilisateurs au Canada:
En ligne: Allez sur www.siriusxm.ca/activatexm
Téléphone: Appelez le 1-877-438-9677
4 Appuyez répétitivement sur pour sélectionner SIRIUSXM
et démarrer la mise à jour.
Port d’extension sur le
panneau arrière
Tuner SiriusXM Vehicle
Antenne

FRANÇAIS 13
Démarrez l’écoute
1 Appuyez répétitivement sur pour sélectionner
SIRIUSXM.
2 Appuyez répétitivement sur pour sélectionner
une bande.
3 Appuyez sur .
“ ” s’allume.
4 Tournez le bouton de volume pour choisir une catégorie,
puis appuyez sur le bouton.
Si “ALL CHANNELS” est sélectionné, tous les canaux disponibles sont
affichés.
5 Tournez le bouton de volume pour choisir un canal, puis
appuyez sur le bouton.
(ou)
Appuyez sur S T/ pour rechercher un canal
manuellement.
• Maintenir enfoncée
S T/
permet de changer le canal
rapidement.
Si un canal verrouillé ou un canal adulte est sélectionné, un écran
d’entrée de code secret apparait. Entrez le code secret pour recevoir
le canal. (
14
)
Pour changer la méthode de syntonisation pour
S
/
T
: Appuyez
sur .
Chaque fois que vous appuyez sur , la méthode de recherche
change entre “CHANNEL” (recherche manuelle d’un canal) et “PRESET”
(recherche d’un canal préréglé de la bande choisie).
Syntonisation à accès direct (en utilisant la RC-406)
1 Appuyez sur DIRECT pour entrer en mode de
Syntonisation à accès direct.
2
A l’aide des touches numériques, entrez le numéro de canal.
3 Appuyez sur pour démarrer la recherche.
•
Pour annuler, appuyez sur ou
DIRECT
.
•
Si aucune opération n’est effectuée pendant 10 secondes
après l’étape
2
, la syntonisation à accès direct est annulée
automatiquement.
Radio SiriusXM®
Mode de touche SiriusXM
Maintenez pressé pour changer le mode de touche (canal ou relecture).
(Défaut: Mode de touche canal)
“ ” s’allume quand le mode de touche de relecture est sélectionné.
Quand le mode de touche de canal est sélectionné...
Pour Sur la façade Sur la télécommande
Sélectionnez un canal Appuyez sur S
/
T S. Appuyez sur / .
Changer un canal
rapidement
Maintenez enfoncée
S
/
T.
Maintenez enfoncée S/ .
Mémoriser un canal de
la bande actuelle
Maintenez pressée
une des touches
numériques (1 6à ).
(Non disponible)
Sélectionner un canal
mémorisé de la bande
actuelle
Appuyez sur l’une des touches numériques (1 6à ).
Quand le mode de touche de relecture est sélectionné...
Pour Sur la façade Sur la télécommande
Lecture / pause Appuyez sur . Appuyez sur .
Sélectionnez une plage Appuyez sur S
/
T S. Appuyez sur / .
Retour / avance rapide Maintenez enfoncée
S
/
T.
Maintenez enfoncée S/ .
Aller au direct Appuyez sur 1.

14
SmartFavorites et TuneStart™
Les canaux mémorisé de l’utilisateur sont reconnus comme canaux
SmartFavorite*. Le tuner SiriusXM Vehicle met automatiquement en cache le
contenu diffusé en tache de fond.
•
La fonction SmartFavorites est disponible avec le tuner SXV200 ou les
modèles ultérieurs de tuner SiriusXM Vehicle.
*
Le tuner SiriusXM Vehicle SXV300 (et ultérieur) peut utiliser les 18 canaux mémorisés comme canaux
SmartFavorites. Le tuner SiriusXM Vehicle SXV200 peut utiliser les 6 canaux mémorisés de la bande
actuelle comme canaux SmartFavorites.
Quand vous syntonisez un canal préféré intelligent, vous pouvez revenir en
arrière et relire 30 minutes maximum de n’importe quel contenu manqué:
nouvelles, discussions, sport ou musique.
•
La lecture démarre à partir du début du morceau si [
TUNE START
] est réglé
sur [
ON
] (
15
) pour la plupart des canaux de musique mémorisés comme
SmartFavorite.
Appuyez sur une des touches numériques (1 6 à ) pour sélectionner
un canal mémorisé.
TuneScan™
Vous pouvez obtenir un bref aperçu des morceaux que vous avez manqués sur
chacun de vos canaux de musique SmartFavorite ou sur le canal de musique
que vous écoutez actuellement.
Maintenez pressé pour démarrer le balayage des
6 premières secondes du contenu musical enregistré.
•
Pour écouter le morceau actuel, appuyez sur le bouton de volume pour
arrêter le balayage. L’appareil continue de lire le morceau actuel.
•
Pour sélectionner le morceau précédent/suivant, appuyez sur
S
/
T
.
•
Pour annuler le balayage, maintenez enfoncé le bouton de volume. L’appareil
retour sur le canal que vous écoutiez avant de lancer TuneScan.
Réglages SiriusXM
1 Appuyez sur le bouton de volume pour entrer [
FUNCTION
].
2 Tournez le bouton de volume pour choisir [
SIRIUS XM
], puis appuyez sur le
bouton.
3 Tournez le bouton de volume pour sélectionner un élément (voir le tableau
suivant), puis appuyez sur le bouton.
4 Répétez l’étape 3 jusqu’à ce que l’élément souhaité soit sélectionné/activé ou
suivez les instructions données pour l’élément sélectionné.
5 Maintenez enfoncée pour quitter.
Pour retourner à l’option de réglage précédente, appuyez sur .
Défaut:
XX
CHANNEL LOCK
Pour déverrouiller les réglages:
1
Tournez le bouton de volume pour sélectionner un numéro.
2
Appuyez sur
S T/
pour déplacer la position d’entrée.
3
Répétez les étapes
1
et
2
pour entrer le code secret actuel.
(Le code secret initial est 0000.)
4
Appuyez sur le bouton de volume pour valider.
CODE SET
1
Tournez le bouton de volume pour sélectionner un numéro.
2
Appuyez sur
S T/
pour déplacer la position d’entrée.
3
Répétez les étapes
1
et
2
pour entrer un nouveau code secret de 4 chiffres.
4
Appuyez sur le bouton de volume pour valider.
5
Répétez les étapes
1
à
4
pour confirmer le code secret.
•
Notez le nouveau code secret afin de pouvoir accéder aux réglages de verrouillage de canal la
fois suivante.
LOCK SETTING MATURE CH
:Sélectionne le réglage du verrouillage défini SiriusXM.;
USER DEFINED
: Sélectionne les canaux individuels que l’utilisateur souhaite verrouiller.;
OFF
:Annulation.
CHANNEL EDIT
*11
Tournez le bouton de volume pour choisir une catégorie, puis appuyez sur le bouton.
2
Tournez le bouton de volume pour choisir un canal que vous souhaitez verrouiller, puis
appuyez sur le bouton.
“L” apparaît devant le numéro de canal.
3
Maintenez enfoncée pour quitter.
CHANNEL CLEAR
*1
YES
:Annule tous les canaux verrouillés.;
NO
:Annulation.
Radio SiriusXM®
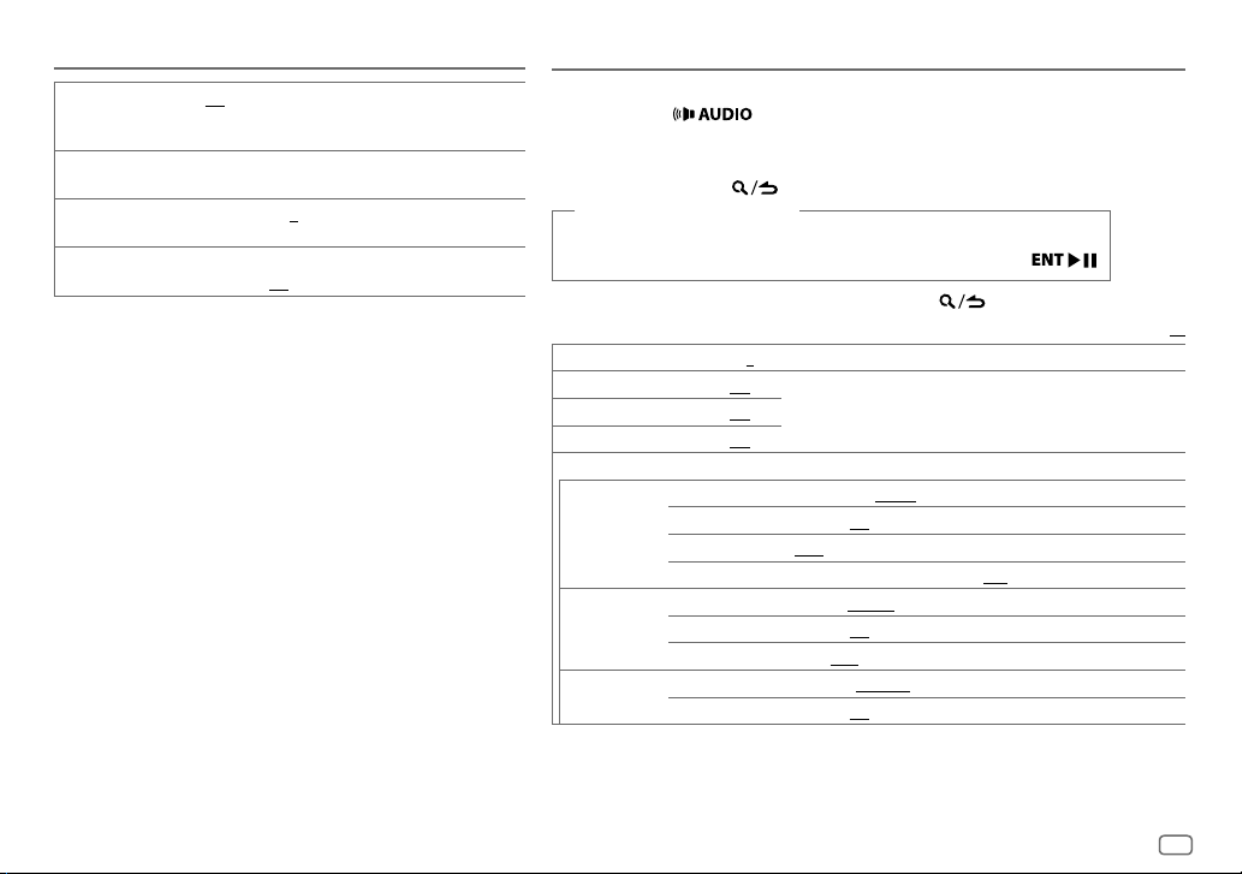
FRANÇAIS 15
TUNE START
*2
ON
:Tous les canaux de musique qualifiés dans SmartFavorite
démarreront la lecture à partir du début du morceau.;
OFF
:Annulation.
SIGNAL LEVEL NO SIGNAL
/
WEAK
/
GOOD
/
STRONG
:Montre la puissance
du signal actuellement reçu.
BUFFER USAGE 0%
—
100%
(
0
):Montre l’utilisation actuelle pour la mémoire
tampon de relecture.
SXM RESET YES
:Réinitialise les canaux mémorisés et le réglage de verrouillage
aux défauts.;
NO
:Annulation.
*1
Affiché uniquement quand [
USER DEFINED
] est sélectionné.
*2
Disponible uniquement si le tuner SiriusXM Vehicle connecté est le SXV200 ou un tuner ultérieur
qui prend en charge SmartFavorites.
Radio SiriusXM® RÉGLAGES AUDIO
Pendant l’écoute de n’importe quelle source...
1 Appuyez sur pour accéder directement à [
AUDIO CONTROL
].
2 Tournez le bouton de volume pour sélectionner un élément (voir le tableau
suivant), puis appuyez sur le bouton.
3 Répétez l’étape 2 jusqu’à ce que l’élément souhaité soit sélectionné ou activé.
4 Maintenez enfoncée pour quitter.
(ou lors de l’utilisation de RC-406)
1 Appuyez sur AUD pour accéder à [
AUDIO CONTROL
].
2 Appuyez sur J K / pour choisir un élément, puis appuyez sur .
Pour retourner à l’option de réglage précédente, appuyez sur .
Défaut:
XX
SUB-W LEVEL –15
à
+15
(
0
)Ajuste le niveau de sortie du caisson de grave.
BASS LEVEL –8
à
+8
(
+2
)
Réglez le niveau à mémoriser pour chaque source. (Avant de réaliser un ajustement,
choisissez la source que vous souhaitez ajuster.)
MID LEVEL –8
à
+8
(
+1
)
TRE LEVEL –8
à
+8
(
+1
)
EQ PRO
(Ce réglage est mémorisé sur [
USER
].)
BASS ADJUST BASS CTR FRQ 60HZ
/
80HZ
/
100HZ
/
200HZ
: Choisit la fréquence centrale.
BASS LEVEL –8
à
+8
(
+2
):Règle le niveau.
BASS Q FACTOR 1.00
/
1.25
/
1.50
/
2.00
:Règle le facteur de qualité.
BASS EXTEND ON
:Met en service les graves étendus.;
OFF
:Annulation.
MID ADJUST MID CTR FRQ 0.5KHZ
/
1.0KHZ
/
1.5KHZ
/
2.5KHZ
:Choisit la fréquence centrale.
MID LEVEL –8
à
+8
(
+1
):Règle le niveau.
MID Q FACTOR 0.75
/
1.00
/
1.25
:Règle le facteur de qualité.
TRE ADJUST TRE CTR FRQ 10.0KHZ
/
12.5KHZ
/
15.0KHZ
/
17.5KHZ
:Choisit la fréquence centrale.
TRE LEVEL –8
à
+8
(
+1
):Règle le niveau.

16
PRESET EQ DRIVE EQ
/
TOP40
/
POWERFUL
/
ROCK
/
POPS
/
EASY
/
JAZZ
/
NATURAL
/
USER
:Sélectionne un égaliseur préréglé adapté à votre genre de musique. (Sélectionnez
[
USER
] pour utiliser les réglages réalisés dans [
EQ PRO
].)
[
DRIVE EQ
] est un égaliseur préréglé qui réduit le bruit extérieur à la voiture ou les
bruit des pneus de la voiture en déplacement.
BASS BOOST LEVEL1
/
LEVEL2
/
LEVEL3
:Choisit votre niveau préféré d’accentuation des graves.;
OFF
:Annulation.
LOUDNESS LEVEL1
/
LEVEL2
:Sélectionner votre accentuations préférée pour les basses et
hautes fréquences pour produire un son plus équilibré aux faibles niveaux de volume.;
OFF
:Annulation.
SUBWOOFER SET ON
:Met en service la sortie du caisson de grave.;
OFF
:Annulation.
LPF SUBWOOFER THROUGH
:Tous les signaux sont envoyés au caisson de grave.;
85HZ
/
120HZ
/
160HZ
:Les signaux audio avec des fréquences inférieures à 85Hz/ 120Hz/ 160Hz sont
envoyés sur le caisson de grave.
SUB-W PHASE REVERSE
(180°)/
NORMAL
(0°):Sélectionne la phase de la sortie du caisson
de grave à synchroniser avec la sortie des enceintes afin d’obtenir des performances
optimales. (Peut être uniquement sélectionné si un réglage autre que [
THROUGH
] est
choisi pour [
LPF SUBWOOFER
].)
FADER R15
à
F15
(
0
):Règle la balance de sortie des enceintes arrière et avant.
BALANCE L15
à
R15
(
0
):Règle la balance de sortie des enceintes gauche et droite.
VOLUME OFFSET
Pour AUX:
–8
à
+8
(
0
) ; Pour les autres sources:
–8
à
0
:Préréglez le niveau de
volume initial pour chaque source. (Avant un ajustement, sélectionnez la source que vous
souhaitez ajuster.)
SOUND RECNSTR
(Reconstruction sonore)
ON
:Crée un son réaliste en compensant les composants haute fréquence et en
rétablissant le temps de montée de la forme d’onde qui est perdu lors de la compression
des données audio.;
OFF
:Annulation.
•
[
SUB-W LEVEL
]/ [
SUBWOOFER SET
]/ [
LPF SUBWOOFER
]/ [
SUB-W PHASE
] peut être
sélectionné uniquement si [
SWITCH PREOUT
] est réglé sur [
SUBWOOFER
]. (
4
)
•
[
SUB-W LEVEL
]/ [
LPF SUBWOOFER
]/ [
SUB-W PHASE
] peut être sélectionné
uniquement si [
SUBWOOFER SET
] est réglé sur [
ON
].
RÉGLAGES D’AFFICHAGE
Réglez le gradateur
Maintenez DISP (DIMMER) enfoncé pour activer/désactiver le gradateur.
•
Si vous avez réglé [
DIMMER TIME
], il sera annulé quand vous maintiendrez ce bouton
enfoncé.
Autres paramètres
1 Appuyez sur le bouton de volume pour entrer [
FUNCTION
].
2 Tournez le bouton de volume pour choisir [
DISPLAY
], puis appuyez sur le
bouton.
3 Tournez le bouton de volume pour choisir un élément
(
17
)
, puis
appuyez sur le bouton.
4 Répétez l’étape 3 jusqu’à ce que l’élément souhaité soit sélectionné/
activé ou suivez les instructions données pour l’élément sélectionné.
5 Maintenez enfoncée pour quitter.
Pour retourner à l’option de réglage précédente, appuyez sur .
RÉGLAGES AUDIO

FRANÇAIS 17
RÉGLAGES D’AFFICHAGE
Défaut:
XX
COLOR SELECT
Sélectionnez une couleur pour
ALL ZONE
,
ZONE 1
et
ZONE 2
séparément.
1
Choisissez une zone. (
16
)
2
Choisissez une couleur pour la zone sélectionnée.
VARIABLE SCAN
/
CUSTOM R/G/B
/ couleurs préréglées*
Pour créer votre propre couleur, sélectionnez [
CUSTOM R/G/B
]. La couleur que vous avez
créé est mémorisée dans [
CUSTOM R/G/B
].
1
Appuyez sur le bouton de volume pour accéder à l’ajustement détaillé de la couleur.
2
Appuyez sur
S
/
T
pour sélectionner la couleur (
R
/
G
/
B
) à ajuster.
3
Tournez le bouton de volume pour ajuster le niveau (
0
—
9
), puis appuyez sur le
bouton.
DIMMER
Assombrit l’éclairage de l’affichage et l’éclairage des touches.
ON
:Le gradateur est activé.;
OFF
:Annulation.
DIMMER TIME
:Réglez l’heure de mise en et hors service du gradateur.
1
Tournez le bouton de volume pour régler l’heure de mise en service [
ON
], puis appuyez
sur le bouton.
2
Tournez le bouton de volume pour régler l’heure de mise en service [
OFF
], puis appuyez
sur le bouton.
(Défaut: [
ON
]:
6:00 PM
; [
OFF
]:
6:00 AM
)
BRIGHTNESS
1
Choisissez une zone. (
16
)
2
0
—
31
: Sélectionne votre niveau de luminosité préféré pour l’éclairage de l’affichage
et des touches.
TEXT SCROLL AUTO
/
ONCE
:Sélectionne de faire défiler automatiquement l’information sur l’affichage,
ou de la faire défiler une seule fois.;
OFF
:Annulation.
*
Couleurs préréglées:
RED1
/
RED2
/
RED3
/
PURPLE1
/
PURPLE2
/
PURPLE3
/
PURPLE4
/
BLUE1
/
BLUE2
/
BLUE3
/
SKYBLUE1
/
SKYBLUE2
/
LIGHTBLUE
/
AQUA1
/
AQUA2
/
GREEN1
/
GREEN2
/
GREEN3
/
YELLOWGREEN1
/
YELLOWGREEN2
/
YELLOW
/
ORANGE1
/
ORANGE2
/
ORANGERED
GUIDE DE DÉPANNAGE
Symptôme Remède
Généralités
Le son ne peut pas être entendu.
•
Ajustez le volume sur le niveau optimum.
•
Vérifiez les cordons et les connexions.
“MISWIRING CHECK WIRING THEN
PWR ON” apparaît.
Mettez l’appareil hors tension, puis assurez-vous que les prises des
câbles d’enceinte sont correctement isolées. Mettez de nouveau
l’appareil sous tension.
“PROTECTING SEND SERVICE”
apparaît.
Envoyez l’appareil au centre de service le plus proche.
Cet appareil ne fonctionne pas
du tout.
Réinitialisez l’appareil. (
3
)
Radio
•
La réception radio est mauvaise.
•
Bruit statique pendant l’écoute de
la radio.
Connectez l’antenne solidement.
CD / USB / iPod
Le disque ne peut pas être éjecté. Maintenez enfoncée
M
pour éjecter le disque de force. Faites
attention que le disque ne tombe pas quand il est éjecté. Si cela ne
résout pas le problème, essayez de réinitialiser l’appareil. (
3
)
Du bruit est produit. Sautez à une autre plage ou changez le disque.
Les plages ne sont pas reproduites
comme vous le souhaitiez.
L’ordre de lecture est déterminé quand les fichiers sont enregistrés.
“READING” clignote sur. N’utilisez pas trop de niveaux de hiérarchie ou de dossiers.
La durée de lecture écoulée n’est
pascorrecte.
C’est causé par la façon don’t les plages ont été enregistrées sur
le disque.
Les caractères corrects ne sont pas
affichés (ex.: nom de l’album).
•
Cet appareil peut uniquement afficher les lettres majuscules, les
chiffres et un nombre limité de symboles.
•
En fonction de la langue d’affichage que vous avez choisie (
5
),
certains caractères peuvent ne pas être affichés correctement.

18
Symptôme Remède
CD / USB / iPod
“NA FILE” Assurez-vous que le disque contient des fichiers audio compatibles.
(
20
)
“NO DISC” Insèrez un disque reproductible dans la fente d’insertion.
“TOC ERROR” Assurez-vous que le disque est propre et inséré correctement.
“PLEASE EJECT” Réinitialisez l’appareil. Si cela ne résout pas le problème, consultez votre
centre de service le plus proche.
“READ ERROR” Copiez les fichiers et les dossiers de nouveau sur le périphérique USB. Si
cela ne résout pas le problème, réinitialisez le périphérique USB ou utilisez
en un autre.
“NO DEVICE” Connectez un périphérique USB puis repassez à la source USB.
“COPY PRO” Un fichier interdit de copie a été lu.
“NA DEVICE” Connectez un périphérique USB compatible et vérifiez les connexions.
“NO MUSIC” Connectez un périphérique USB qui contient des fichiers audio compatibles.
“iPod ERROR”
•
Reconnectez l’iPod.
•
Réinitialisez l’iPod.
ANDROID
•
Aucun son ne peut être
entendu pendant la lecture.
•
Le son sort uniquement du
périphérique Android.
•
Reconnectez le périphérique Android.
•
En mode [
HAND MODE
], lancez n’importe quelle application
multimédia sur le périphérique Android et démarrez la lecture.
•
En mode [
HAND MODE
], relancez l’application multimédia actuelle
ou utilisez une autre application multimédia.
•
Redémarrez le périphérique Android.
•
Si cela ne résout pas le problème, c’est que le périphérique Android
connecté ne peut pas diriger le signal audio sur l’appareil. (
20
)
Lecture impossible en mode
[
BROWSE MODE
].
•
Assurez-vous que KENWOOD MUSIC PLAY APP est installé sur le
périphérique Android. (
7
)
•
Reconnectez le périphérique Android et sélectionnez le mode de
commande approprié.
•
Si cela ne résout pas le problème, c’est que le périphérique Android
connecté ne prend pas en charge [
BROWSE MODE
]. (
20
)
GUIDE DE DÉPANNAGE
Symptôme Remède
ANDROID
“NO DEVICE” ou “READING”
clignote sur.
•
Déactivez les options développeur sur le périphérique Android.
•
Reconnectez le périphérique Android.
•
Si cela ne résout pas le problème, c’est que le périphérique Android
connecté ne prend pas en charge [
BROWSE MODE
]. (
20
)
La lecture est intermittente ou
le son saute.
Déactivez le mode d’économie d’énergie sur le périphérique Android.
“ANDROID ERROR” /
“NADEVICE”
•
Reconnectez le périphérique Android.
•
Redémarrez le périphérique Android.
Pandora
“ADDERROR” La création d’une nouvelle station n’a pas réussie.
“CHECKDEVICE” Vérifiez l’application Pandora sur votre appareil.
“NO SKIPS” La limite de saut a été atteinte.
“NO STATIONS” Aucune station n’a été trouvée.
“STATIONLIMIT” Le nombre de stations enregistrées a atteint la limite. Essayez de nouveau
après avoir supprimer des stations inutiles de votre appareil.
“CONNECT ERROR” La communication est instable.
“RATING ERROR” L’enregistrement des pouces vers le haut/vers le bas a échoué à cause d’une
connectivité réseau insuffisante.
“THUMBS N/A” L’enregistrement de pouces vers le haut/vers le bas n’est pas permis.
“LICENSE ERROR” Vous avez essayé d’accéder à un pays pour lequel Pandora n’est pas
disponible.
iHeartRadio
La station iHeartRadio ne peut
pas être sélectionnée.
Si “Explicit Content” est coché pour [Account Settings] dans la
version web de iHeartRADIO, les stations personnalisées deviennent
disponibles.
“CANNOT CREATE” La création d’un nom de station personnalisé n’a pas réussi.
“CANNOT SAVE” L’ajout à la catégorie préférée a échoué.
“DISCONNECTED” Vérifiez la connexion à l’appareil.
“NO SKIPS” La limite de saut a été atteinte. Réessayez plus tard.
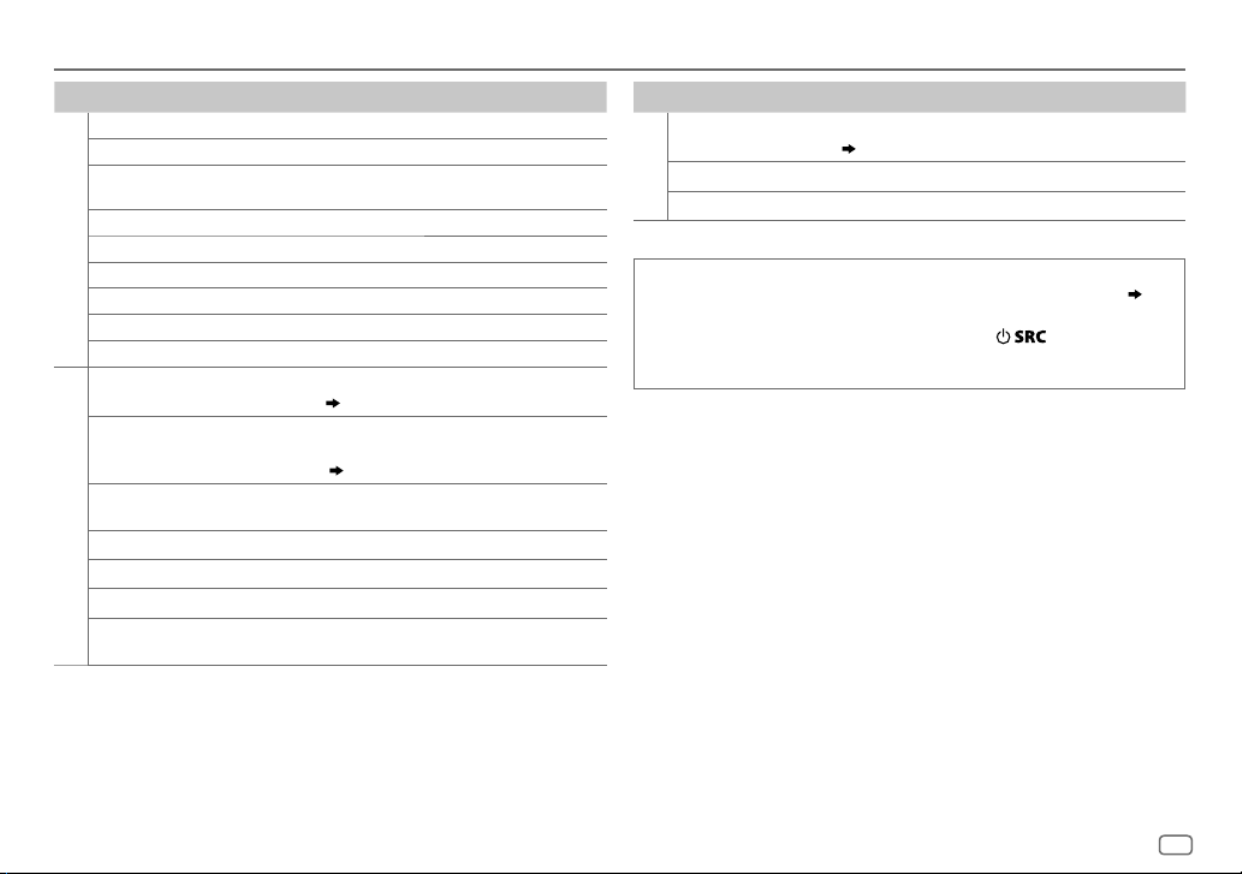
FRANÇAIS 19
GUIDE DE DÉPANNAGE
Symptôme Remède
iHeartRadio
“NO STATIONS” Aucune station n’a été trouvée.
“NOT CONNECTED” La liaison à l’application est impossible.
“IHEARTLINK UP” Assurez-vous que vous avez bien installé la dernière version de l’application
iHeart Link for KENWOOD sur votre appareil.
“PLEASE LOGIN” Vous n’êtes pas connecté. Connectez-vous de nouveau.
“STATION NOT AVAILABLE” La diffusion de la station est terminée.
“STATION NOT SELECTED” Aucune station n’est sélectionnée.
“STREAM ERROR” La diffusion des données est interrompue.
“THUMB FAILED” L’enregistrement du défilement vers le haut/vers le bas a échoué.
“TIMED OUT” Le délai autorisé pour la demande a expiré.
Radio SiriusXM®
“CHLOCKED LOCK CODE?” Le canal sélectionné est verrouillé. Entrez le code secret correct pour
déverrouiller. (
14
)
“CHAN UNSUB” Le canal sélectionné ne fait pas parti de l’abonnement. Appelez le
1-866-635-2349 aux États-Unis ou le 1-877-438-9677 au Canada pour
vous abonner. (
12
)
“CHUNAVAIL” Le canal sélectionné n’est pas disponible. Consultez www.siriusxm.com
pour obtenir plus d’informations sur les canaux disponibles SiriusXM.
“CHECKANTENNA” Vérifiez que l’antenne et sa connexion sont correctes.
“CHECK TUNER” Assurez-vous que le tuner SiriusXM Vehicle est connecté à l’appareil.
“NO SIGNAL” Assurez-vous que l’antenne est montée à l’extérieure du véhicule.
“SUBSCRIPTION UPDATED –
PRESS ENTER TO CONTINUE.”
Votre abonnement a été mis à jour. Appuyez sur le bouton de volume
pour continuer.
Symptôme Remède
Radio SiriusXM®
“CODE ERROR” Assurez-vous que vous avez entré le code secret correct.
(
14
)
“NO CONTENT” Le contenu est insuffisant pour démarrer TuneScan.
“SCAN CANCEL” TuneScan a été interrompu.
Mise en sourdine lors de la réception d’un appel téléphonique
Connectez le fil MUTE à votre téléphone en utilisant un accessoire téléphone en vente dans le commerce. (
23
)
Quand un appel arrive, “CALL” apparaît. (Le son du système audio est mis en pause.)
•
Pour continuer d’écouter le système audio pendant un appel, appuyez sur . “CALL” disparaît et le son
du système audio est rétabli.
Quand l’appel est terminé, “CALL” disparaît. (Le son du système audio est rétabli.)

20
RÉFÉRENCES
Disques ne pouvant pas être lus
•
Disques qui ne sont pas ronds.
•
Disques avec des colorations sur la surface d’enregistrement ou disques sales.
•
Disques enregistrables/réinscriptibles qui n’ont pas été finalisés.
•
CD de 8 cm. Essayer d’insérer un disque à l’aide d’un adaptateur peut entraîner un dysfonctionnement de l’appareil.
À propos des périphériques USB
•
Cet appareil peut reproduire les fichiers MP3/WMA/WAV/FLAC mémorisés sur un périphérique USB à mémoire de
grande capacité.
•
Vous ne pouvez pas connecter un périphérique USB via un hub USB.
•
La connexion d’un câble dont la longueur totale dépasse 5 m peut avoir pour conséquence un fonctionnement
anormal de la lecture.
•
Cet appareil ne peut pas reconnaître les périphériques USB dont l’alimentation n’est pas de 5 V et dépasse 1 A.
À propos de l’iPod/iPhone
Made for
–
iPod touch (2nd, 3rd, 4th et 5th generation)
–
iPod classic
–
iPod nano (3rd, 4th, 5th, 6th et 7th generation)
–
iPhone 3G, 3GS, 4, 4S, 5, 5S, 5C, 6, 6 Plus
•
Il n’est pas possible d’utiliser un iPod lorsque “KENWOOD” ou “ ” est affiché sur l’iPod.
•
En fonction de la version du système d’exploitation de l’iPod/iPhone, certaines fonctions peuvent ne pas être
utilisables sur cet appareil.
À propos du périphérique Android
•
Cet appareil prend en charge Android OS 4.1 et ultérieur.
•
Certains périphériques Android (avec OS 4.1 et ultérieur) peuvent ne pas prendre en charge complétement Android
Open Accessory (AOA) 2.0.
•
Si le périphérique Android prend en charge à la fois le protocole mass storage class et AOA 2.0, cet appareil utilise
toujours en priorité la lecture via AOA 2.0.
Entretien
Nettoyage de l’appareil
Essuyez la saleté de la façade avec un chiffon sec au silicone ou un chiffon doux.
Manipulation des disques
•
Ne pas toucher la surface d’enregistrement du disque.
•
Ne pas coller de ruban adhésif, etc. sur les disques et ne pas utiliser de disque avec du ruban adhésif collé dessus.
•
N’utilisez aucun accessoire pour le disque.
•
Nettoyer le disque en partant du centre vers l’extérieur.
•
Nettoyez le disque avec un chiffon sec au silicone ou un chiffon doux. N’utilisez aucun solvant.
•
Pour retirer les disques de cet appareil, tirez-les horizontalement.
•
Retirez les ébarbures du bord du trou central du disque avant d’insérer un disque.
Plus d’informations
Consultez aussi le site web suivant <www.kenwood.com/cs/ce/> pour:
–
Les dernières mise à jour du micrologiciel et la liste de compatibilité la plus récente
–
Application Android™ KENWOOD MUSIC PLAY
–
Autres informations récentes
Généralités
•
Cet appareil ne peut lire que les CD suivants:
•
Des informations détaillées et des remarques à propos des fichiers audio pouvant être lus se trouvent dans le manuel
en ligne disponible sur le site suivant: www.kenwood.com/cs/ce/audiofile/
Fichiers pouvant être lus
•
Fichier audio reproductible: MP3 (.mp3), WMA (.wma)
•
Supports de disque compatibles: CD-R/CD-RW/CD-ROM
•
Formats de fichiers de disques compatibles: ISO 9660 Niveau 1/2, Joliet, Nom de fichier étendu.
•
Systèmes de fichier de périphérique USB compatibles: FAT12, FAT16, FAT32
Même quand les fichiers audio sont conformes aux normes établies ci-dessus, il est possible que la lecture ne soit pas
possible suivant le type ou les conditions du support ou périphérique.

FRANÇAIS 21
À propos de Pandora
•
Pandora est disponible uniquement dans certains pays.
Veuillez consulter <http://www.pandora.com/legal> pour
en savoir plus.
•
Puisque Pandora est un service tiers, les spécifications sont
sujettes à changement sans notification préalable. Par
conséquent, la compatibilité peut réduite ou certains services ou
même tous les services peuvent devenir indisponibles.
•
Certaines fonction de Pandora ne peuvent pas être utilisées à
partir de cet appareil.
•
Pour les problèmes lors de l’utilisation de l’application, veuillez
contacter Pandora à pandora-support@pandora.com.
À propos de iHeartRadio
•
iHeartRadio® est un service tiers, et par conséquent les
spécifications sont sujettes à changement sans notification
préalable. Par conséquent, la compatibilité peut réduite ou
certains services ou même tous les services peuvent devenir
indisponibles.
•
Certaines fonction de iHeartRadio® ne peuvent pas être utilisées
à partir de cet appareil.
RÉFÉRENCES
Changez l’information sur l’affichage
Chaque fois que vous appuyez sur
DISP
, les informations affichées changent.
•
Si aucune information n’est disponible ou si aucune information n’est enregistrée, “NO TEXT”, “NO INFO”, ou une autre information (par ex. le nom de la station, la durée
de lecture) apparaît.
Nom de la source Informations sur l’affichage
STANDBY Nom de la source (Date/Horloge) (*) (retour au début)
TUNER Fréquence (Date/Horloge) (*) (retour au début)
(Pour les stations FM Radio Broadcast Data System uniquement)
Nom de la station (Date/Horloge) (*) Radio texte (Date/Horloge) Radio texte+ (R.TEXT+) Titre (Artiste) Titre (Date/Horloge)
Fréquence (Date/Horloge) (retour au début)
CD ou USB
(Pour CD-DA)
Titre de plage (Artiste) (*) Titre de plage (Nom du disque) Titre de plage (Date/Horloge) Durée de lecture (Date/Horloge)
(retour au début)
(Pour les fichiers MP3/WMA/WAV/FLAC)
Titre de plage (Artiste) (*) Titre de plage (Titre d’album) Titre de plage (Date/Horloge) Nom de fichier (Nom de dossier)
Nom de fichier (Date/Horloge) Durée de lecture (Date/Horloge) (retour au début)
IPOD ou ANDROID Titre de plage (Artiste) (*) Titre de plage (Nom de l’album) Titre de plage (Date/Horloge) Durée de lecture (Date/Horloge)
(retour au début)
PANDORA Nom de la station (Date/Horloge) (*) Titre de plage (Artiste) Station radio/partagée (Date/Horloge) Titre de plage (Titre d’album)
Titre de plage (Date/Horloge) Durée de lecture (Date/Horloge) (retour au début)
IHEARTRADIO Nom de la station (Date/Horloge) (*) Titre de plage (Artiste) Titre de plage (Date/Horloge) (retour au début)
SIRIUS XM Numéro de canal (État) (*) Nom de canal (État) Titre de morceau (État) Informations sur le contenu (État) Nom de l’artiste (État)
Nom de catégorie (État) Horloge (État) (retour au début)
AUX Nom de la source (Date/Horloge) (*) (retour au début)
*
Désactivez les informations sur l’affichage.

22
INSTALLATION / RACCORDEMENT
Avertissement
•
L’appareil peut uniquement être utilisé avec une alimentation de 12 V CC, à masse
négative.
•
Déconnectez la borne négative de la batterie avant le câblage et le montage.
•
Ne connectez pas le fil de batterie (jaune) et le fil d’allumage (rouge) au châssis de la
voiture ou au fil de masse (noir) pour éviter les courts-circuits.
•
Isolez les fils non connectés avec du ruban adhésif pour éviter les courts-circuits.
•
Assurez-vous de raccorder de nouveau la mise à la masse de cet appareil au châssis de
la voiture après l’installation.
Précautions
•
Pour des raison de sécurité, laissez le travail de câblage et de montage des
professionnels. Consultez votre revendeur autoradio.
•
Installez cet appareil dans la console de votre véhicule. Ne touchez pas les parties
métalliques de cet appareil pendant ou juste après son utilisation. Les parties
métalliques, comme le dissipateur de chaleur et le boîtier, deviennent chaudes.
•
Ne connectez pas les fils
[
des l’enceintes au châssis de la voiture, au fil de masse
(noir) ou en parallèle.
•
Montez l’appareil avec un angle de moins de 30˚.
•
Si le faisceau de fils de votre véhicule ne possède pas de borne d’allumage, connectez
le fil d’allumage (rouge) à la borne du boîtier de fusible de votre véhicule qui offre
une alimentation de 12 V CC et qui se met en et hors service avec la clé de contact.
•
Gardez tous les câbles à l’écart des dissipateurs thermiques.
•
Après avoir installé l’appareil, vérifiez si les lampes de frein, les indicateurs, les
clignotants, etc. de la voiture fonctionnent correctement.
•
Si un fusible saute, assurez-vous d’abord que les câbles ne touches pas le châssis de la
voiture puis remplacez le vieux fusible par un nouveau de même valeur.
Procédure de base
1 Retirez la clé de contact, puis déconnectez la borne
[ de la batterie de la voiture.
2 Connectez les fils correctement.
Reportez-vous à Connexions. (
23
)
3 Installez l’appareil dans votre voiture.
Reportez-vous à Installation de l’appareil (montage
encastré).
4 Connectez la borne de la batterie de la voiture.[
5 Réinitialisez l’appareil. (
3
)
Réalisez les connexions
nécessaires. (
23
)
Tableau de bord de votre voiture
Tordez les languettes appropriées pour
maintenir le manchon de montage en place.
Installation de l’appareil (montage encastré)
Lors d’une installation sans manchon de
montage
1 Retirez le manchon de montage et la plaque
d’assemblage de l’appareil.
2 Alignez les entailles de l’appareil (des deux
côtés) avec le support de montage du
véhicule et fixez l’appareil avec les vis (en
vente dans le commerce).
Comment retirer l’appareil
Insérez les clés d’extraction
profondément dans les fentes de
chaque côté, puis suivez les flèches
indiquées ci-dessous.
Liste des pièces pour l’installation
(A)
Manchon de montage
(B)
Plaque d’assemblage
(C)
Faisceau de fils
(D)
Clé d’extraction
N’utiliser que les vis spécifiés.
L’utilisation de vis incorrects peut
endommager l’appareil.

FRANÇAIS 23
IMPORTANTES :
Nous recommandons d’installer l’appareil en utilisant un harnais de
câblage en vente dans le commerce recommandé spécifiquement pour votre voiture et,
pour votre sécurité, de laisser ce travail a des professionnels. Consultez votre revendeur
autoradio.
Connexions
Fusible (10 A)
Sortie avant/ arrière/ caisson de grave
Borne de l’antenne
Boîte de fusible de la voiture
Boîte de fusible
de la voiture
Pile
Interrupteur d’allumage
Bleu/Blanc
(Fil de commande d’alimentation/
Câble de commande de l’antenne)
Bleu clair/jaune
(Fil de télécommande de volant)
Rouge (Câble d’allumage)
Jaune (Câble de batterie)
Noir (Fil de masse)
A le corps métallique ou châssis de la voiture
À la borne de commande d’alimentation lorsque vous
utilisez l’amplificateur de puissance en option, soit à la
borne de commande d’antenne du véhicule
Marron
(Câble de contrôle de la sourdine)
Blanc
Gris
Vert
Violet
Blanc/Noir
Gris/Noir
Vert/Noir
Violet/Noir
À la borne qui est mise à la masse lorsque le
téléphone sonne ou pendant les conversations (
19
)
(Pour connecter au système de navigation Kenwood,
reportez-vous à votre manuel de navigation.)
À l’enceinte avant (gauche)
À l’enceinte arrière (gauche)
À l’enceinte avant (droite)
À l’enceinte arrière (droite)
Si aucune connexion n’est faite, ne laissez pas le câble sortir de la languette.
À l’adaptateur de télécommande volant
Au tuner SiriusXM Vehicle optionnel (en vente dans le commerce)
(
12
)
Lors de la connexion à un amplificateur extérieur, connectez son fil de masse au châssis
de la voiture pour éviter d’endommager l’appareil.

24
SPÉCIFICATIONS
Tuner
FM Plage de fréquences 87,9 MHz — 107,9 MHz (intervalle de 200 kHz)
Sensibilité utilisable
(S/B=26dB)
8,2dBf (0,71μV/75Ω)
Seuil de sensibilité (S/B = 46dB) 17,2dBf (2,0μV/75Ω)
Réponse en fréquence (±3 dB) 30 Hz — 15 kHz
Taux de Signal/Bruit (MONO) 64 dB
Séparation stéréo (1 kHz) 40 dB
AM Plage de fréquences 530kHz — 1700kHz (intervalle de 10kHz)
Sensibilité utilisable (S/B = 20dB) 29dBμ (28,2μV)
Lecteur CD
Diode laser GaAIAs
Filtre numérique (D/A) 8 fois suréchantillonnage
Vitesse de rotation 500 t/min. — 200 t/min. (CLV)
Pleurage et scintillement Non mesurables
Réponse en fréquence (±1 dB) 20 Hz — 20 kHz
Distorsion harmonique totale (1 kHz) 0,01%
Taux de Signal/Bruit (1 kHz) 105 dB
Gamme dynamique 90 dB
Séparation des canaux 85 dB
Décodage MP3 Compatible avec le format MPEG-1/2 Audio Layer-3
Décodeur WMA Compatible Windows Media Audio
USB
Standard USB USB1.1, USB2.0 Vitesse maximale
Système de fichiers FAT12/16/32
Courant d’alimentation maximum CC5 V 1A
Décodage MP3 Compatible avec le format MPEG-1/2 Audio Layer-3
Décodeur WMA Compatible Windows Media Audio
Décodeur WAV PCM linéaire
Décodeur FLAC Fichier FLAC (48kHz maximum/ 16bits)
Audio
Puissance de sortie maximum 50W×4
Pleine Puissance de Largeur de Bande 22W×4 (avec moins de 1% DHT)
Impédance d’enceinte 4Ω—8Ω
Action en tonalité Graves 100 Hz ±8 dB
Médiums 1,0kHz ±8 dB
Aiguës 12,5kHz ±8 dB
Niveau de préamplification/charge (CD) 2500 mV/10kΩ
Impédance du préamplificateur ≤600Ω
Auxiliaire
Réponse en fréquence (±3 dB) 20Hz—20kHz
Tension maximum d’entrée 1000 mV
Impédance d’entrée 30kΩ
Généralités
Tension de fonctionnement 14,4V (10,5 V — 16V admissible)
Consommation de courant maximale 10A
Plage de températures de fonctionnement –10°C—+60°C
Dimensions d’installation (L × H × P) 182 mm×111mm×158mm
(7-3/16 pouces×4-3/8 pouces×6-1/4 pouces)
Poids 1,6kg (3,6livres)
Sujet à changement sans notification.


2
CONTENIDO ANTES DEL USO
IMPORTANTE
•
Antes de utilizar este producto y para asegurar su uso correcto, lea completamente este manual. En especial, lea y observe las
Advertencias y Precauciones incluidas en este manual.
•
Guarde el manual en un lugar seguro y accesible para futuras consultas.
Advertencia
No utilice ninguna función que pueda desviar su atención mientras está conduciendo el vehículo.
Precaución
Ajuste del volumen:
•
Ajuste el volumen a un nivel que le permita oír los ruidos del exterior para impedir accidentes.
•
Antes de reproducir fuentes digitales, baje el volumen para evitar que el repentino aumento del nivel de salida cause daños a
los altavoces.
General:
•
Evite el uso de dispositivos externos cuando puedan afectar la seguridad de conducción.
•
Asegúrese de tener una copia de respaldo de todos los datos importantes. No aceptamos responsabilidad alguna por la pérdida
de los datos grabados.
•
Para evitar cortocircuitos, nunca coloque ni deje objetos metálicos (por ejemplo, monedas o herramientas metálicas) dentro de
la unidad.
•
Si ocurre un error de disco debido a la condensación en el lente láser, extraiga el disco y espere hasta que se evapore la
humedad.
•
Dependiendo del tipo de vehículo, la antena se extiende automáticamente cuando se enciende la unidad con el cable de
control de antena conectado (
23
). Apague la unidad o cambie la fuente a STANDBY cuando estacione en un lugar con techo
bajo.
Mando a distancia (RC-406):
•
No deje el mando a distancia sobre superficies calientes, tales como el salpicadero.
•
Si la batería de litio no se instala correctamente, existirá el peligro de una explosión. Sustituya la pila únicamente por otra del
mismo tipo o un tipo equivalente.
•
El bloque de baterías no debe exponerse a una fuente de calor excesiva, como luz solar, fuego o similar.
•
Mantenga la batería fuera del alcance de los niños y en su estuche original cuando no esté en uso. Deseche las baterías
utilizadas de forma rápida. En caso de tragarse, póngase con un médico inmediatamente.
Cómo leer este manual
•
Las operaciones se explican utilizando principalmente los botones de la placa frontal.
•
Se utilizan indicaciones en inglés para las explicaciones. Puede seleccionar el idioma de visualización desde el menú
[
FUNCTION
]. (
5
)
•
[
XX
] indica los elementos seleccionados.
•
(
XX
) significa que hay información disponible en la página indicada.
ANTES DEL USO 2
PUNTOS BÁSICOS 3
PROCEDIMIENTOS INICIALES 4
1 Seleccione el idioma de
visualización y cancele la
demostración
2 Ajuste del reloj y la fecha
3 Configuración de los ajustes
iniciales
RADIO 5
AUX 7
CD / USB / iPod / ANDROID 7
Pandora® 10
iHeartRadio® 11
Radio SiriusXM® 12
AJUSTES DE AUDIO 15
AJUSTES DE VISUALIZACIÓN
16
LOCALIZACIÓN Y SOLUCIÓN
DE PROBLEMAS 17
REFERENCIAS 20
Mantenimiento
Más información
INSTALACIÓN / CONEXIÓN 22
ESPECIFICACIONES 24
Specyfikacje produktu
| Marka: | Kenwood |
| Kategoria: | odbiornik |
| Model: | DPX302U |
Potrzebujesz pomocy?
Jeśli potrzebujesz pomocy z Kenwood DPX302U, zadaj pytanie poniżej, a inni użytkownicy Ci odpowiedzą
Instrukcje odbiornik Kenwood

20 Lutego 2025
20 Lutego 2025
20 Lutego 2025
12 Stycznia 2025
25 Września 2024
22 Września 2024
22 Września 2024
18 Września 2024
17 Września 2024
16 Września 2024
Instrukcje odbiornik
- odbiornik Sony
- odbiornik Yamaha
- odbiornik Motorola
- odbiornik Logitech
- odbiornik Sharp
- odbiornik Pioneer
- odbiornik Philips
- odbiornik Plantronics
- odbiornik SilverCrest
- odbiornik Technics
- odbiornik Bosch
- odbiornik JBL
- odbiornik Onkyo
- odbiornik Edision
- odbiornik Roland
- odbiornik Geemarc
- odbiornik Nokia
- odbiornik KEF
- odbiornik Bose
- odbiornik Zgemma
- odbiornik Panasonic
- odbiornik StarTech.com
- odbiornik Klipsch
- odbiornik Crestron
- odbiornik Behringer
- odbiornik Asus
- odbiornik Nedis
- odbiornik Nexa
- odbiornik Medion
- odbiornik Tangent
- odbiornik Boss
- odbiornik Peiying
- odbiornik Marquant
- odbiornik Majestic
- odbiornik Jensen
- odbiornik August
- odbiornik Garmin
- odbiornik Blaupunkt
- odbiornik ATen
- odbiornik Salora
- odbiornik Teac
- odbiornik Metra
- odbiornik Martin Logan
- odbiornik Dual
- odbiornik Hegel
- odbiornik S.M.S.L
- odbiornik Line 6
- odbiornik DAP-Audio
- odbiornik Manhattan
- odbiornik Strong
- odbiornik Tripp Lite
- odbiornik Shure
- odbiornik Denon
- odbiornik Mercury
- odbiornik Block
- odbiornik Phoenix Gold
- odbiornik Audac
- odbiornik Cisco
- odbiornik Cambridge
- odbiornik Smart
- odbiornik Scosche
- odbiornik NuPrime
- odbiornik Polk
- odbiornik DJI
- odbiornik Alpine
- odbiornik Ibanez
- odbiornik Godox
- odbiornik Chamberlain
- odbiornik Lindy
- odbiornik Bang & Olufsen
- odbiornik JVC
- odbiornik Konig & Meyer
- odbiornik Trust
- odbiornik LogiLink
- odbiornik Memphis Audio
- odbiornik IFM
- odbiornik Datapath
- odbiornik Jamo
- odbiornik Focusrite
- odbiornik Rega
- odbiornik IRiver
- odbiornik Hilti
- odbiornik TechniSat
- odbiornik Auna
- odbiornik Vimar
- odbiornik Nubert
- odbiornik Dahua Technology
- odbiornik LD Systems
- odbiornik Krüger&Matz
- odbiornik Audioengine
- odbiornik Emos
- odbiornik AVMATRIX
- odbiornik Renkforce
- odbiornik Marshall
- odbiornik Audiotec Fischer
- odbiornik Clarion
- odbiornik Thomson
- odbiornik DiO
- odbiornik Pro-Ject
- odbiornik AVM
- odbiornik Velleman
- odbiornik Ferguson
- odbiornik Fusion
- odbiornik BOYA
- odbiornik Homematic IP
- odbiornik Neumann
- odbiornik DataVideo
- odbiornik Wharfedale
- odbiornik Intertechno
- odbiornik Magnat
- odbiornik Delta Dore
- odbiornik Pyle
- odbiornik ELAC
- odbiornik Zoom
- odbiornik Panduit
- odbiornik Devolo
- odbiornik Marantz
- odbiornik Sennheiser
- odbiornik Esoteric
- odbiornik Jabra
- odbiornik Chord
- odbiornik Vivotek
- odbiornik Speco Technologies
- odbiornik Medeli
- odbiornik Bowers & Wilkins
- odbiornik Samson
- odbiornik Imperial
- odbiornik PreSonus
- odbiornik Monitor Audio
- odbiornik Audio Pro
- odbiornik Blackstar
- odbiornik Fosi Audio
- odbiornik Revox
- odbiornik Ibiza Sound
- odbiornik Vonyx
- odbiornik Musical Fidelity
- odbiornik Bogen
- odbiornik Alto
- odbiornik Naim
- odbiornik Peavey
- odbiornik Camille Bauer
- odbiornik ART
- odbiornik NAD
- odbiornik RCF
- odbiornik Harman Kardon
- odbiornik Rolls
- odbiornik Audio-Technica
- odbiornik GoGen
- odbiornik Genie
- odbiornik Blustream
- odbiornik Aiwa
- odbiornik JL Audio
- odbiornik AKAI
- odbiornik Axis
- odbiornik ICOM
- odbiornik Vivolink
- odbiornik REL Acoustics
- odbiornik Teufel
- odbiornik Sunfire
- odbiornik Hartke
- odbiornik Klark Teknik
- odbiornik Vision
- odbiornik Telefunken
- odbiornik Eventide
- odbiornik Optoma
- odbiornik Proel
- odbiornik Hifonics
- odbiornik Focal
- odbiornik Taga Harmony
- odbiornik Audix
- odbiornik DBX
- odbiornik Kicker
- odbiornik Amazon
- odbiornik Thorens
- odbiornik Bresser
- odbiornik Rocstor
- odbiornik Omnitronic
- odbiornik Hama
- odbiornik Mackie
- odbiornik Marmitek
- odbiornik Palmer
- odbiornik FiiO
- odbiornik Lindell Audio
- odbiornik Vincent
- odbiornik Smart-AVI
- odbiornik MXL
- odbiornik Goobay
- odbiornik Optex
- odbiornik Reely
- odbiornik BC Acoustique
- odbiornik Lotronic
- odbiornik Bush
- odbiornik Dreambox
- odbiornik Saramonic
- odbiornik Bluesound
- odbiornik Kemo
- odbiornik Deaf Bonce
- odbiornik Sangean
- odbiornik VOX
- odbiornik Insignia
- odbiornik SVS
- odbiornik Hager
- odbiornik Inateck
- odbiornik Arcam
- odbiornik Mac Audio
- odbiornik Infinity
- odbiornik McIntosh
- odbiornik Advance Acoustic
- odbiornik Revel
- odbiornik Denver
- odbiornik ACV
- odbiornik Dynacord
- odbiornik Marshall Electronics
- odbiornik Ashly
- odbiornik Fender
- odbiornik Hertz
- odbiornik InLine
- odbiornik Inter-M
- odbiornik Kali Audio
- odbiornik Mooer
- odbiornik AKG
- odbiornik MEE Audio
- odbiornik Atlas Sound
- odbiornik The T.amp
- odbiornik IOTAVX
- odbiornik Futaba
- odbiornik Trevi
- odbiornik Atlona
- odbiornik Elektrobock
- odbiornik FSR
- odbiornik Simrad
- odbiornik Salus
- odbiornik Gefen
- odbiornik Vivanco
- odbiornik Fishman
- odbiornik Radial Engineering
- odbiornik Lectrosonics
- odbiornik Sencor
- odbiornik Definitive Technology
- odbiornik Ground Zero
- odbiornik Polsen
- odbiornik Raymarine
- odbiornik Stinger
- odbiornik Power Dynamics
- odbiornik AEA
- odbiornik Kanto
- odbiornik Alecto
- odbiornik Kathrein
- odbiornik Rockford Fosgate
- odbiornik Clare Controls
- odbiornik Canton
- odbiornik JUNG
- odbiornik TOA
- odbiornik Monacor
- odbiornik HQ Power
- odbiornik Hotone
- odbiornik Electro-Voice
- odbiornik Anthem
- odbiornik Audizio
- odbiornik Tascam
- odbiornik RME
- odbiornik AudioControl
- odbiornik Karma
- odbiornik Smartwares
- odbiornik Audiolab
- odbiornik Vocopro
- odbiornik Technical Pro
- odbiornik SPL
- odbiornik Fontastic
- odbiornik Cyrus
- odbiornik Gold Note
- odbiornik Terratec
- odbiornik Crunch
- odbiornik Alfatron
- odbiornik Sound Devices
- odbiornik Match
- odbiornik Megasat
- odbiornik Sogo
- odbiornik Classé
- odbiornik Reloop
- odbiornik Fenton
- odbiornik Artsound
- odbiornik Chandler
- odbiornik Belkin
- odbiornik Kramer
- odbiornik KanexPro
- odbiornik Kopul
- odbiornik BZBGear
- odbiornik Cranborne Audio
- odbiornik Rupert Neve Designs
- odbiornik Key Digital
- odbiornik Ram Audio
- odbiornik Whirlwind
- odbiornik Music Hall
- odbiornik Apantac
- odbiornik AMX
- odbiornik Inovonics
- odbiornik SRS
- odbiornik Sonance
- odbiornik Rotel
- odbiornik Atlas
- odbiornik C2G
- odbiornik Brondi
- odbiornik Lumantek
- odbiornik Ampeg
- odbiornik Amplicom
- odbiornik American Audio
- odbiornik Devialet
- odbiornik IFi Audio
- odbiornik Cabasse
- odbiornik Amiko
- odbiornik Hirschmann
- odbiornik Audison
- odbiornik Palsonic
- odbiornik Caliber
- odbiornik Meliconi
- odbiornik Exibel
- odbiornik Telestar
- odbiornik Sagem
- odbiornik Summit Audio
- odbiornik Musway
- odbiornik Brigmton
- odbiornik Sunstech
- odbiornik Avalon
- odbiornik Oculus VR
- odbiornik Redline
- odbiornik Matrox
- odbiornik Steren
- odbiornik Sandberg
- odbiornik Galaxy Audio
- odbiornik Denson
- odbiornik Renegade
- odbiornik Yaesu
- odbiornik Pyle Pro
- odbiornik Roksan
- odbiornik MB Quart
- odbiornik Valcom
- odbiornik Astro
- odbiornik Maxview
- odbiornik Rocketfish
- odbiornik Naxa
- odbiornik Sherwood
- odbiornik QTX
- odbiornik Konig
- odbiornik Valueline
- odbiornik Conrad
- odbiornik RDL
- odbiornik Zehnder
- odbiornik Mx Onda
- odbiornik Fredenstein
- odbiornik Metronic
- odbiornik Harper
- odbiornik TV STAR
- odbiornik QSC
- odbiornik Lanzar
- odbiornik Humax
- odbiornik Vaddio
- odbiornik Gira
- odbiornik Golden Age Project
- odbiornik Apart
- odbiornik Pinnacle
- odbiornik HQ
- odbiornik Max
- odbiornik Homecast
- odbiornik Graupner
- odbiornik Integra
- odbiornik Russound
- odbiornik Engel Axil
- odbiornik Comica
- odbiornik Audient
- odbiornik PAC
- odbiornik Skytec
- odbiornik Luxman
- odbiornik JETI
- odbiornik Linn
- odbiornik Monoprice
- odbiornik Yorkville
- odbiornik Advance
- odbiornik WyreStorm
- odbiornik Sonifex
- odbiornik TV One
- odbiornik Exposure
- odbiornik Axton
- odbiornik Fostex
- odbiornik FBT
- odbiornik MIPRO
- odbiornik Solid State Logic
- odbiornik Neets
- odbiornik NAV-TV
- odbiornik HiFi ROSE
- odbiornik OSD Audio
- odbiornik Mark Levinson
- odbiornik Black Lion Audio
- odbiornik Soundstream
- odbiornik Xoro
- odbiornik DLS
- odbiornik Adastra
- odbiornik PSB
- odbiornik Aeon Labs
- odbiornik Citronic
- odbiornik CSL
- odbiornik Formuler
- odbiornik Universal Audio
- odbiornik Warm Audio
- odbiornik LTC
- odbiornik JB Systems
- odbiornik Zalman
- odbiornik Orava
- odbiornik Thomann
- odbiornik James
- odbiornik HUMANTECHNIK
- odbiornik SIIG
- odbiornik PSSO
- odbiornik Crest Audio
- odbiornik Grace Design
- odbiornik Primare
- odbiornik Xantech
- odbiornik Wet Sounds
- odbiornik Televés
- odbiornik Hughes & Kettner
- odbiornik Manley
- odbiornik Intelix
- odbiornik MuxLab
- odbiornik Extron
- odbiornik Ocean Matrix
- odbiornik Comprehensive
- odbiornik HEOS
- odbiornik Legamaster
- odbiornik Madison
- odbiornik Ebode
- odbiornik Phonocar
- odbiornik Xtrend
- odbiornik Scansonic
- odbiornik Helix
- odbiornik Winegard
- odbiornik Laney
- odbiornik ETON
- odbiornik Xsarius
- odbiornik EA
- odbiornik DirecTV
- odbiornik Octagon
- odbiornik GOgroove
- odbiornik Crown
- odbiornik Kogan
- odbiornik Morel
- odbiornik Avantree
- odbiornik LYYT
- odbiornik Antelope Audio
- odbiornik CE Labs
- odbiornik Pharos
- odbiornik Accell
- odbiornik Jolida
- odbiornik Ecler
- odbiornik Lab Gruppen
- odbiornik Viscount
- odbiornik Ashdown Engineering
- odbiornik Triax
- odbiornik Synq
- odbiornik Mtx Audio
- odbiornik Aquatic AV
- odbiornik Parasound
- odbiornik DB Technologies
- odbiornik Roswell
- odbiornik Velodyne
- odbiornik Epcom
- odbiornik Selfsat
- odbiornik AVPro Edge
- odbiornik Evolution
- odbiornik Skytronic
- odbiornik CYP
- odbiornik Topp Pro
- odbiornik Whistler
- odbiornik Astell&Kern
- odbiornik Bellari
- odbiornik Dimavery
- odbiornik AMS Neve
- odbiornik A-NeuVideo
- odbiornik Aguilar
- odbiornik Powersoft
- odbiornik LinksPoint
- odbiornik Markbass
- odbiornik IMG Stage Line
- odbiornik Wireless Solution
- odbiornik Leviton
- odbiornik Aurel
- odbiornik ESX
- odbiornik NUVO
- odbiornik Phoenix Audio
- odbiornik Comtek
- odbiornik RetroSound
- odbiornik Pyramid
- odbiornik LEA
- odbiornik Sound Ordnance
- odbiornik Canyon
- odbiornik FiveO
- odbiornik Planet Audio
- odbiornik SureCall
- odbiornik CAD Audio
- odbiornik Black Hydra
- odbiornik Elipson
- odbiornik Phonic
- odbiornik Koda
- odbiornik Trace Elliot
- odbiornik Bang Olufsen
- odbiornik JTS
- odbiornik AER
- odbiornik Dynavox
- odbiornik Modelcraft
- odbiornik Simaudio
- odbiornik TIC
- odbiornik Niles
- odbiornik Knoll
- odbiornik Creek
- odbiornik Mobile Crossing
- odbiornik DAP
- odbiornik Krell
- odbiornik Edwards Signaling
- odbiornik GigaBlue
- odbiornik ANKARO
- odbiornik Bugera
- odbiornik Triangle
- odbiornik Wavtech
- odbiornik AmpliVox
- odbiornik Audiofrog
- odbiornik CyberData Systems
- odbiornik Williams Sound
- odbiornik Lyngdorf
- odbiornik SoundTube
- odbiornik WesAudio
- odbiornik AudioSource
- odbiornik Stewart
- odbiornik Leema
- odbiornik Axing
- odbiornik Seco-Larm
- odbiornik Mosconi
- odbiornik Crest
- odbiornik TechLogix Networx
- odbiornik Audibax
- odbiornik Meridian
- odbiornik Quad
- odbiornik Shinybow
- odbiornik Rexing
- odbiornik Shanling
- odbiornik Sinus Live
- odbiornik Soundtrack
- odbiornik Canor
- odbiornik Unison Research
- odbiornik Cerwin-Vega
- odbiornik Universal Remote Control
- odbiornik BMB
- odbiornik Cloud
- odbiornik Antelope
- odbiornik PTN-electronics
- odbiornik Loxjie
- odbiornik Cayin
- odbiornik VMV
- odbiornik GlobalSat
- odbiornik Aplic
- odbiornik PureLink
- odbiornik FoneStar
- odbiornik Henry Engineering
- odbiornik Glemm
- odbiornik ButtKicker
- odbiornik Atoll
- odbiornik Benchmark
- odbiornik VigilLink
- odbiornik SmartSystem
- odbiornik DARTS
- odbiornik Streacom
Najnowsze instrukcje dla odbiornik

9 Kwietnia 2025
9 Kwietnia 2025

5 Kwietnia 2025
4 Kwietnia 2025

3 Kwietnia 2025
2 Kwietnia 2025
2 Kwietnia 2025
1 Kwietnia 2025
30 Marca 2025
30 Marca 2025