Instrukcja obsługi Kenmore 665.13003
Kenmore
Pomywaczka
665.13003
Przeczytaj poniżej 📖 instrukcję obsługi w języku polskim dla Kenmore 665.13003 (72 stron) w kategorii Pomywaczka. Ta instrukcja była pomocna dla 22 osób i została oceniona przez 2 użytkowników na średnio 4.5 gwiazdek
Strona 1/72

,
Use & Care Guide
Manual de uso y cuidado
Guide d’utilisation et d’entretien
English / Español / Français
Models/Modelos/Modèles: 665.1300*, 665.1442*
Kenmore®
ULTRA WASH® Dishwasher
Lavavajillas ULTRA WASH®
Lave-vaisselle ULTRA WASH®
* = color number, número de color, numéro de la couleur
P/N W10836340A
Sears Brands Management Corporation
Hoffman Estates, IL 60179 U.S.A.
www.kenmore.com
www.sears.com
Sears Canada Inc.
Toronto, Ontario, Canada M5B 2C3
www.sears.ca

2
TABLE OF CONTENTS
PROTECTION AGREEMENTS ...................................................2
WARRANTY .............................................................................3
DISHWASHER SAFETY ............................................................ 4
PARTS AND FEATURES............................................................6
START-UP / QUICK REFERENCE ............................................. 7
ULTRA WASH
® FILTRATION SYSTEM .......................................8
DISHWASHER EFFICIENCY TIPS ..............................................9
DETERGENT AND RINSE AID ................................................ 10
Detergent ..........................................................................................10
Rinse Aid............................................................................................10
LOADING................................................................................11
Loading for Best Cleaning and Drying Performance.................11
Top Rack Loading............................................................................ 12
Bottom Rack Loading...................................................................... 13
DISHWASHER USE ..................................................................15
Cycles and Options Information ...................................................15
Dishwasher Control Section........................................................... 17
Dishwasher Feedback Section...................................................... 17
Canceling a Cycle........................................................................... 17
Changing a Cycle After Dishwasher Is Started......................... 17
WASHING SPECIAL ITEMS......................................................18
DISHWASHER CARE ...............................................................19
Cleaning............................................................................................ 19
Drain Air Gap.................................................................................. 19
Vacation or Extended Time Without Use ................................. 19
TROUBLESHOOTING.............................................................20
SERVICE NUMBERS
SERVICE NUMBERS
SERVICE NUMBERS
SERVICE NUMBERSSERVICE NUMBERS .............................................BACK COVER
BACK COVER
BACK COVER
BACK COVERBACK COVER
PROTECTION AGREEMENTS
Master Protection Agreements
Congratulations on making a smart purchase.
Your new
Kenmore
® product is designed and manufactured for years of
dependable operation. But like all products, it may require
preventive maintenance or repair from time to time. That’s when
having a Master Protection Agreement can save you money and
aggravation.
The Master Protection Agreement also helps extend the life of
your new product. Here’s what the Agreement* includes:
✔Parts and labor
Parts and labor
Parts and labor
Parts and laborParts and labor needed to help keep products operating
properly under normal use
under normal use
under normal use
under normal useunder normal use, not just defects. Our coverage
goes well bey
well bey
well bey
well beywell beyond the product warranty
ond the product warranty
ond the product warranty
ond the product warrantyond the product warranty. No deductibles, no
functional failure excluded from coverage—real pr
real pr
real pr
real prreal protection
otection
otection
otectionotection.
✔Expert
Expert
Expert
ExpertExpert service
service
service
service service by a force of more than 10,000 authorized
Sears service technicians
Sears service technicians
Sears service technicians
Sears service techniciansSears service technicians, which means someone you can
trust will be working on your product.
✔Unlimited service calls and nationwide service
Unlimited service calls and nationwide service
Unlimited service calls and nationwide service
Unlimited service calls and nationwide serviceUnlimited service calls and nationwide service, as often as
you want us, whenever you want us.
✔“No-lemon” guarantee
“No-lemon” guarantee
“No-lemon” guarantee
“No-lemon” guarantee “No-lemon” guarantee – replacement of your covered
product if four or more product failures occur within twelve
months.
✔Product replacement
Product replacement
Product replacement
Product replacementProduct replacement if your covered product can’t be fixed.
✔Annual Preventive Maintenance Check
Annual Preventive Maintenance Check
Annual Preventive Maintenance Check
Annual Preventive Maintenance CheckAnnual Preventive Maintenance Check at your request – no
extra charge.
✔Fast help by phone
Fast help by phone
Fast help by phone
Fast help by phoneFast help by phone – we call it Rapid Resoluti
Rapid Resoluti
Rapid Resoluti
Rapid ResolutiRapid Resolution
on
on
onon – phone
support from a Sears representative on all products. Think of
us as a “talking owner’s manual.”
✔P
P
P
PPower surge pr
ower surge pr
ower surge pr
ower surge prower surge protection
otection
otection
otectionotection against electrical damage due to
power fluctuations.
✔$250 Food Loss Protection
$250 Food Loss Protection
$250 Food Loss Protection
$250 Food Loss Protection$250 Food Loss Protection annually for any food spoilage
that is the result of mechanical failure of any covered
refrigerator or freezer.
✔Rental reimbursement
Rental reimbursement
Rental reimbursement
Rental reimbursementRental reimbursement if repair of your covered product takes
longer than promised.
✔25% discount
25% discount
25% discount
25% discount25% discount off the regular price of any non-covered
repair service and related installed parts.
Once you purchase the Agreement, a simple phone call is all
that it takes for you to schedule service. You can call anytime
day or night, or schedule a service appointment online.
The Master Protection Agreement is a risk free purchase. If you
cancel for any reason during the product warranty period, we
will provide a full refund. Or, a prorated refund anytime after
the product warranty period expires. Purchase your Master
Protection Agreement today!
Some limitations and exclusions apply
Some limitations and exclusions apply
Some limitations and exclusions apply
Some limitations and exclusions applySome limitations and exclusions apply.
.
.
. . For prices and
For prices and
For prices and
For prices and For prices and
additional information in the U
additional information in the U
additional information in the U
additional information in the Uadditional information in the U.S.A. call 1
.S.A. call 1
.S.A. call 1
.S.A. call 1.S.A. call 1
800
800
800
800800 827
827
827
827827 6655.
6655.
6655.
6655.6655.
*Co
*Co
*Co
*Co*Coverage in Canada varies on some items. For full de
verage in Canada varies on some items. For full de
verage in Canada varies on some items. For full de
verage in Canada varies on some items. For full deverage in Canada varies on some items. For full details call
tails call
tails call
tails call tails call
Sears Canada at 1
Sears Canada at 1
Sears Canada at 1
Sears Canada at 1Sears Canada at 1
800
800
800
800800 361
361
361
361361 6665.
6665.
6665.
6665.6665.
Sears Installation Service
For Sears professional installation of home appliances, garage
door openers, water heaters, and other major home items, in the
U.S.A. call 1-844-553-6667
1-844-553-6667
1-844-553-6667
1-844-553-66671-844-553-6667, and in Canada
call 1-800-469-4663
1-800-469-4663
1-800-469-4663
1-800-469-46631-800-469-4663.

3
KENMORE MAJOR APPLIANCE WARRANTY
KENMORE LIMITED W
KENMORE LIMITED W
KENMORE LIMITED W
KENMORE LIMITED WKENMORE LIMITED WARRANTY
ARRANTY
ARRANTY
ARRANTYARRANTY
FOR ONE YEAR from the date of sale this appliance is
warranted against defects in material or workmanship when it
is correctly installed, operated and maintained according to all
supplied instructions.
WITH PROOF OF SALE, a defective appliance will receive free
repair or replacement at option of seller.
For warranty coverage details to obtain free repair or
replacement, visit the web page: www
www
www
wwwwww.kenmore.com/warranty
.kenmore.com/warranty
.kenmore.com/warranty
.kenmore.com/warranty.kenmore.com/warranty.
.
.
..
This warranty applies for only 90 DAYS from the sale date in
the United States, and is void in Canada, if this appliance is
ever used for other than private household purposes.
This warranty covers ONL
This warranty covers ONL
This warranty covers ONL
This warranty covers ONLThis warranty covers ONLY defects in material
Y defects in material
Y defects in material
Y defects in materialY defects in material and
and
and
and and
workmanship, and will NO
workmanship, and will NO
workmanship, and will NO
workmanship, and will NOworkmanship, and will NOT pay for
T pay for
T pay for
T pay forT pay for:
:
:
::
1.
1.
1.
1.1. Expendable items that can wear out from normal use,
including but not limited to filters, belts, bags or screw-in
base light bulbs.
2.
2.
2.
2.2. A service technician to clean or maintain this appliance, or
to instruct the user in correct appliance installation,
operation and maintenance.
3.
3.
3.
3.3. Service calls to correct appliance installation not performed
by Sears authorized service agents, or to repair problems
with house fuses, circuit breakers, house wiring, and
plumbing or gas supply systems resulting from such
installation.
4.
4.
4.
4.4. Damage to or failure of this appliance resulting from
installation not performed by Sears authorized service
agents, including installation that was not in accord with
electrical, gas or plumbing codes.
5.
5.
5.
5.5. Damage to or failure of this appliance, including
discoloration or surface rust, if it is not correctly operated
and maintained according to all supplied instructions.
6.
6.
6.
6.6. Damage to or failure of this appliance, including
discoloration or surface rust, resulting from accident,
alteration, abuse, misuse or use for other than its intended
purpose.
7.
7.
7.
7.7. Damage to or failure of this appliance, including
discoloration or surface rust, caused by the use of
detergents, cleaners, chemicals or utensils other than those
recommended in all instructions supplied with the product.
8.
8.
8.
8.8. Damage to or failure of parts or systems resulting from
unauthorized modifications made to this appliance.
9.
9.
9.
9.9. Service to an appliance if the model and serial plate is
missing, altered, or cannot easily be determined to have the
appropriate certification logo
Disclaimer of implied warrant
Disclaimer of implied warrant
Disclaimer of implied warrant
Disclaimer of implied warrantDisclaimer of implied warranties; limitation of remedies
ies; limitation of remedies
ies; limitation of remedies
ies; limitation of remediesies; limitation of remedies
Customer's sole and exclusive remedy under this limited
warranty shall be product repair or replacement as provided
herein. Implied warranties, including warranties of
merchantability or fitness for a particular purpose, are limited to
one year or the shortest period allowed by law. Seller shall not
be liable for incidental or consequential damages. Some states
and provinces do not allow the exclusion or limitation of
incidental or consequential damages, or limitation on the
duration of implied warranties of merchantability or fitness, so
these exclusions or limitations may not apply to you.
This warranty applies only while this appliance is used in the
United States or Canada*.
This warranty gives you specific legal rights, and you may also
have other rights which vary from state to state.
* In-home repair service is not available in all Canadian
geographical areas, nor will this warranty cover user or servicer
travel and transportation expenses if this product is located in a
remote area (as defined by Sears Canada Inc.) where an
authorized servicer is not available.
Sears Brands Management Corporation
Hoffman Estates, IL 60179
Sears Canada Inc.
Toronto, Ontario, Canada M5B 2C3

4
DISHWASHER SAFETY
You can be killed or seriously injured if you don't
immediately follow instructions.
You can be killed or seriously injured if you don't
follow instructions.
All safety messages will tell you what the potential hazard is, tell you how to reduce the chance of injury, and tell you
what can happen if the instructions are not followed.
Your safety and the safety of others are very important.
We have provided many important safety messages in this manual and on your appliance. Always read and obey all
safety messages.
This is the safety alert symbol.
This symbol alerts you to potential hazards that can kill or hurt you and others.
All safety messages will follow the safety alert symbol and either the word “DANGER” or
“WARNING.” These words mean:
IMPORTANT SAFETY INSTRUCTIONS
WARNING:
When using the dishwasher, follow basic precautions, including the following:
SAVE THESE INSTRUCTIONS
■ Read all instructions before using the dishwasher.
■ Use the dishwasher only for its intended function.
■ Use only detergents or rinse agents recommended for
use in a dishwasher, and keep them out of the reach
of children.
■ When loading items to be washed:
1) Locate sharp items so that they are not likely to
damage the door seal; and
2) Load sharp knives with the handles up to reduce
the risk of cut-type injuries.
■ Do not wash plastic items unless they are marked
“dishwasher safe” or the equivalent. For plastic items
not so marked, check the manufacturer's
recommendations.
■ Do not touch the heating element during or
immediately after use.
■ Do not operate the dishwasher unless all enclosure
panels are properly in place.
■ Do not tamper with controls.
■ Do not abuse, sit on, or stand on the door, lid, or dish
racks of the dishwasher.
■ To reduce the risk of injury, do not allow children to
play in or on the dishwasher.
■ Under certain conditions, hydrogen gas may be
produced in a hot water system that has not been
used for two weeks or more. HYDROGEN GAS IS
EXPLOSIVE. If the hot water system has not been
used for such a period, before using the dishwasher
turn on all hot water faucets and let the water flow
from each for several minutes. This will release any
accumulated hydrogen gas. As the gas is flammable,
do not smoke or use an open flame during this time.
■ Remove the door or lid to the washing compartment
when removing an old dishwasher from service or
discarding it.
State of California Proposition 65 Warnings:
WARNING: This product contains one or more chemicals known to the State of California to cause cancer.
WARNING: This product contains one or more chemicals known to the State of California to cause birth defects or
other reproductive harm.

5
■Install where dishwasher is sheltered from the elements.
Avoid possible rupture of fill valve from freezing. Such
ruptures are not covered by the warranty. See the “Vacation
or Extended Time Without Use” section.
■Install and level dishwasher on a floor that will hold the
weight, and in an area suitable for its size and use.
■Remove all shipping plugs from hoses and connectors
(such as the cap on the drain outlet) before installing.
See Installation Instructions for complete information.
Tip Over Hazard
Do not use dishwasher until completely installed.
Do not push down on open door.
Doing so can result in serious injury or cuts.
Electrical Shock Hazard
Electrically ground dishwasher.
Connect ground wire to green ground connector
in terminal box.
Do not use an extension cord.
Failure to follow these instructions can result in
death, fire, or electrical shock.
■ For a grounded, cord-connected dishwasher:
The dishwasher must be grounded. In the event
of a malfunction or breakdown, grounding will
reduce the risk of electric shock by providing a
path of least resistance for electric current. The
dishwasher is equipped with a cord having an
equipment-grounding conductor and a
grounding plug. The plug must be plugged into
an appropriate outlet that is installed and
grounded in accordance with all local codes and
ordinances.
WARNING: Improper connection of the
equipment-grounding conductor can result in a
risk of electric shock. Check with a qualified
electrician or service representative if you are in
doubt whether the dishwasher is properly
grounded. Do not modify the plug provided with
the dishwasher; if it will not fit the outlet, have a
proper outlet installed by a qualified electrician.
■ For a permanently connected dishwasher:
The dishwasher must be connected to a
grounded metal, permanent wiring system, or an
equipment-grounding conductor must be run
with the circuit conductors and connected to the
equipment-grounding terminal or lead on the
dishwasher.
GROUNDING INSTRUCTIONS
SAVE THESE INSTRUCTIONS

6
PARTS AND FEATURES

8
ULTRA WASH
®
FILTRATION SYSTEM
Your dishwasher has the latest technology in dishwasher filtration. This triple filtration system minimizes sound and optimizes water
and energy consumption while providing superior cleaning performance. Throughout the life of your dishwasher, the filter will require
maintenance to sustain peak cleaning performance.
The triple filter system consists of 2 parts, an upper filter assembly and a lower filter.
■The upper filter assembly keeps oversized items and foreign objects, along with very fine food particles out of the pump.
■The lower filter keeps food from being recirculated onto your dishware.
In order to provide optimum cleaning performance we suggest a monthly filter maintenance by removing and inspecting both the
upper and the lower filter for any soils. Based on your dishwashing habits, cleaning of the filters may be required more or less often
than what is indicated in the chart below.
The filters may need to be cleaned when:
■Visible objects or soils are on the Upper Filter Assembly.
■There is degradation in cleaning performance (that is, soils still present on dishes).
■Dishes feel gritty to the touch.
Removing and maintaining the filters is very easy. The chart below shows the recommended cleaning frequency.
Recommended time intervals to clean your filter
*Manufacturer's recommendation: This practice will eliminate the water and energy that you use preparing your dishes for loading.
This will also save you time and effort.
Very Hard Water
If you have hard water (above 15 grains), clean your filter at least once per month. Building up of white residue on your dishwasher
indicates hard water. You may bring your water samples to Sears to check hardness level. For tips on removing spots and stains, see
“Troubleshooting” section.
HE
Number of
Loads Per Week
If you wash
before loading
If you scrape and rinse
before loading
If you only scrape before
loading*
If you do not scrape or
rinse before loading
13-14 Once per year Twice per year Every two months Once per week
8-12 Once per year Every four months Every two months Every two weeks
4-7 Once per year Once per year Every four months Once per month
1-3 Once per year Once per year Twice per year Every two months

9
Filter Removal Instructions
Cleaning Instructions
IMPORTANT
IMPORTANT
IMPORTANT
IMPORTANTIMPORTANT:
:
:
: : Do not use wire brush, scouring pad, etc., as they may damage the filters.
Filter Reinstallation Instructions
IMPORTANT
IMPORTANT
IMPORTANT
IMPORTANTIMPORTANT:
:
:
: : To avoid damage to dishwasher, do not operate your dishwasher without the ULTRA WASH
®filters properly installed.
Be sure the Lower Filter is securely in place and the Upper Filter Assembly
is locked into place. If the Upper Filter Assembly turns
freely, it is not locked into place.
DISHWASHER EFFICIENCY TIPS
Hot water dissolves and activates the dishwasher detergent. Hot water also dissolves grease on dishes and helps glasses dry
spot-free. For best dishwashing results, water should be 120°F (49°C) as it enters the dishwasher. Loads may not wash as well
if the water temperature is too low.
Additional efficiency tips:
■To save water, energy and time, only scrape dishes. Do not rinse dishes before putting them into the dishwasher.
■Use a delay feature to run your dishwasher during off-peak hours. Local utility providers recommend avoiding heavy
usage of energy at certain times of day.
■During the summer, run your dishwasher at night. This reduces daytime heat buildup in the kitchen.
■Use a rinse aid to improve drying.
1.
1.
1.
1.1. Turn the Upper Filter Assembly ¼ turn counterclockwise and lift out.
2.
2.
2.
2.2. Grasp the Lower Filter in the circular opening, lift slightly, and pull forward to remove.
3.
3.
3.
3.3. Clean the filters as shown below.
To remove Upper Filter Assembly
Rinse filter under running water until most soils are removed. If you
have hard-to-remove soils or calcium deposits from hard water, a
soft brush may be required.
P
U
S
H
D
O
W
N
&
T
U
R
N
L
O
C
K
U
N
L
O
C
K
1.
1.
1.
1.1. Noting the previous illustrations, place the Lower Filter under the Locating Tabs in the
bottom of the dishwasher so the round opening for the Upper Filter Assembly lines up
with the round opening in the bottom of the tub.
2.
2.
2.
2.2. Insert the Upper Filter Assembly into the circular opening in the Lower Filter.
3.
3.
3.
3.3. Slowly rotate the filter clockwise until it drops into place. Continue to rotate until the
filter is locked into place. If the filter is not fully seated (still turns freely), continue to
turn the filter clockwise until it drops and locks into place.
NO
NO
NO
NONOTE:
TE:
TE:
TE:TE: The Upper Filter Assembly arrow does not have to align with the arrow in the
Lower Filter as long as the filter is locked.
To replace Upper Filter Assembly
HE

10
DETERGENT AND RINSE AID
Detergent
IMPORTANT
IMPORTANT
IMPORTANT
IMPORTANTIMPORTANT:
:
:
: : Use only automatic dishwashing detergent. Hand
dishwashing detergent will produce excessive suds and overflow
out of the dishwasher.
Recommended Detergent Amount
Recommended Detergent Amount
Recommended Detergent Amount
Recommended Detergent AmountRecommended Detergent Amount
Add recommended amount of detergent to each compartment
as shown and close the detergent lid.
Po
Po
Po
PoPowders and Gels
wders and Gels
wders and Gels
wders and Gelswders and Gels
*Full pre-wash compartment contains 7 tsp (35 mL), and full
main wash cup contains 9 tsp (45 mL).
Premeasured Detergents
Premeasured Detergents
Premeasured Detergents
Premeasured DetergentsPremeasured Detergents
Many detergents now come in premeasured forms (gel packs,
tablets, or powder packs). These forms are suitable for all
hardness and soil levels. Always place premeasured detergents
in the main compartment and close the lid.
Using dishwasher detergent tablets and packs have been
proven better than powder, liquid or gel detergents to reduce
filming on your dishes. By using these tablets and packs, over
time this will start to reduce or eliminate white film. Also, by
using a rinse aid you can minimize repeat buildup of white film.
IMPORTANT
IMPORTANT
IMPORTANT
IMPORTANTIMPORTANT:
:
:
: : Extremely hard water mineral deposits (15 grains
per U.S. gallon or more) can cause damage to your dishwasher
and make it difficult to achieve good results. A water softener is
recommended to avoid damage and achieve good results. You
may bring your water samples to Sears to check hardness level.
Rinse Aid
IMPORTANT:
IMPORTANT:
IMPORTANT:
IMPORTANT: IMPORTANT: Your dishwasher is designed to use a liquid
rinse aid. The use of rinse aids greatly improves drying by
allowing water to drain from the dishes after the final rinse.
They also keep water from forming droplets that can dry as
spots or streaks.
Filling the Dispenser
Filling the Dispenser
Filling the Dispenser
Filling the DispenserFilling the Dispenser
The dispenser holds 5 oz (150 mL) of rinse aid. Under most
conditions, this will last 1 to 3 months.
1.
1.
1.
1.1. Turn the knob to the REFILL position and remove.
2.
2.
2.
2.2. Pour rinse aid into the opening until the indicator points
to FULL. Do not overfill.
3.
3.
3.
3.3. Clean up any spilled rinse aid. Spilled rinse aid can
create excessive suds.
4.
4.
4.
4.4. Replace the knob and turn to the LOCK position.
NO
NO
NO
NONOTE:
TE:
TE:
TE:TE: Indicator reads correct fill level when door is
completely opened.
Rinse Aid Setting
Rinse Aid Setting
Rinse Aid Setting
Rinse Aid SettingRinse Aid Setting
Your rinse aid dispenser is adjustable. For most water conditions,
the factory setting will give good results. If you have hard water
and notice calcium buildup on your dishware, you may want to
try a higher setting. If you notice foam in your dishwasher, use a
lower setting.
T
T
T
TTo Adjust the Setting:
o Adjust the Setting:
o Adjust the Setting:
o Adjust the Setting:o Adjust the Setting:
1.
1.
1.
1.1. Turn the knob to the REFILL position and remove.
2.
2.
2.
2.2. Turn the arrow inside the dispenser to the desired setting.
3.
3.
3.
3.3. Replace the knob and turn to the LOCK position.
Water
Water
Water
Water Water
Hardness
Hardness
Hardness
HardnessHardness
Soil
Soil
Soil
Soil Soil
Level
Level
Level
LevelLevel
Pre-Wash
Pre-Wash
Pre-Wash
Pre-Wash Pre-Wash
Com
Com
Com
ComCompa
pa
pa
papar
r
r
rrt
t
t
ttm
m
m
mme
e
e
een
n
n
nnt
t
t
tt
Main Wash
Main Wash
Main Wash
Main Wash Main Wash
Com
Com
Com
ComCompa
pa
pa
papar
r
r
rrt
t
t
ttm
m
m
mme
e
e
een
n
n
nnt
t
t
tt
Soft
Soft
Soft
SoftSoft
(0-4 grains
(0-4 grains
(0-4 grains
(0-4 grains (0-4 grains
per U
per U
per U
per Uper U.
.
.
..S.
S.
S.
S. S.
gallon)
gallon)
gallon)
gallon)gallon)
Light None ¹⁄₂
Normal None ¹⁄₂
Heavy Full ¹⁄₂
Medium
Medium
Medium
MediumMedium
(5-9 grains
(5-9 grains
(5-9 grains
(5-9 grains (5-9 grains
per U
per U
per U
per Uper U.
.
.
..S.
S.
S.
S. S.
gallon)
gallon)
gallon)
gallon)gallon)
Light None ¹⁄₂
Normal ¹⁄₂ ¹⁄₂
Heavy Full* Full*
Hard
Hard
Hard
HardHard
(10-14 grains
(10-14 grains
(10-14 grains
(10-14 grains (10-14 grains
per U
per U
per U
per Uper U.
.
.
..S.
S.
S.
S. S.
gallon)
gallon)
gallon)
gallon)gallon)
Light ¹⁄₂ Full*
Normal Full* Full*
Heavy Full* Full*
USE RINSE AID FOR
BETTER DRYING
Lock
Refill
Full
Add

11
LOADING
Loading for Best Cleaning and Drying Performance
1.
1.
1.
1.1. Angle dir
Angle dir
Angle dir
Angle dir Angle dirtiest dish surfaces down
tiest dish surfaces down
tiest dish surfaces down
tiest dish surfaces downtiest dish surfaces downward and allo
ward and allo
ward and allo
ward and alloward and allow
w
w
w w
space for water to flo
space for water to flo
space for water to flo
space for water to flospace for water to flow up through each rack and
w up through each rack and
w up through each rack and
w up through each rack and w up through each rack and
between dishware.
between dishware.
between dishware.
between dishware.between dishware.
Separating allows water flow.
2.
2.
2.
2.2. For best silver
For best silver
For best silver
For best silver For best silverware cleaning, use the slots in the
ware cleaning, use the slots in the
ware cleaning, use the slots in the
ware cleaning, use the slots in the ware cleaning, use the slots in the covers
covers
covers
covers covers
to keep items separated.
to keep items separated.
to keep items separated.
to keep items separated.to keep items separated.
Separated
3.
3.
3.
3.3. Use T
Use T
Use T
Use T Use TurboZone
urboZone
urboZone
urboZoneurboZone®
®
®
® ® (on some models)
(on some models)
(on some models)
(on some models)(on some models) option with your
option with your
option with your
option with your option with your
dirtiest items facing toward the lower back.
dirtiest items facing toward the lower back.
dirtiest items facing toward the lower back.
dirtiest items facing toward the lower back.dirtiest items facing toward the lower back.
Soil facing TurboZone
®
spray jets
4. Angle concave surfaces such as the bottom of coffee
4. Angle concave surfaces such as the bottom of coffee
4. Angle concave surfaces such as the bottom of coffee
4. Angle concave surfaces such as the bottom of coffee 4. Angle concave surfaces such as the bottom of coffee
cups to allow water to drain and impro
cups to allow water to drain and impro
cups to allow water to drain and impro
cups to allow water to drain and improcups to allow water to drain and improv
v
v
vve dr
e dr
e dr
e dre drying
ying
ying
ying ying
performance.
performance.
performance.
performance.performance.
Angled surfaces
5.
5.
5.
5.5. Check that all spray arms spin freely before
Check that all spray arms spin freely before
Check that all spray arms spin freely before
Check that all spray arms spin freely before Check that all spray arms spin freely before
every cycle.
every cycle.
every cycle.
every cycle.every cycle.
Spray arms spin freely.
6. Place cups and glasses in the r
6. Place cups and glasses in the r
6. Place cups and glasses in the r
6. Place cups and glasses in the r6. Place cups and glasses in the rows between tines.
ows between tines.
ows between tines.
ows between tines.ows between tines.

12
Top Rack Loading
Loading Recommendations
Loading Recommendations
Loading Recommendations
Loading RecommendationsLoading Recommendations
Place cups and glasses in the rows between tines. Placing
them over the tines can lead to breakage and water spots.
To avoid damage to your delicate items, be sure china,
crystal, stemware and other similar items do not touch
during dishwasher operation.
Load lightweight and dishwasher-safe plastic items only
in the top rack.
10 place load
Flexible Tines (on some models)
Flexible Tines (on some models)
Flexible Tines (on some models)
Flexible Tines (on some models)Flexible Tines (on some models)
The row of tines on the left-hand and right-hand sides of the
top rack can be adjusted to make room for a variety of dishes.
C
C
C
CCup Shelves and Stemware Clips (on some models)
up Shelves and Stemware Clips (on some models)
up Shelves and Stemware Clips (on some models)
up Shelves and Stemware Clips (on some models)up Shelves and Stemware Clips (on some models)
Fold down the extra shelf on either side of the top rack to
hold additional cups, stemware or long items such as utensils
and spatulas.
Adjustable 2-position T
Adjustable 2-position T
Adjustable 2-position T
Adjustable 2-position TAdjustable 2-position To
o
o
oop Rack (on some models)
p Rack (on some models)
p Rack (on some models)
p Rack (on some models)p Rack (on some models)
You can raise or lower the top rack to fit tall items in either the top or bottom rack. Adjusters are
located on each side of the top rack. Raise the top rack to accommodate items up to 9" (22 cm)
in the top rack and 13" (33 cm) in the bottom rack, or lower the top rack to accommodate items
up to 11" (28 cm) in both the top and bottom racks.
To raise or lower the rack, hold the top rack with one hand near the adjuster and use the other
hand to pull out the top of the adjuster. Raise or lower the rack to one of the preset positions.
NOTE:
NOTE:
NOTE:
NOTE:NOTE: The top rack must be level.

13
Bottom Rack Loading
Remo
Remo
Remo
RemoRemovable T
vable T
vable T
vable Tvable Top Rack
op Rack
op Rack
op Rackop Rack
The removable rack allows you to wash larger items such as stock pots, roasters, and cookie sheets in
the lower level rack.
IMPOR
IMPOR
IMPOR
IMPORIMPORT
T
T
TTANT
ANT
ANT
ANTANT:
:
:
:: Remove dishes prior to removing the upper rack from the dishwasher.
To remove the rack (push tab rack stop):
1.
1.
1.
1.1. Roll the rack ¹⁄₃ to ½ of the way out.
2.
2.
2.
2.2. Remove each plastic push tab rack stop from the end of each track by pushing inward toward
the rack on the ridged area of the rack stop. The rack stop will snap open and can be easily
removed by pulling straight out. Be sure to support the track while removing rack stops.
3.
3.
3.
3.3. Roll the rack all the way out of the track and remove from the dishwasher.
To replace the rack:
Reverse the above steps 1 to 3 to replace the rack into the dishwasher.
Loading Recommendations
Loading Recommendations
Loading Recommendations
Loading RecommendationsLoading Recommendations
The bottom rack is best suited for plates, pans, casseroles, and
utensils. See recommended loading patterns shown.
Load small items in the bottom rack only if they are secured
in place.
Load plates, soup bowls, etc., between tines.
Load bowls securely between the rows of tines. Ensure that
there is space between dishes so that the spray will reach
all surfaces.
Load heavily soiled items facing the spray.
NOTE:
NOTE:
NOTE:
NOTE:NOTE: Ensure that detergent dispenser is not blocked by tall
items such as cookie sheets and cutting boards placed at the
left-hand front of rack. See “Start Up/Quick Reference”
section.
10 place load
Fold-Down Tin
Fold-Down Tin
Fold-Down Tin
Fold-Down TinFold-Down Tines (on some models)
es (on some models)
es (on some models)
es (on some models)es (on some models)
You can fold down one row of tines at the back of the bottom
rack in order to accommodate larger dishware.
Keep this tine row in the 60° position when using the
TurboZone® (on some models) option.
IMPORT
IMPORT
IMPORT
IMPORTIMPORTANT
ANT
ANT
ANTANT:
:
:
:: When moving tine row to the flat position,
fold only the tine row toward the front of the dishwasher.
Front

14
Tu
Tu
Tu
TuTur
r
r
rrb
b
b
bbo
o
o
ooZ
Z
Z
ZZo
o
o
oon
n
n
nne
e
e
ee
®
®
®
® ® Loading (on some models)
Loading (on some models)
Loading (on some models)
Loading (on some models)Loading (on some models)
IMPORT
IMPORT
IMPORT
IMPORTIMPORTANT
ANT
ANT
ANTANT:
:
:
: : For proper performance, only one row of items may face the TurboZone
® spray jets.
You must select the TurboZone
® wash option to utilize this wash feature.
Load pans, casserole dishes, etc., with the soiled surfaces facing the TurboZone
® spray jets. TurboZone
®
wash area is located at the back of the lower dish rack.
Below are the recommended loading when using the TurboZone
® option.
Loading Tall Items
Loading Tall Items
Loading Tall Items
Loading Tall ItemsLoading Tall Items
You can wash larger items such as pots, roasters, and cookie
sheets in the bottom rack by removing the top rack. See “Top
Rack Loading” section.
IMPORTANT
IMPORTANT
IMPORTANT
IMPORTANTIMPORTANT:
:
:
:: Do not block detergent dispenser.
Loading Silver
Loading Silver
Loading Silver
Loading SilverLoading Silverware
ware
ware
wareware
Use suggested loading patterns, as shown, to better clean your silverware.
Use the slots in the covers to keep your silverware separated for optimum wash.
NOT
NOT
NOT
NOTNOTE:
E:
E:
E:E: If your silverware does not fit into the designated slots, flip the covers up and mix silverware types to keep them separated.
Load knives down, forks up, and alternate spoons as illustrated, for best cleaning results. Load taller silverware items to the back
and shorter to the front of basket.
10 place setting with double basket 12 place setting
Back of
dishwasher

15
DISHWASHER USE
Cycles and Options Information (on some models)
*Adding options will add time to the cycle. See options information section.
**This is the approximate cycle time obtained with 120°F (49°C) sher. Increase in time resultshot water available at the dishwa from
low temperature of the incoming water.
Cy
Cy
Cy
CyCycl
cl
cl
clcle
e
e
ees
s
s
ss Soil Level
Soil Level
Soil Level
Soil LevelSoil Level
Time* (mins.)
Time* (mins.)
Time* (mins.)
Time* (mins.)Time* (mins.)
w/o Options
w/o Options
w/o Options
w/o Optionsw/o Options
Water
Water
Water
Water Water
Usage
Usage
Usage
UsageUsage
Gallons
Gallons
Gallons
Gallons Gallons
(Liters)
(Liters)
(Liters)
(Liters)(Liters)
Ty
Ty
Ty
TyTyp
p
p
ppi
i
i
iic
c
c
cca
a
a
aal
l
l
ll*
*
*
***
*
*
** Max
Max
Max
MaxMax
Pot
Pot
Pot
PotPots &
s &
s &
s & s & Pa
Pa
Pa
PaPan
n
n
nns
s
s
ss
Works best on your toughest items such as casseroles with
baked-on food residue. Use with TurboZone
® (on some models)
option to get the best cleaning of baked-on soils.
All Soil Levels 125 200 7.4
(28.0)
Normal Wash
Normal Wash
Normal Wash
Normal WashNormal Wash
This cycle with only the Heated Dry option selected, and without
other options selected, is recommended to completely wash and
dry a full load of normally soiled dishes. The energy usage label
is based on this cycle and option combination.
Light 105 170 3.3
(12.4)
Medium 105 170 4.7
(17.6)
Heavy 135 210 7.5
(28.0)
Light Wash (on some models)
Light Wash (on some models)
Light Wash (on some models)
Light Wash (on some models)Light Wash (on some models)
Use for lightly soiled items, china or crystal. Light 74 139 4.0
(15.0)
Quick Rinse (on some models)
Quick Rinse (on some models)
Quick Rinse (on some models)
Quick Rinse (on some models)Quick Rinse (on some models)
Use for rinsing dishes, glasses or silverware that will not be
washed right away.
Do not use detergent. during this cycle, the rinse action will
repeatedly pause for several seconds.
All Soil Levels 10 10 1.7
(6.5)
1 Hr Wash
1 Hr Wash
1 Hr Wash
1 Hr Wash1 Hr Wash
To save water and energy, High Efficiency dishwashers use
advanced filtration which may result in longer cycle times (in
some cases over 2 hours). When you need fast results, 1 Hr Wash
will clean your dishes using slightly more water and energy. For
improved drying, select the Heated Dry option.
All Soil Levels 58 62 5.8
(22.0)

17
Dishwasher Control Section
Dishwasher Feedback Section
Canceling a Cycle
1.
1.
1.
1.1. Open the door slightly to stop the cycle. Wait for the spraying action to stop before completely opening the door.
2.
2.
2.
2.2. Press CANCEL/DRAIN button once. The Cancel/Drain light will light up.
3.
3.
3.
3.3. Close the door within 3 seconds. The dishwasher starts a drain cycle (if water remains in bottom of dishwasher). Let the
dishwasher drain completely. The Cancel/Drain light turns off after 2 minutes.
Changing a Cycle After Dishwasher Is Started
You can interrupt a cycle and restart your dishwasher from the beginning using the following procedure.
1.
1.
1.
1.1. Open the door slightly to stop the cycle. Wait for the spraying action to stop, then open the door completely.
2.
2.
2.
2.2. Check that detergent dispenser cover is still closed. If cover is open, you will need to refill the detergent dispenser before
restarting your new cycle.
3.
3.
3.
3.3. Press CANCEL/DRAIN twice to reset the control.
4.
4.
4.
4.4. Select new cycles and options.
5.
5.
5.
5.5. Press START/RESUME.
Delay Hours (on some models)
Delay Hours (on some models)
Delay Hours (on some models)
Delay Hours (on some models)Delay Hours (on some models)
Use this option to run your dishwasher during off-peak hours. Local utility providers recommend using energy during off-peak hours
when possible.
T
T
T
TTo delay the start:
o delay the start:
o delay the start:
o delay the start:o delay the start:
1.
1.
1.
1.1. Select a wash cycle and options.
2.
2.
2.
2.2. Press the button.
3.
3.
3.
3.3. Press START/RESUME.
NOTE:
NOTE:
NOTE:
NOTE:NOTE: Anytime the door is opened (such as, to add a dish), the Start/Resume button must be pressed again to resume the delay
countdown.
Contr
Contr
Contr
ContrControl Lock Option (on some models)
ol Lock Option (on some models)
ol Lock Option (on some models)
ol Lock Option (on some models)ol Lock Option (on some models)
Use the Control Lock option to avoid unintended use of the dishwasher between cycles. When LOCK ON is lit, all buttons are
disabled. The dishwasher door can still be opened/closed while the controls are locked.
T
T
T
TTo turn on the Lock:
o turn on the Lock:
o turn on the Lock:
o turn on the Lock:o turn on the Lock:
Press and hold HEATED DRY for 3 seconds. LOCK ON will light up. If you press any pad while your dishwasher is locked, the light
flashes 3 times.
NOTE:
NOTE:
NOTE:
NOTE: NOTE: The dishwasher cannot start if the control is locked.
T
T
T
TTo turn off the Lock:
o turn off the Lock:
o turn off the Lock:
o turn off the Lock:o turn off the Lock:
Press and hold HEATED DRY for 3 seconds. The light turns off.
Selecting C
Selecting C
Selecting C
Selecting CSelecting Cycles and Options
ycles and Options
ycles and Options
ycles and Optionsycles and Options
1.
1.
1.
1.1. Select the desired cycle. If you want to run the last cycle that was completed, you can simply press START/RESUME once to
show which options you used, then press START/RESUME again to start the cycle.
2.
2.
2.
2.2. Select the desired options. Not all options are available for every cycle. If an invalid option is selected for a given cycle, the
lights will flash.
T
T
T
TTurning Off/On the Sound
urning Off/On the Sound
urning Off/On the Sound
urning Off/On the Soundurning Off/On the Sound
Press and hold HIGH TEMP for 3 seconds to toggle sound ON and OFF. The sound will not be deactivated for cycle interruption or
service required messages.

19
DISHWASHER CARE
Cleaning
Drain Air Gap
Vacation or Extended Time Without Use
Cleaning the exterior
Cleaning the exterior
Cleaning the exterior
Cleaning the exteriorCleaning the exterior
In most cases, regular use of a soft, damp cloth or sponge and a mild detergent is
all that is necessary to keep the outside of your dishwasher looking nice and clean.
If your dishwasher has a stainless steel exterior, a stainless steel cleaner is
recommended.
Cleaning the interior
Cleaning the interior
Cleaning the interior
Cleaning the interiorCleaning the interior Hard water minerals can cause a white film to build up on the inside surfaces,
especially just beneath the door area.
Do not clean the dishwasher interior until it has cooled. You may want to wear rubber
gloves. Do not use any type of cleanser other than dishwasher detergent because it
may cause foaming or sudsing.
T
T
T
TTo clean interior
o clean interior
o clean interior
o clean interioro clean interior:
:
:
::
Make a paste with powdered dishwasher detergent on a damp sponge and clean.
OR
OR
OR
OROR
Use liquid automatic dishwasher detergent and clean with a damp sponge.
OR
OR
OR
OROR
See the vinegar rinse procedure in the “CLOUDY OR SPOTTED DISHWARE” in the
“TROUBLESHOOTING” section.
NOT
NOT
NOT
NOTNOTE:
E:
E:
E:E: Run a normal cycle with dishwasher detergent after cleaning the interior.
Some state or local plumbing codes require the addition of a drain air gap between a
built-in dishwasher and the home drain system. Check the drain air gap when your
dishwasher is not draining well.
The drain air gap is usually located on top of the sink or countertop near the
dishwasher. To order a drain air gap, please call 1-844-553-6667
1-844-553-6667
1-844-553-6667
1-844-553-66671-844-553-6667. Ask for Part
Number 300096. You may also purchase the part online: www
www
www
wwwwww.searspartsdirect
.searspartsdirect
.searspartsdirect
.searspartsdirect.searspartsdirect.com.
.com.
.com.
.com..com.
NOT
NOT
NOT
NOTNOTE:
E:
E:
E: E: The drain air gap is an external plumbing device that is not part of your
dishwasher. The warranty provided with your dishwasher does not cover service costs
directly associated with the cleaning or repair of the external drain air gap.
T
T
T
TTo clean the drain air gap
o clean the drain air gap
o clean the drain air gap
o clean the drain air gapo clean the drain air gap Clean the drain air gap periodically to ensure proper drainage of your dishwasher.
With most types, you lift off the chrome cover. Unscrew the plastic cap. Then check
for any soil buildup. Clean if necessary.
T
T
T
TTo reduce the risk of pr
o reduce the risk of pr
o reduce the risk of pr
o reduce the risk of pro reduce the risk of property damage
operty damage
operty damage
operty damageoperty damage ■If you will not be using the dishwasher during the summer months, turn off the
water and power supply to the dishwasher.
■Make sure the water supply lines are protected against freezing conditions. Ice
formations in the supply lines can increase water pressure and damage your
dishwasher or home. Damage from freezing is not covered by the warranty.
■When storing your dishwasher in the winter, avoid water damage by having
your dishwasher winterized by authorized service personnel.

20
TROUBLESHOOTING
CHECK THESE POINTS TO
CHECK THESE POINTS TO
CHECK THESE POINTS TO
CHECK THESE POINTS TOCHECK THESE POINTS TO HELP SA
HELP SA
HELP SA
HELP SA HELP SAVE Y
VE Y
VE Y
VE YVE YOU TIME AND MONEY
OU TIME AND MONEY
OU TIME AND MONEY
OU TIME AND MONEYOU TIME AND MONEY
.
.
.
..
PROBLEM
PROBLEM
PROBLEM
PROBLEMPROBLEM SOL
SOL
SOL
SOLSOLUT
UT
UT
UTUTION
ION
ION
IONION
DISHW
DISHW
DISHW
DISHWDISHWASHER DOES NOT RUN
ASHER DOES NOT RUN
ASHER DOES NOT RUN
ASHER DOES NOT RUNASHER DOES NOT RUN NOT
NOT
NOT
NOTNOTE:
E:
E:
E:E: It is normal for the dishwasher to repeatedly pause several times during a cycle.
If the Start/Resume light is blinking, close the door and push START/RESUME.
Be sure the door is closed and latched.
Check that there is not an interference with large casserole dishes and the wash system at the
back of the dishwasher. Adjust loading as necessary to ensure door is closed and latched.
Be sure you have disabled Sleep Mode by pressing either START/RESUME or CANCEL/DRAIN,
or opening the door before selecting your cycle/option.
Be sure you have selected a cycle. See the “Cycles and Options Information.”
Be sure there is power to the dishwasher. A circuit breaker or fuse may have tripped.
If lights other than Start/Resume blink and the unit will not run, you will need to call for service.
DETERGENT REMAINS IN THE
DETERGENT REMAINS IN THE
DETERGENT REMAINS IN THE
DETERGENT REMAINS IN THE DETERGENT REMAINS IN THE
DISPENSER OR
DISPENSER OR
DISPENSER OR
DISPENSER ORDISPENSER OR
T
T
T
TTA
A
A
AABL
BL
BL
BLBLET
ET
ET
ETET IS
IS
IS
IS IS ON
ON
ON
ON ON BOT
BOT
BOT
BOT BOTTOM
TOM
TOM
TOMTOM OF
OF
OF
OF OF TU
TU
TU
TUTUB
B
B
BB
Check for dishware such as cookie sheets, cutting boards, or large containers, etc., that may be
blocking the detergent dispenser from opening properly.
Be sure your detergent is fresh and lump free.
Be sure the cycle has completed (blue light is on). If it has not completed, you will need to resume
the cycle by closing the door and pressing START/RESUME.
C
C
C
CCYCLE RUNS TOO LONG
YCLE RUNS TOO LONG
YCLE RUNS TOO LONG
YCLE RUNS TOO LONGYCLE RUNS TOO LONG NOT
NOT
NOT
NOTNOTES:
ES:
ES:
ES:ES:
■To use less water and reduce energy consumption, you will encounter cycles that typically run
for up to 3 hours.
■A water heater setting of 120°F (49ºC) is best. The dishwasher will delay longer while heating
cooler water.
■Some options will add time to the cycle. See the “Cycles and Options Information” section.
The Heated Dry option adds ½ hour.
Try the 1 Hour Wash cycle.
Run the hot water at a faucet close to the dishwasher before selecting and starting the cycle.
DISHW
DISHW
DISHW
DISHWDISHWASHER NOT DR
ASHER NOT DR
ASHER NOT DR
ASHER NOT DRASHER NOT DRYING
YING
YING
YINGYING NOT
NOT
NOT
NOTNOTE:
E:
E:
E:E: Plastic and items with nonstick surfaces are difficult to dry because they have a porous
surface which tends to collect water droplets. Towel drying may be necessary.
Use of rinse aid along with the Heated Dry option is needed for proper drying.
Proper loading of items can affect drying. See the specific loading instructions within this guide.
Glasses and cups with concave bottoms hold water. This water may spill onto other items when
unloading.
■Unload the bottom rack first.
■Locate these items on the more slanted side of the rack for improved results.
WILL NOT FILL
WILL NOT FILL
WILL NOT FILL
WILL NOT FILLWILL NOT FILL Be sure the water is turned on to the dishwasher.
Check that the float is free from obstructions. See the “Parts and Features” section.
Check for suds in the dishwasher. If foam or suds are detected, the dishwasher may not operate
properly or may not fill with water.
W
W
W
WWA
A
A
AATER REMAINS IN THE TUB/
TER REMAINS IN THE TUB/
TER REMAINS IN THE TUB/
TER REMAINS IN THE TUB/TER REMAINS IN THE TUB/
WILL NOT DRAIN
WILL NOT DRAIN
WILL NOT DRAIN
WILL NOT DRAINWILL NOT DRAIN
Be sure the cycle has completed (the blue light is on). If it has not, you will need to resume the
cycle by closing the door and pressing START/RESUME.
If dishwasher is connected to a food waste disposer, be sure the knockout plug has been removed
from the disposer inlet.
Check for kinks in the drain hose.
Check for food obstructions in the drain or disposer.
Check your house fuse or circuit breaker.

21
HARD W
HARD W
HARD W
HARD WHARD WA
A
A
AATER
TER
TER
TER TER
(WHITE RESIDUE ON
(WHITE RESIDUE ON
(WHITE RESIDUE ON
(WHITE RESIDUE ON (WHITE RESIDUE ON
DISHW
DISHW
DISHW
DISHWDISHWASHER INTERIOR OR
ASHER INTERIOR OR
ASHER INTERIOR OR
ASHER INTERIOR ORASHER INTERIOR OR
GLASSW
GLASSW
GLASSW
GLASSWGLASSWARE)
ARE)
ARE)
ARE)ARE)
NOT
NOT
NOT
NOTNOTE:
E:
E:
E:E: Extremely hard water mineral deposits can cause damage to your dishwasher and make
it difficult to achieve good cleaning. You may bring water samples to Sears to check your water
hardness level. A water softener is strongly recommended if your hardness is 15 grains or more. If
a water softener is not installed, the following steps may help:
Use a commercial cleaner designed for dishwashers once per month.
Clean the ULTRA WASH®filters at least once per month.
Always use a rinse aid.
Always use a high-quality, fresh detergent.
Use a detergent booster/water softener additive designed for dishwashers.
ODORS
ODORS
ODORS
ODORSODORS NOT
NOT
NOT
NOTNOTE:
E:
E:
E:E: If the dishwasher is not used daily, you can run a rinse cycle with the partial load until a
full load is ready to run, or use the Top Rack Only option (on some models) for partial loads.
Run a vinegar rinse through the dishwasher by putting 2 cups (500 mL) of white vinegar in an
upright glass measuring cup in the lower rack. Run a normal cycle with the Heated Dry option
turned off. Do not use detergent.
The dishwasher may not be draining properly. See the “WATER REMAINS IN THE TUB/WILL
NOT DRAIN” section in the “Troubleshooting” section.
NOISY
NOISY
NOISY
NOISYNOISY NOTES:
NOTES:
NOTES:
NOTES:NOTES:
■Surging sounds can occur periodically throughout the cycle while the dishwasher is draining.
■Normal water valve hissing may be heard periodically.
■A normal snap sound may be heard when the detergent dispenser opens during the cycle and
when the door is opened at the end of the cycle.
■Improper installation will affect noise levels.
Be sure the filters are properly installed.
A thumping sound may be heard if items extend beyond the racks and interfere with the wash
arms. Readjust the dishware and resume the cycle.
FOOD SOILS REMAIN
FOOD SOILS REMAIN
FOOD SOILS REMAIN
FOOD SOILS REMAIN FOOD SOILS REMAIN
ON DISHES
ON DISHES
ON DISHES
ON DISHESON DISHES
Be sure the dishwasher is loaded correctly. Improper loading can greatly decrease the washing
performance. See the “Loading for Best Cleaning and Drying Performance” section.
Check filter to ensure it is properly installed. Clean it if needed. See the “Cleaning Instructions”
section in the “ULTRA WASH®Filtration System” section for details.
Select the proper cycle and option for the type of soils. The Pots & Pans cycle with the
TurboZone® (on some models) option can be used for tougher loads.
Be sure the incoming water temperature is at least 120°F (49ºC).
Use the proper amount of fresh detergent. More detergent is needed for heavier-soiled loads and
hard water conditions.
Scrape food from dishes prior to loading (do not prerinse).
DID NOT SANITIZE
DID NOT SANITIZE
DID NOT SANITIZE
DID NOT SANITIZEDID NOT SANITIZE If the sanitized light is blinking, the load is
NOT
sanitized. The cycle was interrupted in the final
rinse, or your water heater is set too low. Set your water heater to 120ºF (49ºC).
DAMAGE TO DISHW
DAMAGE TO DISHW
DAMAGE TO DISHW
DAMAGE TO DISHWDAMAGE TO DISHWARE
ARE
ARE
AREARE Improper loading can cause dishes to become chipped or damaged. See the specific loading
instructions within this guide.
BLINKING LIGHTS
BLINKING LIGHTS
BLINKING LIGHTS
BLINKING LIGHTSBLINKING LIGHTS If Start/Resume or any status lights are blinking and the dishwasher will not run, close the door
and push START/RESUME. If the dishwasher still will not run, call service.
PROBLEM
PROBLEM
PROBLEM
PROBLEMPROBLEM SOL
SOL
SOL
SOLSOLUTIO
UTIO
UTIO
UTIOUTION
N
N
NN
HE
HE

22
CL
CL
CL
CLCLOUDY OR SPOT
OUDY OR SPOT
OUDY OR SPOT
OUDY OR SPOTOUDY OR SPOTTED
TED
TED
TED TED
DISHW
DISHW
DISHW
DISHWDISHWARE (AND HARD
ARE (AND HARD
ARE (AND HARD
ARE (AND HARD ARE (AND HARD
WATER SOLUTION)
WATER SOLUTION)
WATER SOLUTION)
WATER SOLUTION)WATER SOLUTION)
NOTES:
NOTES:
NOTES:
NOTES:NOTES:
■Liquid rinse aid is necessary for drying and to reduce spotting.
■Use the correct amount of detergent.
Confirm that the cloudiness is removable by soaking the item in white vinegar for 5 minutes. If the
cloudiness disappears, it is due to hard water. Adjust the amount of detergent and rinse aid. See
“HARD WATER (WHITE RESIDUE ON DISHWASHER INTERIOR OR GLASSWARE)” in
“Troubleshooting.” If it does not come clear, it is due to etching.
Be sure the incoming water temperature is set at 120°F (49ºC).
Try using the High Temp and Sani Rinse options.
To remove spotting, run a vinegar rinse through the dishwasher.
■Wash and rinse the affected dishware and load into dishwasher. Remove all silverware and
metal items. Put 2 cups (500 mL) of white vinegar in a glass measuring cup in the lower rack.
Run a normal cycle with the Heated Dry option turned off. No detergent is needed.
ETCHING (PERMANENT
ETCHING (PERMANENT
ETCHING (PERMANENT
ETCHING (PERMANENT ETCHING (PERMANENT
CL
CL
CL
CLCLOUDINESS)
OUDINESS)
OUDINESS)
OUDINESS)OUDINESS)
This is an erosion of the surface of the glassware and can be caused by a combination of: water
that is too hot, from using too much detergent with soft water or by pre-washing. Detergent needs
food soil to act upon. If etching has occurred, the glassware is permanently damaged. To avoid
further etching, adjust the detergent amount to match the water hardness, stop pre-washing, and
use water heating options only when incoming water temperature is below 120°F (49ºC).
LEAKING W
LEAKING W
LEAKING W
LEAKING WLEAKING W
A
A
A
AATER
TER
TER
TERTER Be sure dishwasher has been installed properly and is level.
Suds can cause the dishwasher to overflow. Measure the detergent accurately and use only
detergents designed for use in a dishwasher. Less detergent is needed in soft water. Try another
brand of detergent if sudsing continues.
To avoid rinse aid leaking from the dispenser, be sure the lid is securely attached and avoid
overfilling.
TUB IS DISCOL
TUB IS DISCOL
TUB IS DISCOL
TUB IS DISCOLTUB IS DISCOLORE
ORE
ORE
OREORED
D
D
DD NOTES:
NOTES:
NOTES:
NOTES: NOTES:
■High iron content in the water can discolor the tub.
■Tomato-based foods can discolor the tub or dishware.
■A citrus-based cleaner can be used to clean.
PROBLEM
PROBLEM
PROBLEM
PROBLEMPROBLEM SOL
SOL
SOL
SOLSOLUTION
UTION
UTION
UTIONUTION

23
NOTES

24
ÍNDICE
CONTRATOS DE PROTECCIÓN............................................ 24
GARANTÍA.............................................................................25
SEGURIDAD DE LA LAVAVAJILLAS.......................................26
PIEZAS Y CARACTERÍSTICAS ................................................28
PUESTA EN MARCHA/REFERENCIA RÁPIDA ........................29
SISTEMA DE FILTRACIÓN ULTRA WASH
®..............................30
CONSEJOS PARA LA EFICIENCIA DE LA LAVAVAJILLAS .....32
DETERGENTE Y AGENTE DE ENJUAGUE...............................32
Detergente ....................................................................................... 32
Agente de enjuague....................................................................... 33
CÓMO CARGAR ................................................................... 34
Cómo cargar para un mejor desempeño
en el lavado y el secado............................................................... 34
Cómo cargar la canasta superior............................................... 35
Cómo cargar la canasta inferior .................................................36
USO DE LA LAVAVAJILLAS ...................................................38
Información acerca de los ciclos y las opciones .....................38
Sección de control de la lavavajillas ......................................... 40
Sección de información provista por la lavavajillas............... 40
Cómo cancelar un ciclo................................................................ 40
Cómo cambiar un ciclo después de iniciar la lavavajillas..... 40
CÓMO LAVAR ARTÍCULOS ESPECIALES ............................... 41
CUIDADO DE LA LAVAVAJILLAS..........................................42
Limpieza........................................................................................... 42
Purga de aire del desagüe........................................................... 42
Vacaciones o tiempo prolongado sin uso .................................43
SOLUCIÓN DE PROBLEMAS..................................................43
NÚMEROS DE SERVICIO ............................CONTRAPORTADA
CONTRATOS DE PROTECCIÓN
Contratos maestros de protección
¡Felicitaciones por su inteligente adquisición!
Su nuevo producto
Kenmore® está diseñado y fabricado para proporcionarle años
de funcionamiento confiable. Pero al igual que todos los
productos, puede necesitar mantenimiento preventivo o
reparación de vez en cuando. Es allí donde el Contrato maestro
de protección puede ahorrarle dinero e inconvenientes.
El Contrato maestro de protección también ayuda a prolongar
la vida de su nuevo producto. He aquí lo que se incluye en el
Contrato*:
✔Piezas y mano de obra
Piezas y mano de obra
Piezas y mano de obra
Piezas y mano de obraPiezas y mano de obra necesarias para ayudar a mantener
los productos funcionando correctamente bajo uso normal
bajo uso normal
bajo uso normal
bajo uso normalbajo uso normal,
no solo en caso de defectos. Nuestra cobertura va mucho
mucho
mucho
mucho mucho
más allá de la garantía del producto
más allá de la garantía del producto
más allá de la garantía del producto
más allá de la garantía del productomás allá de la garantía del producto. No existen deducibles
ni fallas de funcionamiento que estén excluidas de la
cobertura — pr
pr
pr
prprotección verdadera
otección verdadera
otección verdadera
otección verdaderaotección verdadera.
✔Servicio experto
Servicio experto
Servicio experto
Servicio expertoServicio experto a cargo de un personal de más de 10.000
técnicos de servicio
técnicos de servicio
técnicos de servicio
técnicos de serviciotécnicos de servicio autorizados por Sears
autorizados por Sears
autorizados por Sears
autorizados por Searsautorizados por Sears, lo que significa
que su producto será reparado por alguien en quien usted
puede confiar.
✔Llamadas de ser
Llamadas de ser
Llamadas de ser
Llamadas de serLlamadas de servicio ilimitadas y servicio en todo el país
vicio ilimitadas y servicio en todo el país
vicio ilimitadas y servicio en todo el país
vicio ilimitadas y servicio en todo el paísvicio ilimitadas y servicio en todo el país,
con la frecuencia que usted desee, cuando usted desee.
✔Garantía “sin disgustos”
Garantía “sin disgustos”
Garantía “sin disgustos”
Garantía “sin disgustos” Garantía “sin disgustos” – reemplazo de su producto
protegido si ocurren cuatro o más fallas del producto en el
transcurso de doce meses.
✔Reemplazo del producto
Reemplazo del producto
Reemplazo del producto
Reemplazo del productoReemplazo del producto si su producto protegido no puede
ser reparado.
✔Revisión anual de mantenimiento preventiv
Revisión anual de mantenimiento preventiv
Revisión anual de mantenimiento preventiv
Revisión anual de mantenimiento preventivRevisión anual de mantenimiento preventivo
o
o
oo a solicitud suya
– sin costo adicional.
✔A
A
A
AAyuda rápida por teléfono
yuda rápida por teléfono
yuda rápida por teléfono
yuda rápida por teléfonoyuda rápida por teléfono – lo que nosotros llamamos
Solución rápida
Solución rápida
Solución rápida
Solución rápidaSolución rápida – apoyo por teléfono a cargo de un
representante de Sears para todos los productos. Piense
en nosotros como si fuéramos un “manual del propietario
que habla”.
✔Protección de sobrev
Protección de sobrev
Protección de sobrev
Protección de sobrevProtección de sobrevoltaje
oltaje
oltaje
oltajeoltaje contra daños eléctricos debido
a fluctuaciones de electricidad.
✔Protección por pérdida de comida, por un valor anual de
Protección por pérdida de comida, por un valor anual de
Protección por pérdida de comida, por un valor anual de
Protección por pérdida de comida, por un valor anual de Protección por pérdida de comida, por un valor anual de
$250
$250
$250
$250$250, por cualquier pérdida de comida que sea resultado
de fallas mecánicas de cualquier refrigerador o congelador
cubierto bajo la garantía.
✔Reembolso de la alquiler
Reembolso de la alquiler
Reembolso de la alquiler
Reembolso de la alquilerReembolso de la alquiler si la reparación de su producto
protegido tarda más de lo prometido.
✔25% de descuento
25% de descuento
25% de descuento
25% de descuento25% de descuento sobre el precio común por el servicio de
reparación que no esté bajo protección, así como las piezas
relacionadas con el mismo que se hayan instalado.
Una vez adquirido el Contrato, basta con llamar para fijar la
visita de servicio técnico. Puede llamar a cualquier hora, de día
o de noche, o fijar una visita técnica en Internet.
El Contrato maestro de protección es una compra sin riesgo. Si
por algún motivo lo cancela durante el período de la garantía
del producto, le proveeremos un reembolso total. O un
reembolso proporcional en cualquier momento posterior a la
expiración del período de la garantía. ¡Adquiera hoy su
Contrato maestro de protección!
Se aplican algunas limitaciones
Se aplican algunas limitaciones
Se aplican algunas limitaciones
Se aplican algunas limitacionesSe aplican algunas limitaciones y exclusiones. Para obtener
y exclusiones. Para obtener
y exclusiones. Para obtener
y exclusiones. Para obtener y exclusiones. Para obtener
precios e información adicio
precios e información adicio
precios e información adicio
precios e información adicioprecios e información adicional en EE. UU
nal en EE. UU
nal en EE. UU
nal en EE. UUnal en EE. UU., llame al
., llame al
., llame al
., llame al ., llame al
1-800-827-6655.
1-800-827-6655.
1-800-827-6655.
1-800-827-6655.1-800-827-6655.
*La cobertura en Canadá varía en algunos artículos. Para
*La cobertura en Canadá varía en algunos artículos. Para
*La cobertura en Canadá varía en algunos artículos. Para
*La cobertura en Canadá varía en algunos artículos. Para *La cobertura en Canadá varía en algunos artículos. Para
obtener los detalles completos, llame a Sears Canada al
obtener los detalles completos, llame a Sears Canada al
obtener los detalles completos, llame a Sears Canada al
obtener los detalles completos, llame a Sears Canada al obtener los detalles completos, llame a Sears Canada al
1-800-361-6665.
1-800-361-6665.
1-800-361-6665.
1-800-361-6665.1-800-361-6665.
Servicio de instalación de Sears
Para la instalación profesional de Sears de aparatos
electrodomésticos, abridores de puertas de garaje,
calentadores de agua y otros artículos principales del
hogar, en los EE. UU. llame al 1-844-553-6667
1-844-553-6667
1-844-553-6667
1-844-553-66671-844-553-6667 o en Canadá
llame al 1-800-469-4663
1-800-469-4663
1-800-469-4663
1-800-469-46631-800-469-4663.

25
GARANTÍA DE ELECTRODOMÉSTICOS IMPORTANTES
KENMORE
GARANTÍA LIMIT
GARANTÍA LIMIT
GARANTÍA LIMIT
GARANTÍA LIMITGARANTÍA LIMITADA DE KENMORE
ADA DE KENMORE
ADA DE KENMORE
ADA DE KENMOREADA DE KENMORE
DURANTE UN AÑO a partir de la fecha de venta, este
electrodoméstico, posee garantía contra defectos en los
materiales o en la mano de obra cuando se instale, opere y
mantenga correctamente de acuerdo con todas las
instrucciones provistas.
CON EL COMPROBANTE DE VENTA, un electrodoméstico
defectuoso recibirá la reparación o sustitución gratuita, a
criterio del vendedor.
Para ver los detalles de cobertura de la garantía a fin de
obtener reparación o repuestos sin costo, visite la página web:
www
www
www
wwwwww.kenmore.com/warranty
.kenmore.com/warranty
.kenmore.com/warranty
.kenmore.com/warranty.kenmore.com/warranty.
.
.
..
Esta garantía es válida solamente durante 90 DÍAS a partir de
la fecha de venta en los Estados Unidos, y no tiene validez en
Canadá, si este electrodoméstico se utiliza en algún momento
para fines que no sean domésticos.
Esta garantía cubre ÚNICAMENTE defec
Esta garantía cubre ÚNICAMENTE defec
Esta garantía cubre ÚNICAMENTE defec
Esta garantía cubre ÚNICAMENTE defecEsta garantía cubre ÚNICAMENTE defectos de material y
tos de material y
tos de material y
tos de material y tos de material y
mano de obra y NO pagará:
mano de obra y NO pagará:
mano de obra y NO pagará:
mano de obra y NO pagará:mano de obra y NO pagará:
1.
1.
1.
1.1. Los artículos no reutilizables que puedan gastarse con el uso
normal, incluidos, entre otras cosas, filtros, correas, bolsas y
focos de base roscada.
2.
2.
2.
2.2. Un técnico de servicio para limpiar o realizar el
mantenimiento de este electrodoméstico o para enseñarle al
usuario cómo instalar, operar o mantener el producto
correctamente.
3.
3.
3.
3.3. Llamadas de servicio para corregir una instalación del
electrodoméstico no realizada por agentes de servicio
autorizados de Sears o para reparar problemas con fusibles,
disyuntores, cables y plomería de la casa o con sistemas de
suministro de gas que sean resultado de esa instalación.
4.
4.
4.
4.4. Daños o fallas de este electrodoméstico que sean resultado
de una instalación no realizada por agentes de servicio
autorizados de Sears , incluida una instalación que no
estuviera de acuerdo con los códigos de electricidad, gas o
plomería.
5.
5.
5.
5.5. Daños o fallas de este electrodoméstico, incluido el cambio
de color o la oxidación de superficies, si no se opera y
mantiene correctamente de acuerdo con todas las
instrucciones que se suministran.
6.
6.
6.
6.6. Daños o fallas de este electrodoméstico, incluido el cambio
de color o la oxidación de superficies, como resultado de
accidentes, alteraciones, abuso, uso indebido o un uso
diferente del previsto.
7.
7.
7.
7.7. Daños o fallas de este electrodoméstico, incluido el cambio
de color o la oxidación de superficies, causados por el uso
de detergentes, limpiadores, sustancias químicas o utensilios
diferentes de los recomendados en todas las instrucciones
suministradas con el producto.
8.
8.
8.
8.8. Daños o fallas de piezas o sistemas como resultado de
modificaciones no autorizadas que se hayan efectuado en
este electrodoméstico.
9.
9.
9.
9.9. Servicios a un electrodoméstico si la placa con el modelo y
el número de serie falta, está alterada o no tiene el logotipo
de certificación correcto fácilmente visible.
Exclusión de garantías implícitas; limitación de recursos
Exclusión de garantías implícitas; limitación de recursos
Exclusión de garantías implícitas; limitación de recursos
Exclusión de garantías implícitas; limitación de recursosExclusión de garantías implícitas; limitación de recursos
El único y exclusivo recurso del cliente según los términos de
esta garantía limitada será la reparación o el reemplazo del
producto según se estipula en la presente. Las garantías
implícitas, incluyendo las garantías de comerciabilidad o de
capacidad para un propósito particular, serán limitadas a un
año o al período más corto permitido por ley. El vendedor no se
hará responsable por daños incidentales o consecuentes.
Algunos estados y provincias no permiten la exclusión o
limitación de daños incidentales o consecuentes, o limitación
acerca de cuánto debe durar una garantía implícita de
comerciabilidad o capacidad, de modo que las limitaciones o
exclusiones arriba mencionadas pueden no aplicarse en su caso.
Esta garantía se aplica solo mientras este aparato se use en los
Estados Unidos o en Canadá*.
Esta garantía le otorga derechos legales específicos, y es
posible que usted tenga también otros derechos, los cuales
varían de un estado a otro.
* No se dispone de servicio de reparaciones en la casa en todas
las áreas geográficas de Canadá; esta garantía no cubrirá los
gastos de viaje y transporte del usuario o del personal de
servicios si este producto está ubicado en un área remota
(según lo defina Sears Canada Inc.) donde no haya personal de
servicios autorizado disponible.
Sears Brands Management Corporation
Hoffman Estates, IL 60179
Sears Canada Inc.
Toronto, Ontario, Canada M5B 2C3

26
SEGURIDAD DE LA LAVAVAJILLAS
Si no sigue las instrucciones de inmediato, usted
o sufrir una lesión grave.
Si no sigue las instrucciones, usted puede morir
o sufrir una lesión grave.
Todos los mensajes de seguridad le dirán el peligro potencial, le dirán cómo reducir las posibilidades de sufrir
una lesión y lo que puede suceder si no se siguen las instrucciones.
Su seguridad y la seguridad de los demás es muy importante.
Hemos incluido muchos mensajes importantes de seguridad en este manual y en su electrodoméstico.
Este es el símbolo de advertencia de seguridad.
Este símbolo le llama la atención sobre peligros potenciales que pueden ocasionar la muerte o una
y de la palabra “PELIGRO” o “ADVERTENCIA”. Estas palabras significan:
PELIGRO
ADVERTENCIA
a usted y a los demás.
Lea y obedezca siempre todos los mensajes de seguridad.
Todos los mensajes de seguridad irán a continuación del símbolo de advertencia de seguridad
puede morir
lesión
INSTRUCCIONES IMPORTANTES DE SEGURIDAD
ADVERTENCIA: Cuando use la lavavajillas siga precauciones básicas, incluyendo las siguientes:
GUARDE ESTAS INSTRUCCIONES
■ Lea todas las instrucciones antes de usar la
lavavajillas.
■ Use la lavavajillas únicamente para las funciones que
fue diseñada.
■ Use únicamente detergentes o agentes de enjuague
recomendados para ser usados en las lavavajillas y
manténgalos fuera del alcance de los niños.
■ Al introducir los artículos para lavar:
1) Coloque los artículos puntiagudos de manera que
no dañen el sello de la puerta
2) Introduzca los cuchillos filosos con los mangos
hacia arriba para reducir el riesgo de cortaduras.
■ No lave artículos de plástico que no lleven la
indicación “lavables en la lavavajillas” u otra similar.
Lea las recomendaciones del fabricante para los
artículos de plástico que no lleven tal indicación.
■ No toque el elemento de calefacción durante o
inmediatamente después de usar la lavavajillas.
■ No haga funcionar la lavavajillas a menos que todos
los paneles estén colocados debidamente en su
lugar.
■ No juegue con los controles.
■ No abuse, ni se siente ni se pare sobre la puerta, la
tapa o sobre las canastas de la lavavajillas.
■ Para reducir el riesgo de lesión, no permita que los
niños jueguen dentro ni sobre la lavavajillas.
■ Bajo ciertas condiciones, un sistema de agua caliente
que no p26-ha sido usado por dos semanas o más pued
producir gas hidrógeno. EL GAS HIDRÓGENO ES
EXPLOSIVO. Si el sistema de agua caliente no p26-ha
sido usado por ese período, abra todas las llaves de
agua caliente y deje que corra el agua por varios
minutos antes de usar la lavavajillas. Esto permitirá
que los gases acumulados escapen. Debido a que el
gas es inflamable, no fume ni encienda ninguna llama
cerca de la llave durante este tiempo.
■ Quite la puerta o la tapa del compartimiento de
lavado cuando remueva o deje de usar para siempre
una vieja lavavajillas.
Advertencias de la Proposición 65 del estado de California:
ADVERTENCIA: Este producto contiene una o más sustancias químicas identificadas por el estado de California
como causantes de cáncer.
ADVERTENCIA: Este producto contiene una o más sustancias químicas identificadas por el estado de California
como causantes de defectos congénitos o algún otro tipo de daños en la función reproductora.

27
■Instale su lavavajillas en un lugar protegido de las
inclemencias del tiempo. Evite una posible ruptura de la
válvula de llenado debida al congelamiento. Dichas
rupturas no están cubiertas por la garantía. Vea la sección
“Vacaciones o tiempo prolongado sin uso”.
■Instale y nivele la lavavajillas en un piso que pueda soportar
su peso y en un área adecuada para su tamaño y uso.
■Retire todos los tapones de las mangueras y los conectores
(como la tapa en la salida de desagüe) antes de instalarla.
Vea la información completa en las Instrucciones de
instalación.
Peligro de Vuelco
No use la lavavajillas antes de estar
completamente instalada.
No se apoye en la puerta abierta.
No seguir estas instrucciones puede ocasionar
heridas serias o cortaduras.
Peligro de Choque Eléctrico
Conecte a tierra la lavavajillas.
Conecte el alambre de conexión a tierra al
conector verde de conexión a tierra en la caja de
terminales.
No use un cable eléctrico de extensión.
No seguir estas instrucciones puede ocasionar
la muerte, incendio o choque eléctrico.
■
Para una lavavajillas con cable eléctrico y
conexión a tierra:
La lavavajillas debe estar conectada a tierra. En
caso de funcionamiento defectuoso o avería, la
conexión a tierra reduce el riesgo de choque
eléctrico al establecer una ruta de menor
resistencia para la corriente eléctrica. La
lavavajillas viene equipada con un cable eléctrico
que tiene un conductor para conexión a tierra y un
enchufe con conexión a tierra. El enchufe debe ser
conectado a un contacto apropiado que esté
instalado y conectado a tierra de acuerdo con
todos los códigos y ordenanzas locales.
ADVERTENCIA: La conexión inadecuada del
conductor de conexión a tierra puede resultar en
riesgo de choque eléctrico. Pregunte a un
electricista calificado o a un agente de servicio si
no está seguro si la lavavajillas está
adecuadamente conectada a tierra. No modifique
el enchufe que viene con la lavavajillas. Si no cabe
en el contacto, pida que un electricista calificado
instale un contacto apropiado.
■
Para lavavajillas con conexión permanente:
Esta lavavajillas debe estar conectada a un
sistema de cableado de metal permanente,
conectado a tierra, o se debe tender un conducto
para la conexión a tierra del equipo con los
conductores de circuito y conectado a la terminal
de tierra del equipo o al conductor de suministro
de la lavavajillas.
INSTRUCCIONES DE
CONEXIÓN A TIERRA
GUARDE ESTAS INSTRUCCIONES

28
PIEZAS Y CARACTERÍSTICAS

29
PUESTA EN MARCHA/REFERENCIA RÁPIDA
(VARÍA SEGÚN EL MODELO)
Los filtros desmontables ULTRA WASH®
proporcionan un rendimiento óptimo
La limpieza periódica de los
filtros permite que la
lavavajillas funcione con un
rendimiento óptimo. Los
filtros se encuentran en la
parte central inferior de la
lavavajillas.
Vea “SISTEMA DE
FILTRACIÓN ULTRA
WASH®” para obtener
información acerca de la
remoción y el mantenimiento
de los filtros.
IMPORTANTE: No bloquee el depósito
del detergente
Los artículos altos pueden
bloquear la puerta del
depósito si los coloca en la
canasta inferior. Los moldes
para galletas y las tablas
para cortar pueden
bloquear fácilmente el
depósito si los coloca en la
parte izquierda de la
lavavajillas. Si después de
finalizado un ciclo hay
detergente dentro del
depósito o en el fondo de la
tina, el depósito quedó
bloqueado.
Secado — el agente de enjuague
es fundamental
Deberá usar un agente de
secado, como puede ser un
agente de enjuague, para
un buen rendimiento de
secado (se incluye una
muestra). El agente de
enjuague junto con la
opción Heated Dry
(Secado con calor) le
proporcionarán el mejor
secado y evitarán que se
forme humedad excesiva
en el interior de la
lavavajillas.
HE
HE
P
U
S
H
D
O
W
N
&
T
U
R
N
L
O
C
K
U
N
L
O
C
K
USE RINSE AID FOR
BETTER DRYING
Lock
Refill
Full
Add
1 Hour Wash (Lavado de 1 hora) — cuando
necesita resultados rápidos
Las lavavajillas de alto rendimiento
funcionan por más tiempo para ahorrar
agua y energía, de la misma manera que
se ahorra gasolina cuando se conduce un
automóvil despacio. Cuando necesite
resultados rápidos, el Lavado de 1 hora
limpiará su vajilla usando un poco más de
agua y energía. Para mejorar el secado,
seleccione la opción Heated Dry (Secado
con calor) para agregar más tiempo
al secado.
Ciclo SmartWash®
El ciclo SmartWash® provee resultados
óptimos usando solo la cantidad de agua y
energía necesaria. Se recomiendan los ciclos
SmartWash® y Pots & Pans (Ollas y
cacerolas) para la suciedad rebelde.
Cómo cargar en TurboZone®
(en algunos modelos)
Cuando se
selecciona la
opción TurboZone®,
se proporciona un
lavado concentrado
hacia la parte
posterior de la
canasta inferior
para la vajilla que
sea difícil de lavar.
Coloque estos
platos con la
superficie sucia en
las boquillas de
rociado
TurboZone®, que
están en la canasta
inferior de la
lavavajillas.
HE
H
E
H
E

30
SISTEMA DE FILTRACIÓN ULTRA WASH®
Su lavavajillas cuenta con la última tecnología de filtración para lavavajillas. El sistema de filtración triple minimiza los sonidos y
optimiza el consumo de agua y energía mientras proporciona una limpieza superior. Durante la vida útil de su lavavajillas, el filtro
necesitará mantenimiento para conservar el rendimiento óptimo de limpieza.
El sistema de filtración triple consta de 2 piezas, un conjunto de filtro superior y un filtro inferior.
■El conjunto de filtro superior mantiene los artículos muy grandes y los objetos extraños, junto con las partículas muy pequeñas
de comida, fuera de la bomba.
■El filtro inferior evita que la comida recircule sobre la vajilla.
Para proveer un desempeño óptimo de limpieza, sugerimos un mantenimiento mensual del filtro, que incluya la extracción y la
inspección de los filtros superior e inferior para ver si están sucios. Según sus hábitos de lavado de vajilla, deberá limpiar los filtros
con más o menos frecuencia que lo indicado en la tabla a continuación.
Es posible que sea necesario limpiar los filtros cuando:
■Haya objetos visibles o suciedad en el conjunto del filtro superior.
■Baje la calidad del rendimiento de limpieza (es decir, los platos sigan sucios).
■Los platos se sientan arenosos al tacto.
Es muy fácil quitar y mantener los filtros. La tabla siguiente muestra la frecuencia recomendada de limpieza.
Presione START/RESUME (Inicio/Reanudar)
cada vez que agregue un plato.
Para comenzar y reanudar un ciclo, presione
START/RESUME (Inicio/Reanudar) y cierre
la puerta en menos de 3 segundos. Si la
puerta no se p30-ha cerrado en menos de
3 segundos, el LED del botón de inicio
destellará y el ciclo no comenzará.
IMPORT
IMPORT
IMPORT
IMPORTIMPORTANTE
ANTE
ANTE
ANTEANTE:
:
:
:: Si alguien abre la puerta
(como puede ser para agregar un plato –
aún durante la opción Delay Hours – Horas
de retraso), deberá presionarse el botón
START/RESUME (Inicio/Reanudar) cada vez
y cerrar la puerta en menos de 3 segundos
para reanudar el ciclo.
Dosificación del detergente
Es posible usar demasiado detergente en su lavavajillas. Esto
puede ocasionar corrosión en los platos. Vea “Detergente y
agente de enjuague” para determinar la cantidad de
detergente necesaria según la dureza del agua. Está
comprobado que las pastillas y los paquetes de detergente
para lavavajillas son más eficaces que los detergentes en
polvo, líquidos o en gel para reducir las películas en la vajilla.
HE
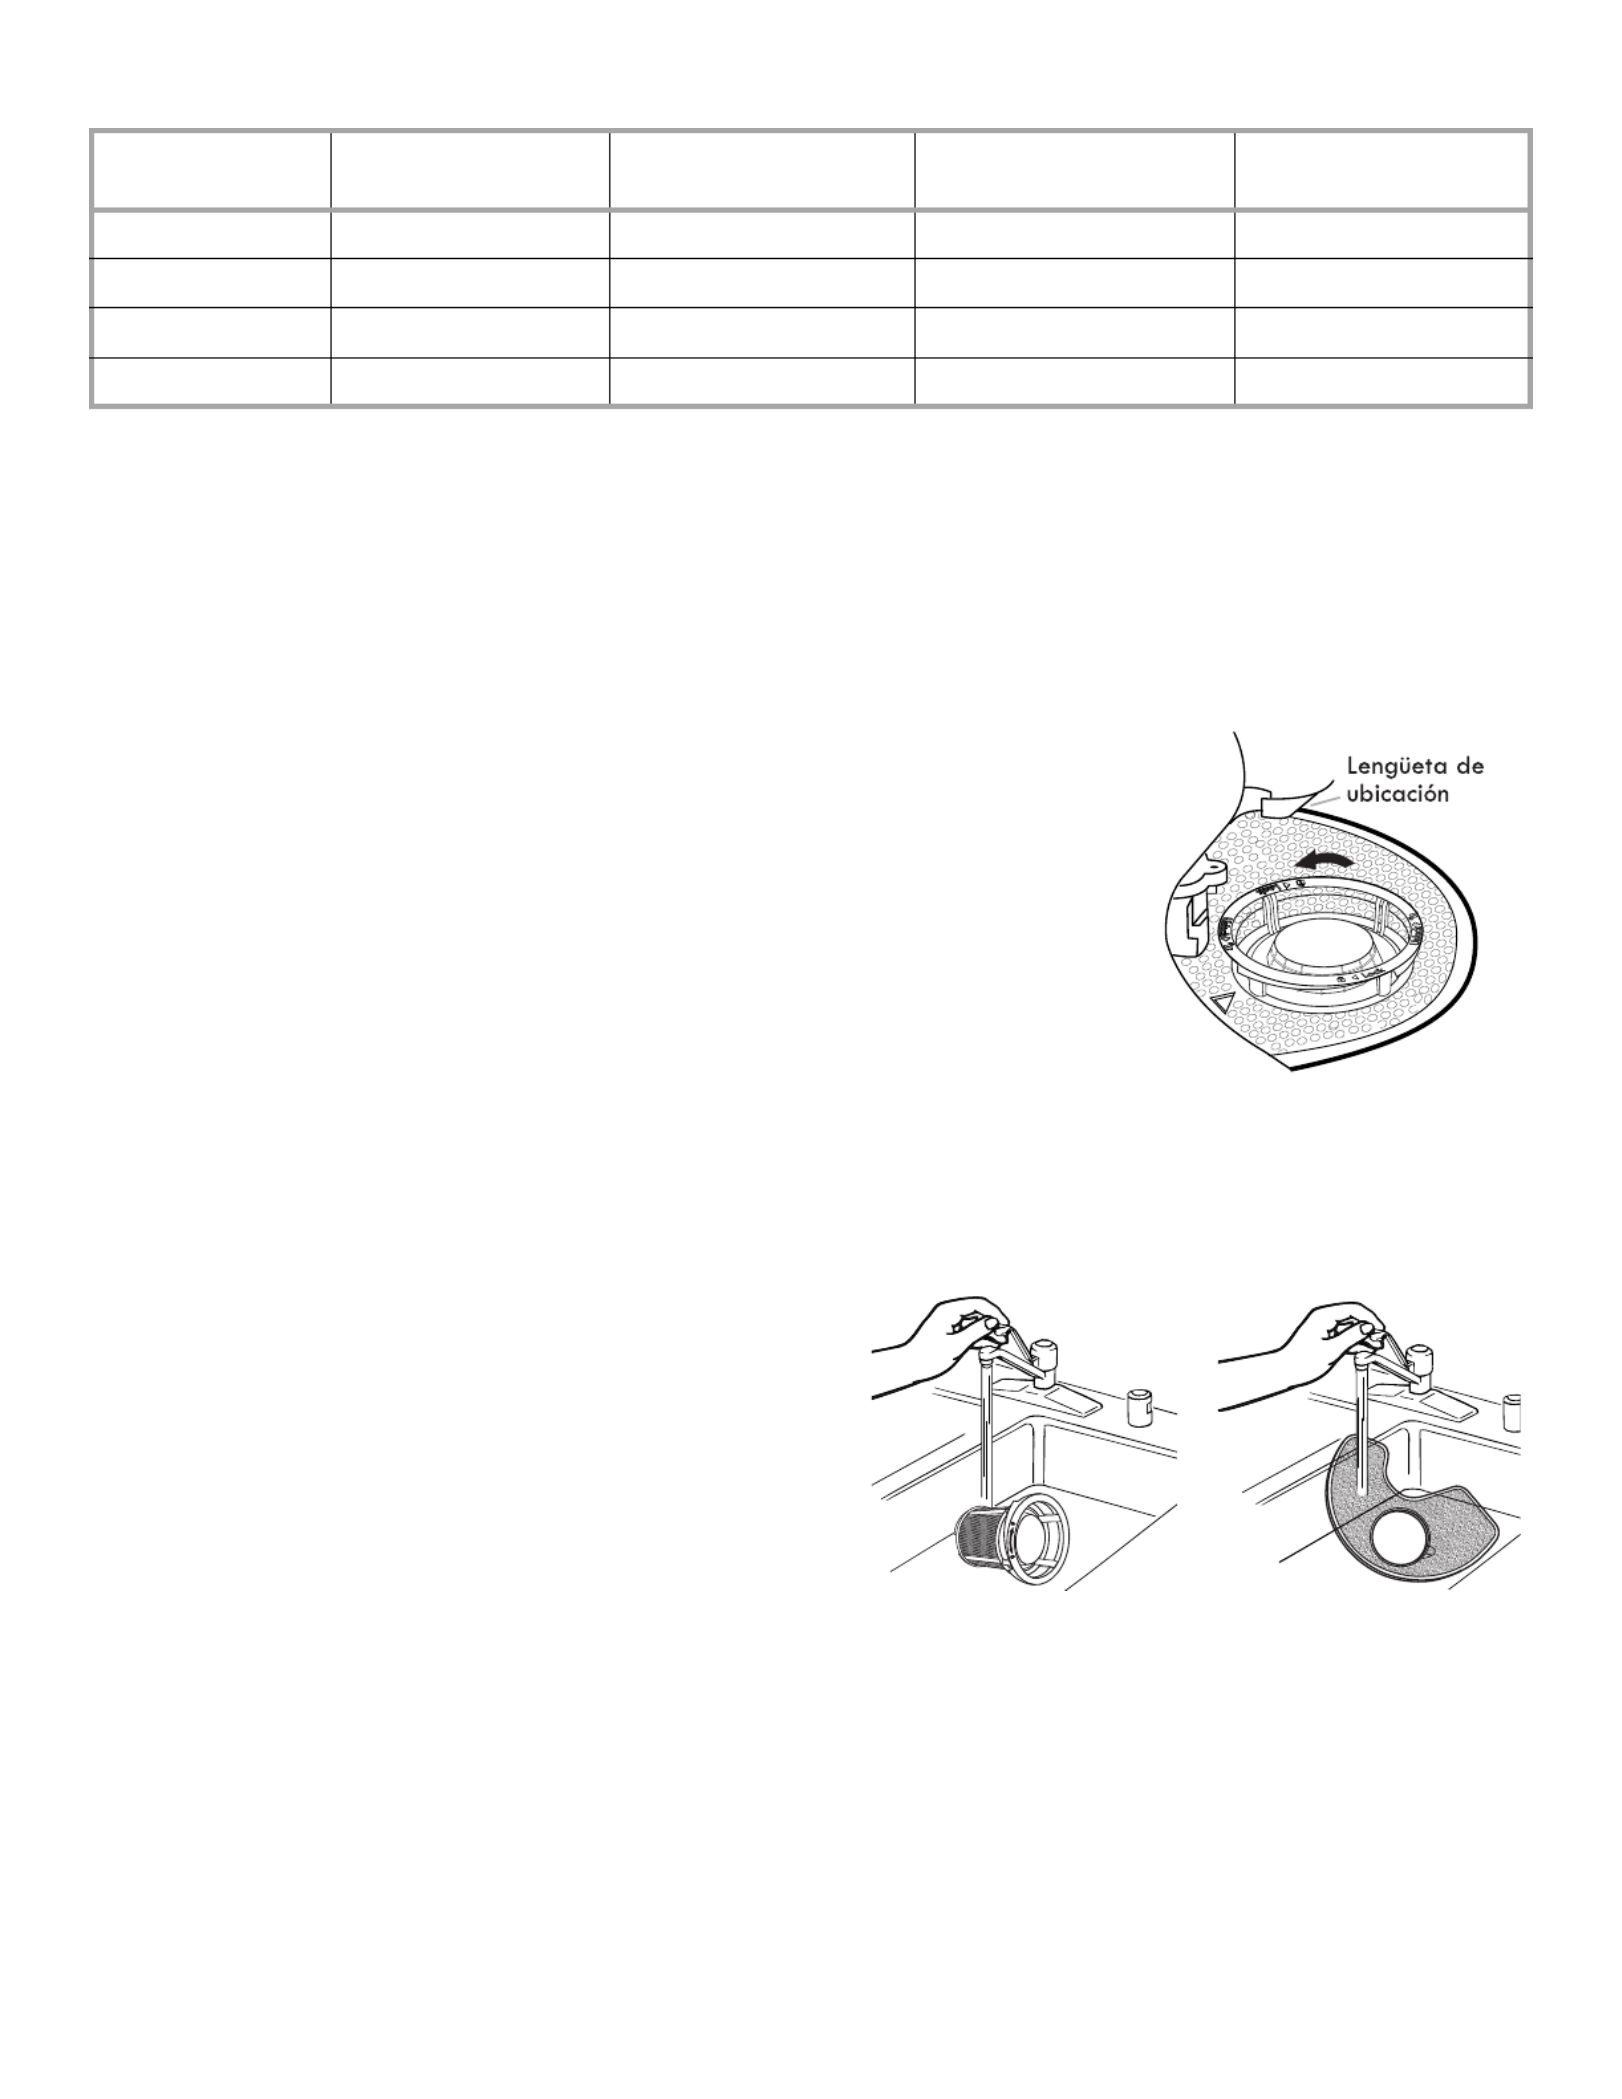
31
Intervalos recomendados para la limpieza del filtro.
*Recomendación del fabricante: Esta práctica eliminará el agua y la energía que usted usa para preparar la vajilla. También le
permitirá ahorrar tiempo y esfuerzo.
Agua muy dura
Si tiene agua muy dura (más de 15 granos), limpie el filtro al menos una vez por mes. La acumulación de residuos blancos en su
lavavajillas indica que el agua es dura. Puede traer sus muestras de agua a Sears para verificar el nivel de dureza. Vea la sección
“Solución de problemas” para consultar los consejos para quitar las manchas.
Instrucciones para quitar los filtros
Instrucciones de limpieza
IMPORTANT
IMPORTANT
IMPORTANT
IMPORTANTIMPORTANTE:
E:
E:
E: E: No use un cepillo de alambre, estropajo, etc., p31-ya que pueden dañar los filtros.
Cantidad de cargas
por semana
Si lava
antes de cargar
Si raspa la comida y
enjuaga antes de cargar
Si solamente raspa la
comida antes de cargar*
Si no raspa la comida ni
enjuaga antes de cargar
13-14 Una vez por año Dos veces por año Cada dos meses Una vez por semana
8-12 Una vez por año Cada cuatro meses Cada dos meses Cada dos semanas
4-7 Una vez por año Una vez por año Cada cuatro meses Una vez por mes
1-3 Una vez por año Una vez por año Dos veces por año Cada dos meses
1.
1.
1.
1.1. Gire el conjunto del filtro superior ¼ de vuelta hacia la izquierda, levante y sáquelo.
2.
2.
2.
2.2. Agarre el filtro inferior en la abertura circular, levante levemente y jale hacia adelante
para quitarlo.
3.
3.
3.
3.3. Limpie los filtros como se muestra debajo.
Para quitar el conjunto
del filtro superior
Enjuague el filtro debajo del agua corriente hasta haber quitado la
mayor parte de la suciedad. En caso de suciedad difícil de sacar o
de depósitos de calcio a causa del agua dura, es posible que deba
usar un cepillo suave.
P
U
S
H
D
O
W
N
&
T
U
R
N
L
O
C
K
U
N
L
O
C
K

34
CÓMO CARGAR
Cómo cargar para un mejor desempeño en el lavado y el secado
1.
1.
1.
1.1. Coloque en ángulo y mirando hacia abajo las
Coloque en ángulo y mirando hacia abajo las
Coloque en ángulo y mirando hacia abajo las
Coloque en ángulo y mirando hacia abajo las Coloque en ángulo y mirando hacia abajo las
superficies más sucias de la vajilla y deje espacio para
superficies más sucias de la vajilla y deje espacio para
superficies más sucias de la vajilla y deje espacio para
superficies más sucias de la vajilla y deje espacio para superficies más sucias de la vajilla y deje espacio para
que el agua fluya hacia arriba, a través de cada
que el agua fluya hacia arriba, a través de cada
que el agua fluya hacia arriba, a través de cada
que el agua fluya hacia arriba, a través de cadaque el agua fluya hacia arriba, a través de cada
canasta y entre la vajilla.
canasta y entre la vajilla.
canasta y entre la vajilla.
canasta y entre la vajilla.canasta y entre la vajilla.
Al separar la vajilla, se permite el flujo de agua.
2.
2.
2.
2.2. Para una mejor limpieza d
Para una mejor limpieza d
Para una mejor limpieza d
Para una mejor limpieza d Para una mejor limpieza de los cubier
e los cubier
e los cubier
e los cubiere los cubiertos, use las
tos, use las
tos, use las
tos, use las tos, use las
ranuras que están en las tapas, de modo que los
ranuras que están en las tapas, de modo que los
ranuras que están en las tapas, de modo que los
ranuras que están en las tapas, de modo que los ranuras que están en las tapas, de modo que los
artículos se mantengan separados.
artículos se mantengan separados.
artículos se mantengan separados.
artículos se mantengan separados.artículos se mantengan separados.
Separados
3.
3.
3.
3.3. Use la opción de T
Use la opción de T
Use la opción de T
Use la opción de T Use la opción de TurboZone
urboZone
urboZone
urboZoneurboZone ®
®
®
®® (en algunos modelos)
(en algunos modelos)
(en algunos modelos)
(en algunos modelos) (en algunos modelos)
colocando sus ar
colocando sus ar
colocando sus ar
colocando sus arcolocando sus artículos más su
tículos más su
tículos más su
tículos más sutículos más sucios mirando hacia la par
cios mirando hacia la par
cios mirando hacia la par
cios mirando hacia la parcios mirando hacia la parte
te
te
te te
posterior inferior
posterior inferior
posterior inferior
posterior inferiorposterior inferior.
.
.
..
Artículos sucios mirando hacia los surtidores de rociado TurboZone
®
4. C
4. C
4. C
4. C4. Coloque en ángulo las superficies cóncavas, como la
oloque en ángulo las superficies cóncavas, como la
oloque en ángulo las superficies cóncavas, como la
oloque en ángulo las superficies cóncavas, como la oloque en ángulo las superficies cóncavas, como la
parte inferior de las tazas de café, para permitir que el
parte inferior de las tazas de café, para permitir que el
parte inferior de las tazas de café, para permitir que el
parte inferior de las tazas de café, para permitir que el parte inferior de las tazas de café, para permitir que el
agua se drene y así mejorar el rendimiento del secado.
agua se drene y así mejorar el rendimiento del secado.
agua se drene y así mejorar el rendimiento del secado.
agua se drene y así mejorar el rendimiento del secado.agua se drene y así mejorar el rendimiento del secado.
Superficies en ángulo
5.
5.
5.
5.5. Antes de cada ciclo
Antes de cada ciclo
Antes de cada ciclo
Antes de cada ciclo Antes de cada ciclo, verifique que todos los brazos
, verifique que todos los brazos
, verifique que todos los brazos
, verifique que todos los brazos , verifique que todos los brazos
rociadores giren libremente.
rociadores giren libremente.
rociadores giren libremente.
rociadores giren libremente.rociadores giren libremente.
Los brazos rociadores giran libremente.
6.
6.
6.
6.6. Coloque las tazas y los vasos en las hileras entre
Coloque las tazas y los vasos en las hileras entre
Coloque las tazas y los vasos en las hileras entre
Coloque las tazas y los vasos en las hileras entre Coloque las tazas y los vasos en las hileras entre
las puntas.
las puntas.
las puntas.
las puntas.las puntas.

36
Cómo cargar la canasta inferior
Canasta superior removible
Canasta superior removible
Canasta superior removible
Canasta superior removibleCanasta superior removible
La canasta removible le permite lavar objetos más grandes como ollas grandes, charolas para asar y
moldes para galletas en la canasta del nivel inferior.
IMPOR
IMPOR
IMPOR
IMPORIMPORT
T
T
TTANTE:
ANTE:
ANTE:
ANTE:ANTE: Quite los platos antes de quitar la canasta superior de la lavavajillas.
Para quitar la canasta (tope de la lengüeta de empuje de la canasta):
1.
1.
1.
1.1. Deslice la canasta ¹⁄₃ a ¹⁄₂ de la distancia hacia afuera.
2.
2.
2.
2.2. Saque cada tope de plástico de la lengüeta de empuje de la canasta del extremo de cada riel,
empujando hacia adentro, hacia la canasta, sobre el área con protuberancia del tope de la
canasta. El tope de la canasta se abrirá y se podrá quitar con facilidad, jalándolo directamente
hacia afuera. Asegúrese de sostener el riel mientras saca los topes de la canasta.
3.
3.
3.
3.3. Deslice la canasta por completo hacia fuera del riel y sáquela de la lavavajillas.
Para volver a colocar la canasta:
Invierta los pasos 1 al 3 para volver a colocar la canasta dentro de la lavavajillas.
Recomendaciones para cargar
Recomendaciones para cargar
Recomendaciones para cargar
Recomendaciones para cargarRecomendaciones para cargar
La canasta inferior es más apropiada para platos, ollas, fuentes
y utensilios. (Vea los patrones de carga recomendados que
se muestran)
Coloque los artículos pequeños en la canasta inferior únicamente
si están seguros en su lugar.
Coloque los platos, tazones de sopa, etc., entre las puntas.
Coloque los tazones firmemente entre las hileras de puntas.
Asegúrese de que haya suficiente espacio entre los platos para
que el rociador pueda alcanzar todas las superficies.
Cargue los artículos con suciedad profunda mirando hacia
el rociador.
NO
NO
NO
NONOT
T
T
TTA:
A:
A:
A:A: Asegúrese de que el depósito de detergente no esté
bloqueado por artículos altos como charolas para
galletas y tablas para cortar colocadas en el lado izquierdo
del frente de la canasta. Vea la sección “Puesta en marcha/
Referencia rápida”.
Carga para 10 puestos
Puntas plegables (en algunos modelos)
Puntas plegables (en algunos modelos)
Puntas plegables (en algunos modelos)
Puntas plegables (en algunos modelos) Puntas plegables (en algunos modelos)
Se puede plegar una hilera de puntas en la parte posterior de la
canasta inferior para hacer lugar para la vajilla más grande.
Mantenga esta hilera de puntas en la posición de 60° cuando
use la opción TurboZone® (en algunos modelos).
IMPOR
IMPOR
IMPOR
IMPORIMPORT
T
T
TTANTE:
ANTE:
ANTE:
ANTE:ANTE: Cuando mueva la hilera de puntas hacia la
posición horizontal, pliegue solamente la hilera de puntas hacia
el frente de la lavavajillas.
Frente

37
Cómo cargar en
Cómo cargar en
Cómo cargar en
Cómo cargar en Cómo cargar en TurboZone® (en algunos modelo
(en algunos modelo
(en algunos modelo
(en algunos modelo (en algunos modelos)
s)
s)
s) s)
IMPOR
IMPOR
IMPOR
IMPORIMPORT
T
T
TTANTE:
ANTE:
ANTE:
ANTE:ANTE: Para un funcionamiento adecuado, solamente una hilera de artículos puede mirar hacia los surtidores
de rociado TurboZone®.
Se deberá seleccionar la opción de lavado TurboZone
® para utilizar esta característica de lavado.
Cargue las sartenes, cacerolas, etc., con las superficies sucias mirando hacia los surtidores de rociado TurboZone
®.
El área de lavado TurboZone® está ubicada en la parte posterior de la canasta de platos inferior.
A continuación se muestran las cargas recomendadas cuando se use la opción TurboZone
®.
Cómo cargar los ar
Cómo cargar los ar
Cómo cargar los ar
Cómo cargar los arCómo cargar los artículos altos
tículos altos
tículos altos
tículos altostículos altos
Se pueden lavar artículos más grandes, tales como ollas,
asadores y charolas para galletas en la canasta inferior,
sacando la canasta superior. Vea la sección “Cómo cargar
la canasta superior”.
IMPOR
IMPOR
IMPOR
IMPORIMPORT
T
T
TTANTE:
ANTE:
ANTE:
ANTE:ANTE: No bloquee el depósito del detergente.
Cómo cargar los cubiertos
Cómo cargar los cubiertos
Cómo cargar los cubiertos
Cómo cargar los cubiertosCómo cargar los cubiertos
Siga los patrones de carga sugeridos, según se muestra, para limpiar mejor los cubiertos.
Para un óptimo lavado, use las ranuras que están en las tapas para mantener los cubiertos separados.
NOT
NOT
NOT
NOTNOTA:
A:
A:
A:A: Si los cubiertos no caben en las ranuras designadas, levante las tapas y mezcle los tipos de cubiertos para mantenerlos
separados. Coloque los cuchillos hacia abajo, los tenedores hacia arriba y alterne las cucharas, como se ilustra, para obtener
mejores resultados en la limpieza. Cargue los cubiertos más largos en la parte posterior y los más cortos en la parte frontal de
la canastilla.
10 puestos con canastilla doble 12 puestos
Parte posterior
de la lavavajillas
Specyfikacje produktu
| Marka: | Kenmore |
| Kategoria: | Pomywaczka |
| Model: | 665.13003 |
Potrzebujesz pomocy?
Jeśli potrzebujesz pomocy z Kenmore 665.13003, zadaj pytanie poniżej, a inni użytkownicy Ci odpowiedzą
Instrukcje Pomywaczka Kenmore

12 Stycznia 2025
3 Stycznia 2025
3 Października 2024
3 Października 2024
3 Października 2024
3 Października 2024
3 Października 2024
3 Października 2024
3 Października 2024
3 Października 2024
Instrukcje Pomywaczka
- Pomywaczka Bauknecht
- Pomywaczka Ikea
- Pomywaczka Samsung
- Pomywaczka Bertazzoni
- Pomywaczka Electrolux
- Pomywaczka DeLonghi
- Pomywaczka AEG
- Pomywaczka Balay
- Pomywaczka Beko
- Pomywaczka Teka
- Pomywaczka LG
- Pomywaczka Küppersbusch
- Pomywaczka Smeg
- Pomywaczka Gram
- Pomywaczka Amica
- Pomywaczka Gorenje
- Pomywaczka Etna
- Pomywaczka Sharp
- Pomywaczka Cookology
- Pomywaczka Russell Hobbs
- Pomywaczka SilverCrest
- Pomywaczka Simpson
- Pomywaczka Dometic
- Pomywaczka Bosch
- Pomywaczka Candy
- Pomywaczka Whirlpool
- Pomywaczka Miele
- Pomywaczka Midea
- Pomywaczka Lamona
- Pomywaczka Hisense
- Pomywaczka Infiniton
- Pomywaczka Medion
- Pomywaczka Baumatic
- Pomywaczka Black & Decker
- Pomywaczka OK
- Pomywaczka Hoover
- Pomywaczka Tesla
- Pomywaczka Westinghouse
- Pomywaczka Romo
- Pomywaczka Maytag
- Pomywaczka GE
- Pomywaczka Blaupunkt
- Pomywaczka Brandt
- Pomywaczka Vivax
- Pomywaczka Salora
- Pomywaczka Siemens
- Pomywaczka Danby
- Pomywaczka Grundig
- Pomywaczka Haier
- Pomywaczka KKT Kolbe
- Pomywaczka Cylinda
- Pomywaczka Jocel
- Pomywaczka Hyundai
- Pomywaczka Silverline
- Pomywaczka Blomberg
- Pomywaczka Husqvarna
- Pomywaczka Concept
- Pomywaczka Fisher & Paykel
- Pomywaczka ECG
- Pomywaczka Indesit
- Pomywaczka Ilve
- Pomywaczka Viking
- Pomywaczka Nodor
- Pomywaczka CATA
- Pomywaczka Hotpoint
- Pomywaczka Kenwood
- Pomywaczka V-Zug
- Pomywaczka Ariston Thermo
- Pomywaczka Zelmer
- Pomywaczka PKM
- Pomywaczka Thor
- Pomywaczka Amana
- Pomywaczka Dacor
- Pomywaczka Hotpoint Ariston
- Pomywaczka Bomann
- Pomywaczka Moulinex
- Pomywaczka Emerio
- Pomywaczka InAlto
- Pomywaczka Meireles
- Pomywaczka Melissa
- Pomywaczka Schneider
- Pomywaczka Stirling
- Pomywaczka MPM
- Pomywaczka CDA
- Pomywaczka Philco
- Pomywaczka Neff
- Pomywaczka Qilive
- Pomywaczka Corbero
- Pomywaczka Zanussi
- Pomywaczka Fagor
- Pomywaczka Koenic
- Pomywaczka Everdure
- Pomywaczka Thomson
- Pomywaczka Ardo
- Pomywaczka Klarstein
- Pomywaczka Wolkenstein
- Pomywaczka Cecotec
- Pomywaczka Artusi
- Pomywaczka KitchenAid
- Pomywaczka Icecool
- Pomywaczka Eta
- Pomywaczka Imperial
- Pomywaczka Sôlt
- Pomywaczka Nevir
- Pomywaczka Exquisit
- Pomywaczka Bartscher
- Pomywaczka Hestan
- Pomywaczka Privileg
- Pomywaczka Arçelik
- Pomywaczka Hanseatic
- Pomywaczka Continental Edison
- Pomywaczka Atag
- Pomywaczka Rosieres
- Pomywaczka Franke
- Pomywaczka Sanyo
- Pomywaczka Novy
- Pomywaczka Telefunken
- Pomywaczka Rommer
- Pomywaczka Inventum
- Pomywaczka SVAN
- Pomywaczka IFB
- Pomywaczka Euro Appliances
- Pomywaczka Caple
- Pomywaczka AEG-Electrolux
- Pomywaczka Omega
- Pomywaczka Comfee
- Pomywaczka Classique
- Pomywaczka Wisberg
- Pomywaczka Bush
- Pomywaczka New Pol
- Pomywaczka Kaiser
- Pomywaczka VOX
- Pomywaczka Insignia
- Pomywaczka Hiberg
- Pomywaczka AYA
- Pomywaczka Pelgrim
- Pomywaczka Frilec
- Pomywaczka Benavent
- Pomywaczka Element
- Pomywaczka Orima
- Pomywaczka Rex
- Pomywaczka Aspes
- Pomywaczka Zerowatt
- Pomywaczka Respekta
- Pomywaczka Technika
- Pomywaczka Vedette
- Pomywaczka Seiki
- Pomywaczka JennAir
- Pomywaczka Frigidaire
- Pomywaczka Matrix
- Pomywaczka RCA
- Pomywaczka Summit
- Pomywaczka Whynter
- Pomywaczka Foster
- Pomywaczka Electra
- Pomywaczka Fulgor Milano
- Pomywaczka Kelvinator
- Pomywaczka Gaggenau
- Pomywaczka Hobart
- Pomywaczka Nabo
- Pomywaczka Avanti
- Pomywaczka Asko
- Pomywaczka Zenith
- Pomywaczka Flavel
- Pomywaczka Altus
- Pomywaczka Esatto
- Pomywaczka Signature
- Pomywaczka Daewoo
- Pomywaczka Porter & Charles
- Pomywaczka Kunft
- Pomywaczka Robinhood
- Pomywaczka Becken
- Pomywaczka Scandomestic
- Pomywaczka Ignis
- Pomywaczka Guzzanti
- Pomywaczka Mach
- Pomywaczka Emilia
- Pomywaczka Belling
- Pomywaczka De Dietrich
- Pomywaczka Eurom
- Pomywaczka Crosley
- Pomywaczka Constructa
- Pomywaczka Proline
- Pomywaczka Winterhalter
- Pomywaczka Euromaid
- Pomywaczka BLANCO
- Pomywaczka Scancool
- Pomywaczka Thermador
- Pomywaczka Swan
- Pomywaczka Zanker
- Pomywaczka Kluge
- Pomywaczka Ariston
- Pomywaczka Techwood
- Pomywaczka Nordland
- Pomywaczka Saba
- Pomywaczka Progress
- Pomywaczka Zanussi-electrolux
- Pomywaczka Tomado
- Pomywaczka Bellini
- Pomywaczka Vestel
- Pomywaczka John Lewis
- Pomywaczka Prima
- Pomywaczka Junker
- Pomywaczka Mabe
- Pomywaczka Monogram
- Pomywaczka Iberna
- Pomywaczka Logik
- Pomywaczka Valberg
- Pomywaczka Scholtes
- Pomywaczka Profilo
- Pomywaczka Castor
- Pomywaczka Bella
- Pomywaczka Hoover-Helkama
- Pomywaczka Juno
- Pomywaczka Defy
- Pomywaczka Schulthess
- Pomywaczka White Knight
- Pomywaczka Sunny
- Pomywaczka Luxor
- Pomywaczka Nordmende
- Pomywaczka Rangemaster
- Pomywaczka Friac
- Pomywaczka Boretti
- Pomywaczka Hansa
- Pomywaczka Rhima
- Pomywaczka Kubo
- Pomywaczka Elba
- Pomywaczka WLA
- Pomywaczka Ansonic
- Pomywaczka Champion
- Pomywaczka Everglades
- Pomywaczka Jenn-Air
- Pomywaczka Limit
- Pomywaczka Freggia
- Pomywaczka Listo
- Pomywaczka Edesa
- Pomywaczka Milectric
- Pomywaczka Leonard
- Pomywaczka New World
- Pomywaczka WhiteLine
- Pomywaczka Sammic
- Pomywaczka Bompani
- Pomywaczka M-System
- Pomywaczka Primo
- Pomywaczka Atlantic
- Pomywaczka Godrej
- Pomywaczka Juno-electrolux
- Pomywaczka Essentiel B
- Pomywaczka Team
- Pomywaczka Schock
- Pomywaczka Stoves
- Pomywaczka Edy
- Pomywaczka Edgestar
- Pomywaczka CaterChef
- Pomywaczka Parmco
- Pomywaczka Eurotech
- Pomywaczka Equator
- Pomywaczka Jolly
- Pomywaczka Vestfrost
- Pomywaczka EKU
- Pomywaczka Elis And Elsa
- Pomywaczka Upo
- Pomywaczka Elettrobar
- Pomywaczka Trieste
- Pomywaczka Sauter
- Pomywaczka Café
- Pomywaczka Lynx
- Pomywaczka Teco
- Pomywaczka Bluesky
- Pomywaczka Otsein
- Pomywaczka Tisira
- Pomywaczka Marynen
- Pomywaczka Therma
- Pomywaczka La Germania
- Pomywaczka Holland Electro
- Pomywaczka Oranier
- Pomywaczka CombiSteel
- Pomywaczka Black Decker
- Pomywaczka Eudora
- Pomywaczka Hoonved
- Pomywaczka Jackson
- Pomywaczka Kucht
- Pomywaczka Kogan
- Pomywaczka Merax
- Pomywaczka Noble
- Pomywaczka General Electric
- Pomywaczka SPT
- Pomywaczka Elin
- Pomywaczka High One
- Pomywaczka Meiko
- Pomywaczka Curtiss
- Pomywaczka Winia
- Pomywaczka Elektron
- Pomywaczka Fisher Paykel
- Pomywaczka WEG
- Pomywaczka Casselin
- Pomywaczka Bar Maid
- Pomywaczka Cosmo
- Pomywaczka CMA Dishmachines
- Pomywaczka FAURE
- Pomywaczka Novamatic
- Pomywaczka Miele Professional
- Pomywaczka Home Electronics
- Pomywaczka Newpol
- Pomywaczka Royal Catering
- Pomywaczka Eurolux
- Pomywaczka Arthur Martin-Electrolux
- Pomywaczka Elektra Bregenz
- Pomywaczka Tuscany
- Pomywaczka Pando
- Pomywaczka Imarflex
- Pomywaczka Koldfront
- Pomywaczka Master Kitchen
- Pomywaczka Helkama
- Pomywaczka Pitsos
- Pomywaczka Cove
Najnowsze instrukcje dla Pomywaczka

9 Kwietnia 2025
9 Kwietnia 2025

9 Kwietnia 2025

8 Kwietnia 2025

8 Kwietnia 2025
8 Kwietnia 2025

8 Kwietnia 2025
8 Kwietnia 2025
7 Kwietnia 2025

7 Kwietnia 2025