Instrukcja obsługi Jensen JDASHCP
Przeczytaj poniżej 📖 instrukcję obsługi w języku polskim dla Jensen JDASHCP (1 stron) w kategorii monitor. Ta instrukcja była pomocna dla 10 osób i została oceniona przez 2 użytkowników na średnio 4.5 gwiazdek
Strona 1/1
QUICK START GUIDE
This Quick Start Guide gives you the basics to
start using your JDASHCP. Please visit
https://www.jensenmobile.com. to download a complete
owner’s manual or call customer service at 1-888-921-4088
(Monday-Friday, 9AM-5PM EST).
JDASHCP
Before You Start
• Avoid installing the unit where it would be subject to high temperatures from direct sunlight, dust,
dirt or excessive vibration.
Dash Mount 7" Touchscreen Monitor with Wireless Apple
® and Android™
Installation
Wiring Diagram - Inputs/Outputs
Control Locations
Main Menu
FM Transmitter
FCC Compliance
USB Operation
This device complies with Part 15 of the FCC Rules. Operation is subject to the following two conditions:
(1) this device may not cause harmful interference, and
(2) this device must accept any interference received, including interference that may cause undesired operation.
Warning: Changes or modifications to this unit not expressly approved by the party responsible for compliance
could void the user’s authority to operate the equipment.
Note: This equipment has been tested and found to comply with the limits for a Class B digital device, pursuant to
Part 15 of the FCC Rules. These limits are designed to provide reasonable protection against harmful interference
in a residential installation. This equipment generates, uses and can radiate radio frequency energy and, if not
installed and used in accordance with the instructions, may cause harmful interference to radio communications.
However, there is no guarantee that interference will not occur in a particular installation. If this equipment does
cause harmful interference to radio or television reception, which can be determined by turning the equipment off
and on, the user is encouraged to try to correct the interference by one or more of the following measures:
• Reorient or relocate the receiving antenna.
• Increase the separation between the equipment and receiver.
• Connect the equipment into an outlet on a circuit different from that to which the receiver is connected.
• Consult the dealer or an experienced radio/TV technician for help.
www.jensenmobile.com
©2024 Namsung America Inc. All rights reserved.
NSC0624-V03
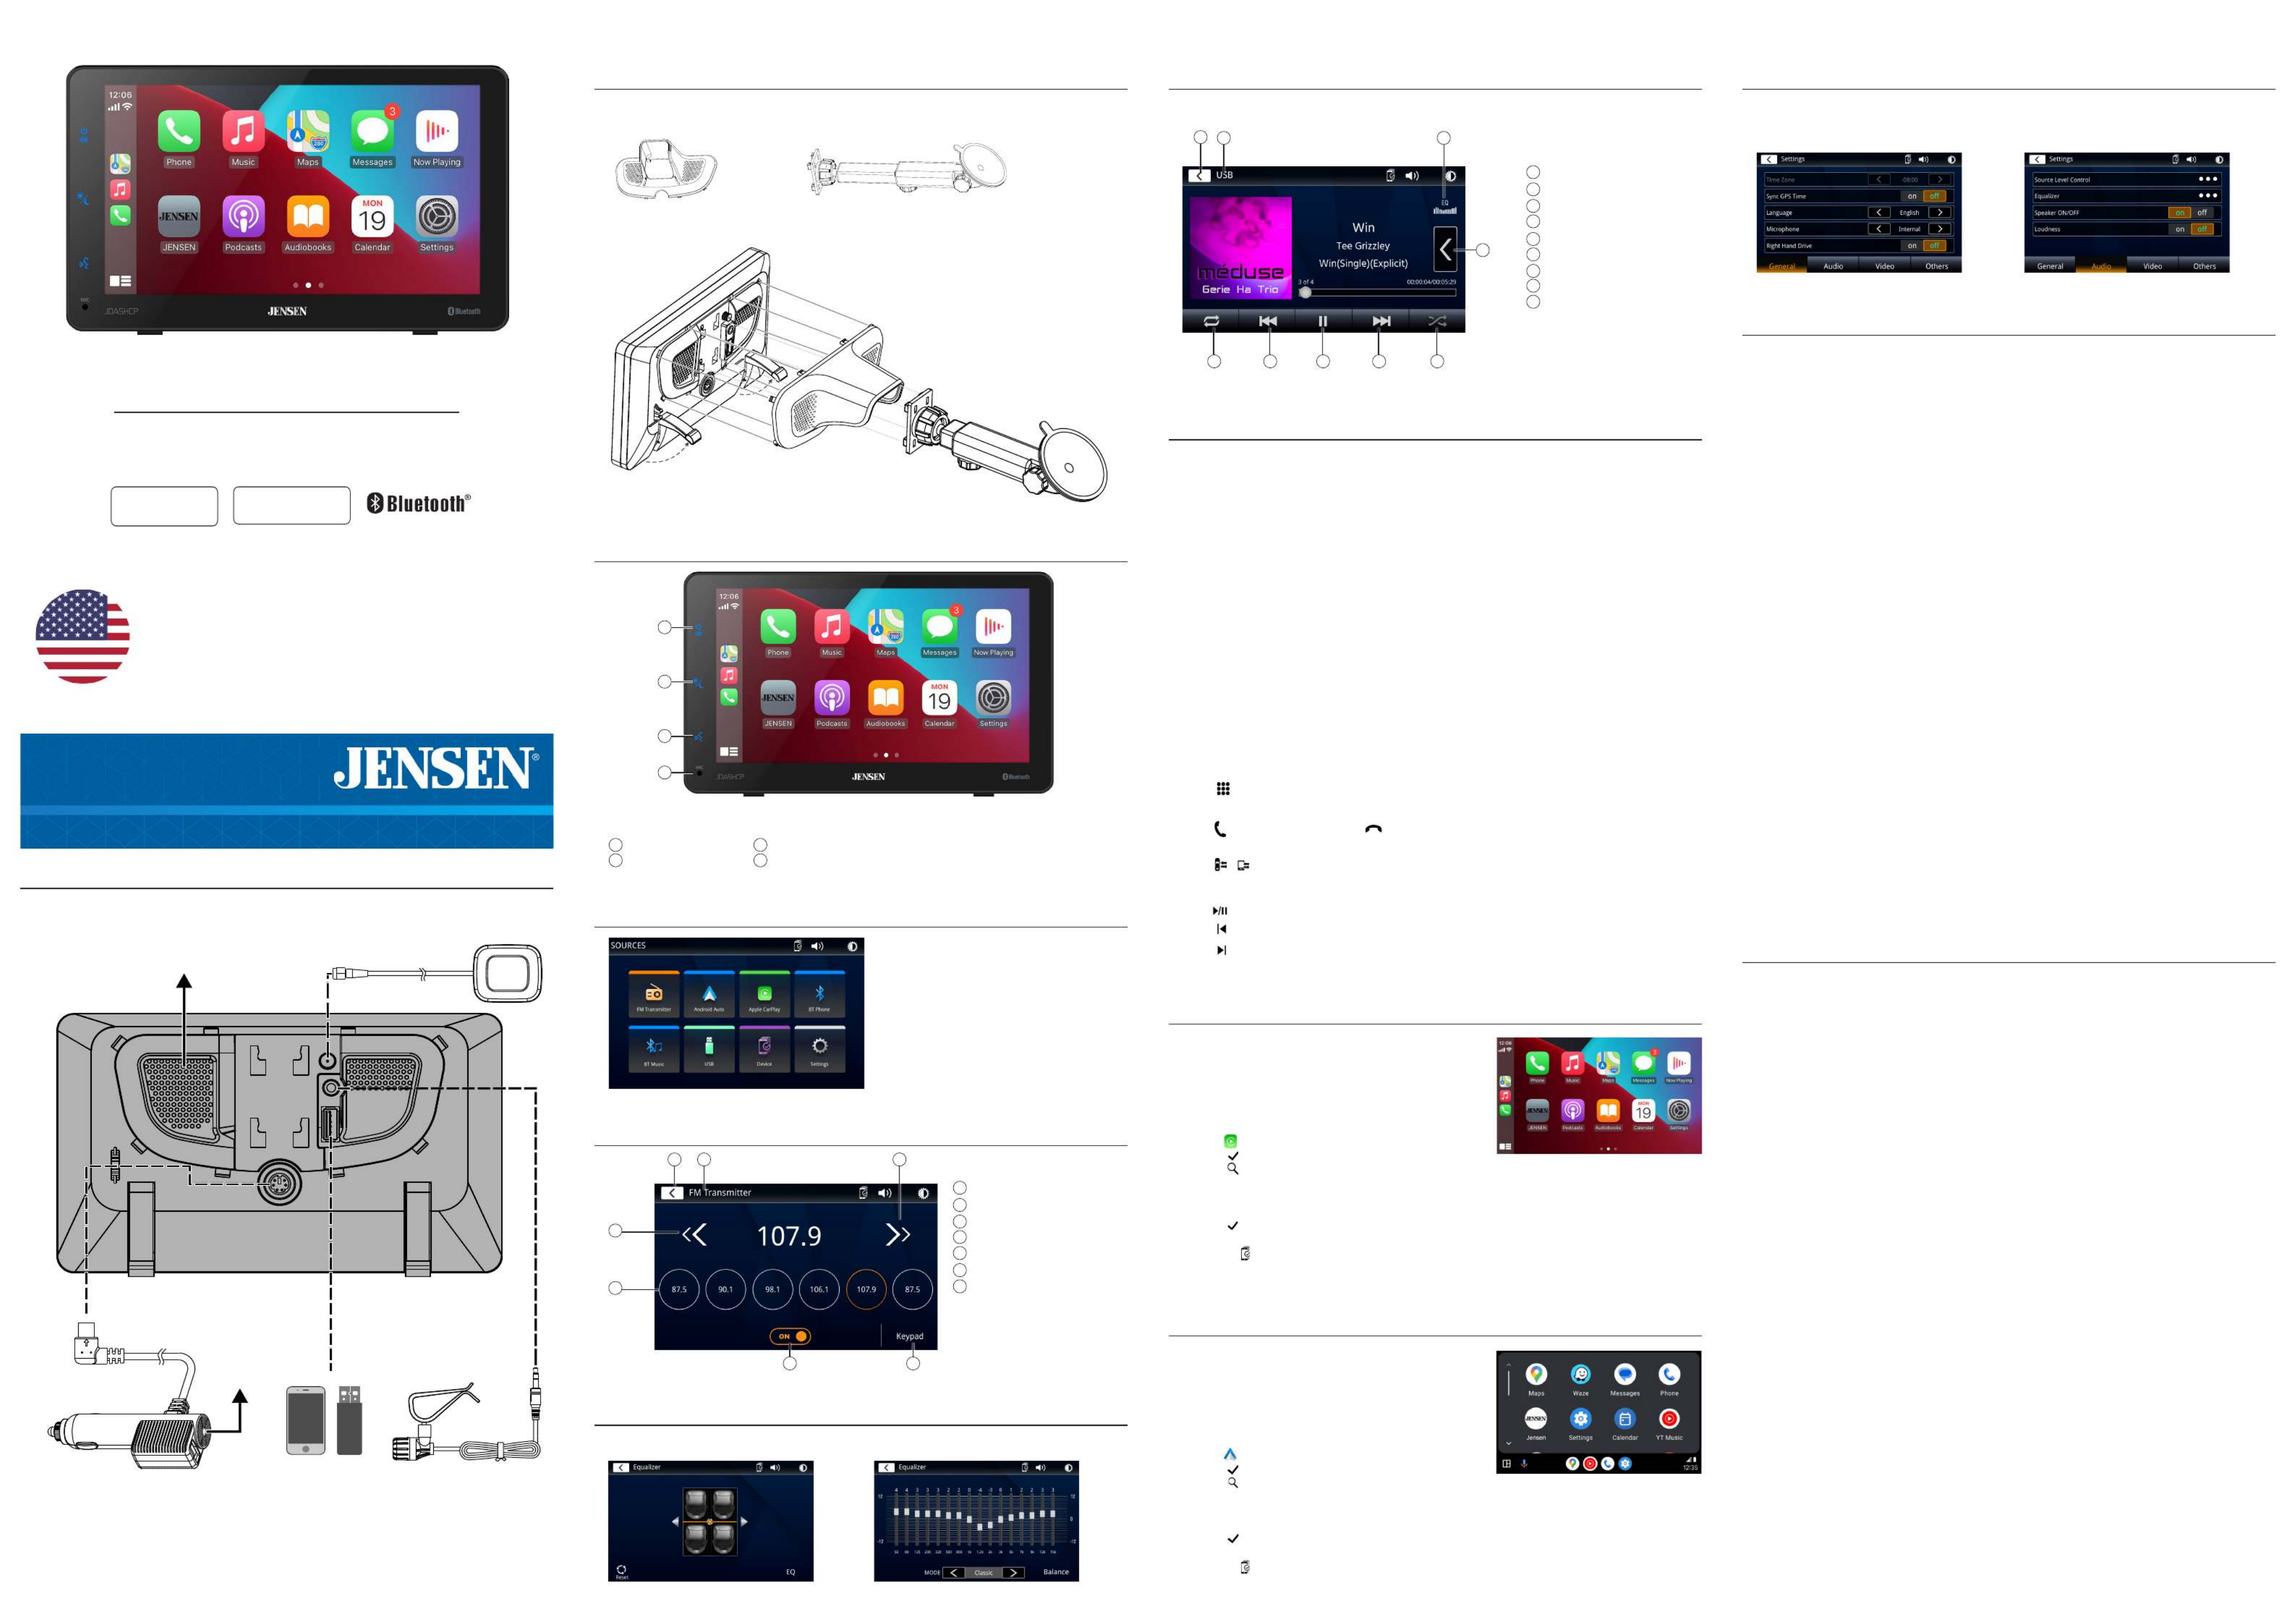
From the main menu, touch the USB icon on the main screen.
General Operation
From the Main Menu screen, select Setup to access the Settings menu and select from categories
represented by the icons on the bottom of the screen: General, Audio, Display, Others. Select the
category, and adjust any of the available options using the touch screen.
Bluetooth Operation
Before using Bluetooth
Before you can use a Bluetooth device to make hands-free calls or stream audio. it must be authenti-
cated. This is also referred to as "pairing" a device.
[Note]
To connect wireless Apple and Android device after installing the On-Dash product in your vehicle,
you must disable the Bluetooth connection between your phone and the existing vehicle's head unit.
Additionally, the phone you want to connect to wireless Apple and Android device must not be con-
nected to any other devices via Bluetooth.
Pairing a New Device
The unit broadcasts the pairing signal constantly when no devices are currently connected. Complete
the pairing sequence from your Bluetooth device. Refer to the owner's manual for your device for more
details. The device name is "JDASHCP". The unit can be in any mode of operation when pairing is
performed. On certain phones, pairing may need to be done more than once.
Connect
The head unit will automatically connect to the last connected device when the connect feature is set to
Auto connect On. If the connect feature is set to Auto Connect Off, the head unit will not automatically
connect to any device.
Bluetooth Phone
From the main menu. touch the on the screen. Bluetooth icon will appear anytime a Bluetooth
Bluetooth device is connected.
Dialing a Number
Press to display keypad and dial a number.
Making and Ending a Call
Press to connect a call, and press to end a call.
Transferring Audio
Press - to transfer audio between the head unit and mobile phone.
Streaming Audio
Press to play or pause the music.
Press to skip to the previous track.
Press to advance to the next track.
Designed and Engineered in USA
The radio display features the following functions and displays:
Audio Operation
Press the "Settings" icon on the main menu screen to adjust the Balance and Equalizer controls
(16-Band Tone Control and 8 Presets EQ Settings).
GPS ANTENNA
Note: Use to improve map accuracy.
1
2
3
4
Voice activation button
Internal microphone
Power/mute
Dimmer
1
2
3
4
SILICON COVER
(
Cover on the back
)
WINDSHIELD / DASHBOARD MOUNT
Wired & Wireless Apple Operation
Wired connection
1. Connect an Apple compatible device to this unit via USB.
2. Press the Apple icon.
The Apple home screen appears.
Wireless connection
Before using Apple wirelessly, turn on the Bluetooth/Wifi function on
the Phone.
1. Press icon on the main menu;
2. Press " ” to confirm to use wireless
Apple
;
3. Press " ”icon to search phone device. The available devices appear on the list;
4.
Find the desired device on the screen and
press
"Pair"
;
5. A pass key will be displayed on the screen
;
6. The same key appears on the phone, press "Pair" and then press "Allow" for the popups
;
7. Press " ” on the screen to confirm to connect
;
8. Press "Use CarPlay" on the phone. The unit configures the connection then starts the application.
Tip: Press " ” icon. Displays Apple device list. This icon appears Only When Apple is connected and two
or more devices can be used as Apple Source.
Wired & Wireless Android Operation
Wired connection
1. Connect an Android compatible device to this unit via USB.
2. Press the Android icon.
The Android home screen appears.
Wireless connection
Before using Android wirelessly, turn on the Bluetooth/Wifi function on
the Android device.
1. Press icon on the main menu;
2. Press " ” to confirm to use wireless Android;
3.
Press " ”icon to search phone device. The available devices appear on the list;
4.
Find the desired device on the screen and
press
"Pair";
5. A pass key will be displayed on the screen;
6. The same key appears on the Android device, press "Pair" and then press "Allow" for the popups
;
7. Press " ” on the screen to confirm to connect
;
The unit configures the connection then starts the application.
Tip: Press " ” icon. Displays Android device list. This icon appears Only When Android is connected and
two or more devices can be used as Android Source.
Speaker
12V Power Adapter
USB port for charging only (2.1A)
3.5mm output to connect audio to
your car stereo
USB Playback
Wired Apple and Android
Connection
Send audio to your
existing car stereo
through the 3.5mm
AUX output.
External Microphone
Use to improve voice quality.
Compatible With
Apple® Phones
Compatible With
Android™ Phones
In main menu, press the desired icon to enter the
corresponding mode: FM Transmitter/Android/
Apple /USB/Device/Settings. /BT Phone/BT Music
1
76
2 3
5
4
Main Menu
Current Mode Indicator
Seek Tune Up
Seek Tune Down
Preset Stations
FM Transmitter On/Off
Keypad
1
2
3
4
5
6
7
Main Menu
Current Mode Indicator
EQ
List
Random
Track Up
Play/Pause
Track Down
Repeat
1
2
3
4
5
6
7
8
9
1 2 3
89 7 6 5
4
Limited Two Year* Warranty
This warranty gives you specific legal rights. You may also have other rights which vary from state to
state.
Jensen warrants this product to the original purchaser to be free from defects in material and
workmanship for a period of two years from the date of the original purchase.
Jensen agrees, at our option, during the warranty period, to repair any defect in material or
workmanship or to furnish an equal new, renewed, or comparable product (whichever is deemed
necessary) in exchange without charges, subject to verification of the defect or malfunction and
proof of the date of purchase. Subsequent replacement products are warranted for the balance of
the original warranty period.
What is covered? This warranty covers all defects in the material and workmanship in this product.
The following are not covered: software, installation/removal costs, damage resulting from accident,
misuse, abuse, neglect, product modification, improper installation, incorrect line voltage, unauthorized repair, or
failure to follow instructions supplied with the product, or damage occurring during
return shipment of the product. Specific license conditions and copyright notices for the software
can be found via www.jensenmobile.com.
Warranty Coverage
* Limited 2-year warranty. (Proof of purchase required)
Extend your warranty from 2 year to 3 years when you register online at www.jensenmobile.com.
What to do?
1. Before you call for service, check the troubleshooting guide in your owner's manual. A slight
adjustment of any custom controls may save you a service call.
2. If you require service during the warranty period, you must carefully pack the product (preferably
in the original package) and ship it by prepaid transportation with a copy of the original receipt from
the retailer to an authorized service center.
3. Please describe your problem in writing and include your name, a return UPS shipping address
(P.O. Box not acceptable), and a daytime phone number with your shipment.
4. For more information and for the location of the nearest authorized service center please contact
us by one of the following methods:
• Call us toll-free at (888) 921-4088
(Monday-Friday, 9:00 am, to 5:00 pm, EST)
• E-mail us at cs@jensenmobile.com
Exclusion of Certain Damages: This warranty is exclusive and in lieu of any and all other warranties,
expressed or implied, including without limitation the implied warranties of merchantability and
fitness for a particular purpose and any obligation, liability, right, claim or remedy in contract or tort,
whether or not arising from the company's negligence, actual or imputed. No person or representative is
authorized to assume for the company any other liability in connection with the sale of this
product. In no event shall the company be liable for indirect, incidental, or consequential damages.
Specyfikacje produktu
| Marka: | Jensen |
| Kategoria: | monitor |
| Model: | JDASHCP |
Potrzebujesz pomocy?
Jeśli potrzebujesz pomocy z Jensen JDASHCP, zadaj pytanie poniżej, a inni użytkownicy Ci odpowiedzą
Instrukcje monitor Jensen

7 Października 2024
Instrukcje monitor
- monitor Sony
- monitor Yamaha
- monitor Samsung
- monitor PeakTech
- monitor UPERFECT
- monitor LG
- monitor Xiaomi
- monitor Joy-It
- monitor Sharp
- monitor Huawei
- monitor TCL
- monitor Pioneer
- monitor Lenovo
- monitor Philips
- monitor Plantronics
- monitor SilverCrest
- monitor Gigabyte
- monitor Acer
- monitor Bosch
- monitor Epson
- monitor JBL
- monitor Hikvision
- monitor Fujitsu
- monitor HyperX
- monitor LC-Power
- monitor Hisense
- monitor Panasonic
- monitor Promethean
- monitor Canon
- monitor Crestron
- monitor Viewsonic
- monitor Behringer
- monitor Asus
- monitor AG Neovo
- monitor Allen & Heath
- monitor IK Multimedia
- monitor Medion
- monitor Boss
- monitor Marquant
- monitor MSI
- monitor Toshiba
- monitor Tesla
- monitor Westinghouse
- monitor Yealink
- monitor Ring
- monitor Garmin
- monitor Blaupunkt
- monitor Salora
- monitor Iiyama
- monitor Citizen
- monitor APC
- monitor Haier
- monitor HP
- monitor Hyundai
- monitor Honeywell
- monitor Chauvet
- monitor Tripp Lite
- monitor Shure
- monitor Cisco
- monitor Xerox
- monitor Smart
- monitor Cooler Master
- monitor Alpine
- monitor Godox
- monitor Dynaudio
- monitor Deltaco
- monitor JVC
- monitor V7
- monitor Dell
- monitor IFM
- monitor Corsair
- monitor Alesis
- monitor Vimar
- monitor Dahua Technology
- monitor Schneider
- monitor Eurolite
- monitor Ricoh
- monitor SMART Technologies
- monitor NZXT
- monitor Emos
- monitor Renkforce
- monitor Marshall
- monitor Viessmann
- monitor Omron
- monitor Thomson
- monitor Velleman
- monitor Neumann
- monitor DataVideo
- monitor Danfoss
- monitor Pyle
- monitor Apple
- monitor Newline
- monitor Waeco
- monitor AOC
- monitor Peerless-AV
- monitor Speco Technologies
- monitor Samson
- monitor PreSonus
- monitor ARRI
- monitor Kindermann
- monitor Olympus
- monitor Mitsubishi
- monitor Fluid
- monitor Razer
- monitor ART
- monitor Continental Edison
- monitor RCF
- monitor NEC
- monitor Brandson
- monitor Prestigio
- monitor OSEE
- monitor Sanyo
- monitor Elvid
- monitor Optoma
- monitor Focal
- monitor Asrock
- monitor Monkey Banana
- monitor Abus
- monitor AMCV
- monitor Jay-Tech
- monitor Mackie
- monitor Palmer
- monitor Barco
- monitor Insignia
- monitor AVer
- monitor Akuvox
- monitor 3M
- monitor Element
- monitor Denver
- monitor Marshall Electronics
- monitor Orion
- monitor Hitachi
- monitor Postium
- monitor Kali Audio
- monitor IStarUSA
- monitor Seiki
- monitor Ernitec
- monitor Wohler
- monitor SmallHD
- monitor AJA
- monitor KRK
- monitor BenQ
- monitor Atlona
- monitor Thermaltake
- monitor Simrad
- monitor Hanwha
- monitor Odys
- monitor Elo
- monitor Ikan
- monitor BOOX
- monitor JUNG
- monitor Burg Wächter
- monitor Eizo
- monitor Monacor
- monitor Aputure
- monitor Daewoo
- monitor Tannoy
- monitor GVision
- monitor Positivo
- monitor Adj
- monitor Freedom Scientific
- monitor SPL
- monitor Qian
- monitor I3-Technologies
- monitor Stairville
- monitor Vitek
- monitor Planar
- monitor Mobile Pixels
- monitor REVO
- monitor Atomos
- monitor Newstar
- monitor SWIT
- monitor Kramer
- monitor RGBlink
- monitor AMX
- monitor Midas
- monitor Alienware
- monitor Archos
- monitor Acti
- monitor Emachines
- monitor Caliber
- monitor Maxdata
- monitor Sunstech
- monitor GlobalTronics
- monitor Sunny
- monitor BlueBuilt
- monitor Da-Lite
- monitor ProXtend
- monitor Kubo
- monitor GeoVision
- monitor LaCie
- monitor InFocus
- monitor Festo
- monitor Konig
- monitor Swissonic
- monitor IHealth
- monitor Peaq
- monitor QSC
- monitor Hannspree
- monitor ESI
- monitor Avocor
- monitor Vivitek
- monitor Genelec
- monitor Interlogix
- monitor Vorago
- monitor EverFocus
- monitor POSline
- monitor Peerless
- monitor M-Audio
- monitor Mad Catz
- monitor Krom
- monitor Monoprice
- monitor Eve Audio
- monitor Yorkville
- monitor HoverCam
- monitor Voxicon
- monitor Sonifex
- monitor TV One
- monitor Fostex
- monitor Prowise
- monitor Terra
- monitor Neets
- monitor Soundstream
- monitor Xoro
- monitor HKC
- monitor CTOUCH
- monitor Ozone
- monitor Ibm
- monitor Maxell
- monitor Packard Bell
- monitor Provision ISR
- monitor Mybeo
- monitor CSL
- monitor Bearware
- monitor Drawmer
- monitor Blue Sky
- monitor Zalman
- monitor Iadea
- monitor Advantech
- monitor Hercules
- monitor Avantone Pro
- monitor Ganz
- monitor TVLogic
- monitor Gamber-Johnson
- monitor Extron
- monitor Neat
- monitor Legamaster
- monitor Belinea
- monitor Adam
- monitor Triton
- monitor ITek
- monitor Kogan
- monitor Posiflex
- monitor Antelope Audio
- monitor MicroTouch
- monitor X-Rite
- monitor EKO
- monitor ONYX
- monitor IBoardTouch
- monitor Mirai
- monitor Elite Screens
- monitor Hollyland
- monitor Mitsai
- monitor Christie
- monitor Skytronic
- monitor Enttec
- monitor Feelworld
- monitor Phoenix Contact
- monitor COMMBOX
- monitor Yiynova
- monitor Alogic
- monitor Pelco
- monitor Lilliput
- monitor LightZone
- monitor AOpen
- monitor Planet Audio
- monitor EC Line
- monitor Datacolor
- monitor HELGI
- monitor Desview
- monitor Syscom
- monitor Allsee
- monitor Night Owl
- monitor ProDVX
- monitor Varad
- monitor PureTools
- monitor DoubleSight
- monitor CTL
- monitor Game Factor
- monitor Nixeus
- monitor Chimei
- monitor Blue Sea
- monitor Faytech
- monitor Hamlet
- monitor Wyse - Dell
- monitor Approx
- monitor Bauhn
- monitor GeChic
- monitor Oecolux
- monitor ADS-TEC
- monitor Satco
- monitor Casalux
- monitor Jupiter
- monitor Transvideo
- monitor Innocn
- monitor KeepOut
- monitor Shimbol
- monitor Raysgem
- monitor Motrona
- monitor Ikegami
- monitor AORUS
- monitor Portkeys
- monitor Mimo Monitors
- monitor American Dynamics
- monitor AIS
- monitor Wortmann AG
- monitor Viotek
- monitor Vidi-Touch
- monitor KTC
- monitor CoolerMaster
- monitor Atlantis Land
- monitor HEDD
- monitor Colormetrics
- monitor IOIO
- monitor DTEN
- monitor Cocopar
- monitor Titan Army
- monitor Xenarc
- monitor Delvcam
- monitor Wimaxit
- monitor BookIT
- monitor SideTrak
- monitor TRIUMPH BOARD
- monitor Japannext
Najnowsze instrukcje dla monitor

1 Kwietnia 2025
1 Kwietnia 2025

30 Marca 2025
30 Marca 2025
30 Marca 2025
30 Marca 2025
30 Marca 2025
30 Marca 2025
30 Marca 2025
30 Marca 2025