Instrukcja obsługi Intermec CN50 Windows Mobile 6.1
Przeczytaj poniżej 📖 instrukcję obsługi w języku polskim dla Intermec CN50 Windows Mobile 6.1 (132 stron) w kategorii PDA. Ta instrukcja była pomocna dla 21 osób i została oceniona przez 2 użytkowników na średnio 4.5 gwiazdek
Strona 1/132

CN50
User’s Manual
Mobile Computer
For Windows Mobile 6.1
ii CN50 Mobile Computer for Windows Mobile 6.1 User’s Manual
Intermec Technologies Corporation
Worldwide Headquarters
6001 36th Ave.W.
Everett, WA 98203
U.S.A.
www.intermec.com
The information contained herein is provided solely for the purpose of allowing customers to
operate and service Intermec-manufactured equipment and is not to be released, reproduced, or
used for any other purpose without written permission of Intermec Technologies Corporation.
Information and specifications contained in this document are subject to change without prior
notice and do not represent a commitment on the part of Intermec Technologies Corporation.
© 2009-2010 by Intermec Technologies Corporation. All rights reserved.
The word Intermec, the Intermec logo, Norand, ArciTech, Beverage Routebook, CrossBar,
dcBrowser, Duratherm, EasyADC, EasyCoder, EasySet, Fingerprint, i-gistics, INCA (under license),
Intellitag, Intellitag Gen2, JANUS, LabelShop, MobileLAN, Picolink, Ready-to-Work, RoutePower,
Sabre, ScanPlus, ShopScan, Smart Mobile Computing, SmartSystems, TE 2000, Trakker Antares,
and Vista Powered are either trademarks or registered trademarks of Intermec Technologies
Corporation.
There are U.S. and foreign patents as well as U.S. and foreign patents pending.
Wi-Fi is a registered certification mark of the Wi-Fi Alliance.
Microsoft, Windows, and the Windows logo are registered trademarks of Microsoft Corporation
in the United States and/or other countries.
Bluetooth is a trademark of Bluetooth SIG, Inc., U.S.A.
This product includes software developed by the OpenSSL Project for use in the OpenSSL Toolkit
(www.openssl.org).
This product includes cryptographic software written by Eric Young (EAY@cryptsoft.com).
This product uses Regex++, Index software during its operational phases. The owner of Regex++
has granted use of the software to anyone provided such use is accompanied by the following
copyright and permission notice:
Regex++, Index. (Version 3.31, 16th Dec 2001)
Copyright © 1998-2001 Dr John Maddock
Permission to use, copy, modify, distribute and sell this software and its documentation for any
purpose is hereby granted without fee, provided that the above copyright notice appear in all
copies and that both that copyright notice and this permission notice appear in supporting
documentation. Dr John Maddock makes no representations about the suitability of this software
for any purpose. It is provided “as is” without express or implied warranty.

CN50 Mobile Computer for Windows Mobile 6.1 User’s Manual iii
Document Change Record
This page records changes to this document. The document was
originally released as Revision 001.
Version
Number Date Description of Change
004 10/2010 Revised to support new software enhancements and
Korean product certification.
003 4/2010 Added new CDMA radio activation procedures.
002 2/2010 Revised to support the new EA11 imager, 2.5G
GPRS/EDGE radio, and increased RAM memory.
Contents
vi CN50 Mobile Computer for Windows Mobile 6.1 User’s Manual
Reading Bar Codes . . . . . . . . . . . . . . . . . . . . . . . . . . . . . . . . . . . . . . . . . . . . . . . . . . . . . . .18
Capturing Signatures . . . . . . . . . . . . . . . . . . . . . . . . . . . . . . . . . . . . . . . . . . . . . . . . . . . . 19
Capturing Documents . . . . . . . . . . . . . . . . . . . . . . . . . . . . . . . . . . . . . . . . . . . . . . . . . . . 19
Using the Color Camera . . . . . . . . . . . . . . . . . . . . . . . . . . . . . . . . . . . . . . . . . . . . . . . . . . . . . . . . . . 20
Zooming On an Image . . . . . . . . . . . . . . . . . . . . . . . . . . . . . . . . . . . . . . . . . . . . . . . . . . .20
Taking a Picture . . . . . . . . . . . . . . . . . . . . . . . . . . . . . . . . . . . . . . . . . . . . . . . . . . . . . . . . . 20
Switching to Video Mode . . . . . . . . . . . . . . . . . . . . . . . . . . . . . . . . . . . . . . . . . . . . . . . . . 21
Saving Picture Files . . . . . . . . . . . . . . . . . . . . . . . . . . . . . . . . . . . . . . . . . . . . . . . . . . . . . .21
Installing a microSD Card . . . . . . . . . . . . . . . . . . . . . . . . . . . . . . . . . . . . . . . . . . . . . . . . . . . . . . . . 22
Enabling the Integrated GPS on the CN50 . . . . . . . . . . . . . . . . . . . . . . . . . . . . . . . . . . . . . . . . . 23
Using the GPSID Installed on the CN50 . . . . . . . . . . . . . . . . . . . . . . . . . . . . . . . . . . . 23
Improving GPS Performance on the CN50 . . . . . . . . . . . . . . . . . . . . . . . . . . . . . . . . .24
2Connecting and Configuring the CN50 . . . . . . . . . . . . . . . . . . . . . . . . . . . . . . . 27
Configuring the CN50 . . . . . . . . . . . . . . . . . . . . . . . . . . . . . . . . . . . . . . . . . . . . . . . . . . . . . . . . . . . 28
Managing the CN50 With SmartSystems Foundation . . . . . . . . . . . . . . . . . . . . . . .28
Using Intermec Settings Directly On the CN50 . . . . . . . . . . . . . . . . . . . . . . . . . . . . . 29
Hiding Menu Items in Intermec Settings . . . . . . . . . . . . . . . . . . . . . . . . . . . . . . . . . . .30
Connecting to a PC . . . . . . . . . . . . . . . . . . . . . . . . . . . . . . . . . . . . . . . . . . . . . . . . . . . . . . . . . . . . . . 31
Establishing an ActiveSync partnership . . . . . . . . . . . . . . . . . . . . . . . . . . . . . . . . . . . .31
Connecting to Your Network. . . . . . . . . . . . . . . . . . . . . . . . . . . . . . . . . . . . . . . . . . . . . . . . . . . . . .33
Connecting the CN50 Using 802.11 Radio Communications . . . . . . . . . . . . . . . .33
Connecting the CN50 Using Bluetooth Communications . . . . . . . . . . . . . . . . . . . 34
Connecting the CN50 to a Wireless Printer. . . . . . . . . . . . . . . . . . . . . . . . . . . . . . . . . 37
Connecting the CN50 Using Ethernet Communications . . . . . . . . . . . . . . . . . . . . 38
Connecting the CN50 Using USB Communications . . . . . . . . . . . . . . . . . . . . . . . .38
Managing Network Connections With iConnect. . . . . . . . . . . . . . . . . . . . . . . . . . . .38
Configuring Wireless Security. . . . . . . . . . . . . . . . . . . . . . . . . . . . . . . . . . . . . . . . . . . . . . . . . . . . .41
Choosing Between Microsoft and Funk Security . . . . . . . . . . . . . . . . . . . . . . . . . . . .41
Loading a Certificate . . . . . . . . . . . . . . . . . . . . . . . . . . . . . . . . . . . . . . . . . . . . . . . . . . . . .53
Disabling Security . . . . . . . . . . . . . . . . . . . . . . . . . . . . . . . . . . . . . . . . . . . . . . . . . . . . . . .54
Configuring the Phone . . . . . . . . . . . . . . . . . . . . . . . . . . . . . . . . . . . . . . . . . . . . . . . . . . . . . . . . . . . 55
Turning On the Phone Using the Wireless Manager. . . . . . . . . . . . . . . . . . . . . . . . .55
Activating the CDMA Phone . . . . . . . . . . . . . . . . . . . . . . . . . . . . . . . . . . . . . . . . . . . . . . 56
Values Required for CDMA Phone. . . . . . . . . . . . . . . . . . . . . . . . . . . . . . . . . . . . . . . . .57
Starting the Activation Wizard . . . . . . . . . . . . . . . . . . . . . . . . . . . . . . . . . . . . . . . . . . . . 57
Contents
CN50 Mobile Computer for Windows Mobile 6.1 User’s Manual vii
Activating the CN50 on Sprint . . . . . . . . . . . . . . . . . . . . . . . . . . . . . . . . . . . . . . . . . . . . 57
Activating the CN50 on Verizon . . . . . . . . . . . . . . . . . . . . . . . . . . . . . . . . . . . . . . . . . . .58
Activating the UMTS Phone . . . . . . . . . . . . . . . . . . . . . . . . . . . . . . . . . . . . . . . . . . . . . . 59
Making a Phone Call . . . . . . . . . . . . . . . . . . . . . . . . . . . . . . . . . . . . . . . . . . . . . . . . . . . . .60
Connecting to an ISP. . . . . . . . . . . . . . . . . . . . . . . . . . . . . . . . . . . . . . . . . . . . . . . . . . . . . . . . . . . . .61
Connecting to a Network With a VPN Server . . . . . . . . . . . . . . . . . . . . . . . . . . . . . . . . . . . . . . .62
3Developing and Installing Applications . . . . . . . . . . . . . . . . . . . . . . . . . . . . . . 65
Developing Applications for the Computer. . . . . . . . . . . . . . . . . . . . . . . . . . . . . . . . . . . . . . . . .66
Packaging Your Application . . . . . . . . . . . . . . . . . . . . . . . . . . . . . . . . . . . . . . . . . . . . . .66
Choosing a Target Location. . . . . . . . . . . . . . . . . . . . . . . . . . . . . . . . . . . . . . . . . . . . . . . 66
Installing Applications on the CN50. . . . . . . . . . . . . . . . . . . . . . . . . . . . . . . . . . . . . . . . . . . . . . .67
Installing Applications Using SmartSystems Foundation Console. . . . . . . . . . . . 67
Installing Applications Using Microsoft ActiveSync . . . . . . . . . . . . . . . . . . . . . . . . . 67
Installing Applications Using a Scan-to-Connect Bar Code . . . . . . . . . . . . . . . . . . 68
Installing Applications Using a MicroSD Card. . . . . . . . . . . . . . . . . . . . . . . . . . . . . .68
Updating the System Software . . . . . . . . . . . . . . . . . . . . . . . . . . . . . . . . . . . . . . . . . . . . . . . . . . . .69
Updating Multiple Computers Using SmartSystems Console . . . . . . . . . . . . . . . . 69
Updating Individual Computers . . . . . . . . . . . . . . . . . . . . . . . . . . . . . . . . . . . . . . . . . .71
4Troubleshooting and Maintaining the CN50. . . . . . . . . . . . . . . . . . . . . . . . . 73
Calling Product Support. . . . . . . . . . . . . . . . . . . . . . . . . . . . . . . . . . . . . . . . . . . . . . . . . . . . . . . . . .74
Finding Your Configuration Number. . . . . . . . . . . . . . . . . . . . . . . . . . . . . . . . . . . . . . 74
Finding Your Software and Firmware Version Numbers . . . . . . . . . . . . . . . . . . . . .74
Troubleshooting the CN50 . . . . . . . . . . . . . . . . . . . . . . . . . . . . . . . . . . . . . . . . . . . . . . . . . . . . . . . 75
Resetting the CN50 . . . . . . . . . . . . . . . . . . . . . . . . . . . . . . . . . . . . . . . . . . . . . . . . . . . . . . . . . . . . . .79
Warm Booting the CN50 . . . . . . . . . . . . . . . . . . . . . . . . . . . . . . . . . . . . . . . . . . . . . . . . . 79
Cold Booting the CN50 . . . . . . . . . . . . . . . . . . . . . . . . . . . . . . . . . . . . . . . . . . . . . . . . . . 79
Clean Booting the CN50. . . . . . . . . . . . . . . . . . . . . . . . . . . . . . . . . . . . . . . . . . . . . . . . . . 80
Cleaning the CN50. . . . . . . . . . . . . . . . . . . . . . . . . . . . . . . . . . . . . . . . . . . . . . . . . . . . . . . . . . . . . . . 81
Contents
viii CN50 Mobile Computer for Windows Mobile 6.1 User’s Manual
ASpecifications. . . . . . . . . . . . . . . . . . . . . . . . . . . . . . . . . . . . . . . . . . . . . . . . . . . . . . . . . . . 83
Physical and Environmental Specifications. . . . . . . . . . . . . . . . . . . . . . . . . . . . . . . . . . . . . . . . .84
CN50 Physical Dimensions . . . . . . . . . . . . . . . . . . . . . . . . . . . . . . . . . . . . . . . . . . . . . . . 84
Power and Electrical Specifications . . . . . . . . . . . . . . . . . . . . . . . . . . . . . . . . . . . . . . . .84
Environmental Specifications . . . . . . . . . . . . . . . . . . . . . . . . . . . . . . . . . . . . . . . . . . . . . 84
Touch Screen Specifications . . . . . . . . . . . . . . . . . . . . . . . . . . . . . . . . . . . . . . . . . . . . . . 84
Keypad Options . . . . . . . . . . . . . . . . . . . . . . . . . . . . . . . . . . . . . . . . . . . . . . . . . . . . . . . . .85
Bar Code Symbologies. . . . . . . . . . . . . . . . . . . . . . . . . . . . . . . . . . . . . . . . . . . . . . . . . . . . 85
CN50 Imager Reading Distances . . . . . . . . . . . . . . . . . . . . . . . . . . . . . . . . . . . . . . . . . . . . . . . . . .85
EA21 Area Imager Minimum Reading Distances. . . . . . . . . . . . . . . . . . . . . . . . . . . .86
EA21 Area Imager Typical Reading Distances. . . . . . . . . . . . . . . . . . . . . . . . . . . . . . .87
EA11 Area Imager Minimum Reading Distances. . . . . . . . . . . . . . . . . . . . . . . . . . . .89
EA11 Area Imager Typical Reading Distances. . . . . . . . . . . . . . . . . . . . . . . . . . . . . . .90
CN50 Docking Connector Specifications . . . . . . . . . . . . . . . . . . . . . . . . . . . . . . . . . . . . . . . . . . 91
Accessories . . . . . . . . . . . . . . . . . . . . . . . . . . . . . . . . . . . . . . . . . . . . . . . . . . . . . . . . . . . . . . . . . . . . . .91
Battery (AB24, AB25). . . . . . . . . . . . . . . . . . . . . . . . . . . . . . . . . . . . . . . . . . . . . . . . . . . . .91
AC Power Adapter (AE37). . . . . . . . . . . . . . . . . . . . . . . . . . . . . . . . . . . . . . . . . . . . . . . . .92
Quad Battery Charger (AC21) . . . . . . . . . . . . . . . . . . . . . . . . . . . . . . . . . . . . . . . . . . . . .92
Single Dock (AD27) . . . . . . . . . . . . . . . . . . . . . . . . . . . . . . . . . . . . . . . . . . . . . . . . . . . . . . 92
Multidock (AD24) . . . . . . . . . . . . . . . . . . . . . . . . . . . . . . . . . . . . . . . . . . . . . . . . . . . . . . . 92
Charge-Only Multidock (AD23) . . . . . . . . . . . . . . . . . . . . . . . . . . . . . . . . . . . . . . . . . . . 92
Vehicle Docks (AV6 and AV9) . . . . . . . . . . . . . . . . . . . . . . . . . . . . . . . . . . . . . . . . . . . . .92
Magnetic Stripe Reader (AR9) . . . . . . . . . . . . . . . . . . . . . . . . . . . . . . . . . . . . . . . . . . . . . 92
BDefault Settings . . . . . . . . . . . . . . . . . . . . . . . . . . . . . . . . . . . . . . . . . . . . . . . . . . . . . . . . 93
Default Configuration . . . . . . . . . . . . . . . . . . . . . . . . . . . . . . . . . . . . . . . . . . . . . . . . . . . . . . . . . . . 94
Data Collection . . . . . . . . . . . . . . . . . . . . . . . . . . . . . . . . . . . . . . . . . . . . . . . . . . . . . . . . . .94
Symbology Option Settings. . . . . . . . . . . . . . . . . . . . . . . . . . . . . . . . . . . . . . . . . . . . . . . 95
Imager Settings . . . . . . . . . . . . . . . . . . . . . . . . . . . . . . . . . . . . . . . . . . . . . . . . . . . . . . . . . . 95
Decode Security Settings . . . . . . . . . . . . . . . . . . . . . . . . . . . . . . . . . . . . . . . . . . . . . . . . . 96
Communications . . . . . . . . . . . . . . . . . . . . . . . . . . . . . . . . . . . . . . . . . . . . . . . . . . . . . . . . . . . . . . . .96
Communication Settings . . . . . . . . . . . . . . . . . . . . . . . . . . . . . . . . . . . . . . . . . . . . . . . . . 96
Bluetooth Settings . . . . . . . . . . . . . . . . . . . . . . . . . . . . . . . . . . . . . . . . . . . . . . . . . . . . . . .96
802.11 Radio Settings . . . . . . . . . . . . . . . . . . . . . . . . . . . . . . . . . . . . . . . . . . . . . . . . . . . .96
Ethernet Adapter Settings . . . . . . . . . . . . . . . . . . . . . . . . . . . . . . . . . . . . . . . . . . . . . . . . 97
Certificates Settings . . . . . . . . . . . . . . . . . . . . . . . . . . . . . . . . . . . . . . . . . . . . . . . . . . . . . .97
Ethernet Adapter IP Settings . . . . . . . . . . . . . . . . . . . . . . . . . . . . . . . . . . . . . . . . . . . . . . 97
Before You Begin
xiv CN50 Mobile Computer for Windows Mobile 6.1 User’s Manual
Patent Information
Product is covered by one or more of the following patents:
4882476; 4894523; 4953113; 4961043; 4970379; 4988852; 5019699;
5021642; 5038024; 5081343; 5095197; 5144119; 5144121; 5182441;
5187355; 5187356; 5195183; 5216233; 5216550; 5195183; 5195183;
5218191; 5227614; 5233172; 5241488; 5243602; 5258606; 5278487;
5288985; 5308966; 5322991; 5331136; 5331580; 5342210; 5349678;
5359185; 5371858; 5373478; 5389770; 5397885; 5410141; 5414251;
5416463; 5442167; 5464972; 5468947; 5468950; 5477044; 5486689;
5488575; 5500516; 5502297; 5504367; 5508599; 5514858; 5530619;
5534684; 5536924; 5539191; 5541419; 5548108; 5550362; 5550364;
5565669; 5567925; 5568645; 5572007; 5576529; 5592512; 5594230;
5598007; 5608578; 5616909; 5619027; 5627360; 5640001; 5657317;
5659431; 5671436; 5672860; 5684290; 5719678; 5729003; 5742041;
5761219; 5764798; 5777308; 5777309; 5777310; 5786583; 5793604;
5798509; 5798513; 5804805; 5805807; 5811776; 5811777; 5818027;
5821523; 5828052; 5831819; 5834753; 5834749; 5837987; 5841121;
5842070; 5844222; 5854478; 5862267; 5869840; 5873070; 5877486;
5878395; 5883492; 5883493; 5886338; 5889386; 5892971; 5895906;
5898162; 5902987; 5902988; 5912452; 5923022; 5936224; 5949056;
5969321; 5969326; 5969328; 5979768; 5986435; 5987192; 5987499;
5992750; 6003775; 6012640; 6016960; 6018597; 6024289; 6034379;
6036093; 6039252; 6064763; 6075340; 6095422; 6097839; 6102289;
6102295; 6109528; 6119941; 6128414; 6138915; 6149061; 6149063;
6152370; 6155490; 6158661; 6164542; 6164545; 6173893; 6195053;
6234393; 6234395; 6244512; 6249008; 6328214; 6330975; 6345765;
6356949; 6367699; 6375075; 6375076; 6375344; 6431451; 6435411;
6484944; 6488209; 6497368; 6532152; 6538413; 6539422; 6621942;
6641046; 6681994; 6687403; 6688523; 6732930
There may be other U.S. and foreign patents pending.

Chapter 1 — Using the CN50
CN50 Mobile Computer for Windows Mobile 6.1 User’s Manual 5
2Shut down the CN50 by going to Start > Programs > Shut Down.
For more information, see “Warm Booting the CN50” on page
79.
3 If necessary, disconnect the handstrap from the top of the CN50.
4Push forward on the battery release tab until the battery releases,
and then lift it away from the CN50.
5Insert the bottom of a fully charged battery into the CN50, and
press down on the top until it clicks into place.
6If necessary, replace the handstrap.

Chapter 1 — Using the CN50
CN50 Mobile Computer for Windows Mobile 6.1 User’s Manual 11
To type a lower case Z:
•Press c9999.
Adjusting the Volume of the CN50
You can adjust the computer volume for your needs and your
environment. The volume includes sounds you hear when you tap the
screen or scan bar codes with a scanner. You can set the volume to off,
very low, low, medium, high, very high (default), and vibrate.
You can use the Volume application (available from the navigation
bar) or the Volume buttons (on the side of the CN50) to change the
volume of the computer.
Location of Volume Buttons on the CN50
•To adjust the volume with the Volume application:
aTap the Volume ( ) icon at the top of the screen.
bUse your stylus to adjust the volume slider to the volume you
want, select Vibrate, or select Off.
•To adjust the volume with the Volume buttons:
•Press the upper side button to increase the volume.
•Press the lower side button to decrease the volume, set the
volume to vibrate, or turn the volume off.
Volume buttons

Chapter 1 — Using the CN50
16 CN50 Mobile Computer for Windows Mobile 6.1 User’s Manual
Location of the CN50 Status LEDs
The next table describes the notification LED, Good Read LED, and
key status LED. For information about the battery status LED, see
“Understanding the Battery Status” on page 6.
Understanding the Status LEDs
Using the Imager
The CN50 has two available area imagers, shown in the next table with
the minimum bar code size supported by each imager
LED Color Description
Notification Orange The CN50 is notifying you of a pending alarm
or message.
Good Read Green The CN50 has successfully decoded a bar code.
Battery See “Checking the Battery Status” on
page 7.
Key Status Green Caps Lock is enabled if you have a QWERTY
keypad.
Green function keys are enabled if you have a
numeric keypad.
Amber Amber function keys are enabled.
Key status LED
Notification LED
Good Read LED
Battery Status
LED

Chapter 1 — Using the CN50
18 CN50 Mobile Computer for Windows Mobile 6.1 User’s Manual
The area imager is equipped with a laser pointer to help you aim at bar
codes, allow you to read 2D bar code symbologies, and support
omni-directional (360°) scanning. Omni-directional scanning lets you
position the CN50 in any orientation to read a bar code label.
Reading Bar Codes
This section describes how to use the CN50 imager to read bar codes.
1Press ^ to turn on the CN50.
2Point the scanner window at the bar code label, and hold the CN50
steady a few inches from the label.
3Press the Scan button. The laser pointer and illumination beam
and frame appear.
4Use the laser pointer as a guide and aim toward the middle of the
bar code. Make sure that the illumination frame covers the bar code
you are trying to decode.
When the CN50 successfully reads a bar code label, you hear a high
beep, and the Good Read LED turns on briefly.
5Release the Scan button.
Scan button
Chapter 1 — Using the CN50
CN50 Mobile Computer for Windows Mobile 6.1 User’s Manual 23
Enabling the Integrated GPS on the CN50
The CN50 comes equipped with an integrated Global Positioning
System (GPS) receiver. It can deliver standards-based National Marine
Electronics Association (NMEA) data strings to GPS applications.
Intermec recommends that you use the GPS Intermediate Driver
(GPSID) instead of directly accessing the GPS hardware. The GPSID is
a Microsoft software component that interacts between applications
and the GPS hardware.
Using the GPSID allows Intermec support for Extended Ephemeris,
which enhances GPS performance by:
•reducing the amount of time it takes your GPS receiver to acquire
a fix.
•eliminating the need to obtain precise satellite data information
from the GPS satellites.
As a Microsoft software component, the GPSID also:
•allows multiple applications to simultaneously access the GPS data
stream.
•provides access to GPS data without requiring applications to
recognize and parse NMEA syntax.
Using the GPSID Installed on the CN50
To use the GPSID installed on your CN50, you need to configure the
GPSID settings.
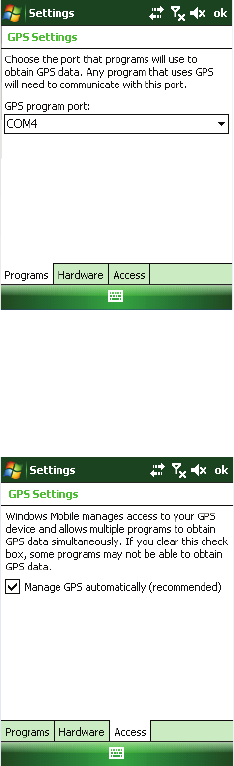
1Tap Start > Settings > System (tab).
2Tap External GPS. The GPS Settings screen appears.
Chapter 1 — Using the CN50
24 CN50 Mobile Computer for Windows Mobile 6.1 User’s Manual
3On the Programs tab, select the COM port that you want your
programs to use to get GPS data from your CN50.
4Tap the Access tab and select the Manage GPS automatically
check box.
5Tap ok.
Improving GPS Performance on the CN50
The integrated CN50 GPS module has three operating modes:
•Standalone-GPS
•Assisted GPS
•gpsOneXTRA™

Chapter 2 — Connecting and Configuring the CN50
CN50 Mobile Computer for Windows Mobile 6.1 User’s Manual 29
•remotely change settings on SmartSystems-enabled computers and
peripherals.
With an AutoDeploy license, SmartSystems can automatically push
software, configuration settings, and other files to connected CN50s.
AutoDeploy can report on asset locations and battery status, making
it easier to manage your mobile devices. The license also enables
ScanNGo, which makes connecting additional CN50s to your secure
wireless network as easy as reading bar codes.
You can download SmartSystems Foundation at no charge from the
Intermec web site. For more information on SmartSystems, go to
www.intermec.com\SmartSystems. To purchase an AutoDeploy
license, contact your local Intermec sales representative.
Using Intermec Settings Directly On the CN50
You can use Intermec Settings on the CN50 to configure the computer
and view system information.
To use Intermec Settings:
1On the CN50, tap Start > Settings > System > Intermec Settings.
2Tap a menu bar. A new menu or a list of configurable items
appears.

Chapter 2 — Connecting and Configuring the CN50
30 CN50 Mobile Computer for Windows Mobile 6.1 User’s Manual
3In a list of configurable items, choose or change options by
entering data in the entry fields or checking the appropriate check
box.
•To restore the default settings to all items in the current menu,
tap Menu > Restore Menu Defaults. Tap Yes to clear the
confirming message and restore menu defaults.
•To restore all default settings, tap Menu > Restore All
Defaults. Tap Yes to clear the confirming message and restore
all defaults, which may take a few minutes.
4Tap Back or to save your changes and go back to the previous
screen. Tap to return to the main menu.
5To close Intermec Settings, in the main menu tap ok or choose
Menu > Exit.
For more information on all parameters in Intermec Settings, see
the Intermec Settings Command Reference Manual.
Hiding Menu Items in Intermec Settings
In Intermec Settings, you can hide items in the CN50 menus, or in the
directory tree in the SmartSystems console. Hidden items are not saved
when you back up your settings in the SmartSystems console.
In Intermec Settings in the SmartSystems console:
•To hide menu items, right-click a menu item and choose Hide
Menu Item from the popup list. Click Yes to clear the confirming
message.
•To restore menu items, click the CN50 name at the top of the
directory tree to select it, and then choose View > Unhide Items.
All hidden menu items are restored
Chapter 2 — Connecting and Configuring the CN50
44 CN50 Mobile Computer for Windows Mobile 6.1 User’s Manual
Configuring WPA or WPA2 with Funk Security
Use the following procedure to configure WPA or WPA2 with Funk
security.
1Make sure the communications and radio parameters on your
CN50 are configured.
2Make sure Funk is selected as your security choice.
3Start Intermec Settings.
4Choose Communications > 802.11 Radio > Funk Security.
5Select the profile you want to configure.
6For Association, choose WPA or WPA2.
7For 8021x, choose None.
8For Pre-Shared Key, enter the pre-shared key or passphrase.
The pre-shared key must be a value of 32 hex pairs preceded by 0x
for a total of 66 characters. The value must match the key value on
the access point. The passphrase must be from 8 to 63 characters.
After you enter a passphrase, the CN50 internally converts it to a
pre-shared key. This value must match the passphrase on the
authenticator.
9Save your settings.
Configuring 802.1x Security With Funk Security
Use the following procedure to configure 802.1x security with Funk
security.
1Make sure the communications and radio parameters on your
CN50 are configured.
2Make sure Funk is selected as your security choice.
3Start Intermec Settings.
4Choose Communications > 802.11 Radio > Funk Security.
5Select the profile you want to configure.
6For Association, choose Open.
7For Encryption, choose WEP.
Chapter 2 — Connecting and Configuring the CN50
48 CN50 Mobile Computer for Windows Mobile 6.1 User’s Manual
cSelect your certificate from the list and press Enter. The User
Logon dialog box appears.
dEnter a User Name and Domain and press Enter.
8If you choose PEAP:
aChoose Properties > Run App. The Auth. Settings box appears.
bChoose Validate Server and press Enter. When the radio starts
to authenticate, the Network Password dialog box appears.
cEnter a User Name and Password and select Save Password.
d(Optional) In the Domain field, enter the Active Directory
domain associated with the user account.
9Save your settings.
Enabling WPA-PSK With Microsoft Security
Use the following procedure to enable WPA-PSK With Microsoft
Security.
1Make sure the communications and radio parameters on your
CN50 are configured.
2Start Intermec Settings.
3Choose Communications > 802.11 Radio > Microsoft Security.
4For Infrastructure Mode, choose Infrastructure.
5For Network Authentication, choose WPA-PSK. Data
Encryption automatically defaults to TKIP.
6For Pre-Shared Key, enter the pre-shared key or the passphrase.
The pre-shared key must be a value of 32 hex pairs preceded by 0x
for a total of 66 characters. The value must match the key value on
the authenticator. The passphrase must be from 8 to 63 characters.
After you enter a passphrase, the CN50 internally converts it to a
pre-shared key.
7Save your settings.

Chapter 2 — Connecting and Configuring the CN50
54 CN50 Mobile Computer for Windows Mobile 6.1 User’s Manual
4To import a root certificate:
aTap the <<< button next to the Import Root Certificate field
to select the root certificate (DER-encoded .cer file) to import.
bClick Import Root Cert to install the selected certificate.
5To import a user certificate:
aTap the <<< button next to the Certificate Path field to select
the user certificate (DER-encoded .cer file without the private
key) to import.
bTap the <<< button next to the Key Path field to select the
private key (.pvk file) which corresponds to the user certificate
you selected.
To import a certificate from an IAS server:
aTap Web Enrollment.
bEnter the User, Password, and Server (IP address) to log into
the server.
cTap OK. A dialog box appears asking if you want to load the
root certificate.
dTap OK. The Enrollment Tool message box appears telling you
that the certificate has been added.
eTap OK to close the message box.
Disabling Security
If you choose not to use security with your wireless network, you can
disable it on the CN50. Intermec recommends that you always set
security in your network.
To disable security:
1Start Intermec Settings. For help, see “Configuring the CN50” on
page 28.
Note: PFX encoded certificates are also supported. Tap the Import
pfx button to import a PFX encoded certificate.
Chapter 2 — Connecting and Configuring the CN50
CN50 Mobile Computer for Windows Mobile 6.1 User’s Manual 55
2Choose Communications > 802.11 Radio > Security Choice and
select Microsoft Security. An alert box appears telling you that
you must save your settings and warm boot the CN50 for the new
security choice to take effect.
3Choose Yes. The CN50 resets and starts with Microsoft Security as
the Security Choice.
4Start Intermec Settings.
5Choose Communications > 802.11 Radio > Microsoft Security.
6For Network Authentication, choose Open.
7For Data Encryption, choose Disabled.
8Tap OK. Your settings are saved.
Configuring the Phone
The CN50 supports two types of mobile wireless phone technology:
•CDMA
•UMTS
With the radio module installed in the CN50, you can send and receive
telephone calls as well as transmit data through wide-area (WAN)
cellular networks.
The CN50 provides a phone speaker, microphone, and speakerphone.
It also supports Bluetooth headsets or hands-free kits. The factory
default setting for the phone is disabled.
After you activate the phone with the wireless carrier of your choice,
you can customize the features of the phone and network settings. For
help, refer to the online help on your CN50.
Turning On the Phone Using the Wireless Manager
You can use the Wireless Manager to enable and disable Bluetooth,
Wi-Fi, and the phone on your CN50.
1Tap Start > Settings > Connections tab > Wireless Manager.
Chapter 2 — Connecting and Configuring the CN50
CN50 Mobile Computer for Windows Mobile 6.1 User’s Manual 59
2Dial 1 when prompted to complete the process.
This will activate the voice service on the CN50 and program the
phone number into the cell phone.
3A popup box will state when the programming is successful. When
you close the popup box, the phone will reset.
Activating the Data Service
Use the following procedures to activate data service for Verizon.
1Tap Start > Settings > Connections > Connection icon.
2Tap Manage existing connections.
3Select the InternetPPP #777 and choose Edit.
4Confirm that the Connection name is correct and then tap Next.
5In the Enter the Number to dial box, enter #777 and tap Next.
6Enter your username: <10_digit_#>@vzw3g.com.
Where <10_digit_#> is your actual 10 digit phone number. For
example, 8005551212@vzw3g.com. To determine your phone
number, go to the phone application and tap Menu > Options.
7Enter the password: vzw (case-sensitive).
8Tap Finish.
You can test the data service by navigating to a web site using
Internet Explorer.
Activating the UMTS Phone
You use a SIM card to activate the UMTS/HSPA phone on the CN50.
You can purchase the SIM card from your network provider. You insert
the SIM card in the battery cavity on the back of the CN50.
To install the SIM card:
1Press ^ to turn off the CN50.
2Disconnect the handstrap from the top of the CN50.
3Push forward on the battery release tab until the battery releases,
and then lift the battery away from the CN50.
Chapter 2 — Connecting and Configuring the CN50
CN50 Mobile Computer for Windows Mobile 6.1 User’s Manual 61
Connecting to an ISP
You can connect to your Internet Service Provider (ISP), and use the
connection to send and receive e-mail messages and view web pages.
Get an ISP dial-up access telephone number, a user name, and a
password from your ISP.
Once the CN50 is connected, you can:
•send and receive message by using Messaging (Outlook E-mail).
•visit web pages by using Internet Explorer Mobile.
Tap the Help icon at any time to view additional information for the
wizard or the settings. To connect to an ISP:
1Tap Start > Settings > Connections tab > Connection.
2Under My ISP, tap Add a new modem connection.
3Enter a name for the connection, such as “ISP Connection.”
4If using an external modem connected to your CN50 with a cable,
select Hayes Compatible on COM1 from the Select a modem
drop-down list.
5Tap Next.
6Enter the access phone number and then tap Next.
7Enter the User name, Password, and Domain (if provided by an
ISP or your network administrator).
8Tap Finish.
9Tap the Advanced tab from the Connections screen and then tap
Dialing Rules.
10 Select Use dialing rules, tap ok at the dialog box, and then tap
Edit.
11 Specify your current phone type and then tap ok until you exit and
return to the Settings page.


Chapter 4 — Troubleshooting and Maintaining the CN50
CN50 Mobile Computer for Windows Mobile 6.1 User’s Manual 75
Troubleshooting the CN50
Use this section to troubleshoot some common problems you may
experience with your CN50.
If you send the CN50 in for service, it is your responsibility to save the
computer data and configuration. Intermec is responsible only for
ensuring that the hardware matches the original configuration when
repairing or replacing the computer.
Problems While Configuring the CN50
Problem Solution
You cannot type a character on the keypad
or you can only type uppercase or
lowercase letters.
You may have locked a modifier key on the keypad.
Press the necessary key sequence to unlock the key. For
help, see “Using the Keypad” on page 8.
You press the Power key and nothing
happens.
•Make sure the backlight is on.
•Make sure you have a charged battery that is
installed correctly. For help, see “Charging the
Battery” on page 4.
•The battery may be discharged. Replace the battery
with a spare charged battery, or charge the battery.
•Reset the CN50. For help, see “Resetting the
CN50” on page 79.
You insert a microSD card and cannot
find the SDMMC Disk folder on the
CN50.
•The microSD card may not be installed correctly.
Insert the microSD card as described in Steps 2
through 4 of “Installing a microSD Card” on
page 22.
•The microSD card may be damaged. Try another
microSD card.
The Battery status LED is on. •If the battery status LED is a steady green, the
battery is more than 95% charged and computer is
on a charger.
•If the battery status LED is blinking red, then the
battery is low. Replace or charge the battery.
•If the battery status LED is a steady red, the main
battery is on charge.

Appendix A — Specifications
84 CN50 Mobile Computer for Windows Mobile 6.1 User’s Manual
Physical and Environmental Specifications
CN50 Physical Dimensions
Power and Electrical Specifications
Environmental Specifications
Touch Screen Specifications
Transflective TFT; QVGA color with touch panel; 240 x 320 pixels; 8.9
cm (3.5 in) diagonal active area; 5-level LED backlight control with
settings.
Length 15.4 cm (6.05 in)
Width 7.4 cm (2.93 in)
Height 2.8 cm (1.09 in)
Weight 310 g (10.9 oz)
Battery type Rechargeable Lithium-ion (Li-ion) batteries:
Battery
capacity
1950 mAh (7.2 Wh) (AB24)
3900 mAh (14.4 Wh) (AB25)
Electrical
rating
4,65 V, 3A
Backup
battery
Super capacitor supplies 5 minutes bridge time
Operating
temperature
-10 °C to 50 °C (14 °F to 122 °F)
Storage
temperature
-20 °C to 60 °C (-4 °F to 140 °F)
Recharge
temperature
0 °C to 45 °C (32 °F to 113 °F)
Humidity 5% to 95% non-condensing
Environmen
tal rating
IP54 compliant
Specyfikacje produktu
| Marka: | Intermec |
| Kategoria: | PDA |
| Model: | CN50 Windows Mobile 6.1 |
Potrzebujesz pomocy?
Jeśli potrzebujesz pomocy z Intermec CN50 Windows Mobile 6.1, zadaj pytanie poniżej, a inni użytkownicy Ci odpowiedzą
Instrukcje PDA Intermec

26 Września 2024
25 Września 2024
24 Września 2024
24 Września 2024
23 Września 2024
23 Września 2024
23 Września 2024
23 Września 2024
23 Września 2024
23 Września 2024
Instrukcje PDA
- PDA Sony
- PDA Sharp
- PDA Acer
- PDA Fujitsu
- PDA Canon
- PDA Mio
- PDA Viewsonic
- PDA Asus
- PDA Toshiba
- PDA Garmin
- PDA Casio
- PDA HP
- PDA Oregon Scientific
- PDA Navman
- PDA HTC
- PDA Qtek
- PDA Ecom
- PDA Palm
- PDA Getac
- PDA Pharos
- PDA Yakumo
- PDA Ockel
Najnowsze instrukcje dla PDA
15 Stycznia 2025
11 Stycznia 2025
28 Września 2024
27 Września 2024
27 Września 2024
23 Września 2024
13 Września 2024
13 Września 2024
12 Września 2024

11 Września 2024