Instrukcja obsługi HiTi CS-320
Przeczytaj poniżej 📖 instrukcję obsługi w języku polskim dla HiTi CS-320 (54 stron) w kategorii drukarka. Ta instrukcja była pomocna dla 9 osób i została oceniona przez 2 użytkowników na średnio 4.5 gwiazdek
Strona 1/54

www.hi-ti.com
1
HiTi Card Printer
CS-310/320
User Manual
HiTi V.2007.11

www.hi-ti.com
2
ACKNOWLEDGEMENTS
Microsoft, MS, MS-DOS and Windows are registered trademarks of Microsoft
Corporations.
Pentium is a U.S. registered trademark of Intel Corporation.
TrueType is a U.S. trademark of Apple Computer, Inc.
Adobe and Acrobat are registered trademarks of Adobe Systems Incorporated.
Brands and product names are trademarks or registered trademarks of their
respective companies.
COPYRIGHT
The information contained in this document is subject to change without notice.
HiTi Digital, Inc. makes no warranty of any kind with regard to this material,
including, but not limited to, the implied warranties of merchantability and fitness
for a particular purpose.
HiTi Digital, Inc. shall not be liable for any errors or for incidental or
consequential damages in connection with the furnishing, the performance, or
the use of this material.
Reproduction, adaptation, or translation of this manual is prohibited without
prior written permission of HiTi Digital, Inc., except as allowed
under copyright laws.
HiTi Digital, Inc., HiTi, HiTi company logo, Photo Desiree, Card Desiree, "Digital
mini-lab just for you", HiTi name (written in Simplified Chinese or Traditional
Chinese), are trademarks or registered trademarks in Taiwan, China and other
countries using HiTi Digital, Inc..

www.hi-ti.com
3
SAFETY INSTRUCTIONS
1. Read these instructions carefully. Keep these instructions for future reference.
Follow all warnings and instructions as marked on the product.
2. Unplug this product from the wall outlet before cleaning. Do not use liquid
detergents or aerosol cleaners. Use a damp cloth for cleaning.
3. Do not use this product near water.
4. Do not place this product on an unstable cart, stand, or table. The product
may fall, causing serious damage to the product.
5. Openings in the cabinet and at the bottom provide ventilation; to ensure a
reliable operation of the product and to protect it form overheating, these
openings should not be blocked or covered. Placing the product on a bed, sofa,
rug, or other similar surface may never block the openings. These products
should never be placed near or over a radiator or a heat register, or in a built-in
installation, unless proper ventilation is provided.
6. This product should be operated from the type of power indicated on the
marking label. If you are not sure of the type of power available, consult with
your dealer or with the local power company.
7. If an extension cord is used with this product, make sure that the total ampere
rating of the equipment plugged into the extension cord does not exceed the
ampere rating of the extension cord. Also, make sure that the total rating of all
products plugged into the wall outlet does not exceed the fuse rating.
8. Do not attempt to service this product yourself, as opening or removing covers
may expose you to dangerous voltage points or other harmful risks. Refer all
servicing to qualified service personnel.

www.hi-ti.com
4
Instruction 5
Chapter 1 Hardware Installation 6
1-1 Check Accessories 6
1-2 Appearance Of CS-310/320 7
1-3 Install Power Cord & USB Cable 10
1-4 Install Cleaning Roller 11
1-5 Install Card & Ribbon 12
Chapter 2 Software Installation 14
2-1 Install Driver (Win 2000 & XP/Vista ) 15
2-2 Uninstall Driver (Win 2000 & XP/Vista ) 16
2-3 Install Card Desiree CS 17
2-4 Driver Instruction 18
Chapter 3 Operation Instruction 29
3-1 LCD Display Instruction 29
3-2 Operation Instruction 29
Chapter 4 How To Clean & Maintain 31
4-1 Clean Cleaning Roller 32
4-2 Clean Print Path 33
4-3 Clean TPH Head 34
4-4 Clean Air Filter 35
4-5 Clean Card-insert Mechanism 36
4-6 Clean Ribbon Sensor 37
Chapter 5 Troubleshooting 38
5-1 Error Message & Solution 38
Appendix A Hi-Ti Card Printer Specification 45
Appendix B Safety Instructions 46
Appendix C FCC Compliance Statement 47
Appendix D Customer Service Information 52
Appendix E Order Information 54

www.hi-ti.com
5
Instruction
Thank you for choosing HiTi Card Printer. We hope this will just be the beginning
of our long-term and successful association. With this HiTi card printer, you can
easily and conveniently print high quality plastic cards, such as personalized ID
cards/credit cards, membership cards,.…etc. Please read this manual carefully
and complete the installation before operating the printer.
HiTi Card Printer CS-310/320 Features
z Supports double-side printing*.
z High quality printing.
z Supports multiple ribbon types.
z Supports various card types.
z Compatible with HiTi Card Desiree CS professional
software.
*CS-310 supports single-side printing only.

www.hi-ti.com
6
Chapter 1 Hardware Installation
1-1 Check Accessories
Please make sure the following items are included when you unpack the card
printer.
1.Card Output Hopper
2. Weight
3. USB Cable
4. Power Cord
5. User Manual
6. CD
7. Cleaning Roller
8. Cleaning Kit
If any of the above items is missing, please contact your nearest HiTi
customer-support facility or your local HiTi distributor. For detailed information,
please refer to Appendix D: Customer Service Information.

www.hi-ti.com
7
1-2 Appearance of CS-310/320
z *CS-310/320 Front side
A. Card Input Hopper
This is the Card Input Hopper for storing blank cards. Please insert the blank cards gently and
remember to shield them with the built-in cover to avoid any dust entering in there.
B. Card thickness selection button
HiTi CS-310/320 provides four selections for thickness: 0.3 mm (10 mil), 0.5 mm (20 mil), 0.8 mm
(30 mil) and 1.0 mm (40 mil). Please move and slide the selector for thickness to the correct
thickness position, which matches the thickness of the cards in the Card Input Hopper.
Remark: The Thickness tolerance of cards are 03mm +/-0.02mm (0.28 ~ 0.32mm), 0.5mm +/-0.03mm
(0.47 ~ 0.53mm), 0.8mm +/-0.04mm (0.76 ~ 0.84mm), 1.0mm +/-0.05mm (0.95 ~ 1.05mm). If your card
thickness is out of the above specification, it may cause significant damage to HiTi ribbon; may
reduce the life span of HiTi Card Printer; may damage print head; and may cause unsatisfactory
color performance.
C. LCD Display:
The status of the printer is displayed on the LCD screen, you can use [◄ ►], [ ], [OK], [ESC]
buttons to control the operation of the printer and for troubleshooting.
D. ID Button
To replace ribbon cartridges, please gently slide the ID button on the top of the printer to open the
ribbon door.
E. Rejected box
When an error occurs during the reading/writing process for smart chips and/or magnetic cards,
these cards are ejected into a rejected box, which holds about 20 cards. The system will show an
error message when cards accumulate to around 20 pieces in the rejected box. Please remove
these cards to continue the printing task.
F. Card Output Hopper
The printed cards will be placed here.
*For CS310i / CS320i (Card Printer + Laminator), the front view is shown as follows.
Laminator Card Printer
www.hi-ti.com
8
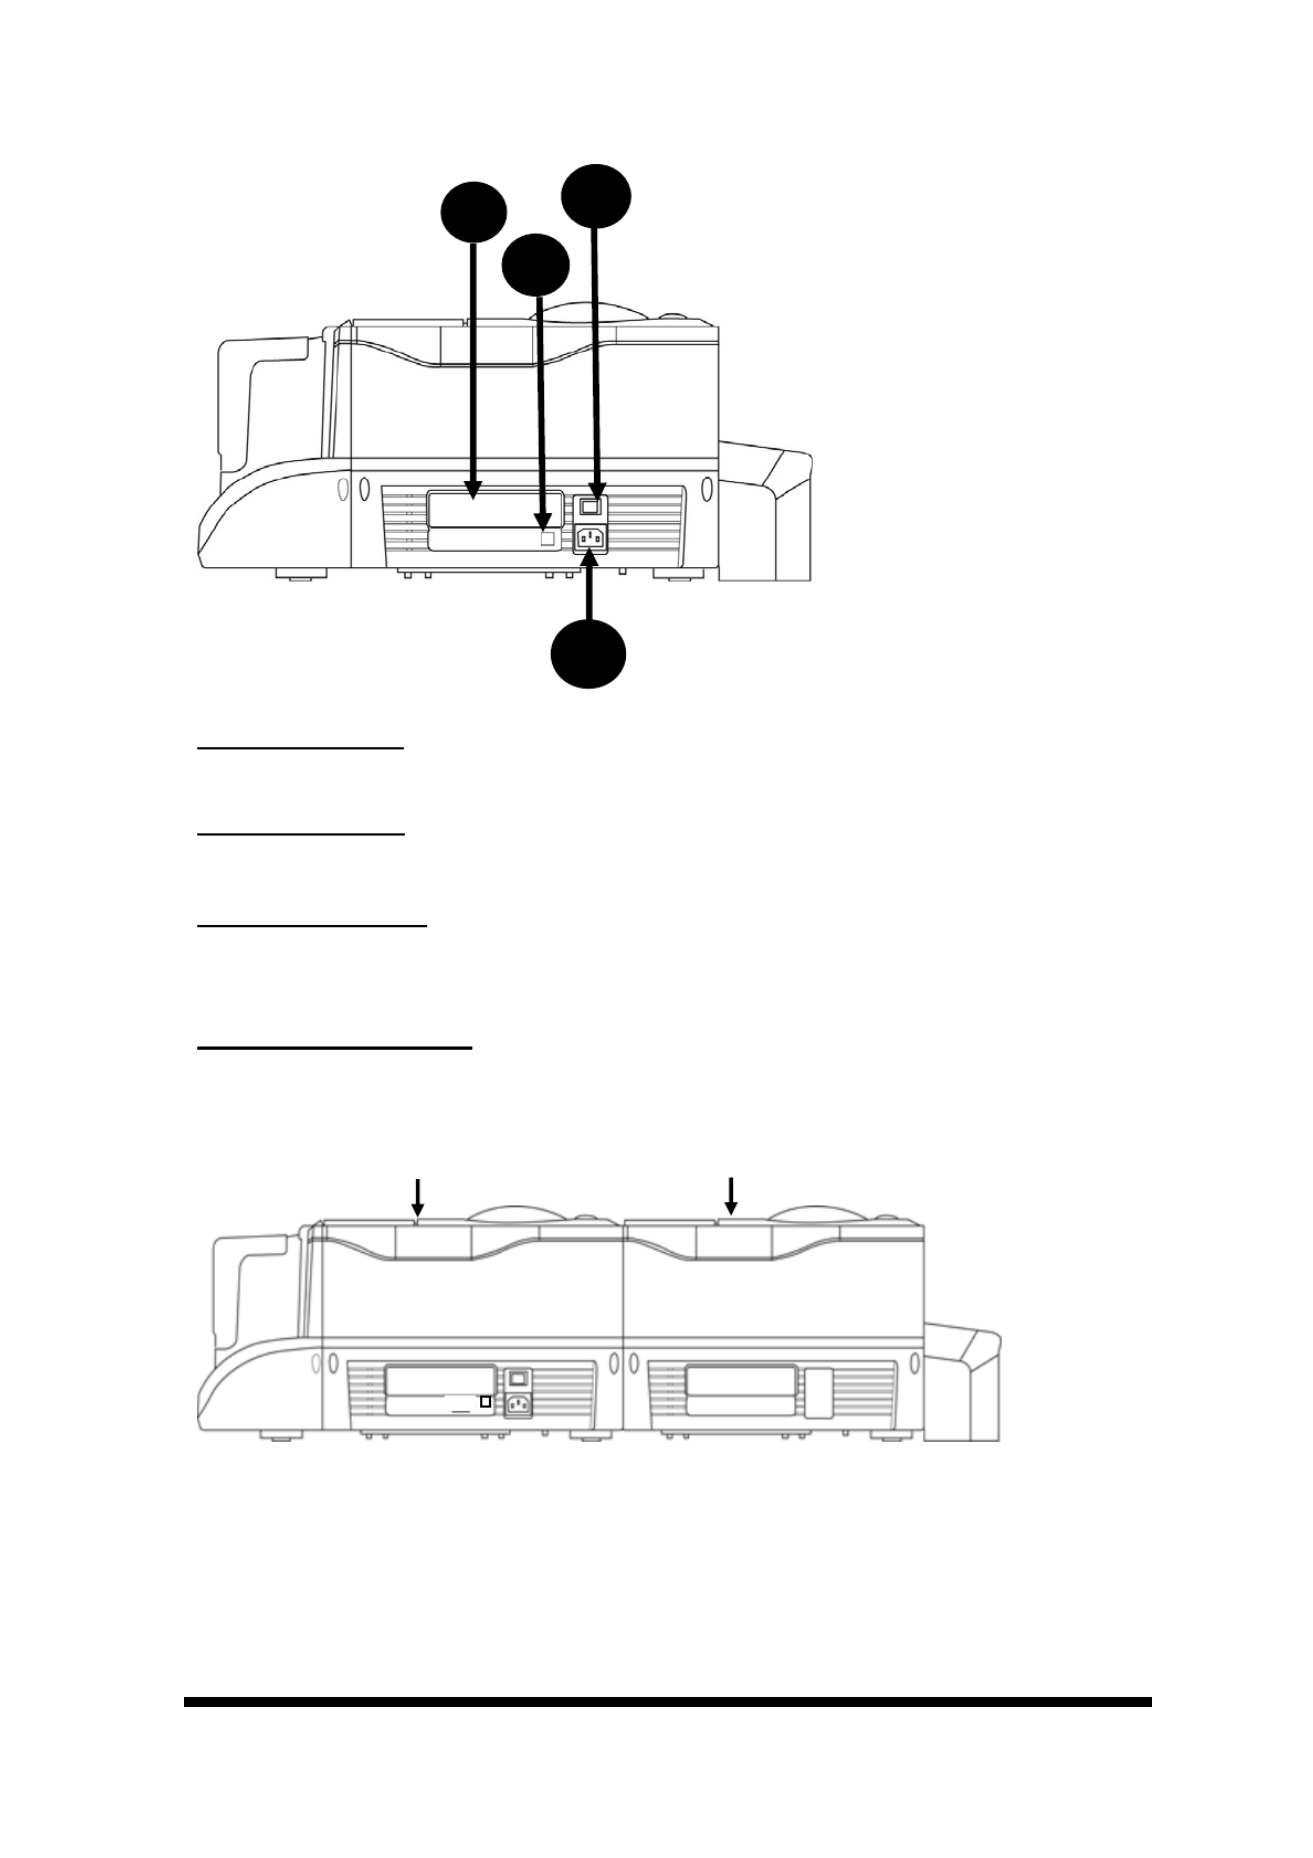
z CS-310/320 Back side*
A. Power Switch
This switch turns the power of the printer on or off.
B. Power Socket
Connect your power cord here.
C. USB Connector
Please connect the printer to a controlling device, such as a PC or a laptop,
hereby using the build-in USB connector.
D. Specification Label
Printer specification and detail information display label.
*For CS310i / CS320i (Card Printer + Laminator), the back view is shown as follows.
A
B
C
D
Card Printer Laminator

www.hi-ti.com
9
z Control Panel.
A. LED Light
Turn the power on. The printer will automatically initiate a system check and turn
on the green LED light to indicate that the printer status is normal. If an error
occurs, an error message will be shown on the LCD display and flash the LED.
Please refer to “Chapter 5 Troubleshooting” for resolving this error message.
Status Light: Green LED means that the status of the card printer is normal.
Error Light: Red LED means that an error has occurred. Please begin the
troubleshooting procedures.
B. LCD display
The device status and error messages are displayed on this LCD display.
C. Control Button
You can use [ ] [ ]◄, ►, [OK], [ESC] buttons to check the information and the
status of the printer or use these buttons to initiate the cleaning process.

www.hi-ti.com
10
1-3 Install Power Cord & USB Cable
1. Connect the printer to the AC power outlet using the supplied power cord.
2. Please connect the printer to a PC using the supplied USB Cable.
3. Turn on the “Power Switch". Before you turn on the “Power Switch”, please
make sure that you have already installed the printer driver. Please refer to
Chapter 2.
4. You will see a "New Hardware Found" message display on the PC screen.
Then it will automatically initiate the printer driver.
5. The card printer will automatically check the printer status when you turn on
the power. If the “status LED” lights stable green; that would indicate that the
printer is ready. If the “error LED” lights on, please check the ERROR
message displayed on the LCD display and look it up in the troubleshooting
procedures.
6. Hardware and driver installation are finished.

www.hi-ti.com
11
1-4 Install Cleaning Roller*
Please ※install the cleaning roller before using the card printer.
. Slide the ID button and lift the ribbon door up.
2. Open the cover of the cleaning module, as illustrated.
3. While holding the cover of the cleaning module open, insert the cleaning roller spool
into the spool receivers. Turn the cleaning roller after its installation; if it turns smoothly,
then the installation of the cleaning roller should be correct. If it does not turn smoothly,
please re-install the cleaning roller.
4. Please close the cover of the cleaning module and close the ribbon door to finish the
installation of the cleaning roller.
*Remar
*Remar
*Remar
*Remar*Remark:
k:
k:
k: k: For CS310i/CS320i (Card Printer + Laminator), please install the second cleaning
roller into the laminator as above procedures, after installing the rst one into the card
printer.

www.hi-ti.com
12
1-5 Install Card & Ribbon
※
※
※
※※ The HiTi card printer package does not include cards and ribbons. You
can contact your local HiTi distributor or refer to Appendix E for consumer
ordering information.
z The Card Installation
1. Please move and slide the selector for
thickness to the correct thickness position
which matches the thickness of the card to
be printed.
2. Open the door of the Card Input
Hopper.
1. Insert a blank card, place the weight on the top and close the door of the Card
Input Hopper. Please refer to the instruction on the weight to position the
weight properly, as illustrated.
Notes:
1. The card should be inserted horizontally into the Card Input Hopper. The
contact smart card and magnetic stripe card need to be inserted in a specific
way, as illustrated.
2. If the cards in the Card Input Hopper can not be picked up smoothly by the
printer, please make sure the cards are not sticking to each other by loosening
or shuffling the cards with your finger.
*The contact smart card installation:
The smart card chip faces up. Then
please insert it horizontally into the Card
Input Hopper as the instructions indicate
on the Card Input Hopper.
*The magnetic stripe card
installation:
The magnetic stripe faces down.
Then please insert it horizontally into
the Card Input Hopper as the
instructions indicate on the Card
Input Hopper.
www.hi-ti.com
13
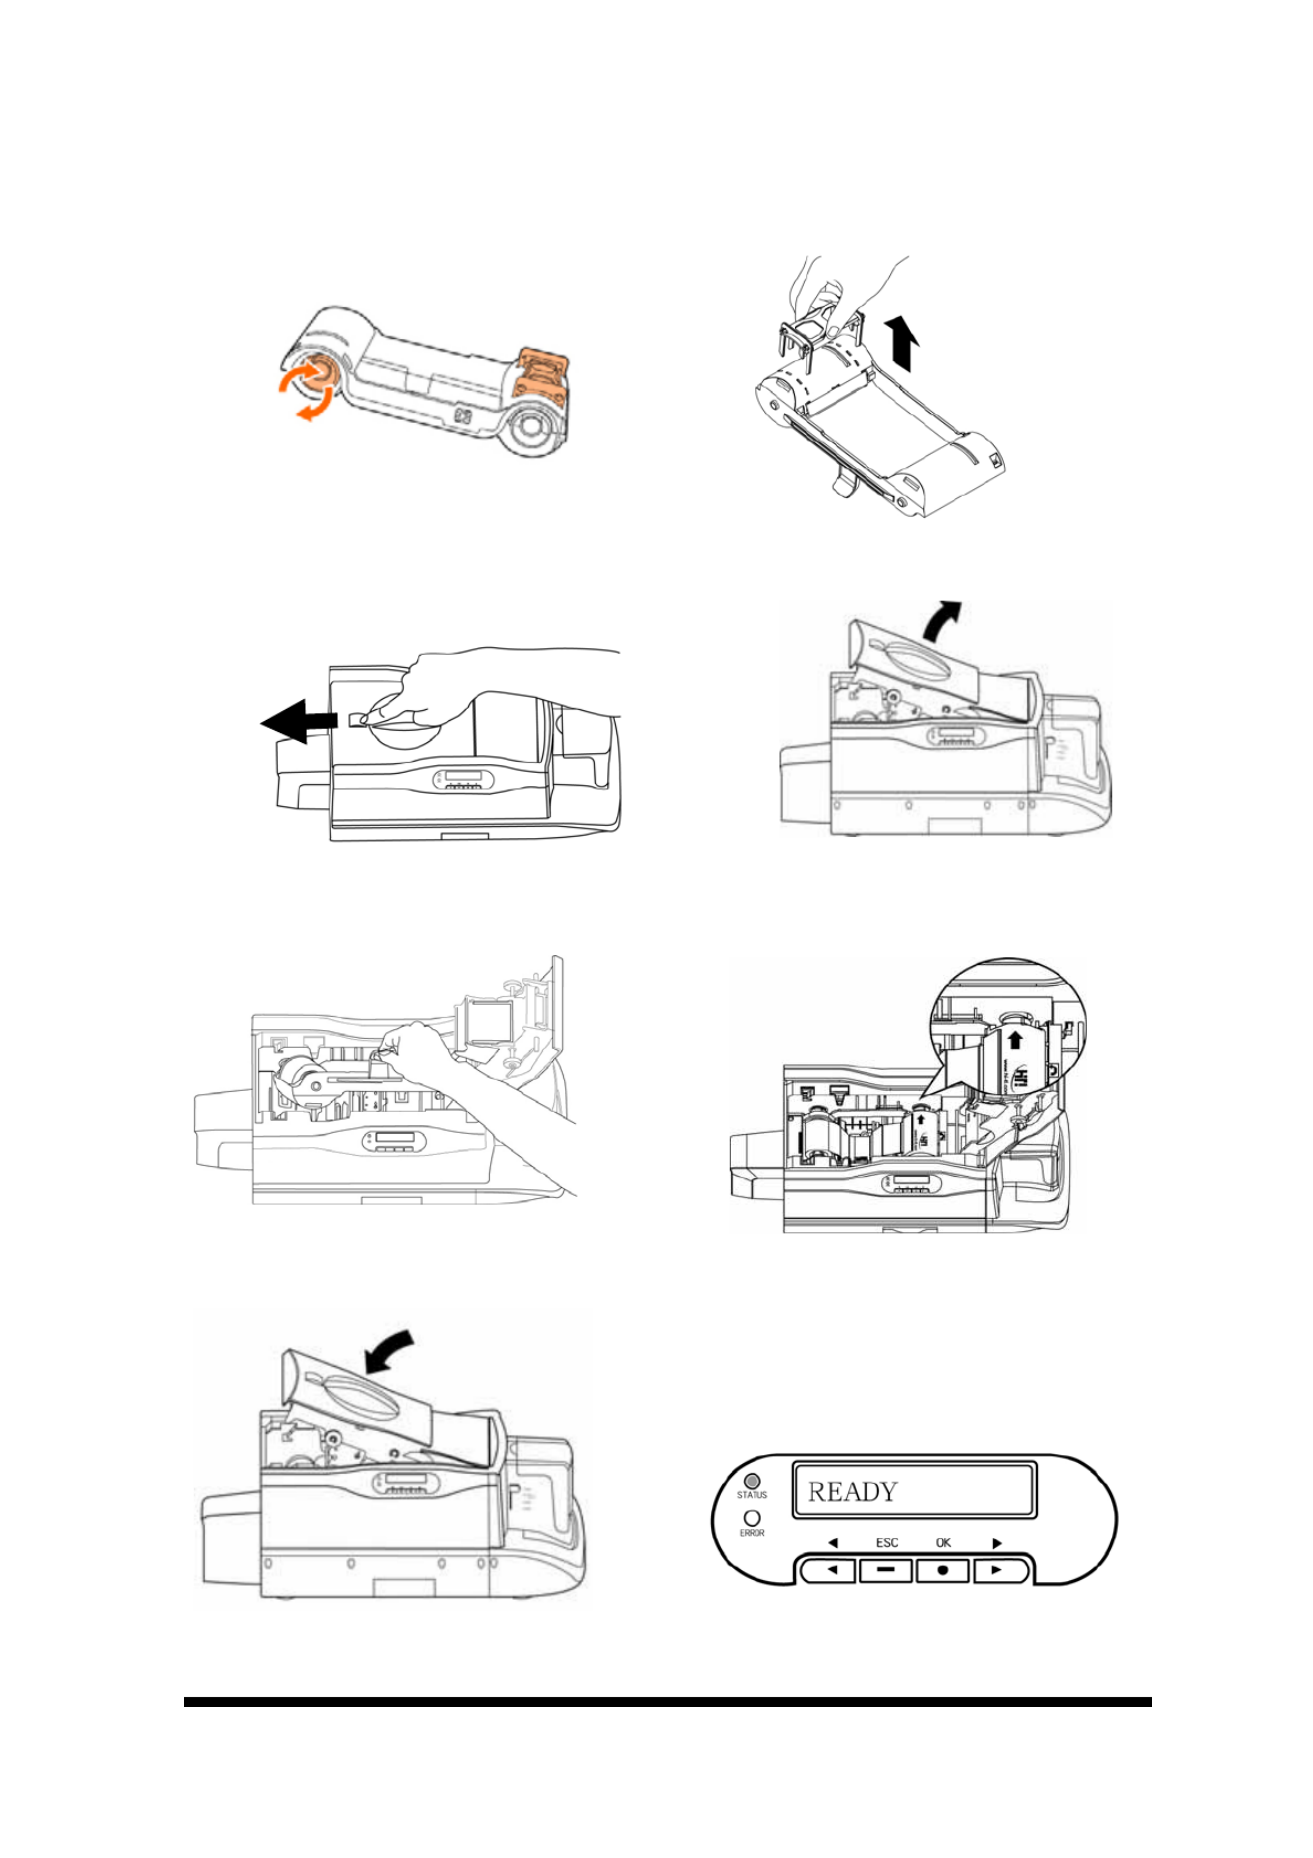
z The Ribbon Installation*
1. Remove the ribbon slack by rotating
the spool as illustrated.
2. Remove the fastener on the ribbon
as illustrated
3. Slide the ID button and lift the ribbon door up.
4. Hold the ribbon cartridge handle and insert it into the printer as illustrated.
Please make sure the drive gear is properly seated against the ribbon spool.
5. Close the ribbon door. Make sure the STATUS LED displays green light and
the LCD display shows “READY”.
*Remark: For CS310i / CS320i, please install the lamination ribbon into the
laminator as above illustrated.

www.hi-ti.com
14
Chapter 2 Software Installation*
System Requirements
Please make sure your PC conforms to the following requirements.
Intel Pentium or compatible PC
Windows 2000/XP/Vista
128 MB RAM or higher
Available USB port
100 MB or more free hard disk space
CD-ROM Drive
*For CS310i / CS320i, please follow the below procedures to install software.
Notice!!
1. Microsoft, MS, MS-DOS and Windows are registered trademarks of the Microsoft
Corporation.
2. Pentium is a U.S. registered trademark of the Intel Corporation.
3. Brands and product names are trademarks or registered trademarks of their
respective companies.

www.hi-ti.com
15
2-1 Install Driver (Windows 2000/XP/Vista)
1.Insert the “Driver CD” into the CD-ROM drive. If the installation doesn’t start
automatically; run the “autorun.exe” in the disk.
2.Please select “Driver / HiTi CS-310 / CS-320” and install.
3.Click the “Start” button to install the driver.
4.Connect the printer to the PC using the USB cable and turn the printer on.
5. In Windows 2000 or Windows XP, if there’s message dialog showing “Digital
Signature Not Found” or “Driver Incompatibility”, please click “Yes” to
continue to install the driver.

www.hi-ti.com
16
6. After copying several files, the Windows 2000 / XP system recognizes this
printer and the installation will be finished.
2-2 Uninstall Driver
1. Under Control Panel/ Add Remove Programs, you can find “HiTi CS-310/320”
Card Printer”.
2. Select [Remove] option, then the system will begin to uninstall the “HiTi
CS-310/320” driver.
3. The Uninstall program will now prompt you to restart Windows.

www.hi-ti.com
17
2-3 Install CardDesiree CS
1. Insert the “Driver CD” into the CD-ROM drive, if the disc doesn’t auto start,
then please execute the “autorun.exe” in the disc.
2. Select "Software / CardDesiree CS" and install.
3. Select language and destination; then press the “Start” button.
4. When the installation is finished, a pop-up message will appear to ask whether
or not to place a "Card Desiree CS" icon on the Windows Desktop?
5. The "Card Desiree CS" installation is finished.

www.hi-ti.com
18
2-4 Driver Instruction
You can access the driver settings in Control Panel-> Printers. Select HiTi
CS-310/320 and right-click the mouse button, then select “Printing Preferences”.
The printer driver is divided into seven different categories (not including general
properties) integrated in a main page. The seven different categories list as
below:
1. Device Option
2. Printing Area
3. Color
4. Tools
5. Magnetic Encoding
6. Import/Export
7. Lamination (This function is available for CS310i / CS320i only)
8. About

www.hi-ti.com
19
[Device Option]
You can modify the settings of the card printer in this page.
A. Ribbon Type: Select the ribbon type you want to use. 1. YMCKO ribbon,2. Resin K
ribbon, 3. YMCO ribbon, 4. KO ribbon or 5. YMCKOK ribbon.
B. Card Type: Select the card type you want to use. You may choose “Blank Card”, “6-pin
Smart Chip Card”, “8-pin Smart Chip Card”, “Magnetic Stripe Card”, “Chip/Magnetic
Card”, and “Adhesive Card”. (Default setting: “Blank Card”)*
*Remark: The Thickness tolerance of cards are 03mm +/-0.02mm (0.28 ~ 0.32mm),
0.5mm +/-0.03mm (0.47 ~ 0.53mm), 0.8mm +/-0.04mm (0.76 ~ 0.84mm), 1.0mm
+/-0.05mm (0.95 ~ 1.05mm). If your card thick e specification, it ness is out of the abov
may cause significant damage to HiTi ribbon; may reduce the life span of HiTi Card
Printer; may damage print head; and may cause unsatisfactory color performance.
C. Printing Mode: Standard Mode is the default setting. If you select Premium Photo
mode, the printing quality will be enhanced but printing speed will be a little bit lower.
D. K only on Back: This option is available only for YMCKO ribbons. When it is marked,
the front side of the card will be printed by YMC of YMCKO; meanwhile, the back side
will be printed by K of YMCKO. Then the user can print out one double-side card by one
set of YMCKO (YMC for the front side; K for the back side).
E. Copies: Set the number of copies to print. (Default setting: 1)
F. Printing Direction: You can select “Portrait” or “Landscape”. (Default setting:
“Landscape”)
Lock: If you are using a 3rd party software application other than Card Desiree CS and
the default printer of your computer is not CS-310/320, then please enable “Lock” to fix
the printing direction.
G. Front/ Back side setting: Setup which side you want to print.
H. Printing Parameters: Select the printing parameters. When you change the Ribbon
type, it will automatically return to the default setting. If □
□
□
□□Using YMC is unmarked, only
the Resin K and O portion of the YMCKO ribbon will be applied during the printing
process.
A C B
D
E F
G
H

www.hi-ti.com
20
※When you select the YMCKO ribbon as your ribbon type, several options for Resin K
will be available.
NOTE:
1. raphical G Device Interface, a Windows standard for dividing the images to many
graphical objects and transmitting them to output devices, such as monitors and
printers.
2. It is recommended to select “Disable doing color printing” if you are not going to use
Card Désirée CS to print.
When you select ※Resin K ribbon or KO ribbon as your ribbon type, then 2 options for
the Resin K / KO ribbon will be available: Black/White and Resin Dither.
Black/White The “Resin K” ribbon will represent the color graphic/texts in black
(RGB=0, 0, 0) and white printing style.
Resin Dither Resin Dither applies different density of black-white mixing to transfer
color graphic to different black level. If the text is the black (RGB=0,
0, 0) graphical object transmitted by GDI, then the text will not be
shown by mixing color, but by the actual contents.
Disable The “Resin K” within YMCKO ribbon will not be applied to print
the black section and the black (RGB = 0, 0, 0) in graphical
objects. It means the color in black (RGB = 0, 0, 0) will always be
composed by Y, M and C.
Always on The “Resin K” within the YMCKO ribbon will be applied to print
all of the black (RGB = 0, 0, 0) in the images.
Text only The “Resin K” within YMCKO ribbon will be applied to print the
graphical object- “Text” which is transmitted by GDI command,
but will not be applied to the black part in the images or the black
(RGB = 0, 0, 0) of the graphical objects transmitted by the GDI
command. For example, the Barcode is transmitted by the GDI
command, but this option will not apply to Resin K within the
YMCKO ribbon to the Barcode.
Disable when doing
color printing
The “Resin K” within the YMCKO ribbon will be applied to print
all the black (RGB = 0, 0, 0) graphical objects that are
transmitted by the GDI command, but will not be applied to all
the black (RGB=0, 0, 0) parts in the images.
Black/White The “Resin K” ribbon will represent the color graphic/texts in
black (RGB=0, 0, 0) and white printing style.
Resin Dither Resin Dither applies different density of black-white mixing
to transfer color graphic to different black level. If the text is
the black (RGB=0, 0, 0) graphical object transmitted by
GDI, then the text will not be shown by mixing color, but by
the actual contents.

www.hi-ti.com
21
[Printing Area Setting]
In this page, you may modify printing areas which will be covered and uncovered
by the ribbon. You can design printing areas, such as the following instructions.
The dark area represents the area which will be covered by the ribbon, and the
blank area represents the area where the ribbon will not cover anything. For
example, if you select magnetic/chip cards and select [Printing
Area]Æ
Æ
Æ
ÆÆOvercoat/Dye Panel, the chip area in the front side and magnetic stripe
area in the back side will be shown as the white/blank areas, that the ribbon will
not be covered by the Over coating and YMC within the YMCKO ribbon during
the printing process. In other words, if you do not want an area to be covered
by the ribbon, you can use this function to edit the printing area. If you do not
want one area to be printed by Resin K within the YMCKO ribbon or the Resin K
ribbon, please select [ ] to edit the printing area. Resin K Panel
A. Overcoat/Dye Panel:When you click [Overcoat/Dye Panel], you can edit the
area which will be covered (black) and uncovered (white) by the over coating
and YMC within the YMCKO ribbon.
B. Resin K Panel:When you click [Resin K Panel], you can edit the area which
will be covered and uncovered by the Resin K ribbon or Resin K within the
YMCKO ribbon.
C. Designed Area: You can select Standard and press [Edit Area] to create and
to assign a printing area or you can select a template file with a designed
area through the drop-down list and press [Edit Area] to edit the designed
area. Please refer to the next page for further details.
Notice
※
※
※
※※ : When you apply [Printing Area] for printing tasks, the Card Type
settings in [Device Option] must be identical to the Card Type
settings in Card Désirée CS. Meanwhile, the chosen template
formats from the drop-down list must match the Card Type you
selected in both [Device Option] and Card Désirée CS.
C
A
B

www.hi-ti.com
22
[Edit Area]
A. Designed Area: You can choose the default layout setting or the custom
layout previously designed and saved through the drop-down list. If you
would like to create a new layout, please select [User defined].
B. Delete: Delete the layout setting file.
C. Save: Save the layout setting file in a particular folder after editing.
D. Save As: Save the layout setting file in any location after the modification.
E. Import: Import the layout setting file from any location for editing.
F. Export: Export the layout setting file to any location.
G. Add Rectangle: Add a non-printing area. You can set the width, height and
position of this area.
H. Erase Rectangle: Delete a non-printing area.
I. Rectangle list: You can select a different rectangle from the rectangle list.
J. Reverse: You can inverse all no-printing areas to be printing areas by
pressing this button.
K. Load Preview Image: You can load any image to adjust the position of the
card and preview the effect after its adjustment.
A
BCD
EF
G
H
I
J
K

www.hi-ti.com
23
[Color]
You may set the printing color of your preference in this page.
A. Color preference setting: There are four options.
1. HiTi Optimized Color (General): The standard color presentation.
2. HiTi Optimized Color (Enhanced): Stronger contrast.
3. Windows Color Management: When applying this option, please follow the
procedures as below:
a. Please check whether the “HTCS310” / “HTCS320” file exists or not.
[Control Panel]→Printers and Faxes→HiTi CS-310/320→ →Properties Color
Management.
A
B
C
D
E
F

www.hi-ti.com
24
b. Please press the “Reset” buttons in C. Printer Color Adjuster and E.
Skin Tone Adjuster respectively.
c. Meanwhile, unmark □
□
□
□□Image Auto Enhancement in “B. Special
Function”.
4. Do not apply any color preference: Select this option and follow the steps
below to acquire the maximum color space.
a. Please press the “Reset” buttons in “C. Printer Color Adjuster” and
“E. Skin Tone Adjuster” respectively. Also, please set Gamma as 0.75.
b. Meanwhile, unmark □
□
□
□□Image Auto Enhancement in “B. Special
Function”.
B. Special Function: Image Auto Enhancement (Default selected). This
function increases color the performance of the printing.
C. Printer Color Adjuster: You may adjust the printing color performance and
sharpness via 8 slider bars or use the “Default” button to return to the default
settings.
D. Skin Tone Preference: You may adjust the skin tone to your preference
through this function.
Preference 1.: relatively Red color performance
Preference 2.: relatively Yellow color performance
E. Skin Tone Adjuster:
z Yellow/Red Adjuster bar (Y/R bar): The adjustment scale ranges
from-5 to 5 and displays a range of adjustment between Yellow and
Red.
z Light / Dark Adjuster bar (L/D bar): The adjustment scale ranges
from-5 to 5 and displays a range of adjustment between Light and
Dark.
z Preview: This displays the variation of Skin Tone after adjusting these
bars.
z Reset: Return to the original settings.
F. Color Chart: You may select a color range and print out a color chart to check
the color preference of the printing.
z You can print out the standard color chart for your reference according to
the settings in “A. Color Preferences”, “C. Printer Color Adjuster”, and “D.
Skin Tone Preference”
z Please unmark □
□
□
□□Image Auto Enhancement in “B. Special Function”
before you print out the color chart.
z If you would like to print out the same colors as the ones you selected
from the standard color chart, then please do not change the settings in
A
., C., D. for the standard color chart. Otherwise, the colors you print will
not be the same as the ones you selected from the standard color chart.
z If you would like to obtain a maximum color space for the color chart, then
please select “Do not apply any color preference” in “A. Color
Preference Setting.” Please refer to the description in “A. Color
Preference Setting” for further details.

www.hi-ti.com
26
[Magnetic Encoding]
A Magnetic Encoding Data: Input Magnetic Data directly. When you are not using the
database, you can manually enter data for the encoding of the magnetic stripe.
There are three tracks within the magnetic stripe. The first track includes
alphanumeric characters and other simple symbols. The second and the third
tracks accept numeric characters only.
When you mark □Track 1, Track 2, □ □Track 3 for data encoding, the function of
□ □Using Database will be disabled. When you mark Using Database for data
encoding, □Track 1, Track 2, □ □Track 3 will be disabled.
B Using Database: Apply database for encoding. Browse: browse the path for a
database. Encoding Data Start From: Decide which data to start encoding from a
database.
Notice: The database function is for the user who needs encoding by database but ※
is not using Card Desiree CS as their application program.
C Encoding Port: The information about the connection port.
D Times of Retrying: After finishing encoding, the encoder will automatically read the
data for verification purposes. If the reading fails, the device can be set to repeat
the process according to the setting of the user.
E Database Sample: There is a Database Sample for your reference. The format of a
database must match this sample. After expressing this button, it will show the data
samples as follows:
1 ABCDEFRG
2 12345678
3 2468024680
A
B
C
D
E

www.hi-ti.com
27
4 HIJKLMN 12345678
5 12345678 2468024680
6 HIJKLMN 2468024680
7 HIJKLMN 2468024680 0987654321
a. 1 ABCDEFRG –this format is for encoding the 1st track only – ex: 1 xxxxxxxx
b. 2 12345678 – this format is for encoding the 2nd track only – ex: 2 11111111
c. 3 2468024680 –this format is for encoding the 3rd track only – ex: 3 00000000
d. 4 HIJKLMN 12345678 - this format is for encoding both the 1st & the 2nd tracks
ex: 4 xxxxxxxx 11111111
e. 5 12345678 2468024680 - this format is for encoding both the 2nd & the 3rd
tracks, ex: 5 11111111 00000000
f. 6 HIJKLMN 2468024680 - this format is for encoding both the 1st & the 3rd
tracks, ex: 6 xxxxxxxx 00000000
g. 7 HIJKLMN 2468024680 0987654321 - this format is for encoding all of the 3
tracks, ex: 7 xxxxxxxx 111111111 00000000
[Import/Export]
A. Import Driver Setting: You can import [Device] and [Color] settings from
other computers to your computer.
B. Export Driver Setting: You can export the [Device Option] [ and Color]
settings from your computer to other computers.
※Notice: The Import/Export function on this page covers the settings for
[Device Option] and [Color] and excludes the parameters you set in
[Printing Area], please note. Please refer to page 22 for
importing/Exporting the settings of the [Printing Area].
A
B

www.hi-ti.com
28
[Lamination]
This function is available for CS310i / CS320i only.
A: Lamination Side: 4 options to do lamination: No Lamination, Front Side
Lamination, Back Side Lamination, Double Side Lamination.
B: Lamination Type: Lamination ribbon options.
C: Transfer Dwell Time: The speed of the transfer to do lamination.
D: Transfer Temperature: The temperature of the transfer to lamination.
E: Lamination Position: To adjust the initial / terminal positions of lamination.
[About]
This section describes the detailed information of this driver and website
address for any inquiries.
A
B
C
D
E
www.hi-ti.com
29
Chapter 3 Operation Instruction
In this Chapter, you will find a detailed introduction about the operation through
the LCD display.
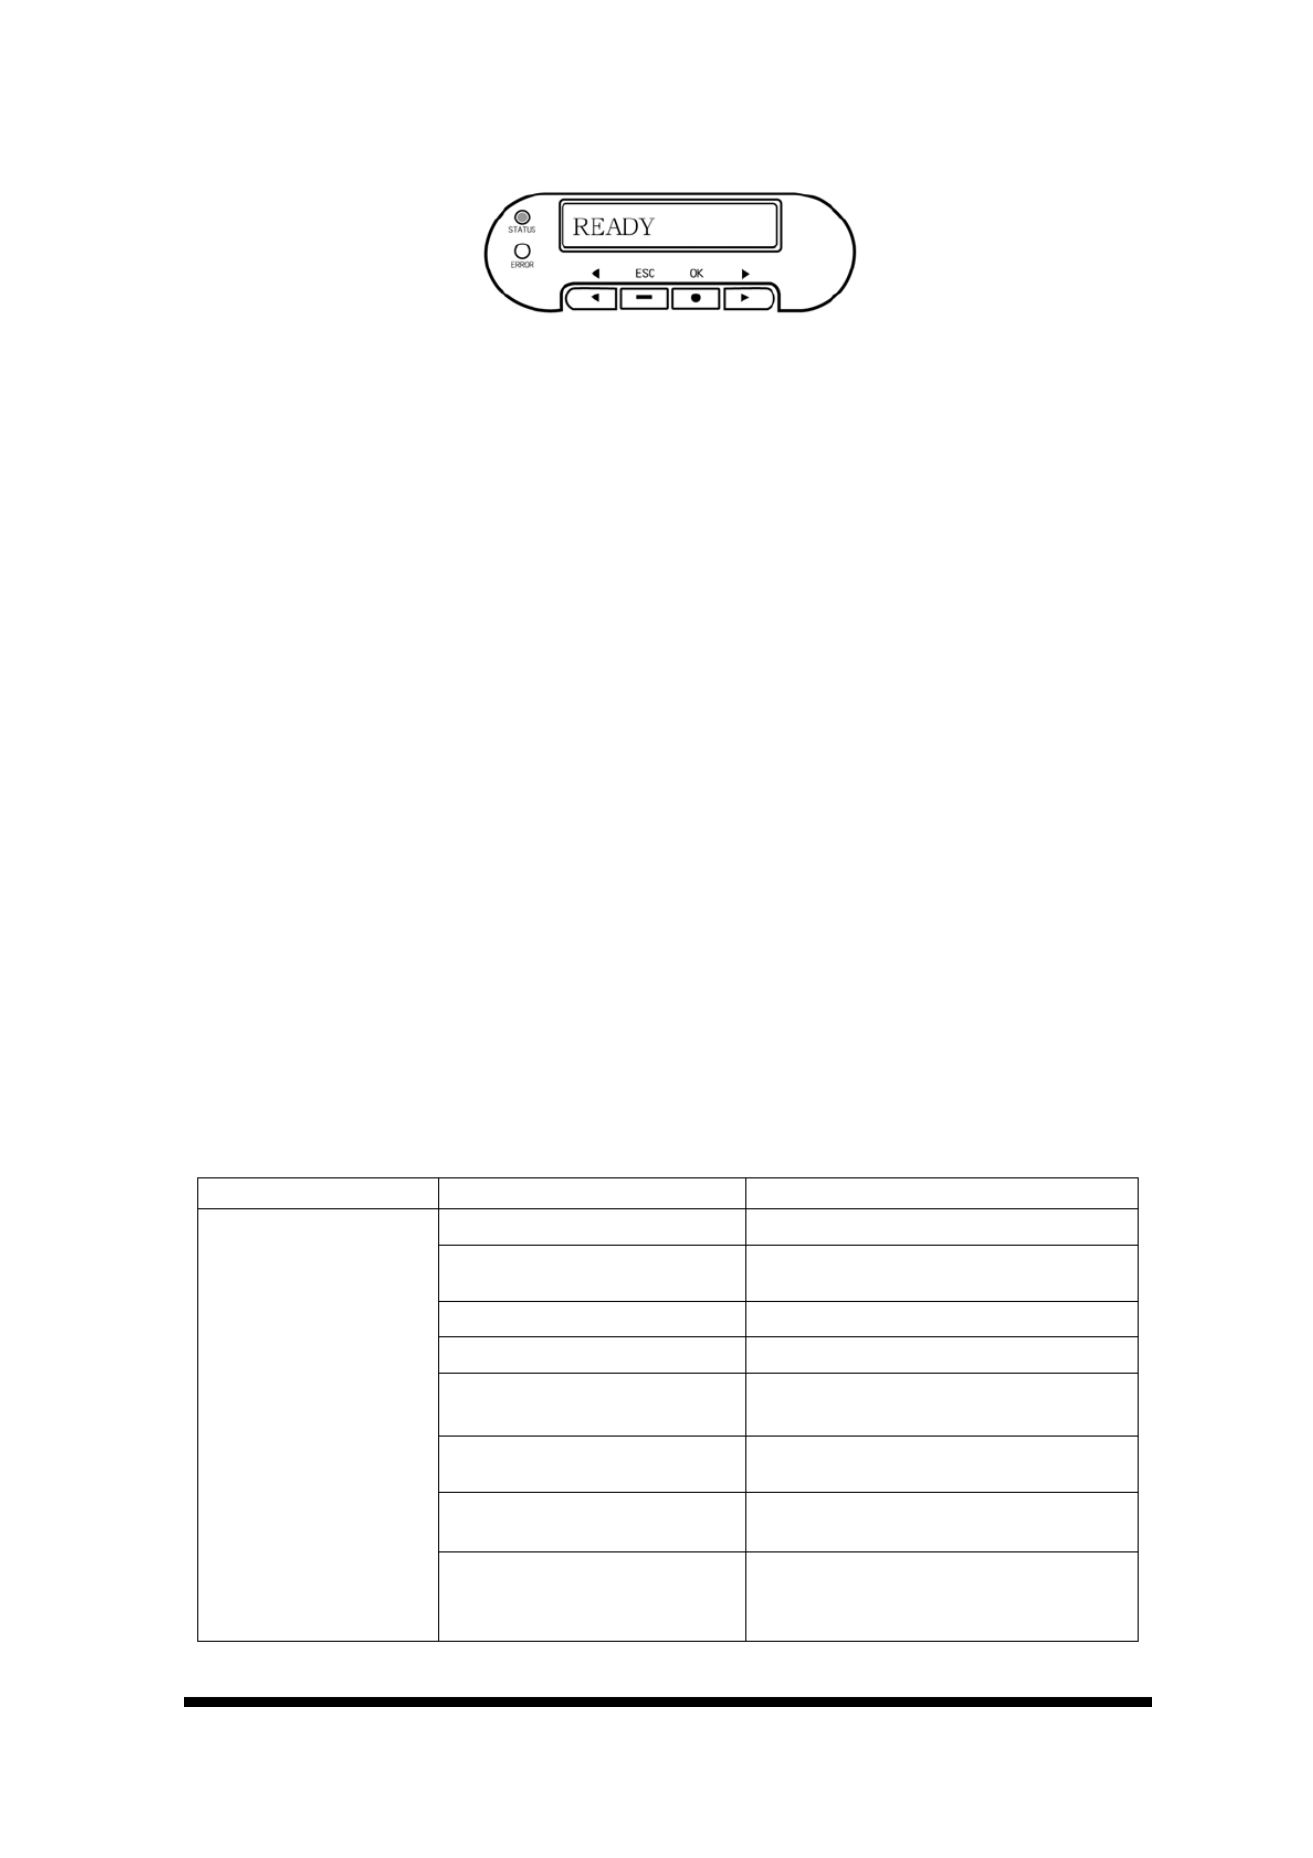
3-1 LCD display instruction
The printer is equipped with an LCD Display and four buttons, which give access
to printer menus. Turn the printer power switch on, the printer system will detect
the printer status and feedback the error messages on the LCD display if any
error would occur. Some errors may be resolved by troubleshooting instructions
from the LCD display. If everything is normal, then the LCD display will display:
“Ready”.
[ ◄ ] : Return to the previous option
[ ► ] : Go to the next option
[OK] / [●] : Go to the next setting menu
[ESC] / [-
-
-
--] : Return to the previous setting menu
3-2 Operation instruction
When the LCD display shows “READY”, you can press ”OK” button to check
the printer status or to clean the printer. It will go to the main setting menu as
follows.
Main Menu Sub Menu Description
..RIBBON TYPE The ribbon type in the printer.
..CARD TYPE The card thickness setting for the
printer.
..MODEL NAME The printer model name.
..FW VERSION The firmware version.
..IC CARD R/W The IC card reading/writing function.
(YES/NO)
..MAG CARD R/W The magnetic stripe card
reading/writing function. (YES/NO)
..RF CARD R/W The contactless card reading/writing
function. (YES/NO)
.DEVICE INFO
..RIBBON CH1 The ribbon sensor switch. You can
select the sensor CH1 or CH2 here.
(CH1/CH2)

www.hi-ti.com
30
..CARD OUT SNR The sensor for cards in the
card-insert mechanism. (ENABLE /
DISABLE). The default setting is
[DISABLE]. However, once you
switch [DISABLE] to [ENABLE] and
there are no cards in the Card Input
Hopper, the error message [CARD
OUT] will be shown on the LCD
display. If the [Card Out] message
continues to exist, even after you
have inserted cards into the Card
Input Hopper and restart your
computer, then please switch
[ENABLE] to [DISABLE] and refer to
Chapter 5 Troubleshooting→ “The
Error Message shown on the
Computer Monitor and the
Solutions”→ “Card out or feeding
error” OR “The Error Message
shown on the LCD Display and the
Solutions” → ”CARD OUT”. After
above procedures if this error
message still persists, please contact
the HiTi customer service center.
..ADF SENSOR SEL The sensors for card (ADF SENSOR
1/ADF SENSOR 2). When the card
feeding process fails, you can try to
switch ADF SENSOR 1 or ADF
SENSOR 2 for troubleshooting. If the
problem can not be resolved, please
refer to Chapter 5 Troubleshooting→
“The Error Message shown on the
Computer Monitor and the
Solutions”→ “Card out or feeding
error” OR “The Error Message
shown on the LCD Display and the
Solutions” → ”CARD OUT”. After
above procedures fail and if the card
feeding process still fails, please
contact the HiTi customer service
center.
. ..CLEANING MODE PUT CLEANING KIT &
OPEN THE DOOR &
CLEAN PROCESSING
Please follow the instruction on the
LCD Display. Remove the peel-off
film from the cleaning card. Insert the
cleaning card and open the ribbon
door. Press [OK] button to initiate the
cleaning process.
} }

www.hi-ti.com
31
Chapter 4 How to maintain your printer*
In order to preserve the performance of the printer and the print quality, please
remember to maintain your card printer regularly. We will introduce a detailed
cleaning procedure in the following sections.
Please pay attention to the following when you use the printer.
1. For a better printing quality, we highly recommend to use the printer in an
indoor- and air conditioned environment, and when storing the card printer,
please put it into plastic bag or use a dust cover to avoid dust accumulation.
2. Please don’t touch the Thermal Printing Head or use any type of liquid
detergent to clean it.
3. Please turn off the power after use to avoid printing head damage.
4. Please do NOT re-use any ribbons and cards that have already been printed
on, or ribbons or cards not manufactured by HiTi. It may cause a card jam or
a printing error, and subsequently cause damage the printer. In that case, the
warranty of your printer would become void.
5. Please use the HiTi cleaning kit to clean the printer after every 400 prints.
*Remark: Please follow the above instructions to maintain CS310i / CS320i.

www.hi-ti.com
32
4-1 Clean Cleaning Roller
1. Switch the card printer off.
2. Slide the ID button and lift the ribbon door up.
3. Open the cover of the cleaning module and take the cleaning roller off, as
illustrated.
4. Roll the cleaning roller against the adhesive side of the cleaning card or against
the adhesive tape to remove the dust from the cleaning roller.
5. Please insert the cleaning roller spool into the spool receivers. Turn the
cleaning roller after installation; if it turns smoothly, the installation of the
cleaning roller is correct. If it does not turn smoothly, please re-install the
cleaning roller.

www.hi-ti.com
33
4-2 Clean Print Path
z In Stand alone mode
1. Turn the power switch of the printer on.
2. The printer will check the system status automatically, and show “Ready” on
the LCD display.
3. Click the [<] or [>] button, and select [Cleaning mode] to begin the cleaning
process.
4. The cleaning process will be displayed on the LCD display. Please follow the
instructions step by step.
a. Take off the ribbon cassette.
b. Please remove the 3M peel-off film on both sides of the cleaning card and
put it into the Card Input Hopper.
c. Press the [OK] button to begin the cleaning process.
5. The Cleaning process is finished.
*For CS310i / CS320i, HiTi recommends users to implement the above
procedures to clean the print path of the card printer before cleaning the print
path of the laminator.
The procedures for cleaing the print path of the laminator are shown as follows:
a. Follow Step 1 – 3 and the LCD will show [Cleaning Path].
b. Press [<] or [>] button to select [Lamination Cleaning Path], then press [OK]
c. Follow Step 4 – 5 to complete the cleaing process.
z In PC link mode
1. Turn the power switch of the printer on.
2. Connect the printer to the PC with the USB cable.
3.Find the driver settings under Control Panel/ Printers. Choose HiTi
CS-310/320 and right-click mouse button, and select “Properties”.
4. Select the [Tools] and press the [Cleaning Tools] button.
5. Follow the cleaning process,
a. Open the cover of the printer.
b. Take off the ribbon cassette.
c. Put the cleaning card into the Card Input Hopper. Please remove the
release paper from the cleaning card and put the cleaning card into the Card
Input Hopper.
d. Press the [Cleaning] button to begin the cleaning process.
6. The Cleaning process is finished.
* Clean print path in PC link mode is available for Card printer only NOT for
CS310i / CS320i.
Notices:
1. Do not put your hand into the card printer during the cleaning process.
2. Do not close the cover of the printer during the cleaning process.
3. Do not turn off the power or unplug the USB cable during the cleaning
process.
Specyfikacje produktu
| Marka: | HiTi |
| Kategoria: | drukarka |
| Model: | CS-320 |
Potrzebujesz pomocy?
Jeśli potrzebujesz pomocy z HiTi CS-320, zadaj pytanie poniżej, a inni użytkownicy Ci odpowiedzą
Instrukcje drukarka HiTi

12 Stycznia 2025
3 Października 2024
16 Września 2024
11 Września 2024
11 Września 2024
9 Września 2024
8 Września 2024
8 Września 2024
8 Września 2024
7 Września 2024
Instrukcje drukarka
- drukarka Sony
- drukarka Samsung
- drukarka LG
- drukarka Xiaomi
- drukarka Sharp
- drukarka Huawei
- drukarka Lenovo
- drukarka Epson
- drukarka Fujitsu
- drukarka Roland
- drukarka Panasonic
- drukarka StarTech.com
- drukarka Canon
- drukarka Fujifilm
- drukarka MSI
- drukarka Toshiba
- drukarka D-Link
- drukarka Citizen
- drukarka HP
- drukarka Brother
- drukarka Honeywell
- drukarka Kodak
- drukarka Testo
- drukarka Primera
- drukarka Xerox
- drukarka Godex
- drukarka Olivetti
- drukarka Zebra
- drukarka Dell
- drukarka Digitus
- drukarka AgfaPhoto
- drukarka Kyocera
- drukarka Ricoh
- drukarka Seiko
- drukarka Renkforce
- drukarka Thomson
- drukarka AVM
- drukarka Velleman
- drukarka Dymo
- drukarka Panduit
- drukarka Olympus
- drukarka OKI
- drukarka Mitsubishi
- drukarka Intermec
- drukarka NEC
- drukarka Polaroid
- drukarka Konica Minolta
- drukarka Bixolon
- drukarka Pantum
- drukarka Olympia
- drukarka Datamax O'Neil
- drukarka DNP
- drukarka Equip
- drukarka ZKTeco
- drukarka TSC
- drukarka Microboards
- drukarka Triumph-Adler
- drukarka Fargo
- drukarka Entrust
- drukarka Kern
- drukarka Brady
- drukarka Tomy
- drukarka Lexmark
- drukarka Sagem
- drukarka Nilox
- drukarka Argox
- drukarka Royal Sovereign
- drukarka Minolta
- drukarka Oce
- drukarka Paxar
- drukarka IDP
- drukarka Metapace
- drukarka Ultimaker
- drukarka Ibm
- drukarka CSL
- drukarka Toshiba TEC
- drukarka Frama
- drukarka Builder
- drukarka Kogan
- drukarka Star Micronics
- drukarka Posiflex
- drukarka Dascom
- drukarka GG Image
- drukarka Vupoint Solutions
- drukarka Elite Screens
- drukarka DTRONIC
- drukarka Phoenix Contact
- drukarka Videology
- drukarka Epson 7620
- drukarka Star
- drukarka EC Line
- drukarka Colop
- drukarka Approx
- drukarka Fichero
- drukarka Raspberry Pi
- drukarka Unitech
- drukarka Middle Atlantic
- drukarka Evolis
- drukarka Tally Dascom
- drukarka Custom
- drukarka Nisca
- drukarka Sawgrass
- drukarka Mutoh
Najnowsze instrukcje dla drukarka

9 Kwietnia 2025

9 Kwietnia 2025
9 Kwietnia 2025

9 Kwietnia 2025

9 Kwietnia 2025
4 Kwietnia 2025
3 Kwietnia 2025
3 Kwietnia 2025
3 Kwietnia 2025

2 Kwietnia 2025