Instrukcja obsługi GPX PJS909
Przeczytaj poniżej 📖 instrukcję obsługi w języku polskim dla GPX PJS909 (2 stron) w kategorii Projektor. Ta instrukcja była pomocna dla 6 osób i została oceniona przez 2 użytkowników na średnio 4.5 gwiazdek
Strona 1/2
INDOOR/OUTDOOR
PROJECTOR SCREEN
User’s Guide for Model PJS909-01
For the most up-to-date version of this User’s Guide, go to www.gpx.com
Please read through this user guide before utilizing the screen.
Correct usage and maintenance will ensure a long product life.
Care & User Instructions
• Please be sure to distinguish between the front and back of the screen fabric when setting up the
projection screen. CineWhiteTM (front projection) has a black backing and Wraith Veil (rear projection)
is labeled front, back.
• Dust, dirt and scratches on the projection surface will affect the picture quality, please take note of the
points below to prevent that from occurring:
1. Do not touch the projection surface with your hands
2. Do not write or draw on the projection surface
3. Do not use fingers or sharp objects to point on the projection surface; this will damage the screen
material.
4. Use a soft-damp cloth to clean the projection surface; do not use chemical cleaning agents or alcohol.
5. Use clean water when dampening the cleaning cloth and do not rub against the material to clean it.
• After using the screen, disassemble it and store it in the carrying bag provided.
• To avoid damage and injury, the screen should only be operated by adults.
Product Description
Design: The aluminum frame is designed to be light weight and easily operated making it easy to carry,
assemble and disassemble.
Screen Fabric: The screen fabric is attached to the rectangular frame and held in place by several press
studs, which ensure and evenly stretched and flat surface. The CineWhiteTM
(front projection) and
WraithVeil (rear projection) screen materials are durable and can be folded many times without causing
damage or distortion to the surface.
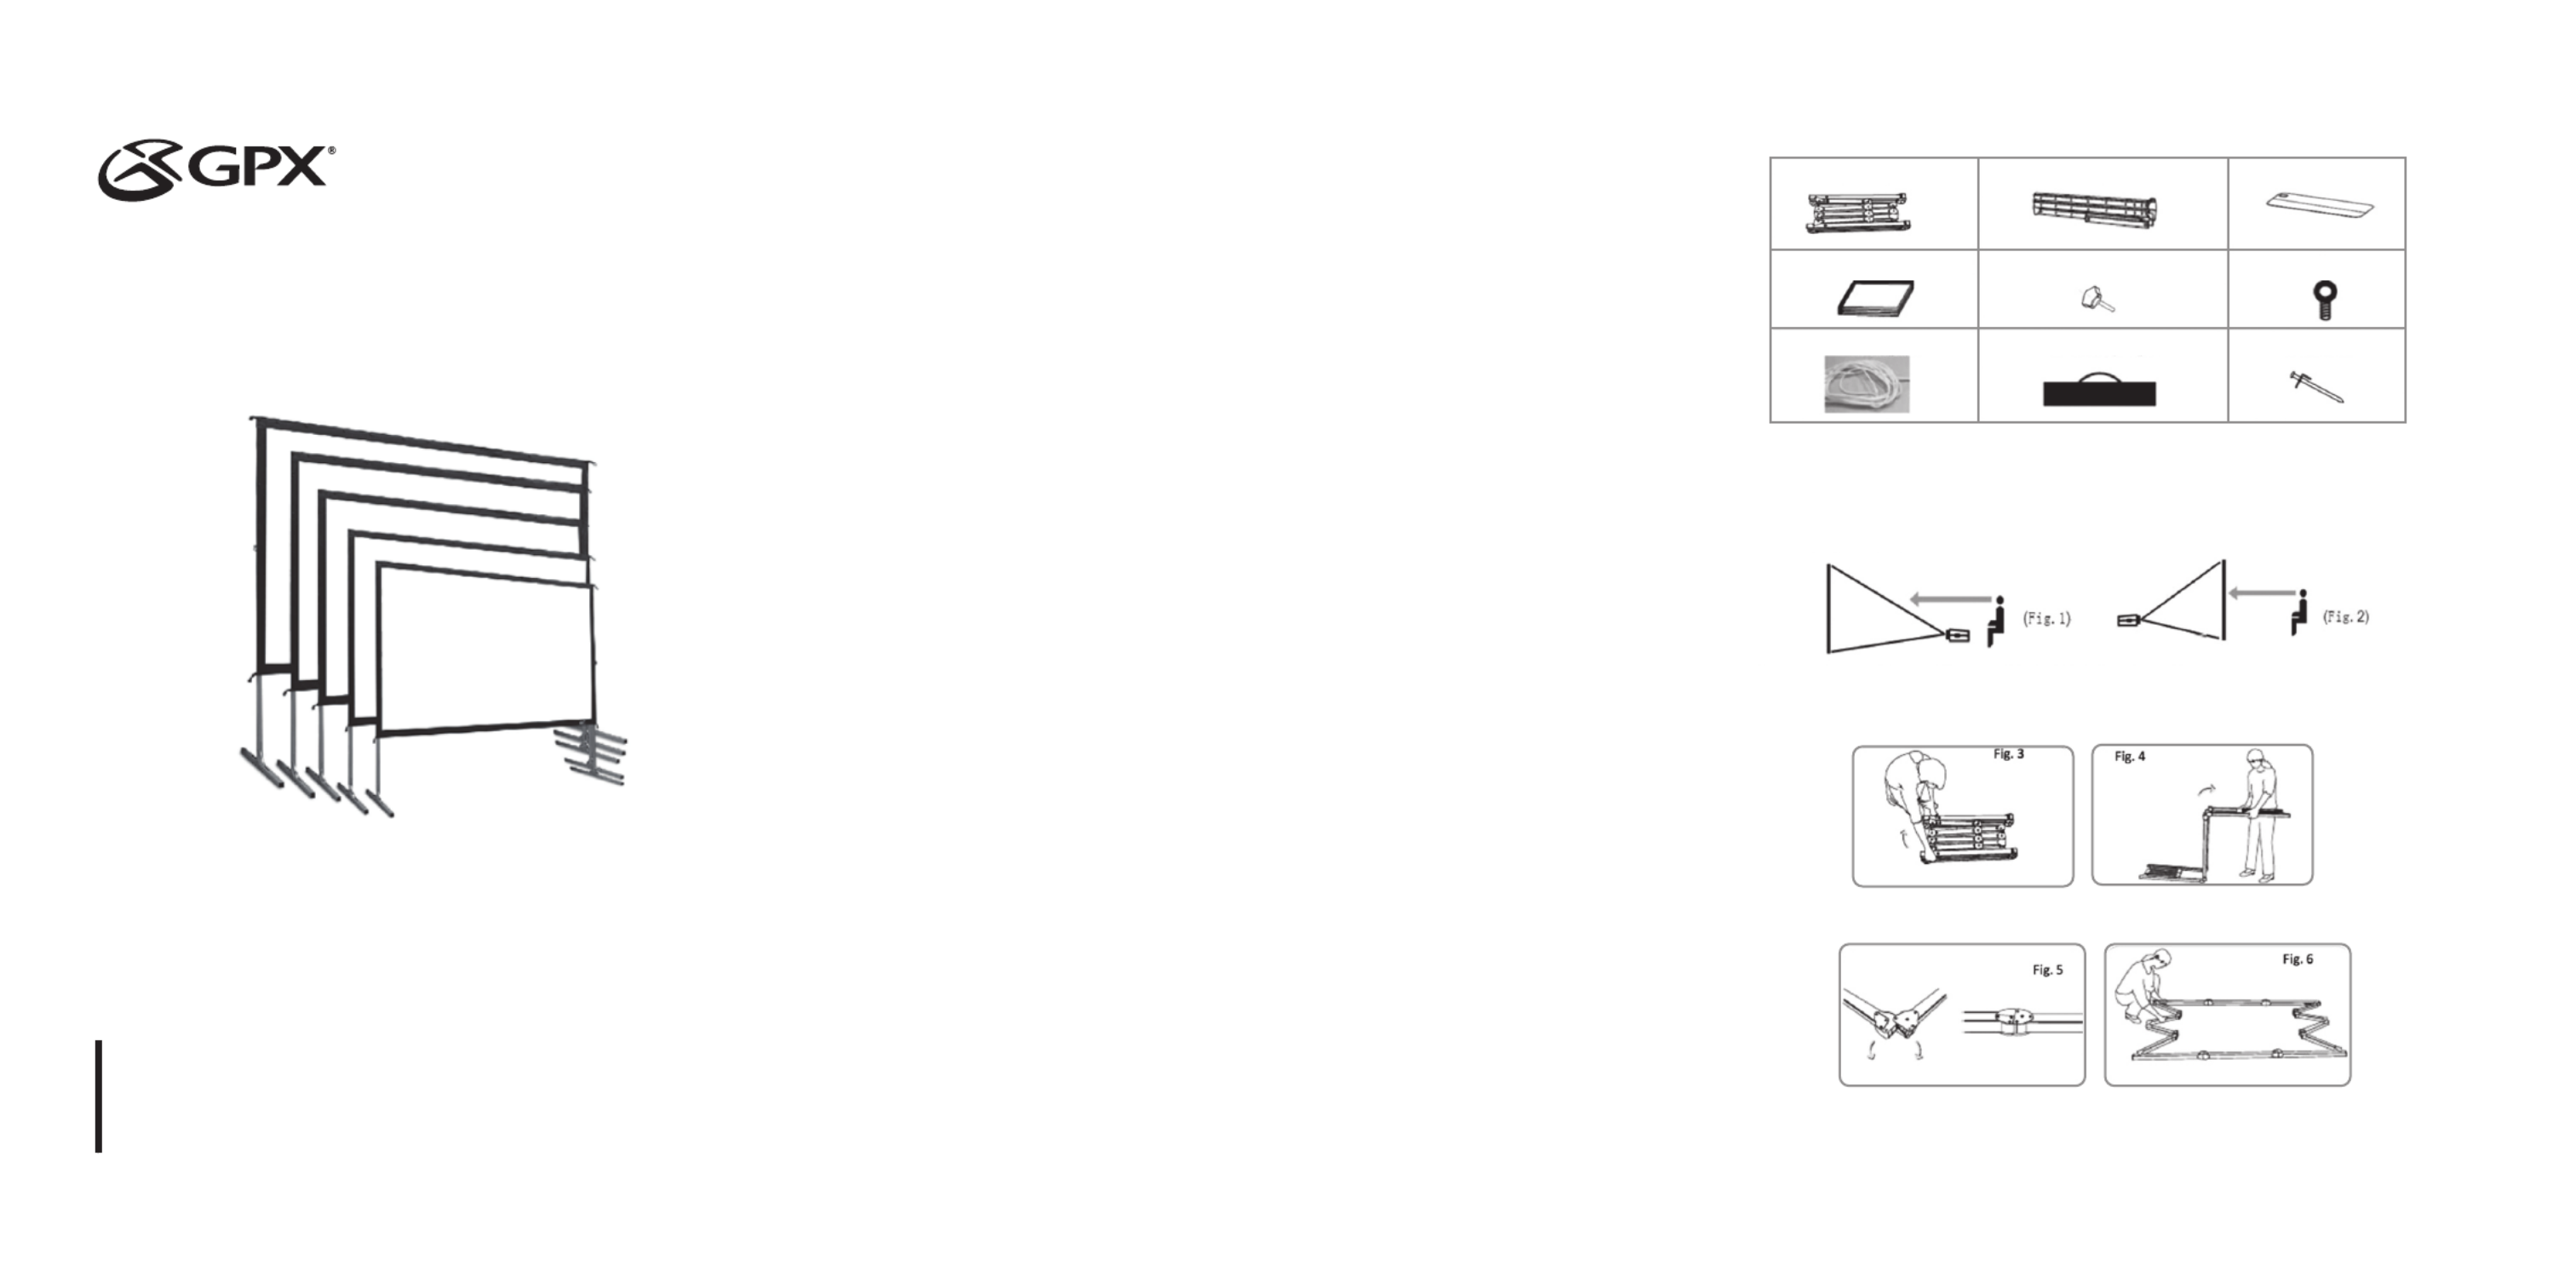
1 2
A. Folding frame x 1
D. Projection screen material x 1
G. Rope x 2
B. Left and right folding legs x 2
E. Knob screw x 2
H. Carrying Bag x 1
C. Screen material bag x 1
F. Eye bolt x 2
I. Stake x 4
Parts Diagram
Note: The parts list above is subject to change without notice.
Correct usage of the projection screen will ensure better viewing results.
For front projection, assemble and view the screen as indicated in Fig. 1
For rear projection, assemble and view the screen as indicated in Fig. 2
Frame Assembly and Screen Material Attachment
1. Take the folding frame (A) carrying bag (H) out of the and place it on a flat surface. Unfold the longer
sections first as shown in Fig. 3-4.
2. Unfold the frame until the latch on the hinge “ clicks” into place. Repeat the procedure for the shorter
sections. (Fig. 5-6)

8. To secure the frame, place a into each hole locatedstake (I)
on the frame footing, and hammer it into the ground. Finally,
tie the 4 to the stakes to prevent the screen fromropes (G)
tilting or failing over. As shown in fig. 18.
Screen Disassembly
1. Remove and from the ground.ropes (G) stackes (I)
2. Unlatch the hinged support bars on front side of each leg so that it is bent and fold that half of the legs
up for the next step.
3. Slowly lower the screen to the ground (towards the closed legs). Two people are needed for this step.
4. Unlatch the hinged support bars and fold down other half of legs.
5. Loosen and remove the ropes, from each leg.knob screws (E) and eye bolts (F)
6. Remove the frame from the legs (B) folding frame (A).
7. Detach the from the by carefully unsnapping each button asscreen material (D) folding frame (A)
shown.
8. Fold in half, folding the bottom of the screen towards the top. Then, fold in halfscreen material (D)
again in the same way. Lastly, fold the material into thirds to condense the length, see Fig. 19-21.
• If you prefer to roll the material, instead of folding into thirds, roll from one end to the other after
folding in half twice.
4
9. Unlatch the hinged support bars in each corner of the folding frame (A).
10. Press in the silver locking buttons, near the folding joints, and slowly gather the sides of the folding
frame.
11. Again, press in the silver locking buttons. Then, pick up one end of the folding frame, and walk it to
the other end, folding the longer sections into thirds.
12. Store the screen in the provided Be surecarrying bag (H).
to place folding frame, legs, and smaller parts into the
carrying bag first and place the material on top to keep
material from creasing or tearing.
5
3
3. Make sure all 4 corners of the frame are at a 90° angle and the hinged support bar is straight and not
bending. (Fig. 7-9)
5. Take the screen material (D) screen material bag (C) out of the and align the corners of the screen
material with the inside corners of the frame. Unfold as shown in the diagram (Fig. 11-12)
4. Insert the into the openings locted at the left andframe legs (B)
right bottom sides of the Secure them byfolding frame (A).
fastening the into the adjacent hole. Next, screwknob screw (E)
the into the openings located at the top of theeye bolts (F)
frame (Fig. 10).
6. Once the is fully extended, secure the material by snapping the buttons onto thescreen material (D)
frame studs as shown in Fig. 13-15. Fasten the buttons in the following order AB CD EF GH.
7. Tie 2 pieces of (1 on the left and 1 on the right) to the that are located at the top of therope eye bolts (F)
frame. Next, lift the screen up while simultaneously opening the frame legs. Two people are needed for
this step. Fig. 16-17
Specyfikacje produktu
| Marka: | GPX |
| Kategoria: | Projektor |
| Model: | PJS909 |
Potrzebujesz pomocy?
Jeśli potrzebujesz pomocy z GPX PJS909, zadaj pytanie poniżej, a inni użytkownicy Ci odpowiedzą
Instrukcje Projektor GPX

3 Października 2024
3 Października 2024
24 Września 2024
24 Września 2024
24 Września 2024
Instrukcje Projektor
- Projektor Sony
- Projektor Yamaha
- Projektor Samsung
- Projektor Leica
- Projektor LG
- Projektor Xiaomi
- Projektor Sharp
- Projektor Lenovo
- Projektor Philips
- Projektor Livoo
- Projektor Acer
- Projektor Epson
- Projektor Hisense
- Projektor Panasonic
- Projektor Promethean
- Projektor Canon
- Projektor Viewsonic
- Projektor Asus
- Projektor Medion
- Projektor OK
- Projektor Lenco
- Projektor Toshiba
- Projektor D-Link
- Projektor Blaupunkt
- Projektor Salora
- Projektor Casio
- Projektor HP
- Projektor Prixton
- Projektor Strong
- Projektor Steinel
- Projektor Kodak
- Projektor Smart
- Projektor ZTE
- Projektor JVC
- Projektor Dell
- Projektor Auna
- Projektor Dahua Technology
- Projektor Eurolite
- Projektor Ricoh
- Projektor Krüger&Matz
- Projektor Renkforce
- Projektor Klarstein
- Projektor Pyle
- Projektor Marantz
- Projektor Showtec
- Projektor Mitsubishi
- Projektor ION
- Projektor XGIMI
- Projektor NEC
- Projektor Polaroid
- Projektor Sanyo
- Projektor Optoma
- Projektor Vogel's
- Projektor Hama
- Projektor Cameo
- Projektor Barco
- Projektor 3M
- Projektor Nebula
- Projektor Anker
- Projektor Hitachi
- Projektor Futurelight
- Projektor RCA
- Projektor BenQ
- Projektor Technaxx
- Projektor Overmax
- Projektor Odys
- Projektor EasyMaxx
- Projektor Smartwares
- Projektor Adj
- Projektor Miroir
- Projektor Stairville
- Projektor Elmo
- Projektor Planar
- Projektor Acco
- Projektor Aiptek
- Projektor ASK Proxima
- Projektor Reflecta
- Projektor Yaber
- Projektor Da-Lite
- Projektor Steren
- Projektor Eiki
- Projektor Derksen
- Projektor InFocus
- Projektor Bauer
- Projektor Naxa
- Projektor Vivitek
- Projektor Emtec
- Projektor Celly
- Projektor Vankyo
- Projektor Laserworld
- Projektor Ibm
- Projektor Maxell
- Projektor La Vague
- Projektor Kogan
- Projektor Tzumi
- Projektor EKO
- Projektor MicroVision
- Projektor Elite Screens
- Projektor Celexon
- Projektor Christie
- Projektor Fun Generation
- Projektor Beghelli
- Projektor Magnavox
- Projektor PLUS
- Projektor Varytec
- Projektor AOpen
- Projektor Ultimea
- Projektor Dracast
- Projektor Dukane
- Projektor Dream Vision
- Projektor Knoll
- Projektor DTS
- Projektor Touchjet
- Projektor Boxlight
- Projektor AAXA Technologies
- Projektor Mimio
- Projektor AWOL Vision
- Projektor Smart Tech
- Projektor Atlantis Land
- Projektor KickAss
- Projektor Microtek
- Projektor VAVA
- Projektor Panamorph
- Projektor Mirabella Genio
Najnowsze instrukcje dla Projektor

9 Kwietnia 2025
9 Kwietnia 2025

2 Kwietnia 2025

5 Marca 2025
5 Marca 2025

3 Marca 2025

1 Marca 2025
26 Lutego 2025

20 Lutego 2025
20 Lutego 2025