Instrukcja obsługi Gigabyte M7700B
Przeczytaj poniżej 📖 instrukcję obsługi w języku polskim dla Gigabyte M7700B (2 stron) w kategorii mysz. Ta instrukcja była pomocna dla 3 osób i została oceniona przez 2 użytkowników na średnio 4.5 gwiazdek
Strona 1/2
Hardware Installation
Introduction
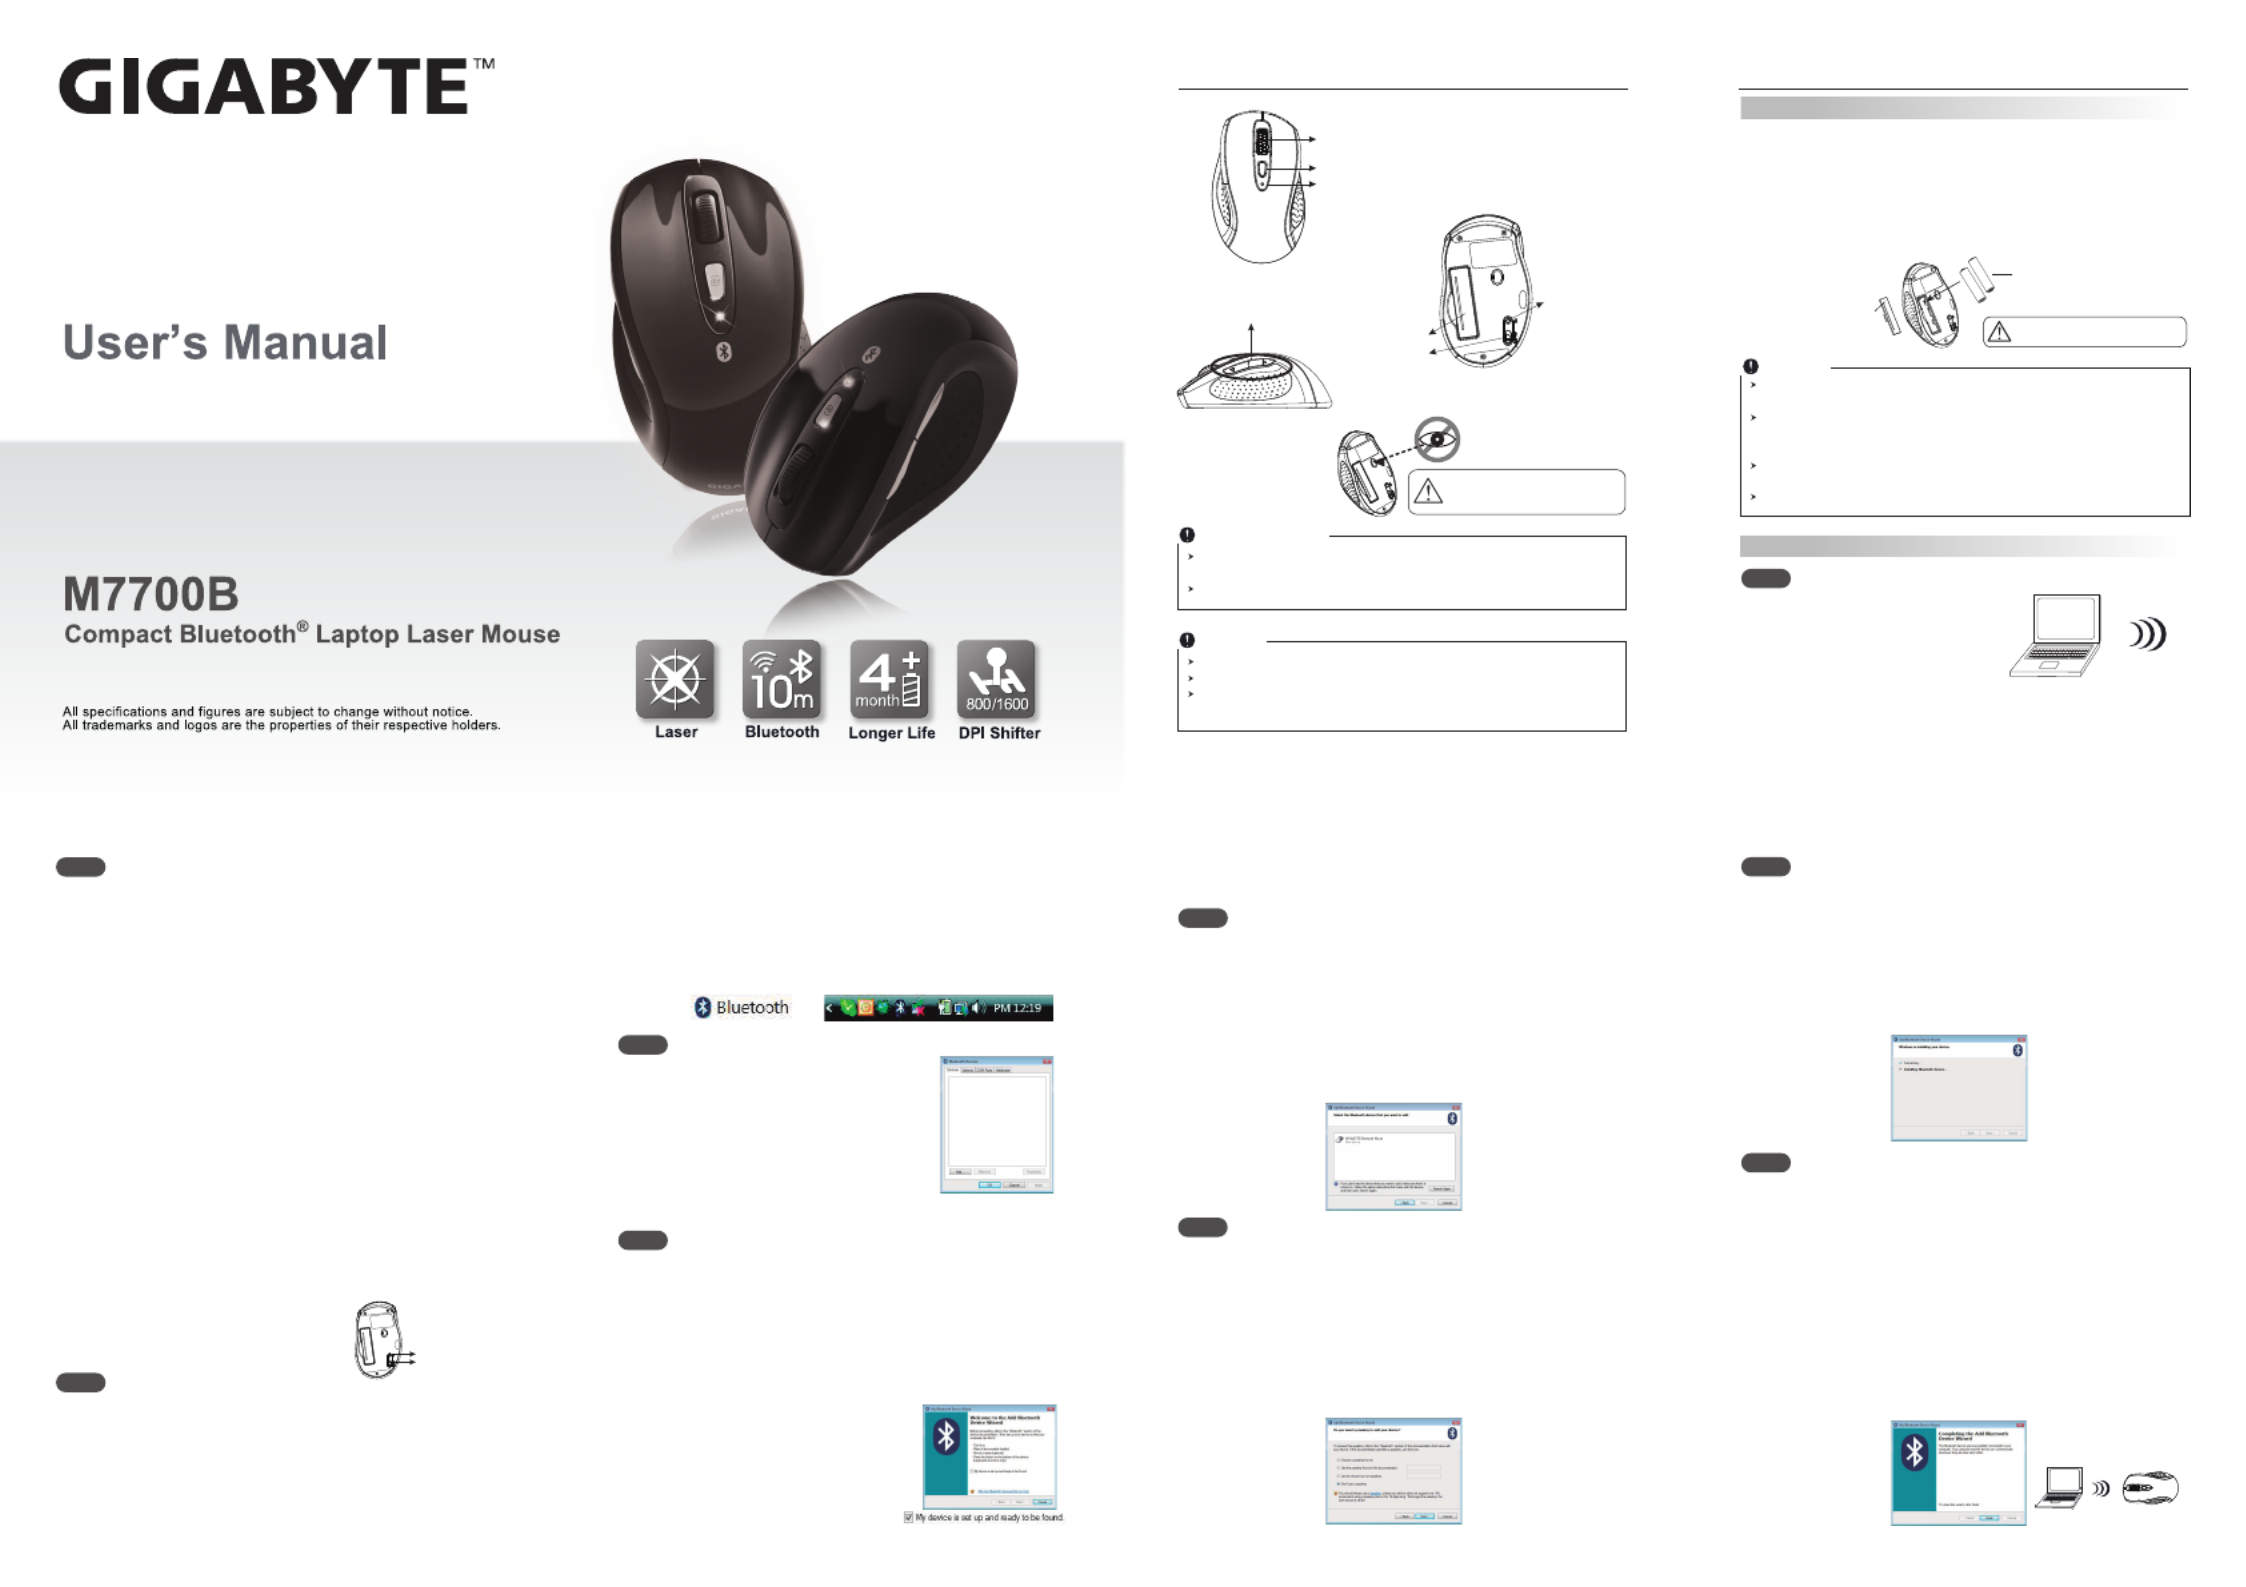
Mouse
Wheel button
800/1600 DPI shifter
Low power /
resolution switch indicator
Internet Forward &
Backward button
ID reset button
Power on/off switch
Battery cover
Please direct theDO NOT
laser beam at anyone's eyes.
+
-
A wrong battery placement
may cause batteries overheat.
Battery compartment cover
2 * AAA batteries
PC
ID reset button
Power on/off switch
Note
This Product doesn’t include Bluetooth dongle.
The mouse easily connects to notebooks built in Bluetooth technology.
The mouse also can be connected to Bluetooth dongle through your Bluetooth
dongle driver, it is not guaranteed 100% compatile.
Safety Notice
This product complies with IEC 60825-1, Class I laser product. (for Laser
mouse models only.)
The product complies with FCC and CE rules.
PC
a. Remove the battery compartment cover on the bottom case of the mouse
b. Fit in the batteries accordingly to the diagram indicated in the battery
cabinet.
c. Close the battery compartments cover properly.
d. Make sure the Power on-off swich on the bottom of the mouse is ON.
e. The Low Power LED on the wheel bar will blink 3 seconds if the mouse
power is on.
Note
The
unit offers a strong power saving management. Once the mouse accesses
the sleeping mode, " to click any button of the mouse" is compulsory to wake it up.
Power on/off:
Power on/off switch is designed to save the batteries power while non-usage of
a longer period.
The red LED on the scroll bar of the mouse is a low batteries power indicator.
It indicates that batteries inside the mouse need to be replaced.
Make sure that you are not working the mouse on glossy or reflective surfaces.
Part 1. Insert the batteries
English: Turn on your PC.
Français: Allumez votre PC.
Español: Encender tu PC.
Português: Ligue o seu PC.
Deutsch: Schalten Sie Ihren PC ein.
Русский: Включите компьютер.
Türkçe: Bilgisayarınızı açın.
中文 : 開啟您的電腦.
Part 2. Bluetooth Pairing
Step a
English: Insert battery properly (please refer Part 1) make sure that
mouse is in power on status. Push ID Button to enter
connecting status, and low power LED will be flashing slowly.
Français:
Insérer la batterie correctement (veuillez vous référer la partie 1)
assurez vous que la souris est sur le statut allumé. Poussez le
bouton ID pour entrer le statut de connexion, et la LED de
faible puissance clignotera lentement.
Español:
Insertar batería correctamente (como presentación en Parte 1).
Asegurar el ratón esta con energia. Pulsar el ID botón para
entrar el estado de conección, y el LED indicador de bajo
energia comenzará relampaguear lentamente.
Português:
Insira a bateria correctamente (consulte a Parte 1) e certifique-se
de que o rato está no estado ligado. Prima Botão ID para
entrar o estado de ligação, e o LED de energia baixa irá piscar
lentamente.
Deutsch: Legen Sie die Batterien ein (siehe Teil 1) und stellen Sie
sicher, dass die Maus eingeschaltet ist. Drücken Sie die ID
Taste, um den Verbindungsstatus anzuzeigen. Die LED
Batterieleuchte wird langsam blinken.
Русский: Установите батарею (см. часть 1). Убедитесь, что мышь
включена. Нажмите кнопку ID, чтобы войти в состояние
подключения. Светодиодный индикатор пониженного
энергопотребления медленно замигает.
Türkçe: Pilinizi uygun şekilde takın (Bölüm 1) ve mouse’un açık konuma
getirin. ID butonuna basarak bağlantı durumunu aktif edin.
Pil seviyesinin düştüğü durumlarda LED ışığı yanıp sönecektir.
中文: 將電池放入您的滑鼠內(請參閱Part 1)
並且確認滑鼠電源是開啟
的。按下無線ID連結按鈕
Step b
Step c
Step e
English:
Choose “
GIGABYTE Bluetooth Mouse
” and click “Next”.
Français:
Choisissez “Nouveau dispositif de souris Bluetooth” et cliquez Suivant”.
Español:
Seleccionar “Bluetooth Ratón Apararo Nuevo” y pinchar en
“Siguiente”.
Português:
Escolha “Novo Dispositivo do Rato Bluetooth” e clique “Seguinte”.
Deutsch:
Wählen Sie “Bluetooth Mouse Neues Gerät” und klicken auf “Weiter”.
Русский: Выберите пункт «Новая мышь Bluetooth» и нажмите кнопку
«Далее».
Türkçe:
" Bluetooth Mouse New Device"I seçin ve “Next” butonuna basın.
中文: 請選擇「GIGABYTE Bluetooth Mouse」,並點選「下一步」
Step f
English:
Now Bluetooth device is in connecting status.
Français:
Maintenant le dispositif Bluetooth est en statut de connexion.
Español:
Ahora Bluetooth aparato es en estado de conección.
Português:
Agora o dispositivo Bluetooth está no estado de ligação.
Deutsch:
Bitte machen Sie einen Haken bei “Keinen Hauptschlüssel
verwenden” und klicken auf “Weiter”.
Русский: Ваше устройство Bluetooth подключено!
Türkçe:
Bluetooth cihazı bu esnada bağlantıyı gerçekleştirir.
中文 : Windows 正在安裝藍芽裝置
Step h
English:
System will show installment finished in dialogue box, then click
“finish”.
Français:
Le système affichera la fin de l'installation dans la boite de dialogue,
puis cliquez “Terminé”.
Español:
Sistema se va a demostrar la ventana de terminación de
instalación, pinchar “Terminar”.
Português:
Sistema mostrará que a instalação está concluída na caixa de
diálogo, em seguida clique “concluir”.
Deutsch:
Das Bluetooth-Gerät ist nun verbunden.
Русский: Система выведет диалоговое окно об успешном
завершении установки. Нажмите кнопку «Завершить».
Türkçe:
Sistem, kurulum işleminin bittiğini gösterir bir pencere açar,
“finish” butonuna basarak kurulumu tamamlayın.
中文 : 系統正在完成新增藍芽裝置精靈,接下來請點選「完成」
Step i
Step g
English: Click “add”.
Français:
Cliquez “ajouter”.
Español:
Pinchar “añadir”.
Português:
Clique “adicionar”.
Deutsch: Klicken Sie auf “Hinzufügen”.
Русский: Нажмите кнопку «Добавить».
Türkçe: "Add" butonunu tıklayın.
中文: 點選 「新增」
Step d
English: Click “Bluetooth icon” to open “Bluetooth device” in control
panel or toolbar.
Français:
Cliquez “Bluetooth Icône” pour ouvrir “Dispositif Bluetooth” dans
le Panneau de commande ou barre d’outils.
Español:
Pinchar en “Bluetooth icono” para abrir “Bluetooth Aparato” en
panel de control o barra de herramiento.
Português:
Clique “ícone Bluetooth” para abrir “Dispositivo Bluetooth” no
painel de controlo ou a barra de ferramentas.
Deutsch: Klicken Sie auf das “Bluetooth Symbol”, um “Bluetooth-Geräte”
in der Systemsteuerung oder der Symbolleiste zu öffnen.
Русский: Щелкните по значку «Значок Bluetooth», чтобы открыть
окно «Устройство Bluetooth» на панели управления или
панели инструментов.
Türkçe: "Bluetooth simgesi”ni tıklayın ve “control panel” içindeki
“Bluetooth device”ı açın
中文: 在「控制台」或「工具列」中點選「藍芽圖示」開啟藍芽裝置
English: Please tick “Don’t use a passkey” and click “Next”.
Français:
Veuillez cliquer “Ne pas utiliser de clef de passe” et cliquez “Suivant”.
Español: Marcar “No uso de llave maestra” y pinchar “Siguiente”.
Português: Marque “Não utilize uma palavra-passe” e clique “Seguinte”.
Deutsch: Bitte machen Sie einen Haken bei “Keinen Hauptschlüssel
verwenden” und klicken auf “Weiter”.
Русский: Поставьте галочку возле пункта «Не использовать ключ
доступа» и нажмите кнопку «Далее»
Türkçe:
“Don’t use a passkey” seçeneğini tıklayın ve “Next” butonuna basın.
中文
: 請勾選「不使用密碼金鑰」,並點選「下一步」
English:
Please tick “My device is set up and ready to found” and click “Next”.
Français:
Veuillez cocher “Mon dispositif est installé et prêt à être trouver”
et cliquez “Suivant”.
Español:
Marcar “Mi aparado es instalado y listo para decubrir” y pinchar
“Siguiente”.
Português:
Marque “Meu dispositivo está definido e pronto para ser
encontrado” e clique “Seguinte”.
Deutsch: Bitte machen Sie einen Haken bei “Gerät ist eingerichtet und
kann erkannt werden” und klicken auf “Weiter”.
Русский: Поставьте галочку возле пункта
«Устройство настроено и готово к
обнаружению» и нажмите кнопку
«Далее».
Türkçe: Lütfen " My device is set up and
ready to found" kutucuğunu tıklayın
ve “Next” butonuna basın.
中文
: 請勾選「我的藍芽裝置已設定並就緒可以找到」,並點選「下一
步」

Specyfikacje produktu
| Marka: | Gigabyte |
| Kategoria: | mysz |
| Model: | M7700B |
| Kolor produktu: | Czarny |
| Waga produktu: | 60 g |
| Pasmo częstotliwości: | 2.4 GHz |
| Zasięg bezprzewdowego router'a: | 10 m |
| Certyfikaty: | CE, FCC, Laser Product Class I |
| Obsługiwane systemy operacyjne Mac: | Nie |
| Interfejs urządzenia: | Bluetooth |
| Technologia wykrywania ruchu: | Laser |
| Liczba przycisków: | 5 |
| Rozdzielczość ruchu: | 1600 DPI |
| Rodzaj baterii: | AAA |
| System operacyjny: | Microsoft Windows 98/2000/ME/XP/Vista/Windows 7 |
| Rolka przewijająca: | Tak |
| Wymiary myszy (SxGxW): | 60 x 100 x 36.5 mm |
Potrzebujesz pomocy?
Jeśli potrzebujesz pomocy z Gigabyte M7700B, zadaj pytanie poniżej, a inni użytkownicy Ci odpowiedzą
Instrukcje mysz Gigabyte

2 Października 2024
28 Sierpnia 2024
18 Sierpnia 2024
6 Sierpnia 2024
16 Lipca 2024
16 Lipca 2024
16 Lipca 2024
14 Lipca 2024
14 Lipca 2024
14 Lipca 2024
Instrukcje mysz
- mysz Gamdias
- mysz Fellowes
- mysz Sven
- mysz LG
- mysz Logitech
- mysz Xiaomi
- mysz Lenovo
- mysz Philips
- mysz Livoo
- mysz SilverCrest
- mysz Acer
- mysz Ducky
- mysz HyperX
- mysz LC-Power
- mysz Conceptronic
- mysz Asus
- mysz Nedis
- mysz Medion
- mysz Marquant
- mysz MSI
- mysz Niceboy
- mysz ILive
- mysz Speed-Link
- mysz Evolveo
- mysz Haier
- mysz HP
- mysz Genesis
- mysz Creative
- mysz Manhattan
- mysz Cooler Master
- mysz Icy Box
- mysz 3Dconnexion
- mysz Natec
- mysz Gembird
- mysz Deltaco
- mysz Trust
- mysz V7
- mysz LogiLink
- mysz Dell
- mysz Corsair
- mysz Steelseries
- mysz Digitus
- mysz Mad Dog
- mysz NZXT
- mysz Renkforce
- mysz BaseTech
- mysz Wacom
- mysz Keychron
- mysz Apple
- mysz Iogear
- mysz NGS
- mysz Cougar
- mysz Perixx
- mysz I-TEC
- mysz NACON
- mysz Ewent
- mysz Razer
- mysz ADATA
- mysz SPC
- mysz Prestigio
- mysz JLab
- mysz Hama
- mysz Microsoft
- mysz Verbatim
- mysz ModeCom
- mysz Sharkoon
- mysz Watson
- mysz Equip
- mysz DeepCool
- mysz 3M
- mysz XPG
- mysz Vakoss
- mysz Denver
- mysz Anker
- mysz InLine
- mysz Rapoo
- mysz Tracer
- mysz Silverstone
- mysz Roccat
- mysz Genius
- mysz Media-Tech
- mysz BenQ
- mysz Thermaltake
- mysz Lexibook
- mysz Vivanco
- mysz Fractal Design
- mysz Kunft
- mysz Best Buy
- mysz Adj
- mysz SureFire
- mysz Savio
- mysz Arctic Cooling
- mysz Cherry
- mysz Belkin
- mysz Xcellon
- mysz Alienware
- mysz A4tech
- mysz ACME
- mysz BeeWi
- mysz Eminent
- mysz Targus
- mysz Exibel
- mysz Logik
- mysz Energy Sistem
- mysz Kensington
- mysz BlueBuilt
- mysz Ednet
- mysz Connect IT
- mysz Steren
- mysz Speedlink
- mysz Sandberg
- mysz Bigben Interactive
- mysz AV:link
- mysz Buffalo
- mysz Nova
- mysz Konig
- mysz Sweex
- mysz KeySonic
- mysz T'nB
- mysz Maxxter
- mysz Saitek
- mysz Turtle Beach
- mysz Vorago
- mysz GMB Gaming
- mysz BakkerElkhuizen
- mysz Evoluent
- mysz Adesso
- mysz Man & Machine
- mysz Satechi
- mysz Mad Catz
- mysz Krom
- mysz ENDORFY
- mysz Mousetrapper
- mysz Mediacom
- mysz INCA
- mysz X9 Performance
- mysz Ozone
- mysz Tesoro
- mysz CSL
- mysz Zalman
- mysz NOX
- mysz SIIG
- mysz Contour Design
- mysz Micro Innovations
- mysz Konix
- mysz Typhoon
- mysz Goldtouch
- mysz Gyration
- mysz Silvergear
- mysz Madcatz
- mysz Penclic
- mysz Kogan
- mysz Bakker Elkhuizen
- mysz R-Go Tools
- mysz G-Cube
- mysz Mitsai
- mysz ISY
- mysz Defender
- mysz Posturite
- mysz Glorious
- mysz ThunderX3
- mysz X-Zero
- mysz Silver Eagle
- mysz Sygonix Connect
- mysz Kondator
- mysz White Shark
- mysz IRIS
- mysz NPLAY
- mysz Canyon
- mysz Spartan Gear
- mysz UGo
- mysz Swiftpoint
- mysz Sanwa
- mysz Hamlet
- mysz Raidsonic
- mysz Approx
- mysz Gamesir
- mysz Mars Gaming
- mysz Vultech
- mysz TEKLIO
- mysz Raspberry Pi
- mysz Urban Factory
- mysz KeepOut
- mysz Humanscale
- mysz Seal Shield
- mysz Wortmann AG
- mysz CoolerMaster
- mysz IOPLEE
- mysz Atlantis Land
- mysz Xtrfy
- mysz Bluestork
- mysz Balam Rush
- mysz SMK-Link
- mysz Getttech
Najnowsze instrukcje dla mysz

8 Kwietnia 2025
3 Kwietnia 2025
30 Marca 2025
30 Marca 2025
30 Marca 2025

28 Marca 2025
28 Marca 2025
28 Marca 2025

27 Marca 2025
27 Marca 2025