Instrukcja obsługi Fujifilm FinePix Z700EXR
Przeczytaj poniżej 📖 instrukcję obsługi w języku polskim dla Fujifilm FinePix Z700EXR (251 stron) w kategorii kamera. Ta instrukcja była pomocna dla 11 osób i została oceniona przez 2 użytkowników na średnio 4.5 gwiazdek
Strona 1/251

DIGITAL CAMERA
FINEPIX Z700EXR
Owner’s Manual
Thank you for your purchase of this prod-
uct. This manual describes how to use your
FUJIFILM FinePix Z700EXR digital camera
and the supplied software. Be sure that
you have read and understood its contents
before using the camera.
For information on related products, visit our website at
http://www.fujifilm.com/products/digital_cameras/index.html
Before You Begin
First Steps
Basic Photography and Playback
More on Photography
More on Playback
Movies
Connections
Menus
Technical Notes
Troubleshooting
Appendix
YF07908 -121 EN


ii
For Your Safety
IMPORTANT SAFETY INSTRUCTIONS
• :Read Instructions All the safety and
operating instructions should be read
before the appliance is operated.
• Retai n Instructions: The safety and
operating instructions should be re-
tained for future reference.
• :Heed Warnings All warnings on the ap-
pliance and in the operating instruc-
tions should be adhered to.
• :Follow Instructions All operating and
use instructions should be followed.
Ins
Ins
Ins
InsInstal
tal
tal
taltallati
lati
lati
latilation
on
on
ononInstallation
Power Sources: This video product
should be operated only from the type
of power source indicated on the mark-
ing label. If you are not sure of the type
of power supply to your home, consult
your appliance dealer or local power
company. For video products intended
to operate from battery power, or other
sources, refer to the operating instruc-
tions.
Grounding or Polarization: This video
product is equipped with a polarized
alternating-current line plug (a plug
having one blade wider than the other).
This plug will t into the power outlet
only one way. T his is a safety feature. If
you are unable to insert the plug fully
into the outlet, try reversing the plug.
If the plug should still fail to t, contact
your electrician to replace your obso-
lete outlet. Do not defeat the safety
purpose of the polarized plug.
Alternate Warnings: This video product is
equipped with a 3-wire grounding-type
plug, a plug having a third (grounding)
pin. This plug will only t into a ground-
ing-type power outlet. This is a safety
feature. If you are unable to insert the
plug into the outlet, contact your elec-
trician to replace your obsolete outlet.
Do not defeat the safety purpose of the
grounding-type plug.
Overloading: Do not overload wall out-
lets and extension cords as this can re-
sult in a risk of re or electric shock.
Ventilation: Slots and openings in the
cabinet are provided for ventilation
and to ensure reliable operation of the
video product and to protect it from
overheating, and these openings must
not be blocked or covered.
The openings should never be blocked
by placing the video product on a bed,
sofa, rug, or other similar surface.
This video product should not be
placed in a built-in installation such as a
bookcase or rack unless proper ventila-
tion is provided or the manufacturer’s
instructions have been adhered to.
This video product should never be
placed near or over a radiator or heat
register.
Att achments: Do not use attachments
not recommended by the video prod-
uct manufacturer as they may cause
hazards.
Water and Moisture: Do not use this video
product near water – for example, near
a bath tub, wash bowl, kitchen sink, or
laundry tub, in a wet basement, or near
a swimming pool, and the like.
Power-Cord Protection: Power-Supply
cords should be routed so that they are
not likely to be walked on or pinched
by items placed upon or against them,
paying particular attention to cords at
plugs, convenience receptacles, and
the point where they exit from the ap-
pliance.
Access ories: Do not place this video
product on an unstable cart, stand, tri-
pod, bracket, or table. The video prod-
uct may fall, causing serious injury to a
child or adult, and serious damage to
the appliance. Use only with a cart,
stand, tripo d, bracket, or table recom-
mended by the manufacturer, or sold
with the video product. Any mounting
of the appliance should follow the
manufacturer’s instructions, and should
use a mounting accessory recommend-
ed by the manufacturer.
An appliance and
cart combination
should be moved
with care. Quick
stops, excessive
force, and uneven
surfaces may cause
the appliance and cart combination to
overturn.
Ant
Ant
Ant
AntAntenn
enn
enn
ennennas
as
as
asasAntennas
Outdoor Ant enna Grounding: If an outside
antenna or cable system is connected
to the video product, be sure the anten-
na or cable system is grounded so as to
provide some protection against volt-
age surges and built-up static charges.
Section 810 of the National Electrical
Code, ANSI/NFPA No. 70, provides
information with respect to proper
grounding of the mast and support-
ing structure, grounding of the lead-in
wire to an antennadischarge unit, size
of grounding conductors, location of
antenna-discharge unit, connection
to grounding electrodes, and require-
ments for the grounding electrode.
Power Lin es: An outside antenna system
should not be located in the vicinity of
overhead power lines or other electric
light or power circuits, or where it can
fall into such power lines or circuits.
When installing an outside antenna
system, extreme care should be taken
to keep from touching such power lines
or circuits as contact with them might
be fatal.
EXAMPLE OF ANTENNA GROUNDING AS
PER NATIONAL ELECTRICAL CODE
Antenna Lead
in Wire
Ground
Clamp
Power Service Grounding
Electrode System
(NEC ART 250. PART H)
Antenna
Discharge Unit
(NEC SECTION
810-20)
Grounding
Conductors
(NEC SECTION
810-21)
Electric
Service
Equipment
Ground
Clamps

iii
For Your Safety
Use
Use
Use
UseUseUse
Cleaning: Unplug this video product
from the wall outlet before cleaning. Do
not use liquid cleaners or aerosol clean-
ers. Use a damp cloth for cleaning.
Object and Liquid Entry: Never push ob-
jects of any kind into this video product
through openings as they may touch
dangerous voltage points or shortout
parts that could result in a re or elec-
tric shock. Never spill liquid of any kind
on the video product.
Lightning: For added protection for
this video product receiver during a
lightning storm, or when it is left unat-
tended and unused for long periods
of time, unplug it from the wall outlet
and disconnect the antenna or cable
system. This will prevent damage to
the video product due to lightning and
power-line surges.
Ser
Ser
Ser
SerServi
vi
vi
vivice
ce
ce
ceceService
Servicing: Do not attempt to service this
video product yourself as opening or
removing covers may expose you to
dangerous voltage or other hazards.
Refer all servicing to quali ed service
personnel.
Damage Requiring Service: Unplug this
video product from the wall outlet and
refer servicing to quali ed service per-
sonnel under the following conditions:
When the power-supply cord or plug is
damaged.
If liquid has been spilled, or objects
have fallen into the video product.
If the video product has been exposed
to rain or water.
If the video product has been dropped
or the cabinet has been damaged.
If the video product does not operate
normally be following the operating
instructions. Adjust only those controls
that are covered by the operating in-
structions as an improper adjustment
of other controls may result in damage
and will often require extensive work
by a quali ed technician to restore the
video product to its normal operation.
When the video product exhibits a
distinct change in performance - this
indicates a need for service.
Replacement Parts: When replacement
parts are required, be sure the service
technician has used replacement parts
speci ed by the manufacturer or have
the same characteristics as the original
part. Unauthorized substitutions may
result in re, electric shock or other
hazards.
Safety Check: Upon completion of any
service or repairs to this video product,
ask the service technician to perform
safety checks to determine that the
video product is in proper operating
condition.
Be sure to read this notes before using
Safety Notes
• Make sure that you use your camera correctly. Read these Safety Notes and your
Owner’s Manual carefully before use.
• After reading these Safety Notes, store them in a safe place.
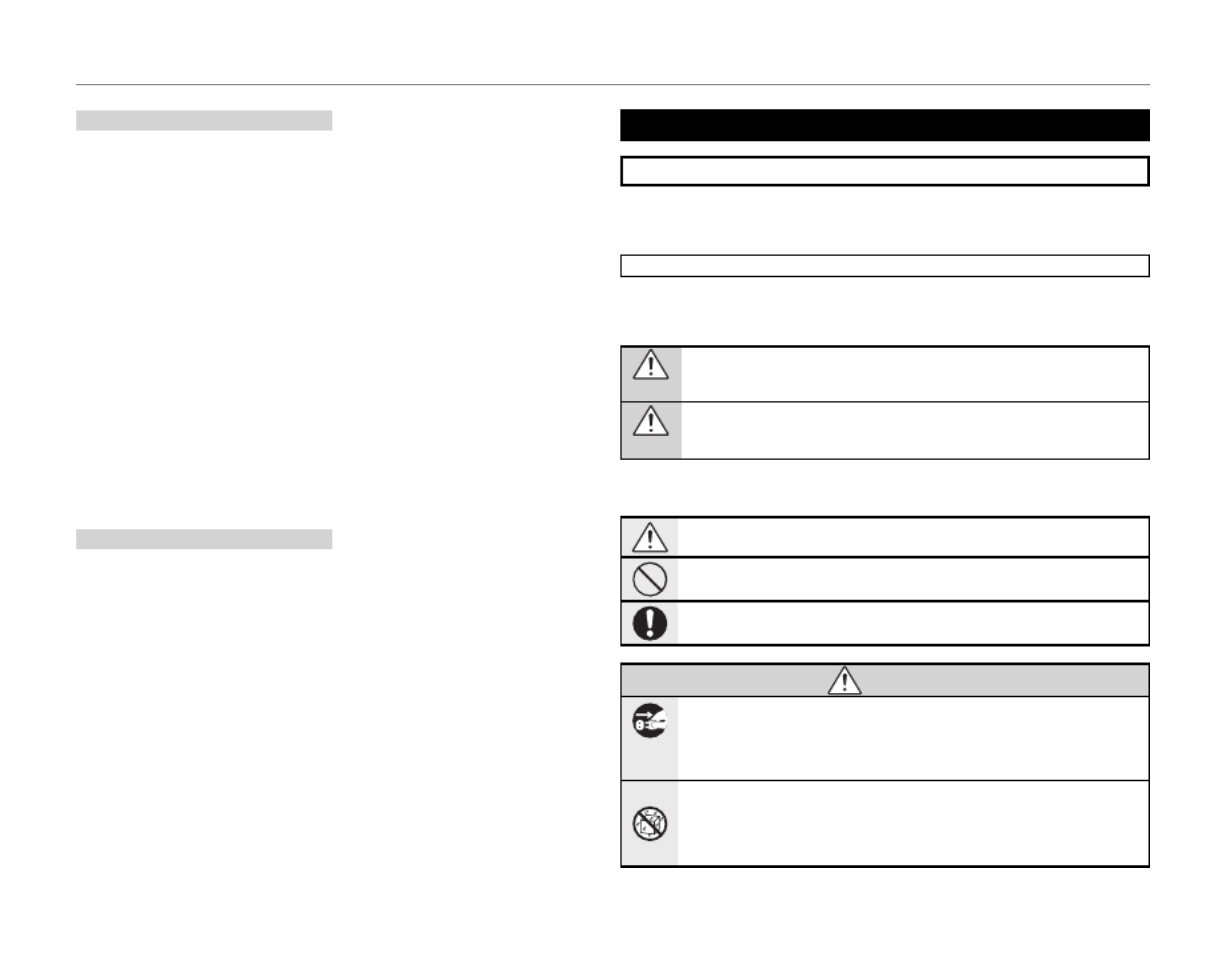
About the Icons
The icons shown below are used in this document to indicate the severity of the
injury or damage that can result if the information indicated by the icon is ignored
and the product is used incorrectly as a result.
WARNING
This icon indicates that death or serious injury can result if the information is ig-
nored.
CAUTION
This icon indicates that personal injury or material damage can result if the infor-
mation is ignored.
The icons shown below are used to indicate the nature of the information which
is to be observed.
Triangular icons tell you that this information requires attention (“important”).
Circular icons with a diagonal bar tell you that the action indicated is prohibited
(“Prohibited”).
Filled circles with an exclamation mark tell you an action that must be performed
(“Required”).
WARNING
WARNING
WARNING
WARNING WARNING WARNING
Unplug
from power
socket.
If a problem arises, turn t he camera o , remove the battery, disconnect and unplug the AC
power adapter.
Continued use of the camera when it is emitting smoke, is emitting any unusual
odor, or is in any other abnormal state can cause a re or electric shock.
• Contact your FUJIFILM dealer.
Do not allow water or foreign objects to enter t he camera.
If water or foreign objects get inside the camera, turn the camera o , remove the
battery and disconnect and unplug the AC power adapter.
Continued use of the camera can cause a re or electric shock.
• Contact your FUJIFILM dealer.


iv
For Your Safety
WARNING
WARNING
WARNING
WARNING WARNING WARNING
Do not use in
the bathroom
or shower.
Do not use the camera in the bathroom or shower.
This can cause a re or electric shock.
Do not disas-
semble.
Never at tempt to change or take apart t he camera. (Never open t he casing.) Do not use the
camera wh en it has been dropped or the casing is damaged.
This can cause a re or electric shock.
• Contact your FUJIFILM dealer.
Do not change, heat or unduly twist or pull the connection cord and do not place heavy ob-
jects on the connection cord.
These actions could damage the cord and cause a re or electric shock.
• If the cord is damaged, contact your FUJIFILM dealer.
Do not place t he camera on an unstable surface.
This can cause the camera to fall or tip over and cause injury.
Never at tempt to take pictur es while in motion.
Do not use the camera while you are walking or driving a vehicle. This can result in
you falling down or being involved in a tra c accident.
Do not touch any metal part s of the camera during a t hunderstorm.
This can cause an electric shock due to induced current from the lightning dis-
charge.
Do not use the bat tery except as speci ed.
Load the battery as aligned with the indicator.
Do not heat , change or take apart the bat tery. Do not drop or subject th e batter y to impacts.
Do not store the bat tery with met allic product s. Do not use char gers other than th e speci ed
model to ch arge the bat tery.
Any of these actions can cause the battery to burst or leak and cause re or injury
as a result.
Use only the battery or AC power adapter s speci ed for use with t his camera. Do not use volt-
ages ot her than the power supply volt age shown.
The use of other power sources can cause a re.
If the batter y leaks and uid gets in con tact with your eyes, skin or clothing. Flush the af-
fect ed area with clean water and seek medical attention or call an emergency n umber right
away.
Do not use the charger to charge batteries other t han those speci ed here.
The Ni-MH battery charger is designed for Fuji lm HR-AA Ni-MH batteries. Using
the charger to charge conventional batteries or other types of rechargeable bat-
teries can cause the battery to leak uid, overheat or burst.
When carrying t he battery, install it in a digital camera or keep it in t he hard case. When
storing the battery, keep it in t he har d case. Wh en discarding, cover th e battery terminals
with insulation tape.
Contact with other metallic objects or battery could cause the battery to ignite
or burst.
WARNING
WARNING
WARNING
WARNING WARNING WARNING
Keep Memor y Cards out of the reach of small children.
Because Memory Cards are small, they can be swallowed by children. Be sure to
store Memory Cards out of the reach of small children. If a child swallows a Memory
Card, seek medical attention or call an emergency number.
CAUTIO
CAUTIO
CAUTIO
CAUTIO CAUTION
N
N
NN CAUTION
Do not use this camera in locations a ected by oil fumes, steam, humidity or dust .
This can cause a re or electric shock.
Do not leave th is camera in places subject to extremely high temperatures.
Do not leave the camera in locations such as a sealed vehicle or in direct sunlight.
This can cause a re.
Keep out of th e reach of small children.
This product could cause injury in the hands of a child.
Do not place heavy objects on t he camera.
This can cause the heavy object to tip over or fall and cause injury.
Do not move the camera while the AC power adapter is still connect ed. Do not pull on t he
connection cord to disconnect the AC power adapter.
This can damage the power cord or cables and cause a re or electric shock.
Do not use the AC power adapt er when t he plug is damaged or the plug socket connection
is loose.
This could cause a re or electric shock.
Do not cover or wrap the camera or t he AC power adapter in a cloth or blanket.
This can cause heat to build up and distort the casing or cause a re.
When you are cleaning the camera or you do not plan to use the camera for an extended pe-
riod, r emove the bat tery and disconnect and unplug the AC power adapter.
Failure to do so can cause a re or electric shock.
When char ging ends, unplug the charger from t he power socket.
Leaving the charger plugged into the power socket can cause a re.
Using a ash too close to a person’s eyes may temporarily a ect the eyesight.
Take particular care when photographing infants and young children.
When an xD-Picture Card is removed, the card could come out of the slot too quickly. Use your
nger to hold it and gent ly release the card.
Request regular int ernal t esting and cleanin g for your camera.
Build-up of dust in your camera can cause a re or electric shock.
• Contact your FUJIFILM dealer to request internal cleaning every 2 years.
• Please note this is not a free of charge service.


v
For Your Safety
The Battery and Power Supply
The following describes the proper use
of the battery and how to prolong its
life. Incorrect use can shorten battery
life or cause leakage, overheating, re,
or explosion.
The battery is not charged at shipment.
Charge the battery before use. Keep
the battery in its case when not in use.
Notes on the Battery
The battery gradually loses its charge
when not in use. Charge the battery
one or two days before use.
Battery life can be extended by turning
the camera o when not in use.
Battery capacity decreases at low tem-
peratures; a depleted battery may not
function at when cold. Keep a fully
charged spare battery in a warm place
and exchange as necessary, or keep the
battery in your pocket or other warm
place and insert it in the camera only
when shooting. Do not place the bat-
tery in direct contact with hand warmers
or other heating devices.
Charging the Battery
Charge the battery in the supplied bat-
tery charger. Charging times will increase
at ambient temperatures below +10 °C
(+50 °F) or above +35 °C (+95 °F). Do
not attempt to charge the battery at
temperatures above 40 °C (+104 °F); at
temperatures below 0 °C (+32 °F), the
battery will not charge.
Do not attempt to recharge a fully
charged battery. The battery does not
however need to be fully discharged
before charging.
The battery may be warm to the touch
immediately after charging or use. This
is normal.
Battery Life
At normal temperatures, the battery
can be recharged about 300 times. A
noticeable decrease in the length of
time the battery will hold a charge in-
dicates that it has reached the end of its
service life and should be replaced.
Storage
Performance may be impaired if the
battery is left unused for extended pe-
riods when fully charged. Run the bat-
tery at before storing it.
If the camera will not be used for an
extended period, remove the battery
and store it in a dry place with an am-
bient temperature of from +15 °C to
+25 °C (+59 °F to +77 °F). Do not store
in locations exposed to extremes of
temperature.
Cautions: Handling the Battery
• Do not transport or store with metal
objects such as necklaces or hairpins.
• Do not expose to ame or heat.
• Do not disassemble or modify.
• Use with designated chargers only.
• Dispose of used batteries promptly.
• Do not drop or subject to strong
physical shocks.
• Do not expose to water.
• Keep the terminals clean.
• The battery and camera body may
become warm to the touch after ex-
tended use. This is normal.
AC Adapters (Available Separately)
Use only FUJIFILM AC adapters desig-
nated for use with this camera. Other
adapters could damage the camera.
• The AC adapter is for indoor use only.
• Be sure the DC plug is securely con-
nected to the camera.
• Turn the camera o before discon-
necting the adapter. Disconnect the
adapter by the plug, not the cable.
• Do not use with other devices.
• Do not disassemble.
• Do not expose to high heat and hu-
midity.
• Do not subject to strong physical
shocks.
• The AC adapter may hum or become
hot to the touch during use. This is
normal.
• If the AC adapter causes radio interfer-
ence, reorient or relocate the receiv-
ing antenna.
Using the Camera
To ensure that images are recorded
correctly, do not subject the camera to
impact or physical shocks while images
are being recorded.
Electrical Interference
This camera may interfere with hospital
or aviation equipment. Consult with
hospital or airline sta before using the
camera in a hospital or on an aircraft.
Liquid Crystal
In the event that the monitor is dam-
aged, care should be taken to avoid
contact with liquid crystal. Take the
urgent action indicated should any of
the following situations arise:
• If liquid crystal comes in contact with your
skin, clean the area with a cloth and
then wash thoroughly with soap and
running water.
• If liquid crystal enters your eyes, ush the
a ected eye with clean water for at
least 15 minutes and then seek medi-
cal assistance.
• If liquid crystal is swallowed, rinse your
mouth thoroughly with water. Drink
large quantities of water and induce
vomiting, then seek medical assis-
tance.
Take Test Shots
Before taking photographs on impor-
tant occasions (such as at weddings
or before taking the camera on a trip),
take a test shot and view the result in
the monitor to ensure that the camera is
functioning normally. FUJIFILM Corpo-
ration can not accept liability for dam-
ages or lost pro ts incurred as a result of
product malfunction.


vi
For Your Safety
To prevent re or shock hazard, do not expose the unit to rain or moisture.
Please read the “Safety Notes” (pages iii–v) and make sure you understand them
before using the camera.
Perchlorate Material—special handling may apply. See http://www.dtsc.ca.gov/
hazardouswaste/perchlorate.
For Cu
For Cu
For Cu
For CuFor Custo
sto
sto
stostomer
mer
mer
mermers in t
s in t
s in t
s in ts in the U.
he U.
he U.
he U.he U.S.
S.
S.
S.S.A
A
A
AA.
.
.
..For Customers in the U.S.A.
Tested To Comply With FCC Standards
FOR HOME OR OFFICE USE
FCC Statement
This device complies with Part 15 of the FCC Rules. Operation is subject to the
following two conditions: (1) This device may not cause harmful interference, and
(2) this device must accept any interference received, including interference that
may cause undesired operation.
CAUTION
This equipment has been tested and found to comply with the limits for a Class
B digital device, pursuant to Part 15 of the FCC Rules. These limits are designed
to provide reasonable protection against harmful interference in a residential
installation. This equipment generates, uses, and can radiate radio frequency
energy and, if not installed and used in accordance with the instructions, may
cause harmful interference to radio communications. However, there is no guar-
antee that interference will not occur in a particular installation. If this equipment
does cause harmful interference to radio or television reception, which can be
determined by turning the equipment o and on, the user is encouraged to try to
correct the interference by one or more of the following measures:
• Reorient or relocate the receiving antenna.
• Increase the separation between the equipment and receiver.
• Connect the equipment into an outlet on a circuit di erent from that to which
the receiver is connected.
• Consult the dealer or an experienced radio/TV technician for help.
You are cautioned that any changes or modi cations not expressly approved in
this manual could void the user’s authority to operate the equipment.
Notes on the Grant
To comply with Part 15 of the FCC Rules, this product must be used with a
FUJIFILM-speci ed ferrite-core USB cable and DC supply cord.
For Cu
For Cu
For Cu
For CuFor Custo
sto
sto
stostomer
mer
mer
mermers in Ca
s in Ca
s in Ca
s in Cas in Cana
na
na
nanada
da
da
dadaFor Customers in Canada
CAUTION: This Class B digital apparatus complies with Canadian ICES-003.
EC De
EC De
EC De
EC DeEC Decla
cla
cla
claclara
ra
ra
raratio
tio
tio
tiotion of Co
n of Co
n of Co
n of Con of Confo
nfo
nfo
nfonformi
rmi
rmi
rmirmit
t
t
tty
y
y
yyEC Declaration of Conformity
We
Name: FUJIFILM Electronic Imaging Europe GmbH
Address: Benzstrasse 2
47533 Kleve, Germany
declare that the product
Product Name: FUJIFILM DIGITAL CAMERA FinePix Z700EXR
Manufacturer’s Name: FUJIFILM Corporation
Manufacturer’s Address: 7-3, AKASAKA 9-CHOME, MINATO-KU, TOKYO,
107-0052 JAPAN
conforms to the following Standards:
Safety: EN60065: 2002 + A1: 2006
EMC: EN55022: 2006 Class B
EN55024: 1998+A1: 2001 + A2: 2003
EN61000-3-2: 2006
EN61000-3-3: 1995 + A1: 2001 + A2: 2005
following the provision of the EMC Directive (2004/108/EC)
and Low Voltage Directive (2006/95/EC).
Kleve, Germany February 1, 2010
Place Date Signature, Managing Director
NOTICES


vii
For Your Safety
Di
Di
Di
DiDispo
spo
spo
sposposal o
sal o
sal o
sal osal of El
f El
f El
f Elf Elec
ec
ec
ecectri
tri
tri
tritrical a
cal a
cal a
cal acal and E
nd E
nd E
nd End Elec
lec
lec
leclectr
tr
tr
trtron
on
on
ononic Eq
ic Eq
ic Eq
ic Eqic Equip
uip
uip
uipuipme
me
me
mement i
nt i
nt i
nt int in Priv
n Priv
n Priv
n Privn Private Ho
ate Ho
ate Ho
ate Hoate Hous
us
us
ususeho
eho
eho
ehoehold
ld
ld
ldlds
s
s
ssDisposal of Electrical and Electronic Equipment in Private Households
Disposal of Used Electrical and Electronic Equipment (Applicable in the European Union,
Norway, Iceland and Liechtenstein)
This symbol on the product, or in the manual and in the war-
ranty, and/or on its packaging indicates that this product shall
not be treated as household waste.
Instead it should be taken to an applicable collection point for
the recycling of electrical and electronic equipment.
By ensuring this product is disposed of correctly, you will help
prevent potential negative consequences to the environment
and human health, which could otherwise be caused by inap-
propriate waste handling of this product.
This symbol on the batteries or accumulators indicates that
those batteries shall not be treated as household waste.
If your equipment contains easy removable batteries or ac-
cumulators please dispose these separately according to your
local requirements.
The recycling of materials will help to conserve natural resources. For more de-
tailed information about recycling this product, please contact your local city
o ce, your household waste disposal service or the shop where you purchased
the product.
In Countries Outside the European Union, Norway, Iceland and Liechtenstein
If you wish to discard this product, including the batteries or accumulators, please
contact your local authorities and ask for the correct way of disposal.
Not
Not
Not
NotNotes o
es o
es o
es oes on Copy
n Copy
n Copy
n Copyn Copyrig
rig
rig
rigright
ht
ht
hthtNotes on Copyright
Unless intended solely for personal use, images recorded using your digital cam-
era system cannot be used in ways that infringe copyright laws without the con-
sent of the owner. Note that some restrictions apply to the photographing of
stage performances, entertainments, and exhibits, even when intended purely for
personal use. Users are also asked to note that the transfer of memory cards con-
taining images or data protected under copyright laws is only permissible within
the restrictions imposed by those copyright laws.
Trad
Trad
Trad
TradTradema
ema
ema
emaemark I
rk I
rk I
rk Irk Info
nfo
nfo
nfonforma
rma
rma
rmarmati
ti
ti
tition
on
on
ononTrademark Information
xD-Picture Card and E are trademark s of FUJIFILM Corporation. Macintosh,
QuickTime, and Mac OS are trademarks of Apple Inc. in the U.S.A. and other
countries. Microsoft, Windows, Windows Vista, Windows 7, and the Windows,
Windows Vista and Windows 7 logos are trademarks or registered trademarks of
Microsoft Corporation in the United States and/or other countries. “Windows” is
an abbreviation used in reference to the Microsoft Windows operating system.
Adobe and Adobe Reader are either trademarks or registered trademarks of
Adobe Systems Incorporated in the U.S.A. and/or other countries. The SDHC and
HDMI logos are trademarks. YouTube is a trademark of Google, Inc. All other trade
names mentioned in this manual are the trademarks or registered trademarks of
their respective owners.
Note: The “CERTIFIED FOR Windows Vista™” and “Compatible with Windows® 7” logos
apply only to the camera and camera hardware driver.


viii
About This Manual
Before using the camera, read this manual and the warnings on pages ii–vii. For information on speci c
topics, consult the sources below.
Memory Cards
Pictures can be stored in the camera’s internal memory or on SD and SDHC memory cards. In this manual, SD
memory cards are referred to as “memory cards.” For more information, see page 13.
✔
✔
✔
✔✔✔
T
T
T
TTroubl
roubl
roubl
roublroublesho
esho
esho
eshoeshootin
otin
otin
otinoting
g
g
gg Troubleshooting
..............................................
..............................................
..............................................
............................................................................................ ..............................................pg. 94
pg. 94
pg. 94
pg. 94pg. 94pg. 94
Having a speci c problem with the camera?
Find the answer here.
✔
✔
✔
✔✔✔
Glossa
Glossa
Glossa
GlossaGlossar
r
r
rry
y
y
yy Glossary
........................................................
........................................................
........................................................
................................................................................................................ ........................................................pg. 1
pg. 1
pg. 1
pg. 1pg. 105
05
05
0505pg. 105
The meanings of some technical terms may be
found here.
✔
✔
✔
✔✔✔
T
T
T
TTable o
able o
able o
able oable of Content
f Content
f Content
f Contentf Contents
s
s
ss Table of Contents
.............................................
.............................................
.............................................
.......................................................................................... .............................................pg. xii
pg. xii
pg. xii
pg. xiipg. xiipg. xii
The “Table of Contents” gives an overview of the
entire manual. The principal camera operations
are listed here.
✔
✔
✔
✔✔✔
Warning M
Warning M
Warning M
Warning MWarning Messag
essag
essag
essagessages a
es a
es a
es aes and Di
nd Di
nd Di
nd Dind Displays
splays
splays
splayssplays Warning Messages and Displays
.....................
.....................
.....................
.......................................... .....................pg. 1
pg. 1
pg. 1
pg. 1pg. 10
0
0
001
1
1
11pg. 101
Find out what’s behind that ashing icon or error
message in the monitor.
✔
✔
✔
✔✔✔
Camera Q & A
Camera Q & A
Camera Q & A
Camera Q & ACamera Q & A Camera Q & A
....................................................
....................................................
....................................................
........................................................................................................ ....................................................pg. ix
pg. ix
pg. ix
pg. ixpg. ixpg. ix
Know what you want to do but don’t know the
name for it? Find the answer in “Camera Q & A.”
✔
✔
✔
✔✔✔
Restric
Restric
Restric
RestricRestricti
ti
ti
titions o
ons o
ons o
ons oons on Camera Se
n Camera Se
n Camera Se
n Camera Sen Camera Sett
tt
tt
ttttings
ings
ings
ingsings Restrictions on Camera Settings
.............
.............
.............
.......................... .............Basic Ma
Basic Ma
Basic Ma
Basic MaBasic Manua
nua
nua
nuanual
l
l
llBasic Manual
See the Basic Manual for restrictions on the op-
tions available in each shooting mode.


ix
Camera Q & A
Find items by task.
Camera S
Camera S
Camera S
Camera SCamera Setu
etu
etu
etuetup
p
p
ppCamera Setup
Que
Que
Que
QueQuest
st
st
ststio
io
io
ioion
n
n
nnQuestion Key phr
Key phr
Key phr
Key phrKey phras
as
as
asase
e
e
eeKey phrase See p
See p
See p
See pSee pag
ag
ag
agage
e
e
eeSee page
How do I set the camera clock? Date and time 15
Can I set the clock to local time when I travel? Time di erence 88
How do I use the touch panel display? Touch panel display 4
How do I keep the display from turning o automatically? Auto power o 87
How do I make the display brighter or darker? LCD brightness 85
How do I stop the camera beeping and clicking? Volume 85
Silent mode 21
Can I change the sound the shutter makes? Sound 85
What are the parts of the camera called? Parts of the camera 2
What do the icons in the display mean? Displays 3, 5
How do I use the menus? Menus 68
What’s behind that ashing icon or error message? Messages and displays 101
How much charge is left in the battery? Battery level 18
How do I calibrate the touch panel? Calibration 90
Can selected portrait subjects be given priority for focus? Face recognition 38
Sharin
Sharin
Sharin
SharinSharing Pict
g Pict
g Pict
g Pictg Pictures
ures
ures
uresuresSharing Pictures
Que
Que
Que
QueQuest
st
st
ststio
io
io
ioion
n
n
nnQuestion Key phr
Key phr
Key phr
Key phrKey phras
as
as
asase
e
e
eeKey phrase See p
See p
See p
See pSee pag
ag
ag
agage
e
e
eeSee page
Can I print pictures on my home printer? Printing pictures 60
Can I copy my pictures to my computer? Viewing pictures on a computer 62


x
Camera Q & A
T
T
T
TTaki
aki
aki
akiaking Pic
ng Pic
ng Pic
ng Picng Picture
ture
ture
turetures
s
s
ssTaking Pictures
Que
Que
Que
QueQuest
st
st
ststion
ion
ion
ionionQuestion Key phr
Key phr
Key phr
Key phrKey phras
as
as
asase
e
e
eeKey phrase See p
See p
See p
See pSee page
age
age
ageageSee page
How many pictures can I take? Memory capacity 106
Can the camera automatically adjust settings for di erent scenes? R mode 17
Can I choose between clarity, reduced noise, and dynamic range? S, T, and U
modes (
R) 23
Is there a quick and easy way to take snapshots? (auto) mode 24
Can I use the touch panel to take pictures? Touch and shoot 24
How can I avoid blurred pictures? Dual IS mode 18
How can I make good portraits? Intelligent Face Detection 28
Can personal information be added to portraits automatically? Face recognition 38
Can I choose my own settings for di erent scenes? H (scene position) 25
Is there a mode for photographing pet dogs? l Pet detection (dog) mode 25
Is there a mode for photographing pet cats? m Pet detection (cat) mode 25
How do I shoot close-ups? Macro mode (close-ups) 35
How do I keep the ash from ring?
Flash mode 30How do I stop my subjects’ eyes glowing red when I use the ash?
How do I “ ll-in” shadows on back-lit subjects?
How do I take a series of pictures in a single burst? Continuous shooting 74
How do I take a group portrait that includes the photographer? Self-timer mode 32
How do I frame pictures with the subject o to one side? Focus lock 36
How do I adjust exposure? Exposure compensation 70
How do I simulate the e ects of di erent types of lm? Film simulation 73
How do I shoot movies? Recording movies 57


xi
Camera Q & A
Viewi
Viewi
Viewi
ViewiViewing Pic
ng Pic
ng Pic
ng Picng Picture
ture
ture
turetures
s
s
ssViewing Pictures
Que
Que
Que
QueQuest
st
st
ststio
io
io
ioion
n
n
nnQuestion Key phr
Key phr
Key phr
Key phrKey phras
as
as
asase
e
e
eeKey phrase See p
See p
See p
See pSee pag
ag
ag
agage
e
e
eeSee page
Can I put a password on my private folder? Password 54
How do I view my pictures? Single-frame playback 42
Can I view face recognition information? Face recognition 38
Can I compare two pictures side by side? Picture Compare 56
How do I delete the current picture? The e icon 22
Can I select other pictures for deletion? Deleting pictures 45
Can I zoom in on pictures during playback? Playback zoom 43
How do I view a lot of pictures at once? Multi-frame playback 44
How do I display pictures in “tall” (portrait) orientation? Rotating the camera 5
Can I protect my pictures from accidental deletion? Protect 78
Can I view my pictures in a slide show? Slide show 77
Can I crop unwanted elements out of my pictures? Crop (trimming) 50
How do I rotate pictures? Rotate 49
Can I make small copies of pictures? Resize 50
Can I create a collage? Collage 48
How do I move or copy pictures to another folder? Move/copy 55
How do I organize my pictures into folders? Folder management 54
How do I nd pictures? Image search 52
Can I select pictures for upload to YouTube
™? Uploading pictures 79
Can I select pictures for upload to Facebook?


xii
For Your Safety ................................................................................. ii
IMPORTANT SAFETY INSTRUCTIONS ...................................... ii
Safety Notes .................................................................................... iii
NOTICES ............................................................................................ vi
About This Manual .......................................................................vii i
Camera Q & A .................................................................................... i x
Be
Be
Be
BeBefore Y
fore Y
fore Y
fore Yfore You Be
ou Be
ou Be
ou Beou Begin
gin
gin
ginginBefore You Begin
Introduction .......................................................................................1
Symbols and Conventions .......................................................... 1
Supplied Accessories .................................................................... 1
Parts of the Camera ....................................................................... 2
Camera Displays (Touch Panel) .............................................3
The Touch Panel Display ............................................................. 4
Rotating the Camera .................................................................. 5
Touch Panel Icons .......................................................................6
First S
First S
First S
First SFirst Steps
teps
teps
tepstepsFirst Steps
Charging the Battery ..................................................................... 8
Inserting the Battery...................................................................... 9
Inserting a Memory Card ........................................................... 11
Turning the Camera on and O ...............................................14
Shooting Mode .............................................................................14
Playback Mode ..............................................................................14
Basic Setup .......................................................................................15
Bas
Bas
Bas
BasBasic Phot
ic Phot
ic Phot
ic Photic Photogra
ogra
ogra
ograography and Pl
phy and Pl
phy and Pl
phy and Plphy and Playbac
aybac
aybac
aybacayback
k
k
kkBasic Photography and Playback
Taking Pictures in R (EXR AUTO) Mode ...........................17
Viewing Pictures ............................................................................22
Mor
Mor
Mor
MorMore on Phot
e on Phot
e on Phot
e on Phote on Photogra
ogra
ogra
ograography
phy
phy
phyphyMore on Photography
A Shooting Mode ........................................................................23
E EXR ......................................................................................23
AUTO ............................................................................................24
TOUCH & SHOOT .....................................................................24
H SCENE POSITION ...................................................................25
l DOG/m CAT .......................................................................25
D NATURAL LIGHT ....................................................................27
C NATURAL & N........................................................................27
MANUAL .....................................................................................27
g Intelligent Face Detection and Red-Eye Removal
...28
N Using the Flash (Super-Intelligent Flash) ......................30
h Using the Self-Timer ............................................................... 32
F Macro Mode (Close-ups) ......................................................35
Focus Lock ........................................................................................36
n
Face Recognition
................................................................... 38
Adding New Faces .......................................................................38
Viewing and Editing Face Recognition Data .....................40
Adding Faces Automatically ....................................................41
Table of Contents


xiii
Table of Contents
Mor
Mor
Mor
MorMore on Playb
e on Playb
e on Playb
e on Playbe on Playback
ack
ack
ackackMore on Playback
Playback Options ...........................................................................42
Playback Zoom ..............................................................................43
Multi-Frame Playback .................................................................44
e Deleting Pictures ......................................................................45
j Edit ................................................................................................. 47
f COLLAGE ................................................................................48
C IMAGE ROTATE .....................................................................49
G CROP........................................................................................50
O RESIZE .....................................................................................50
B RED EYE REMOVAL .............................................................51
H Image Search ............................................................................ 52
Image Search: Deleting Pictures .........................................53
Image Search: Folder Management ...................................53
I Folder Management .............................................................54
Moving and Copying Pictures ..............................................55
h Picture Compare .......................................................................56
Movi
Movi
Movi
MoviMovies
es
es
esesMovies
F Recording Movies ...................................................................57
a Viewing Movies .......................................................................59
Conne
Conne
Conne
ConneConnec
c
c
cctio
tio
tio
tiotions
ns
ns
nsnsConnections
Printing Pictures via USB ...........................................................60
Connecting the Camera ............................................................60
Printing Selected Pictures ........................................................61
Viewing Pictures on a Computer ............................................62
Installing the Software...............................................................62
Connecting the Camera ............................................................66
Me
Me
Me
MeMenus
nus
nus
nusnusMenus
The Shooting Menu ......................................................................68
Using the Shooting Menu .........................................................68
Shooting Menu Options ............................................................69
d EXP. COMPENSATION ........................................................70
N ISO ............................................................................................71
O IMAGE SIZE ............................................................................72
T IMAGE QUALITY ..................................................................73
U DYNAMIC RANGE ...............................................................73
P FILM SIMULATION ..............................................................73
D WHITE BALANCE .................................................................74
R CONTINUOUS .......................................................................74
F AF MODE ................................................................................75


xiv
Table of Contents
The Playback Menu.......................................................................76
Using the Playback Menu .........................................................76
Playback Menu Options .............................................................76
I SLIDE SHOW .........................................................................77
D PROTECT ................................................................................78
i ERASE FACE RECOG. ..........................................................79
j SET UPLOAD-TAG TO .........................................................79
The Setup Menu .............................................................................81
Using the Setup Menu ...............................................................81
Setup Menu Options ...................................................................82
A IMAGE DISP. ..........................................................................83
B FRAME NO. ............................................................................84
Q DIGITAL ZOOM ....................................................................85
I VOLUME .................................................................................85
b SOUND....................................................................................85
J LCD BRIGHTNESS ................................................................85
K FORMAT..................................................................................86
M AUTO POWER OFF ..............................................................87
N TIME DIFFERENCE ...............................................................88
S POWER MANAGEMENT ....................................................89
h CALIBRATION .......................................................................90
T
T
T
TTec
ec
ec
ecechnic
hnic
hnic
hnichnical No
al No
al No
al Noal Notes
tes
tes
testesTechnical Notes
Optional Accessories ...................................................................91
Accessories from FUJIFILM .......................................................92
Caring for the Camera .................................................................93
T
T
T
TTrou
rou
rou
rourouble
ble
ble
bleblesho
sho
sho
shoshooti
oti
oti
otioting
ng
ng
ngngTroubleshooting
Troubleshooting ............................................................................94
Warning Messages and Displays ..........................................101
App
App
App
AppAppendi
endi
endi
endiendix
x
x
xxAppendix
Glossary .......................................................................................... 105
Internal Memory/Memory Card Capacity ....................... 106
Speci cations ............................................................................... 107


1
Before You Begin
Introduction
Symb
Symb
Symb
SymbSymbols and Conv
ols and Conv
ols and Conv
ols and Convols and Conventions
entions
entions
entionsentionsSymbols and Conventions
The following symbols are used in this manual:
3
Caution: This information should be read before use to ensure correct operation.
1
Note: Points to note when using the camera.
2
Tip: Additional information that may be helpful when using the camera.
Menus and other text in the camera monitor are shown in bold. In the illustrations in this manual, the
monitor display may be simpli ed for explanatory purposes.
Suppl
Suppl
Suppl
SupplSupplied Accessories
ied Accessories
ied Accessories
ied Accessoriesied AccessoriesSupplied Accessories
The following items are included with the camera:
NP-45A rechargeable
battery
BC-45W battery charger USB cable CD-ROM
• Strap
Attaching the Strap
Attach the strap as
shown.


2
Introduction
Parts of t
Parts of t
Parts of t
Parts of tParts of the Camera
he Camera
he Camera
he Camerahe CameraParts of the Camera
For more information, refer to the page listed to the right of each item.
13 DC coupler cable cover
14 Battery-chamber cover .......................... 9
15 Tripod mount
16 USB connector ...................................60, 66
17 Battery latch ........................................... 9, 12
18 Memory card slot .....................................12
19 Battery chamber ......................................... 9
7 Illuminator ....................................................82
Self-timer lamp ..........................................34
8 Flash ..................................................................30
9 On/o switch and lens cover ...........14
10 Monitor/touch panel display .........3–7
11 Indicator lamp ............................................20
12 Strap eyelet .................................................... 1
1 Zoom control ...................................... 19, 58
2 Shutter button ...........................................21
3 B/a button ............................. 14, 22, 42
4 Microphone .................................................57
5 Lens ................................................................ 107
6 Speaker ...........................................................59


3
Before You Begin
Introduction
Camera D
Camera D
Camera D
Camera DCamera Displ
ispl
ispl
isplisplays (T
ays (T
ays (T
ays (Tays (Touc
ouc
ouc
oucouch Panel)
h Panel)
h Panel)
h Panel)h Panel)Camera Displays (Touch Panel)
The following indicators may appear during shooting and playback. The indicators displayed vary with
camera settings.
■
■
■
■■■
Shooti
Shooti
Shooti
ShootiShooting
ng
ng
ngng Shooting
10
10
10
1010 :
:
:
::00
00
00
00 00
AM
AM
AM
AMAM
10: 00
AM
127
127
127
127127
127
N
N
N
NN
N MENU DISP
12
12
12
1212 /
/
/
//31
31
31
3131 /
/
/
//2050
2050
2050
20502050
12 / 31 / 2050
3
+1
1600
* a: indicates that no memory card is in-
serted and that pictures will be stored in the
camera’s internal memory (pg. 11).
10 Exposure compensation ...........70
11 Dynamic range ............................... 73
12 Date and time...........................15, 82
13 Sensitivity ............................................71
14
Number of available frames
... 106
15 Film simulation ............................... 73
16 Image quality and size ........72, 73
17 Internal memory indicator *
.....11
18 Current folder .................................. 54
1 Dual IS mode ....................................18
2 Intelligent Face Detection
indicator ...............................................28
3 Silent mode indicator ..................21
4 White balance ..................................74
5 Continuous mode .........................74
6 Battery level .......................................18
7 Focus warning ...................... 20, 101
8 Blur warning ...................................101
9 Focus frame ...............................36, 75
■
■
■
■■■
Playback
Playback
Playback
PlaybackPlayback Playback
MENU DISP
100-0001
5 Edit...........................................................47
6 Protected image .............................78
7 Gift image ...........................................42
8 Frame number ................................ 84
1
Playback mode indicator
...22, 42
2 Intelligent Face Detection
indicator ...............................................28
3 Silent mode indicator ..................21
4 Red-eye removal indicator ......51


4
Introduction
The T
The T
The T
The TThe Touch Panel Dis
ouch Panel Dis
ouch Panel Dis
ouch Panel Disouch Panel Display
play
play
playplayThe Touch Panel Display
The touch panel display can be operated by tapping the display or gliding the stylus or a nger over
the panel. The panel responds to pressure; use a rm touch, but do NOT use excessive force.
■
■
■
■■
■
T
T
T
TTap
ap
ap
apap Tap
Lightly tap the display to
adjust settings or select pic-
tures or menu options.
MENU DISP
■
■
■
■■■
Scroll
Scroll
Scroll
ScrollScroll Scroll
Glide lightly over the display
to scroll through pictures
during playback.
MENU DISP
3 Cautions
To avoid damaging the monitor and touch panel dis-
play, observe the following precautions:
• Do not a x plastic covers, stickers, or other objects to
the panel.
• Use only your ngers to operate the panel. Do not
use excessive force.
• Do not sit on the camera (by, for example, leaving it
in a back pocket when sitting down), place it under
heavy objects, or attempt to force it into a small space
(such as a suitcase that is already full).
• Do not attach objects to the camera strap that might
place pressure on the monitor.
The Touch Panel Display
The actual displays may di er from those shown in this manual.


5
Before You Begin
Introduction
Rotat
Rotat
Rotat
RotatRotating t
ing t
ing t
ing ting the Camera
he Camera
he Camera
he Camerahe CameraRotating the Camera
With some exceptions, the display in the monitor rotates 90 ° when the camera is in “tall” orientation.
■
■
■
■■■
Shooti
Shooti
Shooti
ShootiShooting
ng
ng
ngng Shooting ■
■
■
■■■
Playback
Playback
Playback
PlaybackPlayback Playback
MENU
DISP
MENU
DISP
MENU DISP MENU DISP
Camera held in “wide”
(landscape) orientation
Camera held in “wide”
(landscape) orientation
Camera held in “tall”
(portrait) orientation
Camera held in “tall”
(portrait) orientation

6
Introduction
T
T
T
TTouch Pane
ouch Pane
ouch Pane
ouch Paneouch Panel Icons
l Icons
l Icons
l Iconsl IconsTouch Panel Icons
■
■
■
■■■
Shooti
Shooti
Shooti
ShootiShooting
ng
ng
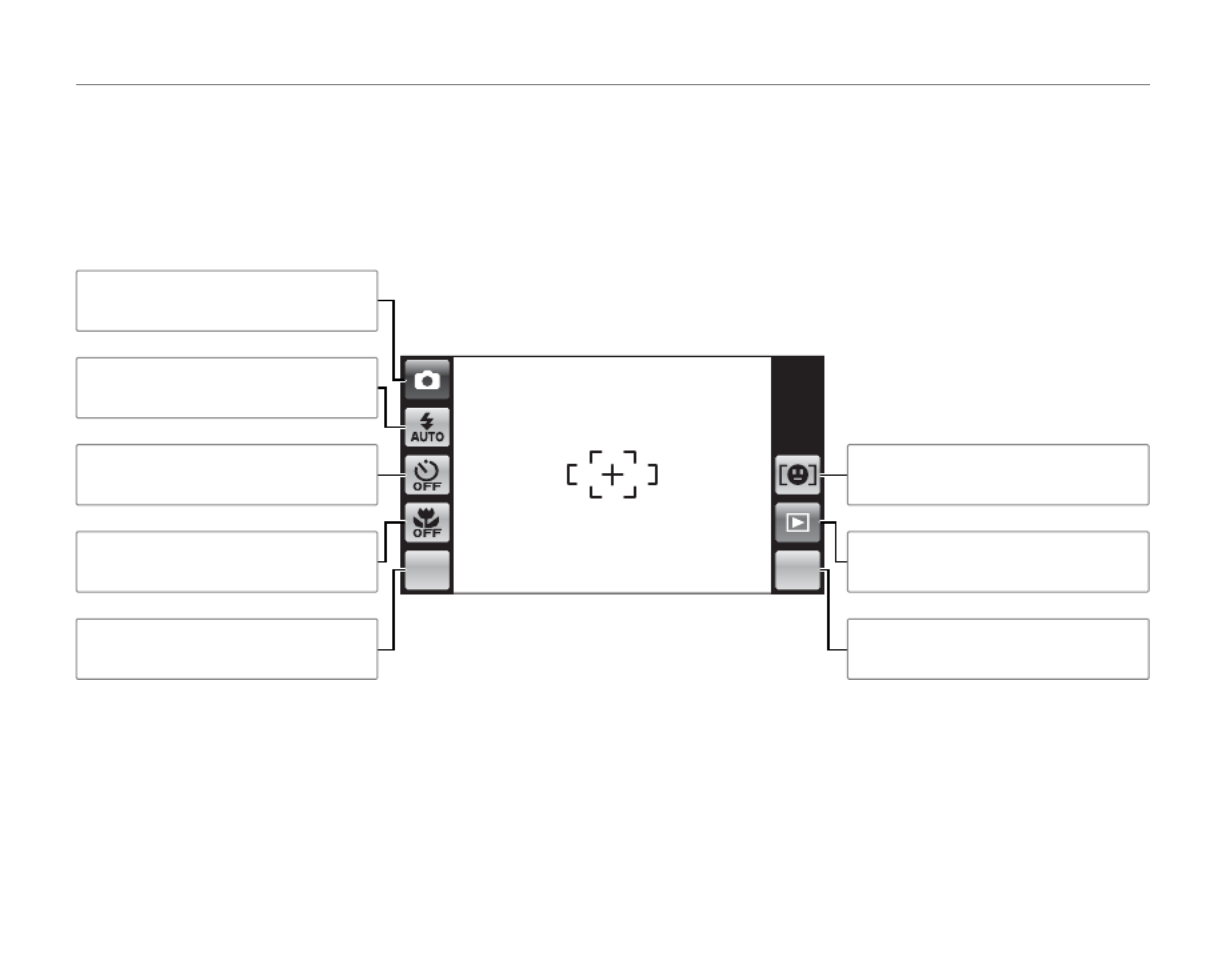
ngng Shooting
Tap the icons in the shooting display to perform the operations listed below. The icons displayed vary
with the options currently selected.
MENU DISP
Flash mode: Choose a ash mode
(pg. 30).
Self-timer: Use the self-timer (pg.
32).
Macro mode: Shoot in macro mode
(pg. 35).
Shooting menu: View the shooting
menu (pg. 68).
Shooting mode: Choose a shooting
mode (pg. 23).
Playback: View pictures (pp. 22,
42).
Display: Turn indicators on or o
(pg. 18).
Face recognition: View face recog-
nition options (pg. 38).

7
Before You Begin
Introduction
■
■
■
■■■
Playback
Playback
Playback
PlaybackPlayback Playback
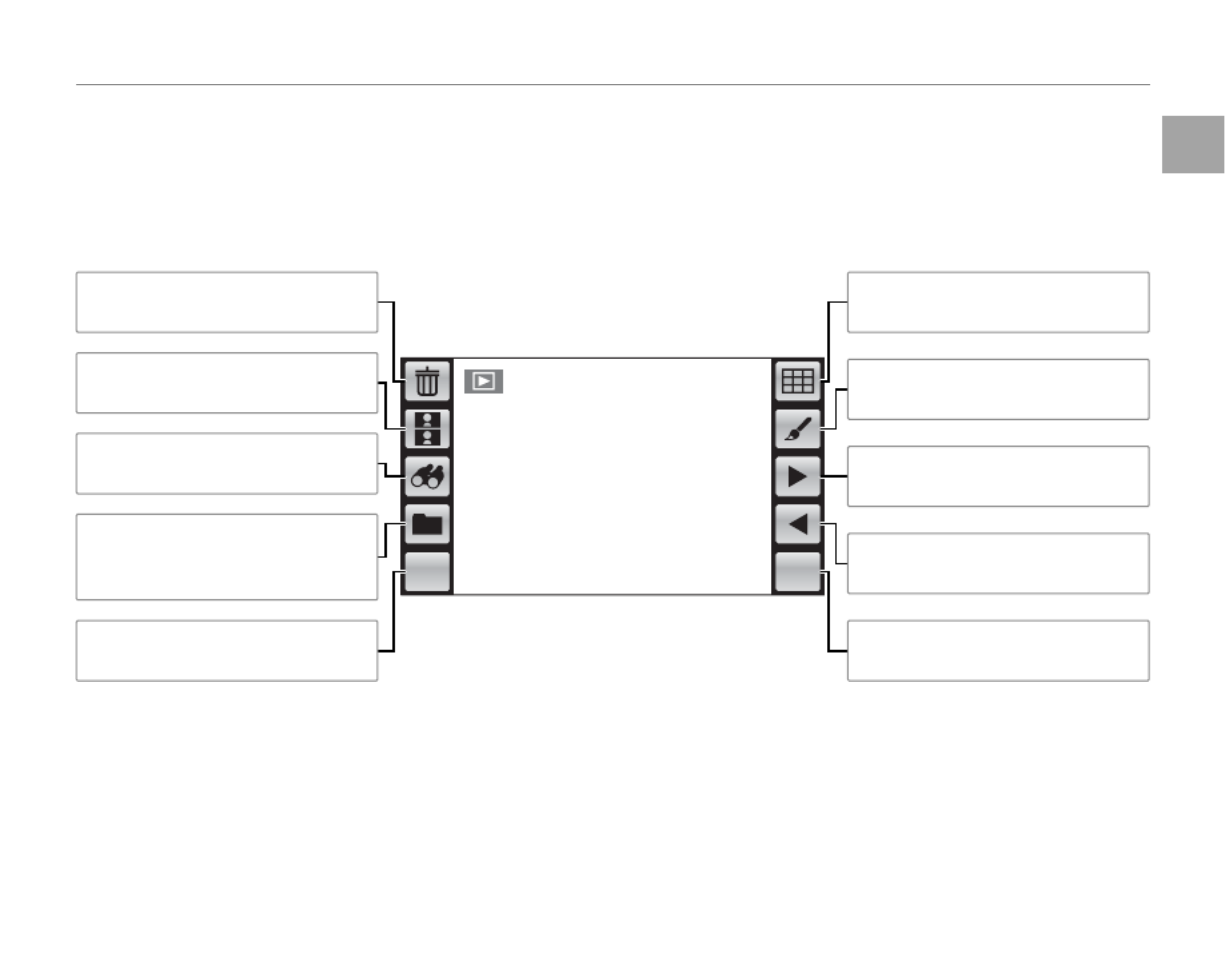
Tap the icons in the playback display to perform the operations listed below. The icons displayed vary
with the type of picture and the current playback mode.
MENU DISP
Picture compare: Compare pic-
tures (pg. 56).
Folder management: Move or copy
pictures between folders (pg.
54).
Playback menu: View the playback
menu (pg. 76).
Delete: Delete the current picture
(pg. 22).
Previous: View the previous pic-
ture (pp. 22, 42).
Display: Turn indicators on or o
(pg. 18).
Next: View the next picture (pp.
22, 42).
Edit: Create collages or retouched
copies of pictures (pg. 47).
Multi-frame: View multiple pic-
tures (pg. 44).
Image search: Find pictures (pg.
52).


First Steps
8
Charging the Battery
The battery is not charged at shipment. Charge
the battery before use.
Batteries
The camera uses an NP-45A rechargeable battery.
1 Place the battery in the charger.
Insert the battery into the supplied battery
charger as shown, making sure that the bat-
tery is in the orientation indicated by the
C B D label.
Battery charger
CFD
label
Battery
CFD
label
Arrow
Charge lamp
3 Cautions
• Unplug the charger when it is not in use.
• Remove dirt from the battery terminals with a
clean, dry cloth. Failure to observe this precau-
tion could prevent the battery from charging.
• Charging times increase at low temperatures.
2 Plug the charger in.
Plug the charger into a power outlet. The
charging indicator will light.
The Charging Indicator
The charging indicator shows battery charge
status as follows:
Cha
Cha
Cha
ChaCharg
rg
rg
rgrgin
in
in
ining ind
g ind
g ind
g indg indic
ic
ic
icicato
ato
ato
atoator
r
r
rrCharging indicator Bat
Bat
Bat
BatBatte
te
te
teter
r
r
rry s
y s
y s
y sy stat
tat
tat
tattatus
us
us
ususBattery status Ac
Ac
Ac
AcActi
ti
ti
tition
on
on
ononAction
O
Battery not
inserted.
Insert the
battery.
Battery fully
charged.
Remove the
battery.
On Battery
charging. —
Blinks Battery fault.
Unplug the
charger and
remove the
battery.
3 Charge the battery.
Remove the battery when charging is com-
plete. See page 110 for information on charg-
ing times.


First Steps
9
Inserting the Battery
After charging the battery, insert it in the camera as described below.
1 Open the battery-chamber cover.
Lightly press the center
of the battery-chamber
cover and open it as
shown.
1 Note
Be sure the camera is o before opening the bat-
tery-chamber cover.
3 Cautions
• Do not open the battery-chamber cover when
the camera is on. Failure to observe this pre-
caution could result in damage to image les or
memory cards.
• Do not use excessive force when handling the
battery-chamber cover.
2 Insert the battery.
Align the orange stripe
on the battery with the
orange battery latch and
slide the battery into the
camera, keeping the
battery latch pressed to
one side. Con rm that
the battery is securely
latched.
3 Caution
Insert the battery in the correct orientation. Do
NOT use force or attempt to insert the battery up-
side down or backwards. The battery will slide in
easily in the correct orientation.
3 Close the battery-chamber cover.
Close the battery-cham-
ber cover and then
lightly press it down and
slide it in to latch.
Orange stripe
Battery latch
Orange stripe
Battery latch


10
Inserting the Batteries
Removing the Battery
After turning the camera o ,
open the battery-chamber cov-
er, press the battery latch to the
side, and slide the battery out
of the camera as shown.
Battery latch
3 Caution
Turn the camera o before removing the battery.
3 Cautions
• Do not a x stickers or other objects to the battery.
Failure to observe this precaution could make it im-
possible to remove the battery from the camera.
• Do not short the battery terminals. The battery could
overheat.
• Read the cautions on page v.
• Use only battery chargers designated for use with the
battery. Failure to observe this precaution could re-
sult in product malfunction.
• Do not remove the labels from the battery or attempt
to split or peel the outer casing.
• The battery gradually loses its charge when not in
use. Charge the battery one or two days before use.
2 Tips: Using an AC Power Adapter
• The camera can be powered by an optional AC pow-
er adapter and DC coupler (sold separately). See the
manuals provided with the AC power adapter and DC
coupler for details.
• If the camera is powered by an AC power adapter,
demo mode instructions will be displayed when the
camera is turned on. Selecting demo mode starts a
slide show; to cancel, press the shutter button.


First Steps
11
Inserting a Memory Card
Although the camera can store pictures in internal memory, optional SD memory cards (sold sepa-
rately) can be used to store additional pictures.
When no memory card is inserted, a appears in the monitor and internal memory is used for recording
and playback. Note that because camera malfunction could cause internal memory to become cor-
rupted, the pictures in internal memory should periodically be transferred to a computer and saved on
the computer hard disk or on removable media such as CDs or DVDs. The pictures in internal memory
can also be copied to a memory card (see page 55). To prevent internal memory from becoming full,
be sure to delete pictures when they are no longer needed.
When a memory card is inserted as described below, the card will be used for recording and playback.
■
■
■
■■■
Compati
Compati
Compati
CompatiCompatible Me
ble Me
ble Me
ble Meble Memor
mor
mor
mormory Cards
y Cards
y Cards
y Cardsy Cards Compatible Memory Cards
FUJIFILM and SanDisk SD and SDHC memory cards have been approved for use in the camera. A com-
plete list of approved memory cards is available at http://www.fujifilm.com/products/digital_cameras/
index.html. Operation is not guaranteed with other cards. The camera can not be used with xD-Picture
Cards or MultiMediaCard (MMC) devices.
3 Caution
SD memory cards can be locked, making it impossible to format the card or to record or
delete images. Before inserting an SD memory card, slide the write-protect switch to the
unlocked position.
Wr
Wr
Wr
WrWrite-protect swit
ite-protect swit
ite-protect swit
ite-protect switite-protect switch
ch
ch
chchWrite-protect switch

12
Inserting a Memory Card
1 Turn the camera o and open the battery-
chamber cover.
Lightly press the center
of the battery-chamber
cover and open it as
shown.
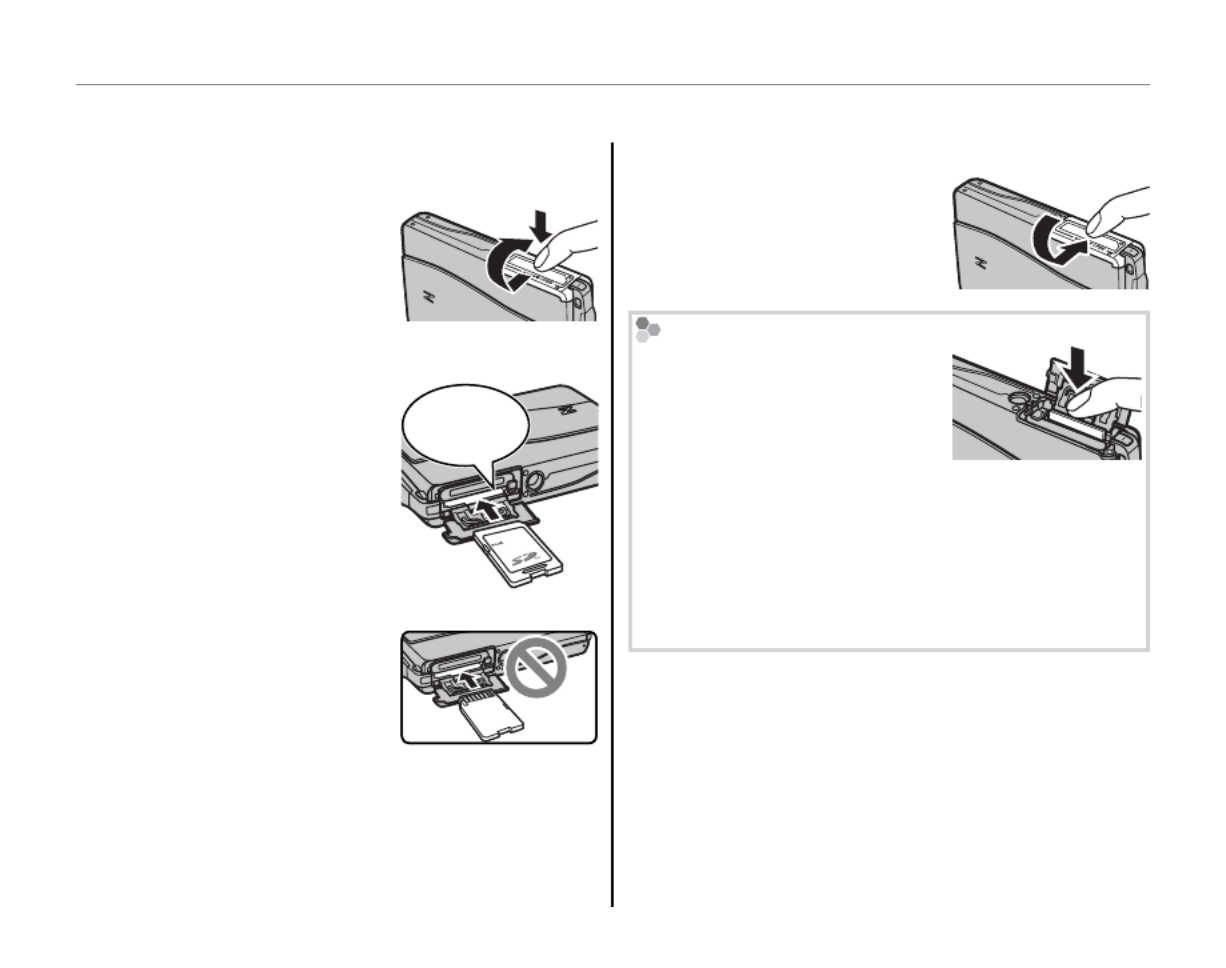
2 Insert the memory card.
Holding the memory
card in the orientation
shown at right, slide it in
until it clicks into place
at the back of the slot.
Click
3 Caution
Be sure card is in correct
orientation; do not insert
at an angle or use force.
If the memory card is not
correctly inserted, pictures
will be recorded to internal memory.
3 Close the battery-chamber cover.
Close the battery-cham-
ber cover and then
lightly press it down and
slide it in to latch.
Removing Memory Cards
Turn the camera o and then
press the card in and release it
slowly. The card can now be
removed by hand.
3 Cautions
• The memory card may spring out if you remove
your nger immediately after pushing the card in.
• Memory cards may be warm to the touch after be-
ing removed from the camera. This is normal and
does not indicate a malfunction.
■
■
■
■■■
Inser
Inser
Inser
InserInserti
ti
ti
titing a Memo
ng a Memo
ng a Memo
ng a Memong a Memory Card
ry Card
ry Card
ry Cardry Card Inserting a Memory Card


First Steps
13
Inserting a Memory Card
3 Cautions
• Do not turn the camera o or remove the memory card while the memory card is being formatted or data are being recorded to or
deleted from the card. Failure to observe this precaution could damage the card.
• Format SD memory cards before rst use, and be sure to reformat all memory cards after using them in a com-
puter or other device. For more information on formatting memory cards, see page 86.
• Memory cards are small and can be swallowed; keep out of reach of children. If a child swallows a memory card,
seek medical assistance immediately.
• miniSD or microSD adapters that are larger or smaller than the standard dimensions of an SD card may not eject
normally; if the card does not eject, take the camera to an authorized service representative. Do not forcibly
remove the card.
• Do not a x labels to memory cards. Peeling labels can cause camera malfunction.
• Movie recording may be interrupted with some types of SD memory card. Use a card with a class 4 write speed
(4 MB/s) or better when shooting HD movies.
• The data in internal memory may be erased or corrupted when the camera is repaired. Please note that the
repairer will be able to view pictures in internal memory.
• Formatting a memory card or internal memory in the camera creates a folder in which pictures are stored. Do
not rename or delete this folder or use a computer or other device to edit, delete, or rename image les. Always
use the camera to delete pictures from memory cards and internal memory; before editing or renaming les,
copy them to a computer and edit or rename the copies, not the originals.


14
Turning the Camera on and O
Shooti
Shooti
Shooti
ShootiShooting Mode
ng Mode
ng Mode
ng Modeng ModeShooting Mode
To turn the camera on, open the lens cover ful-
ly. The camera turns o when the lens cover is
closed.
Camera on Camera o
2 Tip: Switching to Playback Mode
Touch the a icon or press the B/a button to start
playback.
3 Caution
Pictures can be a ected by ngerprints and other
marks on the lens. Keep the lens clean.
Playback Mode
Playback Mode
Playback Mode
Playback ModePlayback ModePlayback Mode
If the lens cover is closed, the camera can be
turned on in playback mode by pressing the B/
a button for about a second.
Press the B/a button for about a second to
turn the camera o .
2 Tip: Switching to Shooting Mode
To exit to shooting mode, press the shutter button or
the B/a button.
3 Caution
The indicator lamp lights when the camera is turned o . Do not remove the battery while the lamp is lit. The
camera can not be turned on again until the lamp turns o .
2 Tip: Auto Power O
The camera will turn o automatically if no operations are performed for the length of time selected in the
M AUTO POWER OFF menu (pg. 87). To turn the camera on, close and reopen the lens cover or press the B/a
button for about a second.


First Steps
15
Basic Setup
A language-selection dialog is displayed the rst time the camera is turned on. Set up the camera as
described below (for information on resetting the clock or changing languages, see page 82).
1 Choose a language.
Tap to select a language.
Tap 6 or 7 to view ad-
ditional languages.
2 Set the date.
Tap the 6 or 7 arrows
to set the date and then
tap OK.
2 Tip: “NO” and “BACK”
Tap
BACK
to return to the previous step, NO to
skip the current step. Any steps you skip will be
displayed the next time the camera is turned on.
1 Note
To change the order in which the year, month,
and day are displayed, tap YY.MM.DD.
3 Set the time.
Select AM or PM, tap
the 6 7 or arrows to set
the time, and tap OK.
DATE/TIME
NO
AM
PM
12 00
hh mm
START MENU
BACK OK
4 Choose a shooting mode.
Tap to select.
NO
START MENU SHOOTING MODE
TOUCH & SHOOT
Focus on the touched
area and shoot.
AUTO
Selects EXR mode and camera
settings for each scene.
BACK
START MENU
ENGLISH
FRANCAIS
1
/
3
DEUTSCH
ESPAÑOL
PORTUGUÊS
ITALIANO
NEDERLANDS
РУССКИЙ ﻲﺑﺮﻋ
START MENU
ENGLISH
FRANCAIS
1
/
3
DEUTSCH
ESPAÑOL
PORTUGUÊS
ITALIANO
NEDERLANDS
РУССКИЙ ﻲﺑﺮﻋ
DATE/TIME
NO
BACK
2010 01 01
YY MM DD
START MENU
OK
YY.MM.DD
DATE/TIME
NO
BACK
2010 01 01
YY MM DD
START MENU
OK
YY.MM.DD


16
Basic Setup
5 Choose power management options.
Tap one of the following
options:
• n POWER SAVE: Save
battery power.
• p QUICK AF: Reduce focusing time, ensur-
ing a quick shutter response.
• o CLEAR DISPLAY: Choose for a brighter,
higher quality display.
Tap OK to enter shoot-
ing mode when setup is
complete.
MENU DISP
2 Tip: The Camera Clock
If the battery is removed for an extended period, the
camera clock will be reset and the language-selection
dialog will be displayed when the camera is turned on.
If the battery is left in the camera or an optional AC
power adapter connected for about a day, the battery
can be removed for about a week without resetting
the clock, language selection, shooting mode, or pow-
er management options.
NO
START MENU POWER MANAGEMENT
POWER SAVE
QUICK AF
CLEAR DISPLAY
Power saving for longer
battery lif e
BACK OK
NO
START MENU POWER MANAGEMENT
POWER SAVE
QUICK AF
CLEAR DISPLAY
Power saving for longer
battery lif e
BACK OK


17
Basic Photography and Playback
Taking Pictures in R (EXR AUTO) Mode
This section describes how to take pictures in R mode (for other shooting modes, see page 23).
1 Turn the camera on.
Fully open the lens cover.
2 Select R mode.
Tap the shooting mode icon to view shoot-
ing modes and tap R.
MENU DISP
SHOOTING MODE
BACK
HOME
Nat ural Light Nat ural & Flash Manual Movie
Scene PositionTo uch & Shoot
3 Display EXR options.
A tip will be displayed.
Tap the tip or wait for it
to clear from the display
automatically.
4 Select R.
Tap R to select R mode and then tap OK
to exit to shooting mode.
OK
SHOOTING MODE
BACK
HOME
AUTO
Selects EXR mode
and camera settings
for each scene.
MENU DISP
R
In this mode, the camera auto-
matically analyzes the compo-
sition and selects a scene and
EXR mode according to shoot-
ing conditions and the type of
subject:
• b (PORTRAIT): Human portrait sub-
ject.
• c (LANDSCAPE): Man-made or natu-
ral landscape.
• (dNIGHT): Poorly-lit landscape.
• (eMACRO): Subject close to camera.
• (gBACKLIT PORTRAIT): Back-lit portrait subject.
• (fNIGHT PORTRAIT): Poorly-lit portrait subject.
a (AUTO) is selected if none of the above are detected.
2 Tip: Auto Image Size
If S is selected for O IMAGE
SIZE in R mode, the camera
will automatically select the op-
timal image size.
HOME
1
/
2
BACK
IMAGE SIZE
9
FRAMES
4:3
L / M
16:9
L / M
4:3 6
M
16:9 4
M
207
FRAMES
251
FRAMES
325
FRAMES
Selected scene
EXR mode (displayed
when shutter button is
pressed halfway)
MENU DISP
SHOOTING MODE
Select shooting mode taking
advantage of SUPER CCD EXR.
SHOOTING MODE
Select shooting mode taking
advantage of SUPER CCD EXR.

18
Taking Pictures in R (EXR AUTO) Mode
5 Check the battery level.
Check the battery level
in the display.
Ind
Ind
Ind
IndIndic
ic
ic
icicator
ator
ator
atoratorIndicator Des
Des
Des
DesDescr
cr
cr
crcrip
ip
ip
ipiptio
tio
tio
tiotion
n
n
nnDescription
D (white) Battery partially discharged.
C (white) Battery more than half discharged.
B (red) Low battery. Charge as soon as pos-
sible.
A
(blinks red)
Battery exhausted. Turn camera o
and charge battery.
Hiding and Viewing Indicators
To hide indicators in the display, tap the DISP icon.
Tap again to display indicators.
MENUMENU DISP
N
N
N
NN
N
127
127
127
127127
127
DISP
Indicators displayed Indicators hidden
Avoiding Blurred Pictures
If the subject is poorly lit, blur-
ring caused by camera or subject
movement can be reduced by
selecting f
ON
for L DUAL
IS MODE in the shooting menu
(pg. 69). The type of blur reduc-
tion can be selected in the setup
menu (pg. 82).
OFF
ON
DUAL IS MODE
HOME
BACK
x is displayed when
dual IS is o .
Sensitivity is raised when dual IS is in e ect. Note
that blurring may still occur depending on the
scene. We recommend that you turn dual IS o
when using a tripod.


19
Basic Photography and Playback
Taking Pictures in R (EXR AUTO) Mode
6 Frame the picture.
Use the zoom control to frame the picture in
the display.
By default, the camera uses
optical zoom only. If desired,
digital zoom (pg. 85) can be
used to zoom in closer.
Select j to zoom out Select i to zoom in
MENU DISP
Zoom indicator
MENU DISP
2 Tip: Focus Lock
Use focus lock (pg. 36) to focus on subjects that
are not in the center of the frame.
Holding the Camera
Hold the camera steady with
both hands and brace your el-
bows against your sides. Shak-
ing or unsteady hands can blur
your shots.
To prevent pictures that are out
of focus or too dark (underex-
posed), keep your ngers and
other objects away from the
lens and ash.
Best Framing
To display a framing guide
(“best framing”), select ON for
the c FRAMING GUIDELINE
option in the shooting menu
(pg. 69).
N
N
N
NN
N MENU DISP
127
127
127
127127
127


20
Taking Pictures in R (EXR AUTO) Mode
7 Focus.
Press the shutter button halfway
to focus.
1 Note
The lens may make a noise when the camera
focuses; this is normal. In R mode, the cam-
era continuously adjusts focus and searches for
faces, increasing the drain on the battery. o is
displayed in the monitor.
If the camera is able to focus, it will beep twice
and the indicator lamp will glow green.
If the camera is unable to focus, the focus frame
will turn red, s will be displayed, and the
indicator lamp will blink green. Change the
composition or use focus lock (pg. 36).
The Indicator Lamp
Indicator lamp
The indicator lamp shows camera status as follows:
Ind
Ind
Ind
IndIndic
ic
ic
icicato
ato
ato
atoator la
r la
r la
r lar lamp
mp
mp
mpmpIndicator lamp Ca
Ca
Ca
CaCamer
mer
mer
mermera st
a st
a st
a sta stat
at
at
atatus
us
us
ususCamera status
Glows green Focus locked.
Blinks green Blur, focus, or exposure warning. Picture
can be taken.
Blinks green
and orange
Recording pictures. Additional pictures can
be taken.
Glows orange Recording pictures. No additional pictures
can be taken at this time.
Blinks orange Flash charging; ash will not re when pic-
ture is taken.
Blinks red Lens or memory error.
2 Tip: Warnings
Detailed warnings appear in the display. See pages
101–104 for more information.


21
Basic Photography and Playback
Taking Pictures in R (EXR AUTO) Mode
8 Shoot.
Smoothly press the shutter button
the rest of the way down to take
the picture.
1 Note
If the subject is poorly lit, the ash may re when
the picture is taken. To take pictures without the
ash, choose another ash mode (pg. 30).
2 Tip: The Shutter Button
The shutter button has two positions. Pressing the
shutter button halfway (q) sets focus and exposure;
to shoot, press the shutter button the rest of the way
down (w).
q w
Press halfway Press the rest of
the way down
Double
beep Click
Where Are My Pictures Stored?
Pictures will be stored in internal memory if no mem-
ory card is inserted. When a memory card is inserted,
pictures are stored in the “D” (“my pictures”) folder.
Use folder management (pg. 54) to organize pictures
into other folders after shooting.
Silent Mode
In situations in which camera
sounds or lights may be unwel-
come, select ON for o SILENT
MODE in the shooting menu
(pg. 69).
OFF
ON
SILENT MODEHOME
BACK
The camera speaker, ash, and illuminator turn o ;
ash and volume settings (pg. 85) can not be adjust-
ed (note that the ash will still re in C mode). To
restore normal operation, turn silent mode o .


22
Viewing Pictures
Pictures can be viewed in the monitor. When taking important photographs, take a test shot and
check the results.
1 Tap the a icon.
The most recent picture will be displayed.
MENU DISP MENU DISP
2 View additional pictures.
Scroll left or right or tap or 8 9.
MENU DISP
or
MENU DISP
P
ress the shutter button or B/a button to exit to
shooting mode.
Deleting Pictures
To delete the current picture,
tap e.
MENU DISP
A con rmation dialog will be
displayed; tap OK to delete
the picture or tap BACK to exit
without deleting the picture.
HOME
BACK OK
ERASE OK?
2 Tip: The Playback Menu
Pictures can also be deleted from the playback menu
(pg. 45).


23
More on Photography
Choose a shooting mode according to the scene
or type of subject. To choose a shooting mode,
tap the shooting mode icon in the monitor and
tap to choose a mode.
MENU DISP BACK
HOME SHOOTING MODE
Nat ural Light Nat ural & Flash Manual Movie
Scene PositionTo uch & Shoot
Mod
Mod
Mod
ModMode
e
e
eeMode Se
Se
Se
SeSee
e
e
eeSee Mod
Mod
Mod
ModMode
e
e
eeMode Se
Se
Se
SeSee
e
e
eeSee
R
EXR
17 D NATURAL LIGHT 27
AUTO 24 C NATURAL & N27
TOUCH & SHOOT 24 MANUAL 27
H SCENE POSITION 25 F MOVIE 57
A description of the selected mode will be dis-
played; tap the description to continue, or wait for
it to clear from the display automatically.
E
E
E
EEE EXR
EXR
EXR
EXR EXR EXR
This mode can be used to al-
low the camera to optimize
settings for your current sub-
ject or to improve clarity, re-
duce noise, or enhance dynamic range. Selecting
this mode displays the following options; select
an option and tap OK, or tap BACK to return to
the shooting mode menu.
Opt
Opt
Opt
OptOptio
io
io
ioion
n
n
nnOption Des
Des
Des
DesDescr
cr
cr
crcri
i
i
iipti
pti
pti
ptiption
on
on
ononDescription
R
E AUTO: The camera automatically se-
lects the scene and E mode according to
shooting conditions (pg. 17).
SRESOLUTION PRIORITY: Choose for crisp, clear
shots.
THIGH ISO & LOW NOISE: Reduce noise in pictures
taken at high sensitivities.
UD-RANGE PRIORITY: Increase the amount of detail
visible in highlights.
OK
SHOOTING MODE
BACK
HOME
AUTO
Selects EXR mode
and camera settings
for each scene.
OK
SHOOTING MODE
BACK
HOME
AUTO
Selects EXR mode
and camera settings
for each scene.
A Shooting Mode

24
A Shooting Mode
AUT
AUT
AUT
AUT AUTO
O
O
OO AUTO
Choose for crisp, clear snapshots. This mode is
recommended in most situations.
TOUCH & SHOOT
TOUCH & SHOOT
TOUCH & SHOOT
TOUCH & SHOOT TOUCH & SHOOT TOUCH & SHOOT
Choose this mode to take pictures by touching
the display instead of pressing the shutter button.
Touch anywhere inside the “touch and shoot”
area to focus on the selected subject and take a
picture.
MENU DISP
Touch and shoot area Touch subject to shoot


26
A Shooting Mode
Sce
Sce
Sce
SceScene
ne
ne
neneScene Des
Des
Des
DesDesc
c
c
ccri
ri
ri
riripti
pti
pti
ptiption
on
on
ononDescription
LPORTRAIT Choose for soft-toned portraits with natural skin tones.
Z PORTRAIT ENHANCER Choose for soft-focus portraits with a smooth skin e ect.
M LANDSCAPE Choose for crisp, clear daylight shots of buildings and landscapes.
N SPORT Choose for fast shutter speeds when photographing moving subjects.
O NIGHT Choose this mode for poorly lit twilight or night scenes. Sensitivity is automatically raised to reduce
blur caused by camera shake. Use a tripod to prevent blur.
H NIGHT (TRIPOD) Choose this mode for slow shutter speeds when shooting at night.
P FIREWORKS Slow shutter speeds are used to capture the expanding burst of light from a rework. Shutter speed
can be selected by tapping the left and right arrows ( 8 9 and ). Use a tripod to prevent blur.
Q SUNSET Record the vivid colors in sunrises and sunsets.
R SNOW Choose for crisp, clear shots that capture the brightness of scenes dominated by shining white snow.
S BEACH Choose for crisp, clear shots that capture the brightness of sunlit beaches.
U PARTY Capture indoor background lighting under low-light conditions.
VFLOWER Choose for vivid close-ups of owers. The camera focuses in the macro range.
W TEXT Take clear pictures of text or drawings in print. The camera focuses in the macro range.
l DOG Choose when photographing dogs. The camera detects and focuses on the faces of dogs.
m CAT Choose when photographing cats. The camera detects and focuses on the faces of cats.


27
More on Photography
A Shooting Mode
D
D
D
DDD NA
NA
NA
NA NATURAL LIGHT
TURAL LIGHT
TURAL LIGHT
TURAL LIGHTTURAL LIGHT NATURAL LIGHT
Capture natural light indoors,
under low light, or where the
ash can not be used. The
ash turns o and sensitivity
is raised to reduce blur.
C
C
C
CCC NA
NA
NA
NA NATURAL &
TURAL &
TURAL &
TURAL & TURAL & NATURAL & N
N
N
NNN
This mode helps ensure good results with back-
lit subjects and in other situations with di cult
lighting. Each time the shutter button is pressed,
the camera takes two shots: one shot without the
ash to preserve natural lighting, followed imme-
diately by a second shot with the ash. Do not
move the camera until shooting is complete.
Flash o Flash on
1 Notes
• Do not use where ash photography is prohibited.
The ash will re even in silent mode.
• Only available if memory remains for two pictures.
MANUAL
MANUAL
MANUAL
MANUAL MANUAL MANUAL
Choose for complete control of camera settings.


28
g Intelligent Face Detection and Red-Eye Removal
Intelligent Face Detection automatically detects human faces anywhere in the frame and sets focus
and exposure for shots that emphasize portrait subjects. Choose to prevent the camera from focusing
on the background when taking group portraits, or to remove “red-eye” caused by the ash.
1 Turn Intelligent Face Detection on.
Tap MENU to display the shooting menu
and tap g (Face Detec.).
MENU DISP BACK
HOME SHOOTING MENU
Dual Is Mode
Framing Silent Set -up
Film Simula. White Bal. Face Det e c. AF Mode
Exposure Quality
Continuous
Size D-Range
The options shown at
right will be displayed.
Tap to select.
OFF
FACE DETECTION
FACE DETECTION ON
RED EYE REMOVAL ON
FACE DETECTION ON
RED EYE REMOVAL OFF
HOME
BACK
Opt
Opt
Opt
OptOption
ion
ion
ionionOption Des
Des
Des
DesDescri
cri
cri
cricription
ption
ption
ptionptionDescription
qIntelligent Face Detection and red-eye
removal on. Use with the ash.
gIntelligent Face Detection on; red-eye
removal o .
OFF Intelligent Face Detection and red-eye
removal o .
2 Frame the picture.
Frame the picture in
vertical or horizontal
orientation. If a face is
detected, it will be indi-
cated by a green border.
If there is more than one
face in the frame, the camera will select the
face closest to the center; other faces are in-
dicated by white borders.
MENU DISP
Green border
MENU DISP
Green border


29
More on Photography
3 Focus.
Press the shutter button halfway
to set focus and exposure for the
subject in the green border.
3 Caution
In some modes, the camera may set exposure for
the frame as a whole rather than the portrait sub-
ject. If no face is detected when the shutter but-
ton is pressed halfway (pg. 96), the camera will
focus on the subject at the center of the display
and red-eye will not be removed.
4 Shoot.
Press the shutter button all the
way down to shoot.
3 Caution
If the subject moves as the shutter button is
pressed, their face may not be in the area indi-
cated by the green border when the picture is
taken.
If q FACE DETECTION ON
RED EYE REMOVAL ON is
selected, the picture will be
processed to reduce red-eye
before it is recorded.
Intelligent Face Detection
Intelligent Face Detection is
recommended when using
the self-timer for group- or
self-portraits (pg. 32).
BACK
7
7
7
77
7
When setting focus and exposure, the camera gives
priority to subjects in its face recognition database
(pg. 38), and subjects identi ed in this manner can
later be located using image search (pg. 52). When
a picture taken with Intelligent Face Detection is dis-
played, the camera can automatically select faces for
playback zoom (pg. 43), red-eye removal (pg. 51), slide
shows (pg. 77), and when ZOOM (CONTINUOUS) is
selected for A IMAGE DISP. (pg. 83).
REMOVINGREMOVING
g Intelligent Face Detection and Red-Eye Removal


31
More on Photography
N Using the Flash (Super-Intelligent Flash)
2 Focus.
Press the shutter button halfway to focus. If the ash will re, p will be displayed when
the shutter button is pressed halfway. At slow shutter speeds, k will appear in the
display to warn that pictures may be blurred; use of a tripod is recommended.
1 Note
When using the ash to take pictures in “tall” (portrait) orientation, we recommend that you hold the cam-
era with the ash above the lens.
3 Shoot.
Press the shutter button the rest of the way down to shoot.
3 Caution
The ash may re several times with each shot. Do not move the camera until shooting is com-
plete.
Red-Eye Removal
When q FACE DETECTION ON RED EYE REMOVAL ON is selected for Intelligent Face Detection
(pg. 28), red-eye removal (J) is available in RED EYE REDUCTION (K
), FORCED FLASH
(L), and RED
EYE & SLOW (M
) modes. Red-eye removal minimizes “red-eye
” caused when light from the ash is
re ected from the subject’s retinas as shown in the illustration at right.

32
h Using the Self-Timer
The camera o ers a “couple timer” for self-portraits taken with a friend, a “group timer” for group por-
traits, a ten-second timer (pg. 34) that allows photographers to appear in their own photographs, and
a two-second timer (pg. 34) that can be used to avoid blur caused by the camera moving when the
shutter button is pressed.
Tap the self-timer icon to display self-timer options and tap to select.
Opt
Opt
Opt
OptOption
ion
ion
ionionOption Des
Des
Des
DesDescr
cr
cr
crcript
ipt
ipt
iptiption
ion
ion
ionionDescription
a (COUPLE TIMER) For self-portraits taken with a friend (pg. 33).
g (GROUP TIMER) For group portraits (pg. 33).
S (10 SEC) Ten-second timer (pg. 34).
R (2 SEC) Two-second timer (pg. 34).
T (OFF) Self-timer o .
DISPMENU
1 Note
Turn macro mode on when shooting self-portraits with the camera held at arm’s length.

33
More on Photography
h Using the Self-Timer
■
■
■
■■■
a COUPL
COUPL
COUPL
COUPL COUPLE TIMER
E TIMER
E TIMER
E TIMERE TIMER COUPLE TIMER
The camera will start the timer when it detects
two portrait subjects close together. Tap 8 or
9 to choose how close the subjects must be to-
gether before the timer starts. To stop the timer
before the picture is taken, press the shutter but-
ton halfway.
COUPLE TIMER
CLOSE UP
Select
MENU DISP
22
Choose 1 (b; 2 s timer), 2 (bb; 2 s
timer), or 3 (bbb; 1 s timer). The
more hearts, the closer the subjects
must be together.
■
■
■
■■■
g GROUP TIMER
GROUP TIMER
GROUP TIMER
GROUP TIMER GROUP TIMER GROUP TIMER
The camera will start the timer when it detects
the selected number of portrait subjects. Tap 8
or 9 to choose the number of subjects. To stop
the timer before the picture is taken, press the
shutter button halfway.
2
persons
Select number
MENU DISP
GROUP TIMER
22
Choose the number of subjects
from 1–4. Timer duration is 1 s for
single subjects, 2 s for groups of
two or more.

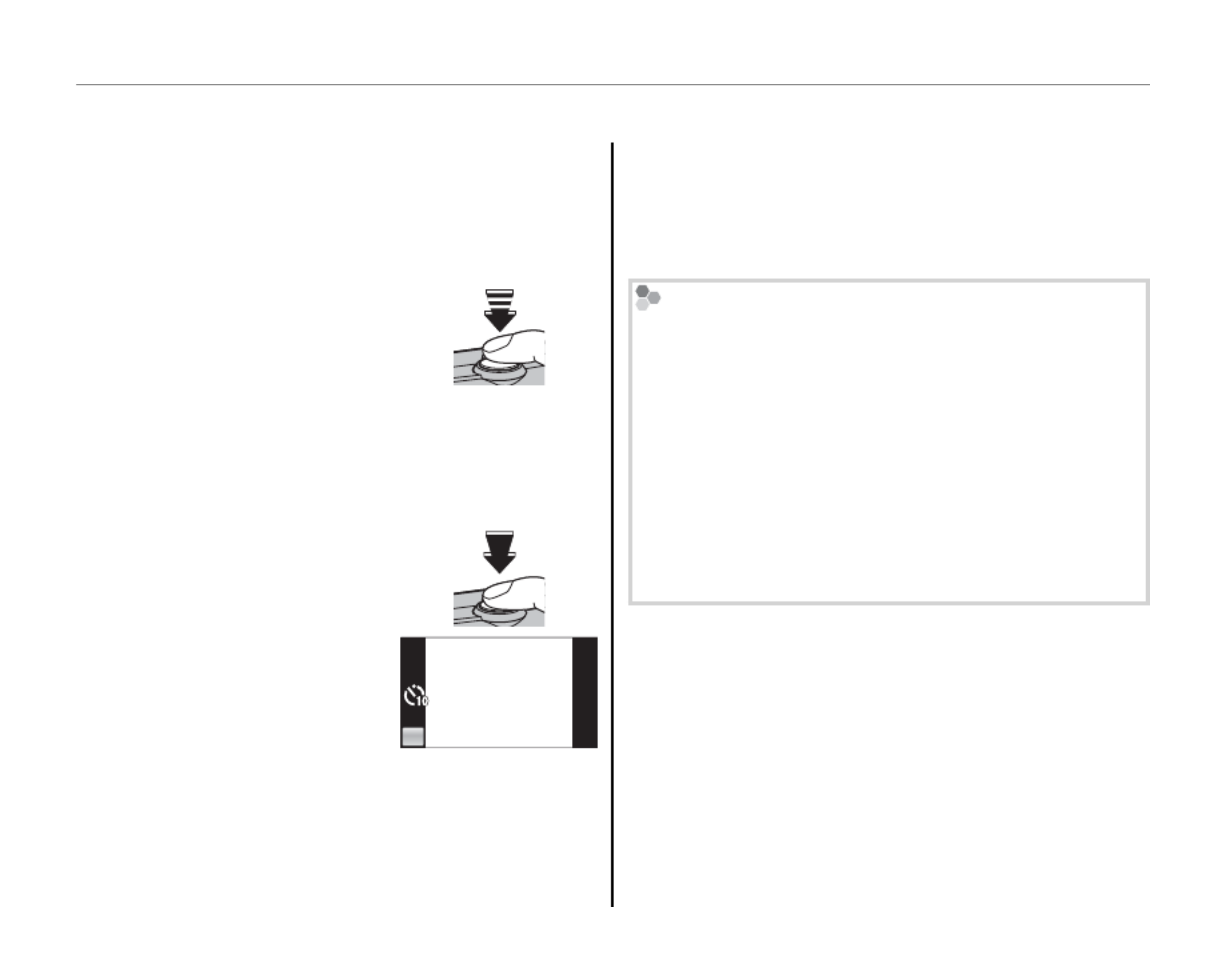
34
h Using the Self-Timer
The camera will start the timer ten or two sec-
onds after the shutter button is pressed all the
way down.
1 Focus.
Press the shutter button
halfway to focus.
3 Caution
Stand behind the camera when using the shutter
button. Standing in front of the lens can interfere
with focus and exposure.
2 Start the timer.
Press the shutter but-
ton the rest of the way
down to start the timer.
The display in the moni-
tor shows the number of
seconds remaining until
the shutter is released.
The self-timer lamp on the front of the camera will
blink immediately before the picture is taken. If
the two-second timer is selected, the self-timer
lamp will blink as the timer counts down.
Intelligent Face Detection
Because it ensures that the faces of portrait subjects
will be in focus, Intelligent Face Detection (pg. 28) is
recommended when using the self-timer for group
portraits or self-portraits. To use the self-timer with
Intelligent Face Detection, turn Intelligent Face De-
tection on, set the timer as described in Step 1, and
then press the shutter button all the way down to
start the timer. The camera will detect faces while
the timer is counting down and adjust focus and ex-
posure immediately before the shutter is released.
BACK
7
7
7
77
7
BACK
7
7
7
77
7
■
■
■
■■■
S (
(
(
( (1
1
1
110 SEC)
0 SEC)
0 SEC)
0 SEC) 0 SEC) /
/
/
/ /
(10 SEC) / R (2 SEC)
(2 SEC)
(2 SEC)
(2 SEC) (2 SEC) (2 SEC)

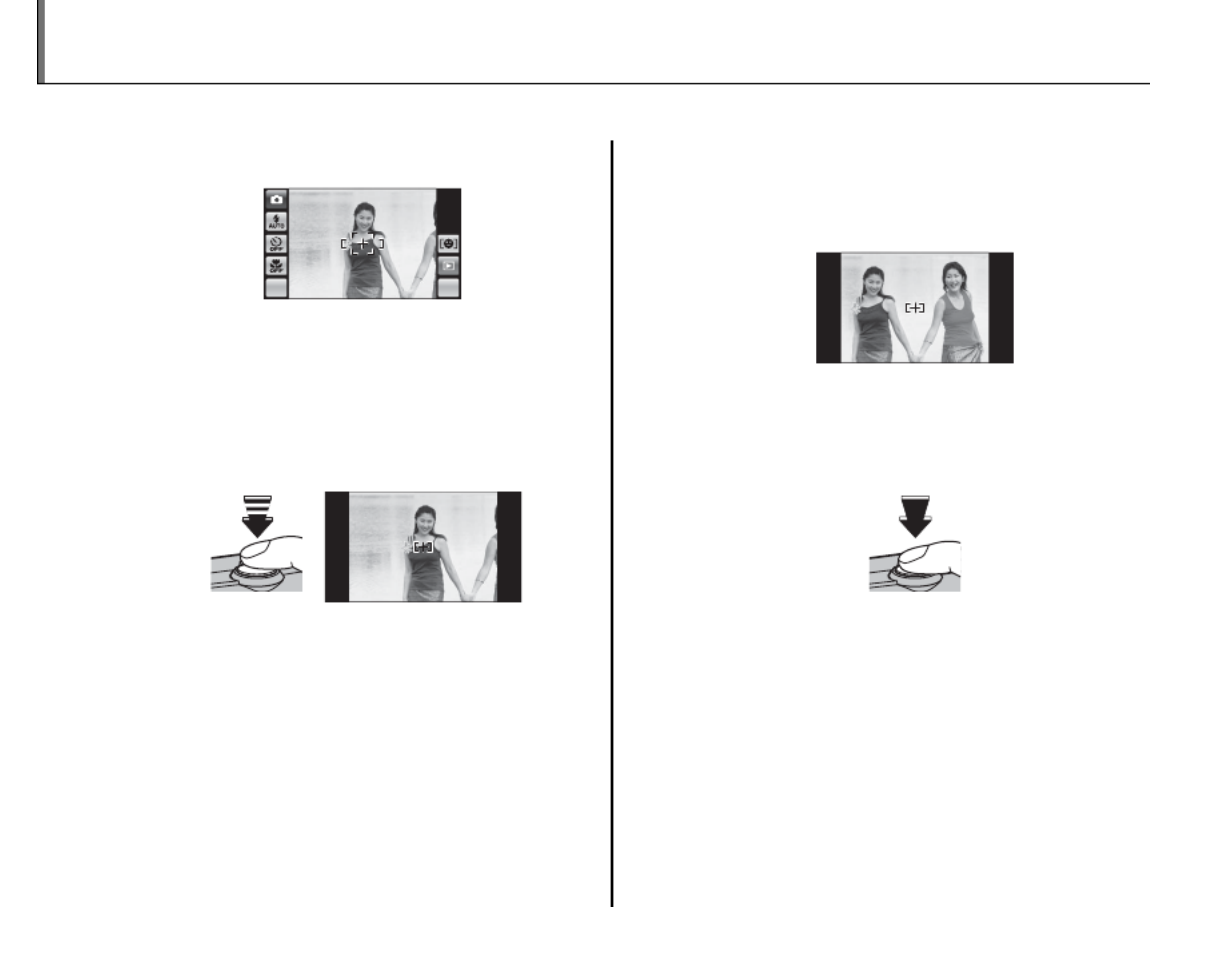
36
Focus Lock
To compose photographs with o -center subjects:
1 Position the subject in the focus frame.
MENU DI SP
2 Focus.
Press the shutter button halfway to set fo-
cus and exposure. Focus and exposure will
remain locked while the shutter button is
pressed halfway (AF/AE lock).
Press
halfway
Repeat steps 1 and 2 as desired to refocus
before taking the picture.
3 Recompose the picture.
Keeping the shutter button pressed halfway,
recompose the picture.
4 Shoot.
Press the shutter-release button the rest of
the way down to take the picture.
Press the rest of
the way down


37
More on Photography
Focus Lock
Autofocus
Although the camera boasts a high-precision autofocus system, it may be unable to focus on the subjects listed
below. If the camera is unable to focus using autofocus, use focus lock (pg. 36) to focus on another subject at
the same distance and then recompose the photograph.
• Very shiny subjects such as mirrors or car bodies.
• Fast-moving subjects.
• Subjects photographed through a window or other re ective object.
• Dark subjects and subjects that absorb rather than re ect light, such as hair or fur.
• Insubstantial subjects, such as smoke or ame.
• Subjects that show little contrast with the background (for example, subjects in clothing that is the same color
as the background).
• Subjects positioned in front of or behind a high-contrast object that is also in the focus frame (for example, a
subject photographed against a backdrop of highly contrasting elements).


38
n Face Recognition
The camera can store information on the face and personal details (name, relationship, and birth date)
of portrait subjects and assign these subjects priority for Intelligent Face Detection (pg. 28) or display
their names and other information during playback (pg. 42).
Adding New Faces
Adding New Faces
Adding New Faces
Adding New FacesAdding New FacesAdding New Faces
Follow the steps below to add faces to the face recognition database.
1 Select REGISTER.
Tap n to display face recognition options
and tap REGISTER.
MENU DISP
FACE RECOGNITION ON
REGISTER
VIEW & EDIT
AUT O REGISTRATION ON
FACE RECOGNITIONHOME
BACK
1 Note
To disable face recognition, select OFF for FACE
RECOGNITION.
2 Take a photograph.
With the subject facing the camera, use the
guides to frame the face of the person you
wish to add to the face recognition database
and take a picture. A con rmation dialog will
be displayed; tap REGISTER to add the face
to the database, RETRY to try again (if an er-
ror is displayed, tap BACK and try again).
CAPTURE THE FACE
ALONG WITH THE GUIDLINE
REGISTER FACE
REGISTER FACE
REGISTER FACE
REGISTER FACEREGISTER FACE
REGISTER FACE
BACK
REGISTER FACE
RETRY REGISTER


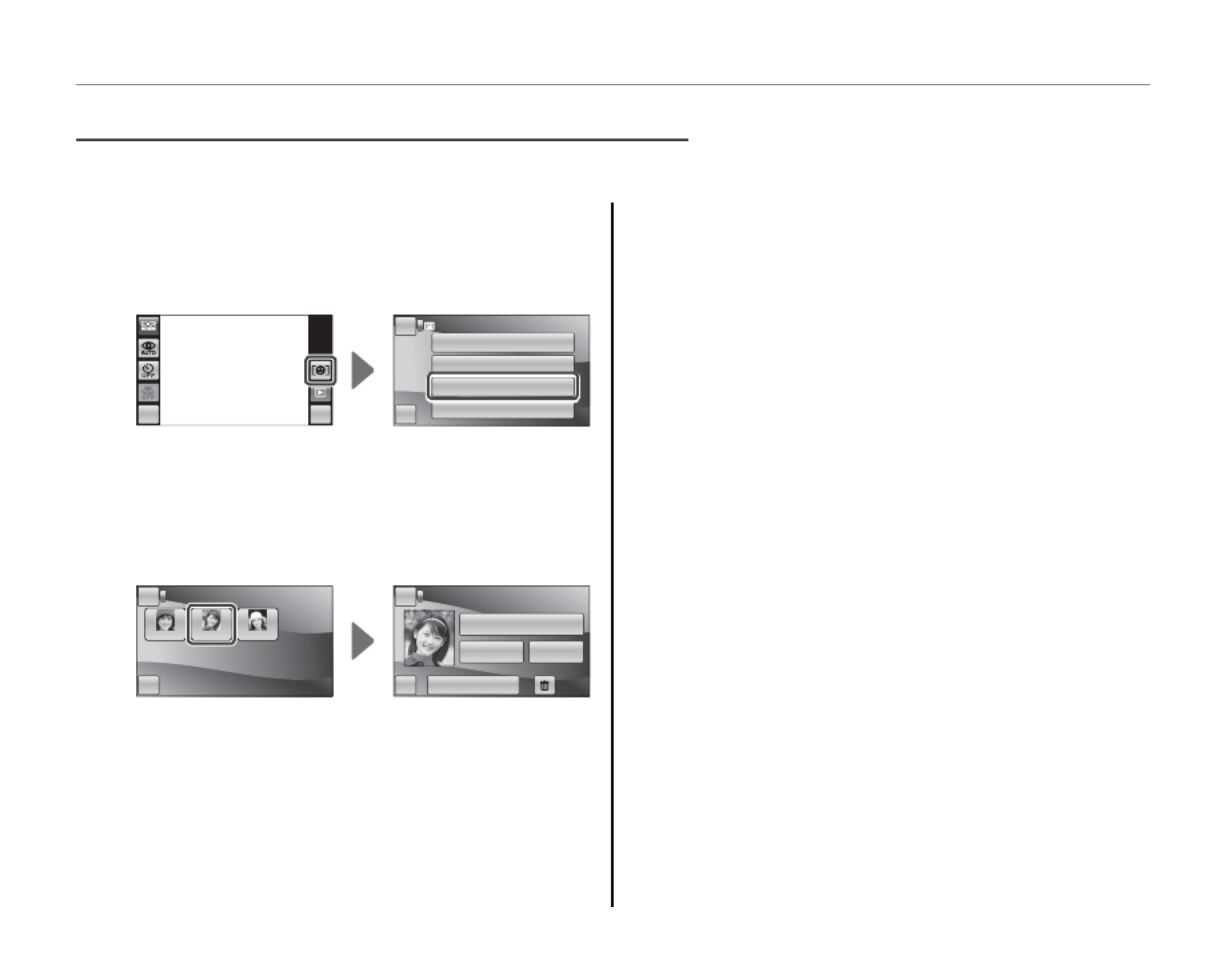
40
n Face Recognition
1 Select VIEW & EDIT.
Tap n to display face recognition options
and tap VIEW & EDIT.
MENU DISP
FACE RECOGNITION ON
REGISTER
VIEW & EDIT
AUT O REGISTRATION ON
FACE RECOGNITIONHOME
BACK
2 Select a face.
The faces in the database will be displayed as
shown below at left; tap a face to display face
recognition data for the selected subject.
BACK
FUJIFILM
1
FUJIFILM
2
FUJIFILM
3
REGISTERED FACEHOME VIEW & EDITHOME
BACK REPLACING IMAGE
NAME
FUJIFILM
2
CATEGORY
NONE
BIRTHDAY
12/ 31/ 2050
3 View or edit face recognition data.
To modify the name, category, or birth date,
tap the current entry and edit the data as de-
scribed in Step 3 on page 39. To retake the
photo, tap REPLACING IMAGE and shoot a
new portrait as described in Step 2 on page
38.
Tap OK to exit when you have nished view-
ing or editing the face recognition data. To
delete face recognition data for the selected
subject, tap e.
Viewing and Edi
Viewing and Edi
Viewing and Edi
Viewing and EdiViewing and Editing Face Recognit
ting Face Recognit
ting Face Recognit
ting Face Recognitting Face Recognition Data
ion Data
ion Data
ion Dataion DataViewing and Editing Face Recognition Data
Follow the steps below to view, edit, or delete face recognition data.

41
More on Photography
n Face Recognition
Adding Faces Automa
Adding Faces Automa
Adding Faces Automa
Adding Faces AutomaAdding Faces Automatical
tical
tical
ticaltically
ly
ly
lylyAdding Faces Automatically
To automatically add frequently-photographed subjects to the face recognition database, select ON
for AUTO REGISTRATION in the face recognition menu. If the camera detects a face that has been
photographed many times without being added to the database, it will display a message prompting
you to create a new face recognition entry. Tap OK and enter face recognition data as described in
Step 3 on page 39.
1 Note
The camera may sometimes fail to recognize new faces automatically. If necessary, faces can be added manually
using the REGISTER option as described on pages 38–39.
Face Recognition
The camera can store data on up to eight faces. If you attempt to add a ninth face, a con rmation dialog will be
displayed; use the VIEW & EDIT
option to make room for new faces by deleting existing data.
AUTO REGIS-
TRATION is disabled if there are already data for eight faces.
When Intelligent Face Detection (pg. 28) is on and the frame contains multiple subjects from the face recogni-
tion database, the camera displays the name of the subject that will be used to set focus and exposure (the
subject shown by the green frame). If no name is entered, the camera will show “---”. Subjects identi ed using
face recognition but not used to set focus and exposure are shown by orange frames, other subjects by white
frames.
3 Caution
Face recognition may not function as expected if the subject is not facing the camera, if only part of the sub-
ject’s face is in the frame, or if details of the subject’s face or expression di er markedly from those recorded in
the database.


44
Playback Options
To view pictures nine at a time, tap G in single-
frame view. The number of pictures displayed
changes each time you tap G (you can also select
j with the camera zoom control to increase the
number of pictures displayed or i to decrease
the number of pictures).
MENU DISP
1 frame 9 frames
25 frames
In 9- and 25-frame views, scroll left or right or tap
6 7, , , or 8 9 to view more pictures.
or
Tap a picture to view it full screen.
1 Note
When you tap a picture to display it full screen, the
folder containing the selected picture becomes the
current folder (pg. 54).
Rotating the Camera
When the camera is held in “tall” (por-
trait) orientation, the highlighted pic-
ture appears at the top of the display.
Tap 6, 7, 8, or 9 to highlight pictures
and tap the picture at the top of the dis-
play to view it full screen.
Mult
Mult
Mult
MultMulti
i
i
ii-
-
-
--Frame Playback
Frame Playback
Frame Playback
Frame PlaybackFrame PlaybackMulti-Frame Playback


Specyfikacje produktu
| Marka: | Fujifilm |
| Kategoria: | kamera |
| Model: | FinePix Z700EXR |
Potrzebujesz pomocy?
Jeśli potrzebujesz pomocy z Fujifilm FinePix Z700EXR, zadaj pytanie poniżej, a inni użytkownicy Ci odpowiedzą
Instrukcje kamera Fujifilm

25 Lutego 2025
8 Lutego 2025
27 Stycznia 2025
14 Stycznia 2025
14 Grudnia 2024
14 Grudnia 2024
14 Grudnia 2024
7 Października 2024
2 Października 2024
29 Września 2024
Instrukcje kamera
- kamera Sony
- kamera Samsung
- kamera Leica
- kamera Logitech
- kamera Xiaomi
- kamera Joy-It
- kamera Braun
- kamera Lenovo
- kamera TP-Link
- kamera Philips
- kamera SilverCrest
- kamera Acer
- kamera Epson
- kamera Hikvision
- kamera EZVIZ
- kamera Panasonic
- kamera Canon
- kamera Mio
- kamera Viewsonic
- kamera Nedis
- kamera Reolink
- kamera Medion
- kamera Lenco
- kamera D-Link
- kamera GE
- kamera Ring
- kamera Garmin
- kamera Imou
- kamera Blaupunkt
- kamera IOptron
- kamera Casio
- kamera Sigma
- kamera HP
- kamera Prixton
- kamera SJCAM
- kamera Creative
- kamera Swann
- kamera Nikon
- kamera Ozito
- kamera Kodak
- kamera Cisco
- kamera Scosche
- kamera DJI
- kamera Zenit
- kamera Gembird
- kamera Minox
- kamera Cobra
- kamera JVC
- kamera Trust
- kamera Fimi
- kamera AgfaPhoto
- kamera Vimar
- kamera Dahua Technology
- kamera Kyocera
- kamera Eufy
- kamera Ricoh
- kamera Rollei
- kamera Netgear
- kamera Velleman
- kamera Bolex
- kamera Pyle
- kamera Vtech
- kamera Speco Technologies
- kamera ARRI
- kamera Fluke
- kamera Olympus
- kamera Avaya
- kamera National Geographic
- kamera Maginon
- kamera SPC
- kamera Polaroid
- kamera Konica Minolta
- kamera Sanyo
- kamera Red Digital Cinema
- kamera Oregon Scientific
- kamera Lorex
- kamera Optoma
- kamera Bresser
- kamera Hama
- kamera GoPro
- kamera TomTom
- kamera Denver
- kamera Anker
- kamera Pentax
- kamera Bushnell
- kamera Berger & Schröter
- kamera Marshall Electronics
- kamera Hitachi
- kamera Emerson
- kamera SereneLife
- kamera Vemer
- kamera Azden
- kamera AVerMedia
- kamera RCA
- kamera Genius
- kamera Levenhuk
- kamera BenQ
- kamera Trevi
- kamera Technaxx
- kamera Lexibook
- kamera Hanwha
- kamera Sencor
- kamera Powerfix
- kamera Blackmagic Design
- kamera Foscam
- kamera Lumens
- kamera Daewoo
- kamera Dörr
- kamera Best Buy
- kamera EVE
- kamera POV
- kamera Elmo
- kamera UniView
- kamera Laserliner
- kamera Vivitar
- kamera PTZ Optics
- kamera Agfa
- kamera Argus
- kamera Easypix
- kamera Celestron
- kamera Yashica
- kamera Flir
- kamera Daitsu
- kamera Arlo
- kamera Nest
- kamera Ansco
- kamera Intel
- kamera Mamiya
- kamera Konig
- kamera Fuji
- kamera Minolta
- kamera Zorki
- kamera EverFocus
- kamera RunCam
- kamera SeaLife
- kamera Burris
- kamera Liiv360
- kamera Watec
- kamera Meade
- kamera Contax
- kamera Sinji
- kamera Traveler
- kamera Exakta
- kamera Digital Watchdog
- kamera MuxLab
- kamera AViPAS
- kamera ZeissIkon
- kamera Silvergear
- kamera Spypoint
- kamera HOLGA
- kamera Praktica
- kamera Hasselblad
- kamera Moto Mods (Motorola)
- kamera Fantasea Line
- kamera Kogan
- kamera Getac
- kamera Brinno
- kamera Z CAM
- kamera General
- kamera Ergoguys
- kamera Strex
- kamera General Electric
- kamera Leotec
- kamera Leitz Focomat IIc
- kamera Syrp
- kamera Cosina
- kamera Videology
- kamera InfiRay
- kamera Pelco
- kamera Videotec
- kamera Cambo
- kamera Kobian
- kamera Kyocera Yashica
- kamera Bauhn
- kamera Konica
- kamera Akaso
- kamera Seek Thermal
- kamera Aida
- kamera Ikegami
- kamera Ikelite
- kamera Adeunis
- kamera Hoppstar
- kamera Moultrie
- kamera PatrolEyes
- kamera Camouflage
- kamera HuddleCamHD
- kamera Aplic
- kamera Linhof
- kamera GoXtreme
- kamera KanDao
- kamera Aquapix
- kamera Kraken Sports
- kamera Voigtlander
Najnowsze instrukcje dla kamera

9 Kwietnia 2025

9 Kwietnia 2025

3 Kwietnia 2025
2 Kwietnia 2025
1 Kwietnia 2025
29 Marca 2025
29 Marca 2025
27 Marca 2025
27 Marca 2025
27 Marca 2025