Instrukcja obsługi Fujifilm FinePix XF1
Przeczytaj poniżej 📖 instrukcję obsługi w języku polskim dla Fujifilm FinePix XF1 (172 stron) w kategorii kamera. Ta instrukcja była pomocna dla 5 osób i została oceniona przez 2 użytkowników na średnio 4.5 gwiazdek
Strona 1/172

XF1
DIGITAL CAMER
A
Owner’s Manual
Thank you for your purchase
of this product. This manual
describes how to use your
FUJIFILM digital camera and the
supplied software. Be sure that
you have read and understood
its contents and the warnings in
“For Your Safety” ( ii) before us-P
ing the camera.
For information on related products, visit our website at
http://www.fujifilm.com/products/digital_cameras/index.html
EN
Before You Begin
First Steps
Basic Photography and Playback
More on Photography
More on Playback
Movies
Connections
Menus
Technical Notes
Troubleshooting
BL01758-200
Appendix

ii
F
F
F
FFor
or
or
or or Y
Y
Y
YY
our Safety
our Safety
our Safety
our Safetyour Safety For Your Safety
• Read Instructions: All the safety and operat-
ing instructions should be read before the
appliance is operated.
• Retain Instructions: The safety and operating
instructions should be retained for future
reference.
• Heed Warnings: All warnings on the ap-
pliance and in the operating instructions
should be adhered to.
• Follow Instructions: All operating and use
instructions should be followed.
Installation
Installation
Installation
InstallationInstallationInstallation
Power Sources: This video product should be
operated only from the type of power source
indicated on the marking label. If you are
not sure of the type of power supply to your
home, consult your appliance dealer or local
power company. For video products intend-
ed to operate from battery power, or other
sources, refer to the operating instructions.
Grounding or Polarization: This video product
is equipped with a polarized alternating-
current line plug (a plug having one blade
wider than the other). This plug will fi t into
the power outlet only one way. This is a safety
feature. If you are unable to insert the plug
fully into the outlet, try reversing the plug. If
the plug should still fail to fi t, contact your
electrician to replace your obsolete outlet.
Do not defeat the safety purpose of the po-
larized plug.
Alternate Warnings: This video product is
equipped with a three-wire grounding-type
plug, a plug having a third (grounding) pin.
This plug will only fi t into a grounding-type
power outlet. This is a safety feature. If you
are unable to insert the plug into the outlet,
contact your electrician to replace your obso-
lete outlet. Do not defeat the safety purpose
of the grounding type plug.
Overloading: Do not overload wall outlets and
extension cords as this can result in a risk of
fi re or electric shock.
Ventilation: Slots and openings in the cabinet
are provided for ventilation, to ensure reliable
operation of the video product and to pro-
tect it from overheating, and these openings
must not be blocked or covered. The open-
ings should never be blocked by placing the
video product on a bed, sofa, rug, or other
similar surface.
This video product should not be placed in a
built-in installation such as a bookcase or rack
unless proper ventilation is provided or the
manufacturer’s instructions have been ad-
hered to. This video product should never be
placed near or over a radiator or heat register.
Attachments: Do not use attachments not
recommended by the video product manu-
facturer as they may cause hazards.
Water and Moisture: Do not use this video
product near water—for example, near a
bath tub, wash bowl, kitchen sink, or laundry
tub, in a wet basement, or near a swimming
pool, and the like.
Power-Cord Protection: Power-supply cords
should be routed so that they are not likely
to be walked on or pinched by items placed
upon or against them, paying particular
attention to cords at plugs, convenience re-
ceptacles, and the point where they exit from
the appliance.
Accessories: Do not place this video product
on an unstable cart, stand, tripod, bracket, or
table. The video product may fall, causing
serious injury to a child or adult, and serious
damage to the appliance. Use only with a
cart, stand, tripod, bracket, or table recom-
mended by the manufacturer, or sold with
the video product. Any mounting of the ap-
pliance should follow the manufacturer’s in-
structions, and should use a mounting acces-
sory recommended by the manufacturer.
An appliance and cart
combination should
be moved with care.
Quick stops, exces-
sive force, and uneven
surfaces may cause
the appliance and cart
combination to overturn.
IMPORTANT SAFETY INSTRUCTIONS

iii
For Your Safety
Antennas
Antennas
Antennas
AntennasAntennasAntennas
Outdoor Antenna Grounding: If an outside
antenna or cable system is connected to the
video product, be sure the antenna or cable
system is grounded so as to provide some
protection against voltage surges and built-
up static charges. Section 810 of the National
Electrical Code, ANSI/NFPA No. 70, provides
information with respect to proper ground-
ing of the mast and supporting structure,
grounding of the lead-in wire to an antenna
discharge unit, size of grounding conductors,
location of antenna discharge unit, connec-
tion to grounding electrodes, and require-
ments for the grounding electrode.
EXAMPLE OF ANTENNA GROUNDING AS PER
NATIONAL ELECTRICAL CODE
Antenna Lead
in Wire
Ground Clamp
Grounding
Conductors
(NEC SECTION
810-21)
Power Service Grounding
Electrode System (NEC ART
250. PART H)
Antenna
Discharge Unit
(NEC SECTION
810-20)
Electric Service
Equipment
Ground Clamps
Power Lines: An outside antenna system
should not be located in the vicinity of over-
head power lines or other electric light or
power circuits, or where it can fall into such
power lines or circuits. When installing an
outside antenna system, extreme care should
be taken to keep from touching such power
lines or circuits as contact with them might
be fatal.
Use
Use
Use
UseUseUse
Cleaning: Unplug this video product from the
wall outlet before cleaning. Do not use liq-
uid cleaners or aerosol cleaners. Use a damp
cloth for cleaning.
Object and Liquid Entry: Never push objects
of any kind into this video product through
openings as they may touch dangerous volt-
age points or short out parts that could result
in a fi re or electric shock. Never spill liquid of
any kind on the video product.
Lightning: For added protection for this video
product receiver during a lightning storm, or
when it is left unattended and unused for
long periods of time, unplug it from the wall
outlet and disconnect the antenna or cable
system. This will prevent damage to the
video product due to lightning and power-
line surges.
Service
Service
Service
ServiceServiceService
Servicing: Do not attempt to service this video
product yourself as opening or removing cov-
ers may expose you to dangerous voltage or
other hazards. Refer all servicing to qualifi ed
service personnel.
Damage Requiring Service: Unplug this video
product from the wall outlet and refer servic-
ing to qualifi ed service personnel under the
following conditions:
• When the power-supply cord or plug is
damaged.
• If liquid has been spilled, or objects have
fallen into the video product.
• If the video product has been exposed to
rain or water.
• If the video product has been dropped or
the cabinet has been damaged.
If the video product does not operate nor-
mally follow the operating instructions. Ad-
just only those controls that are covered by
the operating instructions as an improper
adjustment of other controls may result in
damage and will often require extensive work
by a qualifi ed technician to restore the video
product to its normal operation.
When the video product exhibits a distinct
change in performance—this indicates a
need for service.
Replacement Parts: When replacement parts
are required, be sure the service technician
has used replacement parts specifi ed by the
manufacturer or have the same characteris-
tics as the original part. Unauthorized sub-
stitutions may result in fi re, electric shock or
other hazards.
Safety Check: Upon completion of any service
or repairs to this video product, ask the ser-
vice technician to perform safety checks to
determine that the video product is in proper
operating condition.
iv
For Your Safety
Be sure to read these notes before use
Safety Notes
• Make sure that you use your camera correctly. Read these safety
notes and your carefully before use.Owner’s Manual
• After reading these safety notes, store them in a safe place.
About the Icons
The icons shown below are used in this document to indicate the
severity of the injury or damage that can result if the information
indicated by the icon is ignored and the product is used incorrectly
as a result.
WARNING
This icon indicates that death or serious injury can result if the
information is ignored.
CAUTION
This icon indicates that personal injury or material damage can
result if the information is ignored.
The icons shown below are used to indicate the nature of the instruc-
tions which are to be observed.
Triangular icons tell you that this information requires atten-
tion (“Important”).
Circular icons with a diagonal bar tell you that the action indi-
cated is prohibited (“Prohibited”).
Filled circles with an exclamation mark indicate an action that
must be performed (“Required”).
WARNING
WARNING
WARNING
WARNINGWARNINGWARNING
Unplug from
power socket
If a problem arises, turn the camera o , remove the battery, and
disconnect and unplug the AC power adapter. Continued use of
the camera when it is emitting smoke, is emitting any unusual
odor, or is in any other abnormal state can cause a fi re or elec-
tric shock. Contact your FUJIFILM dealer.
Avoid exposure
to water
Do not allow water or foreign objects to enter the camera. If water
or foreign objects get inside the camera, turn the camera off ,
remove the battery, and disconnect and unplug the AC power
adapter. Continued use of the camera can cause a fi re or elec-
tric shock. Contact your FUJIFILM dealer.
WARNING
WARNING
WARNING
WARNINGWARNINGWARNING
Do not use in
the bathroom or
shower
Do not use the camera in the bathroom or shower. This can cause
a fi re or electric shock.
Do not
disassemble
Never attempt to change or take apart the camera (never open
the case). Failure to observe this precaution can cause fi re or
electric shock.
Do not touch
internal parts
Should the case break open as the result of a fall or other accident,
do not touch the exposed parts. Failure to observe this precau-
tion could result in electric shock or in injury from touching the
damaged parts. Remove the battery immediately, taking care
to avoid injury or electric shock, and take the product to the
point of purchase for consultation.
Do not change, heat or unduly twist or pull the connection cord and
do not place heavy objects on the connection cord. These actions
could damage the cord and cause a fi re or electric shock. If the
cord is damaged, contact your FUJIFILM dealer.
Do not place the camera on an unstable surface. This can cause the
camera to fall or tip over and cause injury.
Never attempt to take pictures while in motion. Do not use the
camera while you are walking or driving a vehicle. This can re-
sult in you falling down or being involved in a traffi c accident.
Do not touch any metal parts of the camera during a thunderstorm.
This can cause an electric shock due to induced current from
the lightning discharge.
Do not use the battery except as speci ed. Load the battery as
shown by the indicator.
Do not heat, change or take apart the battery. Do not drop or subject
the battery to impacts. Do not store the battery with metallic prod-
ucts. Any of these actions can cause the battery to burst or leak
and cause fi re or injury as a result.
Use only the battery or AC power adapters speci ed for use with this
camera. Do not use voltages other than the power supply voltage
shown. The use of other power sources can cause a fi re.
If the battery leaks and uid gets in contact with your eyes, skin or
clothing, ush the a ected area with clean water and seek medical
attention or call an emergency number right away.

vi
For Your Safety
The Battery and Power Supply
Note: Check the type of battery used in
your camera and read the appropriate
sections.
The following describes the proper use of
batteries and how to prolong their life. Incor-
rect use can shorten battery life or cause leak-
age, overheating, fi re, or explosion.
Li-ion Batteries
Li-ion Batteries
Li-ion Batteries
Li-ion BatteriesLi-ion BatteriesLi-ion Batteries
Read this section if your camera uses a
rechargeable Li-ion battery.
The battery is not charged at shipment.
Charge the battery before use. Keep the bat-
tery in its case when not in use.
■Notes on the Battery
The battery gradually loses its charge when
not in use. Charge the battery one or two
days before use.
Battery life can be extended by turning the
camera off when not in use.
Battery capacity decreases at low tempera-
tures; a depleted battery may not function at
when cold. Keep a fully charged spare bat-
tery in a warm place and exchange as nec-
essary, or keep the battery in your pocket or
other warm place and insert it in the camera
only when shooting. Do not place the bat-
tery in direct contact with hand warmers or
other heating devices.
■ Charging the Battery
Charge the battery in the supplied battery
charger. Charging times will increase at am-
bient temperatures below +10 °C (+50 °F) or
above +35 °C (+95 °F). Do not attempt to
charge the battery at temperatures above
40 °C (+104 °F); at temperatures below 0 °C
(+32 °F), the battery will not charge.
Do not attempt to recharge a fully charged
battery. The battery does not however need
to be fully discharged before charging.
The battery may be warm to the touch imme-
diately after charging or use. This is normal.
■Battery Life
At normal temperatures, the battery can be
recharged about 300 times. A noticeable de-
crease in the length of time the battery will
hold a charge indicates that it has reached
the end of its service life and should be re-
placed.
■Storage
Performance may be impaired if the battery is
left unused for extended periods when fully
charged. Run the battery fl at before storing it.
If the camera will not be used for an extended
period, remove the battery and store it in a
dry place with an ambient temperature of
from +15 °C to +25 °C (+59 °F to +77 °F). Do
not store in locations exposed to extremes of
temperature.
■Cautions: Handling the Battery
• Do not transport or store with metal objects
such as necklaces or hairpins.
• Do not expose to fl ame or heat.
• Do not disassemble or modify.
• Use with designated chargers only.
• Do not drop or subject to strong physical
shocks.
• Do not expose to water.
• Keep the terminals clean.
• The battery and camera body may become
warm to the touch after extended use. This
is normal.
AA Alkaline/Rechargeable Ni-MH Batteries
AA Alkaline/Rechargeable Ni-MH Batteries
AA Alkaline/Rechargeable Ni-MH Batteries
AA Alkaline/Rechargeable Ni-MH BatteriesAA Alkaline/Rechargeable Ni-MH BatteriesAA Alkaline/Rechargeable Ni-MH Batteries
Read this section if your camera uses AA
alkaline or rechargeable AA Ni-MH bat-
teries. Information on compatible battery
types may be found elsewhere in the camera
manual.
■Cautions: Handling the Batteries
• Do not expose to water, fl ame, or heat, or
store in warm or humid conditions.
• Do not transport or store with metal objects
such as necklaces or hairpins.
• Do not disassemble or modify the batteries
or battery casing.
• Do not subject to strong physical shocks.
• Do not use batteries that are leaking, de-
formed, or discolored.
• Keep out of reach of infants and small chil-
dren.
• Insert in the correct orientation.

vii
For Your Safety
• Do not mix old and new batteries, batteries
with diff erent charge levels, or batteries of
diff erent types.
• If the camera will not be used for an extend-
ed period, remove the batteries. Note that
the camera clock will be reset.
• The batteries may be warm to the touch
immediately after use. Turn the camera
off and allow the batteries to cool before
handling.
• Battery capacity tends to decrease at low
temperatures. Keep spare batteries in a
pocket or other warm place and exchange
as necessary. Cold batteries may recover
some of their charge when warmed.
• Fingerprints and other stains on the battery
terminals can impair battery performance.
Thoroughly clean the terminals with a
soft, dry cloth before inserting them in the
camera.
If the batteries leak, clean the battery
compartment thoroughly before in-
serting new batteries.
If fl uid from the battery comes into
contact with skin or clothing, fl ush
the aff ected area with water. If uid
enters your eyes, immediately ush the
a ected area with water and seek
medical attention. Do not rub your eyes.
Failure to observe this precaution could
result in permanent visual impairment.
■Ni-MH Batteries
The capacity of Ni-MH batteries may be
temporarily reduced when new, after long
periods of disuse, or if they are repeatedly
recharged before being fully discharged. This
is normal and does not indicate a malfunc-
tion. Capacity can be increased by repeatedly
discharging the batteries using the discharge
option in the camera setup menu and re-
charging them using a battery charger.
QCAUTION: Do not use the discharge option
with alkaline batteries.
The camera draws a small amount of current
even when off . Ni-MH batteries that have
been left in the camera for an extended pe-
riod may be drawn down to the point that
they no longer hold a charge. Battery perfor-
mance may also drop if the batteries are run
down in a device such as a fl ashlight. Use the
discharge option in the camera setup menu
to discharge Ni-MH batteries. Batteries that
no longer hold a charge even after repeat-
edly being discharged and recharged have
reached the end of their service life and must
be replaced.
Ni-MH batteries can be recharged in a bat-
tery charger (sold separately). Batteries may
become warm to the touch after charging.
Refer to the instructions provided with the
charger for more information. Use the char-
ger with compatible batteries only.
Ni-MH batteries gradually lose their charge
when not in use.
■Disposal
Dispose of used batteries in accord with local
regulations.
AC Po
AC Po
AC Po
AC PoAC Power Adapters (A
wer Adapters (A
wer Adapters (A
wer Adapters (Awer Adapters (Available Separately)
vailable Separately)
vailable Separately)
vailable Separately)vailable Separately)AC Power Adapters (Available Separately)
This section applies to all camera models.
Use only FUJIFILM AC power adapters desig-
nated for use with this camera. Other adapt-
ers could damage the camera.
• The AC power adapter is for indoor use only.
• Be sure the DC plug is securely connected
to the camera.
• Turn the camera off before disconnecting
the adapter. Disconnect the adapter by the
plug, not the cable.
• Do not use with other devices.
• Do not disassemble.
• Do not expose to high heat and humidity.
• Do not subject to strong physical shocks.
• The adapter may hum or become hot to the
touch during use. This is normal.
• If the adapter causes radio interference,
reorient or relocate the receiving antenna.

viii
For Your Safety
Using the Camera
Do not aim the camera at extremely bright
light sources, such as the sun in a cloudless
sky. Failure to observe this precaution could
damage the camera image sensor.
T
T
T
TTake T
ake T
ake T
ake Take Test Shots
est Shots
est Shots
est Shotsest ShotsTake Test Shots
Before taking photographs on important
occasions (such as at weddings or before
taking the camera on a trip), take a test shot
and view the result in the LCD monitor to en-
sure that the camera is functioning normally.
FUJIFILM Corporation can not accept liability
for damages or lost profi ts incurred as a result
of product malfunction.
Notes on Copyright
Notes on Copyright
Notes on Copyright
Notes on CopyrightNotes on CopyrightNotes on Copyright
Unless intended solely for personal use, imag-
es recorded using your digital camera system
cannot be used in ways that infringe copy-
right laws without the consent of the owner.
Note that some restrictions apply to the
photographing of stage performances, enter-
tainments, and exhibits, even when intended
purely for personal use. Users are also asked
to note that the transfer of memory cards
containing images or data protected under
copyright laws is only permissible within the
restrictions imposed by those copyright laws.
Handling
Handling
Handling
HandlingHandlingHandling
To ensure that images are recorded correctly,
do not subject the camera to impact or physi-
cal shocks while images are being recorded.
Liquid Crystal
Liquid Crystal
Liquid Crystal
Liquid CrystalLiquid CrystalLiquid Crystal
In the event that the LCD monitor is damaged,
care should be taken to avoid contact with liq-
uid crystal. Take the urgent action indicated
should any of the following situations arise:
• If liquid crystal comes in contact with your
skin, clean the area with a cloth and then
wash thoroughly with soap and running
water.
• If liquid crystal enters your eyes, fl ush the af-
fected eye with clean water for at least 15
minutes and then seek medical assistance.
• If liquid crystal is swallowed, rinse your
mouth thoroughly with water. Drink large
quantities of water and induce vomiting,
then seek medical assistance.
Although the display is manufactured using
extremely high-precision technology, it may
contain pixels that are always lit or that do not
light. This is not a malfunction, and images re-
corded with the product are unaff ected.
Tr
Tr
Tr
TrTrademark Information
ademark Information
ademark Information
ademark Informationademark InformationTrademark Information
xD-Picture Card and E are trademarks
of FUJIFILM Corporation. The typefaces in-
cluded herein are solely developed by Dyna-
Comware Taiwan Inc. Macintosh, QuickTime,
and Mac OS are trademarks of Apple Inc. in
the U.S.A. and other countries. Windows7,
Windows Vista, and the Windows logo are
trademarks of the Microsoft group of com-
panies. Adobe and Adobe Reader are either
trademarks or registered trademarks of Ado-
be Systems Incorporated in the U.S.A. and/or
other countries. The SDHC and SDXC logos
are trademarks of SD-3C, LLC. The HDMI logo
is a trademark. YouTube is a trademark of
Google Inc. All other trade names mentioned
in this manual are the trademarks or regis-
tered trademarks of their respective owners.
Electrical Interference
Electrical Interference
Electrical Interference
Electrical InterferenceElectrical InterferenceElectrical Interference
This camera may interfere with hospital or
aviation equipment. Consult with hospital
or airline staff before using the camera in a
hospital or on an aircraft.
Color T
Color T
Color T
Color TColor Television Systems
elevision Systems
elevision Systems
elevision Systemselevision SystemsColor Television Systems
NTSC (National Television System Committee)
is a color television telecasting specifi cation
adopted mainly in the U.S.A., Canada, and
Japan. PAL (Phases Alternation by Line) is
a color television system adopted mainly in
European countries and China.
Exif Print (Exif Version 2.3)
Exif Print (Exif Version 2.3)
Exif Print (Exif Version 2.3)
Exif Print (Exif Version 2.3)Exif Print (Exif Version 2.3)Exif Print (Exif Version 2.3)
Exif Print is a newly revised digital camera fi le
format in which information stored with pho-
tographs is used for optimal color reproduc-
tion during printing.
IMPORTANT NOTICE:
Read Before Using the Software
Direct or indirect export, in whole or in part,
of licensed software without the permission
of the applicable governing bodies is pro-
hibited.

ix
For Your Safety
NOTICES
To prevent re or shock hazard, do not ex-
pose the unit to rain or moisture.
Please read the “Safety Notes” and make
sure you understand them before using
the camera.
Perchlorate Material—special handling
may apply. See http://www.dtsc.ca.gov/
hazardouswaste/perchlorate.
For Customers in the U.
For Customers in the U.
For Customers in the U.
For Customers in the U. For Customers in the U. S. A.
S. A.
S. A.
S. A.S. A.For Customers in the U. S. A.
Tested To Comply With FCC Standards
FOR HOME OR OFFICE USE
FCC Statement: This device complies with Part
15 of the FCC Rules. Operation is subject to
the following two conditions: (1) This device
may not cause harmful interference, and (2)
this device must accept any interference re-
ceived, including interference that may cause
undesired operation.
CAUTION: This equipment has been tested and
found to comply with the limits for a Class B
digital device, pursuant to Part 15 of the FCC
Rules. These limits are designed to provide
reasonable protection against harmful in-
terference in a residential installation. This
equipment generates, uses, and can radiate
radio frequency energy and, if not installed
and used in accordance with the instructions,
may cause harmful interference to radio com-
munications. However, there is no guarantee
that interference will not occur in a particular
installation. If this equipment does cause
harmful interference to radio or television re-
ception, which can be determined by turning
the equipment off and on, the user is encour-
aged to try to correct the interference by one
or more of the following measures:
• Reorient or relocate the receiving antenna.
• Increase the separation between the equip-
ment and receiver.
• Connect the equipment into an outlet on
a circuit diff erent from that to which the
receiver is connected.
• Consult the dealer or an experienced radio/
TV technician for help.
• You are cautioned that any changes or
modifi cations not expressly approved in
this manual could void the user’s authority
to operate the equipment.
Notes on the Grant: To comply with Part 15 of
the FCC Rules, this product must be used with
a Fujifi lm-specifi ed ferrite-core A/V cable, USB
cable, and DC supply cord.
For Customers in C
For Customers in C
For Customers in C
For Customers in CFor Customers in Canada
anada
anada
anadaanadaFor Customers in Canada
CAUTION: This Class B digital apparatus com-
plies with Canadian ICES-003.
Disposal of Electrical and Electronic Equipment in
Disposal of Electrical and Electronic Equipment in
Disposal of Electrical and Electronic Equipment in
Disposal of Electrical and Electronic Equipment in Disposal of Electrical and Electronic Equipment in Disposal of Electrical and Electronic Equipment in
Private Households
Private Households
Private Households
Private HouseholdsPrivate HouseholdsPrivate Households
In the European Union, Norway, Ice-
land and Liechtenstein: This symbol
on the product, or in the manual
and in the warranty, and/or on its
packaging indicates that this prod-
uct shall not be treated as house-
hold waste. Instead it should be
taken to an applicable collection
point for the recycling of electrical
and electronic equipment.
By ensuring this product is disposed of cor-
rectly, you will help prevent potential nega-
tive consequences to the environment and
human health, which could otherwise be
caused by inappropriate waste handling of
this product.
This symbol on the batteries
or accumulators indicates that
those batteries shall not be treat-
ed as household waste.
If your equipment contains easy removable
batteries or accumulators please dispose
these separately according to your local re-
quirements.
The recycling of materials will help to con-
serve natural resources. For more detailed
information about recycling this product,
please contact your local city offi ce, your
household waste disposal service or the shop
where you purchased the product.
In Countries Outside the European Union, Norway,
Iceland and Liechtenstein: If you wish to discard
this product, including the batteries or accu-
mulators, please contact your local authori-
ties and ask for the correct way of disposal.

xi
T
T
T
TTable of Con
able of Con
able of Con
able of Conable of Contents
tents
tents
tentstents Table of Contents
For Your Safety ..................................................................ii
IMPORTANT SAFETY INSTRUCTIONS ..................................ii
Safety Notes ....................................................................iv
About This Manual ............................................................x
Before Y
Before Y
Before Y
Before YBefore You Begin
ou Begin
ou Begin
ou Beginou BeginBefore You Begin
Symbols and Conventions .................................................1
Supplied Accessories .........................................................1
Parts of the Camera ..........................................................2
Camera Displays ...............................................................6
Shooting ........................................................................6
Playback .........................................................................7
Display mode ...................................................................9
First Steps
First Steps
First Steps
First StepsFirst StepsFirst Steps
Charging the Battery ......................................................13
Inserting the Battery and a Memory Card .....................15
Compatible Memory Cards .............................................18
Turning the Camera on and O ......................................20
Camera Mode .................................................................20
Switching from portable mode to standby mode ...........21
Switching from standby mode to portable mode ...........21
Switching from standby mode to shooting mode
(Turning the camera on) ................................................22
Switching from shooting mode to standby mode
(Turning the camera o ) ................................................22
Playback Mode ...............................................................23
Basic Setup ......................................................................24
Basic Photography and Pla
Basic Photography and Pla
Basic Photography and Pla
Basic Photography and PlaBasic Photography and Playback
yback
yback
ybackybackBasic Photography and Playback
Taking Pictures ................................................................25
Viewing Pictures .............................................................29
More on Photography
More on Photography
More on Photography
More on PhotographyMore on PhotographyMore on Photography
Shooting Mode ................................................................30
E E E ( AUTO/ Priority) .................31
R E ( AUTO) .................................................31
E Priority ..........................................................32
Adv. ADVANCED ..........................................................33
ADVANCED FILTER .........................................................33
r MOTION PANORAMA 360 .......................................34
i PRO FOCUS ...........................................................36
j PRO LOW-LIGHT ....................................................37
j MULTIPLE EXPOSURE ...............................................38
i INDIVID. SHUTTER 3D ..............................................39
SP SCENE POSITION.......................................................41
M MANUAL ...................................................................42
A APERTURE PRIORITY AE ..............................................44
S SHUTTER PRIORITY AE ................................................44
P PROGRAM AE ..............................................................45
C1/C2 CUSTOM MODE .................................................46
Focus Lock ........................................................................47
d Exposure Compensation ..........................................49
F Macro Mode (Close-ups) ...........................................50
N Using the Flash (Super-Intelligent Flash) .................51

xii
Table of Contents
h Using the Self-Timer .................................................53
The Fn Button ..................................................................54
The E-Fn Button ...............................................................55
Using the BUTTON CUSTOM SETTING MenuE-Fn .............55
R Continuous Shooting ...............................................57
I TOP n .....................................................................58
P BEST FRAME CAPTURE ...........................................58
O AE BKT ..................................................................60
W ISO BKT .................................................................60
X FILM SIMULATION BKT ............................................60
Y DYNAMIC RANGE BKT .............................................61
F Focus Mode
...............................................................62
Focus Frame Selection ....................................................65
b Intelligent Face Detection .......................................66
n Face Recognition ......................................................67
Adding New Faces ..........................................................67
Viewing, Editing, and Deleting Existing Data .................69
Adding Faces Automatically ...........................................69
More on Playback
More on Playback
More on Playback
More on PlaybackMore on PlaybackMore on Playback
Playback Options .............................................................71
Continuous Shooting ......................................................71
I Favorites: Rating Pictures .........................................71
Playback Zoom ...............................................................72
Multi-Frame Playback ....................................................73
A Deleting Pictures ......................................................74
b Image Search............................................................75
m PhotoBook Assist .....................................................76
Creating a PhotoBook.....................................................76
Viewing Photobooks ......................................................77
Editing and Deleting Photobooks ...................................77
Viewing Panoramas ........................................................78
Viewing Photo Information ............................................79
Movies
Movies
Movies
MoviesMoviesMovies
Recording Movies ............................................................81
Movie Frame Size ...........................................................83
Viewing Movies ...............................................................84
Connections
Connections
Connections
ConnectionsConnectionsConnections
Viewing Pictures on TV ...................................................85
Printing Pictures via USB ................................................87
Printing the DPOF Print Order.........................................89
Viewing Pictures on a Computer ....................................91
Windows: Installing MyFinePix Studio ...........................91
Macintosh: Installing FinePixViewer...............................94
Connecting the Camera ..................................................96
Menus
Menus
Menus
MenusMenusMenus
Using the Menus: Shooting Mode ..................................99
Using the Shooting Menu...............................................99
Shooting Menu Options ...............................................100
A SCENE POSITION ...................................................100
A MODEE ..................................................100
A Adv. MODE ..........................................................100
N ISO......................................................................100
O IMAGE SIZE .......................................................... 101
T IMAGE QUALITY ...................................................101
U DYNAMIC RANGE .................................................102
P FILM SIMULATION ................................................103
D WHITE BALANCE ..................................................104
d WB SHIFT
............................................................106

xiii
Table of Contents
f COLOR .................................................................106
q SHARPNESS .........................................................106
r HIGHLIGHT TONE ..................................................106
s SHADOW TONE.....................................................106
h NOISE REDUCTION ................................................106
R INTELLIGENT DIGITAL ZOOM ..................................106
R CONTINUOUS .......................................................106
Z ADVANCED ANTI BLUR ..........................................107
b FACE DETECTION SET-UP .......................................107
C PHOTOMETRY ......................................................107
F FOCUS MODE .......................................................107
F FOCUS AREA ........................................................108
F Fn BUTTON ..........................................................108
E E-Fn BUTTON CUSTOM SETTING .............................108
v DISP. CUSTOM SETTING .........................................109
I FLASH .................................................................109
W MOVIE SET-UP .....................................................110
K CUSTOM SET ........................................................110
Using the Menus: Playback Mode ................................111
Using the Playback Menu .............................................111
Playback Menu Options ................................................112
m PHOTOBOOK ASSIST ..............................................112
b IMAGE SEARCH ....................................................112
A ERASE .................................................................112
j MARK FOR UPLOAD TO ..........................................113
I SLIDE SHOW ........................................................114
j RAW CONVERSION ................................................115
B RED EYE REMOVAL ...............................................117
D PROTECT .............................................................. 117
G CROP...................................................................118
O RESIZE .................................................................118
C IMAGE ROTATE .....................................................119
E COPY ...................................................................119
F
VOICE MEMO
.......................................................120
i ERASE FACE RECOG. ..............................................120
K PRINT ORDER (DPOF) ............................................121
J DISP ASPECT ........................................................121
The Setup Menu ............................................................122
Using the Setup Menu ..................................................122
Setup Menu Options ....................................................123
F DATE/TIME ..........................................................123
N
TIME DIFFERENCE
.................................................123
Q a ....................................................123
R RESET ..................................................................124
o SILENT MODE .......................................................124
b SOUND SET-UP ....................................................124
A SCREEN SET-UP ....................................................125
Z POWER MANAGEMENT .........................................126
L IS MODE ..............................................................127
B RED EYE REMOVAL ...............................................127
C AF ILLUMINATOR ..................................................128
j RAW ...................................................................128
t SAVE DATA SET-UP ...............................................129
I FOCUS CONTROL DIAL ...........................................130
Q
VIDEO SYSTEM
.....................................................130
S CUSTOM RESET ....................................................131
K FORMAT ..............................................................131

xiv
Table of Contents
T
T
T
TTechnical Notes
echnical Notes
echnical Notes
echnical Notesechnical NotesTechnical Notes
Optional Accessories .....................................................132
Accessories from FUJIFILM............................................133
Caring for the Camera ...................................................134
Storage and Use ...........................................................134
Cleaning .......................................................................135
Traveling ......................................................................135
T
T
T
TTroubleshooting
roubleshooting
roubleshooting
roubleshootingroubleshootingTroubleshooting
Problems and Solutions ................................................136
Warning Messages and Displays ..................................142
Appendix
Appendix
Appendix
AppendixAppendixAppendix
Memory Card Capacity ..................................................146
Speci cations ................................................................147

2 Before You Begin
Parts of the Camera
Parts of the Camera
Parts of the Camera
Parts of the CameraParts of the Camera Parts of the Camera
For more information, refer to the page listed to the right of each item.
Selector button
Move cursor up
d (exposure compensation) button (P 49)
b ( ) button (delete P 29)
Move cursor left
F ( ) button (macro P 50)
Move cursor right
N ( ash) button (P 51)
MENU/OK button
Sub-command dial
Move cursor down
h ( ) button (self-timer P 53)
* The illustrations in this manual have been simpli ed for explanatory purposes.
4 Before You Begin
Parts of the Camera
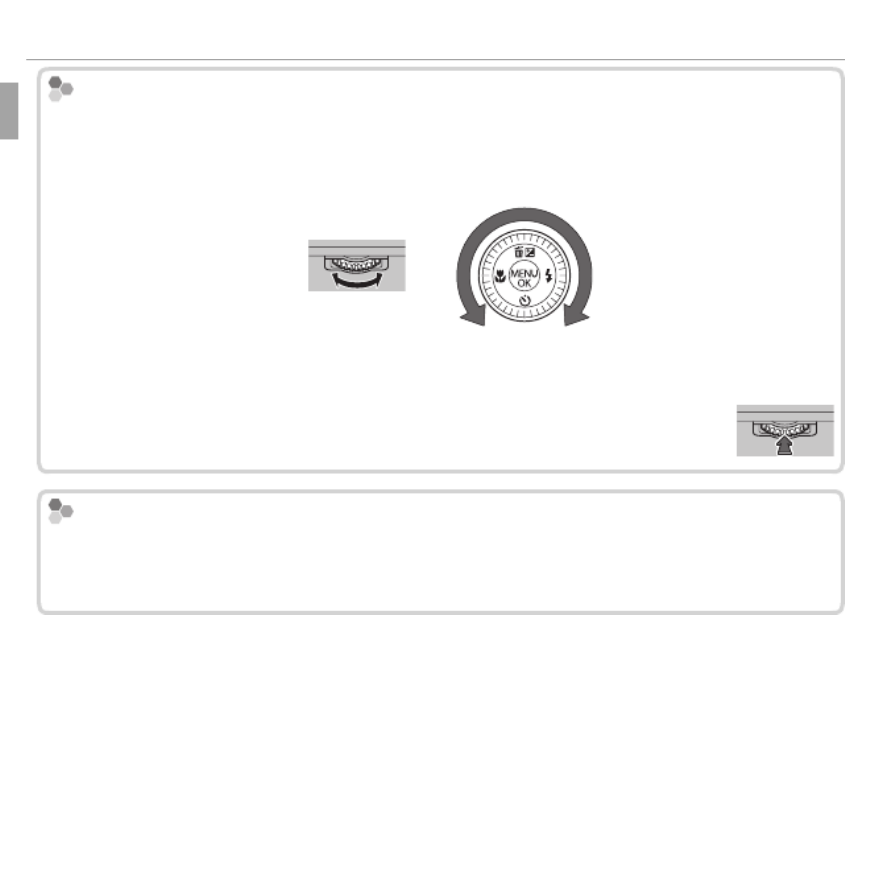
Main-command dial/Sub-
Main-command dial/Sub-
Main-command dial/Sub-
Main-command dial/Sub- Main-command dial/Sub-command dial
command dial
command dial
command dialcommand dial Main-command dial/Sub-command dial
Rotate the main/sub-command dial to set the aperture value or shutter speed. You
can also select items using the main/sub-command dial for the selector button. To
adjust focus for MANUAL, rotate the sub-command dial (P 62).
Main-command
dial
Sub-command
dial
Press the center of the main-command dial for some operations such as
switching the setting item in M mode.
C
C
C
C Control Lock
ontrol Lock
ontrol Lock
ontrol Lockontrol Lock Control Lock
To lock the selector button ( / / / ) and the button, press until dNhFE-Fn MENU/OK
X is displayed. This prevents accidental operation during shooting. The controls
can be unlocked by pressing MENU/OK until is no longer displayed.X

5Before You Begin
Parts of the Camera
T
T
T
T The Indicator Lamp
he Indicator Lamp
he Indicator Lamp
he Indicator Lamphe Indicator Lamp The Indicator Lamp
The indicator lamp shows camera status as follows:
Indicator lamp
Indicator lamp
Indicator lamp
Indicator lampIndicator lampIndicator lamp Camera status
Camera status
Camera status
Camera statusCamera statusCamera status
Glows green
Glows green
Glows green
Glows greenGlows green Glows green Focus locked.
Blinks green
Blinks green
Blinks green
Blinks greenBlinks green Blinks green Blur, focus, or exposure warning. Picture can be taken.
Blinks green and orange
Blinks green and orange
Blinks green and orange
Blinks green and orangeBlinks green and orange Blinks green and orange Recording pictures. Additional pictures can be taken.
Glows orange
Glows orange
Glows orange
Glows orangeGlows orange Glows orange Recording pictures. No additional pictures can be taken at this time.
Blinks orange (fast)
Blinks orange (fast)
Blinks orange (fast)
Blinks orange (fast)Blinks orange (fast) Blinks orange (fast) Flash charging; ash will not re when picture is taken.
Blinks orange (slow)
Blinks orange (slow)
Blinks orange (slow)
Blinks orange (slow)Blinks orange (slow)Blinks orange (slow) The zoom ring is positioned between 25 and STANDBY. Picture can-
not be taken.
Blinks red
Blinks red
Blinks red
Blinks redBlinks red Blinks red Lens or memory error.
Silent Mode
Silent Mode
Silent Mode
Silent Mode Silent Mode Silent Mode
In situations in which camera sounds or lights may be unwelcome, hold the DISP/
BACK button down until o is displayed.
The camera speaker, ash, and AF-assist illuminator/self-timer lamp turn o and ash
and volume settings can not be adjusted (note that the ash will still re when C
is selected in scene mode). To restore normal operation, press the DISP/BACK button
until the o icon is no longer displayed.

7Before You Begin
Parts of the Camera
■ Playback
12/31/2050 10:00 AM
100-0001
1/1000 F2.8
13
+1
4:3
YouTube
F
1 Favorites .....................................................................71
2 Intelligent Face Detection indicator.....................66, 107
3 Red-eye removal indicator .......................................117
4 Pro focus mode, pro low-light mode .................... 36, 37
5 Motion panorama z ........................................ 34, 78
6 3D image.................................................................... 39
7 Portrait enhancer ....................................................... 41
8 Advanced Filter ..........................................................33
9 Frame number .........................................................129
10 Gift image ..................................................................71
11 Dynamic range ......................................................... 102
12 E mode .......................................................... 31
13 Playback mode indicator ...................................... 29, 71
14 Mark for upload to ................................................... 113
15 Photobook assist ........................................................ 76
16 Voice memo indicator .............................................. 120
17 DPOF print indicator ...................................................89
18 Protected image ....................................................... 117

8 Before You Begin
Parts of the Camera
Ba
Ba
Ba
Ba Battery Level
ttery Level
ttery Level
ttery Levelttery Level Battery Level
Battery level is shown as follows:
Indicator
Indicator
Indicator
IndicatorIndicatorIndicator Description
Description
Description
DescriptionDescriptionDescription
D (white) Battery partially discharged.
C (white) Battery more than half discharged.
B (red) Low battery. Charge as soon as possible.
A (blinks red) Battery exhausted. Charge battery.
Bright Ambient Lighting
Bright Ambient Lighting
Bright Ambient Lighting
Bright Ambient Lighting Bright Ambient Lighting Bright Ambient Lighting
Re ections and glare caused by bright ambient lighting may make it hard to see
the display in the monitor, particularly when the camera is used outdoors. This can
be addressed by holding the E-Fn button to trigger outdoor mode. Outdoor mode
can also be enabled using the A SCREEN SET-UP> MONITOR SUNLIGHT MODE
option (P 125).
11Before You Begin
Parts of the Camera
• Playback
100-0001
100-0001
100-0001
100-0001100-0001
100-0001
12/31/2050
12/31/2050
12/31/2050
12/31/205012/31/2050
12/31/2050
1 / 1000 F4 . 5
10
10
10
1010 :
:
:
::00
00
00
0000
AM
AM
AM
AMAM
10 : 0 0
AM
2
-
1
3
3:2
3:2
3:2
3:23:2
3:2
F
F
F
FF
F
200
INFORMATION ON INFORMATION OFF
:
:
:
: OFF
ISO
200
1/1000
F
4.5
2
3
-
1
12/31/2050 10 : 0 0
AM
100-0001
3:2
F
100-0001
100-0001
100-0001
100-0001100-0001
100-0001
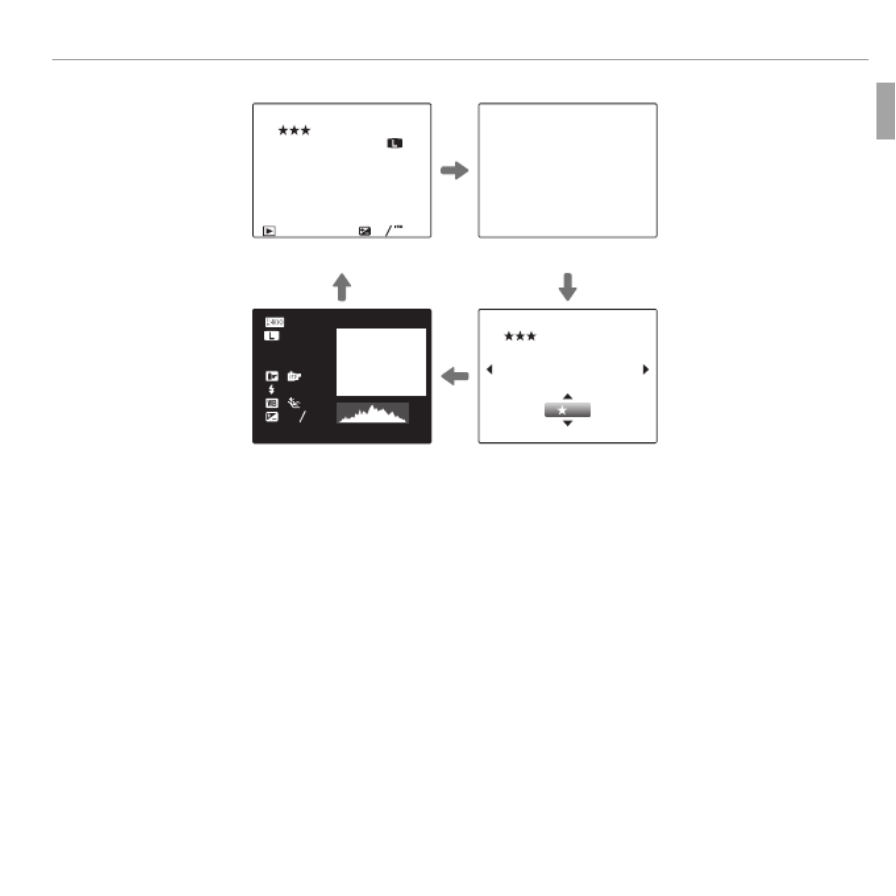
3
12/31/2050 10 : 0 0
AM
DETAIL INFORMA-
TION
I FAVORITES
12 Before You Begin
Parts of the Camera
Hist
Hist
Hist
Hist Histograms
ograms
ograms
ogramsograms Histograms
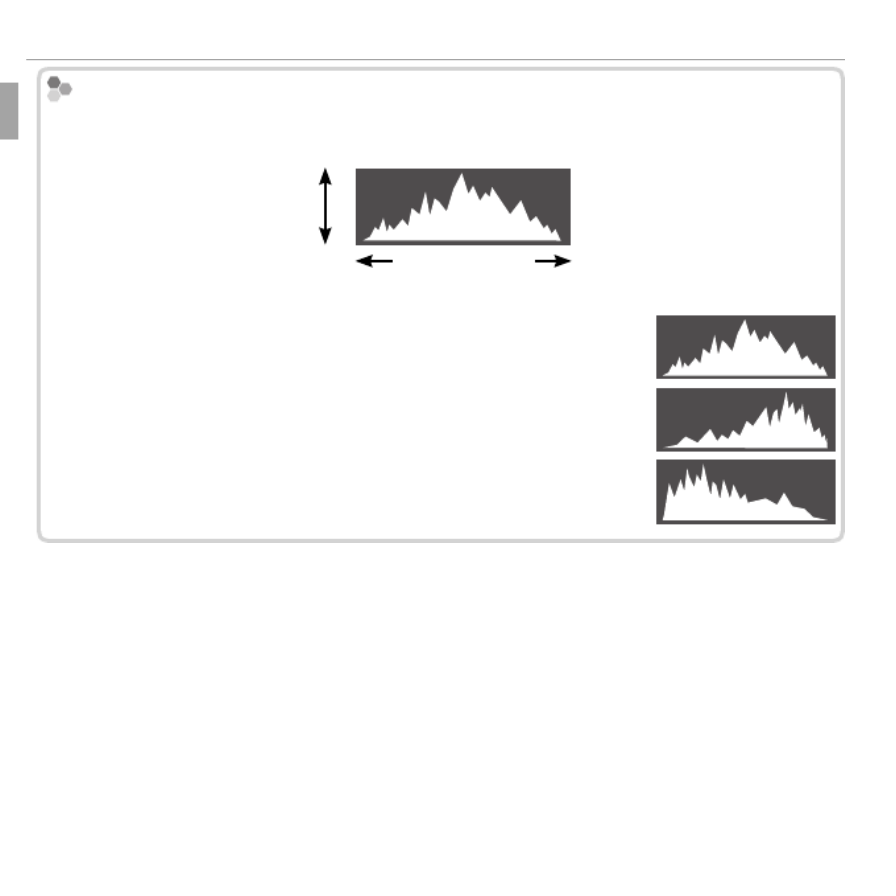
Histograms show the distribution of tones in the image. Brightness is shown by the
horizontal axis, the number of pixels by the vertical axis.
Pixel brightness
Shadows Highlights
pixels
No. of
Optimal exposure: Pixels are distributed in an even curve
throughout the tone range.
Overexposed: Pixels are clustered at the right side of the graph.
Underexposed: Pixels are clustered at the left side of the graph.

13
First Steps
First Steps
First Steps
First StepsFirst Steps First Steps
Charging the Battery
Charging the Battery
Charging the Battery
Charging the BatteryCharging the Battery Charging the Battery
The battery is not charged at shipment. Charge the battery before use.
1 Attach the plug adapter.
Attach the plug adapter as shown, making
sure that it is fully inserted and clicks into
place on the charger terminals.
Q
The plug adapter is exclusively for use with the
supplied battery charger. Do not use it with
other devices.
Battery charger
Plug adapter
2 Place the battery in the supplied battery charger.
Insert the battery in the orien-
tation indicated by the DFC
labels.
The camera uses an NP-50A re-
chargeable battery.
DFC label
Charge lamp
Battery
Arrow
DFC label

14 First Steps
Charging the Battery
3 Plug the charger in.
Plug the charger into an indoor power outlet. The charging indicator will
light.
T
T
T
T The Charging Indicator
he Charging Indicator
he Charging Indicator
he Charging Indicatorhe Charging Indicator The Charging Indicator
The charging indicator shows battery charge status as follows:
Charging indicator
Charging indicator
Charging indicator
Charging indicatorCharging indicatorCharging indicator Battery status
Battery status
Battery status
Battery statusBattery statusBattery status Action
Action
Action
ActionActionAction
O
O
O
OO
O Battery not inser
Battery not inser
Battery not inser
Battery not inserBattery not inserted.
ted.
ted.
ted.ted.Battery not inserted. Inser
Inser
Inser
InserInsert the battery.
t the battery.
t the battery.
t the battery.t the battery.Insert the battery.
Battery fully charged.
Battery fully charged.
Battery fully charged.
Battery fully charged.Battery fully charged.Battery fully charged. Remove the battery.
Remove the battery.
Remove the battery.
Remove the battery.Remove the battery.Remove the battery.
On
On
On
OnOnOn Battery charging.
Battery charging.
Battery charging.
Battery charging.Battery charging.Battery charging. —
—
—
———
Blinks
Blinks
Blinks
BlinksBlinksBlinks Battery fault.
Battery fault.
Battery fault.
Battery fault.Battery fault.Battery fault. Unplug the charger and remov
Unplug the charger and remov
Unplug the charger and remov
Unplug the charger and removUnplug the charger and remove the battery.
e the battery.
e the battery.
e the battery.e the battery.Unplug the charger and remove the battery.
4 Charge the battery.
Remove the battery when charging is complete. See the speci cations
(P 151) for charging times (note that charging times increase both at high
temperatures and at low temperatures).
QUnplug the charger when it is not in use.
15 First Steps
Inser
Inser
Inser
InserInserting the Battery and a Memor
ting the Battery and a Memor
ting the Battery and a Memor
ting the Battery and a Memorting the Battery and a Memory Card
y Card
y Card
y Cardy Card Inserting the Battery and a Memory Card
Although the camera can store pictures in internal memory, optional SD,
SDHC, and SDXC memory cards (sold separately) can be used to store addi-
tional pictures. After charging the battery, insert the battery and memory
card as described below.
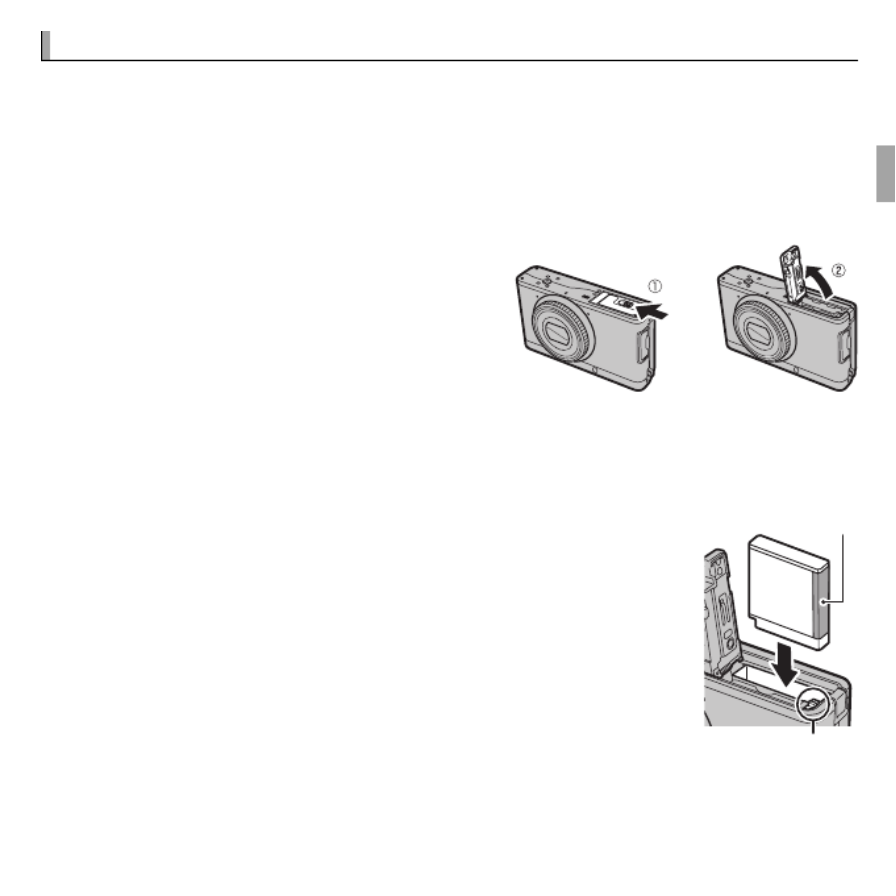
1
Open the battery-chamber cover.
R
Be sure the camera is o before opening
the battery-chamber cover.
QDo not open the battery-chamber cover
when the camera is on. Failure to ob-
serve this precaution could result in dam-
age to image les or memory cards.
Q
Do not use excessive force when handling the battery-chamber cover.
2 Insert the battery.
Align the orange stripe on the battery with the orange
battery latch and slide the battery into the camera, keep-
ing the battery latch pressed to one side. Con rm that the
battery is securely latched.
QInsert the battery in the correct orientation. Do NOT use force
or attempt to insert the battery upside down or backwards.
The battery will slide in easily in the correct orientation.
Battery latch
Orange stripe

19 First Steps
Inserting the Battery and a Memory Card
• The data in internal memory may be erased or corrupted when the camera is re-
paired. Please note that the repairer will be able to view pictures in internal memory.
• Formatting a memory card or internal memory in the camera creates a folder in
which pictures are stored. Do not rename or delete this folder or use a computer or
other device to edit, delete, or rename image les. Always use the camera to delete
pictures from memory cards and internal memory; before editing or renaming les,
copy them to a computer and edit or rename the copies, not the originals.
Q
Q
Q
QQQ Batteries
Batteries
Batteries
BatteriesBatteriesBatteries
• Remove dirt from the battery terminals with a clean, dry cloth. Failure to observe this
precaution could prevent the battery from charging.
• Do not a x stickers or other objects to the battery. Failure to observe this precaution
could make it impossible to remove the battery from the camera.
• Do not short the battery terminals. The battery could overheat.
• Read the cautions in “The Battery and Power Supply” (P vi).
• Use only battery chargers designated for use with the battery. Failure to observe this
precaution could result in product malfunction.
• Do not remove the labels from the battery or attempt to split or peel the outer casing.
• The battery gradually loses its charge when not in use. Charge the battery one or
two days before use.

20 First Steps
T
T
T
TTurning the Camera on and O
urning the Camera on and O
urning the Camera on and O
urning the Camera on and Ourning the Camera on and O
Turning the Camera on and O
Camera Mode
Camera Mode
Camera Mode
Camera ModeCamera Mode Camera Mode
The camera has three characteristic modes (status). Choose a camera mode
according to the purpose.
Mode
Mode
Mode
ModeModeMode Pow
Pow
Pow
PowPower
er
er
ererPower Indicator
Indicator
Indicator
IndicatorIndicatorIndicator
Portable mode
The lens is housed and
locked to carry the cam-
era by a camera case or
a bag (P 21).
O
Standby mode
The camera becomes
turned o temporarily
in this mode (P 21).
O
Shooting mode
The camera turns on
and can take pictures
(P 22).
On

24 First Steps
Basic Setup
Basic Setup
Basic Setup
Basic SetupBasic Setup Basic Setup
A language-selection dialog is displayed the rst time the camera is turned
on. Set up the camera as described below (you can reset the clock or change
languages at any time using the F DATE/TIME or Q a options in
the setup menu; for information on displaying the setup menu, see page 122).
1 Highlight a language and press .MENU/OK
R
Press
DISP/BACK to skip the current step. Any steps you skip
will be displayed the next time the camera is turned on.
START MENU
SET NO
ENGLISH
DEUTSCH
PORTUGUÊS
FRANCAIS
ESPAÑOL
2 The date and time will be displayed. Press the selector
left or right to highlight the year, month, day, hour, or
minute and press up or down to change. To change the
order in which the year, month, and day are displayed,
highlight the date format and press the selector up or
down. Press MENU/OK when settings are complete.
3 Power management options will be displayed. Press the selector up or
down to highlight one of the following options and then press MENU/OK:
• n POWER SAVE: Save battery power.
• o CLEAR DISPLAY: Choose for a brighter, higher quality display.
R
R
R
RRR The Camera Clock
The Camera Clock
The Camera Clock
The Camera ClockThe Camera ClockThe Camera Clock
If the battery is removed for an extended period, the camera clock will be reset and the
language-selection dialog will be displayed when the camera is turned on.
NOSET
DATE/TIME NOT SET
2014
2013
2011
2010
1. 1 12
:
00
AM
2012
YY. MM. DD
Specyfikacje produktu
| Marka: | Fujifilm |
| Kategoria: | kamera |
| Model: | FinePix XF1 |
Potrzebujesz pomocy?
Jeśli potrzebujesz pomocy z Fujifilm FinePix XF1, zadaj pytanie poniżej, a inni użytkownicy Ci odpowiedzą
Instrukcje kamera Fujifilm

25 Lutego 2025
8 Lutego 2025
27 Stycznia 2025
14 Stycznia 2025
14 Grudnia 2024
14 Grudnia 2024
14 Grudnia 2024
7 Października 2024
2 Października 2024
29 Września 2024
Instrukcje kamera
- kamera Sony
- kamera Samsung
- kamera Leica
- kamera Logitech
- kamera Xiaomi
- kamera Joy-It
- kamera Braun
- kamera Lenovo
- kamera TP-Link
- kamera Philips
- kamera SilverCrest
- kamera Acer
- kamera Epson
- kamera Hikvision
- kamera EZVIZ
- kamera Panasonic
- kamera Canon
- kamera Mio
- kamera Viewsonic
- kamera Nedis
- kamera Reolink
- kamera Medion
- kamera Lenco
- kamera D-Link
- kamera GE
- kamera Ring
- kamera Garmin
- kamera Imou
- kamera Blaupunkt
- kamera IOptron
- kamera Casio
- kamera Sigma
- kamera HP
- kamera Prixton
- kamera SJCAM
- kamera Creative
- kamera Swann
- kamera Nikon
- kamera Ozito
- kamera Kodak
- kamera Cisco
- kamera Scosche
- kamera DJI
- kamera Zenit
- kamera Gembird
- kamera Minox
- kamera Cobra
- kamera JVC
- kamera Trust
- kamera Fimi
- kamera AgfaPhoto
- kamera Vimar
- kamera Dahua Technology
- kamera Kyocera
- kamera Eufy
- kamera Ricoh
- kamera Rollei
- kamera Netgear
- kamera Velleman
- kamera Bolex
- kamera Pyle
- kamera Vtech
- kamera Speco Technologies
- kamera ARRI
- kamera Fluke
- kamera Olympus
- kamera Avaya
- kamera National Geographic
- kamera Maginon
- kamera SPC
- kamera Polaroid
- kamera Konica Minolta
- kamera Sanyo
- kamera Red Digital Cinema
- kamera Oregon Scientific
- kamera Lorex
- kamera Optoma
- kamera Bresser
- kamera Hama
- kamera GoPro
- kamera TomTom
- kamera Denver
- kamera Anker
- kamera Pentax
- kamera Bushnell
- kamera Berger & Schröter
- kamera Marshall Electronics
- kamera Hitachi
- kamera Emerson
- kamera SereneLife
- kamera Vemer
- kamera Azden
- kamera AVerMedia
- kamera RCA
- kamera Genius
- kamera Levenhuk
- kamera BenQ
- kamera Trevi
- kamera Technaxx
- kamera Lexibook
- kamera Hanwha
- kamera Sencor
- kamera Powerfix
- kamera Blackmagic Design
- kamera Foscam
- kamera Lumens
- kamera Daewoo
- kamera Dörr
- kamera Best Buy
- kamera EVE
- kamera POV
- kamera Elmo
- kamera UniView
- kamera Laserliner
- kamera Vivitar
- kamera PTZ Optics
- kamera Agfa
- kamera Argus
- kamera Easypix
- kamera Celestron
- kamera Yashica
- kamera Flir
- kamera Daitsu
- kamera Arlo
- kamera Nest
- kamera Ansco
- kamera Intel
- kamera Mamiya
- kamera Konig
- kamera Fuji
- kamera Minolta
- kamera Zorki
- kamera EverFocus
- kamera RunCam
- kamera SeaLife
- kamera Burris
- kamera Liiv360
- kamera Watec
- kamera Meade
- kamera Contax
- kamera Sinji
- kamera Traveler
- kamera Exakta
- kamera Digital Watchdog
- kamera MuxLab
- kamera AViPAS
- kamera ZeissIkon
- kamera Silvergear
- kamera Spypoint
- kamera HOLGA
- kamera Praktica
- kamera Hasselblad
- kamera Moto Mods (Motorola)
- kamera Fantasea Line
- kamera Kogan
- kamera Getac
- kamera Brinno
- kamera Z CAM
- kamera General
- kamera Ergoguys
- kamera Strex
- kamera General Electric
- kamera Leotec
- kamera Leitz Focomat IIc
- kamera Syrp
- kamera Cosina
- kamera Videology
- kamera InfiRay
- kamera Pelco
- kamera Videotec
- kamera Cambo
- kamera Kobian
- kamera Kyocera Yashica
- kamera Bauhn
- kamera Konica
- kamera Akaso
- kamera Seek Thermal
- kamera Aida
- kamera Ikegami
- kamera Ikelite
- kamera Adeunis
- kamera Hoppstar
- kamera Moultrie
- kamera PatrolEyes
- kamera Camouflage
- kamera HuddleCamHD
- kamera Aplic
- kamera Linhof
- kamera GoXtreme
- kamera KanDao
- kamera Aquapix
- kamera Kraken Sports
- kamera Voigtlander
Najnowsze instrukcje dla kamera

9 Kwietnia 2025

9 Kwietnia 2025

3 Kwietnia 2025
2 Kwietnia 2025
1 Kwietnia 2025
29 Marca 2025
29 Marca 2025
27 Marca 2025
27 Marca 2025
27 Marca 2025