Instrukcja obsługi Extron FOXBOX Tx DVI Plus MM
Extron
Wzmacniacz sygnału WiFi
FOXBOX Tx DVI Plus MM
Przeczytaj poniżej 📖 instrukcję obsługi w języku polskim dla Extron FOXBOX Tx DVI Plus MM (2 stron) w kategorii Wzmacniacz sygnału WiFi. Ta instrukcja była pomocna dla 16 osób i została oceniona przez 2 użytkowników na średnio 4.5 gwiazdek
Strona 1/2

This card provides quick start instructions for an experienced installer to set up and
operate an Extron FOXBOX DVI Plus transmitter and receiver.®
NOTES: • OnlytheFOXBOXRxDVIPlusreceivercanacceptinputfroma
FOXBOX Tx DVI Plus transmitter.
• TheFOXBOXRxDVIPlusreceivercanacceptinputsfromanyFOX
500 or FOXBOX transmitter, including VGA models.
Installation
Step 1 — Mounting
Turn off or disconnect all equipment power sources and mount the transmitter and receiver as required.
Step 2 — Input and Output Connections
a. ConnectaDVIvideosourcetothetotheInputconnectoronthetransmitterandtheaDVIDisplaytothe DVI-D INPUT
Ouput connectors on the receiver.
b. Connect unbalanced stereo or mono audio input and an audio output device to the 3.5 mm mini jack audio AUDIO
ports on both units.
c. IfyouwanttheFOXBOXunitstopassserialdataorcontrolsignals,suchasforserialcontrolofaprojector, ALARM
Tx Rx 1 2
RS-232
OVER FIBER
connectthemasterdevicetothetransmitterandtheslavedeviceusingtherstthreepolesoftheRS-232
OverFiber/Alarm5-polecaptivescrewconnectorsonbothunits.
NOTE: 3b ForRS-232responses(fromthereceivertothetransmitter),youmustinstallthecableinstep and leave
the receiver in normal configuration.
d. Forremotemonitoringofthestatusoftheopticallinks,connectalocallyconstructedorobtaineddeviceto
RS-232
OVER FIBER
ALARM
Tx Rx 1 2
thetwoAlarmpolesoftheunits’RS-232OverFiber/Alarm5-polecaptivescrewconnectors.Thetwopoles
are shorted together when no light is detected.
NOTES:TheAlarmportonthetransmitterreportsthestatusoftheRxlightlink.
The Alarm port on the receiver reports the status of the Tx light link.
Step 3 — Throughput Connections
NOTE: Youcanconnectthetransmitterandoneormorereceiversinoneofthreeways:
• Oneway(transmittertoreceiver)only,performstep3a.
• Twoway(transmittertoreceiverandreturn),performsteps 3a 3b and .
• Oneway(transmittertoreceiver)withdaisychain(receivertoreceiver),performsteps3a 3c and .
a. ConnectabercablebetweentheTxportonthetransmitterandtheRxporton
the receiver.
OPTICAL
Tx Rx
LINK
LINK
OPTICAL
Tx Rx
LINK
LINK
and
Transmitter
Receiver
3a
3b
b. Ifyouwantthereceivertosendreturnserialdata(suchasresponsesfroma
controlleddevice)tothetransmitter,connectabercablebetweentheTxport
onthereceiverandtheRxportonthetransmitter.
c. Ifyouwantareceivertodaisychaintheopticalsignaltoanotherreceiver(upto
10receiversinadaisychain):
zConnecttheTxportonthereceivertotheRxportonanotherreceiver.
zSettheModeDIPswitch1uponrstreceiver.
OPTICAL
Tx Rx
LINK
LINK
From Transmitter or
Daisy Chaining Receiver
MODE
1 2
Receiver Receiver
3a 3c
OPTICAL
LINK
LINK
Tx Rx
1
FOXBOXDVIPlus•SetupGuide
Step 4 — Remote Connector
Connectahostdevicetoeitherunit’sfrontpanelCongurationconnectorviathe9-pinDto2.5mmminijackTRSRS-232
cablethatisincludedwiththeTXmodeloravailableseparatelyusingpart# .Refertothe70-335-01 FOXBOX DVI Plus
UserGuidefordetailedinformationabouttheusingtheSimpleInstructionSet(SIS
™)commandsandtheWindows®-based
FOX Extender program to set up and operate the transmitter and receiver and to take advantage of the various adjustments
and test patterns available on the FOXBOX units.
Step 5 — Power
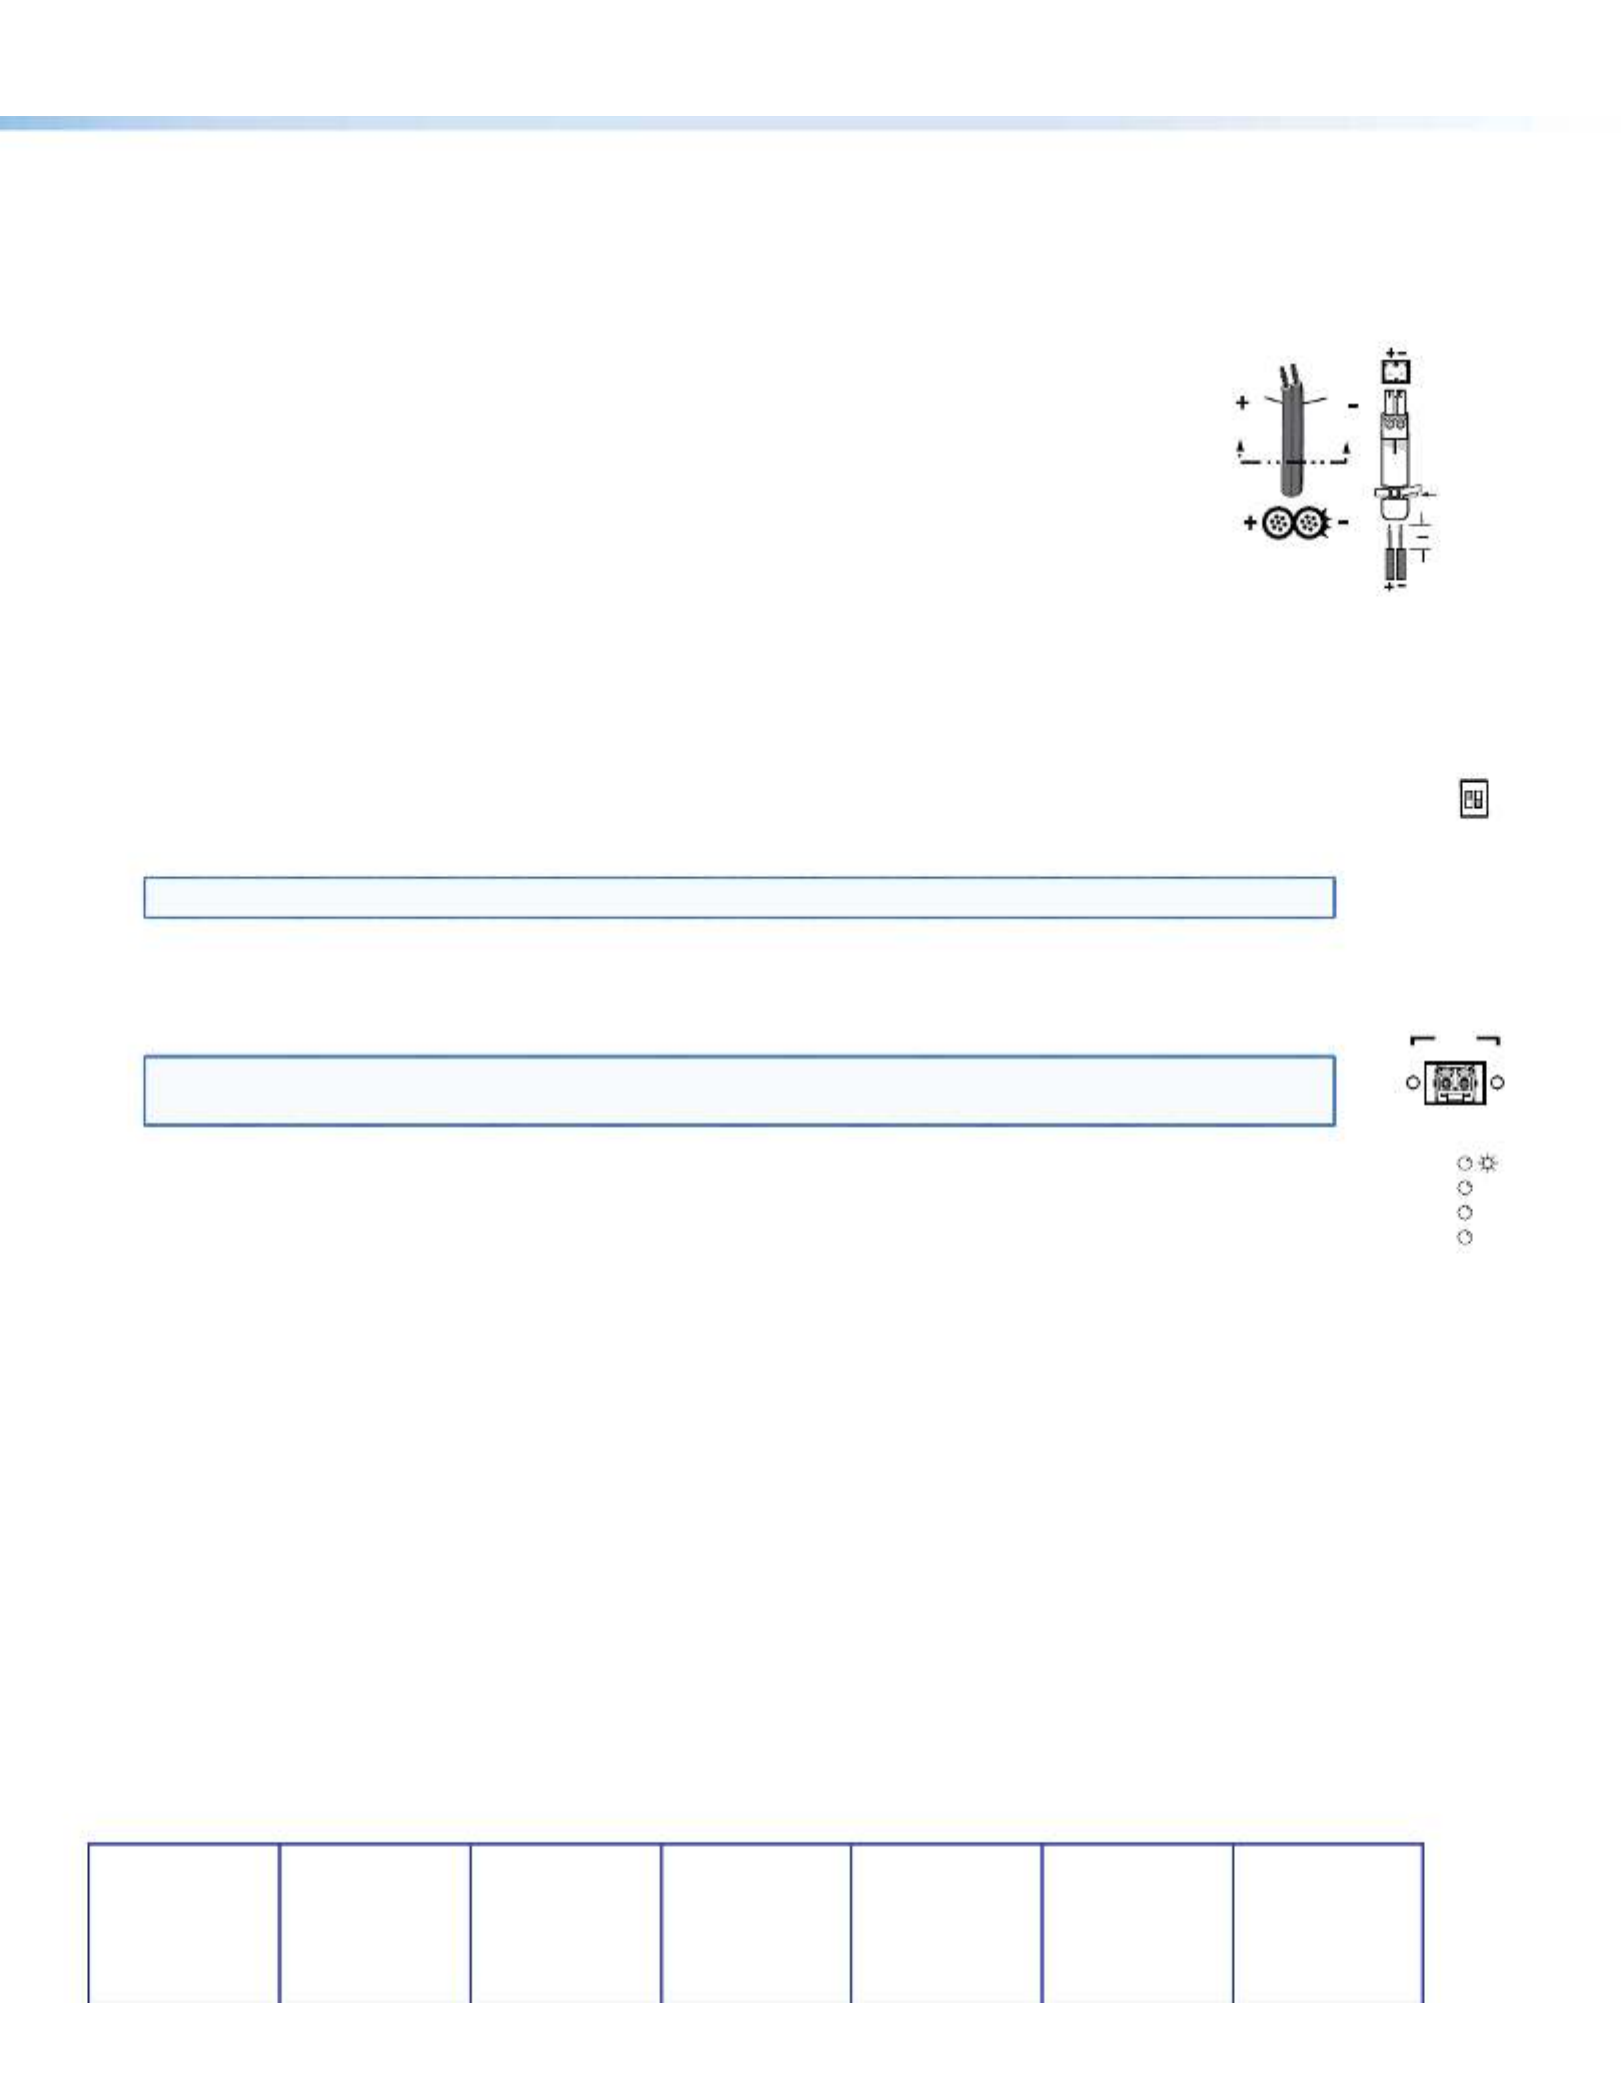
Connectusinganexternalpowersupplyasshownontheright.
Control and Indications
Operation
After all receivers, the transmitter, and their connected devices are powered up,
thesystemisfullyoperational.Ifanyproblemsareencountered,verifythatthe
cablesareroutedandconnectedproperlyandthatalldisplaydeviceshaveidenticalresolutionsandrefreshrates.Ifyour
problemspersist,calltheExtronS3Sales&TechnicalSupportHotline.
Mode Switch
Mode switch (receiver) —Toconnectthereceivedopticalinputtoanotherreceiverinadaisychainconguration,
MODE
1 2
set DIP switch 1 to up as shown.
DIPswitch2isnotused.
NOTE: Upto10properly-conguredreceiverscanbeconnectedinadaisychaintoasingletransmitter.
Indications
Tx Link and Rx Link LEDs—Whenlit,thelinkisactive(lightisoutput[Tx]orreceived[Rx]).
OPTICAL
Tx Rx
LINK
LINK
NOTE: TheLinkLEDsindicatelighttransmissiononly,notwhetherthereisdataencodedintheoptical
link.
Power LED — This LED lights to indicate that power is applied to the unit.
DVI
OVER
TEMP
AUDIO
Over Temp(erature) LED—ThisLEDlightstoindicatethattheunitisoperatingatadangerouslyhigh
temperature(approximately167°F[75°C])andthatequipmentdamageisimminent.
DVI LED — This LED lights on both units when the transmitter detects a signal on its video input. This LED lights on
the receiver when the transmitter detects a DVI video signal.
Audio LED — This LED lights on both units when the transmitter detects a low level audio signal for a short period of time.
It goes dark if the audio signal drops below the minimum threshold for a short period of time.
Power Supply
Output Cord
SECTION A–A
Ridges
Smooth
A A
Captive
Screw
Connector
Tie Wrap
3"
16 (5 mm) Max
.
Extron USA - West
Headquarters
+800.633.9876
Inside USA/Canada Only
+1.714.491.1500
+1.714.491.1517 FAX
Extron USA - East
+800.633.9876
Inside USA/Canada Only
+1.919.863.1794
+1.919.863.1797 FAX
Extron Europe
+800.3987.6673
Inside Europe Only
+31.33.453.4040
+31.33.453.4050 FAX
Extron Asia
+800.7339.8766
Inside Asia Only
+65.6383.4400
+65.6383.4664 FAX
Extron Japan
+81.3.3511.7655
+81.3.3511.7656 FAX
Extron China
+400.883.1568
Inside China Only
+86.21.3760.1568
+86.21.3760.1566 FAX
Extron Middle East
+971.4.2991800
+971.4.2991880 FAX
© 2011 . All rights reserved. Extron Electronics www.extron.com
68-1464-51
Rev B
05 11
2
FOXBOXDVIPlus•SetupGuide(Cont’d)
Specyfikacje produktu
| Marka: | Extron |
| Kategoria: | Wzmacniacz sygnału WiFi |
| Model: | FOXBOX Tx DVI Plus MM |
Potrzebujesz pomocy?
Jeśli potrzebujesz pomocy z Extron FOXBOX Tx DVI Plus MM, zadaj pytanie poniżej, a inni użytkownicy Ci odpowiedzą
Instrukcje Wzmacniacz sygnału WiFi Extron

8 Października 2024
8 Października 2024
8 Października 2024
8 Października 2024
8 Października 2024
Instrukcje Wzmacniacz sygnału WiFi
- Wzmacniacz sygnału WiFi Tenda
- Wzmacniacz sygnału WiFi Xiaomi
- Wzmacniacz sygnału WiFi Huawei
- Wzmacniacz sygnału WiFi TP-Link
- Wzmacniacz sygnału WiFi SilverCrest
- Wzmacniacz sygnału WiFi Hikvision
- Wzmacniacz sygnału WiFi StarTech.com
- Wzmacniacz sygnału WiFi Crestron
- Wzmacniacz sygnału WiFi Asus
- Wzmacniacz sygnału WiFi Nedis
- Wzmacniacz sygnału WiFi Medion
- Wzmacniacz sygnału WiFi TRENDnet
- Wzmacniacz sygnału WiFi D-Link
- Wzmacniacz sygnału WiFi ATen
- Wzmacniacz sygnału WiFi Manhattan
- Wzmacniacz sygnału WiFi Strong
- Wzmacniacz sygnału WiFi Tripp Lite
- Wzmacniacz sygnału WiFi Mikrotik
- Wzmacniacz sygnału WiFi Cisco
- Wzmacniacz sygnału WiFi Moxa
- Wzmacniacz sygnału WiFi DJI
- Wzmacniacz sygnału WiFi Gembird
- Wzmacniacz sygnału WiFi Lindy
- Wzmacniacz sygnału WiFi DSC
- Wzmacniacz sygnału WiFi Deltaco
- Wzmacniacz sygnału WiFi ZyXEL
- Wzmacniacz sygnału WiFi LogiLink
- Wzmacniacz sygnału WiFi Linksys
- Wzmacniacz sygnału WiFi Digitus
- Wzmacniacz sygnału WiFi Dahua Technology
- Wzmacniacz sygnału WiFi Sabrent
- Wzmacniacz sygnału WiFi Netgear
- Wzmacniacz sygnału WiFi AVM
- Wzmacniacz sygnału WiFi Totolink
- Wzmacniacz sygnału WiFi Black Box
- Wzmacniacz sygnału WiFi Iogear
- Wzmacniacz sygnału WiFi Intellinet
- Wzmacniacz sygnału WiFi NGS
- Wzmacniacz sygnału WiFi Devolo
- Wzmacniacz sygnału WiFi Speco Technologies
- Wzmacniacz sygnału WiFi Mercusys
- Wzmacniacz sygnału WiFi Audio Pro
- Wzmacniacz sygnału WiFi Fluke
- Wzmacniacz sygnału WiFi Edimax
- Wzmacniacz sygnału WiFi EnGenius
- Wzmacniacz sygnału WiFi Planet
- Wzmacniacz sygnału WiFi LevelOne
- Wzmacniacz sygnału WiFi Digi
- Wzmacniacz sygnału WiFi Axis
- Wzmacniacz sygnału WiFi Vision
- Wzmacniacz sygnału WiFi Abus
- Wzmacniacz sygnału WiFi Hama
- Wzmacniacz sygnału WiFi Marmitek
- Wzmacniacz sygnału WiFi Ubiquiti Networks
- Wzmacniacz sygnału WiFi Western Digital
- Wzmacniacz sygnału WiFi Smart-AVI
- Wzmacniacz sygnału WiFi Optex
- Wzmacniacz sygnału WiFi Juniper
- Wzmacniacz sygnału WiFi Cudy
- Wzmacniacz sygnału WiFi Arris
- Wzmacniacz sygnału WiFi Allnet
- Wzmacniacz sygnału WiFi Atlona
- Wzmacniacz sygnału WiFi Elektrobock
- Wzmacniacz sygnału WiFi Gefen
- Wzmacniacz sygnału WiFi TOA
- Wzmacniacz sygnału WiFi Monacor
- Wzmacniacz sygnału WiFi Eminent
- Wzmacniacz sygnału WiFi Sitecom
- Wzmacniacz sygnału WiFi Aukey
- Wzmacniacz sygnału WiFi Energenie
- Wzmacniacz sygnału WiFi Techly
- Wzmacniacz sygnału WiFi Steren
- Wzmacniacz sygnału WiFi Envivo
- Wzmacniacz sygnału WiFi Buffalo
- Wzmacniacz sygnału WiFi Davis
- Wzmacniacz sygnału WiFi Vodafone
- Wzmacniacz sygnału WiFi Evga
- Wzmacniacz sygnału WiFi Conrad
- Wzmacniacz sygnału WiFi Essentiel B
- Wzmacniacz sygnału WiFi Maxxter
- Wzmacniacz sygnału WiFi Hawking Technologies
- Wzmacniacz sygnału WiFi Wolfgang
- Wzmacniacz sygnału WiFi Nexxt
- Wzmacniacz sygnału WiFi Tiptel
- Wzmacniacz sygnału WiFi CSL
- Wzmacniacz sygnału WiFi Heatit
- Wzmacniacz sygnału WiFi SIIG
- Wzmacniacz sygnału WiFi Eero
- Wzmacniacz sygnału WiFi SilverNet
- Wzmacniacz sygnału WiFi Nitek
- Wzmacniacz sygnału WiFi Verint
- Wzmacniacz sygnału WiFi Silex
- Wzmacniacz sygnału WiFi Heden
- Wzmacniacz sygnału WiFi DTRONIC
- Wzmacniacz sygnału WiFi 7inova
- Wzmacniacz sygnału WiFi SmartAVI
- Wzmacniacz sygnału WiFi HELGI
- Wzmacniacz sygnału WiFi Tycon Systems
- Wzmacniacz sygnału WiFi Multi-link
- Wzmacniacz sygnału WiFi Atto
- Wzmacniacz sygnału WiFi Amped Wireless
- Wzmacniacz sygnału WiFi Barox
- Wzmacniacz sygnału WiFi Ruckus Wireless
- Wzmacniacz sygnału WiFi Axing
- Wzmacniacz sygnału WiFi EXSYS
- Wzmacniacz sygnału WiFi Gewiss
- Wzmacniacz sygnału WiFi Seco-Larm
- Wzmacniacz sygnału WiFi NetComm
- Wzmacniacz sygnału WiFi Altronix
- Wzmacniacz sygnału WiFi ALC
- Wzmacniacz sygnału WiFi Comtrend
- Wzmacniacz sygnału WiFi Universal Remote Control
- Wzmacniacz sygnału WiFi IDIS
- Wzmacniacz sygnału WiFi Icron
Najnowsze instrukcje dla Wzmacniacz sygnału WiFi
29 Marca 2025
29 Marca 2025
24 Marca 2025
21 Lutego 2025
20 Lutego 2025
20 Lutego 2025
20 Lutego 2025
20 Lutego 2025

5 Lutego 2025
5 Lutego 2025